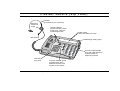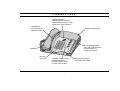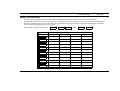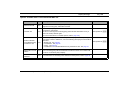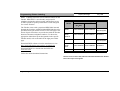
1
. FlexSet 280, 280D, 280D-Z 120, 120D & 120L User Guide (Version 14.66) The flexible way to communicate The information contained in this document is proprietary and is subject to all relevant copyright, patent and other laws protecting intellectual property, as well as any specific agreement protecting TADIRAN TELECOM LTD.’s (here in referred to as the “Manufacturer”) rights in the aforesaid information. Neither this document nor the information contained herein may be published, reproduced or disclosed to third parties, in whole or in part, without the express, prior, written permission of the Manufacturer. In addition, any use of this document or the information contained herein for any purposes other than those for which it was disclosed is strictly forbidden. The Manufacturer reserves the right, without prior notice or liability, to make changes in equipment design or specifications. Information supplied by the Manufacturer is believed to be accurate and reliable. However, no responsibility is assumed by the Manufacturer for the use thereof nor for the rights of third parties which may be affected in any way by the use thereof. Any representation(s) in this document concerning performance of the Manufacturer's product(s) are for informational purposes only and are not warranties of future performance, either express or implied. The Manufacturer's standard limited warranty, stated in its sales contract or order confirmation form, is the only warranty offered by the Manufacturer in relation thereto. This document may contain flaws, omissions or typesetting errors; no warranty is granted nor liability assumed in relation thereto unless specifically undertaken in the Manufacturer's sales contract or order confirmation. Information contained herein is periodically updated and changes will be incorporated into subsequent editions. If you have encountered an error, please notify the Manufacturer. All specifications are subject to change without prior notice. Copyright by TADIRAN TELECOM LTD., 2001-2007. All rights reserved worldwide All rights reserved worldwide. The Coral is Protected by U.S. Patents 6,594,255; 6,598,098; 6,608,895; 6,615,404 All trademarks contained herein are the property of their respective holders. Ta b l e o f C o n t e n t s Introduction............................................................................. iv List of Feature Codes ............................................................. v Symbols Used in This Guide .................................................. ix Product Features and Model Designations: ........................... a FlexSet 280D...................................................................... b FlexSet 280D-Z (Zip Tone) ................................................. c FlexSet 280 ........................................................................ d FlexSet 120D...................................................................... e FlexSet 120 ......................................................................... f FlexSet 120L ...................................................................... g FlexSet 280 and 120 models – External Connections ....... h FlexSet 280 Series with PEX – External Connections ........ i Handset Hook and Telephone Numbers ............................. j Desk Elevation Installation ................................................. k Wall Mounting Installation ................................................... l Turret Console (FlexSet 280D + 6x40B + 280D) ............... m Turret Console (FlexSet 280D + 6x40B + 280D)............ 179 Account Code - As Required.................................................. 1 Account Code - Forced .......................................................... 3 ACD & UCD Groups: .............................................................. 4 Calls Waiting Display (ACD only) ...................................... 5 Load ID - for ACD Group ................................................... 6 Log-In/Out - for Single ACD Group..................................... 8 Primary Log-in (ACD only) ............................................... 10 Release/Resume From All Groups.................................. 12 Release/Resume From a UCD Group............................. 13 Wrap-Up Code (ACD only) .............................................. 14 Wrap-Up Time On/Off ..................................................... 15 Audio Level and Speakerphone Adjustment ........................ 16 Table of Contents Auto Answer On/Off ............................................................. 17 Auto Redial........................................................................... 18 Auto Set Relocate: .............................................................. 21 Permanent........................................................................ 21 Temporary ........................................................................ 22 Boss Group: ......................................................................... 24 Programming Exclusive Hold .......................................... 25 Programming Privacy ...................................................... 26 Call Forward .................................................................... 27 Using ............................................................................... 30 Break-In................................................................................ 33 Broker/Consultation/3-Way Conference Call ........................ 34 Call Forward ......................................................................... 37 Caller ID Control................................................................... 41 Camp-On:............................................................................ 42 Call Back - Station, Outside Line .................................... 42 Off-Hook - Call Waiting/Call Offer ................................... 44 Class Of Service (COS) Switchover..................................... 45 Conference, Multiparty: ........................................................ 46 View/Release ................................................................... 47 Lock.................................................................................. 48 Directory............................................................................... 49 Divert Call ............................................................................. 56 Do Not Disturb (DND) .......................................................... 57 Do Not Disturb Override ....................................................... 59 Elapsed Time Display........................................................... 60 Executive Privilege ............................................................... 61 Flash (Calibrated Opening) On Trunk .................................. 62 FlexiCall................................................................................ 63 i FlexSet 120/280 User Guide Ta b l e o f C o n t e n t s ( c o n t . ) Follow Me.............................................................................. 69 Forced Release..................................................................... 71 Group Calls (Conference): .................................................... 73 Preset Conference Activation ........................................... 75 Temporary Conference Activation ..................................... 76 Joining .............................................................................. 78 Addition of Participants ..................................................... 79 Submitting Request to Speak ........................................... 80 Control over Permission to Speak (Operator) ................... 81 Forced Release of a Participant........................................ 82 Forced Release of an Entire Group Call ........................... 83 Headset Only ........................................................................ 84 Help:..................................................................................... 85 Requesting........................................................................ 85 Answering ......................................................................... 86 Hold....................................................................................... 87 Hot Line:............................................................................... 89 Delayed ............................................................................ 89 Immediate ......................................................................... 90 Idle Display - On/Off.............................................................. 91 Individual Remote System Services (Freedom) - IRSS ........ 92 Last Number Redial ............................................................ 101 Making Calls: External and Internal .................................... 102 Malicious Call Trace On/Off ................................................ 106 Malicious Call Trace Printout............................................... 107 Message: ............................................................................ 108 Answering ....................................................................... 108 Leaving ........................................................................... 110 Cancellation .................................................................... 112 Table of Contents (cont.) Multilingual Display ............................................................. 113 Music On/Off ....................................................................... 114 Music Sources .................................................................... 115 Mute .................................................................................... 116 Name/Dial Number Display................................................. 117 Night Answer (Central Bell/UNA Pickup) ............................ 118 OCC (Other Common Carrier) ............................................ 119 Page_Q ............................................................................... 120 Paging: ................................................................................ 121 Announcing: Public Address ........................................... 122 Announcing: Zone (To FlexSet Group) ........................... 123 Announcing: Voice (To Single FlexSet) ........................... 124 Receiving: Auto-Answer.................................................. 126 Receiving: Turning On/Off............................................... 127 Receiving: Using ............................................................. 128 Park..................................................................................... 129 Passcode ............................................................................ 131 Phone Dial Lock.................................................................. 133 Pickup: Group, Directed ...................................................... 134 Programming: .................................................................... 135 Programmable Keys:...................................................... 135 Possibilities ..................................................................... 139 Button Labeling ............................................................... 141 Boss Group Line Key ...................................................... 144 Preference ...................................................................... 146 Receiving Calls ................................................................... 149 Relay (Accessory)............................................................... 150 Reminder ............................................................................ 151 Ring Adjustment.................................................................. 153 ii FlexSet 120/280 User Guide Ta b l e o f C o n t e n t s ( c o n t . ) Room Status ...................................................................... 154 Saved Number/Repeat Number ......................................... 156 Second Party’s Speaker Status.......................................... 157 Security Line ...................................................................... 158 Series Call.......................................................................... 159 Silent Monitor: .................................................................... 161 1-Way Splitting ............................................................... 162 2-Way ............................................................................. 163 Speakerphone/Headset ..................................................... 165 Speed Dialing:.................................................................... 168 Programming Private Library ......................................... 168 Using Private and Public Libraries ................................ 171 Split Call ............................................................................. 172 Stop Dial............................................................................. 175 Transfer .............................................................................. 176 Turret Console.................................................................... 179 Waiting Calls Display.......................................................... 183 Waiting Calls Receiving ..................................................... 184 Wakeup .............................................................................. 185 Whisper Page:.................................................................... 187 Activation....................................................................... 187 Receiving ....................................................................... 189 Receiving: Turning On/Off.............................................. 191 Appendix A - Glossary........................................................ A-1 Appendix B - Tones............................................................... B-1 Appendix C - LED Indications ............................................. C-1 Appendix D - ISDN Cause Numbers................................... D-1 Table of Contents (cont.) iii FlexSet 120/280 User Guide Introduction Welcome to the Coral system and its associated FlexSet units based on Voice over IP and ISDN standards. Much thought has gone into making this system flexible and easy to use. The FlexSet will become an invaluable part of your work environment, providing you with an important tool for your daily business and communication activities. Although the FlexSet is a very advanced instrument, its use is very simple and straightforward. By using features important for you and your company, your FlexSet will provide you with immediate communication power. Many of the features, which have been assigned during initial installation, are provided on an extension (station) basis. Feature allocation may also be redefined to suit changing working situations or adapted to your individual requirements by allowing you to program each button on your telephone. Button functions may be modified from the FlexSet unit (see page 135). Most of the FlexSet features can be activated by either pressing the programmed key or by dialing the feature access code. This User Guide provides a full description of the capabilities and operation of the FlexSet models 280D, 280D-Z, 280, 120D, 120 and 120L. The manual is organized alphabetically, by feature name. The Table of Contents also doubles as an index to the features that the Coral supports for the various FlexSet units. Use of this guide is straightforward, with each feature listed separately. However, certain features have various user options. In this case all of the options are listed under the major feature name; examples of this are ACD & UCD Groups, Boss Groups and Speed Dialing. The appendices, located at the end of the User Guide, provide basic explanations of special telephony terms used throughout this manual. Not every feature code in this guide may have been installed in your system, or at your extension. Check with your system manager for a list of the specific Coral features installed. Introduction iv FlexSet 120/280 User Guide List of Feature Codes The following feature codes are the default feature codes for all Coral sytems. Your Coral system may employ different feature codes. See your system administrator for the correct feature codes. An arrow (→) between two sets of numbers indicates a range of code numbers available for operating that particular feature, for example 5600→5849. These code numbers are used when you do not have a dedicated key for that feature on your FlexSet. Feature Code No. Feature Account Code .................................................................. #1990 ACD & UCD Groups: Calls Waiting Display (for ACD Group) ........................ #1982 Load ID (for ACD Group) ............................................. #1973 Log-In/Out (for single ACD Group) .............................. #1974 Primary Log-In (for ACD Groups)................................ #1442 Release/Resume From All ACD/UCD Groups............. #1975 Release/Resume From a Single UCD Group .............. #1991 Wrap-Up Code (for ACD Group).................................. #1977 Wrap-Up Time (On/Off) ............................................... #1976 Activation Code 9 ......................................... #11 or #>1 or >1 Auto Answer On/Off........................................................... #138 Auto Redial ........................................................................ #178 Call Forward Timed..................................................... #1984 Call Forward Timed External.................................... #17709 Line ............................................................................... #126 Programming Exclusive Hold ........................................ #187 Programming Privacy .......................................... #186 or #6 Break-In.................................................................. Xfer 3, #124 Call Forward: All ........................................................................... #141 or 8 All External............................................................... #17702 Busy .............................................................................. #140 Busy External............................................................ #17701 No Answer..................................................................... #142 No Answer External ................................................. #17703 Busy/No Answer................................................... #147 or #2 Busy/No Answer External ......................................... #17705 Timed .......................................................................... #1985 Timed External......................................................... #17704 Caller ID Control.............................................................. #1444 Boss Group: Call Forward All Calls .................................................... #168 Call Forward All External ............................................ 17707 Call Forward Busy ......................................................... #167 Call Forward BusyExternal ........................................ #17706 Call Forward No Answer................................................ #169 Call Forward No Answer External............................. #17708 List of Feature Codes Code No. v FlexSet 120/280 User Guide List of Feature Codes (cont.) Feature Feature Code No. Camp-On: Call Back ........................................................... Xfer 2, #176 Off-Hook (Call Waiting/Call Offer)................................ Xfer 8 Cancellation Code 8 ..................................... #10 or #>0 or >0 Class Of Service (COS) Switchover .................................. #149 Conference (Multiparty) ......................................... 7098→7099 Conference Lock..........................................................#1441 Conference Release .................................................... #1983 Follow Me .......................................................................... #189 Follow Me External........................................................ #17713 Forced Release ................................................................. #123 Group Call (Conference) ....................................... 5600→5849 Add-On (Temporary) Group Call ................................. #1449 Forced Release of an Entire Group Call ..................... #1447 Forced Release of a Participant.................................. #1446 Headset Only .................................................................. #1302 Help Requesting.............................................................. #1443 Hold.......................................................................... #171 or #4 Divert Call ........................................................................ #1445 Do Not Disturb (DND) ........................................................ #145 Do Not Disturb, Override ....................................... Xfer 3, #124 Idle Display On/Off ............................................................ #137 IRSS (Freedom)......................................................... #17714 Placing a new IRSS call ................................................... >1 Call transfer...................................................................... >2 Call divert to Coral station ................................................ >3 Enabling Voice Mail (IVR) commands...............................>4 Elapsed Time Display ........................................................ #129 Executive Privelege ........................................................... #170 Flash (Calibrated Opening) On Trunk ................................ #150 FlexiCall: FlexiCall All ................................................................ #17710 FlexiCall Internal........................................................ #17711 FlexiCall External....................................................... #17712 Placing a new call............................................................ >1 Call transfer ..................................................................... >2 Call divert to Coral station ............................................... >3 Enabling Voice Mail (IVR) commands ............................. >4 Call divert to desk phone ................................................. >5 List of Feature Codes (cont.) Code No. Last Number Redial ................................................ > or #143 LED On/Off...................................................................... #1301 Loop .................................................................................. #121 Loop Originating Only ....................................................... #125 Malicious Call Trace On/Off............................................. #1740 Malicious Call Trace Printout........................................... #1741 vi FlexSet 120/280 User Guide List of Feature Codes (cont.) Feature Code No. Feature Message: Answering............................................................. #175 or #5 Leaving......................................................Xfer 5, #175 or #5 Cancellation ................................................................ #1440 Multilingual Display.......................................................... #1328 Music On/Off ..................................................................... #135 Music Sources................................................................. #1329 Mute ............................................................................... #1320 Pickup: Group ...................................................................#181 or 76 Directed ................................................................#180 or 77 Programming Key .............................................................. #139 Programming Preference .................................................. #131 Relay (Accesory) ................................................... 7086→7091 Reminder ........................................................................... #172 Ring Adjustment ................................................................ #136 Room Status.......................................................... 7026→7041 Name/Dial Number Display ............................................... #128 Night Answer (Central Bell/UNA Pickup) .....................#192 or 78, #180 or 77 Saved Number/Repeat Number ...............................#196 or #9 Security Line.................................................................. #17700 Series Call ......................................................................... #195 Silent Monitor: 1-Way (Split) ................................................................ #1448 2-Way ...............................................................Xfer 9, #1981 Speakerphone/Headset......................................... #120, #1323 Speed Dialing: Programming Private Library .................... #193 Split Call .............................................................. #1321, #1322 Stop Dial .................................. # or #1300 (programmable key) System Directory ............................................................. #1994 OCC (Other Common Carrier) .......................................... #127 Page_Q ................................................................. 7060→7069 Paging, Receiving: Auto-Answer .................................................................. #133 Turn On/Off.................................................................... #134 Paging, Announcing: Public Address .................................................. 7074→7079 Voice (To Single FlexSet) ..........................Xfer 6, #191 or #3 Zone (To FlexSet Group)................................... 7300→7309 Park .................................................................#183 or 79 or #7 Passcode........................................................................... #179 Phone Dial Lock ................................................................ #148 List of Feature Codes (cont.) Code No. Transfer (Xfer).................................................................... #122 Waiting Call Display......................................................... #1325 Wakeup.............................................................................. #173 vii FlexSet 120/280 User Guide List of Feature Codes (cont.) Feature Code No. Feature Code No. Whisper Page: Activation ....................................................................#1744 Receiving: Turning On/Off...........................................#1745 List of Feature Codes (cont.) viii FlexSet 120/280 User Guide Symbols Used in This Guide [CODE] Telephone Keys: The key includes a name and an indication LED. [XFER]* XFER (Transfer) key: When Auto Transfer is defined at the station, pressing Xfer is not required while on an established call. The XFER key with asterisk indicates features where this is relevant. MESSAGE DISPLAY Message Display: The optional message LCD display provides information about the status of the FlexSet. The display represents 48 or 80 characters in two rows of 24 or 40 characters each depending on the type of FlexSet used. Volume Controls: The Volume control keys are used to adjust volume and to scroll among items within certain features while these features are displayed, such as Reminder and Private Library. Activation and Cancellation Codes: Used to activate or cancel certain features. The default codes are #11 and #10. The activation and cancellation codes for your system may be different, see your system administrator. These can be entered by dialing or programming a key with the codes, or adding the codes to the program of a feature key. ON/OFF XXXX/YYYY/ZZZZ When shown in the column labeled Key LED, indicates whether or not the key LED is illuminated. The letters xxxx, yyyy and zzzz when shown in the FlexSet display represent numbers or names of station or extension or trunk numbers, or special numbers according to usage. Note: In this guide, these letters are shown when required as part of the FlexSet display. Special usage of these letters will be indicated in the text. Symbols Used in This Guide ix FlexSet 120/280 User Guide Product Features and Model Designations The Coral FlexSet 120/120D/120L and 280/280D/280D-Z series of digital electronic telephone sets are high performance, easy to use instruments; combining excellent voice quality, comfort, and convenience in a state-of-the-art communications tool. The FlexSet provides sophisticated features for the office and rugged durability for industrial environments. The FlexSet is elegantly styled, with careful attention paid to ergonomics. The mounting base allows the cord to exit at the rear or front side, leaving the rear panel clean and uncluttered. The set can be desk or wall mounted, and the optional wall mount/elevation bracket may be reversed on a desktop to elevate the rear of the set and increase the viewing angle and accessibility. The handset cradle has an integral wall hook. An electret transmitter and dynamic receiver provide high quality voice reproduction, and compatibility with a wide range of handset and headset devices. 24 programmable keys are available on the FlexSet 280, and 12 on the FlexSet 120 series. Both series are equipped with 4 additional keys that are programmed system wide for commonly used features. The keyboard incorporates dial and programmable buttons with positive tactile feedback for fast, sure operation. Each programmable button includes a Light Emitting Diode (LED) indicating the status of the station, trunk, or feature associated with the button. The two multifunction volume/scroll buttons control speakerphone and handset volumes; background music source and volume; ringer cadence, tone, and volume; display language; and are also used for scrolling through display lists. The message waiting indicator incorporates two alternately flashing LED’s to command attention. The following pages present the currently available FlexSet models, including auxiliary equipment. Product Features and Model Designations a FlexSet 120/280 User Guide FlexSet 280D Loudspeaker, voice announcer, electronic ringer Volume up/down, adjusts speakerphone, handset and background music levels; ringer level, ringer pitch, ringer cadence; scrolls display lists Display panel, 2 lines, 40 characters each Message waiting lamp Handset Dial pad (key pad) Product Features and Model Designations 24 user programmable keys with LED indicators for dial number or telephony features 4 system defined (fixed) programmable keys, identical function to all keysets in the system b Microphone FlexSet 120/280 User Guide F l e x S e t 2 8 0 D - Z ( Z i p To n e ) Earpiece, electronic ringer Headset (purchased by the customer) Volume up/down, adjusts headset levels; ringer level, cadence; scrolls display lists Display panel, 2 lines, 40 characters each Microphone Message waiting lamp 24 user programmable keys with LED indicators for dial number or telephony features Dial pad (key pad) Product Features and Model Designations 4 system defined (fixed) programmable keys, identical function to all keysets in the system c FlexSet 120/280 User Guide FlexSet 280 Loudspeaker, voice announcer, electronic ringer Volume up/down, adjusts speakerphone, handset and background music levels; ringer level, ringer pitch, ringer cadence Message waiting lamp Handset Dial pad (key pad) Product Features and Model Designations 24 user programmable keys with LED indicators for dial number or telephony features 4 system defined (fixed) programmable keys, identical function to all keysets in the system d Microphone FlexSet 120/280 User Guide FlexSet 120D Loudspeaker, voice announcer, electronic ringer Volume up/down, adjusts speakerphone, handset and background music levels; ringer level, ringer pitch, ringer cadence; Display panel, scrolls display lists 2 lines, 24 characters each Message waiting lamp 8 user programmable keys with LED indicators for dial number or telephony features Handset Dial pad (key pad) Note: 4 system defined (fixed) programmable keys, identical function to all keysets in the system Microphone In FlexSet model 120D, even though the system dial numbers are defined with up to eight digits in the numbering plan, only the last five digits will be shown on the display. Product Features and Model Designations e FlexSet 120/280 User Guide FlexSet 120 Volume up/down, adjusts speakerphone, handset and background music levels; ringer level, ringer pitch, ringer cadence Loudspeaker, voice announcer, electronic ringer Message waiting lamp 8 user programmable keys with LED indicators for dial number or telephony features Handset Dial pad (key pad) Product Features and Model Designations 4 system defined (fixed) programmable keys, identical function to all keysets in the system f Microphone FlexSet 120/280 User Guide FlexSet 120L Volume up/down, adjusts speaker, handset and background music levels; ringer level, ringer cadence Loudspeaker, voice announcer, electronic ringer Message waiting lamp 8 user programmable keys with LED indicators for dial number or telephony features Handset Dial pad (key pad) Product Features and Model Designations 4 system defined (fixed) programmable keys, identical function to all keysets in the system g Microphone not used in FlexSet 120L model FlexSet 120/280 User Guide FlexSet 280 and 120 models – External Connections x Handset Line Line FlexSet 280 Series - Bottom View Product Features and Model Designations Handset FlexSet 120 Series - Bottom View h FlexSet 120/280 User Guide FlexSet 280 Series with PEX – External Connections Connection for second handset or monitor audio Connection to handset or handsfree headset Rear view PEX 2nd Handset PEX LINE DC RJ-11 jack telephone line to Coral system 1st Handset FlexSet 280,280D,280D-Z Power Supply (24 to 48 VDC) Right side view RJ-45 jack for optional FlexSet 40B Bottom view Product Features and Model Designations i FlexSet 120/280 User Guide H a n d s e t H o o k a n d Te l e p h o n e N u m b e r s Handset Off-Hook Removable Handset On-Hook Place Telephone Number here (plastic cover) Product Features and Model Designations j FlexSet 120/280 User Guide Desk Elevation Installation Step 2 Snap the legs located on the thick edge of the bracket into the upper wide slots on the back of the phone. Step 1 Place the bracket’s legs, located on the thin edge of the bracket, into the lower narrow slots on the back of the phone. Product Features and Model Designations k FlexSet 120/280 User Guide Wall Mounting Installation Step 1 Lift up the tab from the opening Step 4 Place the bracket’s legs, located on the thin edge of the bracket, into the narrow slots on the back of the phone. Step 2 Rotate the tab Step 3 Re-insert the tab into the opening Step 5 Snap the legs located on the thick edge of the bracket into the lower wide slots on the back of the phone. Handset Hook Rotation Product Features and Model Designations Bracket Installation l FlexSet 120/280 User Guide Tu r r e t C o n s o l e ( F l e x S e t 2 8 0 D + 6 x 4 0 B + 2 8 0 D ) Primary 1 1 2 3 2 1 2 3 3 1 2 3 1 1 2 3 2 3 1 2 3 1 2 3 Partner Product Features and Model Designations m FlexSet 120/280 User Guide This page intentionally left blank. Product Features and Model Designations n FlexSet 120/280 User Guide Account Code - As Required #1990 When your company is equipped with a Call Accounting System, call statistics are printed through the Station Message Detailed Records (SMDR) report. The Call Accounting System is defined system-wide and among the various types of statistics that the report gives is cost monitoring or pulse metering, which can be assigned to a particular client account number. The printout includes the date and time that the conversation took place. When activated, the Account Code is useful in facilitating billing by individuals regardless of Client Account. Display Message Key LED n = Account number (not displayed when VFAC is used) To activate Account Code from idle: 1. Press [ACCOUNT CODE] or dial feature code #1990. ENTER ACCOUNT # ACCOUNT NUMBER ON 3. Press outside line key or dial the access code for an outside line. ENTER ACCOUNT # nnnn ON 4. Dial external number. ENTER TK/TKG/LIB 2. Dial the account number. Note: Last Number Redial code, Saved Number code or Speed Number ON (Public or Private Library) can also be used instead of an outside line, where applicable. To activate during an incoming or outgoing call: 1. Press [ACCOUNT CODE] or press [XFER]* and dial feature code #1990. ENTER ACCOUNT # ACCOUNT NUMBER ON 2. Dial the account number. ENTER ACCOUNT # nnnn ON Account Code - As Required 1 FlexSet 120/280 User Guide Display Message 3. Listen for the confirmation tone. CONFIRMED 4. Continue the call or hang up. R E C O N N E C T ( t r un k # ) Key LED ON OFF Note: Depending upon your system definition, up to 16 digits are available for account numbers. Only one account number entry is allowed for a single call. Any additional number will show the message “ALREADY SET”. If you dial a wrong account number (when VFAC is installed in your system), the error message “PASSCODE FAIL” will appear. Account Code - As Required 2 FlexSet 120/280 User Guide Account Code - Forced Display Message Key LED The following procedures describe placing calls when the Forced Account Code is required. To make an external call: 1. Dial external line access code or press outside line key or press speed key. 2. Dial account number. 3. Dial external number. To redial the last number: 1. Dial the Last Number Redial feature code #143 or press > or press [LAST NUMBER]. 2. Dial account number. To redial a saved number: 1. Press [SAVED] or dial Saved Number feature code #196. 2. Dial account number. To dial a public or private speed call number: 1. Dial speed call library number or press speed key. 2. Dial account number. Account Code - Forced 3 FlexSet 120/280 User Guide ACD & UCD Groups Display Message Key LED An ACD/UCD group is a number of stations operating together for the purpose of automatic call distribution. The ACD/ UCD groups form the building blocks for modern call centers. The Automatic/Uniform Call Distribution Systems improve incoming call handling by queuing and routing callers. They are used in businesses handling a large volume of incoming calls. ACD/UCD systems prevent from giving busy tone to incoming callers. They encourage callers to wait rather than ring elsewhere. The incoming calls are distributed among a group of agents. Agents can log in or out of the group. When all lines are in use, an announcement plays for callers waiting in queue. If the queue is full, calls are routed to a predetermined telephone number. Calls incoming to an ACD/UCD group are answered by free agents, according to system wide defined rules. The most common ACD rule enables the longest waiting call to be answered by the agent who has been waiting for a call for the longest period of time. UCD groups do not provide call distribution to the longest waiting staff. The UCD system automatically delivers each incoming call to the next available agent. The following ACD/UCD features are available: Feature Page Calls Waiting Display (ACD only). . . . . . . . . . . . . . 5 Load ID - for ACD Group. . . . . . . . . . . . . . . . . . . . 6 Log-In/Out - for a Single ACD Group . . . . . . . . . . . 8 Primary Log-In - for ACD Group . . . . . . . . . . . . . 10 Release/Resume from All Groups . . . . . . . . . . . . . 12 Release/Resume from a single UCD Group . . . . . . 13 Wrap-Up Code - for ACD Group (#1977). . . . . . . . 14 Wrap-Up Time On/Off (#1976) . . . . . . . . . . . . . . . 15 ACD & UCD Groups 4 FlexSet 120/280 User Guide ACD & UCD Groups: Calls Waiting Display (ACD only) #1982 This feature provides you with the ability to view the number of calls waiting for any ACD group. Display Message Key LED nnn = Number of waiting calls To view the number of waiting calls for any group while in idle: 1. Press [CALLS WAITING] or dial feature code #1982 ENTER ACD # ACD WAITING CALL ON 2. Dial any ACD group number. C A L L S W A I T . nnn A C D ( acd # ) OFF 3. Listen for the confirmation tone. Note: To program a [CALLS WAITING] key, use feature code #1982. To view the number of waiting calls for a specific group: The CALLS WAIT ACD # Key LED flashes when calls are waiting. This feature can be used in any call state, including while in conversation. 1. Press the flashing [CALLS WAITING ACD#] key. FLASHING C A L L S W A I T . nnn A C D ( acd # ) Note: To program a [CALLS WAITING ACD #] key, use feature code #1982, followed by the specific ACD group number. ACD & UCD Groups: Calls Waiting Display (ACD only) 5 FlexSet 120/280 User Guide ACD & UCD Groups: Load ID - for ACD Group #1973 This feature enables the system to identify the ACD group agent when joining the system for the first time during a session. Once your ID number is registered in the system for the first time, you can join as many ACD groups as required. As long as you are logged into at least one ACD group, your ID number will remain in the system. However, once you have logged out of the last group, your ID number will be erased from the system. Entering an ACD group requires reloading your ID. Display Message Key LED X = ID number To Load your ID Number: 1. Press [LOAD ID] or dial feature code #1973. ENTER ID LOAD ID ON 2. Dial your ID number (4 digits). E N T E R I D xxx x LOAD ID ON 3. Listen for the confirmation tone. CONFIRMED OFF Note: Only one ID number is allowed per station, any additional Load ID replaces the current one. The ID number can be changed as many times as needed. You can load a different ID while logged in. This may be applicable if another agent takes over your station and wants to continue operating it without logging in. ACD & UCD Groups: Load ID - for ACD Group 6 FlexSet 120/280 User Guide Display Message Key LED To load another ID number: 1. Press [LOAD ID] or dial feature code #1973. Your current ID number (xxxx) appears on the display. E N T E R I D xxx x LOAD ID ON 2. Dial your new ID number (4 digits). As the new ID number is entered, the old ID number disappears from the display. 3. Listen for the confirmation tone. ACD & UCD Groups: Load ID - for ACD Group CONFIRMED 7 ON FlexSet 120/280 User Guide ACD & UCD Groups: Log-In/Out - for Single ACD Group #1974 This feature is used when an ACD group member joins or leaves an ACD group. A user can simultaneously be a member of numerous ACD groups. Display Message Key LED X = ID number (displayed only when required) To log-in to a single group: 1. Press [LOG-IN/OUT] or dial feature code #1974. ENTER ACD # LOGIN OFF 2. Dial your ACD group number. D E A S S I G N ( ac d# ) L O G I N I D : xxxx OFF 3. Dial activation code A S S I G N ( acd # ) L O G I N I D : xxxx ON . 4. Listen for the confirmation tone. Note: When an ACD/UCD ID is required and Log-In is attempted, the display will show: NO ID LOGIN To log-out from a single group: 1. Press [LOG-IN/OUT] or dial feature code #1974. ENTER ACD # LOGIN ON 2. Dial your ACD group number. D E A S S I G N ( ac d# ) L O G I N I D : xxxx ON 3. Dial cancellation code . 4. Listen for the confirmation tone. See Notes on next page. ACD & UCD Groups: Log-In/Out - for Single ACD Group 8 FlexSet 120/280 User Guide Display Message Key LED Notes:1) When you log-out from all the ACD groups the LOG-IN/OUT LED is extinguished and your ID number is erased from the system. The display shows: LOGGED OUT OFF 2) When logging-in or out from additional groups, the above procedures are repeated as many times as needed. 3) If you log-out from your primary group using this feature code, you also log-out as primary, so the group is no longer marked as primary (see page 10). 4) The LOG-IN/OUT key can be programmed with #1974 plus an ACD group number to use the key as an on/off switch for that group. ACD & UCD Groups: Log-In/Out - for Single ACD Group 9 FlexSet 120/280 User Guide ACD & UCD Groups: Primary Log-in (ACD only) #1442 This feature allows defining one of your ACD groups as having priority over other groups of which you are a member. Once you have logged in to your primary group, waiting calls are always routed to you from this group first. Only when no more calls are waiting on the primary group queue, do you receive calls from your other groups. Note: If you did not define any group as primary or logged out from the Display Message Key LED X = ID number (displayed only when required) primary group, then the first group you logged into (see page 8) is defined as primary by the system. To log-In to the Primary Group: 1. Press [PRIMARY LOG-IN] or dial feature code #1442. ENTER ACD# LOGIN OFF 2. Dial your ACD group number. P R I M A R Y ( acd # ) L O G I N I D : xxxx OFF 3. Dial activation code A S S I G N ( acd # ) L O G I N I D : xxxx ON . 4. Listen for the confirmation tone. Notes:1) Some ACD/UCD groups may require you to define an ID number before logging in to the group (see page 6). 2) Only one group can be marked as your primary group. When you log in again on a different group as primary, the previous primary log-in is overridden. 3) The PRIMARY LOG-IN key can be programmed with #1442 plus an ACD group number to use the key as an on/off switch. 4) On logging in to mark a group as primary, you are also logged in as a member of the group (see page 8). ACD & UCD Groups: Primary Log-in (ACD only) 10 FlexSet 120/280 User Guide Display Message Key LED To Log-Out from the Primary Group: The procedure is the same as logging out from a single group (see previous page), except that the primary ACD group number is entered. Note: After logging out so the group is no longer marked as primary by using this feature, you remain logged in as a member of the group (see page 8). ACD & UCD Groups: Primary Log-in (ACD only) 11 FlexSet 120/280 User Guide ACD & UCD Groups: Release/Resume From All Groups #1975 Display Message Key LED You can temporarily self release from all of the ACD/UCD groups of which you are a member. This feature also allows you to resume connections with the ACD/UCD groups from which you have been released. You are automatically released from all the groups of which you are a member if you do not answer a call within a predetermined time (system-wide defined). To release from all ACD/UCD groups: 1. Press [RELEASE ALL] key. RESUMED ALL OFF or Dial feature code #1975 followed by activation code . RELEASED ALL ON 2. Listen for the confirmation tone. To resume connection with all ACD/UCD groups (from idle): 1. Press the lit [RELEASE ALL] key. RELEASED ALL ON or Dial feature code #1975 followed by cancellation code . RESUMED ALL OFF 2. Listen for the confirmation tone. Note: Any attempt to resume, while not in idle, is refused. The following message appears: ACD & UCD Groups: Release/Resume From All Groups 12 ERROR FROM IDLE ONLY ON FlexSet 120/280 User Guide ACD & UCD Groups: Release/Resume From a UCD Group #1991 Display Message Key LED When your station is a member of a UCD group, you may temporarily exit the UCD group and then rejoin when required. To leave a single UCD group: 1. Press [RELEASE HUNT] or dial feature code #1991. ENTER HUNT GR.# RELEASE HUNT 2. Dial your UCD group number. 3. Dial activation code . RESUMED 4. Listen for the confirmation tone. OFF RELEASED ON To return to a single UCD group: 1. Press the lit [RELEASE HUNT] or dial feature code #1991. ENTER HUNT GR.# RELEASE HUNT 2. Dial your UCD group number. 3. Dial cancellation code . RELEASED 4. Listen for the confirmation tone. RESUMED ON OFF Note: The [RELEASE HUNT] key can be programmed with the feature code (#1991) plus the relevant UCD group number to use the key as an on/off switch. ACD & UCD Groups: Release/Resume From a UCD Group 13 FlexSet 120/280 User Guide ACD & UCD Groups: Wrap-Up Code (ACD only) #1977 Display Message Key LED After an ACD incoming call has been completed, information about the call can be sent to the CCM. This information might include whether or not the customer is satisfied, or the origin of an incoming call. The types of information that can be sent to the CCM and the relevant codes are defined system-wide. (See your ACD supervisor for a list of codes). To activate the Wrap-Up code: 1. Press [WRAP-UP CODE] or dial feature code #1977. ENTER CODE WRAP-UP CODE ON 2. Dial the required Wrap-Up code (4 digits). 3. Listen for the confirmation tone. CONFIRMED OFF List of Wrap-Up Codes Wrap-Up Code ACD & UCD Groups: Wrap-Up Code (ACD only) Meaning 14 FlexSet 120/280 User Guide ACD & UCD Groups: Wrap-Up Time On/Off #1976 The Wrap-Up Time feature provides an idle ACD/UCD group member with a time-out period between consecutive group calls. The time-out period is determined for each group on a system-wide basis. This feature allows an agent to utilize the Wrap-Up code without interfering with outside calls. When in Wrap-Up state, the display shows: Display Message Key LED WRAP-UP TIME To activate Wrap-Up Time: 1. Press [WRAP-UP TIME]. WRAP-UP OFF OFF or Dial feature code #1976 followed by activation code . WRAP-UP ON ON 2. Listen for the confirmation tone. To cancel Wrap-Up Time: 1. Press the lit [WRAP-UP TIME]. WRAP-UP ON ON or Dial feature code #1976 followed by cancellation code . 2. Listen for the confirmation tone. ACD & UCD Groups: Wrap-Up Time On/Off WRAP-UP OFF 15 OFF FlexSet 120/280 User Guide Audio Level and Speakerphone Adjustment Display Message Key LED The audio level adjustment is used to control the sound that emanates from the telephone’s loudspeaker and handset. x = 0-15 speaker and music volume level (MIN = 0 to MAX = 15) 24dB range To adjust audio level: y = 0-7 handset volume level (MIN = 0 to MAX = 7) 12dB range • Press to increase volume. • Press to decrease volume. The speaker, background music and handset each has its own audio level and is independently influenced by volume keys as follows: • Speaker: When conversing through the speaker, voice volume can be adjusted. Volume of call monitoring, paging, etc. can also be adjusted. S P K R V O L . xxx x • Speakerphone (not for FlexSet 120L/280D-Z): When conversing handsfree, the sensitive microphone is used to amplify your voice. The system operates in such a way that the two connecting parties (i.e. you and the far side) cannot be heard simultaneously; the stronger party is heard. to hear the far side better, press to be heard more easily (or Press to break in). • Background Music: When in idle, and background music is turned on (see page 114), music volume can be adjusted). M U S I C V O L . xx xx • Handset/Headset: When conversing through the handset or headset, receiver volume can be adjusted. H A N D S T V O L . yyyy Audio Level and Speakerphone Adjustment 16 FlexSet 120/280 User Guide Auto Answer On/Off #138 Display Message Key LED This feature can be used to answer all incoming calls automatically. Incoming calls to your station automatically connect after a predetermined number of rings so that you can answer the call handsfree. When using the FlexSet 120L, however, you must use the handset or headset when speaking. To activate Auto Answer: 1. Press [AUTO ANSWER]. AUTO ANSWER OFF OFF or Dial feature code #138 followed by activation code . AUTO ANSWER ON ON 2. Listen for the confirmation tone. CAUTION ! Leaving your work station while Auto Answer is activated causes your station to answer incoming calls. All conversations in the room can be heard. A trunk call trapped in Auto Answer could lock up the trunk until released by the system. To cancel Auto Answer: 1. Press the lit [AUTO ANSWER] AUTO ANSWER ON ON or Dial Auto Answer code #138 followed by cancellation code . AUTO ANSWER OFF OFF 2. Listen for the confirmation tone. Auto Answer On/Off 17 FlexSet 120/280 User Guide Auto Redial #178 The system can repeatedly dial external busy numbers. The system will redial until the phone rings or up to a number of attempts defined system-wide, before the number is erased from the scanner list. Display Message Key LED t = Outside access code or name d = Outside telephone number To activate Auto Redial from idle (before making an outside call): 1. Press [AUTO REDIAL] or dial feature code #178. AUTO REDIAL 2. Dial the required outside line access code or press a programmed outside line feature key R EP tttt D I A L # ON 0 1 3. Possible outside line access codes: trunk number, trunk group number, routing access, dial service, private/public library number, last number redial code or saved number code. 4. Dial the outside number (see table on page 170). R E P D I A L # nn t t d d d dd d d d d d 5. Press [SPKR] to release or scroll between numbers by pressing the volume keys. To activate Auto Redial when you hear busy tone or no answer: 1. Press [AUTO REDIAL] or Press [XFER] and dial feature code #178. CONFIRMED ON The system now automatically redials at timed intervals. Auto Redial 18 FlexSet 120/280 User Guide Display Message Key LED 2. When the called party answers, press the flashing [SPKR] or lift the handset to enable conversation. To activate Redial features for all numbers: 1. Press [AUTO REDIAL] or dial feature code #178. AUTO REDIAL ON Once activated the following features can be utilized (see the table below). To PRESS Cancel OR DIAL DISPLAY MESSAGE LED COMMENTS or #10 AUTO REDIAL LIST EMPTY Off All numbers in the redial list will be deleted. Confirmation tone will be heard. Freeze HOLD or #>6 HOLD SET Winking All automatic dialing will cease. Confirmation tone will be heard. Restart (release from freeze) SPKR or #>7 HOLD REMOVED On Starts redialing "Frozen" numbers. Auto Redial 19 FlexSet 120/280 User Guide Display Message Key LED To activate Redial features for a single number: 1. Press [AUTO REDIAL] or dial feature code #178. AUTO REDIAL ON Note: Pressing VOL keys allows scrolling through the redial list. When the required number is found the Auto Redial features (see table below) can be directly activated. Pressing SPKR returns operation to normal FlexSet functions. TO OR DIAL Select a saved redial number VOL — Immediately dial or #11 Cancel or #10 or #>6 R E P D I A L # nn h HOLD SET Restart (release from freeze) #>7 R E P D I A L # nn HOLD REMOVED ON Continues dialing the selected number. Assign Priority (double redial cycle) #>8 R E P D I A L # nn p PRIORITY SET ON Increases the redialing rate for a selected number. #>9 R E P D I A L # nn PRIORITY REMOVED ON Returns selected number to standard redial cycle. Freeze PRESS HOLD Cancel Priority Conclude Redial features Auto Redial DISPLAY MESSAGE LED COMMENTS R E P D I A L # nn t t t d d d dd d d d d d ON Once a saved redial number is selected then various other features can be utilized. CONFIRMED ON is entered the number will be As soon as confirmed and redialing will commence. ON Deletes the selected number. WINKING Ceases dialing the selected number. Press the SPKR key or hang up to resume normal FlexSet operation. SPKR 20 FlexSet 120/280 User Guide Auto Set Relocate: Permanent Display Message Key LED When defined for permanent relocation, this feature enables you to swap phones within the same Coral system by assigning one FlexSet the profile of the other FlexSet, and vice versa. All the phones' properties, numbering, programmable keys, membership in groups, etc. are automatically exchanged. This feature facilitates the phone relocation procedure, eliminating the need for traditional phone moves that involve physical disconnection of the station wires and reconnection at another location. Both source and destination phones (see figure) should be keysets. The Auto Set Relocate is activated at the destination station. The phone swap holds until a reverse swap is performed. To activate from the destination location: 1. Press [AUTO SET RELOCATE] or dial the Auto Set Relocate feature code. RELOCATE ENTER SOURCE NO. ON 3. Dial your (source) passcode (4 digits). RELOCATE ENTER PASSCODE ON 4. Dial activation code CONFIRM 2. Dial your (source) station number. (no confirmation tone is heard). 5. The station initializes with the source profile. ON idle display of the source number OFF To reverse the phone relocation: 1. Repeat the above procedure from your original source location. WARNING: See warning on (see page 22). Auto Set Relocate: Permanent 21 FlexSet 120/280 User Guide Auto Set Relocate: Temporary Display Message Key LED When defined for temporary relocation, this feature allows a temporary move of your extension from one location to another, while preserving your extension's original setup. Activating Auto Set Relocate exchanges all of your (source) phone's programmable keys, numbering, membership in groups, etc. with another (destination) phone within the same Coral system. As this takes place, the source phone acquires the full profile of the destination phone, and vice versa. The Auto Set Relocate spares you the inconvenience of having to re-enter all the stored speed numbers and to reset previously defined features at your temporary location. This feature enables you to use any FlexSet available from your Coral system while keeping your unique extension dial number. The Auto Set Relocate is activated at the destination station. The temporary phone swap is automatically reversed at midnight. Reactivating Auto Set Relocate at the already swapped destination station causes: • Automatic cancellation of the first relocation • Exchange of the new (third user's) phone profile with the destination phone profile To activate from the destination (your new) location: Repeat the activation procedure described on the (see page 21) for “Auto Set Relocate: Permanent”. WARNING: When invoking the Auto Set Relocate feature, incorrect information may be sent to the local Emergency or E911 Center. Before activating this feature, contact your local system administrator to ensure that your new and current system profiles are compatible with the E911 (Emergency) Center. Auto Set Relocate: Temporary 22 FlexSet 120/280 User Guide Display Message Key LED To cancel from the destination (your new) location: 1. Press the lit [AUTO SET RELOCATE] or dial Auto Set Relocate feature code. RELOCATE ENTER SOURCE NO. ON 3. Dial your (source) station passcode (4 digits). RELOCATE ENTER PASSCODE ON 4. Dial cancellation code CONFIRM 2. Dial your (source) station number (the number that is now displayed at your new location). (no confirmation tone is heard). 5. The station initializes with the source profile. Auto Set Relocate: Temporary ON idle display of the source number 23 OFF FlexSet 120/280 User Guide Boss Group Display Message Key LED A Boss Group is a number of stations operating together in which the individual stations may or may not simultaneously ring, as defined by the system per Boss Group. The appropriate line key flashes at all stations when a call arrives and can then be answered by any group member. When set to ring at a specific station, the call can be either transferred to any group member or picked up by any group member when not in exclusive hold. Any group member can join a conversation for ‘1A2’ or 3-way conversation by pressing the appropriate illuminated LINE key, but only when the original group member is not in privacy mode. Additional members can join to make a 4-way conversation when allowed system-wide, and none of the three participants have Privacy on. In order to program a line key, see “Programming: Boss Group Line Key” on page 144. The maximum number of lines available for your group is defined on a per group basis. The following Boss Group pages are subdivided into the topics listed below: Feature Page Programming Exclusive Hold . . . . . . . . . . . . . . . 25 Programming Privacy . . . . . . . . . . . . . . . . . . . . . 26 Call Forward . . . . . . . . . . . . . . . . . . . . . . . . . . . 27 Using . . . . . . . . . . . . . . . . . . . . . . . . . . . . . . . . 30 Boss Group 24 FlexSet 120/280 User Guide Boss Group: Programming Exclusive Hold #187 Display Message Key LED As a Boss Group member, you can put your telephone into Exclusive Hold mode. This ensures that a call placed on hold can be retrieved only at the telephone where Exclusive Hold was originally placed. If Exclusive Hold is cancelled, the call put on hold can be retrieved by any other member of your Boss Group. The feature can be utilized for a specific call or for all calls. To activate Exclusive Hold for all calls: 1. Press [EXCLUSIVE HOLD]. NON EXCL. HOLD OFF or Dial Exclusive Hold feature code #187 followed by activation code . EXCLUSIVE HOLD ON 2. Listen for the confirmation tone. To cancel Exclusive Hold for all calls: 1. Press the lit [EXCLUSIVE HOLD]. EXCLUSIVE HOLD ON or Dial Exclusive Hold feature code #187 followed by cancellation code . NON EXCL. HOLD OFF 2. Listen for the confirmation tone. Boss Group: Programming Exclusive Hold 25 FlexSet 120/280 User Guide Boss Group: Programming Privacy #186 or #6 Display Message Key LED As a Boss Group member you can put your telephone into privacy mode. This prevents other stations within your Boss Group from accidentally joining your conversations. To activate Privacy for all calls: 1. Press [PRIVACY]. NO PRIVACY OFF or Dial Privacy feature code #186 followed by activation code . PRIVACY ON 2. Listen for the confirmation tone. To cancel Privacy for all calls: 1. Press the lit [PRIVACY]. PRIVACY ON or Dial Privacy feature code #186 followed by cancellation code . NO PRIVACY OFF 2. Listen for the confirmation tone. Boss Group: Programming Privacy 26 FlexSet 120/280 User Guide Boss Group: Call Forward Display Message Calls arriving at your boss group can be forwarded, according to certain criteria, to ring at various destinations.The system can distinguish between calls arriving from an internal or external source when forwarding. Calls from Internal and External sources can be forwarded to different destinations (see page 38). Possible forward destinations are operator, station/group, external number via public and private speed call library, DVMS pre-recorded message, UNA/central bell, group call, or network number (and the Boss Group itself for external calls). (see page 28) for forwarding procedure). • All Calls Key LED (E) = External calls (E) FWD ALL Forwards all your incoming Boss Group calls to a selected destination. The destination can call back or return calls to your group, and outgoing calls can still be placed from within the group. • Busy (E) FWD BUSY Forwards your incoming boss group calls to another destination when your Boss Group lines are all busy. • No Answer (E) FWD NO ANS Forwards your incoming Boss Group calls to another destination when none of your Boss Group lines has been answered within a system-defined number of rings. • Timed (E) FWD TIMED Forwards your incoming Boss Group calls to another destination, for a time period determined by the system. The system defined time can include up to two separate time periods, for example, between 12:00pm and 12:30pm and between 6:00pm and 6:30pm, your calls can be forwarded to the group secretary. Use the form on the right, to specify the system-defined time periods. Boss Group: Call Forward 27 Time Period From To 1st 2nd FlexSet 120/280 User Guide Display Message Key LED b = Your boss group number or name z = Forward destination To activate Call Forward: 1. Press the required [CALL FORWARD] key, or dial the appropriate Call Forward (Call Forward External) feature code (see table on page 29). ( E ) F W D type 2. Dial your boss group number. bbbbb ( E ) F W D type 3. Dial the destination number where calls are to be forwarded. bbbbb zzzzz ( E ) F W D type 4. Press [SPKR] or hang up. To cancel Call Forward: 1. Press required [CALL FORWARD] key, or dial the appropriate Call Forward (Call Forward External) feature code (see table on page 29). (E) FWD TYPE 2. Listen for the dial tone. 3. Dial your boss group number. bbbbb zzzzz ( E ) F W D type 4. Dial cancellation code bbbbb . ( E ) F W D ty p e 5. Press [SPKR] or hang up. Note: Should you hear a reorder tone, call forward is denied at your station (as defined by Class of Service). In order to use this feature, ask the attendant to activate Call Forward for your boss group. Boss Group: Call Forward 28 FlexSet 120/280 User Guide Display Message Boss Group Call Forward Type Boss Group: Call Forward Key LED Feature Codes Internal and External Calls External Calls Only ALL #168 #17707 BUSY #167 #17706 NO ANSWER #169 #17708 TIMED #1984 #17709 29 FlexSet 120/280 User Guide Boss Group: Using Display Message Key LED Making Calls: 1. Press a free [LINE -nn] key. OFF 2. Dial required number. ON Note: The line key LED of all group members changes from off to steady on. Receiving Calls: When line flashes and telephone rings or only line flashes: xxx xx C A L L b b b bb 1. Press the flashing [LINE -nn] key or, if phone rings, lift handset. A N S W E R xx xxx FLASHING ON 2. Answer the call. Note: The line key LED of all group members changes from flashing to steady on. x = caller number or name (see page 149) To join a group conversation: b = your Boss Group number or name You can join any group conversation when a line key is on. Except when the member’s station is set to privacy, in which case the message PRIVACY and a reorder tone is heard. If another member has already joined the conversation, then you receive the message ILLEGAL and a reorder tone is heard. 1. Press the lit [LINE-nn] key. B T O yy yyy x xxxx ON Both conversing parties will hear the Break-In warning tone. Boss Group: Using 30 FlexSet 120/280 User Guide Display Message Key LED Privacy during a call: activate/cancel While on a call you can speak privately without other parties joining in. This is done by using the Privacy key. The Privacy key turns the feature on and off and can be pressed as many times as necessary. Once Privacy is defined for your station (all calls) the key LED remains illuminated, even if the key is pressed to temporarily override the Privacy feature. However, when your call is completed the telephone returns to the permanent status, private or non-private, as previously defined for all calls. Note: The Exclusive Hold key operates in the same manner as Privacy, except that the messages are relevant for Exclusive Hold. Boss Group: Using 31 FlexSet 120/280 User Guide Display Message Key LED To place a call on Exclusive Hold: For an explanation of how Exclusive Hold operates see explanation of Privacy on page 30. For programming Exclusive Hold see page 25. Note: If your telephone is not in Exclusive Hold mode for all calls, press [EXCLUSIVE HOLD] before you press [HOLD]. Press [HOLD]. EXCLUSIVE HOLD C A L L H O L D xxxx x WINKING Note: The [LINE-nn] LED on hold remains steadily lit at all other FlexSets. To transfer call to a group member (while in conversation): Note: If your telephone is in Exclusive Hold mode for all calls, press [EXCLUSIVE HOLD] before you press [HOLD]. 1. Press [HOLD]. NON EXCL. HOLD Note: [LINE-nn] LED on hold winks on all FlexSets. C A L L H O L D xxxx x WINKING 2. Listen for the confirmation tone. 3. Inform the party to whom you want to transfer on which line the call is held. To return or pickup a call on Hold: 1. Press the winking [LINE-nn]. Boss Group: Using A N S W E R xx xxx 32 WINKING ON FlexSet 120/280 User Guide Break-In Xfer 3, #124 Display Message Key LED This feature enables an authorized user to break into an established two-party call. To break into a busy destination: 1. Press [BREAK IN]. B U S Y xxxxx or Press [XFER] and dial Break-In code 3. B T O yy yyy x xxxx Both conversing parties will hear the Break-In warning tone. To release Break-In (Break-Out): 1. Press [SPKR] or hang up. Note: To program a [BREAK-IN] key, use feature code #124. Break-In 33 FlexSet 120/280 User Guide Broker/Consultation/3-Way Conference Call Xfer Display Message Key LED Your telephone can be set up to use only one of the following three party functions, as defined through your Class Of Service. Each action is performed by first pressing the XFER (transfer) key; however, for stations where Auto Transfer is defined, transfer takes place as soon as the required number is dialed. This takes effect only the first time transfer takes place. Subsequent actions do require pressing XFER as defined in this manual. See also “Transfer to Held Call” on page 178. • Broker Call: This feature allows you to put a call on hold and then converse privately with a third party, while switching between the two calls. The party not in conversation is automatically put on hold and cannot hear any other conversation. • Consultation Call: This feature allows you to consult with a third party. While consulting, the original caller is put on hold. After consultation is complete the two original parties are reconnected and the consulted party is then released. • 3-Way Conference: This feature allows you to bring a third party into an ongoing conversation. All three parties can converse in a three party conference. • Combination Consultation/Broker/3-Way Conference Call: This feature allows you to change a conversation from broker to consultation to 3-way conference by pressing the transfer key while in conversation. The first transfer allows you to converse privately with a third party. The second transfer allows you to speak privately with the original party, while the third party is put on hold. The third transfer places you in a 3-way conversation with all parties. Broker/Consultation/3-Way Conference Call 34 FlexSet 120/280 User Guide Display Message Key LED All the following features are activated during an established call: To activate a Broker Call: 1. Press [XFER]*. 2. Dial the third party - wait for answer. 3. Press [XFER] to alternate between parties (any number of times). Then either • Press [SPKR] or hang up in order to allow conversation between the two parties. or • Press [FORCED RELEASE] to release all parties and press [SPKR]. To activate a Consultation Call: 1. Press [XFER]*. 2. Dial the number of the person you want to consult with, then when your conversation is concluded 3. Press [XFER] to return to the original call (the consulted party is released). Broker/Consultation/3-Way Conference Call 35 FlexSet 120/280 User Guide Display Message Key LED To activate 3-Way Call: 1. Press [XFER]*. 2. Dial the third party number. When the party answers either • Press [FORCED RELEASE] to release the third party and to return to original call (same as consultation call) or • Press [XFER] to connect all three parties. To activate combination of Broker/Consultation/3-Way Conference Call: 1. Press [XFER]*. 2. Dial the third party number, wait for answer. 3. Press [XFER] to put the third party on hold. 4. When you have concluded your private conversation, press [XFER] to complete a 3-Way Conference Call. Broker/Consultation/3-Way Conference Call 36 FlexSet 120/280 User Guide Call Forward Display Message Calls arriving at your station can be forwarded to ring at various destinations, depending on the state of the terminal (all, busy, no answer, timed). Your FlexSet can distinguish between calls arriving from an internal or external source when forwarding (see “Internal/External Forwarding” on page 38). Possible forward destinations are operator, station/group, external number via public and private speed call library, DVMS pre-recorded message, UNA/ central bell, group call, or network number (and the station itself for external calls) (see page 39 for forwarding procedure). (E) = External Calls • All Calls: Forwards all your incoming calls to a designated station. The destination can call back or return calls to your telephone, and you can still place outgoing calls from your telephone. A user lifting handset at a station with activated Call Forward All hears a distinctive dial tone. (E) FWD ALL • Busy: Forwards your incoming calls to another destination when your telephone is busy. (E)FWD BUSY • No Answer: Forwards your incoming calls to another destination when you do not answer within a system-defined number of rings. (E)FWD NO ANS • Busy/No Answer: Forwards your incoming calls to another destination when your telephone is busy, or when you do not answer within a predefined number of rings. (E)FWD BUSY (E)FWD NO ANS • Timed: Forwards your incoming calls to another destination, for a time period determined by the system. The system defined time can include up to two separate time periods, for example, between 12:00pm and 12:30pm and between 6:00pm and 6:30pm. Please use the form on the right, to document the system-defined time periods. (E)FWD TIMED Call Forward 37 Key LED Time Period From To 1st 2nd FlexSet 120/280 User Guide Display Message Key LED Internal/External Forwarding In addition to the forwarding options detailed on (see page 37), you can distinguish between calls arriving from an internal or external source when forwarding. For each forwarding feature (forward all, when busy, on no answer, etc.), you can program your FlexSet to forward your calls as follows: • • • • Forward internal and external calls to the same destination Forward internal and external calls to different destinations Forward internal calls only, while external calls continue ringing at your station Forward external calls only, while internal calls continue ringing at your station This is demonstrated in the following table using the Call Forward All as an example: Forward Option Case Call Forward All (#141) Set to: 1 Feature not set 2 Resultant Call Destination Call Forward All External (#17702) Set To: Internal Calls Go To: External Calls Go To: and Feature not set Your own Station Your own Station Destination X and Feature not set Destination X Destination X 3 Feature not set and Destination Y Your own Station Destination Y 4 Destination X and Destination Y Destination X Destination Y 5 Destination X and Destination Y (Programmed as your own station) Destination X Your own Station Possible destinations for X are: operator, station/group, external number via public and private speed call library, DVMS pre-recorded message, UNA/central bell, group call, or network number. Possible destinations for Y are the same as for X, plus your own station number, thus facilitating forwarding of internal calls to another destination, whilst retaining external calls at your own station, as shown in Case 5 above. Call Forward 38 FlexSet 120/280 User Guide Display Message Key LED x = Forward destination To operate Call Forward: 1. Press required Call Forward key, or dial the appropriate Call Forward feature code (see table below). ( E ) F W D t y pe 2. Press to scroll through types (All, No Answer, or Busy) of call forwarding. 3. Dial destination number where calls are to be forwarded. ( E ) F W D ty pe xxxx x OFF ON 4. Listen for the confirmation tone. To cancel Call Forward: 1. Press the lit Call Forward key, or dial the appropriate Call Forward feature code (see table below). ( E ) F W D ty pe xxxx x 2. Press ( E ) F W D t y pe to scroll through the types (All, No Answer, or Busy) of ON call forwarding. 3. Dial cancellation code 8. 4. Listen for the confirmation tone. Note: Should you hear a reorder tone, call forward is denied at your station (as defined by Class of Service). In order to use this feature, ask the attendant to activate Call Forward at your station. Call Forward 39 Call Forward Type Feature Codes Internal and External Calls External Calls Only All #141 or #8 #17702 Busy #140 #17701 No Answer #142 #17703 Busy/No Answer #147 or #2 #17705 Timed #1985 #17704 FlexSet 120/280 User Guide Display Message Operating Call Forward - key programmed with destination: Key LED E) = External calls You can program a feature key for “Call Forward” to a specific destination (see “Programming: Programmable Keys” on page 135). Pressing the defined key automatically activates Call Forward to the defined destination; the LED is lit. When the key is pressed a second time, Call Forward turns off and the LED extinguishes. Use the Divert Call feature (see page 56), to transfer a single incoming call instead of answering the call. An example of Call Forward All to Susan is shown below. The procedure is similar for other Call Forward types. To activate Call Forward All with destination: 1. Press programmed [(E)FORWARD ALL SUSAN]. (E)FWD ALL Susan ON 2. Listen for the confirmation tone. To cancel Call Forward with destination: 1. Press the lit [(E)FORWARD ALL SUSAN]. 2. Listen for the confirmation tone. (E)FWD ALL OFF Note: The Call Forward with Destination can only be activated if you have a programmed key. To program a destination key with Call Forward, use the relevant access code (see page 37), followed by the destination number. Call Forward 40 FlexSet 120/280 User Guide Caller ID Control #1444 Display Message Key LED The Caller ID Control feature enables you to allow or restrict presenting of your telephone number to the called party for external calls. Your telephone is pre-set in the system to either restrict or display your Caller ID to the called party. Operating this feature overrides this setting on a per-call basis, if permitted by COS. To make a call with a Caller ID Restricted: (the called station normally displays your ID) 1. Dial #1444 followed by activation code . ID. ALLOWED or Press [ID CONTROL], then DIAL ID. RESTRICTED 2. Make call as required. OFF ON OFF To make a call with Caller ID displayed: (the called station normally does not display your ID) 1. Dial #1444 followed by cancellation code . ID. RESTRICTED ON or Press the lit [ID CONTROL], then DIAL ID. ALLOWED 2. Make call as required. OFF ON Notes:1) When you have a Caller ID programmed key, the LED is lit when Caller ID Control is restricted from your station. 2) To program a key with the Caller ID Control feature, use feature code #1444. Caller ID Control 41 FlexSet 120/280 User Guide Camp-On: Call Back - Station, Outside Line Xfer 2, #176 When a station is busy or does not answer, or when an outside line is busy, you may request that the system automatically call you back when the required destination number or line is available. See also “Camp-On: Off-Hook - Call Waiting/Call Offer” on page 44). Display Message Key LED X = Camped-on number To Camp-On to a ringing/busy station or outside line: 1. Press [CAMP ON]. B U S Y xxxxx OFF or Press [XFER] and dial 2. C A M P I N G O N xx xxx ON 2. Listen for the confirmation tone. Your phone rings when station or outside line is available. To Camp-On to a destination from an idle station: 1. Press [CAMP ON] or dial feature code #176. 2. Dial destination number. 3. Listen for the confirmation tone. Your phone rings after the camped-on port is available. When your phone rings (destination station now idle): C A M P C A L L ( your#) C A M P - O N T O xx xxx 1. Answer the call (requested station immediately rings) ANSWER CAMP FLASHING or Should you hear distinctive dial tone, (system-wide defined), press [CAMP ON] or dial 2 to initiate ringing. Camp-On: Call Back - Station, Outside Line I N T E R N A L xxxx x 42 FlexSet 120/280 User Guide Display Message Key LED When your phone rings (required trunk now idle): 1. Answer the call/listen for the outside dial tone C A M P - C A L L ( your # ) C A M P - O N T O x xxxx FLASHING or Should you hear inside distinctive tone, (system-wide defined), press ANSWER CAMP [CAMP ON] or dial 2 to initiate outside call. 2. Dial required outside number (not required in Routing Access dialing). O U T S I D E xxxxx To cancel Camp-On before you are called back: 1. Press the lit [CAMP ON] key or dial feature code #176. 2. Scroll with and stop at the destination you want to cancel. C A M P I N G O N xx xxx ON 3. Dial cancellation code 8. 4. Listen for the confirmation tone if LIST EMPTY is displayed. LIST EMPTY OFF 5. Press [SPKR]. Notes:1) If you have camped onto a number of destinations and your FlexSet is not equipped with a display unit, do not scroll, the oldest number camped on is cancelled. Cancelling camped on numbers can continue throughout the list, with the next oldest number then cancelled each time. 2) If you try to camp again onto an already camped number, you receive the error message: ALREADY SET. 3) To program a Camp On key, use access code #176. 4) Camp On is automatically cancelled after a system-wide defined period after activation. Camp-On: Call Back - Station, Outside Line 43 FlexSet 120/280 User Guide Camp-On: Off-Hook - Call Waiting/Call Offer Xfer 8 Display Message Key LED Upon hearing a busy tone from a Coral station, this feature enables you to send a call waiting tone to the busy party. When you apply this feature you hear a second ringback tone at your telephone. To Camp-On a busy station while off-hook: 1. Press [XFER]. 2. Dial 8. B U S Y xxxxx 3. Listen for the ringback tone or second ringback tone (defined system-wide). DIAL 8 4. Wait for answer. I N T E R N A L xxxx x Camp-On: Off-Hook - Call Waiting/Call Offer 44 FlexSet 120/280 User Guide Class Of Service (COS) Switchover #149 Display Message Key LED Each station has a Primary and Secondary Class Of Service (COS), which provides the basis for dialing and feature capabilities for a particular station. You may change from one COS to another. For an additional explanation see page A-1 in the Glossary provided at the end of this guide. To select your station’s Secondary COS: 1. Press [COS SWITCH] or dial COS Switchover feature code #149. 2NDR COS CHANGE ENTER PASSCODE 2. Dial your passcode (4 digits). 3. Dial activation code . YOUR PRIMARY C O S I S : xxx 4. Listen for the confirmation tone. YOUR SECONDARY C O S I S : yyy To return to your station’s Primary COS: 1. Press [COS SWITCH] or dial COS Switchover feature code #149. 2NDR COS CHANGE ENTER PASSCODE 2. Dial your passcode (4 digits). 3. Dial cancellation code . YOUR SECONDARY C O S I S : yyy 4. Listen for the confirmation tone. Notes:1) In order to perform COS Switchover at your telephone, you must YOUR PRIMARY C O S I S : xxx first have a defined passcode (see page 131). 2) The selection of secondary COS is denied when your telephone is in Check-out mode. Class Of Service (COS) Switchover 45 FlexSet 120/280 User Guide Conference, Multiparty 7098-7099 Display Message Key LED Conference calls allow several users to join a multiparty conversation. Up to 6 or 15 participants are permitted depending on the system hardware assigned to the conference call. You may use any one of the following: • Meet Me Conference • Conference Release • Group Calls (see page 73) • Progressive Add-on • Lock MEET-ME To Join a Conference: (at the assigned hour) Dial assigned conference number 7098-7099 or press [CONF#] Note: Warning tone is heard by all participants. ANSWER (CONF#) ON To leave a conference: Press [SPKR] or hang up. To force release an entire conference: Press [FORCED RELEASE] (see page 71). ADD-ON (while connected to a station/trunk) To add on an additional participant to a progressive conference: (while connected to a station/trunk) 1. Press [XFER]. 2. Press [CONFERENCE#] or dial assigned conference number 7098-7099. ANSWER (CONF #) ON 3. Press [SPKR] or hang up to leave conference. Note: Warning tone is heard by all participants. Conference, Multiparty 46 FlexSet 120/280 User Guide Conference, Multiparty View/Release #1983 This feature allows an authorized user, from idle, to release a conference participant from an ongoing conference. This feature also allows viewing the participant list. Display Message Key LED x = Participant number or name to be released To release a single participant from conference: 1. Press [CONFERENCE RELEASE] or dial feature code #1983. CONF. INSPECT ENTER CONF NUM ON RELEASE XXXXX C O N F ( conf#) ON CONF EMPTY ENTER CONF NUM OFF 2. Press [CONFERENCE#] or dial assigned conference number 7098-7099. 3. Dial participant number or press list (see Caution below). or to scroll through participant 4. To activate Forced Release, dial activation code heard). (no confirmation tone is 5. When no participants remain, the display shows: 6. Press [SPKR] to exit. CAUTION ! If you do not enter or display the participant number (trunk or station number), you will remove an unidentified member from the conference. The first to be removed is always the member who joined the conference first, the second to be removed is the member who joined the conference second, and so on. When a member is removed, a warning tone is heard by all remaining participants. Conference, Multiparty View/Release 47 FlexSet 120/280 User Guide Conference, Multiparty Lock #1441 Display Message Key LED Conference Lock allows an authorized user to block other users from joining an ongoing conference. The CONFERENCE LOCK key acts as an on/off switch, locking and unlocking the conference as required. However, if you are the member who locks the conference and then leaves, you will not be able to rejoin until unlocked by another member. To lock your ongoing conference: 1. Press [CONFERENCE LOCK]. A N S W E R ( conf# ) C N F L O C K ( c on f # ) To unlock your ongoing conference: 1. Press [CONFERENCE LOCK]. A N S W E R ( conf# ) C N F U N L O C K ( conf# ) Note: This feature can only be activated by using a programmed key. To program a Conference Lock key, use access code #1441. Conference, Multiparty Lock 48 FlexSet 120/280 User Guide Directory #1994 Display Message Key LED This feature provides a searchable directory listing for users of display enabled FlexSets (120D, 280D, 280D-Z). Both Shared and Personal records are combined and organized alphabetically, for easy retrieval. A search result can be dialed at the touch of a key. The Directory enables: • Fast search by name • Number retrieval and autodial • Add/edit entries to the Personal directory Shared Directory is composed of the following internal and external numbers: • • • • Public Speed Call Library Hunt Group Boss Group All stations defined in the system Personal Directory is a self-built database of external telephone numbers. It is accessible only from the station at which it was entered. An entry to the Personal Directory is distinguished from a Shared Directory entry by a preceding asterisk. Calls arriving to your station are matched against entries to your Personal Directory. Incoming calls from contacts listed in the directory are shown on the display as they appear in the Directory. Directory 49 FlexSet 120/280 User Guide Display Message Key LED To search the Directory: Note: Both Shared and Personal directories are accessed by the first constituent of an entry. If an entry consists of a given name and a family name, the search will look for the attribute listed first. 1. Press [DIRECTORY] or dial the Directory feature code #1994. DIRECTORY SEARCH: ON 2. Enter all or part of the required name (up to 16 characters) using the alphanumeric keys (see “Keypad - Alphabetic Mode” on page 53 and “Editing Keys” on page 54). You may also use keys to scroll through the Directory. SEARCH: name ON 3. While the name or number of the retrieved contact party is displayed, you can do one of the following: • Place a call by pressing asterisk (>) (see steps below) • Modify a Personal Directory contact information by dialing #2 (see page 51) • Permanently remove a Personal Directory entry by dialing #0 (see page 51) To place a call from the Directory 1. Retrieve the required name (see steps above). SEARCH: name ON 2. Dial asterisk (>) to call currently displayed contact. If you are calling an internal number, the following display appears: I N T E R N A L called name If you are calling an external number, the following display appears: O U T trunk#/name D I A L called number Directory 50 FlexSet 120/280 User Guide Display Message Key LED To modify a Personal Directory entry 1. Retrieve the required name (see Search on page 50). SEARCH: > name ON 2. Dial #2. NAME: > current name ON 3. If required, enter the modified name (see table on page 54 for edit options). N A M E : mo dified name > current name ON 4. Press key to initiate Edit Number mode. 5. If required, enter the modified number (see table on page 54 for edit options) 6. Press NUM: > current number ON N U M : modified number > current number ON key to save the changes. or Dial asterisk (>) to save the changes and to call the saved contact. O U T trunk#/name D I A L n u mb e r OFF SEARCH: > name ON To remove an entry from the Personal Directory: 1. Retrieve the required name (see Search on page 50). 2. Press #0 to delete the entry. The entry subsequent to the one removed appears on the display. CAUTION ! You will not be able to restore the deleted entry. Directory 51 FlexSet 120/280 User Guide Display Message Key LED To add a new entry to Personal Directory: 1. Press [DIRECTORY] or dial the Directory feature code #1994. DIRECTORY SEARCH: 2. Dial #1. NAME: 3. Enter the name of your contact (up to 16 characters including spaces) using the alphanumeric keys (see “Keypad - Alphabetic Mode” on page 53 and “Editing Keys” on page 54). NAME: name 4. Press NUM: key to move to the Number field. ON ON ON ON 5. Enter the external telephone number of your contact party. (Do not enter the outside line access code). N U M : d i a l n u mb e r 6. Press key to save the entry (an asterisk marks the saved entry as a Personal Directory entry) SEARCH: > name ON O U T trunk#/name D I A L n u mb e r OFF ON or Dial asterisk (>) to save the entry and to place a call to the saved contact. Note: 1) Any attempt to make an entry in excess of the number of entries allowed by the system will fail. The following message will appear: 2) Any attempt to assign a dial number already existing in the Directory to a new contact will fail. The following message will appear: Directory 52 OUT OF RANGE ALREADY SET FlexSet 120/280 User Guide Display Message Key LED Keypad - Alphabetic Mode Use the keypad to make new entries or navigate through the directory to a specific entry. The cursor advances automatically when the next key is pressed. If two consecutive letters are on the same key, wait for the cursor to disappear before proceeding to the next key. The table below indicates the key presses used to input the required letters. This table may override the designations on your keypad. For example, to enter “ANN” press: 2 ABC 6 MNO 6 MNO A 6 MNO N C H AR AC T E RS 1 Tim e 2 Tim es 3 Tim es 4 Tim es __ __ __ __ 2 ABC A B C __ 3 DEF D E F __ 4 GHI G H I __ 5 JKL J K L __ 6 MNO M N O __ 7 PQRS P Q R S V __ 1 8 TUV 9 WXYZ * 0 # Directory 6 MNO N KEYS P res s: WAIT T U W X Y Z __ __ __ __ __ __ __ __ __ __ __ __ 53 FlexSet 120/280 User Guide Display Message Key LED Editing Keys The Directory allows you to easily retrieve a telephone number by keying a name of your contact and to place a call to the search result as soon as the match is found. The available key combinations are listed in the table below. Options marked with a diamond () are applicable for the Personal Directory only and are not relevant for the Shared Directory. Option Action Dial Directory Description Or Press DELETE ENTRY #0 Erases the currently displayed contact from the Personal Directory. There is no option to restore the deleted entry. NEW ENTRY #1 Add a new entry to your Personal Directory. MODIFY ENTRY #2 Edit the displayed personal entry. BACKSPACE #3 Erase the last entered character or digit. SPACE #4 Insert a space between words. NAME/NUMBER #5 A toggle key that, when pressed, switches between name and number of your contact. To program the [NAME/NUMBER] button, use feature code #128. See “Name/Dial Number Display” on page 117. SEND > [NAME/NUMBER] Dials the number of the currently displayed contact. 54 FlexSet 120/280 User Guide Display Message Option Action Dial Description Or Press SCROLL Use to scroll, contact by contact, through Directory entries. Directory entries are automatically alphabetized. CAPS LOCK [CAPS LOCK] A toggle key that, when pressed, causes all subsequent alphabetic characters to be either lowercase or uppercase. To program the [CAPS LOCK] button, contact your system administrator for the Lowercase/Uppercase feature code. [CHARACTER/ DIGIT] A toggle key that, when pressed, causes all subsequent characters to be either digits or characters. Used when name entries are comprised of both characters and digits. To program the [CHARACTER/DIGIT] button, contact your system administrator for the Character/Digit feature code. CHARACTER/DIGIT Directory Key LED 55 FlexSet 120/280 User Guide Divert Call #1445 Display Message Key LED This feature enables you to divert an incoming call while actively engaged in another call, or while an idle station is ringing, without first answering it. The call you are engaged in is not interrupted, nor is the incoming call aware of the diversion. The destination can be any permissible dial number in the system. Typically Divert Call can be used to send an incoming call to a boss group, a secretary, or to voice mail, by making Library the destination of the diversion. To activate during ringing: 1. Press [DIVERT CALL to xxxx]. n o r ma l d i s p l a y OFF 2. The incoming call is diverted to the programmed destination. The current call continues uninterrupted or the station remains idle. Notes:1) This feature can be utilized only if you have a programmed DIVERT CALL key with a destination. 2) To program a DIVERT CALL key, use feature code #1445, followed by the destination number. More than one [DIVERT CALL] key may be defined, each with a different destination. 3) Possible destinations are operator, station/group, public speed call library, DVMS pre-recorded message, UNA central bell or group call. 4) Your station must be defined as multi-appearance to be able to divert a new call while engaged in a previous one. Divert Call 56 FlexSet 120/280 User Guide Do Not Disturb (DND) #145 This feature enables you to inhibit the telephone from ringing, although you will still receive VOICE PAGE calls. However, when DND is activated you are still able to make outgoing calls. Any call forwarding to your telephone is automatically cancelled when you activate the DND feature. Only a station with DND Override privilege can call your station. Display Message Key LED x = Caller number or name To activate while your set is ringing: 1. Press [DND]. xxx xx C A L L ( y o u r # ) OFF Note: This feature can be utilized only from a programmed DND key. To activate from idle: 1. Press [DND], DO NOT DISTURB OFF or Dial Do Not Disturb feature code #145 followed by activation code . DO NOT DISTURB ON 2. Listen for the confirmation tone. Note: Should you hear a reorder tone, DND is denied at your station (as defined by Class of Service). In order to use this feature, ask the attendant to activate DND at your station. Do Not Disturb (DND) 57 FlexSet 120/280 User Guide Display Message Key LED To cancel from idle: 1. Press the lit [DND]. DO NOT DISTURB ON or Dial Do Not Disturb feature code #145 followed by cancellation code . DONT DISTURB OFF OFF 2. Listen for the confirmation tone. Do Not Disturb (DND) 58 FlexSet 120/280 User Guide Do Not Disturb Override Xfer 3, #124 Display Message Key LED DND Override can only be utilized by an authorized user. This feature can be applied to stations that are idle, but have been set to Do Not Disturb or Unattended. After dialing a station and receiving a reorder tone, if the DONT DIST or UNATTENDED message appears, override can be applied and your call can ring the station. To override Do Not Disturb status: 1. Press [BREAK IN]. D O N T D I S T x xxxx or Press [XFER] and dial Break-In code 3. then 2. Listen for the ringback tone I N T E R N A L xxxx x 3. Wait for answer. Note: The override feature uses the same feature code as Break-In (see page 33). Do Not Disturb Override 59 FlexSet 120/280 User Guide Elapsed Time Display #129 Display Message Key LED This feature enables you to display the elapsed time during an incoming or outgoing external or network call. When activated from idle, Elapsed Ti