1
Manual III: Extension User’s Guide
Edition 1, November 2014
SW Release 6.0.7 and higher
QX50/QX200/QX2000 Manual III: Extension User’s Guide
Notice to Users
This document, in whole or in part, may not be reproduced, translated or reduced to any machine-readable form without prior written approval.
Epygi provides no warranty with regard to this document or other information contained herein and hereby expressly disclaims any implied warranties of
merchantability or fitness for any particular purpose in regard to this document or such information. In no event shall Epygi be liable for any incidental,
consequential or special damages, whether based on tort, contract or otherwise, arising out of or in connection with this document or other information
contained herein or the use thereof.
Copyright and Trademarks
Copyright © 2003-2014 Epygi Technologies, LTD. All Rights Reserved. Quadro and QX are registered trademarks of Epygi Technologies, LTD. Microsoft,
Windows and the Windows logo are registered trademarks of Microsoft Corporation. All other trademarks and brand names are the property of their
respective proprietors.
Emergency 911 Calls
YOU EXPRESSLY ACKNOWLEDGE THAT EMERGENCY 911 CALLS MAY NOT FUNCTION WHEN USING QUADRO OR QX AND THAT EPYGI TECHNOLOGIES,
LTD. OR ANY AFFILIATES (AGENTS) SUBSIDIARIES, PARTNERS OR EMPLOYEES ARE NOT LIABLE FOR SUCH CALLS.
Limited Warranty
Epygi Technologies, LTD. (‘Epygi’) warrants to the original end-user purchaser every Quadro and QX to be free from physical defects in material and
workmanship under normal use for a period of one (1) year from the date of purchase (proof of purchase required) or two (2) years from the date of
purchase (proof of purchase required) for products purchased in the European Union (EU). If Epygi receives notice of such defects, Epygi will, at its
discretion, either repair or replace products that prove to be defective.
This warranty shall not apply to defects caused by (i) failure to follow Epygi’s installation, operation or maintenance instructions; (ii) external power
sources such as a power line, telephone line or connected equipment; (iii) products that have been serviced or modified by a party other than Epygi or an
authorized Epygi service center; (iv) products that have had their original manufacturer’s serial numbers altered, defaced or deleted; (v) damage due to
lightning, fire, flood or other acts of nature.
In no event shall Epygi’s liability exceed the price paid for the product from direct, indirect, special, incidental or consequential damages resulting from the
use of the product, its accompanying software or its documentation. Epygi offers no refunds for its products. Epygi makes no warranty or representation,
expressed, implied or statutory with respect to its products or the contents or use of this documentation and all accompanying software, and specifically
disclaims its quality, performance, merchantability or fitness for any particular purpose.
Return Policy
If the product proves to be defective during this warranty period, please contact the establishment where the unit was purchased. The Integrator will
provide guidance on how to return the unit in accordance with its established procedures. Epygi will provide the Return Merchandise Authorization
Number to your retailer.
Please provide a copy of your original proof of purchase. Upon receiving the defective unit, Epygi, or its service center, will use commercially reasonable
efforts to ship the repaired or a replacement unit within ten business days after receipt of the returned product. Actual delivery times may vary depending
on customer location. The Distributor is responsible for shipping and handling charges when shipping to Epygi.
European Limited Warranty
The European Limited Warranty is the same as the Limited Warranty above, except the warranty period is for two years from the date of purchase.
Extended Warranty
Extended Warranty Option
Epygi offers an extended warranty program available for purchase by end users. This option is available at the time of purchase, extending the users
original warranty for an additional three (3) years. Combined with the original warranty, the extended warranty would offer a total of five (5) years
protection for European end users and four (4) years protection for non-European end users.
Extended Warranty Statement
Epygi Technologies, LTD. extends its Limited Warranty for an additional period of three (3) years from the date of the termination of the original Limited
Warranty period (proof of purchase required).
Epygi reserves the right to revise or update its products, pricing, software, or documentation without obligation to notify any individual or entity. Please
direct all inquiries to:
Epygi Technologies, LTD.
1400 Preston Road, Suite 300, Plano, Texas 75093
QX50/QX200/QX2000; (SW Version 6.0.x)
2
QX50/QX200/QX2000 Manual III: Extension User’s Guide
Administrative Council for Terminal Attachments (ACTA) Customer Information
This equipment complies with Part 68 of the FCC rules and the requirements adopted by the ACTA. Located on the equipment is a label that contains,
among other information, the ACTA registration number and ringer equivalence number (REN). If requested, this information must be provided to the
telephone company.
The REN is used to determine the quantity of devices which may be connected to the telephone line. Excessive REN’s on the telephone line may result in
the devices not ringing in response to an incoming call. In most, but not all areas, the sum of the REN’s should not exceed five (5.0). To be certain of the
number of devices that may be connected to the line, as determined by the total REN’s contact the telephone company to determine the maximum REN for
the calling area.
This equipment cannot be used on the telephone company-provided coin service. Connection to Party Line Service is subject to State Tariffs.
If this equipment causes harm to the telephone network, the telephone company will notify you in advance that temporary discontinuance of service may
be required. If advance notice isn’t practical, the telephone company will notify the customer as soon as possible. Also, you will be advised of your right
the file a complaint with the FCC if you believe it is necessary.
The telephone company may make changes in its facilities, equipment, operations, or procedures that could affect the operation of the equipment. If this
happens, the telephone company will provide advance notice in order for you to make the necessary modifications in order to maintain uninterrupted
service.
If trouble is experienced with this equipment, please contact EPYGI TECHNOLOGIES, LTD.
If the trouble is causing harm to the telephone network, the telephone company may request you to remove the equipment from the network until the
problem is resolved.
Electrical Safety Advisory
To reduce the risk of damaging power surges, we recommend you install an AC surge arrestor in the AC outlet from which the Quadro or QX is powered.
Industry Canada Statement
This product meets the applicable Industry Canada technical specifications.
Safety Information
Before using the Quadro or QX, please review and ensure the following safety instructions are adhered to:
• To prevent fire or shock hazard, do not expose your Quadro or QX to rain or moisture.
• To avoid electrical shock, do not open the Quadro or QX. Refer servicing to qualified personnel only.
• Never install wiring during a lightning storm.
• Never install telephone jacks in wet locations unless the jack is specified for wet locations.
• Never touch non-insulated telephone wire or terminal unless the telephone line has been disconnected at the network interface.
• Use caution when installing or modifying cable or telephone lines.
• Avoid using your Quadro or QX during an electrical storm.
• Do not use your Quadro, QX or telephone to report a gas leak in the vicinity of the leak.
• An electrical outlet should be as close as possible to the unit and easily accessible.
Emergency Services
The use of VoIP telephony is made available through IP networks such as the Internet and is dependent upon a constant source of electricity, network
availability and proper operation of the equipment. If a power outage, network disruption or equipment failure occurs, the VoIP telephony service could
be disabled. User understands that in any of those events the Quadro or QX may not be able to support 911 emergency services, and further, such services
may only be available via the user's regular telephone line or mobile lines that are not connected to the Quadro or QX. User further acknowledges that any
interruption in the supply or delivery of electricity, network availability or equipment failure is beyond Epygi's control and Epygi shall have no
responsibility for losses arising from such interruption.
Music on Hold Copyright
The default Music on Hold on the Quadro or QX is a 22 second fragment from Chopin's Nocturne Op.9 #2 performed by Marina Vardanyan and kindly
provided to Epygi Technologies, LTD. The recording is royalty free.
Compliance with Laws
You may not use the Epygi Materials for any illegal purpose or in any manner that violates applicable domestic or foreign law. You are responsible for
compliance with all domestic and foreign laws governing Voice over Internet Protocol (VoIP) calls.
QX50/QX200/QX2000; (SW Version 6.0.x)
3
QX50/QX200/QX2000 Manual III: Extension User’s Guide
Table of Contents
Manual I: see Installation Guide
This guide describes step-by-step instruction to install and configure QX IP PBX.
Manual II: see Administrator's Guide
This guide describes detailed the menus available for administrators only and includes further all system default values at a glance.
Manual III: Extension User's Guide
About this Extension User's Guide ................................................................................................................................................................................6
QX IP PBX’s Feature Codes...............................................................................................................................................................................................7
Establishing a call ............................................................................................................................................................................................................................................................................ 7
Using PBX Services.......................................................................................................................................................................................................................................................................... 7
Outgoing Call Blocking............................................................................................................................................................................................................................................................. 9
Unconditional Call Forwarding Management................................................................................................................................................................................................................. 9
No Answer Call Forwarding Management .................................................................................................................................................................................................................... 10
Voice Mail Services ...................................................................................................................................................................................................................................................................... 10
Voice Mailbox ................................................................................................................................................................................................................................................................................. 10
Personal Settings .................................................................................................................................................................................................................................................................... 11
Change Password ................................................................................................................................................................................................................................................................... 12
Services for Incoming Calls ................................................................................................................................................................................................................................................. 12
Recording Box ................................................................................................................................................................................................................................................................................ 13
QX IP PBX’s Auto Attendant Services ......................................................................................................................................................................... 14
Call Codes Available in Auto Attendant ............................................................................................................................................................................................................................... 16
Your Extension Graphical Interface ........................................................................................................................................................................... 17
Entering SIP Addresses Correctly .......................................................................................................................................................................................................................................... 17
Voice Mail .......................................................................................................................................................................................................................... 18
Voice Mailbox ................................................................................................................................................................................................................................................................................. 18
Voice Mail Settings ....................................................................................................................................................................................................................................................................... 19
Voice Mail Profiles........................................................................................................................................................................................................................................................................ 22
Group List ........................................................................................................................................................................................................................................................................................ 24
Call History........................................................................................................................................................................................................................ 26
PBX Information .............................................................................................................................................................................................................. 27
Speed Calling .................................................................................................................................................................................................................... 27
Account Settings .............................................................................................................................................................................................................. 28
Basic Services ................................................................................................................................................................................................................... 29
General Settings ............................................................................................................................................................................................................................................................................ 29
Hold Music Settings ..................................................................................................................................................................................................................................................................... 30
Do Not Disturb ............................................................................................................................................................................................................................................................................... 31
Hot Line Settings........................................................................................................................................................................................................................................................................... 31
Caller ID Services ............................................................................................................................................................................................................ 32
Hiding Caller Information ......................................................................................................................................................................................................................................................... 33
Incoming Call Blocking ............................................................................................................................................................................................................................................................... 34
Outgoing Call Blocking ............................................................................................................................................................................................................................................................... 34
Distinctive Ringing ....................................................................................................................................................................................................................................................................... 35
Call Hunting .................................................................................................................................................................................................................................................................................... 35
Many Extensions Ringing .......................................................................................................................................................................................................................................................... 36
Call Forwarding ............................................................................................................................................................................................................................................................................. 37
Unconditional Call Forwarding ............................................................................................................................................................................................................................................... 38
QX50/QX200/QX2000; (SW Version 6.0.x)
4
QX50/QX200/QX2000 Manual III: Extension User’s Guide
Busy Call Forwarding.................................................................................................................................................................................................................................................................. 38
No Answer Call Forwarding ..................................................................................................................................................................................................................................................... 39
Unregistered/Inaccessible Call Forwarding ...................................................................................................................................................................................................................... 40
Find Me / Follow Me ................................................................................................................................................................................................................................................................... 40
Emergency Interrupt .................................................................................................................................................................................................................................................................. 42
Intercom........................................................................................................................................................................................................................................................................................... 42
Voicemail Profile........................................................................................................................................................................................................................................................................... 43
Appendix: Glossary ......................................................................................................................................................................................................... 44
Appendix: Software License Agreement ................................................................................................................................................................... 49
QX50/QX200/QX2000; (SW Version 6.0.x)
5
QX50/QX200/QX2000 Manual III: Extension User’s Guide
About this Extension User's Guide
The QX IP PBX Manual is divided into three parts:
•
•
•
Manual-I: Installation Guide
gives step-by-step instructions to provision the QX IP PBX and configure the phone extensions with the Epygi SIP Server. After successfully
configuring the QX IP PBX, a user will be able to make SIP phone calls to remote QX IP PBX devices, make local calls to the PSTN and access the
Internet from devices connected to the LAN.
Manual-II: Administrator's Guide that explains all QX IP PBX management menus available for administrators only. It includes a list of all
System Default Values.
Manual-III: Extension User's Guide explains all QX management menus available for extension users. A list of all call codes can be found here in
Extension User’s Guide.
This guide contains many example screen illustrations. Since QX IP PBXs offer a wide variety of features and functionality, the example screens shown may
not appear exactly the same for your particular QX IP PBX as they appear in this manual. The example screens are for illustrative and explanatory
purposes, and should not be construed to represent your own unique environment.
QX IP PBX’s Feature Codes explains all call codes available for extension users.
QX IP PBX’s Auto Attendant Services explains the operating mode of QX IP PBX's auto attendant and lists the call codes that may be used to enter the
auto attendant.
Your Extension Graphical Interface explains the QX IP PBX's Your Extension graphical user interface and the input options available for extension
users and administrators.
Appendix: Glossary explains various technical terms.
Appendix: Software License Agreement includes the contract for using QX IP PBX's hardware and software.
QX50/QX200/QX2000; (SW Version 6.0.x)
6
QX50/QX200/QX2000 Manual III: Extension User’s Guide
QX IP PBX’s Feature Codes
This chapter describes how QX IP PBX’s feature codes allow the user to navigate through QX IP PBX’s services with the help of a phone handset. These
services are Establishing a Call, PBX Services and Voice Mail Services.
Establishing a call
To make a call, dial the Routing Number.
Routing Numbers and available routes to, from and through QX IP PBX are listed in the Call Routing Table (see Manual II: Administrator’s Guide). The
Call Routing Table is configured and managed by QX IP PBX’s Administrator. To receive information about dialing rules, please contact the administrator.
Please Note: You may accelerate establishing a connection by entering a pound (#) sign dialed at the end of the routing number.
Using PBX Services
PBX Services accessible at the dial tone, characterized by beginning with the key :
Entering the Voice Mail Services
(see further key codes below)
Redialing automatically
For extensions attached to FXS lines, this service may be used in two ways:
• Press *1 and hang up. As soon as the last called destination will be reached, your phone will start ringing.
• Press *1 and stay with the handset lifted. The connection will be established immediately when the called destination answers the
call.
A specific beep will be heard during the entire auto redialing period (specified on the Basic Services – General Settings page). A beep will
be heard if no auto redialing is possible. To stop the auto redialing process, simply lift the handset and hung up again (if you were keep
waiting with the handset lifted, you will need to push the hook button twice on your phone to stop the redialing).
For extensions attached to IP lines:
• Press *1 to redial the last number that you called.
• If the called number is busy after dialing *1 keep the handset lifted to activate the auto redialing of the last called number. The
connection will be established immediately when the called destination answers the call.
Please Note: This service is functional for SIP and PBX calls only. For PSTN calls, this feature works as a single redial (with no multiple
attempts to reach the called destination).
Please Note: This service works when the Voice Mail and Call Waiting services are disabled on the called destination.
Calling back the last caller
If calling back is not possible, you will hear the message “The dialed number doesn’t exist”.
Unconditional Call Forwarding Management configured for Any Address or Other Addresses in the Caller ID Based Services table
will get activated. To toggle (activate or deactivate) the Unconditional Call Forwarding service again, press 1 directly after entering
the *4 menu. If no unconditional forwarding is configured for Any Address/Other Addresses entries, the system will not activate the
forwarding service and a voice message will ask to configure the forwarding settings first. (See further key codes below.)
Enabling/Disabling the Do Not Disturb service turns off/on your phone bell for the time period indicated on the Do Not Disturb
settings page. Incoming calls will be routed to voice mail.
Blocking the last caller
The last caller party will be blocked and added to the table on the Caller ID Based Services. You may unblock it later from the Incoming
Call Blocking page. This service is available for 10 seconds after the call has been terminated.
Attention: Blocking the caller with anonymous caller ID (for example, anonymous@anonymous or similar) will lead to blocking all
callers with an unknown caller address.
Getting the line information
You will hear your line, extension and SIP number.
Speed Calling is used to add a new entry to your Speed Calling table. A two digit speed calling code is required followed by the
destination number. In the Speed Calling table, the registered destination will have an Auto call type.
Hot Desking used to login/logout to the public phone with the virtual extension. To login, the extension number and the password of
the preconfigured virtual extension are required. After login, the phone becomes a full featured QX IP PBX phone with all supplementary
PBX features available. When logged out, the public phone becomes available for other users to login and the extension which has been
last used on that phone becomes again inactive.
Outgoing Call Blocking used to block or unblock outgoing calls for certain called number. Insert the extension's password and press 1
to block or 2 to unblock a number. Dial a Called Number to be blocked and press #. Dial a Called Number to be unblocked and press #.
Mark the Last Call as Bad
This will mark the last call in the system logs in the specific way and is used for diagnostics purposes only.
QX50/QX200/QX2000; (SW Version 6.0.x)
7
QX50/QX200/QX2000 Manual III: Extension User’s Guide
Logs Collecting
This will generate a special user's failure log with the details of the last call for administrator's revision. Use this code in the cases your
administrator has advised you. You will get the dial tone after this feature code is dialed.
Easy Login/Logout
Used by ACD agent to easy login or logout to all groups where it is subscribed to.
No Answer Call Forwarding Management configured according to the No Answer Call Forwarding settings for Any Address entries in
the Caller ID Based Services table will get activated. To toggle (activate or deactivate) the forwarding service again, press 1 directly after
entering the *84 menu. If no No Answer Call Forwarding is configured for Any Address entries, the system will not activate the
forwarding service and a voice message will ask to configure the forwarding settings first. (See further key codes below.)
Access to the Shared Mailboxes used to access other extension’s mailboxes on the QX IP PBX. If the mailbox is configured as shared, no
password will be prompted to enter it. Otherwise, the corresponding extension’s password will be prompted to enter its mailbox. The
mailbox can be configured as shared either by administrator from Extension’s Management - Voice Mailbox Settings page (see
Manual II: Administrator’s Guide) or by the extension’s user from Many Extensions Ringing page. Once entered the other extension's
mailbox, you will get all the same menu options and functionality as you have in your own mailbox.
Listen in to the third party’s call. You will not be able to speak in the call.
+
Extension
Number +
+ Extension
Number +
Whisper to the third party’s call. You will be able to listen to the call and speak only to extension you have dialed.
+ Extension
Number+
Barge in to the third party’s call. You will be able to listen to the call and speak to all participants.
If you have problems using , and feature codes, turn to your system administrator for the corresponding configuration.
This feature code is only available when the extension you dial is in the call.
+ Extension
Number+
Intercept allows you to pick up a ringing call on another specified extension after this feature code is dialed.
PBX services accessible during the call (for phones connected to the FXS lines), characterized by starting with the key
Keeping a call on hold
:
is used to hold the active connection, in order to place or receive a second call. When holding the first call, the user is able to
place a call to a third party, in particular cases for conferencing (3 way calling) or call transferring purposes. To be able to receive a
second call while currently being on a call, the call waiting service should be enabled on the Basic Services – General Settings page. When
a second call comes in, the beep sound indication is heard in the active call.
Transferring a call without consultation
Press
to hold a call partner and to get a dial tone (within approximately 1 second). Enter the phone number of the destination
phone where the call should be transferred to. Hang up on the ring tones. The call on hold will be transferred to the specified
destination.
Transferring a call with consultation
Press
to hold a call and to get the dial tone (within approximately 1 second). Enter the phone number of the destination
phone where the call should be transferred to. Talk to the called party and then hang up. The call partner on hold will be connected to
the called party.
Joining active lines to start a conference call
Hold the first call (
), make the second call (or receive a new one) and press
to join both active lines together for the
conference call. To terminate the conference call with the first or second party, use correspondingly
or
key
combinations.
Attention: Pressing
and waiting for 5 seconds will initiate a call switch and will connect you back to the held party instead of
initiating the a conference call.
Attention: After initiating a conference call, the extension can leave the conference by pressing
without terminating the call
between the other two parties.
QX50/QX200/QX2000; (SW Version 6.0.x)
8
QX50/QX200/QX2000 Manual III: Extension User’s Guide
To terminate the call
Call Park
Dial
to park a call (system will play the extension number and SIP username of the first available Call Park extension). Go to
the remote location and call the Call Park extension to pick up the parked call. If enabled, the system will ask for the password
authentication. If successfully entered, the parked call will be resumed.
To use the Call Park feature, at least one Call Park extension should be created on the QX IP PBX.
Attention: The Call Parking is valid within the timeout defined by QX IP PBX’s administrator, during which hold music (if configured)
will be played to the parked party. Contact your system administrator if you need the call parking timeout to be modified. When the Call
Park timeout expires, a short ring notification will be sent to the phone initiating the call parking, and if no one picks up the parked call
or if the phone is off the hook, the parked call will be automatically disconnected.
Directed Call Park
Hold the current call (
) and dial the Call Park extension number within the five second timeout.
Attention: If the five second timeout is exceeded, then the QX IP PBX will consider it as an attempt for retrieving the parked call.
Go to the remote location and call the Call Park extension to pick up the parked call. If enabled, the system will ask for the password
authentication. If successfully entered, the parked call will be resumed.
To use the Directed Call Park feature, multiple Call Park extensions should be created on the QX IP PBX.
Attention: The Call Parking is valid within the timeout defined by QX IP PBX’s administrator, during which hold music (if configured)
will be played to the parked party. Contact your system administrator if you need the call parking timeout to be modified. When the Call
Park timeout expires, a short ring notification will be sent to the phone initiating the call parking, and if no one picks up the parked call
or if the phone is off the hook, the parked call will be automatically disconnected.
+ Call
Park Extension
Number+
For PBX services on IP phones accessible during the call, refer to the “Epygi IP PBX Features on Epygi Supported IP phones” document on the
Epygi’s Web portal.
Outgoing Call Blocking
Outgoing Call Blocking
(available on the dial tone)
Insert the extension’s password and press
Enable Outgoing Call Blocking
Dial a Called Number
to be blocked and press
Disable Outgoing Call Blocking
Dial a Called Number
to be unblocked and press
Unconditional Call Forwarding Management
Unconditional Call Forwarding Management
(when this menu is accessed, the Unconditional Call Forwarding service
is already getting toggled)
Toggle (enable or disable) the Unconditional
Forwarding service again*
Change the Forwarding Number
Dial a new Forwarding Number
and press
Confirm the new Forwarding Number with or
press to dial a new Forwarding Number.
Please Note: Using the Change the Forwarding Number option will change the first entry in the Unconditional Call Forwarding table with Auto call
type to the inserted Forwarding Number. Any other entries with Auto call type, as well as with other call types will not be modified.
* Besides Any Address/Other Addresses entry of the Unconditional Call Forwarding table this toggling also affects all those entries that have Toggle from
Handset option selected. The states of those entries will be set equal to the state of Any Address/Other Addresses entry after toggling.
QX50/QX200/QX2000; (SW Version 6.0.x)
9
QX50/QX200/QX2000 Manual III: Extension User’s Guide
No Answer Call Forwarding Management
No Answer Call Forwarding Management
Toggle (enable or disable) the No Answer Call
Forwarding service again*
Change the Forwarding Number
Dial a new Forwarding Number
and press
Confirm the new Forwarding Number with or
press to dial a new Forwarding Number.
Please Note: Using the Change the Forwarding Number option will change the first entry in the No Answer Call Forwarding table with Auto call type to
the inserted Forwarding Number. Any other entries with Auto call type, as well as with other call types will not be modified.
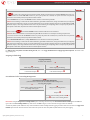
Voice Mail Services
Enter Voice Mail Services *
The Voice Mail Services are divided into three parts: Voice
Mailbox, Personal Settings and Password Change. Each of
these parts has a hierarchy that is described below.
Voice Mailbox
Personal Settings
Change Password
* After the first boot-up of the QX IP PBX or if the Voice Mail Configuration Wizard is
manually enabled by QX IP PBX’s administrator, entering the Voice Mail Services for
the first time will activate the Voice Mail Configuration Wizard which will prompt the
essential user’s personal settings. Below are instructions on how to proceed with the
Voice Mail Configuration Wizard from the handset.
Enter Voice Mail Services
for the first time after QX IP PBX’s first boot-up,
reset factory default or Voice Mail Configuration Wizard activation
Dial the extension user’s new Password and press
Confirm the extension user’s new Password and press
Record a Voice Mail Greeting and press
The following key combinations are available to navigate
through Voice Mail Services menus.
Apply recorded Voice Mail Greeting and
move forward to the next step
Record Voice Mail Greeting again
Record a User’s name and press
Apply recorded User’s name and exit
Record User’s name again
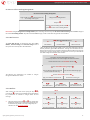
Enter Voice Mail Services
Voice Mailbox
After entering the voice mail services (using the keys )
press the key to enter the Voice Mailbox menu. The following
key combinations are available to navigate within the new
messages.
•
During the message playback and keys change their
functionality and serve to rewind and forward the message
for the timeout (by default 3 seconds) configured by the
extension user from Voice Mail Settings.
QX50/QX200/QX2000; (SW Version 6.0.x)
Exit
Voice Mail Services
Go to the top of the
Voice Mail Services Tree
Enter Voice Mail Services
Voice Mailbox Menu
Send a Message or Leave a
Reminder
Play Previous Message*
Print the attached FAX
Go one level up in the
Voice Mail Services Tree
Play First Message
Get Date/Time Info
Play Current Message
Play Next Message*
Play Last Message
Delete Current Message
10
QX50/QX200/QX2000 Manual III: Extension User’s Guide
(and press START button
on the FAX machine)
Reply or Forward a
Message
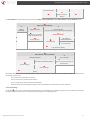
The Voice Mailbox menu has the following sub-hierarchy in the Reply or Forward a Message and the Send a Message or Leave a Reminder menus:
Reply or Forward a Message
Call Back
immediately
Reply by Voice Mail
Dial to mark the message
as Urgent, or press pound to
assign the Normal priority.
Forward a Message
(any FAX attached to the message will be also forwarded)
Dial
Destination Number
Record a Message
Record a Message
Dial additional
Destination Number
Record a Message
Dial to mark the message as Urgent, or press pound to
assign the Normal priority.
Send a Message or Leave a Reminder
Dial
Destination Number
Record a Message
Dial additional Destination Number
Leave a reminder
Dial to mark the message as
Urgent, or press pound to assign the
Normal priority.
Record a Message
Dial to mark the message as Urgent, or press pound to assign the Normal
priority.
Please Note: This service is restricted regarding sending a message to PSTN destinations. A message will be successfully received by the destination if all of
the following criteria are met:
-
-
The connection to the destination is successful;
The voice mail service is enabled on the destination;
There is enough space in the voice mailbox of the destination;
The duration of the forwarded/replied message is less than the maximum voice mail duration set up at the destination.
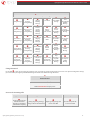
Personal Settings
Use the digit to enter the area where the personal system messages can be modified. A voice notification will play the list of available system messages
that may be modified so the user can select the desired system message by the corresponding buttons:
QX50/QX200/QX2000; (SW Version 6.0.x)
11
QX50/QX200/QX2000 Manual III: Extension User’s Guide
Greeting Message
Incoming
Blocking Message
Listen to Current
Greeting Message
Listen to Current
Incoming
Blocking Message
Record a New
Greeting Message
Record a New
Incoming
Blocking Message
Restore Default
Greeting Message
Restore Default
Incoming
Blocking Message
Stop Recording
or Playback
Greeting Message
Stop Recording or
Playback
Incoming
Blocking Message
Enter Voice Mail Services
Review System Messages
Outgoing
Blocking
Message
Your Name
Listen to
Current
Outgoing
Blocking
Message
Listen to
Current
Name recorded
Record a New
Outgoing
Blocking
Message
Record a New
Name
Restore Default
Outgoing
Blocking
Message
Restore
Default
Name
Listen to
Current
Out of Office
Message
Record a New
Out of Office
Message
Restore
Default
Out of Office
Message
Stop Recording
or Playback
Outgoing
Blocking
Message
Out of Office
Message
Stop Recording
or Playback
Name Message
Stop
Recording or
Playback
Out of Office
Message
Find
Me/Follow Me
(FMFM)
Message
Listen to
Current FMFM
Message
Record a New
FMFM
Message
Restore Default
FMFM
Message
Stop Recording
or Playback
FMFM
Message
Change Password
Use the digit to enter the area where the extension’s user may change its password. This password is used to access personal configuration settings
(also voice mailbox) through the QX IP PBX Web Management and the voice mailbox through the handset.
Change Password
Dial Old Password and press pound
Dial New Password and press pound
Confirm New Password and press pound
Services for Incoming Calls
Calling to the extension
Skip the greeting message
and enter the called
extension’s Voice Mailbox
(authentication required)
QX50/QX200/QX2000; (SW Version 6.0.x)
Calling to the extension’s Voice Mailbox
(during the greeting message)
Skip the greeting message and
Calling to the Zero Out destination
record a Voice Mail
In call queue
Leave the call queue and
record a Voice Mail
12
QX50/QX200/QX2000 Manual III: Extension User’s Guide
Recording Box
Call the extension to enter its Recording Box
To reach the extension’s Recording Box from the phone handset,
you should simply call that extension by dialing its PBX number,
SIP address or calling from PSTN.
•
During the recording playback and keys change
their functionality and serve to rewind and forward the
recording for the certain timeout (by default 3 seconds).
QX50/QX200/QX2000; (SW Version 6.0.x)
Recording Box extension password may be required
if security is configured
Play First Recording
Play Previous Recording*
Play Current Recording
Play Last Recording
Get Date/Time Info
Play Next Recording*
Delete Current Recording
13
QX50/QX200/QX2000 Manual III: Extension User’s Guide
QX IP PBX’s Auto Attendant Services
QX IP PBX’s Auto Attendant provides remote access to the QX IP PBX voice connectivity services. Specifically, it supports remote connection to QX IP PBX
extensions along with their mailboxes and making pass-through calls to other destinations. Remote access to the QX IP PBX auto attendant is possible
through IP and PSTN calls.
QX IP PBX’s Auto Attendant can be accessed locally, remotely from the IP network (by dialing Auto Attendant’s SIP address) and from the PSTN network
(by dialing QX IP PBX’s PSTN number) if the calls addressed to the QX IP PBX’s PSTN number are routed to the Auto Attendant.
Attention: If the Auto Attendant authentication attempts fail consecutively five times, QX IP PBX’s Auto Attendant will become unavailable for the next 5
minutes.
The Auto Attendant services are divided several feature groups, but only Connection Service and Extensions Directory are supported by the voice
messages which helps the caller to navigate within the area using the telephone handset buttons. Other services are available using the appropriate call
code, but are not supported by voice messages. Thus, they are hidden for external callers.
Connection Service provides access to all extensions of the QX IP PBX device without restrictions. All QX IP PBX extensions may call each other dialing the
extension number. All external callers (using PSTN or IP calling) can reach each QX IP PBX extension dialing QX IP PBX’s phone number and using the Auto
Attendant’s voice menu to be connected to the desired extension by entering the extension number.
Remote Enquiry allows access to the mailboxes of QX IP PBX’s extensions (both, active or inactive) in order for example to check the voice messages left
for an absent user. The mailbox may be protected by a user password (optional, set by the system administrator or user).
You may remotely access your mailbox dialing QX IP PBX’s phone number and using the Auto Attendant’s voice menu (key for Voice Mail) and
entering your password (if any). To navigate within your voice mails use the Voice Mailbox service call codes (for example dial 8 to hear the last message
in your mailbox).
Call Relay
The QX IP PBX Auto Attendant is registered at Epygi’s SIP server by default. It may be used similar to a private switching center if the Auto Attendant is
routed to a particular ISDN trunk a “default user”. It then allows, for example, establishing cost-saving long-distance calls via PSTN to the QX IP PBX Auto
Attendant at the United States headquarters, via IP to the remote QX IP PBX Auto Attendant in the Office Asia or via PSTN to the other desired destinations
(see QX IP PBX’s Feature Codes). Access to Call Relay needs authorization.
Remote Configuration Menu
This menu allows extension owners to remotely enable/disable the Unconditional Call Forwarding service for Any Address or Other Addresses
entries of the Caller ID Based Services table on the corresponding extension, as well as to change the certain forwarding number in the Unconditional Call
Forwarding table. This menu requires extension authorization. For more details about the access key combinations, see Unconditional Call Forwarding.
Call Back
With the QX IP PBX's Call Back service callers can save the call charge when calling to/through the QX IP PBX to the third party SIP or PSTN destinations.
The QX IP PBX allows you to configure a list of trusted callers that are allowed to make free of charge calls. Two types of Call Back configurations are
available on the QX IP PBX: Pre-configured Call Back and Remote Call Back Configuration.
Pre-configured Call Back
For Pre-configured Call Back, a list of trusted callers must be configured in the QX IP PBX's Authorized Phones Database using Web Management. The
Call Back service should be enabled and a valid callback destination should be specified for each caller.
To use Pre-configured Call Back, the caller registered in the Authorized Phones Database should simply call to the QX IP PBX’s Auto Attendant through
SIP or PSTN, let the call to ring twice and then hang up. Call Back will be instantly activated, and QX IP PBX will call back to the defined Call Back
destination. By answering the incoming call caller will be connected to the Auto Attendant menu.
Remote Call Back Configuration
The Remote Call Back Configuration service is used by authorized callers to configure or reconfigure existing call back configuration on the QX IP PBX.
Remote Call Back Configuration is divided into two modes accessible from the QX IP PBX's Auto Attendant:
•
•
Permanent Call Back
Non-Permanent (Instant) Call Back
Please Note: Remote Call Back Configuration services are only available when the Automatically Enter Call Relay Menu checkbox is disabled in the Call
Back settings for the trusted user.
Permanent Call Back
Permanent Call Back service allows callers registered in the Authorized Phones Database to create a new trusted caller with Call Back enabled. They can
also modify the Call Back destination of existing callers in the Authorized Phones Database. By calling QX IP PBX's Auto Attendant and entering the Auto
Attendant menu, the caller can use the code (see QX IP PBX’s Feature Codes) to create a new trusted caller as well as to modify the Call Back
destination for the already registered callers in the Authorized Phones Database.
QX50/QX200/QX2000; (SW Version 6.0.x)
14
QX50/QX200/QX2000 Manual III: Extension User’s Guide
By entering Permanent Call Back reconfiguration menu, system asks caller to login by dialing the number and an appropriate password for the QX IP PBX's
extension that is used as login extension in the Call Back settings. After passing the login, callers should follow the voice instructions for configuring a new
entry or reconfiguring existing entries in Authorized Phone database.
When system accepts the inserted settings, the corresponding entry will be logged to the Authorized Phones Database. The caller will then be
disconnected from the QX IP PBX's Auto Attendant and the defined Call Back destination will receive a call from the QX IP PBX within the next 45 seconds.
Answering the incoming call, the caller will be reconnected to the QX IP PBX's Auto Attendant.
Please Note: The detected caller number must correspond to the one applied by the caller. In case of PSTN call back at least one PSTN line must be
available on the QX IP PBX. There must be network connectivity and the destination must be reachable.
Non-Permanent Call Back
Non-Permanent Call Back configuration service allows trusted caller to organize one-time Call Back to the defined destination. In this situation, no entry
will be logged to the Authorized Phones Database. By calling QX IP PBX's Auto Attendant and entering the Auto Attendant menu, the caller can use
menu (see QX IP PBX’s Feature Codes) to modify the Call Back destination for already registered callers in the Authorized Phones Database.
The system will ask to login by dialing the number and an appropriate password for the QX IP PBX's extension that is used as login extension in the Call
Back settings. After login, caller should follow the voice instructions for reconfiguring the existing entry in Authorized Phone database. The caller will then
be disconnected from the QX IP PBX's Auto Attendant and the defined Call Back destination will receive a call from the QX IP PBX within the next 45
seconds. Answering the incoming call, the caller will be reconnected to the QX IP PBX's Auto Attendant.
Please Note: For both Permanent Call Back and Non-Permanent Call Back, the detected caller number must correspond to the one configured for trusted
caller. In case of PSTN call back at least one PSTN line must be available on the QX IP PBX. There must be network connectivity and the destination must be
reachable.
Call Routing Management Menu
This menu is used to manage the routing entries in the Call Routing table, i.e. to enable/disable certain dialing rules by dialing key combinations preconfigured on each routing entry.
Dialing at the Auto Attendant welcome message, will ask for an enabler/disabler key used to enable or disable the routing rule(s)
correspondingly. Since multiple routing rules may have the same enabler/disabler key combinations (the same key may be used as enabler for one routing
rule, and as disabler for another one), dialing the certain key will affect all pre-configured routing rules.
If the routing record has an authorization enabled on the enabler/disabler key, administrator’s password will be required to be inserted after the key.
Once the administrator’s password is dialed, system plays a confirmation about the accepted configuration and the state of the certain routing rule(s) is
getting modified.
If administrator’s password has been inserted incorrectly for 3 times, no status changes will be applied to any of the routing record(s), even to those which
have no authorization enabled.
Mainly targeting external users, QX IP PBX AA also provides voice services for local users. It will be helpful if the desired extension number is unknown.
The Extensions Directory is used to access QX IP PBX’s extensions by spelling names (assigned to the extensions and configured by administrator) using
the keypad of the phone. More than one name may be assigned to an extension, reaching the extension by spelling one of the names attached to it. If the
spelled name matches to some record in the extensions directory table, a wave file with the extension user name (or any other information characterizing
the extension’s user) will be played to the caller. Every extension’s user may configure these wave files individually.
QX50/QX200/QX2000; (SW Version 6.0.x)
15
QX50/QX200/QX2000 Manual III: Extension User’s Guide
Call Codes Available in Auto Attendant
The following key combinations are available to access and manipulate within Auto Attendant services for external calls addressed to the Auto Attendant,
incoming calls from the mainline routed to the Auto Attendant or local calls made by dialing the 2-digit attendant extension:
Incoming call to Auto Attendant Services
(press on the Auto Attendant welcome message to dial the ZeroOut destination)
Extensions Menu - establishing a connection to an extension on the called QX IP PBX
Remote Enquiry - establishing a connection to the mailbox of an extension on the called QX IP PBX
Call Relay Menu - mainly for external calls (IP/PSTN) but local calls are also allowed.
Keys
-
(already in)
This service avoids having to hang up and redo the entire dialing process if QX IP PBX detects an error in the dialed number
or the user decides to cancel the call and dial a new number. By entering the combination the call will be interrupted
and the user will get an invitation to dial a new one. This is applicable during dialing, after the ring tone has started, and after
the call has been established.
“” digit combination is
applicable:
•
•
•
During the dialing,
After ring tones start,
After call establishment.
Under the following restrictions:
•
•
This feature can only be used when accessing from PSTN to the external SIP
destination through QX IP PBX’s AA or vice versa.
This feature is not available on the second QX IP PBX Auto Attendant (calling from
one Auto Attendant to another).
Remote Configuration Menu – allows remote enabling/disabling of the Unconditional Call Forwarding service for Any
Address or Other Addresses entries in the Caller ID Based Services table on the extension and to modify the certain
forwarding destination.
Permanent Call Back – allows PSTN callers registered in the Authorized Phones Database to reconfigure Authorized
Phones Database entries by modifying the caller’s and/or callback numbers. The caller will then be able to initiate a callback
only by calling from the newly specified caller number.
Non-Permanent Call Back – allows PSTN callers registered in the Authorized Phones Database to change the callback
destination for a one-time callback. After the caller hangs up, QX IP PBX will call back to the newly specified number. This
change will not be logged into Authorized Phones Database.
Administrator Login
Allows to modify Auto Attendant greeting and menu messages, as well as to manage universal extension messages.
Call Routing Management Menu – allows managing the routing entries in the Call Routing table, i.e. to enable/disable
certain routing rules by dialing key combinations pre-configured on each routing entry.
Extensions Directory - accesses QX IP PBX extensions by spelling the extension’s user name using the keypad on the
phone.
Quits the Auto Attendant and starts a dial tone.
QX50/QX200/QX2000; (SW Version 6.0.x)
16
QX50/QX200/QX2000 Manual III: Extension User’s Guide
Your Extension Graphical Interface
QX IP PBX configuration management may be accessed on two different levels: for users (extensions) and administrators. If you are an extension user, log
in with the extension number and the password (if any) you received from your system administrator.
If you are an admin, additionally the Return link will appear to go back to the QX Management page.
Log Out is used to close the session between the user PC and QX and to leave the QX Your Extension Management.
Your Extension menus allow you to access the following settings to operate and perform actions that are private for each user:
Voice Mail
•
•
•
•
Voice Mailbox
Voice Mail Settings
Voice Mail Profiles
Group List
Call History
PBX Information
Speed Calling
Account Settings
Basic Services
•
•
•
•
General Settings
Hold Music Settings
Caller ID Services
•
•
•
•
•
•
•
•
•
•
•
•
•
•
Hiding Caller Information
Incoming Call Blocking
Outgoing Call Blocking
Distinctive Ringing
Call Hunting
Many Extensions Ringing
Unconditional Call Forwarding
Busy Call Forwarding
No Answer Call Forwarding
Unregistered/Inaccessible Call Forwarding
Find Me / Follow Me
Emergency Interrupt
Intercom
Voicemail Profile
Do Not Disturb
Hot Line Settings
Entering SIP Addresses Correctly
Calls over IP are implemented based on Session Initiating Protocol (SIP) on the QX IP PBX. When making a call to a destination that is somewhere on the
Internet, a SIP address must be provided.
SIP addresses needs to be specified in one of the following formats:
“display name” <username@ipaddress:port>
“display name” <username@ipaddress>
username@ipaddress:port
username@ipaddress
username
For your convenience, the following combinations can be used:
•
•
•
*@ipaddress - any user from the specified SIP server
username@* - a specified user from any SIP server
*@* - any user from any SIP server
QX50/QX200/QX2000; (SW Version 6.0.x)
The display name and the port number are optional parameters in the SIP
address. If a port is not specified, 5060 will be set up as the default one. The
range of valid ports is between 1024 and 65536.
A flexible structure of wildcards is allowed. In comparison with a wildcard,
the “?” character stands for only one unknown digit and the “*” character
stands for any number of any digits.
Please Note: Wildcards are available for caller addresses only. No wildcard
characters are allowed for called party addresses. Exceptions are addresses
in the Caller ID Services - Addresses table that are used by Outgoing Call
Blocking and Hiding Caller Information Settings services. To use “*” and
“?” alone (as non wildcard characters), use “\*” and “\?” correspondingly.
17
QX50/QX200/QX2000 Manual III: Extension User’s Guide
Voice Mail
The Voice Mail Service provides a possibility to leave brief voice messages on the mailbox of an unavailable or busy QX IP PBX extension. The caller hears
a greeting message (configurable by the extension user) and a signal initiating the Voice Mail recording. The extension user may configure the maximum
duration of the voice message as well as the Voice Mail system activation timeout (see chapter Voice Mail Settings).
Received voice messages are stored in the Voice Mailbox. They can be accessed by the key combination from the phone handset and via QX IP PBX
management. Voice messages can to be played, marked (from GUI only), deleted, replied to (from handset only) or forwarded by the user. Messages with a
facsimile (FAX) attached will be displayed in a special way in the Voice Mailbox on web management access and will be indicated by a special voice signal
when accessing the message from the handset. The Incoming FAX message can be viewed and downloaded to the PC from the Voice Mailbox at Web
management access as a *.tif picture file.
QX IP PBX’s Voice Mail service also allows reviewing system messages used for telephony services functionality. The voice mail greeting, incoming and
outgoing blocking messages, user’s name and out of office greeting can be played, recorded and restored. Greeting messages are played to the caller
announcing that the called extension is unavailable and asking to leave a voice mail. Blocking messages are played when receiving or making
incoming/outgoing calls from/to the restricted destination. User’s name is played when surfing the Extensions Directory. The personal out of office
greeting is played instead of the main greeting message, when out of office option is selected on the extension.
QX IP PBX provides caller the possibility of leaving voice messages when called extension is busy or unavailable. A voice mail greeting message, and a
voice signal indicating voice mail recording initiation, are played back to the caller.
All voice mail functionality settings, such as enabling the greeting message, adjusting the maximal voice mail duration, voice mail system activation
timeout, etc, are configurable by the user through the extension’s Voice Mail Settings.
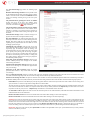
Voice Mailbox
QX IP PBX supports two ways of accessing the extension’s Voice Mailbox: through the phone handset and through QX IP PBX Web Management. With both
options, the user is free to manipulate with voice mails located in the Voice Mailbox, such as playing, deleting, forwarding, etc.
When accessing the Voice Mailbox through the phone handset, additional settings to manipulate the user defined system messages are provided. The user
can define their own Voice Mail Greeting, Incoming and Outgoing Blocking messages as well as the User’s recorded name. Each of these system messages
can be played, recorded and restored. Voice Mail Greeting messages are played back to the caller announcing that the called extension is unavailable and
asking to leave a voice mail. Blocking messages are played back to the caller when receiving or making incoming/outgoing calls from/to the restricted
destination. User’s recorded Name is used in the Extensions Directory when the spelled name matches the entry in the directory table.
Instructions on accessing and navigating within the voice messages and Voice Mailbox Services via the phone handset are described in the Feature Codes.
Please Note: When playing newly received voice mails (via a phone handset or with the use of the Play button in this page) will deprive the “New” state of
the voice mail.
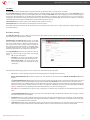
The Voice Mailbox can hold New (not yet played) and Old
(already played) voice mails. The Status column in the Voice
Mailbox table indicates the current state of the voice mails. All
new mails in the table are displayed in bold font. Playing a
voice mail cancels both the New status and bold font.
Voice mails can be selected to be played, deleted, marked as
important or book-marked, etc. Additionally they can be
forwarded to desired email addresses.
VM free space provides information on the number of
minutes/seconds of free voice mailbox space.
The following functional buttons and fields are available:
Check Mail refreshes the mailbox and updates the number
of newly arrived mails (if any).
New Mails shows the number of newly arrived mails since
the user's last access to the voice mailbox.
All Mails shows the number of all mails existing in the
mailbox.
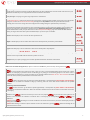
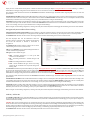
The Voice Mailbox tables display all voice mails in the mailbox:
Fig.III- 1: Voice Mailbox page
Status - indicates whether the voice mail is New and not yet played. New mails are displayed in bold font.
! - indicates whether message has an urgent priority or not.
BM (bookmark) - shows marked records. The fields can include some indications (image signs) depending on the type of being marked.
Caller – is the address of the caller who left the voice mail.
Date & Time – is the voice mail receipt date and time.
Message – indicates voice mail duration (in minutes/seconds) and a speaker sign used to play (using any available media player supported by your
Operation System) the received voice mail or to download the audio file to the PC.
QX50/QX200/QX2000; (SW Version 6.0.x)
18
QX50/QX200/QX2000 Manual III: Extension User’s Guide
FAX (facsimile) – indicates whether a FAX message is attached to the voice mail, and if so, displays the size of the FAX message (in KBs) and an icon
used to view the incoming FAX message or download the graphical file to PC.
The column headings of the voice mail tables are created as a link. By clicking on the column heading the table will be sorted by the selected column. Upon
sorting (ascending, descending) arrows will be displayed next to the column heading. Each row in the Voice Mailbox tables can be selected by a checkbox
for editing, deleting or marking.
The following functional buttons serve to modify the table entries:
Forward link allows forwarding a selected voice mail to one or more email addresses with some enclosed message in the email body. The link refers to
the page where email addresses should be defined (use a space, semicolon or a comma to separate the mailing addresses in the text field), email subject
and some message can be inserted. Voice mails will get automatically converted to the G.711 codec before being attached to the email. The Voice Mail
forwarding feature is active only when Mail Service is enabled otherwise the “Mail Service is disabled” error appears.
Please Note: If the voice mail contains FAX inside, then the graphical file of the FAX message will be forwarded together with the accompanying voice
mail.
Mark submits the values chosen out of the drop down list aside (Important or Bookmark) to the selected records.
To Play a Voice Mail
1. Click on the speaker icon of the corresponding voice message.
2. Depending on your browser’s settings the .wav file will be played directly or an application will ask you to save the .wav file on the local PC. In the
second option, please specify the path and run the media file from the specified location to play it.
To Mark a Voice Mail Record
1. Select the checkbox of the corresponding record in the Voice Mailbox table that should to be marked.
2. Select the desired marking type from the Mark drop down list.
3. Select the Mark button to initiate the marking operation. Depending on the selected marking type the record(s) will show an image sign in the
corresponding BM field.
To Delete a Voice Mail Record
1. Select the checkbox of the corresponding record(s) in the Voice Mailbox table that should to be deleted.
2. Select the Delete button.
3. Confirm the deletion with Yes. The selected voice messages will be deleted. To abort the deletion and keep the messages in the inbox, select No.
Voice Mail Settings
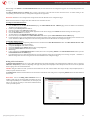
The Voice Mail Settings permits enabling the Voice Mail Service for the callers if the called extension is not available or does not answer. The voice mail
system will be activated allowing the caller to leave a voice message. This page also provides information on the voice mailbox settings such as maximal
mail message duration, voice mail indication method when a new voice mail arrives, various settings for the voice mailbox as well as a possibility to send
voice mails via e-mail.
QX50/QX200/QX2000; (SW Version 6.0.x)
19
QX50/QX200/QX2000 Manual III: Extension User’s Guide
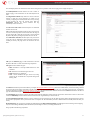
The Voice Mail Settings page offers the following input
options:
Maximum mail message duration lists the possible values
for the maximum mail duration (counted in minutes) during
which a voice mail will be recorded. The Unlimited selection
allows voice message recording as long as the user’s space
remains.
Ask password before granting local access to mailbox
protects local access of the user’s voice mailbox. If the
checkbox is checked a user password will be required to
access the voice mailbox via digit combination.
Ask password before granting remote access to mailbox
protects remote access of the user’s voice mailbox. If the
checkbox is checked a user password will be required to
access the voice mailbox when reaching it through the Auto
Attendant.
Send welcome message enables a welcome message to be
played to the user when accessing the mailbox locally.
Play Voice Mail Help is an optional setting that plays voice
mail help instructions to the user when entering the Voice
Mailbox. This option guides the user through the mailbox,
explaining how to play and delete the voice mails as well as
modifying system messages.
Automatically play messages will auto play of all voice
mails. Whenever entering the voice mailbox, the system will
sequentially play the date/time when the message was
received followed by the voice mail itself in the order sorted
by the priority level (starting with the message in highest
priority) or. If no priority is specified, they will be played in
the order in which messages were received, i.e. starting with
first (oldest) message. When the last message is played, the
Voice Mail help will be replayed.
Send mails count information message announces the
number of New (unread) voice messages in the mailbox
when entering the mailbox.
Send date/time information message announces the time
and date a voice message was received and is played before
every voice message.
Send beep at the end of message enables an optional
parameter that activates a “beep” sound after each played
voice message.
Fig.III- 2: Voice Mail Settings page
When the Silent VM recording checkbox is selected, callers who have reached the extension's voice mail service will not hear an invitation to record a
voice mail and the following beep sound. The voice mail recording will start without any additional notification.
Send new voice message via email is an option to send new voice mail files via e-mail to the defined recipients. Mails will be automatically converted to
the Windows PCMU (CCITT u-law, 8 kHz, 8 bit Mono) wave format before being attached to the e-mail. Checkbox activates the following input options:
Email Address requires the e-mail address(es) of the person(s) that should to receive the newly arrived voice mails on their e-mail account(s). Use a
space, semicolon or a comma to separate the mailing addresses in the text field.
The next two fields are used for retransmission of the voice mail via email. Number of times text field requires the maximum number of times the
voice mail will be delivered via email to the recipient within the interval (in minutes) defined in the Repeat every text field. If the voice mail is
required to be sent only once, insert “1” in Repeat every text field and “0” in the Number of times text field.
The Voice Mail and Fax dropdown lists allow to select the email sent options- do not send notification, send notification without attachment or send
notification with voice or fax attachments.
Remove Voice Mail on send removes the voice mail from the user mailbox after sending it to the e-mail recipient(s).
Remove Fax On Send removes fax attachment from the user mailbox after sending it to the email recipient(s).
Attention: The e-mail can only handle up to 3 minutes long voice mails. If the voice mail is longer than 3 minutes, it will be truncated and only the
first 3 minutes of it will be sent to the indicated e-mail address. However, in the e-mail body the recipient will receive the information that the
attached voice mail is truncated and the total length of the voice mail. Please note that the voice mails longer than 3 minutes will not be removed
from the voice mailbox once they are sent per e-mail even if the Remove Voice Mail on send checkbox is selected. This gives you a possibility to
listen to the ending of the voice mail directly from your voice mailbox (from the handset or by downloading it from the Web management).
Please Note: This service will work only when System Mail is enabled on the QX IP PBX. Contact your system administrator if you have problems
with voice mail delivery via email.
QX50/QX200/QX2000; (SW Version 6.0.x)
20
QX50/QX200/QX2000 Manual III: Extension User’s Guide
Send new voice message notification via SMS allows the voice mail notification delivery via SMS to the defined mobile number. Checkbox activates the
following input options:
Mobile Number text field requires the destination’s mobile number.
The next two fields are used for retransmission of SMS notifications. The number of times text field requires the maximum number of times the
notification should be delivered to the recipient within the interval (in minutes) defined in the Repeat every text field. If the notification is required
to be sent only once, insert “1” in Repeat every text field and “0” in the Number of times text field.
Please Note: This service will work only when SMS Service is enabled on the QX IP PBX. Contact your system administrator if you have problems
with voice mail notifications delivery via SMS.
Send new voice message notification via phone call enables the voice mail notification delivery via a phone call to the defined phone number. The
checkbox activates the following input options:
Call Type drop down list includes the available call types:
•
•
•
•
PBX - local calls to QX IP PBX extensions;
SIP – calls through a SIP server;
Auto – for undefined call types. The destination (independent on whether it is a PBX number or SIP address) will be reached through
Routing;
Callback – automatic call to the voice mail author. This can be used as a notification that the recipient has received the voice mail but has
not yet played it.
Call To text field requires the destination’s phone number depending on the selected call type. For Callback call type, no destination’s phone number
is required.
The next two fields are used for retransmission of phone notifications. Number of times text field indicates the maximum number of times the
notification should be delivered to the recipient within the interval (in minutes) defined in the Repeat every text field. If the notification is specified
to be sent only once, insert “1” in Repeat every text field and “0” in the Number of times text field. For Callback call type, the first notification is sent
to the voice mail author after the first expiration of the interval defined in the Repeat every text field. For calls with call type different from Callback,
the first notification will be sent immediately.
Restore default Notification Message restores the default notification message. If the checkbox is selected, the file upload will be disabled.
Upload new Notification Message will show the attached notification file selected by the current extension. Please note that a different notification
message can be uploaded in case this service serves as a notification to the extension user (to inform about the new voice mail received) or if it
serves as a notification for the voice mail author to be informed that the message has been received by the QX IP PBX but is not yet played by the
extension user. The uploaded file needs to be in the PCMU (CCITT u-law, 8 kHz, 8 bit Mono) wave format, otherwise the system will prevent
uploading with the “Invalid audio file, or format is not supported” warning message. The system also prevents uploading in case insufficient space is
available on QX IP PBX for the corresponding extension and gives a “You do not have enough space” warning.
Choose File browses for the notification file that must be in PCMU (CCITT u-law, 8 kHz, 8 bit Mono) wave format.
Download Notification Message appears only if a file has been uploaded previously. The link is used to download the audio file to the PC and opens
the file-chooser window where the saving location can be specified.
Voice Mail indication enables user notifications for new voice messages in the mailbox. During Lamp indication, depending on the type of phone a visual
blinking signal will announce a new voice mail.
The ZeroOut voice mail feature allows a caller that has reached the called extension’s voice mailbox to accelerate the automatic redirection feature
instead of leaving a message in the extension’s Voice Mailbox. To activate this feature, the caller should dial digit (see Feature Codes) during the voice
mail greeting which invites the caller to leave a message. The caller will then be automatically transferred to the destination specified in this page.
Enable ZeroOut checkbox selection enables the ZeroOut feature and activates the following fields to be inserted:
Redirect Call Type drop down list includes the available call types:
•
•
•
•
PBX - local calls between QX IP PBX extensions and the Auto Attendant
SIP – calls through a SIP server
PSTN – calls to PSTN
Auto – used for undefined call types. Destination (independent on whether it is a PBX number, SIP address or PSTN number) will be
reached through Routing.
The Redirect Address text field requires the destination address where the caller should be automatically forwarded to if activating the ZeroOut
feature.
The Enable FAX Redirection checkbox is used to redirect the incoming FAX (facsimile) when the FAX tone is detected after Voice Mail has been activated.
The checkbox selection enables the Redirect to extension drop down list where extensions with enabled FAX Support are listed and is used to select the
extension where the incoming FAX should be forwarded.
The Automatic Fax Receiving Mode checkbox is used to set the Unified voice mail to FAX receiving mode without receiving initial FAX CNG signal from
the caller side.
The Enable Out of Office checkbox allows activation of the Out of Office message which acts as an optional Voice Mail Greeting message in the period
while the user is out of office, on vacations, etc. When this checkbox is selected, a user-defined Out of Office message will be played (if uploaded or
recorded from the phone handset, otherwise a default Out of Office message will be used) to the caller which reached the called extension’s Voice Mailbox.
Restore default Out of Office file restores the default Out of Office message file. If the checkbox is selected, the file upload will be disabled.
QX50/QX200/QX2000; (SW Version 6.0.x)
21
QX50/QX200/QX2000 Manual III: Extension User’s Guide
Upload new Out of Office Greeting file will show the attached Out of Office message file selected by the current user. The Out of Office message file will
be played to a caller when entering the voice mail system. The uploaded file needs to be in PCMU (CCITT u-law, 8 kHz, 8 bit Mono) wave format, otherwise
the system will prevent its uploading and will give the “Invalid audio file, or format is not supported” warning message. The system also prevents
uploading when insufficient space is available on QX IP PBX for the corresponding extension. In this situation, the “You do not have enough space” warning
will be received. Optionally, the Out of Office message can be recorded from the phone handset (see Feature Codes).
Choose File browses for the Out of Office message file that must be in PCMU (CCITT u-law, 8 kHz, 8 bit Mono) wave format.
Download Out of Office Greeting file appears only if some file has been uploaded previously. The link is used to download the audio file to the PC and
opens the file-chooser window where the saving location can be specified.
Expiration Date and Time selection is used to set the expiration date and time of the Out of Office message validity. When the expiration date/time
expires, the Out of Office message automatically gets disabled and Voice Mail regular greeting gets activated again.
Forward/Rewind Duration drop down list is used to select the timeout in seconds used to shift the voice mail playback from the handset. For more
instruction on how to shift the voice mail playback, please refer to Feature Codes.
Restore default Greeting file will restore the default greeting file. If the checkbox is selected, the file upload will be disabled.
Upload new greeting file will show the attached greeting file selected by the current user. The greeting file will be played to a caller when entering the
voice mail system. The uploaded file needs to be in PCMU (CCITT u-law, 8 kHz, 8 bit Mono) wave format, otherwise the system will prevent uploading and
the “Invalid audio file, or format is not supported” warning message will be received. The system also prevents uploading in case insufficient space is
available on QX IP PBX for the corresponding extension. In this situation, the “You do not have enough space” warning will be received. Optionally, a
greeting file can be recorded from the phone handset (see QX IP PBX’s Feature Codes).
Choose File browses for the greeting file that must be in PCMU (CCITT u-law, 8 kHz, 8 bit Mono) wave format.
Download Greeting File appears only if a file has been previously uploaded. The link is used to download the audio file to the PC and opens the filechooser window where the saving location can be specified.
Voice Mail Profiles
The Voice Mail Profiles page is used to define custom voice mail profiles and their settings.
The Voice Mail Profiles page contains a table where all Voice
Mail Profiles for the corresponding extension are listed. The
following functional buttons are available:
Fig.III- 3: Voice Mail Profiles page
Add opens the Add Entry page where a new Profile Name
should be defined.
Edit opens the Edit Entry page where Voice Mail Profile
settings should be defined.
Fig.III- 4: Voice Mail Profiles – Add Entry page
QX50/QX200/QX2000; (SW Version 6.0.x)
22
QX50/QX200/QX2000 Manual III: Extension User’s Guide
The Voice Mail Profiles page is used configure the profile
specific voice mail settings. This page contains the following
components:
Maximum Mail Message Duration lists the possible values
for maximum mail duration (counted in minutes) during
which a voice mail will be recorded. The Unlimited selection
allows voice message to be recorded as long as the user's
space could hold.
Send new voice message via email is an option to send new
voice mail files via e-mail to the defined recipients. Mails will
be automatically converted to the PCMU (CCITT u-law, 8 kHz,
8 bit Mono) wave format before being attached to the e-mail.
Checkbox activates the following input options:
Email Address requires the mailing address(s) of the
person(s) that should to receive the newly arrived voice
mails on their email accounts. Use a space or a comma to
separate the mailing addresses in the text field.
The next two fields are used for retransmission of voice mails
via email. Number of times text field requires the maximum
number of times the voice mail will be delivered via email to
the recipient within the interval (in minutes) defined in the
Repeat every text field. If the voice mail is required to be
sent only once, insert "1" in Repeat every text field and "0"
in the Number of times text field.
The Voice Mail and Fax dropdown lists allow to select the
email sent options- do not send notification, send notification
without attachment or send notification with voice or fax
attachments.
Remove Voice Mail on send removes the voice mail from
the user mailbox after sending it to the email recipient(s).
Remove Fax On Send removes the fax attachment from the
user mailbox after sending it to the email recipient(s).
Fig.III- 5: Voice Mail Profiles – Edit Entry page
Attention: The e-mail can only handle up to 3 minutes long voice mails. If the voice mail is longer than 3 minutes, it will be truncated and only the first 3
minutes of it will be sent to the indicated e-mail address. However, in the e-mail body the recipient will receive the information that the attached voice
mail is truncated and the total length of the voice mail. Please note that the voice mails longer than 3 minutes will not be removed from the voice mailbox
once they are sent per e-mail even if the Remove Voice Mail on send checkbox is selected. This gives you a possibility to listen to the ending of the voice
mail directly from your voice mailbox (from the handset or by downloading it from the Web management).
Please Note: This service will work only when System Mail is enabled on the QX IP PBX (see Manual II - Administrator’s Guide). Contact your system
administrator, if you have problems with voice mail delivery via email.
Send new voice message notification via SMS allows voice mail notification delivery via SMS to the defined mobile number. Checkbox activates the
following input options:
Mobile Number text field requires the destination's mobile number.
The next two fields are used for retransmission of SMS notifications. The Number of times text field requires the maximum number of times the
notification should be delivered to the recipient within the interval (in minutes) defined in the Repeat every text field. If notification is required to be sent
only once, insert "1" in Repeat every text field and "0" in the Number of times text field.
Please Note: This service will work only when SMS Service is enabled on the QX IP PBX (see see Manual II - Administrator’s Guide). Contact your system
administrator, if you have problems with voice mail notifications delivery via SMS.
Send new voice message notification via phone call enables the voice mail notification delivery via phone call to the defined phone number. The
checkbox activates the following input options:
Call Type drop down list includes the available call types:
•
•
•
•
PBX - local calls to QX IP PBX extensions;
SIP - calls through a SIP server;
Auto - for undefined call types. Destination (independent on whether it is a PBX number or SIP address) will be reached through Routing;
Callback – automatic call to the voice mail author. This can be used as a notification that the recipient has received the voice mail but has not
yet played it.
Call To text field requires the destination's phone number depending on the selected call type. For Callback call type, no destination's phone number
is required.
The next two fields are used for retransmission of phone notifications. The number of times text field indicates the maximum number of times the
notification should be delivered to the recipient within the interval (in minutes) defined in the Repeat every text field. If the notification is
specified to be sent only once, insert "1" in Repeat every text field and "0" in the Number of times text field. For Callback call type, the first
QX50/QX200/QX2000; (SW Version 6.0.x)
23
QX50/QX200/QX2000 Manual III: Extension User’s Guide
notification is sent to the voice mail author after the first expiration of the interval defined in the Repeat every text field. For calls with call type
different from Callback, the first notification will be sent immediately.
Restore default Notification Message restores the default notification message. If the checkbox is selected, the file upload will be disabled.
Upload new Notification Message will show the attached notification file selected by the current extension. Please note that a different notification
message can be uploaded in case this service serves as a notification to the extension user (to inform about the new voice mail received) or if it
serves as a notification for the voice mail author to be informed that the message has been received by the QX IP PBX but is not yet played by the
extension user). The uploaded file needs to be in the PCMU (CCITT u-law, 8 kHz, 8 bit Mono) wave format, otherwise the system will prevent
uploading with the "Invalid audio file, or format is not supported" warning message. The system also prevents uploading in case not enough space
is available on QX IP PBX for the corresponding extension and gives a "You do not have enough space" warning.
Choose File browses for the notification file that must be in PCMU (CCITT u-law, 8 kHz, 8 bit Mono) wave format.
Download Notification Message appears only if a file has been uploaded previously. The link is used to download the audio file to the PC and opens
the file-chooser window where the saving location can be specified.
The ZeroOut voice mail feature allows a caller that has reached the called extension's voice mailbox to accelerate the automatic redirection feature
instead of leaving a message in the extension's Voice Mailbox. To activate this feature, the caller should dial 0 digit (see QX IP PBX’s Feature Codes) during
the voice mail greeting which invites the caller to leave a message. The caller will then be automatically transferred to the destination specified in this
page.
Enable ZeroOut checkbox selection enables the ZeroOut feature and activates the following fields to be inserted:
Redirect Call Type drop down list includes the available call types:
PBX - local calls between QX IP PBX extensions and the Auto Attendant
SIP - calls through a SIP server
PSTN - calls through the PSTN
Auto - used for undefined call types. Destination (independent on whether it is a PBX number, SIP address or PSTN number) will be reached
through Call Routing.
Redirect Address text field requires the destination address where caller should be automatically forwarded in case of activating the ZeroOut feature.
Restore Default Greeting File will restore the default greeting file. If the checkbox is selected, the file upload will be disabled.
Upload New Greeting File shows an attached greeting file selected by the current user. The greeting file will be played to a caller party when it is entering
the voice mail system. The uploaded file needs to be in PCMU (CCITT u-law, 8 kHz, 8 bit Mono) wave format, otherwise the system will prevent uploading
and the "Invalid audio file, or format is not supported" warning message will be received. The system also prevents uploading in case not enough space is
available on QX IP PBX for the corresponding extension. In this situation, the "You do not have enough space" warning will be received. Optionally,
greeting file can be recorded from the phone handset (see Feature Codes).
The Choose File button helps to choose the desired greeting file that should be in PCMU (CCITT u-law, 8 kHz, 8 bit Mono) wave format.
Download Greeting File appears only if a file has been previously uploaded. The link is used to download the audio file to the PC and opens the filechooser window where the saving location can be specified.
Group List
Group List page allows you to define Groups with the specified addresses inside. The Group List is used to send or forward voice messages (see QX IP
PBX’s Feature Codes) to the number of addresses simultaneously. Groups may consist of a variety of PBX and SIP addresses.
The Group List page consists of a table where all defined Group
Keys and the corresponding addresses are listed.
Press on a link in the Addresses column to access the Address
List for the Group page and to modify the addresses of the
corresponding group. If Group doesn’t include addresses, “no
address is available” will be displayed in the Addresses column.
The Add functional button opens the Group List - Add Entry
page where a new Group Key can be defined.
QX50/QX200/QX2000; (SW Version 6.0.x)
Fig.III- 6: Group List page
24
QX50/QX200/QX2000 Manual III: Extension User’s Guide
The Group List - Add Entry page consists of two text fields
used to insert the Group Key and the Group Name (optionally).
The Group Key should include numeric characters only and
should be unique in the Group List table.
Please Note: Groups with keys equal to extension numbers on
QX IP PBX have a higher priority and will be applied when
sending or forwarding a voice message to the corresponding
destination.
Fig.III- 7: Add Group page
The Address List for the Group page contains a table of
addresses where new address may be added to the group and
existing ones may be edited or deleted.
The Add functional link moves to the Address List for the
Group – Add Entry page where new address may be defined.
Fig.III- 8: Addresses List page
Address List for the Group – Add Entry page consists of the
following components:
Call Type lists the available call types:
• PBX - local calls between QX IP PBX extensions and Auto
Attendant
•
•
SIP – calls through a SIP server
Auto – used for undefined call types. The destination
(independent on whether it is a PBX number or SIP
address) will be reached through Routing.
The Address text field is used to define the address that ought
to be included in the group. The value in this field is strictly
dependent on the Call Type defined in the same named drop
down list. If the PBX call type is selected, the QX IP PBX
extension number should be defined in this field. For the SIP
call type, the SIP address should be defined.
To Configure a Group
1. Press Add in the Group List page. Group List - Add Entry page will be displayed in the browser window.
2. Fill in the Group Key and Group Name (optionally) in the same named field.
3. Press Save.
4. Click on the link in the row corresponding to the newly created Group.
5. Press Add in the Address List for the Group page. Address List for the Group – Add Entry page appears.
6. Choose a Call Type from the corresponding drop down list.
7. Define the group member address in the Address text field.
8. Press Save.
QX50/QX200/QX2000; (SW Version 6.0.x)
Fig.III- 9: Add Address page
25
QX50/QX200/QX2000 Manual III: Extension User’s Guide
Call History
The Call History page collects the call events and their parameters over the QX IP PBX, i.e. incoming and outgoing calls reporting. It contains three tables
and provides reports on successful, not successful and missed incoming and outgoing calls for the current extension only. This page also allows you to
filter the collected Call History based on various criteria. The search components are as follows:
The From and To text fields are used to search by date and time.
The data must be inserted in the following format: dd-mm-yyyy
hh:mm:ss or dd-Mon-yyyy hh:mm:ss. The From field must
indicate an earlier date and time from that which is indicated in
the To field. If the entered data is not an earlier date and time,
the “Minimal date should be less than maximal date” error
message prevents statistics from filtering.
•
•
•
The From and To drop down lists are used to search by
duration. The duration needs to be specified from the listed
values. The From field must indicate a shorter duration
than the To field. If the entered data is a larger duration,
the “Minimal duration should be less than maximal
duration” error message prevents statistics from filtering.
Called Phone requires the called party’s SIP address,
extension or PSTN number as a search criteria.
Calling Phone requires the caller party’s SIP address,
extension or PSTN number as a search criteria. For both
Called and Calling Phone wildcards are available (see
chapter Entering SIP Addresses Correctly). If the defined
caller or called addresses are inserted incorrectly the
“Calling (Called) address is incorrect” error message will
prevent filtering.
Fig.III- 10: Call History page
The Call History - Successful Calls, Missed Calls and Unsuccessful Outgoing Calls tables list the successful, missed and not successful incoming and
outgoing calls and their parameters (Call Start Time, Call durations, Calling and Called phones) for each corresponding extension. Each column heading in
the tables are created as links. By clicking on a column heading, the table will be sorted by the selected column. After the sorting (ascending or
descending) arrows will be displayed next to the column heading.
Number or records displays the current number of statistics entries in the table. For successful calls, Total Duration, Maximum Duration, Average
Duration and Minimum Duration are displayed at the top of the table.
The Filter performs a search procedure according to the selected criteria. The search may be conducted with several criteria at the same time.
The Records per page are used to select the number of displayed statistic records per page. The Previous and Next can be utilized to switch between
these pages.
The Download Call Detail Records links are available below in all Call History tables and allows you to download the displayed call history in a text file.
To Filter the Call History
1. Enter the desired search criteria.
2. Click on the Filter button to search call reports within the Call History table.
Please Note: To return to the complete call history table clear all search criteria and press Filter.
QX50/QX200/QX2000; (SW Version 6.0.x)
26
QX50/QX200/QX2000 Manual III: Extension User’s Guide
PBX Information
The PBX Information page provides read only information
about the extension codecs, other existing extensions and
available PSTN lines on the QX IP PBX depending on the active
interface.
The PBX Information displays a list of available codecs for the
corresponding extension, the list of other extensions on the QX
IP PBX, their Display names, the SIP registration username and
line number (if attached). Any shared FXO lines, E1/T1 and
ISDN trunks are also visible here.
Fig.III- 11: PBX Information page
Speed Calling
The Speed Calling service of QX IP PBX simplifies dialing to the called destination. It provides short digit combinations for frequently dialed phone
numbers. From this page, you may assign short digit combinations to certain destinations to make the dialing easy and avoid long phone number dialing.
To call the corresponding destination using Speed Calling service, dial + Speed Calling Code from the handset. The system will dial out the destination
assigned to the Speed Calling Code.
The new Speed Calling entries can also be created from the handset by dialing (see QX IP PBX’s Feature Codes for more details).
The Speed Calling Settings page lists all defined Calling codes
with following parameters:
Add opens the Speed Calling Settings-Add Entry page where
the user may add a preferred key combination for Speed Calling.
Edit opens the Speed Calling Settings-Edit Entry page where
the Speed Calling codes may be edited. The page includes the
same components as the Add Speed Calling Code page.
If no records are selected and the user attempts to Edit or Delete
them, the “No records selected” error message will appear.
Fig.III- 12: Speed Calling Settings page
The Speed Calling Settings - Add Entry page includes the
following fields and buttons:
Call Type lists the available call types:
•
•
•
•
PBX - local calls between QX IP PBX extensions and Auto
Attendant
SIP – calls through a SIP server
PSTN – calls to PSTN
Auto – used for undefined call types. The destination
(independent on whether it is a PBX number, SIP address
or PSTN number) will be reached through Routing.
QX50/QX200/QX2000; (SW Version 6.0.x)
Fig.III- 13: Speed Calling Settings – Add Entry page
27
QX50/QX200/QX2000 Manual III: Extension User’s Guide
The Calling Code (#) requires a key combination to dial the destination phone number. Only numeric characters are allowed for this field. If nonnumeric
symbols are entered and the Save button is selected, “Incorrect calling code: no symbol characters allowed” will appear. This field is limited to two digits.
If the calling code already exists in the Speed Calling Codes table, the “Speed Calling Code already exists” error will appear when you select Save.
Description allows entering a short description about the called destination or simply the username of the remote party.
Depending on the selected call type the Call To text field requires the SIP address, extension or PSTN number that has to be dialed whenever the calling
code is used. The extension number should be inserted in the Call To field for the PBX call type. A SIP address should be entered for SIP call type. Only SIP
registration username can be inserted here to call to the SIP user registered on the same SIP server that the current extension is registered on. If the SIP
server hostname is omitted, the system will automatically set the current extension's registration server hostname instead. A PSTN number should be
inserted for PSTN call type. The PSTN number length depends on the area code and phone number. For the PSTN call type, the symbols “,”, “p” and “P” are
available to be inserted in this field. These symbols are used to insert a 1 second long pause which might be required by the PSTN dialing rules.
To Add a Speed Calling Code
1. Press the Add button on the Speed Calling Settings page. The Speed Calling Settings - Add Entry page will appear in the browser window.
2. Select the call type from the Call Type drop down list.
3. Choose a Calling Code and enter the Description for the called party.
4. Enter the destination SIP address, extension or PSTN number (dependant on the chosen call type) in the Call To text field according to the entering
rules.
5. To create the Speed Calling Code click on Save.
To Edit a Speed Calling Code
1. Select the checkbox of the corresponding record that has to is be edited in the Speed Calling Codes table
2. Press the Edit button on the Speed Calling Settings page. The Speed Calling Settings-Edit Entry page will appear in the browser window.
3. Change the desired fields.
4. To save the modifications click on Save.
To Delete a Speed Calling Code
1. Select the checkbox of the corresponding record that should to be deleted from the Speed Calling Code table.
2. Press the Delete button on the Speed Calling page.
3. Confirm the deletion by clicking the Yes button. The speed calling code with its parameters will be deleted. To abort the deletion and to keep the
original record in the list, select No.
Account Settings
The Account Settings page provides information on the extension display name, allows changing the user password, enabling user password protection
for incoming/outgoing calls and downloading/uploading of a file with the user-defined voice greetings. All parameters listed on this page may be modified
and submitted. This page consists of the following components:
Extension shows a non-editable parameter providing
information about the current user extension number.
Display Name defines an optional parameter used to identify
the caller. Usually the display name appears on the phone
display if a call is placed or a voice mail is sent. The field is not
limited regarding symbol usage but its length is limited to
twenty characters.
Password Protection for:
• Incoming Calls enables password protection for
incoming calls. If the service is enabled a user password
is required to be able to accept the incoming calls.
• Outgoing Calls enables password protection for
outgoing calls. If the service is enabled a user password
is required to be able to make calls.
Fig.III- 14: Extension Account Settings page
Enable SIP Remote Extension Settings checkbox is only visible when the system administrator has activated the SIP Remote Extension service for the
corresponding extension at least one time. With this checkbox, the extension user may enable/disable the SIP Remote Extensions functionality. The
administrator defines all settings of the SIP Remote Extension feature.
Please Note: If you find the Enable SIP Remote Extension Settings checkbox missing on this page, please consult with your system administrator for the
first-time activation of the SIP Remote Extension service on the corresponding extension.
QX50/QX200/QX2000; (SW Version 6.0.x)
28
QX50/QX200/QX2000 Manual III: Extension User’s Guide
The User’s name for Extensions Directory to upload text field is used to enter the path where the file with the user's name is located. If the file with the
user's name is browsed with the help of file-chooser, this field displays the path of the browsed file. The Choose File button is used to browse for the file
with the user's name. The user's name also can be modified from the handset and will be played when the spelled name matches the name configured for
the corresponding user.
Please Note: A user cannot be reached through the Extensions Directory until their name is recorded/uploaded into the Extensions Directory.
The Download User’s name link is used to download the user-defined wave file with the user's name.
The File to upload text field is used to type in the path where the backed up file with voice messages is located. If voice greetings are browsed with the
help of a file-chooser, this field displays the path of the browsed file. The Choose File button is used to browse for the previously downloaded file with
custom voice messages.
Attention: Uploading the selected file will replace your custom voice messages. Uploading custom messages downloaded from the other QX IP PBX will
overwrite messages that have not been configured by the user with the current device defaults. This means that if some default messages were used on
one QX IP PBX, they may be completely different on another QX IP PBX after uploading of the voice data.
The link Download custom voice messages appears only when there are user-defined custom greetings recorded. It is used to download a compressed
file with all user specified voice messages. The link opens the file-chooser window to specify the saving location.
The Change Password page is used to change the user’s
password.
The GUI Access Password offers the following components:
•
•
The New Password field requires a new password
for the Extension. The Password field is checked
against its strength and you may see how strong is
your inserted password is right below that field.
Reentering the new password in the Confirm New
Password field will confirm the new password. The
password can consist of numeric values only.
Fig.III- 15: Change Password page for extension access
Please Note: Up to twenty (0-20) digits are allowed. A corresponding warning appears if any other symbols are inserted. It is highly recommended to
define a proper and non-empty password on this page if the extension is being used for the Call Relay service from the QX IP PBX’s Auto Attendant.
Basic Services
The Basic Services page allows you to configure the basic telephony features of QX IP PBX, such as Call Waiting, Hold Music and Do Not Disturb services.
The Basic Services page consists of two frames. The left frame lists all services. When you click on a service, its corresponding settings will be displayed in
the right frame.
Please Note: Remember to save changes before moving between the service configuration pages.
General Settings
The General Settings page consists of the following
components:
Main
No answer timeout lists the possible timeout values for the
incoming call ringing duration before the voice mail system
answers (if Voice Mail service is enabled).
Call Waiting
Call Waiting is used to receive an incoming call when you are
currently on a call. The caller will hear a ringing tone and the
QX IP PBX user will hear a special beeping on the telephone
when the call arrives. For analog phones, to switch between the
current call and the new incoming call, use the appropriate
calling code. For IP phones to switch between the current call
and the new incoming call, use the corresponding Hold or Line
softkey/button (for more details refer to the “Epygi IP PBX
Features on Epygi Supported IP phones” document on the
Epygi’s Web portal).
Enable Call Waiting Service activates this service and makes
it available for the phone handset.
QX50/QX200/QX2000; (SW Version 6.0.x)
Fig.III- 16: Basic Services – General Settings page
29
QX50/QX200/QX2000 Manual III: Extension User’s Guide
Auto Redial
The Autoredial service of QX IP PBX supports automatic redialing if the called destination is currently busy or unavailable.
The Autoredial Settings page displays the available settings for automated redialing. Use the appropriate calling code to enable Autoredial from the
handset. The caller may hang up or stay with the lifted handset after enabling the Autoredial service. When hanging up, the system will keep trying to
reach the last called destination for the specified time period. When the destination is reached, the caller’s phone will start to ring. A voice message is
being played to the called party asking to wait until the caller answers. If the caller keeps the handset lifted, the system will also continue to reach the last
called destination and the call will be established when the destination called answers the call.
Autoredial Interval sets the time values between redialing attempts (counted in seconds).
Autoredial Period sets the total duration of redial attempts (counted in minutes).
Please Note: This service is functional for SIP and PBX calls only. For PSTN calls, this feature works as a single redial (with no multiple attempts to reach
the called destination).
Hold Music Settings
The Hold Music Settings are used to define the music that will be played while on hold or putting a remote party on hold. To specify this music the
following checkboxes and text fields are available:
Send Hold Music to Remote IP Party enables the specified
music for sending to a remote IP party whenever it is on hold
and waiting. If this checkbox is disabled, QX IP PBX will not
send any hold music to the remote IP party. The remote IP
party will then hear their own hold music, or something similar,
if configured. The hold music is always sent to PBX and PSTN
destinations independent on the configuration of this option.
The Listen Hold Music drop down list specifies the music the
current user will hear while on hold. It offers the following
options:
•
Off - no music will be played.
•
Own Music - the current user will define the music
that will be played to them self while being on hold.
•
Remote Party's Music - the current user will hear
the remote party's hold music, if enabled, and sent by
remote party.
The manipulation radio buttons group allows you to select the way custom hold music will be provided.
•
Fig.III- 17: Basic Services - Hold Music Settings page
File selection is used to upload the hold music file. The following options are available under this selection:
Restore Default Hold Music File enables the default music. If the checkbox is selected, the text field Upload New Hold Music File will be
disabled.
The Upload New Hold Music File text field can be used to enter the path where the hold music file is located. If the hold music file is browsed
with the help of file-chooser, this field displays the path of the browsed file. The Choose File button is used to browse for the hold music file.
The music file needs to be in PCMU (CCITT u-law, 8 kHz, 8 bit Mono) wave format, otherwise the system will prevent uploading the file and will
display the warning message "Invalid audio file or format is not supported". Additionally, the system will refuse uploading if insufficient
memory is available for the corresponding extension and will then announce "You do not have enough space".
Please Note: It is recommended to use a piece of music not longer than one minute to leave enough space for user-defined messages and voice
mails.
•
•
The Download Hold Music File link appears only if a file has been uploaded recently. It downloads the audio file to the PC and opens a window
where the saving location can be specified.
RTP Channel selection is used to define the channel for the broadcast streaming. The RTP channels are created by the system administrator.
Therefore if you are experiencing problems with using the RTP channels as hold music, or no RTP channels are available to select on this page,
turn to your system administrator for clarification.
Audio Line In (available only for QX50/QX200) selection uses the external radio broadcasting or any other audio resource as the hold music.
When selecting this option, check with your system administrator if there is an external audio resource connected to the QX IP PBX.
QX50/QX200/QX2000; (SW Version 6.0.x)
30
QX50/QX200/QX2000 Manual III: Extension User’s Guide
Do Not Disturb
Do Not Disturb Settings are used to configure the Do Not Disturb service. The service is used to turn off the phone ringer and may only be enabled from
the handset with the appropriate calling code. If you have Do Not Disturb service enabled along with the Voice Mail Service, all incoming calls will directly
go to the extension’s voice mailbox.
The Do Not Disturb Settings page consists of the following components:
The Actual State field indicates the state of the service (active or not active). It also indicates the time left until the end of Do Not Disturb service
functionality or "Service is not active" if the service is disabled.
The Expiration Timeout drop down list is used to choose the
period for the phone ringer to be off when enabling the Do Not
Disturb service.
The Send Message to Caller checkbox enables a voice message
notification to be sent to callers if the Voice Mail Service is disabled
on the extension. If the Send Message to Caller checkbox is
selected, but the extension has no voice mailbox assigned, a voice
message that the called destination is temporarily unavailable will
be played to callers. If the checkbox is not selected, incoming calls
will be routed to the extension's voice mailbox if available or will
be unconditionally disconnected.
An extension with DND enabled can be reached again as soon as
the service is disabled or the Expire Timeout period is over.
Fig.III- 18: Basic Services - Do Not Disturb Settings
Hot Line Settings
Hot Line Settings (available only for QX50/QX200) are used to set a destination that should be automatically dialed in case of no action for a predefined
period after lifting the handset. This user-configurable service is commonly used for emergency calls.
Attention: This service is only available on the FXS lines; it is not available if your extension is attached to an IP line. If you find Hot Line settings
unavailable for your extension, please contact your system administrator.
The Hot Line Settings page offers of the following input options:
Enable Hot Line Service enables the Hot Line Service and all components below.
Timeout is used to select the inactivity timeout before the defined
number will be dialed automatically.
Call Type lists the available call types:
• PBX - local calls between QX IP PBX extensions and the Auto
Attendant
•
•
•
SIP – calls through a SIP server
PSTN – calls to PSTN
Auto – destination (independent on whether it is a PBX
number, a SIP address or a PSTN number) will be reached
through Routing.
Depending on the Call Type selection, a destination extension
number, a SIP address (see chapter Entering SIP Addresses
Correctly), or a PSTN number should be inserted into the text field
Called Address. If the defined caller address is not corresponding
to these requirements, an error message, "Caller address is
incorrect", will appear and prevent saving the incorrect data. The
PSTN number length depends on the area code and the phone
number.
QX50/QX200/QX2000; (SW Version 6.0.x)
Fig.III- 19: Basic Services - Hotline Settings page
31
QX50/QX200/QX2000 Manual III: Extension User’s Guide
Caller ID Services
The Caller ID Based Services page provides options to configure a set of telephony settings from the same page. Call Forwarding, Incoming and Outgoing
Call Blocking, Hiding Caller Information, Call Hunting, Many Extension Ringing, Distinctive Ringing, Find Me/Follow Me, Intercom, Emergency Interrupt
and Voicemail Profile settings are configurable from this page.
Fig.III- 20: Caller ID Based Services for Any Address page
The Caller ID Based Services page contains a table listing all caller or called destinations and the ON/OFF status of the caller ID based services. The caller
or called destination numbers are used to configure caller ID based services based. The column headings in the table are designed as links. By clicking on a
column heading, the table will be sorted by the selected column. After sorting, (ascending or descending) arrows will be displayed next to the column
heading.
The table also has Any Address entry that is undeletable. It is used to configure caller ID based services for all addressed. When adding a new caller
address Any Address is changed to Other Addresses. Now there could be different configurations for the specified addresses and for all others.
Add opens the Caller ID Based Services - Add Entry page where a new address and presence states can be defined. This page consists of the following
components:
The Description text field requires optional information about the address owner.
Call Type lists the available call types:
•
•
•
•
PBX - local QX IP PBX extensions and Auto Attendant
SIP – caller or called destinations reached through a SIP server
PSTN – caller or called destination dialed from or to PSTN
Auto – used for undefined call types. In this case, for incoming calls from specific address, configuration of caller ID based services will apply either
to PBX, SIP or PSTN callers. For outgoing calls, the called destination will be reached through Routing.
Address requires a SIP address (see chapter Entering SIP Addresses Correctly), an extension or a PSTN number, for whom supplementary services should
be applied. If the address already exists in the table, selecting Save will give the error “Caller address already exists”. A wildcard is allowed in this field
(see chapter Entering SIP Addresses Correctly). Entering “*” as PBX or PSTN addresses will apply configuration of supplementary services to all extensions
or PSTN users.
The extension number should be inserted in the Address text field for the PBX call type. The PSTN number length depends on the area code and phone
number.
The Presence State radio buttons allows to set the Presence State of an extension.
•
•
All States selection is used to select all states for an
extension.
Specific States selection contains a group of radio buttons
that are used to select the state of the corresponding
extension:
o
o
o
o
o
o
o
o
Online
Offline
Busy
Away
DND
Meeting
Vacation
Lunch
QX50/QX200/QX2000; (SW Version 6.0.x)
Fig.III- 21: Caller ID Based Services – Add Entry page
32
QX50/QX200/QX2000 Manual III: Extension User’s Guide
When clicking on the Address in the Caller ID Based Services table, the caller ID based services configuration pages for the corresponding extension will
be displayed.
The Caller ID Based Services for Address page consists of two frames. In the left frame all caller ID based services are listed. Clicking on the
corresponding caller ID based service, its settings will be displayed in the right frame.
Please Note: Remember to save changes before moving between the caller ID based services configuration pages.
Below are the instructions to configure each caller ID based service available to the user.
To Configure Caller ID Based Services
1.
2.
3.
4.
5.
6.
7.
8.
Press the Add button on the Caller ID Based Services page. The Caller ID Based Services - Add Entry page, where new addresses can be defined,
will appear in the browser window.
Define an optional Description of the address.
Select the call type from the Call Type drop down list.
Enter the SIP address, extension or PSTN number (dependant on the chosen call type) in the Address text field according to the entering rules.
Select the Presence State of an extension.
To add an address to the Caller ID Based Services table, click Save.
Click on the newly created Address in the Caller ID Based Services table to open the Caller ID Based Services for Address page.
From the left frame, choose a Caller ID Based Services. From the right frame, enable, configure and adjust the corresponding service. Do this for each
service. Remember to Save the configurations each time moving between the Caller ID Based Services configuration pages.
To Edit Caller ID Based Services
1.
Select the checkbox of the corresponding address that has to be edited in the Caller ID Based Services table. The Caller ID Based Services - Edit
Entry page will appear in the browser window.
2.
Change the Description of the address, if needed.
3.
Change the Call Type and the Address defined in the corresponding fields.
4.
Change the Presence State of the extension, if needed.
5.
Save changes.
6.
If the reconfiguration of Caller ID Based Services is needed, click on the corresponding Address in the Caller ID Based Services table to open the
Caller ID Based Services for Address page.
7.
From the left frame, choose a Caller ID Based Services. From the right frame, change the corresponding service settings, if required. Remember to
Save the configurations each time moving between the Caller ID Based Services configuration pages.
Hiding Caller Information
The Hiding Caller Information service is used to hide QX IP PBX user information depending on the called destinations. When this service is activated,
Unknown or Anonymous (or similar text, depending on the type of the phone) will be displayed on the called phone when the current user of QX IP PBX
makes outgoing calls to the selected destination.
Attention: Using the “Block Last Caller” operation from the handset for the caller with the hidden caller ID (for example, anonymous@anonymous or
similar) may block all unknown callers.
The Enable Service checkbox selection hides the current extension’s information when calling to the corresponding Address listed in the Caller ID Based
Services table.
Please Note: Even if the Hiding Caller Information service is
enabled, it shall work only for internal PBX calls and SIP calls. If you
call through FXO/ISDN port to a PSTN number, the called party will
still see your caller ID. To hide your caller ID for PSTN destinations,
contact your PSTN operator.
Fig.III- 22: Hiding Caller Information page
QX50/QX200/QX2000; (SW Version 6.0.x)
33
QX50/QX200/QX2000 Manual III: Extension User’s Guide
Incoming Call Blocking
Incoming Call Blocking allows blocking unwanted incoming calls for a QX IP PBX extension. This page provides the necessary settings for incoming call
blocking. It indicates if the service is enabled for the particular caller and whether or not the custom message will be used to inform the caller about the
call being blocked. If the service for the particular caller has been enabled by the administrator and has been stated as protected, the user cannot disable it.
Please Note: The administrator can protect the service from being disabled by you. Contact the administrator if callers complain that they cannot reach
you.
The Enable Service checkbox selection blocks all calls to the current extension using the corresponding Address listed in the Caller ID Based Services
table where the Incoming Call Blocking service is configured.
The Send Message to Caller Party checkbox is available when the service is enabled and initiates a message to inform the caller that their line has been
blocked. Otherwise, the calling party will be disconnected without notification.
The Restore Default Blocking Message File restores the default incoming call blocking message if another user-defined file has been previously selected.
When the checkbox is selected, the file upload possibility will be disabled.
The Upload New Blocking Message File requires the name of the
desired voice message file. The file needs to be in PCMU (CCITT ulaw, 8 kHz, 8 bit Mono) wave format, otherwise the system will
prevent uploading it and the “Invalid audio file, or format is not
supported” warning message will be received. The system also
prevents uploading if there is not enough space available for the
corresponding extension. You will then receive the “You do not
have enough space” warning.
Choose File is used to browse custom voice message used for
incoming call blocking.
The Download Custom Blocking Message File link only appears
if a file has been previously uploaded. The link is used to download
the audio file to the PC and opens a window where the saving
location can be specified.
Fig.III- 23: Incoming Call Blocking page
Outgoing Call Blocking
Outgoing Call Blocking allows blocking unwanted outgoing calls for a QX IP PBX extension where the destination Address service is configured. This
page provides the necessary settings for the outgoing call blocking service. It indicates whether service is enabled for the particular caller and whether or
not a custom message will be used to inform caller about the call being blocked. If the service a particular caller has been enabled by administrator and has
been stated as protected, the user cannot disable it.
Please Note: The administrator can protect the service from being disabled by you. Contact the administrator if you have problems establishing a certain
call.
The Enable Service checkbox selection blocks all calls to the corresponding Address listed in the Caller ID Based Services table associated to the
corresponding extension.
The Send Message to Caller Party checkbox is available when service is enabled and it initiates a message to inform the caller that their line has been
blocked. Otherwise, the calling party will be disconnected without a warning.
The Restore Default Blocking Message File restores the default outgoing call blocking message if another user-defined file has been previously selected.
When the checkbox is selected, the file upload possibility will be disabled.
QX50/QX200/QX2000; (SW Version 6.0.x)
34
QX50/QX200/QX2000 Manual III: Extension User’s Guide
The Upload New Blocking Message File requires the name of the
desired voice message file. The file needs to be in PCMU (CCITT ulaw, 8 kHz, 8 bit Mono) wave format, otherwise the system will
prevent uploading it and “Invalid audio file, or format is not
supported” warning message will be received. The system also
prevents uploading if there is not enough space available for the
corresponding extension. The “You do not have enough space”
warning will then be received.
Choose File is used to browse custom voice message used for
outgoing call blocking.
The Download Custom Blocking Message File link appears only if
a file has been previously uploaded. This link is used to download
the audio file to the PC and opens a window where the saving
location can be specified.
Fig.III- 24: Outgoing Call Blocking page
Distinctive Ringing
The Distinctive Ringing service of QX IP PBX allows you to assign
different ringing patterns to individual callers. The Distinctive
Ringing Settings page provides the necessary settings to receive a
distinct ring depending on the caller’s address.
Please Note: Refer to the “Epygi IP PBX Features on Epygi
Supported IP phones” document on the Epygi’s Web portal for more
details on the list of IP phones that supports Distinctive Ringing.
The Enable Service checkbox enables the service. Other components
on this page are available only when this checkbox is selected.
Nick Name requires the callers nickname (if any).
Ringing Pattern lists the possible ringing patterns that may be
assigned to a specified caller.
Fig.III- 25: Distinctive Ringing page
Please Note: All phones attached to the extensions in the Many Extension Ringing/Call Hunting table will ring with the pattern defined for the individual
caller to that extension.
Call Hunting
The Call Hunting service provides the possibility of an incoming call consecutively ringing on several extensions depending on the calling party. The Call
Hunting page contains a table where all the participants in the call hunting group for the corresponding extension should be defined.
Attention: By configuring the Call Hunting service, Unconditional
Call Forwarding, Find Me/Follow Me and Many Extensions Ringing
automatically will be disabled on the current extension.
Selecting Enable Service activates the Call Hunting service on the
current extension.
The table displayed here lists the extensions where the call must be
consecutively duplicated in case of a call from the corresponding
caller. Status indicates if the extension is Attached, Not Attached or
Attendant. An extension cannot ring if it is Not Attached. The
administrator must attach it to the line from the Extensions
Management page.
When the order of entries in the Call To table is defined in the
consecutive ringing order, the Move Up/ Move Down becomes
available. This will move the checked Call To extension either one
level up or down.
QX50/QX200/QX2000; (SW Version 6.0.x)
Fig.III- 26: Call Hunting page
35
QX50/QX200/QX2000 Manual III: Extension User’s Guide
Add opens the Add Entry page to add called extensions (an attendant
or a user extension). It has manipulation radio buttons to select the
type of extension to be added to Call Hunting. It contains the following
components:
•
•
The Call To drop down list contains QX IP PBX’s attendant or
user extensions, depending on the radio button selected. It is
possible to add the same extension more than once to the Call To
table. The extension will ring, depending on the order, as often as
configured.
The Duration drop down list is only available for user extensions
only. It is used to select the period (in seconds) for which the
corresponding user’s extension should ring.
Fig.III- 27: Call Hunting – Add Entry page
The Circular Mode checkbox enables the call hunting start over when the last extension in the Call Hunting table has been called and there is still no
answer. The Circular Mode will last as long as the No Answer Timeout is configured in the Basic Services – General Settings page. When this checkbox is
not selected, call hunting will terminate once the last extension in the Call Hunting table does not answer the call, the incoming call will then be redirected
to the Voice Mailbox of the extension it originally called (if enabled) or it will be disconnected.
Please Note: The Voice Mail Service will be activated on then originally called extension only after all extensions in the Call Hunting table are called at
least once, regardless the No Answer Timeout configured from the Basic Services – General Settings page.
Attention: The Circular Mode will not work if the list of called destinations contains at least one Auto Attendant extension, otherwise the hunted call will
be answered by the Auto Attendant and will terminate there.
The Random Hunting option allows an incoming call to ring extensions in the Call Hunting table in random order. If this checkbox is selected, an incoming
call will ring at an extension randomly selected from the Call Hunting table. If the called extension does not answer the call, the next extension will be
chosen randomly from the remaining extensions list. The process will continue until the last extension on the list is called. If the call is still not answered, it
will be forwarded to the voice mail box of the originally called extension.
If both the Circular Mode and Random Hunting checkboxes are selected, the cycle will restart in the same random order after calling the last extension.
If nobody answers, the call will be redirected to the mailbox of the originally called extension after the No Answer Timeout expires.
When saving the Call Hunting configuration a message will notify the user that Many Extension Ringing, Find Me/Follow Me and Unconditional Call
Forwarding services have been disabled.
Many Extensions Ringing
The Many Extensions Ringing service of QX IP PBX provides parallel ringing on several extensions when there is an incoming call.
Attention: By configuring Many Extensions Ringing service, Unconditional Call Forwarding, Find Me/Follow Me and Call Hunting services will be
automatically disabled on the current extension.
QX50/QX200/QX2000; (SW Version 6.0.x)
36
QX50/QX200/QX2000 Manual III: Extension User’s Guide
Selecting Enable Service activates the Many Extensions Ringing
service on the current extension.
The table displayed here lists all existing extensions on the QX IP PBX.
Any or all of the extensions can be enabled to participate in the Many
Extensions Ringing for the selected extension. The State column
displays whether or not the extension is enabled to participate with
the Many Extension Ringing. The State column also displays whether
or not the extension is active.
The State column indicates whether the extension is Attached or Not
Attached. An extension cannot ring if it is Not Attached. It has to be
attached to the line by the administrator from the Extensions
Management page.
The Enable/Disable functional buttons are used to select one or more
extensions to be involved or not in the Many Extensions Ringing
procedure. The state of the participant (Enabled or Disabled) is also
displayed in the table.
Please Note: The system will prevent the enabling of extensions if the
total number of extensions participant to the specific caller Many
Extension Ringing exceeds a certain number dependant on the
hardware resources of the board.
When saving the Many Extensions Ringing configuration, a message
will notify the user that the Forwarding services have been disabled.
By default, the Many Extension Ringing table includes only one preconfigured extension for that the service is already configured.
Otherwise if the Many Extensions Ringing service is enabled but no
called extensions are provided (or the extension provided by default
has been deleted), the current extension will not ring.
Fig.III- 28: Many Extension Ringing page
The Allow access to Shared Mailbox for enabled extensions checkbox is used to share the mailbox of the current extension to all enabled extensions in
the Many Extensions Ringing list. With this option selected, all enabled extensions in this list will have a direct access to the current extension’s mailbox
without password authentication. For details on how to access Shared Mailboxes, see QX IP PBX’s Feature Codes.
Call Forwarding
QX IP PBX offers the following types of call forwarding:
• Unconditional - all incoming calls from the certain caller will be forwarded to the defined destinations.
• Busy - calls from the certain caller will be forwarded to the defined destinations only when called extension is busy with another call.
• No Answer - calls from the certain caller will be forwarded to the defined destinations only when called extension is unable to answer the
incoming call. No answer timeout is configured from the Basic Services – General Settings page.
• Unregistered/Inaccessible Call Forwarding - calls from the certain caller will be forwarded to the listed destinations when called IP phone is
not registered on the QX IP PBX or when it is unreachable, e.g. due to IP phone reboot or network problems. This call forwarding type is only
available for extensions attached to IP lines.
The following rules are applicable to all call forwarding types:
• By setting up unconditional call forwarding service, Many Extension Ringing, Find Me/Follow Me and Call Hunting services will be
automatically disabled. The exception is cases when unconditional call forwarding is enabled from the handset (see QX IP PBX’s Feature Codes).
• PSTN destinations (with PSTN or Auto call type) have priority in Forward to list. If there are different destinations in the Forward to list, the
call will be forwarded to PSTN destination (in the same time any available SIP or PBX destinations will receive a short ring). If the PSTN
destination was not successful, the next PSTN destination will be dialed, otherwise if there are no more PSTN destinations in the table, the call
will be forwarded to any available SIP and PBX destinations simultaneously.
• If there are multiple entries with any combination of PBX or SIP call types, then all destinations will ring simultaneously and the call will be
established with the destination that will pick up the call the first.
• Unconditional call forwarding service has higher priority versus to other forwarding types, i.e. when Unconditional Call Forwarding is enabled,
Busy Forwarding and No Answer Forwarding services will not work even if they are enabled. In the meantime, Busy Forwarding can work in
conjunction with No Answer Forwarding and vice versa.
QX50/QX200/QX2000; (SW Version 6.0.x)
37
QX50/QX200/QX2000 Manual III: Extension User’s Guide
Unconditional Call Forwarding
Unconditional Call Forwarding is a service of QX IP PBX that allows the automatic unconditional transfer of incoming calls to a variety of other
destinations.
The Enable Service checkbox selection activates the unconditional call forwarding service on the current extension.
The table displayed here lists the destinations where the incoming call from a particular caller should be unconditionally forwarded.
Enable/Disable functional button is used to enable/disable the corresponding forwarding destinations. This is helpful to avoid removing forwarding
destination(s) if they are not applicable at the moment.
The State column indicates whether the corresponding forwarding
destination is Enabled or Disabled.
The Forward to column indicates the forwarding destination.
Add opens the Add Entry page to add forwarding destinations. It
consists of the following components:
Call Type lists the available call types:
•
•
•
•
PBX - forwarding destination is a local QX IP PBX extensions
or Auto Attendant.
SIP – forwarding destination is reached through a SIP
server.
PSTN – forwarding destination is a PSTN user.
Auto – used for undefined call types. In this case, the
routing pattern will be considered and parsed through the
Call Routing Table.
The Forward To text field requires the SIP address (see chapter
Entering SIP Addresses Correctly), a PBX extension or a PSTN
number, where an incoming call from a certain caller should be
unconditionally forwarded. If the address already exists in the
table, selecting Save will display the error “Caller address already
exists”. A wildcard is allowed in this field (see chapter Entering SIP
Addresses Correctly). Entering “*” as PBX or PSTN addresses will
apply the configuration of Caller ID Based services to all extensions
or PSTN users.
The extension number should be inserted in the Forward To text
field for the PBX call type. The PSTN number length depends on
the area code and phone number.
Fig.III- 29: Unconditional Call Forwarding page
Fig.III- 30: Call Forwarding – Add Entry page
Send Notification Via SMS checkbox enables SMS notifications sending to the user’s mobile phone when unconditional call forwarding on the
corresponding extension from the certain caller takes place. This checkbox selection enables the Mobile Number text field where the user’s mobile phone
number should be defined. If you feel this service is not working, contact your system administrator to configure the SMS Settings.
Send E-mail checkbox enables email notifications sending to the user’s mailbox when unconditional call forwarding on the corresponding extension from
the certain caller takes place. This checkbox selection enables the E-mail Address text field where the user’s email address should be defined. If you feel
this service is not working, contact your system administrator to configure the Mail Settings.
When saving this call forwarding configuration, a message will notify the user that Many Extension Ringing and Call Hunting services have been disabled.
The Toggle from Handset checkbox enables toggling the Unconditional Call Forwarding service for a selected caller ON or OFF from the phone handset
by dialing the *4 feature code (for more details, see QX IP PBX’s Feature Codes). Dialing this feature code will toggle the Unconditional Call Forwarding
service for all entries in the Caller ID Based Services table that have the Toggle from Handset option enabled. The service will be activated if it was
previously deactivated and deactivated if previously activated.
Please Note: The Toggle from Handset checkbox is only available on the entries different from Any/Other Addresses.
Busy Call Forwarding
Busy Call Forwarding is a service of QX IP PBX that allows the automatic transfer of incoming calls to a variety of other destinations when the called
extension is busy.
The Enable Service checkbox selection activates the busy call forwarding service on the current extension.
QX50/QX200/QX2000; (SW Version 6.0.x)
38
QX50/QX200/QX2000 Manual III: Extension User’s Guide
The table displayed here lists the destinations where the incoming
call from a particular caller should be forwarded to when the
called extension is busy.
The State column indicates whether the
forwarding destination is Enabled or Disabled.
corresponding
The Forward to column indicates the forwarding destination.
Add opens the Add Entry page to add forward destinations. It
consists of the following components:
Call Type lists the available call types:
•
•
•
•
PBX - forwarding destination is a local QX IP PBX
extensions or Auto Attendant.
SIP – forwarding destination is reached through a SIP
server.
PSTN – forwarding destination is a PSTN user.
Auto – used for undefined call types. In this case, the
routing pattern will be considered and parsed through the
Call Routing Table.
Fig.III- 31: Busy Call Forwarding page
The Forward To text field requires the SIP address (see chapter Entering SIP Addresses Correctly), extension or PSTN number, where an incoming call
from a particular caller should be forwarded when the called extension is busy. If the address already exists in the table, selecting Save will display the
error “Caller address already exists”. A wildcard is allowed in this field (see chapter Entering SIP Addresses Correctly). Entering “*” as PBX or PSTN
addresses will apply configuration of Caller ID Based services to all extensions or PSTN users.
The extension number should be inserted in the Forward To text field for the PBX call type. The PSTN number length depends upon the area code and
phone number.
Send Notification Via SMS checkbox enables SMS notifications sending to the user’s mobile phone when busy call forwarding on the corresponding
extension from the certain caller takes place. This checkbox selection enables the Mobile Number text field where the user’s mobile phone number should
be defined. If you feel this service is not working, contact your system administrator to configure the SMS Settings.
Send E-mail checkbox enables email notifications sending to the user’s mailbox when busy call forwarding on the corresponding extension from the
certain caller takes place. This checkbox selection enables the E-mail Address text field where the user’s email address should be defined. If you feel this
service is not working, contact your system administrator to configure the Mail Settings.
When saving this call forwarding configuration, a message will notify the user that Many Extensions Ringing and Call Hunting services have been disabled.
No Answer Call Forwarding
No Answer Call Forwarding is a service of QX IP PBX that allows the automatic transfer of incoming calls to a variety of other destinations when the
called extension is unable to pick up the call. No answer timeout is configured from the Basic Services – General Settings page.
The Enable Service checkbox selection activates the no answer call forwarding service on the current extension.
The table displayed here lists the destinations where the
incoming call from a particular caller should be forwarded to if
the called extension is unable to answer the call.
The State column indicates whether the corresponding
forwarding destination is Enabled or Disabled.
The Forward to column indicates the forwarding destination.
Add opens the Add Entry page to add forwarding destinations. It
consists of the following components:
Call Type lists the available call types:
•
•
•
•
PBX - forwarding destination is a local QX IP PBX
extensions or Auto Attendant.
SIP – forwarding destination is reached through a SIP
server.
PSTN – forwarding destination is a PSTN user.
Auto – used for undefined call types. In this case, routing
pattern will be considered here and parsed through Call
Routing Table.
Fig.III- 32: No Answer Call Forwarding page
The Forward To text field requires the SIP address (see chapter Entering SIP Addresses Correctly), extension or PSTN number, where incoming call from
the certain caller should be forwarded in case the called extension does not answers the call. If the address already exists in the table, selecting Save will
QX50/QX200/QX2000; (SW Version 6.0.x)
39
QX50/QX200/QX2000 Manual III: Extension User’s Guide
display the error “Caller address already exists”. A wildcard is allowed in this field (see chapter Entering SIP Addresses Correctly). Entering “*” as PBX or
PSTN addresses will apply configuration of Caller ID Based services to all extensions or PSTN users.
The extension number should be inserted into the Forward To text field for the PBX call type. The PSTN number length depends on the area code and
phone number.
Send Notification Via SMS checkbox enables SMS notifications sending to the user’s mobile phone when no answer call forwarding on the corresponding
extension from the certain caller takes place. This checkbox selection enables the Mobile Number text field where the user’s mobile phone number should
be defined. If you feel this service is not working, contact your system administrator to configure the SMS Settings.
Send E-mail checkbox enables email notifications sending to the user’s mailbox when no answer call forwarding on the corresponding extension from the
certain caller takes place. This checkbox selection enables the E-mail Address text field where the user’s email address should be defined. If you feel this
service is not working, contact your system administrator to configure the Mail Settings.
When saving this call forwarding configuration, a message will notify the user that Many Extensions Ringing and Call Hunting services have been disabled.
Unregistered/Inaccessible Call Forwarding
Unregistered/Inaccessible Call Forwarding is only available for extensions attached to IP lines. Calls from the certain caller will be forwarded to the
listed destinations when called IP phone is not registered on the QX IP PBX or when it is unreachable, e.g. due to IP phone reboot or network problems.
The Enable Service checkbox selection activates the unregistered/inaccessible call forwarding service on the current extension.
The table displayed here lists the destinations where the
incoming call from a particular caller should be forwarded to if
the IP line this extension is attached is inaccessible or
unregistered.
The Enable Service checkbox selection activates the no answer
call forwarding service on the current extension.
Add opens the Add Entry page to add forwarding destinations. It
consists of the following components:
Call Type lists the available call types:
•
•
•
•
PBX - forwarding destination is a local QX IP PBX
extensions or Auto Attendant.
SIP – forwarding destination is reached through a SIP
server.
PSTN – forwarding destination is a PSTN user.
Auto – used for undefined call types. In this case, routing
pattern will be considered here and parsed through Call
Routing Table.
Fig.III- 33: Unregistered/Inaccessible Call Forwarding page
The Forward To text field requires the SIP address (see chapter Entering SIP Addresses Correctly), extension or PSTN number, where incoming call from
the certain caller should be forwarded in case the called extension does not answers the call. If the address already exists in the table, selecting Save will
display the error “Caller address already exists”. A wildcard is allowed in this field (see chapter Entering SIP Addresses Correctly). Entering “*” as PBX or
PSTN addresses will apply configuration of Caller ID Based services to all extensions or PSTN users.
The extension number should be inserted into the Forward To text field for the PBX call type. The PSTN number length depends on the area code and
phone number.
Send Notification Via SMS checkbox enables SMS notifications sending to the user’s mobile phone when Unregistered/Inaccessible call forwarding on the
corresponding extension from the certain caller takes place. This checkbox selection enables the Mobile Number text field where the user’s mobile phone
number should be defined. If you feel this service is not working, contact your system administrator to configure the SMS Settings.
Send E-mail checkbox enables email notifications sending to the user’s mailbox when Unregistered/Inaccessible call forwarding on the corresponding
extension from the certain caller takes place. This checkbox selection enables the E-mail Address text field where the user’s email address should be
defined. If you feel this service is not working, contact your system administrator to configure the Mail Settings.
When saving this call forwarding configuration, a message will notify the user that Many Extensions Ringing and Call Hunting services have been disabled.
Find Me / Follow Me
The Find Me / Follow Me service of the QX IP PBX allows you to configure simultaneously or subsequently ringing destinations on the incoming call from
the certain caller. The ringing destinations can be local PBX extensions, remote SIP or PSTN destinations. From this page you may also adjust a sequence in
which the destinations will ring.
Attention: This service has higher priority over all Caller ID based services, except for Incoming Call Blocking and Unconditional Call Forwarding. This
means that if the same caller is configured in the incoming call blocking, unconditional call forwarding and the Find Me/Follow Me pages, the incoming call
blocking and the unconditional call forwarding services will take effect. Besides this, if you have Find Me/Follow Me service enabled along with the Many
Extensions Ringing, No Answer Call Forwarding, Busy Call Forwarding or Call Hunting, only Find Me/Follow Me service will take effect.
The Enable Service checkbox selection activates the Find Me/Follow Me service on the current extension.
QX50/QX200/QX2000; (SW Version 6.0.x)
40
QX50/QX200/QX2000 Manual III: Extension User’s Guide
The table displayed here lists destinations where the incoming call from a particular caller will be ringing in the configured sequence.
The Enable/Disable functional buttons are used to enable or
disable ringing on the destinations in the Find Me/Follow Me
table.
The Ring Extension Phone drop down list is used to select the
interval in which the current extension (on which you are
currently configuring the Find Me/Follow Me service) will ring
on the incoming call from the selected caller. With the
Immediately selection, the current extension will ring
immediately as the call comes in.
The Max Active Calls Count text field requires the maximum
number of active calls.
If N= 1, where N is the maximum number of active calls, then only
one active call will be possible to make and the next call will go to
the voice mail. If N >1, then the next call will go to the next Find
Me/Follow Me phones (if configured) which are not in the call.
The Confirmation Passcode text field requires the password to
accept the call for destinations where passcode activation is
enabled (see below). Only digit values are allowed in this text
field.
Fig.III- 34: Find Me/Follow Me page
Add opens the Add Entry page to add a destination to the Find
Me/Follow Me table. It consists of the following components:
Call Type lists the available call types:
•
•
•
•
PBX - destination is a local QX IP PBX extensions or Auto
Attendant.
SIP –destination is reached through a SIP server.
PSTN –destination is a PSTN user.
Auto – used for undefined call types. In this case, routing
pattern will be considered here and passed through Call
Routing Table.
Fig.III- 35: Find Me/Follow Me – Add Entry page
The Address text field requires the SIP address (see chapter Entering SIP Addresses Correctly), extension or PSTN number, where the incoming call from
the certain caller will be ringing. If the address already exists in the table, selecting Save will display the error “Caller address already exists”. A wildcard is
allowed in this field (see chapter Entering SIP Addresses Correctly). The extension number should be inserted into the Address text field for the PBX call
type. The PSTN number length depends on the area code and phone number.
The Start Ringing drop down list is used to select the interval when the destination will ring after the call from the selected caller comes in to the current
extension. Immediately selection indicates that the destination will ring immediately as the call comes in.
The Ask Confirmation Passcode checkbox is used to enable the password protection of the call. With this option enabled, the destination who answers
the call will be prompted to insert a password in order to accept the call. The confirmation passcode is defined under the Find Me/Follow Me table (see
above).
Welcome Message - this group allows specifying the Find Me/Follow Me Welcome Message Delay and updating the welcome message which is playing
only once when calling to Find Me/Follow Me extension, downloading it to the PC, or restoring the default one.
The group offers the following components:
QX50/QX200/QX2000; (SW Version 6.0.x)
41
QX50/QX200/QX2000 Manual III: Extension User’s Guide
Welcome Message Delay requires the delay (in seconds) after which the welcome message will be played when calling to the Find Me/Follow Me
extension. The Choose File button is used to upload the custom Welcome Message file and opens the file chooser window to browse for a new custom
welcome message file.
Attention: The uploaded file needs to be in PCMU (CCITT u-law, 8 kHz, 8 bit Mono) wave format, otherwise the system will prevent uploading it and the
"Invalid audio file, or format is not supported" warning message will appear. The system also prevents uploading if there is not enough memory available
for the corresponding extension and the "You do not have enough space" warning message will appear.
The Download Custom Welcome Message and Restore Default Welcome Message links appear only if a file has been uploaded previously. The
Download Custom Welcome Message link is used to download the welcome message file to the PC and opens the file-chooser window where the saving
location may be specified. The Restore Default Welcome Message link is used to restore the default welcome message and remove the previously
uploaded file.
The Audio Wait Options radio buttons allows you to configure the audio type which should be played recursively after playing the welcome message:
•
•
•
•
•
No Audio - is used to disable any audio after the welcome message played once.
Default Recording selection enables the default Audio Wait music.
Custom Recording selection is used to upload the custom recording file. Choose File text field can be used to type the path where custom
recording file is located. Choose File button is used to browse for the custom recording file.
The recording file needs to be in PCMU (CCITT u-law, 8 kHz, 8 bit Mono) wave format, otherwise the system will prevent uploading the file and
display the warning message "Invalid audio file or format is not supported". The system will refuse uploading also if there is not enough
memory available for the corresponding extension and will then announce "You do not have enough space".
RTP Channel selection is used to define the channel for the broadcast streaming. The RTP channels are created by the system administrator.
Therefore, if you are experiencing problems with using the RTP channels as Audio Wait Option, or no RTP channels are available to select on
this page, turn to your system administrator for clarification.
Audio Line In selection (available only for QX50/QX200) uses the external radio broadcasting or any other audio resource as the Audio Wait
music. When selecting this option, check with your system administrator if there is an external audio resource connected to the QX IP PBX.
Emergency Interrupt
The Emergency Interrupt service is used to interrupt active
calls in case of emergency. With this service activated, the call
from the defined caller will take priority over the existing call
and will interrupt it. Once interrupted, the priority call will ring
on the phone.
Please Note: This service is only working on IP phones.
Depending on the IP phone model, interruption and new call
arrival during off hook may be different.
Fig.III- 36: Emergency Interrupt page
Intercom
Intercom service is used to call an extension by forcing it to go off-hook and opening two-way communication. The service is particularly used for
announcements addressed to an extension. When the call comes in to the extension which has an Intercom service enabled, called extension ring once and
then will automatically go off-hook (the phone speaker automatically becomes activated) and the caller will be able to make his announcement.
Please Note: Intercom service requires called extension to use SIP or analog phones which are able to automatically go off-hook. For Intercom service
supported on IP phones, refer to the “Epygi IP PBX Features on Epygi Supported IP phones” document on the Epygi’s Web portal.
QX50/QX200/QX2000; (SW Version 6.0.x)
42
QX50/QX200/QX2000 Manual III: Extension User’s Guide
The Intercom page contains the following components:
The Intercom drop-down list has three available sections:
•
•
•
Allow Activation on Request - this selection enables the
Intercom service for calls that are made through a call
routing rule of the PBX-Intercom call type. Please contact
your system administrator to ensure a corresponding rule
is available for your extension.
Activate Always - this selection unconditionally enables
the Intercom service on the extension.
Disabled - this selection disables the Intercom service.
The Activation signal drop-down list has three available
sections:
•
•
•
Ring Only If Requested – this selection allows you to
play audible signal if the Play audible signal before
Intercom activation checkbox is enabled in the call
routing rule of the PBX-Intercom call type.
Ring On Activation this selection allows you to play
audible signal before Intercom activation whether the
Play audible signal before Intercom activation
checkbox in the call routing is enabled or not.
Fig.III- 37: Intercom page
Silent Activation this selection allows you to activate the Intercom service silently, without any audible signal whether the Play audible signal
before Intercom activation checkbox in the call routing is enabled or not.
Attention: Intercom will not work if the called extension is in call. If this service is enabled along with Many Extension Ringing, Call Hunting or
Forwarding services, Intercom will not take effect and other high priority services will be primary.
Voicemail Profile
The Voicemail Profile page allows you to activate the voicemail
profile based on Caller ID and Presence States.
The Voicemail Profile radio buttons allows you to configure the
voice mail profile settings.
•
•
•
Use Profile As Requested - this selection enables the
voicemail profile settings for calls that are made
through a call routing rule of the PBX-Voicemail call
type. Please contact your system administrator to
ensure a corresponding rule is available for your
extension.
Use Default Voicemail Settings selection enables the
default voicemail profile settings. No profile will be
used, regardless of how the call has arrived to
extension.
Use Specific Profile drop-down list allows the
selection of a previously created voicemail profile in
the Voice Mail Profiles page regardless of how the call
has arrived to extension.
QX50/QX200/QX2000; (SW Version 6.0.x)
Fig.III- 38: Voicemail Profile page
43
QX50/QX200/QX2000 Manual III: Extension User’s Guide
Appendix: Glossary
A
Asymmetric Digital Subscriber Line (ADSL) - is a method for moving data over regular phone lines. An ADSL circuit is much faster than a regular phone
connection, and the wires coming into the subscriber's premises are the same (copper) wires used for regular phone service. An ADSL circuit must be
configured to connect two specific locations, similar to a leased line. A commonly discussed configuration of ADSL would allow a subscriber to receive data
(download) at speeds of up to 1.544 Megabits per second, and to send (upload) data at speeds of 128 kilobits per second. Thus is the 'Asymmetric' part of
acronym. Another commonly discussed configuration would be symmetrical: 384 kilobits per second in both directions. In theory ADSL allows download
speeds of up to 9 megabits per second and upload speeds of up to 640 kilobits per second. ADSL is often discussed as an alternative to ISDN, allowing
higher speeds in cases where the connection is always to the same place.
Asynchronous Transfer Mode (ATM) - a 53-byte cell-switching technology well suited for carrying voice, data, and video traffic on the same
infrastructure. It is inherently scalable in throughput and was designed to provide Quality of Service (QoS).
Auto Attendant (AA) - a feature providing remote access to QX voice connectivity services. Specifically, it supports remote connection to QX extensions,
to their mailboxes and for making calls to other destinations. Remote access to QX AA is possible through IP and PSTN calls.
Auto Redial - a service that allows automatically recalling the destination that was busy.
C
Call - establishment of (or attempt to establish) a voice or data connection between two endpoints, or between two points that provide a partial link (e.g.,
a trunk) between two endpoints.
Call Blocking - a QX service that allows blocking unwanted incoming or outgoing calls over QX.
Call Forwarding - a QX service that allows transferring a call to another destination in case the QX user is busy, not answering or unconditional.
Call Hold - a QX service that allows holding the call in order to make another one, or to answer the second incoming call. The first call partner will listen to
music while being on hold.
Call Waiting - a QX service that allows receiving a second call while being busy with the first one. The waiting party will hear a beeping during the
conversation.
Caller ID - caller information is displayed on the called party’s phone.
Central Office (CO) - a local switching system that connects lines to lines and lines to trunks. Sometimes used to refer to the building in which a switching
system is located and the associated equipment. It is also the physical point where calls enter the long distance network.
CODEC - COmpression/DECompression that transforms analog voice into a digital bit stream and vice-versa. It is now an overall term for the technology
used in digital audio and video.
D
D-channel - In ISDN, the 16-kb/s segment of a 144-kb/s, full-duplex subscriber service channel that is subdivided into 2B+D channels, i.e., into two
64-kb/s clear channels and one 16-kb/s channel for the ISDN basic rate. Note 1: The D channel is usually used for out-of-band signaling. The two 64-kb/s
clear channels are used for subscriber voice and data services. Note 2: The D-channel specifications are addressed in the CCITT Recommendation for the
Integrated Services Digital Network (ISDN). Note 3: The D-channel may be 64 kb/s for the primary rate ISDN service.
Data Encryption Standard (DES) - a block cipher algorithm for encrypting (coding) data so it is nearly impossible for anyone without the decryption key
to get the data back in unscrambled form. The DES standard enciphers and deciphers data using a 64-bit key.
Daylight saving time (DST) - a convention of advancing clocks so that afternoons have more daylight and mornings have less. Typically clocks are
adjusted forward one hour near the start of spring and are adjusted backward in autumn.
Dial peer - an addressable call endpoint. In Voice over IP (VoIP), there are two types of dial peers: POTS and VoIP.
Dial plan - a description of the dialing arrangements for customer use on a network.
Digital Signal Processor (DSP) - A specialized microprocessor that performs calculations on digitized signals that were originally analog, and then
forwards the results. The big advantage of DSPs lies in their programmability. DSPs can be used to compress voice signals to as little as 4,800 bps. DSPs are
an integral part of all voice processing systems and fax machines.
Digital Subscriber Line (DSL) - public network technology that delivers high bandwidth over conventional copper wiring at limited distances. There are
four types of DSL: ADSL, HDSL, SDSL, and VDSL. All are provisioned via modem pairs, with one modem located at a central office and the other at the
customer site. Since most DSL technologies do not use the entire bandwidth of the twisted pair, there remains room for a voice channel.
Distinctive Ringing - QX service that allows a specific ringing pattern assignment for particular callers over QX.
Domain - a place on the Internet you can visit with your browser, i.e., a www site. It also might be a single computer or computers masqueraded as a
single computer. On the Internet, the domain is the address that gets you there.
Domain name - in a network using the TCP/IP, the full domain name consists of a sequence of names (labels) separated by periods (dots), for example,
qx.epygi.com.
QX50/QX200/QX2000; (SW Version 6.0.x)
44
QX50/QX200/QX2000 Manual III: Extension User’s Guide
Domain Name System (DNS) - a system used on the Internet for translating names of network nodes into their addresses.
Downstream - in communications, there are two circuits. One coming toward you and the other going away from you. Downstream is another term for
the transmission coming toward you.
Dual-Tone Multifrequency (DTMF) - a method of signaling consisting of a push-button or touch tone dial that sends out a sound consisting of two
discrete tones that are picked up and interpreted by telephone switches (either PBXs or central offices).
Dynamic Host Configuration Protocol (DHCP) - a network standard regulating the IP address and other information assigned to the clients by the
server.
Dynamic Host Control Protocol (DHCP) - a protocol that is used to dynamically allocate and assign IP addresses. DHCP allows you to move network
devices from one subnet to another without administrative attention.
E
E1 - wide area network digital transmission scheme. E1 is the European equivalent of a T1 line. The E1's higher clock rate (2.048 MHz) allows for 32
separate 64Kbps channels, which include one channel for framing and one channel for D-channel information.
Ethernet - a local area network used for connecting computers, printers, workstations, terminals, servers, etc., within the same building or campus.
Ethernet operates over twisted pair and/or over coaxial cable at speed up to 10Mbps.
Ethernet Controller - the unit that connects a device to the Ethernet cable.
Ethernet Switch - the device that connects local area networks.
Extensions - users over QX.
External User - users connecting QX by IP or PSTN calls.
F
Firewall - a combination of hardware and software that limits the exposure of a computer or group of computers to an attack from outside. A firewall is a
system or combination of systems that enforce a boundary between two or more networks. One purpose of an Internet firewall is to provide a single point
of entry where a defense can be implemented, allowing access to the Internet resources from within the organization, and providing controlled access
from the internet to hosts inside the organization’s internal networks.
Firmware - is computer or OS required software that resides on ROM.
Foreign Exchange (FX) - a Central Office trunk that has access to a distant Central Office. A dial tone is returned from that distant Central Office and a
location can be reached in the area of the foreign Central Office by dialing a local number.
Foreign Exchange Office (FXO) - a service that can be ordered from the telephone company that provides local telephone service from a central office
that is outside (foreign to) the subscriber’s exchange area. To generate a call from the computer telephony system to the POTS set, you will need a FXS
connection configured. See also FXS.
Foreign Exchange Station (FXS) - Interface that connects directly to a standard telephone, fax machine, or similar device over a standard RJ-11 modular
telephone cable, and supplies ringing voltage, dial tone, and similar signals to it. See also FXO.
Framing - A procedure for controlling errors. Consists of inserting bits so the receiver can identify the time slots allocated to each subchannel.
G
Gatekeeper - is the central control entity that performs management functions in a Voice and Fax over IP network and for multimedia applications such
as video conferencing. Gatekeepers provide intelligence for the network, including address resolution, authorization, and authentication services, the
logging of call detail records, and communications with network management systems. Gatekeepers also monitor the network for engineering purposes as
well as real-time network management and load balancing, controlling bandwidth, and providing interfaces to existing legacy systems.
Gateway - an entrance into and out from a communications network. Technically, a gateway is an electronic repeater that intercepts and steers electrical
signals from one network to another.
Greeting - voice messages that are played to the QX users or users calling to the QX activating specific services.
H
Hold Music - music played to the party that is on hold.
Host - an intelligent device attached to the network; can be also a mainframe computer.
Host Name - the name given to a mainframe computer or device.
Hunt Grouping - the QX service that allows configuring several users over QX to ring in series when a specific call arrives.
Hypertext Transfer Protocol (HTTP) - the protocol used by Web browsers and Web servers to transfer files, such as text and graphics files.
I
QX50/QX200/QX2000; (SW Version 6.0.x)
45
QX50/QX200/QX2000 Manual III: Extension User’s Guide
Integrated Services Digital Network (ISDN) - is a system of digital phone connections which allows voice and data to be transmitted simultaneously
across the world using end-to-end digital connectivity. There are two basic types of ISDN service: Basic Rate Interface (BRI) and Primary Rate Interface
(PRI). BRI is a basic service is intended to meet the needs of most individual users. PRI is intended for users with greater capacity requirements
Internet Control Message Protocol (ICMP) - a network-layer Internet protocol that reports errors and provides other information relevant to IP packet
processing.
Internet Protocol (IP) - a unique, 32-bit number for a specific TCP/IP host on the Internet, normally printed in decimal form (for example,
128.122.40.227). Part of the TCP/IP family of protocols, it describes the software that tracks the Internet address of nodes, routes outgoing messages, and
recognizes incoming messages.
Internet Service Provider (ISP) - a vendor who provides direct access to the Internet or a company that provides Internet access to other companies and
individuals.
Intrusion Detection System (IDS) - is a firewall, but together with deleting the dangerous packets or packets including intrusion attacks, IDS also keeps
information about dropped packets and the senders responsible for them.
IP address - also known as the Internet Address, is a unique 32-bit identifier for a specific TCP/IP host computer on a network. IP addresses are in dotted
decimal form, such as 192.168.10.26, with each of the four address fields assigned as many as 255 values.
IP address Mask - A range of IP addresses defined so that only machines with IP addresses within the range are allowed access to an internet service. To
mask a portion of the IP address, replace it with the asterisk wild card character (*). For example, 192.44.*.* represents every computer on the internet
with an IP address beginning with 192.44
IP Gatekeeper - defines the policies that govern a multimedia system such as dialing plans, user privileges, bandwidth consumption, and others. The
gatekeeper also provides the means to extract information from such a system for various purposes, e.g., billing information, users that are logged in, etc.
The gatekeeper is also a focal point for the introduction of supplementary services.
IP Gateway - most commonly, a network device that converts voice and fax calls, in real time, between the public switched telephone network (PSTN) and
an IP network. The main IP gateway functions include voice, fax, compression/decompression, packetization, call routing, and control signaling. Additional
features may include interfaces to external controllers, such as gatekeepers or soft-switches, billing systems, and network management systems.
IP PBX - an enterprise-based IP data network device that switches VoIP telephone traffic.
IP Telephony - a technology that allows voice phone calls to be made over the Internet or other packet networks using a PC via gateways and standard
telephones.
IPSec - is used to provide security for transmission of sensitive information over unprotected networks such as the Internet. IPSec acts at the network
layer, protecting and authenticating IP packets between participating IPSec devices ("peers"), such as Cisco routers.
J
Jitter Buffer - the buffer that collects incoming packets to place them in the right order. If the network has a high delay variation, increasing the Jitter
Buffer can improve the audio quality, but this also increases the delay.
L
LED - Light-Emitting Diode, A semiconductor device that emits visible light when conducting current. Has replaced incandescent lamps as indicators in
most electronic equipment.
Lifeline POTS - a voice telephone line that works even if electricity is cut off at the customer premises, since the line is powered from emergency backup
at the central office. Multiple lifeline POTS lines can be delivered on one copper pair with the use of a digital line powered pair gain system. A basic
telephone service supplying standard single line telephones, telephone lines, and access to the PSTN.
Local Area Network (LAN) - a short distance data communications network (typically within a building or campus) used to link computers and
peripheral devices under some form of standard control.
Login -the procedure of identifying a user with a username and a password to enter into the protected field.
M
Many Extensions Ringing - a QX service that allows configuring several users over QX to ring simultaneously when a specific call arrives.
Media Access Control (MAC) Address - the address for a device as it is identified at the Media Access Control layer in the network architecture.
Media Access Control (MAC) Layer - is one of two sublayers that make up the Data Link Layer of the OSI model. The MAC layer is responsible for moving
data packets to and from one Network Interface Card (NIC) to another across a shared channel.
Media Gateway - a generic class of products grouped under the Media Gateway Control Protocol (MGCP). A major function of the media gateway is simple
IP/TDM conversion under the control of a softswitch.
N
Name server - a directory service that provides a mapping between a resource’s global name and its physical location in the network.
QX50/QX200/QX2000; (SW Version 6.0.x)
46
QX50/QX200/QX2000 Manual III: Extension User’s Guide
Network Address Translation (NAT) - is used to allow LAN devices that do not have their own static IP addresses to connect to the Internet sharing an
IP address. NAT will assume control of assigning their IP address. Furthermore, the NAT takes care that packets will reach the LAN PC that originated the
traffic. This mechanism is absolutely transparent for the users (or the PCs in the LAN).
Network Time Protocol (NTP) - a protocol that is used for time counting in the Internet, based on the atomic clocks with the precision in milliseconds.
This is the recommended protocol for synchronizing the time of hosts in the network.
P
Packetization Interval - the time interval between two RTP packets of the same stream. If the interval is increased, the overhead is decreased but the
voice quality might deteriorate. If the interval is decreased, the network load is increased and the delay is reduced.
Password - a secret alphanumeric string used to identify and to allow the user to have access to a system.
PCM - a form of modulation in which the information signals are sampled at regular intervals and a series of pulses in coded form are transmitted
representing the amplitude of the information signal at that time.
Point-to-Point Protocol (PPP) - allows a computer to connect to the Internet with a standard dial-up telephone line and a high-speed modem and to
enjoy most of the benefits of the direct connection.
Point-to-Point Tunneling Protocol (PPTP) - enables virtual private networking - enabling secure remote access to corporate networks over the
Internet.
POTS (Plain Old Telephone Service) - is the standard telephone service that most homes use. It is also referred to as the PSTN, or the Public Switched
Telephone Network
Private Branch Exchange (PBX) - a telephone switch owned privately, usually by a large company. If it owns a PBX, a company does not need to lease a
telephone line for each telephone set at a site.
Proxy server - an intermediate device that receives SIP requests from a client and then initiates requests on the client's behalf.
Public Switched Telephone Network (PSTN) - refers to the local telephone company.
R
Real-Time Transport Protocol (RTP) - the Internet-standard protocol for the transport of real-time data, including audio and video, allows applications
to synchronize audio and video information. RTP connections are established between servers across the Internet after voice has been converted to IP
format. RTP is used in virtually all Voice-over-IP architectures, for videoconferencing, media-on-demand, and other applications.
Real-Time Transport Control Protocol (RTCP) - is the control protocol that works in conjunction with RTP. RTCP control packets are periodically
transmitted by each participant in an RTP session to all other participants. Feedback of information to the application can be used to control performance
and for diagnostic purposes.
Registration - procedure of user subscribing to a server. Usually some personal parameters such as username, password, etc., are required upon
registration.
Remote Testing - remote connection from the Epygi Support office to the customer’s QX for testing and/or for troubleshooting.
Router - A device that determines the next network point to which a data packet should be forwarded enroute toward its destination. The router is
connected to at least two networks and determines which way to send each data packet based on its current understanding of the state of the networks it
is connected to. Routers create or maintain a table of the available routes and use this information to determine the best route for a given data packet
RSA - is an asymmetric key system. It must be available on both sides of the VPN and generates on each side a different pair of keys, a private and a public
key.
S
Security Parameter Index (SPI) - is an index to keep VPN tunnels distinct. A security association is defined by destination, protocol and SPI. Without the
SPI, connections to the same gateway using the same protocol would not be distinguishable.
Session Initiation Protocol (SIP) - is an application-layer control protocol that can establish, modify and terminate multimedia sessions or calls. SIP is
increasingly used for Internet telephony signaling, in gateways, PC phones, softswitches, and softphones, but it is not limited to Internet telephony, and
can be used to initiate and manage any type of session, including video, interactive games, and text chat.
Signaling - a process of sending a transmission signal over a physical medium for communication.
Silence Suppression - a method that allows disabling RTP packet transmission when there is no voice activity. This feature helps to avoid extra traffic
when the RTP stream doesn’t contains voice data.
Simple Network Management Protocol (SNTP) - the Internet standard protocol developed to manage nodes on an IP network.
SIP address - unique address of the users registered on the SIP server. The address can be used to connect the user. The full SIP address has the following
format: “display name” <username@ipaddress:port>.
SIP server - this server is used for registering users. It gives a possibility to make IP connections between users registered on the same SIP server.
Software - PC programs.
QX50/QX200/QX2000; (SW Version 6.0.x)
47
QX50/QX200/QX2000 Manual III: Extension User’s Guide
Software PBX - a telephone system that converges voice and data on an industry-standard computing platform and uses computer telephony components
that conform to industry standards. Since they conform to industry standards, software PBXs are interoperable with third-party systems and CT
components. Conformance also allows software PBXs to run third-party enhanced applications such as desktop call control, graphical voice mail,
automatic call distribution (ACD), IP gateways, follow-me call forwarding, unified messaging, and CRM integration.
Speed Calling - a service that allows making a personal address book for every QX user. A simple digit combination can be assigned to any destination
phone number.
T
Transfer - a service giving a possibility to readdress incoming calls. Call Transfer can be conditional (with consultation) and unconditional (without
consultation).
Transmission Control Protocol (TCP) - a connection-oriented transport layer protocol that provides reliable full-duplex data transmission. TCP is part
of the TCP/IP protocol stack.
Transmission Control Protocol/Internet Protocol (TCP/IP) - is a networking protocol that provides communication across interconnected networks,
between computers with diverse hardware architectures and various operating systems.
Trunk: - is a communications channel between two points, typically referring to large-bandwidth telephone channels between switching centers that
handle many simultaneous voice and data signals.
Trunk Level 1 (T1) - a high-speed (1.544Mb/s) digital telephone line with the equivalent of 24 individual 64Kb/s channels that are joined via time
division multiplexing. A T1 line can be used to transmit voice or data, and many are used to provide connections to the Internet. T1 is the North American
equivalent of an E1 line.
U
UDP - a connectionless transport layer protocol in the TCP/IP protocol stack. UDP is a simple protocol that exchanges datagram without
acknowledgments or guaranteed delivery, requiring that error processing and retransmission be handled by other protocols.
Universal Serial Bus (USB) - is an interface with a protocol that is designed to handle a broad range of devices - telephones, modems, printers, etc.
Upstream- in communications, there are two circuits - one coming toward you and the other going away from you. Upstream is another term for the name
of the channel going away from you.
URL - an identifier used to locate content that is transported via the HTTP protocol.
Username - identification name of the user. Usually used for registration and login.
V
VCI - parameter used to configure ATM settings and is usually given by the Internet provider.
Virtual Private Network (VPN) - connects two local networks (intranets) over the insecure Internet securely. VPN routers manage authentication
between servers and clients and handle data encryption for the connection. Only authorized users can access the network and the data exchange cannot be
intercepted. A VPN includes authentication and encryption to protect data integrity and confidentiality. VPNs are “virtual” in the sense that individuals can
use the public Internet as a means of securely accessing an internal network. Once the VPN connection is established, users have access to the same
network resources, addresses, and so forth as if they were connected locally. VPNs are “private” because the data is encrypted between two VPN gateways.
Encryption makes it very difficult for anyone to intercept data and capture sensitive information such as passwords.
Voice mail - a brief message that external users can leave for the QX users in the event that nobody answers the call.
Voice Mail System (VMS) - a feature providing the possibility of leaving brief voice messages at the unavailable or busy QX extension’s mailbox.
Voice mailbox -is the mailbox where voice mails are collected.
Voice message - help messages that are played to the user giving a hint on how to manipulate the menus within QX using the phone handset.
Voice Over Internet Protocol (VOIP) - technology used to transmit voice conversations over a data network using the Internet Protocol. This provides
ability to carry normal telephony-style voice over an IP-based internet with POTS-like functionality, reliability, and voice quality.
VPI - parameter used to configure ATM settings usually given by the Internet provider.
W
Wide Area Network (WAN) - a communications network used to connect computers and other devices across a large area.
QX50/QX200/QX2000; (SW Version 6.0.x)
48
QX50/QX200/QX2000 Manual III: Extension User’s Guide
Appendix: Software License Agreement
EPYGI TECHNOLOGIES, LTD.
Software License Agreement
THIS IS A CONTRACT.
CAREFULLY READ ALL THE TERMS AND CONDITIONS CONTAINED IN THIS AGREEMENT. USE OF
THE QUADRO HARDWARE AND OPERATIONAL SOFTWARE PROGRAM INDICATES YOUR
ACCEPTANCE OF THESE TERMS AND CONDITIONS. IF YOU DO NOT AGREE TO THESE TERMS AND
CONDITIONS, YOU MAY NOT USE THE HARDWARE OR SOFTWARE.
1.
2.
3.
4.
5.
6.
7.
License. Epygi Technologies, LTD. (the "Licensor"), hereby grants to you a non-exclusive right to use the Quadro or QX Operational Software
program, the documentation for the software and such revisions for the software and documentation as the Licensor may make available to you from
time to time (collectively, the "Licensed Materials"). You may use the Licensed Materials only in connection with your operation of your Quadro or
QX. You may not use, copy, modify or transfer the Licensed Materials, in whole or in part, except as expressly provided for by this Agreement.
Ownership. By paying the purchase price for the Licensed Materials, you are entitled to use the Licensed Materials according to the terms of this
Agreement. The Licensor, however, retains sole and exclusive title to, and ownership of, the Licensed Materials, regardless of the form or media in or
on which the original Licensed Materials and other copies may exist. You acknowledge that the Licensed Materials are not your property and
understand that any and all use and/or the transfer of the Licensed Materials is subject to the terms of this Agreement.
Term. This license is effective until terminated. This license will terminate if you fail to comply with any terms or conditions of this Agreement or
you transfer possession of the Licensed Materials to a third party in violation of this Agreement. You agree that upon such termination, you will
return the Licensed Materials to the Licensor, at its request.
No Unauthorized Copying or Modification. The Licensed Materials are copyrighted and contain proprietary information and trade secrets of the
Licensor. Unauthorized copying, modification or reproduction of the Licensed Materials is expressly forbidden. Further, you may not reverse
engineer, decompile, disassemble or electronically transfer the Licensed Materials, or translate the Licensed Materials into another language under
penalty of law.
Transfer. You may sell your license rights in the Licensed Materials to another party that also acquires your Quadro or QX product. If you sell your
license rights in the Licensed Materials, you must at the same time transfer the documentation to the acquirer. Also, you cannot sell your license
rights in the Licensed Materials to another party unless that party also agrees to the terms and conditions of this Agreement. Except as expressly
permitted by this section, you may not transfer the Licensed Materials to a third party.
Protection And Security. Except as permitted under Section 5 of this Agreement, you agree not to deliver or otherwise make available the Licensed
Materials or any part thereof to any person other than the Licensor or its employees, without the prior written consent of the Licensor. You agree to
use your best efforts and take all reasonable steps to safeguard the Licensed Materials to ensure that no unauthorized person shall have access
thereto and that no unauthorized copy, publication, disclosure or distribution thereof, in whole or in part, in any form, shall be made.
Limited Warranty. The only warranty the Licensor makes to you in connection with this license is that the media on which the Licensed Materials
are recorded will be free from defects in materials and workmanship under normal use for a period of one (1) year from the date of purchase (the
"Warranty Period"). If you determine within the Warranty Period that the media on which the Licensed Materials are recorded are defective, the
Licensor will replace the media without charge, as long as the original media are returned to the Licensor, with satisfactory proof of purchase and
date of purchase, within the Warranty Period. This warranty is limited to you as the licensee and is not transferable. The foregoing warranty does not
extend to any Licensed Materials that have been damaged as a result of accident, misuse or abuse.
8.
EXCEPT FOR THE LIMITED WARRANTY DESCRIBED ABOVE, THE LICENSED MATERIALS ARE PROVIDED ON AN "AS IS" BASIS. EXCEPT AS
DESCRIBED ABOVE, THE LICENSOR MAKES NO REPRESENTATIONS OR WARRANTIES THAT THE LICENSED MATERIALS ARE, OR WILL BE, FREE
FROM ERRORS, DEFECTS, OMISSIONS, INACCURACIES, FAILURES, DELAYS OR INTERRUPTIONS INCLUDING, WITHOUT LIMITATION, TO ANY
IMPLIED WARRANTIES OF MERCHANTABILITY, FITNESS FOR A PARTICULAR PURPOSE, LACK OF VIRUSES AND ACCURACY OR COMPLETENESS OF
RESPONSES, CORRESPONDENCE TO DESCRIPTION OR NON-INFRINGEMENT. THE ENTIRE RISK ARISING OUT OF THE USE OR PERFORMANCE OF
THE LICENSED MATERIALS REMAINS WITH YOU.
9.
The foregoing limitation, exclusion and disclaimers apply to the maximum extent permitted by applicable law.
LIMITATION OF LIABILITY AND REMEDIES. IN NO EVENT SHALL THE LICENSOR OR ANY OTHER PARTY WHO HAS BEEN INVOLVED IN THE
CREATION, PRODUCTION OR DELIVERY OF THE LICENSED MATERIALS BE LIABLE FOR ANY CONSEQUENTIAL, INCIDENTAL, DIRECT, INDIRECT,
SPECIAL, PUNITIVE OR OTHER DAMAGES, INCLUDING, WITHOUT LIMITATION, LOSS OF DATA, LOSS OF BUSINESS PROFITS, BUSINESS
INTERRUPTION, LOSS OF BUSINESS INFORMATION, OR OTHER PECUNIARY LOSS, ARISING OUT OF THE USE OF OR INABILITY TO USE THE
LICENSED MATERIALS, EVEN IF THE LICENSOR OR SUCH OTHER PARTY HAS BEEN ADVISED OF THE POSSIBILITY OF SUCH DAMAGES. YOU AGREE
THAT YOUR EXCLUSIVE REMEDIES, AND THE LICENSOR'S OR SUCH OTHER PARTY'S ENTIRE LIABILITY WITH RESPECT TO THE LICENSED
MATERIALS, SHALL BE AS SET FORTH HEREIN, AND IN NO EVENT SHALL THE LICENSOR'S OR SUCH OTHER PARTY'S LIABILITY FOR ANY
DAMAGES OR LOSS TO YOU EXCEED THE LICENSE FEE PAID FOR THE LICENSE MATERIALS.
Compliance With Laws. You may not use the Licensed Materials for any illegal purpose or in any manner that violates applicable domestic or
foreign law. You are responsible for compliance with all domestic and foreign laws governing Voice over Internet Protocol (VoIP) calls.
QX50/QX200/QX2000; (SW Version 6.0.x)
49
QX50/QX200/QX2000 Manual III: Extension User’s Guide
10. U.S. Government Restricted Rights. The Licensed Materials are provided with RESTRICTED RIGHTS. Use, duplication or disclosure by the
Government is subject to restrictions as set forth in subparagraphs (c)(1) and (2) of the Commercial Computer Software—Restricted Rights clause at
48 C.F.R. section 52.227-19, or subparagraph (c)(1)(ii) of the Rights in Technical Data and Computer Software clause at DFARS 252.227.7013, as
applicable.
11. Entire Agreement. It is understood that this Agreement, along with the Quadro or QX installation and administration manuals, constitute the
complete and exclusive agreement between you and the Licensor and supersede any proposal or prior agreement or license, oral or written, and any
other communications related to the subject matter hereof. If one or more of the provisions of this Agreement is found to be illegal or unenforceable,
this Agreement shall not be rendered inoperative but the remaining provisions shall continue in full force and effect.
12. No Waiver. Failure by either you or the Licensor to enforce any of the provisions of this Agreement or any rights with respect hereto shall in no way
be considered to be a waiver of such provisions or rights, or to in any way affect the validity of this Agreement. If one or more of the provisions
contained in this Agreement are found to be invalid or unenforceable in any respect, the validity and enforceability of the remaining provisions shall
not be affected.
13. Governing Law. This Agreement shall be governed by and construed in accordance with the laws of the state of Texas, without regard to choice of
law provisions that would cause the application of the law of another jurisdiction.
14. Attorneys' Fees. In the event of any litigation or other dispute arising as a result of or by reason of this Agreement, the prevailing party in any such
litigation or other dispute shall be entitled to, in addition to any other damages assessed, its reasonable attorneys’ fees, and all other costs and
expenses incurred in connection with settling or resolving such dispute.
If you have any questions about this Agreement, please write to Epygi at 1400 Preston Road, Suite 300, Plano, Texas 75093 or call Epygi at (972)
692-1166.
15. Free Software. Certain software utilized in the Epygi products is free software in its original form or in its modified form. Both types of free software
are available to you free of charge for redistribution or modification under certain conditions. Permission is granted to copy, distribute and
or/modify any free software you wish to download, whether in its original or modified forms, under the GNU General Public License or Free
Documentation License, Version 1.1 or any later version published by the Free Software Foundation. BECAUSE THE FREE SOFTWARE IS LICENSED
FREE OF CHARGE, THERE IS ABSOLUTELY NO WARRANTY. Please make sure you download the GNU license from www.gnu.org . For a list of free
software go to http://www.epygi.com/about/free-software-list.
QX50/QX200/QX2000; (SW Version 6.0.x)
50