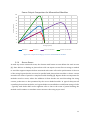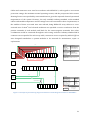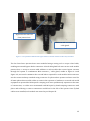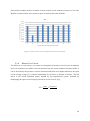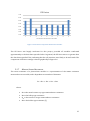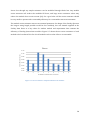
1
Honours Thesis Project Report PV Array Troubleshooting and Educational Facility Kieran Peters Supervisors M. Calais, T. Pryor, S. Glenister This page is intentionally left blank. I ACKNOWLEDGEMENTS I would like to express my appreciation to senior lecturers Dr Trevor Pryor and Dr Martina Calais, technician Iafeta ‘Jeff’ Laava and technical officer John Boulton for their guidance, advice and technical support. Thanks to their encouragement and experience throughout the past twelve months this project has become a successful reality. This thesis would not have been possible without their support. I wish you many years of trouble-free teaching and working with this educational facility. I II ABSTRACT The Photovoltaic Array Troubleshooting and Educational Facility is a specialised experimentation platform for researchers and students to develop a greater practical understanding of photovoltaic modules, arrays, shading effects and fault scenarios. The Facility was designed, constructed, tested, and delivered to Murdoch University in order to complete the requirements of an undergraduate engineering honours thesis. Proposed learning experiments involved the investigation of series, parallel, and bypass diode connections of or within photovoltaic modules, partial shading and mismatch effects, as well as the effectiveness of over-current protection under different fault conditions in an extra low voltage array. The Facility provides for the safe measurement of voltages and currents of individual module or array sections of the interconnected array using handheld multimeters and portable IV curve tracers. Research was conducted on background photovoltaic system theory, module construction and array design, followed by an in-depth examination of the relevant legal regulations applicable to this project. This research was followed by a basic feasibility analysis, used to determine the practicability of this project as a means to satisfy the client requirements, given the technical, operational, economic and scheduling opportunities available for application. Once feasibility was demonstrated the Facility could be designed in detail using software tools, with components specified, sourced, financed and ordered. Upon arrival of the build components the Facility was constructed using industry-standard tools and methods, and tested for module performance and student-level experiment suitability. The Photovoltaic Array Troubleshooting and Educational Facility project was a complete success. Many new experiments are now available to students, particularly dealing with photovoltaic fault scenarios. Almost all existing d.c. photovoltaic experiments from the Murdoch University Renewable Energy Engineering major can now be conducted in greater detail, on a full array of modules, while exposing students to industry standard components and techniques. The Facility is also available for open days and promotions, and shall be used to attract new students to the industry, the school, and generate a greater enthusiasm for solar power generation. II III LIST OF CONTENTS I ACKNOWLEDGEMENTS II ABSTRACT I II III LIST OF CONTENTS III IV LIST OF FIGURES VI V LIST OF TABLES VI LIST OF SYMBOLS VII LIST OF ABBREVIATIONS VII VIII IX CHAPTER 01: INTRODUCTION 1 1.1 Project Introduction 1 1.2 Document Structure 2 CHAPTER 02: RESEARCH AND LITERATURE REVIEW 5 2.1 5 Photovoltaic Module Research 2.1.1 The Photovoltaic Effect: 5 2.1.2 The ‘One-Diode Model’ Applied To Crystalline Photovoltaic Cells: 7 2.1.3 Typical Crystalline Photovoltaic Module Components 8 2.1.4 Shading Effects On Crystalline Photovoltaic Modules 9 2.1.5 Photovoltaic Module String Arrangements 9 2.1.6 Bypass Diodes Photovoltaic System Regulations Research 11 12 2.1.7 AS5033:2014 Installation and Safety requirements for photovoltaic (PV) arrays 12 2.1.8 AS3000:2007 Wiring Rules 12 2.1.9 AS3008.1:2010 Electrical Installations – Selection of cables 13 2.2 Available Products and Components 13 2.3 Existing Projects and Systems 15 III CHAPTER 03: DESIGN METHODOLOGY 16 3.1 Design Approach: 16 3.1.1 Research 17 3.1.2 Conceptualisation 18 3.1.3 Design Requirement Analysis 20 3.1.4 Feasibility Analysis 20 3.1.5 Preliminary Design 25 3.2 Detailed Design 26 3.3 Significant Design Issues 32 3.4 Key Assumptions 32 CHAPTER 04: FACILITY CONSTRUCTION 34 4.1 Component Acquisition 34 4.2 System Construction 34 4.2.1 PV Module Preparation 34 4.2.2 Photovoltaic Array Frame Construction 36 4.2.3 Photovoltaic Array Wiring Installation 40 4.2.4 Facility Accessory Construction 43 4.2.5 Wiring Enclosure Assembly 44 4.2.6 Control Panel Construction 46 4.2.7 Final System Assembly 48 CHAPTER 05: FACILITY TESTING 50 5.1 50 Module Testing 5.1.1 Maximum PV Module Power 51 5.1.2 Voltage at Module Maximum Power 52 5.1.3 Current at Module Maximum Power 53 5.1.4 Module Voltage at Open Circuit 54 5.1.5 Module Current at Short Circuit 55 5.1.6 Module Fill Factor 56 5.1.7 Module Series Resistance 57 5.1.8 Module Shunt Resistance 59 5.2 Selection of Spare PV Module 60 IV 5.3 Practical Experiment Results 62 5.3.1 Sample Experiment 01: Bypass Current Observation 62 5.3.2 Sample Experiment 02: String Fault Analysis 67 CHAPTER 06: CONCLUSIONS AND RECOMMENDATIONS 74 6.1 Project Conclusion 74 6.2 Recommendations for Future Works 75 VIII WORKS CITED 76 IX APPENDICES 77 V IV LIST OF FIGURES FIGURE 1-1: PHOTOGRAPH OF FACILITY AND CONTROL PANEL A, AS PICTURED IN THE PV IN AUSTRALIA REPORT 2014 [1]................................................................................................................................................ 1 FIGURE 1-2: DOCUMENT STRUCTURE AND RELATIONSHIP TO CHAPTERS. ............................................................. 3 FIGURE 2-1: A SIMPLIFIED SOLAR CELL, SHOWING CREATION OF HOLE-ELECTRON PAIRS. .......................... 5 FIGURE 2-2: NEWLY MANUFACTURED MONOCRYSTALLINE PHOTOVOLTAIC CELLS [6]. ................................. 6 FIGURE 2-3: ‘ONE-DIODE-MODEL’ EQUIVALENT CIRCUIT MODEL FOR A PHOTOVOLTAIC CELL................... 7 FIGURE 2-4: CROSS SECTION OF TYPICAL CRYSTALLINE, LAMINATED PHOTOVOLTAIC MODULE. ............. 8 FIGURE 2-5: I-V (CURRENT-VOLTAGE) CURVES FOR MISMATCHED PV MODULES. ........................................... 10 FIGURE 2-6: P-V (POWER-VOLTAGE) CURVES FOR MISMATCHED PV MODULES. ............................................... 11 FIGURE 3-1: PROJECT DESIGN APPROACH FLOWCHART. ................................................................................................ 16 FIGURE 3-2: CONCEPT GOOGLE SKETCH-UP DESIGN FOR FACILITY, FRONT VIEW. .......................................... 19 FIGURE 3-3: CONCEPT GOOGLE SKETCH-UP DESIGN FOR FACILITY, REAR VIEW. ............................................. 19 FIGURE 3-4: TELOS STRUCTURE GUIDE FOR FEASIBILITY ANALYSIS. ...................................................................... 21 FIGURE 3-5: DETAILED DESIGN FACILITY FRAME WITH TILTED ARRAY [12]. .................................................... 27 FIGURE 3-6: EXAMPLE OF PARTIAL WIRING DIAGRAM FOR ENCLOSURE A. FULL DIAGRAMS AVAILABLE IN APPENDIX I. ........................................................................................................................................................................... 28 FIGURE 3-7: CONTROL PANEL A EXPERIMENT PLATFORM. LARGER IMAGE SHOWN IN APPENDIX O. ... 29 FIGURE 3-8: CONTROL PANEL B EXPERIMENT PLATFORM. LARGER IMAGE SHOWN IN APPENDIX P. .... 29 FIGURE 3-9: EXAMPLE OF PARTIAL WIRING DIAGRAM FOR ENCLOSURE B. FULL DIAGRAMS AVAILABLE IN APPENDIX L. .......................................................................................................................................................................... 31 FIGURE 4-1: PREPARED PV MODULE WITH BYPASS DIODES REMOVED AND THIRD CABLE ENTRY INSTALLED. .................................................................................................................................................................................. 35 FIGURE 4-2: PHOTOVOLTAIC MODULE FLY-LEADS INSTALLED WITH MC4 CONNECTORS. .......................... 36 FIGURE 4-3: PV ARRAY MOCK-UP ON INDUSTRY STANDARD MOUNTING RAILS. ............................................... 37 FIGURE 4-4: PV ARRAY MEASURED FOR ROTATION SHAFT CONSTRUCTION, ALSO SHOWN IS ARRAY FRAME. ........................................................................................................................................................................................... 38 FIGURE 4-5: MODULE MOUNTING BRACKETS WITH EARTHING CONNECTION PINS [16]. ............................ 38 FIGURE 4-6: FACILITY FRAME CONSTRUCTED WITH PNEUMATIC CASTER WHEELS....................................... 39 FIGURE 4-7: ARRAY MOUNTED ON FACILITY FRAME USING PILLOW BLOCK BEARINGS. .............................. 40 FIGURE 4-8: PV MODULE CABLE LOOM MEASURED AND CUT TO SIZE. ................................................................... 41 FIGURE 4-9: ARRAY WIRING ROUTED THROUGH INDUSTRY STANDARD CONDUIT TO WIRING ENCLOSURES. .............................................................................................................................................................................. 41 FIGURE 4-10: PV MODULE WIRING INTERFACE WITH ENCLOSURE A, USING CUSTOM CABLE GLANDS. 42 FIGURE 4-11: FACILITY TESTING WITHOUT CONTROL PANELS. ................................................................................. 42 FIGURE 4-12: SENSOR MOUNTING PANEL CONSTRUCTION. ......................................................................................... 43 FIGURE 4-13: PV ARRAY WITH SENSOR PANEL (GREY) MOUNTED ON THE PLANE OF ARRAY. .................. 44 FIGURE 4-14: ENCLOSURE A BACK PLATE WITH PARTIALLY COMPLETE WIRING. ........................................... 45 FIGURE 4-15: WIRING ENCLOSURE BACK PLATE INSTALLATION AND INTERCONNECTION. ....................... 46 VI FIGURE 4-16: PAPER MOCK-UP OF CONTROL PANEL GRAPHIC DESIGN. ................................................................. 47 FIGURE 4-17: INTERFACE WIRING FOR ENCLOSURE A CONTROL PANEL. ............................................................. 48 FIGURE 4-18: COMPLETED FACILITY ON SITE AT MURDOCH ENGINEERING BUILDING 220 ROOF. ......... 49 FIGURE 5-1: MAXIMUM POWER COMPARISON BETWEEN PV MODULES. ............................................................... 51 FIGURE 5-2: MAXIMUM POWER VOLTAGE COMPARISON BETWEEN PV MODULES........................................... 52 FIGURE 5-3: MAXIMUM POWER CURRENT COMPARISON BETWEEN PV MODULES. ......................................... 53 FIGURE 5-4: OPEN CIRCUIT VOLTAGE COMPARISON BETWEEN PV MODULES. ................................................... 55 FIGURE 5-5: SHORT CIRCUIT CURRENT COMPARISON BETWEEN PV MODULES. ............................................... 56 FIGURE 5-6: FILL FACTOR COMPARISON BETWEEN PV MODULES. ........................................................................... 57 FIGURE 5-7: SERIES RESISTANCE COMPARISON BETWEEN PV MODULES. ............................................................ 58 FIGURE 5-8: SHUNT RESISTANCE COMPARISON BETWEEN PV MODULES. ............................................................ 60 FIGURE 5-9: IV AND PV PLOTS FOR PV MODULE 01. .......................................................................................................... 61 FIGURE 5-10: IV AND PV PLOTS FOR PV MODULE 02. ....................................................................................................... 62 FIGURE 5-11: FACILITY CONTROL PANEL SECTION REQUIRED FOR SAMPLE EXPERIMENT 01. ................ 63 FIGURE 5-12: MANUAL LOAD CONNECTION CONTROL PANEL LAYOUT. ................................................................ 64 FIGURE 5-13: MPPT LOAD CONNECTION CONTROL PANEL LAYOUT. ....................................................................... 64 FIGURE 5-14: UNSHADED PHOTOVOLTAIC MODULE [23]. ............................................................................................. 65 FIGURE 5-15: SUGGESTED PARTIAL SHADING PATTERN FOR PHOTOVOLTAIC MODULE [24]. ................... 65 FIGURE 5-16: SAMPLE EXPERIMENT 01 IV AND PV CURVE RESULT FOR THREE PARALLEL MODULES. 67 FIGURE 5-17: EQUIVALENT CIRCUIT MODEL DIAGRAM FOR SAMPLE EXPERIMENT 02. ................................ 68 FIGURE 5-18: CONTROL PANEL B LAYOUT SHOWING COLOURED BANANA SOCKETS. .................................... 69 FIGURE 5-19: STRING CURRENT MEASUREMENTS FOR SAMPLE EXPERIMENT 02 UNDER VARIOUS LOADS. ............................................................................................................................................................................................ 71 V LIST OF TABLES TABLE 1: SIMPLIFIED COMPONENT SURVEY. ........................................................................................................................ 13 TABLE 2: TECHNICAL FEASIBILITY MATRIX .......................................................................................................................... 23 TABLE 3: DETAILED DESIGN FACILITY PHYSICAL DIMENSIONS. ................................................................................ 27 TABLE 4: SPI-SUN SIMULATOR RESULTS FOR PV MODULES ......................................................................................... 50 TABLE 5: PARAMETER COMPARISON FOR PHOTOVOLTAIC MODULES ONE AND TWO................................... 60 VII VI LIST OF SYMBOLS A A Ampere C °C Degree Celcius α Temperature coefficient of Current D …° Degree (plane angle) H Hz Hertz K kg Kilogram kW Kilowatt M mA Milliampere m2 Square meter N ηc Module efficiency O Ω Ohm P κ Temperature coefficient of Power V V Volts β Temperature coefficient of Voltage W W Watt VIII VII LIST OF ABBREVIATIONS A a.c. Alternating current D d.c. Direct current E ELV Extra-low voltage I IMP Maximum power current ISC Short circuit current IV Current-Voltage characteristic L LV Low voltage M MPP Maximum power point MPPT Maximum power point tracker P PMAX Maximum Power PV Photovoltaic S STC Standard test conditions, 1000Wm2, ETC T TC Temperature coefficient V VMP Maximum power voltage VOC Open circuit voltage W WP Peak wattage IX This page is intentionally left blank. CHAPTER 01: INTRODUCTION 1.1 Project Introduction The Photovoltaic Array Troubleshooting and Educational Facility is a specialised experimentation platform for researchers and students to develop a greater understanding of photovoltaic modules, arrays, shading effects and fault scenarios. The Facility was designed, constructed, and tested to complete the requirements of an undergraduate engineering honours thesis. Figure 1-1: Photograph of Facility and Control Panel A, as pictured in the PV in Australia Report 2014 [1]. For several years Murdoch University has operated a number of courses involving photovoltaic system design, particularly in the field of Renewable Energy Engineering. These courses involve practical experiments in addition to software and mathematical simulations. Academic chairs 1 and course supervisors have identified a broad range of photovoltaic experiments considered appropriate as learning exercises for future students. Proposed learning experiments involve the investigation of series, parallel and bypass diode connections of/within PV modules, partial shading and mismatch effects, as well as the effectiveness of over-current protection under different fault conditions in an extra low voltage PV array. The facility should allow for the safe measurement of voltages and currents of individual module/array sections of the interconnected array (at least three strings in parallel) using handheld multimeters and portable IV curve tracers [2]. Fault finding involves conducting tests on electrical installations to discover faults or verify that the installation is operating correctly. “It may also include the process of applying testing instruments or devices to various parts of the electrical installation and equipment to determine how the electrical installation and equipment is operating” [3]. Fault finding is an important activity to understand for any photovoltaic system designer, operator, or service technician, as dangerous faults on photovoltaic arrays can be invisible to the lay man and difficult to detect. A need therefore exists for a practical teaching tool to be implemented for use in these and future courses. This tool would take the form of a Photovoltaic Array Troubleshooting and Training Facility, a small, configurable array of photovoltaic modules with a range of measurement, testing and logging capacities available to students. The purpose of this thesis project was to fulfil this need through the design, construction, testing, and delivery of such a teaching tool. 1.2 Document Structure This document shall follow a basic structure that can be simplified as: introduction, background, core and synthesis. The introduction explains what the thesis project is about; the problems solved by this project, the aims and scope, and a brief overview of the thesis report. The background reviews knowledge required for a reader to understand the project, including photovoltaic theory, practice, and relevant legal requirements. The core section deals with the design, construction, testing, and experiment results of the project. The synthesis draws together the results of the project to summarise the work and evaluate the degree to which the Facility solves the problems identified in the introduction. The basic structure relates to the chapters of this document as shown in Figure 1-2 below. 2 INTRODUCTION CHAPTER 01 BACKGROUND CHAPTER 02 CHAPTER 03 CORE CHAPTER 04 CHAPTER 05 SYNTHESIS CHAPTER 06 Figure 1-2: Document structure and relationship to Chapters. 3 This page is intentionally left blank. 4 CHAPTER 02: RESEARCH AND LITERATURE REVIEW 2.1 Photovoltaic Module Research 2.1.1 THE PHOTOVOLTAIC EFFECT: A solar cell is a large semiconductor diode. The cell, shown in Figure 2-1, consists of a p-n semiconductor junction created by doping a semiconductor crystal with impurities; boron and phosphorous are frequently used. Figure 2-1: A simplified solar cell, showing creation of hole-electron pairs. Within the crystalline structure of a crystalline photovoltaic cell, atoms require four valence band electrons to bind with the structure. The n-region contains many free negative charges as the introduced impurities have a greater number of valence band electrons than the four required. This results in a region of weakly bonded electrons that could move in a conduction band as current, if provided with enough energy. This energy could be supplied by photons, 5 particles of light, delivered through a grid of metal that forms one electrical contact of the cell. The other region is doped with different impurities that have less than four outer electrons; additional electrons are required for a complete bind into the crystal structure, but these can be ‘borrowed’ from nearby atoms, producing a shift in the placement of the missing electron. These positive-charge ‘holes’ outnumber the free electrons in the region, so the region is described as a p-region [4]. The p-type and n-type semiconductors are brought together to form a metallurgical junction. A metallic layer on the back of the cell serves as the other electrical contact for the diode. When photons enter the cell through the front, a current will flow through an external path connecting the two metallic contacts [5]. Other contact configurations exist but this simple model is sufficient for the purposes of understanding this document. Figure 2-2: Newly manufactured monocrystalline photovoltaic cells [6]. 6 2.1.2 THE ‘ONE-DIODE MODEL’ APPLIED TO CRYSTALLINE PHOTOVOLTAIC CELLS: The behaviour of a photovoltaic cell may be represented as an equivalent electrical circuit model. Such models are developed primarily for one semiconductor cell, and assume that all connected cells are identical, but are sufficient for this analysis. Current produced as photons excite electrons in the semiconductor is represented by a current source, producing current IL. A series resistance, Rs, may be used to represent the resistance of the silicon wafer, the metal contacts and the resistance between silicon and metal contacts to current flow. A shunt resistance represents manufacturing defects that lead to internal current flow. Typically non-ideal junction properties or impurities will give rise to this behaviour. For the purposes of this document the shunt resistance can be considered a constant. A perfect PV cell would have zero or very low series resistance and an infinite or very high shunt resistance. A diode permits current to short-circuit across the cell in shunt configuration under certain conditions: 𝐼𝐷 = 𝐼0 [𝑒 𝑞(𝑉+𝐼𝑅𝑆 ) 𝑘𝑇 − 1] where q is element charge and k is the Boltzmann constant. Using Kirchoff’s current law to solve for the current through the load ILOAD: 𝐼𝐿𝑂𝐴𝐷 = 𝐼𝐿 − 𝐼𝐷 − 𝐼𝑆𝐻 Figure 2-3: ‘One-diode-model’ equivalent circuit model for a photovoltaic cell. 7 2.1.3 TYPICAL CRYSTALLINE PHOTOVOLTAIC MODULE COMPONENTS Typical crystalline photovoltaic modules consist of a combination of individual photovoltaic cells encased in a protective structure that permits photons to enter the cells while preventing damage from torsion, weather, vandalism, physical impacts, etc. A generic cross section of such a module is shown in Figure 2-4. An aluminium frame is often, but not always, used to provide the module with rigidity and simplify mounting options. Figure 2-4: Cross section of typical crystalline, laminated photovoltaic module. A hardened or tempered glass layer (typically with anti-reflective coating) permits photons to strike the PV cells while protecting the cells from damage. An encapsulant, typically ethyl-vinylacetate (EVA) surrounds the cells and forms an airtight layer [7]. Electrical conductors run from cell to cell and connect the internal circuit of the module. The strings of conductor-connected cells are terminated in a junction box that permits connections to the load to be made, and houses any bypass and blocking diodes that may be installed. A plastic laminate layer, such as Tedlar [7], may be used on commercial modules to provide support for the cells from behind. Modules are typically assembled as a string of photovoltaic cells. Many crystalline modules commercially available today contain 36 cells in series to produce voltages high enough to charge 12V batteries. 8 2.1.4 SHADING EFFECTS ON CRYSTALLINE PHOTOVOLTAIC MODULES Shaded or partially shaded crystalline photovoltaic modules do not produce rated maximum current or power. A shaded photovoltaic cell experiences reduced current flow, with current reducing proportionally as shading increases until the cell is completely shaded and no current may flow. As series strings of cells are limited to the lowest-current cell [4], partial shading of a module can have significant impacts on the behaviour of the module or even the array of modules. Best PV cell performance and return on investment therefore requires the smallest amount of shading possible. 2.1.5 PHOTOVOLTAIC MODULE STRING ARRANGEMENTS Modules can be connected in a similar manner to simple voltage sources, such as batteries. Photovoltaic modules are however not easily modelled as ideal, constant, voltage or current sources, and can be configured in series or parallel combinations to produce a range of output currents and voltages. Series-connected modules produce a voltage at maximum power approximately the sum of the individual modules maximum power voltages. A string of series-connected modules is limited by the module producing the lowest current at that voltage. This module will dissipate the additional current generated by other modules in the string as heat. Series combinations are typically used in industry to produce high array voltages in order to simplify converter design. Modules connected in parallel theoretically produce a net current that is the sum of currents produced by each individual module in the string. The voltage across each parallel PV module may be considered to be equal for the purposes of this simple working understanding. The result of a parallel combination is to increase the total available current over a similar voltage range to the individual modules. 9 Current Output Comparison for Mismatched Modules 6 Current (Amps) 5 4 3 2 1 0 0 5 10 15 20 25 30 35 40 45 50 Voltage (Volts) Module A Module B Series Combination Parallel Combination Figure 2-5: I-V (Current-Voltage) curves for mismatched PV modules. Series and parallel combinations can be connected to form an array of photovoltaic modules. Figure 2-5 shows a simple set of measurements taken using two PV modules on hand at Murdoch. Figure 2-5 displays two combinations of modules that are not producing the same current are shown; such a mismatch could occur due to a design error, or more frequently due to partial shading on the under-producing module. Series combinations are shown to produce a much higher voltage than the individual modules, and a parallel combination is shown to produce a high current while maintaining the same voltage as the single modules. Similarly, Figure 2-6 shows the resulting power produced by each combination. It can be seen clearly that the photovoltaic module producing a lesser current limits the series combination power, while the parallel combination remains free to generate as much power as possible given the limited current production. 10 Power Output Comparison for Mismatched Modules 100 90 80 Power (Watts) 70 60 50 40 30 20 10 0 0 5 10 15 20 25 30 35 40 45 50 Voltage (Volts) Module A Module B Series Combination Parallel Combination Figure 2-6: P-V (Power-Voltage) curves for mismatched PV modules. 2.1.6 BYPASS DIODES As with any series connected circuit, the element with lowest current defines the total current [4]. Since defects or shading on photovoltaic cells can impair current flow on strings, a method to avoid the negative impacts defects associated with some cells on the performance of the rest of the string. Bypass diodes are wired in parallel with photovoltaic modules to divert current around in the event of partial or complete module shading [8]. Bypass diodes are important for modules wired in series, where the addition of these diodes can avoid throttling the string current production to that permitted by the worst shaded module. In typical thirty-six-cell crystalline photovoltaic modules, two bypass diodes are installed across different strings of cells – typically each diode shall service eighteen cells so that in the event of partial shading, the module could continue to contribute some current to the string as per usual. 11 Photovoltaic System Regulations Research Photovoltaic systems are not exempt Australian Standards regulations for system design, installation and usage. The Facility is no exception to this; two primary Standards documents are applicable to the system: AS5033 of 2014, regarding installation and safety requirements specific to photovoltaic arrays, and AS3000 of 2007, the standard “wiring bible” document of wiring rules relevant to any electrical system for use in Australia. Standard document AS3008 of 2001 was also found to be a useful guide, but is considered as a guide only, as AS3008 deals with a.c. cables and wiring only. The key elements of these documents essential to a full understanding of this project are outlined below. In general, sections examined within each Standard shall be described as “Standard ID”-“Section ID”. For example, “Installation and safety requirements for photovoltaic (PV) arrays section 2.2, array mechanical designs”, would be describes as “AS5033-2.2”. 2.1.7 AS5033:2014 INSTALLATION AND SAFETY REQUIREMENTS FOR PHOTOVOLTAIC (PV) ARRAYS AS5033 is a significant document used to ensure the Facility meets a number of legal requirements set by Australian Standards. Methods for determining wire, switch and fuse sizes and necessities are explored, with the intention of protecting human life and Facility infrastructure. Design configuration restrictions are specified for elements such as the frame, array configuration, cable routing, enclosure design, signage, and so on. A full analysis of the relevant AS5033 requirements is set out in APPENDIX A; a reader not familiar with this Standard may find such an analysis useful for an understanding of the AS5033 requirements on the Facility. 2.1.8 AS3000:2007 WIRING RULES AS3000 is an important document for the safety of people using and near to the Facility. Colloquially known as the ‘wiring bible’, this Standard is applicable to almost any electrical installation used within Australia. At all times AS3000 must be adhered to, with explicit protection systems enforced wherever required or suggested by the Wiring Rules. This Standard specifies that any electrical installation shall be designed to protect persons, livestock and property from harmful effects, function correctly as intended, minimise inconvenience in the event of a fault and facilitate safe operation, inspection, testing and maintenance for the life of the system. Full details of the AS3000 requirements on the Facility are listed in APPENDIX B. 12 2.1.9 AS3008.1:2010 ELECTRICAL INSTALLATIONS – SELECTION OF CABLES AS3008.1 defines methods for cable selection for common cable use up to and including 600 volts at 50 hertz, a.c. based on current-carrying capacity, voltage drop, and short-circuit temperature rise. Although this Standard deals with a.c. cable selection, it is suggested as a guide by AS5033 for cable selection throughout the Facility [9]. “AS/NZS 3008.1 series applies to a.c. cables, but for the purposes of [AS 5033], the current rating tables and calculations are relevant also for d.c.” [9]. This standard defines minimum ratings for cables that must be adhered to at all points on the Facility. 2.2 Available Products and Components A survey of parts and components available for use on the Facility was conducted. This research would be particularly important as a great number of design choices would depend on component availability. In the interest of brevity, the most important parts researched are displayed in Table 1 below. A full list of components used in the construction of the Facility are listed in APPENDIX S. Table 1: Simplified component survey. RS Australia, Altronics, Jaycar, SolarMatrix These documents are essential for correctly Product Catalogues specifying real, obtainable components throughout the Facility. One of the largest issues encountered was an inability to access quality, appropriate components that result in safe, long running application in the real world. Yingli Data Sheets Yingli Data Sheets were initially used wherever general physical or electrical dimensions associated with the PV modules are required. These measurements shall always be cross-checked against the actual modules when such an activity is possible. 13 Lorentz Data Sheets See Yingli Data Sheets above. It is notable that the Lorentz data sheets significantly deviated from the real Lorentz PV modules – data sheets alone are not necessarily suitable as sole means of determining component suitability. PROVA Curve Tracer, UniT DMM and Measurement devices have limitations on PROTEK DMM Manuals the voltages and currents able to be safely measured. These limitations impose design restrictions on the Facility. IPD Telergon, ABB and other d.c. Isolators Isolators are available for a number of poles. Of particular note were the Telergon eightpole, lockable d.c. isolators, capable of isolating eight separate circuit elements at the same time. Various Banana, XLR and other Plug/Socket A large number of sockets and connectors Data Sheets were available, however sockets with documented current and voltage ratings proved difficult to find. Rated plugs and sockets would be required to demonstrate that student-interaction elements of the Facility would be safe to use. ABB Overcurrent Protection Devices Overcurrent protection devices are available in a number of configurations, such as fastbreaking, slow-breaking, etc. A balance may be found between compliance with legal regulations, adequate student protection, and operational feasibility. BlueSea Push Specifications Button Circuit Breaker BlueSea breakers were the only available d.c. overcurrent protection devices for low nominal currents 14 2.3 Existing Projects and Systems A number of photovoltaic-oriented projects have previously been conducted at Murdoch University. Thesis report documents are available for many of these systems, and were examined for insight on potential challenges or roadblocks that may impact this project. These projects included, but were not limited to: Thesis Project: Stuart Kempin o Kempin, Stuart. 2012. A Photovoltaic Training Facility On The Murdoch University Engineering & Energy Building’s North East Roof, Engineering, Murdoch University. o Kempin’s thesis involved the production of a PV educational training facility, albeit on a larger scale than this project. This document has proved valuable for insight into the challenges faced when constructing PV training facilities. Thesis Project: Benjamin Marshall o Marshall, Ben, 2012. Solar Glider o Marshall’s thesis involved the design and construction of a small photovoltaicpowered model aircraft. This document was useful as a guide to technical representations of reasonably difficult concepts. Solar Trainer for laboratory PV systems education o Dolan, Dale S., Lisa Friedman, Jonathan Huff, and Taufik Taufik. Solar trainer for laboratory photovoltaic systems education, 2012. o As with Kempin’s thesis, this document has provided a valuable insight into the production of training and laboratory equipment for use by students. 15 CHAPTER 03: DESIGN METHODOLOGY 3.1 Design Approach: A typical engineering design approach was observed throughout this project. Figure 3-1 shows the design approach as a flowchart, where each stage is completed sequentially until the design is finalised. Research Conceptualisation Feasibility Analysis •Australian Standards •PV design/installer references •Product catalogues and component data sheets •Brainstorming •Discussions •Component Research •Personal Experience •Technical feasibility •Basic legal feasibility •Economic feasibility •Real component availability Design requirement analysis Preliminary design Detailed design •Requirement conflicts removed •Client expectations noted •Usage/transit sites examined •Meet all relevant Standards •Paper/Whiteboard Sketches •Google Sketch-up •Basic wiring diagrams •Frame and component layout •Microsoft Excel/Visio •Detailed Sketches •Strict dimensions declared •Materials and components chosen Figure 3-1: Project design approach flowchart. Research was undertaken to determine the minimum requirements of Australian Standards relevant to the Facility, to survey existing PV education teaching systems, and to determine the range of available components and parts that may be used within the facility. Following the successful completion of the research stage, a conceptualisation stage was undertaken to generate concepts and ideas for the system design. This stage represents a significant creative design phase in the project, where a reasonably unstructured process occurred. Brainstorming and sketches were used to assist the formation of ideas, coupled with a certain amount of component research to ensure generated concepts were reasonable. Based on the initial research and conceptualisation a simplified feasibility analysis was conducted. A short technical feasibility assessment was conducted to determine whether or not 16 the experiments required can actually be performed using available components. A simple legal feasibility assessment was conducted to ensure the experiments could be conducted whilst still adhering to all legal requirements of Australian Standards found in the research stage. A basic economic feasibility test was then conducted to compare an estimated cost of the system to commercially available systems; any differences were identified and explored. Once system feasibility was established, a short design requirement analysis was conducted. The purpose of this analysis was to remove requirement conflicts and confirm client expectations. Facility usage and storage locations and transit paths were examined to ensure the system complied with all expected client usage patterns while maintaining system longevity and usability. Once all relevant design requirements were confirmed, and all conflicts resolved, a preliminary design was generated. This design phase involved the use of tactile design tools, such as whiteboard diagrams and pen-to-paper sketching of the facility frame, wiring and PV module placement. This progressed to design using software tools, predominantly Google Sketch-Up and Microsoft Visio, as these tools were readily available. The preliminary designs naturally progressed to a detailed design stage. During the detailed design software tools such as Microsoft Visio were used to produce detailed wiring diagrams and sketches, and produce the control panel interface designs. 3.1.1 RESEARCH Research formed an important early stage of system design for the Facility. Research was required to determine the minimum legal and operational requirements for various system elements. Research was undertaken to determine the minimum requirements of Australian Standards relevant to the Facility (detailed in Section 0), to survey existing photovoltaic education teaching systems, to familiarise project members with standard industry photovoltaic installation techniques, and to determine the range of available components, equipment, and parts that may be used within the facility. A search was conducted for published reports of similar systems. This search was largely unfruitful, with the exception of a ‘Solar Trainer Laboratory’ at California Polytechnic State University and a ‘Solar PV Troubleshooting Learning System’ manufactured by Amatrol in Indiana, U.S.A. The former focused on the mechanical tracking movement of a single photovoltaic module [10], and the latter on Balance of System Components such as power distribution, grid-connection and micro-inverters [11]. A small assortment of primary-level 17 education resources for solar power learning were also discovered, but found to be largely irrelevant due to the overly simplistic nature of concepts and models discussed in such works. The Photovoltaic Array Troubleshooting and Educational Facility was therefore considered to be reasonably unique because it caters to an altogether different area of essential photovoltaic system design understanding – outlined in the introduction of this document. A survey was conducted of available photovoltaic modules, components and equipment. It was found that the majority of the locally available modules were supplied with poor documentation; a number of modules simply did not match the physical or electrical dimensions of their respective datasheets. Many components ideal for use in the Facility were available with a short delay, so time was allotted in the project schedule to account for such delays. In general, whatever components not available from local suppliers could be ordered from national or international suppliers as required, with an additional shipping charge applied. 3.1.2 CONCEPTUALISATION Facility conceptualisation occurred with the aid of a number of elements, including personal experiences with current relevant engineering experiments, meetings and discussions with relevant Murdoch University staff for ideas, concepts, and warnings. An examination of appropriate locations for facility use assisted in the generation of ideas for system design. Conceptual drawings were produced using tactile pen-and-paper, whiteboard, and software methods, such as Google Sketch-Up (shown in Figure 3-2 and Figure 3-3). This stage represents a significant creative design phase in the project, where a reasonably unstructured process occurred. 18 Figure 3-2: Concept Google Sketch-Up design for Facility, front view. Figure 3-3: Concept Google Sketch-Up design for Facility, rear view. 19 3.1.3 DESIGN REQUIREMENT ANALYSIS The design requirement analysis focused on understanding the specific scope of the project, the operation of the Facility to be produced and the additional, occasionally conflicting requirements of several members of Murdoch University staff. Conflicts occurred between directives of individual project supervisor staff members as well as between said directives and the relevant Australian Standards. Key expectations were noted, including requirements for current and voltage for certain experiments, Facility usage locations, and subsequent transit pathways and methods. After several rounds of short discussions and informal interviews, all design requirement conflicts were removed and the resulting requirements consolidated to a single Scope. Sites for facility situation were then examined, along with all required doorways, corners, corridors and elevators to reach these locations. Proximity of proposed usage sites to mains power outlets was examined and found to be acceptable. Annual average peak-sun-hours and incoming beam radiation data from local sites were examined to ensure adequate sunlight would be available during all Murdoch University teaching periods. With the additional aid of a Solar Pathfinder solar siting device, the required siting locations were determined to be suitable for use year-round. The main intended usage site of Engineering Building 220 on the South St Murdoch University campus. 3.1.4 FEASIBILITY ANALYSIS A basic feasibility analysis was performed to ensure the project was feasible under the current design requirement understanding. The TELOS structure (Technical, Economic, Legal, Operational, and Scheduling) was used as a guide to direct this analysis. 20 Technical Feasibility Economic Feasibility Legal Feasibility Operational Feasibility Schedule Feasibility Figure 3-4: TELOS structure guide for feasibility analysis. 3.1.4.1 TECHNICAL FEASIBILITY The technical feasibility study attempted to determine whether Murdoch University has the necessary technical expertise to handle completion of the project. It was necessary to gain an understanding of the present technical resources of Murdoch and their applicability to the expected needs of the proposed Facility. A simple evaluation of the skills, tools, Hardware, and software available and how these meet the needs of this project’s product was conducted; the results of this evaluation are shown in 21 Table 2. The general result of this technical feasibility study was positive: Murdoch University has access to the required technical resources to successfully see this project through to completion. 22 Table 2: Technical feasibility matrix Technical Skill, Expertise, or Tool Applicable Murdoch University Sufficient? Required for Project Option Available for Project (Yes/No) Tertiary study level research skills Skills provided by Mr Kieran Peters, Yes under advisement by Dr Trevor Pryor and Dr Martina Calais Access to Australian Standards Murdoch University subscription to SAI Yes Global Standards with online access Access to PV Module reference texts Texts and Online Text Access provided Yes and Installation reference texts by Murdoch University Access to component Data Sheets Data Sheets provided in most cases by Yes Retailer, Wholesaler, Distributor or Manufacturer Access to suitable design software Software tools tools. Microsoft SpiceNet, (Microsoft Visio, Yes Excel, etc.) provided by Murdoch University. Component purchasing procedure Purchase Order procedure determined Yes structure and experience by Murdoch University. Supplier contacts provided by Mr Kieran Peters. Finance process advice provided by Ms Jann Rizkallah and Ms Miriam Everall. Essential basic Hand and Power Tools Tools provided by Mr Kieran Peters, or Yes able to be purchased on behalf of Murdoch University where required Machining and Welding Skills and Tools Workshop and Skills provided by Yes technical officer Mr John Boulton Electrical Component, Cabling and Tools and Skills provided by Mr. Kieran Yes Equipment Installation Skills and Tools Peters, technician Mr Iafeta Laava, and technical officer Mr John Boulton (licenced electrician) Site Suitability determination Skills and Tools provided by Murdoch University. Tools Yes Skills provided by Mr Kieran Peters 23 3.1.4.2 ECONOMIC FEASIBILITY A simple economic feasibility study was conducted to ensure the Facility would provide positive economic benefits to Murdoch University exceeding the cost of design, components, construction and testing. Positive benefits included the availability of an entirely new teaching tool, providing a greatly enhanced learning experience for students when compared to existing tools, as well as enhanced promotion capabilities available to Murdoch University for attracting new students to relevant courses. Project costs were limited to component purchases, as individuals undertook this project on a volunteer basis. This feasibility analysis section was not exhaustively completed; it quickly became apparent that the positive difference between project costs to Murdoch University and economic benefits obtained from a completed Facility was an order of magnitude greater than the alternative option to purchase a ready-made system that did not meet the entire scope of project, such as the Amatrol PV Troubleshooting unit [11]. 3.1.4.3 LEGAL FEASIBILITY A short legal feasibility study was performed to ensure that relevant standards and regulations can be met wherever possible. The Facility represents a special case that more closely resembles a test bench than a power generation facility; explicit compliance with some standards or regulations may be deemed unnecessary by project supervisors. In particular, AS5033-3.3.4 specifies the requirement for string overcurrent protection based on a comparison to module maximum overcurrent protection rating [9], a specification required by IEC61730-2 to be published in the documentation of photovoltaic modules. Unfortunately the vast majority of modules available for use on the Facility did not include this mandatory specification on any published documentation; attempts were made to contact the relevant manufacturers but were unfruitful. After discussion with project supervisors it was determined to move the project forward by assuming the greatest tolerable module maximum overcurrent protection rating to be three times the short circuit current at STC. This decision was made with the caveat that a shading device may be required to limit current production during fault current experiments involving more than three parallel strings, on cold days with very high incoming solar radiation. Students would also be required to complete a supervised induction experiment before any unsupervised work could be performed using the Facility. Such limitations should serve to safeguard students using the facility and provide them with the skills to manage these and other hazards fundamental to photovoltaic power generation. 24 3.1.4.4 OPERATIONAL FEASIBILITY The operation feasibility study aimed to determine if the Facility would solve the problems defined in the project scope. Desired operational outcomes included system reliability, maintainability, usability, predictability and affordability. Such an initial study relied mainly on performance metrics that could be considered extremely subjective: student interaction with teaching tools vary from gentle, careful touches, to callously-indifferent clobbering, through to actual abuse and vandalism. It was therefore determined to select components rated for heavyduty use in industry wherever possible, and cross-check designs with Murdoch University technical staff to leverage their considerable experience with system maintenance. System predictability would be determined in part by the solar radiation and temperature conditions on each day of use, but would exhibit an appropriately predictable response outside of these variables – given adequate sensor instruments such variability would be used to enhance the Facility as a teaching tool, for better student understanding of how photovoltaic cells are influenced by local conditions. In general, it was hoped that the Facility would prove to be operationally feasible, and would fit in well with the Murdoch University teaching culture. 3.1.4.5 SCHEDULE FEASIBILITY The schedule feasibility study was performed to determine if the project could be reasonably expected to be completed and ready for delivery within the allotted time frame. Basic estimations for how long the system would take to develop were delivered to the client at week four of the project. A reasonable schedule was developed using Gantt chart software tool Gantt Project. This schedule is shown in APPENDIX E. Deadlines shown in APPENDIX E were generally desirable, instead of mandatory, implying a certain degree of flexibility to accept short delays or setbacks was inherent in the project schedule. It was determined that Murdoch University current technical feasibility level was sufficient, meaning that further training or upskill activities would not be required. This meant that, given no extreme setbacks occurred, the project schedule was feasible and the Facility would be completed on time. 3.1.5 PRELIMINARY DESIGN During the preliminary design phase the overall system configuration was designed. An array of eight photovoltaic modules would feed a control panel system housed in two enclosures. Each enclosure would house a hard-wired experiment terminal that prevents student access to voltages exceeding the project safety limits. Simple schematics and diagrams were designed for 25 basic configuration, and appropriate facility components found. Sample preliminary design diagrams are shown in APPENDIX F and APPENDIX G. The detailed design was to be heavily influenced by availability of certain components, such as modules, fuses, and sockets; preliminary design choices were made for certain components to create a starting point for the detailed design. 3.2 Detailed Design After a brief consultation with the relevant project supervisors all preliminary designs were approved, and the project could continue to a detailed design phase. This design period used the preliminary design choices as a starting point to produce a sufficiently detailed plan for construction work to commence. Strict external Facility dimensions were declared, given restrictions including door widths and elevator dimensions. These restrictions are non-negotiable, as widening of elevators and hallways was not an option. The facility was therefore sized to be as wide as possible for maximum stability, at the dimensions listed in Table 3. Yingli sixty watt, square form-factor photovoltaic modules were selected for a balance between maximum current, maximum number of potential parallel strings and module physical dimensions, with the physical dimensions being the decisive factor for module suitability. Three modules side-by-side would fit inside the elevator, so a total of eight photovoltaic modules was chosen for the array, as shown in Figure 3-5. To fit through the elevator and external doorways the array would tilt on a horizontal shaft to a larger angle from horizontal than required for maximum beam solar radiation. Given these restrictions the Facility frame was constructed as a pair of A-frames on a rectangular supporting structure the maximum width and length permitted. Frame materials were chosen for ease of construction; steel was used for the frame proper, with aluminium used to tie array rails together. Barriers were specified to prevent corrosion of dissimilar metals wherever required by AS5033-2.2. Facility movement requirements were used to select appropriate pneumatic caster wheels, pillow-block bearings, and the rotating steel array shaft. Photovoltaic modules were selected for a compromise between high current production and small form-factor. Crystalline technology modules were suggested by the relevant project supervisors as the most applicable type for shading and hot-spot experiments, so a polycrystalline module was selected. 26 Figure 3-5: Detailed design Facility frame with tilted array [12]. Table 3: Detailed design Facility physical dimensions. Physical Dimension Measurement Value Facility Length 2100mm Facility Maximum Width 2132mm Facility Maximum Height 2300mm Array Minimum Tilt Angle 5 degrees from horizontal Array Maximum Tilt Angle 65 degrees from horizontal Module operating parameters declared and environmental stimuli accounted for; module operation at minimum expected temperatures was determined and considered as the maximum array voltage for system design as per AS5033-4.2: 27 𝑃𝑉 𝐴𝑟𝑟𝑎𝑦 𝑀𝑎𝑥 𝑉𝑜𝑙𝑡𝑎𝑔𝑒 = 𝑉𝑂𝐶 𝐴𝑅𝑅𝐴𝑌 + 𝛾𝑣 (𝑇𝑚𝑖𝑛 − 𝑇𝑆𝑇𝐶 )𝑀 𝑃𝑉 𝐴𝑟𝑟𝑎𝑦 𝑀𝑎𝑥 𝑉𝑜𝑙𝑡𝑎𝑔𝑒 = 18.40 − (0.0037 ∗ 18.40)(−3.4 − 25)𝑀 𝑃𝑉 𝐴𝑟𝑟𝑎𝑦 𝑀𝑎𝑥 𝑉𝑜𝑙𝑡𝑎𝑔𝑒 = 𝑀20.34 𝑉𝑜𝑙𝑡𝑠 where Tmin is the lowest minimum temperature measured at the nearby Jandakot Aero site [13], 5.8 kilometres away, and M is the number of modules in series [14]. Therefore the maximum number of series modules under ELV would be five. This series restriction required that no more than five modules be made available to students for connection in series; clearly it would not be feasible to deliver the unprotected terminals for all eight modules to the student user. It was decided to provide two separate control panels for two mutually-exclusive experiment platforms. Enclosure A, shown in Figure 3-7, would present four individual modules for series, parallel, and bypass experiments, with all available module connection terminals presented in such a way that students could measure current flows around modules using handheld multimeters. Enclosure B, shown in Figure 3-8, would present a hard-wired array containing four strings of two series modules each, connected in parallel on the negative rail but not the positive rail, such that an operator could select the number of D- Earth Module C- D+ Module Module B- Y X W C+ Module Module Breaker A- V U B+ Module T 2 Pole DC 6 A+ 5 Module Load - Z Breaker Load + Q S 2 Pole DC String - 4 3 Module 2 String + MPPT + R 1 Battery/ MPPT - Battery/ parallel strings required for each experiment. P M O Telergon 8 Pole DC Isolator Earth N K Breaker L I 2 Pole DC J Breaker H G 2 Pole DC F E Breaker D C 2 Pole DC B A Breaker Unlabelled sockets not required, but potentially useful. 2 Pole DC BPD Switch Bank B B B B B B B B B B B B B B B B P P P P P P P P P P P P P P P P D D D D D D D D D D D D D D D D PV MODULES TECH: POLY QTY: 8 MANUF: YINGLI MODEL: YLP60Wp 4 MODULES IN SERIES TEST SOCKETS MAX POWER: 60W MAX POWER VOLTAGE: 17.5V MAX POWER CURRENT: 3.43A OPEN CIRCUIT VOLTAGE: 22.0V SHORT CIRCUIT CURRENT: 3.8A TECH: BANANA QTY: 32 MANU: SCHÜTZINGER MODEL: SEB 6445 NI / X CATEGORY: CAT III INSULATED: YES (POLYAMIDE) MAX VOLTAGE: 1000V MAX CURRENT: 32A PERMISSABLE OPERATING TEMPERATURE: -25C TO +80C DC BREAKERS MANU: TELERGON ZFV32x2 MAX VOLTAGE: 600V MAX CURRENT: 32A PERMISSABLE OPERATING TEMPERATURE: -40C TO +45C MANU: ABB MODEL: 2CDS272001R0065 - S202MB6 RATED CURRENT: 6.0A RATED DC VOLTAGE: 125V CHARACTERISTIC: CURVE B H- Earth Module G- H+ Module Module F- DC ISOLATOR G+ Module Module E- F+ Module Module D- E+ Module D+ Module C- Module Module C+ B- Module B+ Module A- Module A+ Module Module BPD Con. Pt. Con. Pt. BPD BPD Con. Pt. BPD Con. Pt. BPD Con. Pt. BPD Con. Pt. BPD Con. Pt. BPD Con. Pt. Enclosure B DOCUMENT WD3-1-6 POLES: 2 GANGED ACROSS 2 POLES ONLY Author: Kieran Peters Date: 12/03/2015 Enclosure A Upper Wiring Level Wiring Diagram Figure 3-6: Example of partial wiring diagram for Enclosure A. Full diagrams available in APPENDIX I. 28 Wiring Enclosure A was designed to receive the array cables, pass the terminals of four modules through a load-breaking d.c. isolator and suitable overcurrent breakers, and present these four modules on Control Panel A by means of voltage and current rated, insulated banana sockets. Banana sockets are coloured to indicate positive terminals in red, negative terminals in black, and current measurement connections in yellow. A keyed, heavy duty battery isolation switch would be provided on the interface to isolate the battery from the system. Terminals for a MPPT load, charging the battery, would be available as banana sockets, as would terminals for connection to a manual, external load, such as the RISE a.c./d.c. 1kW load bank. Full wiring schematics for Wiring Enclosure A are included in APPENDIX I, APPENDIX J, and APPENDIX K as a three-layer set of plans for ease of viewing. DOCUMENT GD4-2-1 E Author: Kieran Peters Date: 14/05/2015 Enclosure B Fault Current Experiment Graphic incl. Student Access Points AX E Manual Load Connection CONTROL PANEL A CONTROL PANEL B AY E AZ E Module A Breaker Module B Breaker Module C Breaker Module D Breaker Module A Breaker Module B Breaker MODULE A G E I SA1 E O SA2 E SA3 E H TE I SA4 E SA5 E SA1 SB1 E O I SA3 SB3 E SA2 SB2 E 6A DC Breaker B E SA5 SB5 E I E D P I EI AS E AB D AT EJ E H SD3 SA3 E SD2 SA2 E AM C E I I SD5 SA5 E SD4 SA4 E O O E AN D AP EF Current Shunt P E R E E Q ES Manual Load Connection MPPT Load Connection X E 3B E EZ 5B E E AA Y E 3A DC Breaker (Normally Closed) 5A DC Breaker (Normally Closed) AD E AB E 7B E E AC 6A DC Breaker (Normally Closed) DOCUMENT GD4-1-1 Author: Kieran Peters Date: 14/05/2015 Fault Current Shunt EL O MODULE B O AU K E AL B E I 50A 50mV ±0.25% SD E E K MODULE C AK A E O AO E I SA5 SC5 E O AD EF SD1 SA1 E V E W E I String EF Breaker AA C E I SA4 SC4 E O AQ G E I String CD Breaker I AR H E TE U E O EJ MODULE D O EL AV O String AB Breaker SA2 SC2 E AC E I SA3 SC3 E AI K E B ZE I EI AG AH EJ MODULE D A Y E O E G E SC O Module D Breaker MODULE C AE G E SA1 SC1 E System DC Isolator D E I E SB O MODULE A Module C Breaker C E EF E O R EF EI I String GH Breaker 50A 50mV ±0.25% SA4 SB4 E V EJ A E SA E AF H E String EF Breaker O C E I O EL AJ String AB Breaker String CD Breaker O I O O E D K E W N B E Q E I EF M A E EI U O EJ G ES I C E I O O EL X O E I K E B E I EI Battery Breaker MODULE B A E MODULE G H E String GH Breaker EL MPPT Load Connection System DC Isolator MODULE H Bypass CD Breaker MODULE E Bypass AB Breaker MODULE F Battery Switch AE E 7A DC Breaker (Normally Closed) Enclosure A Bypass Experiment Graphic incl. Student Access Points E M Figure 3-7: Control Panel A experiment platform. Larger image shown in APPENDIX O. E N 50A 50mV ±0.25% Current Shunt O E Battery Switch Figure 3-8: Control Panel B experiment platform. Larger image shown in APPENDIX P. Wiring Enclosure B was designed to receive a pass-through of array terminals from Enclosure A, configure the array of modules as four parallel strings of two series modules with a hard-wired connection on the negative array parallel node, and provide string terminals to Control Panel B. These terminals were provided to Control Panel B through a load-breaking d.c. isolator, string overcurrent protection breakers and terminated in the same insulated banana sockets as Control Panel A. A current shunt connection is available for current measurements on the negative rail of the array that shall permit a student to measure net array current flow to a load using handheld digital multimeters. A secret array of banana sockets would also be installed 29 behind Control Panel B, connected to every node on the array to provide a bank of connection points for hidden array faults to be made. Fault connections would be made by a laboratory instructor connecting nodes on the array to a load-breaking heavy duty d.c. isolator through a current shunt. The isolator would permit the fault to be engaged or disengaged as required. A means of safe current measurement would be provided by the shunt, permitting measurements using current-limited handheld devices. The Enclosure is designed such that no student shall have access to, or vision of, the array faults, with the exception of operating the fault isolation switch on the Facility exterior. Students shall not be able to determine the location of the fault/s without undertaking a series of measurements. Wiring Enclosure B shall also house the terminals for MPPT load connection, battery overcurrent protection breaker, and manual load connection; the same load connection points are provided on Control Panel B as Control Panel A. Wiring enclosure B would also house four small d.c. overcurrent protection breakers for 3A, 5A, 6A, and 7A nominal currents, to permit individual strings to be connected by a student to these breakers for photovoltaic array overcurrent protection device operation experiments. As with Control Panel A, the full three-level wiring diagram for Control Panel B is included in APPENDIX L, APPENDIX M, and APPENDIX N. Bypass diode experiments require the ability to install and uninstall bypass diodes on command. Providing student access to the standard bypass diode location, the junction box, of each photovoltaic module would not only by impractical, but also unsafe as the junction boxes house the terminals for each module, meaning that a student would be able to easily connect more than five modules in series. The bypass diodes would instead be housed in Wiring Enclosure A, and controlled using switches on Control Panel A. This configuration would require the addition of a third cable between the Wiring Enclosure A and each module, to effectively provide the standard bypass diode connection point within the Enclosure. Bypass cables would be installed with blue coloured insulation to differentiate them from the other array cables. It should be noted that this configuration does not adhere to AS5033-4.3 as to do so would prevent the conduct of any experiments that feature the absence of bypass diodes. Overcurrent protection devices were sized in accordance with AS5033-3.3.4 at a nominal current capacity of 6A. Breakers were chosen due to the exceptionally-large inherent cost of a fused student experimentation platform. Control Panel A would receive fast-breaking Curve B breakers for best protection, while Control Panel B would require slower-breaking Curve D breakers in order to actually observe any fault overcurrent flow for a period of more than a few seconds. Isolators were chosen to be load-breaking, but shall be supported by the breakers as backup load-breaking disconnection devices: the breakers could be manually actuated to halt current flow in the event of an isolator failure. 30 Cables and connectors were sized in accordance with AS5033-4.3, with regard to overcurrent protection ratings, the maximum normal operating current, and the prospective fault current. Derating factors were specified by some manufacturers, given the expected elevated operational temperatures of the system. However, the only available industry-standard, multi-stranded cables with suitable temperature and UV ratings were well oversized for these requirements, so the smallest of these over-rated sizes was selected, being HIKRA PV array cables at a crosssectional area of 6mm2. Red coloured insulation was specified on active conductors from the positive terminals of each module, and black for the return negative terminals; this colour coordination would be continued throughout each wiring enclosure. Industry-standard MC-4 connectors were specified for each array cable; connectors are not required by AS5033 [9] but were designed nonetheless to permit modules to be removed for maintenance, repair or replacement. PV MODULES 15-35cm TECH: POLY QTY: 8 MANUF: YINGLI MODEL: YLP60Wp 4 MODULES IN SERIES MAX POWER: 60W MAX POWER VOLTAGE: 17.5V MAX POWER CURRENT: 3.43A OPEN CIRCUIT VOLTAGE: 22.0V SHORT CIRCUIT CURRENT: 3.8A H- Earth Module G- H+ Module Module F- G+ Module Module E- F+ Module Module D- E+ Module Module C- D+ Module Module B- C+ Module Module A- B+ Module A+ Module Enclosure A Module TEST SOCKETS TECH: BANANA QTY: 32 MANU: SCHÜTZINGER MODEL: SEB 6445 NI / X CATEGORY: CAT III INSULATED: YES (POLYAMIDE) MAX VOLTAGE: 1000V MAX CURRENT: 32A PERMISSABLE OPERATING TEMPERATURE: -25C TO +80C DC ISOLATOR MANU: TELERGON ZFV32x2 MAX VOLTAGE: 600V MAX CURRENT: 32A PERMISSABLE OPERATING TEMPERATURE: -40C TO +45C 10-15cm Fault Switch DPST DC Isolator Earth Earth Fault 2 Fault 1 Earth 10cm 40-50cm 10cm 40-50cm Earth Earth Earth Earth Earth Earth Earth Earth Earth All Metal Parts Earth Fault Current Shunt DC BREAKERS MANU: BLUE SEA SYSTEMS MODEL: 7050; 7052; 7053; RATED CURRENT: 3A; 5A; 7A RATED DC VOLTAGE: 32V DC CHARACTERISTIC: THERMAL POLES: 1 EACH PERMISSABLE OPERATING TEMP: -10C TO 60C ONLY MANU: ABB MODEL: 2CDS272001R0065 - S202MB6;10 RATED CURRENT: 6.0A; 10.0A RATED DC VOLTAGE: 125V CHARACTERISTIC: CURVE B POLES: 2 GANGED ACROSS 2 POLES ONLY DOCUMENT WD3-2-4 Author: Kieran Peters Date: 10/03/2015 Enclosure B Lower Wiring Level Wiring Diagram Figure 3-9: Example of partial wiring diagram for Enclosure B. Full diagrams available in APPENDIX L. 31 3.3 Significant Design Issues One notable design issue encountered during the project was the mismatch between component data sheet specifications and real-world specifications of the actual components. Significantly, the small form-factor Lorentz 40W photovoltaic modules specified in the detailed design were ordered by a local supplier, but upon arrival it was discovered that the manufacturer had deviated from the data sheet in several aspects – most importantly, the Lorentz modules that arrived were over sixty per-cent longer than specified in the data sheet. This additional length would not fit through the elevator doors or other required transit pathways without fairly exotic folding mounting mechanisms. It was deemed preferable to instead select an alternative photovoltaic module that met the size and electrical requirements of the Facility. The Yingli 60W square form-factor module was then selected from a local retailer as the best available option. Unfortunately such a decision had wide-ranging impacts on the entire design, since all cables, switches, sockets, terminals, protection devices and other component selections are dependent on the physical and electrical characteristics of the photovoltaic modules. The result of a change to the photovoltaic module selection was a significant delay while an almost complete redesign of the system was accomplished at a stage where Facility construction should have been undertaken. 3.4 Key Assumptions A number of assumptions concerning Facility use have been made during the design process. These assumptions are necessary to avoid over-designing the system in an attempt to produce a system that is functional, safe to operate and as “student-proof” as practicable. Key assumptions are outlined below: 1. Laboratory instructors and technicians operating or maintaining the Facility shall have a working understanding of photovoltaic modules, arrays, protection devices and configurations. 2. Laboratory instructors and technicians shall not cause the total voltage available to students to exceed 120V, ripple-free d.c. at any time. This can be achieved by never permitting a series connection of more than five modules. Instructors shall not make the internal electrical connections of the facility available to students. 3. Students using the Facility shall have a basic understanding of the theory behind photovoltaic modules, solar geometry, electrical circuits and circuit measurements, data 32 logging, over-current protection devices, and shall obey all reasonable instructions and warning signage. 4. Students using the Facility shall undergo a simple induction before attempting to use the Facility unsupervised. 5. The Facility may be left in direct sunlight and rain for weeks at a time, but the primary storage location shall be indoors. When possible the Facility shall be stowed before it could be affected by extreme wind or weather events. 6. The Facility shall be used within a 100km range of Perth, Western Australia and is therefore unlikely to be exposed to significant levels of solar radiation at temperatures below freezing. This geographical limitation has implications for usable array angles. 33 CHAPTER 04: FACILITY CONSTRUCTION 4.1 Component Acquisition Components were sourced from local industry suppliers wherever possible to maximise available support from local industry, where any issues could be discussed in-person, manufacturing facilities could be inspected, faulty components could easily be returned, and relationships between Murdoch University and members of local industry established or reinforced. Local industry wholesalers were canvassed, and SolarMatrix selected for most attractive component pricing, and most helpful service. SolarMatrix supplied as many photovoltaic-industry components as possible, including array cables, conduit, connectors, module mounting hardware, d.c. isolators and overcurrent circuit breakers. National wholesaler RS Components was selected to supply enclosures, internal wiring, terminals, sockets and some overcurrent protection devices. Local retailer 12 Volt Shop was the only supplier with stock of a suitable photovoltaic module and low-current over-current d.c. breakers. Local specialist printer ImageSource took on the challenging task of printing and machining the plastic control panel backgrounds. Every attempt was made to purchase components from wholesalers or distributors to minimise costs and access higher-quality parts than those available from local electronics supply stores, but a small number of components were only available from retail outlets. At all points in the component acquisition phase an emphasis was placed on obtaining real-world, industry standard parts for maximum practical student experience. In general, component selection and acquisition was dictated by part availability, particularly given the time constraints imposed by complications during the design phase. 4.2 System Construction 4.2.1 PV MODULE PREPARATION Photovoltaic modules were prepared for installation on the Facility by removing the preinstalled bypass diodes, cutting a third cable entry point in module junction boxes, installing short fly-lead cables with connectors and finally testing the performance characteristics of each module. Photovoltaic module junction boxes were opened to reveal bypass diode connection points; Yingli Solar solders bypass diodes in place inside a low form-factor junction box. These bypass diodes were carefully de-soldered from the module to prevent automatic bypass diode operation (Figure 4-1); bypass diodes were later installed inside Wiring Enclosure A with a control mechanism to facilitate a bypass of current around cells when desirable. 34 Bypass diodes removed from junction box. Additional MC-4 connection cable gland. Figure 4-1: Prepared PV Module with bypass diodes removed and third cable entry installed. The low form-factor junction boxes were modified using a cutting tool to accept a third cable, enabling an external bypass diode connection. A third cable gland hole was cut into each module junction box, to accept a custom cable addition to each module that carries bypass currents through the system. A combination MC4 connector / cable gland, visible in Figure 4-1 and Figure 4-2, was used to minimise the cost and labour required for each module. MC4 connectors are the current industry standard string connector for photovoltaic systems and were used for all main photovoltaic module cables to assist in the exposure of students to as much real-world equipment as practicable. MC4-specific crimping tools were prohibitively expensive at the time of construction, so cables were terminated with MC4 pins by hand-crimping connectors with pliers and soldering to ensure connections would last for the life of the system. Once fly-lead cables were installed, each module was tested as per Chapter 05. 35 Figure 4-2: Photovoltaic module fly-leads installed with MC4 connectors. 4.2.2 PHOTOVOLTAIC ARRAY FRAME CONSTRUCTION The photovoltaic modules were mounted on industry-standard mounting rails, manufactured by Schletter. Mounting rails serve the purpose of supporting and fixing the modules in place. A mock-up of the array for measurement on these rails is shown in Figure 4-3; minor frame modifications were required as the Yingli photovoltaic modules were slightly wider than specified by manufacturer data sheets. The rails used were a typical roof-mount style with a ten millimetre channel underneath that served to secure each run of modules together in a custom array frame and mount the array on the Facility. 36 Figure 4-3: PV Array mock-up on industry standard mounting rails. The best array tilt angle to maximise the potential use of incoming solar radiation changes according to solar geometry and location of use. Because maximum current production would be required for certain fault scenario experiments using the facility, a basic method of altering the array angle would be required. To facilitate tilt angle adjustments a shaft was fabricated, upon which the array would rotate about a horizontal axis. This shaft is shown in Figure 4-4 whilst measurements for fixing arrangements were made. The shaft was fixed to the array frame using the ten millimetre channels of each Schletter rail, and is held by pillow block bearings on the main Facility frame to permit smooth rotation. Array rotation is permitted between approximately sixty-five degrees from horizontal to nine degrees from horizontal, with angles outside this range prohibited by automatic micro-switch control of the array tilt motor, and backup rubber stoppers. Array rotation is driven by a modified winch motor, through a reduction gearbox capable of producing enough torque to hold the array steady at a chosen angle. Modules were secured to frame rails using Schletter earthing PV mounts. These mounts, shown in Figure 4-5, pierce the frame of each photovoltaic module when torqued appropriately [15]. This has the result of electrically connecting all module frames together for earthing purposes, and subsequently reduces the required length of cable for earth connections. 37 Figure 4-4: PV array measured for rotation shaft construction, also shown is array frame. Figure 4-5: Module mounting brackets with earthing connection pins [16]. 38 The steel A-frame was constructed to support the array and permit rotation while providing mounting opportunities for other hardware. The frame was built to be the maximum possible width and length permitted by the elevator design in Building 220 of Murdoch University. Pneumatic caster wheels were installed on each corner to permit travel over mild bumps and gaps in pavement. These wheels are shown in Figure 4-6. Two IP65 wiring enclosures, pictured in Figure 4-7, were installed on the A-frame, each to house one of the two mutually-exclusive experiment control panels. Provisions were also installed for the A-frame to carry a large battery, and the winch motor, with room remaining for a third potential experiment control panel enclosure. Figure 4-6: Facility frame constructed with pneumatic caster wheels. 39 Figure 4-7: Array mounted on facility frame using pillow block bearings. 4.2.3 PHOTOVOLTAIC ARRAY WIRING INSTALLATION Three cables connected each module to the wiring enclosure. These cables were coloured red for active, black for return and blue for the bypass point connection. Each module was routed separately to provide access to individual modules inside the wiring enclosures. The wiring loom for array cables is shown in Figure 4-8. Cables connecting the photovoltaic modules to the wiring enclosures are potentially exposed to weather, solar radiation, mechanical stress and student interference. For this reason, and to meet requirements of AS5033, all array cables were routed through ultraviolet-resistant, industry-standard photovoltaic cable conduit, secured primarily with aluminium saddles and reinforced using ultraviolet-resistant cable ties. Figure 4-9 shows the cable conduit routes being installed to minimise cable loops, and therefore voltages induced by nearby lightning strikes, as per AS5033. Array cable conduit was connected to Wiring Enclosure A through the base of the enclosure, as per AS3000. Custom cable conduit glands (Figure 4-10) were produced to accept the non-standard size of photovoltaic cable conduit, and module cables terminated on DIN rail connections within the enclosure. Once array wiring was completed, preliminary Facility testing could be conducted without using the control panels, as shown in Figure 4-11. 40 Figure 4-8: PV module cable loom measured and cut to size. Figure 4-9: Array wiring routed through industry standard conduit to wiring enclosures. 41 Figure 4-10: PV module wiring interface with Enclosure A, using custom cable glands. Figure 4-11: Facility testing without control panels. 42 4.2.4 FACILITY ACCESSORY CONSTRUCTION Several accessories to the Facility were constructed that enhanced the quality of the system as a teaching tool. These included basic orientation and level indicators, hooks to store measurement and circuit leads on the control panels, a battery storage box and a sensor mounting panel in the plane of the array. The sensor panel, shown in Figure 4-12 and Figure 4-13, shall permit simple measurements of incoming ‘beam’ direct solar radiation in the plane of the array, an important parameter for many photovoltaic system calculations. This panel was constructed of a ten millimetre thick, heat-resistant, rigid polyvinyl chloride panel with an aluminium frame to mimic the surrounding photovoltaic modules, and installed in the centre of the array. Figure 4-12: Sensor mounting panel construction. 43 Figure 4-13: PV Array with sensor panel (grey) mounted on the plane of array. 4.2.5 WIRING ENCLOSURE ASSEMBLY Facility wiring enclosures were carefully planned to provide detailed designs in Section 3.2. Using these detailed designs, shown in APPENDIX I through APPENDIX N, the enclosure back plates were drilled to accept DIN rail terminal mounts and cable trays. Wiring was routed between rails of terminals to form the required electrical circuits. DIN rails were installed as per AS2756, with all rails parallel to the primary photovoltaic module terminal connections [17]. Cable trays installed throughout each back plate serve to hide cables that cannot be routed cleanly from view. 44 Figure 4-14: Enclosure A back plate with partially complete wiring. Murdoch University policy is to display high-standard wiring to students on all facilities and projects, and the Facility is no exception. Wherever possible cables were installed with neat bends, secured in logical groups and colour coordinated to represent active, bypass and return circuit stages in red, blue and black respectively. Such a colour scheme ties the enclosure design language to the array cable design language and should assist future technicians in troubleshooting or maintaining Facility components. Enclosure wiring was routed in such a way that each mutually exclusive experiment is isolated from the other, with completely separate cables, components, mounting rails and isolation devices used for each experiment control panel. This ensures that any maintenance issues or breakages that occur to one experiment shall not influence another experiment, a requirement of AS3000 [18]. Experiment circuits both receive current from the same teamed terminals located horizontally across the bottom rail in Enclosure A (Figure 4-14), with Enclosure B connecting to the photovoltaic array through interconnections between the two enclosures, as shown in Figure 4-15. 45 Figure 4-15: Wiring enclosure back plate installation and interconnection. 4.2.6 CONTROL PANEL CONSTRUCTION Control panels were constructed of a six millimetre thick, Opal brand polycarbonate that is graffiti-resistant, capable of handling temperatures over eighty degrees Celcius, and strong enough to prevent cracks or damage from over-enthusiastic student interaction. After a tour of the printing facilities of the local supplier ImageSource, a large-format printing machine was selected to transfer the graphic design to the Opal backings. Figure 4-16 shows a paper mock-up of each control panel by the printer, and was used to resolve several minor issues with printing and cutting. A fine-resolution CNC-style machine was chosen to cut holes for each of the banana sockets and the breakers. 46 Figure 4-16: Paper mock-up of control panel graphic design. Once the control panels were printed and holes cut, delivery was taken and further construction continued on site at Murdoch University. Approximately one hundred banana socket terminals were installed through the Opal backings, along with small breakers and keyed switches for battery control. These interface elements were wired together appropriately to permit student access to experiment measurement points in a logical fashion, seen in Figure 4-17. Emphasis was placed on ensuring the control panels will last for the life of the system. As a result of this the control panel construction phase took a reasonably long time, but this was preferable to a rushed job given that student safety, not to mention AS3000-1.6 compliance, would depend on the ability of these control panels to prevent student access to dangerous voltages or currents within the Facility. 47 Figure 4-17: Interface wiring for Enclosure A control panel. Each control panel was then installed in the relevant wiring enclosure using a hinge and secure wingnut connection, and electrically connected to the wiring back plates. The breakers and isolators were placed on a riser from the back plate to protrude through each control panel and provide isolation actuation to users and ensure these protection devices are accessible to the lay person, in accordance with AS3000-2.1.2.D [18]. 4.2.7 FINAL SYSTEM ASSEMBLY Once all necessary components were assembled or custom-built, the entire Facility system could be put together and tested further. The final system assembly stage required the removal of the photovoltaic array shaft to fit the tilt-mechanism gearbox, and subsequent reinstallation. The finished build is shown in Figure 4-18, on site at Murdoch University Building 220, and can be favourably compared with the detailed design sketch in Figure 3-5. 48 Figure 4-18: Completed facility on site at Murdoch Engineering Building 220 roof. 49 CHAPTER 05: FACILITY TESTING 5.1 Module Testing Photovoltaic modules were individually tested using the newly assembled Spi-Sun sun simulator located at Murdoch University. The Spi-Sun Simulator 560SLP system permits indoor testing of terrestrial photovoltaic modules using an upward facing illumination with spectrum closely matching the solar spectrum [19]. The illumination systems produces a filtered light that simulates the spectrum observed after solar radiation passes through 1.5 thicknesses of the Earth’s atmosphere. This filtered spectrum corresponds to “noon on a clear sunny day when the sun is about sixty degrees above the horizon and the photovoltaic module directly faces the sun” [19]. This machine is suitable for use in research and development applications as well as highvolume automated production systems [20]. The primary objective of these tests was to determine the existence of any faults or issues with the modules, match similar modules into groups, and enhance the value of the Facility as a teaching tool by providing detailed module characteristics in a Facility Data Sheet for future use. Murdoch University staff may design future teaching activities that could rely on such measured characteristics. The sun simulator outputs a characteristic IV curve, as well as various key parameters such as series and shunt resistance, maximum power point, fill factor, open circuit voltage, and short circuit current. A summary of key sun simulator results is shown in Table 4, and shall be explored in the following pages. Table 4: SPI-SUN Simulator Results for PV Modules Parameter Data Sheet 1 2 3 4 5 6 7 8 9 Unit PMAX: 60±3% 62.15 60.80 60.75 61.39 61.25 61.11 61.17 61.73 62.52 W VPM: 17.50 18.21 18.40 17.97 18.07 18.08 17.99 18.14 18.14 18.40 V IPM: 3.43 3.41 3.30 3.38 3.40 3.39 3.40 3.37 3.40 3.40 A VOC: 22.0 22.58 22.61 22.44 22.40 22.44 22.30 22.43 22.57 22.58 V ISC: 3.80 3.62 3.52 3.62 3.64 3.62 3.63 3.62 3.63 3.63 A Fill Factor: 0.72 0.76 0.76 0.75 0.75 0.75 0.75 0.75 0.75 0.76 % RSERIES: - 0.662 0.635 0.712 0.701 0.668 0.634 0.628 0.680 0.654 Ω RSHUNT: - 712 1122 766 1091 455 771 479 1065 766 Ω 50 5.1.1 MAXIMUM PV MODULE POWER The maximum power provided by a cell is achieved at a point on the IV characteristic, where the product IV is at a maximum [7]. The maximum module power parameter is worthwhile considering for any real-world photovoltaic installation as this serves to indicate the best-casescenario peak power output of a photovoltaic module. A good photovoltaic system design will aim to operate the modules at peak power and therefore maximise return on project investment across the life of the system. The maximum module power is not of pivotal importance for the PV Array Troubleshooting and Educational Facility, as long as the voltage and current at the point of maximum power meet minimum requirements and do not exceed any project safety limitations. PMAX 63.00 Maximum Power (W) 62.50 62.00 61.50 61.00 60.50 60.00 59.50 1 2 3 4 5 6 7 8 9 PV Module Identification Number Figure 5-1: Maximum power comparison between PV modules. Figure 5-1 shows a comparison of the maximum power produced by each of the nine available photovoltaic modules. It should be noted that although the peak power produced by each module varies considerably, such variances are mainly within the ±3% tolerance [14] listed on the module data sheets by manufacturer Yingli. Two modules actually performed even better than this stated tolerance, producing up to 4.2% greater than rated maximum power during tests. 51 5.1.2 VOLTAGE AT MODULE MAXIMUM POWER The maximum power voltage of a PV module is the voltage across module terminals at which the module outputs the greatest power. The voltage at maximum module power becomes important to a photovoltaic system designer when attempting to produce peak power using a number of modules in parallel. A significant mismatch represents a discrepancy between peak power production areas of the IV curve between modules, and could suggest that the modules have been poorly binned during production. VPM Voltage at Maximum Power (V) 18.50 18.40 18.30 18.20 18.10 18.00 17.90 17.80 17.70 1 2 3 4 5 6 7 8 9 PV Module Identification Number Figure 5-2: Maximum power voltage comparison between PV modules. The voltage at maximum module power was considered important for this project as an attempt was made to provide reasonably matched photovoltaic modules to students, particularly for the experiments conducted using Wiring Enclosure A. As these experiments deal with cases of current and voltage mismatching under normal and shaded conditions, the introduction of extraneous discrepancies through severely mismatched modules should be avoided wherever possible. Results from the sun simulation showed that no module performed at peak power at the manufacturer declared 17.50V d.c., with almost all modules exceeding 18V d.c. and two modules approaching an entire volt greater at maximum power than expected. Repeat tests, and later handheld IV curve tracer tests confirmed this finding, and the discrepancy was assumed to be produced by either poor module binning during production or a low quality control environment. 52 5.1.3 CURRENT AT MODULE MAXIMUM POWER The maximum power current, IMP, is a measurement of the amount of charge flowing to the load when the photovoltaic module produces maximum power. This parameter could be considered an important measurement for safe Facility operation, as overcurrent protection devices may require certain magnitudes of current to operate. For a number of potential fault current experiments the greatest magnitude currents available would be required, so a comparison between module outputs would be useful for experiment design. Results from the sun simulation (Figure 5-3) determined that eight modules produced IMP currents of similar magnitude to the data sheet specifications, but module two output was significantly lower. The lower-current module is the same that produced an unusually high voltage at maximum power; while the output power is acceptable, this module would limit the current production of any series-connected modules. IPM Current at Maximum Power (A) 3.44 3.42 3.40 3.38 3.36 3.34 3.32 3.30 3.28 3.26 3.24 1 2 3 4 5 6 7 8 9 PV Module Identification Number Figure 5-3: Maximum power current comparison between PV modules. 53 5.1.4 MODULE VOLTAGE AT OPEN CIRCUIT The module voltage at open circuit is the voltage for maximum electrical load in the circuit [7]. The open circuit voltage can be related to the simple electrical circuit model used in Chapter 02 by the following simplified equation, where I0 is the saturation, or leakage current: 𝑉𝑂𝐶 = 𝑘𝑇 𝐼𝐿 ln ( + 1) 𝑞 𝐼0 Without an external circuit, the incoming solar radiation photons will still produce electron-hole pairs within each photovoltaic cell; the holes and electrons still move towards the doped p- and n-layers, but can proceed no further without a complete circuit. “The voltage difference between the front and back of the cell will become large enough to flatten the barrier sufficiently to allow some holes and electrons to leak back. When the number of carriers leaking back is equal to the number being generated by the incoming light, an equilibrium voltage has been reached” [21]. The voltage at this equilibrium point is the open circuit voltage, and does not experience large variances in response to changes in solar radiation intensity. In industry the open circuit voltage is used when considering the maximum potential output voltage of a photovoltaic installation, for example when configuring protection systems or meeting regulation requirements. As discussed in Chapter 02, AS5033-2.1.6 limits the variance between module VOC values within each string, and between strings, to limit the potential for circulating currents within the array. The module open circuit voltage was an important consideration for the Facility as this parameter provided a reasonable expectation of the maximum voltage magnitude output available to students. With this information in hand, design of the protection systems, string configurations, and decisions on the quantity of individual modules provided for student configuration could be produced. 54 Voltage at Open Circuit (V) VOC 22.65 22.60 22.55 22.50 22.45 22.40 22.35 22.30 22.25 22.20 22.15 22.10 1 2 3 4 5 6 7 8 9 PV Module Identification Number Figure 5-4: Open circuit voltage comparison between PV modules. Figure 5-4 shows a comparison of the module VOC measurements. As with the module voltage at maximum power, the open circuit module voltage was generally greater than specified on the manufacturer data sheet. This parameter varied by as much as 1.39% between modules; this difference was not considered to be of great concern as the Facility array strings for Enclosure B would be made of two modules in series, meaning that even were the modules with the largest discrepancy placed in series the facility would still comply with AS5033-2.1.6. 5.1.5 MODULE CURRENT AT SHORT CIRCUIT The current in the circuit when a short is placed across the photovoltaic module terminals (i.e. No load) is described as the short circuit current. “Short circuit current is the light-generated current or photo current, IL” [7], as shown in Figure 2-3. The short circuit current shares a direct relation to the number of photons of light being absorbed by the cell. The short-circuit current is therefore directly proportional to light intensity [21]. The module current at short circuit is the highest current that the photovoltaic module can be expected to produce. If a fault occurred to short between parts of the array, the fault currents could potentially be equal to, or much greater than, the short circuit current of the components involved. This parameter is important both for the Enclosure A experiments and the Enclosure B experiments on board the Facility. In particular, high ISC values were desirable for situations where poor sunlight may hamper fault current detection. Figure 5-5 shows that most 55 photovoltaic modules produce a similar current at short circuit, with the exception of one unit; Module 2 produced 3.3% less current at open circuit than the other modules. Current at Short Circuit (A) ISC 3.66 3.64 3.62 3.60 3.58 3.56 3.54 3.52 3.50 3.48 3.46 3.44 1 2 3 4 5 6 7 8 9 PV Module Identification Number Figure 5-5: Short circuit current comparison between PV modules. 5.1.6 MODULE FILL FACTOR The fill factor, or curve factor, is a measure of sharpness of the knee in an IV curve. It indicates how well a junction was made in the cell and how low the series resistance has been made. It can be lowered by the presence of series resistance and tends to be higher whenever the open circuit voltage is high [7]. A simple relationship for fill factor is defined as follows: “The fill factor is the actual maximum power divided by the hypothetical ‘power’ obtained by multiplying the open-circuit voltage by the short-circuit current” [21]. 𝐹𝐹 = 𝑃𝑀𝐴𝑋 𝑉𝑀𝐴𝑋 𝐼𝑀𝐴𝑋 = 𝑉𝑂𝐶 𝐼𝑆𝐶 𝑉𝑂𝐶 𝐼𝑆𝐶 56 Fill Factor 77.0% 76.5% 76.0% 75.5% 75.0% 74.5% 74.0% 73.5% 1 2 3 4 5 6 7 8 9 PV Module Identification Number Figure 5-6: Fill Factor comparison between PV modules. The fill factor was largely irrelevant for this project, provided all modules conformed approximately to the data sheet specified value. In general, the fill factor was at or greater than the data sheet specified 72%, indicating that the cell junctions were likely to be well made. The comparison of fill factor ratings is shown graphically in Figure 5-6. 5.1.7 MODULE SERIES RESISTANCE The series resistance of a photovoltaic module is a representation of the innate resistance measured across a module, and is dependent on a number of elements: 𝑅𝑆 = 𝑅𝐶𝑃 + 𝑅𝐵𝑃 + 𝑅𝐶𝑁 + 𝑅𝐵𝑁 where: RCP is the metal contact to p-type semiconductor resistance RBP is the bulk p-type resistance RCN is the contact to n-type semiconductor resistance RBN is the bulk n-type resistance [7] 57 Power lost through any simple resistance can be modelled through Ohm’s law. Any module series resistance will reduce the available fill factor, and large series resistance values may reduce the module short circuit current [22]. For a good solar cell the series resistance should be very small to operate with a reasonably efficiency for a reasonable return on investment. The module series resistance was not an essential parameter for design of the Facility (because the longest string length possible would be four modules), but was instead supplied in the Facility Data Sheet as a key value for student models and experiments that examine the efficiency of Facility photovoltaic modules. Figure 5-7 shows the net series resistance of each module to be less than 0.72Ω. For 36-cell modules such a value of RSERIES is reasonable. RSERIES 0.720 Series Resistance (Ω) 0.700 0.680 0.660 0.640 0.620 0.600 0.580 1 2 3 4 5 6 7 8 9 PV Module Identification Number Figure 5-7: Series resistance comparison between PV modules. 58 5.1.8 MODULE SHUNT RESISTANCE A shunt path may exist for current flow across the photovoltaic cell junction due to surface effect or a poor junction. This alternate path for cell current constitutes a shunt resistance RP across the junction. Therefore junction current is [7]: 𝐼 = 𝐼𝐿 − 𝐼0 [exp ( 𝑒(𝑉 − 𝐼𝑅𝑆 ) 𝑉 − 𝐼𝑅𝑆 ) ) − 1] − ( 𝐴𝑘𝑇 𝑅𝐶𝑃 where: RCP is the metal contact to p-type semiconductor resistance For a good solar module the shunt resistance should be very large, to minimise uncontrollable internal losses within each cell. Figure 5-8 shows that all modules exhibit a shunt resistance in excess of 450Ω, and should resist an acceptable amount of internal module current flow for the experiments required by the Scope of this project. It is notable that potential exists for a comparison between modules with high and relatively low shunt resistance on the Facility, and this may provide opportunity for a greater range of student experiments than originally required; to facilitate this, the four modules presented on Control Panel A (Modules 1, 3, 4 and 5) were chosen to show a range of available shunt resistances. 59 RSHUNT Shunt Resistance (Ω) 1200 1000 800 600 400 200 0 1 2 3 4 5 6 7 8 9 PV Module Identification Number Figure 5-8: Shunt resistance comparison between PV modules. 5.2 Selection of Spare PV Module The Facility required only eight photovoltaic modules to meet the scope of the project, but nine modules were purchased to provide Murdoch University with one spare unit. The spare module could be swapped with any unit on the Facility if one were to suffer damage, or be used to perform small-scale induction experiments on the same model module as used on the system proper. Each module was compared to the others to determine which would be designated spare. In the interest of brevity one module shall be compared with the chosen spare here. Table 5: Parameter comparison for photovoltaic modules one and two. Parameter Data Sheet 1 2 Unit PMAX: 60±3% 62.15 60.80 W VPM: 17.50 18.21 18.40 V IPM: 3.43 VOC: 22.0 ISC: 3.80 3.62 3.52 A Fill Factor: 0.72 0.76 0.76 % RSERIES: - RSHUNT: - 3.41 3.30 A 22.58 22.61 V 0.662 0.635 Ω 712 1122 Ω 60 Photovoltaic module one is a suitable unit for the Facility array. The module produces an acceptable magnitude of power, even though the voltage at peak power is higher, and the current at peak power lower than specified on the manufacturer data sheet. The PV and IV curves, shown in Figure 5-9, exhibit reasonably model characteristic shapes with a better fill factor than specified by Yingli Solar. Sun simulator test results show the parameters and characteristics of module one to be approximately in line with almost all of the photovoltaic modules purchased for the Facility. PV Module 1 4 Current (Amps) 3 50 2.5 40 2 30 1.5 20 Power (Watts) 60 3.5 1 10 0.5 0 0 0 5 10 15 20 25 Voltage (Volts) Figure 5-9: IV and PV plots for PV Module 01. By comparison, photovoltaic module two is the least-suitable unit of those available for installation on the Facility array. While module two series and shunt resistance values were better than most of the modules, this particular module produces much less current from I SC to IMP under the same sun simulator tests as the other units -- this IV characteristic behaviour is shown in Figure 5-10. As fault current detection and overcurrent protection device actuation form an important subset of experiments available on the Facility, an emphasis must be placed on maximum string current production. Therefore, as the photovoltaic module that produces the least current under most circumstances, module two was selected to serve as the spare unit for the Facility. 61 PV Module 2 4 Current (Amps) 3 50 2.5 40 2 30 1.5 20 Power (Watts) 60 3.5 1 10 0.5 0 0 0 5 10 15 20 25 Voltage (Volts) Figure 5-10: IV and PV plots for PV Module 02. 5.3 Practical Experiment Results A number of sample practical experiments were developed to enhance the effectiveness of the Facility as a teaching tool. Experiments placed an emphasis on series and parallel module connections in shaded and unshaded situations, bypass module connections and operation, array string behaviour under normal and fault scenarios, and supervised overcurrent protection device actuation. Experiments developed were generally short, discrete, and intended for expansion by Murdoch University teaching staff before release to students. To demonstrate the effectiveness of the Facility as an experiment platform, two experiments were selected for further testing and verification. 5.3.1 SAMPLE EXPERIMENT 01: BYPASS CURRENT OBSERVATION 5.3.1.1 OBJECTIVES The objective of Sample Experiment 01 was to explore the effect of partial shading on photovoltaic module IV curves installed in various series and parallel configurations. Bypass diodes shall be examined as a solution to poor performance characteristics, with focus on improving the electrical power production of crystalline modules under said shading. Upon 62 completion of Sample Experiment 01, a student would have developed a greater understanding of shading effects on crystalline-technology modules, bypass solutions, and IV curve tracing. Figure 5-11: Facility control panel section required for Sample Experiment 01. 5.3.1.2 EQUIPMENT REQUIRED Facility – Wiring Enclosure A, shown in APPENDIX O. PROVA 210 Solar Module Analyzer ‘IV Curve Tracer’ with custom banana leads Temperature Sensor or digital thermometer 5 DMMS – UniT 240V DMMs used Handheld DMM wired to Irradiance Sensor on Facility Shading device 5.3.1.3 SAFETY REQUIREMENTS The experiment involved electrical connections with voltages up to 91V d.c. and currents up to 15 A. Although arcing is unlikely in this experiment, great care should be taken that all electrical connections are checked for tightness. Covered, sturdy shoes and sun protection shall be required. 5.3.1.4 METHOD Part A: 1. Connect PROVA unit to the positive and negative external load terminals of the Enclosure A Control Panel (the Control Panel). 63 2. Connect the positive and negative terminals of one module to the Control Panel Manual Load Connection using banana plug leads. Figure 5-12: Manual Load Connection control panel layout. Figure 5-13: MPPT Load Connection control panel layout. 3. Ensure the all module circuit model switches, shown as white circles in Figure 5-11, are in the ON (I) binary position and all breakers are in the ON position. 4. Engage the system by turning the Master Isolator Switch to the ON position. 5. Note the module temperature and solar radiation in the plane of the array. 6. Trace an IV curve for the module using the PROVA unit. Save this curve and note the time/ID. 7. Move the three vertically-oriented module circuit model switches to the OFF (O) binary position. Repeat Steps 4 through 6. 8. Disengage the system by turning the Master Isolator Switch to the OFF position. 9. Configure up to three modules in series, parallel, or some combination of series and parallel using banana plug leads. 10. Repeat Steps 3 through 8 for your chosen combination. Part B: 11. Connect UniT DMMs as ammeters inline between various points on the module circuit diagram by bridging the yellow connection banana sockets in Figure 5-11 with banana leads. These DMMs shall display the current movement around the circuit. 12. Disconnect the module positive and negative terminals from the Manual Load Connection and instead connect said terminals to the MPPT Battery load shown in Error! Reference source not found. using banana plug leads. 64 13. Move the Bypass Diode Switch to the ON (I) binary position. 14. Engage the system by turning the Master Isolator Switch to the ON position. 15. Measure the current flowing through the circuit as the module operates. Note the solar radiation in the plane of the array and the module temperature, and record the currents. 16. Disengage the system by turning the Master Isolator Switch to the OFF position. 17. Repeat steps 13 to 16 for any other measurement points of interest. 18. Shade part of the module with the supplied shading apparatus. No more than 50% should be shaded. This shaded section should be aligned with the left or right side of the photovoltaic module, as per Figure 5-15. Figure 5-14: Unshaded photovoltaic module [23]. Figure 5-15: Suggested partial shading pattern for photovoltaic module [24]. 19. Repeat steps 13 to 16, noting how the current bypasses part of the module, through the bypass diodes. Be sure to always disengage the system by turning the Master Isolator Switch before changing any current measurement connections. 20. Move the shade to different positions over the module while observing the DMM display. Take note of how the current flows change through the bypass diodes as the shade moves. 21. Move the Bypass Diode Switch to the OFF (O) binary position. Repeat Steps 13 to 16. 22. Disconnect the DMMs and load, and return the system to the standard configuration. 65 23. Plot IV and PV curves for the module in excel. How does engaging the bypass diodes change the shape of these curves? 24. Annotate circuit diagrams to show how the current flows when the module is shaded. Which bypass diode protects each side of the module? What happens when there are no bypass diodes connected? 5.3.1.5 RESULTS/CONCLUSIONS Despite the winter weather conditions at the time of conducting this experiment, the Facility performed well. In fact, the low ambient temperatures on the day contributed to a greater than rated module output for the measured incoming solar radiation. A number of module combinations in series and parallel were conducted. In the interest of brevity, one of the many potential combinations of modules is shown in Figure 5-16 below. This combination required the connection of three modules in parallel; such a configuration is unusual within industry, but serves here to demonstrate the behaviour of parallel-connected strings in a safe, low-voltage situation. It can be seen in Figure 5-16 that a module fitted with bypass diodes is able to produce greater magnitude current than a module without bypass. Without the bypass diode, the combined IV curve is limited to the ISC of the shaded cells, and a large amount of power is dissipated in these shaded cells. With bypass diodes engaged on the shaded module, the shaded cells experience a limited reverse voltage, and the IV curve changes shape to reflect this. It was observed that currents flow through bypass diode pathways on the Control Panel A graphics, as currents actually bypassed the shaded cells, to the middle of the string of cells within the module; the bypass current flowed through the left-hand diode when the right-hand cells of the module were shaded, the right-hand diode when the left-hand cells were shaded, and through both diodes to bypass the module completely when the shading was great enough across the whole module. The diodes are shown to reduce the effect of the shaded cell on the Facility output, particularly at lower voltages. Many such configurations are available for student experimentation, and will serve as a hands-on learning platform for understanding these reasonably non-intuitive electricity generation behaviours. 66 9 90 8 80 7 70 6 60 5 50 4 40 3 30 2 20 1 10 0 Power (W) Current (A) Three Parallel Modules One Partially Shaded 0 0 5 10 15 20 25 Voltage (V) I (A) WITH BPD I (A) WITHOUT BPD P (W) WITH BPD P (W) WITHOUT BPD Figure 5-16: Sample Experiment 01 IV and PV curve result for three parallel modules. 5.3.2 SAMPLE EXPERIMENT 02: STRING FAULT ANALYSIS 5.3.2.1 OBJECTIVES The objective of Sample Experiment 02 was to explore the location and effect of a short circuit fault in one string on the current production of the photovoltaic module array under various load conditions. A short circuit between the midpoint of String AB and the negative terminal rail of the array shall be made by a tutor, as shown in Figure 5-17. A student would measure the currents flowing through each string, the fault connection, and through a connection to the load. These measurements would be used to determine the string impacted by this short circuit fault, and whether or not overcurrent protection devices are likely to operate. Upon completion of Sample Experiment 02, a student would have developed a greater understanding of simple faults on a photovoltaic array and some of the difficulties detecting faults in photovoltaic systems. 67 Figure 5-17: Equivalent circuit model diagram for Sample Experiment 02. 5.3.2.2 EQUIPMENT REQUIRED Facility – Wiring Enclosure B, shown in APPENDIX P. 6 DMMS – UniT 240V DMMs were used Handheld DMM wired to Irradiance Sensor on Facility Shading device 5.3.2.3 SAFETY REQUIREMENTS The experiment involved electrical connections with voltages up to 46V d.c. and currents up to 15 A. It is noted in AS5033-2.1.8 that “the fault current depends on the number of strings, the fault location and the irradiance level. This makes short circuit detection within a PV array very difficult. Electric arcs can be formed in a PV array with fault currents that would not operate an overcurrent device” [9]. Although arcing is unlikely in this experiment, great care should be taken that all electrical connections are checked for tightness. At all times a ‘one hand behind 68 your back’ approach should be taken to minimise any risk of fault current flow through two arms, through a student’s torso. Covered, sturdy shoes and sun protection shall be required. Figure 5-18: Control Panel B layout showing coloured banana sockets. 69 5.3.2.4 METHOD 1. Connect four UniT DMMs as ammeters inline for each string on the module circuit diagram by bridging the yellow connection banana sockets in Figure 4-18 with banana leads. These DMMs shall display the current movement through each string. 2. Connect a fifth DMM to the yellow banana sockets on the negative rail of the module circuit and measure the voltage across these terminals. This element is a current shunt, as shown on the diagram in APPENDIX P, and permits safe measurement of high currents by inferring current using Ohm’s law. 3. Bridge the red banana sockets at the top end of each String on the Control Panel using banana plug leads. This step connects all four strings in parallel, to form the array circuit shown in Figure 5-17. 4. Connect the array positive and negative terminals to the MPPT Battery load shown in Error! Reference source not found. using banana plug leads. 5. Ensure the Fault Isolator Switch, provided external to the Wiring Enclosure B, is in the OFF (O) binary position. 6. Engage the battery by inserting the key and turning the Battery Switch to the ON position. 7. Engage the system by turning the Master Isolator Switch to the ON position. 8. Measure the current flowing through the circuit as the modules operate. Note the currents produced by each string. 9. Disengage the system by turning the Master Isolator Switch to the OFF position. 10. Engage the Fault Isolator Switch by turning the dial to the ON (I) binary position. 11. Engage the system by turning the Master Isolator Switch to the ON position. 12. Measure the current flowing through the circuit as the modules operate. Note the currents produced by each string. How has this changed from Step 8? If the string overcurrent protection actuates, disengage the system using the Master Isolator Switch, wait one minute, and then repeat the experiment. 13. Disengage the system by turning the Master Isolator Switch to the OFF position. 14. Repeat Steps 10 through 13 using various Manual Loads in series with the MPPT Load, if available. 15. Disconnect the DMMs and load, and return the system to the standard configuration. 16. Compare the current flows for each string, and the load, in excel. How does the fault change these currents? Will the overcurrent protection devices actuate with a large load connected to the array? 70 5.3.2.5 RESULTS/CONCLUSIONS The Facility performed well and the hidden fault exhibited an expected behaviour, and served well to highlight the limitations of overcurrent protection as a protective device in photovoltaic arrays. The Facility operator was able to find the location and nature of a fault on the array. Figure 5-19 shows that in the blue no load scenario, strings CD, EF and GH operate in a business-as-usual fashion to feed in to the faulty string, backwards through Module A – this observation points to a short somewhere on string AB to ground. After a short time the String AB Breaker actuated and shut down the faulty string, protecting the system and any bystanders as per AS5033 [9]. String Current Measurements 15 Current (Amps) 10 5 0 -5 -10 -15 String AB String CD String EF String GH To Load Array Section Measured No Load Situation Light Load Situation Heavy Load Situation Figure 5-19: String current measurements for Sample Experiment 02 under various loads. Under the light load red scenario the three normally operating strings feed the load, and excess current is fed into the fault, backwards through Module A. After a few minutes, String AB Breaker actuated and the faulty string was shut down – this actuation took longer because the fault current was not a great deal larger in magnitude than the nominal operating current for a breaker sized in accordance with AS5033-3.3.4. The time-overcurrent curve for a Curve D ABB 71 6A DC breaker shows that currents so close to nominal may take up to twenty minutes to cause the breaker to actuate. It is particularly interesting to note that under a heavy load, in this case the MPPT Load and a large 12V winch, String AB sees almost no reverse current; the overcurrent breaker will never actuate. This highlights one of the important safety issues faced by photovoltaic modules, where faults may exist and be difficult to detect without a detailed inspection. Such an experiment may be used to impress upon students the importance of care and attention when approaching photovoltaic installations, and demonstrate the need for careful design when engineering solar generation systems. 72 This page is intentionally left blank. 73 CHAPTER 06: CONCLUSIONS AND RECOMMENDATIONS 6.1 Project Conclusion A need was shown to exist for a practical teaching tool to be implemented for use by Murdoch University courses involved with photovoltaic system design. This tool was to take the form of a specialised, configurable array of photovoltaic modules with a range of measurement and testing capacities available to students. Proposed learning experiments involve the investigation of series, parallel and bypass diode connections of/within PV modules, partial shading and mismatch effects, as well as the effectiveness of over-current protection under different fault conditions in an extra low voltage PV array. The facility would need to allow for the safe measurement of voltages and currents of individual module/array sections of the interconnected array (at least three strings in parallel) using handheld multimeters and portable IV curve tracers. The purpose of this thesis project is to fulfil this need through the design, construction and delivery of such a teaching tool. The Photovoltaic Array Troubleshooting and Educational Facility project was a complete success. The project came in on time, under budget, even after a number of setbacks. A wide range of project management, technical, legal, financial and research skills outside the requirements of many honours thesis projects were developed throughout the course of the project, to the exceptional benefit of both Mr Kieran Peters and Murdoch University. Many new experiments are now available to students, particularly dealing with photovoltaic fault scenarios. This is a crucial area of photovoltaic system design that was previously available only as theoretical models or limited demonstrations. Almost all existing d.c. photovoltaic experiments from the Murdoch University Renewable Energy Engineering major can now be conducted in greater detail, on a full array of modules, while exposing students to industry standard components and techniques. The Facility is also available for open days and promotions, and shall be used to attract new students to the industry, the school, and generate a greater enthusiasm for solar power generation. Already this project has been shown in the draft PV in Australia 2014 report from the Australian Photovoltaic Institute, and it is hoped that other opportunities will be found in the future to showcase this example of Murdoch University student design, innovation and discovery. 74 6.2 Recommendations for Future Works A number of opportunities for future work exist outside the scope of this project. One would suggest these works in the format of undergraduate engineering honours thesis and undergraduate engineering technician project opportunity descriptions: Develop a full range of undergraduate student experiments for photovoltaic module basics, including series/parallel configurations, string fault scenarios, parallel fault scenarios, and earth fault situations. Interface the Facility earth bus with the installation earth of the Engineering Building 220, or the external lightning protection system on said building. Permit true earth fault currents to flow in a safe manner and expand the range of fault scenario experiments available to students or researchers. Expand the sensor panel with a greater number of applicable sensors in the plane of the array; ambient and module cell temperatures, wind speed and direction, etc. Integrate these sensors with the tilt control mechanism to automatically track for the best power generation based on environment conditions. Tilt control movements should not present any danger to students operating the Facility. Expand the logging capabilities of the Facility. Two unused current shunts have been fitted within Wiring Enclosure A for additional current measurements as many logging devices have difficulty measuring large currents. A serial port or similar could be added to the Facility to provide a connection means for Arduino, DataLogger, or similar devices. 75 VIII WORKS CITED [1] [2] [3] [4] [5] [6] [7] [8] [9] [10] [11] [12] [13] [14] [15] [16] [17] [18] [19] [20] [21] [22] [23] [24] A. P. Institute, "Australian PV in Australia Report 2014, APVI, June 2015," APVI, IEA2015. M. Calais, "Thesis Meeting Email Correspondence," K. Peters, Ed., ed, 2014. Standards-Australia, "AS 4836: Safe working on or near low-voltage electrical installations and equipment," ed: SAI Global Limited, 2011. S. Krauter, Solar electric power generation: Springer, 2006. Luque and S. Hegedus, Handbook of photovoltaic science and engineering. United Kingdom: Wiley-Blackwell (an imprint of John Wiley & Sons Ltd), 2011. O. D. o. Transport, "Solar World Wafer," ed. flickr: Oregon Department of Transport, 2009. G. N. Tiwari, S. Dubey, and J. C. R. Hunt, Fundamentals of photovoltaic modules and their applications. United Kingdom: Royal Society of Chemistry, The, 2010. S. E. International, Photovoltaics: Design and Installation Manual. United States: Solar Energy International, 2004. Standards-Australia, "AS 5033: Installation and safety requirements for photovoltaic (PV) arrays," ed: SAI Global Limited, 2014. D. S. Dolan, L. Friedman, J. Huff, and T. Taufik, "Solar trainer for laboratory photovoltaic systems education," in North American Power Symposium (NAPS), 2012, 2012, pp. 1-6. Amatrol, "Solar PV Troubleshooting Learning System," vol. 6552-B, ed. Jeffersonville, Indiana: Amatrol, 2010. G. Broun, "Detailed KP Thesis Design Render," ed, 2014. B. o. Meteorology, "Lowest Temperature for Jandakot Aero," BoM, Ed., ed, 2015. Yingli, "YL60Wp Data Sheet," Y. Energy, Ed., 20070824.03.Rev01.E ed: Yingli, 2007. Schletter, "Professional Solar Mounting Systems: Mounting and Project Planning," ed. schletter.de: Schletter GmbH, 2012. h.-N. Unknown, "Panel Mounting," ed. flickr: 'h080' (flickr handle), 2011. Standards-Australia, "AS 2756: Low-voltage switchgear and controlgear - Mounting rails for mechanical support of electrical equipment," ed: SAI Global Limited, 1997. Standards-Australia, "AS 3000: Wiring Rules," ed: SAI Global Limited, 2007. S. Solar, "Spi-Sun Simulator 5600 SLP System: Operation and Maintenance Manual," Edition C ed: Spire Solar, 2012. S. Solar, "Spi-Sun Simulator 5600SLP," Revision C ed: Spire Solar, 2012. R. J. Komp, "Practical Photovoltaics," Plant Energy Manage.;(United States), vol. 6, 1982. C. Honsberg and S. Bowden, "PVEducation. org," Retrieved October, vol. 10, p. 2012, 2010. G. Broun, "KP Thesis Top Down PV Module Diagram," ed, 2014. G. Broun, "KP Thesis Top Down PV Module with Shading Diagram," ed, 2014. All diagrams, artwork and charts were generated by the author, or reproduced with permission of the content owners or copyright holders. 76 IX APPENDICES APPENDIX A AS5033:2014 REQUIREMENTS ANALYSIS AS5033 is a key document for ensuring the Facility meets Australian Standards. Methods for determining wire, switch and fuse sizes and necessities are explored, with the intention of protecting human life and Facility infrastructure. AS5033-2.1.3 describes several basic photovoltaic array configurations, and illustrates the general functional configuration of a PV powered system. AS5033-2.1.6 sets out requirements for series-parallel configurations of modules. Most notably, “PV strings connected in parallel shall have matched open circuit voltages within 5% per string” to avoid circulating currents -- an important but reasonably non-intuitive safety aspect, and “PV modules that are electrically in the same string shall be all in the same orientation within ±5° (azimuth and tilt angle)”. AS5033-2.1.7 specifies that batteries connected to photovoltaic systems shall have fault current protection installed to minimise damage by large battery fault currents. Wherever possible said fault protection should be installed as close as possible to the battery. AS5033-2.1.8 postulates that fault currents may flow due to prospective fault conditions within a PV array. These fault currents depend on the number of module strings, fault location and irradiance level. Short circuit detection can be very difficult in photovoltaic arrays as fault currents may be just slightly higher than nominal operating currents. Possibilities of line-to-line faults, earth faults and inadvertent wire disconnections in the array need to be minimised wherever possible. AS5033-2.1.9 considers module operation at elevated temperatures. Modules can be expected to operate at approximately 25°C above ambient temperature in a typical installation with very good ventilation, receiving incoming solar radiation at approximately 1000Wm-2 [9]. Photovoltaic modules can be expected to operate at elevated temperatures, and all components and equipment that may be in direct contact or near the PV array (conductors, PCEs, connectors etc.) need to be capable of withstanding the expected maximum operating temperature of the array. AS5033-2.2 specifies relevant requirements for mechanical and frame components with regards to thermal and corrosion concerns for the location at which the array is to be installed. Mounting arrangement of modules and other metallic components should allow for maximum expansion/contraction under expected operating temperatures. Mounting frames, and other 77 methods used for attaching modules to frames “shall be made from corrosion resistant materials suitable for the lifetime and duty of the system (e.g. aluminium, galvanised steel or H3 treated timber)… Care shall be taken to prevent electrochemical corrosion between dissimilar metals.” On a related note AS5033-4.3 requires that all equipment exposed to the outdoor environment shall be at least IP54 compliant and shall be UV resistant. AS5033-3.2 specifies that all wiring shall be installed in accordance with AS3000:2007. Protection against electric shock, by means of double or reinforced insulation shall be required for all LV systems, but no specific directives for ELV are specified. In general, “because of the risk of d.c. arcs, double insulation is recommended where possible to make the installation as ‘inherently safe’ as possible.” As such, double insulation cables should be installed for all Facility parts exposed to student interaction. AS5033-3.3 provides directives regarding protection against overcurrent in the Facility. Faults are described as a potential source of overcurrent, and may occur as a result of short circuits within modules, junction and combiner boxes, module wiring or earth faults from array wiring. “Semiconductor (solid state) devices shall not be used for overcurrent protection purposes” [9], presumably to improve protection system reliability over the life of the Facility. AS5033-3.3.2 requires that overcurrent protection be provided where required by manufacturers of PV modules and associated equipment, or where the photovoltaic system is connected to batteries. Said protection shall be installed in the form of either circuit breakers or fuses; where batteries are installed the battery-relevant protection as per AS5033-2.1.7. AS5033-3.3.3 requires that “all overcurrent protection shall be capable of interrupting the maximum prospective fault current from the battery” [9]. AS5033-3.3.4 suggests that circuit breakers are not ideal for string overcurrent protection, implying that replaceable fuses would be a better option. String overcurrent protection shall also be used in all instances where the PV module maximum overcurrent protection rating is less than the product of the module short circuit current STC and the number of modules in the string minus one: ((𝑆𝐴 − 1) ∗ 𝐼𝑆𝐶 𝑀𝑂𝐷 ) > 𝐼𝑀𝑂𝐷 𝑀𝐴𝑋 𝑂𝐶𝑃𝑅 Overcurrent protection shall be sized in accordance with AS5033-3.3.5. Each photovoltaic module string shall be protected with an overcurrent protection device where the nominal overcurrent protection rating of the string overcurrent protection device shall be In where: 78 𝐼𝑛 > 1.5 ∗ 𝐼𝑆𝐶 𝑀𝑂𝐷 𝐼𝑛 < 2.4 ∗ 𝐼𝑆𝐶 𝑀𝑂𝐷 𝐼𝑛 ≤ 𝐼𝑀𝑂𝐷 𝑀𝐴𝑋 𝑂𝐶𝑃𝑅 AS5033-3.3.6 determines that overcurrent protection for strings shall be placed where string cables join the sub-array or array cables in the string combiner box. Array overcurrent protection shall be installed where array cables join the application circuit or the PCE. “In ELV arrays, overcurrent protective devices, where required for string and sub-array cables, shall be placed in either the positive or negative conductor (the number of current carrying conductors minus one). Where the extra-low voltage array is earthed, the protective devices shall be installed in all unearthed current carrying conductors.” AS5033-3.4 describes protection requirements against earth faults. In general, such protection is not required as the project scope requires the Facility to deliver ELV to student-accessible areas and the system is not connected to an inverter or functional earthing of any kind. On a similar note, AS5033-4.4.2 describes necessary arrangements for systems functionally earthed, floating and requiring lightning protection. Systems under ELV that do not include a.c. modules or micro-inverters with LV output, that are not required to be earthed for lightning protection, are not required to have protective earthing or bonding installed. AS5033-3.5 lists requirements for protection against lightning and overvoltage. Lightning protection is generally only required where systems are installed on buildings, unlike the portable frame system required for the Facility. However, AS5033-3.5.2 remains relevant in that “all d.c. cables should be installed so that positive and negative cables of individual circuits should be bundled together, avoiding the creation of wiring loops in the system.” Wiring loops could result in a situation where voltages are induced in the Facility when lightning strikes locations nearby, such as strikes upon the external lightning protection system on the Engineering Building 220. AS5033-4.2 specifies that the photovoltaic array maximum voltage shall be considered to be equal to VOC ARRAY, corrected for the lowest expected operating temperature: 𝑃𝑉 𝐴𝑟𝑟𝑎𝑦 𝑀𝑎𝑥 𝑉𝑜𝑙𝑡𝑎𝑔𝑒 = 𝑉𝑂𝐶 𝐴𝑅𝑅𝐴𝑌 + 𝛾𝑣 (𝑇𝑚𝑖𝑛 − 𝑇𝑆𝑇𝐶 )𝑀 79 where: M is number of series connected modules in a string. Yv is voltage temperature coefficient supplied by manufacturer. AS5033-4.3 Requires that all components installed in photovoltaic systems shall be rated for d.c. use, have a voltage rating equal to or greater than the PV array maximum voltage, and have a current rating greater/equal to that shown in AS5033 Table 4.2. Additionally, “systems with voltages above 50 V d.c. shall include bypass diodes, unless shading is not possible by design or location, or unless the PV module manufacturer specifies not to use bypass diodes. If PV modules are not internally fitted with bypass diodes, they shall be fitted externally with a minimum of one per PV module” [9]. Circuit breakers shall be certified to either AS60898.2 or IEC60947-2, not polarity sensitive, rated to interrupt the full prospective currents AS5033-4.3 specifies that no disconnecting device shall have exposed live parts in connected or disconnected state. Such devices shall be selected for appropriate current ratings for the expected temperatures and greater/equal to the overcurrent protection devices to which they are attached. Switch-disconnectors shall not be polarity sensitive, rated to interrupt the full load and prospective fault currents, interrupt all conductors simultaneously and be capable of being secured in the open position. ELV plug connections for interruption under load may be used instead if the equivalent level of safety and performance can be assured. Cable sizing shall be determined with regard to overcurrent protection ratings (where in use), the maximum normal operating current, and the voltage drop and prospective fault current (choose largest size of these). Derating factors specified by manufacturer may apply, particularly given the expected elevated operational temperatures of the system. Cable types shall have suitable temperature rating and if exposed to the environment be UV-resistant or protected from UV-light, be flexible (multi-stranded). Cables shall be supported, such that they do not suffer fatigue and are protected from abrasion, tension, compression and cutting forces (see AS3000). Plastic cable ties shall not be used as a primary means of support. AS5033-4.3 requires that plugs, sockets and connectors shall comply with EN50521, be protected from contact with live parts in connected and disconnected states, have suitable current ratings and be capable of accepting the cable used. They shall require a deliberate force to separate, have suitable temperature rating, and be UV-resistant and of a suitable IP rating if 80 exposed to the environment. Install to minimise strain on connectors and only mate connectors of the same type from the same manufacturer. Bypass diodes shall have a voltage rating at least 2xVOC MOD, a current rating of at least 1.4xISC MOD, be installed so no live parts are exposed and protected from degradation due to environment factors. AS5033-4.4 specifies several key installation and location requirements relevant to the Facility. Overcurrent protection devices shall be located at the end of the cable that is electrically most remote from the photovoltaic array. Disconnection means shall be provided to isolate the PV array from the PCE or application circuit and vice versa. Suitably rated circuit-breakers used for overcurrent protection may also provide load breaking disconnecting facilities. AS5033 Table 4.3 shows disconnection device requirements in PV array installations. AS5033-5.2 requires several warning labels and signs to be installed for several applications of photovoltaic modules. Labels and signs shall be sufficiently durable for purpose, in English, visible when applicable, and clearly legible. AS5033-5.3.2 requires that a sign containing this text shall be attached to the photovoltaic array and string junction boxes: “WARNING: HAZARDOUS D.C. VOLTAGE” in black text on yellow background. AS5033-5.5.2 Specifies that where multiple isolation devices are used, the following text shall be displayed next to PCE: “WARNING: MULTIPLE D.C. SOURCES. TURN OFF ALL D.C. ISOLATORS TO ISOLATE EQUIPMENT”. AS5033-5.5.3 requires that all systems greater than 240W shall include a shutdown procedure that sets out steps to safely shut down the system, placed adjacent to and visible from equipment to be operated in the event of a shutdown. AS5033-5.7 requires that suitable documentation of the installed system must be included with the system. 81 APPENDIX B AS3000:2007 REQUIREMENTS ANALYSIS AS3000 is an important document for the safety of people using and near to the Facility. At all times AS3000 must be adhered to, with explicit protection systems enforced wherever required or suggested by the Wiring Rules. AS3000-1.6 specifies that any electrical installation shall be designed to protect persons, livestock and property from harmful effects, function correctly as intended, minimise inconvenience in the event of a fault and facilitate safe operation, inspection, testing and maintenance for the life of the system. Designers shall “ensure that the voltage at the terminals of electrical appliances and equipment is suitable for the nominal operating voltage of electrical appliances and equipment to be supplied” [18]. The installation “shall be divided into circuits as necessary to avoid danger and minimise inconvenience in the event of a fault and facilitate safe operation, inspection, testing and maintenance” [18]. AS3000-1.7 requires that electrical equipment “shall be selected and installed to operate in a safe and reliable manner in the course of normal operating conditions; and not cause danger from electric shock, fire, high temperature or physical injury in the event of reasonably expected conditions of abnormal operation, overload, fault or external influences that may apply in the electrical installation; and be installed in accordance with the manufacturer’s instructions” [18]. Equipment is deemed to satisfy this requirement if it satisfies the essential safety requirements of AS3820, or other appropriate Australian Standard. Any equipment installed shall be subject to reasonable inspection, and verification upon installation, alteration, addition or repair prior to being placed in service or use to confirm that the installation meets all requirements of AS3000 as applicable. AS3000-1.4 provides several definitions, an understanding of which is crucial for a complete understanding of the project scope and for the Facility to meet the minimum legal requirements. Relevant definitions are as follows: “Extra-low voltage: Not exceeding 50V a.c. or 120 V ripple-free d.c.” [18] “Low voltage: Exceeding extra-low voltage, but not exceeding 1000 V a.c. or 1500 V d.c.” [18] Fault current: "A current resulting from an insulation failure or from the bridging of insulation.” [18] Short circuit current: "A fault current resulting from a fault of negligible impedance between live conductors having a difference in potential under normal operating conditions.” [18] 82 AS3000-1.5.3 specifies requirements for basic protection against direct contact and fault protection against indirect contact. “Protection shall be provided against shock current arising from contact with parts that are live in normal service” [18]. Accessible conductive parts must not be live. Protection against direct contact may be provided by basic protective provisions alone, such as insulation, barriers, enclosures, or obstacles. “Protection shall be provided against shock current arising from contact with parts that… become live under fault conditions” [18]. Accessible parts must not become live in fault situations. Protection against indirect contact may be provided by means of automatic disconnection devices, and/or insulation that would limit or prevent fault current to flow through a body. Enclosures and insulation must be selected to appropriate an appropriate degree of protection against contact with direct or indirect currents, and external influences. AS3000-2.5 requires that “active conductors shall be protected by one or more devices that automatically disconnect the supply in the event of overcurrent, before such overcurrent attains a magnitude or duration that could cause injury to persons or livestock or damage because of excessive temperatures or electromechanical stresses in the electrical installation” [18]. The Standard does not provide explicit details for ELV circuit requirements, so every effort shall be made to ensure that overcurrent protection devices are installed to limit risk to any person using the Facility. AS3000-2.5.3.1 specifies that a certain coordination must be designed between conductors and protective devices, such that: 𝐼𝐵 ≤ 𝐼𝑁 ≤ 𝐼𝑍 𝐼2 ≤ 1.45𝐼𝑍 where: IB is the maximum demand current IN is the nominal current of the protective device IZ is the continuous current-carrying capacity of the conductor and I2 is the current ensuring effective operation of the protective device. (May be considered 1.45IN [18]) This specification ensures that the current carrying conductors in an electrical installation are rated for currents suitably higher than, or equal to, the demand current and protection device nominal current ratings. 83 AS3000-1.5.10 requires that protective earthing conductors be capable of carrying earth fault currents without reaching excessive temperatures. AS3000-2.3.2.1.2 requires that “all poles of a d.c. circuit shall be capable of being isolated by a device for isolation” [18]. However, switches in an extra-low voltage d.c. installation may operate in one less conductor than the number of conductors in the circuit. Isolators shall be clearly labelled such that any lay person could isolate the system if the need arose. 84 APPENDIX C DETAILED P HOTOVOLTAIC MODULE SUN SIMULATOR RESULTS Module 1 Mod Type: Date: Time: Irradiance: IrrCorr: Lamp Voltage: Corrected To: Module Temp: Corrected To: MCCC: Voc: Isc: Rseries: Rshunt: Pmax: Vpm: Ipm: Fill Factor: Active Eff: Aperture Eff: Segment Area: Segs in Ser: Segs in Par: Panel Area: Frequency: Module 2 Module 3 Module 4 Module 5 Module 6 Module 7 Module 8 Module 9 Yingli Yingli Yingli Yingli Yingli Yingli Yingli Yingli Yingli YL60Wp YL60Wp YL60Wp YL60Wp YL60Wp YL60Wp YL60Wp YL60Wp YL60Wp 2/03/2015 2/03/2015 2/03/2015 2/03/2015 2/03/2015 2/03/2015 2/03/2015 2/03/2015 2/03/2015 14:47:08 14:45:02 14:29:44 14:26:43 14:32:35 14:35:30 14:37:53 14:40:17 14:43:00 100.01 100.007 99.9962 99.9874 100.018 100.008 100.051 100.019 99.9961 100 100 100 100 100 100 100 100 100 2050 2050 2050 2050 2050 2050 2050 2050 2050 100 100 100 100 100 100 100 100 100 25.3871 24.7972 25.2877 23.811 23.8357 24.398 23.8265 23.8865 25.0968 25 0.9863 22.5782 3.61904 0.66161 712.168 62.1453 18.2128 3.41217 0.76054 11.0657 3.82762 156 25 0.9863 22.6147 3.51617 0.63503 1122.29 60.7991 18.403 3.30376 0.7646 10.826 3.74471 156 25 0.9863 22.4414 3.62285 0.71214 765.536 60.7496 17.9683 3.38092 0.7472 10.8172 3.74166 156 25 0.9863 22.3953 3.63677 0.70104 1091.33 61.3904 18.0689 3.39757 0.75374 10.9313 3.78113 156 25 0.9863 22.439 3.61983 0.66841 454.747 61.2511 18.0829 3.38724 0.75408 10.9065 3.77255 156 25 0.9863 22.3026 3.63393 0.63439 771.198 61.1094 17.9881 3.3972 0.754 10.8813 3.76382 156 25 0.9863 22.4333 3.62223 0.62817 479.205 61.1667 18.1423 3.37149 0.75273 10.8915 3.76735 156 25 0.9863 22.5683 3.62852 0.68024 1065.08 61.7307 18.1396 3.40309 0.75382 10.9919 3.80208 156 25 0.9863 22.5786 3.63367 0.65414 766.381 62.515 18.3954 3.3984 0.76197 11.1316 3.8504 156 36 1 16236 274000 36 1 16236 274000 36 1 16236 274000 36 1 16236 274000 36 1 16236 274000 36 1 16236 274000 36 1 16236 274000 36 1 16236 274000 36 1 16236 274000 85 SweepDelay: SweepLength: SweepSlope: MCCC2: MCCC3: MCCC4: LampI: IntV: IntV2: IntV3: IntV4: LoadV: PulseWidth1: PulseWidth2: PulseWidth4: TRef1: TRef2: MCMode: Irradiance2: IrrCorr2: LoadV2: PulseWidth12: PulseWidth22: Irradiance3: IrrCorr3: LoadV3: PulseWidth13: PulseWidth23: 10 60 0.025 1.0022 1.155 1.155 100.035 5.94087 6.04186 5.9427 5.9427 5.39811 66.1605 65.9562 0 26.0934 26.6523 FALSE 100.166 70 3.1 66.1605 65.9562 100.107 40 3.1 66.1605 65.9562 10 60 0.025 1.0022 1.155 1.155 99.9878 5.94087 6.04186 5.9427 5.9427 5.39811 66.0729 65.9854 0 26.0924 26.7101 FALSE 100.158 70 3.1 66.0729 65.9854 100.106 40 3.1 66.0729 65.9854 10 60 0.025 1.0022 1.155 1.155 99.9956 5.9412 6.0422 5.9427 5.9427 5.39811 66.1021 66.1021 0 25.7587 26.3764 FALSE 100.177 70 3.1 66.1021 66.1021 100.117 40 3.1 66.1021 66.1021 10 60 0.025 1.0022 1.155 1.155 99.9753 5.9412 6.0422 5.9427 5.9427 5.39811 65.927 65.9708 0 25.6931 26.4286 FALSE 100.178 70 3.1 65.927 65.9708 100.118 40 3.1 65.927 65.9708 10 60 0.025 1.0022 1.155 1.155 100.017 5.9412 6.0422 5.9427 5.9427 5.39811 66 66.0584 0 25.7704 26.3881 FALSE 100.176 70 3.1 66 66.0584 100.116 40 3.1 66 66.0584 10 60 0.025 1.0022 1.155 1.155 100.019 5.9412 6.0422 5.9427 5.9427 5.39811 66.1605 66 0 25.8702 26.4291 FALSE 100.178 70 3.1 66.1605 66 100.116 40 3.1 66.1605 66 10 60 0.025 1.0022 1.155 1.155 100.039 5.9412 6.0422 5.9427 5.9427 5.39811 66.0292 66.0146 0 25.9378 26.4378 FALSE 100.176 70 3.1 66.0292 66.0146 100.116 40 3.1 66.0292 66.0146 10 60 0.025 1.0022 1.155 1.155 100.04 5.9412 6.0422 5.9427 5.9427 5.39811 66.0437 66.0729 0 25.9481 26.4481 FALSE 100.177 70 3.1 66.0437 66.0729 100.116 40 3.1 66.0437 66.0729 10 60 0.025 1.0022 1.155 1.155 99.9951 5.94087 6.0422 5.9427 5.9427 5.39811 66.0437 66.0437 0 26.0386 26.6563 FALSE 100.176 70 3.1 66.0437 66.0437 100.117 40 3.1 66.0437 66.0437 86 APPENDIX D VISIO WIRING DIAGRAM CONCEPT FOR EXPERIMENT MEASUREMENTS [FIGURE ID HERE] 87 APPENDIX E GANTT CHART SCHEDULE FOR PROJECT DEVELOPMENT Appendix Figure 6-1: Gantt chart schedule for project development. 88 APPENDIX F DOCUMENT GD3-1-8, PRELIMINARY DESIGN FOR CONTROL PANEL A Appendix Figure 6-2: Preliminary design for Control Panel A. 89 APPENDIX G DOCUMENT GD3-2-8, PRELIMINARY DESIGN FOR CONTROL PANEL B Appendix Figure 6-3: Preliminary design for Control Panel B. 90 APPENDIX H SUITABILITY COMPARISON FOR REVISED PHOTOVOLTAIC MODULE S ELECTION. Appendix Figure 6-4: Yingli 60W module suitability selection matrix. 91 Appendix Figure 6-5: Sunpower 40W module suitability selection matrix. 92 Appendix Figure 6-6: Yingli 40W module suitability selection matrix. 93 D- Earth D+ Module C- Module C+ Module B- Breaker Module B+ Module 2 Pole DC A- Breaker Module A+ Module 2 Pole DC Load - Module Load + String - String + MPPT + Battery/ MPPT - Battery/ APPENDIX I DOCUMENT WD3-1-4, E NCLOSURE A LOWER WIRING LEVEL WIRING DIAGRAM Telergon 8 Pole DC Isolator Earth Breaker 2 Pole DC Breaker 2 Pole DC Breaker 2 Pole DC Breaker 2 Pole DC BPD Switch Bank B B B B B B B B B B B B B B B B P P P P P P P P P P P P P P P P D D D D D D D D D D D D D D D D PV MODULES TECH: POLY QTY: 8 MANUF: YINGLI MODEL: YLP60Wp 4 MODULES IN SERIES TEST SOCKETS MAX POWER: 60W MAX POWER VOLTAGE: 17.5V MAX POWER CURRENT: 3.43A OPEN CIRCUIT VOLTAGE: 22.0V SHORT CIRCUIT CURRENT: 3.8A TECH: BANANA QTY: 32 MANU: SCHÜTZINGER MODEL: SEB 6445 NI / X CATEGORY: CAT III INSULATED: YES (POLYAMIDE) MAX VOLTAGE: 1000V MAX CURRENT: 32A PERMISSABLE OPERATING TEMPERATURE: -25C TO +80C DC ISOLATOR DC BREAKERS MANU: TELERGON ZFV32x2 MAX VOLTAGE: 600V MAX CURRENT: 32A PERMISSABLE OPERATING TEMPERATURE: -40C TO +45C MANU: ABB MODEL: 2CDS272001R0065 - S202MB6 RATED CURRENT: 6.0A RATED DC VOLTAGE: 125V CHARACTERISTIC: CURVE B Earth H- H+ Module G- Module Module G+ Module F- Module F+ Module E- Module E+ Module D- Module D+ Module C- Module C+ Module B- Module B+ Module A- A+ Module Module Con. Pt. BPD Con. Pt. BPD BPD Con. Pt. BPD Con. Pt. BPD Con. Pt. BPD Con. Pt. BPD Con. Pt. BPD Con. Pt. Enclosure B DOCUMENT WD3-1-4 POLES: 2 GANGED ACROSS 2 POLES ONLY Author: Kieran Peters Date: 13/03/2015 Enclosure A Lower Wiring Level Wiring Diagram 94 Earth D- D+ Module C- Module C+ Module B- Breaker Module B+ Module 2 Pole DC A- Breaker Module A+ Module 2 Pole DC Load - Module Load + String - String + MPPT + Battery/ MPPT - Battery/ APPENDIX J DOCUMENT WD3-1-5, E NCLOSURE A MIDDLE WIRING LEVEL WIRING DIAGRAM Telergon 8 Pole DC Isolator Earth Breaker 2 Pole DC Breaker 2 Pole DC Breaker 2 Pole DC Breaker 2 Pole DC BPD Switch Bank B B B B B B B B B B B B B B B B P P P P P P P P P P P P P P P P D D D D D D D D D D D D D D D D PV MODULES TECH: POLY QTY: 8 MANUF: YINGLI MODEL: YLP60Wp 4 MODULES IN SERIES TEST SOCKETS MAX POWER: 60W MAX POWER VOLTAGE: 17.5V MAX POWER CURRENT: 3.43A OPEN CIRCUIT VOLTAGE: 22.0V SHORT CIRCUIT CURRENT: 3.8A TECH: BANANA QTY: 32 MANU: SCHÜTZINGER MODEL: SEB 6445 NI / X CATEGORY: CAT III INSULATED: YES (POLYAMIDE) MAX VOLTAGE: 1000V MAX CURRENT: 32A PERMISSABLE OPERATING TEMPERATURE: -25C TO +80C DC ISOLATOR DC BREAKERS MANU: TELERGON ZFV32x2 MAX VOLTAGE: 600V MAX CURRENT: 32A PERMISSABLE OPERATING TEMPERATURE: -40C TO +45C MANU: ABB MODEL: 2CDS272001R0065 - S202MB6 RATED CURRENT: 6.0A RATED DC VOLTAGE: 125V CHARACTERISTIC: CURVE B Earth H- H+ Module Module G- Module G+ Module F- Module F+ Module E- Module E+ Module D- Module D+ Module C- Module C+ Module B- Module B+ Module A- A+ Module Module Con. Pt. BPD Con. Pt. BPD BPD Con. Pt. BPD Con. Pt. BPD Con. Pt. BPD Con. Pt. BPD Con. Pt. BPD Con. Pt. Enclosure B DOCUMENT WD3-1-5 POLES: 2 GANGED ACROSS 2 POLES ONLY Author: Kieran Peters Date: 12/03/2015 Enclosure A Middle Wiring Level Wiring Diagram 95 Earth D- D+ C- Module C+ Module B- Module B+ Module Breaker Y X W Module V U 2 Pole DC A- T Module 6 A+ 5 Module Load - Z Breaker Load + Q S 2 Pole DC String - 4 3 Module 2 String + MPPT + R 1 Battery/ MPPT - Battery/ APPENDIX K DOCUMENT WD3-1-6, E NCLOSURE A UPPER WIRING LEVEL WIRING DIAGRAM P A C E G I K M O Telergon 8 Pole DC Isolator Earth N Breaker L 2 Pole DC J Breaker H 2 Pole DC F Breaker D 2 Pole DC B Breaker Unlabelled sockets not required, but potentially useful. 2 Pole DC BPD Switch Bank B B B B B B B B B B B B B B B B P P P P P P P P P P P P P P P P D D D D D D D D D D D D D D D D PV MODULES TECH: POLY QTY: 8 MANUF: YINGLI MODEL: YLP60Wp 4 MODULES IN SERIES TEST SOCKETS MAX POWER: 60W MAX POWER VOLTAGE: 17.5V MAX POWER CURRENT: 3.43A OPEN CIRCUIT VOLTAGE: 22.0V SHORT CIRCUIT CURRENT: 3.8A TECH: BANANA QTY: 32 MANU: SCHÜTZINGER MODEL: SEB 6445 NI / X CATEGORY: CAT III INSULATED: YES (POLYAMIDE) MAX VOLTAGE: 1000V MAX CURRENT: 32A PERMISSABLE OPERATING TEMPERATURE: -25C TO +80C DC ISOLATOR DC BREAKERS MANU: TELERGON ZFV32x2 MAX VOLTAGE: 600V MAX CURRENT: 32A PERMISSABLE OPERATING TEMPERATURE: -40C TO +45C MANU: ABB MODEL: 2CDS272001R0065 - S202MB6 RATED CURRENT: 6.0A RATED DC VOLTAGE: 125V CHARACTERISTIC: CURVE B H- Earth H+ Module Module G- Module G+ Module F- Module F+ Module E- Module E+ Module D- Module D+ Module C- Module C+ Module B- Module B+ Module A- A+ Module Module Con. Pt. BPD Con. Pt. BPD BPD Con. Pt. BPD Con. Pt. BPD Con. Pt. BPD Con. Pt. BPD Con. Pt. BPD Con. Pt. Enclosure B DOCUMENT WD3-1-6 POLES: 2 GANGED ACROSS 2 POLES ONLY Author: Kieran Peters Date: 12/03/2015 Enclosure A Upper Wiring Level Wiring Diagram 96 APPENDIX L DOCUMENT WD3-2-4, E NCLOSURE B LOWER WIRING LEVEL WIRING DIAGRAM PV MODULES 15-35cm TECH: POLY QTY: 8 MANUF: YINGLI MODEL: YLP60Wp 4 MODULES IN SERIES MAX POWER: 60W MAX POWER VOLTAGE: 17.5V MAX POWER CURRENT: 3.43A OPEN CIRCUIT VOLTAGE: 22.0V SHORT CIRCUIT CURRENT: 3.8A H- Earth H+ Module G- Module G+ Module F- Module F+ Module E- Module E+ Module D- Module D+ Module C- Module C+ Module B- Module B+ Module A- Module A+ Module Enclosure A Module TEST SOCKETS TECH: BANANA QTY: 32 MANU: SCHÜTZINGER MODEL: SEB 6445 NI / X CATEGORY: CAT III INSULATED: YES (POLYAMIDE) MAX VOLTAGE: 1000V MAX CURRENT: 32A PERMISSABLE OPERATING TEMPERATURE: -25C TO +80C DC ISOLATOR MANU: TELERGON ZFV32x2 MAX VOLTAGE: 600V MAX CURRENT: 32A PERMISSABLE OPERATING TEMPERATURE: -40C TO +45C 10-15cm Fault Switch DPST DC Isolator Earth Fault 2 Earth Fault 1 Earth 10cm 40-50cm 10cm 40-50cm Earth Earth Earth Earth Earth Earth Earth Earth Earth All Metal Parts Earth Fault Current Shunt DC BREAKERS MANU: BLUE SEA SYSTEMS MODEL: 7050; 7052; 7053; RATED CURRENT: 3A; 5A; 7A RATED DC VOLTAGE: 32V DC CHARACTERISTIC: THERMAL POLES: 1 EACH PERMISSABLE OPERATING TEMP: -10C TO 60C ONLY MANU: ABB MODEL: 2CDS272001R0065 - S202MB6;10 RATED CURRENT: 6.0A; 10.0A RATED DC VOLTAGE: 125V CHARACTERISTIC: CURVE B POLES: 2 GANGED ACROSS 2 POLES ONLY DOCUMENT WD3-2-4 Author: Kieran Peters Date: 10/03/2015 Enclosure B Lower Wiring Level Wiring Diagram 97 APPENDIX M DOCUMENT WD3-2-5, E NCLOSURE B MIDDLE WIRING LEVEL WIRING DIAGRAM PV MODULES TECH: POLY QTY: 8 MANUF: YINGLI MODEL: YLP60Wp 4 MODULES IN SERIES TEST SOCKETS TECH: BANANA QTY: 32 MANU: SCHÜTZINGER MODEL: SEB 6445 NI / X CATEGORY: CAT III H- H+ Module G- Module G+ Module F- Module F+ Module E- Module E+ Module D- Module D+ Module C- Module C+ Module B- Module B+ Module A- Module A+ Module Module Internal connections for fault production Enclosure A MAX POWER: 60W MAX POWER VOLTAGE: 17.5V MAX POWER CURRENT: 3.43A OPEN CIRCUIT VOLTAGE: 22.0V SHORT CIRCUIT CURRENT: 3.8A INSULATED: YES (POLYAMIDE) MAX VOLTAGE: 1000V MAX CURRENT: 32A PERMISSABLE OPERATING TEMPERATURE: -25C TO +80C DC ISOLATOR MANU: TELERGON ZFV32x2 MAX VOLTAGE: 600V MAX CURRENT: 32A PERMISSABLE OPERATING TEMPERATURE: -40C TO +45C 20-30cm Load Parallel Block - Fault 2 Earth Fault 1 Earth Breaker 2 Pole DC Battery Load SPST Battery Keyed Switch Load - Load + 15-30cm Telergon 8 Pole DC Isolator MPPT & Battery Tutor configures fault connections by connecting these terminals to the above module fault terminal points 10-15cm Earth DC BREAKERS MANU: BLUE SEA SYSTEMS MODEL: 7050; 7052; 7053; RATED CURRENT: 3A; 5A; 7A RATED DC VOLTAGE: 32V DC CHARACTERISTIC: THERMAL POLES: 1 EACH PERMISSABLE OPERATING TEMP: -10C TO 60C ONLY MANU: ABB MODEL: 2CDS272001R0065 - S202MB6;10 RATED CURRENT: 6.0A; 10.0A RATED DC VOLTAGE: 125V CHARACTERISTIC: CURVE B POLES: 2 GANGED ACROSS 2 POLES ONLY DOCUMENT WD3-2-5 Author: Kieran Peters Date: 10/03/2015 Enclosure B Middle Wiring Level Wiring Diagram 98 APPENDIX N DOCUMENT WD3-2-6, E NCLOSURE B UPPER WIRING LEVEL WIRING DIAGRAM PV MODULES TECH: POLY QTY: 8 MANUF: YINGLI MODEL: YLP60Wp 4 MODULES IN SERIES MAX POWER: 60W MAX POWER VOLTAGE: 17.5V MAX POWER CURRENT: 3.43A OPEN CIRCUIT VOLTAGE: 22.0V SHORT CIRCUIT CURRENT: 3.8A TEST SOCKETS TECH: BANANA QTY: 32 MANU: SCHÜTZINGER MODEL: SEB 6445 NI / X CATEGORY: CAT III INSULATED: YES (POLYAMIDE) MAX VOLTAGE: 1000V MAX CURRENT: 32A PERMISSABLE OPERATING TEMPERATURE: -25C TO +80C DC ISOLATOR MANU: TELERGON ZFV32x2 MAX VOLTAGE: 600V MAX CURRENT: 32A PERMISSABLE OPERATING TEMPERATURE: -40C TO +45C DC Breakers 15-20cm V Parallel Block - Breaker Parallel Block + U 10A 2 Pole DC Breaker Battery Load 3 16 A 2 Pole DC SPST 4 Battery Keyed Switch 6 Load - Load + 5 H F D B G E C A M I N J O Q S P R T Telergon 8 Pole DC Isolator 2 1 Array Current Shunts 15-20cm DC BREAKERS K Fault Current Shunt L MANU: BLUE SEA SYSTEMS MODEL: 7050; 7052; 7053; RATED CURRENT: 3A; 5A; 7A RATED DC VOLTAGE: 32V DC CHARACTERISTIC: THERMAL POLES: 1 EACH PERMISSABLE OPERATING TEMP: -10C TO 60C ONLY MANU: ABB MODEL: 2CDS272001R0065 - S202MB6;10 RATED CURRENT: 6.0A; 10.0A RATED DC VOLTAGE: 125V CHARACTERISTIC: CURVE B POLES: 2 GANGED ACROSS 2 POLES ONLY DOCUMENT WD3-2-6 Author: Kieran Peters Date: 10/03/2015 Enclosure B Upper Wiring Level Wiring Diagram 99 APPENDIX O DOCUMENT GD4-1-1, ENCLOSURE A CONTROL PANEL GRAPHIC E E AX Manual Load Connection CONTROL PANEL A E AY E AZ Bypass AB Breaker Battery Switch Bypass CD Breaker Module A Breaker Module C Breaker Module B Breaker Module D Breaker Module B Breaker Module A Breaker MODULE B MODULE A EL I E SA1 O I EI SA2 E C E I E SC1 SA1 V EJ SC3 SA3 E O AH EJ SC2 SA2 E EL AV I C AA E SA3 SD3 E O AD EF O E D AB I AT EJ SA2 SD2 E O C AM E E AO I SC5 SA5 E E SC4 SA4 O O EI AS I I E SA1 SD1 E K AU B AL E E A AK G AQ E E H AR O E AC I E P D R EF MODULE D E K AI ZE B I EI AG O Module D Breaker E Y A O SB5 SA5 E E SB4 SA4 MODULE C G AE E E H AF C O E I O Module C Breaker EL AJ O E Q O E D EF SB2 SA2 E I SB3 SA3 E O EJ I I SA5 E E SA4 O EI U I O O E SB1 SA1 E K W B N E E A M G ES TE H I E SA3 E EL X O I I E K B E E A G E E H MPPT Load Connection System DC Isolator I I SA5 SD5 E E SA4 SD4 O O E D AN AP EF DOCUMENT GD4-1-1 Author: Kieran Peters Date: 14/05/2015 Enclosure A Bypass Experiment Graphic incl. Student Access Points 100 APPENDIX P DOCUMENT GD4-2-1, ENCLOSURE B CONTROL PANEL GRAPHIC DOCUMENT GD4-2-1 Author: Kieran Peters Date: 14/05/2015 Enclosure B Fault Current Experiment Graphic incl. Student Access Points CONTROL PANEL B Battery Breaker 6A DC Breaker A E String AB Breaker String CD Breaker B E String EF Breaker C E String GH Breaker System DC Isolator TE D E V E 50A 50mV ±0.25% E G EF E I E SB E SC EI E K P E R E E Q ES Manual Load Connection MPPT Load Connection X E 3B E 3A DC Breaker (Normally Closed) E N 50A 50mV ±0.25% Current Shunt E AA 5A DC Breaker (Normally Closed) AD E AB E 7B E E AC 6A DC Breaker (Normally Closed) E M EZ 5B E Y E String GH Breaker String EF Breaker MODULE D Current Shunt EL MODULE E MODULE C String CD Breaker Fault Current Shunt O EJ MODULE A MODULE B String AB Breaker W E SD E O MODULE G O U E I MODULE H SA E O E H I MODULE F I 50A 50mV ±0.25% AE E 7A DC Breaker (Normally Closed) O E Battery Switch 101 APPENDIX Q DOCUMENT GD4-1-2, ENCLOSURE A CONTROL PANEL GRAPHIC CUTTING INSTRUCTION E AX E Manual Load Connection CONTROL PANEL A AY E AZ E Battery Switch Bypass AB Breaker Bypass CD Breaker Module A Breaker Module B Breaker Module C Breaker Module D Breaker Module A Breaker Module B Breaker MODULE A EL H E G E I SA1 E MODULE B A E O SA2 E SA1 SB1 E E D AE G E I SA1 SC1 E SA3 SC3 E O AH EJ I SA2 SC2 E EL AV AR H E O AA C E SD3 SA3 E O E AB D O AT EJ AU K E AL B E I SD2 SA2 E O AM C E AO E I O AD EF SD1 SA1 E AK A E EI AS SA5 SC5 E SA4 SC4 E AQ G E I I O E D P R EF MODULE D AC E I O V EJ AI K E B ZE I EI AG SA5 SB5 E SA4 SB4 E O Module D Breaker A Y E O O C E I MODULE C AF H E O I Module C Breaker EL AJ SA2 SB2 E Q E O K E W N B E I SA3 SB3 E O EF M A E O I SA5 E SA4 E EJ G ES EI U I O O H TE I C E I SA3 E EL X O E I K E B E I EI MPPT Load Connection System DC Isolator I I SD5 SA5 E SD4 SA4 E O O E AN D AP EF DOCUMENT GD4-1-1 Author: Kieran Peters Date: 14/05/2015 Enclosure A Bypass Experiment Graphic incl. Student Access Points 102 APPENDIX R DOCUMENT GD4-2-2, ENCLOSURE B CONTROL PANEL GRAPHIC CUTTING INSTRUCTION DOCUMENT GD4-2-1 Author: Kieran Peters Date: 14/05/2015 Enclosure B Fault Current Experiment Graphic incl. Student Access Points CONTROL PANEL B Battery Breaker 6A DC Breaker A E String AB Breaker String CD Breaker B E String EF Breaker C E String GH Breaker System DC Isolator TE D E V E 50A 50mV ±0.25% E G EF E I E SB E SC EI E K P E R E E Q ES Manual Load Connection MPPT Load Connection X E E 3B 3A DC Breaker (Normally Closed) E N 50A 50mV ±0.25% Current Shunt E AA 5A DC Breaker (Normally Closed) AD E AB E 7B E E AC 6A DC Breaker (Normally Closed) E M EZ 5B E Y E String GH Breaker String EF Breaker MODULE D Current Shunt EL MODULE E MODULE C String CD Breaker Fault Current Shunt O EJ MODULE A MODULE B String AB Breaker W E SD E O MODULE G O U E I MODULE H SA E O E H I MODULE F I 50A 50mV ±0.25% AE E 7A DC Breaker (Normally Closed) O E Battery Switch 103 [PLACEHOLDER FOR DATA SHEET] 104 [PLACEHOLDER FOR DATA SHEET] 105 [PLACEHOLDER FOR DATA SHEET] 106 [PLACEHOLDER FOR DATA SHEET] 107 APPENDIX S LIST OF P ARTS AND COMPONENTS U SED WITHIN THE FACILITY Qty Description FEMALE BANANA SOCKET BLACK 15.00 RS Components Part: 753-1630 Schützinger Part: SEB 6445 NI / SW FEMALE BANANA SOCKET RED 15.00 RS Components Part: 753-1633 Schützinger Part: SEB 6445 NI / RT FEMALE BANANA SOCKET YELLOW 26.00 RS Components Part: 753-1646 Schützinger Part: SEB 6445 NI / GE FEMALE BANANA SOCKET GREEN 5.00 RS Components Part: 753-1649 Schützinger Part: SEB 6445 NI / GN FEMALE BANANA SOCKET BLUE 10.00 RS Components Part: 753-1637 Schützinger Part: SEB 6445 NI / BL MALE BANANA PLUG BLACK 20.00 RS Components Part: 273-7300 Multi Contact Part: 22.2260-21 22.1025 MALE BANANA PLUG RED 20.00 RS Components Part: 273-7293 Multi Contact Part: 22.2260-22 22.1025 EQUIPMENT CABLE 20.00 RS Components Part: 605-7989 Taiyo Cabletec Part: C3/RV-90 2.5SQBLACK20M CURRENT SHUNT 3.00 RS Components Part: 810-3267 Murata Power Part: 50A/50mV 3020-01096-0 SPST OUTDOOR SWITCH 8.00 RS Components Part: 692-8440 S200 6A CURVE B DC BREAKER 8.00 RS Components Part: 132-093 ABB Part: 2CDS272001R0065 - S202MB6 PERFORATED NS35/7.5 DIN RAIL 8.00 RS Components Part: 648-5738 Phoenix Contact Part: 1207653 DIN RAIL END CAP 20.00 RS Components Part: 803-9602 Phoenix Contact Part: 1206560 108 GROUND TERMINAL BLOCK 20.00 RS Components Part: 627-3894 Phoenix Contact Part: 3044128 GREY TERMINAL BLOCK 50.00 RS Components Part: 776-7996 Phoenix Contact Part: 3044364 BLUE TERMINAL BLOCK 50.00 RS Components Part: 804-3115 Phoenix Contact Part: 3044500 GREY 4 CONTACT TERMINAL BLOCK 20.00 RS Components Part: 776-7860 Phoenix Contact Part: 3048823 END COVER 10.00 RS Components Part: 627-3973 Phoenix Contact Part: 3047028 2-WAY PLUG IN BRIDGE JUMPER 5.00 RS Components Part: 652-3644 Phoenix Contact Part: 3030336 10-WAY PLUG IN BRIDGE JUMPER 5.00 RS Components Part: 627-3406 Phoenix Contact Part: 3030271 12-WAY TERMINAL STRIP 5.00 RS Components Part: 703-3836 MALE BANANA PLUG BLACK 8.00 RS Components Part: 446-838 Multi Contact Part: 22.2380-21 22.1203 MALE BANANA PLUG RED 8.00 RS Components Part: 446-844 Multi Contact Part: 22.2380-22 22.1203 MALE BANANA PLUG YELLOW 60.00 RS Components Part: 446-888 Multi Contact Part: 22.2380-24 22.1203 FEMALE BANANA SOCKET BLACK 15.00 RS Components Part: 753-1630 Schützinger Part: SEB 6445 NI / SW FEMALE BANANA SOCKET RED 15.00 RS Components Part: 753-1633 Schützinger Part: SEB 6445 NI / RT FEMALE BANANA SOCKET YELLOW 34.00 RS Components Part: 753-1646 Schützinger Part: SEB 6445 NI / GE 109 FEMALE BANANA SOCKET BLUE 6.00 RS Components Part: 753-1637 Schützinger Part: SEB 6445 NI / BL CURRENT SHUNT 3.00 RS Components Part: 810-3267 Murata Power Part: 50A/50mV 3020-01096-0 S200 6A 2P CURVE D DC BREAKER 4.00 RS Components Part: 746-7854 ABB Part: 2CDS252001R0061 - S202D6 EQUIPMENT CABLE 1.00 RS Components Part: 605-7989 Taiyo Cabletec Part: C3/RV-90 2.5SQBLACK20M EQUIPMENT WIRE 2.5MM GREEN/YELLOW 1.00 RS Components Part: 544-1793 Manufacturer Part: 6A-2491X2.5-GNYW-100R EQUIPMENT WIRE 2.5MM RED 1.00 RS Components Part: 544-1800 Manufacturer Part: 6A-2491X2.5-RD-100R EQUIPMENT WIRE 2.5MM BLUE 1.00 RS Components Part: 361-866 Manufacturer Part: 6A-2491X2.5-BE-100R EQUIPMENT WIRE 2.5MM BLACK 1.00 RS Components Part: 361-850 Manufacturer Part: 6A-2491X2.5-BK-100R PV CABLE RED 30.00 SolarMatrix Part: CA-PV1-60R PV CABLE BLACK 30.00 SolarMatrix Part: CA-PV1-60 30.00 SolarMatrix Part: CA-PV1-60B PV CABLE BLUE MC-4 MALE CABLE COUPLER 20.00 SolarMatrix Part: CA-MC4-M60-I MC-4 FEMALE CABLE COUPLER 10.00 SolarMatrix Part: CA-MC4-F60-I MC-4 FEMALE CABLE RECEPTACLE 10.00 SolarMatrix Part: CA-MC4-FPR 110 MC4 OPEN END SPANNER 1.00 SolarMatrix Part: CAT11063 CABLE GLAND GREY 14.00 SolarMatrix Part: EC2175-2-28 14.00 SolarMatrix Part: EC217088G LOCK NUT CABLE CONDUIT 1.00 SolarMatrix Part: EC2160017 DC CIRCUIT BREAKER 1.00 SolarMatrix Part: 10A DC CIRCUIT BREAKER 1.00 SolarMatrix Part: 16A TELERGON 8 POLE DC ISOLATOR 1.00 SolarMatrix Part: ZFV31X2 MPPT MODULE 1.00 SolarMatrix Part: 1N82558 MOUNTING RAIL 6.00 SolarMatrix Part: MF11010 solo05 RAIL END CAP 12.00 SolarMatrix Part: MF11016 12.00 SolarMatrix Part: MF11152 MODULE END CLAMP MODULE GROUNDING MID CLAMP 12.00 SolarMatrix Part: MF11160 EPDM RUBBER SEAL 1.00 SolarMatrix Part: MF11272 1 roll AGM BATTERY 120AH 1.00 SolarMatrix Part: BAT22120 111 SYSTEM SHUTDOWN LABEL 1.00 SolarMatrix Part: SAS3054 SOLAR WIRING LABEL 3.00 SolarMatrix Part: SAS3058 PV SWITCH DISCONNECTOR 1.00 SolarMatrix Part: ISI0244 MC-4 MALE CABLE COUPLER 4.00 SolarMatrix Part: CA-MC4-M60-I MC-4 FEMALE CABLE COUPLER 6.00 SolarMatrix Part: CA-MC4-F60-I MC-4 FEMALE CABLE RECEPTACLE 8.00 SolarMatrix Part: CA-MC4-FPR 8 POLE DC ISOLATOR 1.00 SolarMatrix Part: ZFV31X2 GROUNDING LUG 10.00 SolarMatrix Part: MF41306 PV MODULE 9.00 12V Shop Part: YL60Wp 660x630 Format DC CIRCUIT BREAKER 1.00 12V Shop Part: 3A Push-button style 1.00 12V Shop Part: 5A Push-button style DC CIRCUIT BREAKER DC CIRCUIT BREAKER 1.00 12V Shop Part: 7A Push-button style 112