1
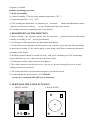
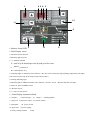
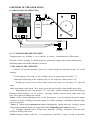
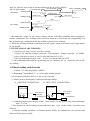
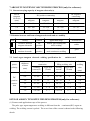
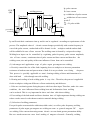
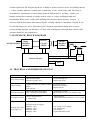
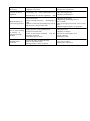
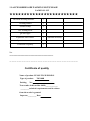
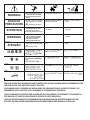
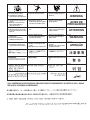
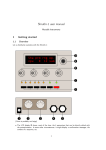
THANKS FOR PURCHASING OUR PRODUCT
INVERTER
DC TIG/PULSE TIG/DC MMA
WELDING MACHINE
ASSEMBLY AND OPERATING INSTRUCTIONS
(be suitable for 1x220~240V)
SAFETY PRECAUTIONS
Follow these precautions carefully. Improper use of any welder can
result in injury or death.
1. ONLY CONNECT WELDER TO A POWER SOURCE FOR WHICH IT
WAS
DESIGEND. The specification plate on the welder lists this information. When welding outdoors
only use an extension cord intended for such use.
2. ONLY OPERATE WELDER IN DRY LOCATIONS and on cement or masonry floor. Keep
area clean and uncluttered.
3. KEEP ALL COMBUSTIBLES AWAY FROM WORK SITE.
4. DO NOT WEAR CLOTHING THAT HAS BEEN CONTAMINATED with grease or oil.
5.
KEEP CABLES DRY AND FREE FROM OIL AND GREASE and never coil around
shoulders.
6. SECURE WORK WITH CLAMPS or other means; don't over reach when working.
7. NEVER STRIKE AN ARC ON A COMPRESSED GAS CYLINDER
8.
DON'T ALLOW THE INSULATED PORTION OF THE ELECTRODE HOLDER TO
TOUCH THE WELDING GROUND WHILE CURRENT IS FLOWING.
9. SHUT OFF POWER AND UNPLUG MACHINE WHEN REPAIRING OR ADJUSTING.
Inspect before every use. Only use identical replacement parl.
10.
FOLLOW ALL MANUFACTURER'S RULES on operating switches and making
adjustments.
11. ALWAYS WEAR PROTECTIVE CLOTHING when welding . This includes: long sleeved
shirt(leather sleeves), protective apron without pockets, long protective pants and boots. When
handing hot materials, wear asbestos gloves.
12.
ALWAYS WEAR A WELDER'S HELMET WITH PROTECTIVE EYE PIECE when
welding. Arcs may cause blindness. Wear a protective cap underneath the helmet.
13.
WHEN WELDING OVERHEAD, BEWARE OF HOT METAL DROPPINGS. Always
protect the head, hand, feet and body.
14. KEEP A FIRE EXTINGUISHER CLOSE BY AT ALL TIMES.
15. DO NOT EXCEED THE DUTY CYCLE OF THE MACHINE. The rated cycle of a welding
machine is the percentage of a ten minute period that the machine can operate safely at a given
output setting.
16. KEEP ALL CHILDREN AWAY FROM WORK AREA. When storing equipment, make
sure it is out of reach of children.
17. GUARD AGAINST ELECTRIC SHOCK. DO not work when tired. Do not let body come
In'contact with grounded surfaces.
1. MAIN USAGE AND THE RANGE OF USAGE(APPLICATIONS):
TIG180D inverse argon arc welder with international advanced technology is a new variety
of welding machine using MOSFET(or IGBT). It has performance and high efficiency that the
traditional welder can not be compared with. TIG180D welder is triple functional machine
used as MMA/DC TIG,PULSE TIG welder. The welding current and pulse frequency
is all
infinitely and independently adjustable. All ferrous metal, copper and stainless steel material can
be omnibearing welding in all position.The welding current is stable. The welding seam is
nice.few spatters and low noise occurs during
welding.It has high frequency arc striking.
The welder has outstanding feature of minimum current. The minimum current can be up to
5A.Protection measures of the welder are perfect.
The
welder is reliable,light in weight and
easy to use. It is particularly suitable for enterprise of plant and mine, build, decoration and
maintenance sectors.
2. MAIN TECHNICAL SPECIFICATIONS
Model
Power Supply Voltage
TIG180D
AC 220/230/240V 50Hz
No-load Voltage
70V
Rated Output Current
180A
Rated Duty Cycle
35%
Peak Cur. Adjusting Range
base Amps
5-180A(TIG)
5-160A(Stick)
5-180A
Start current
5~150A
End current
5~150A
Pulse Width Ratio
5%-95%
Pulse Frequency
0.5 - 500Hz
TIG Arc starting mode
Up-slope,Down-slope time
Pre Flow Time
Post Flow Time
high frequency arc striking
0-25 S
0~10S
0~25S
Mass
9.8kg
Protection Class of enclosure
I P21S
3. OPERATING CONDITION AND WORK SURROUNDING
1. Operating condition:
Voltage of power source: AC220/230/240V±10%
Frequency: 50/60Hz
Reliable grounding protection
2. Work surrounding
(1) relative humidity: ≤90%(average monthly temperature≤20℃ )
(2) ambient temperature: -10℃ - 40℃
(3) The welding site should have no harmful gas, chemicals,
explosive and corrosive medium,
molds and inflammable matter,
no big vibration and bump to the welder.
(4) Avoiding rain water. Operating in rain is not allowed.
4. DESCRIPTION OF THE ERECTION
a. Before welding , the operator should read the operation
correctly according to the
instructions and uses the welder
process specification.
b. Checking the welder appearance for deformation and damage.
c. For the safety of the equipment and the persons, the customer must correctly make grounding
2
or protecting according to the power supply system: using 4 mm lead to connect the protection
grounding of the welder.
d. Welding operation should be carried out in dry and good ventilating area. The surrounding
objects should be not less than 0.5m away from the welder.
e. Checking the welder output connector for tightness.
f. The welder can not be moved or the cover can not be opened during the power is on and
welding operation is carried out.
g. The welder should be cared,used and managed by specialized person.
h. Confirming that the power source is 220/230/240V
It can not be connected with 380V power absolutely.
5. SKETCH OF THE PANEL FUNCTION
1. FRONT PANEL
2. BACK PANEL
4 3 16 7 8 26
6 5TIG180D
15 13 11 19
9 10
1
22
20
12
24
15 17
18
16
23
21
1
4 2 8
5
10
12
TIG180D
11
6
1.Memory chanel LED
3
13
9
2. Data Display meter
3. Parameter Select function
4.indicating light of power
5. A --unit of current
S -- unit of up & downslope time & pre& post flow time
% -- unit of peak time on
Hz-- unit of pulse freq.
6. indicating light of Parameter Select function(Pre-flow /Start current/Up slope/Welding Amps/Pulse peak amps/
peak time on/ pulse freq./down slope/end current/post flow)
8.warning indicating light
9.indicating light of MMA Parameter Select function(arcforce slector /Hot start time/hot start amp)
10.Pulse on /pulse off/MMA slector
11.HF/LIFT slector
12. 2 steps/ 4 steps slector
13. Data Display Adjustment Knob
15. output"-" ( Ground clamp) 16. output"+"(Welding holder)
17.argon out 18.argon arc control (or remote control)
19.nameplate
21.argon inlet
20. power switch
22.power supply
23.safety earthing column
24.fan
6.METHOD OF THE OPERATION
6.1.ARGON ARC WELDING(TIG)
4 3 16 7 8 26
6 TIG180D
5 15 13 11 19
9 10
1
switch
20
22
flow meter
12
argon
gas inlet pipe
24
bottle
15 17
18
23
16
21
torch
oo
workpiece
6.1.1 CLEARING BEFORE WELDING
Tungsten argon arc welding is very sensitive to surface contamination of filled metal.
Therefore before welding is carried out,grease, paint and coating on the surface,lubricant for
machining and oxidized film should be removed.
1.2 DC ARGON ARC WELDING
①.selector "10" onto the position " pulse off " ,Connecting the gas inlet pipe to inlet "21" of the
welding.
②.Connecting gas inlet pipe of the welding torch to argon output of welder "17".
③.Putting the aerial plug of the welding torch in the argon arc control socket "18".
④ .Testing gas: get the power of the welder ready and switch on the power "2", open the
argon
bottle switch and switch on the flow meter, press the torch switch, select suitable argon flow.
⑤ . .Regulating the base current knob "13". Selecting suitable welding current according to
thickness of the workpiece to be welded.. Selecting suitable current down slope time and
after flow time according to the current.
Notice 1:The current indicating meter on the front panel is used to display the preset output
current level before welding, and actual output level while welding: A lit display indicates input
power is turned on.
Notice 2: When using 'Adjustable foot control '.regulating the current with sole. welding current
will increase gradually when you step at full tilt the 'Adjustable foot control' with sole.
⑥ . Tungsten electrode end is 2-3mm away from the welding workpiece. Press the torch
switch,arc striking will occur.
Notice: During welding, when the" 12. 2steps/4steps switch"on "2 steps", switch of the torch
must be pressed and can not be released.otherwise the arc will be broken.
relex it one time (OFF)
★ 2/4 steps change
press it one time(ON)
switch of torch
four steps
up-slop time
welding current
welding current
relex it second time(OFF)
press it second time(ON)
crater current
initial current
down-slop time
OFF
switch of torch
two steps
ON
up-slop time
down-slop time
welding current
welding current
⑦.Releasing the switch of the torch, welding current will reduce gradually (time is adjustive)
and arc extinguishes.The welding torch can not be removed as soon as the arc extinguishing. Let
the protection gas cooling down for the welding seam not to be oxidized.
⑧.When the welding operation is finished, turn off argon bottle switch and cut off input power
of the welder.
1.3 PULSE ARGON ARC WELDING
①. Selection of peak current and base current:
②. selector "10" onto the position " pulse on ", The frequency changes between 0.5-500Hz.
③.select peak time on ratio: It can be selected between 5%-95%.
④.select up-slope&down slope time: It can be selected between 0-25S.
⑤.Gas connecting and testing,are generating and are blowing off etc. are all the same as DC
are welding.
6.2.Hand welding with electrode
①.selector "10" onto the position " MMA "
②.Regulating Current Knob"3" to select right welding current
select empiric formula:I=40d, d is dia. of the electrode.
③.Notice positive and negative connection during welding.
A. POSITIVE CONNECTION
B . NEGATIVE CONNECTION
WELDER
WELDER
ELECTRODE
HOLDER
WORKPIECE
ELECTRODE
HOLDER
WORKPIECE
④ .Connecting input power for the welder, then switch on the power and current indicating
light "2" is on .
⑤ .Pay attention to rated welding current and rated duty cycle of the welder. Overload is not
allowed.
⑥.After the welding operation is finished, let the welder be ventilated for a few minutes and
then cut off the power switch.
7.ARGON TUNGSTEN DC ARC WELDING PROCESS (only for reference)
7.1 Current carrying capacity of tungsten electrode(A)
DC negative
connecting
pure
tungsten
dia. of
tungsten
electroder
(mm)
pure
tungsten
thorium
tungsten
cerium
tungsten
1.0
20 - 60
15 - 80
20 - 80
1.6
40 - 100
70 - 150
50 - 160
10 - 30
2.0
60 - 150
100 - 200
100 - 200
10 - 30
DC positive connecting
7.2 Relation between end form of tungsten electrode and arc stability
form
variety
current
application range
cerium or thorium
DC
narrow gap welding and
tungsten electrode
positive
sheet welding
tungsten cerium or
DC
dia. <1mm tungsten elec-
thorium electrode
positive
trode continuous welding
7.3 hand argon tungsten electrode welding specification for
power
polarity
thickness
of sheet
(mm)
curling butt
connection
welding
Argon flow
electrical arc
stable
good
stainless steel
butt connection and
dia. of
filling welding wire
welding
argon flow
welding
wire
current(A)
(L/min)
current
(L/min)
(mm)
0.5
10 - 30
4
15 - 35
4
1.0
0.8
15 - 40
4
35 - 40
4
1.0
positive
1.0
35 - 60
4
40 - 70
4
1.6
connec-
1.5
45 - 80
4-5
50 - 85
4-5
1.6
2.0
75 -120
5-6
80 -130
5-6
2.0
3.0
110-140
6-7
120-150
6-7
2.0
DC
tion
8.PULSE ARGON TUNGSTEN WELDING PROCESS(only for reference)
(1) Features and application scope of the process
The pulse type argon tungsten arc welding is different from the continuous(DC) argon arc
welding. The welding current is pulsed. The wave form of the current is shown in the following
sketch.
Ip--pulse current
CUR.
welding process
(A)
tp tb
up-slope
Ib--base current
tb-- width time of base current
tp+tb=T
tp
--- = D pulse width
tb
Ip
arcing off
arcing
T
after flow
Ib
gas sending
in advance
tp--width time of pulse current
down-slope
t1
T (s)
Ip and Ib and their continuous time tp and tb can be regulated according to requirements of the
process. The amplitude value of
electric current changes periodically with certain frequency in
case of the pulse current , molten bath will be formed in the
workpiece and the molten bath
will be solidified in case of base current. The welding seam is formed by reciprocal overlaps .
Welding heat input can be controlled by regulating pulse frequency, pulse current amplitude,
size of base current, continuous time of pulse current and base current and therefore
the
welding seam, size and quality of the zone influenced from heat can be controlled.
(2) Advantages and application scope of pulse argon gas tungsten arc welding
a. Precisely control the size of the bath inputting heat to workpiece to increase penetration
resistance of molten seam and preservation of bath. It is easy to obtain even fusing
deepness.
This process is specially applicable to omni - bearing welding of sheet and formation to be
done with both
sides through one side welding.
b. Heating and cooling of each welding point is very fast . Therefore, the process is applicable
for the workpiece with great difference of heat conductivity and thickness.
c. Pulse arc can obtain greater fusing deepness with lower heat input. Therefore, under the same
condition, the zone influenced from welding heat and deformation from welding
can be reduced. This is very important for sheet and ultra -thin sheet welding.
d. Fast cooling of the bath metal and short duration time of high temperature during welding can
reduce cracks caused to the thermo-sensitive materials during welding.
(3) Selection of welding parameters
Except for pulse current and the width time(width ratio) as well as pulse frequency,welding
parameters of pulse argon gas tungsten arc welding are same as general tungsten DC
argon
arc welding. Pulse current increasing means electric arc can obtain greater penetration ability.
But too much current can cause local melting of tungsten electrode. Generally, welding
current required for DC tungsten argon arc welding or greater current is used. Arc holding current
( ie base current) influences cooling and crystallizing of the metal in the bath. The range is
determined by performance of the welding materials.When sheet is welding, smaller arc
holding current (base current) is usually used in order to reduce welding through and
deformation. When pulse width ratio (holding time of pulse current and base current) is
selected, both the heat input and features of pulse welding should be considered. Usually, it can
be selected between 30 -60%. Selection of pulse frequency(periodical change time of pulse
current) mainly depends on thickness of sheet and welding speed and operation custom of the
operator should be also considered.
9. SYSTEMATIC BLOCK DIAGRAM
AC220/230/240V
Input
Rectifier
&Filter
Inverse
Circuit
25KHz
+
output
Rectifier
&Filter
-
H. F.
Control Circuit
panel
10. TROUBLES AND PROBLEM SOLVING
Trouble
Causes
Problem Solving
Power lamp not light
1.No electricity input
2.Switch of welder fails.
1.Check incoming line
2.Replace the switch
Fan not rotating
1.Fan poer line is off.
1.Reconnect the line
2.Enclosure blocks the fan due to defor
2.Reform the enclosure
mation
3.Replace the fan
3.The fan fails.
Warning lamp lights
1.Over heat(yellow lamp lights)
2.Oer current(Green lamp lights)
No output of welder
1.Over crrent protection
2. Welder fails
Self-protection has engaged
1.Display "801"
Welding stops, and w
2.Display "802"
arning light is on
3.Display "804"
4.Display "805"
1.Welding after cooling.
2.Input voltage too low or the machine fails.
1. Over load using
2. Maintenance in manufacturer or service center
1.over-voltage, lower-voltage
2.over-temperature,
3.over-current,
4.torch switch always close
Output current
decreased
1. Input Voltage is low
2. Input line is too thin
Current can not be
regulated
1.Connecting line of the potentiometer is of
1.Reconnecting the line
f
2.Replace potentiometer
2.Potentiometer for current regulation fails
High frequency are
can not be generated
1.The switch fails
2.Interval of high frequency discharging is t
oo big
3.Distance of the torch and workpieceis too far
high frequency arc generator fails
2. Power line is thickened
1.Replace torch switch
2.Regulating discharging interval
to 0.8-1.0mm
3.Put torch tungsten electrode close to work
piece
4.Replace high frequency arc generator
1.Regulated well
1.Argon gas flow is not regulated well
Arc of argon welding
2.Replace or sharpen
2.Tungsten electrode fails
is broken or
3.Value of current does not match with dia. 3.Select the electrode dia. and
tungsten electrode
current correctly
of tungsten electrode
is burnt
4.Enlarge the time
4.After flow time too short
Welding torch
overheat
1.Not use the water cooling when the
current is more than 160A
2.The argon flow is the low current
1.Use water cooling
2.Enlarge the argon flow
11.ACCESSORIES:SEE PACKING LIST,PLEASE
PACKING LIST
★★★★★★★★★★★★★★★★★★★★★★★★
TIG180D Welding machine
1
Welding Holder
1
Ground clamp
1
TIG welding torch
1
gas inlet pipe
1
Adjustable foot control
1
Operation instructions
1
Certificate of quality
1
optional accessory
No.
━━━━━━━━━━━━━━━━━━━━━━━
─────────────────────────────
Certificate of quality
Name of product: PULSE TIG WELDING
Type of product:
Packing
TIG180D
No:
Test results of this welder fulfils_____________
_________technical requirements and its release
from the works is granted.
Inspector_________ Date
● Do not touch electrically live parts or
WARNING
Spanish
AVISO DE
PRECAUCION
French
ATTENTION
German
WARNUNG
Portuguese
ATENÇÃO
● Keep flammable materials away.
● Wear eye, ear and body protection.
● Mantenga el material combustible
● Protéjase los ojos, los oídos y el
electrode with skin or wet clothing.
● Insulate yourself from work and
ground.
● No toque las partes o los electrodos
bajo carga con la piel o ropa mojada.
● Aislese del trabajo y de la tierra.
● Ne laissez ni la peau ni des vête-
ments mouillés entrer en contact
avec des pièces sous tension.
● Isolez-vous du travail et de la terre.
● Berühren Sie keine stromführenden
Teile oder Elektroden mit Ihrem
Körper oder feuchter Kleidung!
● Isolieren Sie sich von den
Elektroden und dem Erdboden!
● Não toque partes elétricas e elec-
trodos com a pele ou roupa molhada.
● Isole-se da peça e terra.
fuera del área de trabajo.
● Gardez à l’écart de tout matériel
inflammable.
● Entfernen Sie brennbarres Material!
cuerpo.
● Protégez vos yeux, vos oreilles et
votre corps.
● Tragen Sie Augen-, Ohren- und Kör-
perschutz!
● Mantenha inflamáveis bem guarda-
dos.
● Use proteção para a vista, ouvido e
corpo.
Japanese
Chinese
Korean
Arabic
READ AND UNDERSTAND THE MANUFACTURER’S INSTRUCTION FOR THIS EQUIPMENT AND THE CONSUMABLES TO BE
USED AND FOLLOW YOUR EMPLOYER’S SAFETY PRACTICES.
SE RECOMIENDA LEER Y ENTENDER LAS INSTRUCCIONES DEL FABRICANTE PARA EL USO DE ESTE EQUIPO Y LOS
CONSUMIBLES QUE VA A UTILIZAR, SIGA LAS MEDIDAS DE SEGURIDAD DE SU SUPERVISOR.
LISEZ ET COMPRENEZ LES INSTRUCTIONS DU FABRICANT EN CE QUI REGARDE CET EQUIPMENT ET LES PRODUITS A
ETRE EMPLOYES ET SUIVEZ LES PROCEDURES DE SECURITE DE VOTRE EMPLOYEUR.
LESEN SIE UND BEFOLGEN SIE DIE BETRIEBSANLEITUNG DER ANLAGE UND DEN ELEKTRODENEINSATZ DES HERSTELLERS. DIE UNFALLVERHÜTUNGSVORSCHRIFTEN DES ARBEITGEBERS SIND EBENFALLS ZU BEACHTEN.
● Keep your head out of fumes.
● Use ventilation or exhaust to
● Turn power off before servicing.
● Do not operate with panel open or
guards off.
remove fumes from breathing zone.
● Los humos fuera de la zona de res-
piración.
● Mantenga la cabeza fuera de los
humos. Utilice ventilación o
aspiración para gases.
● Gardez la tête à l’écart des fumées.
● Utilisez un ventilateur ou un aspira-
● Desconectar el cable de ali-
mentación de poder de la máquina
antes de iniciar cualquier servicio.
● Débranchez le courant avant l’entre-
tien.
teur pour ôter les fumées des zones
de travail.
● Vermeiden Sie das Einatmen von
Schweibrauch!
● Sorgen Sie für gute Be- und
Entlüftung des Arbeitsplatzes!
● Mantenha seu rosto da fumaça.
● Use ventilação e exhaustão para
remover fumo da zona respiratória.
● Strom vor Wartungsarbeiten
● No operar con panel abierto o
guardas quitadas.
● N’opérez pas avec les panneaux
ouverts ou avec les dispositifs de
protection enlevés.
● Anlage nie ohne Schutzgehäuse
abschalten! (Netzstrom völlig öffnen; Maschine anhalten!)
oder Innenschutzverkleidung in
Betrieb setzen!
● Não opere com as tampas removidas.
● Desligue a corrente antes de fazer
● Mantenha-se afastado das partes
serviço.
● Não toque as partes elétricas nuas.
● Não opere com os paineis abertos
moventes.
WARNING
Spanish
AVISO DE
PRECAUCION
French
ATTENTION
German
WARNUNG
Portuguese
ATENÇÃO
ou guardas removidas.
Japanese
Chinese
Korean
Arabic
LEIA E COMPREENDA AS INSTRUÇÕES DO FABRICANTE PARA ESTE EQUIPAMENTO E AS PARTES DE USO, E SIGA AS
PRÁTICAS DE SEGURANÇA DO EMPREGADOR.