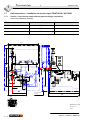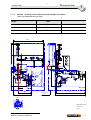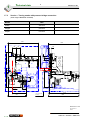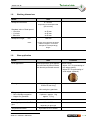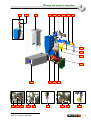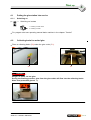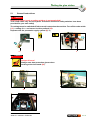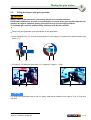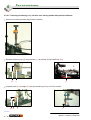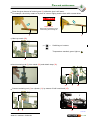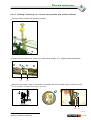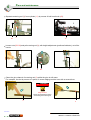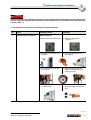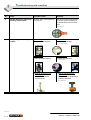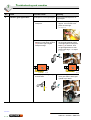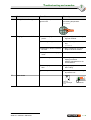
1
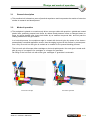
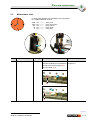
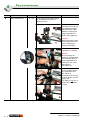
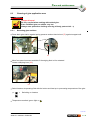
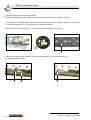
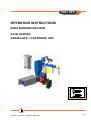
Special Machines
OPERATING INSTRUCTIONS
EDGE BANDING MACHINE
GLUE STATION
GRANULATE + CARTRIDGE 1905
2892170 x Index AC x 12/2006 x ENGLISH
P05
Relevance in print
When buying the edge banding machine you decided in favour
of a model with an individual composition. This operating instructions also contains additional devices, except special executions, that are offered by HOLZ--HER within the model range.
We ask for your understanding that there are mentioned additional devices which you did not choose.
The high standard of quality and security is guaranteed by a permanent development. Therefore there can possibly appear differences between this operating instructions and your unit. Also
errors cannot be excluded totally. Therefore we ask for your understanding that from descriptions, indications and illustrations
there cannot be derived legal claims.
Order information
Please supply the following information:
Title of document
Code number
Date of issue
Language
REICH Spezialmaschinen GmbH
Plochinger Straße 65
72622 Nürtingen
Germany
Telephone +49 7022 702--0
Telefax
+49 7022 702 101
E--Mail: [email protected]
Internet: http://www.holzher.de
This document was prepared by the Technical Editorial Department of
REICH Special Machines GmbH.
1905
2
Special Machines
2892170 x 03/2004 x ENGLISH
Contents
CHAPTERS
1
1.1
1.2
1.3
1.4
1.5
1.6
1.6.1
1.6.2
1.6.3
1.7
1.7.1
Technical data
Characteristic Data . . . . . . . . . . . . . . . . . . . . . . . . . . . . . . . . . . . . . . . . . . . . . . . . . . . . . . . . . .
Weight . . . . . . . . . . . . . . . . . . . . . . . . . . . . . . . . . . . . . . . . . . . . . . . . . . . . . . . . . . . . . . . . . . . . .
Operation . . . . . . . . . . . . . . . . . . . . . . . . . . . . . . . . . . . . . . . . . . . . . . . . . . . . . . . . . . . . . . . . . . .
Scope of application . . . . . . . . . . . . . . . . . . . . . . . . . . . . . . . . . . . . . . . . . . . . . . . . . . . . . . . . .
Intended use . . . . . . . . . . . . . . . . . . . . . . . . . . . . . . . . . . . . . . . . . . . . . . . . . . . . . . . . . . . . . . . .
Unit dimensions -- Installation on model range SPRINT . . . . . . . . . . . . . . . . . . . . . . . . . . .
Version -- Non--tracing nozzle without pressure bridge connection . . . . . . . . . . . . . . . .
Version -- Tracing nozzle without pressure bridge connection . . . . . . . . . . . . . . . . . . . .
Version -- Tracing nozzle with pressure bridge connection . . . . . . . . . . . . . . . . . . . . . . .
Unit dimensions -- Installation on model ranges TRIATHLON / ACCORD . . . . . . . . . . . .
Version -- Non--tracing nozzle without pressure bridge connection . . . . . . . . . . . . . . . .
1
1
1
1
1
1
1
1
1
1
1
------------
1
1
1
1
2
3
3
4
5
6
6
(model ranges TRIATHLON / ACCORD)
1.7.2
Version -- Tracing nozzle without pressure bridge connection . . . . . . . . . . . . . . . . . . . . 1 -- 7
(model range TRIATHLON with roller bridge)
1.7.3
Version -- Tracing nozzle with pressure bridge connection . . . . . . . . . . . . . . . . . . . . . . . 1 -- 8
(model ranges TRIATHLON / ACCORD)
1.8
1.9
1.10
1.11
1.12
1.12.1
1.12.2
1.13
2
2.1
2.2
Working dimensions . . . . . . . . . . . . . . . . . . . . . . . . . . . . . . . . . . . . . . . . . . . . . . . . . . . . . . . . . 1 -- 9
Glue application . . . . . . . . . . . . . . . . . . . . . . . . . . . . . . . . . . . . . . . . . . . . . . . . . . . . . . . . . . . . . 1 -- 9
Connected power . . . . . . . . . . . . . . . . . . . . . . . . . . . . . . . . . . . . . . . . . . . . . . . . . . . . . . . . . . . 1 -- 10
Compressed air . . . . . . . . . . . . . . . . . . . . . . . . . . . . . . . . . . . . . . . . . . . . . . . . . . . . . . . . . . . . 1 -- 10
Accessories . . . . . . . . . . . . . . . . . . . . . . . . . . . . . . . . . . . . . . . . . . . . . . . . . . . . . . . . . . . . . . . . 1 -- 11
Standard accessories . . . . . . . . . . . . . . . . . . . . . . . . . . . . . . . . . . . . . . . . . . . . . . . . . . . . . . 1 -- 11
Operating tools . . . . . . . . . . . . . . . . . . . . . . . . . . . . . . . . . . . . . . . . . . . . . . . . . . . . . . . . . . . 1 -- 11
Special accessories (optional) . . . . . . . . . . . . . . . . . . . . . . . . . . . . . . . . . . . . . . . . . . . . . . . . 1 -- 11
Safety
Protective devices . . . . . . . . . . . . . . . . . . . . . . . . . . . . . . . . . . . . . . . . . . . . . . . . . . . . . . . . . . . 2 -- 1
Residual risks . . . . . . . . . . . . . . . . . . . . . . . . . . . . . . . . . . . . . . . . . . . . . . . . . . . . . . . . . . . . . . . 2 -- 2
1905
289.2170 x 09/2004 x ENGLISH
3
Special Machines
Contents
CHAPTERS
3
3.1
3.2
3.3
4
4.1
4.1.1
4.2
5
5.1
5.2
5.3
5.4
5.5
5.6
5.6.1
5.6.2
5.6.3
5.6.4
5.7
5.8
5.9
5.10
5.11
5.12
5.13
5.14
Design and mode of operation
General description . . . . . . . . . . . . . . . . . . . . . . . . . . . . . . . . . . . . . . . . . . . . . . . . . . . . . . . . . . 3 -- 1
Mode of operation . . . . . . . . . . . . . . . . . . . . . . . . . . . . . . . . . . . . . . . . . . . . . . . . . . . . . . . . . . . 3 -- 1
Design . . . . . . . . . . . . . . . . . . . . . . . . . . . . . . . . . . . . . . . . . . . . . . . . . . . . . . . . . . . . . . . . . . . . . 3 -- 2
Start up
Putting the glue station into service . . . . . . . . . . . . . . . . . . . . . . . . . . . . . . . . . . . . . . . . . . . . 4 -- 1
Switching on . . . . . . . . . . . . . . . . . . . . . . . . . . . . . . . . . . . . . . . . . . . . . . . . . . . . . . . . . . . . . . . 4 -- 1
Collecting basin for melted glue . . . . . . . . . . . . . . . . . . . . . . . . . . . . . . . . . . . . . . . . . . . . . . . 4 -- 1
Setting the glue station
General instructions . . . . . . . . . . . . . . . . . . . . . . . . . . . . . . . . . . . . . . . . . . . . . . . . . . . . . . . . . . 5 -- 1
Filling the hopper with glue granulate . . . . . . . . . . . . . . . . . . . . . . . . . . . . . . . . . . . . . . . . . . 5 -- 3
Change of glue type – Granulate to cartridge . . . . . . . . . . . . . . . . . . . . . . . . . . . . . . . . . . . 5 -- 5
Insertion of glue cartridges into magazine . . . . . . . . . . . . . . . . . . . . . . . . . . . . . . . . . . . . . . 5 -- 7
Setting of processing temperature . . . . . . . . . . . . . . . . . . . . . . . . . . . . . . . . . . . . . . . . . . . . 5 -- 8
Setting glue application to workpiece front edge . . . . . . . . . . . . . . . . . . . . . . . . . . . . . . . . . 5 -- 9
Metering rod adjustment by hand with spindle to position indicator . . . . . . . . . . . . . . . 5 -- 9
Metering rod adjustment with bridge connection . . . . . . . . . . . . . . . . . . . . . . . . . . . . . . 5 -- 10
Metering rod adjustment, power--assisted (optional) . . . . . . . . . . . . . . . . . . . . . . . . . . 5 -- 10
Version «Tracing nozzle» -- Processing of glued--on edging . . . . . . . . . . . . . . . . . . . 5 -- 11
Setting glue application via the line control points to workpiece front-- and rear edge 5 -- 12
Setting of glue application to workpiece bottom edge -- readjustment . . . . . . . . . . . . . . 5 -- 13
Setting of glue application . . . . . . . . . . . . . . . . . . . . . . . . . . . . . . . . . . . . . . . . . . . . . . . . . . . 5 -- 14
Setting nozzle to workpiece infeed fence . . . . . . . . . . . . . . . . . . . . . . . . . . . . . . . . . . . . . . 5 -- 15
Nozzle pressure on workpiece . . . . . . . . . . . . . . . . . . . . . . . . . . . . . . . . . . . . . . . . . . . . . . . . 5 -- 15
Change of glue granulate . . . . . . . . . . . . . . . . . . . . . . . . . . . . . . . . . . . . . . . . . . . . . . . . . . . . 5 -- 16
Replenish the glue granulate . . . . . . . . . . . . . . . . . . . . . . . . . . . . . . . . . . . . . . . . . . . . . . . . . 5 -- 17
Change of glue cartridge . . . . . . . . . . . . . . . . . . . . . . . . . . . . . . . . . . . . . . . . . . . . . . . . . . . . 5 -- 18
1905
4
Special Machines
289.2170 x 09/2004 x ENGLISH
Contents
CHAPTERS
6
6.1
6.2
6.3
6.3.1
6.3.2
6.3.2.1
6.3.2.2
6.3.2.3
6.3.2.4
6.3.2.5
6.4
6.5
Care and maintenance
General instructions . . . . . . . . . . . . . . . . . . . . . . . . . . . . . . . . . . . . . . . . . . . . . . . . . . . . . . . . 6 -- 1
Maintenance chart . . . . . . . . . . . . . . . . . . . . . . . . . . . . . . . . . . . . . . . . . . . . . . . . . . . . . . . . . 6 -- 3
Cleaning of glue application area . . . . . . . . . . . . . . . . . . . . . . . . . . . . . . . . . . . . . . . . . . . . 6 -- 5
Removing glue residues . . . . . . . . . . . . . . . . . . . . . . . . . . . . . . . . . . . . . . . . . . . . . . . . . . . . 6 -- 5
Cleaning of bores for glue delivery and metering rod . . . . . . . . . . . . . . . . . . . . . . . . . . . . 6 -- 7
Cleaning of bores for glue delivery . . . . . . . . . . . . . . . . . . . . . . . . . . . . . . . . . . . . . . . . . 6 -- 10
Cleaning of metering rod -- Version non--tracing nozzle with position indicator . . . 6 -- 12
Cleaning of metering rod -- Version tracing nozzle with position indicator . . . . . . . . 6 -- 15
Cleaning of metering rod -- Version tracing nozzle with bridge connection . . . . . . . 6 -- 19
Cleaning of metering rod -- Version non--tracing nozzle with power--assisted
metering rod adjustment (optional) . . . . . . . . . . . . . . . . . . . . . . . . . . . . . . . . . . . . . . . . . 6 -- 23
Resetting to new workpiece thicknesses -- idle time . . . . . . . . . . . . . . . . . . . . . . . . . . . . 6 -- 26
Cleaning of the glue application system after processing PUR hot--melt glue . . . . . . 6 -- 27
7
Troubleshooting and remedies . . . . . . . . . . . . . . . . . . . . . . . . . . . . . . . . . . . . . .
8
Notes
7 -- 1
. . . . . . . . . . . . . . . . . . . . . . . . . . . . . . . . . . . . . . . . . . . . . . . . . . . . . . . . . . . . . . . 8 -- 1
Explanation:
Correction bars for modifications with respect to the previous edition are shown in side bars or within
tables or graphic frames.
1905
289.2170 x 09/2004 x ENGLISH
5
Special Machines
Contents
-- Void page --
1905
6
Special Machines
289.2170 x 09/2004 x ENGLISH
Technical data
2891522 Ind. AE
1
CAUTION
The unit must only be used in conjunction with an PLC programmable logical controller. *
1.1
Characteristic Data
Unit denomination
Glue station for granulate + cartridge
Model 1905
Glue in name plate type 131.0801
Schild, Typ 131.0801 einkleben
Model / Unit No. / Year of manufacture
Manufacturer
1.2
Weight
Model
1905
Weight
27 kg
1.3
Operation
The glue station applies hot--melt glue to the longitudinal edges of panel--shaped rectangular workpieces of wood or of materials whose physical and technological properties are similar to those of
wood, such as particle board, fibreboard, MDF, etc. as the workpiece passes through the machine.
This glue station can be used on its own or in combination with other units of an edge bander with
programmable logical controller (in the following referred to as PLC).
1.4
Scope of application
The workpiece is placed on a continuously driven conveyer chain with precision-- guided and coated
plastic links; positively pressed onto these by rubber faced pressure rollers or clamped down on these
by spring--loaded roller levers held down by an endless compound belt, and fed past the coating
nozzle from the glue station.
In a hot/cold process, the workpiece edge is coated with hot--melt glue by means of an electro--pneumatically controlled application nozzle, then the edging is glued to this surface by contact pressure.
Only as much hot melt glue is melted as is needed for the present banding process.
The hot--melt unit will accept either cartridges or hot--melt pellet packs. Hot--melt glue is made available by way of a magazine for cartridges or a hopper for granulate.
Re--filling of the hot--melt unit with either glue cartridges or granulate is automatic.
1905
2892170 x 09/2004 x ENGLISH
Special Machines
1 -- 1
1
1.5
Technical data
2891522 Ind. AE
Intended use
This glue station is intended only for melting hot--melt glue in the form of cartridges or granulate to be
applied laterally to panels as part of a run through an edge banding machine, in order to press edging
onto these surfaces.
Permissible working dimensions see Item 1.7.
Any other or alternative use shall be considered use outside this scope of application.
The manufacturer shall not be liable for any resulting damage and any such use is at the sole risk of
the user.
1905
1 -- 2
Special Machines
2892170 x 09/2004 x ENGLISH
Technical data
2891522 Ind. AE
1.6
Unit dimensions -- Installation on model range SPRINT
1.6.1
Version -- Non--tracing nozzle without pressure bridge connection
Model
1905
Width
451 mm
Height
609 mm
Depht
610 mm
1
35 +-- 00,2
Zero point
253
63
64,4
41 31,5
609
451
54
Unit
204
610
Frame SPRINT
271
13 -- range
620
300
Dimensions in mm
289.1492 Ind. C
Sheet 4
1905
2892170 x 09/2004 x ENGLISH
Special Machines
1 -- 3
Technical data
1
1.6.2
2891522 Ind. AE
Version -- Tracing nozzle without pressure bridge connection
Model
1905
Width
445 mm
Height
667 mm
Depht
610 mm
445
30
1,5
20
12,2
35 +-- 00,2
Zero point
253
63
64,4
41 31,5
667
4
54
Unit
204
610
Frame SPRINT
271
13 -- range
620
300
Dimensions in mm
289.1492 Ind. C
80
Sheet 3
1905
1 -- 4
Special Machines
2892170 x 09/2004 x ENGLISH
Technical data
2891522 Ind. AE
1.6.3
1
Version -- Tracing nozzle with pressure bridge connection
Model
1905
Width
445 mm
Height
543 mm
Depht
645 mm
445
20
163,3
30
1,5
60
8
60
645
4
35 +-- 00,2
253
64,4
543
41 31,5
543
12,2
54
Zero point
Unit
204
271
610
Frame SPRINT
13 -- range
620
Dimensions in mm
289.1492 Ind. C
Sheet 1
1905
2892170 x 09/2004 x ENGLISH
Special Machines
1 -- 5
Technical data
1
2891522 Ind. AE
1.7
Unit dimensions -- Installation on model ranges TRIATHLON / ACCORD
1.7.1
Version -- Non--tracing nozzle without pressure bridge connection
(model ranges TRIATHLON / ACCORD)
Model
1905
Width
451 mm
Height
609 mm
Depht
610 mm
451
2
609
1
Zero point
253
63
64,4
41
609
35 +-- 00,2
54
Unit
204
610
Frame TRIATHLON
271
Belt bridge
620
300
Dimensions in mm
289.1786 Ind. A
Sheet 4
1905
1 -- 6
Special Machines
2892170 x 09/2004 x ENGLISH
Technical data
2891522 Ind.AE
1.7.2
1
Version -- Tracing nozzle without pressure bridge connection
(model range TRIATHLON with roller bridge)
Model
1905
Width
445 mm
Height
667 mm
Depht
610 mm
445
30
1,5
20
12,2
35 +-- 00,2
Zero point
253
63
64,4
67
667
4
54
Unit
204
610
Frame TRIATHLON
271
Belt bridge
620
300
Dimensions in mm
289.1786 Ind. A
80
Sheet 3
1905
2892170 x 09/2004 x ENGLISH
Special Machines
1 -- 7
Technical data
1
1.7.3
2891522 Ind. AE
Version -- Tracing nozzle with pressure bridge connection
(model ranges TRIATHLON / ACCORD)
Model
1905
Width
445 mm
Height
543 mm
Depht
616 mm
445
60
1,5
20
193
30
8
60
616
4
543
12,2
253
63
64,4
543
41
35 +-- 00,2
54
Zero point
Unit
204
271
610
Frame TRIATHLON
Belt bridge
620
Dimensions in mm
289.1786 Ind. A
Sheet 1
1905
1 -- 8
Special Machines
2892170 x 09/2004 x ENGLISH
Technical data
2891522 Ind. AE
1.8
1
Working dimensions
Model
1905
Workpiece thickness
6 -- 60 mm
depending on feed speed and
glue viscosity
Standard value of feed speed
-- 15 m/min
-- 11 m/min
-- 08 m/min
at 30 mm
at 45 mm
at 60 mm
Workpiece lenght
min.
140 mm
max.
For 60 mm workpiece thickness
4000 mm approx. For thinner
workpieces correspondingly
longer.
1.9
Glue application
Model
Glue application
Glue type
1905
Comment
Hot/cold process, glue application left--hand by sword nozzle
with electro--pneumatic control.
Sword nozzle:
-- Wiper 120q for processing of
thin edges (serie).
-- Wiper 90q for processing of
solid edges (optional).
Hot--melt glue cartridge
Ø 63 x 80 mm long
Hot--melt glue--granulate
Filling capacity:
-- Glue cartridge magazine
-- Hopper for granulate
Heating--up time
Working temperature for EVA
glue
Temperature control
4 pieces = approx. 1 kg
approx. 1,5 kg
% 5 min
160 -- 240q C
depending on glue type
by means of PLC control
1905
2892170 x 09/2004 x ENGLISH
Special Machines
1 -- 9
Technical data
1
1.10
2891522 Ind. AE
Connected power
Model
1905
400 V 50 Hz + N
2,3 kW
4,85 A
230 V 50/60 Hz
2,3 kW
6,65 A
200 V 50 Hz
2,3 kW
7,45 A
Control voltage
1.11
24 V DC
Compressed air
Model
1905
Compressed air connection
Air consumption
max. 6 bar
(6 x 10⁵ Pa)
50 L/min
1905
1 -- 10
Special Machines
2892170 x 09/2004 x ENGLISH
Technical data
2891522 Ind. AE
1.12
Accessories
1.12.1
Standard accessories
1905
Hopper for granulate
1
Application
Article No. 2891387
Hopper for hot--melt glue--granulate
Container contents:
approx. 1,5 kg
1.12.2
Operating tools
1905
Hex.--socket offset screw key
A/F 4 ISO 2936
Double open ended spanner
A/F 17x19 DIN 895
Application
Removal and re--installation of
metering rod strap
Setting glue application to lower
edge of workpiece
Nozzle scraper
X
Cleaning nozzle of glue
remains
Wire brush
X
Cleaning nozzle of glue
remains
Nozzle bore broach
X
Cleaning out glue delivery
bores at nozzle
1.13
Special accessories (optional)
1905
Magazine for glue cartridge
Application
Article No. 2891735
Magazine for hot--melt glue-cartridge
Ø 63 x 80 mm long
Container contents:
4 pieces = approx. 1 kg
Continuation
1905
2892170 x 09/2004 x ENGLISH
Special Machines
1 -- 11
1
Technical data
2891522 Ind. AE
1905
Extension kit for processing
PUR--hot--melt glue
Application
Article No. 1614789
When processing PUR hot-melt glue, an additional pressure reducer is needed to reduce the glue application rate.
Metering rod adjustment power
assisted for version non--tracing
nozzle and control SPK 18000
Article No. 1320432
Powered setting of glue application height.
Data input at PLC--control operating panel.
Extension kit strap for assembly
of edge feeder unit 1901
Article No. 2892294
Base plate reinforcement for
edge feeder.
Selector switch extension kit for
unit 1901--1905--1906--1907
Model range ACCORD
Article No. 2542277
Additional selector switches for
glue station and edging feed
units for functions:
-- Change of glue cartridge
-- Flushing--out glue remains
-- Strip/coiled edging
1905
1 -- 12
Special Machines
2892170 x 09/2004 x ENGLISH
Safety
2
See also operating manual for the basic machine, chapter ”safety”.
2.1
Protective devices
Pressure relief for pressure cylinder (6)
When the hopper or the magazine (9) is removed over the guide tube, the air supply to the pressure
cylinder (6) is interrupted by safety device S4 (56).
Machine shut--down after 6 minutes
– Once the operating temperature has been reached, the timer starts and switches the machine off
if no workpiece has been fed in.
– When pausing for longer than the time delay set, the machine will switch off because of the corresponding non--activation of control switch S1 and/or the corresponding PLC line control point.
1905
2892170 x 09/2004 x ENGLISH
Special Machines
2 -- 1
Safety
2
2.2
Residual risks
Our machines harbour residual risks that are unavoidable despite the care taken in their design and
manufacture, and that are inherent to operation of the machine.
DANGER
Residual risks are:
Uncovered area between transport chain and raised pressure bridge at the basic machine. This would
allow access to the glue application roller.
Danger of burns!
Hot--melt glues produce vapours, even at recommended processing temperatures. This may lead to
unpleasant odours being generated and to an irritation of the breathing and sensory organs. Should
the stated processing temperatures be considerably exceeded over a long period of time, dangerous
decomposition products may also develop.
For this reason it is important that the vapours produced should be evacuated by suitable means, such
as an extraction unit fit for the purpose.
When processing PUR hot--melt glues, even when keeping to the recommended processing temperature, vapours may be produced that may possibly contain minimal quantities of residual isocyanic
monomers, for which reason good extraction facilities and proper ventilation are essential.
Read and observe the safety and processing instructions issued by the glue manufacturer.
Xn
1905
2 -- 2
Special Machines
2892170 x 03/2004 x ENGLISH
Safety
2
While first heating of the glue station and reaching of the processing temperature the rinsing cylinder
automatically changes for approx. 1 second.
No processings in this area while machine is switched on.
There is a burn hazard when working in the area of the hot glue station.
Exceeding the limiting pressure for pneumatic hoses.
The manufacturer of this machine shall not be liable for risks arising from the use of other agents
(such as lubricants or cleaners) or from hooking up the machine to machines or products made by
other manufacturers. *
1905
2892170 x 09/2004 x ENGLISH
Special Machines
2 -- 3
2
Safety
-- Void page --
1905
2 -- 4
Special Machines
2892170 x 03/2004 x ENGLISH
Design and mode of operation
3.1
3
General description
This machine/unit is based on years of practical experience and incorporates the results of extensive
studies in research and development.
3.2
Mode of operation
The workpiece is placed on a continuously driven conveyer chain with precision-- guided and coated
plastic links; positively pressed onto these by rubber faced pressure rollers or clamped down on
these by spring--loaded roller levers held down by an endless compound belt, and fed past the
coating nozzle from the glue station.
In a hot/cold process, the workpiece edge is coated with hot--melt glue by means of an electro-pneumatically controlled application nozzle, then the edging is glued to this surface by contact pressure. Only as much hot melt glue is melted as is needed for the present banding process.
The hot--melt unit will accept either cartridges or hot--melt pellet packs. Hot--melt glue is made available by way of a magazine for cartridges or a hopper for granulate.
Re--filling of the hot--melt unit with either glue cartridges or granulate is automatic.
Glue station cartridge
Glue station granulate
1905
2892170 x 03/2004 x ENGLISH
Special Machines
3 -- 1
3
Design and mode of operation
3.3
Design
1
Console
2
Adjusting nut -- Setting of glue flow
3
Metering rod
4
Cylinder, glue (Z2) -- Open/close the boring for glue application at the nozzle
5
Guide tube
6
Cylinder (Z1) -- Glue press--on
7
Press--on piston of cylinder (Z1)
9
Magazine for glue cartridge
10
Stopping plate for workpieces
11
Cylinder (Z5) -- Rinsing glue
12
Handle to set metering rod to workpiece top edge
(version without pressure bridge connection)
14
Position indicator
26
Knurled nut to adjust nozzle pressure on workpiece
27
Knurled nut to set working position Yes/No
29
Nozzle for glue application
56
Safety device (S4) -- Interruption of the air supply to the pressure cylinder (Z1) for the glue type
60
Glue type
61
Tracing nozzle for glue application
(optional)
65
Pressure bridge connection to set metering rod
to workpiece top edge
68
Driver for pressure bridge connection
69
Hopper for granulate
79
Motorical setting of metering rod to workpiece top edge
(version non--tracing nozzle with control SPK 18000)
1905
3 -- 2
Special Machines
2892170 x 03/2004 x ENGLISH
Design and mode of operation
3
Z2
12
14
9
69
68
3
65
4
2
Z5
11
29
10
S4
56
5
6
1
26
Z1
27
1
26
5
29
79
7
60
61
1905
2892170 x 03/2004 x ENGLISH
Special Machines
3 -- 3
3
Design and mode of operation
-- Void page --
1905
3 -- 4
Special Machines
2892170 x 03/2004 x ENGLISH
Start up
4.1
Putting the glue station into service
4.1.1
Switching on
=
4
Switching on heaters
1 = Heating of nozzle insert
2 = Heating of nozzle
For program start see operating manual basic machine in the chapter ”Control”.
4.2
Collecting basin for melted glue
Place a collecting basin (50) under the glue outlet (51).
Bottom view
50
51
DANGER
Danger of burns via hot glue.
During the flushing process, glue from the glue outlet will flow into the collecting basin.
Wear heat protection gloves. *
1905
2892170 x 12/2006 x ENGLISH
Special Machines
4 -- 1
4
Start up
-- Void page --
1905
4 -- 2
Special Machines
2892170 x 09/2004 x ENGLISH
Setting the glue station
5.1
5
General instructions
DANGER
Removal of safety hoods or safety switches is not permissible!
This could cause very serious injuries. Protection hoods and safety switches have been
provided for your own safety!
The voltage must be switched off before work is started on the machine. Turn off the main switch
(13) -- setting «O» -- and secure it with a padlock (25).
Depressurise the pneumatic supply system (8)! *
25
13
8
DANGER
Danger of burns!
Always wear heat protection gloves when
working at the hot nozzle (29).
29
1905
2892170 x 09/2004 x ENGLISH
Special Machines
5 -- 1
Setting the glue station
5
When changing the glue type never put your hands in the glue shaft.
Changing of glue cartridge with a tool [e.g. nozzle scraper (63)] and wear heat protection
gloves.
*
56
CAUTION
When removing the hopper for granulate (69) care should be taken to prevent granulate from
entering the slot of the safety device (56).
Cover safety device.
69
56
*
NOTICE
To ensure that the nozzle and the glue channel are kept clean, the flushing cylinder (11) should be
changed over for approximately 1 second when the glue station is first heated up and the processing
temperature has been reached, so that, by way of the metering rod (3), the glue in the upper area
of the metering rod can get to the collecting basin (50) through the glue outlet (51).
11
3
51
50
1905
5 -- 2
Special Machines
2892170 x 03/2004 x ENGLISH
Setting the glue station
5.2
5
Filling the hopper with glue granulate
CAUTION
Always observe manufacturers’ processing advice and recommendations!
REICH Special Machines assume no responsibility in respect of the glue supplied with the new
machine as regards optimum glueing properties for any specific edging material.
The suitable glue must be determined by sufficient tests by the customer.
*
Select the glue granulate type appropriate to the application.
Push clamping ring (70) over the tubular section of the hopper (69) and secure with knurled--head
screw (71).
70
69
70
71
Fill hopper (69) with glue granulate (60). (Capacity = approx. 1,5 kg)
60
69
69
NOTICE
For sticky glue granulate that do not run easily, add talcum powder at the rate of 10 g to 3 kg and
mix well.
1905
2892170 x 03/2004 x ENGLISH
Special Machines
5 -- 3
Setting the glue station
5
CAUTION
When filling in glue granulate (60), no residue or dirt particles (A) must be allowed to get into
the glue shaft.
Otherwise the bores in the heating area may become blocked.
Ensure absolute cleanliness when filling in granulate. *
60
A
The fully--automated control system permits continuous operation with an exactly metered and
aligned glue application. When there is little glue left, a control switch switches over the pressure
cylinder, but only when there is no workpiece in the machine. Sufficient glue is available for the workpiece currently in the machine.
1905
5 -- 4
Special Machines
2892170 x 03/2004 x ENGLISH
Setting the glue station
5.3
5
Change of glue type – Granulate to cartridge
CAUTION
Run granulate hopper empty or empty the glue with rinsing process at the operating panel.
When removing the hopper for glue granulate (69), care should be taken that no granulate can
enter the slot of the safety device (56).
Cover safety device.
69
56
*
Loosen the knurled--head screw (71) and push the clamping ring (70) off the tubular section of the
hopper (69).
70
69
70
71
Lift off the hopper (69) for glue granulate.
The air supply for the pressure cylinder of glue granulate is interrupted through non--activation of
the safety device (56).
69
Continuation
1905
2892170 x 09/2004 x ENGLISH
Special Machines
5 -- 5
Setting the glue station
5
Clean guide tube (5) of granulate remains.
If this is not done, there is a risk of malfunction, such as missing glue application to the workpiece,
because of a jammed glue cartridge (60).
5
60
Inserting magazine (9) for glue cartridges.
9
1905
5 -- 6
Special Machines
2892170 x 03/2004 x ENGLISH
Setting the glue station
5.4
5
Insertion of glue cartridges into magazine
CAUTION
Always observe manufacturers’ processing advice and recommendations!
REICH Special Machines assume no responsibility in respect of the glue supplied with the new
machine as regards optimum glueing properties for any specific edging material.
The suitable glue must be determined by sufficient tests by the customer.
*
Select the glue cartridge type appropriate to the application.
Fill magazine (9) with glue cartridges (60). (Capacity 4 cartridges = approx. 1 kg)
60
9
CAUTION
When re--loading glue cartridges (60), no dirt or off--cut particles must be allowed to fall into the
glue stack.
Otherwise the bores in the heating area may become blocked.
Carefully insert clean glue cartridges (60) with the flat surface facing the pressure piston of the
pressure cylinder. Keep the magazine (9) filled with glue cartridges, even during operation. *
Surface drawn
in wrong side
wrong side
60
60
Surface flat
9
correct side
The fully--automated control system permits continuous operation with an exactly metered and
aligned glue application. When the glue cartridge has melted off, a control switch changes the pressure cylinder over, but only whilst there is no workpiece in the machine. There is a glue reserve
sufficient for the workpiece in the machine at the time.
1905
2892170 x 03/2004 x ENGLISH
Special Machines
5 -- 7
Setting the glue station
5
5.5
Setting of processing temperature
DANGER
Exceeding processing temperature!
If the indicated glue processing temperature is exceeded over a prolonged period, there is
the danger of noxious decomposition products being developed.
Always use the glue at the temperature recommended by the manufacturer!
When processing PUR hot--melt glues, even when keeping to the recommended processing temperature, vapours may be produced that may possibly contain minimal quantities of residual
isocyanic monomers, for which reason good extraction facilities and proper ventilation are essential. Take measures to duct away any vapours (extractor). *
=
Switching on heaters
1 = Heating of nozzle insert
2 = Heating of nozzle
The nominal values for heating of nozzle insert «1» and heating of nozzle «2» can be changed.
-- See operating manual basic machine in the chapter ”Control”.
Observe the processing temperature by the manufacturer.
NOTICE
For one best possible flow of glue, the nominal temperature for heating of nozzle «2» should be set
higher by 5--10 E C than the nominal value for the heating of nozzle insert «1». *
CAUTION
The modified values remain stored even after using the OFF button at the control panel or the
EMERGENCY--OFF device.
If the machine is switched off at the main switch before saving the current programs, the
modified values will not be stored.
1905
5 -- 8
Special Machines
2892170 x 09/2004 x ENGLISH
Setting the glue station
5.6
5
Setting glue application to workpiece front edge
CAUTION
In the case of machines without infeed blocking device, the metering rod (3) should only be
re--set when the unit is heated up, whether by hand, power--assisted or by bridge connection.
Otherwise there is a risk of damage to the glue application system.
Before re--setting the metering rod, wait until the glue has reached its processing temperature.
*
3
3
3
Illustration:
Illustration:
Metering rod (3) with manual adjustment spindle
Setting to workpiece thickness
Metering rod (3) with power--
Nozzle metering rod (3) with bridge connection
assisted adjustment spindle
Adjustment of metering rod by setting bridge
(optional)
to workpiece thickness.
5.6.1
Illustration:
Metering rod adjustment by hand with spindle to position indicator
Set metering rod (3) with handle (8) to workpiece thickness according to position indicator (14).
Lock the dimension set by means of rocker lever at position indicator (14).
Lock
14
3
8
14
1905
2892170 x 09/2004 x ENGLISH
Special Machines
5 -- 9
Setting the glue station
5
5.6.2
Metering rod adjustment with bridge connection
The metering rod (3) is set to the workpiece thickness at the same time as the bridge is adjusted, either
power--assisted (A) or manually (B).
3
Illustration:
A
B
Nozzle metering rod (3) with bridge connection
5.6.3
Metering rod adjustment, power--assisted (optional)
Power--assisted metering rod (3) adjustment is controlled from the display of the operating panel of
PLC control.
3
Illustration:
Metering rod (3) with power--assisted adjustment spindle
=
Switching on heaters
1 = Heating of nozzle insert
2 = Heating of nozzle
Management of motor--assisted axis data see operating manual basic machine in the chapter
”Control”.
1905
5 -- 10
Special Machines
2892170 x 09/2004 x ENGLISH
Setting the glue station
5.6.4
5
Version «Tracing nozzle» -- Processing of glued--on edging
CAUTION
When processing workpieces with glued--on edging and using the version «Tracing nozzle» the
tracer shoe (66) must be raised.
Non--observation implies the risk of damage to the glue application system.
Raising tracer shoe. *
66
DANGER
Danger of burns!
Always wear heat protection gloves when
working at the hot nozzle (29).
29
Release belleville spring washer (40) on tracer shaft (67) below the pressure spring, raise the tracer
shoe and once more tighten the belleville spring washer (40).
67
40
67
1905
2892170 x 09/2004 x ENGLISH
Special Machines
5 -- 11
Setting the glue station
5
5.7
Setting glue application via the line control points to workpiece
front-- and rear edge
The line control points have been programmed at works.
For reduction of glue application, the line points for processing may be modified or stored in the
corresponding program. (See operating manual basic machine in the chapter ”Control”.)
Line control point
Glue application
ON
Front edge
OFF
Rear edge
CAUTION
The modified values of line control points remain stored even after using the OFF button at
the control panel or the EMERGENCY--OFF device.
If the machine is switched off at the main switch before saving the current programs, the modified
values of line control points will not be stored.
1905
5 -- 12
Special Machines
2892170 x 09/2004 x ENGLISH
Setting the glue station
5.8
5
Setting of glue application to workpiece bottom edge -- readjustment
Loosen hex. nut A/F19 (22).
A/F 19
22
Adjust via hex. nut with spanner A/F19.
A/F 19
Turning clockwise = moves nozzle (29)
upwards
Turning
anti--clockwise
= moves nozzle (29)
downwards
21
29
Tighten hex. nut A/F19 (22).
A/F 19
22
1905
2892170 x 09/2004 x ENGLISH
Special Machines
5 -- 13
Setting the glue station
5
5.9
Setting of glue application
Loosen clamping screw (44) at setting nut (2).
44
2
Turn setting nut (2) at glue cylinder (4). The countersunk hole (A) corresponding to the nozzle bore
is more or less covered by setting nut depending on the desired effect.
NOTICE
A
Also the glue quantity depends
on glue viscosity.
Turning clockwise = decreased
glue application
Turning
anti--clockwise
= increased
glue application
A
4
A
2
Tighten clamping screw (44) at setting nut (2) and fix by a hex. nut.
2
44
1905
5 -- 14
Special Machines
2892170 x 09/2004 x ENGLISH
Setting the glue station
5.10
5
Setting nozzle (29) to workpiece infeed fence
The nozzle (29) must spring back by approx. 2 mm as the workpiece is fed through (A).
29
29
A
Adjustment:
-- Loosen hex. nuts (24).
-- Turn console (1) by 2 mm approx.
-- Fixed by hex. nuts (24).
1
5.11
24
Nozzle (29) pressure on workpiece
Pressure on workpiece (A) about 70 N.
When processing other glue types, such as thin PUR glues, it is necessary to readjust the pressure
force.
Adjustment: Loosen or tighten the knurled nut (26) on threaded rod.
Knurled nut (26):
Turning clockwise = pressure force
more
prestressed spring
Turning
anti--clockwise
= pressure force
less
released spring
29
A
26
1905
2892170 x 09/2004 x ENGLISH
Special Machines
5 -- 15
Setting the glue station
5
5.12
Change of glue granulate
Select heaters at operating field with the button and heat up to processing temperature of the glue.
=
Switching on heaters
1 = Heating of nozzle insert
2 = Heating of nozzle
Expel remaining glue through the outlet.
Release rinsing process--see operating manual basic machine in the chapter ”Control”.
Replenish with glue granulate when the fault message «REPLENISH HEATING SYSTEM» appears in the basic display, at the latest.
Delete fault message by pressing reset key
.
Fill hopper (69) with glue granulate (60). (Filling capacity = appox.1.5 kg)
60
69
69
Melt off one glue shaft filling at least, until only new glue leaves the glue outlet.
Release rinsing process--see operating manual basic machine in the chapter ”Control”.
1905
5 -- 16
Special Machines
2892170 x 09/2004 x ENGLISH
Setting the glue station
5.13
5
Replenish the glue granulate
Glue granulate (60) can be replenished by way of the hopper (69) at any time, even during processing. (Filling capacity = appox.1.5 kg)
60
69
69
Replenish with glue granulate when the fault message «REPLENISH HEATING SYSTEM» appears in the basic display, at the latest.
Delete fault message by pressing reset key
.
When there is little glue left, a control switch switches over the pressure cylinder, but only when
there is no workpiece in the machine. Sufficient glue is available for the workpiece currently in the
machine.
Red light on:
-- Glue supply used up
-- Glue pellets not replenished
-- Fault message «REPLENISH HEATING SYSTEM»
1905
2892170 x 09/2004 x ENGLISH
Special Machines
5 -- 17
Setting the glue station
5
5.14
Change of glue cartridge
Select heaters with key at operating panel.
=
Switching on heaters
1 = Heating of nozzle insert
2 = Heating of nozzle
Release change process--see operating manual basic machine in the chapter ”Control”.
Pressure piston (7) of glue cartridge pressure cylinder (60) in place.
Illustration:
removed magazine
60
Remove magazine (9) for glue cartridge.
Air supply for glue cartridge pressure cylinder interrupted through non--activation of air valve (56).
9
Continuation
1905
5 -- 18
Special Machines
2892170 x 09/2004 x ENGLISH
Setting the glue station
5
DANGER
Danger of burns!
Always wear heat protection gloves when
working at the hot nozzle (29). *
29
DANGER
When changing the glue cartridge never put your hands in the glue shaft.
Use a tool (e.g. nozzle scraper) and wear heat protection gloves. *
1905
2892170 x 09/2004 x ENGLISH
Special Machines
5 -- 19
5
Setting the glue station
Remove glue cartridge remainder (60) from guide tube, using a tool (e. g. nozzle scraper).
60
Remove glue threads from the guide tube with a suitable tool (such as a piece of edging) and insert
glue cartridge magazine (9).
9
1905
5 -- 20
Special Machines
2892170 x 09/2004 x ENGLISH
Care and maintenance
6.1
6
General instructions
DANGER
Refer to the chapter ”Safety” during maintenance and inspection work.
The voltage must be switched off before work is started on the machine. Turn off the main switch
(13) -- setting «O» -- and secure it with a padlock (25).
Depressurise the pneumatic supply system (8)!
25
13
8
*
Clean the machine/unit daily.
Remove wood chips with a suitable brush or with a saw dust approved extractor system.
Remove any wood left inside, particularly in the area of the motor, spindles and guideways.
DANGER
This will endanger your health!
Because of the fine dust produced, the machine should never be cleaned with
compressed air.
Use extraction system released for wood dust. *
Lightly grease all moving parts, such as sliding surfaces, adjusting spindles and guideways, whenever
required.
Pollution of the environment.
Waste material of all kinds should be disposed of in an environmentally friendly way and in compliance with local recycling and disposal procedures. *
Continuation
1905
2892170 x 03/2004 x ENGLISH
Special Machines
6 -- 1
6
Care and maintenance
Emergency measures
If molten glue should come into contact with the skin, rinse affected area immediately under cool
running water (not iced water) for 10 to 15 minutes, until the pain subsides.
Never try to prise glue off the skin.
Burns should be treated by a medical practitioner as soon as possible.
1905
6 -- 2
Special Machines
2892170 x 03/2004 x ENGLISH
Care and maintenance
6.2
6
Maintenance chart
In single--shift operation the operating hours correspond
to a certain lubrication rhythm:
12
9
3
6
2000
1000
160
40
8
hrs.
hrs.
hrs.
hrs.
hrs.
----------------------------------------------
Every year
Every six months
Every month
Every week
Every day
A
B
Item
Maintenance point
A
Glue application area
Interval
8
hrs.
Maintenance work
Remarks
Visual inspection.
Proceed as indicated in
chapter 6.3
Remove residual glue incrustations
and dirt with nozzle scraper (63)
and wire brush (64).
63
64
Continuation
1905
2892170 x 03/2004 x ENGLISH
Special Machines
6 -- 3
6
Care and maintenance
Item
Maintenance point
B
Oiling metering rod.
Interval
8
hrs.
Maintenance work
Remarks
Thinly apply a coat of light engine
oil, such as SAE 10 W 30 , to
metering rod (3).
Set metering rod to approximately 40 to 50 mm
glue application height,
either manually, motor-assisted or through the
bridge, depending on
model. See chapter 5.5.
3
Caution!
Wait for the glue to reach
processing temperature
before changing the
metering rod setting.
9 (69)
Remove the magazine
(9)/hopper (69) for glue.
Caution!
When removing the
hopper for glue granulate
care should be taken to
prevent granulate from
entering the slot of the
safety device.
See chapter 5.1.
Caution!
Do not contaminate the
glue application area
with engine oil.
Otherwise there may be
a risk of danger from the
edging stop.
Only apply a thin film of
engine oil to the metering stick.
1905
6 -- 4
Special Machines
2892170 x 03/2004 x ENGLISH
Care and maintenance
6.3
6
Cleaning of glue application area
DANGER
Danger of burns!
Be very careful when working with melted glue.
Even solidified glue can still be very hot.
Always wear protective clothing covering all body parts at risk. *
6.3.1
Removing glue residues
Press back glue station against spring pressure and set knurled nut (27) against support wall.
27
More free space becomes available if the edging feed unit is retracted.
Loosen clamping lever (62).
62
Select heaters at operating field with the button and heat up to processing temperature of the glue.
=
Switching on heaters
Temperature reached; green light on
.
Continuation
1905
2892170 x 09/2004 x ENGLISH
Special Machines
6 -- 5
Care and maintenance
6
Expel remaining glue through the outlet.
Release rinsing process--see operating manual basic machine in the chapter ”Control”.
In the case of ACCORD range machines, the flushing process can also be carried out by means
of the selector switch (99) at the back of the operating cabinet.
Selector switch in «position II» = expel glue remains through nozzle bores
99
Clean glue remains from nozzle (29) with nozzle scraper (63) and wire brush (64).
(Supplied as accessories)
£
63
29
64
1905
6 -- 6
Special Machines
2892170 x 09/2004 x ENGLISH
Care and maintenance
6.3.2
6
Cleaning of bores for glue delivery and metering rod
Press back glue station against spring pressure and set knurled nut (27) against support wall.
27
More free space becomes available if the edging feed unit is retracted.
Loosen clamping lever (62).
62
Select heaters at operating field with the button and heat up to processing temperature of the glue.
=
Switching on heaters
1 = Heating of nozzle insert
2 = Heating of nozzle
Temperature reached; green light on
.
Continuation
1905
2892170 x 09/2004 x ENGLISH
Special Machines
6 -- 7
Care and maintenance
6
Machines with magazine for glue cartridge
Remove magazine (9) for glue cartridge.
Air supply for glue cartridge pressure cylinder interrupted through non--activation of air valve (56).
9
Machines with hopper for glue granulate
CAUTION
Run granulate hopper empty or empty glue by pressing the flushing key (F4) at the operating
panel.
When removing the hopper for glue granulate (69) , care should be taken that no granulate can
enter the slot of the safety device (56).
Cover safety device.
69
56
Continuation
1905
6 -- 8
Special Machines
2892170 x 09/2004 x ENGLISH
Care and maintenance
6
Loosen the knurled--head screw (71) and push the clamping ring (70) off the tubular section of the
hopper (69).
70
69
70
71
Lift off the hopper (69) for glue granulate.
The air supply for the pressure cylinder of glue granulate is interrupted through non--activation of
the safety device (56).
69
DANGER
Danger of burns!
Always wear heat protection gloves when
working at the hot nozzle (29). *
29
1905
2892170 x 09/2004 x ENGLISH
Special Machines
6 -- 9
Care and maintenance
6
6.3.2.1 Cleaning of bores for glue delivery
Separate metering rod (3) from cylinder (11) by means of ball head knob (45).
45
3
11
Move fork joint (73) out of the way and turn metering rod (3) by hand until the bores for glue delivery
at the nozzle (29) are open.
73
3
29
Carefully clean out the glue delivery bores by means of broach (62), as supplied with the
accessories.
62
1905
6 -- 10
Special Machines
2892170 x 09/2004 x ENGLISH
Care and maintenance
6
Connect metering rod (3) to cylinder (11) by means of ball head knob (45).
45
3
11
Loading magazine (9) or hopper (69) for glue.
Glue cartridge
Glue granulate
9
69
1905
2892170 x 09/2004 x ENGLISH
Special Machines
6 -- 11
Care and maintenance
6
6.3.2.2 Cleaning of metering rod -- Version non- tracing nozzle with position indicator
Version non--tracing nozzle with position indicator
Separate metering rod (3) from cylinder (11) by means of ball head knob (45).
45
3
11
Unscrew bolts (31) at strap (30) and pull metering rod (3) out of the nozzle.
30 31
3
3
Continuation
1905
6 -- 12
Special Machines
2892170 x 09/2004 x ENGLISH
Care and maintenance
6
Clean the glue channel of metering rod (3) whilst the glue is still warm.
For example, the slot by means of a piece of veneer edging and the bore with a screw driver.
DANGER
Danger of burns!
Always wear heat protection gloves
when working at the metering rod.
3
3
Heat up nozzle (29).
=
Switching on heaters
Temperature reached; green light on
.
29
Insert metering rod (3) into nozzle (29) and attach strap (30).
3
30
29
Connect metering rod (3) to cylinder (11) by means of ball head knob (45).
45
3
11
Continuation
1905
2892170 x 09/2004 x ENGLISH
Special Machines
6 -- 13
Care and maintenance
6
Loading magazine (9) or hopper (69) for glue.
Glue cartridge
Glue granulate
69
9
Select heaters at operating field with the button and heat up to 160q C.
=
Switching on heaters
1 = Heating of nozzle insert
2 = Heating of nozzle
Temperature reached; green light on
.
Check that glue is delivered through all bores of nozzle (29).
Release flushing process--see operating manual basic machine in the chapter ”Control”.
29
1905
6 -- 14
Special Machines
2892170 x 09/2004 x ENGLISH
Care and maintenance
6
6.3.2.3 Cleaning of metering rod -- Version tracing nozzle with position indicator
Version tracing nozzle with position indicator.
Scrape off glue remains at nozzle (29) with nozzle scraper (63), supplied with accessories.
£
63
29
Measure and make a note of dimension X between the end of tracer shaft (34) and nut (35).
x
(For re--assembly reset dimension X again to this value)
35
34
Continuation
1905
2892170 x 09/2004 x ENGLISH
Special Machines
6 -- 15
Care and maintenance
6
Separate metering rod (3) from cylinder (11) by means of ball head knob (45).
45
3
11
Loosen nuts (35+36) and pull metering rod (3), with height adjustment (positional indicator), out of the
nozzle.
A/F 13
3
35
29
3
Clean the glue channel of metering rod (3) whilst the glue is still warm.
For example, the slot by means of a piece of veneer edging and the bore with a screw driver.
DANGER
Danger of burns!
Always wear heat protection gloves
when working at the metering rod.
3
3
Continuation
1905
6 -- 16
Special Machines
2892170 x 09/2004 x ENGLISH
Care and maintenance
6
Heat up nozzle (29).
=
Switching on heaters
Temperature reached; green light on
.
29
Re--assembly in reverse order.
Connect metering rod (3) to cylinder (11) by means of ball head knob (45).
45
3
11
Loading magazine (9) or hopper (69) for glue.
Glue cartridge
Glue granulate
9
69
Continuation
1905
2892170 x 09/2004 x ENGLISH
Special Machines
6 -- 17
Care and maintenance
6
Select heaters at operating field with the button and heat up to 160q C.
=
Switching on heaters
1 = Heating of nozzle insert
2 = Heating of nozzle
Temperature reached; green light on
.
Check that glue is delivered through all bores of nozzle (29).
Release rinsing process--see operating manual basic machine in the chapter ”Control”.
29
1905
6 -- 18
Special Machines
2892170 x 09/2004 x ENGLISH
Care and maintenance
6
6.3.2.4 Cleaning of metering rod -- Version tracing nozzle with bridge connection
Version tracing nozzle with bridge connection.
Scrape off glue remains at nozzle (29) with nozzle scraper (63), supplied with accessories.
£
63
29
Measure and make a note of dimension X between the end of tracer shaft (34) and nut (35).
x
(For re--assembly reset dimension X again to this value)
35 34
Continuation
1905
2892170 x 09/2004 x ENGLISH
Special Machines
6 -- 19
Care and maintenance
6
Separate metering rod (3) from cylinder (11) by means of ball head knob (45).
45
3
11
Disconnecting bridge connection (75):
Loosen threaded pin (74) and pull out cylindrical pin (76).
SW4
76
65
Loosen nut (35) and pull metering rod (3) out of nozzle.
SW13
3
29
3
Continuation
1905
6 -- 20
Special Machines
2892170 x 09/2004 x ENGLISH
Care and maintenance
6
Clean the glue channel of metering rod (3) whilst the glue is still warm.
For example, the slot by means of a piece of veneer edging and the bore with a screw driver.
DANGER
Danger of burns!
Always wear heat protection gloves
when working at the metering rod.
3
3
Heat up nozzle (29).
=
Switching on heaters
Temperature reached; green light on
.
29
Re--assembly in reverse order.
Connect metering rod (3) to cylinder (11) by means of ball head knob (45).
45
3
11
Continuation
1905
2892170 x 09/2004 x ENGLISH
Special Machines
6 -- 21
Care and maintenance
6
Loading magazine (9) or hopper (69) for glue.
Glue cartridge
Glue granulate
69
9
Select heaters at operating field with the button and heat up to 160q C.
=
Switching on heaters
1 = Heating of nozzle insert
2 = Heating of nozzle
Temperature reached; green light on
.
Check that glue is delivered through all bores of nozzle (29).
Release rinsing process--see operating manual basic machine in the chapter ”Control”.
29
1905
6 -- 22
Special Machines
2892170 x 09/2004 x ENGLISH
Care and maintenance
6
6.3.2.5 Cleaning of metering rod -- Version non- tracing nozzle with power--assisted metering
rod adjustment (optional)
Version non--tracing nozzle with power--assisted metering rod adjustment.
Separate metering rod (3) from cylinder (11) by means of ball head knob (45).
45
3
11
Loosen bolts (31) at bearing block (30) and pull metering rod (3) out of nozzle.
30 31 3
3
Continuation
1905
2892170 x 09/2004 x ENGLISH
Special Machines
6 -- 23
Care and maintenance
6
Clean the glue channel of metering rod (3) whilst the glue is still warm.
For example, the slot by means of a piece of veneer edging and the bore with a screw driver.
DANGER
Danger of burns!
Always wear heat protection gloves
when working at the metering rod.
3
3
Heat up nozzle (29).
=
Switching on heaters
Temperature reached; green light on
.
29
Re--assembly in reverse order.
Connect metering rod (3) to cylinder (11) by means of ball head knob (45).
45
3
11
Continuation
1905
6 -- 24
Special Machines
2892170 x 09/2004 x ENGLISH
Care and maintenance
6
Loading magazine (9) or hopper (69) for glue.
Glue cartridge
Glue granulate
69
9
Select heaters at operating field with the button and heat up to 160q C.
=
Switching on heaters
1 = Heating of nozzle insert
2 = Heating of nozzle
Temperature reached; green light on
.
Check that glue is delivered through all bores of nozzle (29).
Release rinsing process--see operating manual basic machine in the chapter ”Control”.
29
1905
2892170 x 09/2004 x ENGLISH
Special Machines
6 -- 25
Care and maintenance
6
6.4
Resetting to new workpiece thicknesses -- idle time
If, after some time, settings are changed to a greater workpiece thickness, it may become necessary
to clean the nozzle wiper (29) as well as the bores for glue delivery.
Remove glue remains from nozzle with nozzle scraper (63) and wire brush (64). (----> 6.3)
£
63
29
63
Carefully clean the glue delivery bores with broach (62). (----> 6.3)
62
Version Tracing nozzle with or without pressure bridge connection
In the case of models of these variants, before any change--over from high to low workpiece thickness, the pressure bridge must first be moved completely to the top and/or the nozzle opened to
the maximum workpiece thickness before the cleaning process. This ensures that there will be no
glue in the sword nozzle when once again changing from a thin workpiece to a thick one.
Cleaning process as aforesaid.
NOTICE
Idle times should be avoided.
When the machine is idle for more than 6 minutes, the nozzle bores may become clogged.
(Machine shut--down after 6 minutes)
After finishing work, switch off machine immediately.
(Short heating--up time) *
1905
6 -- 26
Special Machines
2892170 x 12/2006 x ENGLISH
Care and maintenance
6.5
6
Cleaning of the glue application system after processing PUR hot-- melt glue
To clean the glue application system when alternately processing reactive PUR hot--melt glue and/or
other non--reactive hot--melt glue types (such as EVA--based glue), the corresponding glue manufacturer can provide cleaning cartridges and granulate.
Use of these cleaning products prevents both blockages and reactive contamination of the glue application system, and ensures that the nozzle bores remain open.
NOTICE
Cleaning of the glue application system after long periods of disuse.
The glue application system must be completely cleaned out, and the glue application bores of
the nozzle rinsed clean, after processing PUR glue and then changing to other glue types, as well
as after long periods of disuse, such as overnight and over the weekend.
Use cleaning cartridges or granulate available from the glue manufacturer, and observe the
corresponding usage and safety advice.
(----> 6.3)
*
1905
2892170 x 09/2004 x ENGLISH
Special Machines
6 -- 27
6
Care and maintenance
-- Void page --
1905
6 -- 28
Special Machines
2892170 x 09/2004 x ENGLISH
Troubleshooting and remedies
7
DANGER
Repairs to electrical equipment must not be performed except by an electrician, or by trained personnel under the direction and supervision of an electrician, in accordance with electrical engineering rules. *
This table is intended for rectification of simple problems.
No.
Fault
Possible cause
1
Nozzle does not heat up
Basic machine
Remedy
a) Main switch not switched on.
a) Switch on main switch
-- Position ”I” --.
b) Emergency--Off button (28)
pressed.
b) Pull out pushbutton (28) to
disengage it.
28
c) No compressed air or pressure too low.
c) Set working pressure from
6 bars to gauge reading on
servicing unit (8).
8
d) Heaters at operating panel
not selected on.
d) Select the heaters at operating panel. LED indicator flashing.
Continuation
1905
2892170 x 09/2004 x ENGLISH
Special Machines
7 -- 1
Troubleshooting and remedies
7
No.
Fault
Possible cause
Remedy
2
Nozzle does not reach processing temperature
Nominal value of the heaters incorrectly set.
Set nominal value of the heaters
to the processing temperature
recommended by the manufacturer.
(see chapter 5.5)
3
No glue applied or only
in part
Glue cartridge
a) Glue cartridge used up.
Glue cartridge
a) Refill glue cartridge.
(see chapter 5.3+5.4)
Glue granulate
b) Glue granulate used up.
Glue granulate
b) Refill glue granulate.
(see chapter 5.2)
c) Manual adjustment from
metering rod
Workpiece thickness
incorrectly set
c) Manual adjustment from
metering rod
Set workpiece thickness to
position indicator.
(see chapter 5.6.1)
Continuation
1905
7 -- 2
Special Machines
2892170 x 09/2004 x ENGLISH
Troubleshooting and remedies
7
No.
Fault
Possible cause
Remedy
n
No glue applied or only
in part
d) Bores of nozzle clogged.
d) Carefully clean nozzle bores
with broach.
(see chapter 6.3.2.1)
e) Top of metering stick glue incrusted.
f) When glue unit was changed
from granulate to cartridge,
granulate remains were still in
the guide tube and the cartridge jammed.
e) Clean.
(see chapter 6.3.2.2/6.3.2.3/6.3.2.4/6.3.2.5)
f) Remove glue cartridge and
clean guide tube of granulate
remains.
(see chapter 5.3.)
Continuation
1905
2892170 x 03/2004 x ENGLISH
Special Machines
7 -- 3
Troubleshooting and remedies
7
No.
Fault
Possible cause
Remedy
4
Uneven glue application
a) Workpiece not at right angles.
a) Check that workpiece is at
right angles.
b) Nozzle not in contact with
workpiece.
b) Nozzle must spring back by
approx. 2 mm as the workpiece runs through.
(see chapter 5.10)
c) Parallelism divergence (x)
between nozzle wiper surface
(29) and the right--angled
workpiece edge.
c) Loosen hex. nut 13 A/F and
set eccentric adjuster with 3
A/F angle spanner until parallelism (x) is reached. Then
set glue application to workpiece lower edge – re--adjust
(s. chapter 5.8)
X
29
Top view
d) Nozzle (29) not at right angle
to feed chain.
X
29
Top view
d) Loosen fixing screw and
move glue station at the glue
cylinder up or down.
29
Continuation
1905
7 -- 4
Special Machines
2892170 x 03/2004 x ENGLISH
Troubleshooting and remedies
7
No.
Fault
Possible cause
Remedy
5
Glue joint too heavy
Processing temperature of the
glue too low.
Set selectors to recommended
processing temperature.
(see chapter 5.5)
6
Edging does not stick
a) Dust on edging and/or workpieces.
b) Too thin glue application.
a) Use workpieces and edging free of dust.
b) Check glue application setting.
(see chapter 5.8)
c) Workpieces and/or workshop
too cold.
c) Bring workpieces and workshop to 18--20qC at least.
d) Workpieces and/or edging too d) Material moisture<10%
moist.
e) Unsuitable glue.
e) Use a glue type suited to the
edging processed.
Observe manufacturer’s recommendations.
f) Teak edging stored for a long
time.
g) Glue--on pressure too low.
f) Apply edging immediately
after cutting.
g) Check pressure roller setting
at pressure unit.
7
Other faults
Spezialmaschinen
Manual
Error Messages
PLC
SERVICE
1905
2892170 x 09/2004 x ENGLISH
Special Machines
7 -- 5
7
Troubleshooting and remedies
-- Void page --
1905
7 -- 6
Special Machines
2892170 x 03/2004 x ENGLISH
Notes
8
1905
2892170 x 09/2004 x ENGLISH
Special Machines
8 -- 1
REICH Spezialmaschinen GmbH
Technische Dokumentation
Plochinger Straße 65
72622 Nürtingen
Germany
Telefax +49 7022 702 139
Sender
Comment to manual 1905
Output date 12/2006 -- Index AC
Idea
Review
Correction