1
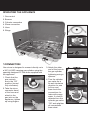
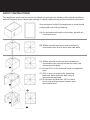
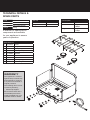
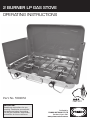
2 BURNER LP GAS STOVE
OPERATING INSTRUCTIONS
Part No. 509012
CERT: 4411
IMPORTANT
Read these instructions for use
carefully. Familiarise yourself with
the appliance before connecting
it to it’s gas container. Keep these
instructions for future reference.
Distributed by
AGA LTD
Logo created from high res .jpeg supplie
PRIMUS AUSTRALIA PTY
Bundoora Victoria 3083
www.primusaustralia.com.au
GENERAL WARNINGS
IMPORTANT
•This appliance shall only be connected
to cylinder with a 3/8” LH BSP gas cylinder
valve certified to AS2469 standards.
This appliance is designed for outdoor use only
and must be operated away from any flammable
material or surfaces & materials.
•This appliance is to be stored in a dry & well
ventilated location free from direct sunlight.
Do not store when still connected to the cylinder.
Make sure that the cylinder is disconnected and
is stored in a well ventilated area, free from direct
sunlight, heat and ignition sources. If being stored
indoors, ensure that the location complies with the
standard AS/NZS1596.
•This appliance must only be serviced by an
authorised service agent, return to your place
of purchase for service & repair.
•Keep away from children at all times.
•Surfaces of the appliance will become hot during
operation please take care when handling or
moving the appliance.
•Appliance is to be used on a stable, level, flat
non-flammable surface, the appliance should be
protected from direct drafts and in a well ventilated
place.
•Only cooking vessels with a maximum diameter of
220mm are to be used with this appliance.
•Take care that the primary air intakes, located
on the burner tube of this appliance are not
obstructed, or that air flow is restricted by placing
items or other appliances close to or adjacent to
the inlets.
•If you smell gas immediately turn the gas off at the
cylinder and move the appliance & cylinder to a well
ventilated area outside, keeping well away from
sources of heat such as naked flames & pilot lights.
•Do not attempt to move or relocate the appliance
when it is operating, extinguish the burner &
allow to cool, disengage the gas cylinder then
move the appliance.
DANGER!
•During operation all surfaces will be extremely hot
and should not be touched or handled.
•Do not use the appliance if it has a leak, worn,
deteriorated or damaged seals.
•Handle with care even after brief use, always pick
up using the handle not the cylinder.
•It may be hazardous to attempt to fit other types of
gas containers or cartridges.
•Use only in well ventilated areas.
•Always operate appliance a minimum of 800mm
from flammable materials, walls & ceiling.
•Do not use adaptors or modify appliance to fit
other connectors or cylinders.
•Do not use multiple appliances to heat a
single utensil.
•Children must be supervised by an adult at
all times.
•Never leave appliance unattended when operating.
•Use as a cooking appliance only, is not to be used
as heater or modify for any other reason.
•Avoid boil over & spills on to burners.
CARBON MONOXIDE HAZARD
•This appliance produces carbon monoxide which
has no odour. Using the appliance in enclosed
spaces, for example; caravan, car, boat or mobile
home could cause DEATH.
CHECKING FOR GAS LEAKS
•Check that all connections are tight and that the
gas cylinder connection has been tightened before
you turn the cylinder gas valve on.
•NEVER check for leaks with a flame or pilot light.
•Using soapy water coat all connections, if bubbles
appear turn the cylinder gas control off and
retighten the connection before re-testing.
•Inspect the appliance regularly for signs of wear,
leaks or incorrect operation. If symptoms such
as flaring of the burners, issues with lighting,
damages to hoses or connections or leaks from
seals or gas controls are identified do not attempt
to repair, return to your authorised stockist for
service & maintenance.
•To check if gas remains in the cylinder, disconnect
from the appliance and hold the cylinder in a
vertical position then shake from side to side, if
there is a sound or feel of liquid movement inside
the cylinder contains gas.
•When changing gas cylinders ensure this is
conducted outside in a well ventilated location free
from people, animals & ignition sources such as
naked flames, pilot lights & electrical equipment
with heaters or elements.
OPERATING THE APPLIANCE
1. Gas control
2. Burners
3. Cylinder connection
4. Stove connection
5. Hose
5
6. Wings
6
3
2
6
2
4
1
1
1.CONNECTION
Your stove is designed to connect directly on to
a 3/8” LH BSP camping gas cylinder using the
specially designed LP Gas hose supplied with
the appliance.
1. Check that the
gas controls
are in the “Off”
position (turned
fully clockwise).
2. Take the stove
connector head
of the hose and
attach to the
gas inlet on the
appliance, tighten
up using fingers.
3. Attach the other
end of the hose to
the gas cylinder,
tightening using a
spanner.
4. Turn the cylinder
gas valve on in
an anti-clockwise
direction for one
full turn and
then check the
connections for
leaks with soapy
water, if a leak is
detected turn the
cylinder gas valve
“Off” and retighten
all connections
then retest.
2.LIGHTING BURNER
4.TURNING THE APPLIANCE OFF
1.Check that the
gas control is
shut off, then turn
the gas cylinder
valve on in an
anti-clockwise
direction for one
full turn.
If the appliance is no longer to be used and to
reduce the risk of blocked gas jets caused by
excess gas being left in the hose, all remaining
gas must be expelled from the hose assembly.
3.If the burner does not ignite, turn the
gas control in the clockwise direction
to the “Off” position and allow the
residual gas to disperse before
attempting to reignite the burner.
2.Turn the gas
controls on the
appliance
clockwise to the
“Off” position.
2.Take a lit match
or lighter and
position close
to the edge of
the burner that
is to be ignited,
slowly turn the
gas control in an
anti-clockwise
direction approximately ¼ of a turn.
1.With the flame
still operating,
turn the valve
on the gas
cylinder in
the clockwise
direction until
it is “Off”. Allow
the flame to
burn down then
extinguish once
all remaining gas
in the hose has
been used.
3.ADJUSTING FLAME
CARE INSTRUCTIONS
1.Turn the gas
control in an
anti-clockwise
direction to
achieve a higher
flame and in
the clockwise
direction for a
lower flame.
Your appliance is manufactured with a hard
wearing powder coated finish on the cabinet,
chrome plated burners, trivet and stainless
steel drip tray (if fitted) and is easy to clean.
Using warm soapy water with a mild detergent
wipe down all surfaces and areas of the
appliance, taking care not to allow water to
enter the burner outlets or aeration holes
located in the burner tube.
DO NOT submerge the appliance is a sink
or bowl.
DO NOT use abrasive cleaners or bleach.
SAFETY INSTRUCTIONS
This appliance must only be used in an above ground open air situation with natural ventilation,
without stagnant areas, where gas leakage is rapidly dispersed by wind and natural convection.
Any enclosure in which the appliance is used should
comply with one of the following:
(A) An enclosure with walls on all sides, but with no
overhead cover.
(B) Within a partial enclosure that includes an
overhead cover and no more than two walls.
(C) W
ithin a partial enclosure that includes an
overhead cover and more than two walls, the
following must apply:
(1) At least 25% of the total wall area is completely
open.
(2) 3
0% or more in total of the remaining
wall side, back and front wall areas is
open and unrestricted.
(3) In the case of balconies, 20% or more
of the total wall area must remain open
and unrestricted.
1
1
2
1
2
TECHNICAL DETAILS &
SPARE PARTS
Code
Description
Size
Weight
Consumption
509012
Gas Jet
464 x 289 x 82mm
Large Burner:
Medium Burner:
2 Burner LP Gas Stove
0.15mm
Inlet Pressure:
Cylinder Pressure
Large Burner:
180g/hr
9.1Mj/hr
Medium Burner:
0.18mm
4.3kg
A selection of spare parts &
components are available
for your appliance to ensure
years of operation.
136g/hr
6.8Mj/hr
1
Spare Part List
1
PCS7012
Trivet
3
PCS5012
Gas jet large burner
2
4
5
6
7
8
9
PCS6012
PCS8951
PCS8950
PCS8952
PCS8949
PCS8414
HP1200F
Large burner
“O” ring for spindle
Spindle
Lock nut
2
Control knob
“O” ring for gas connector
1200mm gas hose
2
WARRANTY
This appliance is covered
against faulty workmanship
and materials for a period
of 3 years from the date of
original purchase.
The following items are not
covered by warranty:
3
• Blocked jet nipples
Each of these items are a
serviceable part and are
readily available from your
specialist outdoor retailer.
4
5
3
6
7
4
5
8
6
7
9