1
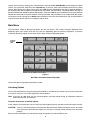
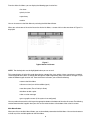
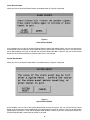
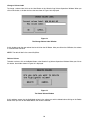
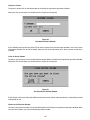
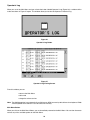
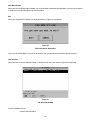
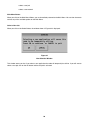
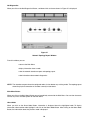
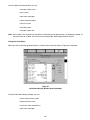
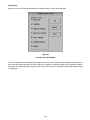
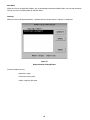
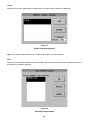
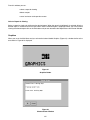
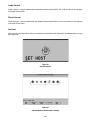
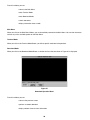
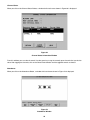
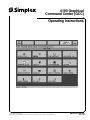
4190 Graphical Command Center (GCC) Operating Instructions 1997 Simplex Time Recorder Co. All specifications and other information shown were current as of publication, and are subject to change without notice. NET-31-101 (574-312) Ed 1 97 -4 TABLE OF CONTENTS Page Introduction ............................................................................................................................................................1 Before You Can Operate the GCC ..................................................................................................................1 Log On ..............................................................................................................................................................2 Main Menu .............................................................................................................................................................3 Activating Options..........................................................................................................................................3 Using the Touchscreen to Activate Options ..................................................................................................3 Using the Mouse to Activate Options............................................................................................................4 Using the Keyboard to Activate Options .......................................................................................................4 Active Lists ......................................................................................................................................................4 Main Menu Button.........................................................................................................................................5 Alarm Silence Button ....................................................................................................................................6 System Reset Button ....................................................................................................................................6 Disable/Enable Button ..................................................................................................................................7 Action Message Button.................................................................................................................................7 Time and Date ................................................................................................................................................8 Historical Log ..................................................................................................................................................9 Main Menu Button.......................................................................................................................................10 Change View ..............................................................................................................................................10 Volume Operations ..................................................................................................................................... 11 Change a Volume Label .......................................................................................................................12 Delete a Volume ...................................................................................................................................12 Export a Volume ...................................................................................................................................13 Back Up a Volume................................................................................................................................14 Restore a Volume.................................................................................................................................15 Close an Active Volume .......................................................................................................................15 Return to the Previous Window............................................................................................................15 Operator’s Log ..............................................................................................................................................16 Main Menu Button.......................................................................................................................................16 Add a Note..................................................................................................................................................17 Change the Volume to View .......................................................................................................................17 Service ............................................................................................................................................................18 Main Menu Button.......................................................................................................................................19 Exit..............................................................................................................................................................19 Job Selection ..............................................................................................................................................19 Main Menu Button ................................................................................................................................20 Select a New Job .................................................................................................................................20 Select a New Network ..........................................................................................................................21 Unit Restart.................................................................................................................................................21 Net Diagnostics...........................................................................................................................................22 i -3 TABLE OF CONTENTS (cont.) Page Main Menu Button................................................................................................................................ 22 About Node .......................................................................................................................................... 22 Attendance........................................................................................................................................... 23 Network Diagnostics ............................................................................................................................ 23 Touchscreen......................................................................................................................................... 24 Status & Control .......................................................................................................................................... 24 Change the Point Status ............................................................................................................................ 25 Status................................................................................................................................................... 25 Return Button....................................................................................................................................... 26 Control Menu ....................................................................................................................................... 26 Action Messages.................................................................................................................................. 27 Go to a Point .............................................................................................................................................. 27 Main Menu.................................................................................................................................................. 28 Alarm Silence ............................................................................................................................................. 28 System Reset ............................................................................................................................................. 28 Change View .............................................................................................................................................. 29 Editors ............................................................................................................................................................ 30 Reports/Printer ............................................................................................................................................. 33 Main Menu.................................................................................................................................................. 34 Generate .................................................................................................................................................... 34 Generate a Report ............................................................................................................................... 35 Cancel.................................................................................................................................................. 35 Target ................................................................................................................................................... 36 View............................................................................................................................................................ 36 Select a Report for Viewing ................................................................................................................. 37 Graphics......................................................................................................................................................... 37 Utility Control ................................................................................................................................................ 38 Audio Control ................................................................................................................................................ 39 Phone Control .............................................................................................................................................. 39 Set Host ......................................................................................................................................................... 39 Main Menu.................................................................................................................................................. 40 Terminal Mode............................................................................................................................................ 40 Download Mode ......................................................................................................................................... 40 Return .................................................................................................................................................. 41 Network Download............................................................................................................................... 41 Channel Status .................................................................................................................................... 42 Attendance ................................................................................................................................................. 42 About Node ................................................................................................................................................ 43 Site Info .......................................................................................................................................................... 43 Menu ............................................................................................................................................................... 44 Using The Simulator ................................................................................................................................... 45 Adding/Deleting Users and Setting their Access Level .................................................................... 45 -2 ii LIST OF ILLUSTRATIONS Figure 1 2 3 4 5 6 7 8 9 10 11 12 13 14 15 16 17 18 19 20 21 22 23 24 25 26 27 28 29 30 31 32 33 34 35 36 37 38 39 40 41 42 43 44 45 46 47 Page 4120 Applications Icons................................................................................................................................1 Main Menu (Log On Icon Only).....................................................................................................................2 Log On Services Window .............................................................................................................................2 Main Menu (Available Options Displayed) ....................................................................................................3 The Active Lists Button .................................................................................................................................4 The Active List Menu ....................................................................................................................................4 Typical Active List Screen .............................................................................................................................5 Alarm Silence Window..................................................................................................................................6 System Reset Window..................................................................................................................................6 Active List Screen Changed to Allow Enabling or Disabling a Point.............................................................7 Action Message Dialog Box..........................................................................................................................7 Time and Date Button ...................................................................................................................................8 Set Time and Date Window ..........................................................................................................................8 Historical Log Button.....................................................................................................................................9 Historical Log Viewing Screen ......................................................................................................................9 Historical Log Volume/View Selection Window...........................................................................................10 Historical Log Volume Operations Window................................................................................................. 11 Change Volume Label Window...................................................................................................................12 Delete Volume Window...............................................................................................................................12 Export Volume Window...............................................................................................................................13 Percent Copied Window .............................................................................................................................13 Backup Volume Window .............................................................................................................................14 Percent Backed Up Window .......................................................................................................................14 Restore Volume Window ............................................................................................................................15 Close Active Volume Window .....................................................................................................................15 Operator’s Log Button.................................................................................................................................16 Operator’s Log Viewing Screen ..................................................................................................................16 Add Operator’s Note Window .....................................................................................................................17 Change Log View Volume Window.............................................................................................................17 Service Button ............................................................................................................................................18 Service Menu..............................................................................................................................................18 Exit Confirmation Dialog Box ......................................................................................................................19 Job Selection Window ................................................................................................................................19 New Selection Window ...............................................................................................................................20 Network Selection Window .........................................................................................................................21 Unit Restart Operation Window ..................................................................................................................21 Network Topology Report Window..............................................................................................................22 Network Attendance Report Window..........................................................................................................23 Network Diagnostics Window .....................................................................................................................23 Status & Control Button ..............................................................................................................................24 Status and Control Menu ............................................................................................................................24 Point Status Display Window (Status Selected) .........................................................................................25 Point Status Display Window (Control Selected) ........................................................................................26 Point Status Display Window (Action Messages Selected) ........................................................................27 Go To Point Address Window .....................................................................................................................27 Alarm Silence Window................................................................................................................................28 System Reset Window................................................................................................................................28 -1 iii LIST OF ILLUSTRATIONS (cont.) Figure 48 49 50 51 52 53 54 55 56 57 58 59 60 61 62 63 64 65 66 67 68 69 70 71 72 73 Page Change Point View Window ....................................................................................................................... 29 Editors Button............................................................................................................................................. 30 4120 Programming Unit Window................................................................................................................ 30 Configure Menu.......................................................................................................................................... 31 Point Configuration Editor .......................................................................................................................... 31 Action Message Editor ............................................................................................................................... 32 Edit Operator Information Screen............................................................................................................... 32 Reports/Printer Button................................................................................................................................ 33 Report Status and Control Window ............................................................................................................ 33 Report Selection Dialog Window................................................................................................................ 34 Historical Log Volume/View Selection Window .......................................................................................... 35 Report Target Dialog Window..................................................................................................................... 36 View Report Dialog Window ....................................................................................................................... 36 Graphics Button.......................................................................................................................................... 37 Choose Screen Window............................................................................................................................. 37 Utility Control Button................................................................................................................................... 38 Utility Control Menu .................................................................................................................................... 38 Set Host Button .......................................................................................................................................... 39 Set Host/Download Main Menu Window .................................................................................................... 39 Download Operation Menu........................................................................................................................ .40 Network Download Operation Window....................................................................................................... 41 Channel Status Information Window .......................................................................................................... 42 Attendance Window ................................................................................................................................... 42 Site Information Button............................................................................................................................... 43 Menu Names and Commands.................................................................................................................... 44 Simulator Main Menu ................................................................................................................................. 45 0 iv Introduction The 4120 Graphical Command Center (GCC) is a node on a 4120 Network used for annunciating and controlling the points contained within the network.The graphical interface provided makes it easy to interact with the network. You can interact with the network by entering input through a keyboard, mouse, or touchscreen. This publication provides instructions for operating the 4120 Graphical Command Center. For installation and checkout instructions, refer to the 4190 Graphical Command Center (GCC) Installation and Checkout Instructions (Part No. 574-311). Before You Can Operate the GCC The first time you enter windows after installing the GCC software, the program manager group icons are created. The program manager group icons are shown in Figure 1. Figure 1 4120 Applications Icons If the system has been programmed, you can simply double-click on the 4120 RunTime icon to begin operating the GCC. If the system has not been programmed, you receive a message informing you that there has been an error while trying to load the database. If you receive this type of message, refer to the Graphical Command Center (GCC) Programming Instructions (Part No. 574-150) and ensure that the system is programmed as desired. 1 After you double-click the 4120 RunTime icon, the Simplex logo is momentarily displayed followed by the Main Menu (Figure 2). Figure 2 Main Menu (Log On Icon Only) Before you log on, only the Log On icon is displayed (unless access levels have been customized to allow operations to be performed without logging on) on the Main Menu by default. To access additional options, you must log on. Log On To log on, click on the Log On icon. After you click on the Log On icon, the Log On Services Window is displayed (Figure 3). Figure 3 Log On Services Window 2 Log on at this screen by entering your name/number in the box labeled Name/Number and clicking on the Enter square. The cursor then advances to the Passcode box. At this box, enter your passcode and click on the Enter square. After clicking on the Enter square, click on the OK square at the bottom of the Log On Services Window. If the name/number and passcode are recognized by the system, the Main Menu is displayed behind the Log On Services Window with additional options displayed in it. Click on the OK square at the bottom of the Log On Services Window one more time to close the window. If the name/number and passcode are not recognized by the system, you receive an error message and a Return box is displayed. If you click on the Return box, you are returned to the Log On Services Screen and you can attempt to log on again. Main Menu The Main Menu (Figure 4) displays the options that you can access. The number of options displayed varies depending upon your access level and may also vary depending upon the features required for a particular installation. Generally, higher access levels yield a higher number of displayed options. SYSTEM STATUS LINE Figure 4 Main Menu (Available Options Displayed) You use the options displayed to operate the system. Activating Options You can activate options by using any one of three methods. If available for your system, you can use a touchscreen or a mouse. If not, you can use the keyboard to activate options. Note: If you click on Help while you are activating options, the Help function brings up information about the particular option you are activating. Using the Touchscreen to Activate Options If your system has a touchscreen, you can simply use your finger to press the area of the screen you wish to activate. CAUTION: There is a thin sensing layer on the surface of the touchscreen. When pressing the screen, be careful not to crease this layer with your fingernail. If this layer is creased, the touchscreen may not function properly. After you press the desired area, the functions under that option are made available to you. 3 Using the Mouse to Activate Options If your system has a mouse, you can simply click on the area of the screen you wish to activate. After you click on the desired area, the functions under that option are made available to you. Using the Keyboard to Activate Options The GCC is a PC-based product that comes with a keyboard. Use the keyboard to activate options by using the arrow keys to move to the area of the screen you wish to activate. You can also use the Tab key to move forward through the possible options and the Shift and Tab key combination to move backwards through the possible options. When you are at the area of the screen you wish to activate, press the Enter key and the functions under that option are made available to you. Active Lists When you are at the Main Menu and you activate the box labeled Active Lists (Figure 5), the Active List Menu (Figure 6) is displayed. Figure 5 The Active Lists Button Figure 6 The Active List Menu 4 From the Active List Menu, you can display the following type of active lists: • fire alarm • priority 2 alarm • supervisory • trouble You can also return to the Main Menu by activating the Main Menu Button. When you activate one of the active lists on the Active List Menu, a screen similar to the one shown in Figure 7 is displayed. Figure 7 Typical Active List Screen NOTE: The desired point must be highlighted before you can act on it. This screen displays all active lists under the particular category (fire alarm, priority 2 alarm, supervisory, or trouble). The background color (which is configurable through the 4120 Programming Unit) of the title bar changes as you select the different types of active lists. From the Active List Screen, you can do the following: • return to the Main Menu • silence an alarm (turn off the audible signals) • reset the system (Fire or Priority 2 Alarm) • disable or enable a point • view an action message • go to a graphics screen (if the system is so configured) You can perform these tasks by clicking on the appropriate button at the bottom of the active list screen.The following sections describe what happens when you click on the various buttons at the bottom of the active list screen. Main Menu Button When you click on the Main Menu Button, you are immediately returned to the Main Menu. You can then choose to activate any of the available options on the Main Menu. 5 Alarm Silence Button When you click on the Alarm Silence Button, the window shown in Figure 8 is displayed. Figure 8 Alarm Silence Window At this window, you can click on the Alarm Silence Button to silence the audible signals. You can also click on the Cancel Button if you change your mind and decide that you would rather not silence the alarm. If you click on the Alarm Silence Button, the alarm is silenced and the Alarm Silence Window is closed. If you click on the Cancel Button, the Alarm Silence Window is closed and the alarm is not silenced. System Reset Button When you click on the System Reset Button, the window shown in Figure 9 is displayed. Figure 9 System Reset Window At this window, you can click on the System Reset Button to reset the system. You can also click on the Cancel Button if you change your mind and decide that you would rather not reset the system. If you click on the System Reset Button, the system is reset and the System Reset Window is closed. If you click on the Cancel Button, the System Reset Window is closed and the system is not reset. 6 Disable/Enable Button When you click on the Disable/Enable Button, the Active List Screen changes to the screen shown in Figure 10. Figure 10 Active List Screen Changed to Allow Enabling or Disabling a Point At this screen, you can enable a point, disable a point, or return to the previous screen. To disable a point, select the desired point by clicking on it and then clicking on the Disable Point Button. To enable a point, select the desired point by clicking on it and then clicking on the Enable Point Button. To return to the previous screen, click on the Return Button. After you click on the Return Button, you are returned to the previous Active List Screen. Action Message Button When you click on the Action Message Button, the message Select point to view action message for is displayed. After this message is displayed, click on the point for which you wish to view the action message. After you click on the point, the Action Message Dialog Box (Figure 11) is displayed. Figure 11 Action Message Dialog Box 7 When you have finished viewing the action message, you can click on the Close Window Button and you are returned to the Active List. Time and Date When you are at the Main Menu and you activate the button labeled Time And Date (Figure 12), a window opens (Figure 13) that allows you to set the time and date. Figure 12 Time and Date Button Figure 13 Set Time and Date Window From this window, you can set the time and date by entering the correct time and date and then clicking on the Set Time Button. Use the up arrow to increase values and the down arrow to decrease values. Click on the Next Button to move to the next value you would like to set. You can also use the Tab key to move from one 8 button to the next button. If you use the Tab key to move from one button to the next, the Return Button and Set Time Button are also activated. When you use the Next Button to move from one button to the next, the Return and Set Time buttons are not activated. When you have set the correct time and date, click on the Return Button and you are returned to the Main Menu. Local Time and Date are updated immediately. Network Time and Date are also updated immediately if a Timekeeper Node is configured. Historical Log When you are at the Main Menu and you activate the button labeled Historical Log (Figure 14), a window similar to the one shown in Figure 15 opens. This window allows you to view the historical log. Figure 14 Historical Log Button Figure 15 Historical Log Viewing Screen From this window, you can: • return to the Main Menu • change the view 9 • perform historical log volume operations You can perform these tasks by clicking on the appropriate button at the bottom of the Historical Log Viewing Screen. Main Menu Button When you click on the Main Menu Button, you are immediately returned to the Main Menu. You can then choose to activate any of the available options on the Main Menu. Change View When you click on the Change View Button, a window similar to the one shown in Figure 16 is displayed. Figure 16 Historical Log Volume /View Selection Window From this window, you can selectively display historical information. You can display information based upon the following categories: • display the entire historical log • display the fire alarm historical log only • display the priority 2 alarm historical log only • display the supervisory historical log only • display the trouble historical log only • display the control historical log only • display the diagnostic historical log only • display the operator historical log only When you click on the Change View Button, a window similar to the one shown in Figure 16 is displayed. The title bar at the top of the window changes, when you click on the OK button, in accordance with the choice you make: entire historical log, fire alarm historical log, supervisory historical log, trouble historical log, etc. When you have finished viewing the desired log information, you can click on the Change View Button and you are returned to the Historical Log Volume/View Selection Window. From this window, you can choose other historical log information to view. 10 Volume Operations When you click on the Volume Operations Button, a window similar to the one shown in Figure 17 is displayed. Figure 17 Historical Log Volume Operations Window From this window, you can do the following: • change the volume label • delete a volume • export a volume • back up a volume • restore a volume • close an active volume • return to the previous window Note: These options are not automatically available on an NPU. P206 “NPU Keyboard Active Control” has to be turned on manually. 11 Change a Volume Label To change a volume label, click on the Label Button at the Historical Log Volume Operations Window. When you click on this button, a window similar to the one shown in Figure 18 is displayed. Figure 18 The Change Volume Label Window At this window, enter the new volume label and click on the OK Button. After you click on the OK Button, the volume is saved with the new label. NOTE: The default label is the current Day/Date. Delete a Volume To delete a volume, click on the Delete Button at the Historical Log Volume Operations Window. When you click on this button, the window shown in Figure 19 is displayed. Figure 19 The Delete Volume Window At this window, ensure that the highlighted volume is the volume you wish to delete before clicking on the Delete Button. After you click on the Delete Button, the volume is deleted. 12 Export a Volume To export a volume, click on the Export Button at the Historical Log Volume Operations Window. When you click on this button, a window similar to the one shown in Figure 20 is displayed. Figure 20 The Export Volume Window At this window, enter the filename that you want the volume exported to and then place the appropriate floppy disk in the A: drive. After placing a floppy disk in the A: drive, click on the desired format (ASCII Text or Comma Delimited Text) and then click on the OK button. After you click on the OK button, the system starts writing the information to the A: drive and a window similar to the one shown in Figure 21 is displayed. The default export/backup drive is the A: drive. This can be changed by entering the complete path of a destination filename on a different drive. An example of this is: B:\History\Vol1.txt. NOTE: Some data base packages expect comma delimited data. This is important to know if you want to import this information into an off-the-shelf data base package. Figure 21 Percent Copied Window 13 This window asks you to please wait and displays the percentage of copied information completed. While this message is displayed, you should wait and not attempt to perform system actions. When the system informs you that the information is 100% copied, you can again use the system to perform desired actions. Back Up a Volume To back up a volume, click on the Backup Button at the Historical Log Volume Operations Window. When you click on this button, a window similar to the one shown in Figure 22 is displayed. Figure 22 The Backup Volume Window At this window, enter the filename that you want the volume to be backed up to and then place the appropriate floppy disk in the A: drive. After placing the floppy disk in the A: drive click on the OK button. After you click on the OK button, the system starts writing information to the A: drive and a window similar to the one shown in Figure 23 is displayed. Figure 23 Percent Backed Up Window This window asks you to please wait and displays the percentage of copied information completed. While this message is displayed, you should wait and not attempt to perform system actions. When the system informs you that the information is 100% copied, you can again use the system to perform desired actions. 14 Restore a Volume To restore a volume,click on the Restore Box at the Historical Log Volume Operations Window. When you click on this button, the window shown in Figure 24 is displayed. Figure 24 The Restore Volume Window At this window, enter the filename of the file you wish to restore and insert the proper diskette in the A: drive. After inserting the diskette, click on the OK button. After you click on the OK button, the A: drive activates and the file is restored. Close an Active Volume To close an active volume, click on the Close Active Volume Button at the Historical Log Volume Operations Window. When you click on this button, the window shown in Figure 25 is displayed. Figure 25 The Close Active Volume Window At this window, click on the Close Active Button to close the active volume and a new volume is automatically created and opened for use. Return to the Previous Window To return to the previous window, click on the Return Button at the Historical Log Volume Operations Window. When you click on this button, you are returned to the previous window. 15 Operator’s Log When you are at the Main Menu and you activate the button labeled Operator’s Log (Figure 26), a window similar to the one shown in Figure 27 opens. This window allows you to view the Operator’s Historical Log. Figure 26 Operator’s Log Button Figure 27 Operator’s Log Viewing Screen From this window, you can: • return to the Main Menu • add a note • change the volume to view Note: The Add Note option is not automatically available on an NPU, because by default there is no keyboard. P206 “NPU Keyboard Active Control” has to be turned on manually. Main Menu Button When you click on the Main Menu Button, you are immediately returned to the Main Menu. You can then choose to activate any of the available options on the Main Menu. 16 Add a Note When you click on the Add Note Button, the window shown in Figure 28 is displayed. Figure 28 Add Operator’s Note Window To add an operator’s note, type in the desired text and click on the OK button to save the note. If you change your mind and do not want to save the note, simply click on the Cancel button and the note is not saved. Change the Volume to View When you click on the Change Volume Button, a window similar to the one shown in Figure 29 is displayed. Figure 29 Change Log View Volume Window To change the log volume you are viewing, click on the Change Volume Button and then click on the volume you wish to view. After clicking on the volume you wish to view, click on the OK button and the selected volume is displayed. 17 Service When you are at the Main Menu and you activate the button labeled Service (Figure 30), the window shown in Figure 31 is displayed. Figure 30 Service Button Figure 31 Service Menu From the Service Menu, you can: • return to the Main Menu • exit the GCC • select a new job • restart the unit • run network diagnostics • calibrate the touchscreen 18 Main Menu Button When you click on the Main Menu Button, you are immediately returned to the Main Menu. You can then choose to activate any of the available options on the Main Menu. Exit When you activate the Exit Button, the dialog box shown in Figure 32 is displayed. Figure 32 Exit Confirmation Dialog Box If you click on the Exit Button, you exit out of the GCC and are returned to the Windows operating system. Job Selection When you click on the Job Selection Button, a window similar to the one shown in Figure 33 is displayed. Figure 33 Job Selection Window From this window, you can: • return to the Main Menu 19 • select a new job • select a new network Main Menu Button When you click on the Main Menu Button, you are immediately returned to the Main Menu. You can then choose to activate any of the available options on the Main Menu. Select a New Job When you click on the Select Button, the window shown in Figure 34 is displayed. Figure 34 New Selection Window This window warns you that if you select a new application the node will temporarily be off-line. If you still want to select a new job, click on the OK button and the new job is activated. 20 Select a New Network When you click on the Network Box, a window similar to the one shown in Figure 35 is displayed. Figure 35 Network Selection Window From this window, you can select a new network to run. To select a new network, click on the name of the desired network and then click on the Select Button and the new network is selected. Unit Restart When you click on the Unit Restart Button, the window shown in Figure 36 is displayed. Figure 36 Unit Restart Operation Window If you do restart the unit, the point states are cleared, the point counts are cleared, and the unit is restarted. If you decide that you do not want to restart the unit, click on the Cancel button and you are returned to the previous screen. If you do want to restart the unit, click on the Restart button and the unit is restarted. 21 Net Diagnostics When you click on the Net Diagnostics Button, a window similar to the one shown in Figure 37 is displayed. Figure 37 Network Topology Report Window From this window, you can: • return to the Main Menu • display information about a node • view the network attendance report and topology report • view information about network diagnostics NOTE: The attendance report shows the configured nodes. It also denotes any missing nodes. The topology report shows the physical connection of all nodes currently in attendance. Main Menu Button When you click on the Main Menu Button,you are immediately returned to the Main Menu. You can then choose to activate any of the available options on the Main Menu. About Node When you click on the About Node Button, information is displayed about the highlighted node. To display information about another node highlight it and click on the About Node Button. After clicking on the About Node Button, the information about that particular node is displayed. 22 Attendance When you click on the Attendance Button, a window similar to the one shown in Figure 38 is displayed. Figure 38 Network Attendance Report Window This window displays attendance information for the various nodes on the network. Missing Nodes are shown with an X through them. To return to the previous window, click on the Topology Button. Network Diagnostics When you click on the Host Diagnostics Button, a window similar to the one shown in Figure 39 is displayed. Figure 39 Network Diagnostics Window From this window, you can: • return to the previous menu • clear tallies • start messages • stop messages 23 To perform any of the listed actions, click on the appropriate button and the action is performed. Touchscreen When you click on the Touchscreen Button, a window is displayed that allows you to calibrate the touchscreen. To calibrate the touchscreen, follow the instructions displayed. You should touch the monitor where indicated. As you touch the monitor, the system will calibrate itself and will then be ready for use. CAUTION: There is a thin sensing layer on the surface of the touchscreen. When pressing the screen, be careful not to crease this layer with your fingernail. If this layer is creased, the touchscreen may not function properly. NOTE: The system will not respond to events while in the calibration screen. Exit out of the calibration screen as quickly as possible. Do not leave the system in the calibration screen. Status & Control When you are at the Main Menu and you activate the button labeled Status & Control (Figure 40) a window similar to the one shown in Figure 41 is displayed. Figure 40 Status & Control Button Figure 41 Status and Control Menu 24 From the Status And Control Menu, you can: • change the point status • go to a point • view action messages • return to the Main Menu • silence an alarm • reset the system • change the point view Note: Go to a point is not automatically available on an NPU because by default there is no keyboard available. To use this function on an NPU, you must turn on manually P206 “NPU Keyboard Active Control”. Change the Point Status When you click on the Change Status Button, a window similar to the one shown in Figure 42 is displayed. Figure 42 Point Status Display Window (Status Selected) From the Point Status Display Window, you can: • return to the previous screen • display the point status • access the Point Control Menu • view action messages 25 Status When you first enter the Point Status Display Window, the Status Option is selected and the status of the highlighted point is displayed. Return Button When you click on the Return Button, you are immediately returned to the Status and Control Menu. You can then choose to activate any of the available options on the Status and Control Menu. Control Menu When you click on the Control Menu Button, the window shown in Figure 43 is displayed. Figure 43 Point Status Display Window (Control Selected) From the Control Selection, you can put a point in Normal State or Trouble State and you can increase or decrease the priority, of a point. 26 Action Messages When you click on the Action Messages Selection, the screen shown in Figure 44 is displayed. Figure 44 Point Status Display Window (Action Messages Selected) From this window, you can select an action message to view. Click on the type of message (Alarm, Priority 2 Alarm, Supervisory, Trouble, or General Info), that you wish to view and then click on the View button. After clicking on the View button, the message is displayed. Go to a Point When you click on the Go To Point Button, the window shown in Figure 45 is displayed. Figure 45 Go To Point Address Window From this window, you can go to any valid point address. To go to a point address, enter that address (such as P17 or any valid address) and click on the OK Button. After clicking the OK button, you are brought to the entered point. If you change your mind and would rather not go to that point, you can click the Cancel Button and you are returned to the Status and Control Menu. 27 Main Menu When you click on the Main Menu Button, you are immediately returned to the Main Menu. You can then choose to activate any of the available options on the Main Menu. Alarm Silence When you click on the Alarm Silence Button, the window shown in Figure 46 is displayed. Figure 46 Alarm Silence Window From this window, you can silence alarms. When you silence an alarm, the audible signal is stopped. If you do want to silence the alarm, click on the Alarm Silence Button and the audible signals are stopped. If you change your mind and do not want to silence the alarm, click on the Cancel Button. After clicking on the Cancel Button, the alarm continues and you are returned to the Status And Control Menu. System Reset When you click on the System Reset Button, the window shown in Figure 47 is displayed. Figure 47 System Reset Window From this window, you can reset the system. When you reset the system, the cause of the alarm may be lost. If you do want to reset the system, click on the System Reset Button. After you click on the System Reset Button the system is reset. If you change your mind and do not want to reset the system, click on the Cancel Button. After clicking on the Cancel Button, you are returned to the Status And Control Menu. 28 Change View When you click on the Change View Button, the window shown in Figure 48 is displayed. Figure 48 Change Point View Window From this window, you can select the types of points you want to view. To select a type of point to view, click on the box in front of the point type you wish to view. When an X appears in the box, that point type is selected for viewing. When you have selected the point types that you wish to view, click on the OK Button and the selected point types are displayed. 29 Editors When you are at the Main Menu and you activate the button labeled Editors (Figure 49), a window similar to the one shown in Figure 50 is displayed. Figure 49 Editors Button Figure 50 4120 Programming Unit Window 30 At the 4120 Programming Unit Window, click on Configure. When you click on Configure, the menu shown in Figure 51 opens. Figure 51 Configure Menu At this menu, Point Config, Action Message, and Operator Definition are displayed in black (not grayed out). These options are available for editing. When you click on Point Config, a screen similar to the one shown in Figure 52 is displayed. Figure 52 Point Configuration Editor At this screen, you can edit the point configuration. 31 When you click on Action Message, a screen similar to the one shown in Figure 53 is displayed. Figure 53 Action Message Editor At this screen, you can edit the selected action messages. When you click on Operator Definition, a screen similar to the one shown in Figure 54 is displayed. Figure 54 Edit Operator Information Screen At this screen, you can edit the selected operator information. When you add an operator, you log on for the first time by using the Operator Number. You are then prompted by the system to change the default passcode. To make the new operator and passcode permanent, you must build the job. Note: Saving the job will not make the new operator and passcode permanent; you must build the job to make the new operator and passcode permanent. 32 Reports/Printer When you are at the Main Menu and you activate the button labeled Reports/Printer (Figure 55) a window similar to the one shown in Figure 56 is displayed. Figure 55 Reports/Printer Button Figure 56 Report Status and Control Window From the Status And Control Window, you can: • return to the Main Menu • generate reports • terminate reports (Terminate will cancel a currently printing or pending report. To terminate a report, highlight it and press terminate). • view reports 33 Main Menu When you click on the Main Menu Button, you are immediately returned to the Main Menu. You can then choose to activate any of the available options on the Main Menu. Generate When you click on the Generate Button, a window similar to the one shown in Figure 57 is displayed. Figure 57 Report Selection Dialog Window From this window, you can: • generate a report • cancel the current action • select a target for the report 34 Generate a Report When you click on the Generate Button and the “Historical Log Report” is highlighted, a screen similar to the one shown in Figure 58 is displayed. Figure 58 Historical Log Volume/View Selection Window From this window, highlight the volume you wish to view. After highlighting the volume, highlight the view you desire. You can select from the following views: • entire historical log • fire alarm historical log • priority 2 alarm historical log • supervisory historical log • trouble historical log • control historical log • diagnostic historical log • operator historical log Cancel When you click on the Cancel Button, you are immediately returned to the Report Status and Control Window. You can then choose to activate any of the available options in the Report Status and Control Window. Note: Rev 1.01 supports only one type of report, the “Historical Log Report.” 35 Target When you click on the Target Button, a window similar to the one shown in Figure 59 is displayed. Figure 59 Report Target Dialog Window Note: You cannot change the filename on an NPU unless P206 is manually turned on. View When you are at the Report Status and Control Window, and you click on the View Button a window similar to the one shown in Figure 60 is displayed. Figure 60 View Report Dialog Window 36 From this window, you can: • select a report for viewing • delete a report • cancel and return to the previous screen Select a Report for Viewing Select a report for viewing by clicking on the desired report. When the report is highlighted it is selected. After the desired report is selected click on the OK button and the selected report is displayed. When you have finished viewing the selected report click on the Exit button and you are returned to the Report Status And Control Window. Graphics When you are at the Main Menu and you activate the button labeled Graphics (Figure 61) a window similar to the one shown in Figure 62 is displayed. Figure 61 Graphics Button Figure 62 Choose Screen Window 37 From the Choose Screen Window, you can select a screen to view. To select a screen to view, click on it and then click on the OK button; the selected screen is then displayed. To view the possible selections you can click on the down arrow and the up arrow to bring different choices into the window. You can also scroll through the different choices by clicking on the scroll button and holding the mouse button down while dragging the scroll button along the scroll bar. As you drag the scroll button the various choices are displayed. To select a choice, stop dragging the scroll button when the desired choice is displayed in the Choose Screen Window and then click on it; the selected screen is then displayed. To exit from the Choose Screen Window click on the Cancel Button. After you click on the Cancel Button, you are returned to the Main Menu. Utility Control When you are at the Main Menu and you activate the box labeled Utility Control (Figure 63), the Utility Control Menu (Figure 64) is displayed. Figure 63 Utility Control Button Figure 64 Utility Control Menu From the Utility Control Menu, you can control the utility points contained within the system. 38 Audio Control Audio Control is a feature supplied with the Network Processing Unit (NPU) and is not available in the Graphical Command Center (GCC). Phone Control Phone Control is a feature supplied with the Network Processing Unit (NPU) and is not available in the Graphical Command Center (GCC). Set Host When you are at the Main Menu and you activate the box labeled Set Host (Figure 65), the window shown in Figure 66 is displayed. Figure 65 Set Host Button Figure 66 Set Host/Download Main Menu Window 39 From this window, you can: • return to the Main Menu • enter Terminal Mode • enter Download Mode • check attendance • display information about a node Main Menu When you click on the Main Menu Button, you are immediately returned to the Main Menu. You can then choose to activate any of the available options on the Main Menu. Terminal Mode When you click on the Terminal Mode Button, you initiate specific node terminal operations. Download Mode When you click on the Download Mode Button, a window similar to the one shown in Figure 67 is displayed. Figure 67 Download Operation Menu From this window, you can: • return to the previous screen • perform a network download • display network channel status information 40 Return When you click on the Return Button, you are returned to the Set Host/Download Main Menu. You can then choose to activate any of the available options on the Set Host/Download Main Menu. Network Download When you click on the Network Download Button, a window similar to the one shown in Figure 68 is displayed. Figure 68 Network Download Operation Window From this window, download the desired network by clicking on it and then clicking on the OK button. 41 Channel Status When you click on the Channel Status Button, a window similar to the one shown in Figure 69 is displayed. Figure 69 Channel Status Information Window From this window, you can close channels. Use the space bar to tag the currently open channels that you wish to close. After tagging the channels, click on the Close Channel Button and the tagged channels are closed. Attendance When you click on the Attendance Button, a window similar to the one shown in Figure 70 is displayed. Figure 70 Attendance Window 42 This window shows the attendance for the various nodes on the network. If a node is not communicating, this window provides a quick way of showing it. About Node When you click on the About Node Button, a window containing information about the current node is displayed. Site Info When you are at the Main Menu and you activate the button labeled Site Info (Figure 71), a screen containing information about the site is displayed. Figure 71 Site Information Button 43 Menu When you activate the Menu Button, menu names are displayed as shown in Figure 72. When you click on a menu name, the menu commands are displayed as shown in Figure 72. You can use these commands to control the system. MENU SCREEN UTILITY CONTROL PRINT TASK SERVICE MAIN MENU LOG ON/LOG OFF SYSTEM RESET GRAPHICS SCREEN SET TIME DATE ALARM SILENCE HELP ACTIVE LISTS QUIET SOUNDER F7 HISTORICAL LOG STATUS & CONTROL OPERATOR’S LOG UTILITY CONTROL SET HOST AUDIO CONTROL PHONE CONTROL CURRENT SCREEN 4120 PROGRAMMER REPORTS/PRINTER CONTROL SIMULATOR F8 EXIT OPERATOR HELP NETWORK DIAGNOSTICS SITE INFORMATION JOB SELECTION SYMBOL LEGEND UNIT RESET ABOUT Figure 72 Menu Names and Commands 44 Using The Simulator You can use the Simulator to perform Control and Simulate operations on external points while their associated Network Loops are off-line. Control operations are point specific actions which can be performed on both local and external points under normal system operation (disable, enable, etc.). Simulate operations are point specific actions that can be performed only on external points while their associated Network Loop is in simulation mode, an example of this would be setting a Monitor point’s physical state (normal, abnormal, open or short). To enter the simulator, click on the MENU button in the upper left corner of the Main Menu (Figure 4). When you click on the MENU button the selections shown at the top of Figure 72 become available. Click on the Task selection, and the 4120 Programmer choice and the Simulator choice are displayed. Click on Simulator, and the Simulator Main Menu (Figure 73) is displayed. Figure 73 Simulator Main Menu From this screen, you can use the Simulator to check out the system. Adding/Deleting Users and Setting Their Access Level To add/delete users and set their access levels, perform the following steps: • double click on the GCC/NPU Programmer Icon (the message Loading 4120 Programmer ...) is displayed • click on File • click on Open • open the desired job • click on Log On/Off • Log On to the 4120 Programming Unit • click on Configure • click on Operator Definition (the Edit Operator Information Window is displayed) • at this window, add or delete operators as desired • when you add an operator, use the up arrow and down arrow to set their access level After you add a user, click on OK and that user is added to the user list. 45 46 47 48 Ed 1 97 Simplex Plaza • Gardner, Massachusetts 01441-0001 U.S.A. NET-31-101 (574-312)