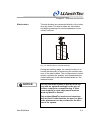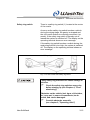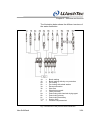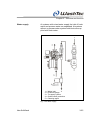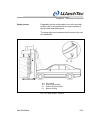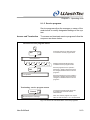
1
Operating instructions Roll-over wash system New SoftWash WashTec Cleaning Technology GmbH Argonstraße 7 D - 86153 Augsburg Mat. no. 216122GB Index: a 2.2.2007 © Copyright WashTec Cleaning Technology GmbH. All rights reserved. No part of this publication may be reproduced or translated in full or in part without prior written permission. Right to make changes Changes may be made at any time to the form, equipment and technology of items covered in this documentation. For this reason, no claims relating to the aforementioned may be derived from the information, illustration and descriptions provided in these operating instructions for appliances or systems manufactured after the date of issue of these operating instructions. Warranty We reserve the right to make changes to this publication. WashTec can accept no liability for indirect damage or direct damage, incidental damage, consequential damage or compensation for expenses incurred by performance of contract which arise from delivery, provision and use of this material. Introduction These operating instructions are intended to help you familiarize yourself with your roll-over wash system of type New SoftWash. To start with, we have a few important things to say about safety. Please observe these instructions without fail, in order to prevent damage to machinery and injury to persons. You will then learn about the structure and function of your roll-over wash system. We show you step by step how to put the system into operation and how to operate it. We also provide you with tips on maintenance and care, so that your roll-over wash system functions well at all times. Please pay unconditional attention to the warranty specifications on the next three pages. Any questions? Before you do anything else, always look in the table of contents. You are sure to find what you need there. And if you do need us in person: just call us or send a fax. FAX While talking about service: in this operating instruction the WashTec Service is mentioned several times. WashTec Service means the personnel of the WashTec Cleaning Technology GmbH as well as the personnel of our partners. Dear Customer, thank you for opting for WashTec. You have selected a product that will be in reliable operation in your car wash business for a long time. And there is a lot you can do to ensure this. Please read this operating manual carefully and observe the maintenance and care instructions listed in it. This significantly increases the service life of your system. In case of a problem, please check the following points first: • • • • • Observe the error messages on the display of the operating unit! Could the problem be due to a power failure or a failure in the air or water supply? Are missing respectively wrong equipment or non-dearated feed pumps the cause? Is the emergency-off button/switch activated? Are the light barriers dirty? Our customer service will remedy defects in/on the system in the scope of our warranty. These relate to the service that is part of the delivery scope of our machines and do not include: equipment, wear and tear parts, damages caused by improper operation, etc. The exclusions from warranty are listed on the next two pages. If components were connected during the installation of your new system (for example existing aggregates like pumps etc. or equipment by other manufacturers like automatic doors, water recycling plants, etc.) that we did not deliver, possible operational breakdowns caused by these components are also excluded from our warranty. This naturally also applies to breakdowns directly related to this thirdparty equipment. In order to prevent damages to vehicles passing through the car wash facility, you must observe all notices in the operating manual. A sequencer controls the automatic doors (in winter operation together with light barrier signals) by means of switching impulses for opening and closing the car wash facility. For protection against damage, the doors must be equipped with suitable safety installations. Please contact your door supplier. We wish you lots of success with your business. WashTec Cleaning Technology GmbH Exclusions from warranty Valid for machine types: z z z z z z Delivery and installation of any type of illuminates and lights Delivery and installation of sign boards or –foils. Program modifications on behalf of the ordering party Delivery of operating facilities/ program cards Provision of cleaning agents and operating facilities Remedy of damages which are related to the impact of frost Exchange of defect pre-fusing in the supply line (customer z supplied main distributor) z Replacement of system parts which got lost by theft Replacement and disposal of filter media such as quartz z sand, filter pads, etc. z Disposal of silt traps and sedimentation tanks z Filling and spindling of the under-floor heater Remedy of damages or malfunctions which have been caused by improper operation of the system through the operaz tor. Examples: Usage of non-original WashTec spare parts or non-original 1. brush material by the ordering party 2. Manual actuation of contactors Damage of the system or accessories by the operator or 3. third party Cleaning of the system with unsuitable cleaning agents, e.g. 4. hydrofluoric acid. Unprofessional cleaning of the system with high-pressure 5. units Soiling of brushes or dosing facilities due to mixing up or 6. using the wrong cleaning agents such as shampoo, wax, etc. Wrong setting of the dosing facilities by the ordering party 7. and resultand malfunctions Empty cleaning agent containers or dosing pumps which 8. have not been bleeded. 9. Violent removal of jammed program cards 10. Dirty light barriers and spray nozzles Malfunctions caused by clogging of the fresh water line, 11. process water line and waste water line and by cleaning these lines Explicit non-observance of the maintenance and care work 12. which has to be carried out by the operator and which is outlined in the operating instructions / operating journal GW WT CW WR SW X X X X X X X X X X X X X X X X X X X X X X X X X X X X X X X X X X X X X X X X X X X X X X X X X X X X X X X X X X X X X X X X X X X X X X X X X X X X X X X X X X X X X X X X X X X X X X X X X X X X X X X X X X X X X X X Valid for machine types: Services which have to be supplied to remedy or minimize, odour problems and which have been caused by insufficient 13. cleaning of the recycling system and its environment 14. 15. 16. 17. 18. z WT CW WR SW X X X X X Not accurately timed disposal or cleaning of the silt trap, X X X X X sedimentation tanks, pump storage tank and light oil- or coalescence separator Cleaning the filter of the water supply and the freeze protecX tion facility No or wrong supply of coins, wrong coins X Cleaning of the chimney and heater systems X All malfunctions at the burner of the heating system and X yearly emission control Submitance of evidence for the above examples rests with the ordering party X Consumable material which is not included in the scope of supplies: Replacement brush for surAqua tester Brush feet face washer Fine-filter plug Flat jet nozzle Hand lance High-pressure pistol Injectors Lance holder Lance pipe Lance hose Foam lance Dirt filter Protection hood Protection hood for brush Collar Support for foam brush Explanation of the short terms: GW WT CW WR SW GW ¾ ¾ ¾ ¾ ¾ Gantry wash system Conveyor wash tunnel Commercial vehicle wash system Water recycling system Self service wash systems List of contents Subject Page no. Introduction 1. General information 1.1. 1.2. Guide to symbols Manufacturer´s Declaration 2. Safety instructions 2.1. 2.2. 2.3. 2.4. 2.5. 1-1 1-1 1-1 2-1 General information Intended use Additional dangers Working safely Safety during operation 2-1 2-2 2-3 2-3 2-6 3. Structure and function 3-1 3.1. 3.2. 3.3. 3.4. 3.5. 3.6. 3.7. Complete System Mechanical structure Additional equipment - mechanical Fluid technical system Additional equipment - spray system Control system and electronics Special equipment 3-2 3-3 3-13 3-21 3-35 3-42 3-44 4. Commissioning/assembly/dis-mantling/ conversion/disposal 4-1 4.1. 4.2. 4.3. Commissioning Dismantling/conversion/transport/ assembly Disposal 5. Washing operation 5.1. 5.2. 5.3. 5.4. Safety instructions Preparing the vehicle Car wash procedure Procedure for emergency stops and malfunctions 4-1 4-8 4-8 5-1 5-2 5-4 5-5 5-8 6. Settings and checking 6.1. 6.2. 6.3. 6.4. 6.5. 6.6. Adjusting the compressed air Filling the dosing pumps Adjusting the dosing pump Bleeding the suction lines at the rim cleaner pump Adjust rim cleaner pump Reading and setting the water flowing pressure 7. Maintenance and care 7.1. Safety instructions 7.2. Care 7.2.1. Lime-scale removal 7.2.2. Cleaning of the system 7.2.3. Cleaning of the floor 7.2.4. Cleaning of the brushes 7.2.5. Special treatment 7.3. Maintenance 7.3.1. Maintenance on demand 7.3.2. Weekly Maintenance 7.3.3. Monthly Maintenance 7.3.4. Maintenance every six months 7.3.5. Annual 6-1 6-1 6-4 6-5 6-6 6-7 6-8 7-1 7-1 7-2 7-4 7-5 7-5 7-6 7-9 7-10 7-10 7-11 7-12 7-13 7-14 8. Error messages 8-1 9. Operating units 9-1 9.1. Operating terminal CP1 9.1.1. Overview 9.1.2. Starting up the operating terminal 9.1.3. Starting wash programs 9.1.4. Manual operation with control buttons 9.1.5. Service programs 9.2. Card reader 9.2.1. Overview 9.2.2. Structure 9.2.3. Commissioning 9.2.4. Washing operation with card 9.2.5. Start of wash programs 9.2.6. Cleaning the card reader 9-3 9-3 9-4 9-4 9-7 9-10 9-79 9-79 9-80 9-80 9-81 9-82 9-84 10. Additional equipment 10.1. 10.2. 10.3. 10.4. 10.5. 11. Technical specifications 11.1. 11.2. 12. Fresh-water supply systems Under-body wash - turnable Under-body wash – sectionwise Vehicle moving device Rolling shutter door control Dimensions Technical Data Appendix 10-1 10-2 10-4 10-7 10-8 10-9 11-1 11-1 11-3 12-1 Chapter 1 – General information 1. General information 1.1. Guide to symbols This section contains an explanation of the symbols used in these operating instructions. Indicates an imminently hazardous situation which, if not avoided, may result in death or serious injury. CAUTION Indicates a potentially hazardous situation which, if not avoided, may result in property damage. NOTICE Indicates sections which contain important information. ) ⇒ Indicates work operations which need to be carried out. This symbol is followed by a description about how the status of the system changes after an operation has been carried out. 1.2. Manufacturer´s Declaration The roll-over wash system New SoftWash is developed and manufactured in compliance with valid European standards and guidelines. The manufacturer´s declaration for your roll-over wash system is included in the appendix of these operating instructions. New SoftWash 1-1 Chapter 2 - Safety instructions 2. Safety instructions 2.1. General information In order to guarantee safe use and fault-free operation, all individuals who are involved in any way with the roll-over wash system must have read and understood this operating manual. The instructions in this operating manual must be complied with by all individuals who operate the roll-over wash system or who work on it. In addition, the regulations and directives which are applicable in the place of use must also be observed (safety regulations, environmental requirements, etc.). Operating company The operating company is obliged only to allow individuals to work on the roll-over wash system who are familiar with the regulations for safety in the workplace and for accident prevention, have been instructed in using the system, who have previously read and understood this operating manual. We recommend that every operating company has this confirmed in writing by its personnel. Personnel New SoftWash All individuals who are commissioned to work on the roll-over wash system must, before work commences, undertake to observe the regulations for safety in the workplace and accident prevention, and to read this operating manual carefully and to observe its content. 2-1 Chapter 2 - Safety instructions 2.2. Intended use The roll-over wash system New SoftWash is designed for cleaning the outside of closed vehicles or parts of vehicles, in which the cleaning, drying or special treatment equipment are power driven. CAUTION Vehicles which extend beyond the allowed vehicle-width or vehicle-length should not be washed. Pay attention to the information in chapter 11 "Technical specifications". If the roll-over wash system is used for vehicles with certain features, this may result in damage to the vehicle. Pay attention to the information in chapter 5 "Washing operation". The safety of persons and animals, the roll-over wash system and vehicles cannot be guaranteed if the wash system is not used in accordance with its intended use. WashTec can accept no liability for any other usage or any modifications made to the roll-over wash system. New SoftWash 2-2 Chapter 2 - Safety instructions 2.3. Additional dangers The roll-over wash system has been manufactured in accordance with the latest safety standards and has been rated as absolutely operationally safe. Despite this fact, the system can represent a danger if it is used incorrectly or for any purpose other than its intended use by untrained personnel. No liability can be accepted for damages caused by improper use, incorrect operation or non-observance of the operating instructions 2.4. Working safely General All work on the roll-over wash system other than that specifically described in this operating manual may only be carried out by WashTec Service personnel. No liability can be accepted for damages that are caused by improper work - in particular work that is not described in this operating manual. Work on the roll-over wash system that is described in this operating manual may only be carried out by authorised, qualified and fully instructed personnel. These individuals must have received instruction from WashTec Service about potential dangers. Work on the electrical parts of the system may only be carried out by qualified individuals as defined by DIN EN 50110-1 Section 3.2.1. In countries where DIN EN 50110-1 does not apply, the country-specific regulations must be observed. New SoftWash 2-3 Chapter 2 - Safety instructions Working without protective clothes can cause serious accidents. Protective clothes ) ) ) Maintenance Service Care Observe the accident prevention regulations which apply to the place of operation. Wear proper non-skid boots and appropriate protective clothes. Maintenance, service and care work carried out on the machine while it is switched on can cause serious accidents. Always work through the following steps before starting maintenance, service and care work: ) ) ) ) ) New SoftWash Always refer to the safety instructions of the cleaning and care agent manufacturer for proper precautions. Move the roll-over wash system into an easily accessible position Switch off the electricity on the complete system Turn off the compressed air. Close the air supply at the ball valve located in the fluidtechnical system cabinet and turn the input pressure regulator to 0 bars. Switch off the water supply. Secure the system to prevent it from being switched on unintentionally. 2-4 Chapter 2 - Safety instructions Checks Faults Carrying out checking and adjustment work and attempting to rectify errors on the roll-over wash system while it is switched on can result in serious accidents. If necessary, authorised, qualified and instructed individuals who are familiar with the potential risks may enter the system while it is switched on. In this case, there must always be a second person at the main switch who can switch off the roll-over wash system in the event of an emergency. A falling roof brush or roof nozzle can cause serious accidents. Never stand underneath the roof brush or roof nozzle. Keep adequate distance to power driven elements. Do not touch moving elements while the system is running. Please observe that also idle elements may suddenly be moved by the controller. New SoftWash 2-5 Chapter 2 - Safety instructions 2.5. Safety during operation Safety instructions for the operator The roll-over wash system may only be operated by authorised, qualified and instructed personnel. These individuals must have received instruction from WashTec Service personnel about potential dangers. With self-service wash systems, there must always be one person who can be reached during operation who is familiar with the system and is able to take or initiate the necessary measures to prevent dangerous situations in the event of failure. For wash systems which are operated in selfservice mode, e.g. the operator or his personnel are not present during the wash cycle, and where the driver remains seated in the vehicle during the wash cycle it is highly recommended to install a video surveillance for controlling the wash area. In dangerous situations, the "emergency off" button is to be pressed immediately. The wash system operator is obliged to inform vehicle wash customers of the potential risks involved in using the roll-over wash system. This information must be displayed on instruction notices in front of the vehicle wash building. New SoftWash 2-6 Chapter 2 - Safety instructions Incorrect use of the roll-over wash system by customers can cause serious accidents. Safety instructions for the customer Only for car wash systems, where the customer remains in his car during the wash cycle Only for car wash systems, where the customer leaves his car during the wash cycle New SoftWash Customers must be informed of the following without fail: For safety reasons, the instructions of the car wash plant operator must be obeyed. The vehicle may not be left by any person in case of problems. Wait for instructions of the operator. The operating range of the roll-over wash system should not be entered during the wash cycle without attendance of the operator and only with his agreement. Children and animals may not be left alone inside the car during the wash cycle. No persons are allowed within the operating range of the roll-over wash system during the wash process. The drive in area has to be kept clear. Any animals are to be kept on a leash and under supervision. 2-7 Chapter 3 - Structure and function 3. Structure and function This chapter is designed to help you familiarise yourself with the structure and function of your roll-over wash system. The following pages contain a short description of the individual assemblies, to assist you in this process: Complete System…............................... Mechanical structure ............................. Additional equipment - mechanical ..….. Fluid technical system ..........………...... Additional equipment - spray system .... Control system and electronics ............. 3-2 3-3 3-13 3-21 3-35 3-42 The diagrams below will help you with orientation. Side view Rear Front Entry direction Front view Control cabinet side (RS) Resource cabinet side (CS) Fig. 3-1: Orientation diagram New SoftWash 3-1 Chapter 3 - Structure and function 3.1. Complete System 1 = Peripheral distributor 2 = Wash system 3 = Peripheral devices (Pumps, doors, etc.) Fig. 3-2: Complete System The energy provided by the customer is fed into the peripheral distributor (1). The peripheral distributor distributes the energy to the wash system and to the peripheral devices such as pumps and rolling shutter doors, contains the energy elements and exchanges data between wash system and peripheral devices. PV0 The peripheral distributor PV0 is the basic version. A maximum of 3 signals may be transmitted from the wash system to the peripheral devices. PV1-PV2 The peripheral distributors PV1and PV2 are intelligent distributors. Data exchange is handled by a CAN-Bus. A separate signal line is not used. The peripheral distributors PV1and PV2 differentiate among each other by the number of signals which may be processed and by the number of power elements. New SoftWash 3-2 Chapter 3 - Structure and function 3.2. Mechanical structure 1 = Frame 3 = Roof brush 5 = Wheel washer (option) 2 = Drier system 4 = Side brushes 6 = Operating unit Fig. 3-3: Roll-over wash system- front view Frame New SoftWash The self-supporting stainless-steel frame forms the main framework of the roll-over wash system. The two side elements contain the control cabinet on the right and the fluid technical system on the left side. They act as supporting elements for the upper frame. There is a base with a travel mechanism below each side element. 3-3 Chapter 3 - Structure and function Side brushes The side brushes are connected directly to the rotary drive by shafts. The side brushes are mounted to self-aligning bearings for precise adaptation to the vehicle contours. Fig. 3-4: Side brushes on movable bearings During the washing stage, the vehicle contour is recorded electronically by measuring the contact pressure of the side brushes. The microprocessor control system regulates the position and consequently the contact pressure of the side brushes based on the measured data. NOTICE The roll-over wash system is pre-set in the factory with the optimum settings for the type of brushes installed on commissioning. If other brush material is used, adjustments must be made by WashTec Service. Only original WashTec brushes and coverings may be used. If other brushes are used, no guarantee whatsoever can be provided for the function of the system. New SoftWash 3-4 Chapter 3 - Structure and function Positioning side brushes The positioning of the side brushes in their outer stop position (home position) is controlled by proximity switches in the cross beam. The servo drive will be stopped as soon as the switching cam covers the proximity switch. The inward positioning of the side brushes is controlled by a pulse counter (breaker plate (2) and proximity switch (3)). The pulse counter determines the length of run of the side brush. 1 = Proximity switch home position 2 = Breaker plate 3 = Proximity switch pulse counter Fig. 3-5: Positioning side brushes New SoftWash 3-5 Chapter 3 - Structure and function Controlling side brushes The side brushes are mounted in self-aligning bearings. The degree of displacement of the side brush is determined by a proximity switch (1) and a switching cam (2). The permitted degree of displacement is exceeded as soon as the switching cam uncovers the proximity switch. In this case the gantry is stopped and the side brushes perform a corrective movement. The system will be switched off if the proximity switch is not covered afterwards. An error message will be displayed on the operating unit. 1 = Proximity switch 2 = Switching cam Fig. 3-6: Controlling side brushes New SoftWash 3-6 Chapter 3 - Structure and function Lifting system for roof brush and roof drier Roof drier and roof brush are lifted or lowered by one lifting system. The system consists of the lift drive, a lift axle, a coil disc (on one side directly connected to the lift drive) and two flat belts. A breaker plate is fastened to the lift axle on the drive side. This breaker plate serves together with a proximity switch as a pulse counter. The pulse counter is used to determine the length of run of the roof drier or the roof brush. 1 = Roof drier 2 = Carriage roof drier 3 = Roof brush 4 = Carriage roof brush 5 = Flat belt 6 = coil disc and breaker plate 7 = Deflection roller Fig. 3-7: Lift system New SoftWash 3-7 Chapter 3 - Structure and function While unwinding the flat belt the roof drier is lowered first because of the higher weight. The roof brush remains in the upper stop position. If the roof brush should be lowered two cylinders extend the roof drier brackets on both sides out of the side frame. The roof drier will be positioned on the brackets. The flat belts are directed across the deflection rollers and the roof brush will be lowered. 1 = Carriage roof drier 2 = Flat belt 3 = Lift drive 4 = Bracket for roof drier 5 = Cylinder Fig. 3-8: Positioning of roof drier on brackets New SoftWash 3-8 Chapter 3 - Structure and function Controlling the roof drier and the roof brush 1+2 (ES-Side) 3+4 (ES-Side) 5+6 (MS-Side) The position of roof drier and the roof brush are controlled by three proximity switches and the pulse counter. = Proximity switch + switching cam for roof drier home position. = Proximity switch + switching cam for roof brush home position. = Proximity switch + switching cam for roof drier arrested on brackets (without illustration) Fig. 3-9: Proximity switches roof drier and roof brush NOTICE New SoftWash The position of the proximity switches and the switching cams depends on the machine type. The illustration shows the position for machine type 24 + 28. 3-9 Chapter 3 - Structure and function Roof brush The roof brush is connected directly to the rotary drive (2) by a shaft (1). Up and down movements are executed steplessly by means of flat belts (3) and the lift drive. 2 1 = Shaft 2 = Rotary drive 3 = Flat belt 3 1 Fig. 3-10: Roof brush During the washing stage, the vehicle contour is memorised electronically by measuring the contact pressure of the side brushes. The central control system regulates the up and down movement on the basis of these measured data. NOTICE The roll-over wash system is pre-set in the factory with the optimum settings for the type of brushes installed on commissioning. If other brush material is used, adjustments must be made by WashTec Service. Only original WashTec brushes and coverings may be used. If other brushes are used, no guarantee whatsoever can be provided for the function of the system. New SoftWash 3-10 Chapter 3 - Structure and function Drier system In the standard version the drier system is designed as an integral nozzle. Optionally the system may be equipped with a roof drier with light barriers and side blowers (see chapter 3.2. “Additional equipment – mechanical”). The integral nozzle is mounted on guide rails. Up and down movements are executed steplessly by means of flat belts and the lift drive. Fig. 3-11: Drier system During the drying stage, the control system uses the vehicle contour it has memorised during the washing stage. New SoftWash 3-11 Chapter 3 - Structure and function Safety ring switch There is a safety ring switch (1) located at the centre of the nozzle. As soon as the safety ring switch touches a vehicle during the drying stage, the gantry is stopped and the roof nozzle makes a correcting movement (upwards). If the safety ring switch is thereby not released the system is switched off. The display on the operating terminal shows an error message. If the safety ring switch touches a vehicle during the wash stage which is too high, the system is switched off. The display on the operating terminal shows an error message. 1 = Safety ring switch Fig. 3-12: Roof nozzle with safety ring switch ! Faulty safety ring switches can cause damage to vehicles. ) Check the safety ring switches every day before starting up (see Chapter 4, "Commissioning") Obstacles on the vehicle (taxi signs, ski-holders, etc.) may not, in some circumstances, be detected, and can be damaged. ) New SoftWash Override obstacles manually (see chapter 9, "Operating units") 3-12 Chapter 3 - Structure and function 3.3. Additional equipment - mechanical Depending on the model, your roll-over wash system will have various kinds of additional equipment. Roof drier with attached light barrier system If the system is equipped with a contour controlled high-pressure system, a vehicle moving device or if drying of the vehicle should be performed without previous brush wash, a roof drier with attached light barriers is installed. The light barrier system at the roof nozzle is used to control the up and down movement of the roof nozzle. This is always necessary when the vehicle contour has not already been captured by the roof brush and when the roof nozzle should follow the vehicle contour as accurate as possible, e.g. during the contour controlled high-pressure cleaning. The light barriers are positioned to the left and right of the roof nozzle (1). 1 = Light barriers Fig. 3-13: Position of the light barriers New SoftWash 3-13 Chapter 3 - Structure and function CAUTION Defect light-barriers can cause damage to vehicles. ) Observe the operating unit for failure messages during start-up of the system. Obstacles on the vehicle (taxi signs, ski-holders, etc.) may not, in some circumstances, be detected, and can be damaged. ) New SoftWash Override obstacles manually (see chapter 9, "Operating units"). 3-14 Chapter 3 - Structure and function Side blowers If the system is equipped with a roof drier with attached light barriers, side blowers may be installed additionally. They consist of a blower and an air duct. They are installed in the side frames. Fig. 3-14: Side blowers New SoftWash 3-15 Chapter 3 - Structure and function Traffic lights The traffic lights are the ideal solution for correct positioning of vehicles in the wash system. Two light barriers (1 and 2) determine the correct vehicle position. They are mounted in the two side elements, on one side the transmitters, and on the other the receivers. 1 = Light barrier stop 2 = Light barrier reverse Fig. 3-15: Position of the light barriers Three symbols are used to indicate how the vehicle should be positioned. FORWARD STOP REVERSE Fig. 3-16: Traffic light symbols New SoftWash 3-16 Chapter 3 - Structure and function Insufficient safety distances may cause severe accidents. Systems where the safety distance does not comply to local regulations may not be operated without safety shutdowns. In case the system has been modified afterwards in a way that the safety distance does not comply anymore to local regulations (i.e. installation of a heater, a wash basin, etc.) the wash system has to be refitted with a safety shutdown. The safety shutdown feature is used in short or narrow buildings in which the safety distance specified by the valid, applicable local regulations cannot be maintained. Safety shutdown front and rear side The safety shutdown feature at the front and rear side consists of a pivoted cover and a proximity switch which is located in the lower side element. The system shuts down as soon as pressure is applied to the cover. Fig. 3-17: Safety shutdown - front side : New SoftWash 3-17 Chapter 3 - Structure and function Outer sides The safety shutdown at the outer sides consists of a swivel mounted splash guard and a switch which is mounted behind the splash guard in the lower section. The system shuts down as soon as pressure is applied to the splash guard. Fig. 3-18: Safety shutdown outer sides If the safety shutdown is faulty, people can get caught between the wall of the building and the wash gantry. ) New SoftWash Check the safety shutdown every day before starting up the system (see Chapter 4 "Commissioning") 3-18 Chapter 3 - Structure and function Wheel wash brushes The wheel wash brushes are integrated in both side elements and are driven directly. A light barrier (LS3) detects the wheel. LS3 = Light barrier Fig. 3-19: Wheel was brush The wheel washing stage takes place during the forwards wash in the following sequence: ⇒ ⇒ ⇒ ⇒ ⇒ ⇒ CAUTION Vehicles with rear wheel cladding may be damaged in automatic operating mode. ) NOTICE New SoftWash The light barrier detects the wheel The gantry comes to a standstill The wheel wash brush is extended The wheel is washed The wheel wash brush returns to its starting position The gantry starts again The wheel wash brushes must be controlled manually (see Chapter 9 "Operating units"). The water supply for the wheel washer will be switched on and off together with the pre-rinsing. 3-19 Chapter 3 - Structure and function Wheel wash brushesHigh-pressure spray system (only for 70-bar version) This high-pressure (HP) system gives the wheel wash brushes additional cleaning power when cleaning the wheels. In addition it cleans the lower sides of the vehicle. Fig. 3-20: High pressure wheel washer One nozzle in the wheel wash brush (1) and one additional nozzle (2) above the wheel washer spray water with high pressure onto the wheels and the lower vehicle sides. The procedure for cleaning the wheel is identical to the procedure for the standard wheel wash brush. The high pressure cleaning is started as soon as the front of the vehicle is detected and stops with detection of the vehicle rear. NOTICE New SoftWash The high-pressure wheel washer may be combined with a side high-pressure system. In this case the spray nozzles are designed differently (see page 3-38). 3-20 Chapter 3 - Structure and function Fluid technical system 3.4. The fluid technical system is made up of the following elements: Fluid system (1) Spray system (2) 1 2 Fig. 3-21: Fluid technical system New SoftWash 3-21 Chapter 3 - Structure and function Fluid system The fluid system is located in the left side element of the gantry and is made up of the following elements: Low-pressure water distribution (1) Dosing pumps and cleaning agent containers (2) Pneumatic system (3) Peripheral control box (4) Heater/Freeze protection (w/o. Illustration) 1 2 3 4 2 Fig. 3-22: Fluid system New SoftWash 3-22 Chapter 3 - Structure and function NOTICE Each chemical system (Shampoo, foam, etc.) is colour coded, e.g. Shampoo = yellow. Low-pressure water distribution The low-pressure water distribution distributes the water which is supplied by the two inlets (Fresh water and process water) to the individual spray systems. It has a modular structure and varies depending on the configuration of the system. The illustration shows the maximum configuration of the water distribution. Different versions as well as the water inlets are described on the next pages. Pos. 1 2 3 Valve Y2 Y1 Y5/Y7 4 5 6 7 8 Y8 Y4 Y6 Function Brush wetting Pre-rinsing Wax care/ Extra Preservation Chemical pre-wash Foam pre-wash Post-rinsing Inlet process water Inlet fresh water Fig. 3-23: Low-pressure water distribution (Fresh and process water) New SoftWash 3-23 Chapter 3 - Structure and function The illustration below shows the different versions of the water distribution. 1a 1b 2a 2b 3a 3b 4 5 6a 6b 6c 7-11 12 = = = = = = = = = = = = = Brush wetting Brush wetting with dry-run protection Pre-rinsing Pre-rinsing with wheel washer Extra preservation Wax care Chemical pre-wash Foam pre-wash Post-rinsing with chemical drying agent Post-rinsing primary Post-rinsing secondary Suction lines Cleaned compressed air Fig. 3-24:Versions of low-pressure water distribution New SoftWash 3-24 Chapter 3 - Structure and function Water supply At systems with mixed water supply the inlet of fresh water and process water are separated. At systems without a process water system both inlets are supplied with fresh water. 1 = Water inlet 2 = Pressure gauge 3 = Too spray system 4 = Outlet freeze protection 5 = Cleaning agent Fig. 3-25: Water supply New SoftWash 3-25 Chapter 3 - Structure and function NOTICE Water and air pressure have been optimally adjusted by WashTec Service during initial commissioning of the system. A modification of the settings may cause a deterioration of the washing result. New SoftWash 3-26 Chapter 3 - Structure and function Dosing pumps and Cleaning containers The electrically controlled dosing pumps (1) draw the cleaning and care products from the relevant cleaning agent containers (2) and feed them directly into the relevant distributor. 1 = Dosing pumps 2 = Cleaning agent containers Fig. 3-26: Dosing pumps and cleaning agent containers NOTICE If a cleaning agent container has been emptied completely, the dosing pump has to be refilled with the cleaning agent. ) New SoftWash Fill the dosing pump as described in chapter 6 „"Operation and settings"). 3-27 Chapter 3 - Structure and function Pneumatic system The pneumatic system controls the pneumatic components in the system. The compressed air supply can be opened and closed by using a ball valve (1). A filter pressure regulator (2) is located behind the ball valve. The filter pressure regulator cleans the compressed air from destructive particles and regulates the compressed air which is provided by the customer to the main pressure of approx. 6 bar. Besides the main pressure the system is using reduced air pressure for several tasks. These are adjusted to the required value by additional pressure regulators. Set value main pressure: approx. 6 bar Pressure regulator wheel washer: Set value approx. 3 bar Pressure regulator foam: Set value approx. 2,5 bar 1 = Ball valve 2 = Filter pressure regulator 3 = Pressure regulator wheel washer 4 = Pressure regulator foam 5 = Pneumatic valves Fig. 3-27: Pneumatic system New SoftWash 3-28 Chapter 3 - Structure and function CAUTION The air pressure has been optimally adjusted by WashTec Service during initial commissioning of the system. A modification of the settings may cause malfunctions of the system and thus damage the system and/or vehicles. Pneumatic valves The pneumatic valves are used to control all pneumatic components and devices. 1 = Manual operation switches Fig. 3-28: Pneumatic valves NOTICE The Manual operation switches (1) must be set to position 0 when the system is operated in automatic mode. There is a risk of injury if the manual operation switches are in position 1. Pneumatic units may suddenly be moved. Pay attention that no person is close to devices which are manually actuated by the pneumatic valve. New SoftWash 3-29 Chapter 3 - Structure and function Peripheral control box A peripheral control box is used to control the components in the resource cabinet. A CAN-Bus is used for data exchange with the main controller. A pressure button for manual filling of the dosing pumps is located on the front of the peripheral control box (see chapter 6.2). Fig. 3-29: Peripheral control box New SoftWash 3-30 Chapter 3 - Structure and function Heater The heater in the resource cabinet guarantees a safe operation during low temperatures. The temperature sensor is located in the resource cabinet as well. The heater is switched on as soon as the current temperature drops more than 2° below the set temperature. Fig. 3-30: Heater Setting of the temperature is done in the service program 0370 (see chapter 9.1.5. „Service programs“). New SoftWash 3-31 Chapter 3 - Structure and function Freeze protection The freeze protection device provides protection from frost damage to the water system for roll-over wash systems that are installed outdoors or which are not protected from frost. A temperature sensor controls the temperature. If the temperature drops 2° below the temperature set-point, the executing wash program will first be finished. Afterwards the freeze protection program will be started to drain all spray systems. Setting of the temperature is done in the service program 0371 (see chapter 9.1.5. „Service programs“). The roll-over wash system cannot execute a wash program while the freeze protection program is running. NOTICE In order for the freeze protection device to function correctly, the water supply must be installed in a room that is frost protected. All supply lines must be laid with frost protection. The freeze protection program does not work when the main switch or the compressed air are switched off or if the emergency-off button is pressed. This may cause damage to the system. New SoftWash 3-32 Chapter 3 - Structure and function Spray system Depending on the configuration your roll-over wash system may be equipped with a varying number of spray heads and spray pipes. The spray pipes are connected with hoses to the water distribution. 1a = 1b = 2= 3= Pre-rinsing Post-rinsing primary Post-rinsing secondary Brusch wetting Fig. 3-31: Spray system - standard New SoftWash 3-33 Chapter 3 - Structure and function Pre-and post-rinsing (1+2) The pre-rinse is used to remove most of the dirt from the vehicle. Either recycled or fresh water is used for this purpose, depending on the roll-over wash system model. NOTICE The water supply for the wheel washer will be switched on and off together with the pre-rinsing. The purpose of the post-rinse is to rinse off the vehicle with fresh water after it has been washed. A chemical drying aid can also be applied during this stage. NOTICE Optionally the system may be equipped with a secondary post-rinsing. NOTICE The water pressure for pre-rinsing can be adjusted at a separate ball valve. Do not reduce the flowing pressure at the fresh water inlet because this will also change the mixing ratio of the foam system. Brush wetting (3) The purpose of the brush wetting system is to keep the brushes covered with water during the washing stage. In the first washing stage they are supplied with water and shampoo and in the second washing stage just with water. Either fresh or recycled water may be used for this purpose, depending on the rollover wash system model. New SoftWash 3-34 Chapter 3 - Structure and function 3.5. Additional equipment - spray system 1 = Brush wetting 2 = Foam Pre-wash 3 = Side high-pressure 4 = Chemical pre-wash 5 = Wax/preservation 6 = Post-rinsing secondary 7 = Rim cleaner Fig. 3-32: Optional spray system The illustration shows the maximum system configuration without side drier. New SoftWash 3-35 Chapter 3 - Structure and function Your system may deviate from the illustration depending on the actual configuration. The position of the spray pipes remains thereby unchanged. The illustration below shows a spray system without side high-pressure and wax/preservation. Fig. 3-33: Reduced spray system Foam pre-wash (2) The foam device sprays a dirt- softening, highly foaming shampoo onto the surface of the vehicle. Chemical pre-wash (4) The chemical pre-wash sprays a dirt-softening chemical solution onto the surface of the vehicle during a separate stage. NOTICE New SoftWash The best cleaning result is achieved with a liquid and fine blowy foam which flows down the vehicle. Dry foam does not absorb the dirt and has only a limited cleaning effect (see chapter 6 „Operation and settings“ for more information). 3-36 Chapter 3 - Structure and function Secondary post-rinsing (6) A secondary post-rinsing may be installed in short halls (less than 8750 mm hall length). Procedure When the gantry is moved backwards first the primary post-rinsing is turned on. While the gantry moves towards the vehicle front the primary postrinsing is turned off and the secondary post-rinsing is turned on. Fig. 3-34: Spray system – post-rinsing New SoftWash 3-37 Chapter 3 - Structure and function Rim spraying device (7) The rim spraying device applies a rim cleaner through a nozzle (7) as soon as the wheel is detected by the light barrier. A separate rim cleaner pump (8) sucks the rim cleaner out of the cleaning agent container and leads it directly to the rim spray nozzle where it is applied undiluted. Information about setting and bleeding the rim cleaner pump can be found in chapter 6 „Operation and settings“. 7 = Rim spray nozzle 8 = Rim cleaner pump Fig. 3-35: Rim spraying device New SoftWash 3-38 Chapter 3 - Structure and function The system may be equipped with four different highpressure systems: Side high-pressure (3) The side high-pressure device cleans heavy soiling off the sides of the vehicle with high water pressure. Either fresh or recycled water may be used for this purpose, depending on the roll-over wash system model. Side high-pressure with high-pressure wheel washer The high-pressure wheel washer is always combined with four additional spray nozzles (see illustration on the right). Side and wheel will be cleaned with high pressure. All-around high pressure – level controlled Fig. 3-36: Side-high pressure with high-pressure wheel washer – 16/40 bars The all-around high pressure system cleans the entire vehicle with high water pressure from heavy soiling. Either fresh or recycled water may be used for this purpose, depending on the roll-over wash system model. The level control operates depending on the height of the vehicle. The roof nozzle is fastened to the integral drier. Additionally a light barrier is installed in the side elements in a height of approx. 1,6 m (Transmitter in one side, receiver in the other side). While the gantry moves forward, e.g. during chemical pre-wash or foam wash, the light barrier monitors if the vehicle is higher than the position of the light barrier (approx. 1,6 m). If the vehicle is higher than 1,6 m the roof nozzle remains in the upper home position during highpressure cleaning (gantry moves backward). If the vehicle is lower the roof spray nozzle is lowered to the level of the light barrier. New SoftWash 3-39 Chapter 3 - Structure and function Contour controlled all-around high pressure The contour controlled all-around high pressure system cleans the entire vehicle with high water pressure from heavy soiling. Either fresh or recycled water may be used for this purpose, depending on the roll-over wash system model. This version uses a roof drier with an attached light barrier system (see chapter 3.2. „Additional equipment - mechanical“). The roof spray nozzle is fastened to the roof drier. The contour control operates depending on the contour of the vehicle. While the gantry moves forward, e.g. during chemical pre-wash or foam wash, the light barrier monitors the contour of the vehicle and stores this information. While the gantry moves backward the vehicle will be cleaned with high pressure. The roof drier follows the contour of the vehicle. For all high-pressure cleaning systems: A separate pump station supplies the necessary amount of water at the correct pressure for the highpressure cleaning system (see Chapter 10 "Additional equipment").. New SoftWash 3-40 Chapter 3 - Structure and function Preservation system (5) The preservation system applies preservative (e.g. foam wax) to the vehicle in a separate stage. Osmosis The osmosis device is responsible for drying the vehicle without water spots in situations where a drier system cannot be used. The osmosis water is used in place of fresh water in the post-rinse stage. New SoftWash 3-41 Chapter 3 - Structure and function 3.6. Control system and electronics The control system is installed in control cabinet. 1 = Microprocessor control 2 = Transformer 3 = Circuit breaker 4 = Fuses 5 = Motor protection switches 6 = Conductors 7 = Frequency converters Fig. 3-37: Controller New SoftWash 3-42 Chapter 3 - Structure and function When the control cabinet door is opened, there is a risk of electrical shock injury when the system is switched on. Switch the power off at the main switch and close the compressed air supply before you open the control cabinet door. If the door must be opened with the system switched on in order to carry out certain maintenance, testing and adjusting work observe the following information: This may only be done by authorized, qualified and fully instructed personnel who have received instruction from WashTec Service about potential dangers. Do not touch any parts and only carry out the work described in this operating manual. Microprocessor control The microprocessor control system is the central intelligence unit of the roll-over wash system. It controls all devices according to the selected wash program. Motor protection switches The motor protection switches have an integrated fuse, which can be reinserted after failure. NOTICE New SoftWash The circuit diagram is located in door of the control cabinet. 3-43 Chapter 3 - Structure and function 3.7. Special equipment Depending on the model, your roll-over wash system may have an additional fresh water supply an under-body-wash a rolling shutter door control system … You can find a detailed description of all the above in Chapter 10 "Special equipment". New SoftWash 3-44 Chapter 4 – Commissioning/dismantling/ conversion/ transport/assembly 4. Commissioning/assembly/dismantling/conversion/disposal 4.1. Commissioning This chapter describes all the stages which must be worked through in order to put the roll-over wash system into operation correctly. ) Cleaning work ) Clean the floor of the building. Take particular care over the area around the floor rails. Clean the transmitters and receivers of all the light barriers. Fig. 4-1: Position of the light barriers for traffic lights and wheel washer ) ) New SoftWash Remove all obstacles, such as cleaning equipment, buckets, hoses, etc. from the building. Only in cold weather: remove any frozen areas from the entrance and exit areas of the building. 4-1 Chapter 4 – Commissioning/dismantling/ conversion/ transport/assembly Switching on ) ) Open the air and water connections. Switch the system on at the main switch. ⇒ The roll-over wash system carries out a self-test which last about 10 seconds. ) Cleaning agents ) ) CAUTION Note the message displayed on the operating unit. Check the levels in the chemical storage containers. If necessary, fill up the containers with cleaning agent, pre-diluted as recommended by the supplier of the cleaning agents. If a chemical storage container has been emptied completely, all air must be bled out of the supply lead (see Chapter 6 "Operation and settings"). The wrong selection of cleaning agents may cause poor cleaning results and damages to the vehicle and the system. The selection of the best suited cleaning agents depends among other things on the water quality and water hardness. Discuss with your cleaning agent supplier which cleaning agents are best suited for your system. New SoftWash 4-2 Chapter 4 – Commissioning/dismantling/ conversion/ transport/assembly Highly inflammable and toxic cleaning agents may cause damage to machinery and injury to persons. Such cleaning agents may not be used because of the risk for fire hazard and health. Caution should be exercised in handling all chemical compounds. Some car wash chemicals are somewhat caustic and should not be permitted to come in direct contact with bare skins or eyes. ) ) ) ) New SoftWash Always refer to product MSDS Sheets for proper precautions. Whenever handling such chemicals wear proper protective rubber gloves, boots and a face shield. After refilling containers, check the filters in the suction hoses to ensure they function correctly, and clean them if necessary. Carefully close the door of the fluid technical system cabinet and remove the socket wrench to prevent the door being opened without permission. 4-3 Chapter 4 – Commissioning/dismantling/ conversion/ transport/assembly Safety devices A fault in the safety devices (emergency-off function, safety shut-down and safety switches) can cause serious accidents and/or damage to vehicles. For this reason, all safety devices must be checked every day to ensure that they function correctly. If any safety device is faulty, please inform WashTec Service immediately. On no account may the roll-over wash system be put into operation. We recommend to each operating company that the performed tests with the test result as well as name, date and signature of the testing person should be documented in written form. Proceed with the following steps to check the safety devices: Moving the wash gantry Check emergency-off function The test result of a function test is always displayed on the operating unit. Therefore it is recommended to move the wash gantry close to the operating unit to easily read off the test result. Use the function keys as described in chapter 9.1.4. for moving the wash gantry. ) Press the emergency-off button. ⇒ The display in the operating unit shows „Emergency Off“ ) ) New SoftWash Release the emergency-off button. Acknowledge the message. 4-4 Chapter 4 – Commissioning/dismantling/ conversion/ transport/assembly Checking the safety shutdown If your roll-over wash system is equipped with additional safety shutdown features, these must be checked before the system is started up. ) Press strongly against one of the cabinet doors. ⇒ The display in the operating unit shows „Emergency stop actuated internally“. ⇒ The message remains in the display after releasing the door. ) ) ) Acknowledge the message. Repeat the above steps for the other door and for the covers on the rear side. Press frontal against the lateral splash guard. ⇒ The display in the operating unit shows „Emergency stop actuated internally“. ⇒ The message remains in the display after releasing the splash guard. ) ) New SoftWash Acknowledge the message. Repeat the above steps for the splash guard on the other side. 4-5 Chapter 4 – Commissioning/dismantling/ conversion/ transport/assembly Checking the safety ring switch ) Press the safety ring switch upwards. ⇒ The display in the operating unit shows „Safety ring“. ⇒ The message remains in the display after releasing the ring switch. ) Checking safety switch for side brushes ) Acknowledge the message. Push one of the side brushes strongly backward. ⇒ The display in the operating unit shows „Safety strip actuated“. ⇒ The message remains in the display after releasing the side brush. ) ) New SoftWash Acknowledge the message. Repeat the above steps for the other side brush. 4-6 Chapter 4 – Commissioning/dismantling/ conversion/ transport/assembly Checking the traffic lights If your roll-over wash system is fitted with a set of traffic lights to help position vehicles, they must be tested before the system is started up, by covering the traffic-light light barriers. If they function correctly, the following symbols should appear on the traffic lights: ) Both light barriers free: ⇒ The traffic lights show "FORWARD" . ) Cover light barrier 1. ⇒ The traffic lights show "STOP". ) Cover light barriers 1 and 2. ⇒ The traffic lights show "REVERSE". Fig. 4-2: Testing the traffic light In the event of malfunctions, see Chapter 6 "Operation and settings". The roll-over wash system is now ready for operation. New SoftWash 4-7 Chapter 4 – Commissioning/dismantling/ conversion/ transport/assembly 4.2. Dismantling/conversion/transport/ assembly We can accept no liability for damage caused by dismantling, transportation or reconstruction or by conversion work carried out on the roll-over wash system. This applies also for disposal of the roll-over wash system. Dismantling, transport and reconstruction or conversion of the roll-over wash system calls for detailed specialist knowledge We recommend you have this work carried out by WashTec Service. 4.3. Disposal Disposal of the roll-over wash system We recommend that you have the roll-over wash system dismantled for subsequent disposal/scrap by WashTec Service or by another company with suitable experience in your area. You must comply with the applicable local waste disposal regulations and legislation when disposing of the system. Disposing of brushes, coverings and waste water New SoftWash You must observe the applicable local waste disposal regulations and legislation when disposing brushes, coverings and waste water. 4-8 Chapter 5 - Washing operation 5. Washing operation This chapter contains important safety instructions for washing operation and describes all the stages which must be worked through when washing vehicles. NOTICE This information is intended for the wash system operator and for car wash customers. The car wash customer must be fully informed on instruction notices. Instructions which are intended only for the wash system operator are marked separately. New SoftWash 5-1 Chapter 5 - Washing operation 5.1. Safety instructions CAUTION New SoftWash If the roll-over wash system is used for vehicles with certain features, this may result in damage to the vehicle. Vehicles which are not suitable for the dimensions of the roll-over wash system (see Chapter 11 "Technical specifications") may not be washed. New or re-sprayed vehicles on which the paintwork is not yet fully hardened must not be washed. Vehicles with special attachments or mounted elements (outside spare wheels, roof railing, taxi signs or similar) may only be washed after inspection and with the approval of the operator. Damaged vehicles may only be washed after inspection and with the approval of the operator. For convertibles or semi-covered vehicles, the instructions/requirements for the use of car washes provided in the vehicle manual must be observed. Vehicles which vary heavily from the standard version such as vehicles with a low or high ground clearance, may only be washed after inspection and with the approval of the operator. The roof brush has to be manually controlled for pick-ups, i.e. vehicles with an open loading area, and vehicles with unfavourable designed rear spoilers. 5-2 Chapter 5 - Washing operation NOTICE Information only for the operator WashTec can accept no responsibility for damage to vehicles where one or more of the points listed above are applicable. If these vehicles are washed irrespective of the above points, this must be done on the good judgement of the operator and will be his responsibility. The following points must be observed here in particular: For wash systems which are operated in selfservice mode, e.g. the operator or his personnel are not present during the wash cycle, it is highly recommended to install a video surveillance for inspecting every vehicle before the vehicle is cleaned. Special attachments or mounted elements which cannot be removed must be overridden manually with the relevant control buttons on the operating unit (see Chapter 9 "Operating units"). For vehicles with wheel claddings and vehicles with low or high ground clearance, the wheel washer must be controlled manually (see Chapter 9 "Operating units"). For vehicles with a low ground clearance, there is a risk that the vehicle will get stuck if a nonrecessed under-body wash or car shifting device is installed. NOTICE Information only for the operator New SoftWash The operating units offer various possibilities for starting the wash program and controlling it manually (see Chapter 9 "Operating units"). 5-3 Chapter 5 - Washing operation 5.2. Preparing the vehicle In order to prevent damage to vehicles, the following preparations must be made before washing. These preparations can be made either by the wash plant operator or the customer. The car wash customer must be provided with information about these preparatory steps on instruction notices. ) ) ) ) ) ) ) ) ) New SoftWash Remove aerials or push them in. Switch off radios if the vehicle is equipped with an automatic aerial. Fold in the mirrors if possible. Remove any extra mirrors. Check that additional lights or headlights are securely attached. Lock the vehicle before the wash cycle starts (including trunk or tailgate). Switch windshield wipers to their home position. Remove all loose parts, such as extra parts attached to windshield wipers or similar objects. Close the sliding roof or the roof (convertibles). 5-4 Chapter 5 - Washing operation 5.3. Car wash procedure The car wash procedure depends on the selected start setting (see chapter 9.1.5. menu 36 Automatic start), on the setting of the entrance/exit doors (see chapter 9.1.5. menu 33 door functions) and whether the driver remains in the vehicle during the wash cycle or waits outside of the wash building. Three typical car wash procedures are described below. Operation mode 1 Automatic start is switched off, the entrance door is open and the driver waits outside of the wash building. ) ) ⇒ ) ) ) ) ⇒ ⇒ ⇒ ) New SoftWash Drive the vehicle forward into the wash system so that there is enough space on each side. Position the vehicle correctly The traffic light shows “Stop”. Turn off the engine, put the car in PARK (for a standard car put the car in 1st gear) and apply the parking brake. Close the windows, leave the vehicle and lock all vehicle doors (including trunk or tailgate). Leave the car wash building. Select a wash program (by card or by input at the operating unit). The wash program will be started automatically. When the wash cycle is finished, the roll-over wash system returns to its home position. The traffic light shows the drive-out direction. Enter the vehicle and drive the car out of the wash building. 5-5 Chapter 5 - Washing operation Operation mode 2 Automatic start is switched off, the entrance door is closed and the driver waits outside of the wash building. ) ⇒ ) ) ⇒ ) ) ) ) ⇒ ⇒ ⇒ ) CAUTION New SoftWash Select a wash program (by card or by input at the operating unit). The entrance door opens Drive the vehicle forward into the wash system so that there is enough space on each side. Position the vehicle correctly the traffic light shows “Stop”. Turn off the engine, put the car in PARK (for a standard car put the car in 1st gear) and apply the parking brake. Close the windows, leave the vehicle and lock all vehicle doors (including trunk or tailgate). Leave the car wash building. Start the wash program with the button <<START>>. The vehicle will be cleaned. When the wash cycle is finished, the roll-over wash system returns to its home position. The traffic light shows the drive-out direction. Enter vehicle and drive the car out of the wash building. If problems occur or there is any danger, press the emergency-off button and inform the wash system operator. 5-6 Chapter 5 - Washing operation Operation mode 3 Automatic start is switched on, the entrance door is closed and the driver remains in the vehicle during the wash cycle. ) ⇒ ) ) ) ⇒ ) ) Select a wash program (by card or by input at the operating unit). The entrance door opens Close windows and doors and lock all doors from the inside. Drive the vehicle forward into the wash system so that there is enough space on each side. Position the vehicle correctly the traffic light shows “Stop”. Turn off the engine, put the car in PARK (for a standard car put the car in 1st gear) and apply the parking brake. ⇒ Remain seated in the vehicle. The wash cycle starts. The vehicle will now be washed. When the wash cycle is finished, the roll-over wash system returns to its home position. The traffic light shows the drive-out direction. ) Drive the vehicle out of the car wash building. ⇒ ⇒ ⇒ Leaving the vehicle can cause serious accidents. Inform the customer that he should never leave the car and that he should wait for instructions. For wash systems which are operated in selfservice mode, e.g. the operator or his personnel are not present during the wash cycle, it is highly recommended to install a video surveillance for controlling the wash area. New SoftWash 5-7 Chapter 5 - Washing operation Information only for the operator 5.4. Procedure for emergency stops and malfunctions ) ) No damage to the vehicle or the roll-over wash system ) ) ) ) ) ) Damage to vehicle ) ) ) ) ) ) New SoftWash Ascertain the reason for the emergency-stop/ malfunction. Remedy the cause if possible. Release the emergency-off button. Acknowledge the message. Press the button or <<OK>> if the wash cycle should be continued. ⇒ The wash cycle will be continued. Press the button <<Cancel>> if the wash cycle should be aborted. Press the button <<Home position>> and than <<OK>> ⇒ The system moves automatically in its home position. Start the wash program again. Determine the damage and its cause. Make a note of the damage and its cause in a damage report. You can find an example in the appendix of these operating instructions. The damage report must be signed by the wash system operator and by the car wash customer. Check if the roll-over wash system can be moved in its home position without further damage to the vehicle. If this is not possible, inform WashTec Service. Otherwise proceed with the following steps. Release the emergency-off button. Acknowledge the message. 5-8 Chapter 5 - Washing operation ) ) ) ) ) Damage to the roll-over wash system ) ) ) ) ) Press the button << Cancel >>. Press the button <<Home position>> and than <<OK>> ⇒ The system moves automatically in its home position. Watch the procedure and press immediately the emergency-off button if the movement may cause further damage. Remove the vehicle from the roll-over wash system and initiate steps for legal settlement of damage claims. Inform WashTec Service. Check if the roll-over wash system can be moved in its home position without further damage to the system. If this is not possible, inform WashTec Service. Otherwise proceed with the following steps. Acknowledge the message. Press the button << Cancel >>. Press the button <<Home position>> or <<OK>> at the operating unit. ⇒ The system moves automatically in its home position. ) ) ) New SoftWash Watch the procedure and press immediately the emergency-off button if the movement may cause further damage. Remove the vehicle from the roll-over wash system. Inform WashTec Service. 5-9 Chapter 6 – Settings and checking 6. Settings and checking 6.1. Adjusting the compressed air Main pressure The filter pressure regulator cleans the compressed air from destructive particles and regulates the main pressure. The main pressure is used to move the pneumatic components into operational readiness, i.e. moving the wheel wash brush towards the vehicle. Set-value main pressure: approx. 6 bar. The compressed air is adjusted at the regulator knob (3). ) ) 1 = Compressed air inlet 2 = Compressed air outlet 3 = Regulator knob 4 = Condensation container 6 = Drain valve 7 = Ball valve Fig. 6-1: Filter pressure regulator ) Release the regulator by pulling up the regulator knob. Set the required pressure by turning the regulator knob to the right or left. The adjustment range is between 0.6 and 10 bar. Secure the regulator by pushing the regulator knob back down again. The compressed air may contain condensation water which settles in the condensation container (4). The draining is carried out automatically by the drain valve (6). New SoftWash 6-1 Chapter 6 – Settings and checking Air pressure wheel washer A reduced air pressure is used to extend the wheel washer towards the wheel. This pressure is adjusted at the pressure regulator 1. Pressure regulator for wheel washer: Set value 3 bar Fig. 6-2: Pressure regulator The air pressure is adjusted at the regulator knob. ) ) ) New SoftWash Release the regulator by pulling the knob downwards. Set the required pressure by turning the knob to the right or to the left. Secure the regulator by pushing the knob upwards. 6-2 Chapter 6 – Settings and checking Air pressure foam generator NOTICE The air pressure for the foam reactors can be read off at compressed air pressure gauges (2). The air pressure can be adjusted at the pressure regulator. The optimum air pressure depends essentially from the chemical cleaning agents used in the system and has been optimally adjusted by WashTec Service during initial commissioning of the system. A modification of the settings may cause a deterioration of the washing or preservation result. It is recommended that any changes should only be done by WashTec Service or the cleaning agent supplier with appropriate experience. NOTICE Reading and setting of the air pressure is only possible when the spray system is switched on. ) ) ) ) Switch on the desired foam spray arch by using the menu 038 in the service program (see chapter 9.1.5 “Service program – program menus”). Read off the air pressure at the associated pressure gauge. Readjust the setting if necessary at the pressure regulator. Check the result The best cleaning result is achieved with a liquid and fine blowy foam which flows down the vehicle. ) New SoftWash Switch off the foam spray arch by using the menu 038 in the service program. 6-3 Chapter 6 - Operation and settings 6.2. Filling the dosing pumps If a cleaning agent container has been emptied completely, the dosing pump has to be refilled with the cleaning agent. ) ⇒ ) ⇒ ) NOTICE New SoftWash Press the button at the peripheral control box. The water pumps will be locked and the dosing pumps will be pulsed for max. 2 minutes. Pull out the plunger at the dosing pump. The dosing pump will be filled. When the dosing pump is sufficiently filled the plunger starts pulsing strongly. You may now release the plunger. Press the button at the peripheral control box again. ⇒ The chemical loading procedure is finished. ) Press any button at the operation terminal. ⇒ The water pumps will be unlocked. Please observe that the system is only ready for operation after all of the above described steps have been completed. 6-4 Chapter 6 - Operation and settings 6.3. Adjusting the dosing pump The volume of chemical agent required depends on the type of chemical agent. Please follow the detergent manufacturer's instructions. ) ) CAUTION Release the click-stop by pulling out the adjuster and adjust to the delivery volume recommended by the supplier. Push in the adjuster afterwards. If the lever at the dosing pump is activated water may leak from the pump. The lever should only be activated by WashTec service New SoftWash 6-5 Chapter 6 - Operation and settings 6.4. Bleeding the suction lines at the rim cleaner pump If a cleaning agent container has been emptied completely, all air must be bled out of the suction line after the container has been refilled. ) Switch on the dosing pump by using the menu 039 in the service program (see chapter 9.1.5 “Service program – program menus”). In condition „rim cleaner pump on“ the pump will be clocked, i.e. with each stroke cleaning agent is drawn out of the container. Leave the pump switched on until the cleaning agent sprays out of the nozzle. New SoftWash 6-6 Chapter 6 - Operation and settings 6.5. Adjust rim cleaner pump The volume of chemical agent required depends on the type of chemical agent. Please follow the detergent manufacturer's instructions. ) CAUTION Adjust the delivery volume at the adjusting screw (1) at the rim cleaner pump. The use of improper cleaning agents (such as cleaners that contain hydrochloric acid, sulphuric acid, formic acid, hydrofluoric acid or oxalic acid) and/or incorrect mixing proportions as well as use of undiluted cleaning agents may cause damage to the system or the vehicles. Use only products which are recommended for the automatic cleaning of vehicles. Never use the cleaning agents undiluted. Dilute the cleaning agents as specified by the supplier. For damages caused by using improper cleaning agents or incorrect mixing proportions no warranty claims will be accepted. NOTICE New SoftWash The maximum adjustable volume is 50 ml/stroke. 6-7 Chapter 6 - Operation and settings 6.6. Reading and setting the water flowing pressure The water flowing pressure can be read of at the pressure gauges (1) and can be adjusted at the pressure regulators (2). NOTICE The water flowing pressure has been optimally adjusted by WashTec Service during initial commissioning of the system. A modification of the settings may cause a deterioration of the washing result. A = Process water B = Fresh water 1 = Pressure gauge 2 = Pressure regulator Fig. 6-3: Water flowing pressure NOTICE New SoftWash Reading and adjusting of the flowing pressure is only possible when the spray system is switched on. 6-8 Chapter 6 - Operation and settings Water flow pressure for fresh water supply at systems without foam system ) ) ) Switch on the post-rinsing spray arch by using the menu 038 in the service program (see chapter 9.1.5 “Service program – program menus”). Read off the flowing pressure at the pressure gauge. Readjust the setting if necessary at the pressure regulator. Set value with spray system is switched on: 3 bar. ) Water flow pressure for fresh water supply at systems with foam system ) Switch off the spray arch by using the menu 038 in the service program. Regulate the air pressure at one foam reactor (e.g. foam wax) to zero. Important: Memorize setting. The flowing pressure may be adulterated with air pressure on the foam reactor (higher flowing pressure). ) ) ) Switch on the spray arch which is associated to the selected foam reactor, e.g. foam wax by using the service program. Read off the flowing pressure for the fresh water supply at the pressure gauge. Readjust the setting if necessary at the pressure regulator. Set value with spray system switched on: 3 bar ) ) New SoftWash Switch off the spray arch by using the menu 038 in the service program. Adjust the air pressure at the foam reactor to the previously set value. 6-9 Chapter 6 - Operation and settings Water flow pressure for process water supply ) ) ) Switch on the spray arches for pre-rinsing and brush wetting by using the menu 038 in the service program (see chapter 9.1.5 “Service program – program menus”). Read off the flowing pressure at the pressure gauge. Readjust the setting if necessary at the pressure regulator. Set value with spray system is switched on: 2,5 bar. ) New SoftWash Switch off the spray arch by using the menu 038 in the service program. 6-10 Chapter 7 - Maintenance and care 7. Maintenance and care 7.1. Safety instructions Maintenance, service and care work carried out on the machine while it is switched on can cause serious accidents. Always work through the following steps before starting maintenance, service and care work: ) ) ) ) ) CAUTION Switch off the electricity on the complete system Turn off the compressed air. Close the air supply at the ball valve located in the fluidtechnical system cabinet and turn the input pressure regulator to 0 bars. Switch off water supply. Secure the system to prevent it from being switched on unintentionally. Objects such as tools, cleaning supplies, etc which remain on or in the system after completion of maintenance or care work may cause damage to the system or vehicles. ) New SoftWash Move the roll-over wash system into an easily accessible position Makes sure that all objects are removed from the system after completion of maintenance or care work. 7-1 Chapter 7 - Maintenance and care 7.2. Care Regular care of the roll-over wash system contributes considerably to its smooth running and helps retain its value. The essential care programme includes: Lime-scale removal Cleaning of the system Cleaning of the floor Cleaning of the brushes Special treatment The care intervals depend on the water quality and the degree of soiling. Caution should be exercised in handling all chemical compounds. Some cleaning agents are somewhat caustic and should not be permitted to come in direct contact with bare skins or eyes. ) ) Always refer to product MSDS Sheets for proper precautions. Whenever handling such cleaning agents wear proper protective rubber gloves, antiskid boots and a face shield. Highly inflammable and toxic cleaning agents may cause damage to machinery and injury to persons. Such cleaning agents may not be used because of the risk for fire hazard and health. New SoftWash 7-2 Chapter 7 - Maintenance and care CAUTION Cleaning with high pressure can cause damage to the roll-over wash system. Do not use high pressure appliances for cleaning. New SoftWash 7-3 Chapter 7 - Maintenance and care 7.2.1. Lime-scale removal Sooner or later, depending on the water quality, limescale deposits will build up on the system. These must be removed carefully. ) ) ) ) CAUTION Only use products for lime-scale removal that are based on citric acid, amidosulphuric acid or phosphoric acid. Mix these with water in the proportions specified by the manufacturer. Use these products to remove the lime-scale deposits carefully from the system. Rinse the system down with plenty clear water. Use of other products, such as cleaners that contain hydrochloric acid, sulphuric acid, formic acid, hydrofluoric acid or oxalic acid or incorrect mixing proportions, can cause corrosion damage and damage to tiles and the surface of the system. For damages caused by using one of the cleaners stated above no warranty claims will be accepted. When removing lime-scale, avoid bringing the products into contact with plastic components, belts, sensors and cables. The acidic mixture can cause damage to these elements. Only for systems with a water recycling system ) ) New SoftWash After removing lime-scale, check the pH-value in the water recycling system. The pH-value must be between 7,0 and 8,0. Wash at least 30 vehicles with fresh water if the pH-value is below 7. 7-4 Chapter 7 - Maintenance and care 7.2.2. Cleaning of the system ) ) Clean the entire frame of the roll-over wash system. Clean the flat belts of the lifting system of roof brush and drier system. Only use pH-neutral cleaning and treatment products for this purpose (see below) or the cleaning agent that is also used for cleaning vehicles in the prescribed concentration. ) CAUTION Rinse the system down with plenty clear water. The permissible pH-value for the cleaning and treatment products used for cleaning the frame must be between 5 and 8 and must not contain any solvent. Any products with higher or lower values than these may fade colour and deteriorate material and will reduce the lifetime of the roll-over wash system. 7.2.3. Cleaning of the floor A slippery floor may cause severe accidents. ) New SoftWash Clean the floor as necessary. Remove all remaining detergent carefully to reduce the slip hazard. 7-5 Chapter 7 - Maintenance and care 7.2.4. Cleaning of the brushes The following description applies to the cleaning of original WashTec brushes. Water hardness The water hardness has substantial influence on the type of pollution. If the water hardness is higher than 10 °dH (German hardness) lime deposit may be causing the pollution in the first place. ) Ask your water supply company for the water hardness. The water hardness can be specified in hardness grade or by the content of calcium and magnesium. Furthermore the hardness grades are country specific. The information and conversion table below should assist you in the definition: Specification in hardness grades: French hardness: 1 °dH = 1,78 °fH 1 ° fH = 0,56 °dH English hardness: 1 °dH = 1,25 °eH 1 ° eH = 0,8 °dH Specification in calcium and magnesium ions: 10 °dH = 1,8 mmol/l Ca + Mg If calcium and magnesium are specified in mg/l use the conversion below: 1 mg/l calcium = 0,025 mmol/l calcium 1 mg/l magnesium = 0,043 mmol/l magnesium New SoftWash 7-6 Chapter 7 - Maintenance and care CAUTION Brushes may be damaged if they are cleaned too hot. Cleaning Brushes may also be damaged if cleaners are used which contain hydrochloric acid, sulphuric acid, formic acid, hydrofluoric acid or oxalic acid. Use only cold or lukewarm water (max 30°) for cleaning the brushes. Clean the brushes first with an acid cleaner (cleaner with a pH value < 7) if the water hardness is higher then 10 ° dH,. If the water hardness is lower you can start immediately with the alkaline cleaning (pH-value > 7). Acid cleaning ) ) ) Alkaline cleaning ) ) ) New SoftWash Spray the brushes with acid cleaner. Let the cleaner act on the brushes for approx. 10-15 min. Flush the cleaner out of the brushes with a strong jet and plenty of water. Spray the brushes with alkaline cleaner. Let the cleaner act on the brushes for approx. 10-15 min. Flush the cleaner out of the brushes with a strong jet and plenty of water. 7-7 Chapter 7 - Maintenance and care Final work ) ) New SoftWash Check the pH-value in the tank system after cleaning the brushes when the system is equipped with a water recycling system. The pH-value must be between 7,0 and 8,0. Wash at least 30 vehicles with fresh water if the pH-value is below 7. 7-8 Chapter 7 - Maintenance and care 7.2.5. Special treatment Rollover maintenance should be completed with the application of a protective coating. Treatment can be carried out with commercially available treatment products that are water repellent and form an invisible protective film. ) ) NOTICE Apply the treatment product to the frame of the roll-over wash system. Rub off any extra treatment product. Exercise caution when using treatment products. Always follow the instructions for use and safety instructions provided by the manufacturer. Do not spray into the roof or side brushes. New SoftWash 7-9 Chapter 7 - Maintenance and care 7.3. Maintenance Your roll-over wash system has been developed and manufactured so that a minimum of maintenance and care work is necessary. In order to ensure that constantly good washing results and the maximum system operating time are always achieved, you should carry out the following work on a regular basis. You can find a check-list for maintenance and care work in the appendix. Please use this list as a reminder when carrying out the necessary work. 7.3.1. Maintenance on demand Proceed with the following steps if the spray nozzles are clogged (insufficient spray pattern): ) NOTICE New SoftWash Remove and clean clogged or soiled nozzles. Exchange defect nozzles. Inform WashTec Service if the spray pattern is not sufficient after cleaning or exchanging the nozzles. 7-10 Chapter 7 - Maintenance and care 7.3.2. Weekly Maintenance Flat belt ) Energy chains ) System of hoses ) Low-pressure water distribution Clean the suction grids New SoftWash ) ) Check the belts for wear. If there is a high degree of wear, i.e. the belts are frayed or torn, please inform WashTec Service. Check all the energy chains including leads and cables (roof brush, dryer system, etc.) for wear and breakage. In the event of heavy wear or breakage, please inform WashTec Service. Check the system of hoses for loose connections and leaks. Tighten any loose connections. If you find any leaks, please inform WashTec Service. Check the low-pressure water distribution for damage and leakages. Please inform WashTec Service in case of damages or leakages. Clean the suction grids of the dryer blowers. 7-11 Chapter 7 - Maintenance and care 7.3.3. Monthly Maintenance Cleaning the agent containers ) ) ) Checking the brushes Track and guide rollers New SoftWash ) ) ) Rinse out the cleaning agent containers with water to remove any thickened chemicals. Fill each container with the correct cleaning agent. Bleed all air out of the supply hoses (see Chapter 6 "Operation and settings") Check the side and roof brushes and wheel washing brushes for wear. In the event of heavy wear, please inform WashTec Service. Clean all the track and guide rollers. Check all drive, track and guide rollers for wear. In the event of heavy wear, please inform WashTec Service. 7-12 Chapter 7 - Maintenance and care 7.3.4. Maintenance every six months Safety ring switch Slide bearings NOTICE ) ) ) NOTICE New SoftWash Spray the guide of the safety ring switch with the WashTec special-grease-spray. Spray all slide bearings with the WashTec special-grease-spray. Use the WashTec special-grease-spray with caution: do not spray into the wash brushes. ) Drives Check the safety ring switch for smooth operation. Ensure that all the drives are properly sealed. You can recognise leaks by traces of oil on the housing. If you detect any leaks, please inform WashTec Service. We recommend an inspection and maintenance by WashTec Service at six-monthly intervals. 7-13 Chapter 7 - Maintenance and care 7.3.5. Annual We recommend an annual inspection of the highpressure system and of the safety devices by WashTec Service. NOTICE Check whether your roll-over wash system is fitted with additional equipment. If this is the case, please also carry out the required maintenance and care work for these appliances. You can find a detailed description in Chapter 10 "Special equipment" or in the separate operating instructions of the appliances. New SoftWash 7-14 Chapter 8 - Error messages 8. Error messages The error messages will be shown in the display of the operating unit according to the pattern shown below: Part Failure Module name No. Type of failure DB1 S15 025 No travel pulses Pulse counter DD1 B4 039 Short circuit transmitter Light barrier front 061 Safety strip initiated Emergency-off CHK Cause of failure The module abbreviation shows the module where the failure has been occurred, for example DB1 = roof brush. The table on page 8-3 shows the assignment of the abbreviations to the modules. The part name indicates the part, e.g. S15 = switch no. 15. The failure number is a consecutive number which is associated to the type of failure. The type of failure is an indication for the failure, e.g. short circuit at the transmitter of a light barrier. The cause of failure indicates the failure source, e.g. light barrier front. The tables on page 8-5 to 8-9 show the different type of failures and causes of failures. New SoftWash 8-1 Chapter 8 - Error messages Modules, type of failure and cause of failure are combined by the controller and displayed on the operating unit. Example: Procedure at error messages Part Failure Module name No. Type of failure DB1 S14 002 Stop position not disconnected Upper limit switch DD1 S19 002 Stop position not disconnected Upper limit switch ) ) ) ) New SoftWash Cause of failure Read off the failure message on the operating unit and make notice of the message. Check, if you can remedy the failure on your own. Switch the roll-over wash system off (see safety instructions in chapter 7 „Maintenance and care“) and remedy the cause of the failure. Inform WashTec Service if you cannot remedy the failure on your own or if the failure reoccurs. 8-2 Chapter 8 - Error messages Table of modules – part 1 Abbreviation Module DB1 SB1 SB2 RAW DD1 UBW Y1 C2 C3 C4 C5 C6 C7 Y9 Y10 Y50 Y51 Y52 Y53 Y25 Y27 Y54 Y37 Y38 Y44 Y13 Y43 Y55 Y56 DOP PMP ANL M1 M2 M3 New SoftWash Roof brush 1 Side brush 1 Side brush 2 Wheel wash brush Roof nozzle 1 Under-body wash Pre-rinsing Brush wetting Foam CVW Wax Post-rinsing / CTH Special chemistry with foam Special chemistry without foam Hot water Cold water Chemical pre-wash bumper Chemical pre-wash lower side Chemical pre-wash roof front Chemical pre-wash roof rear High-pressure roof Rim cleaner Chemical pre-wash upper side High-pressure lower side Swivel pipes High-pressure upper side Osmosis High-pressure under-body wash Insect remover bumper Insect remover side Dosing pumps Water pumps System Machine 1 Machine 2 Machine 3 8-3 Chapter 8 - Error messages Table of modules – part 2 Abbreviation Module CHK FUP FUH FS1 FS2 WAB EFT AFT TTO KLG LED PVS RPD SER BED KFZ LS TST SOF New SoftWash Check, monitoring Frequency converter gantry Frequency converter lifting Frequency converter side brush 1 Frequency converter side brush 2 Vehicle moving device Entrance door Exit door Separation door Card reader unit LED display Peripheral distributor cabinet Real Power Device, Effective power measurement device Serial interfaces Operating unit, parallel input Vehicle position Light barrier module Test Special functions 8-4 Chapter 8 - Error messages Type of failure and cause of failure – Part 1 No. Type of failure Cause of failure 001 002 003 004 005 006 007 008 009 010 011 012 013 014 015 016 017 018 019 020 021 022 023 024 025 026 027 028 029 030 031 032 033 034 035 036 037 038 Cable or electronics End position keeps touched End position left by itself End position not reached Cable or electronics End position keeps touched End position left by itself End position not reached Cable or electronics End position keeps touched End position left by itself End position not reached Cable or electronics End position keeps touched End position left by itself End position not reached Cable or electronics End position keeps touched End position left by itself End position not reached Cable or electronics End position keeps touched End position left by itself End position not reached No position pulses Cable or electronics Actuated Cable or electronics Actuated Cable or electronics Actuated Cable or electronics Actuated Cable or electronics Actuated Cable or electronics Actuated Cable or electronics Limit switch, top Limit switch, top Limit switch, top Limit switch, top Limit switch, bottom Limit switch, bottom Limit switch, bottom Limit switch, bottom Limit switch, inside Limit switch, inside Limit switch, inside Limit switch, inside Limit switch, outside Limit switch, outside Limit switch, outside Limit switch, outside Limit switch, end of bay Limit switch, end of bay Limit switch, end of bay Limit switch, end of bay Limit switch, begin of bay Limit switch, begin of bay Limit switch, begin of bay Limit switch, begin of bay Pulse counter Pulse counter Personnel protection Personnel protection Safety switch, brush Safety switch, brush Belt monitor Belt monitor Anti collision switch Anti collision switch Safety switch Safety switch Safety device Safety device New SoftWash 8-5 Chapter 8 - Error messages Type of failure and cause of failure – Part 2 No. Type of failure Cause of failure 039 040 041 042 043 044 045 046 047 048 049 050 051 052 053 054 055 056 057 058 059 060 061 062 063 064 065 066 067 068 069 070 071 072 073 074 075 076 Short-circuit, transmitter Wire break, transmitter Short-circuit, receiver Wire break, receiver Power limit reached Short-circuit, transmitter Wire break, transmitter Short-circuit, receiver Wire break, receiver Power limit reached Short-circuit, transmitter Wire break, transmitter Short-circuit, receiver Wire break, receiver Power limit reached Short-circuit, transmitter Wire break, transmitter Short-circuit, receiver Wire break, receiver Power limit reached Actuated Actuated internally Safety strip activated No voltage No voltage No voltage No voltage No voltage Fuse tripped Fuse tripped Fuse tripped Cable or electronics Power limit reached Short-circuit, overload No measured value Tank empty Tank empty Tank empty Light barrier, front Light barrier, front Light barrier, front Light barrier, front Light barrier, front Light barrier, center Light barrier, center Light barrier, center Light barrier, center Light barrier, center Light barrier, rear Light barrier, rear Light barrier, rear Light barrier, rear Light barrier, rear Light barrier Light barrier Light barrier Light barrier Light barrier Emergency cut off Emergency cut off Emergency cut off X11-X13 (FC and inputs) X2, X3 (24VDC outputs) X5, X6 (24VDC outputs) X7 (24VDC outputs) Px, control voltage Motor protection, rotation Motor protection, feed Motor protection, blower Power measurement Power measurement Power measurement Power measurement Shampoo Drying aid Wax New SoftWash 8-6 Chapter 8 - Error messages Type of failure and cause of failure – Part 3 No. Type of failure Cause of failure 077 078 079 080 081 082 083 084 085 086 087 088 089 090 091 092 093 094 095 096 097 098 099 100 101 102 103 104 105 106 107 108 109 110 Tank empty Tank empty Tank empty Dry running protection Dry running protection Dry running protection Dry running protection Dry running protection Frost protection activated Fuse tripped Fuse tripped System switched on Factory settings loaded Data error: copy loaded Emergency copy loaded Config. update loaded Counter deleted Data exchange with PC Cannot initialize SMC Data backup deviation Data backup Parameter Read/write error SMC Hardware configuration error Communication interrupted Card memory full Remaining value too low Card invalid Power limit reached Short-circuit, overload Short-circuit, overload Short-circuit, overload Short-circuit, overload Short-circuit, overload Short-circuit, overload Foam Special chemical 1 Special chemical 2 System Fresh water pump Recycled water pump High pressure pump Osmosis pump Plant Pumps New SoftWash Parameter Parameter Parameter Parameter Frequency converter Output, mains for FC Output, lift motor brake Output, forwards rotation Output, backwards rotation Output, feed in Output, feed out 8-7 Chapter 8 - Error messages Type of failure and cause of failure – Part 4 No. Type of failure Cause of failure 111 112 113 114 115 116 117 118 119 120 121 122 123 124 125 126 127 128 129 130 131 132 133 134 135 136 137 138 139 140 141 142 143 144 Short-circuit, overload Short-circuit, overload Short-circuit, overload Short-circuit, overload Short-circuit, overload Short-circuit, overload Short-circuit, overload Short-circuit, overload Short-circuit, overload Short-circuit, overload Short-circuit, overload Short-circuit, overload No portal movement for 1 min. Both limit switches actuated No voltage/internal fault Factory settings loaded Data error: copy loaded Emergency copy loaded Data backup deviation Data backup Factory settings loaded Data error: copy loaded Emergency copy loaded Data backup deviation Data backup Card Intake/outlet faulty Card Locked Card Wrong station number Card Wrong price zone Card Expired Card R/W error Card Not inserted Service interval elapsed Data exchange with PC Output, fix brushes Output, lift brushes Output, FC at lift motor Output, brush watering Output, high-pressure valve Output, blower 1 Output, blower 2 Output, fill boiler Output, boiler heating Output, drain fresh water Output, drain recycled water Output, drain boiler New SoftWash Light barrier Counter Counter Counter Counter Counter Program sequence table Program sequence table Program sequence table Program sequence table Program sequence table SMS parameters changed 8-8 Chapter 8 - Error messages Type of failure and cause of failure – Part 5 No. Type of failure Cause of failure 145 146 147 148 149 150 151 152 153 154 155 156 157 158 159 160 161 162 163 164 165 166 167 168 169 Short-circuit, overload System ready for operation Actuated unexpectedly Actuated unexpectedly Switched on Program invalid Cable or electronics End position keeps touched End position left by itself End position not reached Fuse tripped Fuse tripped Fuse tripped Fuse tripped Completed Tank empty Report counters File not existing Slowing down to large No type support Data back-up actuated Code not valid Factory settings loaded Data error copy loaded Limit switch, clock cycle New SoftWash Limit switch, top Limit switch, hall begin Service program Limit switch, initial position Limit switch, initial position Limit switch, initial position Limit switch, initial position Fresh water pump Recycled water pump High-pressure pump Osmosis pump Self test Extra treatment 3 Language Lift motor SMC Program Light barrier WRAS system WRAS system WRAS system 8-9 Chapter 9 - Operating units 9. Operating units The roll-over wash system can be operated, i.e. starting the wash programs and making adjustments, with various different operating units. The roll-over wash system is always equipped with the operating terminal CP1. Wash programs can be started from the operating terminal by pressing a program button or by entering a code. The optional card reader may be used to start wash programs with transponder cards. Both units are described in this chapter. Fig. 9.1: Operating terminal CP1 with and without card reader New SoftWash 9-1 Chapter 9 - Operating units Instead of the optional card reader other card readers may be installed from which wash programs can be started with punched-cards, magnetical-cards or transponder-cards. These card readers are described in separate operating instructions. NOTICE Important information for systems with other card readers! Several functions such as the start of wash programs over the key pad or the manual operation of machine components over the function keys can be executed from the operating terminal CP1 as well as from the card readers. It is also possible that certain functions may not be executed at all from the card reader. It is therefore recommended, to execute those functions only from the operating terminal CP1. Check which type of operating unit is used in your system and turn to the relevant section or to the individual operating instructions to continue. Operating terminal CP1.................................. Operating terminal CP1 with card reader....... New SoftWash 9-3 9-79 9-2 Chapter 9 - Operating units 9.1. Operating terminal CP1 9.1.1. Overview The operating terminal is used to control the wash system. It is installed in a plastic housing which can be wall-mounted or rack-mounted. This chapter contains the following information: Starting up the operating terminal.................. Starting wash programs................................. Manual operation with control buttons............. Service programs............................................. 9-4 9-4 9-7 9-10 1 = Display 2 = Numeric keys 3 = Control buttons 4 = Special function buttons 5 = Function buttons 6 = Navigation buttons 7 = Emergency-Off button Fig. 9-2: Operating terminal - front view New SoftWash 9-3 Chapter 9 - Operating units 9.1.2. Starting up the operating terminal The operating terminal is started automatically when the roll-over wash system is switched on at the main switch. Depending on the operation mode, the display may show the following messages: Drive in vehicle or Select program or Please insert card 9.1.3. Starting wash programs Wash programs may be started by entering a program number or a program code (code operation mode). In Code operation mode the customer receives at purchase a ticket with an access code. The wash procedure is started by entering the access code at the operating terminal. NOTICE New SoftWash Please note that in code operation mode the program selection has to switched-off (see menu 0361 in chapter 9.1.5). Otherwise the operating terminal takes the data entry as a program number. 9-4 Chapter 9 - Operating units The further steps depend on the operation mode and the position of the vehicle. Operation mode 1 The driver drives into the wash building, positions the vehicle, leaves the vehicle, starts the wash program and waits outside the building. Procedure ) ) ⇒ Select the desired wash program on the keypad or enter the code. Acknowledge the input with the button <<OK>> or press the button <<Cancel>> if you would like to change the input. The wash program starts. The display shows: Program x running New SoftWash 9-5 Chapter 9 - Operating units Operation mode 2 The driver drives in front of the wash building, selects a wash program, drives the vehicle into the building, leaves the vehicle, starts the wash program and waits outside the building. Procedure ) ) ) ) ⇒ Select the desired wash program on the keypad or enter the code. Acknowledge the input with the button <<OK>> or press the button << Cancel >> if you would like to change the input. Drive the vehicle into the building. Start the wash program with button <<Start>>. The wash program starts. The display shows: Program x running Operation mode 3 The driver drives in front of the wash building, selects a wash program, drives the vehicle into the building, remains seated and the wash program starts automatically (Automatic start on). Procedure ) ) Select the desired wash program on the keypad or enter the code. Acknowledge the input with the button <<OK>> or press the button << Cancel >> if you would like to change the input. ) Drive the vehicle into the building. ⇒ The wash program starts. The display shows: Program x running New SoftWash 9-6 Chapter 9 - Operating units 9.1.4. Manual operation with control buttons The control buttons can be used for manual operation of individual machine elements, such as the roof brush, side brushes, etc. or of the complete wash gantry. The motion is activated by pressing the button. The motion remains active as long as the button is pressed. In control mode, i.e. no wash program is running, the moving direction of the machine modules can be determined by the navigation buttons. ) ⇒ ) ⇒ NOTICE New SoftWash Select the desired machine element by using the control buttons. The LED in the lower right corner is illuminated. Select the desired moving direction by using the navigation buttons. The element will be moved as long as the navigation button remains pressed or until the home position is reached. Manual operation can be deactivated to avoid misuse (see chapter 9.1.5 „Service programs – menu 0360“). 9-7 Chapter 9 - Operating units Push-button <<Roof brush>> + Wash mode: Roof brush up. The roof brush moves back downwards after releasing the button. Control mode: Roof brush up or down. The roof brush remains in its actual position after releasing the button. Push-button <<Side brushes>> Wash mode: + Side brushes apart. The side brushes moves back inwards after releasing the button. Control mode: Side brushes apart or together. The side brushes remain in their actual position after releasing the button. Push-button <<Roof nozzle>> + Wash mode: Roof nozzle up. The roof nozzle moves back downwards after releasing the button. Control mode: Roof nozzle up or down. The roof nozzle remains in its actual position after releasing the button. Push-button <<Wheel wash brushes>> Wash mode: New SoftWash The wheel wash brushes are switched off and remain switched off until the end of the wash program. 9-8 Chapter 9 - Operating units Push-button <<Wash gantry>> + Wash mode: Without function. Control mode: Wash gantry forward or backward. The wash gantry remains in its position after releasing the button. Push-button <<Home position>> + Wash mode: Without function. Control mode: Roof brush and roof nozzle move upwards, side brushes move apart. The wash gantry moves in its home position. For safety reasons, one of the four navigation buttons or the button <<OK>> has to be pressed in addition to the button <<Home position>>. New SoftWash 9-9 Chapter 9 - Operating units 9.1.5. Service programs Service programs allow the manager or owner of the wash tunnel to modify designated settings of the system. Access and Termination To access and terminate service programs follow the sequence as shown below. Access to service program menus P Press the buttons one after the other to access the service program level OK Enter password ? ? ? ? ? Different passwords allow access to different service program levels Service programs for the operator Password = 00001: Password cannot be changed,limited access to service programs OK 0> Operator Service programs for for the operator Password = 00000. Password can be changed, unlimited access to service programs Terminating service program menus Cancel Normal sequence message The service program level will be left by pressing the <Cancel>-button several times Note: The service program can only be left if the LED of button <<P>> is illuminated Fig. 9-3: Access to and termination of service programs New SoftWash 9-10 Chapter 9 - Operating units NOTICE Service programs may not be accessed while wash programs are executed. About using service programs Service programs are structured in several levels. In each level different operations can be performed. NOTICE There is a button called <<Cancel>> on the front panel. The meaning of this button is Cancel or Abort. Calling menu items The menu items within a service program can be called by using the navigation buttons or by entering the menu item number directly. The menu items can be found from page 9-12. The illustration below shows the direct call of a menu item. On the next page you will learn how the menu item is called with the navigation buttons. Direct call of a service program menu item By entering the number of the menu item directly, the program jumps immediately to the corresponding position, e.g. Enter 033 for menu item Operator/Machine setting/door functions 0> Operator 0 3 3 3x Cancel 033> Door functions By pressing the button < > the first door and the according door settings are displayed. Cancel Entrance door off Fig. 9-4: Direct call New SoftWash 9-11 Chapter 9 - Operating units Navigation with the service program with these buttons OK 0> Operator Button < > or <OK> leads to the next lower level Or Cancel Or 01> Wash counter OK 02> Invoicing Or Cancel A “>” behind the item number indicate that there is a lower menu level available Or 020> Accounting 03> Machine settings Button and call the previous or next menu item within a menu level OK 04> System settings Or Button < > or <Cancel> leads back to the next higher level Cancel Or 040> Date and time 041> Change password Fig. 9-5: Navigation with navigation buttons New SoftWash 9-12 Chapter 9 - Operating units Modification of values/ parameters Values/parameters can be modified within a menu item. The modification follows the sequence as shown below: Modification of a parameter 0>Operator 0 Enter the menu number 021 to change parameters Alternatively also accessable with the navigation buttons 2 02> Invoicing 1 021> Prices OK Activate the selected menu item to modify the parameter Cancel Returns to the next higher level Price P01 004,50 0 To OK Promotion 004,00 9 Enter the new prices. Switch between the zones with <OK> Acknowledge the parameter modification. Attention: The parameter is not modified without acknowledging To the next, respectively previous module Shift cursor to the desired position Fig. 9-6: Modification of parameters/values New SoftWash 9-13 Chapter 9 - Operating units Service program menus The menu items of a service program are released by a password when accessing the service program. The following listing shows all menu items which may be called from the operator or the owner of the rollover wash system. A Menu item can be called directly by using the number code. Menu 01> Wash counter The menu „Wash counter“ allows to display different counters. The table below shows on a glance all menus and sub-menus available in this menu item. 01> Wash counter 010 Total counter Total: XXXXXX Shift: YYYYYY Failed: ZZZZZZ 011> Lifetime 0110 Cash (Manual entry) Program 1 XXXXXX Promotion YYYYYY 0111 Non-cash Program 1 XXXXXX Promotion YYYYYY 0112 Servicing Program 1 XXXXXX Promotion YYYYYY 012> Day 0120 Cash (Manual entry) Program 1 XXXXXX Promotion YYYYYY 0121 Non-cash Program 1 XXXXXX Promotion YYYYYY 0122 Servicing Program 1 XXXXXX Promotion YYYYYY 0124 Clear day counter New SoftWash 9-14 Chapter 9 - Operating units ) ⇒ Press the button <<¨>> to enter the next menu level. The display shows the first sub-menu 010 Total counter ) Menu 010 Total counter ) ⇒ Select the desired sub-menu by pressing the buttons <<ª>> and <<©>>. Press the button Taste <<¨>> to display the total counter. The display shows Total: XXXXXX Shift: YYYYYY Failed: ZZZZZZ Total = Shift = Failed = All wash cycles since commissioning All wash cycles since the daily counter has been cleared All wash cycles which have been aborted since commissioning ) Press the button <<Cancel>>. ⇒ The display shows: 010 Total counter New SoftWash 9-15 Chapter 9 - Operating units Menu 011 Lifetime ) ⇒ Press the button <<¨>> to enter the next menu level. The display shows the first sub-menu 0110 Cash (Manual entry) The menu „Lifetime“ provides three sub-menus ) Select the desired sub-menu by pressing the buttons <<ª>> and <<©>>. 0110 Cash (Manual entry) 0111 Non-cash 0112 Service The menu „Cash“ shows the total amount of wash cycles which have been started on the operating terminal by entering a wash program. The menu “Non-cash” shows the total amount of wash cycles which have been started otherwise, e.g. with a wash card at the card reader. The menu „Service“ shows the total amount of wash cycles which have been started from WashTec Service in service mode. ) ⇒ Press the button <<¨>> to display the counter of the selected menu. The display shows: Program Z XXXXXX Promotion YYYYYY Z = XXX = YYY = New SoftWash Program number (Start with program1) All wash cycles of program Z during regular times All wash cycles of program Z during promotion times 9-16 Chapter 9 - Operating units ) ⇒ Select with the buttons <<ª>> and <<©>> the counters of other programs or press the button <<Cancel>> to return to the start menu. The display shows for example: 0110 Cash (Manual entry) ) ⇒ Select with the <<ª>> und <<©>> another sub-menu or press the button <<Cancel>> to return to the start menu. The display shows: 011 Lifetime New SoftWash 9-17 Chapter 9 - Operating units Menu 012 Day ) ⇒ Press the button <<¨>> to enter the next menu level. The display shows the first sub-menu 0110 Cash (Manual entry) The menu „Day“ provides four sub-menus ) Select the desired sub-menu by pressing the buttons <<ª>> and <<©>>. 0120 Cash (Manual entry) 0121 Non-cash 0122 Service 0124 Clear day counter The menu „Cash“ shows the total amount of wash cycles which have been started on the operating terminal by entering a wash program during this day. The menu “Non-cash” shows the total amount of wash cycles which have been started otherwise during this day, e.g. with a wash card at the card reader. The menu „Service“ shows the total amount of wash cycles which have been started from W ashTec Service in service mode during this day. For the first three menus: ) ⇒ Press the button <<¨>> to display the counter of the selected menu. The display shows: Program Z XXXXXX Promotion YYYYYY Z = XXX = YYY = New SoftWash Program number (Start with program1) All wash cycles of program Z at regular times All wash cycles of program Z at promotion times 9-18 Chapter 9 - Operating units ) ⇒ Select with the buttons <<ª>> and <<©>> the counters of other programs or press the button <<Cancel>> to return to the start menu. The display shows for example: 0120 Cash (Manual entry) ) ⇒ Select with the <<ª>> und <<©>> another sub-menu or press the button <<Cancel>> to return to the start menu. The display shows: 012 Day The display shows: For the menu „Clear day counter“ 0124 Clear day counter ) ⇒ Press the button <<OK>> to clear the daily counter. The display shows: Day counters cleared ) ⇒ Press twice the button <<Cancel>> to return to the start menu. The display shows: 012 Day New SoftWash 9-19 Chapter 9 - Operating units Menu 02 Invoicing The menu „Invoicing“ allows the display of the daily settlement and the display and modification of prices, promotions as well as currencies and taxes. The table below shows on a glance all menus and sub-menus available in this menu item. 02> Invoicing 020> Accounting 0200> Day Turnover: Cash 123456,00 EUR 021> Prices Price P01 XXXXXX Promotion YYYYYY 022> Promotion times (zone 2) 0 Mo Time1 00:00-00:00 Time2 00:00-00:00 023> Currency and tax Currency: EUR Tax: 16,00 % 024> Check WRAS Code Enter Code xxxxx ) ⇒ Press the button <<¨>> to enter the next menu level. The display shows the first sub-menu: 020 Accounting ) New SoftWash Select the desired sub-menu by pressing the buttons <<ª>> and <<©>>. 9-20 Chapter 9 - Operating units Menu 020 Accounting ) ⇒ Press twice the button <<¨>> to display the daily settlement. The display shows the daily settlement: Turnover cash: YYYYYY ZZ YYY = ZZ = Daily turnover Currency ) Press twice the button <<Cancel>>. ⇒ The display shows: 020 Accounting New SoftWash 9-21 Chapter 9 - Operating units Menu 021 Prices ) Press the button <<¨>>. ⇒ The display shows: Price P Z XXX.XX Promotion YYY.YY Z = XXX = YYY = Program number (Start with Prog. 01) Price for Prog. Z at regular times Price for Prog. Z at promotion times You can define a regular and a promotion price for each wash program. Promotion prices are only valid at specified promotion times (see menu 022 Promotion times). ) NOTICE Display only Select with the buttons <<ª>> and <<©>> the price display for the desired program. Prices cannot be changed with password 00001. ) ⇒ Press the button <<Cancel>> to return to the start menu. The display shows: 021 Prices New SoftWash 9-22 Chapter 9 - Operating units Change prices ) ⇒ Press the button <<OK>>. The cursor is placed below the first digit of the regular price. <OK> Price P Z XXX.XX Promotion YYY.YY ) ) ) 1 2 3 +., ABC DEF 4 5 6 GHI JKL MNO 7 8 9 PQR STU VWX OK ⇒ ⇒ Press the button <<¨>> until the cursor is placed below the desired digit. Enter the new value. Press the button <<OK>>. The data entry is accepted The cursor is placed below the 1. digit of the promotion price. Cancel <OK> START 0 YZ Price P Z XXX.XX Promotion YYY.YY <Cancel> ) ) New SoftWash < Cancel > < Cancel > Press twice the button <<Cancel>> when the promotion price should not be changed. Otherwise proceed as described on the next page. Select with the buttons <<ª>> and <<©>> another program. Press the button <<Cancel>> to return to the start menu. 9-23 Chapter 9 - Operating units Change promotion price ) Press the button <<¨>> until the cursor is placed below the desired digit. Price P Z XXX.XX Promotion YYY.YY ) ) 1 2 3 +., ABC DEF 4 5 6 GHI JKL MNO 7 8 9 PQR STU VWX OK Cancel ⇒ ⇒ Enter the new value. Press the button <<OK>>. The data entry is accepted. The cursor is placed below the 1. digit of the price. START Price P Z XXX.XX Promotion YYY.YY 0 YZ ) Press the button <<Cancel>>. Price P Z XXX.XX Promotion YYY.YY <Cancel> ) ⇒ < Cancel > Select with the <<ª>> and <<©>> another program or press the button <<Cancel>> to return to the start menu. The display shows: 021 Prices New SoftWash 9-24 Chapter 9 - Operating units Example In this example the price for program 5 will be increased from 11,00 to 12,50 Euro at regular times and will be decreased from 10,00 to 9,50 at promotion times. ) ⇒ Press the button <<OK>>. The cursor is placed below the 1. digit of the regular price. <OK> Price P05 011.00 Promotion 010.00 ) ⇒ Press twice the button <<¨>>. The cursor is placed below the 3. digit of the regular price. Price P05 011.00 Promotion 010.00 ) ⇒ 1 2 3 +., ABC DEF 4 5 6 GHI JKL MNO 7 8 9 PQR STU VWX Enter the number 2 on the key pad. The cursor is placed below the 4. digit of the regular price. OK Cancel Price P05 012.00 Promotion 010.00 START 0 YZ New SoftWash 9-25 Chapter 9 - Operating units ) ) 1 2 3 +., ABC DEF 4 5 6 GHI JKL MNO 7 8 9 PQR STU VWX OK ⇒ ⇒ Cancel Enter the number 5 on the key pad. Press the button <<OK>>. The data entry is accepted. The cursor is placed below the 1. digit of the price. <OK> START 0 YZ Price P05 012.50 Promotion 010.00 ) ⇒ Press the button <<¨>>. The cursor is placed below the 2. digit of the promotion price. Price P05 012.50 Promotion 010.00 ) ⇒ 1 2 3 +., ABC DEF 4 5 6 GHI JKL MNO 7 8 9 PQR STU VWX Enter the number 0 on the key pad. The cursor is placed below the 3. digit of the promotion price. OK Cancel Price P05 012.50 Promotion 000.00 START 0 YZ ) ⇒ New SoftWash Enter the number 9 on the key pad. The cursor is placed below the 4. digit of the promotion price. 9-26 Chapter 9 - Operating units Price P05 012.50 Promotion 009.00 ) ) 1 2 3 +., ABC DEF 4 5 6 GHI JKL MNO 7 8 9 PQR STU VWX OK ⇒ ⇒ Cancel Enter the number 5 on the key pad. Press the button <<OK>>. The data entry is accepted. The cursor is placed again below the first digit of the price. START Price P05 012.50 Promotion 009.00 0 YZ ) Press the button <<Cancel>>. Price P05 012.50 Promotion 009.50 <Cancel> ) ⇒ <Cancel> Select with the <<ª>> and <<©>> another program or press the button <<Cancel>> to return to the start menu. The display shows: 021 Prices New SoftWash 9-27 Chapter 9 - Operating units Menu 022 Promotion times ) ⇒ Press the button <<¨>>. The display shows the current promotion time for the displayed day of the week. Z Time1 00:00-00:00 Time2 00:00-00:00 Z = Day of the week (Start with 0 Mo) You can define two promotion times for each day. During these times the previously defined promotion prices are valid. Setting 00:00-00:00 = No promotion time ) ) New SoftWash Select with the buttons <<ª>> and <<©>> the desired day of the week. Press the button <<Cancel>> to return to the start menu. 9-28 Chapter 9 - Operating units Change promotion times ) ⇒ Press the button <<OK>>. The cursor is placed below the 1. digit of Time1. <OK> Z Time1 00:00-00:00 Time2 00:00-00:00 ) ) ) 1 2 3 +., ABC DEF 4 5 6 GHI JKL MNO 7 8 9 PQR STU VWX OK ⇒ ⇒ Cancel Press the button <<¨>> until the cursor is placed below the desired digit. Enter the new value. Press the button <<OK>>. The data entry is accepted. The cursor is placed below the first digit of promotion time 2. START <OK> 0 YZ Z Time1 00:00-00:00 Time2 00:00-00:00 <Cancel> ) ) New SoftWash <Cancel> <Cancel> Press twice the button <<Cancel>> when the second promotion time should not be changed. Otherwise proceed as described on the next page. Select with the buttons <<ª>> and <<©>> another day. Press the button <<Cancel>> to return to the start menu. 9-29 Chapter 9 - Operating units Change promotion time 2 ) Press the button <<¨>> until the cursor is placed below the desired digit. Z Time1 00:00-00:00 Time2 00:00-00:00 ) ) ⇒ ⇒ 1 2 3 +., ABC DEF 4 5 6 GHI JKL MNO 7 8 9 PQR STU VWX Enter the new value. Press the button <<OK>>. The data entry is accepted. The cursor is placed again below the 1. digit of the time 1. OK Z Time1 00:00-00:00 Time2 00:00-00:00 Cancel START ) Press the button <<Cancel>>. 0 YZ Z Time1 00:00-00:00 Time2 00:00-00:00 <Cancel> ) ⇒ <Cancel> Select with the <<ª>> and <<©>> another day or press the button <<Cancel>> to return to the start menu. The display shows: 022 Promotion times New SoftWash 9-30 Chapter 9 - Operating units Example In this example a promotion time will be set which is valid on Wednesday from 7 – 8:30 am and from 5 – 7 pm (17:00-19:00). ) ) ⇒ Select Wednesday with the buttons <<ª>> and <<©>>. Press the button <<OK>>. The cursor is placed below the 1 digit of promotion time 1. <OK> 2 We Time1 00:00-00:00 Time2 00:00-00:00 ) ⇒ Press the button <<¨>> once. The cursor is placed below the 2. digit of promotion time 1. 2 We Time1 00:00-00:00 Time2 00:00-00:00 1 2 3 +., ABC DEF 4 5 6 GHI JKL MNO 7 8 9 PQR STU VWX ) ) Enter the number 7 on the key pad. Press the button <<¨>> three times. OK ⇒ Cancel The cursor is placed below the 6. digit of promotion time 1. START 0 2 We Time1 07:00-00:00 Time2 00:00-00:00 YZ New SoftWash 9-31 Chapter 9 - Operating units ) ⇒ 1 2 3 +., ABC DEF 4 5 6 GHI JKL MNO 7 8 9 PQR STU VWX Enter the number 8 on the key pad. The cursor is placed below the 7. digit of promotion time 1. OK Cancel 2 We Time1 07:00-08:00 Time2 00:00-00:00 START ) ) 0 YZ ⇒ ⇒ Enter the number 3 on the key pad. Press the button <<OK>>. The data entry is accepted. The cursor is placed below the 1. digit of promotion time 2. <OK> 2 We Time1 07:00-08:30 Time2 00:00-00:00 ) ⇒ 1 2 3 +., ABC DEF 4 5 6 GHI JKL MNO 7 8 9 PQR STU VWX Enter the number 1 on the key pad. The cursor is placed below the 2. digit of promotion time 2. OK Cancel 2 Mi Time1 07:00-08:30 Time2 10:00-00:00 START 0 YZ ) ) ⇒ Enter the number 7 on the key pad. Press twice the button <<¨>>. The cursor is placed below the 5. digit of promotion time 2. 2 We Time1 07:00-08:30 Time2 17:00-00:00 New SoftWash 9-32 Chapter 9 - Operating units ) ⇒ 1 2 3 +., ABC DEF 4 5 6 GHI JKL MNO 7 8 9 PQR STU VWX Enter the number 1 on the key pad. The cursor is placed below the 6. digit of promotion time 2. OK 2 We Time1 07:00-08:30 Time2 17:00-10:00 Cancel START 0 YZ ) ) ⇒ ⇒ Enter the number 9 on the key pad. Press the button <<OK>>. The data entry is accepted. The cursor is placed again below the 1. digit of the time 1. 2 We Time1 07:00-08:30 Time2 17:00-10:00 ) Press the button <<Cancel>>. 2 We Time1 07:00-08:30 Time2 17:00-19:00 <Cancel> ) ⇒ <Cancel> Select with the buttons <<ª>> and <<©>> another day. Press the button <<Cancel>> to return to the start menu. The display shows: 022 Promotion times New SoftWash 9-33 Chapter 9 - Operating units Menu 023 Currency and tax ) ⇒ Press the button <<¨>>. The display shows the actual currency and sales tax. The cursor is placed below the first digit of the currency: Currency: EUR Tax: 16,00 % You can display and change the currency and tax to local values. Display only ) Change ) ) Press the button <<OK>>. ⇒ The data entry is accepted. ) Press the button <<Cancel>> to return to the start menu without any changes. Enter the new currency. Press the button <<¨>> until the cursor is placed below the desired digit. <¨> Currency: EUR Tax: 16,00 % New SoftWash 9-34 Chapter 9 - Operating units ) Press the button <<Cancel>> when the tax should not be changed. Otherwise proceed as described below. Currency: EUR Tax: 16,00 % <Cancel> ) Press the button <<¨>> until the cursor is placed below the desired digit. Currency: EUR Tax: 16,00 % ) ) ⇒ ⇒ Enter the new value. Press the button <<OK>>. The data entry is accepted. The cursor is placed again below the first digit of the currency. Currency: EUR Tax: 16,00 % ) ⇒ Press the button <<Cancel>> to return to the start menu. The display shows: 023 Currency and tax New SoftWash 9-35 Chapter 9 - Operating units Example In this example the currency shall be changed to swiss franks (Sfr) and the sales tax shall remain unchanged. The cursor is placed below the first digit of the currency. Currency: EUR Tax: 16,00 % ) ) ⇒ 1 2 3 +., ABC DEF 4 5 GHI JKL 7 8 9 PQR STU VWX 2 6 MNO OK Cancel START 0 3 1 YZ ) ) ⇒ ) ) ⇒ ⇒ Press the number 8 once =S. Press the button <<¨>> once. The cursor is placed below the next digit of the currency. Press the number 3 three times = F. Press the button <<¨>> once. The cursor is placed below the next digit of the currency. Press the number 7 three times = R. Press the button <<OK>> once. The data entry is accepted. The cursor is placed below the first digit of the currency. Currency: SFR Tax: 16,00 % ) ⇒ Press the button <<Cancel>> to return to the start menu. The display shows: 023 Currency and tax New SoftWash 9-36 Chapter 9 - Operating units Menu 024 Check WRAS Code ) Press the button <<¨>>. ⇒ The display shows: Enter Code: xxxxxx You can verify if a code has been used or if the code is still available for a wash cycle. ) ) ⇒ Enter the code. Press the button <<OK>>. If the code has been used for a wash cycle the display shows: Program and date of the wash cycle ⇒ If the code has not been used for a wash cycle the display shows: Code not found ) New SoftWash Press the button <<Cancel>> to return to the start menu. 9-37 Chapter 9 - Operating units Menu 03 Machine Settings The menu „Machine settings“ is used to switch devices of the wash system on or off or to control them manually. The table below shows on a glance all menus and sub-menus available in this menu item. 03> Machine settings 030> Modules On-Off Mod 000: DB1 = active 031> Lift control roof nozzle Lift control roof nozzle: on 032> Contact pressure Roof brush : 100 % 033> Door functions Entrance door Exit door Separator door off off off 034> Positioning lights Positioning lights on 035> Automatic start Automatic start off 036> Manual control 0360 Manual control buttons off 0361 Program selection at operating terminal off 037> Temperature setting 0371 Freeze protection on at xx°C 0372 Heater on at xx°C 038> Spray arch Shampoo Active foam Wax Drying aid Foam wax off off off off off 039> Bleed rim cleaner Rim cleaner New SoftWash on 9-38 Chapter 9 - Operating units ) ⇒ Press the button <<¨>> to enter the next menu level. The display shows the first sub-menu: 030> Module On-Off ) NOTICE New SoftWash Select the desired sub-menu by pressing the buttons <<ª>> and <<©>>. The menu cannot be activated during operation of the wash system. 9-39 Chapter 9 - Operating units Menu 030 Module On-Off ) ⇒ Press the button <<¨>> to display the modules. The first module is shown: Mod 001: X = active X = Abbreviation of the module, e.g. DB1 for roof brush 1 You can now change the condition of a module, i.e. activate or deactivate a module. A module which is deactivated will not be actuated during a wash cycle. NOTICE CAUTION Use this function to switch off a defect module. You can then operate the wash system with reduced functionality. Modules which are not in their home position may cause damages to vehicles or to the wash system. Make sure that all modules are in their home position before you deactivate a module. The wash system cannot be started if a module is not in its home position. New SoftWash 9-40 Chapter 9 - Operating units ) ) ⇒ Select with the buttons <<ª>> and <<©>> a module. Press the button <<OK>> to change the condition of the module, e.g. from active to inactive. The display shows for example: Mod 001: DB1 = inactive ) ⇒ Select with the buttons <<ª>> and <<©>> further modules or press the button <<Cancel>> to return to the start menu. The display shows: 030 Modules On-Off New SoftWash 9-41 Chapter 9 - Operating units Menu 031 Lift control roof nozzle ) ⇒ Press the button <<¨>> to display the condition of the roof nozzle. The display shows: Lift control roof nozzle: on You can now change the condition of the roof nozzle, i.e. switch roof nozzle on or off. NOTICE Use this menu to switch off the lift control after a malfunction of the roof nozzle. You can then operate the wash system with reduced functionality. The roof nozzle remains in the upper home position. The blower of the roof nozzle remains active. ) ⇒ Press the button <<OK>> to change the condition of the module, e.g. from active to inactive. The display shows: Lift control roof nozzle: off ) ⇒ Press the button <<Cancel>> to accept the change. The display shows: 031 Lift control roof nozzle New SoftWash 9-42 Chapter 9 - Operating units CAUTION A roof nozzle which is not in the upper home position may cause damages to vehicles or to the wash system. Make sure that the roof nozzle is always in the upper home position before you deactivate the lift drive. The wash system cannot be started if the roof nozzle is not in its home position. New SoftWash 9-43 Chapter 9 - Operating units Menu 032 Contact pressure ) ⇒ Press the button <<¨>> to display the contact pressure. The display shows: Roof brush: 100% In case of wear the contact pressure of the roof brush and the side brushes can be adjusted. CAUTION Incorrect adjustment of the brush pressure may cause insufficient washing results or may damage the vehicle. The brush pressure is optimally adjusted by WashTec Service on commissioning. ) ) ) ⇒ Select with the buttons <<ª>> and <<©>> the brush. Change the contact pressure with the buttons <<¨>> (+ 10%) and <<§ >> (-10%). Press the button <<OK>> to accept the data entry. The display shows the new contact pressure: Roof brush: 110% ) ⇒ Select with the buttons <<ª>> and <<©>> further brushes or press the button <<Cancel>> to return to the start menu. The display shows: 032 Contact pressure New SoftWash 9-44 Chapter 9 - Operating units Menu 033 Door functions ) Press the button <<¨>>. ⇒ The display shows: Entrance door off In this menu you can change the operation mode of the doors. The following operation modes are available: Off Close before washing Close before drying Winter door mode A detailed description abut the different operations modes can be found in chapter 10 “Additional equipment“. NOTICE Entrance and exit door have to be set to the same function if the wash building has only one door. Select with the buttons <<ª>> and <<©>> a door. ) ⇒ Press the button <<OK>> to change the operation mode of the selected door. The display shows subsequently the different operation modes, e.g.: Entrance door ) ⇒ close before drying Select with the buttons <<ª>> and <<©>> further doors or press the button <<Cancel>> to return to the start menu. The changes will be accepted. The display shows: 033 Door functions New SoftWash 9-45 Chapter 9 - Operating units Menu 034 Positioning lights ) Press the button <<¨>>. ⇒ The display shows: Positioning lights: on You can now change the condition of the positioning lights, i.e. switch the positioning light on or off. ) ⇒ Press the button <<OK>> to change the condition, e.g. from on to off. The display shows: Positioning lights: off ) ⇒ Press the button <<Cancel>> to return to the start menu. The changes will be accepted. The display shows: 034 Positioning lights New SoftWash 9-46 Chapter 9 - Operating units Menu 035 Automatic start ) Press the button <<¨>>. ⇒ The display shows: Automatic start: off You can now change the operation mode. „Automatic start: on“ the wash cycle starts automatically with a time delay when the wash program has been selected (by entering the program on the key pad or by inserting a wash card into the card reader) and the vehicle has been positioned in the wash hall. Pay attention to the safety instructions in chapter 5.3. „Automatic start on“ is generally activated when the driver remains in the vehicle during the wash cycle. Different procedures are possible with „Automatic start: off“ (see chapter 5.3 „Washing procedure“). ) ⇒ Press the button <<OK>> to change the operation mode, e.g. from off to on. The display shows for example: Automatic start: on ) ⇒ Press the button <<Cancel>> to return to the start menu. The changes will be accepted. The display shows: 035 Automatic start New SoftWash 9-47 Chapter 9 - Operating units Menu 036 Manual control In the menu „Manual control“ you can deactivate the manual control buttons (only control mode) and you can set the program selection, i.e. starting a wash program by entering a program number at the operating terminal or by entering a code or using the card reader. The table below shows on a glance all menus available in this menu item. 036> Manual control 0360 Manual control buttons Manual control buttons: off 0361 Program selection at operating terminal Program selection at operating terminal: off ) ⇒ Press the button <<¨>> to enter the next menu level. The display shows the first sub-menu: 0360 Manual control buttons ) New SoftWash Select the desired sub-menu by pressing the buttons <<ª>> and <<©>>. 9-48 Chapter 9 - Operating units Menu 0360 Manual control buttons ) Press the button <<¨>>. ⇒ The display shows: Manual control buttons: on You can switch the manual control buttons on or off. If the manual control buttons are switched off you cannot move any devices in control mode, i.e. no wash program is running. The control buttons remain active during washing operation. NOTICE Use this menu to avoid misuse at systems which are operated in self service mode (e.g. wash systems with card reader). ) ⇒ Press the button <<OK>> to change the condition, e.g. from on to off. The display shows for example: Manual control buttons: off ) ⇒ Press the button <<Cancel>> to return to the start menu. The changes will be accepted. The display shows: 0360 Manual control buttons New SoftWash 9-49 Chapter 9 - Operating units Menu 0361 Program selection at operating terminal ) Press the button <<¨>>. ⇒ The display shows: Program selection at operating terminal: on This function is only useful if the operating unit is equipped with a card reader or a code system. With “Program selection at operating terminal: on“ wash programs can only be started from the card reader or by entering a code at the operating terminal. NOTICE Program selection cannot be changed with password 00001. ) ⇒ Press the button <<OK>> to change the condition, e.g. from on to off. The display shows for example: Program selection at operating terminal: off ) ⇒ Press the button <<Cancel>> to return to the start menu. The changes will be accepted. The display shows: 0361 Program selection at operating terminal New SoftWash 9-50 Chapter 9 - Operating units Menu 037 Temperature setting In the menu „Temperature setting“ you can set the temperatures for activating the freeze protetction and for switching on the heater in the resource cabinet. The table below shows on a glance all menus available in this menu item. 037> Temperature setting 0370 Freeze protection Freeze protection on at xx°C 0371 Heater Heater on at xx°C ) ⇒ Press the button <<¨>> to enter the next menu level. The display shows the first sub-menu: 0370 Freeze protection ) New SoftWash Select the desired sub-menu by pressing the buttons <<ª>> and <<©>>. 9-51 Chapter 9 - Operating units Menu 0370 Freeze protection ) Press the button <<¨>>. ⇒ The display shows: Freeze protection on at xx°C ⇒ ) ) ⇒ ) ⇒ The cursor is placed below the first digit of the temperature. Entert the new value. Press the button <<OK>>. The data entry is accepted. Select with the <<ª>> and <<©>> another program or press the button <<Cancel>> to return to the start menu. The display shows: 037> Temperature setting New SoftWash 9-52 Chapter 9 - Operating units Menu 0371 Heater ) Press the button <<¨>>. ⇒ The display shows: Heater on at xx°C ⇒ ) ) ⇒ ) ⇒ The cursor is placed below the first digit of the temperature. Entert the new value. Press the button <<OK>>. The data entry is accepted. Select with the <<ª>> and <<©>> another program or press the button <<Cancel>> to return to the start menu. The display shows: 037> Temperature setting New SoftWash 9-53 Chapter 9 - Operating units Menu 038 Spray arch ) Press the button <<¨>>. ⇒ The display shows: Shampoo off In this menu you can switch on individual spray arches. The complete spray arch inclusive pumps and dosing pumps will be switched on. Switching the spray arches on or off has no impact on the settings or the wash program. ) ) ⇒ Select with the buttons <<ª>> and <<©>> the spray arch which should be switched on. Press the button <<OK>> to switch on the spray arch. The display shows for example: Shampoo ⇒ ) ) ⇒ on The selected spray arch will now be switched on. Press the button <<OK>> to switch off the spray arch. Select with the buttons <<ª>> and <<©>> further spray arches or press the button <<Cancel>> to return to the start menu. The display shows: 038 Spray arch New SoftWash 9-54 Chapter 9 - Operating units Menu 039 Bleed rim cleaner ) Press the button <<¨>>. ⇒ The display shows: Bleed rim cleaner: off This function is only used to bleed the rim cleaner pump (see chapter 6.4). In condition „Bleed rim cleaner: on“ the pump will be clocked, i.e. with each stroke cleaning agent is drawn out of the container. Leave the pump switched on until the cleaning agent sprays out of the nozzle. Switching the rim cleaner on or off has no impact on the settings or the wash program. ) ⇒ Press the button <<OK>> to change the condition, i.e. from off to on. The display shows for example: Bleed rim cleaner: on ⇒ ) ) ⇒ The rim cleaner pump draws cleaning agent out of the container. Press the button <<OK>> to switch off the rim cleaner pump when the cleaning agent sprays out of the nozzle. Press the button <<Cancel>> to return to the start menu. The display shows: 039 Bleed rim cleaner New SoftWash 9-55 Chapter 9 - Operating units Menu 04 System settings NOTICE This menu is used for system settings and to assign program names to wash programs. The menu „system settings“ cannot be accessed with the password 00001. The table below shows on a glance all menus and sub-menus available in this menu item. 04> System settings 040> Date and time Day: 0 Date: 01.01.2002 Time: 14:05:00 041> Change password Password: 042> Set telephone numbers SMS-Main office: 000000000000000 Mobile Phone: 000000000000000 SMS-Main office: + 49 171 07 60 256 WashTec-Server + 49 171 07 60 000 Forward Server Mobile Phone to mobile phone Nr. 043> Station code Station code: 000 044> Opening hours Opened: 00:00 – 24:00 Mo 045> Selectable program names Selectable program names off 046> Program names Program 01: 047> Release Please enter PIN: 048> WRAS Setup Code Enter code: New SoftWash 9-56 Chapter 9 - Operating units ) ⇒ Press the button <<¨>> to enter the next menu level. The display shows the first sub-menu: 040> Date and time ) New SoftWash Select the desired sub-menu by pressing the buttons <<ª>> and <<©>>. 9-57 Chapter 9 - Operating units Menu 040 Date and time ) ⇒ Press the button <<¨>>. The display shows the current setting for date and time. The cursor is placed below the day code: Day: 0 Date: XX.XX.XXXX Time: YY.YY.YY You can now display and change date and time. The day code will be generated from the date. Mo = 0, Tue = 1, etc. to Su = 6 Display only ) Change ) Press the button <<Cancel>> to return to the start menu without any changes. Press the button <<OK>> and the cursor is placed below the 1. digit of the date. <OK> Day: 0 Date: XX.XX.XXXX Time: YY.YY.YY ) NOTICE The date can only be reset with a clearance from WashTec (see menu 047). ) New SoftWash Enter the new date. Press the button <<¨>> until the cursor is placed below the first digit of the time or press the button <<OK>> to accept the new date and than the button <<Cancel>> to return to the start menu. 9-58 Chapter 9 - Operating units <OK> Day: 1 Date: 16.12.2003 Time: YY.YY.YY <Cancel> ) ) 1 2 3 +. , ABC DEF 4 5 6 GHI JKL MNO 7 8 9 PQR STU VWX OK Cancel ⇒ ⇒ <Cancel> Enter the new time. Press the button <<OK>> to accept the data entry. The new time is accepted. The cursor is placed below the daily code. START 0 Day: 1 Date: 16.12.2003 Time: 14.02.03 YZ ) ⇒ Press the button <<Cancel>> to return to the start menu. The display shows: 040 Date and time New SoftWash 9-59 Chapter 9 - Operating units Menu 041 Change password ) Press the button <<¨>>. ⇒ The display shows the current password, e.g.: New password: 00000 You can now change the password. ) ) 1 2 3 +. , ABC DEF 4 5 6 GHI JKL MNO 7 8 9 PQR STU VWX OK ⇒ Enter the new password. Press the button <<OK>>. The new password is accepted. The display shows shortly the message: Cancel New password accepted START 0 YZ And afterwards the new password, e.g. New password: 11111 ) ⇒ Press the button <<Cancel>> to return to the start menu. The display shows: 041 Change password New SoftWash 9-60 Chapter 9 - Operating units Menu 042 Set telefone numbers ) ⇒ Press the button <<¨>>. The display shows the phone number of the SMS-main office. The cursor is placed below the first digit of the phone number: SMS-main office: +491710760256 The SMS-main office number as shown above is preset in the factory. Error messages will be forwarded directly to the WashTec Service Centre. By entering a SMS-central phone number and a mobile phone number you can transmit error messages as SMS to a mobile phone. By entering your own mobile phone number you will always be informed about malfunctions, no matter where you are. The SMS- central phone number can be obtained from the provider of the telephone card which is installed in the modem of the system (in the controller cabinet). 1 2 3 +. , ABC DEF 4 5 6 GHI JKL MNO 7 8 9 PQR STU VWX OK ) ) ) Cancel ⇒ Enter the SMS- central phone number. Press the button <<OK>>. Press the button <<ª>> The display shows: START 0 Mobil Phone _ YZ New SoftWash 9-61 Chapter 9 - Operating units 1 2 3 +. , ABC DEF 4 5 6 GHI JKL MNO 7 8 9 PQR STU VWX OK ) ) ) Enter the phone number of the mobile phone. Press the button <<OK>>. Press the button <<Cancel>> to accept the phone number and to return to the start menu. Cancel ⇒ The display shows: START 0 YZ New SoftWash 042 Set telefone numbers 9-62 Chapter 9 - Operating units Menu 043 Station code ) ⇒ Press the button <<¨>>. The display shows the current station code. The cursor is placed below the first digit of the station code: Station code: 000 This function is only useful if the operating unit is equipped with a card reader. The station code is transferred onto the wash card when the card is generated. This procedure assures that wash cards can only be used on systems where they have been generated. NOTICE After the station code has been changed wash cards which have been generated with the old station code will no longer be accepted. ) ) 1 2 3 +. , ABC DEF 4 5 6 GHI JKL MNO 7 8 9 PQR STU VWX OK Cancel ⇒ ) START 0 YZ ⇒ Enter the new station code. Press the button <<OK>>. The new station code will be accepted. Press the button <<Cancel>> to return to the start menu. The display shows: 043 Station code New SoftWash 9-63 Chapter 9 - Operating units Menu 044 Opening hours ) Press the button <<¨>>. ⇒ The display shows: Opened: 00:00 – 24:00 Mo You can determine the daily opening hours of the wash system and define the days at which the wash system should be completely closed. The left time indicates when the system is opened, the right time indicates when the system is closed. The day of the week is displayed rightmost. Daily opening hours ) Enter the desired opening hours for the selected day. ) Press the button <<OK>>. ⇒ The data entry will be accepted. ) ) Press the button <<ª>> to select the next day. Enter for all further days the desired opening hours as described above. By entering „00:00 – 00:00“ the system is closed the whole day. New SoftWash 9-64 Chapter 9 - Operating units Close system at selected days ) Press the button <<ª>> until the displays shows: [01] closed at [day.month]: 00.00 You may select up to 28 days at which the system is completely closed. ) Press the button <<OK>>. ⇒ The cursor is placed below the first digit of the day ) ) Enter day and month, e.g. 16.05 for May 16th. Press the button <<OK>>. ⇒ The data entry is accepted. ) ) ) ⇒ Press the button <<ª>> to select the next day. Enter all further days at which the system should be closed as described above. Press the button <<Cancel>> to return to the start menu. The display shows: 044 Opening hours New SoftWash 9-65 Chapter 9 - Operating units Menu 045 Selectable program names ) Press the button <<¨>>. ⇒ The display shows: Selectable program names: off You can assign individual program names to the wash programs (see menu 046). These program names will be shown in the display when the “selectable program names” are switched on. ) ⇒ Press the button <<OK>> to change the condition, e.g. from off to on. The display shows for example: Selectable program names: on ) ⇒ Press the button <<Cancel>> to accept the change and to return to the start menu. The display shows: 045 Selectable program names New SoftWash 9-66 Chapter 9 - Operating units Menu 046 Program names ) ⇒ Press the button <<¨>>. The display shows the first program name. The cursor is placed below the 1. digit of the program name.: Program 01: _ You can now assign program names to the individual programs. ) ) Select with the buttons <<ª>> and <<©>> the program to which you want to assign a name. Enter the desired program name, e.g. „Foam“. Press the button <<1>> to obtain special characters, numbers and blanks. 1 2 3 +., ABC DEF 5 3x JKL MNO 4 GHI 7 PQR 2x 6 8 9 STU VWX OK Cancel START ) ⇒ Press the button <<OK>> to accept the program name. The display shows for example: 0 1x YZ Program 01: Foam ) ⇒ Select with the buttons <<ª>> and <<©>> further programs. Press the button <<Cancel>> to return to the start menu. The display shows: 046 Program names New SoftWash 9-67 Chapter 9 - Operating units Menu 047 Release NOTICE New SoftWash This menu is only intended for WashTec Service. A modification of the data in this menu may cause malfunctions of the system. 9-68 Chapter 9 - Operating units Menu 048 WRAS Setup Code ) Press the button <<¨>>. ⇒ The display shows: Enter code: _ This function is necessary when the system is equipped with a WRAS system. The code is supplied by the WRAS system. Wash system and WRAS system are synchronized after entering the code. ) ) 1 2 3 +. , ABC DEF 4 5 6 GHI JKL MNO 7 8 9 PQR STU VWX OK ⇒ Cancel START ) 0 Enter the code. Press the button <<OK>>. Wash system and WRAS system are now synchronized. Press the button <<Cancel>> to return to the start menu. YZ ⇒ The display shows: 048 WRAS Setup Code New SoftWash 9-69 Chapter 9 - Operating units Menu 05 Create cards This menu is only helpful when the operating terminal is equipped with a card reader. The menu “Create cards” provides the following functions: ) ⇒ Creating single cards Creating multi cards Creating cash cards Reading card data Press the button <<¨>> to enter the next menu level. The display shows: ** Single card** 050 Create cards active ) ⇒ F1 F2 F3 P ) ) ⇒ New SoftWash Press the button <<P>>. The LED is switched off and the operating unit is now ready for creating and reading cards. Select with the buttons <<¨>> and <<§>> the desired sub-menu. Press the button <<OK>> to acknowledge the selection. The display shows the selected sub-menu. 9-70 Chapter 9 - Operating units Data entry for single cards ** Single card ** 050 Create cards active Special offer no ) NOTICE Select with the buttons <<¨>> or <<§>> whether the card should be used as a special offer card. Special offer cards will only be accepted at promotion times as set in menu 022. ) ⇒ Press the button <<OK>> to accept the data entry. The display shows the next request: ** Single card ** 050 Create cards active Wash program New SoftWash 01 9-71 Chapter 9 - Operating units ) ) 1 2 3 +., ABC DEF 4 GHI 25 JKL 6 MNO 7 8 9 PQR STU VWX OK Cancel ⇒ Enter the desired program, e.g. 02 for program 2. Press the button <<OK>> to accept the data entry. The display shows the next request: START ** Single card ** 0 YZ 050 Create cards active 1 Valid until: ) ) ⇒ New SoftWash xx.yy.zzzz Enter the validity date. Press the button <<OK>> to accept the data entry. The data entry is completed. 9-72 Chapter 9 - Operating units Data entry for multi cards ** Multi card ** 050 Create cards active Special offer no ) NOTICE Select with the buttons <<¨>> or <<§>> whether the card should be used as a special offer card. Special offer cards will only be accepted at promotion times as set in menu 022. ) ⇒ Press the button <<OK>> to accept the data entry. The display shows the next request: ** Multi card ** 050 Create cards active Wash program New SoftWash 01 9-73 Chapter 9 - Operating units ) ) 1 2 3 +., ABC DEF 4 GHI 25 JKL 6 MNO 7 8 9 PQR STU VWX OK Cancel ⇒ Enter the desired program, e.g. 02 for program 2. Press the button <<OK>> to accept the data entry. The display shows the next request: START ** Multi card ** 0 YZ 1 050 Create cards active Credit: ) ) ⇒ 00 Enter the number of wash cycles which should be executed with this card. Press the button <<OK>> to accept the data entry. The display shows the next request: ** Multi card ** 050 Create cards active Valid: xx.yy.zzzz ) ) ⇒ New SoftWash Enter the validity date. Press the button <<OK>> to accept the data entry. The data entry is completed. 9-74 Chapter 9 - Operating units Data entry for cash cards ** Cash card ** 050 Create cards active Credit: ) ) ⇒ 0000.00 Enter the desired credit. Press the button <<OK>> to accept the data entry. The display shows the next request: ** Cash card ** 050 Create cards active valid: xx.yy.zzzz ) ) ⇒ New SoftWash Enter the validity date. Press the button <<OK>> to accept the data entry. The data entry is completed. 9-75 Chapter 9 - Operating units Creating cards After the data entry has been completed the display shows in the first line: ** Please insert card ** ) ⇒ ⇒ Insert the card into the card reader. The card is drawn into the card reader and the selected data will be transmitted together with the station code onto the card. During data transmission the display shows in the first line: ** 1. writing card ** Up to three data transmissions will be executed. The card will be returned after the third attempt has failed and the display shows: ** Card writing error ** ) Repeat the procedure with another card. The card will be rejected after successful data transmission. The display shows: ** Please insert card ** You can now create further cards of the same type by inserting these cards into the card reader and by repeating the procedure as described above. New SoftWash 9-76 Chapter 9 - Operating units ) ) ⇒ Press the button <<Cancel>> when no further cards should be created with the same data. Press the button <<OK>> to create further cards of the same type with other data (e.g. another program). The display shows: ** XXX-Card ** 050 Create cards active Request for action ) ) ) Quit card creation Proceed with the steps as described above. Select with the buttons <<¨>> and <<§>> another card type. Press the button <<OK>> to acknowledge the selection. ⇒ The display shows the selected card type. ) Press the button <<P>>. ⇒ The LED in the lower right corner is illuminated. ) Press the button <<Cancel>>. ⇒ The display shows: 05> Create card New SoftWash 9-77 Chapter 9 - Operating units Read cards ** Reading card ** 050 Create cards active ) Press the button <<OK>> to read the information stored on the card. The display shows in the first line: ** Please insert card ** ) ⇒ Insert the card into the card reader. The card is drawn into the card reader and the information stored on the card is subsequently displayed. The card is rejected after all information has been displayed. The display shows: ** Please insert card ** You can now read further cards. New SoftWash 9-78 Chapter 9 - Operating units 9.2. Card reader 9.2.1. Overview The optional available card reader will be installed together with the operating terminal CP1. The card reader is used to start wash programs with wash cards. The card reader is installed together with the operating terminal CP1 in a metal housing which may be mounted to the wall or on a post. 1 2 3 4 5 1 = Card reader 2 = Cover 3 = Lock 4 = Protective cover 5 = Post Fig. 9-7: Card reader New SoftWash 9-79 Chapter 9 - Operating units 9.2.2. Structure The card reader is installed in one housing together with the operating terminal CP1. The card slot (1) for the wash cards with a plastic cover (2) is located on the front side. A lock (3) for releasing the card reader/operating terminal unit is located on the right side. The complete unit can be swayed forward. Wash cards which have not been returned are collected in a tray and can be removed. For protection against vandalism the protective cover (4) can be turned upwards and locked. The complete unit can be mounted to the wall or on a post (5). 9.2.3. Commissioning The operating unit is started automatically when the system is switched on at the main switch. New SoftWash 9-80 Chapter 9 - Operating units 9.2.4. Washing operation with card The card reader can be used for washing operation with 3 different types of card: Single card This reusable card can be used for a single wash with the program of choice. Multi card The multi card can be used for several washes with the same program. Cash card The cash card can be used to make any selection from the range of wash programs on offer. After each wash, the remaining credit is transferred onto the card. Single and multi cards can be reformatted as special offer cards - for example if a wash is offered for a more economical price on work days between 9 and 12. These card are only accepted at the set special offer times. With cash cards, only the special offer rate is charged off the card during special offer times. CAUTION Card may be damaged at strong heat. Inform your customer that cards should never be exposed to direct solar radiation. New SoftWash 9-81 Chapter 9 - Operating units 9.2.5. Start of wash programs The car wash procedure depends on the operating mode setting (see chapter 9.1.3. Start of wash programs). ) Insert the card in the direction of the arrow into the card slot when the display shows the message: Please insert card The next steps vary according to the type of card: Single card ⇒ ⇒ The card is drawn in. The wash program starts. Multi card ⇒ ⇒ ⇒ The wash program is charged to the card. The card is returned. The wash program starts. The card is drawn in after the last wash. Cash card ⇒ The unused credit on the card is displayed: Balance XXX or balance too low The balance XXX will be displayed either in local currency or in Euro depending on the currency setting. New SoftWash 9-82 Chapter 9 - Operating units Afterwards the display shows: Select program ) ) Select a suitable program on the ten-number keypad. The display shows: PX X YYY.YY ) YYY.YY EUR = = selected program price of the program Confirm your entry by pressing the <OK> key. If there is not enough credit left on the card: purchase a new card or select a different program. ⇒ ⇒ ⇒ The wash program is deducted from your card. The card is returned. The wash program starts. Incorrect entry or different program required? ) ⇒ Press the button <<Cancel>> to delete the entry The card is returned. You can also easily overwrite the entry, e.g. 05 for program 5. When the wash cycle has finished, the following message appears on the display: Drive out car New SoftWash 9-83 Chapter 9 - Operating units 9.2.6. Cleaning the card reader By using soiled wash cards the plain rollers of the card reader may be soiled. You can recognize a soiling when the wash cards are not smoothly drawn in. In this case you have to clean the plain rollers. Use therefore the WashTec cleaning set consisting off a cleaning card and a cleaning liquid. For cleaning proceed with the steps described below: ) ) 1 ⇒ 2 1 = Cleaning card 2 = Microfibre cloth New SoftWash ) ) Apply a few drops of the cleaning liquid to the microfibre cloth (2). Insert the cleaning card into the card slot of the card reader. The card reader attempts to read the card. Because its not a wash card the card is rejected. The display of the operating terminal displays a message that the card is not readable. Repeat the procedure 3-4 times. Remove the cleaning card afterwards. 9-84 Chapter 10 - Additional equipment 10. Additional equipment This chapter is intended to help you familiarise yourself with the structure and function of various additional equipment with which your roll-over wash system may be fitted. Check which additional equipment is used in your wash system and turn to the relevant sections to continue. Please take special note of the maintenance instructions. Fresh-water supply system…...…….. Under-body wash - turnable……....... Under-body wash - sectionwise ........ Vehicle moving device....................... Rolling shutter door control system… New SoftWash 10-2 10-4 10-7 10-8 10-9 10-1 Chapter 10 - Additional equipment 10.1. Fresh-water supply systems Fresh-water supply systems ensure that your rollover wash system is always supplied with an adequate volume of water and the necessary water pressure. Structure Fresh-water supply systems consist of a fresh-water tank with level regulation and pumps with various delivery capacities. Roll-over wash systems with 70 bars high pressure are additionally equipped with a 70 bars high pressure pump. Fresh-water supply systems are installed outside the roll-over wash system. Water tank: Delivery capacity: 250 l Tank 1,5 kW-pump 5,5 kW- pump 11 kW- pump 1 = Water inlet 4 = Pump 6 = Pneumatic unit Under-body wash 2 = Overflow 3 = Water tank 5 = water connection to roll-over wash system 7 = water connection to under-body wash 1 8 m3/h at 4 bar 8 m3/h at 16 bar 4,5 m3/h at 70 bar 1 1 3 3 5 2 2 3 5 4 2 64 5 4 7 1,1 kW pump: fresh-water without high pressure 5,5 kW pump: 16 bar high pressure without external under-body wash 5,5 kW pump: 16 bar high pressure with external under-body wash Fig. 10-1: Fresh-water supply systems New SoftWash 10-2 Chapter 10 - Additional equipment Operation Work through the following steps when the water tank has been emptied: ) ) ) ⇒ Maintenance Open the bleeder valve on the pump. Fill the water tank with water. Close the bleeder valve again. The system is now ready for operation again. Weekly ) Check that the level regulation functions correctly. Monthly ) Check the dirt traps in the supply hoses and clean the filter if necessary. Every six months We recommend an inspection and maintenance by WashTec Service at six-monthly intervals. New SoftWash 10-3 Chapter 10 - Additional equipment 10.2. Under-body wash - turnable The under-body wash device cleans the underside of the vehicle and inside the wheel arches. It is realized as under-floor version (integrated in the floor). 1 4 3 2 1 1= 2= 3= 4= Spray pipes with nozzles (pivoted) Cylinder Water supply Cover Fig. 10.2: Under-body wash device - turnable New SoftWash 10-4 Chapter 10 - Additional equipment Structure The under-body wash device consists of a basic frame, two spray pipes with nozzles, a cylinder for rotating the spray pipes, the water supply and a separate pneumatic device. The pneumatic device is located at the water tank of the fresh-water supply system. All elements are covered by removable cover panels. The high pressure pump supplies the under-body wash device with water. The spray pipes are pivoted and are moved back and forth by the cylinder during the wash cycle (position 1 and 2). Function 2 1 3 Position 2 Position 1 1 = Spray pipes 2 = nozzles 3 = cylinder Fig. 10.3: Turning of the spray pipes New SoftWash 10-5 Chapter 10 - Additional equipment Maintenance Weekly ) ) ) Remove the cover panels and rinse all the mud and dirt out of the base frame with a strong water jet. Check the nozzle heads on the spray nozzles. Clear clogged or soiled openings with a needle. Empty the condensation container at the maintenance unit (see Chapter 6 "Settings and checking"). Monthly ) ) Check the system of hoses for loose connections and leaks. Tighten loose connections. If you find any leaks, please inform WashTec Service. Lubricate the swivel heads (1) of the swivel device 1 Fig. 10.4: Lubrication points Every six months We recommend an inspection and maintenance by WashTec Service at six-monthly intervals. New SoftWash 10-6 Chapter 10 - Additional equipment 10.3. Under-body wash – sectionwise Structure The under-body wash device cleans the underside of the vehicle and inside the wheel arches. It consists of the control system and a base frame with flat-jet nozzles, which is fixed to the floor of the car wash building. All components are covered, except for the nozzle pipe with removable plates. Function The high-pressure pump in the water supply system supplies the under-body wash device with either fresh or recycled water. The flat jet nozzles are activated in sequence. Maintenance Weekly ) ) NOTICE Remove the cover panels and rinse all the mud and dirt out of the base frame with a strong water jet. Check the nozzle heads on the spray nozzles. Clear clogged or soiled openings with a needle. When you have dismantled the nozzles for cleaning, ensure when you re-mount the flat jet nozzles that they are positioned correctly: at 45 degrees to the direction of travel. Monthly ) Check the system of hoses for loose connections and leaks. Tighten loose connections. If you find any leaks, please inform WashTec Service. Every six months We recommend a twice-yearly inspection and maintenance by WashTec Service. New SoftWash 10-7 Chapter 10 - Additional equipment 10.4. Vehicle moving device The vehicle moving device is installed in short car wash buildings (hall length less than 8.3 metres) to move the vehicle during the wash program. Structure NOTICE The vehicle moving device consists of a double ramp that travels on rails. Gratings are mounted in its frame so that the dirty water can run off easily and cleaning is simplified. There are wedges on the ramps to assist with driving the car up the ramp, which move with the system. The vehicle moving device reduces the effective washing height by 6 cm. Function The vehicle is parked in the usual way on the vehicle moving device. The vehicle moving device is moved during the wash cycle by a hydraulic cylinder. Maintenance Every six months We recommend a twice-yearly inspection and maintenance by WashTec Service. New SoftWash 10-8 Chapter 10 - Additional equipment 10.5. Rolling shutter door control Structure Rolling shutter doors which are already fitted in the building can be controlled conveniently with the rolling shutter door controls. The rolling shutter doors are controlled by the controller of the wash system. The settings can be done in the service program (see chapter 9.1.5 menu 033 door functions). In drive-through halls each door can be individually set, e.g. entrance door =close before drying and exit door = winter operation mode. In halls with one door (entrance door = exit door) both doors must be set to the same operation mode. Operation modes The rolling shutter door controller can be operated in 4 operation modes: Off The rolling shutter doors are not actuated. The doors can only be operated with the buttons provided by the door supplier. Close before drying ⇒ Entrance and exit door close before the drying procedure starts. ⇒ Entrance and exit door open after the drying procedure is finished or with end of the wash program. ⇒ Entrance and exit door close before start of the wash program. ⇒ Entrance and exit door open with end of the wash program. Close before washing New SoftWash 10-9 Chapter 10 - Additional equipment Winter operation mode Entrance and exit door are closed in winter operation mode. Two procedures are possible: Procedure 1 ⇒ ⇒ ⇒ ⇒ Procedure 2 ⇒ ⇒ ⇒ ⇒ New SoftWash The entrance door opens with program start. The entrance door is closed with start of a wash program by pressing the start button. Entrance and exit door open with the end of the wash program (depending on the setting). Entrance and exit door are closed when the vehicle has left the wash building (depending on the setting). The entrance door opens when the "Door open" button is pressed or when the induction loops detect a vehicle in front of the car wash building. The entrance door is closed with start of a wash program by inserting the wash card. Entrance and exit door open with the end of the wash program (depending on the setting). Entrance and exit door are closed when the vehicle has left the wash building (depending on the setting). 10-10 Chapter 10 - Additional equipment NOTICE In case of emergency the doors can be opened and closed as required with the pushbuttons provided by the supplier of the rolling shutter doors. On single-button operation without an upper limit switch, the rolling shutter door may get out of synchronisation. ) Press the button again once to restore the correct rhythm. The door cannot be opened with the "Door open" button during the drying or washing cycle. All doors are opened in case of an emergency stop. When the system is moved in its initial state all doors are moved into their home position. CAUTION Please observe the valid national regulations for automatically operated rolling shutter doors. CAUTION The doors must be inherently safe, i.e. the door must recognize an obstruction by itself and must stop if necessary. WashTec does not take responsibility for damages caused by doors. New SoftWash 10-11 Chapter 11 - Technical specifications 11. Technical specifications 11.1. Dimensions Machine depth For all versions: Approx. 1690 mm with plastic doors Approx. 1565 mm with metal doors Width Description Max. vehicle width (1) Machine width Building width (2) B1 B2 B4 L1 Dimensions in mm 2400 3470 Min. 4000 Min. 8290 Building length(2) (1) Measured across rear-view mirrors (2) With additional equipment Machine type dependant data can be found on the next page. B4 B2 B1 H3 H2 H1 Fig. 11-1: Dimensions New SoftWash 11-1 Chapter 11 - Technical specifications Heigths Description Size H1 Drive through Machine type -dimensions in mm 20 21 22 23 2000 2100 2200 2300 height H2 Machine height H3 Building height Description Size H1 Drive through H2 H3 height Machine height Building height Description Size H1 Drive through 2784 2880 2884 2980 2984 3080 3084 3180 Machine type -dimensions in mm 24 25 26 27 2400 2500 2600 2700 3184 3280 3284 3380 3384 3480 3484 3580 Machine type -dimensions in mm 28 2800 height Weight New SoftWash H2 Machine height H3 Building height 3584 3680 Size Weight in kg 20 appr. 1350 21 appr. 1350 22 appr. 1350 23 appr. 1350 Size Weight in kg 24 appr. 1350 25 appr. 1450 26 appr. 1450 27 appr. 1450 Size Weight in kg 28 appr. 1450 11-2 Chapter 11 - Technical specifications 11.2. Technical Data Wash capacity up to 12 vehicles/hour (*) (*) The wash capacity depends on the selected wash program. The specified value is valid for the program 2x Washing + 2x Drying Electrical data Electrical protection class Mechanical connection data Environmental data Illumination of wash hall New SoftWash Electrical connection Conductor cross-section in mm² Fusing (slow at 400 VAC) Power consumption Peripheral cabinet System 400 N/PE 5X6 5X10 5X16 35 A 50 A 63 A 16 kW 16 kW 16 kW IP65 according to DIN EN 60529 IPX5D according to DIN EN 60529 Low-pressure water fitting 4-16 bar High-pressure - water fitting 16-40 bar High-pressure - water fitting 70 bar Air fitting, 6-8 bar R ¾” Operating temperature range Allowed shut-down temperature +2°C to + 40° C R 1“ R 1/2“ R 1/4“ Min. + 2°C (without freeze protection) Recommended illumination Min. 120 Lux in wash hall 11-3 Chapter 11 - Technical specifications The consumption data depends on the configuration of the system, the kind of water, the used chemical agents and the selected program. The following specifications can therefore only serve as a guideline and are valid for a vehicle length of approx. 4,5 meters. Wash and Drying Pump capacity Power consumption (Wh/wash) Recycled water (l/ wash) Fresh water (l/ wash) Compressed air (NI/ wash) Shampoo (ml/ wash) Drying aid (ml/ wash) Pre-wash Power consumption (Wh/wash) Fresh water (l/ wash) Compressed air (NI/ wash) Foam agent (ml/Wäsche) High-pressure 16 bar Under-body wash 16 bar Pump capacity Power consumption (Wh/wash) Recycled water (l/ wash) High-pressure 40 bar 73 9 16,7 10-20 10-20 73 9 16,7 10-20 10-20 Foam 11 3 24 10-20 5,5 kW Side- AllHP around HP 32 62 Contour HP 73 UBW 20 50 55 Pump capacity Power consumption (Wh/wash) Recycled water (l/ wash) New SoftWash 1,1 kW Wash + Wash + Wheel wash Wheel wash + drying 185 629 50 35 15 kW Side-HP 82 All-around HP 160 19 49 11-4 Chapter 11 - Technical specifications Preservation Coldwax 11 Power consumption (Wh/wash) Fresh water (l/ wash) 5 Compressed air (NI/ wash) 0 Wax agent (ml/ wash) 10-20 Sound pressure level Sound pressure level Foam wax 11 3,5 24 10-20 LpA in dB(A) 80 New SoftWash 11-5 12. Appendix Contents New SoftWash Manufacturer´s declaration Damage registration Checklist for maintenance and care work 12-1 New SoftWash 12-2 Vehicle incident report Enter your name and address (1) GET THE DETAILS Date and approx. time of Date of incident report incident (2) WHO WAS INVOLVED? Name, address and drivers lic. no. of the customer Damaged vehicle Make Type Year Mileage Car License (3) HOW DID THE INCIDENT HAPPEN? DESCRIBE (4) WHAT VEHICLE DAMAGE OCCURED? You can use the car pictures. Indicate where damage occurred and describe Previous damage? If yes, what? Other damage? (i.e. buildings, etc.) Witnesses? If yes, enter name and address Signature of wash system operator New SoftWash Signature of customer 12-3 Checklist for maintenance work - Weekly - Part/assembly Work Frame ) Flat belts ) Energy chains ) System of hoses ) Low-pressure water distribution Clean the suction grids New SoftWash ) ) Check Clean the entire frame of the rollover wash system with commercially available detergents Check the belts for signs of wear. Check the energy chains including leads and cables of the roof brush and the wheel washer for signs of wear and breakage. Check the system of hoses for loose connections and leaks. Tighten any loose connections. Check the nozzle heads on the spray nozzles and spray pipes. Clear clogged or soiled openings with a needle. Replace defect nozzles Clean the suction grids of the dryer blowers. 12-4 Checklist for maintenance work - Monthly - Part/assembly Work Clean the agent containers ) ) ) Check the brushes Track and guide rollers ) ) ) New SoftWash Check Rinse out the cleaning agent containers with water to remove any thickened chemicals. Fill each container with the correct cleaning agent. Bleed all air out of supply hoses. Check the side, roof and wheel washing brushes for wear. Clean all the track and guide rollers. Check all drive, track and guide rollers for wear. In the event of heavy wear, please inform WashTec Service 12-5 Checklist for maintenance work - Every six months - Part/assembly Safety ring switch Work ) ) Slide bearings ) Check Check the safety ring switch for smooth operation. Spray the guidance of the safety ring switch with the WashTec special- grease-spray. Spray all slide bearings with the WashTec special-grease-spray Use the WashTec special-grease-spray with caution: do not spray into the wash brushes. Drives New SoftWash ) Ensure that all the drives are properly sealed. You can recognise leaks by traces of oil on the housing. 12-6