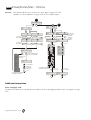
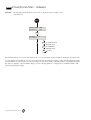
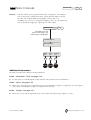
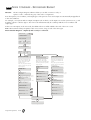
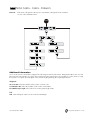
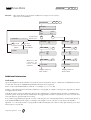
1
3GS Integrated Security Solution
3GS Programming
Europlex Technologies [Ireland] Ltd.
Europlex Technologies [UK] Ltd.
Clonshaugh Business and Technology Park,
Trent House, University Way,
Clonshaugh,
Cranfield Technology Park,
Dublin 17,
Bedford MK43 0AN,
Ireland.
England.
Tel: +353 - 1 - 2500500
Tel: +44 - 1234 - 757100
Fax: +353 - 1 - 2500590
Fax: +44 - 845 - 3307240
e-mail: [email protected]
e-mail: [email protected]
e-mail: [email protected] (for technical support)e-mail: [email protected] (for technical support)
Company Web Site address: www.europlex.ie
Warning
While this system is an advanced design integrated security system, it does not offer guaranteed protection
against burglary, fire or other emergency. Any alarm system, whether commercial or domestic, is subject to
compromise or failure to warn for a variety of reasons.
Therefore, good installation practices, thorough testing and regular maintenance by the installation company
and frequent testing by the user are essential to ensure continuous satisfactory operation of the system. It is
recommended that the installation company offer a maintenance program and instruct the user with the
correct procedure for use and testing of the system.
Copyright
Europlex Technologies [Ireland] Ltd. (hereafter referred to as Europlex) 2004. All rights reserved. No part of
this publication may be reproduced, transmitted, stored in a retrieval system, or translated into any language
or computer language in any form or by any means electronic, mechanical, magnetic, optical, chemical,
manual or otherwise without the prior written permission of Europlex.
All products or services mentioned in this manual are covered by the trademarks, service marks or product
names as designated by the companies who market those products.
Disclaimer
Europlex make no representations or warranties with respect to the contents hereof and specifically disclaim
any implied warranties of merchantability or fitness for any particular purpose. Further Europlex reserve the
right to revise this publication and to make changes from time to time in the contents hereof without the
obligation of Europlex to notify any person of any such revision.
3GS Technical Manuals: Programming, Issue 04, Manual Code 6090, October 2004.
ABOUT 3GS MANUALS
The 3GS manuals cover every aspect of installing, configuring, and troubleshooting the 3GS integrated system. The set
of manuals is designed to enable the installer to completely configure a Europlex 3GS System for intruder alarm, access
control, and radio functionality.
There are six separate 3GS manuals, each in PDF format.
●
Introduction to 3GS (3GS_introduction.pdf),
●
●
3GS Hardware (3GS_hardware.pdf),
●
●
This guide provides easy-to-use instructions for starting up and using a 3GS integrated system.
3GS Peripherals (3GS_peripherals.pdf)
●
●
This manual outlines the steps required to setup and customise the system for your requirements.
3GS User Guide (3GS_userguide.pdf)
●
●
This manual describes the hardware components of the 3GS system. It details each component, how to
connect them together, power them, and build a completed 3GS integrated system.
3GS Programming (3GS_programming.pdf),
●
●
This manual provides an overview of the integrated system, installation guidelines and information on cabling
issues.
Peripherals details the Europlex 3GS peripheral devices that compliment the operation of the 3GS integrated
system.
3GS Appendices (3GS_appendices.pdf).
●
Appendices includes technical specifications for all Europlex products relevant to the 3GS integrated system,
and gives a brief overview of the 3GS+ and Panelman software applications.
Note 3GS+ and Panelman for Windows are documented in detail in the Help files and corresponding Word documents
that are supplied on the application CDs.
Issue 04 October 2004
Introduction - iii
Introduction - iv
CONTENTS
About 3GS Manuals
iii
Programming Overview
1-1
General Overview
1-3
Software Identification
Software Features
Nodes
Outputs
Variables
Intruder System Overview
Users
Zones
Areas
Outputs
Intruder Log
System Summary
Access System Overview
Doors
Door Groups
Cards
Time Zones
Access Log
Access Control Setup Examples
Example 1
Example 2
Radio System Overview
Radio PA Buttons
Pager Transmitter
Getting Started
Cold Start or Warm Start?
Clear Node Database?
Enter Name & Address
Initialise Nodes?
System Start Types
Online Nodes/Online Inputs/Online Doors
Alert Message Displayed on Startup
System Reset
3GS Initial Setup Menu
1-3
1-3
1-3
1-3
1-3
1-4
1-4
1-4
1-4
1-4
1-4
1-4
1-5
1-5
1-5
1-5
1-5
1-6
1-7
1-7
1-8
1-9
1-9
1-9
1-10
1-10
1-10
1-10
1-10
1-10
1-10
1-10
1-10
1-12
Programming Menus
2-1
Menu Navigation
2-3
Remote Keypad Display
Security
Typing Text
Selecting Options
Scrolling Through Options
3 way Display Options
Answering a Question
Entering Numerical Values
Installer Menu Options
Master Menu Options
Zones/Doors/Vars
Zones/Doors/Vars - Descriptions
Zones/Doors/Vars - Options
Zone Types
Zone Attributes
Zones/Doors/Vars - Variables
Zones/Doors/Vars - Extra
Node Configure
Node Configure - Nodes - Information - Find
Node Configure - Nodes - Information - Monitor
Node Configure - Nodes - Configure
Node Configure - Inputs
Node Configure, Inputs Menu
Nodes Configure - Outputs
Node Configure - Reconfigure Ringnet
Service Mode
Service Mode - OnLine Report
Service Mode - Test
Service Mode, Test, Monitor Menu
Service Mode - Monitor
Service Mode - Monitor Menu
2-10
2-11
2-12
2-13
2-14
2-16
2-20
2-21
2-22
2-23
2-24
2-25
2-26
2-27
2-28
2-30
2-31
2-32
2-33
2-34
2-35
Radio PA Test
2-36
Setup Cards
2-37
Setup Cards
Setup Cards
Setup Cards
Setup Cards
- Cards - Assign
- Cards - Formats
- Cards - Site Code
- Pass/Void
Card Information
Issue 04 October 2004
2-3
2-3
2-4
2-5
2-6
2-6
2-7
2-7
2-8
2-9
2-38
2-39
2-40
2-41
2-43
Door Configure
Door Configure - Setup
Door Configure - Timers
Door Configure - Zones
Time Zone Setup
Time Zones - Setup
2-44
Set Up DM1200
2-69
2-45
2-47
2-48
User Setup
2-70
Area Setup
2-72
Edit Output Database
2-74
Radio PA Assign
2-76
2-49
2-50
Radio PA Assign - RPAs
Radio PA Assign - Descriptions
Radio PA Assign - Options
2-77
2-78
2-79
Door Group Setup
2-52
Manual Door Control
2-53
Edit Levels Database
2-54
Time Advance
2-81
Setup SIA
2-56
Literal Edit and Holiday Scheduler
2-82
Soak Mode
2-58
Command Mode
2-84
Disable Mode
2-59
Soft Start
2-85
Output Test
2-60
Unset/Reset
2-86
System Log
2-61
Accept All Alerts
2-87
Print all Reports
2-62
Edit Time Commands
2-88
Set Date & Time
2-63
Set Data Format
2-64
Force Call
2-68
Contents
Late Working Time Commands
Inhibit Mode
2-89
2-90
1
PROGRAMMING OVERVIEW
In this chapter
■
General Overview.................. 1-3
■
Intruder System Overview ...... 1-4
■
Access System Overview ........ 1-5
■
Access Control Setup Examples 1-7
■
Radio System Overview .......... 1-9
■
Getting Started .................... 1-10
GENERAL OVERVIEW
Nodes
100
Outputs
255
Output Functions
1000
Complete programmability is a very powerful feature of
the 3GS system. This allows you to configure each system
for an installation’s specific requirements and to define
how zones behave under certain conditions. Node
descriptions, zone descriptions and user names allow
easy identification of system events and user action.
●
Up to 255 system relay outputs which can switch on
and off alarm sounders, lights, control cameras, open
electric gates, and so on. Some of these outputs may
connect directly to the control unit, while others
interface to the network via nodes.
●
Audible devices, such as bells, sirens, buzzers, and
so on.
●
Sensors which connect to system zones (for example
motion detectors).
●
Smoke detectors which detect the presence of
smoke or pre-combustion gases in the area where
they are placed.
●
10,000 access cards.
●
64 access doors.
Software Identification
Information about the software version used for a
particular panel is printed on the panel’s eprom:
3GS xxx xx
xxxxx 023Z
Nodes
The 3GS system handles one hundred nodes in total on
the ringnet. The nodes available offer a range of
functionalities, including display and key entry, input and
output for intruder access control and radio power
monitoring, and so on. Depending on the system
configuration, these nodes can be used to handle the
highest level of security, access control and many other
features.
Outputs
This label provides the following information:
햲 Product Name. This is the product name for the
panel (3 characters).
햳 ID Code. Every new release eprom is given a
unique identification code. This code is used by
Europlex to identify the exact files used to create
the eprom.
Note If you have a query regarding software
always quote this ID code.
Software Features
Your Europlex integrated system consists of some or all of
the following equipment:
●
3GS Control Panel
●
Up to one hundred nodes
●
Up to 200 fully supervised zones, some of which can
be connected directly to the main control panel and
others which interface to a network cable ringnet
running around your premises via nodes.
●
Up to 200 fully supervised zones, some of which can
be connected directly to the main control panel and
others which interface to a network cable ringnet
running around your premises via nodes.
Issue 04 October 2004
The 3GS system is capable of controlling up to 255
unique system outputs. The Controller has four on-board
1 Amp relays, while relays on the I/O nodes can be
addressed to any output number (1-255). Relay outputs
can be used to trigger any amount of devices for many
applications.
Typical applications are:
●
Siren/bell/strobe triggering
●
Camera Switching
●
System set/arm and alarm indication
●
Lighting/heating circuit control
●
Door/security barrier control
●
Inputs to remote communication devices
Output functions are predefined and output types may
be assigned to them.
Variables
The 3GS system has many variables, which are detailed
later in this chapter. These variables offer a choice of
operation to the installer, allowing for the customisation
of the system.
Programming Overview 1-3
INTRUDER SYSTEM OVERVIEW
The main intruder system components are detailed
below. The diagram opposite shows an example of this
configuration.
the same output type.
Remote comms.
to central station.
Users
Serial Port
Currently the 3GS system supports up to 126 intruder
system users. User 1, by default, is the installer/engineer
user, who has a default code of 1010 and a default set of
engineering options, detailed in the Menus chapter,
which can not be altered. User 2, by default, is the
master user, who has a default user code of 1020 and a
default set of options, also detailed in the Menus chapter,
which can not be altered.
There are three special users, which are for logging
purposes only; user 37 is a timed user, user 38 is a
remote user and user 39 is an access control user. These
special users have no user options and no user code. All
other users can be given a subset of the master user
options. The Default codes for a Class IV system and
Grade 3 system are: installer 001010 (user 1); master
001020 (user 2).
D M 12 00
C o ntro lle r
Ringnet
PSU
B at.
RKD Node
8 I/O N o d e
A ux. A la rm O utp ut
6 O u tp u t N o d e
E ncryp tio n N o d e
Z o ne
Zones
The 3GS currently has the facility for up to two hundred
alarm zone inputs and sixty four alarm door zone inputs.
Zones are added to the system using end of line resistors
(EOL’s). Each node on the 3GS, except for the 6 Output
node, has the capacity for zones. A node input is
assigned a zone number on power up. All inputs on all
nodes do not have to be used. These zones are
configured on the intruder system by assigning zone
types and attributes (detailed in the Menus chapter),
which determine the behaviour and actions of the
system in various modes.
Areas
The 3GS system can be sub divided into areas. These
areas may be set/armed and unset/disarmed individually.
Users and RKDs may be assigned to one or more areas
and only users with rights to these areas will be allowed
to set/arm or unset/disarm them. Area related messages
can only be viewed at RKDs assigned to the area. Zones
and doors can also be assigned to an area so that when
an area is armed, both zones and doors are also armed.
H an d-H e ld
Tra nsm itte r
(H H T )
Intruder Log
The intruder log stores one thousand log events, which
are date and time stamped. This log provides a record of
all intruder and system activity (keypad input, status
alerts, alarm activations, and so on). It can be viewed on
the RKD nodes or printed if a hard-copy is required. The
detail and length of the log provides an invaluable record
of the system operation for both fault finding and
intrusion alarm analysis.
When the log reaches maximum capacity, further events
will cause the oldest events to be erased. Log events will
be stored for a minimum of 30 days if there is a power
failure.
System Summary
Outputs
Alarm Users
255
The 3GS outputs can be configured to respond to
intruder alarm events. The system has a set of default
outputs (detailed in the Menus chapter), which are
tripped under certain conditions. The nodes must be
configured to have node outputs mapped to output
types. More than one node output may be assigned to
Alarm Outputs
255
Alarm Zones
200
Areas
32
Alarm Log
1000
Programming Overview 1-4
ACCESS SYSTEM
OVERVIEW
Remote comms.
to central station.
Serial Port
D M 120 0
Cards
10,000
Doors
64
Access Levels
250
Function Levels
250
Visitor Levels
250
Door Groups
250
Time Zones
64
Access Control Log
3,000
C o ntro ller
Ringnet
PSU
Ba t.
RKD N ode
A ux. A larm O utput
(x 2)
Access N odes
Exit
Sw itch
Sw ipe
Read er (x2 )
The 3GS Access Control system allows the 3GS to
manage a complex card access system for your premises.
The diagram opposite shows an example of this
configuration.
Doors
The 3GS Access node provides a facility for two doors per
node (see 3GS Hardware for further information), to a
capacity of sixty four doors per system. Each door can be
integrated to the intruder system by assigning zone types
and attributes. The door can be used in conjunction with
cards to set/arm and unset/disarm the system. These doors
are monitored for forced and left open conditions and
outputs can be tripped for these events. Doors can be set
up for free access or card access, or can be timed or
permanently opened/locked.
Door Groups
Doors are grouped to provide different levels of access.
Issue 04 October 2004
Exit Sw itch (x2)
D oo r O p en
M o nito r
H and -H eld
Transm itter
(H H T)
Lo ck
O utp ut (x2)
Pro xim ity
Read er (x2 )
Cards
The 3GS Access system has a capacity for 10,000 cards.
Each card must be passed on the system for an access
level, which is a combination of door groups and time
zones. Cards may be configured as temporary cards
(visitor level), which makes the card valid on the system
between specified times.
For integration of cards onto the intruder system,
function levels can be assigned to the card, which allow
setting/arming and unsetting/disarming the system at
particular doors.
Time Zones
A time zone is a set of on/off times for a selection of days
in the week. They can be applied to doors for timed
opening or locking and to cards to permit access to a
group of doors for a time zone via access levels. Time
zones may be configured for extra security features, such
as PIN codes.
Programming Overview 1-5
Access Log
Door Outputs
The access control log provides a record of all access
control events (access granted, access denied, timed
open, manual door control, and so on). These events are
all date and time stamped and may be viewed or
printed.
The system features two outputs specific to doors. These
are:
When the log reaches maximum capacity, further events
will cause the oldest events to be erased. Log events will
be stored for a minimum of 30 days if there is a power
failure.
PIN pad only operation
This option is only available on Access Control node
software, rev. 1.06 or later. This allows the cardholder to
gain access using just the card's PIN code. However, if
two cardholders' PIN codes match, the system will use
the first cardholders information to log the data. Ideally
each cardholder should have a unique PIN code. This
feature is only enabled when the cardholder has a time
zone with the PIN ONLY attribute set. When the time
zone is active the cardholder can simply enter his code
to gain access. When the time zone has elapsed, card
and PIN are required.
●
PINPad Only Duress code
The Duress code is now activated by keying in the code
followed by the hash key (#) on the PINpad. The Duress
code is also activated by incrementing the last digit of
your code by 1. For example, if your code is 1234, you
can activate Duress by keying in 1235.
●
Access Node Stand-alone mode – PIN only
In stand-alone mode, access is permitted through doors
with keypads, using a system PIN code only. This system
PIN code defaults to 1020, but may be changed from the
SETUP CARDS, SITE CODE menu on the panel.
Note PINpad only operation is configurable using
3GS+.
The Access Node will store 300 log events when in
stand-alone mode.
Cards and Stand-Alone Operation
Operating the Node in stand-alone mode – that is, when
not connected to the Ringnet – will affect its ability to
read cards in the following ways:
●
Unstructured Cards will not be recognised.
●
The node will support structured cards of numbers 1
to 10,000 only.
If a card had been presented to the reader and granted
access while comms. were operating, the node will keep
this information in memory. When in standalone mode,
the Access Control Node will continue to grant access to
this card. If access was denied while comms. were
operating, the standalone node will deny access
accordingly.
Programming Overview 1-6
Door Forced
Forcing a door will cause a door forced output to
trigger (specific to the door, if assigned), the door
description to be displayed, and a keypad buzzer to
sound in the relevant areas (local alarm only).
If a door is programmed with a zone type, then a door
forced will cause execution of a zone command string –
that is, if the system is set/armed, a full alarm will result.
If a door is inhibited, the ‘door forced’ and ’door left
open’ conditions are still monitored for access control
but will not cause an alarm.
To remove a door zone which is generating false alarms,
the door should be disabled until the door zone is fixed
(Installer code plus SHIFT NO).
Door Left Open
Leaving a door open too long will cause a door left
open output to trigger (specific to the door, if assigned),
the door description to be displayed, and a keypad
buzzer to sound in the relevant areas (local alarm only).
Door timers are setup or changed using 3GS+ software.
4-Door Enhanced Access Control Node
The 3GS 4 Door Access Control node is an enhanced
Access Node with a 4-door, 2-zone capacity. THe
Enhanced Access Node provides support for 8 relay
outputs that you can configure as 4 locks and 4
assignable codes. Other features of the Enhanced Node
include on-board ferrites for improved Ringnet noise
immunity, 5V and 12V outputs with resettable PTZ fuses
to power card readers, and an upgradeable flash
memory chip.
ACCESS CONTROL SETUP EXAMPLES
Example 1
3 Setup Site Code (see page 2-40)
To pass a card (with a card number of 1 and a site code
of 1000) for all doors on the system for 24 hour access.
The card must be presented to each door when entry is
required at any time of the day.
- Installer code SHIFT SHIFT 6
SETUP
- Quit back to Date & Time using NO key.
- Select ’Cards’
- Select ’site code’
- Enter 0000001000 and press #.
1 Setup Door Group 1 (see page 2-52)
4 Assign Card no.1 onto the System (see page 2-38)
- Installer code SHIFT SHIFT 3
- Select ’Setup’
- Installer code SHIFT SHIFT 6
- Enter door group 1
- Select ’cards’
- Press # (enter)
- Select ’assign’
- Select all doors by pressing * key. All dots (.)
on the display change to asterix (*)
- Select ’select’
- Press #
- To card no 1. Press #
- Quit back to Date & Time using NO key
- Card no.1 is now assigned to card ID 1
- Select card No. 1. Press #
- Quit back to ’Date and Time’ using NO key
2 Setup Access Level 1 (see page 2-54)
5 Pass Card 1 for all Doors for 24 hour Access (see page
2-41)
- Installer code SHIFT SHIFT 8
- Select ’Access’
- Installer Code SHIFT SHIFT 6
- Select ’Groups - Times’
- Select 'Pass/Void-To 'Pass Cards?' Press Yes.
- Enter group/time 1
- At 'From card No.' Enter 1.
- Press #
- Press #
- Enter door group no.1 and press #.
- To 'Change Access Level?' Press Yes.
- Enter time zone 0 (24 Hr)
- At 'Enter Access Level ?' Enter 1.
- Press #
- Quit back to ’Group - Times
- Press #.
Access’
- Select ’Access’
- Enter access level 1
- Press #
- Set Group/Time 1 to YES
- Quit back to Date and Time using NO key.
The card is now passed for all doors for 24 hours
a day.
This setup can be greatly simplified by using Europlex’s
Access Management Software 3GS+.
- Press #
- Quit back to Date & Time using NO key
- Access level 1 is setup for group/time 1, which
is door group 1 for 24 hour access
Issue 04 October 2004
Programming Overview 1-7
Example 2
●
- Setup access level 2 for group time 2: door
group 1 (all doors), time zone 2
To setup the access system so all doors are in free access
from 9am to 1pm and from 2pm to 5pm, Mon-Fri. Card
access is required outside these times.
●
Setup Time Zone for Doors (see page 2-49)
- Pass all cards for access level 2
●
Setup Doors for Free Access (see page 2-44)
- Installer code SHIFT SHIFT 5
- Installer code SHIFT 3
- Select ’Zones’
- Select ’Setup’
- Select ’Setup’
- Select ’Zones’
- Enter time zone 1. Press#.
- Select door 1
- Enter time slot 1. Press #.
- Set On Time to 09.00
- Press YES for time zone 1. Dot (.) changes to
asterix (*)
- Set Off Time to 13.00
- Repeat for all doors on the system
- Enter time slot 2
- Quit back to Date & Time
- Set On Time to 14.00
- Set Off Time to 17.00
- Quit back to Selection of Days
- Set Mon, Tue, Wed, Thur, Fri to YES
- Quit back to ’Enter Time Zone’
●
Setup Cards for Card Access (see page 2-37)
Setup Time Zone for Card Access (see page 2-49)
- In Time Zone menu enter time zone 2
- Enter time slot 1
- Set On Time to 13.00
- Set Off Time to 14.00
- Enter time slot 2
- Set On Time to 17.00
- Set Off Time to 09.00
- Set all days to YES and the rest of the time zone
options to NO
Programming Overview 1-8
Doors will go into free access during the times 9am-1pm
and 2pm-5pm, no card required. OUtside these times
card access is required to open the doors.
More complex examples of the above can be achieved,
but to do so Europlex recommend the use of the Access
Management Software 3GS+. Using this software, it is
possible to easily configure the access control system to
allow card access to a variety of doors for various times
using different access levels. Time zones can be setup to
require a card and PIN for access. Cards can be setup as
visitor cards, which requires specifying a start and expiry
date. Cards can be configured to set/arm and unset/
disarm the system/areas by passing the card for a
function level. For more information, see the 3GS+ PC
Software online help.
RADIO SYSTEM OVERVIEW
T
h
e
tion of 418MHz or 433MHz radio panic attack buttons.
The diagram opposite shows an example of this
configuration.
PAG ER
RE CEIV ER
3
G
S
R
a
d
i
o
Radio PA Buttons
These radio transmitter buttons can be given a
description (user name or location) and may be
configured to transmit a range of messages depending on
the button combination pressed. These units also
monitor for low battery condition.
PAG ER
s
y
s
t
e
m
Pager Transmitter
The pager transmitter unit is connected to a serial port on
the 3GS. This can be configured to transmit messages to
pager receivers.
RIN G N ET
a
l
l
o
w
s
H UA N OD E
f
o
r
H UtA N O D E
h
e
i
n
t
e
g
r
a
Issue 04 October 2004
RPA
HHT
Programming Overview 1-9
GETTING STARTED
In order for the system to function as specified, ensure
that both AC/mains and battery backup power sources
are connected.
Initialising the system with either power source removed
will generate an alert message. On power up, the RKD
node briefly displays its own setup information followed
by the 3GS application program version/operating system
version and date – see “3GS Initial Setup Menu” on page
1-12 for more details.
Cold Start or Warm Start?
If this is the initial power up, perform a cold start (see
table overleaf). While the 3GS version message is on the
display (approximately 5 seconds), press the FULL key. A
cold start resets the system RAM thereby returning
system settings to their default settings (all programmed
data and log data is cleared).
Initialise Nodes?
Following a warm start (or soft start), this option prompts
you to inform the system if you have changed the zones/
doors hardware configuration by pressing the YES key.
If the zones/doors configuration is unchanged since the
last system start-up, press NO.
System Start Types
There are four different start types outlined in the
followin table. It is not necessary to perform a warm/soft
start when adding new nodes/inputs/doors to the system.
These can now be brought online within the Node
Configure option.
Online Nodes/Online Inputs/Online
Doors
If you are powering up a system which already has data
programmed, allow the version message to time-out and
this will generate a warm start.
The system will make a count of all online nodes, inputs
and doors. If this does not correspond with the number
of nodes, inputs or doors connected, press the NO key.
Clear Node Database?
The number of off-line nodes, inputs or doors is then
displayed. The system will indicate why a node is OFFLINE.
The node database contains data the installer will have
programmed, such as node IDs, descriptions, input/
output assignments and so on. On initial power up
therefore, this database is already clear. When this option
is selected, the system scans the Ringnet and assigns
default ID numbers and descriptions to all online nodes
and assigns zone numbers to all online inputs. Any
programmed node information is overwritten.
By selecting NO to this option, it is possible to perform a
cold start, without losing programmed node information.
Enter Name & Address
The system requests the installation name and address.
This is achieved by placing a text overlay on the numeric
keypad and using the method described in “Typing Text”
on page 2-4” to enter alphanumeric characters.
The installation name/address will appear on the system
log, literal printout and online reports. To bypass this step
press the # key.
Programming Overview 1-10
Alert Message Displayed on Startup
Following a system start up, an alert message will be
displayed. A cold start will also cause the keypad buzzer
to sound. It will be necessary to “alert accept” these
messages – “Accept All Alerts” on page 2-87.
System Reset
When the system resets, the O/P 253 watchdog reset/
auto start will trip. This event is logged. This output can
only be reset by an alert accept and system unset.
Start Type
How to select...
When to select...
Consequence
Cold Start
Press down FULL key while 3GS
version message is displayed
(directly after applying power).
On initial power up.
If programmed data is corrupt
and reset required.
System RAM is reset.
All system programmed data
and historical log information
is lost.
Warm Start
Allow normal message routine
(after applying power).
Normal power up.
Option to add new inputs.
Programmed data okay.
Soft Start
i
CODE SHIFT 7.
During system operation.
ii
Select Soft Start from menu.
Option to add new inputs.
Programmed data okay.
i
Automatic system reset (after
hardware disruption).
ii
Reset button activated
(located on Controller
board).
During system operation, a
reset button auto start will
allow you to reset RAM by
pressing the FULL key while
the version message is
displayed – that is, perform a
Cold Start.
System messages will
indicate the cause of system
generated auto start.
Auto Start
Issue 04 October 2004
Programming Overview 1-11
3GS Initial Setup Menu
Programming Overview 1-12
<
2
PROGRAMMING MENUS
In this chapter
■
Menu Navigation.................................... 2-3
■
Typing Text.............................................. 2-4
■
Help Menu ............................................. 2-6
■
Installer Menu Options ........................... 2-8
■
Master Menu Options ............................. 2-9
■
Zones/Doors/Vars................................. 2-10
■
Node Configure ................................... 2-21
■
Radio PA Setup ..................................... 2-29
■
Service Mode........................................ 2-30
■
Radio PA Test ........................................ 2-36
■
Setup Cards.......................................... 2-37
■
Card Information.................................. 2-43
■
Door Configure .................................... 2-44
■
Time Zone Setup .................................. 2-49
■
Door Group Setup ................................ 2-52
■
Manual Door Control............................ 2-53
■
Edit Levels Database ............................. 2-54
■
Setup SIA ............................................. 2-56
■
Soak Mode ........................................... 2-58
■
Disable Mode ....................................... 2-59
■
Output Test........................................... 2-60
■
System Log ........................................... 2-61
■
Print all Reports .................................... 2-62
■
Set Date & Time.................................... 2-63
■
Set Data Format ................................... 2-64
■
Force Call............................................. 2-68
■
Set Up DM1200.................................... 2-69
■
User Setup ........................................... 2-70
■
Area Setup ........................................... 2-72
■
Edit Output Database ........................... 2-74
■
Radio PA Assign .................................... 2-76
■
Time Advance....................................... 2-81
■
Literal Edit and Holiday Scheduler......... 2-82
■
Command Mode .................................. 2-84
■
Soft Start .............................................. 2-85
■
Unset/Reset .......................................... 2-86
■
Accept All Alerts.................................... 2-87
■
Edit Time Commands............................ 2-88
■
Inhibit Mode ......................................... 2-90
MENU NAVIGATION
Remote Keypad Display
LED Steady
You use the remote keypad display (RKD) to control,
program and observe the past or present state of your
installation.
Green
The keypad can be divided into the following main
areas:
Yellow
Mains supply present
System warning message
햲 Mode Keys. Allow you to arm (Part/Half/Full) and
Communications lost
햳 Alpha Numeric Display. The 2 x 24 character
liquid crystal display (LCD) shows system messages
or prompts.
Communications lost line 1A 1B
Yellow: indicates the occurrence of a system
event. An alert or warning message will indicate the
location and nature of the event.
● Red: indicates the status of the communications
network.
4
5
(flashes off twice every 2-3 seconds.)
Security
3GS contains a number of features to protect the system
from unauthorized access or attempts to break the
codes.
The system allows 90 seconds for a valid code to be
entered. If three or more incorrect codes are entered
during this time, the following alert message is displayed
and logged:
6
*
(flashes on briefly
every 2-3 seconds.)
If one incorrect code is entered and no subsequent valid
code is entered within the time-out period, the following
message appears:
Communications OK
Communications lost line 2A 2B
numeric keypad provide a visual display of the system status, as follows:
Green: indicates system power status.
System alert message
(flashes off once every 2-3 seconds.)
햴 Status LEDs. The three LEDs to the right of the
●
Mains supply failure
Red
disarm the system.
●
LED Flashing
Note For security reasons, your actual numeric
code is never shown.
For the Class IV system and 3GS software versions which
supersede version 5.50 the following applies:
●
After 3 incorrect codes, the keypad is disabled for 90
seconds. During this period all key entries are
ignored. For every subsequent incorrect code up to
the seventh, the keypad is disabled for 90 seconds. If
another incorrect code is entered a tamper event is
generated, all events are logged.
햵 Numeric Entry Keys. You use the numeric keypad to enter your user code and to program the system.
햶 Menu Navigation Keys. Allow you to navigate
through the menu structures.
Issue 04 Octoberv 2004
Programming Menus 2-3
Typing Text
You may need to enter text when editing zone descriptions, node descriptions, user names and so on. There are two
ways you can do this:
●
Via either the RKD or HHT keypad
●
Via software (such as 3GS+, Panelman, or PC)
An overlay card is provided to help you locate the character position for each key when entering text via the keypad:
C
D
.
+
I
-
,
E
J
L
*
,
F
K
M
G
/
H
&
A
!
N
<
O
>
P
Q
B
:
R
[
S
]
T
W
U
V
Y
Z
SPACE
%
X
SHIFT
Move cursor
forward
BACKSPACE
Rotate
cursor
Move cursor
backward
?
=
ENTER
Press when
complete
To enter text via a keypad:
1 The cursor will be in character position 1:
2 Place the letter overlay card on the keypad.
3 Locate on the overlay the character you wish to enter.
For example:
4 Select the appropriate character.
Most keys will have three characters when in typing mode. The orientation of the cursor governs which character is
selected:
selects “2”.
selects “L”.
selects “K”.
5 Continue entering the remainder of the text entry.
To delete characters
With the cursor in position 1, use the * key to move the cursor back over the characters:
Programming Menus 2-4
<f r a n> k
F
G
R
[
A
!
N
<
SHIFT
L
SHIFT
>
When the cursor is over the character to be deleted, hold down the SHIFT key.
K
#
SHIFT
ENTER
The keypad beeps as it deletes characters to the right.
With the cursor in the
character position, press # to complete text entry.
Selecting Options
The 3GS system options can be divided into installer options and user options. The installer options (detailed overleaf)
are primarily system setup and maintenance options, and the user options (also detailed overleaf) are system operation
options. The master user is given all the operational options by default. The master user assigns an appropriate number
of options to the general users depending on their security requirements – see “Installer Menu Options” on page 2-8
for further information.
There are two methods of selecting an option:
●
Direct Access – this allows you to select an option directly.
●
Help Menu Access – this allows you to locate an option by scrolling through the available options.
Direct access
You can select an option directly by entering its particular code. For example, to select the Node Configure option,
enter the following:
1
0
1
0
followed by
Default Engineer Code
SHIFT
4
"Shift" key (x1) Selection key
For Class IV systems, the default code is 001010. This will select the following option:
NODE CONFIGURE
For certain options, you need to press the SHIFT key twice before pressing the selection key.
See “Installer Menu Options” on page 2-8 and “Master Menu Options” on page 2-9 for further information.
Issue 04 October 2004
Programming Menus 2-5
Help Menu
INSTALLER CODE _ _ _ _
HELP
SELECT AN OPTION...
ZONES/ DOORS/VARS ?
code + shift Part
UNSET
PART
YES
to scroll forward through
the help menu
to scroll back through
the help menu
NODE CONFIGURE ?
code + shift 4
YES
Additional menu options
The Help menu allows you to scroll through all available options using the following keys on the keypad:
●
UNSET to scroll forward through menu options.
●
PART to scroll back through menu options.
●
YES to select an option.
●
NO to exit the menu.
Only options which have been assigned to you are displayed. You have 90 seconds in which to make a selection.
Scrolling Through Options
Use the following keys when viewing options that do not require input:
●
UNSET to scroll forward.
●
PART to scroll back.
3 way Display Options
Certain displays will present three flashing sub-options. Sub-option selection is determined by the option’s position on
the display:
ID.S
UNSET
OPTIONS
HALF
NAMES
HELP
To select To select To select
O i
The UNSET key selects the left option.
●
The HALF key selects the middle option.
●
The HELP key selects the right option.
●
Programming Menus 2-6
Answering a Question
On the following display, the flashing “?” indicates that the system is waiting for an answer:
PRINT LOG ?
Press YES or NO as required.
Pressing # (or any key other than YES) is interpreted as a NO by the system.
In some cases, an option may be presented with YES or NO displayed underneath, like this:
Select YES or NO as appropriate.
The system will automatically move to the next option. When complete, press # to accept all data entered.
Entering Numerical Values
In a display where you have to enter a number, a flashing digit will prompt entry, like this:
SET MINUTE:
1
You can enter a number using two methods:
●
Enter the number directly. For example, press 2, press 0, then #. If you make a mistake (before pressing #) press
* to move backward, and YES to move forward, then re-enter the correct digits followed by #.
●
Scroll through numbers. Use the two keys denoted as + (UNSET) and - (PART) on the overlay. The plus key will
increment the number, while the minus key will decrement it.
Issue 04 October 2004
Programming Menus 2-7
Installer Menu Options
●
Engineer code = 1010, Class IV system 001010
Option
Shift Key
Selection Key
General
Intruder
Zones/Doors/Vars
x1
Node Configure
PART
x1
4
Radio PA Setup
x2
9
Service Mode
x1
YES
Radio PA Test
x2
0
Setup Cards
x2
6
Card Information
x2
4
Door Configure
x1
3
Time Zone Setup
x2
5
Door Group Setup
x2
3
Manual Door Control
x2
7
Edit Levels Database
x2
8
Setup SIA
x2
NO
Soak Mode
x2
2
Disable Mode
x1
NO
Output Test
x1
5
YES
System Log
Access
Print All Reports
x1
6
Set Date/Time
x1
9
Set Data Format
x1
8
Force Call
x1
FULL
Set Up DM1200
x2
FULL
User Setup **
x1
UNSET
Program ACE
x2
HALF
Area Setup
x1
2
Edit Output Functions
x2
HELP
Radio PA Assign
x2
*
Time Advance
x2
YES
Literal Edit
x1
HALF
Command Mode
x1
1
Soft Start
x1
7
FULL
Unset/Reset
UNSET
Accept All Alerts
0
Edit Time Commands
x1
*
Override Faults
x2
#
NO
Programming Menus 2-8
Full Set
Inhibit Mode
Radio
Note ** Class IV system: the engineer can only change his own code.
Master Menu Options
●
Master code= 1020, Class IV system 001020
Option
Shift Key
Unset/Reset
Selection Key
General
Intruder
x1
#
View System Status
x2
PART
Part Set
PART
Half Set
HALF
Full Set
FULL
1
x2
Mode 5
5
Mode 6
6
Mode 7
7
Mode 8
8
Mode 9
9
Set Date/Time
x1
9
Change ID
x1
0
User Setup
x1
UNSET
Program ACe
x2
HALF
Area Setup
x1
2
Radio PA Assign
x2
*
System Log
YES
x2
0
Setup Cards
x2
6
Card Information
x2
4
Manual Door Control
x2
7
Hour Adjust
x1
HELP
0
Edit Time Commands
x1
*
Override Faults
x2
#
no
Inhibit Mode
Engineer Enable
x1
#
Override Defaults
x1
#
Issue 04 October 2004
Radio PA Test
Accept All Alerts
Radio
UNSET
Enable/Disable Engineer
Coded Reset
Access
Programming Menus 2-9
menu
Function:
ZONES/DOORS/VARS
INSTALLER CODE _ _ _ _
SHIFT
PART
This menu allows you to assign zone types and attributes to the system zones
and doors, and to set the system variables.
INSTALLER CODE _ _ _ _
SHIFT
PART
ZONES/DOORS/VARS
ZONES
UNSET
DOORS
HELP
D es c
DESCS
UNSET
OPTIONS
HALF
UNSET
HALF
VARS
HELP
HELP
TYPES ATTRIBUTES OUTPUTS
UNSET
HALF
HELP
O p tion s
CURRENT LIMIT
PSU Overcurrent
0
Va rs
Additional Information
For the intruder system to operate correctly, zones and doors must be configured with the required zone types and
attributes – refer to “Zone Types” on page 2-13 and “Zone Attributes” on page 2-14.
DESC: See “Zones/Doors/Vars - Descriptions” on page 2-11.
For ease of zone and door identification, each zone and door on the system should be given a description.
OPTIONS: See “Zones/Doors/Vars - Options” on page 2-12.
This menu is used to setup zone and door types and attributes.
VARS: See “Zones/Doors/Vars - Variables” on page 2-16.
System variables, including exit/entry times, can be programmed in this menu. Details of all variables are given in the
variables table on page 2-17/2-18.
Programming Menus 2-10
menu
Function:
ZONES/DOORS/VARS - DESCRIPTIONS
This submenu allows you to assign an alphanumeric description of up to 24
characters for each zone and door input.
D e sc
ZONES
UNSET
DOORS
HELP
UNSET
HELP
ENTER DOOR NO. 1
ALARM 1
ENTER ZONE NO. 1
ALARM 1
NODE 0
#
<
Node number
Door description
#
<
Zone description
(defaults to zone
type if no description
exists)
INPUT 1
Input number
Key in a new description
(see Menu Navigation:Typing Text)
#
#
ENTER ZONE NO. 2
ALARM 2
or
Key in zone/door
number directly
2
UNSET
PART
NO
4
ENTER DOOR NO. 2
ALARM 2
#
to scroll forward
through zones
to scroll back
through zones
to exit
<
NODE 3
INPUT 8
Additional Information
When you choose the DESCS option, the top line of the first display requests a zone/door number. The bottom line
shows the current zone description. However, if no description exists, the zone type is displayed (for example, after a
cold start). To insert text from the 3GS RKD, see “Typing Text” on page 2-4. Alternatively, the zone and door
descriptions may be entered using the Europlex PC product range (3GS+, Panelman, and so on).
It is a good idea to precede the zone/door description with the zone/door number (for example, 1-RECEPTION
DOOR).
Issue 04 October 2004
Programming Menus 2-11
menu
Function:
ZONES/DOORS/VARS - OPTIONS
This submenu allows you to set types (see “Zone Types” on page 2-13) and
attributes (see “Zone Attributes” on page 2-14) for zone and door inputs.
O p tion s
T Y P E S A T T R IB U T E S E X T R A
UN SE T
H A L F.
HE LP
U NS ET
ZO N E S
UN SE T
H EL P
H A LF
ZO N E S
UN SE T
D OO RS
H ELP
Ex tra
D OO RS
H ELP
U NS ET
U NS ET
S E T FR O M
Key in zone/
door number
1
ZO NE NU M B ER _ _ _ _
SE T TO
Key in zone/
door number
H EL P
H EL P
S E T FR O M
#
DO OR NU M B E R _ _ _ _
SE T TO
1
E N T E R ZO N E N O .
A LA R M
1
#
1
Zones
ZO NE NU M B ER _ _ _ _
#
DO OR NU M B E R _ _ _ _
#
#
ZO NE NU M B ER _ _ _ _
IN H IB IT
A LA R M
EN TE R DO OR NO.
A LA R M
1
IN H IB IT
A LA R M
YE S ?
to assign
YES?
D o o rs
INHIBIT
YES?
EXIT
A LA R M
U NS ET
AREA 1?
... to
AREA32?
COMMON?
NO?
ACCESS
?
YE S
to scroll and
display another
zone type
to assign as displayed zone
type (in this case ALARM)
Enter the zone
/door number
and scroll
through the
zone/door
attributes
to assign
YE S
INHIBIT
#
DO OR NU M B E R _ _ _ _
YE S ?
YE S
1
NO?
PUSH
NO?
FIRE-X
NO?
UNSET LOCAL YES?
PART?
HALF?
LINE?
FULL?
A RE A SE LEC T ED
A LA R M
ALARM?
FIRE?
UNSET
RESET?
TECH?
PA R T
SPARE?
LOG ?
NO
to scroll forward
through zones
to scroll back
through zones
See Additional Information
for details of these menus
#
to move to
the next zone
#
to move to
the next door
to exit
See Additional Information
for details of this menu
E N T E R ZO N E N O .
A LA R M
NO
2
to quit
E N T E R D O O R N O.
A LA R M
NO
2
to quit
Additional Information
Extra: See page 2-20
The Extra menu allows you to expand the zone and door functions, by mapping a block of up to 16 outputs to a single
zone.
Programming Menus 2-12
Zone Types
Zones will report input activity differently depending on the zone type assigned. For example, a zone set as an alarm
type zone will report an input going open as a full alarm in all modes other than Unset/Disarm.
Some zone types are specifically designed for use with certain systems.
The behaviour of many zones is based on that of the most common zone type Alarm, so it is advisable to use this type
as a reference. For all zone types, a discon (disconnected) or tamper alarm activation is reported in the same fashion as
an Alarm type zone.
Area -1 to Area -32
Available only when the number of areas is greater than 0. Area zones are instant Alarm
zones which are active when the relevant area is set/armed. When activated, these trip
the intruder alarm output for the relevant areas.
Common
Available only when the number of areas is greater than 0. The Common zone is active
when the common area is set/armed – that is, when all other areas are set/armed. All
attributes are assignable to common zones.
Part/Half/Full
Available only when the number of areas equals 0 and the system operates as a
standard 3GS installation. The Part zone is active in part and full modes. The Half zone
is active in half and full modes. The Full zone is active only in full mode. Half, Part, and
Full zones cannot be assigned attributes.
Line
This is a line monitoring zone. Usually used in conjunction with a telephone line output
from a digital dialler or direct communications device. When opened during a full
alarm, this will shorten the bell delay to 1 second.
Alarm
Available only when the number of areas is equal to 0. This is the normal Alarm zone
and is active in all modes except unset/disarm. Any open, discon or tamper activity will
cause a full alarm when set/armed.
Fire
The Fire zone operates 24 hour fire monitoring independent of normal panel operation.
When opened, the Fire zone trips the 3GS system output number 5, displays warning
messages, and automatically opens all doors.
Reset
The panel may be programmed to require an installer reset, after an alarm, before the
panel may be re-armed. This is normally performed by an installer entering his code at
the panel. An alternative to this is to open ’reset’ zone, which performs the same
function.
Tech
When opened, the Tech zone sets an output corresponding to its own number, so that
when Tech zone 100 opens, it will trip output 100. The output resets when the zone
closes. Installers should ensure that the output corresponding to the Tech zone is not
already assigned to another function.
Spare
This zone type has effectively no function – opening and closing of the zone does not
cause any activation. This type has been added to allow the installer initialise a zone on
the system but without having to assign it as a specific type.
Log
This zone will log a state change in any mode. Log zones can be used for monitoring.
FTC
This zone type is used in conjunction with the FTC relay on the DM1200. The FTZ zone
is a normally closed zone type which is wired in series with the FTC relay. In the event
that the DM1200 cannot communicate with the ARC, the FTC relay trips causing the
FTC zone type to open.
Note An FTC zone type generates a call service and an engineer will be required
to clear the alert.
Cabinet
Issue 04 October 2004
The cabinet zone type is a normally closed zone type and is active in all zone modes.
Any open DISCON or TAMPER activity will cause a full alarm when set/armed.
Programming Menus 2-13
Zone Attributes
Zone attributes allow you to further customise the behaviour of zones. 3GS allows for up to 16 different attributes. The
following attributes are applicable to areas 1 to 32, Common, and Alarm zone types. Some attributes are applicable to
both zones and doors, some to zones only, and some to doors only. With the exception of the Inhibit attribute, only
one other attribute should be assigned per zone.
Inhibit
This attribute allows the zone in question to be inhibited. Must be used in conjunction with the
Inhibit mode (Zones and Doors).
Exit
Applying the Exit attribute to an alarm or area zone will change it to an exit zone for that area/
system. Opening the zone while the area/system is set/armed will start an entry timer.
Access
Usually for movement detectors on the exit/entry route. Behaves as an Exit zone during exit/
entry and otherwise as a Alarm zone (Zones and Doors).
Push
The Push attribute is used for push-button arming of the area outside the final exit, avoiding the
need to wait for the final timer to expire before the buzzer sounds to confirm arming of the area.
The Push function is enabled by setting the final set variable to YES (giving an infinite exit time
until the Push button is pressed). Assign to an area zone to allow setting/arming of the area, or to
a Common or Alarm zone to allow setting/arming of the whole system (Zones only).
Fire-x
To be used with fire exit doors which should not be opened during the day. Outputs 177 to 208
and Common 209 for relevant areas (Fire Exit) are dedicated to this attribute. When the area is
unset/disarmed and the Fire-x zone is opened, the output is triggered, the buzzer sounds, and an
alert message is displayed. When the area is set/armed, the zone will behave as a normal area
zone (Zones and Doors).
Xshunt
The Xshunt attribute when applied to a zone will cause the next zone in line to be shunted or
inhibited when the area is unset/disarmed. For example, if applied to zone 23, when opened it
will shunt or inhibit zone 24. Usually used in conjunction with a Fire-x zone. If the enable xshunt
variable is set to YES, the xshunted zones will be re-enabled after an unset (Zones only).
Xtampr
The Xtampr attribute will cause the zone to behave as a bell tamper when the system is unset/
disarmed, firing the strobe outputs (51 to 59) and external bell outputs (41 to 49) for relevant
areas (Zones only).
Panic
The Panic attribute is used in conjunction with 24 hour panic buttons. Activation of a zone with
the Panic attribute assigned will trip and generate output 3 and output 214 (Raid Camera), but
no audible system alarm. The panic attribute will not display an alert message on the keypad
until the unset has been performed (Zones only).
Day-PA
This attribute is similar to Panic but operates in unset/disarm mode only. When assigned to an
area zone which is then opened (for example, a self-locking panic button), Day-PA generates a
silent alarm and trips outputs 3 and 214 (Zones and Doors).
Keyarm
If a zone has been assigned as Keyarm, then when it opens it will toggle the area's status. If the
area is unset/disarmed and you open the zone, the area will attempt to set/arm. If the area is set/
armed (or setting) and you open the zone, the area will unset/disarm. If the keyarm only variable
is set to not open, the keyarm zone will operate on opening and closing.
Note The Common and Alarm zones will set/arm or unset/disarm the full system.
24 Hour
If a zone has been assigned the 24 Hour attribute, then it is active at all times and will cause a
full alarm if opened in any mode. The intruder output 1 and both external and internal Bells are
tripped.
Set/Arm
Assignable to zone for system arming via valid card entry and push button activity (Zones only).
Programming Menus 2-14
Unset Local
To be used with Doors/Zones which should not be opened during the day. When the area is
unset/disarmed and the Zone/Door (with unset local attribute) is opened, the buzzer sounds,
output 250 turns on, and an alert message is displayed. When the area is set/armed, the zone
will behave as a normal area zone (Zones and Doors).
Double
Knock
Normally assigned to troublesome detectors. If two armed Double Knock zones are triggered (or
the same one activates twice) during the Double Knock period, then an alarm is generated.
Double Knock time is set in seconds. It requires two open actions within that time. All open
Double Knock zones are logged when the system is set/armed (Zones only).
Fire
The Fire attribute effectively creates a fire zone. The Fire attribute will ensure 24 hour fire
monitoring, independent of normal panel operation. When the attribute is set and the zone is
opened, the system trips output no. 5 (‘Fire’) and warning messages are displayed.
Note All doors are automatically unlocked when a fire alarm occurs. To prevent certain doors from
opening, use the Door Open Inhibit option.
Issue 04 October 2004
Programming Menus 2-15
menu
Function:
ZONES/DOORS/VARS - VARIABLES
The Variables submenu allows you to view or adjust the system variables (and
control timers).
Va rs
CURRENT LIMIT
PSU Overcurrent
0
UNSET
E/E AREA 1
Area 1 Exit Time
or
30
UNSET
PART
NO
to scroll forward
through zones
to scroll back
through zones
to exit
Most variable timers are set in seconds between 0 - 9999 (Soak Days being the Exception). 0 will give an infinite time.
You can display each variable in sequence and adjust and save the setting by entering a value directly or by pressing the
Unset/Part keys. Press the NO key to exit at any stage (except when setting a YES/NO variable). You will then be given
the option to print the current variable settings. See the following table for a complete list of available variables and
their max/min/default settings.
Programming Menus 2-16
Additional Information: Variables Table
Variable
Description
Default
min
max
Current Limit
Sets the power supply current limit in mA (0 to 9999) which when
exceeded, will generate an alert warning. For example, the limit
for a 3A PSU could be set to 2000mA, 3000mA for a 4A PSU,
6000mA for a 8A PSU. When set to 0, PSU overcurrent will not be
monitored.
0
0
9999
E/E Area 1-32
Sets the entry/exit time for the relevant areas. The default is 45 sec- 30
onds for Class IV systems.
0
9999
E/E Common
Sets the entry/exit time for the Common area. The default is 45
seconds for Class IV systems.
30
0
9999
Bell Delay
This is the delay period between an alarm digi-activation and the
siren/bell outputs being activated.
1
0
9999
Bell Time
The time period for which the external siren/bell (output 2) will
sound for before automatic shut down. For Class IV systems, the
default bell time is 900 seconds. This setting can only be changed if
required to comply with local specifications.
900
0
9999
Modem
Set to YES if you want the modem to dial out on alarm. Compatible with ED2000 or Eurodial 2000 PC software.
?
yes
no
Alarm Display This variable controls RKD display options in Full Set/Full Arm
mode (the default is 0). 0=Display always blank, 1=Alert messages
only, 2=Alert & warning messages, 3=Date & Time, Open Zones
and Alert/Warning messages displayed, 4=Open Zones (plus
description) are displayed.
0
0
4
Output Log
This variable controls the logging of outputs. If set to 1, any output
which changes state is logged. When set to 0, output activity is not
logged. You may also set this variable to 2 thereby preventing outputs being logged when the system is being unset/disarmed).
0
0
2
Arms
Set to YES if using the Arms Network system.
no
yes
no
Soak Test
Days
The number of consecutive days for which a Soak Test is active.
14
0
9999
Service Reset
This facility is incorporated so that after an alarm activation, a serv- 0
ice company installer must attend the installation and reset this
variable to 1 before the system may be set/armed again. An alarm
in set/arm mode will increment the variable to 2 and cause the
message CALL SERVICE to be displayed. If set to 0, then a service
visit is not required after an alarm activation. Service Reset can be
over-ridden by Coded Reset or by the engineer accepting alerts –
see Coded Reset in the 3GS Version 5 User Guide.
0
2
Suspicion
Audible
If set to YES, an RPA Suspicion event will also cause the keypad to
beep. For use with a Radio PA handset.
no
yes
no
Delayed Raid
Sets the time before a Delayed raid will be activated, as well as the
Raid Cancel time period. For use with a Radio PA handset.
90
0
9999
Final Set
If this variable is set to YES, an infinite exit time is started until a rel- no
evant zone with the PUSH attribute is opened. The system will
then arm 3 seconds later and the exit buzzer will stop.
yes
no
Local Alarm
0=Full alarm; 1=Local alarm (buzzer and internal bells); local
alarm causing alert message displays only; 2=External and internal
bell outputs are reset by accepting alerts.
1
7
Issue 04 October 2004
0
Programming Menus 2-17
Detector Reset When an area is unset/disarmed, this variable determines whether
the detector reset outputs will trigger. Used to unlatch any detectors that have previously latched.
no
yes
no
Verify Time
If, after an alarm activation, a second zone triggers (during this Ver- 10
ify Time), then the Verified Alarm output is tripped. For Class IV
systems the default is 0.
0
9999
Func. Enable
Time
Cards and doors may now be assigned functions such as SET/ARM
and UNSET/DISARM. Typically two actions are required in order
for the function to be performed. For example, the software can be
programmed so that a card can set/arm an area by first swiping at
the exit reader and then swiping at the entry reader. The user has a
limited amount of time to perform both of these actions, and this
time is known as the FUNC. ENABLE TIME (Default=10 seconds).
10
1
9999
Multi-Area
setting/
arming
Keypads are now assignable to areas so that area status and area
keypad buzzer are relevant to keypads in that area only. An area
may only be set/armed and unset/disarmed from a keypad, which
is assigned to that area. However, there may be some instances
where a user may wish to set/arm or unset/disarm an area from
another area in the same building.
0
0
1
Retrigger
Variable
If set to YES, then the bells/sirens will resound if a second zone
activation is detected at the end of the bell time. If set to NO
(default), then the external bells will only trigger once.
no
yes
no
Set Door
Protect
If the Set Door Protect variable is set to NO, then any valid card
that has no function assigned will be granted access if the area is
set/armed. This is to allow access to cards with no functions
assigned. If this variable is set to YES, then only valid cards with the
unset/disarm function will be granted access. Cardholders who
normally unset/disarm the system must be given the unset/disarm
function to be allowed access to the building when the system is
set/armed, otherwise access is denied. Defaults to NO.
no
yes
no
IR Enable
Time
When an installer enters this code, the infrared comms. on the
node is enabled for this time period.
7200
1
9999
Common
Area?
Set to NO if system has more than one area but there is no common area. Once selected, as NO the system will not display common area messages. If set to YES, common area messages are
displayed.
yes
yes
no
ENGINEER
ACCESS
This variable allows the engineer to access engineering menus
while the system/area is set.
no
yes
no
CONFIRMED
TIME
If after and alarm activation, a second zone triggers (during this
time), then the confirmation Alarm Output is tripped.
The confirmed time variable is the length of time after an intial
activation for which a confirmed alarm will be generated. A confirmed alarm will only be generated if there is a second activation
within the confirmed time. If a subsequent activation does not
occur, then 0/P 252 (inhibit zone) trips and the input is inhibited.
This will be cleared whern the system is unset.
0
0
9999
AREA 1
SECURE
When this variable is set to YES, only an AREA 1 user can disarm
area 1. System unset will not disarm area 1.
no
yes
no
SPECIAL
ACCESS
Access card users from card ID 1 to 200 may inhibit zones 1 to
200. Presenting card 37 to any reader will inhibit zone 37. Zone
37 will be enabled the next time card 37 is presented to any
reader.
no
yes
no
Programming Menus 2-18
BELL ON 1st
When this variable is set to YES, both external and internal bells
will activate on an unconfirmed alarm. When set to NO, both bells
will activate on a confirmed alarm. See the 3GS DD243 Application Guide for confirmed/unconfirmed alarms.
PAGER ACTIVE
IN SETNO
When this variable is set to YES, you can receive alarm events sent
to a Scope pager unit while the intruder system is set.
KEYARM
OPEN ONLY
When this variable is set to NO, the keyarm zone when opened
will change the status of the system to Armed and when closed will
Disarm the system. When set to YES, the status of the system will
toggle on the opening only of the Keyarm zone.
FRONT DOOR
BUZZER
When set to YES, this variable activates the Front Door Buzzer on
the remote keypad when the Front Door is opened.
AUTOINHIBIT
When set to YES, the system will set, ignoring all open zones/doors.
When the exit timer has expired and if an open zone is then
closed, it again is made active.
ENABLE XSHUNTS
With the X-Shunt variable set to YES, a System Unset will enable all
shunted zones.
ENTRY EXIT
DISABLE NO
Setting the Exit Entry Disable variable to YES will disable a confirmed alarm to the ARC if the original unconfirmed alarm was
generated on an Exit zone type.
PUSH TO SET
DELAY
On starting the exit timer, this is the time from the push zone being
activated to the system/area being armed.
PORTABLE
ACE
Used in conjunction with remote arming of the intruder system.
When using the entry route, a confirmed alarm will only occur on
the activation of three separate zones including the exit zone.
LIGHT OPEN
ZONES
When set to YES, an opening of any zone in all modes will illuminate all Remote Keypads.
ACCESS
MESSAGE
DISPLAY
When set to YES, all Door forced and Door left open alerts are displayed and the buzzer sounds on the remote keypad. If set to NO,
Door forced and Door left open alerts are only logged.
Issue 04 October 2004
no
yes
no
Programming Menus 2-19
menu
ZONES/DOORS/VARS - EXTRA
Zone Output Mapping
A block of up to 16 outputs can be mapped to a single zone – in a typical configuration this would enable a number of
camera outputs at different points within an area to trip at the same time, once the zone is activated.
Any sequential block of outputs can be mapped – for example: outputs 1 to 16, 20 to 25, 50 to 53, and so on.
The following table shows the zones and set modes which will trip the mapped
outputs where
●
No = Mapped outputs will not trip
●
Yes = Mapped outputs will trip
Zone
Unset
Set
Alarm
No
Yes
Fire-X
Yes
Yes
Panic
Yes
Yes
Day-Pa
Yes
Yes
24 Hour
Yes
Yes
Unset Local
Yes
Yes
E x tr a
#
NO
Programming Menus 2-20
to exit
menu
Function:
NODE CONFIGURE
INSTALLER CODE _ _ _ _
SHIFT
4
This menu allows you to program and view the configuration of the Ringnet.
You can find nodes, examine their status, change their descriptions, change
their IDs, and set up the RKD node backlight, contrast, and so on.
In addition, you can view or change the mapping of zones to node inputs and
view or change the mapping of output types to node outputs.
INSTALLER CODE _ _ _ _
SHIFT
4
Controller scans the
ringnet and analyses the
current node configuration
SCANNING RINGNET...
NODE CONFIGURE
NODES
Unset
INPUTS
Half
UNSET
HALF
OUTPUTS
Help
HELP
N o de s In pu ts O u tp uts
Additional Information
The Node Configure menu has the following submenus:
Nodes - Information - Find: See page 2-22
●
Use this option to scroll through the nodes and view node information and sound buzzer.
Nodes - Inputs: See page 2-25
●
Allows you to clear input zone assignments from a node, manually re-assign zone assignments to a new input or
node, and to automatically re-assign zone assignments to all inputs.
Nodes - Outputs: See page 2-27
●
Allows you to clear output assignments from a node and to manually reassign outputs to a node.
Issue 04 October 2004
Programming Menus 2-21
menu
NODE CONFIGURE - NODES - INFORMATION - FIND
Function:
The Find submenu allows you to scroll through the nodes and view ID information. When a node is
viewed on the display, its on-board buzzer sounds to identify the nodes location.
N od e s
INFORMATION
UNSET
CONFIGURE
HELP
UNSET
FIND
UNSET
HELP
MONITOR
HELP
HELP
M on
Current Node. The asterisk indicates that
the node is currently on-line.
UNSET
0000000031 NODE = 1 *
NODE 1
UNSET
C o n fig
To view the system's nodes
in ascending numerical order
0000000033 NODE = 2
NODE 2
#
Node Description. Each node can be
given an alpha-numeric description
of up to 24 characters (see Typing
Text). By default, the system will
construct a description based on the
node's ID. For example, the node
assigned as ID 2 will have a default
description of NODE 2.
Node Tamper Activated. The hash symbol
indicates that the node’s tamper switch
(front or back) is open.
Node ID. On system power-up every
node is automatically assigned an ID
number (1-100). The main controller
is identified as node 0 (this cannot be
changed). All other node IDs can be
re-assigned from within the
"Configure" menu.
Node Serial Number. Every 3GS
printed circuit board has it's own serial
number which is embedded in
Eeprom and provides Europlex with a
unique product tracking number.
Additional Information
Nodes - Information - Monitor: See page 2-23
●
Use this option to monitor and view a node’s current operational status, input/output connections, and so on.
Nodes - Configure: See page 2-24
●
Allows you to manually or automatically assign or view a node ID, give nodes a text description, and adjust the
RKD settings.
Programming Menus 2-22
menu
Function:
NODE CONFIGURE - NODES - INFORMATION - MONITOR
The Monitor option allows you to monitor a node’s current operational status. The data is displayed in
real time. For example, if you activate a tamper switch of the monitored node, the Lid Tamper message
displays to reflect this.
M on
ENTER NODE NO. 1
Node 01
For RKD node
to scroll forward
through zones.
to scroll back
through zones
Unique node serial number
(embedded in node’s eprom)
IO NODE 8 IN 1 OUT
NODE 2
Node type and number of
inputs/outputs
PSU VOLTAGE = 12.9
NODE 2
DC Supply Voltage to Node
LID TAMPER CLOSED
NODE 2
Lid tamper status
BACK TAMPER CLOSED
NODE 1
BACK TAMPER CLOSED
NODE 2
Back tamper status
ONLINE INPUTS = 2
NODE 1
ON LINE INPUTS = 8
NODE 2
Inputs currently on-line
ONLINE OUTPUTS = 1
NODE 1
ONLINE OUTPUTS = 1
NODE 2
Outputs currently on-line
SOFTWARE VERSION x.x
NODE 2
Node software version
COMM1 ON COMM2 ON
NODE 1
COMM1 ON COMM2 ON
NODE 2
Status of comms. lines 1(in)
and 2 (out)*
DAYS RUNNING = x
NODE 1
NODE FUSE = OK
NODE 2
Status of node fuse
AUX. CURRENT = x mA
NODE 2
Total current drawn from node’s
DC outputs by external devices
DAYS RUNNING = x
NODE 2
Number of days since
node power-up
RKD NODE 2 IN 1 OUT
NODE 1
PART
Alternatively, key in zone
number directly and press #.
For IO node
PCB ID = 0000000032
NODE 2
PCB ID = 0000000031
NODE 1
UNSET
Different nodes have different monitor menus. For example,
nodes with mains/AC and batteries connected will monitor the
status of these also.
PSU VOLTAGE = 12.5
NODE 1
LID TAMPER CLOSED
NODE 1
SOFTWARE VERSION x.x
NODE 1
*This display indicates the status of the node’s Ringnet communication ports.
Comm 1 refers to port 1A/1B (in), Comm 2 refers to port 2A/2B (out). When a
port’s status is ON, data is being transmitted successfully.
If a port displays as OFF, the node has detected a communications failure and
has temporarily shut down the port to allow communications to continue on the
other port. A communications failure can be due to either communication lines
swapped or interference. After a short period the node will re-open the port to
check for communications and will continue to operate in this fashion until
communications have been restored.
Scroll through the online nodes by pressing the UNSET or PART keys. Note that the 3GS Controller board may be
monitored by selecting node 0. Press NO at any stage to exit the menu.
Issue 04 October 2004
Programming Menus 2-23
menu
NODE CONFIGURE - NODES - CONFIGURE
Function:
The Configure submenu allows you to manually or automatically assign or view a node ID, give nodes a
text description, and adjust the RKD settings.
C on fig
IDS
DESC
node configuration
UNSET
HALF
SETUP
HELP
SCANNING RINGNET...
NODE CONFIGURATION
ENTER NODE NO. 1
NODE 1
ENTER NODE NO. 1
NODE 1
#
CLEAR
AUTO
MANUAL
NODE CONFIGURATIONS
#
EDITING LITERAL NUMBER 101011
BACKLIGHT LEVEL =80%
Type in Node Description (see "Typing Text")
up to a maximum of 24 characters. When
HALF
UNSET
HELP
generating a node description it is a good
To clear To auto assign To manually
idea to prefix the description with the node
node Ids
node Ids assign node Ids
ID, e.g. 1- RKD MAIN LOBBY.
B
BUSY CONFIGURING...
UNSET
Select a node
ARE YOU SURE ?
# when complete.
SCANNING RINGNET...
YES
BUSY CONFIGURING...
0000000031
NODE 1
->
Key in new ID number to
assign to this node, eg. 5
NODE 1
UNSET
PART
UNSET
0000000032 ->
60%
80% 100%
#
CONTRAST LEVEL = 100%
0%
20% 40%
60%
80% 100%
# to toggle backlight on/off. When set to on, the
NODE 5
If your choice of node ID conflicts NODE ID ALREADY EXISTS
with an existing node, display shows: OVERWRITE ?
(yes/no)
20% 40%
BACKLIGHT OFF
NODE 1
UNSET
#
0000000031 ->
NODE 5
0%
UNSET
Buzzer of selected
node (to have ID
changed) will sound.
To silence press HALF.
C u rre n t ID n u m b e r o f se le cte d n o d e
SCANNING RINGNET...
BACKLIGHT LEVEL = 100%
Adjust the intensity of the RKD backlight
or contrast level by pressing the Enter key
CONTRAST LEVEL = 40%
ENTER NODE NO.1
NODE 1
#
RKD Display/Key Illumination backlight remains
permanently on. This will increase the RKD's
quiescent current consumption. When set to off,
the backlight will only illuminate on key
depression.
to scroll forward
through nodes
to scroll back
through nodes
Select as required.
to scroll to next node
NODE 2
The new Node ID is displayed: NODE 2
Enter 0 to clear ID (unassigned).
The three options on the display are:
●
IDS: Allows you to manually or automatically assign or view node IDs. This option has three submenus:
Clear - Clears input’s zone assignments from one or more nodes. The buzzer sounds continuously and an alert
message is generated to indicate the inputs are disconnected and the node is lost. The system provides the option
to clear zone assignments from an individual node or from all nodes at once.
Auto - Automatically re-assign zone assignments.
Manual - Manually re-assign zone assignments to a new node or input.
●
Description: Allows you to enter a node description.
●
Setup: Allows you to adjust the node settings.
Programming Menus 2-24
menu
Function:
NODE CONFIGURE - INPUTS
The Inputs submenu allows you to clear input zone assignments from a node, manually re-assign
zone assignments to a new input or node, and to automatically re-assign zone assignments to all
inputs. All inputs must be assigned zone assignments.
The three options on the display are:
Clear
Allows you to clear all node ID assignments and to put inputs into a DISCON state. You can clear input zone
assignments from an individual node or from all nodes at once.
Important Clearing an input's assignment means that all zone information that has been assigned to that input will be
lost and therefore EOL input activity will not be reported.
Auto
Allows you to automatically assign zone numbers to unassigned node inputs in ascending sequential order. Inputs other
than those that are in a DISCON state will have zones assigned. If some inputs have already been assigned zones,
selecting this option can produce a non-sequential series of zones on a node.
For example, if inputs 1-6 on a node are assigned as zones 9-14 and inputs 7-8 are unassigned; by selecting Auto, the
system will search for the highest available zone numbers to assign to inputs 7 and 8. If the highest available zones are
26 and 27, the zone sequence on this node will read 9, 10, 11, 12, 13, 14, 26, 27.
Manual
Allows you to manually re-assign zone assignments to a new node or input. Selecting Manual provides three fields of
data, as follows:
햲 Allows you to view an input's zone assignment.
햳 Allows you to relocate a zone to another node.
햴 Allows you to re-assign a zone to an input.
Issue 04 October 2004
Programming Menus 2-25
Node Configure, Inputs Menu
_N
E
G
D
IO
R
C
L
n
A
iy
T
S
e
K _.T
TFIH
4S 7
6
5
4
3
2
.o
N
la
ire
S
p
le
H
T
E
U
R
P
fG
Ia
F
O
N
S
C
tD
s
n
O
N S
o
w
N
rp
h
tld
ie
n
au
scM
T
b
m ,stu
p
an
iG
d
/e
rIU
SR
P
y5
S
EY 5
S
EY
E
4
N
S
D
O
L
-A
C
o
.>
-T
V
O
M
C
tD
A
L
s
P
n
EY
p
le
H
N
IfE
R
a
U
G
F
S
EY ?
T
E
N
G
w
n
e
h
iR
tyd
.kacslro
P
f .n
8
iagm
2
?
S
te
O
T
sF
yU
h
R
N
P
ID
E
L
- 0
1
>
3
-S
O
N
n
e
h
w
y
k
d
o
a
s
rA
Py
d
a
e
r D
E
H
S
IN
F
Programming Menus 2-26
menu
Function:
NODES CONFIGURE - OUTPUTS
The Outputs submenu allows you to clear output assignments from a node and to manually reassign
outputs to a node.
O utp uts
CLEAR
output configuration
UNSET
ASSIGN
*key in node
number directly:
HELP
2
4
or
UNSET
#
PART
SINGLE NODE
ALL NODES
output configuration
UNSET
to scroll forward
through nodes
to scroll back
through nodes
NO
to exit
HELP
ENTER NODE NO. 1
NODE 1
Scroll through and select a
single node number.*
ENTER NODE NO. 3
NODE 3
D isp la y s h o w s:
ENTER NODE NO.1
NODE 1
� Confirm Node Selection
#
ARE YOU SURE ?
OUTPUT 2 NODE1 ->NOT PROG
NODE 1
#
#
To remove all
output
assignments on
node 3
YES
This will clear
output
assignments on
all nodes.
� Assign Output Type. This field allows
you to assign an output type to an output.
ENTER OUTPUT NO 1
The next display presents three
fields of data which enable you
to assign output types
ARE YOU SURE ?
YES
to confirm selected node.
to e x e c u te
� Select output number. The first field allows
you to select an output number and view
the output type assigned to it.
OUTPUT 2 NODE1 -> TYPE 1
enter output type
P re s s
UNSET
#
#
- to sc r o ll to T Y P E 3 :
OUTPUT 2 NODE1 -> TYPE 3
enter output type
to assign output 2 on node 1
as output type 3.
Output Number
OUTPUT 1 NODE1 ->NOT PROG
enter output no.
Output Type
This display shows that output 1 on node 1
has not been assigned an output type.
Therefore it has an output type of 0 and will
remain off line.
To assign an output type 3 (panic alarm)
tooutput 2 on node 1 proceed as follows
UNSET
to scroll to output 2
OUTPUT 2 NODE1 ->NOT PROG
enter output no.
P re s s
# to se le c t.
Additional Information
All outputs must be assigned to an output type (between 0 and 255, 0 being unassigned). The 3GS Controller defaults
to having output types 1, 2, 3, and 4 for output numbers 1, 2, 3, and 4. The mapping of these output types to specific
output functions is described in the Edit Output Functions Menu . This menu allows you to set up physical outputs of
nodes for output control.The two submenus are:
●
CLEAR: This menu allows you to clear output assignments from one or more nodes.
Note Clearing a nodes output assignment means that the output is set to type 0 and therefore will not trigger. On the
Controller (node 0), output 1 is unaffected but 2, 3, and 4 are left unassigned.
●
ASSIGN: This menu allows you to assign output types to node outputs. An output type determines an output’s
behaviour (the conditions under which it will trigger). Select a node by scrolling to it or enter a number directly.
The system identifies the number of outputs on a node and so allows access. Therefore, when only a single output
exists on a node, scrolling is not possible.
Issue 04 October 2004
Programming Menus 2-27
menu
Function:
NODE CONFIGURE - RECONFIGURE RINGNET
The Reconfigure Ringnet submenu allows you to add or remove a node, or
replace a node – without losing any of the node’s configuration.
Zone descriptions, zone numbers, and output types of the previous zones and outputs are automatically mapped back
to the same addresses.
For example, a 3GS system with an 8 Input/1 Output node on which 3 of the inputs are used as system zones 4, 5, and
6 and the output is coded as Type 7. The new node will automatically be coded up with these zone numbers and
output type.
If there are extra inputs on the new node, the additional zones will be added to the end of the zone count.
Note We recommend that you replace nodes one at a time, using a node of the same type.
Ensure that the Ringnet is completely and securely re-connected.
INSTALLER CODE _ _ _ _
SHIFT
4
SCANNING RINGNET...
NODE CONFIGURE
NODES
Unset
INPUTS OUTPUTS
Half
Help
NO
RECONFIGURE RINGNET ?
YES
REPLACE
Unset
ADD
Half
REMOVE
Help
Remove node and replace
Press any key when ready
D is c o nn e c t a n d p h y sic a lly
re m o ve th e no d e fro m th e
s ys te m a n d re p la c e w ith
a n o th e r n o d e .
Pre ss a n y k e y w h e n fin is he d
a n d th e sy ste m w ill s ca n th e
ring n e t a g a in .
D is c o nn e c t a n d p h y sic a lly
re m o ve th e no d e fro m th e
s ys te m .
Pre ss a n y k e y w h e n fin is he d
a n d th e sy ste m w ill s ca n th e
ring n e t a g a in .
C o nn e c t th e n e w n o d e
p h ys ic a lly to th e s yste m .
Pre ss a n y k e y w h e n fin is he d
a n d th e sy ste m w ill s ca n th e
ring n e t a g a in .
Serial No. 234567
Node ID 5
Exchange Node 4 ?
Serial No. 8171
SCANNING RINGNET ...
YES
YES
Remove Node 3 ?
Serial No. 3456
SCANNING RINGNET ...
YES
Exchange Node 4 ?
Are you sure ?
YES
Remove node. Fix cables.
Press any key when ready
Add node
Press any key when ready
ON-LINE NODES 4 ->5
C h e c k th a t th e b a r c o d e o f th e
n o d e to b e r e m o v e d is c o r r e c t
C h e c k th a t th e b a r c o d e o f th e
n e w n o d e is c o rr e c t
YES
ON-LINE DOORS 2 ->3
YES
YES
Node removed
Press any key when ready ...
YES
Updating node database ..
SCANNING RINGNET ...
SCANNING RINGNET ...
ON-LINE NODES 4 ->3
ON-LINE NODES 4 ->4
YES
ON-LINE INPUTS 8 ->8
YES
ON-LINE DOORS 2 ->2
YES
ON-LINE INPUTS 8 ->6
ON-LINE DOORS 2 ->1
PRINT NODE INFO?
NO
FINISHED
Programming Menus 2-28
C h e c k th a t th e b a r c o d e o f th e
n o d e to b e r e m o v e d is c o r r e c t
Remove Node 3 ?
Are you sure ?
ON-LINE INPUTS 8 ->10
New Node No. 51617283
Is this correct ?
YES
YES
menu
Function:
RADIO PA SETUP
INSTALLER CODE _ _ _ _
SHIFT SHIFT
9
This menu allows you to set up the pager to transmit to pager receivers and set
up the radio panic attack button units.
INSTALLER CODE _ _ _ _
SHIFT SHIFT
9
RADIO PA SETUP
BUTTONS
Unset
PAGER
Help
UNSET
HELP
RAID
Not Assigned
Press the Radio PA
button (or
combination of
buttons) that you
wish to assign for
suspicion alarm. Eg,
press LEFT button,
display shows
Continue to assign
buttons in this
fashion
to scroll forward
through zone.
to scroll back
through zones
PAGER ADDR
Unset
PART
TEST
Help
HELP
UNSET
PAGER ADDRESS = 0000000
SUSPICION
LEFT BUTTON
SENDING TEST MSG
TE ST ME SSAGE
#
Key in digits for an address.
If you make a mistake and
wish to overwrite a digit
RAID
Not Assigned
DELAYED RAID
Not Assigned
UNSET
,
*
to move back a character
YES
to move forward a character
A test message is now
transmitted to the
pocket pager of this
Address.
RAID CANCEL
Not Assigned
INTERROGATE
Not Assigned
PHOTO ENTRY
Not Assigned
*
NO
to exit from either menu
NO
to exit from option
PRINT PAGER/BUTTN DATA
To clear an
assignment
NO
to exit YES
to print
Additional Information
Buttons
Select Buttons to assign a single button or a combination of buttons to an option. Up to 7 different button configurations may be
obtained by pressing the buttons singularly and as combinations. This allows all six options to be assigned to a RPA. Note that
these options must be granted to the RPA within the Radio PA Assign - Options submenu (see page 2-79) in order for the RPA to
operate.
Note The assignment that is made to one RPA button(s) is the same for every RPA unit on the system. For example,
if the left button on RPA 1 is assigned as Raid, every RPA left button is also assigned as Raid.
Pager
Each pager unit has a unique 7 digit address. Key in this address as shown and select the test function to send a
message to the relevant pager.
Issue 04 October 2004
Programming Menus 2-29
menu SERVICE MODE
Function:
INSTALLER CODE _ _ _ _
SHIFT
YES
This option allows you to check the physical operation of the system, verifying that all zone/door inputs
are responding correctly. Data is available on the state of each zone/door input (whether online or not).
INSTALLER CODE _ _ _ _
SHIFT
YES
SERVICE MODE
REPORT
Unset
TEST
Half
MONITOR
Help
UNSET
HALF
HELP
R e p o rt
Test
M onitor
Additional Information
This menu is most useful for testing zones and doors on this system. Reports can be generated for online zones and
doors. A complete walk test of all zones and doors can be carried out and a log of this test is recorded. Individual zones
or doors can be monitored for current real time states without generating alarms.
Outline Report: See page 2-31
●
This menu allows you to view the display or print out the state of all online zones and doors on the system.
Test: See page 2-32
●
This menu allows you to test all online zones and doors on the system.
Monitor: See page 2-34
●
This menu allows you to monitor the state of all zones and doors on the system.
Programming Menus 2-30
menu
Function:
SERVICE MODE - ONLINE REPORT
The Online Report submenu allows you to generate an online report for zones or door inputs (inputs
which have EOLs fitted). This report displays all online zones or doors connected to the panel which have
states other than DISCON (disconnected).
Additional
Information
Re port
To print a report
Before printing the report,
ensure a serial printer is
attached to one of the serial
ports of the Controller. Use
the Set Data Formats menu
to configure the serial port
for printer settings.
ZONES
UNSET
The report starts with the
zone which has the lowest
number on the system and
increases numerically until
all the online zones have
been reported. The system
displays zone type, number,
state, analogue value (in
brackets), node number, and
the input to which the zone
has been assigned. Each
zone state displayed will be
prefixed with a character if a
zone is either manually
inhibited, command string
inhibited, or disabled.
Note Use the # key if you
need to skip quickly through
the report.
Issue 04 October 2004
HELP
ON-LINE REPORT
PRINT ON-L REPORT ?
FINISHED is printed at the
end of the report. To
terminate the printout at any
stage press the NO key (this
displays an ABORTED
message).
If you do not require a hard
copy, you can send the
report to the display by
pressing the NO key when
the print alternative is
displayed.
DOORS
Press to view
online report
NO
YES
PRINTING...
Z o ne o n -lin e re p o rt
Zone type
Set by default.
May be changed in
Zones - Doors - Vars Menu
AREA 1 1 CLOSED
LOBBY AREA 1
ZONE 2 CLOSED
ZONE 2
AREA 1 3 OPEN
ZONE 3 AREA 1
Resistance Value
Current Zone State
Zone number
Zone type
Zone description
or
Zone type
D o o r o n-lin e re p o rt
[2100]
D o o r zo n e typ e
M a y b e c ha n g ed in
AREA 1 1 CLOSED [2100] Z o ne s - D o o rs - Va rs M en u
FRONT DOOR AREA 1
[2154]
DOOR 2 CLOSED
DOOR 2
[2154]
[4147]
D oor
N um ber
D o o r Typ e
AREA 1 1 CLOSED [2100]
LOBBY
AREA 1
AREA 1 3 OPEN
DOOR 3 AREA 1
D o o r S ta te
[4147]
Door description
Resistance Value
AREA 2 CLOSED [2100]
WINDOW
UNSET
Press to increase scrolll
speed
ZONE 12 CLOSED [2100]
ZONE 12 OPEN
Report will detail all zones
on the system and when
finished exits to the main
menu
Programming Menus 2-31
menu
Function:
SERVICE MODE - TEST
This menu allows you to walktest the zones and doors on the system.
Additional Information
Testing a zone/door
The left hand side of the top line of the display shows the zone/door to be tested, while the result of the last zone
tested is to the right. The node and input to which it is assigned are displayed on the bottom line.
To help identify the location of the zone/door, press the Help key to display the zone description (if one exists). In door
walktest, the door description will be displayed on the bottom line of the display (if one exists), otherwise the door
number and zone type assigned will be displayed.
The system will start by requesting the first online zone on the system to be tested and then work in ascending
numerical order until the last zone on the system is tested.
The message TEST 1 will remain in the display until the system detects a change from zone 1. While waiting for this
change, all other zone changes are displayed and noted by the system. This is so that when their turn in the numerical
sequence comes, it will be unnecessary to walktest those zones again (the system skips to the next zone which has not
changed state since the start of the test).
Whilst the panel is displaying TEST, you can view the zone description for the zone in question by pressing the Help
key.
If a zone cannot be tested for some reason, you can skip it by pressing the # key.
Printout
When Walktest is chosen, a printout is started which displays information about the walktest. First, the time and date of
when the test started is printed along with any zone which is skipped. When the walktest is complete, the number of
zones correctly tested are printed along with the number which were not tested. The final line of the printout gives the
time and date at which the test was finished.
Note If a zone is inhibited or disabled, it will only be reported in the display when it is the zone currently being
tested.
Programming Menus 2-32
Service Mode, Test, Monitor Menu
Te st
REPORT
UNSET
TEST
HALF
UNSET
HALF
MONITOR
HELP
HELP
ZONES
UNSET
DOORS
HELP
HELP
UNSET
WALKTEST
TEST 1
NODE 0 INPUT 1
#
WALKTEST
the system is prompting you
to test zone 1
to skip a zone without testing
TEST 2 :
1 OPEN
NODE 0 INPUT 2
NO
to abort test
Next zone to test
TEST 3 :
2 OPEN
NODE 1 INPUT 1
Result of last zone tested
TEST 1
DOOR 1
#
ALARM
the system is prompting you
to test door 1
to skip a door without testing
TEST 2
DOOR 2
ALARM
NO
to abort test
Now open DOOR 2
TEST 3 :
2 OPEN
DOOR 3 ALARM
Now open DOOR 3
TEST 4 :
2 OPEN
NODE 1 INPUT 2
FINISHED
Issue 04 October 2004
TEST 4 :
3 OPEN
DOOR 4 ALARM
Display returns to this when
the last zone number is reached.
FINISHED
Display returns to this when
the last door number is reached.
Programming Menus 2-33
menu
Function:
SERVICE MODE - MONITOR
The Monitor submenu allows you to look at any zone/door individually and will
display its state and resistance value. The buzzer is also sounded if the zone/
door is not closed with a different tone for each state.
Note Zone Status does not show zones when they are in Soak Mode
On selecting this menu, enter the number of the zone/door to be tested and press #. The number you enter must be a
valid number or an error message is displayed and you must try again.
You can increment (UNSET key) or decrement (PART key) the zone/door number without having to exit and re-enter
this mode. The characters displayed determine the zone/door status.
Character(s) displayed Zone Status
NIGHT 4 CLOSED [2100]
NODE 0 INPUT 4
On-line : [value]
NIGHT 4 CLOSED * 2100*
NODE 0 INPUT 4
Not on-line : *value*
* NIGHT 4 CLOSED [2100]
NODE 0 INPUT 4
Inhibited manually : leading *
/ NIGHT 4 CLOSED
NODE 0 INPUT 4
[2100]
Inhibited by command string : leading /
+ NIGHT 4 CLOSED [2100]
NODE 0 INPUT 4
Inhibited manually and
by command string : leading +
NIGHT 4 CLOSED /2100/
NODE 0 INPUT 4
Disabled : /value/
At this stage, the UNSET key will cause the display to change showing the response of the input above and the PART
key will show the input below. The resistance value displayed will increase on systems with long cable runs or cable
with high capacitance.
The buzzer is used in this mode to indicate the state of the input under test. The relationship between buzzer sound
and the state of the input is as follows:
Input State
Buzzer Pattern
Closed
Off
Open
Long Beep
Short
Fast Beep
Disconnected
Continuously On
Note The buzzer sound can be distracting – it is possible to silence it by pressing the HALF SET key. Default =
buzzer sound ON. Press the help key to view the zone description.
Programming Menus 2-34
Service Mode - Monitor Menu
M o nitor
REPORT
UNSET
UNSET
TEST
HALF
MONITOR
HELP
HALF
HELP
ZONES
UNSET
DOORS
HELP
UNSET
HELP
ZONE MONITOR
DOOR MONITOR
ENTER ZONE NO. 1
RECEPTION PIR
ENTER DOOR NO. 1
FRONT DOOR
ZONE NUMBER _ _ _
#
DOOR NUMBER _ _ _
#
Zone/door status
is displayed
ALARM 1 CLOSED
NODE 0 INPUT 1
To scroll
forward
UNSET
ALARM 2 CLOSED
NODE 0 INPUT 2
HELP
…
RECEPTION PIR
Issue 04 October 2004
[2100]
PART
ALARM 1 CLOSED
FRONT DOOR
To scroll
back
[2100]
to view
zone description
To scroll
forward
UNSET
ALARM 2 CLOSED
FRONT DOOR
[2100]
PART
Door Type
Door Number
Current Door State
Resistance Value (ohms)
Node number and
input number
To scroll
back
[2100]
HELP
to view
door description
…
FRONT DOOR
Programming Menus 2-35
menu
Function:
RADIO PA TEST
INSTALLER CODE _ _ _ _
SHIFT SHIFT
0
This menu allows you to test radio panic attack buttons on the system, without
causing alarms. Details of the unit under test are displayed.
K e y in
Additional Information
INSTALLER CODE _ _ _ _
SHIFT SHIFT
0
TEST RADIO PA
Location of Node
See HUA Node in 3GS Hardware.
NO BUTTONS PRESSED
Radio Field Strength
Some units do not support this feature. The Radio Field
Strength percentage will help the installer to determine
the optimum location for placement of a HUA Node.
The installer can test a node’s ability to receive a signal
by activating an RPA button at different locations
throughout the premises. A low reading of signal
strength may require the node to be relocated. If
relocation does not provide the required coverage, an
additional node may be added to the system, placed in
a suitable location and re-tested.
Pre s s a R a d io PA b u tto n
a n d d a ta o n th e b u tto n
a n d u n it w ill a p p e a r o n
th e d is p la y, e g :
RPA1
JOHN SMITH
SUSPICION
75%
R PA D e sc rip tio n
R a d io Fie ld S tr e n g th
O p tio n A ss ig n e d
Pre s s a n o th e r b u tto n (o r co m b in a tio n
o f b u tto n s if p ro g r a m m e d ) a n d a
d iffe re n t o p tio n is d isp la y e d :
RPA1
RAID
JOHN SMITH
75%
To e xit fro m o p tio n p r e ss NO
Battery Low
If the RPA battery level is below 7.5Vdc, the RPA will
not operate correctly and the system will display an RPA
Battery Low message (in which case batteries must be
replaced). If the low battery condition is ignored, the
transmitter will eventually fail to transmit (the transmit
indicator will not illiminate when buttons are pressed).
Yo u a re th e n p ro m p te d ...
Are you sure ???
Pre s s Y E S to e x it th e Te st R A D IO
PA m e n u .
RPA ..
xxxxxxxxxx
Right & Left
75%
R PA B a tte ry b e lo w 7 .5 V d c w ill
p r o d u c e th is m e ss a g e :
RPA 1
Programming Menus 2-36
Low Battery
Alternative Data Displayed
If R PA n u m b e r is m is sin g
th is in d ic a te s th e u n it is n o t
a s sig n e d to s y ste m .
1 0 - d ig it s e ria l n u m b e r
d isp la y e d if n o d e sc rip tio n
h a s b e e n g iv e n .
If n o o p tio n is a ss ig n e d ,
th e k e y (s) p re s se d a re d isp la y e d .
menu
Function:
SETUP CARDS
INSTALLER CODE _ _ _ _
SHIFT SHIFT
6
This menu allows you to setup cards on the access system and pass them for
various levels of access.
6
SET UP CARDS
CARDS
UNSET
PASS/VOID
HELP
UNSET
HELP
Pass/
Void
ASSIGN
UNSET
FORMATS
HALF
SITE CODE
HELP
UNSET
HALF
HELP
A ssign
Fo rm a ts
Site
Code
Additional Information
Europlex’s Access Control Management software, 3GS+, is available to setup and manage the Access Control system
database.
Note For more information on this menu, see Access System Overview in 3GS Hardware.
Assign: See page 2-38
●
This menu is used to assign cards onto the 3GS system. All cards must be assigned before they can be programmed
for use on the system. Cards can be assigned by presenting them at a reader and learning the card, by selecting
from a range 1-10,000, or by programming via 3GS+.
Formats: See page 2-39
●
This menu allows for the use of non-standard card formats.
Site Code: See page 2-40
●
This menu is used to program the system site code.
Pass/Void: See page 2-41
●
This menu allows you to pass or void cards on the system. Cards can be passed for groups of doors for time zones.
Cards can be given PIN codes, an expiry date or a function level in this menu.
Issue 04 October 2004
Programming Menus 2-37
menu
SETUP CARDS - CARDS - ASSIGN
This menu is used to insert cards onto the 3GS system.
A ssig n
UNSET
HELP
Additional Information
This menu allows you to assign IDs to cards in 2 ways:
●
Learn: The card to be passed is of unknown origin and the pre-encoded number is not known. In this case, the
card is presented at a card reader and then given a card ID. When you re-assign the ID to your present card, the
existing ID, description, and door group/time zone information is over-written and must be re-set.
You will be prompted if the ID has already been assigned, in which case you can over-write the existing card, or
choose the next available ID.
●
Select: Batches of cards with pre-coded numbers of between 1 and 9999 can be passed directly into the system
and given corresponding card IDs. The first card of the batch becomes Card ID 1, the second becomes Card ID 2,
and so on.
In effect, this gives you 1-to-1 mapping, automatically assigning IDs to cards.
Programming Menus 2-38
menu
Function:
SETUP CARDS - CARDS - FORMATS
This menu is designed to allow you to enter details of Wiegand or ISO cards that
are not of the standard format.
Form ats
Additional Information
Access node version 1.08 and later supports the following structured card formats: Wiegand 26/30/37, ISO 4-4, and
Macrosoft, but is designed to recognise other formats using the formats menu. It is possible to use this menu to setup
the system to recognise other Wiegand or ISO formats by programming the required parameters.
Wiegand
Site Code Bits Enter the number of bits for the card site code.
Card Number Bits Enter the number of bits for the card number.
Even/Odd Parity Length Enter values here for the parity length in bits.
ISO
ISO cards will require values for Site Code and Card digits.
Issue 04 October 2004
Programming Menus 2-39
menu
Function:
SETUP CARDS - CARDS - SITE CODE
This menu allows you to setup the Site codes for cards, to specify the pin code
length, and to enter the system pin code for PINpad only operation.
Site
Co d e
Additional Information
Site Code Can be of any length up to 10 digits.
PIN Length Defaults to 4 digits, can be up to 6 digits.
PIN Code Enter the system PIN code for standalone PINpad only operation.
Programming Menus 2-40
menu
Function:
SETUP CARDS - PASS/VOID
This menu allows you to pass cards on the Access Control system once a card ID has been assigned.
P ass/
Vo id
Enter Access Level
Enter Visitor Level
Change Access Level?
Not assigned
0
0
Change Visitor Level?
Not assigned
Enter Function Level 0
Change Function Level?
Not assigned
PIN Code Required YES
Change Requirement?
PIN Code not required
PIN Code Required NO
Change PIN Code
YES
Enter PIN Code
Card Inside Perim?
Returns to main menu
Change Card Location?
Card Inside Perim.
Returns to main menu
Additional Information
Card Range
Enter the range of cards to be passed, from 1 to 9999. To pass a single card, enter the card number and press the # key
twice. Once the card(s) has been passed, the display will prompt for the access level for this/these cards.
Change Access Level?
An access level is a combination of one or more group times. Group times consist of Time Zones applied to door
groups so that once applied to a card, it will limit the card user to having access to certain doors at certain times only.
Up to 250 access levels are programmed by the installer, who will indicate which levels should be assigned to which
cards. When you have assigned an access level, you are prompted for the visitor level.
Change Visitor Level?
The visitor level is used to program temporary cards, which will only be valid for a certain period of time (between a
Issue 04 October 2004
Programming Menus 2-41
given start and end date & time). The system allows for
up to 250 different Visitor levels, which are programmed
by the installer. Once assigned, you are then prompted
for a function level.
Change Function Level?
Function levels give the user the ability to set/arm and
unset/disarm an area by presenting a card to a reader
outside the area entrance door. A function level will give
a card 3 extra capabilities: to unset/disarm an area from
the outside, to unset/disarm an area from the inside, and
to set/arm an area once you have left (by swiping your
card at a reader near the exit door). Up to 250 function
levels are programmed by the installer. When you have
assigned a function level, you are prompted to change
the PIN code requirement for the card.
Change Requirement?
This option allows you to decide if a card should also
require a PIN code before it will be granted access
through a door. It also allows you to change the existing
PIN code for the card or create a new one.
Note The user should be aware that the PIN code created
using this option will apply to all the cards being passed at
this stage
Once a PIN code requirement has been assigned, you
will be prompted to identify the card location.
Change Card Location?
Before the card is passed, it must be located in the
system. This menu will identify the card as being inside
or outside the alarm area when passed.
Programming Menus 2-42
When all the system cards can be located at any time, they
can be tracked and controlled effectively. Setting the card
location enables the card for Roll Call and Anti-Passback
functions (both configured using 3GS+), which allow the
installer to identify which cards are in use in the system at
any given time and to control the use of cards within the
system. Once the location has been assigned, press the
key to return to the main menu.
Voiding Cards
The Void Cards option removes a set of cards from the
system.
Voiding a card removes all the card’s settings, from card
ID to access/function/visitor levels.
Exiting the Setup Cards menu
Press NO to exit.
The display will show:
If you have a printer connected to the Controller serial
port, you can now print out the card settings you have
just configured.
Press YES to print and NO to exit.
menu
Function:
CARD INFORMATION
INSTALLER CODE _ _ _ _
SHIFT SHIFT
4
This menu allows you to test cards on the system.
CARD INFORMATION
TEST
Unset
No card present
Pre s e n t a n y c a rd to th e re a d e r.
If th e c a rd is n o t v a lid , th e
d isp la y w ill n o t c h a n g e .
T h is d ig it in d ic a te s c a rd
h a s b e e n a s sig n e d
(if u n a s sig n e d ,
".." w ill a p p e a r).
Card ID
Site Code
CARD 3 -> 1013
SITE : 1234
Door 9
NO
#
Card Number
Door card has been
presented at
Pre ss N O to exit th e
m en u , o r # to vie w
a n o th er ca rd
Additional Information
Testing Cards
The Test menu checks that the card presented to the reader is valid for the system. A card will be valid if it is the right
card type for the reader (proximity, swipe), if it has the correct site code encoded, and if it has been passed on the
system – see “Setup Cards” on page 2-37.
The default is No card present. If the card is not a valid format, the display will not change and you can press NO to
exit the test. When you present a valid card to a reader, the display will show the card ID, number, site code, and the
door at which the card is presented.
Issue 04 October 2004
Programming Menus 2-43
menu
Function:
DOOR CONFIGURE
INSTALLER CODE _ _ _ _
SHIFT
3
This menu allows you to set an ID, description, and open/locked properties for the doors on your system.
3
Setup
p re ss
to m o ve to n e x t d o o r
!"
NO
to exit
#$
% Additional Information
Each door is automatically given a unique ID, which will identify the door within the system. Time zones are
configured in a separate system menu – see “Time Zone Setup” on page 2-49. When configuring a door, you can only
assign pre-set time zones. Similarly, door groups (sets of pre-configured doors) are set up within the door group system
menu.
Note Doors can be assigned as 'zone' types the same way as normal zones. As such, when the door changes state,
it will act in the same way as a zone (with the same 'type' assigned). For example, if the Exit attribute is set to
YES for a door, it will start the entry time when opened if the system or area is set/armed.
IDs
The system automatically assigns an ID to every new door with an EOL resistor connected to the door input, attaching it
to the next available reader on the node. The door will then be identified by its number, the ID of the reader/lock to
which it is attached, and the ID of the node on which the reader is to be found. For example: Door 1, Node 2, Reader 2.
Clear will clear all existing Door IDs from the system, leaving every ID unassigned.
Note If you Clear existing door IDs, you must follow this by selecting Auto, or the system doors will not function.
Auto scans the system and re-assigns every valid door in numerical order. If a Door ID is cleared from the system, the
next door will be re-assigned to the ID left unassigned.
Manual option not implemented.
Door Description
Enter door description required – see “Typing Text” on page 2-4 for further information on entering text.
Setup: See page 2-45
This menu allows you to setup all door options, timers, and time zones.
Programming Menus 2-44
menu
Function:
DOOR CONFIGURE - SETUP
This menu allows you to setup the door options.
S e tu p
O P T IO N S
U nse t
T IM E R S
H a lf
Unset
ZON ES
H e lp
HALF
HELP
T im e rs Z o n e s
OPEN INHIBIT?
UNSET
PART
to scroll forward
to scroll back
LOCK INHIBIT?
ASSIGN PINPAD?
ENABLE ANTI-PASSBACK?
YES
to assign
NO
to clear
#
to accept
DOOR SET OPEN INHIBIT?
DOOR UNSET LOCK INHIBIT?
PIN CODE WHEN DOOR SET?
ANY ISO FORMAT CARDS?
YES
YES
YES
YES
YES
YES
YES
YES
Door 1 Open
Door 2 Lock
Door 3 PINPad
Door 4 ANTI-PB
Door 5 Open
Door 6 LOCK
Door 7 PINPAD
Door 8 ISO
Additional Information
Timers: See page 2-47
This menu allows you to setup door related times such as Door Open Time and Lock Time.
Zones: See page 2-48
This menu allows you to assign time zones to doors.
All 64 doors are represented by dots. YES selects the option *, which appears on the display, on a door. Selecting NO,
the default, will then remove the option from the door. UNSET scrolls to the next door, PART scrolls back to the
previous door. The * button will toggle between selecting the option for ALL doors and removing the option from ALL
doors.
Open Inhibit?
When this option is selected, it prevents the doors being opened by time zone or by manual door control (RKD or PC
menu).
Lock Inhibit?
When this option is selected, it prevents doors being locked by time zone or by manual door control (RKD or PC menu).
Issue 04 October 2004
Programming Menus 2-45
Assign Pinpad?
The Pinpad menu allows you to assign PINpads to one, some or all of the 64 doors available in the system. This option
is coordinated with the PIN code option selected when setting up cards. PINpad identifies those doors that may
require a PIN code for access and will therefore need a PINpad installed near the card reader. The display shows the
doors (32 at a time) represented as dots, followed by the Door ID and PINpad. PINPads will normally be positioned on
the entry side of a door.
YES assigns a PINpad to the reader on Door 1 (default is NO), and the selection is shown by *. UNSET scrolls forward
to Door 2, PART scrolls back. Any PINpad assignment to a door can be removed by scrolling to the relevant Door and
selecting NO. The * button toggles between PINpads assigned to all doors, and no PINpads assigned to any doors.
Anti-Passback?
Anti-Passback is a feature that will help to prevent a number of different people using the same card.
When a card is used to gain entry to a door that has been set to Anti-Passback, the same card must be used to exit. So every
entry through the door using this card must be followed by an exit using the same card. If a ring of doors around an area have
all been set to Anti-Passback, the user can enter through one door and exit through any of the other doors in the ring. In
effect, this creates an anti-passback perimeter. Whoever enters the perimeter will need the same card to exit. This helps to
restrict the use of a card to one user, and creates an effective card tracking system – “Setup Cards” on page 2-37,
The ANTI-PB menu is used in the same way as PINpad and Inhibit. 32 doors at a time are represented by dots. YES
sets Anti-Passback on a door (the default is NO) and the setting is shown by *. UNSET scrolls forward to Door 2, PART
scrolls back. The * button toggles between assigning the option to all 64 doors or assigning it to none.
Door Set Open Inhibit?
When the area for this door is set, then it is prevented from going into free access.
A typical application for this would be a door that is normally on free access from 9am to 5pm. If the system is still set/
armed at 9am, then the door will not go into free access.
Door Unset Lock Inhibit?
When the area for this door is unset/disarmed, then it is prevented from being locked.
PIN Code when Door Set?
If the door has this option, then a PIN code is required when a card is presented and the area for this door is set.
Any ISO Format Cards?
If the door has this option, then any card conforming to the ISO format will be allowed through the door.
This is mainly used for bank lobbies and is only available on Access Control Node software rev. 1.06 or later. These
cards do not need to be assigned or passed on the system, so the number of bankcards allowed access is unlimited.
Access granted to bankcards is logged in the panel access log.
Note All door options can be set up at the keypad, but it is recommended that all access control features/settings
are implemented using 3GS+ PC software.
Programming Menus 2-46
menu
DOOR CONFIGURE - TIMERS
Function:
This menu allows you to change the timers for individual doors, and allows for
doors to be configured with different times.
T im e rs
ENTER DOOR NO 1
DOOR 1
K e y in d ire c tly o r s c ro ll to
th e d o o r y o u w is h to a d ju s t
th e s e ttin g s fo r.
ENTER DOOR NO. 3
DOOR 3
p re s s
#
UNSET
to scroll forward
DOOR OPEN TIME = 10
(secs)
PART
to scroll back
LOCK TIME = 5
(secs)
GRANTED TIME = 5
(secs)
DENIED TIME = 3
(secs)
D is p la y re tu rn s to s u b - m e n u
d is p la y s h o w n a b o v e .
Additional Information
Door Open Time
This is the number of seconds that the door is allowed to remain open after you have been granted access. This feature
prevents a door from being accidentally left open or intentionally propped open.
The default is 10 seconds and the range is 0 to 255 seconds. To accept the default, simply press #. To enter a new
time, key in the new time. Then type # to accept.
Lock Time
The number of seconds for which a door lock is released. This is the length of time the user will have to physically open
the door once they have been granted access.
The default is 5 seconds (range 0 - 255). A zero-second value (called turnstile operation) is possible, which will unlock
the door for a fraction of a second. Press # to accept the default. To enter a new time, over-type the flashing number
with the new setting and press # to accept.
Granted Time
The number of seconds for which the Green LED (access granted) will light. The default is 5 seconds.
Denied Time
The number of seconds for which the Red LED (access denied) will light.
The default is 3 seconds. Once you have accepted your settings for this door, the menu will prompt you for another
Door Number. Enter the number of your choice, or use the UNSET or PART keys to scroll forwards or backwards to a
particular Door. To exit the TIMERS menu at any stage, press NO.
Issue 04 October 2004
Programming Menus 2-47
menu
Function:
DOOR CONFIGURE - ZONES
This menu allows you to assign any of the first 16 preset time zones to individual
doors.
Zones
ENTER DOOR NO 1
DOOR 1
YES
to assign
NO
to clear
#
to accept
#
Time Zone 1
#
PRINT DOOR DATA
?
#
ALL DOORS
?
NO
ENTER DOOR NO 1
DOOR 1
#
PRINTING ...
Additional Information
When you have selected the Door Number, the display will show the 16 available time zones as dots. To assign a time
zone to a door, use the UNSET and PART keys to move to the zone of your choice. Selecting YES assigns that zone to
your Door. NO will clear a time zone previously set. # accepts your settings. The * button toggles between assigning all
time zones to this door or assigning no time zones.
Before leaving the system menu, you will be prompted to print the door data you have just configured. This printout
will detail the settings for all or individual doors in the system.
Programming Menus 2-48
menu
TIME ZONE SETUP
Function:
INSTALLER CODE _ _ _ _
SHIFT SHIFT
5
This menu allows you to setup and clear time zones and configure holidays for
use on the Access Control system.
INSTALLER CODE _ _ _ _
SHIFT SHIFT
5
TIME ZONE SETUP
CALENDAR
Unset
ZONES
Help
CLEAR
Unset
SETUP
Help
ENTER MONTH 1
S etu p
ALL TIME ZONES ?
#
A s sig n H o lid a y sta tu s
to d a ys u s in g th e
U N S E T a n d PA R T k e ys
to sc ro ll, a n d th e Y E S
k e y to a ss ig n .
Day 1 Jan
YES
NO
ENTER TIME ZONE 1
#
#
ENTER MONTH 2
CLEARING ...
W h e n h o lid a ys a re s e t, re tu rn
to su b -m e n u
Additional Information
Calendar
This option allows you to select the days required as holidays for the Access Control system and is linked to the time
zone setup menu overleaf. Enter the number of the month (Jan=1, Feb=2, and so on). Days are represented on the
display as dots, with 31 days allowed for all months. A day is assigned Holiday status by pressing YES, (default is NO).
UNSET/PART scrolls forward/back. The * button toggles between assigning Holiday status to all days or assigning it to
none. # accepts the settings made for the month and returns to the enter month number prompt. NO then quits the
menu.
Clear
This option allows you to clear all or individual time zones from the system.The first option is to clear ALL TIME
ZONES? Press YES to clear all time zones.To clear individual time zones, press NO.
Setup: See page 2-50
This menu allows you to setup the time zones on the 3GS access system by specifying the on/off times, the days of the
week, and the conditions to be applied during the time zone.
Issue 04 October 2004
Programming Menus 2-49
menu
Function:
TIME ZONES - SETUP
This menu allows you to setup the time
zones on the 3GS access system by
specifying the on/off times, the days of the
week, and the conditions to be applied
during the time zone.
S e tu p
ENTER TIME ZONE 1
00:00 00:00
#
TIME SLOT 1 ?
Additional Information
Time Zone Setup
Access to a secure area is controlled by means of time
zones. A time zone is that period of time when the door
to the area is unlocked, and access is granted. Each time
zone is made up of four separate on/off slots, which
means that the zone can be customised to grant access
for busy periods only, and deny access for the rest of the
time.
YES
NO
On Time --> 00:00
Off Time --> 00:00
T h e c u rs o r fla sh e s o n th e firs t
d ig it. U s e E N T E R to s c ro ll to
O n m in .s , a n d O ff m in .s
a n d h o u rs
#
TIME SLOT 2 ?
YES
NO
Sunday ?
(Yes/No)
To g g le Y E S / N O to a ss ig n th e z o n e
to th is d a y (a n d th e n e a c h d a y in
tu rn M o n - S u n , H o lid a y)a n d th e n
p re ss E N T E R .
PIN code required:
NO
inside zone (Yes/No)
#
Time zones and time slots
A time zone is broken down into four on/off
programmable time slots. For example, access to an area
on a typical Monday might be busiest from 7:30-9am,
12-2:30pm, 4-5pm, and 5:30-6pm. Access to the area is
granted during these slots, and denied for the rest of the
24 hour period. Alternatively, you may have only 2 busy
periods during the 24 hour day and will need to program
slots 1 and 2 only, leaving slots 3 and 4 blank.
Time zones and days
Allow PIN code only
inside time zone
NO
#
Keep door open:
(Yes/No)
NO
#
Keep door locked:
(Yes/No)
NO
#
ENTER TIME ZONE 2
00:00 00:00
Time zones can be assigned to any day of the week, or to
a holiday. The above four slot configuration might be
suitable for Monday, Tuesday, Wednesday, and Thursday of the week, whereas Friday, Saturday/Sunday, and holidays
might need a different configuration. In this way, a time zone is customised to allow for the particular requirements of
a day and then assigned.
Time zones and cards
If no time zone is assigned to a card, the card will have 24 hour access to the door. If a time zone is attached, then the
card must be presented to the door when that time zone is active. Further control is provided by assigning a PIN code
to the time zone, which must be co-coordinated with the setup of the card.
If a PIN code requirement has been assigned to a zone, cards with PIN code assignments will be prompted for the PIN
Programming Menus 2-50
code when this zone is active. Cards without PIN code assignments will be allowed access immediately – provided
they have been passed for that time zone. The digits of the PIN code itself are configured during card setup.
Time zones and doors
The first 16 time zones can be assigned to doors during door configuration. The properties of the time zone will control
the door when that time zone is active. Any door assigned the active time zone will remain open/locked for that time
period.
Setting up new time zones
Enter the number of the time zone you wish to configure. By default, the display shows the time zone number and the
time settings of the first two time slots.
Enter times for Time Slot 1. The # key moves the cursor from On-time hours and minutes to Off-time hours and
minutes. Press # again to accept your settings.
Note Time Zone 0 is 24 hrs 7 days a week.
Assigning zones to days
The menu scrolls through the days Sunday to Holiday. Press YES or NO to toggle the zone to each day in turn and # to
accept. Note that it is possible to assign more than one zone to a particular day.
Note If the time zone is se tup for a holiday and if the current day is a holiday, then the time zone is active.
PIN Code required
If a higher level of security is required at a door at certain times, the PIN code access option allows you to attach a PIN
code to a time zone. If this is set to YES, then any cards with PIN codes attached (see “Setup Cards” on page 2-37) will be
required to enter a PIN code when this time zone is active.
Note The door must also be configured for PINpad.
Allow PIN code only
This option is only available on Access Control Node software rev. 1.06 or later. This allows the cardholder to gain
access using just the card's PIN code, without the need to use the card. If two cardholders' PIN codes match, however,
the system will use the first cardholders information to log the data. Ideally each cardholder should have a unique PIN
code. This feature is only enabled when the cardholder has a time zone with the PIN ONLY attribute set. When the
time zone is active, the cardholder can simply enter his code to gain access. When the time zone has elapsed, card
and PIN are required. The Duress code is now activated by keying in the code followed by the hash key (#) on the
PINpad.
Door Open
When attached to a time zone, the Door Open option will keep a door unlocked while the time zone is active. By
assigning this zone to a number of doors, you ensure that these doors will remain unlocked while the zone is active.
Choose YES to enable this option. # accepts your settings. Note that the time zone must also be assigned to the door in
“Door Configure - Zones” on page 2-48. The menu returns you to the ENTER TIME ZONE prompt. Choose NO to
quit.
Door Locked
When attached to a time zone, the Door Locked option will keep a door locked while the time zone is active. By
assigning this zone to a number of doors, you ensure that these doors will remain locked while the zone is active.
Choose YES to enable this option. # accepts your settings. Note that the time zone must also be assigned to the door in
“Door Configure - Zones” on page 2-48. The menu returns you to the ENTER TIME ZONE prompt. Choose NO to
quit.
Printing your time zone data
Before quitting the Time Zone Setup menu, you will be asked if you want to PRINT TIME ZONE DATA? You have the
option to print out the settings for all time zones or an individual zone.
Issue 04 October 2004
Programming Menus 2-51
menu
Function:
DOOR GROUP SETUP
INSTALLER CODE _ _ _ _
SHIFT SHIFT
3
This menu allows you to group doors together for use on the Access Control system.
INSTALLER CODE _ _ _ _
SHIFT SHIFT
3
DOOR GROUP SETUP
CLEAR
Unset
NO
SETUP
Help
CLEAR DOOR GROUPS?
YES
ENTER DOOR GROUP 1
NO
ALL DOOR GROUPS?
YES
ENTER DOOR GROUP 1
#
ENTER DOOR GROUP 1
#
CLEARING ...
Door 1 Group 2
UNSET to s c ro ll fo rw a rd , PART
back.
YES to a ss ig n a d o o r to a
g ro u p , NO to re m o v e th e
c u rre n t a ss ig n m e n t.
* to to g g le b e tw e e n a ll d o o rs
a s s ig n e d o r n o n e
ENTER to p ro c e e d to th e n e xt
d o o r g ro u p
Additional Information
Clear
This option allows you to clear the doors from all or individual door groups.
Setup
This option allows you to link doors together in a group for use with cards through access levels. For example, if you
have already configured door group 7 and you want to re-configure it, enter 7 to go into the settings for that group.
Otherwise, you can set up each group in turn by completing the menu options for each group and continuing on to the
next.
Having given the number of the group you wish to set up, the display represents each of the 64 doors in the system (32
displayed at a time) as a dot, followed by the number of the door and group. As with Door Configuration options, a
door is added to the group by pressing YES (default is NO), UNSET moves forward to the next door, and PART moves
back. The * button toggles between assigning all doors to the group or assigning none. # accepts the settings made for
the group and returns to the ENTER DOOR GROUP number prompt. NO then quits the menu.
Before exiting, the system asks you if you want to PRINT ALL DOOR DATA? You then have the option of printing the
details (that is, group number and ID of doors contained in the group) of all or individual groups. YES prints the data,
NO quits the menu.
Programming Menus 2-52
menu
Function:
MANUAL DOOR CONTROL
INSTALLER CODE _ _ _ _
SHIFT SHIFT
7
This menu allows you to permanently open or lock a door or range of doors and to momentarily open a
door.
INSTALLER CODE _ _ _ _
SHIFT SHIFT
7
MANUAL DOOR CONTROL
OPEN
Unset
UNSET
RESTORE
Part
HALF
PERMANENT
Unset
LOCK
Help
HELP
MOMENTARY
Help
HELP
ENTER DOOR NO. 1
Door 1
#
FROM DOOR NO. 1
Door 1
#
S e le c t th e ra n g e o f d o o rs to
b e p e rm a n e n tly o p e n e d /
re s to re d / lo c k e d
TO DOOR NO. 64
Door 64
#
R e tu rn to su b -m e n u
Additional Information
This option provides a manual override on all door, time zone, and card settings. At any stage, you can access this
menu to open/lock a door or series of doors. Once you have selected your doors, the system will check for Lock/Open
Inhibits operating on these doors. See “Door Configure” on page 2-44. If none have been set, the doors can be
opened/locked.
The Open menu allows you to open a range of doors permanently (that is, the door will remain open until you
manually restore the original door settings), or momentarily (that is, you can open one door for the number of seconds
for which the door lock would normally remain open once access has been granted). See “Door Configure” on page 244 for further information.
When you select Permanent, you are prompted to enter the range of door numbers you wish to open. Enter the From
and To ranges. When the Permanent condition is set on a door, the green LED (access granted) on the node will flash.
This allows free access through the doors selected until restored or locked.
The Momentary sub-menu will ask you for the number of the door you wish to open. Again, enter the number. The
green LED will light steadily while access is granted.
Restore restores all door settings to their defaults. Enter the range of doors to be restored and # to accept and quit.
Once defaults have been restored, the system is in normal operation and no LEDs are lit.
The Lock menu works similarly to Open. When the Lock is manually set on a door, the card reader attached to the
door will not read or accept any cards. When the door is locked in this way, the red LED flashes to indicate access
denied.
Issue 04 October 2004
Programming Menus 2-53
menu
Function:
EDIT LEVELS DATABASE
INSTALLER CODE _ _ _ _
8
SHIFT SHIFT
This menu allows you to setup the access, visitor and function levels for the Access Control system.
INSTALLER CODE _ _ _ _
SHIFT
SHIFT
8
EDIT LEVELS DATABASE
ACCESS VISITOR FUNCTION
Unset
Half
Help
UNSET
GROUP TIMES
ACCESS
HELP
UNSET
Enter Group Time
3
E n te r th e n u m b e r o f th e G ro u p
Tim e y o u w is h to s e t u p e .g . 3
Enter Access Level
E n te r th e n u m b e r o f th e A c c e s s
Le v e l yo u w is h to s e t u p e . g. 2
#
#
Enter Door Group number 5
Group/Time 3
GROUP TIME 3
Access Level 2
E n te r th e n u m b e r o f th e G ro u p
Tim e D o o r G ro u p , e .g . 5
#
Enter Time Zone No.
Group/Time 3
2
A s s ig n a n y o f th e 2 5 0 G ro u p
Tim e s to th is A c c e s s L e v e l, e .g . 3
#
1
E n te r th e n u m b e r o f th e G ro u p
Tim e Tim e Z o n e e .g . 1
#
GROUP TIME 4
Access Level 2
A s s ig n a n o th e r G ro u p Tim e to
th is A c c e s s Le v e l if n e c e s s a ry,
e .g . 4
#
HALF
HELP
Enter Visitor Level
3
Enter Function Level
E n te r th e n u m b e r o f th e Fu n c tio n
Le v e l yo u w is h to s e t u p e . g. 2
UNSET
E n te r th e n u m b e r o f th e V is ito r
Le v e l yo u w is h to s e t u p e . g. 3
8
9
E n te r th e n u m b e r o f th e s ta rt
m o n th , e .g . S e p te m b e r, 9
#
Set Area
(Yes/No)
#
NO
Pre s s Y E S / N O to a s s ig n th is
o p t io n to t h e Fu n c tio n Le v e l
99
#
........***..............
. . .. . . . . . . . . . .Door 11 Level 3
#
Enter expiry day
8 Sep 1999
A card may be passed for an access level, which is
made up of two group times. The first group time
is for Door Group 1 for 24 hour operation and
the second group time is for Door Group 2 for
Time Zone 1 (9:00 to 17:00). This will allow the
card access to all the doors in Door Group 1 for
24 hours a day and all the doors in Door Group 2
from 9:00 to 17:00.
NO
Pre s s Y E S / N O to a s s ig n th is
o p t io n to t h e Fu n c tio n Le v e l
E n te r th e n u m b e r o f th e s ta rt
ye a r, s a y 1 9 9 9 , e .g . 9 9
Example
#
Unset Inside Area
(Yes/No)
#
Enter start month
NO
Pre s s Y E S / N O to a s s ig n th is
o p t io n to t h e Fu n c tio n Le v e l
E n te r th e n u m b e r o f th e d a y o n
w h ic h a c c e s s is to b e g in e .g . 8 th
Enter start year
#
Unset Outside Area
(Yes/No)
#
Enter start day
3
8
E n te r th e n u m b e r o f th e d a y o n
w h ic h a c c e s s is to e x p ire ,
e .g . 8 th
#
Enter expiry month
8 Sep 1999
U s e th e U N S E T /PA R T k e y s to
s c ro ll th ro u g h th e 6 4 d o o rs , a n d
p re s s Y E S / N O to a s s ig n th e s e
o p t io n s to th e re q u ire d d o o r s.
#
10
E n te r th e n u m b e r o f th e e xp iry
m o n th , e .g . O c to b e r, 1 0
#
Enter expiry year
8 Sep 1999
00
8 Oct 2000
E n te r th e n u m b e r o f th e e xp iry
ye a r, s a y 2 0 0 0 , e .g . 0 0
#
Additional Information
Access Levels
All cards assigned on the 3GS system must be given an Access Level for operation. Access levels consist of a list of
Group Times – that is, Door Group and Time Zone combinations. A card is passed on the 3GS system by giving it one
of the 250 available access levels. Each access level is made up of a selection of the 250 group times available. The
group times are made up of any combination of the 250 door groups and 64 time zones.
Programming Menus 2-54
Function Levels
On the 3GS panel, cards can be used to set/arm or unset/disarm an area or the entire system. A number of functions
are provided which can be assigned to doors in the form of a function level. The function level is then assigned to the
card. The doors will typically be set up with the EXIT attribute.
The function performed depends on the door type – for example, if the door is type AREA 12, then the function
applies to area 12. In the case of a non-area door type, the function will apply to the whole system.
The card functions that are provided are:
●
Unset/disarm inside the door:
If the area is set/armed and a card with this function is presented to the entry reader, the user is granted access to
the door. When the door is opened it will start the entry timer. This allows the cardholder to unset/disarm the
system by presenting the card to the exit reader or entering valid code of the RKD. The time between presenting
the card to the entry reader and the exit reader must be within the FUNCTION ENABLE TIME. See “Door
Configure” on page 2-44.
●
Unset/disarm outside the door:
If the area is set/armed and a card with this function is swiped on the entry reader, the user is granted access to the
door. When the door is opened, it will unset/disarm the system or area immediately.
If the door is set/armed and the card holder tries to gain access without either of the above unset/disarm functions,
then access is denied and the message ACCESS DENIED: DOOR ARMED is logged.
●
Set/Arm:
If the door is unset/disarmed, then the cardholder can set/arm the area/system by presenting the card to the exit
reader and then presenting it to the entry reader during the FUNCTON ENABLE TIME. Alternatively, the
cardholder can use the SET button to set/arm the area/system.
When any of these functions are performed, they are logged in the security and access logs.
Note If the SET DOOR PROTECT variable is set to NO, then any valid card that has no function assigned will be granted
access if the area is set/armed. This is to allow access to cards with no functions assigned.
If this variable is set to YES, then only valid cards with the unset/disarm function will be granted access. Cardholders
who normally unset/disarm the system must be given the unset/disarm function to be allowed access to the building when
the system is set/armed otherwise access is denied. DEFAULTS TO NO.
Visitor Levels
All cards can be configured as temporary cards using this facility.
●
250 Visitor Levels are available on the panel, each of which can be set up with a start date and an expiry date.
●
A card passed for a Visitor Level will be valid for the access level it has between the start date and expiry date.
●
A visitor card expired message is logged if used after the expiry date.
Issue 04 October 2004
Programming Menus 2-55
menu SETUP SIA
Function:
INSTALLER CODE _ _ _ _
SHIFT SHIFT
NO
This menu allows you to select an SIA record, set a reporting delay of 0 to 99 seconds, and set a
combination of two phone numbers to be used to report the record to the central station. The DM1200
can be programmed to report to both telephone numbers (x AND y) or either teleephone number (x OR
y).
K e y in
INSTALLER CODE _ _ _ _
SHIFT SHIFT
NO
SETUP SIA
AR
Code
01
Delay
1 OR 2
Phones
UNSET
PART
HELP
Pre ss
UNSET
Pre ss
UNSET
/
PART
Pre ss # to s e t th e
c o d e d e la y in s e c o n d s
fro m 1 to 9 9 .
to sc ro ll
fo rw a rd /b a c k
th ro u g h th e
S IA co d e s
# a g a in to se t th e
p h o n e o p tio n s, a n d
to g g le A N D / O R .
HELP
to
NOTE:
S e ttin g th e p h o n e n u m b e rs
fo r a p a rtic u la r re c o rd to '0
o r 0 ' w ill d isa b le th e
re p o rtin g o f th is re c o rd .
fo r e xa m p le :
BA
Code
10
Delay
0 OR 0
Phones
Additional Information
SIA Reporting
SIA (Security Industries Association) reporting provides greater precision in the reporting of alarm events via a
communications device to a Central Station. When used with a Europlex DM1200 digital communicator, SIA will add
user name and zone information to every event reported and will prioritise events for immediate transmission or for
transmission following a pre-set time delay. Once the DM1200 has been configured and tested – see “Set Up
DM1200” on page 2-69 – SIA Reporting is automatically enabled for that panel. Standard alarm events are assigned
SIA codes, according to the table below.
SIA is standard on Version 5.00 software and is only available on the Europlex DM1200 digital communicator Version
3 or greater.
Note Setting the phone numbers for a particular record to '0 or 0' will disable the reporting of this record.
For example:
BA
10
0 OR 0
CODE DELAY PHONES
Programming Menus 2-56
Standard alarm events are assigned SIA codes according
to the following table.
MA
Medical Alarm*
OA
Automatic opening*
SIA Code
Alarm Event
AR
AC Mains power restored
OP
Alarm area has been unset/
disarmed
AT
AC Mains power fault
OP1 - OP32
Block areas 1-32 have been unset/
disarmed
BA
Alarm zone opened
OQ
Remote Opening*
BR
Alarm zone reset
PA
Panic Alarm activated
BB
Alarm zone inhibited
PB
Panic zone has been inhibited
BT
Short or discon on alarm zone
PR
Panic zone restored
BU
Zone inhibit removed
PT
Short or discon on Panic zone
BV
Alarm verification *
PU
Panic zone inhibit removed
CA
System Armed Automatically*
RR
Power Up (system lost power,
power restored)*
RX
Test Call
TA
Tamper Alarm
TR
Tamper reset following alarm
CG
System has been Part Set/Armed
CI
Fail to Close (Fail to Set)*
CL
Alarm area has been Fully Set/
Armed
CL1-CL32
Block areas 1-32 have been Fully
Set/Armed
YF
Syntax error - system data corrupted
CP
Remote Closing*
YI
Overcurrent trouble (Expansion
Device)*
FA
Fire Alarm
YJ
Overcurrent restoral*
FR
Fire zone has been reset
YM
System battery fault
FB
Fire zone has been inhibited
YP
System power supply fault
FT
Short/discon on Fire zone
YQ
Power Supply fault restored
FU
Fire zone Inhibit removed
YR
Battery fault restored
HA
Duress
YX
Service required
JA
User Code Entry Timeout
JD
Date change*
JT
Time change*
LR
Phone line restoral*
LT
Phone line restoral*
MR
Medical Response*
Issue 04 Octoberv 2004
*: These variables are available on software versions that
supercede version 5.50.
Programming Menus 2-57
menu
SOAK MODE
Function:
INSTALLER CODE _ _ _ _
SHIFT SHIFT
2
This menu allows you to monitor troublesome or suspect zones (sensors/
detectors) in an installation.
INSTALLER CODE _ _ _ _
SHIFT SHIFT
2
SOAK MODE
ZONES
UNSET
CLEAR SOAK
?
if soak zone/
doors exist
DOORS
HELP
HELP
UNSET
SOAK FROM
NO
YES to clear
to soak
more zones
all soaked
/doors
zones/doors
1
ZONE NUMBER _ _ _
SOAK FROM
#
1
DOOR NUMBER _ _ _
#
CLEARED
SOAK TO
1
ZONE NUMBER _ _ _
When "n" is the
number of
zones under
soak test
SOAK TO
#
n SOAK ZONES
Display returns to
Date & Time
1
DOOR NUMBER _ _ _
#
n SOAK DOORS
Display returns to
Date & Time
Additional Information
Soak Mode
Upon entering this mode, the number of zones/doors to be tested can be chosen – whether its an individual zone/door
or a block of zones/doors. TAMPER and DISCON activations are not ignored.
Zones can be soaked individually or in blocks – for example, 3 to 3 or 1 to 20.
Activity is only relevant in FULL SET mode and then it is only logged (no outputs or messages are triggered). No alarms
are triggered in any mode.
Soak Mode can be used for troublesome detectors after adjustment to confirm that their operation is reliable before
use in the system. As all open and closed transitions are logged, with exact time of operation, it is easy to see how often
each soak detector operated and for how long.
If no activity is logged during the period of a zone’s soak test, the zone automatically returns to normal status (that is, at
next UNSET/DISARM after the expiry of soak days). The length of a zone soak test is set in days in the Variables
submenu – see “Zones/Doors/Vars” on page 2-10 for further information. Re-selection of the option allows you to clear
all zones/doors on Soak Test.
Programming Menus 2-58
menu
Function:
DISABLE MODE
INSTALLER CODE _ _ _ _
SHIFT
NO
This menu allows you to disable zone/door inputs from reporting any change of state (including tamper
and discon). The input is effectively no longer connected and can cause no alarm, log, and so on. The
disable status of inputs is not cancelled on return to unset/disarm mode and remains off until restored by
selecting Clear Disables.
INSTALLER CODE _ _ _ _
SHIFT
NO
DISABLE MODE
ZONES
UNSET
CLEAR DISABLE
?
if disable zone/
doors exist
DOORS
HELP
HELP
UNSET
DISABLE FROM
NO
to disable more
zones/doors
YES
1
DISABLE FROM
1
to clear
all disabled
zones/doors
ZONE NUMBER _ _ _
#
DOOR NUMBER _ _ _
#
CLEARED
DISABLE TO
1
ZONE NUMBER _ _ _
When "n" is the
number of
zones un der
disable test
n DISABLE ZONES
Display returns to
Date & Time
DISABLE TO
#
1
DOOR NUMBER _ _ _
#
n DISABLE DOORS
Display returns to
Date & Time
Additional Information
Disable Mode
The number of disables, if any, is displayed on each mode change along with a short beep at the RKD. Disables should
only be used as a last resort – for example, to isolate a door with an intermittent tamper fault, allowing use of the
system until the problem is solved.
On selection, the display shows DISABLE MODE followed by DISABLE FROM1. Key in the number of the input from
which disables are to start and press the # key. Key in the number at which the disable ends in the same fashion. The
display then shows N DISABLES, where n is the number of zones/doors disabled on the system. You are then exited
automatically from this menu.
Clearing Disables
On entry into this mode, if there are inputs already disabled, the panel will prompt CLEAR ALL DISABLES? which
requires a YES or NO selection. If YES is selected, all disables are cleared. Only disabled online doors are counted in
the disable total.
However, disabled doors can be checked to ensure selection is correct by entering Door Monitor in the Service Mode
menu. When the resistance value is enclosed by “/“, the input is in fact disabled. Details of disabled doors are logged.
Issue 04 October 2004
Programming Menus 2-59
menu
OUTPUT TEST
Function:
INSTALLER CODE _ _ _ _
SHIFT
5
This menu allows you to examine the current state of any output on the system and to toggle it for test
purposes.
●
INSTALLER CODE _ _ _ _
SHIFT
●
5
●
OUTPUT TEST
●
●
The Controller, RKD, and I/O module relays are normally
OFF (de-energised) – that is, when the output is turned
ON, the relay is energised (except for Controller relay 1
which is fail safe and therefore normally ON, power
removed, output OFF). For this reason, output1 is
Intruder Alarm and is used as the primary alarm
indicator.
ENTER OUTPUT NO 1
ENTER OUTPUT NO. _ _ _
#
The system prompts for an output
type to test - for example, 2
OUTPUT TYPE 2 OFF
press Yes to toggle
to toggle output type
2 (relay 2) OFF/ON
YES
OUTPUT TYPE 2
ON
press Yes to toggle
UNSET
PART
to scroll forward
through output types
to scroll back
through output types
NO
to exit menu
ENTER OUTPUT NO 3
NO
Display shows
next output type
Press again to exit
FINISHED
Additional Information
The display prompts you to enter an output type (all
outputs set as this type will be triggered simultaneously).
Use the UNSET key to increment the output type and
use the PART SET key (hold down the key to auto-repeat)
to decrement it. The display will always show the current
state of the output indicated. Use the YES key to toggle
the output ON and OFF. The NO key exits the menu.
Output Types
The 3GS system can control up to 255 unique system
outputs. The Controller has four on-board 1 Amp relays
(default output types 1 to 4) while relays on the I/O
nodes can be addressed to any output type (1 to 255).
Relay outputs can be used to trigger devices for many
applications, such as:
Programming Menus 2-60
Siren/bell/strobe triggering
Camera switching
System set/arm and alarm indication
Lighting/heating circuit control
Door/security barrier control
You can duplicate output types in order to assign any
number of I/O module relays the same number, in which
case they will respond identically.
For example, output 2 drives the 3GS Controller onboard relay to activate the external sounder and an I/O
node output could also be programmed as output 2 to
trigger external security lights when the sounder
operates. You assign output types using the Node
Configure menu – see “Nodes Configure - Outputs” on
page 2-27 for further information.
Note For the DM1200 to initiate
communications on activation of output 1, the
unit must be programmed to view this as a
negative trigger. To do this, change the output
trigger control from POS to NEG. See also
DM1200 in 3GS Peripherals.
Power Consumption
When a 1A relay energises, it can typically draw up to
30mA. It is important that you take into consideration
this power consumption when calculating PSU
requirements, particularly if a 6-output node is in use
where the current drawn by the relays alone may exceed
180mA. Output devices such as sounders/strobes and so
on will also be drawing large amounts of current. Remote
power supply units should be used to power I/O nodes
in such a situation.
Output functions
Output types range from 1 to 255 with their pre-defined
functions. Output functions range from 1 to 1000. The
255 output types may be mapped to any of the 1000
output functions depending on the system requirements
– see “Edit Output Database” on page 2-74. The system
allows for spare output types with no pre-defined
function. For example: 110, 250 to 255.
The 3GS Controller has 4 on-board 1Amp relays,
defaulted to types 1, 2, 3, and 4, while relays on the
Nodes are not defaulted and can be addressed to any of
255 output numbers.
SYSTEM LOG
menu
Function:
INSTALLER CODE _ _ _ _
YES
This menu allows you to view or print either of the two logs maintained by the 3GS system:
INSTALLER CODE _ _ _ _
YES
SYSTEM LOG
ALARM
ACCESS
UNSET
YES
PRINT LOG
HELP
?
PRINTING...
NO
NO
to quit print-out
System log
Access log
ABORTED
SYSTEM LOG
Bottom line scrolls User
Name, User Number and
nature of event/action taken.
Top line displays Time & Date
event occured (hyphens
change to indicate a new
event occuring).
Access LOG
_MON 24JUL95 *15:15:20
JOHN SMITH
USER 3 SELECTED
SYSTEM LOG
Details of the Access Log will
be displayed here.
_ _ MON 24JUL95 *15:00:45
MARY JONES
USER 8 ACCEPTED
ID SECURITY ALERT
_ _ _MON 24JUL95 *15:00:40
MARY JONES
USER 8 SELECTED
ALERT ACCEPT
UNSET
_MON 24JUL95 *13:55:12
STATUS ALERT
ID SECURITY ALERT
PART
to
to
to
to
scroll forward
more recent events
scroll back
more recent events
_MON 24JUL95 *12:25:09
OUTPUT 6 OFF
_ _MON 24JUL95 *12:25:05
FRANK WALL
USER 2 SELECTED
UNSET
NO
to exit
ABORTED
Additional Information
●
Alarm and system log – Maintains a record of the last 1000 alarm events.
●
Access log – Stores 3000 access log events.
These logs record all activity on the 3GS system, including keypad input, alerts, activities, access, and so on. Each event
is date-time stamped to the nearest second. To clear either log, you need to carry out a cold start.
Printing logs
When the option PRINT LOG? is displayed, you can print by pressing the YES key (ensure a serial printer is connected
and the serial port correctly configured). Otherwise, press NO to display the log on the RKD.
Viewing logs
You can quickly step through the log display (one line at a time) by pressing the # key. An * appears in the centre of the
date and time display to make the log easily differentiable from the Unset/Disarm mode display. The date and time
remain visible in the display until all information regarding that particular event has been shown. The PART SET key will
rewind one entry at a time to the first entry of the date currently being displayed, while the UNSET key will skip to the
next entry. To leave the system log at any point in the record, press the NO key.
Issue 04 October 2004
Programming Menus 2-61
menu
Function:
PRINT ALL REPORTS
INSTALLER CODE _ _ _ _
SHIFT
6
This option provides a printout of reports on the system configuration.
INSTALLER CODE _ _ _ _
PRINT ALL REPORTS
SHIFT
6
?
NO
PRINT VARIABLES
?
NO
PRINT USER INFO
UNSET
PART
?
to scroll forward
to scroll back
Additional Information
If not all reports are required, press NO and the option to print each in turn is displayed. If the PRINT LIST? option is
selected, only those literals which have been modified will be printed. A report printout may be aborted at any stage
by pressing the NO key. Ensure the serial port to which the printer is connected is configured for printer operations.
See “Set Data Format” on page 2-64 for the correct settings (baud rate, parity, and so on).
Programming Menus 2-62
menu
Function:
SET DATE & TIME
INSTALLER CODE _ _ _ _
SHIFT
9
The system Date & Time should be set after a cold start. Note that the time is set in 24 hour clock
notation. Use the UNSET/PART keys to scroll through the digits or key in the digits directly.
INSTALLER CODE _ _ _ _
SHIFT
9
SET HOUR:
SET DATE/TIME
Edit Hour (1-24)
#
To leave
unchanged
4 DIGITS _ _
To leave
unchanged
2 DIGITS _ _
SET YEAR : 1996
Edit Year if required
1
_
SET MINUTE:
1
To leave
unchanged
#
Edit Minute (1-59)
SET MONTH:
Edit Month (1-12)
2 DIGITS _ _
1
#
To leave
unchanged
2 DIGITS _ _
#
SET SECOND :
1
To leave
unchanged
2 DIGITS _ _
Edit Second (1-59)
SET DAY :
Edit Day (1-31):
1
#
Date & Time are now set
To leave
unchanged
2 DIGITS _ _
#
MON 22JUL96 15:15:20
Note: There are two methods of editing the display
1 Key in digits
To b a c k sp a c e :
*
To m o ve fo rw a rd :
YES
2 Scroll through digits
To in c rem e n t d ig its :
Issue 04 October 2004
UNSET
To d e c re m en t d ig its:
PART
Programming Menus 2-63
menu
SET DATA FORMAT
Function:
INSTALLER CODE _ _ _ _
SHIFT
8
This menu allows you to configure the Controller’s three serial ports for local (direct) connect or remote
connect (via modem) to a range of devices – such as a PC, Printer, pager, modem, and so on.
INSTALLER CODE _ _ _ _
SHIFT
8
SET DATA FORMAT
PORT 1
2400
E,8,1
Unset . ...... Half ............. Help
to exit
NO
To scroll and/or #
accept data
To scroll To scroll To scroll
UNSET
HALF
PORT 1
PORT 2
150
E,8,1
300
600
N,8,1
O,8,1
1200
2400
4800
E,7,1
N,7,1
O,7,1
PORT 3
HELP
Parity, Data Bits,
Stop Bit
E,8,2
N,8,2
O,8,2
E,7,2
N,7,2
O,7,2
9600
19200
Baud Rate
to select displayed configuration
PRINTER
PORT 1
#
NO
NO ?
YES
PRINTER YES
PORT 1
#
#
PAGER
YES
?
YES
PAGER
NO
#
?
?
LOG FILTER
ACCESS FILTER
#
The pager is now selected
32767
255
TRANSMIT NAME: NO
LOG FILTER
32767
ACCESS FILTER
255
#
SYSTEM ID
?
YES
To scroll
and/or accept
data press:
TRANSMIT NAME: YES
?
#
(See Typing Text)
ENTER NAME & ADDRESS
1
ACCESS CONTROL 0
AUTODIAL ID
Note:
Dial Mode set to 0
- Remote Communications
Dial Mode set to other
- Local Communications
DIAL MODE
0
DIAL
MODE:
DIAL
ACCESS: 0
ACCESS
The port is now set up
for printer operation.
0
If dial mode set as "3":
3
CODE
ENTER DIAL COMMAND
AT E0 V1 Q0 D
ENTER TEL. . NO. 1
ENTER TEL. . NO. 2
Additional Information
Port 1,2,3
Port 1 refers to the RS232 (9-pin) connector located on the right of the Controller PCB. Ports 2 and 3 are TTL and are
labelled TX 2/RX2 and TX3/RX3. On ports 2 and 3, the12v supply should not be used to power devices – instead, use
12V supply from 3GS PSU.
Note Ports can be set to perform the same local function (for example, 2 ports set for printer).
Programming Menus 2-64
Baud rate
You can set up the panel for the baud rates ranging from
150 to 19200.
System (Alarm) Log Filter
Log Type
Description
1
Zone Change
E = Even Parity
2
Status Change (Alert, Clear, Cancel)
N = No Parity
3
User Select, Accept, Denied
4
Output On, Off
5
Lit and Variable
6
8 Bit sentence
7
Lit Sentence
8
Cable Fault
When set to YES, data is transmitted out to this port.
9
Soak Zone, Door
Transmit Name
10
Inhibit Zone, Door
The name and address entered during the initialisation
sequence of the system (usually after a cold start) can be
printed at the start of every logged text if required.
11
Disable Zone, Door
12
Enable Zone, Door
13
Access Status Changes
14
Literal Sentence
15
Door Change
Parity, data bits and stop bits
Select the appropriate communications protocol.
Parity:
O = Odd Parity
Data Bits:
8/7 = 8 or 7
Stop Bits:
1/2 = 1 or 2
Printer
For direct connection to a printer this must be set to YES.
Serial Port 3 defaults to PRINTER: YES.
Pager
For connection to a local pager, set this to YES. Messages
will be formatted for the pager before being transmitted
on this port.
Log Filter
This controls which event types of logged data are output
to the serial port. It allows for filtering of log events based
on the log type. The log filter consists of a 16 bit word,
where each bit represents a log type. Each log type is
listed in the following table.
●
Zone changes are controlled by bit 1.
●
If the bit is SET, then reporting of zone changes is
ENABLED.
●
If the bit is not SET, then the log type will be skipped
when reporting.
●
Add the number of each log type together to
generate the appropriate log filter – for example, the
default value of 32767 allows all events
(1+2+3+......+15=32767).
Issue 04 Octoberv 2004
Default = 32767 (all system and alarm events.)
Access Filter
This allows for filtering of access (of events based on
access log type). To filter certain access log types, change
these values. The following table lists all access log types.
Programming Menus 2-65
.
Access Log Filter
Important If a DM1200 Digital Communicator is
connected, the Dial Mode must be set to 0. If
another communications device such as a
modem is in use, set Dial Mode to 3.
Log Type
Description
Dial Access
1
Door Event
This option controls the access code requirement.
2
Card Event
3
Access Node Event
4
Access Exception
5
Time Zone Change (state=0=normal, 1=free access, 2=locked
6
Control Door Event
7
Access User Select, Accept, Denied
Autodial ID
8
Log Card Select, Accept, Denied
Default = 255 (all access events).
This may be set as any number between 0-9999 and is
recognised by communications software as a unique
account number for the installation.
System ID
Enter Dial Command
This is used for distinguishing between panels during
polling when multiple units are connected to a single
serial line. Valid values for a SYSTEM ID are from 0 to
127 inclusive.
This is a set up command sent by the system to the
modem before the modem dials out. The default
command for the 3GS Controller is:
Set to 0 for a remote printer set up. When using the
system in auto-dial modem configuration, SYSTEM ID is
usually set to a fixed value for all panels (for example, 1).
Access control
This variable determines the level of control available to
the remote user over a particular panel. Changing this
value impacts the level of control available to remote
users. See the ESCO Protocol documents for details.
Dial mode
Decides if the panel will dial out and if so when. Also
controls communications mode. The legal values are:
0
Direct connect.
1
Dump log data when available to a remote
device.
2
Dump log data to a remote device when variable%’ is set from the panel – for example, by
time command.
3
Remote Communications. Allowed based on
dial access. The panel dials the programmed
modem telephone numbers when data has been
logged.
Programming Menus 2-66
●
0: Unrestricted access. No access code required.
●
1: Password access. Access code required before
serial comms.
Note For Class IV systems, password protetction is
compulsory on all remote communications.
●
2: Callback. Controller will hang-up after a valid
connect sequence from the communications device
and ring the pre-programmed telephone number.
AT E0 V1 Q0 D
Enter tel. No. 1
This is the number dialled by the system when contacting
a remote location. This must not be left blank if dial
mode is non-zero.
If successful, communications cannot be established and
a backup number will be dialled (see “Enter Tel. No. 2”
on page 2-66).
Enter Tel. No. 2
This is the backup number which is dialled if connection
is not established using the primary telephone number.
This may be left blank if a backup facility is not required.
Modem communications
The following describes important parameters and modem settings required for high speed modem configuration
(9600 bps and 19200 bps) to the 3GS Controller
The commands detailed refer specifically to Multitech modems. For other modem types, please refer to the
manufacturer manual for equivalent settings.
The following tables show parameters to be set for modem communication (in this case Multitech modem) with
Panelman/ED2000:
Normal settings
Parameter
Description
AT Command(s)
Echo
Turn echo off
E0
Response
Include connection speed in response
X1
Verbose
Modem responds in ‘words’ rather than code
V1
Auto Answer
Accepting incoming call after specified number of rings
S0=1
Flow Control
Both Hardware and Software based flow control must be disabled
&E3
DTR Signal
The PC will normally provide its modem with Data Terminal Ready
(DTR) signal. If this is not available, the Modem will not respond.
The panel doesn’t provide DTR, so its modem must be configured to
ignore this signal.
&D2 (PC)
&D0 (Panel)
High speed settings
Parameter
Description
AT Commands
Max Speed
Sets upper limit for incoming and outgoing speeds.
$MB19200
$SB19200
V.42 Error Correction
Disable Error Correction. This means carrier signal will be established once speed is matched.
AT&E0
Data Compression
Data Compression should be disabled.
AT&E14
V.32 Terbo Tones
For communication at 19200bps, the connection response
CONNECT 19200 (rather than CONNECT 14400) is required.
Not all Multitech modems support this feature.
AT#V0
Issue 04 October 2004
Programming Menus 2-67
menu
Function:
FORCE CALL
INSTALLER CODE _ _ _ _
SHIFT FULL
This menu allows you to initiate a call from the 3GS to the telephone number programmed in the Set data
Formats menu or to the telephone number programmed in the DM1200 menu.
SHIFT
FULL
FORCE CALL
COMMUNICATING...
PORT n
n = selected port.
The display returns to
date and time.
Additional Information
By selecting Force Call, the 3GS will dial the connected modem’s primary telephone number – see “Set Data Format”
on page 2-64 – and establish communications with a remote PC. This could be used as a test function or to allow
personnel at a remote location to perform system maintenance using Panelman software. The 3GS serial port will
already have been configured and a DM1200 or modem connected.
Programming Menus 2-68
menu
Function:
SET UP DM1200
INSTALLER CODE _ _ _ _
SHIFT SHIFT
FULL
This menu allows you to configure the Controller to communicate via the Europlex DM1200 digital
communicator.
INSTALLER CODE _ _ _ _
SHIFT SHIFT
FULL
SET UP DM1200
Select the port to which the
DM1200 is connected
PORT 1
PORT 2
PORT 3
unset............half...........,,help
HALF
UNSET
By default, port 2 is
configured for DM1200
communications protocol.
HELP
See "Check Before
Programming”
NO RESPONSE
CHECKING...
PORT 2
DM1200 PROGRAMMER
!! PRESS ANY KEY !!
#
DM 1200
Additional Information
DM1200: See DM1200 in 3GS Peripherals
This menu gives you access to the DM1200 programming menus for configuration.
Note Notification Requirements: Grade 3 System Option A, Class IV system Option A
Alarm Transmission System Performance Criteria: For a Grade 3 System and a Class IV system, the alarm transmission
performance criteria is ATS4 – as per EN50131-1:19997 COR 2000.
Issue 04 October 2004
Programming Menus 2-69
USER SETUP
menu
Function:
INSTALLER CODE _ _ _ _
SHIFT UNSET
This menu allows you to set up users and user names. You, the installer, cannot assign options to system
users, this must be done by the Master User. The Master User has all options, by default, and this cannot
be removed.
SHIFT UNSET
INSTALLER CODE _ _ _ _
USER SETUP
ID.S
OPTIONS
UNSET
NAMES
HALF
HELP
ENTER USER NO. 3
To select displayed user
Change ID Codes
Alternatively key in user number or
scroll through users using UNSET
key.
Assign Options
UNSET
NO
. . . .
PART SET
NEW CODE _ _ _ _
#
?
HALF SET
?
FULL SET
?
BELL TEST
?
MODE 6
?
MODE 7
?
MODE 8
?
MODE 9
?
SET DATE/TIME
?
CHANGE ID
?
USER SETUP
?
SYSTEM LOG
?
HOUR ADJUST
?
Assign Names
Key in a user
name (see
"Typing Text").
?
<
USER CODE
#
#
NO
To withhold an option
YES
To assign an option
EDIT TIME COMMANDS ?
INHIBIT MODE
?
ENTER USER NO. 4
NO
to exit
Note The Options menu is not available on Class IV systems.
Programming Menus 2-70
#
To accept all data
Display shows next user number
Additional Information
ID Codes
The first step should be to change the master default code (1020) by selecting ID.S. All system users should be assigned
codes in the same fashion. If required, the user can assign their own code by using the Change ID option (the master
user must give the user this option). An ID code must have 4 digits.
Note ID codes for the Class IV system are 6 digits in length. 3GS software which supersedes Version 5.50 will have 6
digit codes by default.
Note The 3GS also has a Duress facility whereby in a crisis situation a user may activate a silent panic alarm (no
bells/sirens and communication is initiated) by incrementing their ID code by 1. For example, if code=1239,
entering 1240 will generate a duress alarm. Therefore, it is not advisable to assign sequential codes (for example
1234, 1235) as the lower code cannot utilise the Duress facility.
Options
System users can be assigned options as required. Press YES to assign an option, NO to withhold and scroll forward.
When the options have been assigned, press # to accept. The next user number is displayed. When scrolling through
the user help menu, a user will only see those options which have been assigned to them.
If the USER SET UP option is given to a user, that user may assign options to other users. However, the user is restricted
to assigning only those options they possess themselves.
Names
Up to 23 characters may be entered for a user name. This greatly enhances the interpretation of the system log,
identifying by name who set/armed or unset/disarmed the system, and so on. When NAMES is selected, a flashing
cursor appears. Place the text overlay on the keypad to identify characters and key in names as shown in “Typing Text”
on page 2-4.
As an alternative to the User Set Up option, codes/options/names may be downloaded from a PC using Panelman
software.
The first option to be displayed is Unset?. To give a user the option to unset/disarm the panel, press the YES key.
Continue in this fashion until the required options are assigned and then press # to accept the data.
Issue 04 October 2004
Programming Menus 2-71
menu
Function:
AREA SETUP
INSTALLER CODE _ _ _ _
SHIFT
2
The Area Setup menu allows you to set the number of areas to be active in the
system and assigns Area Set/Arm and Unset/Disarm rights to system users,
keypads to areas, and programming area names.
Additional Information
The system currently allows for up to 32 areas, and can
be set/armed for any number of areas up to 32.
Setting the number of areas in the system is an installer
option only. The option to assign user rights to areas is
available to both Installer and Master User.
Providing the user with an area gives them the right to
set/arm or unset/disarm that area. However, the user
must also be given the PART SET user option for area
set/arm, and the HALF SET user option for area set/arm
– see the 3GS Version 5 User Guide. This allows the
user to be given or denied the right to set/arm an area.
Installer’s are not allowed to set/arm or unset/disarm
areas.
Once the user set/arm or unset/disarm rights have been
assigned, they are effective immediately so that
individual users will only be able to set/arm or unset/
disarm those areas to which they have rights. PART and
HALF keys are used for Area Unset/Disarm and Area
Setting/Arming – see the 3GS Version 5 User Guide.
Setting the number of areas to 0 will configure the
system for no areas and PART and HALF keys are used
to PART SET and HALF SET the system.
INSTALLER CODE _ _ _ _
USERS
UNSET
KEYPADS
PART
SHIFT
2
DESCS
HALF
#
NUMBER OF AREAS
24
Key in the number of blocks to be
active in this installation, e.g. 24
#
ENTER USER NUMBER
2
Assign Set/Unset rights to User 2
for each area in turn.
#
Area Keypads
Use this option to assign keypads to areas so that
messages for individual areas can only be seen on the
keypads assigned to the area.
The system may be set up so that each area has a
keypad installed at a point convenient to the Exit/Entry
route. In this case, you should assign this keypad to the
area. Once assigned, the keypad will display only those
alert messages relating to that particular area, and
when the user is setting the system, will display the
number of that area first allowing instant setting.
Alternatively, one keypad may be positioned at a point
central to a number of areas – for example, Areas 5 and
7. In this case, the keypad can be assigned to both
areas and will then display messages for these two
areas only. When setting, the display will prompt the
user to first set/arm Area 5, followed by Area 7, and will
then scroll through the other areas configured.
Programming Menus 2-72
AREA-2
Area Number 1
NO?
YES
NO
AREA-2
Area Number 2
NO?
YES
NO
#
The display then scrolls through
the rest of the areas configured
for the installation.
to return to the user prompt
ENTER USER NUMBER
NO
Use YES/NO keys to assign/deny rights
3
to quit
Assign Set/Unset rights to User 3
for each area in turn.
When arming an area, the keypad shows the current area(s) to which the keypad is assigned. However, the flashing
cursor enables the user to key in the number of any area instantly and set/arm that area, provided the user has setting/
arming rights.
In the example shown, the keypad has been
assigned to Areas 5 and 7.
This keypad will now display messages for Areas
5 and 7.
Enter the node number of
the keypad to which you
want to assign areas.
By default, the node
number of the keypad you
are currently using will be
displayed.
ENTER NODE NO. 4
keypad
AREA UNSET
Area Number 5
#
AREA UNSET
Area Number 7
Zones and doors that are open in the areas
assigned to a particular keypad can be displayed
at any stage by pressing the * key.
AREA-1
Area Number 1
Area Descriptions
Like 3GS zones, doors or cards, system areas can
be given individual descriptions for ease of
identification. Descriptions are entered by
entering text – see “Typing Text” on page 2-4 for
further information. Once entered, the
description is effective immediately and is given
in any alert messages, log entries, and printed
reports.
Assign area(s) to this
keypad using the YES/NO
keys
NO
Private Mode
The private mode feature prevents two separate
users from configuring the system at the same
time. When one system RKD is in use, an
attempt to key in at any other system the RKD
will produce the message: System Busy... Please
Wait. The keypad continues to display this
message until the user at the other keypad has
finished, when it returns to normal day/date/
time.
No?
AREA-5
Area Number 2
YES?
YES
AREA-7
Area Number 2
YES?
Areas 5 and 7 have now
been assigned to this
YES
The display then scrolls
through the rest of the
#
to return to node prompt when finished
Printing Area Information
When you exit the Area Setup menu, you are
prompted to Print Area Options? and to Print Modes?
When you select to Print Area Options, the resulting report details the user area rights, number and name of system
users, areas assigned to keypads, and total number of areas in the system. The Print Modes option will give a report on
the current status of each area on the system.
Issue 04 October 2004
Programming Menus 2-73
menu
Function:
EDIT OUTPUT DATABASE
INSTALLER CODE _ _ _ _
SHIFT SHIFT HELP
This menu allows you to map an output function to an output number (1-255).
INSTALLER CODE _ _ _ _
SHIFT SHIFT HELP
EDIT OUTPUT DATABASE
UNSET
to scroll forward
PART
to scroll back
STANDARD ?
#
to edit the
standard ou tputs
AREA ENTRY/EXIT ?
#
to edit the A rea
E/E ou tpu ts
AREA SET ?
# etc.
AREA ALARM ?
#
AREA BELL ?
#
AREA STROBE ?
#
AREA FAIL TO SET ?
#
AREA FIRE-X ?
#
MISCELLANEOUS ?
#
AREA WARNING ?
#
AREA DETECTOR RESET ?
#
DOOR FORCED ?
#
DOOR LEFT OPEN ?
#
PRINT OUTPUT DATABASE?
YES
Additional Information
In a complete 32-area, 64-door system, each area will require an output for the following events: Area Set/Arm, Area
Fail to Set/Arm, Area Alarm, Area 10-minute Warning, Area Detector Reset, and also (depending on the device type in
use) Area Strobe, Bell , or Fire-X.
Given the limit of 255 different output numbers, it will be necessary to customise the output list to suit individual
systems. For example, if the installer wants Area Fails To Set/Arm condition to drive the system buzzer and all Areas are
programmed in the same way, then the output types Area 1 to Area 32 Fail to Set/Arm (by default outputs 144 to 175)
may all be given the same output number 8. In this way, an Area Fail to Set/Arm condition in any area will result in
activating the system buzzer.
If there are 30 doors on the system, the Door Forced condition for all 30 doors may be set to the same output number
– for example: number 7, Internal Bell – and so all doors will respond in the same way when forced.
In the default output list, outputs 110 and 250 to 255 are unassigned. Certain output types have been given a zero
default value.
Programming Menus 2-74
The following table lists all available output types and their current values. The sub-menus divide the outputs into
standard, Area exit/entry, and so on.
Menu option
Function
O/P no.
Menu option
Output
O/P no.
Standard
Intruder
1
Area Fail to Set/Arm
Area 1 to Area 32 Fail to
Set/Arm
144-175
External Bell
2
Common Area Fail to
Set/Arm
176
Panic
3
Area 1 to Area 32 Fire-X
177-208
Full Set/Full Arm
4
Common Area Fire-X
209
Fire
5
PIN Code Alert
210
Tech
6
PIN Code Duress
211
Internal Bell
7
Installer On-Site
212
System Buzzer
8
Line Fault
213
Verified Alarm
9
Raid Camera
214
Modem
10
Photo Entry
215
Exit/Entry Area 1
to 32
11-42
Suspicion
216
Common Area
Exit/Entry
43
Unset Local
250
Area 1 Set/Arm to
Area 32 Set/Arm
44-75
Duress
251
Common Area
Set/Arm
76
*Area 1 to Area 32 10m
warning
0
Area 1 Alarm to
Area 32 Alarm
77-108
*Full Set/Full Arm 10m
warning
0
Common Area
Alarm
109
*Area 1 to Area 32 Det.
Reset
0
Area 1 Bell to
Area 32 Bell
111-142
*Common Area Det.
Reset
0
Common Area
Bell
143
Door Forced
*Door 1 to Door 64
Forced
0
Area 1 to Area 32
Strobe
217-248
Door Shunted
*Door 1 to Door 64
Left Open
0
Common Area
Strobe
249
Zone Inhibit on
confirmed alarm **
O/P 252
252
Watchdog Reset **
O/P 252
252
Auto Start
Auto Start
253
FTC
FTC
255
Area Exit Entry
Area Set/Arm
Area Alarm
Area Bell
Area Strobe
Area Fire-X
Miscellaneous
Area Warning
Area Detector Reset
*: The output type has not been given a default value.
**: These output types apply to Class IV systems and all software that supercedes 3GS version 5.50.
Issue 04 October 2004
Programming Menus 2-75
menu
Function:
RADIO PA ASSIGN
INSTALLER CODE _ _ _ _
SHIFT SHIFT
*
This menu allows you to setup radio panic attack button units on the system,
assign descriptions to these units, and allocate options to each one.
INSTALLER CODE _ _ _ _
SHIFT SHIFT
*
RADIO PA ASSIGN
RPA'S
Unset
DESCS
Half
OPTIONS
Help
UNSET
HALF
HELP
R PA’s
D escs
O ptions
Additional Information
RPA: See page 2-77
These units must be learned onto the system and assigned an RPA number to function correctly. Each RPA button unit
has a unique number encoded into its memory for identification.
Descs: See page 2-78
This is a 23 character text message for the RPA user name or RPA location.
Options: See page 2-79
Each RPA can be assigned a set of options based on the button combinations.
Programming Menus 2-76
menu
Function:
RADIO PA ASSIGN - RPAS
This menu allows you to put an RPA unit on the system.
R PA’s
S a m p le S e r ia l N o
R PA N o
Default Description
RPA 1
RPA 1
->
UNSET
PART
0123456789
Example
In this example Radio PA0123456789 is assigned as
RPA 1.
Display shows
RPA 2
RPA 2
UNSET
to scroll forward
through zones
to scroll back
through zones
To re-assign as RPA 2
-> NOT ASSIGNED
Press top button on
Radio PA-0123456789
and display prompts: ASSIGNED TO RPA 1
REASSIGN... YES / NO
YES
RPA 2
-> 0123456789
Radio PA - 0123456789 is
now assigned as RPA 2.
RPA 1 is now unassigned
PART
RPA 1
RPA 1
-> NOT ASSIGNED
*
To clear an assignment,
Additional Information
Each Radio PA (RPA) unit is encrypted with a unique ten digit serial number. The 3GS Controller uses this serial number
to identify the RPA. In order for the system to recognise individual units, it is necessary to assign an RPA NUMBER to
each unit from 1 to 126. This is achieved by selecting the RPAS option and pressing any RPA button. The RPAs serial
number is displayed along with an RPA number. RPA numbers may be reassigned if required.
On Class IV systems and all software versions that supersede 3GS version 5.50, the Watchdog Reset O/P 253 will be
triggered. This ouput can only be reset by carrying out the Alert Accept procedure after the panel has restarted.
Issue 04 October 2004
Programming Menus 2-77
menu
Function:
RADIO PA ASSIGN - DESCRIPTIONS
This menu allows you to program an RPA description.
D e sc s
EDIT RPA DESCRIPTION
#
ENTER RPA NO. 1
RPA 1
UNSET
Scroll to the RPA you wish
to enter a description for.
UNSET
PART
ENTER RPA NO. 3
RPA 3
to scroll forward
through zones
to scroll back
through zones
#
RPA 3
RPA 3
#
Type in RPA Description up
to a maximum of 24
characters using the method
shown in Typing Text at the
start of this chapter.
When complete.
Additional Information
An alphanumeric description of up to 24 characters (that is, RPA user’s name) may be assigned to each RPA unit after it
has been assigned an RPA number. This is achieved by placing an overlay card on the numeric keypad and inputting
characters from within the DESCS menu option. A default description (based on the RPA number) will already exist –
for example , RPA 1. Edit this description (recall “Typing Text” on page 2-4). Alternatively, descriptions can be entered
using Panelman
Programming Menus 2-78
menu
Function:
RADIO PA ASSIGN - OPTIONS
This menu allows you to setup RPA options for each unit.
IMPORTANT : B y d efa u lt, th e R PA
u n its h a ve N O o p tio n s a n d th ere fo re
w ill N O T o p e ra te u n til o p tio n s h a ve
b e e n a ss ig n e d a s Y E S.
O p tio n s
UNSET
ENTER RPA NO. 1
RPA 1
PART
Scroll to the RPA you wish
to assign options for.
to scroll forward
through zones
to scroll back
through zones
#
RAID
RPA 1
NO?
T h e s ys te m d is p la y s th e
firs t o p tio n fo r R PA 1
UNSET
DELAYED RAID
RPA 1
NO?
RAID CANCEL
RPA 1
NO?
SUSPICION
RPA 1
NO?
PHOTO ENTRY
RPA 1
#
NO?
To assign an
option
NO
To deny an option
(or leave at
default
To accept these options
The next RPA number is displayed
Continue to assign options as
shown above
ENTER RPA NO. 2
RPA 2
NO
YES
to exit
Additional Information
There are currently six programmable options which provide an arrangement of uses for the RPA buttons. Individual
buttons (or a combination of buttons) can be assigned an option within the Radio PA Set Up menu, provided it is
granted to the RPA unit within the Options menu first. For example, on RPA units, if the left button is required to
activate a Delayed Raid option and the right button is to activate Raid Cancel, both of these options must be granted to
the individual RPA unit concerned. By default, RPA’s are assigned no options and therefore failure to assign options as
described means the units will not operate. As up to 7 different button configurations may be obtained by pressing the
buttons singularly and as combinations, all seven options may be assigned to each RPA unit. Details of these options are
given overleaf.
Issue 04 October 2004
Programming Menus 2-79
Raid
The Raid option causes an instant silent alarm. When selected, this option turns on the Panic and Raid-Camera outputs
and triggers the pager units immediately. NO alert appears on the RKD until a System Unset/Disarm is performed,
whereby a Radio Panic Alarm is displayed along with the RPA description that triggered the alert. The action is
recorded in the system log.
Delayed Raid
This option operates identically to the Raid option except that the activation of the Panic output is delayed for 90
seconds. This provides the opportunity to cancel the panic output (assuming the Raid Cancel option has been granted)
and therefore prevent consequent action – for example, central station communications.
Raid Cancel
This option resets the Panic and Raid-Camera outputs provided it has been selected within 90 seconds of the Panic
output being triggered. The pager units are triggered and the action is recorded in the system log. The user must still
unset/disarm the system to clear the Panic alert messages.
Suspicion
When selected, this option turns on the suspicion output (which will typically activate the same camera as the raid
camera output) and triggers the pager units immediately. A suspicion alert is displayed with the RPA description that
triggered the alert and is recorded in the system log.
Photo Entry
When selected, this option turns on the suspicion output for approximately 5 seconds which will activate a CCTV
camera and record personnel entering the premises.
Programming Menus 2-80
menu
Function:
TIME ADVANCE
INSTALLER CODE _ _ _ _
SHIFT SHIFT
YES
This menu allows you to advance the time on the 3GS.
ENGINEER CODE _ _ _ _
SHIFT SHIFT YES
TIME ADVANCE
FINISHED
The system clock has now
been adjusted to 5 seconds
before the next pre-set time
command.
TUE 02JAN96 00:04:20
Display shows adjusted
date & time
Additional Information
This option will advance the system clock to five seconds before the next pre-set time command. This is useful when
testing or demonstrating the operation of such time commands. The option is available to all users with the Date/Time
Adjust option.
Issue 04 October 2004
Programming Menus 2-81
LITERAL EDIT AND HOLIDAY SCHEDULER
menu
Function:
INSTALLER CODE _ _ _ _
SHIFT HALF
This menu allows you to change system literals and schedule system holidays for
alarm operation.
INSTALLER CODE _ _ _ _
P rin t O p tio n
LIT. EDIT.
Unset
The option to print all literals
or only those which have
changed is given on exit.
to exit
NO
SHIFT
HALF
HOL. SCHED
Help
UNSET
HELP
XXXXX BYTES FREE
HOLIDAY SCHEDULER
PRINT LITS ?
where x = available
RAM space
LITERAL :
to exit
YES
NO
FRI MAY 01
TYPE 00
FRI MAY 01
TYPE 00
1
To print
Key in a literal
number, eg. 2
PRINT ALL LITS ?
LITERAL NUMBER _ _ _ _
NO
YES
Only literals
that have been
edited are
printed.
LITERAL :
#
2
All literals
are printed.
#
EDIT
COPY
DEFAULT
FRI MAY 01
UNSET
Edit Literal
HALF
TYPE 01
HELP
Copy Literal
Default Literal
<
EDITING LITERAL NO. 2
#
Key in the new text to
appear in the literal
eg Literal 177 which
contains the text
"Zone Tamper
Alarm", :
# to select a source literal
COPY LITERAL
(the preceding literal is
always displayed)
1
If you wish to select another
literal as the source literal,
key in a new number, eg:
10
The contents of literal 10 is
now copied to literal 2.
ZONE TAMPER ALARM
EDITING LITERAL NO. 177
Key in 1
0
LITERAL :
Programming Menus 2-82
#
3
Display shows next literal
number
Key in the
holiday number
to be assigned
to the selected
day.
Additional Information
Literal Edit
WARNING: This function is for advanced users only and any modifications to literals may compromise the operation
of the system.
Submenus are:
●
Edit – Allows entry/deletion of characters.
●
Copy – Copies strings and thus avoids repetitive typing.
●
Default – Returns literals to original state (that is, after a Cold Start).
Edit
This function allows the changing of the literal selected. The content of the literal is displayed. If the literal is empty of
text, the display will be blank.
Copy
This function will copy the contents of one literal (source) into another (target). The contents of the target literal will be
overwritten. The literal that is displayed before selecting the COPY function is the target literal.
Default
This function returns a literal to its factory default settings.
Holiday Scheduler
Holiday types are configured within the system literal file and are identified by a two digit number.
To assign, use the UNSET/PART keys to select the relevant day, and the HALF key to select the correct month. Key in
the type number and press #. The holiday is now set.
Issue 04 Octoberv 2004
Programming Menus 2-83
menu
Function:
COMMAND MODE
INSTALLER CODE _ _ _ _
SHIFT
1
This menu provides you with direct access to the power of the command string interpreter.
INSTALLER CODE _ _ _ _
SHIFT
1
COMMAND MODE
<
Enter command to execute.
Display returns to Date & Time.
Additional Information
WARNING: This function is for advanced users only and any modifications to literals may compromise the operation
of the system.
When a command string is entered, the 3GS will execute it immediately. Should an error occur during the execution, a
SYNTAX ERROR message is displayed and the command string aborted.
Any command string up to the maximum length of 127 characters may be entered. A blank display is presented each
time, but the most recently entered string is stored in literal 498. The most commonly used and simple commands are
for direct control of the system outputs.
For example:
S2
Will set output 2, both the on-board relay and any other node outputs assigned as output 2.
R2
Resets the same output.
B1841 Will generate an unused RKD sound pattern.
B0
Will turn off the RKD buzzer.
Programming Menus 2-84
menu
Function:
SOFT START
INSTALLER CODE _ _ _ _
SHIFT
7
This menu allows you to reset the 3GS system.
INSTALLER CODE _ _ _ _
SHIFT
7
ARE YOU SURE ?
YES
RKD 2I/1O 0000000031
V02 10MAY95 001 1 2
3GS 200 V1.00 20 NOV 95
3GS -OS V1.30 20 NOV 95
UPDATING DATABASE
ENTER NAME/ ADDRESS
Key in Name/Address
(see "Typing Text")
#
SOFT START
INITIALISE NODES ?
NO
YES
To re in itia lis e
rin g n e t
PSU TYPE = 4AMP
BUSY... RE-SHEDULING
MON 24JUL95 15:15:20
Additional Information
A Soft Start is a system requested reset which does not remove any programmed data. When selected, the keypad
buzzer sounds and the display prompts ARE YOU SURE?. Pressing NO returns the system to standby mode. A soft start
alert message is generated and this must be accepted in the normal fashion – see “Accept All Alerts” on page 2-87 for
further information.
Issue 04 October 2004
Programming Menus 2-85
menu
Function:
UNSET/RESET
INSTALLER CODE _ _ _ _
UNSET
This menu allows you to disarm the system and put the 3GS into Unset mode (that is, normal daytime
operation). When selected, all system alarm outputs are reset. This option is only available to the installer
in Unset mode. This means that the installer cannot unset/disarm the system but can use the unset
function to reset system outputs.
Enter the premises via the
correct entry route.
The entry buzzer will
sound.
INSTALLER CODE _ _ _ _
UNSET
USER CODE ????
WAIT...
UNSET
S yste m g o e s in to S ta n d b y
m o d e a n d d isp la y s h o w s
MON 01JAN96 15:15:20
Additional Information
Unset/Disarm Mode
When in Unset/Disarm mode, the display alternates showing the date and time along with any system warnings or alert
messages. An open zone will have its description displayed, however the zone state open is not indicated.
Zones which are in a TAMPER or DISCON (disconnected) condition will cause both the zone description and zone
state to appear on the display. An alert message is generated, buzzer sounds, and an alarm is recorded in the system
log. Pressing the ENTER key in this mode causes the display to skip quickly through the various messages.
Unsetting/disarming the system also starts a battery test and will cause any battery problems on the system to be
reported.
Note For Class IV systems, the default engineer installer code (001010) is only valid when the system is in unset/
disarm mode.
Programming Menus 2-86
menu
Function:
ACCEPT ALL ALERTS
INSTALLER CODE _ _ _ _
0
This menu allows you to clear all alert messages from the display.
INSTALLER CODE _ _ _ _
0
1 ACCEPTED
FRI 30JUL99 12:15 PM
T h e n u m b e r o f a lerts c le a red is sh o w n
te m p o ra rily b efo re retu rn in g to th e d a y,
d a te & tim e
A n y n u m b er o f a le rt m es sa g es
m a y b e a c c e p ted u sin g th is
m eth o d , eg :
FRI 30JUL99 12:15 PM
CODE ENTRY TIME OUT
FRI 30JUL99 12:15 PM
***ALARM***
FRI 30JUL99 12:15 PM
++CALL SERVICE++
INSTALLER CODE _ _ _ _
0
3 ACCEPTED
FRI 30JUL99 12:15 PM
Additional Information
Alert messages are flashing messages displayed to alert the user that a particular condition exists/existed on the system.
Alert messages must be accepted, as shown in diagram above. This will remove the message and silence the buzzer.
When the alert accept option is selected, all alert messages which are currently displayed are accepted (removed).
If the condition that caused the alert message still exists, a steady warning message will remain on the display until the
condition indicated no longer exists.
Entry to the ALERT ACCEPT option is not logged but acceptance of any alert message is logged along with the identity
of the user.
Issue 04 October 2004
Programming Menus 2-87
menu
Function:
EDIT TIME COMMANDS
INSTALLER CODE _ _ _ _
This menu allows you to edit the execution times of automatic time commands.
INSTALLER CODE _ _ _ _
SHIFT
Key in new time
command (24-hour
EDIT TIME COMMANDS
0 2 : 00
/[ SUNDAY HOUR ]
Press
Press
*
*
YES
to backspace.
to move forward.
#
24 : 00
Display shows next time
command
/[LOG DUMP]:%
#
24 : 00
/[AREA 1 10M WA
24 : 00
/[AREA 32 10M WA
24 : 00
/[FULL SET 10M
24 : 00
/[L.W. AREA1 WA
24 : 00
/[L.W. AREA 32 WA
TO
TO
24 : 00 /[HUA TEST SAT
24 : 00
/[L.W. FULL SET
24 : 00
/[SIA TEST CALL
FINISHED
System then prompts you to
print time commands
PRINT TIME COMMANDS ?
NO
YES
PRINTING...
Display returns to Date & Time.
Programming Menus 2-88
SHIFT
*
Additional Information
An automatic time command is a programmed command string which instructs the 3GS to execute a function at a preset time. For example, the system could be instructed to automatically FULL set at 18:00. Modification of these
commands is normally performed using the Literal Edit function and should only be undertaken by experienced
installers. This mode is a simplified time command edit function which allows the user to modify the TIME at which the
action will occur without allowing alteration of the command. The new time must be valid (24 hour format) or the
procedure will not continue. After adjustment is made, the ENTER key should be pressed to program the new time into
the system.
Use the UNSET and PART keys to move backwards and forwards through the time strings.
Note Setting a time command to 24:00hr disables it.
SUNDAY HOUR
Checks for hour change on Sundays.
LOG DUMP
Sets dial out variable for system to dial a remote PC/Printer.
AREA 1 10M WARN to AREA 32 10M WARN
Automatic arming commands for Areas 1 to 32.
These commands (one for each block) start a 10 minute warning time (to inform people that they must leave the
building), after which time the relevant area will arm. Half way through the 10 minute warning time, the keypad
buzzer pattern will change to indicate 5 minutes left. At the end of this time, the area will set/arm automatically.
The standard Automatic Set time command can be cancelled by unsetting/disarming the area within this 10 minute
warning time.
BATTERY TEST
This command sets a time (1 per day) at which an automatic battery test will be carried out. Class IV systems support a
battery fault within 10 seconds irrespective of the 3GS system mode.
Memory Test (Class IV)
This command sets the hourly time (1 per day) when an automatic memory test is carried out.
FULL SET 10M WARN
Automatic arming command for the full system. Works in the same way as the Area 10 minute warning but in this case
the full system will arm.
Late Working Time Commands
These commands allow for late working on the premises. They will arm the system/area if the first arming time
command is cancelled. These are:
●
L.W. AREA1 WARN to L.W. AREA32 WARN
●
L.W. FULL SET WARN
For example, AREA1 10M WARN may be set/armed to 7pm and the L.W. AREA1 WARN set/armed to 9pm. Normally
the first time command would arm the area 1 at 7pm. However, if the user cancels the first time command so that they
may work late, then the first time command is ignored and the system will be armed by the second time command at
9pm.
Late working time commands should only be used for areas that have to be set/armed by a certain time.
SIA TEST CALL
Sets a time at which the DM1200 will send SIA messages to the Central Station receiver to ensure line integrity.
Issue 04 October 2004
Programming Menus 2-89
menu
Function:
INHIBIT MODE
INSTALLER CODE _ _ _ _
This menu allows you to temporarily isolate troublesome zones/doors, which may be preventing the
system from setting. It is important to be aware that zones/doors which are inhibited will only report a
Tamper or Discon state – Open and Closed states are ignored.
INSTALLER CODE _ _ _ _
NO
INHIBIT MODE
ZONES
UNSET
DOORS
HELP
UNSET
INHIBIT FROM
INHIBIT FROM
#
1
#
n INHIBITS
#
1
DOOR NUMBER _ _ _
#
n INHIBITS
Display returns to Date & Time.
To C le a r Z o n e In h ib its
CLEAR ALL INHIBITS
YES
CLEARED
Back to inhibit zones
Display returns to Date & Time.
To C le a r D o o r In h ib its
CLEAR ALL INHIBITS
?
NO
Programming Menus 2-90
DOOR NUMBER _ _ _
INHIBIT TO
ZONE NUMBER _ _ _
1
If inhibited doors exist
INHIBIT TO
HELP
1
ZONE NUMBER _ _ _
If inhibited zones exist
NO
?
YES
NO
CLEARED
Back to inhibit doors
Additional Information
Inhibiting
Inhibiting a zone/door prevents openings and closings having an effect on the system. If zones/doors have been
inhibited, on selection of FULL set mode, a message will indicate how many are inhibited.
Selection of this option is logged by the system and an asterisk appears beside the log entry to indicate the zone/door
has been inhibited manually (zone/door may also be inhibited via literal commands). The identity of the user selecting
the option is also logged.
The INHIBIT function can be re-entered any number of times to inhibit more zones/doors – existing inhibited zones/
doors will not be affected.
Note The Inhibit command is available to all users with level II access.
Auto Inhibits
When the system is set using a timed command, it has the facility to inhibit up to 200 zones and override system faults
such as
●
Cable Fault
●
Battery Fault
●
Fuse Fault
●
Line Fault
●
FTC Fault
Clear Inhibits
To clear inhibits, re-enter Inhibit Mode using the installer code followed by the NO key. You are prompted to select
zones/doors. Once selected the message CLEAR ALL INHIBITS? will appear in the display. Press YES to clear the
inhibited zones/doors. Press NO to inhibit more zones/doors. Inhibits are automatically removed after performing an
unset/disarm from FULL SET mode.
Note Zones/doors can only be inhibited when the Inhibit attribute has been set to YES.
Issue 04 October 2004
Programming Menus 2-91
Programming Menus 2-92
INDEX
Numerics
range 2-41
stand alone operation 1-6
visitor level 2-41
voiding 2-42
3GS software 1-3
features 1-3
3GS System
variables 1-3
Clearing existing door settings 2-51, 2-52
Code
A
entry time-out 2-3
Accept All Alerts 2-87
Cold Start 1-10
Access Control Setup Examples 1-7
Cold start 1-10
Access level 2-41
Command Mode 2-84
Access Log 1-6
Common Area
variable 2-18
Access System
cards 1-5
door groups 1-5
doors 1-5
time zones 1-5
Copy 2-83
Current Limit Variable 2-21
D
Alarm Display Variable 2-17
Data Bits 2-65
Alarm Event 2-57
Default 2-83
Alert messages 1-10, 2-3
Delayed Raid Variable 2-17
Anti-passback 2-45
Denied Time 2-47
Area Setup 2-72
Descriptions
node 2-11
Arms Variable 2-17
Assign radio PA number (HUA) 2-77
Assigning
outputs 2-29
zones to days 2-51
Automatic Set Warn Variable 2-18
Detector Reset Variable 2-18
Dial Access Serial Port 2-66
Dial Mode
serial Port 2-67
Disable Mode 2-59
Door
B
description 2-44
open option 2-51
Battery 2-3
Baud Rate 2-65
Door Configure 2-44
Bell Delay Variable 2-17
Setup 2-45
Timers 2-47
Zones 2-48
Bell Time Variable 2-17
Buzzer Pattern 2-34
Door Group Setup 2-52
C
Door Open Time 2-47
Card Information 2-43
Cards
access level 2-41
function level 2-42
location 2-42
Issue 04 October 2004
E
E/E Area 1-8 2-17
E/E Common Variable 2-17
Edit 2-83
Index
Edit Levels Database 2-54
Modem communications 2-67
Edit Output Database 2-74
Modem Variable 2-17
Edit Time Commands 2-88
Multi-Area setting 2-18
Enter
N
dial command 2-66
telephone 2-66
Name and address
of installation 1-10
F
Names
Final Set Variable 2-17
assign user 2-71
Force Call 2-68
Node
Func. Enable Time 2-18
assigning output types 2-29
clearing output assignments 2-29
clearing the database 1-10
initialising 1-10
Function level 2-42
G
Getting Started 1-10
Node Configure 2-21
Granted Time 2-47
Inputs 2-25
Nodes- Information-Monitor 2-23
Nodes-Configure 2-24
Nodes-Information-Find 2-22
Outputs 2-27
Reconfigure Ringnet 2-28
H
Help Menu 2-6
hour change on Sunday
2-89
I
ID Codes 2-71
O
Inhibit Mode 2-90
On-line nodes 1-10
Intruder Log 1-4
Open/Lock Inhibit 2-45
Intruder System
Options, Assign User 2-71
areas 1-4
outputs 1-4
overview 1-4
users 1-4
zones 1-4
Output Assignments 2-60
Output Log Variable 2-17
Output Test 2-60
Output Types 2-60
Outputs 1-3
IR Enable Time 2-18
assigning 2-29
variable 2-18
P
L
Pager Transmitter 1-9
Learn cards procedure 2-38
Literal Edit and Holiday Scheduler 2-82
Local Alarm Variable 2-17
Locating a card on the system 2-42
Lock time 2-47
Log dump
2-89
Log Filter 2-65
Parity Serial Port 2-65
Photo entry (HUA) 2-80
PIN code access 2-51
PIN pad only operation 1-6
Power Consumption 2-60
Print all Reports 2-62
Printer Serial Port 2-65
Printing Service Mode 2-32
M
Manual Door Control 2-53
Menu Navigation 2-3
Menu options
Installer 2-8
Master 2-9
Index
Printing time zone data 2-51
Programming Overview 1-3
R
T
Radio field strength (HUA) 2-36
Testing
Radio PA Assign 2-76
Descriptions 2-78
Options 2-79
RPAs 2-77
cards 2-43
Time Advance 2-81
Time commands
log dump 2-89
Sunday hour change 2-89
Radio PA Buttons 1-9
Radio PA Setup 2-29
Time Zone Setup 2-49
Radio PA Test 2-36
Time Zones
Radio System
Setup 2-50
overview 1-9
Time zones
Replace/Add/Remove Nodes 2-17
and cards 2-50
and doors 2-51
and time slots 2-50
Retrigger 2-18
S
Transmit Name, Serial Port 2-65
Select cards procedure 2-38
Typing Text 2-4
Service Mode 2-29, 2-30
Monitor 2-34
On-Line Report 2-31
Test 2-32
U
Unset/Reset 2-86
User Setup 2-70
Service Reset Variable 2-17
Set Data Format 2-64
V
Set Date & Time 2-63
Variables 2-30
assigning 2-30
Set Door Protect 2-18
Set Up DM1200 2-69
Verify Time Variable 2-18
Setting
Visitor level 2-41
up new time zones 2-51
Setup Cards 2-37
Cards- Site Code 2-40
Cards-Assign 2-38
Cards-Formats 2-39
Pass/Void 2-41
Setup SIA 2-56
SIA Code 2-57
Soak Mode 2-58
Soak Test Days Variables 2-17
Soft Start 2-85
Stand-Alone Operation 1-6
Start Types 1-10
Start Up alert message 1-10
Voiding Cards 2-42
W
Walktest 2-32
Warm Start 1-10
Z
Zone attributes 2-14
Zones
disabling 2-59
Zones/Doors/Vars 2-10
Descriptions 2-11
Extra 2-20
Options 2-12
Variables 2-16
Status LEDs 2-3
Stop Bits 2-65
Sunday hour
2-89
Suspicion Audible Variable 2-17
System ID, Serial Port 2-66
System Log 2-61
Issue 04 October 2004
Index
Index