1
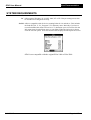
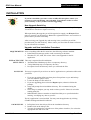
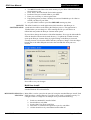
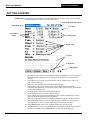
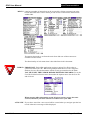
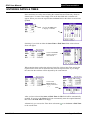
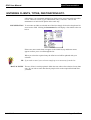
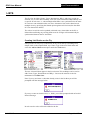
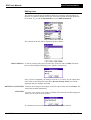
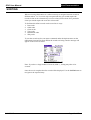
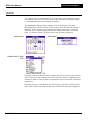
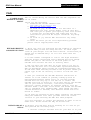
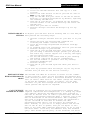
ODO
User Manual
Version 2.2
Created by ComIT Solutions Pty Ltd
Dec 2005
User Documentation
ODO User Manual
Contents
OVERVIEW........................................................................................................................... 4
QUICK START ..................................................................................................................... 4
ARCHITECTURE................................................................................................................. 5
SYSTEM REQUIREMENTS ............................................................................................... 6
PC ........................................................................................................................................ 6
PALM.................................................................................................................................... 6
INSTALLATION................................................................................................................... 7
REQUIREMENTS .................................................................................................................... 7
EXTRACTING THE SETUP FILES............................................................................................. 7
PC INSTALL .......................................................................................................................... 7
PALM INSTALL...................................................................................................................... 7
CONDUIT CONFIGURATION ................................................................................................... 8
MULTIPLE USERS VIA A SINGLE PC....................................................................................... 8
MULTIPLE USERS VIA SHARED NETWORK ........................................................................... 9
STARTING ODO ................................................................................................................ 10
TIP ................................................................................................................................ 10
REGISTRATION ................................................................................................................... 10
TRIAL ................................................................................................................................. 10
Registration Form......................................................................................................... 10
GETTING STARTED......................................................................................................... 11
OVERVIEW ......................................................................................................................... 11
ODO Main Form........................................................................................................... 11
MENUS ............................................................................................................................... 12
USER ID ............................................................................................................................. 12
AUTO NEW ......................................................................................................................... 12
ENTERING DATES & TIMES.......................................................................................... 13
ENTERING ODOMETER READINGS ........................................................................... 14
TIP ................................................................................................................................ 14
ENTERING CLIENTS, TYPES, DESTINATIONS ETC. .............................................. 15
LIST SELECTION ................................................................................................................. 15
TIP ................................................................................................................................ 15
MANUAL ENTRY ................................................................................................................ 15
LISTS.................................................................................................................................... 16
EDIT EXISTING ................................................................................................................... 17
DELETING A LIST ITEM ....................................................................................................... 17
NEW ITEM .......................................................................................................................... 17
ODO LIST ............................................................................................................................ 18
ODO List Form ............................................................................................................. 18
CUSTOMISING ODO LIST ................................................................................................... 18
SORTING............................................................................................................................. 19
GOTO ................................................................................................................................... 20
GOTO CLIENT, TYPE ETC .................................................................................................... 20
GOTO ODO ........................................................................................................................ 20
GOTO DATE........................................................................................................................ 20
RECORD DUPLICATION................................................................................................. 21
DELETE RECORD............................................................................................................. 21
PURGE RECORDS............................................................................................................. 22
EXPORTING RECORDS................................................................................................... 22
ENTERING EXPENSES .................................................................................................... 23
24/12/2005
Page: 2 of 32
ODO User Manual
User Documentation
EXPENSE FORM .................................................................................................................. 23
SUPPORT............................................................................................................................. 24
FAQ....................................................................................................................................... 25
UNABLE TO GET REFERENCE TO DAO OBJECT ................................................................... 25
WHY DOES HOTSYNC CONSISTENTLY FAIL? ...................................................................... 25
INSTALL ODO ON A NEW PC.............................................................................................. 25
INSTALL ODO ON A NEW PDA .......................................................................................... 26
HOW DO I USE ODO WITH ACCESS 2000 AND ABOVE ........................................................ 26
CAN I USE EXCEL INSTEAD OF ACCESS? ............................................................................. 26
PURGING RECORDS ............................................................................................................. 27
WHY DOES SETUP FAIL TO RECOGNISE DAO EVEN AFTER I HAVE INSTALLED DAOTEST
SUCCESSFULLY? ................................................................................................................. 27
WHY ARE THERE MORE RECORDS ON MY PC THAN MY PALM?........................................... 27
WHY ARE THERE MORE RECORDS ON MY PALM THAT MY PC? ........................................... 28
I HAVE REINSTALLED PALM DESKTOP AND NOW MY RECORDS ARE NOT BEING SYNCED .... 29
WHY ARE MY RECORDS NOT SYNCING FROM MY PC?......................................................... 29
LICENCE AGREEMENT .................................................................................................. 30
24/12/2005
Page: 3 of 32
User Documentation
ODO User Manual
OVERVIEW
ODO has been specifically designed so that you (the user) can keep a day-to-day
record of trip details to and from clients. ODO provides an accurate and efficient
method logging vehicle usage that may be used to generate reports for invoicing and
TAX purposes, or exporting to other systems.
This software is ideal for individuals or companies that maintain vehicle log books
for business travel purposes.
QUICK START
1. Install the software following the installation instructions
2. Start ODO on your Palm device
3. When using ODO for the first time your MUST ensure you have set up your
User ID on the Preference form. You can leave this as default (“ODO”), but if
you change the User ID after you have entered records that have not been
synched then you WILL loose them.
4. Set-up the Client, Type, Destination, Why and Car list with your required data
5. Enter you ODO records
6. Perform a Hotsync to transfer your data to the PC
7. Open up the PC application to review your data and confirm the synch operation
Each new entry will default to the current date and last entered ODO and Car. To
change the date, click on the Start Date field. A calendar will appear so that a
specific date can be chosen.
Start Time and End Time default to current time. To change, click on the time
fields. A Time select form will then be displayed for you to choose from. Total
hours for this trip will be calculated automatically.
To change the Start and End ODO click on the odometer reading and enter the
required figures. Note you can use the Page up and Down buttons to scroll through
the numbers.
Select or enter the require client, destination etc.
Further notes can be written on the lines provided. You are now ready to save this
ODO entry. The record is automatically saved when you exit ODO, use a menu item
or create a new record.
24/12/2005
Page: 4 of 32
User Documentation
ODO User Manual
ARCHITECTURE
The ODO application has three components as shown below.
1. Palm application
2. Synchronisation conduit
3. PC Access database
1
3
2
Palm 1
Palm HotSync®
Desktop System
Palm 2
ODO entries can be made either on the Palm, the PC or both. When the Palm is
synchronised using Hotsync manager the new or changed entries will be transferred
between each system.
ODO is designed to be multi user, i.e. one PC may be used to synchronise multiple
Palm devices. This allows a number of users to enter vehicle log data remotely on
their Palms and synchronise to a central database. Consolidated reporting can then
be performed from the centralised PC Access database through the user-friendly PC
application.
24/12/2005
Page: 5 of 32
User Documentation
ODO User Manual
SYSTEM REQUIREMENTS
PC ODO requires Windows 95, 98, ME, 2000, NT or XP. Hotsync manager must also
be installed and configured correctly.
PALM ODO is compatible with all devices running Palm OS 3.0 and above. This includes
the Palm III, IIIx, V, Vx, Tungsten T, T3 and many more. Basically if you have a
recent Palm PDA then ODO will run on it. To determine your OS version click the
Info menu item from the Home page on your Palm. When the info page is shown
click the Version option. Your OS version will be displayed at the top of the screen.
ODO is not compatible with the original Pilot 1000 or Pilot 5000.
24/12/2005
Page: 6 of 32
User Documentation
ODO User Manual
INSTALLATION
If you have installed a previous version of ODO PC then please ensure you
perform a synch and backup your Odo.mdb. You will also need to re-enter
your serial key so sure you have it before upgrading.
New Upgrade Serial Key
Users upgrading from a version prior to V2 will require a new serial key. Existing
V2 and above users do not require a new key.
When purchasing the upgrade you will be required to supply your Hotsync User
name to generate your upgrade key. Note: The registration name is case sensitive so
please ensure you enter it carefully.
After receiving your Upgrade key and entering it into your PDA you will be
provided with your full serial key. Please ensure you record this for future reference
as you will need it to reinstall.
Upgrade and New Installation Procedure
REQUIREMENTS Prior to installing ODO the PC must have the following software installed:
1. Palm HotSync® manager with a cradle connecting to the Palm.
2. Windows 9x, NT, 2000, XP or later. Mac is not supported for the PC
application.
EXTRACTING THE This step is required for all installations.
SETUP FILES 1. Download the ODOSetup.zip file to a temporary directory.
2. Unzip ODOSetup.zip to a temporary directory
3. In explorer locate the directory where you extracted the files.
PC INSTALL This step is required if you wish to use the PC application to synchronise ODO with
your PDA.
1. If you are an existing ODO user then please first perform a sync and backup
your odo.mdb file (just in case!)
2. Locate the Setup.exe file and run it.
3. If you are upgrading please select the Repair option, otherwise follow the
prompts.
4. Setup will prompt for an installation directory. We recommend using the
default.
5. Once Setup is complete you may need to reboot your PC. Please do so before
running ODO PC.
6. IMPORTANT! Please remember to install the ODO.prc to your Palm before
entering / modifying any data on your PC.
The PC Application is now installed. You may start the application by clicking
START\All Program\ODO PC\ODO PC.
PALM INSTALL 1. In Explorer locate the Odo.prc file in the installation directory.
2. Double click on the Odo.prc file.
3. You may be prompted to select the user of the palm to install to, if so select the
appropriate user and click ‘OK’.
24/12/2005
Page: 7 of 32
User Documentation
ODO User Manual
4. You MUST install ODO to the main memory of your PDA. ODO will not run
from a memory card
5. Click ‘Done’ when the Install Tool window appears.
6. Perform a Hotsync to install ODO to your PDA.
7. Enter your serial key or select register later.
8. If upgrading please perform a Desktop Overwrites Handheld sync for ODO to
refresh your data on your PDA.
9. Set your ODO UserID on your PDA BEFORE entering any data
CONDUIT The ODO Conduit is a small application which interfaces with Hotsync to
CONFIGURATION synchronise the ODO records during the HotSync process. This application is
installed when you run Setup.exe. After running this file you will notice an
ODOCond entry under the Hotsync Custom menu option.
If you wish to change the location of the ODO database, first copy the Odo.mdb file
from the install location to the desired directory. To update the Conduit location,
open up the Hotsync Custom dialog by right clicking on the Hotsync icon and
selecting Custom. Click on the ODOCond entry and press Change. Click the ellipse
button next to the ODO DB path and select the Odo.mdb file from your new
location.
Press OK to save your changes.
Multi User Install
ODO may be configured for multiple users in a number of different ways. Two
standard methods are outlined below
MULTIPLE USERS VIA A Many PDA’s can be synced to the same PC using the standard Hotsync install. Each
SINGLE PC PDA must have a unique Hotsync User ID to ensure each is synched correctly. To
configure ODO on a single PC for multiple users perform the following:
1.
2.
3.
4.
5.
24/12/2005
Perform a standard PC install of ODO
Install ODO to each PDA
Set the ODO User ID on each PDA
Enter data via each PDA and perform a sync for each PDA
All data should now by consolidated within ODO PC
Page: 8 of 32
ODO User Manual
MULTIPLE USERS VIA
SHARED NETWORK
24/12/2005
User Documentation
If each PDA is to sync via a separate PC then the ODO.mdb can be placed on a
shared network drive accessible via each PC. To configure ODO for a distributed
install perform the following:
1. Perform a standard PC install of ODO on each PC
2. Install ODO to each PDA
3. Copy a ODO.mdb file to a shared network drive.
4. Delete all other copies of the ODO.mdb file for each PC
5. Configure the ODOCond to point to the Shared copy of ODO.mdb
6. Set the ODO User ID on each PDA
7. Enter data via each PDA and perform a sync for each PDA
8. All data should now by consolidated within ODO PC
Page: 9 of 32
User Documentation
ODO User Manual
STARTING ODO
Once ODO is installed on your Palm a new Icon will appear as below.
Click on this icon to start ODO on your Palm.
TIP If after synchronising your Palm you cannot see the icon, try selecting the “All”
category from the top right hand side of the screen. If the icon is still not displayed
then the application has not been installed correctly. Please repeat the Palm Install
procedure again.
REGISTRATION ODO is a licensed application. To purchase please go to www.handango.com and
type ComIT in the search field. When paying the small licence fee you must register
your copy receive a serial key. When registering you will be required to supply
the registration name displayed in the middle of the form when you start the
application. This (Emulator as shown in the form below) will be used to create your
serial key.
TRIAL You may use the ODO application for a trial period to assess its performance.
Whilst in trial mode the application is fully functional for a limited time though the
number of entries has been limited. Once either the trial period or record limit is
reached no more records can be entered or edited. To start the trial click on the
Register Later button shown below. Note, whilst in trial mode the Register form will
appear each time you start the application.
Registration Form
The text at the bottom of the form displays the number of days and records left in
the trial.
24/12/2005
Page: 10 of 32
User Documentation
ODO User Manual
GETTING STARTED
OVERVIEW Get familiar with the Main form and feature buttons on the screen, as this will help
to understand how to create your first ODO entry.
1. Current Record and Count
ODO Main Form
8. Odometer
details
2. Vehicle
3. Time details
4. Popup Lists
5. Notes
6. Expenses
7. Navigation
1. This displays the current record number and the total number of records entered.
In this particular example, we are looking at record 208 out of a total of 979
records.
2. Each ODO record can be associated with a vehicle. Either enter a vehicle or
select one from the list.
3. The Date, Start and End time and duration for this trip.
4. The triangles represent drop down lists. When clicked a list of possible
selections will appear for you to choose from. Either select an entry from the list
or enter the details directly.
5. Click the Notes icon to enter details about the trip.
6. Click the Expense icon to enter expense details
7. These arrows are used to navigate through your records. Alternatively use the
page up and down buttons on your organiser.
8. The Start, End and Diff fields record the odometer readings relating to the trip.
9. The Goto button allows you to navigate directly to a different set of records.
This may be time, client or other depending on the current sort order.
10. The Cancel button cancels any changes made to the current record.
11. The New button creates a new blank record. Navigating past the last record also
creates a new blank record if Auto New is selected in the Preferences.
24/12/2005
Page: 11 of 32
ODO User Manual
User Documentation
MENUS ODO has a number of menus that can be accessed by clicking on menu icon in the
bottom left hand corner. These menus provide access to other forms and functions
within ODO.
The menus shown above are from the main form. Sub sets of these menus are
available on other forms.
The functionality of each menu item is described later in this document.
USER ID IMPORTANT. Each ODO application requires a unique User ID in order to
synchronise data with a PC. When using multiple Palm devices with a single PC
database, the user ID also determines which records get transferred to the Palm.
YOU MUST SET THE USER ID BEFORE ENTERING RECORDS. To set the
User ID click the Preferences menu item under the Options menu. Set the User ID
and click exit.
When entering ODO information on the PC please ensure you use the same
User ID, otherwise your data will not be transferred to your PDA.
AUTO NEW If you select Auto New a new record will be created when you navigate past the last
record. Otherwise a message will be displayed.
24/12/2005
Page: 12 of 32
User Documentation
ODO User Manual
ENTERING DATES & TIMES
Dates and times are easily entered using the custom Date and Time entry forms as
shown below. To enter a date simply click on the date field and a calendar will
appear. When you select the required date the Date field on the ODO record will be
updated.
Click on the Date field
to display a calendar
Similarly if you click on either the Start Time or End Time fields a time selector
form will appear.
Click on the Time
fields to display a
time selector
When entering times on the time selector form, first click on Start Time and set the
required time. Then click on End time and select the required time. If you change
the start time the end time will be adjusted by the same amount.
Click on the
Hours fields to
display a duration
l t
After you have selected the Start and End Time the Hrs field will be automatically
updated. If you tap on the Hours field you can manually enter the required duration,
this will set the End Time accordingly.
Alternatively you can use the Time short cut buttons
to the current time.
24/12/2005
to set the Start or End Time
Page: 13 of 32
User Documentation
ODO User Manual
ENTERING ODOMETER READINGS
When you create a new ODO record the Start and End odometer readings are set to
the last enter odometer value for the selected Car. i.e. your current odometer
reading. You can change these by clicking on either the Start, End of Distance
readings to display the odometer entry form below
This form allows you to quickly enter your odometer reading in one of three ways:
Either:
1. Use the plus and minus buttons to set the required ODO reading.
2. Use the Page up and Page down buttons to increase or decrease the
odometer reading.
3. Tap on the number and then enter the require reading using the Graffiti
number pad.
TIP If you tap on a number the reading increases or decreases from that point when
using the Plus or Minus, or the Page buttons.
Once you have entered the desired reading click OK, or Cancel to discard your
changes. The ODO record is then updated with the new value and the Distance, or
End ODO automatically calculated.
24/12/2005
Page: 14 of 32
ODO User Manual
User Documentation
ENTERING CLIENTS, TYPES, DESTINATIONS ETC.
ODO allows you to maintain multiple lists which can be associated with each ODO
record. These are Clients, Types, Destinations, Why’s and Cars. The use and
maintenance of each list all operate in the same way.
LIST SELECTION To associate an ODO record with one of the lists simply click on the drop down list
arrow next to field. Clicking the Destination list will display a list similar to the one
below.
If there are more entries than can appear in the initial list, up and down arrows
appear to allow you to scroll through the list.
When you select the required entry the ODO record will be updated with your
selection
TIP If you wish to cancel your selection simply tap in an area away from the list.
MANUAL ENTRY The use of lists is entirely optional. ODO does not enforce list selection for any data
entry. If you wish to enter data directly simple click on the required field and enter
your data.
24/12/2005
Page: 15 of 32
User Documentation
ODO User Manual
LISTS
The five lists in ODO (Clients, Types, Destinations, Why’s and Cars) provide an
efficient way to enter data constantly. Each list can be maintained independently and
is specific to each user, i.e. when multiple ODO PDA’s are synchronized to the same
PC each user can maintain his/her own lists. Alternative lists can be shared across
multiple users by specifying the Shared option against each list item (See the ODO
PC User manual for details).
The values in each list can be updated or deleted at any time either on the PC or
Palm without affecting any existing ODO records. Changes will automatically be
synchronized between the PC and Palm.
Creating List Entries on the Fly
ODO provides an easy way to add entries to any list on the fly (excluding Cars).
Simple click on the required field, say Clients. Type in the new client name and
select the Add to Clients menu option under the Tools menu.
The new client will then appear in the list selection. This technique can be used to
add Clients, Types, Destinations and Why’s. Cars must be entered via the list
maintenance form Edit Cars.
Note if you try and enter a value that already exists in the list then you will be
prompted with the message below:
If you try to enter an invalid value, i.e. blank, you will be prompted with an Invalid
Record message:
In each case the value will not be added to the list.
24/12/2005
Page: 16 of 32
User Documentation
ODO User Manual
Editing Lists
The values in each list may be updated, deleted or created by using the Edit List
function. To edit the contents of each list, select the required menu item under the
tools menu. E.g. to edit the Destinations list select Edit Destinations.
The contents of the list will be displayed similar to below:
EDIT EXISTING To edit an existing entry first select the entry in the list and click Edit. The form
below will be displayed allowing you to edit the selected entry
Once you have completed your changes click Save, or Cancel. If your edited value
is the same as an existing list value then a Record Already Exists error will be
displayed and your changes discarded
DELETING A LIST ITEM To delete an existing list item simply select the required item and click Delete. The
item will be deleted immediately.
NEW ITEM To create a new item in a list simply click New. The form below will be displayed
where you can enter the new list item.
To confirm the new list item click Save, otherwise Cancel to discard.
24/12/2005
Page: 17 of 32
ODO User Manual
User Documentation
ODO LIST
This form displays a list of all ODO records and can be viewed by clicking on the
List All Records menu item under the Records menu.
ODO List Form
Scroll bar
Navigation
Buttons
Use the scroll bar or up and down navigation buttons to scroll through the list. Use
the left and right navigation buttons to scroll across the ODO records and display
additional columns. Drag the column separators to resize the columns.
You have the choice of sorting this listing by Date, ODO, Client, Type, Destination
and Why by using the Options menu function. To display a particular record in
detail click required row. This will open up the ODO main form and display the
selected record.
CUSTOMISING ODO Since each ODO record contains many fields it is not possible to fit all fields in the
LIST ODO list at one time. ODO allows you to customise the list to select which fields
are displayed and the column width of those fields. To customise the list click the
Set Columns menu item under the Display menu. This will show the form below.
To ensure a column is displayed in the ODO list form check the tick box next to the
required column. Next set the required column width for each column, acceptable
values are 0 – 99 pixels. On most devices each character is approximately 5 pixels.
Thus 40 = 8 characters (depends on character size, ie. ‘1’ is less than ‘O’).
Alternatively you can drag the column separators in the ODO List View to resize
the columns. Click OK to save your changes, the ODO List form will now be
displayed with your new settings.
24/12/2005
Page: 18 of 32
ODO User Manual
User Documentation
SORTING
When reviewing ODO entries it is often necessary to navigate between records in
different orders. I.e. To review trips on a particular day you would require the
records in date order. Alternatively to review what you have done for a particular
client you would require the records in client order.
To facilitate this ODO records can be sorted in six ways:
1. Date order
2. ODO order
3. Client order
4. Type order
5. Destination order
6. Why order
To sort the records use the sort menu commands under the Options menu on the
ODO main form and List form. Whist the records are being sorted a message will
appear on the screen as below.
Note: if you have a large number of records (1000 +), sorting may take a few
seconds.
Once the sort is complete the first record will be displayed. Use the GOTO button to
navigate to the required entry.
24/12/2005
Page: 19 of 32
User Documentation
ODO User Manual
GOTO
It is often necessary to navigate directly to a particular record or group of records.
One method is to use the List form to scroll to the required record and then display
it. The Goto button provides an alternative method.
The Goto button displays either a calendar, a list or an odometer entry form
depending on the current sort order. If the sort order is by date then the calendar is
displayed. If the sort order is by ODO then an odometer entry form is displayed,
otherwise a list is shown displaying all possible values based on the current sort
order. I.e. if the sort order is by Clients, then a list of clients is displayed.
GOTO DATE
GOTO ODO
GOTO CLIENT, TYPE
ETC
Selecting a date or an odometer will navigate to the first occurrence of the selection.
If no occurrence is found then the next record after the selection is displayed. If the
selection is before or after all ODO records then the first or last records is displayed
respectively.
Similarly selecting a value from the list will navigate to the first occurrence of that
value. If the value is not found then the next record after the selection is displayed.
24/12/2005
Page: 20 of 32
User Documentation
ODO User Manual
RECORD DUPLICATION
Often when travelling to and from client sites you record the same trip information
each time, with only the date and odometer readings updated. ODO provides a
simple way to repeat any previous trip.
First locate the previous ODO record you wish to repeat, then click on the Duplicate
Record menu item under the Record menu.
A new ODO record will be created with the following details:
• Date and Start time set to the current date and time
• End time set to Start time + trip duration
• Start ODO set to last ODO entered
• End ODO set to Start ODO + trip distance
• All other details copied from original record
To use the duplicate record feature effectively duplicate the required record at the
beginning of your trip. You can then update the time and distance if required at the
end of your trip.
Similarly you can automatically create a Return Trip record based on an existing
record. To use this feature first create the outbound record and record the distance
and travel time. When commencing the return trip simply click the Return Trip
menu item under the Record menu. This will create a new record with the folloing
details:
•
•
•
•
•
•
Date and Start time set to the current date and time
End time set to Start time + trip duration
Start ODO set to last ODO entered
End ODO set to Start ODO + trip distance
From and To locations reversed
All other details copied from original record
DELETE RECORD
Delete record does exactly that, it deletes the current ODO record. Simply select the
required record to delete from the main form and click the Delete Record menu item
under the Record menu. A confirmation will be displayed, click OK to confirm the
delete or Cancel to discard.
24/12/2005
Page: 21 of 32
User Documentation
ODO User Manual
PURGE RECORDS
Multiple records can be deleted from ODO using the Purge function. Simply select
the Purge Records menu item under the Records menu to display the purge records
form below.
Select the Start and End date range to delete the records from and press Purge.
WARNING. ONCE RECORDS HAVE BEEN PURGED THEY CAN NOT BE
RECOVERED. PURGING RECORDS ON YOUR PDA WILL ALSO
REMOVE THEM FROM YOUR PC.
EXPORTING RECORDS
ODO records can be exported to the Memo pad. To export your data select the
Export Records menu item under the Records menu to display the form below.
Select the date range you wish to export records from and select the required Export
option from the Export list. Due to size limitations in the Memo records, multiple
entries may be created to store the exported data.
Exporting data does not delete the data from ODO.
24/12/2005
Page: 22 of 32
User Documentation
ODO User Manual
ENTERING EXPENSES
Expenses related to travel can be recorded using the Expense form as shown below.
To access this form either select the Expenses menu item on the Tools menu, or
click the $ next to the New button.
EXPENSE FORM
By default expenses are separated into Petrol related and other, though you may add
as many categories as you like. When selecting the Petrol category the Qty and Fill
Up options are displayed to records the volume of fuel purchased. Any other
category will hide these options.
The date and drop down lists function the same as in ODO main form. List
selections can be added on the fly using the menu options.
To enter the amount and qty simply click on the field and a numerical key pad will
be displayed as shown below. Enter the required number and click Enter to save.
24/12/2005
Page: 23 of 32
User Documentation
ODO User Manual
SUPPORT
ODO has been thoroughly tested on multiple Palm devices. If in the unlikely event
you experience a problem please first ensure you have followed the installation and
setup instructions. If the problem persists please email all bugs and support related
enquires to
[email protected]
and include ODO Support in the email header.
To assist us we will require the following information:
1. Registration No or serial key, purchase date and contact details
2. Palm OS version
3. Your PC windows version
4. A detailed description of the problem. If it is bug related, an example of the
operations performed which caused the problem.
24/12/2005
Page: 24 of 32
ODO User Manual
User Documentation
FAQ
UNABLE TO GET This is caused during the install when the DAO components can
REFERENCE TO DAO not be found.
OBJECT Please try the following:
1. Download and install DAOTest from
www.comit.com.au/support.htm
2. Try the ODO Setup again
3. If still no joy, in the install for ODO there is a
DAOLicence.reg file. Please double click on this file
and click yes to update your registry. This file creates
a licence key for DAO which some times does not get
installed if your have MS Project installed. Try setup
again.
4. If still no joy install MFC and restart. Try setup
again.
If after the above you are still experiencing problems
please contact [email protected]
WHY DOES HOTSYNC 1. First off, have you installed the ODO Conduit? It should be
CONSISTENTLY FAIL? installed when you run the Setup.exe file. To check right
click on your Hotsync icon and select Custom. If installed you
should see an ODOCond entry. If it is not there then run
Setup.exe.
2. Is the Conduit configured to look at the right database?
From the hotsync custom menu select ODOCond and click change.
Ensure the path at the bottom of the form points to the
ODO.mdb file and that the file is actually there.
3. Did you enter the same User ID on the Palm as you use on
the PC? The ODO user ID is located under Options/Preferences.
This ID determines which records get transferred between your
PC and Palm. When entering records on the PC please ensure you
either type in the ID correctly or select it from the list
box.
4. Have you converted the ODO.mdb database from Access 97
format? If so the conduit is probably coming up with an
Unrecognised Database format error. If you have already
entered data the only way to fix this is to convert the
ODO.mdb file back to Access 97. To do this open up the ODO.mdb
file in your version of Access, click Tools, Database
Utilities, Convert Database, To Previous version. Save the
database under a new name. Close Access and rename the ODO.mdb
file to something else (ODO2000.mdb). Then rename the newly
created database to ODO.mdb, this database should now be in
Access 97 format.
If you have not entered any data simply reinstall the database
using the ODODB.exe file. Note you must enter the correct
location to your existing odo.mdb file when prompted.
It is not necessary to convert the database in order to use it
under 2000. Please review the FAQ for Access 2000.
INSTALL ODO ON A To migrate your ODO data from an existing PC to a new PC you
NEW PC must perform the following steps:
1. Perform a Hotsync and make sure all your data is on your
24/12/2005
Page: 25 of 32
ODO User Manual
User Documentation
existing PC
2. Locate the ODO.mdb database file and copy to a safe
location
3. Install the same version of ODO on your new PC. Note it
MUST be the same version
4. Copy the ODO.mdb from your old PC to the new PC install
directory (c:\Program Files\ODO PC by default) replacing
the existing ODO.mdb file
5. Open ODO on your New PC, if prompted for the database
location browse to the install directory and select the
ODO.mdb file.
6. Check that your data is visible
7. Perform a Hotsync and check the Hotsync log for any
errors
INSTALL ODO ON A To migrate your ODO data from an existing PDA to a new PDA you
NEW PDA must perform the following steps:
1. Perform a Hotsync and make sure all your data is on your
PC
2. Delete ODO from your existing PDA (required for
licensing and conduit conflict issues)
3. Click the Start\App Programs\ODO PC\Install Palm App
menu item
4. If prompted select the appropriate user for your new PDA
5. Perform a Hotsync on your new PDA
6. Open ODO on your new PDA and enter your serial key. If
you are using a different Hotsync profile you may need a
new serial key. Contact support for a new key and supply
the new registration name.
7. Set the ODO UserID to the UserID used in your existing
ODO entries (check the PC app for confirmation)
8. Set the ODO Conduit to perform a once only Desktop
Overwrites Handheld sync
9. Perform a Hotsync
10.Open ODO on your new PDA again and check your data is
there.
If you have any problems check the Hotsync log for any errors
and make sure you have set the User ID correctly.
HOW DO I USE ODO The ODO.mdb file MUST be in Access 97 format for the conduit
WITH ACCESS 2000 AND to work correctly. Since you can not modify the database with
ABOVE later versions you must create a new Access database in Access
2000 (or above). Then Link all the tables (except the ODOCond)
to the new DB. Remember to Link, not Import. You can then
view/edit all your data through the new Access 2000 DB and
create queries and reports as required.
CAN I USE EXCEL ODO uses an optimised two way synchronisation routine which
INSTEAD OF ACCESS? requires complicated data manipulation. I.e. during any single
sync updates, deletions and additions may have occurred on
both the PC and the Palm. In order to process these ODO uses a
technique called double buffering where a separate copy of the
data is maintained in the Access database. This complexity
does lead to significant performance gains (we synchronise a
10,000+ record DB in less than 20 seconds) but does
unfortunately mean that it can not easily be achieved in
Excel. However, if your aim is to simply extract and use the
data on the PC (not to update) then you can import it into
Excel or any other ODBC compliant application. To do so open a
new excel sheet. Click Data, Get External Data, New Database
Query. This should open MS Query. On the Databases tab select
24/12/2005
Page: 26 of 32
User Documentation
ODO User Manual
MS Access Database and OK. Browse to the location of your
ODO.mdb file and open it. You will be prompted to select the
data to include in your query, click on ODO and click the
right arrow button. Click next three times and then select
return data to Excel and click finish.
You should now see all your data entered on your Palm. If
required you can also import the other tables, though these
are just lookups. The ODOCOND table is the double buffer
mentioned earlier.
Alternatively simply use the ODO PC application to export the
ODO data into an Excel or CSV format suitable for Excel.
We have also released a free export utility (DBExport
which will take all the data from the ODO (and Times)
and export it to a CSV format suitable for Excel. You
this utility on Palmgear and Handango. If you wish to
utility please ensure you have MDAC2.6 installed (see
DBExportReadme file).
V1)
database
can find
use this
the
PURGING RECORDS If you have MS Access you can delete a range of records by
performing the following query
DELETE FROM ODO WHERE ODO.StartDate < #M/D/YYYY#
Where M = Month No, D = Day No and YYYY = Year.
PLEASE NOTE ONCE DELETED YOU CAN NOT RECOVER THESE RECORDS! We
recommend making a backup of your odo.mdb file should you
require these records in the future.
ODO PC 1.5 and above includes a purge function which can be
used to achieve the same results.
WHY DOES SETUP FAIL
TO RECOGNISE DAO
EVEN AFTER I HAVE
INSTALLED DAOTEST
SUCCESSFULLY?
There is a bug in the self-registration function of the MS DAO
DLL which does not always create the required licence key in
the registry to support ActiveX scripting. To work around this
install DAOLicence.reg by double clicking on the file. Set-up
should now install correctly.
WHY ARE THERE MORE There are a number of reasons why you may have different
RECORDS ON MY PC record counts on your Palm to the PC, some by design and some
caused by incorrect use.
THAN MY PALM?
ODO is designed to consolidate multiple Palms to one database.
To do so each Palm must have a unique ODO User ID which is
attached to each ODO record. When you sync, only records with
the same User ID’s are transferred to and from your PC. If
either your Palm or PC User ID’s have been changed after
entering records it is possible some ODO records have been
created under different ID's, thus when you sync you are only
synchronizing your current User ID's records. This would
explain why there are more records on the PC than on the Palm.
If you operate your ODO system with only one User you can
verify this by either reviewing all your ODO records on the PC
and looking for different ID's or running the following query
against your Access database:
Select Distinct ID from ODO
24/12/2005
Page: 27 of 32
User Documentation
ODO User Manual
This query will list all the unique ID's used against your
records.
If you have used multiple ID's, then performing a Handheld
overwrites Desktop sync will not fix this problem. It will
only replace records with the same User ID as currently used
on the Palm. To fix you must first perform a sync and ensure
all the records from your palm are correct on the PC. Then
update all ODO records on the PC to the current Palm User ID
either by manually modifying them or running the following
query:
Update ODO Set ID = 'Enter Your User ID here between the
quotes'
Then perform a Desktop overwrites Handheld sync. This will
copy all the PC records back to the Palm with the new User
ID's where appropriate. Your Palm and PC should now be in
sync.
Other causes would be where you have manually modified the
User ID or the RecID on the PC after synching with the Palm.
This would effectively have the same effect as changing the
Palm User ID and cause the records not to be copied to the
Palm. To Fix follow the same procedure above.
If you have manually modified the ODOCond table then you will
most likely loose sync between the data on the Palm and PC.
Again the best way to fix this is to ensure the PC data is
correct and perform a Desktop overwrites Handheld sync.
Finally if there is a problem with the ODO Conduit this could
cause loss or corruption of data. Currently we are not aware
of any such problems but you can review your Hotsync log to
verify this. If the conduit is working correctly you should
see OK ODOCond in your log file. Otherwise forward the log
file to [email protected] and we'll investigate.
WHY ARE THERE MORE Have you changed your user ID on your Palm after entering
RECORDS ON MY PALM records?. ODO is designed to be multi user, i.e. many Palm
THAT MY PC? devices can synch to the same Access database. This is
facilitated by recording the User ID against each record. The
User ID should not be changed after you have started entering
data. If you change the user ID after entering records then
you will only synchronise those records created with the new
ID.
To resolve this you can either:
A) Change the User ID back to the original name (assuming you
have not entered any new records with the new ID) and perform
a Handheld overwrites Desktop. All your records should now be
in synch.
or
B) Note: you will need Access or another ODBC tool to perform
this process. First Perform a Handheld overwrites Desktop.
This will copy all the Handheld records to the ODOCond table.
If the User ID on the Palm is different that against the ODO
records then these records will not be copied to the ODO table
and you will have to do this manually. To do so first delete
all existing records in your ODO table using the query below,
replace YourID with your current ODO User ID, and Your OLD ID
with the previous User ID
UPDATE ODOCOND SET ID = "YourID"
24/12/2005
Page: 28 of 32
User Documentation
ODO User Manual
WHERE ID =”Your OLD ID”
Next perform an update query on the ODOCond table to set the
UserID to the same as that on the Palm, use the query below
replacing YourID with your current user id (leave the quotes)
UPDATE ODOCOND SET ODOCOND.ID = "YourID"
Then append all records to the ODO table using the query
below:
INSERT INTO ODO (ID, StartDate, StartTime, EndTime, Hours,
StartODO, EndODO, Distance, Type, Client, To, Reason, Details,
RecId, Car, From, Via )
SELECT ODOCOND.ID, ODOCOND.StartDate, ODOCOND.StartTime,
ODOCOND.EndTime, ODOCOND.Hours, ODOCOND.StartODO,
ODOCOND.EndODO, ODOCOND.Distance, ODOCOND.Type,
ODOCOND.Client, ODOCOND.To, ODOCOND.Reason, ODOCOND.Details,
ODOCOND.RecId, ODOCOND.Attributes, ODOCOND.Car, ODOCOND.From,
ODOCOND.Via
FROM ODOCOND
WHERE (((ODOCOND.ID)="YourID"));
All your records will now be in the ODO table. Check the data
and when satisfied make a backup of the ODO.mdb file (just in
case) and perform a desktop overwrites handheld synch. All
your ODO records should now be in sync.
As long as you do not perform a Desktop overwrites Handheld
before getting the records into the ODO table you should not
loose your data.
I HAVE REINSTALLED
PALM DESKTOP AND
NOW MY RECORDS ARE
NOT BEING SYNCED
When you reinstall Palm Desktop unless you select “Keep
existing Conduit settings” you effectively overwrite the ODO
conduit entry, thus removing it from Hotsync. The easiest way
to resolve this issue is to:
1. Make a copy of your ODO.mdb file to a temp directory
2. Uninstall ODO PC
3. Reinstall ODO PC from your original setup files (only the
PC component, not the Palm)
4. Replace the odo.mdb file in the install directory with the
one copied previously
5. Perform a Hotsync
Your PC and Palm should now be in sync.
WHY ARE MY RECORDS Please check the following:
NOT SYNCING FROM
1. Have you installed the ODO Conduit? Look in the Hotsync
MY PC?
custom screen for an entry called ODOCond. If not please
reinstall ODO PC.
2. Are you using the same version of ODO on your PC and
PDA?
3. Is it configured to point to your odo.mdb file?
4. Are there any records in the odo.mdb file?
5. Are you using the same ODO UserID on both your PC and
PDA?
6. Are there any errors in the Hotsync log file?
24/12/2005
Page: 29 of 32
ODO User Manual
User Documentation
LICENCE AGREEMENT
ComIT Solutions Pty Ltd. LICENSE AGREEMENT
This is a legal agreement between you and ComIT Solutions Pty Ltd.
covering your use of ODO. Be sure to read the following agreement before
using the software. IF YOU DO NOT AGREE TO THE TERMS OF THIS AGREEMENT,
DO NOT USE THE SOFTWARE AND DESTROY ALL COPIES OF IT.
This ComIT End-User License Agreement ("EULA") is a legal agreement
between you (either an individual or a single entity) and ComIT Solutions
Pty Ltd. By installing, copying, or otherwise using ODO ("the Software")
on any computer or device, you agree to be bound by the terms of this
EULA. If you do not agree to the terms of this EULA, you are not
authorized to use the Software.
GRANT
ComIT Solutions Pty Ltd. grants you a non-exclusive license to use the
Software.
You may:
* use the Software on any single computer or electronic device;
* use the Software on a second device so long as only one copy is used at
a time;
* copy the Software for archival purposes, provided any copy must contain
all of the original Software's proprietary notices and this license
agreement; or
You may not:
* permit other individuals to use the Software except under the terms
listed above;
* permit concurrent use of the Software;
* modify, translate, reverse engineer, decompile, disassemble or create
derivative works based on the Software;
* copy the Software other than as specified above;
* rent, lease, grant a security interest in, or otherwise transfer rights
to the Software; or
* remove any proprietary notices or labels on the Software.
WARRANTY
ComIT Solutions Pty Ltd. warrants that for a period of sixty (60) days
from the date of acquisition, the Software, if operated as directed, will
substantially achieve the functionality described in the Documentation.
ComIT Solutions Pty Ltd. does not warrant, however, that your use of the
Software will be uninterrupted or that the operation of the Software will
be error-free or secure. ComIT Solutions Pty Ltd. also warrants that the
media containing the Software, if provided by ComIT Solutions Pty Ltd.,
is free from defects in material and workmanship and will so remain for
sixty (60) days from the date you acquired the Software. ComIT Solutions
Pty Ltd's sole liability for any breach of this warranty shall be, in
ComIT Solutions Pty Ltd's sole discretion: (i) to replace your defective
media; or (ii) to advise you how to achieve substantially the same
functionality with the Software as described in the Documentation through
a procedure different from that set forth in the Documentation; or (iii)
if the above remedies are impracticable, to refund the license fee you
paid for the Software. Repaired, corrected, or replaced Software and
24/12/2005
Page: 30 of 32
ODO User Manual
User Documentation
Documentation shall be covered by this limited warranty for the period
remaining under the warranty that covered the original Software, or if
longer, for thirty (30) days after the date (a) of shipment to you of the
repaired or replaced Software, or (b) ComIT Solutions advised you how to
operate the Software so as to achieve the functionality described in the
Documentation. Only if you inform ComIT Solutions Pty Ltd. of your
problem with the Software during the applicable warranty period and
provide evidence of the date you purchased a license to the Software will
ComIT Solutions Pty Ltd. be obligated to honor this warranty. ComIT
Solutions Pty Ltd. will use reasonable commercial efforts to repair,
replace, advise or, for individual consumers, refund pursuant to the
foregoing warranty within 30 days of being so notified.
THIS IS A LIMITED WARRANTY AND IT IS THE ONLY WARRANTY MADE BY ComIT
Solutions Pty Ltd. ComIT Solutions Pty Ltd. MAKES NO OTHER EXPRESS
WARRANTY AND NO WARRANTY OF NONINFRINGEMENT OF THIRD PARTIES' RIGHTS. THE
DURATION OF IMPLIED WARRANTIES, INCLUDING WITHOUT LIMITATION, WARRANTIES
OF MERCHANTABILITY AND OF FITNESS FOR A PARTICULAR PURPOSE, IS LIMITED TO
THE ABOVE LIMITED WARRANTY PERIOD; SOME JURISDICTIONS DO NOT ALLOW
LIMITATIONS ON HOW LONG AN IMPLIED WARRANTY LASTS, SO LIMITATIONS MAY NOT
APPLY TO YOU. NO ComIT SOFTARE DEALER, AGENT, OR EMPLOYEE IS AUTHORIZED
TO MAKE ANY MODIFICATIONS, EXTENSIONS, OR ADDITIONS TO THIS WARRANTY.
If any modifications are made to the Software by you during the warranty
period; if the media is subjected to accident, abuse, or improper use; or
if you violate the terms of this Agreement, then this warranty shall
immediately be terminated. This warranty shall not apply if the Software
is used on or in conjunction with hardware or software other than the
unmodified version of hardware and software with which the software was
designed to be used as described in the Documentation. THIS WARRANTY
GIVES YOU SPECIFIC LEGAL RIGHTS, AND YOU MAY HAVE OTHER LEGAL RIGHTS THAT
VARY BY JURISDICTION.
DISTRIBUTION
Distribution of the Software is not allowed without permission of ComIT
Solutions Pty Ltd.
You may not modify, translate, reverse engineer, decompile, disassemble
or create derivative works based on the Software. You may not copy the
Software other than as specified above. You may not rent, lease, grant a
security interest in, or otherwise transfer rights to the Software. You
may not remove any proprietary notices or labels on the Software. You
must maintain all copyright notices on all copies of the Software.
TITLE.
Title, ownership rights, and intellectual property rights in the Software
shall remain in ComIT Solutions Pty Ltd.
TERMINATION.
The license will terminate automatically if you fail to comply with the
limitations described herein. On termination, you must destroy all
copies of the Software and Documentation.
EXPORT CONTROLS.
None of the Software or underlying information or technology may be
downloaded or otherwise exported or reexported (i) into (or to a national
or resident of) Cuba, Iraq, Libya, Yugoslavia, North Korea, Iran, Syria
24/12/2005
Page: 31 of 32
ODO User Manual
User Documentation
or any other country to which the U.S. has embargoed goods; or (ii) to
anyone on the U.S. Treasury Department's list of Specially Designated
Nationals or the U.S. Commerce Department's Table of Denial Orders. By
downloading or using the Software, you are agreeing to the foregoing and
you are representing and warranting that you are not located in, under
the control of, or a national or resident of any such country or on any
such list.
LIMITATION OF LIABILITY
UNDER NO CIRCUMSTANCES AND UNDER NO LEGAL THEORY, TORT, CONTRACT, OR
OTHERWISE, SHALL ComIT Solutions Pty Ltd. OR ITS SUPPLIERS OR RESELLERS
BE LIABLE TO YOU OR ANY OTHER PERSON FOR ANY INDIRECT, SPECIAL,
INCIDENTAL, OR CONSEQUENTIAL DAMAGES OF ANY CHARACTER INCLUDING, WITHOUT
LIMITATION, DAMAGES FOR LOSS OF GOODWILL, WORK STOPPAGE, COMPUTER FAILURE
OR MALFUNCTION, OR ANY AND ALL OTHER COMMERCIAL DAMAGES OR LOSSES. IN NO
EVENT WILL ComIT Solutions Pty Ltd. BE LIABLE FOR ANY DAMAGES IN EXCESS
OF THE AMOUNT ComIT Solutions RECEIVED FROM YOU FOR A LICENSE TO THE
SOFTWARE, EVEN IF ComIT Solutions Pty Ltd. SHALL HAVE BEEN INFORMED OF
THE POSSIBILITY OF SUCH DAMAGES, OR FOR ANY CLAIM BY ANY OTHER PARTY.
THIS LIMITATION OF LIABILITY SHALL NOT APPLY TO LIABILITY FOR DEATH OR
PERSONAL INJURY TO THE EXTENT APPLICABLE LAW PROHIBITS SUCH LIMITATION.
FURTHERMORE, SOME JURISDICTIONS DO NOT ALLOW THE EXCLUSION OR LIMITATION
OF INCIDENTAL OR CONSEQUENTIAL DAMAGES, SO THIS LIMITATION AND EXCLUSION
MAY NOT APPLY TO YOU.
HIGH RISK ACTIVITIES.
The Software is not fault-tolerant and is not designed, manufactured or
intended for use or resale as on-line control equipment in hazardous
environments requiring fail-safe performance, such as in the operation of
nuclear facilities, aircraft navigation or communication systems, air
traffic control, direct life support machines, or weapons systems, in
which the failure of the Software could lead directly to death, personal
injury, or severe physical or environmental damage ("High Risk
Activities"). ComIT Solutions Pty Ltd. and its suppliers specifically
disclaim any express or implied warranty of fitness for High Risk
Activities.
MISCELLANEOUS.
If any provision of this Agreement is held to be unenforceable, such
provision shall be reformed only to the extent necessary to make it
enforceable. This Agreement shall be governed by California law (except
for conflict of law provisions). The application the United Nations
Convention of Contracts for the International Sale of Goods is expressly
excluded.
U.S. GOVERNMENT RESTRICTED RIGHTS. Use, duplication or disclosure by the
Government is subject to restrictions set forth in subparagraphs (a)
through (d) of the Commercial Computer-Restricted Rights clause at FAR
52.227-19 when applicable, or in subparagraph (c)(1)(ii) of the Rights in
Technical Data and Computer Software clause at DFARS 252.227-7013, or at
252.211-7015, or to ComIT Solutions Pty Ltd's standard commercial
license, as applicable, and in similar clauses in the NASA FAR
Supplement. Manufacturer is ComIT Solutions Pty Ltd, 2/765 Burwood Rd,
East Hawthorn, 3123, Victoria, Australia. ABN 24 093 555 705.
24/12/2005
Page: 32 of 32