1
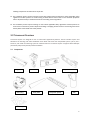
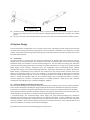
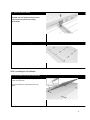
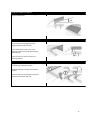
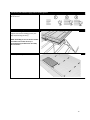
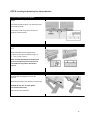
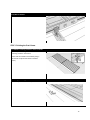
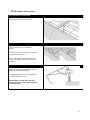
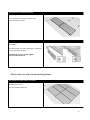
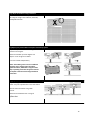
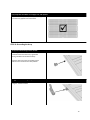
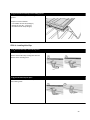
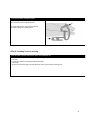
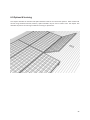
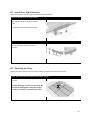
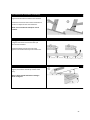
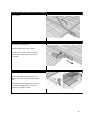
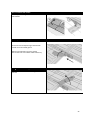
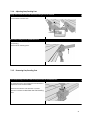
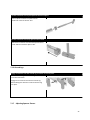
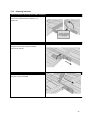
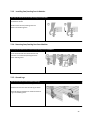
Trinamount II Installation Manual For Pitched Roof (Corrugated Metal) Version A Table of Contents 1.0 Introduction . . . . . . . . . . . . . . . . . . . . . . . . . . . . . . . . . . . . . . . . . . . . . . . . . . . . . . . . . . . . . . . . . . . . . . . . . . . . . . . . . . . . . . . . . . . . . . . . . . . . . . . . . . . . 1 2.0 Safety Precautions . . . . . . . . . . . . . . . . . . . . . . . . . . . . . . . . . . . . . . . . . . . . . . . . . . . . . . . . . . . . . . . . . . . . . . . . . . . . . . . . . . . . . . . . . . . . . . . . . . . . 1 2.1 General Safety . . . . . . . . . . . . . . . . . . . . . . . . . . . . . . . . . . . . . . . . . . . . . . . . . . . . . . . . . . . . . . . . . . . . . . . . . . . . . . . . . . . . . . . . . . . . . . . . . . . . . . 1 2.2 Installation Safety . . . . . . . . . . . . . . . . . . . . . . . . . . . . . . . . . . . . . . . . . . . . . . . . . . . . . . . . . . . . . . . . . . . . . . . . . . . . . . . . . . . . . . . . . . . . . . . . . 1 3.0 Trinamount Overview . . . . . . . . . . . . . . . . . . . . . . . . . . . . . . . . . . . . . . . . . . . . . . . . . . . . . . . . . . . . . . . . . . . . . . . . . . . . . . . . . . . . . . . . . . . . . . . 2 3.1 Components ............................................................................................................................. 2 4.0 System Design . . . . . . . . . . . . . . . . . . . . . . . . . . . . . . . . . . . . . . . . . . . . . . . . . . . . . . . . . . . . . . . . . . . . . . . . . . . . . . . . . . . . . . . . . . . . . . . . . . . . . . . . 3 4.1 Introduction . . . . . . . . . . . . . . . . . . . . . . . . . . . . . . . . . . . . . . . . . . . . . . . . . . . . . . . . . . . . . . . . . . . . . . . . . . . . . . . . . . . . . . . . . . . . . . . . . . . . . . . . . 3 4.2 Determine Method for Calculating Design Loads . . . . . . . . . . . . . . . . . . . . . . . . . . . . . . . . . . . . . . . . . . . . . . . . . . . . . . 3 4.3 Gather Site Information . . . . . . . . . . . . . . . . . . . . . . . . . . . . . . . . . . . . . . . . . . . . . . . . . . . . . . . . . . . . . . . . . . . . . . . . . . . . . . . . . . . . . . . . . 4 4.4 Create Array Layout and Bill of Materials . . . . . . . . . . . . . . . . . . . . . . . . . . . . . . . . . . . . . . . . . . . . . . . . . . . . . . . . . . . . . . . . . . 5 5.0 Mechanical Installation .............................................................................................................. 5 5.1Step1:Formual&Layoutlines……………………………………................. .........................................................................6 5.2 Step2:Installing Roof Attachments………………….……………………..........................................................................6 5.3 Step3: Installing the First Column of cam feet ……………………………….…………………………………….....................8 5.4 Step4:Installing the array skirt……………………………………………………......................................................................9 5.5 Step5:Installing the First Module…………..………………………………........................................................................11 5.6 Step6: Installing the Remaining First-column modules .…………..……………………….....................................14 5.7 Step7:Finishing the First Column…………..……………………………….........................................................................15 5.8 Step8:Remove the Array Skirts…………..………………………………............................................................................16 5.9 Step9:Install, True, and Level the Remaining Columns…………..…………………..............................................17 5.10 Step10:Grounding the Array…………..………………………………...............................................................................19 5.11 Step11:Installing Wire Clips…………..……………………………….................................................................................20 5.12 Step12:Providing Tools for Servicing………..………………….................................................................................20 6.0 Options & Servicing……………………………………………..................................................................... 2 2 6.1 Interlock vs. Hybrid Interlock……………………………………………………………………….…………….……………………………..2 3 6.2 7.0 Servicing the Array….………………………………………………………………………………………….…………………………………….23 Using the Trinamount and Flat Tools.........................................................................................28 7.1 The Trinamount tool….……………………………………………………………………………………………………………………………28 7.1 The Flat tool….………………………………………………………………………………………………………………………………..………….33 1.0 Introduction Trinamount System II from TrinaSolar, Inc. offers the fastest and least expensive way to mount rooftop PV arrays on metal roofs using a series of drop-in and quarter-turn connections to greatly accelerate the process. Structural and earthing connections are accomplished using very few parts and no mounting rails. The simple installation delivers labor and logistics savings. 2.0 Safety Precautions WARNING: All instructions in this Installation Manual should be read and understood before attempting installation. The installer assumes all risk of personal injury or property damage that may occur during the installation and handling of the components. 2.1 General Safety 1. All installations must be performed in compliance with all applicable regional and local codes, in particular AS/ NZS 1170.2.2011. 2. Follow all safety precautions detailed in this Installation Manual as well as the Module installation manual. 3. Use proper fall-protection equipment and scaffolding according to national safety standards. 4. Do not perform any installations in wet or windy conditions. 2.2 Installation Safety 5. All installation and servicing must be performed by qualified personnel. 6. The installer is responsible for knowing and following all applicable codes and regulations and for obtaining all required permits and inspections. Ensure all personnel are properly trained and licensed. 7. Check applicable building codes or refer to a structural engineer to ensure that the structure upon which the Trinamount II is being installed can properly support the array under live load conditions. 8. Trinamount II must be installed over an appropriately rated fire resistant roof covering. 9. Rockits and Interlocks must be fully engaged with the PV modules. You will feel a snap when Rockits are properly installed. 10. Always use appropriate Personal Protective Equipment (PPE) such as safety glasses, gloves, hard hat, safety shoes, harnesses etc. As required by local regulations and best practices. 11. Never expose PV modules to excessive loads or deformation such as twisting or bending. 12. Some components may be heavy and/or bulky. Always use proper lifting and carrying techniques when 1 handling components and materials at the job site. 13. The installation process involves working around high-voltage electrical equipment. Follow applicable safety regulations and best practices to avoid creating an electrocution hazard. Tasks on the electrical equipment have to be performed by a certified electrician and according to local regulations. 14. The installation process requires working on roofs. Follow applicable safety regulations and best practices to avoid a fall. Use caution to prevent objects from falling or dropping off the roof area. Cordon off ground areas directly below roof-related work when possible. 3.0 Trinamount Overview Trinamount System II is designed for use on metal roofs supported by battens. The low number of parts and elimination of mounting rails makes installation much faster and easier than comparable systems; just lay out a few lines, and install the mounting system at selected locations. Trinamount System II supports both landscape (horizontal) and portrait (vertical) module installation. 3.1 Components Big Foot Ground lug Cam Foot Array Skirt Interlock Array Skirt Spacer Hybrid Interlock Jam Wire Clip 2 Trinamount Tool Flat Tool Trinamount Tool: The Trinamount Tool is used to install the Interlocks and Ground Lug and to level the Rockits using a #30 Torx bit. It can also help with installing Hybrid Interlocks that are snug in the module groove. Flat Tool: This tool is a low-cost alternative to the Trinamount Tool. It is also customized for module removal. 4.0 System Design Trinamount System II is designed for use on a variety of metal roofs. This chapter provides a high-level overview of the process of assessing and planning a prospective Trinamount System II installation. Each installation is unique and has unique requirements that go beyond the high-level overview included in this manual. Please contact Trina Solar Sales Representative 4.1 Introduction Trinamount System II complies with the structural requirements of AS/NZS 1170.2.2011 based on both the configurations and criteria provided in the Certification Letter with accompanying span and the Trinamount-design web-based design tool available at www.trinamount-design.com. The span tables and design tool define the maximum Big Foot spacing requirements and maximum cantilever allowances for a range of site-specific variables (Wind Region, Terrain Category, Importance Level, and Topographic Factor) and building-specific variables (Average Roof Height, Least Horizontal Building Dimension, Roof Slope, Attachment Type, Batten Dimensions, Batten Spacing, and Mounting Area). Collect the site conditions for your project location and then refer to the tables in the certification letter or enter your variables in the Trinamount-design to determine the maximum allowable spacing between Big Feet. If your site or building conditions are outside the assumptions on the span tables or outside the allowable ranges on the Trinamount-design, refer to AS/NZS 1170.2.2011 or contact a structural engineer for assistance. Trinamount System II mounting hardware is rated for use with maximum module front-side loadings of up to 113 lbs/ft2 (552kg/m2, 5400 Pa). 4.2 Determine Method for Calculating Design Loads Determining allowable Big Foot spacing and cantilever allows creation of both a system layout and bill of materials. There are two methods for calculating the design loads that will determine allowable foot spacing and cantilever. •Trina Solar, Inc. publishes an engineering certification letter that contains span tables that determine allowable foot spacing and cantilever based on site specific variables. The engineering certification letter can be found on the resources page of the Trina Solar, inc. website at www.Trinamount-design.com/resources. • Trinamount-design: The Trinamount-design online design tool (www.trinamount-design.com) determines allowable Big Foot spacing and cantilever based on site-specific information. It allows modification and other assumptions from the engineering certification letter and span tables to obtain results that are more customized to the site conditions. The Trinamount-design also allows you to build a basic layout, create a bill of materials, and print load calculations to include in permit submittal packages. All installations must conform to the following general requirements: 3 • The cantilever of a mounted module relative to Big Foot locations can never be greater than 1/3 of the maximum permitted span. • For landscape installations, the maximum span permitted for all site conditions not covered by the Span Tables/ Trinamount-design is 60% of the long frame length. • All Cam Foot installations must be located at least 50mm from a frame corner. • A single module mounted in landscape requires a minimum of two Cam Feet installed per long side frame. • A single module mounted in portrait requires a minimum of two Cam Feet installed per short side frame. 4.3 Gather Site Information Allowable Big Foot spacing and cantilever are based on design loads that are derived from site specific variables. The span tables are configured to factor basic wind speed, exposure category, ground snow load, roof slope, and roof zone; however, the engineering certification letter details assumptions for other site-specific variables. If you are using the span tables, verify that all variables are within the assumed allowable ranges defined in the Engineering Certification Letter. If you are using the Trinamount-design, the tool will prompt you to enter site variables. 4.4 Create Array Layout and Bill of Materials You may create an array layout and bill of material manually or by using the Trinamount-design online design tool at www.trinamount-design.com. For manual configurations, follow the instructions below. 4.4.1 STEP 1: Locate The Array Begin creating your array layout by obtaining the following information: • PV module manufacturer • PV module model • PV module dimensions • Number of PV modules required for the installation • Row/column configuration • Module orientation (Trinamount System II arrays can be installed in either landscape or portrait orientation.) • Overall array dimensions (Add a 50mm gap around each PV module at every vertical and horizontal seam.) After obtaining the above information, determine what roof zone(s) the array is in and note any modules that are in edge or corner zones. 4.4.2 STEP 2: Configure the Components After determining the allowable span and cantilever as previously described, lay out the locations of the Big Feet accordingly. Calculate the maximum cantilever at the edge of the array by multiplying the maximum allowable span by 0.33. 4.4.3 STEP 3: Identify Interlock Locations Locate Interlocks at in a nominal east-west orientation at every module corner, excluding corners that are located at the nominal east and west edges of the array. 4.4.4 STEP 4: Identify Hybrid Interlock Locations If an Interlock location prevents locating a Big Foot on a desired batten, you may either replace the Interlock with a Hybrid Interlock or shift the array to the East or West until all conflicts are resolved. 4.4.5 STEP 5: Identify Thermal Expansion Joint Locations After determining the array layout, verify that thermal expansion and ground bond allowances are not exceeded. The array requires a thermal expansion joint at every sixth vertical module seam. Add an additional thermal expansion joint and ground break if the array exceeds 12 modules per column. Interlocks installed as thermal expansion joints do not carry the ground bond. Each portion of the array on either side of the thermal expansion joint therefore requires its own Ground Lug. Add one Ground Lug for each array portion segmented by thermal expansion joints/ground breaks and install a ground bond jumper between Ground Lugs. 4.4.6 - STEP 6: Calculate the Bill of Material After configuring the components, count each component to create a Bill of Material (BOM). 5.0 Mechanical Installation 4 This chapter guides you through the Trinamount System II installation process. Please read this chapter in its entirety to familiarize yourself with the process before beginning the installation. You may also visit the Resources section at www.trinamount-design.com to view videos and other training materials. Also, be sure that the site has been completely prepped before beginning the installation. 5 STEP 1: Formulas & Layout Lines To lay out a LANDSCAPE installation: Chalk selected battens per Trina solar Span Table. Chalk horizontal lines as follows: • A: Row 1-2: Module width + 1/2” • B: Row 1-3: 2 × (Module width + 1/2”) • C: Row 1-4: 3 × (Module width + 1/2”) Note: 1/2” equals approximately 13mm. To lay out a PORTRAIT installation: Chalk selected battens Trina solar Span Table. Chalk horizontal lines as follows:• A: Row 1-2: Module length + 1/2”(13mm) • B: Row 1-3: 2 × (Module length + 1/2”) Note: 1/2” equals approximately 13mm. STEP 2: Installing Roof Attachments 2-A: Lay out the locations of the Big Feet. NOTE: This example details a portrait installation. Make sure that all horizontal (East-West) lines are centered above battens. 6 2-B: Position the mounting tabs of Big Feet toward the roof peak. The mounting tabs of each Big Foot must point toward the roof peak. 2-C: Position and mount each Big Foot as shown if mounting on a custom orb roof. Apply a layer of EPDM self-adhesive rubber seal to the bottom of each Big Foot. Fasten each Big Foot using 3 screws drilled through the crests of the corrugated roof. Screws must penetrate at least 35mm into the battens. The Big Feet at the E and W edges of the array may be moved inward toward the center of the array for aesthetics provided that all Cam Feet will fully engage in the mounting groove. 2-D: Position and mount each Big Foot as shown if mounting on a Trimdek metal roof. Apply a layer of EPDM self-adhesive rubber seal to the bottom of each Big Foot. Fasten each Big Foot using 2 screws drilled through the crests of the Trimdek roof. Screws must penetrate at least 35mm into the battens. The Big Feet at the E and W edges of the array may be moved inward toward the center of the array for aesthetics provided that all Cam Feet will fully engage in the mounting groove. 7 STEP 3: Installing the First Column of Cam Feet 3-A: Install the first Cam Foot. Begin working at the E or W edge of the array. Place the Cam Foot into the Big Foot. The Key side of a Rockit (A) always snaps into a module or Array Skirt while the Tongue side (B) always accepts a module during drop-in. The Tongue side of the Rockit must face toward the inside of the array. 3-B: Attach the Cam Foot using the Flat Tool. Use Flat Tool to tighten Cam Foot 1/4 turn clockwise, as shown. Ensure Rockit is oriented with the Tongue side facing toward the inside of the array, as shown in image 2. 3-C: Install remaining Cam Feet. Repeat Steps 3-A and 3-B for the remaining Rockits. Use a string to ensure that Rockits are aligned. Adjust the Cam Feet on the Big Feet as needed. 8 3-D: Adjust Cam Foot height. The bottoms of all Rockits should be coplanar. Spin the top portion of the Cam Foot (the Rockit) to adjust Z-axis leveling. Verify that the Tongue sides of all Rockits are facing toward the inside of the array, ready to accept modules. STEP 4: Installing the Array Skirt 4-A: Place an Array Skirt Spacer over an Interlock This is necessary for the Interlock to hold the Array Skirt flush. NOTE: Array Skirt Spacers are only needed for Interlocks that connect two Array Skirts. 4-B: Connect the first two Array Skirt segments together. Install interlock in first Array Skirt section (1). Align the Array Skirt with the center mark on the Interlock (2). Turn the fastener to Position #3 (see Step 4-C) to attach it to the Array Skirt (3). Slide the second Array Skirt into position (4) and turn the second fastener to Position #3 as described in Step 4-C (5). 9 4-C: Attach Interlocks using a Trinamount Tool. Place the Trinamount Tool over the fastener with the #1 aligned with the reference mark on the Interlock. Rotate the Trinamount Tool clockwise to Position #3. CAUTION: Do not over- or under-tighten. Turn to Position #3 exactly. Repeat for the second fastener. 4-D: Place the Array Skirt onto the Cam Feet. The Key side of the Rockit must engage with the groove in the Array Skirt. If the Array Skirt edge is positioned within 4” (101mm) of a Cam Foot stud, you must use a Hybrid Interlock. Note: Please see Step 3-A for an explanation of the Key and Tongue sides of the Rockit. 4-E: Rotate the Array Skirt into place. You will feel a snap when the Array Skirt is properly installed. 10 4-F: Push Jams into the Rockits. Place one Jam in each Rockit. CAUTION: This is an important safety measure to prevent the Array Skirt from rotating off the Rockit. 4-G: Verify array installation progress. The array should appear as shown here. STEP 5: Installing the First Module 5-A: Lower module onto Rockits and Interlocks. The module groove rests on the Tongue side of Rockits and Interlocks. Align the module N/S as specified in the array layout. 11 5-B: Rotate module to 15 degrees. At 15 degrees, the module starts to engage the tongues of the Rockits. 5-C: “Drop in” module onto Rockits and Interlocks. Push the module forward while lowering it to the plane of the roof (0 degrees) to fully engage the Rockits and Interlocks. If the module does not fully seat, raise it slightly (4-5 degrees) and push forward again while lowering. Please see Section 6.2 for instructions on removing modules. 5-D: Add rear Rockit/Cam Foot assemblies. Engage the Key side of the Rockit with groove in module then rotate into position. The Rockit will snap into place when properly installed. Attach the Cam Foot to the Big Foot using the Flat Tool as described in Step 3-B. 12 5-E: The Key side of Rockits engage with the module grooves. Engage the Key side of Rockits in the module as shown here. 5-F: Ground the Array. Add a Ground Lug to the outside module edge and connect to building ground. (See Step 10,Grounding the Array) NOTE: Grounding as soon as the first module is installed ensures that the array is grounded during installation for the safety of a technician 5-G: Verify array installation progress. The array should appear as shown here. 13 STEP 6: Installing the Remaining First-Column Modules 6-A: Place module on front row Rockits. Repeat Steps 5-A through 5-E for the next module. This module should be approx. 1/2’’(13mm)the next from the first module. Use the hash marks on top of the Interlock as a guide for module spacing. 6-B: Install an Interlock. Engage and push the Interlock firmly into place. Modules should be spaced approximately 1/2”(13mm) apart. (The acceptable range is 1/ 4” - 3/4”, or 6mm - 19mm.) NOTE: Interlocks placed between modules will be reversed compared to the Interlocks used to assemble the Array Skirt as described in Step 4-B. 6-C: Attach the Interlock to the modules. Place the Trinamount Tool over the fastener with the #1 aligned with the alignment mark on the Interlock. Rotate the Trinamount Tool clockwise to Position #3. CAUTION: Do not over- or under-tighten. Turn to Position #3 exactly. Repeat for the second fastener. 14 6-D: Add rear Rockits. Attach as described in Step 5-D. STEP 7: Finishing the First Column 7-A: Add the remaining modules to the first column. Repeat Steps 6-A through 6-D for each remaining module in the column. Ensure that the modules are leveled by using a #30 Torx bit to adjust each Rockit as needed (Z-axis). 7-B: 7-B: Manage the wiring. Use Wire Clips as described in Step 11. 15 STEP 8: Remove the Array Skirts 8-A: Lift the Jams out of the Rockits Lift all Jams up and out of all Rockits being used to attach Array Skirts to the array. 8-B: Use the Flat Tool to disengage the Interlock fasteners. Slide the Flat Tool between the Array Skirt and module and hook it on to an Interlock fastener. Loosen the fastener by turning them to Position #1. Repeat for all Interlocks. The Flat Tool alignment mark lines up with the mark on the Interlock when the fastener is at Position #1. 8-C: Remove the first Array Skirt. Grasp the Array Skirt on the long edge and then lift up and away to disengage it from the Rockits (modules not shown here). Once disengaged, pull the Array Skirt straight out and lift clear of the array. CAUTION: Make sure that Jams, interlocks, and Array Skirt Spacers won’t fall and possibly hit someone below. 16 8-D: Remove the remaining Array Skirts. Repeat Step 8-C for rest of the Array Skirts. The array should look like this once the Array Skirts have been removed. 8-E: Reinstall the Interlocks. Reinstall the Interlocks with the Key side facing the modules. Turn the fasteners to Position #3 using the Trinamount Tool as described in Step 6-C. CAUTION: Do not over- or under-tighten. Turn to Position #3 exactly. STEP 9: Install, True, and Level the Remaining Columns 9-A: Add the remaining columns of modules. Repeat Steps 5 through 7 for the remaining modules in the array. The array should look like this. 17 9-B: Adjust the modules during installation. Each module can be trued or adjusted in the XY axis using the Tongue side of Rockits, Interlocks, and Hybrid Interlocks. 9-C:Adjust (true) each module to keep the overall array square. Adjust the depth at which the module groove is seated on the Tongues. Rotate each module up a few degrees and adjust it on the Tongues as needed. True each module independently. NOTE: The module groove can seat at different positions on the Tongue side of Interlocks, Hybrid Interlocks, and Rockits. Tongues can be fully or partially placed into the groove and still accomplish a solid structural and ground bond connection. 9-D: Adjust (level) each module to maintain a flat array surface. Adjust the height of each module to maintain a planar array over imperfections in the roof surface. Raise or lower each Rockit using a #30 Torx bit. Rotate the threaded stud over a range of 3/4ate the t 18 9-E: Verify that all modules are straight, true, and coplanar. Adjust the module position, rotation, and leveling until the array appears true and smooth. STEP 10: Grounding the Array 10-A: Place a Ground Lug into the module. Grounding as soon as the first module is installed ensures that the array is grounded during installation for technician safety. Place the Ground Lug into the module groove with the set screw at the 9 o’clock position. 10-B: Lock the Ground Lug into place. Rotate the Ground Lug 1/4 turn clockwise using the Trinamount Tool. 19 10-C: Connect the Ground Lug to the building ground. Connect the Ground Lug to the building ground. Torque set screw as follows: • 14-10 AWG: 40 inch-lbs.(5.48 kg-m) • 8 AWG: 45 inch-lbs.(6.22 kg-m) • 6-4 AWG: 50 inch-lbs.(6.91 kg-m) STEP 11: Installing Wire Clips 11-A: Place the Wire Clip in the module groove. Set the Wire Clip in the module groove Ensure that the Wire Clip is sitting flush with the bottom of the module groove 11-B: Push the Wire Clip into place. Push the thumb tab inward until it clips into the module groove. 20 11-C: Connect wires and adjust tension. Lay wires in the wire basket portion of the Wire Clip or push into wire retention feature. To adjust wire tension, squeeze the Wire Clip and slide it along the module groove. STEP 12: Providing Tools for Servicing 12-A: Assemble a system maintenance kit for the installation site. Provide the following items for array servicing following installation: • Flat Tool • Trinamount System II Installation Manual (Australia) • Wire Clips • At least one Ground Lug per thermal expansion section plus sufficient earthing wire 21 6.0 Options & Servicing This chapter describes the standard and Hybrid Interlocks used for the Trinamount System II. Most modules will connect using standard Interlocks; however, Hybrid Interlocks may be used in certain cases. This chapter also describes the process of removing a module for servicing or replacement. 22 6.1 - Interlock vs. Hybrid Interlock Trinamount System II uses two types of Interlock: standard and hybrid. Option A: Standard Cam Foot and Interlock. The standard Cam Foot (A) attaches a module to the Big Foot anywhere along the module frame. Interlocks (B) attach modules to each other Option B: Cam Foot and Hybrid Interlock The Hybrid Interlock allows for the installation of a Cam Foot in the same location as an Interlock. 6.2 - Servicing the Array Remove modules by column to access a faulty module. See Chapter7 for tool use instructions SVC-A: Start at the top of the column with the faulty module. Work from the top down, removing one module at a time. CAUTION: Removing an interlock or ground lug may interrupt the earthing path. Install ground lugs as necessary to maintain a continuous path to earth 23 SVC-B: Remove the end column of Interlock(s). Place the Trinamount Tool over the fastener with the 3 aligned with the reference mark on the Interlock. Rotate the Trinamount Tool counter clockwise? to Position 1. Repeat for the second fastener. NOTE: Turn to Position #1 exactly for ease of removal. SVC-C: Remove Cam Feet. Disengage the Cam Foot from the Big Foot using the Flat Tool to turn the Cam Foot 1/4 turn coutner clockwise. Rotate the Rockit and Cam Foot out of the groove in the module.See Step 3-B in Section 5.3. SVC-D: Remove the first module. Pull the module back and then rotate up 15 degrees, then lift the module up and out of the array. Note: Pull the module back before rotating it above 15 degrees. 24 SVC-E: Remove Interlock(s) from the next row of modules. Rotate both fasteners to Position #1 using Flat Tool as shown. SVC-F: Disengage the Interlocks using the Flat Tool. Use the Flat Tool to lever the Interlock lug out of the module groove. Slide the Interlock clear of the modules. You may need to tap the Interlock using the Flat Tool and a rubber mallet to free it from the module. SVC-G: Remove the next module. Remove the Cam Foot. Pull the module back and then rotate up 15 degrees, then lift the module up and out of the array. Repeat Steps SVC-E through SVG-G to remove the remaining modules until you reach the module you are going to replace. 25 SVC-H: Install the new module. Follow steps 6-A through 6-F in section 6 to install the new module. SVC-I: Replace the Interlock(s). Slide the Interlock into position. Use the Flat Tool to keep the lug of the Interlock rotated out of the module groove Slide the Interlock back into place, tapping with the Flat Tool and a rubber mallet if necessary. SVC-J: Attach the Interlock(s) Twist the fasteners to Position #3 using the Flat Tool. 26 SVC-K: Wire the module. Use wire clips to rewire the module. (See Section 5.10.) SVC-L: Install the remaining modules. Follow Steps SVC-H through SVC-K to install the remaining modules in the column. 27 7.0 Using the Trinamount and Flat Tools This chapter describes the Trinamount Tool and the Flat Tool used for installing and maintaining Trinamount System arrays. Each tool has several uses and is designed to make working with Trina components fast and easy. 7.1 - The Trinamount Tool The Trinamount Tool appears as shown here. 28 7.1.1 Installing Interlocks Interlocks install at Position #1. Place the Interlocks in the PV module groove as described in the installation instructions. Place the Trinamount Tool over the fastener with the 1 aligned with the reference mark on the Interlock. Interlocks Interlocks attach at exactly Position #3. Rotate the Trinamount Tool clockwise to Position 3. CAUTION: Do not over- or under-tighten. Turn to Position #3 exactly. Repeat for the second fastener to finish installing the Interlock Thermal expansion joints If your array requires Thermal Expansion Joints (refer to the installation instructions and site design documents (Certification letter?) ), turn one fastener to Position #2 and one to Position #3. This allows array subsections to expand and contract independently. CAUTION: Do not over- or under-tighten. Turn to Position #2 or #3 exactly. 29 Turn fasteners to Position #1 to remove Interlock. Place the Trinamount Tool over the fastener at Position #3 or #2 as appropriate, and then turn counter clockwise to Position #1. Remove the Interlock using a Flat Tool as described in the installation instructions and in Section 6.2. 7.1.2 Removing Interlocks Rock Cam/Leveling Feet into place in module grooves. Place Cam/Leveling Foot in module groove and engage Trinamount Tool as shown. Rotate the Cam/Leveling Foot into place as shown. 7.1.3 Installing Cam/Leveling Feet 30 7.1.4 Adjusting Cam/Leveling Feet Engage the Trinamount Tool with the Cam/Leveling Foot to be removed. Slide the Rockit end of the Trinamount Tool sideways over the Rockit as shown here. Rock Cam/Leveling Foot out of Module Groove. Rotate the Trinamount Tool up to rock the Cam/Leveling Foot free of the module groove. 7.1.5 Removing Cam/Leveling Feet Level Cam/Leveling Feet with a #30 Torx bit placed into the Trinamount Tool. Place the #30 Torx bit into the handle end of the Trinamount Tool, then engage the Torx bit with the adjustment screw inside the Rockit. Rotate the Trinamount Tool clockwise or counter clockwise as needed to raise/lower the Cam/Leveling Foot. 31 Use the Trinamount Tool to place Spanner Sleeves on Splices. Place the Spanner Sleeve on the Splice. Push the Spanner Sleeve into place with the handle end of the Trinamount Tool. Use the Trinamount Tool to tap Spanner Sleeves flush. Tap the Spanner Sleeve and Splice with the head of the Trinamount Tool until the Spanner Sleeve is flush with the end of the Spanner Bar. 7.1.6 Ground lugs Engage Trinamount Tool with Ground Lug and rotate to lock into place. Place the Ground Lug into the module groove at the desired location. Engage the Trinamount tool with the Ground Lug. Rotate 90 degrees clockwise to lock the Ground Lug into place. 7.1.7 Adjusting Spanner Sleeves 32 7.2 The Flat Tool The Flat Tool appears as shown here. 33 7.2.1 Installing Interlocks Engage the fastener at Position #1. Hook the end of the Flat Tool on the Interlock fastener at Position 1, as shown. Interlocks attach at exactly Position #3. Rotate the Flat Tool clockwise to Position 3. CAUTION: Do not over- or under-tighten. Turn to Position #3 exactly. Repeat for the second fastener to finish installing the Interlock. Thermal expansion joints. If your array requires Thermal Expansion Joints (refer to the installation instructions and site design documents), turn one fastener to Position #2 and one to Position #3. This allows array subsections to expand and contract independently. CAUTION: Do not over- or under-tighten. Turn to Position #2 or #3 exactly. 34 7.2.2 Removing Interlocks Loosen the fasteners by turning them CCW to Position #1. The Flat Tool alignment mark lines up with the mark on the Interlock when the fastener is at Position #1. Rock the Interlock to free the Interlock. Hook the Flat Tool on the Interlock as shown and pull it toward you to free the Interlock from the PV modules. Tap to the side. Fastener drops from groove, slide opposite direction to complete removal if needed. 35 7.2.3 Installing Cam/Leveling Feet in Modules You may use the Flat Tool to install Leveling Feet in Modules. Hook the Rock In portion of the Flat Tool onto the Rockit as shown. Rotate to lock the Cam/Leveling Foot into place in the module groove. 7.2.4 - Removing Cam/Leveling Feet from Modules You may use the Flat Tool to remove Cam/Leveling Feet from Modules. Push the Rock Out side of the Flat Tool into the slot in the Rockit and then rotate the Flat Tool as shown to rock the Cam/Leveling Foot free of the module groove. 7.2.5 - Ground Lugs The Flat Tool can be used to install Ground Lugs. Place the Ground Lug in the module groove. Hook the Flat Tool over the Ground Lug as shown. Rotate 90 degrees clockwise to attach the Ground Lug in the module groove. 36