1
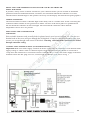
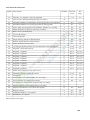
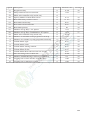
Heron MCI Decoder Control
MCI Series Decoder Control
User and Installation Manual
Model MCI40S
Model MCI150S
Version 6.11.1
PERTH
PH: 08 9455 1677
FAX: 08 9455 1680
SYDNEY
PH: 02 9725 5733
FAX: 02 725 5283
MELBOURNE
PH: 03 9457 7500
FAX: 03 9457 7400
BRISBANE
PH: 07 3290 1200
FAX: 07 3808 4997
ADELAIDE
PH: 08 8341 0008
FAX: 08 8341 0707
[email protected]
[email protected]
[email protected]
[email protected]
[email protected]
www.hrproducts.com.au
Lit HR 1
TABLE OF CONTENTS
Selecting the Location for the Controller
Mounting the Controller
Mains Connection
Two Core Cable
Cable Earth Points
Installing Decoders
Setting Decoder Serial Number
Pump Start
Pump Pressurisation
Set Number of Valves
Set Extra Options Access
Programming Instructions
Set Current Time
Set Today
PAGE
4
4
4
5
5
7
7
7
7
8
8
8
8
Set Valve Water Time
Set Run Times in Hours & Minutes
Set All Valve Run Times
Set Valves to Run in Blocks (Synchronously)
Set Delay Between valves
Set Days of the Week Cycle Starts
Set Daily Cycle Start Times
Set Required Number of Programs
Maximum Number Started Programs to Run Together
Operating the Controller Manually
Manual Station Advance
Manual Stop - Terminating a Watering Cycle
Manually Turning a Station On and Off
Manually Turning Master Valve/Pump On and Off
Manual Activating a Station for its Programmed Time
Manual Activating a Program
System Check Cycle (see manually activating a program)
Customising Programs
Changing the Zone Number (Asynchronous)
Changing Valve Order
Program Configuration Options
Irrigation Program Options
Program Ignores Percentage Reduction
Program Ignores Freeze Input
Rain Off
Rain Sensor Control
Water Budgeting
9
9
9
10
23
11
11
8
8
15
15
15
15
15
15
15
15
12
12
13
14
23
14
14
16
19
16
2
TABLE OF CONTENTS
Loop Watering
Setting Continual Cycling Program
Disable Continual Cycling
Backing Up Cycling Program
Cycling Programs Priority Over Automatic Start Programs
Manually Starting the Loop Cycle (see manual activating a program)
Testing Decoders and Cable
Faults
Remote Start Input
Remote Stop Input
Low Tank
Freeze
Stop
Options
Keypad Security
Weaning Programs
Chaining Programs
PC Connection
Fertigation
Back Flushing
Watermeters
Sensors
Multi - Interface Cards
Pump Start Relays & Master Valve Decoders
Sizing Two Wire Cable Path
PAGE
17
17
17
18
18
15
20
22
24
24
24
24
24
25
28
28
28
29
29
29
29
29
29
30
31
3
SELECTING THE PROPER LOCATION FOR YOUR CONTROLLER
Indoor Wall Mount
If possible, always select an indoor location for your controller where you are assured of maximum
protection from environmental hazards, accidents, and vandalism. Mount the controller on a solid,
smooth surface shoulder high so the operator can easily see the display and read the faceplate graphics.
Outdoor Wall Mount
The most desirable location is shoulder high on the shady side of a suitable wall. Avoid concealing the
controller behind a shrub of near ground level where it will be in the direct path of a sprinkler head.
Do not mount the controller in direct sunlight. Do not mount the controller where ambient
temperatures above 40°C are present.
MOUNTING THE CONTROLLER
Wall Mount
Select suitable fasteners such as molly bolts in plaster board, wood screws in wood, etc. Check to see
that the head of the screw will pass through the lid bolt hole. Controller should be mounted using four
screws, one screw through each corner lid bolt hole. Warning additional holes should not be drilled
through controller casing.
CONNECTING MAINS SUPPLY (Licsensed Electrician)
Important Make sure mains supply is turned off before connecting the controller Check that the mains
supply voltage is 240vac same as controller input voltage.The mains supply should be fused with a
3 amp fuse and connected via a residual Current Circuit Breaker. Connect the mains supply to the three
terminals inside the IEC plug Live to L, Neutral to N and Earth to E as shown in Fig 1.
IMPORTANT YOU MUST CONNECT SURGE EARTH
4
TWO CORE CABLE PATH OUTPUT
One two-wire cable output rated at 1.6A at 30VAC. The two-core cable output is protected by an electronic
fuse, which is set at 1.6A. The controller gives out 30VAC to power 24VAC solenoids. This larger voltage
allows for voltage drop in the two wire cable. If you are connecting solenoids close to the controller
(less than 200m) there will be little voltage drop and you should check that the solenoids are capable of
withstanding a voltage as high as 30VAC.
TWO CORE CABLE PATH
No special two wire cable is required. No restriction on the topolgy of the two wire cable. When solenoid
valves are located at some distance from a controller there will be a voltage drop in the cable. Care must be
taken to ensure that the maximum cable run will not create excessive voltage drop to prevent the solenoid
valve from working. A maximum of 150 single station decoders can be connected to the two-wire cable.
When installing a looped path do not run cable back to output terminal. Join cable at ground level below
controller, see Fig 2 page 5.
The maximum cable run is dependent upon
The size of the cable
The number of valves operating together
The current draw of the solenoid valve and its minimum working voltage
Fluctuations in mains voltage and loading on the controller transformer.
The number of decoders
For guidance purposes we will assume that
the solenoid valve takes 0.25A and is operating on its own
the minimum operating voltage is 20V
there are 50 decoders on the cable that are evenly distributed
The following table shows the maximum distance that a valve can operate using a single cable run and a
looped cable run for different size cable. Important please consult HR Products when running multiple
solenoids and longer cable paths are required.
Cable Size
1.0mm2
1.5mm2
2.5mm2
Distance to furthest
valve on a single path
0.64 klm
0.96 klm
1.6 klm
Distance to furthest
valve on loop circuit
1.28 klm
1.92 klm
3.2 klm
See page 31 for calculating voltage drop
CABLE EARTH POINTS
Heron cable earth points (CSUPE) should be wired to the two wire path with copper earth rods.
A minimum of two CSUPE should be installed for any cable path.
Additional cable earth points should be wired every 750 m if necessary. Failure to wire these earth points
will make the controller liable to serious damage caused by lightning surges. See Fig 2 page 6
5
6
INSTALLING DECODERS
Never expose decoders to direct sunlight or in locations where they may be exposed to ambient
temperatures of more than 38°C. In warmer climates this will necessitate installing in valve box
underground. It is recommended that a two wire water proof cable joiner eg. 3M DBY or similar, is used to
connect the decoders. All cable joints must be sealed to minimise water ingress.
The controller gives out 30VAC to power 24VAC solenoids. This larger voltage allows for voltage drop in
the two wire cable. If you are connecting solenoids close to the controller (less than 200m) there will be
little voltage drop and you should check that the solenoids are capable of withstanding a voltage as high as
30VAC. IMPORTANT use decoder models DECB1, DECB2 and DECB3 only.
The decoder outputs are on the following wires. The return wire from the solenoid valves is wired
to either of the red wires. Decoders are available with 1,2 or 3 outputs. Decoder output can operate a
load of 0.6A
Serial No. controls
decoder output on
1st Serial No.
2nd Serial No.
3rd Serial No.
YELLOW wire
WHITE wire
PURPLE wire
SETTING DECODER SERIAL NUMBERS
You need to set the decoder serial number of each irrigation valve.The decoder serial number is shown on
the side of each decoder. Any decoder serial number can be assigned to any valve. For example, if you have
a decoder with serial number 02345 and you wish this to be valve 1 you must assign 02345 to valve 1.
Proceed as follows: Press RIGHT arrow key until the following page is displayed EDIT S/N.
Press SELECT and the following page will be displayed EDIT S/N 001 VALVE 1 02345.
Now using the keyboard enter the required serial number for valve 1, example 02345.
Press RIGHT arrow key to enter serial numbers of other valves.
To return to the time page press START STOP key twice.
PUMP START
The MCI does not have a pump start output. To facilitate a pump start output you must purchase a
Heron Two Wire Pump Start. There are a number of options available. Important Never connect any relay
across the two wire cable. See page 30 for Pump Start options.
PUMP PRESSURISATION IN MINUTES (Option 5)
The pump pressurisation time (in minutes) can be set, make sure the VALVES OFF is displayed by pushing
START STOP key twice.Press and hold MANUAL ADVANCE key for five seconds waiting for the option
screen to appear. Once option screen is displayed, using the RIGHT arrow key scroll to option 5, using the
key pad change delay time between 1 minute to 99 minutes. Press the LEFT arrow key scrolling back past
option 1 the display will take 10 seconds to return to the VALVES OFF page.
PUMP PRESSURISATION IN SECONDS (Option 6)
The pump pressurisation time (in seconds) can be set, make sure the VALVES OFF is displayed by pushing
START STOP key twice.Press and hold MANUAL ADVANCE key for five seconds waiting for the option
screen to appear. Once option screen is displayed, using the RIGHT arrow key scroll to option 6, using the
key pad change delay time between 1 second to 99 seconds. Press the LEFT arrow key scrolling back past
option 1 the display will take 10 seconds to return to the VALVES OFF page.
7
SET CURRENT TIME & DAY
Make sure the VALVES OFF is displayed by pushing START STOP key twice.
Press and hold down on 0 key for five seconds or until flashing cursor appears.
Using the number keys and RIGHT arrow key, the correct time of day can be entered.
When you have set the time press START STOP key twice.
SET TODAY (Option 8)
Make sure the VALVES OFF is displayed by pushing START STOP key twice.
Press and hold MANUAL ADVANCE key for five seconds waiting for the option screen to appear.
Once option screen is displayed using the RIGHT arrow key scroll to option 8 and using the key pad select
current day of week (1 = Monday, 2 = Tuesday etc).
Press the LEFT arrow key scrolling back past option 1 the display will take 10 seconds to return to the
VALVES OFF page.
SET EXTRA OPTIONS ACCESS (Option 15)
Heron controller has 81 options you need to access these to allow certain programming.
Make sure the VALVES OFF is displayed by pushing START STOP key twice.
Press and hold MANUAL ADVANCE key for five seconds waiting for the option screen to appear.
Once option screen is displayed, using the RIGHT arrow key scroll to option 15 press 1.
Press the LEFT arrow key scrolling back past option 1 the display will take 10 seconds to return to the
VALVES OFF page.
SET NUMBER OF VALVES (Option 1)
Make sure the VALVES OFF is displayed by pushing START STOP key twice.
Press and hold MANUAL ADVANCE key for five seconds waiting for the option screen to appear.
Once option screen is displayed, using the RIGHT arrow key scroll to option 1, the default valve number is
32, using the key pad change to your required number of valves. A maximum of 150 valves can be set.
Press the LEFT arrow key scrolling back past option 1 the display will take 10 seconds to return to the
VALVES OFF page.
SET REQUIRED NUMBER OF PROGRAMS (Option 4)
Make sure the VALVES OFF is displayed by pushing START STOP key twice.
Press and hold MANUAL ADVANCE key for five seconds waiting for the option screen to appear.
Once option screen is displayed, using the RIGHT arrow key scroll to option 4 and now key in your desired
number of programs between 1 and 15. Press the LEFT arrow key scrolling back past option 1 the display
will take 10 seconds to return to the VALVES OFF page.
MAXIMUM NUMBER STARTED PROGRAMS TO RUN TOGETHER (Option 19)
This specifies the maximum number of automatically started irrigation programs that can run at the same
time. If this option is set to ‘0’, only one irrigation program can run at any time. Setting this option to 2 will
allow 2 irrigation programs to run at the same time. Make sure the VALVES OFF is displayed by pushing
START STOP key twice. Press and hold MANUAL ADVANCE key for five seconds waiting for the option
screen to appear. Once option screen is displayed, using the RIGHT arrow key scroll to option 19 and now
key in your desired number of programs between 1 and 4. Press the LEFT arrow key scrolling back past
option 1 the display will take 10 seconds to return to the VALVES OFF page.Note: A maximum of 4
irrigation programs can run at any time. This includes automatically started AND continually cycling
programs. See Option 20
8
SET VALVE RUN TIMES
Make sure the VALVES OFF is displayed by pushing START STOP key twice.
Press the RIGHT arrow key to display EDIT PROG 1, to select other programs use the key pad to enter
your chosen program between 1 & 15 now press SELECT and the display will change to display the
below. The cursor will be flashing on VALVE 01 time. Heron controller is factory set to 59 minutes and
59 second.
1
1
1
1
VALVE 01
VALVE 02
VALVE 03
VALVE 04
00.00
00.00
00.00
00.00
Now you want VALVE 01 to run for 10 minutes & VALVE 02 to run for 5 minutes, use the key pad to enter
10 minutes for VALVE 01 press the RIGHT arrow key to scroll down to VALVE 02 and enter 5 minutes.
Repeat this for all remaining valves.
1
1
1
1
VALVE 01
VALVE 02
VALVE 03
VALVE 04
10.00
05.00
00.00
00.00
When finished press the START STOP key twice to return to VALVE OFF display.
Note: The numbers on the left column are the zone numbers these indicate what valves, if any, run
together. In the above example all valves are in the same irrigation Zone (Zone 1) so no valves will run
together. See page 9 for running multiple valves.
SET RUN TIMES IN HOURS & MINUTES (Option 31,32,33,34,35,36,37,38)
Make sure the VALVES OFF is displayed by pushing START STOP key twice.
Press and hold MANUAL ADVANCE key for five seconds waiting for the option screen to appear.
Once option screen is displayed using the RIGHT arrow key scroll to option 31 and press 2, program 1 has
now been set to operate in hours and minutes. Repeat this for option 32, 33, 34, 35, 36, 37 & 38 to change
to hours and minutes for programs 2, 3, 4, 5, 6, 7, & 8.
Press the LEFT arrow key scrolling back past option 1,the display will take 60 seconds to return to the
VALVES OFF page. Run times are now set to 59 hours and 59 minutes.
SET ALL STATION RUN TIMES
When setting up an irrigation program, the ‘Set All’ key is a quick method of setting a number of valves to
the same time. Press the RIGHT arrow key to display EDIT PROG 1 (cursor will be flashing on 1) if you
want to set another program select any number between 1 & 15, press SELECT then press SET ALL.
The cursor will be flashing on 1 press the RIGHT arrow key to move cursor, use the key pad to select your
last valve number, press the RIGHT arrow key to drop down to valve water time. Use key pad to enter your
chosen water time. Press SET ALL to accept your run time.
9
SET VALVES TO RUN IN BLOCKS (Option 23)
Make sure the VALVES OFF is displayed by pushing START STOP key twice.
Press and hold MANUAL ADVANCE key for five seconds waiting for the option screen to appear.
Once option screen is displayed using the RIGHT arrow key scroll to option 44 and press 1, now scroll
back using the LEFT arrow key to option 23 and press 1, press the LEFT arrow key scrolling back past
option 1,the display will take 60 seconds to return to the VALVES OFF page.
The controller has now been set to operate a maximum of 4 valves.
Press the RIGHT arrow key to display EDIT PROG 1 (cursor will be flashing on one) if you want to set
another program select any number between 1 & 15, press SELECT your program will now be similar to
the following.
A
B
A
B
VALVE 01
VALVE 02
VALVE 03
VALVE 04
10.00
05.00
00.00
00.00
If you want the first 2 valves to run together and the next 2 valves to run together press the RIGHT arrow
key to scroll to B at valve 02 press SELECT to change to A. Now scroll to A at valve 03 press SELECT
to change to B. You program will now be similar to the following.
A
A
B
B
VALVE 01
VALVE 02
VALVE 03
VALVE 04
10.00
05.00
00.00
00.00
Now when this program runs it will run all the valves marked with an ‘A’ until it reaches valves marked
with ‘B’. So in the above program it will run VALVE 01 and VALVE 02 together. The program will then
run VALVE 03 and VALVE 04 for the set water time etc. The program will not move onto the next group
until all valves have run the set water time. In the above example VALVE 03 and VALVE 04 will not run
until VALVE 02 has finished.
Important: Ensure that your program never has a consecutive string of more than 4 ‘A’s or 4 ‘B’s
as the controller will not run the program. The controller will one valve at a time if more than 4 ‘A’s
or 4 ‘B’s are set . This still applies even if the valve times are 0. If you have valves at the end of
your program that you don’t use set the left hand column to A, B, A, B etc for these valves.
When finished set Option 44 back to 0. This prevents the sequence number and the valve names being
changed. Make sure the VALVES OFF is displayed by pushing START STOP key twice.
Press and hold MANUAL ADVANCE key for five seconds waiting for the option screen to appear.
Once option screen is displayed using the RIGHT arrow key scroll to option 44 and press 0, now scroll
back past option 1,the display will take 60 seconds to return to the VALVES OFF page.
10
SET CYCLE START TIMES (Option 3)
Heron controller is supplied with 3 daily cycle starts per program.
To select days of the week make sure the VALVES OFF is displayed by pushing START STOP key twice.
Press and hold MANUAL ADVANCE key for five seconds waiting for the option screen to appear.
Once option screen is displayed using the RIGHT arrow key scroll to option 3 and press 32.
Press the LEFT arrow key scrolling back past option 1,the display will take 60 seconds to return to the
VALVES OFF page.
Controller will now accept Mon, Tues, Wed, Thurs, Fri, Sat, Sun, daily or off cycle starts.
Flexability to choose up to 32 cycle starts on any day,or 4 cycle starts on each day of the week.
SETTING DAILY CYCLE STARTS
Make sure the VALVES OFF is displayed by pushing START STOP key twice.
Press RIGHT arrow key to display the EDIT AUTOS page, press SELECT to display the following
AUT START 1
PRG 1
PRG 1
PRG 1
0.00
0.00
0.00
.Screen shows the 3 daily cycle starts, press SELECT key to change from program 1 up to 15.
Use key pad to set the first cycle start time, press the RIGHT arrow key to scroll to 2 cycle start, use key
pad to set your second cycle start time, repeat this process for a 3rd cycle start.
AUT START 1
PRG 1
PRG 1
PRG 1
1.00
14.00
16.00
Screen shows cycle starts at 1.00am, 2.00pm, 4.00pm
Return to the VALVES OFF screen pressing START STOP twice.
Up to 30 daily cycle starts can be set, controller is supplied set with 3.
To add more daily starts Press and hold MANUAL ADVANCE key for five seconds waiting for the option
screen to appear. Once option screen is displayed using the RIGHT arrow key scroll to option 2 and key in
your daily cycles between 1 and 30.
SETTING DAYS OF THE WEEK FOR CYCLE STARTS
Make sure the VALVES OFF is displayed by pushing START STOP key twice.
Press RIGHT arrow key to display the EDIT AUTOS page, press SELECT to display the daily start screen.
You need to scroll past the daily starts page, press RIGHT arrow key until the following screen appears
PROG 1
AUT START 4
MON
AT
0.00
Cursor will be flashing on PROG 1 press SELECT key to change from Prog 1 up to Prog 15.
Press RIGHT arrow key to scroll to MON, press select to change to your required water.
Press RIGHT arrow key to scroll to time and using key pad enter your desired start time.
Press RIGHT arrow key to scroll to AUT START 5 and repeat the process for selected days and cycle start
times. Up to 32 cycle starts can be selected, cycle starts can be set to any given day ie: all 32 cycle starts
can be allocated to one day or a series of days of the week by choice.
11
CUSTOMISING PROGRAMS
You only need to do this if you wish to vary the number of valves that run in parallel, you wish to vary the
order in which valves run in the program, you wish to change valve names
First you need to select the configuration mode by setting Option 44 to 1. When you have finished you
should now set Option 44 back to 0. This prevents the sequence number and the valve names being
changed. Now you need to enter the program, you wish to customise. Press RIGHT arrow key to display
the EDIT PROG page, as shown below.
EDIT
PROG 1
Now press SELECT to edit program 1 and the first page of Program 1 will be displayed. If the controller is
new it will be the default configuration as shown below.
1
1
1
1
VALVE 01
VALVE 02
VALVE 03
VALVE 04
00:00
00:00
00:00
00:00
CHANGING THE ZONE NUMBER (Asynchronous)
In the example above, there are four valves displayed called VALVE 01 , VALVE 02 VALVE 03 and
VALVE 04. The number on the left is the irrigation zone number for the valve. They are all set to 1 so all
valves are in the same zone (zone1). As they are in the same zone NO valves will run together.
If, for example, you wanted VALVE 01 and VALVE 02 to run together you would need to assign them to
different irrigation zones, as follows
1
2
1
1
VALVE 01
VALVE 02
VALVE 03
VALVE 04
00:00
00:00
00:00
00:00
To do this move the cursor over the zone number for VALVE 02 and change it to 2.
Important You must set the valves you wish to run together at the beginning of the program.
12
CHANGING VALVE ORDER
If you need VALVE 04 to run before VALVE 03 then you would need to change the page to the following
1
1
1
1
VALVE 01
VALVE 02
VALVE 04
VALVE 03
00:00
00:00
00:00
00:00
Now VALVE 04 appears before VALVE 03 in the list so VALVE 04 will run first. To do this move the
cursor so it is over VALVE 03 and the page will automatically ask you to enter the name reference number.
In the example below it is currently at 003 which is the reference for VALVE 03.
1
1
1
1
VALVE 01
VALVE 02
VALVE 003
VALVE 03
00:00
00:00
00:00
00:00
Now change Name Reference Number to 004 which will be the Name Reference Number for VALVE
04.as shown below.
1
1
1
1
VALVE 01
VALVE 02
VALVE 004
VALVE 003
00:00
00:00
00:00
00:00
Now press RIGHT arrow key and VALVE 04 will be the third valve in the program. You will need to
change previous valve 04 to 03.
IMPORTANT When you have finished you should now set the Configuration Option 44 back to 0.
See top of page 20 for instructions.
13
PROGRAM CONFIGURATION OPTIONS (Option 31 to 38)
Program configuration options allow individual programs to customised. Option 31 relates to program 1
Option 32 to program 2 etc. Programs 1 to 8 can be individually customised.
The following 6 features can be set for each program.
Program has Continual cycling facility
Program Valve time in Hours and Minutes
Value
+1
+2
Program ignores Percentage reduction
+4
Program ignores the Freeze input
Program can be started via Analogue input
on MF interface
Program can be started via light
Multi-wire controllers Only
+8
+16
+32
+64
Description of facility
See section 6
Sets time in hours and minutes instead of
minutes and seconds
Ignores percentage reduction whether set
manually or by rain sensor (always runs at
100%)
Program ignores the freeze or Stop inputs
See MF interface manual
See Light sensor manual
To include a feature add the value of the facility to the Option .
For example suppose you require continual Cycling on Program 1 and Program 1 to Ignore Freeze input.
For program 1 we must change Option 31. Now Continual Cycling has a value 1 and ‘Ignore Freeze Input’
has a value 8. The required value for Option 31 is 1+8=9.
Program Ignores Percentage Reduction (+4)
This facility allows a program to ignore any percentage reduction that is set. For example you may not want
indoor irrigation to be affected by the rain sensor percentage reduction. As described above add 4 to the
appropriate Program Option number.
Program Ignores Freeze Input (+8)
This facility allows a program to ignore the Freeze Input. For example you may have two different
irrigation systems one which uses a water storage tank and one that uses mains water. This facility can
prevent the mains water irrigation from being suspended when the water storage tank runs low.
As described above add 8 to the appropriate Program Option number.
14
OPERATING CONTROLLER MANUALLY
To manually start the pump, a valve or an irrigation program press START STOP and the following page
will be displayed.
START
PUMP
PROG
VALVE
PUMP START
Press START STOP key, with the flashing arrow pointing at PUMP press SELECT to start Pump 1.
The display below will be shown.
TIME
12:30
PUMP ON
VALVE START
Press START STOP key, press the RIGHT arrow key to position the flashing arrow to point at VALVE.
Press SELECT and the page below is shown.
START
VALVE 5
2
Enter the number of the valve to be started. Press the RIGHT arrow key and then enter the number of
minutes the valve is to run. In the example above valve 5 has been set to run for 2 minutes.
Now press SELECT to start this valve. The TIME PAGE will be displayed as shown below.
Important, manual valve activation will run from 1 second up to 59 minutes only.
TIME
VALVE 5
12:30
1:58
PROGRAM START
Press START STOP key, to start an irrigation program press the RIGHT arrow key to move to PROG. Press
SELECT to start the irrigation program. Enter any program 1 to 15 press SELECT to start the
irrigation program. The time page will be displayed as shown below.
TIME
PROG 1
12:22
VALVE 01 9:59
MANUAL STOP
Pressing START STOP at any time when a program, valve or pump is running will stop the program, valve
or pump immediately.
MANUAL ADVANCE
With irrigation program running press MANUAL ADVANCE to move to next station in the sequence.
15
RAIN OFF (Option 13)
Make sure the VALVES OFF is displayed by pushing START STOP key twice.
Press and hold MANUAL ADVANCE key for five seconds waiting for the option screen to appear.
Once option screen is displayed using the RIGHT arrow key scroll to option 13 and press 1, now scroll
back option 1,the display will take 60 seconds to return to the VALVES OFF page.
The controller has now been set to allow automatic starts to be disabled by pressing the SELECT key when
on the Time page. When automatic starts are active the controller will display the following
TIME
12:00
MON
AUTOS ON
When the SELECT key is pressed the controller will then display the following and all automatic starts will
be disabled until the SELECT key is pressed again.
TIME
12:00
AUTOS OFF
MON
WATER BUDGETING (Option 11)
Make sure the VALVES OFF screen is displayed by pushing START STOP key twice.
Press and hold MANUAL ADVANCE key for five seconds waiting for the option screen to appear.
Once option screen is displayed using the RIGHT arrow key scroll to option 11 and press 1, now scroll
to option 25 and press 1. Now scroll back past option 1,the display will take 60 seconds to return to the
VALVES OFF page. The controller has now been set to allow percentage water time adjustments from
1% to 250% for automatic programs. Press the RIGHT arrow key until the following screen is displayed.
Use the key pad to make percentage changes from 1% to 250%
MAN ADJUST
50%
In the example above irrigation programs will run for half their normal time.
Important do not leave the percentage value at 0%. No irrigation will run.
16
LOOP WATERING (Option 31,32,33,34,35,36,37,38)
The continual cycling facility allows an irrigation program to continuously cycle. Programs continually
cycle between a specified start and stop time, with a programmable delay between cycles. This is normally
used for misting or propagation applications.
To set a program to continually cycle make sure the VALVES OFF is displayed by pushing START STOP
key twice. Press and hold MANUAL ADVANCE key for five seconds waiting for the option screen to
appear. Once option screen is displayed using the RIGHT arrow key scroll to option 31 and press 1,
program 1 has now been set to operate in loop cycling watering. Repeat this for option 32, 33, 34, 35, 36,
37 & 38 to change to loop cycling for programs 2, 3, 4, 5, 6, 7, & 8.
Press the LEFT arrow key scrolling back past option 1,the display will take 60 seconds to return to the
VALVES OFF page.
Setting A Continual Cycling Program
Make sure the VALVES OFF is displayed by pushing START STOP key twice.
Press RIGHT arrow key to display the CYCLE PROG 1 screen , the following screen allows you to,
Specify the start and stop times for the continual cycling period, Set the delay period (in hours and minutes)
between each cycle, Disable / Enable the continual cycling program.
CYCLE
PROG 1
CYCLE NEVER
WAIT 0:00
Now Press SELECT to enter the start and stop times for continual cycling and the delay period between
cycles. In the example below, program 1 has been set to continually cycle from 6:00 hours to 21:30 hours,
with a 20 minute delay between each cycle.
CYCLE
CYCLE
WAIT 0:20
PROG 1
06:00
21:30
NEXT
13:30
The time that the next cycle will begin is automatically calculated and displayed if the real time is within
the cycling range. In the example above, the next continual cycle of program 1 will begin at 13:30 hours.
Disabling Continual Cycling
You can disable the continual cycling program by pressing the SELECT button when the continual cycling
screen is displayed.
CYCLE
PROG 1
CYCLE NEVER
WAIT 0:00
To re-enable continual cycling press the SELECT button again. The start times will be redisplayed.
17
BACK UP A CYCLING PROGRAM (Option 70,71)
If a Continual Cycling program cannot run because another program is running the controller can
remember that a program tried to start. The controller will then run the program when the other program(s)
have finished. Make sure the VALVES OFF is displayed by pushing START STOP key twice.
Press and hold MANUAL ADVANCE key for five seconds waiting for the option screen to appear.
Once option screen is displayed using the RIGHT arrow key scroll to option 71 and press 1, for the cycling
program to be backed up. Now scroll back past option 1,the display will take 60 seconds to return to the
VALVES OFF page.
CYCLING PROGRAMS TAKE PRIORITY OVER AUTO START PROGRAMS (Option 29)
This option allows any of the continually cycling programs to take priority over any automatically started
irrigation program. With this feature set, if an automatically started irrigation program is running, the continually cycling program will cut-in and run. The halted automatically started irrigation program will then
continue from where it was stopped, once the cycling program has completed. If you want this facility set
Make sure the VALVES OFF is displayed by pushing START STOP key twice. Press and hold MANUAL
ADVANCE key for five seconds waiting for the option screen to appear. Once option screen is displayed
using the RIGHT arrow key scroll to option 29 and press 1, for the cycling program to take priority.
Now scroll back past option 1,the display will take 60 seconds to return to the VALVES OFF page.
18
RAIN SENSOR TO REDUCE WATERING (Option 7)
The Heron rain sensor allows the irrigation program to be reduced depending on the amount of rain that
has fallen, up to 4 rain days of historical data can be stored and included in the rain fall measurement.
Two trip points can be set. To set the historical data make sure the VALVES OFF screen is displayed by
pushing START STOP key twice. Press and hold MANUAL ADVANCE key for five seconds waiting for
the option screen to appear. Once option screen is displayed using the RIGHT arrow key scroll to option 7
and press your historical day number between 1 & 4, Now scroll back past option 1,the display will take 60
seconds to return to the VALVES OFF page.
IMPORTANT setting option 7 to 0 will disable the rain sensor.
Connecting the Rain Sensor
Connect the two terminals inside the rain sensor to Input 2 (across “I2” and “C2” see Fig 1 page 3 ). The
terminals in the rain sensor are accessed by removing the bottom of the rain sensor.
Using the Rain Sensor
When option 7 is set (see above), the rain page can be displayed from the VALVES OFF screen by pressing
the LEFT arrow key. The rain page is shown below
RAIN FALL 2mm
ADJ
50%
TRIP
4
00%
9
On the rain page you can set two trip points in mm of rain fall. When these trip points are met irrigation
programs will run for either 50% (half) of their normal time or 0% of their normal time (i.e. not run).
To set a trip point move the cursor under the appropriate percentage (50%, or 0%) and enter a number.
In the example above trip points have been set at 4 mm and 9 mm.
Testing the Rain Sensor
The rain sensor can be tested by pressing the spoon down inside the rain sensor . Pressing the spoon
down every 10 seconds will increment the rain fall by 1 mm. If you press the spoon enough times so that a
trip level is reached you will see a reduction in the irrigation watering programs.
IIMPORTANT The rain sensor has no effect on a manual valve start, one minute must elapse before
the percentage reduction will be registered after the threshold is reached.
Heron Rain Sensor supplied as optional extra.
19
TESTING DECODERS AND CABLE (Option 50)
The controller has a test facility which allows you to check the two wire cable by giving a measure of how
good the communication is to a decoder. This is particularly useful where you may have an intermittent
problem with the two wire cable.
To use the test facility make sure the VALVES OFF screen is displayed by pushing START STOP key
twice. Press and hold MANUAL ADVANCE key for five seconds waiting for the option screen to appear.
Once option screen is displayed using the RIGHT arrow key scroll to option 50 press 1. Now scroll back
past option 1,the display will take 60 seconds to return to the VALVES OFF . Now manually start the valve
to be tested. MCI will display the following for a good cable and decoder.
VALVE 1
DECO
REPLY
CABLE GOOD
0:59
GOOD
5000
OHM
If there is a short circuit on the cable and the MCI cannot communicate with the decoder at all the
following will be displayed. The resistance displayed is the resistance between the two cores of the two
wire cable.
FAULT
CABLE
BAD
200 OHM
The table on next page shows the possible responses and likely causes.
IMPORTANT When finished testing Option 50 should be set back to 0.
DISPLAY OUTPUT CURRENT (Option 51)
For testing purposes current flowing to solenoid valves will be displayed on fourth line of TIME SCREEN.
IMPORTANT When finished testing Option 51 should be set back to 0.
20
MESSAGE
ACTION
DECO REPLY
Decoder working OK . No action required.
GOOD
DECO REPLY FAIR Decoder working OK but is located a long way from MCI-100s (approximately
1Km/1 mile). If the decoder is local then there is too much series resistance
and you should check joints in the cable.
DECO REPLY BAD The decoder is not working. The likely causes are:Break in cable to decoder
Cable series resistance to the decoder is too high (greater than 100 ohms)
Serial number not correct
Decoder connected the wrong way round
CABLE GOOD
Cable in good condition
CABLE FAIR
Acceptable if there are more than 50 decoders connected. If there are less
than 50 decoders present then there is excessive moisture in multiple joints or
the cable has a semi short circuit.
CABLE BAD
There is a short on the cable. Look at the resistance displayed on the
MCI to determine the likely cause:
200-1000 ohms:
The system will work but there is a semi-short circuit which is likely to cause
intermittent problems. Check all joints that are immersed in water and for
damaged cable. Isolate areas of the cable and see if the problem goes away
or resistance increases.
30-100 ohms:
A solenoid coil is connected directly across the cable or a decoder has failed
or there is a short circuit very much greater than 1Km/1 mile from controller.
Cut the cable in half and see if problem goes away.
20-30 ohms:
There is a short circuit on cable. The short will be about 1 Km/0.7 mile away.
15-30 ohms:
There is a short circuit on cable less than 1 Km/0.7 mile away.
21
FAULTS
If a fault occurs whilst the controller is running a watering program, for example a cable breaks, then the
following display is shown.
TIME
12:11
FAULT
The nature of the fault is displayed by pressing the RIGHT arrow key. The Fault Page will be displayed.
N12
N16
FAULT
O/L6
O/L6
In the example above the Fault Page indicates that current Over/Load 6 (O/L6) has occurred on valves
with Valve Reference Numbers 12 and 16. To find the appropriate decoder serial number and/or valve name
from the Valve Reference Number go to the Serial Number Pages.
Display
CAB O/L1
CAB O/L2
CAB O/L4
Nx O/L6
x=valve
reference
number
Nx DECO
x=valve
reference
number
Nx OFF
x=valve
reference
number
Fault
two wire cable line
loading not ok
remote short on two wire
cable (more than
1.6amps)
current overload when
valves running
(more 1.6amps)
decoder output overload
more than 0.5amps
no acknowledgement
from the decoder when
switching on
no acknowledgement
from decoder when
switching off
Response
all irrigation programs
will be halted
all irrigation programs
will be halted
Action
Refer to TESTING
DECODERS
Refer to TESTING
DECODERS
current and subsequent
irrigation programmes
will continue. If 20 faults
occur all programs will
be halted
run the program to see what valve
or valves are running when the
fault occurs. May be coil short
circuit on the output of a decoder
or to many valves running. View
current by setting option 51
current and subsequent
there is a short or the coil is failing
irrigation programmes
on the output of the decoder.Find
will continue. If 20 faults the decoder with valve reference
occur all programs will number, disconnect the coil from
be halted
the decoder and test again.
current and subsequent
find the decoder with the valve
irrigation programmes
reference number. Check decoder
will continue. If 20 faults serial is correct. Check decoder
occur all programs will is wired to specification. Refer
be halted
TESTING DECODERS or try
decoder locally at controller
all irrigation profind the decoder with the valve refgrammes will be halted erence number. Retry the decoder
twice to see if problem repeats.
Check joints to decoder. If decoder
still fails test at controller. Refer
TESTING DECODERS.
The fault page is cleared by manually starting and stopping an irrigation program.
22
IRRIGATION PROGRAM OPTIONS
Maximum Number of Automatically Started Programs to Run Together (Option 19 & 20)
This specifies the maximum number of automatically started irrigation programs that can run at the same
time. If this option is set to ‘0’, only one irrigation program can run at any time. Setting this option to 2 will
allow 2 irrigation programs to run at the same time. Note: A maximum of 4 irrigation programs can run at
any time. This includes automatically started AND continually cycling programs. See Option 20
Allocate Remote Start input to a Program (Option 16)
The Remote Start Input can be assigned to initiate any irrigation program. Enter the number of the irrigation
program you want it to initiate. If this option is not set, the Remote Start Input will trigger irrigation
program 1 by default.
Program 1 will Take Priority (Option 30)
This allows program 1 to take priority over any other automatically started irrigation programs. If you need
his facility set Option 30 to ‘1’. Default is ‘0’.With Option 30 set, if a program is running, and program
1 wishes to start , it will cut-in and run. The halted irrigation program will continue from where it was
stopped, once program 1 has completed. Note: If option 29 has been set then any the continually cycling
program will have priority running over irrigation program 1.
Delay Between Valves (Option 58)
A delay between the operation of the valves within an irrigation program can be introduced using this
option.The delay can be set from 1 to 255 seconds. Enter the number of seconds delay required. The delay
will apply to all irrigation programs.
Allow Programs to be manually Started in Parallel (Option 40)
With Option 40 set, programs can be manually started in parallel. Operation of the controller is exactly the
same except that pressing Start/Stop will always show the following page.
START
PUMP
PROG
VALVE
STOPALL
To manually stop the controller you must press Start/Stop to display the page above and then press RIGHT
arrow to move the cursor to ‘STOPALL’ and the press Select.To allow programs to run in parallel you must
also set one or both of the parallel program Options (Option19 or 20).
Allow Only One Program to Run whether ‘Normal’ or ‘Cycling’ (Option 21)
If option 21 is set to ‘1’, only one irrigation program will ever run at any time. Option 21 overrides options
19 and 20 i.e. specifying how many automatically started and continually cycling programs can run at the
same time. Default is ‘1’. Note: If you want either automatically started or continually cycling irrigation programs to run at the same time, then you must set option 21 to ‘0’.
23
REMOTE START INPUT
One remote start input. A temporary closed contact on this input will start an irrigation program. The user
can specify the irrigation program number that is started. Cable length on this input should be kept to less
than 20 meters. The Remote Start input is also used to connect for the Heron Rain sensor.
The remote start input is across “I2” and “C2” (See Fig 1 page 3) Joining these terminals will start
program 1. The terminals have to be connected for only a short period, 1 second, to activate the program.
If the contacts are left shorted program 1 will continually cycle.
REMOTE STOP INPUT (Option 9)
One Stop or Freeze input. A closed contact on the input will either permanently stop an irrigation program
or temporarily freeze the irrigation program for the duration of the closed contact. The user can specify
whether this is a Freeze Input or a Stop Input. Cable lengths on this input should be kept to less than
20 meters. The remote stop input is across “I1” and “C1” (See Fig 1 page 3) Joining these inputs halts the
irrigation programs. The programs will continue once the short is removed. This input may be connected to
a float switch in the water reservoir so that the irrigation sequence is halted if the water level is low.
When the remote Stop Input is active the following messages can be displayed.
LOW TANK (Option 10)
Indicates that the water level in the storage tank is low. The irrigation program will
temporarily stop. Once the water tank has been filled, the irrigation program will start again.
Make sure the VALVES OFF screen is displayed by pushing START STOP key twice.
Press and hold MANUAL ADVANCE key for five seconds waiting for the option screen to appear.
Once option screen is displayed using the RIGHT arrow key scroll to option 10 and press 1, Now scroll
back past option 1,the display will take 60 seconds to return to the VALVES OFF page. LOW TANK will
replace STOP in the display.
FREEZE indicates that a sensor connected to the remote stop input has been activated. Once the freeze
condition has been removed from the input, the irrigation program will start again from the point at which it
was temporarily halted.
STOP indicates that a sensor connected to the remote stop input has been activated. In this case, the
irrigation program will not restart when the remote stop condition is removed.
24
OPTIONS
Heron controller is supplied with 81 user Options. Throughout this User Guide you would have been setting
these as you entered certain irrigation requirements. This section describes the options you can set on your
controller. There are 15 Basic Options and 66 Advanced Options.To access the configuration options press
and hold down MANUAL ADVANCE button for 10 seconds. The following page will be displayed.
OPTION
1
8
2
3
3
0
The LEFT and RIGHT arrow keys are used to position the cursor under the option you want to change.
Use the keypad to enter the required number, as described below, to activate the option.
In the example above, Option’s 1,2 and 3 have been set to 8, 3 and 0. When the required options have
been set, press the LEFT arrow key past Option 1 to return to the VALVE OFF page.
The 15 basic options are listed below.
Option
1
2
3
4
5
6
7
8
9
10
11
12
13
14
15
Description
Set number of valves
Set number of Daily automatic starts
Set number of Weekly automatic starts
The number of irrigation programs
Set pump pressurisation time in minutes
Set pump pressurisation time in seconds
Rain sensor connected and number of historical rain days
The Day of the week (1 = Monday 2 = Tuesday)
Controller does a permanent Stop instead of Freeze
Display Low Tank instead of Freeze or Stop
Use Percentage Up and Down
Spare - not in use
Use ‘Disable Automatic Starts’ facility (Rain off)
Spare - not in use
DISPLAY ADVANCED OPTIONS (OPTIONS 16 TO 77)
Default
Value
48
0
3
1
0
2
0
1 -7
0
0
0
0
0
0
0
Allowed
Value
4 - 150
0 - 30
0 - 32
1 - 15
0 - 59
0 - 59
0-4
1-7
0/1
0/1
0/1
See Page
8
11
11
8
7
7
19
8
24
24
16
0/1
16
0/1
8
More Options next page.
25
ADVANCED OPTIONS
Option Description
16
17
19
20
21
22
23
24
25
26
27
28
29
30
31
32
33
34
35
36
37
38
39
40
41
42
44
45
49
50
51
55
56
Allocate ‘I1’ input to a specific program
Over Load 1 threshold (Engineering Use Only)
Maximum number of automatic started programs to run together
Maximum number of cycling programs to run together
Allow only one program to run whether ‘normal’ or ‘cycling’
Multi-Interface board uses alarm op as 4th op.
Run valves synchronously
Use wean facility
Chain Programs
Single Analog Interface Board Fitted
Remote Input interface Board Fitted
Multi-Interface Board Fitted
Cycling programs priority over all automatic started programs
Program 1 will take priority
Program 1 Options
Program 2 Options
Program 3 Options
Program 4 Options
Program 5 Options
Program 6 Options
Program 7 Options
Program 8 Options
Multi-wire controller only (not in use)
Manually Start programs in parallel
Fertigation
Valve names use a letter suffix (PC use only)
Put Controller in configuration mode
Put controller in test mode (Engineering Use Only)
Display optical errors (Engineering Use Only)
Display decoder two wire cable line quality
Display current
Controller address – PC option
Baud Rate- PC Option
Default
Allowed
Value
See
Page
1
70
0
0
1
0
0
0
1
0
0
0
0
0
0
0
0
0
0
0
0
0
1-15
23
0-4
0-1
0/1
0/1
0/1
0/1
2
0/1
0/1
0/1
0/1 6
0/1 4
0/127
0/127
0/127
0/127
0/127
0/127
0/127
0/127
8,23
23
23
29
10
28
28
29
29
29
18
23
9,14,17
9,14,17
9,14,17
9,14,17
9,14,17
9,14,17
9,14,17
9,14,17
0/1 4
0
0/1
0/1
23
29
29
12
0/1
0/1
0-5
0- 2
20,21
20
29
29
0
0
0
0
0
0
0
0
1
2
More options next page
26
Option
57
58
59
60
61
62
63
64
65
66
68
70
71
72
73
74
75
76
77
79
80
81
Description
Keypad security
Delay between valves in Seconds
Multi-wire controller only (not in use)
Specify number of back flush valves
Back flush delay between valves
Back flush on PD only
Back flush on PD and Time
Back flush priority
Number of Log Days – PC option
Number of Log Days Confirmation- PC Option
Multi-wire controller only (not in use)
Number of Automatic Start programs to back-up
Number of Continual Cycling programs to back-up
Volume Meter Type
Volume Meter Units
Volume Meter Timing window
Volume Meter Scaler
Volume Meter Hold Off for Flow rate Alarm
Max Percentage error in flow rate
Number of MPD Dosing Controllers Connected
Logging rate of Flow and EC and pH values
Logging rate of Analogue Values
Default Allowed Value
0
0- 99
0
0-59
0
0
0–15
0
0- 127
0
0-127
0
0-127
0
0/1
0
0-32
0
0-32
0
0/1 4
0
0-15
0
0-15
0
0-127
0
0-127
0
0-127
0
0-127
0
0-127
0
0-100
0
0-1
0
0-99
0
0-99
See Page
28
23
29
29
29
29
29
27
27
18
18
29
29
29
29
29
29
29
29
29
27
KEYPAD SECURITY (Option 57)
A security code can be set to prevent unauthorised use of the controller. Make sure the VALVES OFF
screen is displayed by pushing START STOP key twice. Press and hold MANUAL ADVANCE key for five
seconds waiting for the option screen to appear. Once option screen is displayed using the RIGHT arrow
key scroll to option 57 now press any number between 01 to 99 This number will become the third and
fourth digits of the security code. The first and second digits of the security code will be 57, for example if
option 57 has been set to 15, then the security code 5715 must be entered when ever the controller is
operated. Now scroll back past option 1,the display will take 60 seconds to return to the VALVES OFF
page. The controller has now been set to Keypad security. The user must enter the security code if the
keypad is not used for three minutes.
WEANING PROGRAMS (Option 24)
The wean facility allows Programs 2,3 and 4 to be operated at less frequent intervals than Program 1. For
example Program 2, will start half as many times as Program 1, see table below. Programs 2,3 and 4 are
automatically triggered after Program 1 finishes.
Irrigation Initiated
First Time
Second Time
Third Time
Fourth Time
Fifth Time
Sixth Time
Seventh Time
Eighth Time
Ninth Time
Irrigation Programs Run
Prog 1
X
X
X
X
X
X
X
X
X
Prog 2 Prog 3 Prog 4
X
X
X
X
X
X
X
X
X
That is Program 2 will start every second time program 1 starts, Program 3 will start every third time
program 1 starts and Program 4 will start every fourth time program 1 starts.
CHAINING PROGRAMS (Option 25)
The chain facility allows Programs 1,2,3 and 4 to be chained together. With the option set when ever
Program 1 finishes, Program 2 will start and then Program 3 and then Pprogram 4.
28
PC CONNECTION
One four pin connection for communicating with a PC. A Heron RS232INTD optical interface plugs into
this 4 pin connector. The Heron Optical interface provides a 5mm optical isolation gap between your PC
and the controller to protect the PC from electrical surges. For simple uploading and downloading of
programs the Heron RS232INTB can be used. Consult HR Products for PC connection programs and
details.
RS232INTD - maximum distance between PC and controller 500m
RS232INTB - maximum distance between PC and controller 100m
FERTIGATION (Option 41,79,80,81)
The Fertigation option will only operate with a MPD dosing controller. MPD dosing controller connected,
the dosing controller will be instructed to add fertilizer only on valves with sequence numbers.
Check with HR Products for more details.
BACK FLUSHING (Option 60,61,62,63,64)
The back flushing facility available on Agricultural models only. Check with HR Products for more
details.
WATERMETERS (Option 72,73,74,75,76,77)
Watermeter option requires multinterface card to support volume instead of timed watering, logging flows
and monitoring irrigation flow rates to set ranges. Check with HR Products for more details
SENSORS
Heron have the following range of sensors available Heron Light Sensor, Heron Humidity Sensor, Heron
Temperature Sensor, Heron Rain Sensor. Consult HR Products for more details.
MULTI-INTERFACE CARDS
Interface cards are available for use with Sensors and Watermeters. Please check with HR Products for
more details.
29
PUMP STARTS & MASTER VALVE
A range of pump start modules are available. All the pump start modules are controlled via the two-wire
cable. All pump start modules can be remote from the controller. A maximum of 100 pump start modules
can be fitted.
Type
DIN rail relay
(DECBRDIN)
Features
Connected from two wire
path, will activate 240vac
output when 30vac on
cable path
Optical latching
Connected from two wire
(DECBPL)
path, will activate 240vac
output when 30vac on
cable path.
Optical Intelligent
Connected from two wire
Pump Start latching
path, programmable
(DECBPL2SN)
decoder has ON serial &
OFF serial numbers will
activate 240vac ouput.
If pump decoder loses 30V
then it will switch off
Optical 24VAC
Optical pump start used in
(DECBP24V)
areas with high surges.
Used with DECBMV2SN
to provide switching signal
when 30vac on cable path.
Requires transformer
(240vac - 24vac) supplied
with DECBP24V
Decoder Master Valve Connected from two wire
(DECBMV)
path, will activate 24vac
solenoid when 30vac on
path.
Programmable Master Connected from two wire
Valve
path, programmable
(DECBMV2SN)
decoder has ON srial &
OFF serial numbers will
activate 24vac
solenoid. Also used with
DECBP24V to provide
isolation from surges or
intelligent pump start.
Output
240V contact
rated
Isolation between 2 wire
cable and pump start control
4mm through relay contact, not
recommended for areas with high
probability of surge
240V contact
rated
30mm excellent immunity to
electrical surges
240V contact
rated
30mm excellent immunity to
electrical surges
24Vac at
0.4amp to
contactor of
pump.
30mm excellent immunity to
electrical surges
24Vac at
0.6amp
built in surge protection
excellent immunity to electrical
surges
24Vac at
0.6amp
built in surge protection
excellent immunity to electrical
surges
30
CALCULATING VOLTAGE DROP
The following assumes the decoder current is negligible. The cable voltage drop is given by the formula
Cable Voltage Drop = 2 x L x R x C
L is length in Km between the controller and the valve as measured along the length of the cable
R is the resistance per Km
C is the current consumption of the valve (a standard valve will take a current of 0.25A).
Running Multiple Valves from One Output
If you run valves in parallel then you must multiply the valve current by the number of valves you are
running in parallel.
Looped Cables
The resistance of a looped cable is halved because the current has two paths to follow. The voltage drop of
a looped cable is
Cable Voltage Drop = 0.5 x L x R x C
Where the L is measured around the total circumference of the loop.
Approximate Cable Resistance
The table below lists approximate values of cable resistance. Always check the actual resistance of
your cable you are installing.
Cable Size
1.0mm2
1.5mm2
2.5mm2
Resistance
Per Klm
19 ohms
13 ohms
8 ohms
Example:
If 2.0Km of 2.5mm2 cable was used to connect a valve taking 0.25A then voltage drop would be
calculated as follows
From table above 2.5mm2 cable has resistance of 8 ohms/km.
ThereforeVoltage Drop = 2 x 2.0Km x 8 x 0.25 = 8 V
(Cable Voltage Drop = 2 x L x R x C)
31