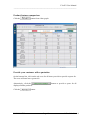
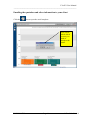
1
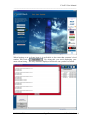
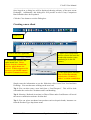
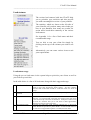
2011
FLeaTS User Manual
D. Harris
Firstfolio Limited
2/2/2011
FLeaTS User Manual
_____________________________________________________________________
FLeaTS
4
Installing FLeaTS
4
Where to get help
5
Logging on and changing your password
6
Creating a new client
8
Creating a new record for a returning client
9
Your client list
10
Opening, editing and updating a client record
10
Creating a split lead
11
Editing Client contact details
11
Adding additional contacts to a client’s record
12
Receiving a company generated lead
The Lead Sheet
13
14
Lead statuses
Lead status usage
15
15
Create a custom view
16
Sending an email from FLeaTS
Sending an email to a single client
Sending an email to a group of clients
Creating standard email templates
Sending a standard email
Sending an appointment email
18
18
19
20
21
23
Reassigning a lead
24
Deactivating a lead
24
Reactivating a lead
25
Searching for policy, forms and lender information
BloomSEARCH
26
Invoicing and financial
28
Claiming your commissions
Draft Invoice
Final Invoice
Income forecast
Past invoices
Claiming exceptions
28
29
29
29
29
30
Creating and maintaining lender accreditations
Adding an accreditation
Editing and deleting lender accreditations
Loan Comparison Software and
31
31
31
Product Information
Product matrix
V02022011DH
26
32
33
Page 2
© Firstfolio Limited
FLeaTS User Manual
_____________________________________________________________________
Accessing the loan matching system from current record
34
Accessing the loan matching system for a new prospect
34
Qualify your client
37
Find the appropriate loan
What if scenario
38
42
Product features comparison
43
Provide your customer with a quotation
Amending a quote
43
45
Emailing the quotation and other information to your client
46
Printing your quotation and comparisons
47
Create new client from loan scenario and prospect
48
NCCP compliance
49
Forms
Client Needs Analysis Form (CNA)
National Finance Broking Agreement and Appointment to Act (FBA)
Accessing Forms
49
49
50
50
Create a contacts database
53
Backing up your records
55
Reporting a problem
56
Menu Glossary
57
Top menu bar
57
Side menu bar
58
V02022011DH
Page 3
© Firstfolio Limited
FLeaTS User Manual
_____________________________________________________________________
FLeaTS
FLeaTS consists of several components including:
1.
2.
3.
4.
Client Relationship Management (CRM)
Commission management and financial forecasting
Sales and lead management and tracking
Loan matching and comparison software
This manual is designed to provide you with an overview of the workings of the
software and a guide as to how to get the best out of it. FLeaTS, if used to its
maximum will provide you with tools that will help you to improve your business.
Installing FLeaTS
Once you have been provided with your user ID and password you can install FLeaTS
onto your computer. There is no limit to the number of computers you can install the
system on; however, if using multiple computers you will need to ensure that you
‘Exchange’ your data both before leaving one computer and again before starting
work on another.
You can install the system from the following website:
http://www.echoice.com.au/fleats
Full instructions for the installation are contained on the web page.
You can also install the add-on link to the Pisces online lodgement system from this
page. However, prior to doing so you should ensure that you have the necessary
permission to do so and also that you are aware of the ongoing costs associated with
this facility (if any).
V02022011DH
Page 4
© Firstfolio Limited
FLeaTS User Manual
_____________________________________________________________________
Where to get help
A complete manual for both FLeaTS and Pisces Electronic Lodgement is available for
download from the Firstfolio website at:
http://www.firstfolio.com.au/partnering-services/bloom
Additional assistance is available from:
For installation problems:
•
John Nielsen on 1300 883480
For help with system use:
•
•
Email: [email protected]
Broker Help Line: 1300 883480
•
•
System “Bug Button”
from within FLeaTS
Pisces Help: 1300 135 970 (For online lodgements only. For issues relating to
accessing Pisces from FLeaTS please use one of the above contacts.)
V02022011DH
Page 5
© Firstfolio Limited
FLeaTS User Manual
_____________________________________________________________________
Logging on and changing your password
Enter ID and password
then click the Exchange
button. Note: these are
case sensitive
Passwords are
changed by
clicking here
Do not clear
cache unless
instructed.
Note: If you are working offline you need to click the
instead of the Exchange button.
button
Tip: 3 unsuccessful attempts to log in will cause your access to be frozen. If this
occurs you need to contact your administrator to unlock your account.
V02022011DH
Page 6
© Firstfolio Limited
FLeaTS User Manual
_____________________________________________________________________
When logging on at a clients home it is preferable to also enter that customer’s lead
number and click on
. By doing this you avoid displaying your
entire client listing. The only customer displayed will be the one you have selected.
V02022011DH
Page 7
© Firstfolio Limited
FLeaTS User Manual
_____________________________________________________________________
Once logged on, a dialog box will be displayed showing a history of the most recent
Exchanges. Additionally, this dialog box will provide an alert if any Comparison
Rate Schedules have been updated.
Click the Close button to exit the Dialog box.
Creating a new client
Click here
1. Enter correct lead source
and if a referrer deal enter the
membership number (same
numbering as in the old
system).
Click to add more applicants
3. Commission structure and
splits shown here. Please
ensure that the commission
and any splits shown are
correct. If these appear to be
incorrect you should contact
Firstfolio Commissions Dept.
2. Enter appropriate lead state.
Note: If loan has already
settled select “Settled by
lender” to claim commission.
Simply enter the information as per the fields then click Create New Lead and then
Exchange. You can then start working on the new lead.
Tip 1: You can also create a new lead from a “Lead Prospect”. This will be dealt
with under the section for Calculators and Loan Matching.
Tip 2: Selecting “Referred (Associate) or Direct Writer under Lead Source will reveal
the correct commission structure for that deal.
Tip 3: You can select non-home loan products such as deposit bonds, insurance etc
from the Product Type drop down menu.
V02022011DH
Page 8
© Firstfolio Limited
FLeaTS User Manual
_____________________________________________________________________
Creating a new record for a returning client
When an existing client returns for another loan you can create a new record from the
previously settled one.
icon to access the Settled and dead lead archives then enter the
1. Click on the
appropriate search information to locate the client’s record. This can be name,
tracking ID etc.
2. Highlight the appropriate client’s record
3. Click on the
icon in the left margin (not the one at the top of the page)
4. This will take you to the same client set-up screen and all information will be
copied from the previous record.
5. Ensure that you amend any changes if necessary.
V02022011DH
Page 9
© Firstfolio Limited
FLeaTS User Manual
_____________________________________________________________________
Your client list
This is the main screen and contains a listing of all your active clients and their
current status.
Opening, editing and updating a client record
Select your client from the list and double click to open the record.
Tip 1: Holding your curser over an icon will open a box explaining what the icon is
for.
Tip 2: To copy and paste to or from any part of the system use the following key
strokes:
Copy – Ctrl C
Paste – Ctrl V
Cut – Ctrl X
Tip 3: If you are doing a split loan for a client remember to create the split lead in
FLeaTS. See item 7 below.
V02022011DH
Page 10
© Firstfolio Limited
FLeaTS User Manual
_____________________________________________________________________
3. Click here
for complete
lead history
3. Click tab to enter/edit
documents you’ve verified
(see section on NCCP),
lender details or to view
history.
7. Create Split lead
8. All past comments
listed here. Double
click to expand.
6. Enter new comments here
1. Select a
new lead
status
2. Select
the next
activity
4. Enter the
next action
date
5. Save &
Exit to
Lead List
Tip: You should exchange your updates as often as possible to avoid accidental loss
of work. To exchange click the
icon. This will save your work to your own
computer plus the main server. At the same time, your system will be updated with
any changes on the server.
Creating a split lead
Click on the
icon as per item 7 above and enter the required information
regarding the loan split. You will not need to re-enter customer information.
Remember to adjust your loan amounts so all splits add up to the total loan.
Editing Client contact details
Open the client record from the Client List and click the
you to the Edit screen.
V02022011DH
Page 11
icon. This will take
© Firstfolio Limited
FLeaTS User Manual
_____________________________________________________________________
Click to add
additional
applicants
Enter post
settlement address
Post Settlement Address
here or copy from
Current address.
Note: Some fields may be greyed out meaning that you cannot edit them via this
process. Changes of this nature need to be made by an administrator. Contact your
relevant support officer for assistance in these matters.
Adding additional contacts to a client’s record
You can add additional contact details to a client’s record to enable emails to be sent
to other related parties such as solicitor, spouse etc. This record also contains all other
contact details.
Click the
button on the main client list screen then click the
button on the next screen.
V02022011DH
Page 12
© Firstfolio Limited
FLeaTS User Manual
_____________________________________________________________________
Click to create a
new contact. Enter
details, save and
then exchange.
Highlight the
contact from the list
then click to edit.
Save and exchange
when done.
When sending emails to the client you can now select additional recipients by ticking
the boxes to the left of the FLeaTS email screen.
To access additional contacts information open the client record from the client list
and click the
icon. Select the contact and double click to open the details.
Receiving a company generated lead
If you are receiving leads from Firstfolio or eChoice these will be automatically
placed into your client database. You will receive an alert via email and/or SMS.
To view the Lead Sheet open the client record from the client list and click the
icon.
V02022011DH
Page 13
© Firstfolio Limited
FLeaTS User Manual
_____________________________________________________________________
The Lead Sheet
V02022011DH
Page 14
© Firstfolio Limited
FLeaTS User Manual
_____________________________________________________________________
Lead statuses
The various lead statuses built into FLeaTS help
you to prioritise your activities and also provide
you with a meaningful overview of your portfolio.
The statistics, which are shown at the left side of
your client list, tell you how many active leads you
have in your database, how many are overdue for
action and a break-down summary of the various
lead statuses.
See Appendix 1 for a list of lead states and their
recommended usage.
You are able to sort your client list simply by
clicking on the top of the column you wish to sort
by.
Alternatively, you can create various views to suit
your requirements.
Lead status usage
Using the pre-set lead states in the system helps to prioritise your clients as well as
your follow-up activities.
In the table below is a list of all lead states along with their suggested usage.
1
Lead received
2
Self
built
received
3
Contact made
4
Appointment made
V02022011DH
lead
The initial lead state for a company generated lead. These should not
remain in this state beyond the initial contact. All new company
generated and issued leads should be contacted within two hours of
receipt.
This is the initial lead state for new clients that you set up in the system.
“Contact made” should only be used as a transient state after “Lead
received”. It is expected that a lead will only remain in this state for up
to one week except in unusual circumstances. Examples of when to use
this state are: customer asks you to call back to make appointment,
customer says they’ll call you back etc.
Expected next state after Lead received (allowing for 2. above) for
mobile HLMs and possible for phone HLMs. No lead should remain in
this state once an appointment (phone or mobile) has been held.
Page 15
© Firstfolio Limited
FLeaTS User Manual
_____________________________________________________________________
5
Awaiting
decision
customer
6
Not ready yet
7
Awaiting documents
A loan application has been completed with the customer but we are
awaiting some or all supporting documents. For a phone appointment
the product and lender has been chosen but we are awaiting receipt of
the signed application and supporting documents. Leads will remain in
this state until the signed application and supporting documentation has
been received and submitted to the lender. Alternatively, the next states
would be:
• Not ready yet – customer has delayed or cannot proceed for
more than 60 days
• Lead dead – Customer has decided not to proceed. Full details
required in FLeaTS.
8
Pre-application
submitted
Self-explanatory. You should move all Pre-approvals into this state
as soon as they are submitted.
9
Pre-application
approved
Self-explanatory. You should move all Per-approvals into this state
as soon as they are conditionally approved.
10
Full
application
submitted
Self-explanatory. You should move all full-approvals into this state
as soon as they are submitted.
11
Full
approved
Self-explanatory. You should move all Full-approvals into this state
as soon as they are unconditionally approved.
12
Settled
13
Lead dead
application
When a face-to-face or phone appointment has been held but client is
still in “decision mode”. Also applies to phone based leads when a
“sales discussion” has taken place.
Only applies when a customer will not or cannot proceed for a period
greater than 60 days.
Self-explanatory. Please move all settled loans into this state as soon
as you have confirmed that settlement has occurred. Also, please
ensure that you have the loan amount entered correctly as these
activities will help to ensure that commissions are paid correctly
and on time.
Self-explanatory. All leads to be made Dead must be moved to Inactive
Lead Candidate for RM action/approval.
Create a custom view
Creating a custom view allows you to select the information you like to see. It may
be that you prefer to group one or more lead statuses into one view or you might
prefer to change the information you see in the client list.
To create your custom view, click on the Change view settings button.
V02022011DH
Page 16
© Firstfolio Limited
FLeaTS User Manual
_____________________________________________________________________
This button
enables you to
select the lead
statuses that
will be shown
in this view.
You need to
give the view a
name and then
you can save
the view.
This button
enables you to
select the
information that
you see in the
client list.
When you have created your preferred views they can
be selected by clicking on the appropriate button.
These are located at the bottom left of the Client List.
V02022011DH
Page 17
© Firstfolio Limited
FLeaTS User Manual
_____________________________________________________________________
Sending an email from FLeaTS
FLeaTS has the ability to send emails, either to individual clients or to a group of
clients. The advantage of emailing from FLeaTS is that all your outbound emails are
recorded in the client history.
Note: FLeaTS cannot receive emails. Replies to your FLeaTS emails will go to your
normal email address and can the copied and pasted into FLeaTS.
Sending an email to a single client
You can highlight the client in the client list or open the client record and then click
the
icon.
Type your email here
1. You do not need to type the salutation as this is already set up in the client record.
In the example above the salutation is “Hi Allan”. This can be overtyped if you
like. Similarly, your email signature is also pre-coded into the email.
2. If you have created multiple contacts for this client you can select which contacts
to send the email to by clicking the appropriate ones on the left side of the screen.
3. When you have finished the email click “Save for Exchange”. The email will not
be sent until next time you Exchange your data.
4. Attachments can be added to the email by clicking the Add Attachment button and
following the directions.
V02022011DH
Page 18
© Firstfolio Limited
FLeaTS User Manual
_____________________________________________________________________
5. A copy of the email can be sent to your email Inbox by ticking the box next to the
Subject line.
6. If you need to exit the email prior to completing it you can save it by clicking
Save as Draft.
Sending an email to a group of clients
To send an email to multiple clients you highlight the clients in the client list and then
click the
icon. Clients are highlighted by clicking on the first one and then,
while holding down the Shift key use the down arrow until you have highlighted all
the clients to receive the email.
Click “Yes” to the Dialog box shown.
You can then follow the steps outlined for sending a single email.
Note: Each recipient will only see their own email address. No information about
other recipients is sent.
V02022011DH
Page 19
© Firstfolio Limited
FLeaTS User Manual
_____________________________________________________________________
Creating standard email templates
The FLeaTS email system enables you to create standard emails for marketing, client
follow-up etc.
Instructions are in the image above.
V02022011DH
Page 20
© Firstfolio Limited
FLeaTS User Manual
_____________________________________________________________________
Sending a standard email
1. Click on the Select template drop down.
2. Select your template
3. Click the arrow to bring up the selected email.
V02022011DH
Page 21
© Firstfolio Limited
FLeaTS User Manual
_____________________________________________________________________
To send the email, click the Save for exchange button. Remember, the email will not
be sent until you Exchange.
Tip: Standard emails can also be sent to multiple clients by following the instructions
under that heading.
V02022011DH
Page 22
© Firstfolio Limited
FLeaTS User Manual
_____________________________________________________________________
Sending an appointment email
FLeaTS enables you to set an appointment date and time and send a confirming email
within the same action. The email will also ask that the client have the appropriate
paperwork available. These are auto selected based on the loan and client type,
however, documents not required can be deselected by un-ticking the box.
To create an appointment email, select the client from the client list or open the client
record and click the
icon from the left margin.
Type any additional
comments here.
Select the
loan/client type.
Un-tick any
documentation not
required.
1. Click on the date field and then select date and time of the appointment.
2. Type the appointment location into the Location field.
V02022011DH
Page 23
© Firstfolio Limited
FLeaTS User Manual
_____________________________________________________________________
Reassigning a lead
If you are an administration person for a group of brokers you may have a need to
reassign leads to loan writers within your group.
To reassign a lead/client, highlight the client or open the client record and click on the
icon. This will open the reassignment facility shown below.
1.
2.
3.
4.
5.
Enter a comment in the “New comments” field.
Select the appropriate Team. Your options in this regard will be limited.
Select the loan writer from the drop down box “Select HLM”.
Click Submit
Exchange data.
Deactivating a lead
When a client tells you they no longer want to proceed with you, you can deactivate
(or make Dead) the lead by clicking on the
details in the next screen.
icon and completing the required
Note: Deactivated leads can be reactivated at any time.
V02022011DH
Page 24
© Firstfolio Limited
FLeaTS User Manual
_____________________________________________________________________
Reactivating a lead
If you need to reactivate a Dead lead you can do this by clicking the
icon.
Enter information in
any of the fields and
click
the
search
button.
Click here if you wish to
create a new lead from a
previously settled lead.
Select the lead you wish to reactivate
icon. The lead
then click on the
will then be placed back in your active
client list.
Note: This area of FLeaTS also contains all your settled loans.
V02022011DH
Page 25
© Firstfolio Limited
FLeaTS User Manual
_____________________________________________________________________
Searching for policy, forms and lender information
BloomSEARCH
BloomSEARCH is a search engine within FLeaTS that provides the ability to search
and download all lender documents, calculators, policy updates and loan information.
All lender changes are uploaded to BloomSEARCH within 24 hours of notification
(most with 4 hours).
In addition to new updates received, all historical information is retained and remains
available to view, save or print.
To access BloomSEARCH, click the
icon from within FLeaTS.
Enter your search
terms here just like
Google or any other
search engine.
Tips:
1. Do not make your search too narrow (e.g. 52 Hectares). Just “hectares” will give
better results as it is unlikely that any lender policy refers directly to 52 hectares.
2. Searching on say, ANZ, will give results on all matters relating to ANZ whereas
“discharge ANZ” will provide results relating to ANZ discharge policy,
procedures, forms etc.
V02022011DH
Page 26
© Firstfolio Limited
FLeaTS User Manual
_____________________________________________________________________
Example of a search on “ANZ”
Simply click
on the item
you wish to
view to open,
Example of a search on “ANZ LVR policy”
Note: All documents are date stamped. You can use your scroll bar to scroll through
all documents, select what you want and print or save.
V02022011DH
Page 27
© Firstfolio Limited
FLeaTS User Manual
_____________________________________________________________________
Invoicing and financial
The system produces your invoice automatically based on loans that you have moved
into the “Settled” status. All information shown in the draft invoice is determined by
the information you have entered into the system including loan amounts, lender,
settlement date etc. Incorrect entry of any of any information could cause
inaccuracies in the Draft Invoice.
1. Draft Invoice shows loans settled but not yet processed by “accounts”.
2. Final Invoice is available after payments have been made and includes full details
of those payments.
3. Forecast Earnings will display your expected income by month based on the data
you have entered such as loan amounts, settlement dates, lender etc.
4. Tax Year to Date earnings shows payments that you have received during the
current and past financial years.
1
2
3
4
Claiming your commissions
Note: If your client’s loan settled before claiming your commission please refer
to “Creating a new client” on page 7.
By changing an existing client status to “Settled by Lender” your lead is now in a
condition to enable payment of commissions. You don’t need to do anything else.
Change lead status
to Settled by
Lender
Enter Settlement date,
loan product and bank
reference numbers
V02022011DH
Page 28
© Firstfolio Limited
FLeaTS User Manual
_____________________________________________________________________
Draft Invoice
Click in the
icon to show a draft of your invoice (RCTI) based on the
information you have entered into FLeaTS. Remember; this is only a draft as the
information has not been verified against settlement information provided by the
lenders.
Final Invoice
Click the
icon to show and print your Final RCTI. This will reflect the amount
you have been paid.
Income forecast
You can forecast your income for future commission periods based on information
you have entered into the system. Click the
wish to forecast.
icon and then select the period you
Past invoices
Past RCTIs are available by clicking the
year and month to view and print the RCTI.
V02022011DH
icon. Select the appropriate financial
Page 29
© Firstfolio Limited
FLeaTS User Manual
_____________________________________________________________________
Claiming exceptions
Click on the
button to view the Commission Exceptions screen. Settled loans
will only appear here if they have been entered into FLeaTS incorrectly or have not
been entered at all.
Click on the loan
you wish to claim
to highlight it.
Enter the Settled loan
Account Number
then click “Claim”.
By entering your originator name and ticking the “Find by originator” FLeaTS will,
where possible, find exceptions belonging to you.
Note: Your originator name is the ‘name’ by which each lender recognises you in
their system. This may be your name, your accreditation number or some other
variation. You will therefore most likely have several originator names – one for each
lender you have accreditation with.
You only need to enter this information once as the system will record those details
for future use whenever you tick the Find by originator box.
V02022011DH
Page 30
© Firstfolio Limited
FLeaTS User Manual
_____________________________________________________________________
Creating and maintaining lender accreditations
It is important to ensure that you have entered your lender accreditation details in the
system. FLeaTS uses this information to allow online lodgement via Pisces e-app and
also to establish which lenders it can display in the loan qualification and matching
software.
To add, amend or delete an accreditation click the
accreditations screen.
Adding an accreditation
icon to take you to the
Click here if you can’t
see the above icon on
your screen.
Correct code
format for your
lender will be
displayed here.
All codes must
be entered in the
correct format.
1. Click to add
accreditation
Editing and deleting lender accreditations
2. Select Lender
and enter details
in appropriate
fields.
Follow the same procedure as above after highlighting the lender you wish to edit or
delete and then clicking the appropriate button.
V02022011DH
Page 31
© Firstfolio Limited
FLeaTS User Manual
_____________________________________________________________________
Loan Comparison Software and
Product Information
V02022011DH
Page 32
© Firstfolio Limited
FLeaTS User Manual
_____________________________________________________________________
Product matrix
Basic information on all lender products is available from both the FLeaTS and Loan
Matching screens. From any FLeaTS screen click the
Loan Matching system click the
Select
product type
V02022011DH
icon. If you are in the
icon at the top left of the screen.
Tick if you only
want to see Low
Doc products
Page 33
Click to
download
latest updates
© Firstfolio Limited
FLeaTS User Manual
_____________________________________________________________________
Accessing the loan matching system from current record
Loan matching can be accessed from your client list by highlighting or opening a
client’s record and clicking the
icon or by clicking the quick scenario icon as
shown below. When accessing via a client’s record you will be taken directly to the
details screen as shown below.
Click here to “unlock”
the screen and allow
editing.
Whether accessing for an existing client or a new prospect the system works exactly
the same from this screen onwards. Refer to the next section for further details.
Accessing the loan matching system for a new prospect
Click the
icon to open the New Prospect page. This facility enables you to
create a ‘quick’ scenario without the need to create a whole client record. New client
records can be created from a scenario.
V02022011DH
Page 34
© Firstfolio Limited
FLeaTS User Manual
_____________________________________________________________________
Click to create a
prospect
This screen only comes up for new prospects
Click to create
new scenario then
click Open.
V02022011DH
Page 35
© Firstfolio Limited
FLeaTS User Manual
_____________________________________________________________________
1.
3.
2.
4.
8
5.
9.
1.
6.
7.
10
11
12
.
.
.
13
14
15
.
.
.
Note: A new field
has since been
added here to
allow selection of
banks that the
client is already a
customer of. This
will assist with
selection of
lenders for high
LVR loans
22
16
.
17
18
.
19
20
21
.
.
.
24
23
Required fields. Some prefilled but you should check
contents.
V02022011DH
25
26
.
.
Not compulsory but recommended
Page 36
© Firstfolio Limited
FLeaTS User Manual
_____________________________________________________________________
Tip: Always ensure you enter a savings period (25) to ensure you get an accurate list
of qualified lenders.
1.
2.
3.
4.
5.
6.
7.
8.
9.
10.
11.
Select customer type
Select property usage
Loan Amount
Refinance amount (if Refi.)
Cash out amount (if Refi.)
Enter state where loan to be
Ownership %
Select security type
Select appropriate holding
Estimated value or contract price
State security located in
12. How is the security property used
13. Add or subtract loans
14.
15.
16.
17.
18.
19.
20.
21.
22.
23.
24.
Navigate forward or back
Add or subtract securities
Add or subtract borrowers
*Select relationship type
Number of dependants
Self employed (yes or no)
Cust. age (for Reverse mortgage)
^Time in current and previous job
#
Income (all types). Monthly
Enter all expenses
Credit rating. Enables more info if
not “Good”.
25. Savings period
26. Enter available funds for purchase
* Some types require a set combination. I.e. Married/Defacto 1 requires another applicant Married/Defacto 2.
^ Required for servicing for some lender matches when loan is high LVR
#
you can enter the annual figure and press F12 to convert to monthly
Qualify your client
Click the
button to progress to the client qualification screen.
You can elect to display a schedule
of costs and funds required only, lenders the client qualifies with or both by checking
one or both boxes. The system will default to both.
In the screen shot below you see the following:
1. Cost schedule detailing all appropriate state government and lender and mortgage
insurance costs. (Note: LMI is stated as an average of all qualifying lenders at this
time).
2. Finds required by the client to complete the purchase plus a warning if there is a
shortfall based on initial input.
3. Lenders with whom the scenario qualifies ordered from left to right on maximum
loan amount for that lender. Use the horizontal scroll bar to slide through lenders
out of view.
4. You can change the loans that appear by selecting various tick boxes at the bottom
of the screen. Usually the default view is sufficient.
5. You should note that other than determining maximum capacity for each lender no
loan matching or ranking has taken place at this time.
6. At this point you know that based on the information provided the scenario will
qualify with a number of lenders.
V02022011DH
Page 37
© Firstfolio Limited
FLeaTS User Manual
_____________________________________________________________________
Note the highlighted warning showing a funds shortfall. This will be shown if the
amount entered in the “Funds Available” field are less than the calculated funds
required.
Find the appropriate loan
Click the
button.
From the following page you can select the features that you and your client consider
the most appropriate for their circumstances.
V02022011DH
Page 38
© Firstfolio Limited
FLeaTS User Manual
_____________________________________________________________________
Select the preferred
loan type. You can
select more than one
type.
How many loans do
you want to display?
Select the preferred
loan features
At this point always
select the default –
Prime Lenders.
You can “force” a
lender in by clicking
here and selecting the
lender.
You can match on
cost alone or features
THEN cost
Cost ranking can be
done over short,
medium and long
term.
You can choose to show
only the highest rank
product from each lender
OR multiple products from
a lender if they outrank
other lenders’ products.
Click the
V02022011DH
Manually enter
products from lenders
not in the software.
button.
Page 39
© Firstfolio Limited
FLeaTS User Manual
_____________________________________________________________________
% match against
selected features
Product related
warnings.
Select your
ranking criteria
Ticking will
cause reason
for reduced
match score to
be displayed.
Tip: Expand the Warning column to view the entire warning. Do this by placing your
cursor on the column divider, circled above, and dragging it to the right. You can
expand any column in this way.
1. Click the
2. Click the
button or click on individual loans you wish to rank.
button.
Any displayed product can be excluded by highlighting it and clicking the
button. This will cause the system to do a new lender match
without the excluded product.
V02022011DH
Page 40
© Firstfolio Limited
FLeaTS User Manual
_____________________________________________________________________
Use these buttons to
advance or contract
the graph time period.
These loans are ranked by total cost (principal, interest and fees) payable. The graph
will default to the full loan term but this can be changed. Clicking the
button or
button will reduce or increase the graph term by five years. The
buttons
will reduce or increase the graph by 1 year increments.
You can lock the projection in place by ticking the Lock Projection box. Leaving the
box unticked will return the graph to the maximum term each time you return to it
after going to another screen.
The lines on the graph show the total amount paid over the designated number of
years.
Note: Changing the term on the graph does not change the initial loan term. It shows
the amount of the loan including costs and interest paid over the time specified.
By clicking the
V02022011DH
icon you are able to change the graph view to the following.
Page 41
© Firstfolio Limited
FLeaTS User Manual
_____________________________________________________________________
Instead of displaying total payments this graph displays the expected loan balance at
the various points in time. The graph term can be advanced and contracted in the
same manner as shown above.
What if scenario
You can accommodate what if scenario requests (in the line graph above) for making
additional payments, lump sum payments or average offset balance.
Set the
appropriate options as shown below in the Loan Preferences Screen.
V02022011DH
Page 42
© Firstfolio Limited
FLeaTS User Manual
_____________________________________________________________________
Product features comparison
Click the
button from either graph.
Provide your customer with a quotation
On the bottom line, click on the red cross for all loans you wish to provide a quote for.
The cross will turn into a green tick.
button to provide a quote for all
Alternatively, click the
displayed lender products
Click the
V02022011DH
button.
Page 43
© Firstfolio Limited
FLeaTS User Manual
_____________________________________________________________________
Quote page 1 & 2.
Quote page 3.
V02022011DH
Page 44
© Firstfolio Limited
FLeaTS User Manual
_____________________________________________________________________
Amending a quote
Click the
button.
1. You can add a new cost by clicking the
button
2. Costs can be deleted by clicking on the item to be deleted and then clicking the
button.
V02022011DH
Page 45
© Firstfolio Limited
FLeaTS User Manual
_____________________________________________________________________
Emailing the quotation and other information to your client
Click the
icon to open the email template.
You will be
asked which
screens you
wish to
attach to the
email.
V02022011DH
Page 46
© Firstfolio Limited
FLeaTS User Manual
_____________________________________________________________________
If your client
has more
than one
contact
select the
contacts to
send the
email to.
Edit or enter
new email
text here.
List of
screens
attached
Add other
attachments or
CRS here.
Printing your quotation and comparisons
All quotations and comparisons can be printed for your records by clicking on the
Print icon on each page.
V02022011DH
Page 47
© Firstfolio Limited
FLeaTS User Manual
_____________________________________________________________________
Create new client from loan scenario and prospect
Once you have established that the new prospect is going to become a client you
should create a new client record.
Click the
icon. You will be asked to save the current record.
Enter the details and Save.
You will then be presented with the screen below. Enter the appropriate additional
information and click
.
V02022011DH
Page 48
© Firstfolio Limited
FLeaTS User Manual
_____________________________________________________________________
Return to the main client list screen and exchange.
NCCP compliance
Forms
Several “Forms” have been included in FLeaTS to enable compliance with the NCCP
legislation which came into effect on July 1st 2010. These include a Needs Analysis
Form and the National Finance Brokers Agreement.
In order to avoid duplication of effort the forms can be auto populated from all data
held in FLeaTS client data, Loan Match Data. It is therefore recommended that you
set the client up in FLeaTS with as much data as possible including the loan matching
scenario so that you can get the most advantage of the auto-populate feature.
It is a Firstfolio requirement that Authorised Credit Representatives use FLeaTS and
the inbuilt forms to ensure that you remain compliant with the legislation. If you hold
your own Australian Credit Licence Firstfolio strongly recommends the use of these
facilities to ensure you remain compliant.
Client Needs Analysis Form (CNA)
Completion of this form ensures that all the necessary data is captured to enable you
to make the Preliminary assessment as required by the act. Information contained
within the client’s record in FLeaTS and the Loan Matching software can be
transferred to the CNA avoiding duplication of entry.
V02022011DH
Page 49
© Firstfolio Limited
FLeaTS User Manual
_____________________________________________________________________
National Finance Broking Agreement and Appointment to Act (FBA)
The FBA is the disclosure document that will be required under the Act from 1st
January 2001 except for NSW where that state’s legislation still requires this
document. In the interests of uniformity and full disclosure Firstfolio requires that
Authorised Credit Representatives use this form in all cases regardless of state. It is
also strongly recommended that holders of their own Australian Credit licence also
use the form regardless of state.
Accessing Forms
Highlight
client
from
Lead List
Click
“Forms”
icon
Click here and select
required form.
V02022011DH
Page 50
© Firstfolio Limited
FLeaTS User Manual
_____________________________________________________________________
Note: You can
click to populate
the form from this
page or from the
form itself. You
can also elect to
overwrite existing
values.
Click
here to
start the
form.
Select source
of data to
populate the
form.
V02022011DH
Page 51
© Firstfolio Limited
FLeaTS User Manual
_____________________________________________________________________
Print, save to
.pdf or email
the form.
Use these buttons to
navigate forward
and back through
the form.
Transaction details
page after
populating from
FLeaTS.
Click here to
navigate to
specific page.
Note: The process for completing all forms is the same.
V02022011DH
Page 52
© Firstfolio Limited
FLeaTS User Manual
_____________________________________________________________________
Create a contacts database
FLeaTS provides you with database to maintain all your business contacts.
To set the database up, click the
icon.
Click here
V02022011DH
Page 53
© Firstfolio Limited
FLeaTS User Manual
_____________________________________________________________________
Enter appropriate
information.
Tick box if contact
is to be paid a
commission split
Enter
additional
information
V02022011DH
Page 54
© Firstfolio Limited
FLeaTS User Manual
_____________________________________________________________________
Backing up your records
Whilst most data is replicated on the server and therefore backed up daily there are
some system generated files that reside on your own computer. To ensure that you do
not lose these in the event of loss or damage to your computer you should undertake a
regular back-up routine. The FLeaTS system will remind you of this at various log-on
intervals by presenting the following screen.
The files that require backing up are listed on the reminder. Of course, it would be
prudent to take the opportunity to also back-up your other data at the same time.
Instructions for backing up can be obtained by clicking on the
button.
Clicking on the
button will close the reminder window;
however, no back-up will have been performed.
V02022011DH
Page 55
© Firstfolio Limited
FLeaTS User Manual
_____________________________________________________________________
Reporting a problem
If you think that the software is returning incorrect information you should report this
via the Bug
Administrator.
button.
This will generate an email to the Calculator
These reports will be investigated as a priority and results of the investigation reported
back to you.
V02022011DH
Page 56
© Firstfolio Limited
FLeaTS User Manual
_____________________________________________________________________
Menu Glossary
Top menu bar
Lender accreditation entry and management
Loan matrix
Set auto exchange times (not compulsory)
Bug button – report errors
Set up contacts database
Request time off leads (for HLMs and LMs who receive company leads)
Exchange button
Search
Client (lead) list
Diary
View results of previous exchanges
Dead and settled leads
E-app (Pisces) history. Not new submissions.
Past RCTIs
Commission forecast
Final RCTI
Draft RCTI
Commission exceptions
Create new client
Create loan scenario and prospect
V02022011DH
Page 57
© Firstfolio Limited
FLeaTS User Manual
_____________________________________________________________________
Side menu bar
Print
Create PDF Document
Broker Resources (BloomSEARCH etc)
Export to Excel
Email client(s)
Make lead Dead
Reassign lead
Make appointment email
Create Split Lead (not new lead)
Loan qualification, matching and ranking
Create forms including FBC, Needs Review etc
Ad contacts to a client’s record
Create new e-App (Pisces) application
Show commission splits for deal
Make a note against selected lead
The following additional side menu items appear when you open a client’s record:
Edit client contact and address details
View client history
V02022011DH
Page 58
© Firstfolio Limited