1
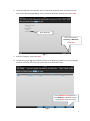
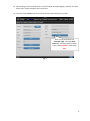
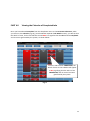
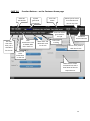
User Manual Quick Reference Guide 1 Index Page No. Glossary of Terms 3 PART 1.0 Viewing the Calendar 4 Selecting Your Job for Today 5 Start Time Tracking 5 Adding Materials to the Job (building the Invoice) 6 Stop Time Tracking 7 Completing the Job 8 PART 3.0 Email Invoice to the Customer 10 PART 4.0 Viewing the Calendar of COMPLETED Jobs 11 PART 5.0 Function Buttons on Customer Page 12 PART 6.0 Detailed description of Function Buttons 13 PART 2.0 2 Glossary of Terms Attachment – Any uploaded document or attachment connected to a job. For example: Job Plans, OHS Procedures, Dial before You Dig Plans, Safe Work Method Statements etc. Calendar – The Calendar displaying Blocks of time representing the various Jobs Scheduled Category – (An advanced feature that may not always be needed by every User) Tasks, Work Items, and Materials may be grouped by Category, so that searching the data base is streamlined Comments – The field where Job Comments may be entered. A very useful tool when using JobStream Customer – The customer is the client for whom a job is scheduled Customer List – A list view off all Customers Device – refers to the iPad, Laptop or Computer working with JobStream Invoice – The Invoice generated by the System after Job Completion Job – Any Job entered into the System, and Scheduled on the Calendar Jobs List – A list view of scheduled Jobs Job Number – A Job Number generated by the System during the Scheduling process Materials – Materials that have been entered into the data base, or inserted by the user from a Suppliers Invoice that will be booked out on a Job Schedule – The time allocated for Jobs in the scheduling stage will arrange Jobs in blocks of time on the Calendar. Task – A brief description of the Job to be undertaken by the User (E.g. Repair, Inspection, Service Call, Check Leaks etc.) Time – The Start and Finish Time scheduled for a Job Time Tracking - The function enabling a User to start the automatic Time Keeping once on the Job Tool Bars First Tool Bar – When viewing a Job Detail Screen there are two tool bars at the top of the screen. Referring to the First Toolbar in this manual means the Tool Bar at the TOP of the page Second Tool Bar - Referring to the Second Toolbar in this manual means the Tool Bar below the First Toolbar Type – The type of Job. E.g. Do and Charge- Quotation - Quoted Job - Recall Status – The Status of the Job. New, Quoted, Scheduled, In Progress, On Hold, Complete, Complete and Paid User – all employees accessing JobStream with an iPad and included on the Calendar are referred to as Users Work Items – (Advanced Feature) an expanded description of the Task/Work to be carried out on the Job. (E.g. the Task is be: Check Leaks. The Work Item then might be: Investigate leak under Laundry Sink) RHS – Right hand side of the screen LHS – Left hand side of the screen 3 PART 1.0 Viewing the Calendar The Calendar in the JobStream –Total Workflow Solutions gives the user an instant snapshot of scheduled jobs for all users including location, Job Number times and dates scheduled. At any time the user may view today’s scheduled jobs, job booked in for future dates, or Jobs that have been completed in the past. By touching the Calendar button (top RHS of screen) all jobs scheduled for all users will be displayed on today’s calendar. Each job will be represented by a solid block of blanked out time. Within this block is displayed the system generated Job Number and the Suburb location of the job. The next two working days of the week may be accessed to view the schedule simply by touching one of the other two dates displayed. By touching a “block” of time on the Calendar, the Customers Home Page details of that particular Scheduled Job will be displayed and allows viewing of the Job Details 1st Tool Bar 2nd Tool Bar Touching any of the Time ‘Blocks’ will open the Customer page for that particular Job The date can be changed using the date ‘Calculator’ to view any forward or past Job details Fig. 1 the Calendar Displaying Scheduled Jobs All time “blocks” on the Calendar in the above example are coloured Charcoal. This colouring informs the viewer that the jobs displayed have been scheduled, but not yet completed 4 Part 2.0 Selecting your Job for Today On arrival at the Job, touch the ‘Block’ of time on the Calendar (Fig. 1) representing that particular job today, the Job Number and Customer Details page (Fig. 2) will open as shown below: Once you have opened the Customer screen, and you are ready to commence the Job, touch the Time Button to commence Automatic Time Tracking It’s a good idea to use the Comments field as much as possible. It can give the User a full picture of what needs to be done on the Job Fig. 2 1. When all is in readiness to start the Job, touch Time, and the following screen will appear (Fig. 3): Fig. 3 To start automatic time tracking, touch Start Time Tracking 2. Now touch Start Time Tracking, and automatic time tracking will commence It is not necessary to Stop Time Tracking until ALL aspects of the Job have been completed IMPORTANT NOTE: 5 3. To add Materials to the Job and start building the invoice, Touch Materials, and the following screen appears (Fig 4): Touch Add from List to select the material used on the Job Fig. 4 4. Touch Add from List (Fig. 4), and then touch the All Category button, and from the drop down menu select the relevant Category for the materials Touch All Category button Fig. 4a 5. Once you have selected the desired Category from the drop down menu, then touch Search to find the Material to be added to the Invoice 6 6. Touch the Material to be selected, then you will be prompted to enter a quantity for that item on the following page (Fig. 5), once you have entered the quantity, then touch Save Enter Quantity After you enter the Quantity of Materials touch Save Fig. 5 7. Enter the Quantity, then touch Save 8. The following page (Fig. 6) will appear and this is the beginning of the list of service charges, materials and work items that the system will use to build the invoice Touch Add from List each time a new Material is added to the job, touching Save after every entry Fig. 6 7 9. Continue to touch Add From List to select next the items for the invoice. Continue adding from the Materials List, until all items that need to be invoiced have been included 10. Once all Materials have been added to the Job, and ALL WORK HAS FINISHED, touch Stop Time Tracking Fig. 7 Once you have entered ALL Materials AND ALL WORK HAS FINISHED onOnce the Job touch Stop Time Tracking. Your Invoice has now been generated by Job Stream IMPORTANT NOTE: Even though all materials may have been added to the Job, DO NOT touch Stop Time Tracking until ALL WORK HAS FINISHED 11. At this point a touch Job Details at top RHS of the screen (Fig. 8), to return to the Customer Job Screen (Fig. 9) Once you have Stopped Time Tracking, touch Job Details to return you to the Customer Screen Fig. 8 8 12. On returning to the Customer Screen, touch the BLUE Status Bar (Fig. 9), and from the drop down menu, select Complete, then touch Save. 13. The Job is now COMPLETE and an Invoice has been generated by the system. Once you’ve returned to the Customer Page, touch the BLUE Status bar, and from the drop down menu, select Complete, then touch Save Fig. 9 9 PART 3.0 Emailing the Invoice to the Customer 1. Now that the Job has been completed, all that’s left is to email the Invoice to the Customer. From the Customer Information page, open the invoice. Check that all materials and Time that need to be charged out are listed. Touch the Invoice button to view and check invoice prior to emailing to the customer 2. At the bottom LHS of the invoice screen, touch Send Once the Invoice details have been checked for accuracy, touch Send 10 PART 4.0 Viewing the Calendar of Completed Jobs Once you have Selected Complete from the drop down menu on the Customer Job Screen, when you return to the Calendar (Fig. 10), (touch Calendar top RHS of Job Details screen), you will see that the ‘Block’ of time, for this Job will have turned RED. This signifies that the Job has been Completed and an Invoice generated by the system, as shown below: Once the Job has been COMPLETED, the ‘Block’ of time on the Calendar will appear in RED, signifying that the Job is in fact COMPLETED, and an Invoice has been generated by the system Fig.10 11 PART 5.0 Function Buttons – on the Customer Home page View this Jobs Details System generated Job Number Your User Name Allows you to return the Calendar and view at any time View the Invoice generated for this job See who else other than you is scheduled for the Job View attachments such as SWMS, OHS Docs. Plans etc. for the Job See the Job Tasks undertaken on the Job Work Items and Materials used on the Job Start Time Tracking An Admin Function Button Return at any time to view the Job List Make full use of the comments box with a brief detail of the Job Requirements 12 PART 6.0 Function Buttons – Detailed Description The second tool bar displays the following buttons on the Jobs Details page Schedule – Touching the Schedule button opens the screen displaying the user/s who’ve been assigned to the JOB Task – Touching the Task button opens the Task screen where tasks relevant to the job can be selected from the drop down menu accessed by touching the All Category field and making a selection from the list Attachment – Touching the Attachment button opens the screen displaying any attachments pertinent to the individual job such as: site plans; dial before you dig plans; official Customer Job Order etc. These attachments are added by the System Administrator. An attachment can be opened simply by touching the desired Attachment Work Items – Touching the Work Items button opens the screen displaying a further, more detailed description of actual tasks carried out on the job. Again, by touching the All Category button on this page will display a list of Work Items which may be selected Materials –Touching the Materials button opens the screen displaying materials used on a job. This screen also displays the material Item Code, the Material Item Description and the price of the item. This screen also allows the user to select such items as Service Call Charges, After Hours Surcharge, and the ability to select materials form a hard copy of a Suppliers Invoice. (These buttons are located at the bottom of the Materials page) Time – Touching the Time button allows the commencement of the automatic time keeping feature by touching the Start Time Tracking button, immediately the user arrives at the job. Time keeping will stop by touching the Stop Time Tracking button. This is usually done when all work and data entries have been completed, and the job is considered finished. Invoice – Touching the Invoice button will display a copy of the Invoice that has been generated by the System, reflecting all chargeable Time and Materials consumed by the Jobe Tasks – touching the Tasks button allows entry for a description of the task to be undertaken Work Items – touching the Work Items (may best be described as a subset of the Tasks button) allows a more specific detail of the Job to be entered(e.g. a specific task at a specific location on the job) GL List – touching the GL List button allows Job Codes to be added to differentiate between Job Types Procedures – touching the Procedures button allows to upload a Procedure for later attachment to any Job Users – touching the Users button allows the adding of Users (employees using the various iPads) to the System. Reports – touching the Reports button opens Device – touching the Device button allows pairing of a device (iPad or computer) to the System 13