1
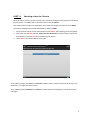
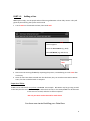
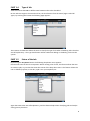
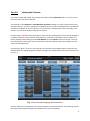
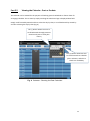
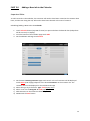
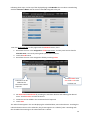
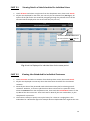
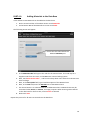
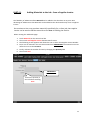
Admin User Manual 1 Index Page No. Glossary of Terms 3 PART 1.0 The Admin Site - Getting Started 4 PART 1.1 Selecting a User for a Device (iPad/Computer) 5 PART 1.2 Adding a User 6 PART 1.3 Adding a New Customer to the Data Base 7 PART 1.4 Type of Job 8 PART 1.5 Status of the Job 8 PART 2.0 Viewing the Calendar 9 PART 2.1 Viewing the Calendar – Jobs Completed 10 PART 2.2 Viewing the Calendar – Post and Predate 11 PART 3.0 Adding a New Job to the Calendar 12 PART 3.1 Viewing Details of Jobs Scheduled for individual Users 15 PART 3.2 Viewing Jobs Scheduled for individual Customers 15 PART 4.0 Adding Materials to the Data Base 16 PART 4.1 Adding Materials to the Job (From a Suppliers Invoice) 17 PART 4.2 Category – Materials, an Advanced Feature 18 PART 5.0 Function Buttons – Detailed Description 19 PART 5.1 Function Buttons – on the Customer Home page 20 2 Glossary of Terms Attachment – Any uploaded document or attachment connected to a job. For example: Job Plans, OHS Procedures, Dial Before You Dig Plans, Safe Work Method Statements etc. Calendar – The Calendar displaying Blocks of time representing the various Jobs Scheduled Category – (An advanced feature that may not always be needed by every User) Tasks, Work Items, and Materials may be grouped by Category, so that searching the data base is streamlined Comments – The field where Job Comments may be entered. A very useful tool when using JobStream Customer – The customer is the client for whom a job is scheduled Customer List – A list view off all Customers Device – refers to the iPad, Laptop or Computer working with JobStream Invoice – The Invoice generated by the System after Job Completion Job – Any Job entered into the System, and Scheduled on the Calendar Jobs List – A list view of scheduled Jobs Job Number – A Job Number generated by the System during the Scheduling process Materials – Materials that have been entered into the data base, or inserted by the user from a Suppliers Invoice that will be booked out on a Job Schedule – The time allocated for Jobs in the scheduling stage will arrange Jobs in blocks of time on the Calendar. Task – A brief description of the Job to be undertaken by the User (E.g. Repair, Inspection, Service Call, Check Leaks etc.) Time – The Start and Finish Time scheduled for a Job Time Tracking - The function enabling a User to start the automatic Time Keeping once on the Job Tool Bars First Tool Bar – When viewing a Job Detail Screen there are two tool bars at the top of the screen. Referring to the First Toolbar in this manual means the Tool Bar at the TOP of the page Second Tool Bar - Referring to the Second Toolbar in this manual means the Tool Bar below the First Toolbar Type – The type of Job. E.g. Do and Charge- Quotation - Quoted Job - Recall Status – The Status of the Job. New, Quoted, Scheduled, In Progress, On Hold, Complete, Complete and Paid User – all employees accessing JobStream with an iPad and included on the Calendar are referred to as Users Work Items – (Advanced Feature) an expanded description of the Task/Work to be carried out on the Job. (E.g. the Task is be: Check Leaks. The Work Item then might be: Investigate leak under Laundry Sink) RHS – Right hand side of the screen LHS – Left hand side of the screen 3 PART 1.0 The Admin Site - Getting Started So as to immediately start using JobStream it will be necessary to first launch the Admin Site 1 2 On the Main Menu Page touch Launch Admin Site Touch the Options button or Launch Admin Site , and the following screen appears: 3 In the Authentication Required Box enter the User Name and Password, and then touch Log In. The following screen then appears. You are now in the Admin Site where you can start building the Data Bases for the system very quickly and with relative ease! 1st Tool Bar 2nd Tool Bar 4 PART 1.1 Selecting a User for a Device Once the Admin Screen has been accessed, the iPad that’s being used will need to be identified for the System, so a User needs to be nominated to use this Device Each time this device logs onto JobStream, the system will recognise the device as the USER. Therefore each different iPad will identified by a different USER 1 2 3 On the second tool bar of the Admin Screen touch Device, the following screen will appear Now touch the blue box marked ‘Select User for this Device’, and from the drop down list that appears, select the User who will be using this device Touch Save at the bottom RHS of the screen In the above example, the User for the Device is Keiran Laurent, and each time this iPad logs on to JobStream, it recognises Keiran Laurent Once a User has been Selected for the device, commencement of building the various data bases can begin 5 PART 1.2 Adding a User Users quite simply, are the people who will be using JobStream in their daily routine. They will generally be accessing the System with an iPad 1. Touch Users on the Second Tool Bar, then touch Add To add a User touch Add, and this screen appears. Enter the Users Name (e.g. Bob) Then Full Name (e.g. Bob Short) Then touch Save 2. Now continue entering all Users by repeating the process, remembering to touch Save after each entry 3. Once all users have been entered into this data base, they can now be nominated as Device Users, for their individual iPad or computer Important Note: A User can be selected for more than one Device. For Example: Bob Green may be go using an iPad in the field, but also use his office computer when back at base. In this example Bob can be selected as the User on his iPad, and also his office computer But only one User can be selected for each device You have now started building your Data Base 6 PART 1.3 Adding a New Customer to the Data Base To add a New Customer the user needs to be on the Jobs List page. So on the Admin Page simply touch Jobs List. (This can also be done from the Main Menu Page) 1. 2. 3. 4. 5. On the Jobs List Page, touch the Add Button, bottom RHS of page The Add New Job page appears. Touch the Search button beside the Customer field The Searching for Existing Customer page appears. Touch the Add button once again The New Job: Add New Customer Page appears Touch Customer Type (BLUE BOX)and from the drop down menu select Company or Individual 6. Now simply fill in all required fields using the screen keyboard, and ensuring the email address is accurate. (This will enable the emailing of an invoice later as soon as the job is completed) New Job: Add New Customer page Continue to add Customers following the above process; remember to touch Save after each Customer entry 7 PART 1.4 Type of Job JobStream allows the User to differentiate between Jobs to be scheduled. On the Jobs List Page on the second tool bar, the third button from the LHS of page is titled All Types, by touching this button the following page appears: This Feature of JobStream allows the User to classify the type of Job when scheduling Jobs. The titles are self-explanatory. The Type classification will be used when adding or scheduling a Job into the system PART 1.5 Status of the Job By touching the Any Status button the following drop down menu appears: Likewise the status of the Job is important. When viewing a list of Jobs, this feature allows the User to View ALL jobs, or just Jobs that meet the criteria of the drop down menu. This feature allows the user to follow-up quotes, to see why a job is not yet completed, etc. Again the Status titles are self-explanatory, and this feature helps when classifying jobs and maybe setting priority levels etc. 8 Part 2.0 Viewing the Calendar This section jumps little ahead, but provides some idea of what JobStream offers in way of a visual tool once Jobs have been scheduled. The Calendar in the JobStream –Total Workflow Solutions package is in itself a powerful visual aid that gives the user an instant snapshot of scheduled jobs for all users including location, Job Number and times scheduled. At any time the user may view today’s scheduled jobs, and at any date in the future or any Job that has been completed in the past. By touching the Calendar button (top RHS of screen) all jobs scheduled for all users will be displayed on today’s calendar. Each job will be represented by a solid block of blanked out time. Within this block is displayed the System generated Job Number and the Suburb location of the job. The next two working days of the week may be accessed to view the schedule simply by touching one of the other two dates displayed. By touching a “block” of time on the Calendar, the Customers Home Page details of that particular Scheduled Job are displayed again and allows viewing of the Job Details with the Function Buttons as in Part 1.3 Fig. 4 The Calendar Displaying Scheduled Jobs All time “blocks” on the Calendar in the above example are coloured charcoal. This colouring informs the viewer that the jobs displayed are scheduled, but not yet completed 9 Part 2.1 Viewing the Calendar – Jobs Completed The Calendar below (Fig. 5) shows Jobs displayed in Red A Job displaying in Red indicates that ALL aspects of the Job have been completed, and an Invoice generated by the System Time ‘Blocks’ appearing in Red indicate all aspects of the job have been completed and, and an Invoice has been generated Fig. 5 Screen Displaying Completed Jobs 10 Part 2.2 Viewing the Calendar - Post or Predate The Calendar can be viewed for the purpose of checking past Job Schedules or future dates for arranging schedules. This is done by simply touching the Calculator logo in displayed date field. Simply scroll forward by Month and then select the day by date, or scroll backwards by month by and also selecting the day by date (Fig. 6) The (-) button allows the user to scroll backwards through previous months and years to view jobs history The (+) button allows the user to scroll forwards to schedule jobs in advance, and also to check user availibility Fig. 6 Calendar - Showing the Date Calculator 11 PART 3.0 Adding a New Job to the Calendar Important Note: To add a new Job to the Calendar, the Customer will need to have been created in the customer data base, and the User doing the Job, will need to have been selected as the User of a Device Scheduling/Adding a New Job to the Calendar. 1. Touch Calendar button (top RHS of screen) to open and select the desired date (todays date will be currently on display) 2. From the bottom of the Calendar page touch Add 3. On the Add New Job Page touch Search 4. On the Search Existing Customer page touch Search. A list of Customers will be displayed touch Select (LHS of page) adjacent to the desired Customer on the customer list. The customer will now be displayed on the Add New Job Page a) Select the type of job from the Type: field popup menu b) Select a user for the Assigned To field popup menu c) Add comments to the Comments field if required d) NOW touch the Save button 12 Following these steps, at the top of the displayed page a Job Number has now been created along with the Customer’s Name and the name of the User assigned to the job. From the second tool bar on this page touch the Schedule button, then: 1. Reconfirm the user in the Assigned To: field popup menu, and this point ensure that the Schedule Date is correct by setting with system Date Calculator 2. Touch the Add button 3. Reconfirm the user in the Assigned to field by touching Select Comments can be added in the Comments Field if required required Touch Set Time once Start and Finish Time has been set 4. Set Start Time and End Time by touching the calculator buttons and selecting the desired times. Touch Set Time on both calculators 5. Comments can be added in the Comments field if required 6. Touch Save The Job will now appear in list view displaying the scheduled date, start and end times. Touching the Calendar button returns to the Calendar, the job now appears as a ‘Block of Time’ coinciding with the scheduled time settings in the nominated user’s column. 13 This job can now be accessed at any time from the Calendar simply by touching the “block of time” on the Calendar Important Notes: It is necessary that when creating a new Job, in the User must be continually re-confirmed, because it is possible to ‘invite’ other users to join a job at any time. The Comments Field The Comments field should not be underestimated as a useful tool when using JobStream. The comments entered into this field are referred to by the Users when a Job order has been scheduled prepared by someone else. Also when viewing historical jobs (jobs completed previously) the comments can be used to refresh memory in the event of a customer inquiry etc. 14 PART 3.1 Viewing Details of Jobs Scheduled for individual Users 1. Touch All Users and select a single User from the drop down menu, then touch Search 2. All jobs now displayed for the week, are now only for the selected user (See Fig. 2). All aspects of the job can be now viewed by navigating through the job with the use of the Function Buttons displayed on the second tool bar (see part 1.2) Touch the Exclude Date button to view all Jobs of ANY date for a selected Customer Fig. 2 Job List Displayed for individual User for the same period PART 3.2 Viewing Jobs Scheduled for individual Customers 1. Touch Customer and select a customer from the drop down menu, then touch Search 2. All jobs now displayed are now only those that have been scheduled for the selected customer 3. Generally the date of the job would need to be known when jobs for selecting specific customers. However, to view ALL jobs that have been carried out for a particular client, select the Customer from the drop down menu, then touch the Exclude Date button on the top RHS of the Jobs List Screen. Then touch Search. Now all jobs ever undertaken, or jobs completed for a particular. 4. This feature is handy to quickly view a jobs history for a client at a single glance. Jobs undertaken for a Real Estate Agent for example where multiple addresses might be the case. 15 PART 4.0 Adding Materials to the Data Base In the Admin Screen Materials can be added to the data base. 1. On the second tool bar of the Admin Screen touch Materials 2. At the bottom RHS of the Material List screen touch Add The following Screen will appear: Ensure the Cost field reflects the Material SELLING price 3. In the Material Code field type in the code for the material item. The code may be a Supplier Code from an invoice, or the Users own internal coding system 4. Next, touch Item Service Char… , and from the drop down menu select the relevant Item Service Charge 5. Next, in the Description field, type a brief description of the Material Item 6. Next, in the Cost field, enter the SELLING cost of the Material item 7. The Active button is an advanced feature of JobStream where a Material item may be nominated either Active or Inactive, for usage purposes. When entering new materials to the data base for the first time, ensure Active is selected 8. Now touch Save Repeat this process for all items to entered into the data base 16 PART 4.1 Adding Materials to the Job - from a Supplier Invoice The flexibility of JobStream allows Materials to be added to the data base at any time. One advantage of JobStream is that Materials can be added to the data base directly from a suppliers invoice On occasions a User may purchase material/s specifically for a client job, that supplier invoice can be used to add the materials as the User is building the Invoice. When viewing the Job details page: 1. 2. 3. 4. Touch Materials on the second tool bar Then touch Add Supplier Invoice bottom RHS of screen The following screen appears and allows the user to enter the Supplier Invoice Number Enter cost of material in the Cust Amt-Ex GST field. IMPORTANT: the material cost must reflect the cost to the Customer 5. Finally, indicate the number of items by changing the Quantity field 6. Then touch Save IMPORTANT Customer Cost Ensure the quantity is correct before touching Save 17 PART 4.2 Category – Materials, (an Advanced Feature) Why Set up Categories? Materials, Tasks and Work Items can be designated a Category code. Example 2- Doors Hang Door Decorative Front Door Hardy’s Colonial Entrance Door PLUMBER Assume the Category is: The Task might be: The Work Item might be: The Materials might be: Cisterns Repair Cistern in Main Bathroom Repair leaking inlet Fluid Master Side Inlet Valve Category CISTERNS Example 1 - BUILDER Assume the Category is: The Task might be: The Work Item might be: The Materials might be: Category DOORS The following examples illustrate the why a Category for Materials, Tasks and Work Items might be helpful when establishing your data base, so that the System links the Task, Work Item and Materials with a common Category Code. So, searching for a Task, Work Item or Materials is much easier when the aforementioned headings have been linked to a Category, as the user does not have to search the ENTIRE database for materials. For example: When the builder searches for the actual door in his Materials database under the Category – DOORS, there might only be six or seven doors in his list. So searching for the door and adding it to the Job, is quick and simple! The same applies as he searches for his Task, Work Item and Materials under the DOORS Category Setting up Categories is not an essential requirement of establishing the data base. However in the event that a Materials data base might become very large over a period of time, an early decision to employ a Category classification system for Materials, Tasks and Work Items may assist Users at a later date. (JobStream Help will be pleased to assist with this feature) 18 PART 5.0 Function Buttons – Detailed Description The second tool bar displays the following buttons on the Jobs Details page Schedule – Touching the Schedule button opens the screen displaying the user/s who’ve been assigned to the JOB Task – Touching the Task button opens the Task screen where tasks relevant to the job can be selected from the drop down menu accessed by touching the All Category field and making a selection from the list Attachment – Touching the Attachment button opens the screen displaying any attachments pertinent to the individual job such as: site plans; dial before you dig plans; official Customer Job Order etc. These attachments are added by the System Administrator. An attachment can be opened simply by touching the desired Attachment Work Items – Touching the Work Items button opens the screen displaying a further, more detailed description of actual tasks carried out on the job. Again, by touching the All Category button on this page will display a list of Work Items which may be selected Materials –Touching the Materials button opens the screen displaying materials used on a job. This screen also displays the material Item Code, the Material Item Description and the price of the item. This screen also allows the user to select such items as Service Call Charges, After Hours Surcharge, and the ability to select materials form a hard copy of a Suppliers Invoice. (These buttons are located at the bottom of the Materials page) Time – Touching the Time button allows the commencement of the automatic time keeping feature by touching the Start Time Tracking button, immediately the user arrives at the job. Time keeping will stop by touching the Stop Time Tracking button. This is usually done when all work and data entries have been completed, and the job is considered finished. Invoice – Touching the Invoice button will display a copy of the Invoice that has been generated by the System, reflecting all chargeable Time and Materials consumed by the Jobe Tasks – touching the Tasks button allows entry for a description of the task to be undertaken Work Items – touching the Work Items (may best be described as a subset of the Tasks button) allows a more specific detail of the Job to be entered(e.g. a specific task at a specific location on the job) GL List – touching the GL List button allows Job Codes to be added to differentiate between Job Types Procedures – touching the Procedures button allows to upload a Procedure for later attachment to any Job Users – touching the Users button allows the adding of Users (employees using the various iPads) to the System. Reports – touching the Reports button opens Device – touching the Device button allows pairing of a device (iPad or computer) to the System 19 PART 5.1 Function Buttons – on the Customer Home page View this Jobs Details System generated Job Number Your User Name Allows you to return the Calendar and view at any time View the Invoice generated for this job See who else other than you is scheduled for the Job View attachments such as SWMS, OHS Docs. Plans etc. for the Job See the Job Tasks undertaken on the Job Work Items and Materials used on the Job Start Time Tracking An Admin Function Button Return at any time to view the Job List Make full use of the comments box with a brief detail of the Job Requirements 20