1
MantissaCorporation
Operations Productivity System™
OPS/Master®System Reference Manual
Version 5.20.1
Mantissa ASO™
Automated Systems Operation
OPS/MASTER®
OPS/MASTER®
Notice
The software described in this document is proprietary to Mantissa Corporation, and furnished under a license
agreement. The software may be used or copied only in accordance with the terms and conditions of that agreement.
Copying or usage other than as provided for in the agreement is unauthorized and unlawful.
This document is subject to change without notice.
Trademarks
OPS and Operations Productivity System are trademarks of Mantissa Corporation. Other product name
references are trademarks of their respective holders.
Copyrights 1989 - 2013
E:\Manuals\Product Manuals\ASO\OM (OPS Master)\Reference Guide\Current Release\OPS_CVR1.fm
Publication Information
Publication Name:
Publication Number
Release:
OPS/Master® System Reference Guide,
OPS002-JMIN
5.20.1
Print date:
November 24, 2013
Mantissa Corporation © 2013
Page - 2
OPS/MASTER®
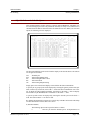
TABLE OF CONTENTS
Preface
Overview of Documentation
19
Volume I ..........................................................................................................................................19
JOB/Master® Reference ...................................................................................................19
User Tutorials ...................................................................................................................19
Volume II ........................................................................................................................................19
CONSOLE/Master® Reference ........................................................................................19
RUN/Master® Reference ..................................................................................................20
System Administration .....................................................................................................20
Installation Guide ..............................................................................................................20
Messages and Codes .........................................................................................................20
JOB/Master®
Chapter 1
E:\Manuals\Product Manuals\ASO\OM (OPS Master)\Reference Guide\Current Release\OM_05v20TOC.fm
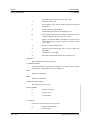
Introduction to JOB/Master®
23
JOB/Master® Features ....................................................................................................................23
Machine and Software Environment ................................................................................23
JOB/Master® Operational Features ..................................................................................24
JOB/Master® Scheduling Features ...................................................................................25
JOB/Master® Job Control Features ..................................................................................26
JOB/Master® Benefits ....................................................................................................................27
Job Schedule Confirmation .............................................................................................................27
Library Management Facility ..........................................................................................................28
Dynamic Job Submission ................................................................................................................28
Dynamic Job Release ......................................................................................................................28
Dynamic Repair ...............................................................................................................................28
MODEL / COUNT OF TAPES: .....................................................................................................29
Remote Job Tracking Support .........................................................................................................29
Automatic Logging of Data Base Updates ......................................................................................29
Job Triggering .................................................................................................................................29
Job Triggering Concepts ...................................................................................................30
Mantissa Corporation © 2013
Page - 17
OPS/MASTER®
Controlling Execution Through JCL ................................................................................30
Steplevel Dependencies ....................................................................................................31
Dependency Based on Multiple Jobs ................................................................................31
Externally Submitted Jobs ...............................................................................................................32
Dataset Contention Resolution ........................................................................................................33
Activating the Dataset Contention Monitor ....................................................................................33
Scheduling Flow ..............................................................................................................................34
Selection ............................................................................................................................35
Scheduling Event Analysis/Reporting ..............................................................................35
Submit, Tracking, Event Recording .................................................................................35
Security Function ............................................................................................................................35
Signing On .......................................................................................................................................36
JOB/Master® Primary Menu ..........................................................................................................38
Logging Into JOB/Master® For The First Time .............................................................................39
Interactive Help ...............................................................................................................................40
Screen Navigation .............................................................................................................40
Chapter 2
41
Introduction .....................................................................................................................................41
Job Level and Step Level Concepts ................................................................................................42
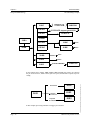
Design and Methodology ................................................................................................................42
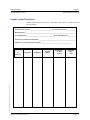
Sample System Worksheets ............................................................................................................45
Interactive Data Base Creation ........................................................................................................47
Identifying Jobs Under JOB/Master® Control ...............................................................................47
Run Mode Option ............................................................................................................................51
Select Mode On The List Queue .....................................................................................................52
Adding Systems and Jobs ................................................................................................................53
Job Dependencies ............................................................................................................................54
Alternate Job Definition ..................................................................................................................54
Validating Systems ..........................................................................................................................55
LOOPDRV ......................................................................................................................................55
LOOPDRV Examples .......................................................................................................56
How and When To Use LOOPDRV .................................................................................56
Procedure ..........................................................................................................................56
Schedule Events from Outside JOB/Master® .................................................................................57
Chapter 3
Job Database Creation
59
Before You Begin ............................................................................................................................59
Job Fail and Condition Code Testing ..............................................................................................60
Command Scheduling .....................................................................................................................61
Job Definition Screens ....................................................................................................................61
Data Base Index ..............................................................................................................................63
Job Definition Screen 1 ...................................................................................................................64
MODEL / COUNT OF TAPES: .....................................................................................................68
Page - 18
Mantissa Corporation © 2013
E:\Manuals\Product Manuals\ASO\OM (OPS Master)\Reference Guide\Current Release\OM_05v20TOC.fm
Job Scheduling Concepts
OPS/MASTER®
Trigger and Condition Code Information ................................................................................71
Job Definition Screen 2 ...................................................................................................................72
Job Definition Screen 3 ...................................................................................................................73
Job Definition Screen 4 ...................................................................................................................77
Job Definition Screen 5 ...................................................................................................................79
Job Step Definition Screen ..............................................................................................................81
Trigger and Condition Code Information ................................................................................83
Calendar Definition Screen .............................................................................................................84
Calendar Display/Update ................................................................................................................87
Year End Calendar Propogation ......................................................................................................89
Overview ...........................................................................................................................89
Relative Calendars ............................................................................................................89
Actual Calendars ...............................................................................................................89
Data Base Definition Name Change .................................................................................90
Calendar Change Timing ..................................................................................................90
What You Need To Do: ....................................................................................................90
Process Keyword Definition Screen ...............................................................................................91
Process Keyword Table ...................................................................................................................93
Negative Co-Requisite Dependency Screen ...................................................................................96
Message Group ................................................................................................................................98
System Definition ..........................................................................................................................100
Manual Task Message Definition .................................................................................................104
Chapter 4
E:\Manuals\Product Manuals\ASO\OM (OPS Master)\Reference Guide\Current Release\OM_05v20TOC.fm
Dataset Dependency
107
Overview .......................................................................................................................................107
Dataset Definition Panel ................................................................................................................108
Defining Dataset Triggers ...............................................................................................108
Definition Data ...............................................................................................................110
Process Trigger Definitions ............................................................................................110
Verifying Data ................................................................................................................111
Trigger Definitions .........................................................................................................112
Testing the Datasets ........................................................................................................112
Technical Considerations ..............................................................................................................112
DSN Index Table Display Panel ...................................................................................................113
Chapter 5
Generating a Schedule
115
Scheduling Criteria ........................................................................................................................115
Schedule Generation Parameters ...................................................................................................116
Relationship of Calendars to Process Keywords ...........................................................................117
Batch Mode ...................................................................................................................................117
Include/Exclude Jobs ......................................................................................................119
Online Mode ..................................................................................................................................120
Scheduling Jobs .............................................................................................................................120
Scheduling Individual Jobs or Systems .........................................................................................120
Mantissa Corporation © 2013
Page - 19
OPS/MASTER®
Automatic Schedule Creation ........................................................................................................121
AD HOC - Dynamically Added Jobs ............................................................................................121
Job Schedule Confirmation ...........................................................................................................121
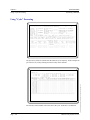
Using "Cycle" Processing .............................................................................................................122
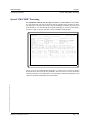
Special “JMSCHED” Processing ..................................................................................................123
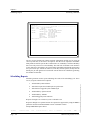
Scheduling Reports .......................................................................................................................124
Chapter 6
Job Submission
131
Submit Facility ..............................................................................................................................131
Starting and Stopping the Submit Facility ......................................................................131
External Submits ...........................................................................................................................132
Library Management Facility ........................................................................................................132
USER Submit PDS .........................................................................................................133
Submit PDS .....................................................................................................................133
STAGING PDS ...............................................................................................................133
Placing Members Into The STAGING PDS ...................................................................133
Dynamically Added Jobs ................................................................................................136
Browsing the JMSTGPDS ..............................................................................................137
Submit Member ..............................................................................................................138
Force Submiting a Job ...................................................................................................................139
User Submit Exit ...........................................................................................................................139
Resource Routing ..........................................................................................................................139
Dynamic Job Submission ..............................................................................................................140
Dynamic Repair .............................................................................................................................140
Chapter 7
141
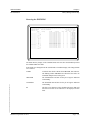
Introduction ...................................................................................................................................141
Job Tracking Screens ......................................................................................................141
Job Run Documentation ..................................................................................................141
Job Statistics ...................................................................................................................142
Operations Reports .........................................................................................................142
On-line Job Tracking Facilities .......................................................................................142
Entering JOB/Master® ..................................................................................................................143
Chapter 8
Symbolic Substitution
201
Introduction ...................................................................................................................................201
Symbolic Substitution Flow ..........................................................................................................201
Symbolic Substitution Menu .........................................................................................................204
Selecting Symbolic Substitution .....................................................................................204
Option 1 - Resolve ..........................................................................................................206
Option 2 - Reset ..............................................................................................................208
Page - 20
Mantissa Corporation © 2013
E:\Manuals\Product Manuals\ASO\OM (OPS Master)\Reference Guide\Current Release\OM_05v20TOC.fm
Job Tracking
OPS/MASTER®
Option 3 - Display ...........................................................................................................209
Option 4 - Recovery ........................................................................................................210
Option 5 - Library ...........................................................................................................212
Option O - OPINS ...........................................................................................................213
Option E - E / OPINS .....................................................................................................214
Option J - JCL SCAN .....................................................................................................215
Option X - Exit ...............................................................................................................216
Utilizing Substitution ....................................................................................................................216
JCL or Data Replacement ...............................................................................................216
JCL Setup Flag ................................................................................................................218
Default Control Records .................................................................................................219
Global Substitution Variables .........................................................................................220
Symbol Name Specification ...........................................................................................221
Overflow of Card Images ...............................................................................................221
User ISPF Panels ............................................................................................................223
ISPF File Tailoring .........................................................................................................224
Automatic Variable Substitution (AVS) .......................................................................................225
Batch Substitution Processing ........................................................................................225
AVS Audit Log ...............................................................................................................226
JCL Override/Date Substitution ....................................................................................................227
Substitution Control ........................................................................................................227
Optional Parameters ........................................................................................................227
Substitution Error Processing .........................................................................................230
Chapter 9
Profile
231
PROFILE Option ...........................................................................................................................231
Setting PFKS and Job Card JCL Parameters ................................................................................232
Display Global Option Settings .....................................................................................................233
Update Global Option Settings .....................................................................................................233
E:\Manuals\Product Manuals\ASO\OM (OPS Master)\Reference Guide\Current Release\OM_05v20TOC.fm
Chapter 10
Data Base Detail Reports
239
Introduction ...................................................................................................................................239
Definitions .....................................................................................................................................242
Job/Step Definitions (10) ................................................................................................242
Calendar Definitions (11) ...............................................................................................243
Process Keyword Definitions (12) ..................................................................................243
Negative/Corequisite Dependencies (13) .......................................................................243
Message Definitions (14) ................................................................................................243
Group Definitions (15) ....................................................................................................243
Data Base XREF Reports ..............................................................................................................244
Calendar to Job/Process Keyword (20) ..........................................................................244
Process Keyword to Job (21) ..........................................................................................244
Negative/Corequisite Dependencies to Job (22) .............................................................244
Message to Job/System (23) ...........................................................................................245
Mantissa Corporation © 2013
Page - 21
OPS/MASTER®
Groups to Job/System (24) .............................................................................................245
Job Flow (25) ..................................................................................................................245
History Recap Reports ..................................................................................................................246
Job Run/Audit Trail (30) .................................................................................................246
Data Base Reporting by Selection .................................................................................................247
Making the Database Selection ......................................................................................247
Setting options ................................................................................................................249
Sample Job Definition Report .........................................................................................250
Job Definition Fields ......................................................................................................250
Sample Dataset Definition Report ..................................................................................254
Dataset Definition Fields ................................................................................................254
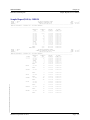
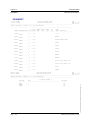
Sample Reports .............................................................................................................................256
Sample Report(10): JM2020 .........................................................................................................257
Sample Report(11): JM3010 .........................................................................................................258
Sample Report(12): JM3020 .........................................................................................................259
Sample Report(13): JM3030 .........................................................................................................260
Sample Report(14): JM3040 .........................................................................................................261
Sample Report(15): JM3050 .........................................................................................................262
Sample Report(20): JM4010 .........................................................................................................263
Sample Report(21): JM4020 .........................................................................................................264
Sample Report(22): JM4030 .........................................................................................................265
Sample Report(23): JM4040 .........................................................................................................266
Sample Report(24): JM4050 .........................................................................................................267
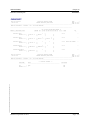
Sample Report(25): Job Flow (Part 1) ..........................................................................................268
Sample Report(25): Job Flow (Part 2) ..........................................................................................268
Sample Report(30): JM5010 .........................................................................................................270
Sample Report(30-1): JM5020 ......................................................................................................271
Sample Report(30-2): JM5020F ....................................................................................................272
Sample Report(30-3): JM5020S ....................................................................................................273
Sample Report(30-4): JM5020R ...................................................................................................274
Sample Report(30-5/6): JM5030 ...................................................................................................275
JMJOBRPT ...............................................................................................................................276
JMDSNRPT ..................................................................................................................................277
Batch Functions
279
Batch Programs .............................................................................................................................279
Introduction .....................................................................................................................279
JMBACKUP ..................................................................................................................................280
JMSHUT .......................................................................................................................................280
JMSSCPSC ....................................................................................................................................281
JMTRACE .....................................................................................................................................281
JMSTATUS ...................................................................................................................................282
JMBPOST .....................................................................................................................................282
JMPURGE .....................................................................................................................................283
JMRESORC ..................................................................................................................................284
JMRESTOR ..................................................................................................................................285
JMCLEAN ....................................................................................................................................285
JMDBCOPY ..................................................................................................................................286
Page - 22
Mantissa Corporation © 2013
E:\Manuals\Product Manuals\ASO\OM (OPS Master)\Reference Guide\Current Release\OM_05v20TOC.fm
Chapter 11
OPS/MASTER®
Chapter 12
Tutorial
287
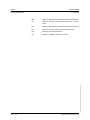
Introduction ...................................................................................................................................287
Sample Company Work Days and Holidays ..................................................................287
Creating a Sample Inventory Job Schedule ...................................................................................288
Schedule Requirements ...................................................................................................288
Creating the Job Definition For INVNTRL1 ..................................................................289
Creating the Workday Calendar .....................................................................................295
Viewing/Updating the Workday Calendar .....................................................................297
Creating The HOLIDAY Calendar .................................................................................298
Creating the Job Definition for INVNTRY2 ..................................................................299
Creating the LASTWKD Keyword Definition ...............................................................302
Creating the Job Definition for INVNTRY3 ..................................................................303
Defining a Sample Sales Job Schedule .........................................................................................306
Schedule Requirements ...................................................................................................306
Calendar Requirements ...................................................................................................306
Creating the System Definition for SALES ....................................................................306
Creating the SALESMSG Message Definition ..............................................................310
Creating the SALESGRP Group Message Def. ..............................................................312
Creating the Job Definition for REGSALES ..................................................................314
Creating the MON-SAT Calendar ..................................................................................315
Creating the Job Definition for TOTSALES ..................................................................317
Defining A Sample Commissions Job Schedule ...........................................................................319
Schedule Requirements ...................................................................................................319
Calendar Requirements ...................................................................................................319
Creating the Job Definition for COMM1 .......................................................................319
Defining the Process Keyword 1AND16 ........................................................................321
Creating the Job Definition for TOTCOMM ..................................................................322
Running a Job Schedule Simulation ..............................................................................................323
Monitoring the Queue ...................................................................................................................325
Posting Manual Task Complete ....................................................................................................327
E:\Manuals\Product Manuals\ASO\OM (OPS Master)\Reference Guide\Current Release\OM_05v20TOC.fm
Preface
Overview of Documentation
329
Volume I ........................................................................................................................................329
JOB/Master® Reference .................................................................................................329
User Tutorials .................................................................................................................329
Volume II ......................................................................................................................................329
CONSOLE/Master® Reference ......................................................................................329
RUN/Master® Reference ................................................................................................329
System Administration ...................................................................................................330
Implementation Checklist ...............................................................................................330
Installation Guide ............................................................................................................330
Messages and Codes .......................................................................................................330
Mantissa Corporation © 2013
Page - 23
OPS/MASTER®
CONSOLE/Master®
Chapter 13
Introduction to CONSOLE/Master®
333
Overview .......................................................................................................................................333
Benefits ..........................................................................................................................................334
CONSOLE/Master® Components ................................................................................................335
Starting the Control Region ...........................................................................................................335
Stopping the Control Region .........................................................................................................335
Starting CONSOLE/Master® On-line Sessions ...........................................................................336
Chapter 14
Automated Operator
339
Overview .......................................................................................................................................339
Automated Operator Components ..................................................................................339
Automated Operator Data Base Session .......................................................................................340
Menu Options .................................................................................................................340
Console Message Table ..................................................................................................341
Functional Fields .............................................................................................................341
ADD - Console Message Definition .............................................................................................343
Multi-line Messages ......................................................................................................................348
Persistent Store Processing ............................................................................................................349
Extended Console Message Definition .........................................................................................350
UPDATE / BROWSE Console Message Definition .....................................................................352
DELETE Request ..........................................................................................................................352
Chapter 15
353
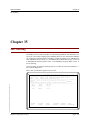
Overview .......................................................................................................................................353
Invoking the MVS Console ...........................................................................................................354
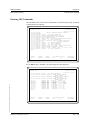
Entering JES Commands ...............................................................................................................355
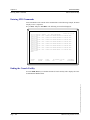
Entering MVS Commands ............................................................................................................356
Ending the Console Facility ..........................................................................................................356
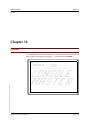
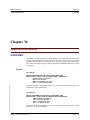
Chapter 16
Profiles
357
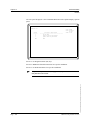
Profile Function Keys ....................................................................................................................359
Profile Parameters .........................................................................................................................360
Page - 24
Mantissa Corporation © 2013
E:\Manuals\Product Manuals\ASO\OM (OPS Master)\Reference Guide\Current Release\OM_05v20TOC.fm
MVS Console Facility
OPS/MASTER®
Chapter 17
Report Facility
361
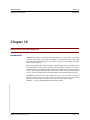
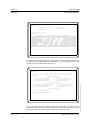
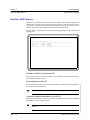
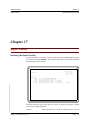
Initiating the Report Facility .........................................................................................................361
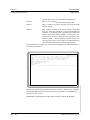
Sample Report ...............................................................................................................................363
Chapter 18
Technical Specifications
367
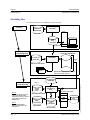
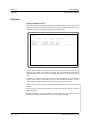
Architecture ...................................................................................................................................367
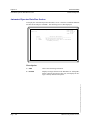
Machine and Software Environment .............................................................................................368
Chapter 19
File Backup and Recovery
369
Backing Up Files ...........................................................................................................................369
Restoring Files ...............................................................................................................................369
Chapter 20
Advanced Functions
371
Fast Path Message Processing .......................................................................................................371
REFRESH Function ......................................................................................................................371
JOB/Master® Interface .................................................................................................................372
Initial Command Stream Processing .............................................................................................372
Global Status Change And Display ...............................................................................................372
E:\Manuals\Product Manuals\ASO\OM (OPS Master)\Reference Guide\Current Release\OM_05v20TOC.fm
RUN/Master®
Chapter 21
Introduction to RUN/Master®
377
Overview .......................................................................................................................................377
Features ...........................................................................................................................377
Benefits ...........................................................................................................................378
Components ...................................................................................................................................378
Job Indicator Flag ..........................................................................................................................378
Starting the Control Region ...........................................................................................................379
Stopping the Control Region .........................................................................................................379
Starting On-Line Sessions .............................................................................................................379
Mantissa Corporation © 2013
Page - 25
OPS/MASTER®
Chapter 22
On-line Assist Functions
381
Starting the On-line Assist Functions ............................................................................................381
Table of Restart Jobnames ............................................................................................................384
Table of Stepnames .......................................................................................................................385
Online Assist JCL Processing .......................................................................................................387
Table of Replacement JCL .............................................................................................387
Table of Restart Actions .................................................................................................388
Table of Original JCL .....................................................................................................389
Table of Actions - Postconfirmation .............................................................................................390
Submit JCL Screen ........................................................................................................................391
Ending the On-line Assist Functions .............................................................................................391
RUN/Master® Audit Trail ............................................................................................................392
Chapter 23
Profiles
393
Profile Function Keys ....................................................................................................................395
Profile Parameters .........................................................................................................................396
Update Rerun Reason Codes .........................................................................................................397
Chapter 24
Report Facility
399
Initiating the Report Facility .........................................................................................................399
Chapter 25
401
Architecture ...................................................................................................................................401
Machine and Software Environment .............................................................................................401
Chapter 26
File Backup and Recovery
403
Backing Up Files ...........................................................................................................................403
Restoring Files ...............................................................................................................................403
Page - 26
Mantissa Corporation © 2013
E:\Manuals\Product Manuals\ASO\OM (OPS Master)\Reference Guide\Current Release\OM_05v20TOC.fm
Technical Specifications
OPS/MASTER®
SECURITY ADMINISTRATION
Chapter 27
Interactive Security Facility (ISF)
407
Introduction ...................................................................................................................................407
Benefits ...........................................................................................................................407
Data Base Components ...................................................................................................408
Global Security Attributes ..............................................................................................408
Accessing ISF ................................................................................................................................409
JOB/Master® Security ....................................................................................................412
Symbolic Substitution Security ......................................................................................415
RUN/Master® Security ..................................................................................................416
CONSOLE/Master® Security ........................................................................................418
Chapter 28
Interactive Help
421
INSTALLATION
Chapter 29
E:\Manuals\Product Manuals\ASO\OM (OPS Master)\Reference Guide\Current Release\OM_05v20TOC.fm
OPS/Master Installation
425
Introduction ...................................................................................................................................425
STEP 1: Preliminary Setup ...........................................................................................................425
OPS/Master Installation ................................................................................................................430
Overview ................................................................................................................................430
STEP 2: Product Installation .........................................................................................................431
JMVINIT ................................................................................................................................433
Considerations for JMVINIT: ................................................................................................433
JOB/Master® .........................................................................................................................436
RUN/Master® ........................................................................................................................437
CONSOLE/Master® ..............................................................................................................437
Chapter 30
JOB/Master® Advanced Functions
439
Operating Multiple Control Regions .............................................................................................439
Job Submit User Exit Facility .......................................................................................................440
Logon and Command Intercept Facility ........................................................................................442
Mantissa Corporation © 2013
Page - 27
OPS/MASTER®
Remote Job Tracking Support .......................................................................................................443
Overview .........................................................................................................................443
Installation ......................................................................................................................443
Startup Procedure ............................................................................................................445
Shutdown Procedures .....................................................................................................446
NJE support .....................................................................................................................447
JOB/Master® History File ............................................................................................................448
General Information ...............................................................................................................448
History File Calculation .........................................................................................................448
Increasing History File ...........................................................................................................449
QUICK START
Introduction to QuickStart
453
Chapter 31
455
OPS/MASTER ..............................................................................................................................455
OPS/Master Procedure Parameters ........................................................................................455
JOB/MASTR .................................................................................................................................455
JOB/MASTR Procedure Parameters ......................................................................................456
Cycle Processing .............................................................................................................457
JMSCHED .....................................................................................................................................457
Schedule Generation Parameters ...........................................................................................457
Batch Mode ............................................................................................................................458
Include/Exclude Parms ..................................................................................................................460
JCL date override in JMSCHED ............................................................................................461
JMBACKUP ..................................................................................................................................462
JMRESTOR ..................................................................................................................................462
JMJCLMB .....................................................................................................................................463
CONSMASTR ..............................................................................................................................466
CMBACKUP ................................................................................................................................466
CMRESTOR .................................................................................................................................466
RUNMASTR .................................................................................................................................466
RMBACKUP ................................................................................................................................467
RMRESTOR .................................................................................................................................467
Chapter 32
Set Profile
469
JOB/Master® Primary Menu ........................................................................................................469
JOB/Master® Profile Update/Display Functions ..........................................................................470
Page - 28
Mantissa Corporation © 2013
E:\Manuals\Product Manuals\ASO\OM (OPS Master)\Reference Guide\Current Release\OM_05v20TOC.fm
Procs
OPS/MASTER®
Global Profile ................................................................................................................................471
RUN/Master® Profile ...................................................................................................................474
CONSOLE/Master® Profile .........................................................................................................474
Chapter 33
Interactive Security Facility (ISF)
475
Setting up security .........................................................................................................................475
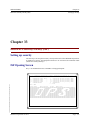
ISF Opening Screen ......................................................................................................................475
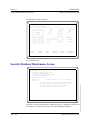
Security Database Maintenance Screen ........................................................................................476
JOB/Master® Security Panel #1 ...................................................................................................478
JOB/Master® Security Panel #2 ................................................................................................479
JCL /Substitution Security Screen .................................................................................................480
RUN/Master® Security Screen .....................................................................................................481
CONSOLE/Master® Security Screen ...........................................................................................482
Chapter 34
JOB/Master® Database set up
483
Creating WORKDYnn/HOLIDYnn ..............................................................................................483
Chapter 35
Job Tracking
487
Chapter 36
E:\Manuals\Product Manuals\ASO\OM (OPS Master)\Reference Guide\Current Release\OM_05v20TOC.fm
Additional Information
489
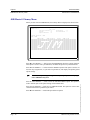
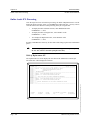
LOOPDRV ....................................................................................................................................489
Examples ................................................................................................................................489
Multiple Step LOOPDRV ......................................................................................................490
When to use LOOPDRV: .......................................................................................................490
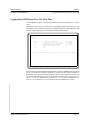
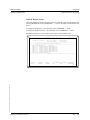
Run Mode Option ..........................................................................................................................490
PRODUCTION (P) ...............................................................................................................490
CHECK (C) ............................................................................................................................491
SELECT (S) ...........................................................................................................................491
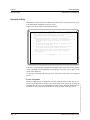
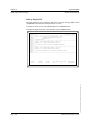
Select Mode On The List Queue ...................................................................................................492
Mantissa Corporation © 2013
Page - 29
OPS/MASTER®
MESSAGES & CODES
Chapter 37
JOB/Master® Region Messages
497
Chapter 38
JOB/Master® Online Messages
509
Chapter 39
JOB/Master® Remote Tracking Support Messages
521
Chapter 40
RUN/Master® Messages
525
Chapter 41
OPS/MASTER Messages
527
Chapter 42
535
Chapter 43
ISPF Short Messages
539
Chapter 44
Security Messages
541
APPENDICES
Page - 30
Mantissa Corporation © 2013
E:\Manuals\Product Manuals\ASO\OM (OPS Master)\Reference Guide\Current Release\OM_05v20TOC.fm
CONSOLE/Master® Messages
E:\Manuals\Product Manuals\ASO\OM (OPS Master)\Reference Guide\Current Release\OM_05v20TOC.fm
OPS/MASTER®
Appendix A
Glossary
Mantissa Corporation © 2013
545
INDEXED REFERENCES
Page - 31
E:\Manuals\Product Manuals\ASO\OM (OPS Master)\Reference Guide\Current Release\OM_05v20TOC.fm
OPS/MASTER®
Page - 32
Mantissa Corporation © 2013
OPS/MASTER®
Preface
Overview of Documentation
Preface
Overview of Documentation
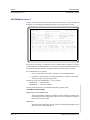
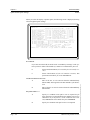
This manual provides complete system information for current users of JOB/Master®,
which is one of the Operations Productivity Systems offered by Mantissa Corporation.
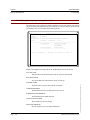
JOB/Master® is a completely interactive operations scheduling system. It allows scheduling personnel to automate the production process in an efficient way, through a series of
simple, self-prompting screens.
The intended audience of this manual is management, production control personnel, and
systems personnel (for installation verification).
The OPS/Master® Reference Guide contains the following sections:
JOB/Master® Reference
JOB/Master® is used to create all definitions required for schedule generation. This section contains illustrations of all JOB/Master® screens and detailed descriptions of the contents of these screens.
E:\Manuals\Product Manuals\ASO\OM (OPS Master)\Reference Guide\Current Release\OPS_P01.fm
User Tutorials
This section contains step-by-step instructions for creating several job definitions and
other important tasks performed by OPS/Master® users. These tutorials also include
detailed instructions for creating calendar and process keyword definitions.
CONSOLE/Master® Reference
This module simplifies MVS functions and automates console operations. It also illustrates all CONSOLE/Master® screens and provides detailed descriptions of all fields on
these screens.
RUN/Master® Reference
This module is a rerun management system that automates the restarting or rerunning of a
batch job. All screens involved in the restart process are described in this section.
Mantissa Corporation © 2013
Page - 17
Preface
OPS/MASTER®
Overview of Documentation
System Administration
This section of the reference guide contains information on setting up OPS/Master® security (for all modules), specifying global parameters, establishing user exits, and OPS/Master® system customization.
Installation Guide
This section provides all the necessary information for the successful installation of all
OPS/Master® modules. Instructions are also provided for verifying the successful installation of OPS/Master® modules.
Messages and Codes
E:\Manuals\Product Manuals\ASO\OM (OPS Master)\Reference Guide\Current Release\OPS_P01.fm
This section contains a list of all messages and codes in the OPS system.
Page - 18
Mantissa Corporation © 2013
JOB/Master®
Release 5.20.1
Mantissa Corporation®
1012 Edenton Street
Birmingham, Alabama 35242
OPS/MASTER®
OPS/Master® is a software product of Mantissa Corporation. All rights are reserved, and reproduction, use of, or distribution of this documentation is prohibited unless written consent is obtained from Mantissa Corporation. This document contains proprietary information and is intended for use only by licensees of OPS/Master® and those
evaluating its potential worth in their respective operating environment.
E:\Manuals\Product Manuals\ASO\OM (OPS Master)\Reference Guide\Current Release\SECT1cvr.fm
© Copywrite - Mantissa Corporation 1989-2013
Publication Information
Publication Name:
Publication Number
Release:
Mantissa Corporation © 2013
INSTALLATION
OPS002-JMIN
5.20.1
Page - 20
OPS/MASTER®
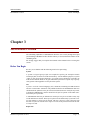
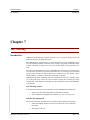
Chapter 1
Introduction to JOB/Master®
JOB/Master® Features
Chapter 1
Introduction to JOB/Master®
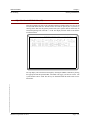
Operationally, it is impossible to remove all human control from job scheduling and have
an efficiently run operations department. JOB/Master® supplements the scheduling effort,
reduces the time it takes to train new staff members, and does not impose a scheduling
system that takes more time to understand and use than the actual scheduling process
itself.
Production control is the part of the data processing organization which is responsible for
the daily processing of business tasks. Administration and control of these tasks is vital to
the effectiveness of the organization. The Production Control Manager is responsible for
maximizing the workload of the organization and insuring the quality of the output.
A successful production control operation requires a system that provides standards for
the organization of workload, monitoring for quality control, documentation for audit control, and flexibility for change.
E:\Manuals\Product Manuals\ASO\OM (OPS Master)\Reference Guide\Current Release\OPS_C01.fm
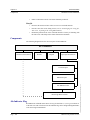
The process of completing the organization’s work involves the execution of jobs or jobstreams organized in a sequential manner. The management tool required to provide for
these standards is an automated scheduling system.
When the business task is scheduled, production control must know whether each job or
job step is dependent upon successful completion of a predecessor job or the end of a specific job step or series of job steps. The control of the task is defined at either the job level,
or the job step level.
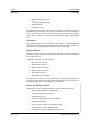
JOB/Master® Features
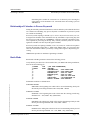
Machine and Software Environment
Mantissa Corporation © 2013
•
MVS release 3.8 through MVS/ESA, with time sharing option (TSO)
•
Access methods, BPAM, BSAM, QSAM and VSAM
•
IBM or IBM compatible display terminals (any terminal supported by ISPF can
be used by JOB/Master®)
•
The IBM utility IEBCOPY that is required for JOB/Master® installation
Page - 21
Chapter 1
OPS/MASTER®
JOB/Master® Features
Introduction to JOB/Master®
•
JES2/JES3 Support
•
No modification to operating system required
•
No modifications to JES required
•
No special SVC’s required
•
The processing of SMF record type 30
•
Uses dataspace for all buffers
•
Approximately 10 cylinders of 3380 space for installation
•
Approximately 50 cylinders of 3380 space for data files and production use
•
The JOB/Master® control region task must execute from an APF authorized
library and execute in a region size of 2048K
Page - 22
•
JOB/Master® is accessed through any TSO terminal
•
TSO/ISPF Editor
•
ISPF program product
•
On-line definition of jobs, job steps, and calendars
•
Control of job dependencies based on programmable or manual conditions
•
Step or job level condition code checking
•
Condition code scheduling at the step or job level
•
Control of predecessor and successor dependencies
•
Automatic or manual submit and release of jobs
•
Tracks and monitors jobs, real-time
•
Produces on-line and hard copy operations run documentation
•
Produces on-line and hard copy management statistics and reports
•
Performs modeling and simulation functions for testing and production
•
Multiple Virtual Storage (MVS) console facility
•
Signal completion of events from external sources, such as Customer Information Control System (CICS) or Batch
•
Message routing
•
On-line job run history data
•
Ability to dynamically route jobs based on user defined resources
•
On-request jobs with predecessor relationships can be added dynamically
•
Real-Time forecasting
•
No JCL changes required
•
Job workload can be shifted from one CPU to another
Mantissa Corporation © 2013
E:\Manuals\Product Manuals\ASO\OM (OPS Master)\Reference Guide\Current Release\OPS_C01.fm
JOB/Master® Operational Features
OPS/MASTER®
Chapter 1
Introduction to JOB/Master®
JOB/Master® Features
•
One schedule for multiple CPU’s
•
Submission of jobs via NJE and track movement of submitted jobs
•
User notification across CPU’s of job activity
•
Allows for workload balancing in multi-CPU environment
•
Automatic resolution for jobs waiting on datasets
E:\Manuals\Product Manuals\ASO\OM (OPS Master)\Reference Guide\Current Release\OPS_C01.fm
JOB/Master® Scheduling Features
Mantissa Corporation © 2013
•
On-line implementation of schedules
•
No JCL changes are required for schedule implementation
•
Existing PDS JCL libraries can be used
•
On-line tutorial and help facility for schedule implementation
•
Schedule definition is provided on user-friendly screens
•
Track and schedule batch jobs
•
Unlimited calendar support, with shared calendar option
•
Scheduling flexibility by providing schedule based on calendar date, day of
month and/or day of week
•
Time definition to provide that a job will not run if it has not started by it’s scheduled time
•
Schedule recurring events on the same day
•
Schedule jobs based on Data Set Functions
•
Schedule based on activity of CICS, IDMS, etc.
•
Schedule of jobs determined by jobs in JES reader queue
•
Manual events can be controlled by schedule
•
Schedule of Jobs on NJE sites running MVS
•
Unlimited number of predecessor and successor jobs
•
Schedule control of resource availability
•
Provides control of job file contention
•
Scheduling may be defined after midnight without having to define a 48 hour day
•
Provide for scheduling delays automatically without time restrictions
•
Signaling of JCL errors
•
Provides for non-scheduled jobs
•
Scheduling can be determined on basis of step level condition codes
•
Scheduled jobs can be based on completion of non-scheduled jobs
•
Schedule allows for intervention when system crash occurs
•
Jobs are prevented from automatic submission when a resource is unavailable
Page - 23
Chapter 1
OPS/MASTER®
JOB/Master® Features
Introduction to JOB/Master®
•
The schedule may be altered based on a job or step condition code
•
Simulation of current schedule
•
Simulation of future schedule
•
Simulation of effects of adding and deleting jobs from the schedule
Page - 24
•
Notification by USERID
•
Immediate notification to operator and user of job failure
•
Immediate notification to operator and user of job delay
•
Immediate notification to operator and user of manual tasks
•
Abend and restart procedures for job failure
•
Simulation schedule
•
Interface to ACF2, RACF security systems
•
Continues schedule when a restarted job completes successfully
•
Provides for restarting a job when initial job fails
•
Job run statistics, both current and historical
•
Job trigger/predecessor requirements
•
Schedule status of a job
•
Jobs waiting on dependency criteria requirements
•
ABEND/rerun tracking
•
Posting and on-line update of job scheduling criteria
•
Ability to submit a job from user defined PDS
•
On-line submit from the JOB/Master® PDS
•
On-line hold and release of scheduled jobs
•
Status of JOB/Master® jobs executing
•
Tracking and posting of non-CPU tasks
•
Dynamic access to full MVS console facilities through JOB/Master®
•
Tracking of manual output processing
•
On-line log review
•
Tracking of any modifications to schedule or jobs
•
Tracking of used resources
•
Daily Schedule report
•
Flat file generation for downloading to other reporting systems. Use of all job
control features at remote NJE facilites
Mantissa Corporation © 2013
E:\Manuals\Product Manuals\ASO\OM (OPS Master)\Reference Guide\Current Release\OPS_C01.fm
JOB/Master® Job Control Features
OPS/MASTER®
Chapter 1
Introduction to JOB/Master®
JOB/Master® Benefits
E:\Manuals\Product Manuals\ASO\OM (OPS Master)\Reference Guide\Current Release\OPS_C01.fm
JOB/Master® Benefits
•
Maximized Productivity by eliminating manual intervention.
•
Cost-Effective by removing costs related to job delays and reruns.
•
Ease of Use by operating on ISPF screens that are clear, concise and user
friendly.
•
Quick Installation by requiring no operating system modifications and reducing
Job and Schedule implementation tenfold. JOB/Master® can be installed in less
than four hours.
•
Increased Efficiency by offering functions on the step or data set level. This
enables the user to proceed to a successor job as soon as the required job steps or
data sets from the predecessor job are processed without waiting for all steps in
the predecessor job to be completed.
•
One-Time Data Entry by alleviating redundant and time-consuming data entry.
This enables the user to compile and store a wide variety of job-related data in
the JOB/Master® data base that can be applied throughout the system.
•
Minimizes Initiation Delays by allowing an entire group of jobs to reach the top
of the job queue in parallel.
•
Automatic Scheduling by time and date. The system is designed to understand
all standard scheduling terms, i.e., weekdays, workdays, weekends. Since one
company’s production cycle may differ from another, the system allows a schedule to be designed according to the user’s particular production cycle. The system
takes into consideration holidays and other special days designated on a calendar.
Provides as many separate calendars as required, i.e., for each remote data center
with its own holiday calendar.
•
Resource Management by preventing a job from being started if vital resources
are not available. Schedules both abstract and real resources in a data center,
locally and globally.
•
Job History Management by providing a job history data set to record job run
statistics.
•
Remote Job Tracking Support provides for the submission, tracking, and
events monitoring of remote NJE facilities attached to the central processing
facility. A Master processor can now submit, schedule, track and control secondary site(s). No hooks to your operating systems are required.
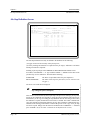
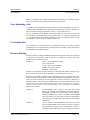
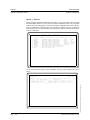
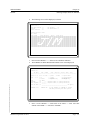
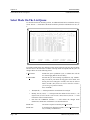
Job Schedule Confirmation
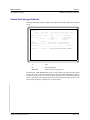
At the beginning of the day or shift, users can request an on-line display of the jobs to be
submitted to the system that day. The sequence of jobs that JOB/Master® has assembled
can be changed interactively by adding a job dynamically to the scheduling queue, cancelling a job, changing the setup requirements, changing job streams, etc. The job requirements can be changed at any time prior to a jobs’ submission to the JES input queue.
More than one day’s schedule can be viewed on-line, which is useful when planning for
the week in advance.
Mantissa Corporation © 2013
Page - 25
Chapter 1
OPS/MASTER®
Library Management Facility
Introduction to JOB/Master®
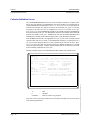
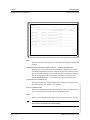
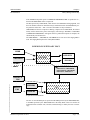
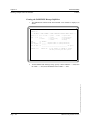
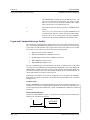
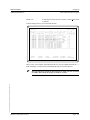
Library Management Facility
JOB/Master® allows users to manage and synchronize JCL setup activities for any seven
day period, for jobs that require JCL or control card changes from one day to the next. The
JOB/Master® Library Management Facility can be utilized for this purpose.
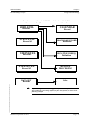
The Library Management feature allows each day’s run JCL to be placed in the PDS that
corresponds to the day of the week on which it is scheduled to run. JOB/Master® also
contains a DEFAULT SUBMIT PDS, for jobs not requiring control card or day-to-day
JCL changes.
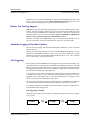
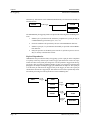
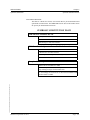
During schedule processing, when JOB/Master® is ready to submit a job to the Job Entry
Subsystem (JES) input queue, the day of the week corresponding to the schedule date will
determine which PDS is used for retrieving the submission JCL. If daily PDS’s are
defined, they will be used. If a staging PDS is defined, it will be used. If JOB/Master®
finds the job in the STAGING PDS, it will submit the job. If the job is not found in the
STAGING PDS, the DEFAULT SUBMIT PDS will be searched. If the job is found here, it
will be submitted from this PDS. If neither of the two libraries contain the job, a “SUBMIT FAILED” message will be issued to the user. JOB/Master® will periodically retry the
submit process until either the job is added to one of the submit libraries, or the job is cancelled from the JOB/Master® schedule.
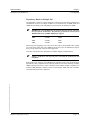
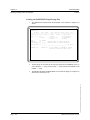
Dynamic Job Submission
JOB/Master® dynamically checks predecessor requirements, time criteria and input setup
flags. The job is submitted to the JES input queue when all criteria are satisfied.
JOB/Master®’s dynamic job submission eliminates delays between dependent jobs and
removes the need for operator decisions.
Dynamic Tape Support
For example, 3490 => 02 3480 => 00 specifies that two 3490 drives and no 3480 drives
are required. Setting the count to zeros indicates no tapes of that model are required. The
model numbers can be any tape model defined in your system up to a maximum of five.
Currently Mantissa's master tape group table has 5 models. They are 3420, 3423, 3480,
3490 and 3590.
Dynamic Job Release
A job defined to run automatically, with no special conditions involved, is submitted
dynamically by JOB/Master® to the input queue, determining the need for operator intervention. When a job is dependent on a specific manual task or event, JOB/Master® waits
until the appropriate action is taken (the job control operator enters data, checks totals,
feeds card input, etc.). As soon as these events are completed, the job is released automatically by JOB/Master®.
Dynamic Repair
When a job ABENDS, typically a recovery process must occur. The repair job could be
held up while operators analyze the problem to decide how to proceed.
Page - 26
Mantissa Corporation © 2013
E:\Manuals\Product Manuals\ASO\OM (OPS Master)\Reference Guide\Current Release\OPS_C01.fm
JOB/Master® can dynamically ensure that the job will have the specified number of tape
drives available before job submission. The optional model numbers and required number
of concurrent drives required to run the job are specified at the job level and up to two different models per job are supported.
OPS/MASTER®
Chapter 1
Introduction to JOB/Master®
Remote Job Tracking Support
JOB/Master® can recognize the ABEND, as defined in the JOB/Master® data base, and
invoke a set of recovery procedures, without manual intervention. Repair jobs can be
run automatically, eliminating costly delays and potential human error.
Remote Job Tracking Support
JOB/Master® provides support for running jobs on any processor utilized within an organization. Jobs can be started or tracked on any processor connected to an NJE network. It
is not necessary for JOB/Master® to submit the various jobs. Jobs can be tracked at the
main processing site in a Real Time environment. Jobs not submitted by JOB/Master®
must, of course, contain the proper job card identifier in col. 71.
Job status is available on the JOBQ Display “LQ”, (Tracking Menu), at the host site as the
job(s) are processed in exactly the same manner as if they were executing locally.
Automatic Logging of Data Base Updates
There is now auto logging of most fields used during the definition for a Job to the JOB/
Master® data base.
Changes to fields and/or deletions of records from the JOB/Master® data base are now
logged into the HISTORY AUDIT file as they occur. They can be displayed by viewing
the Message Audit Log from the TRACKING FACILITY. (Refer to the “DH” command
in the “Job Tracking” section of this manual).
Job Triggering
Before starting to use the JOB/Master® Job Trigger feature, it must be insured that a logically defined system or a group of jobs is defined in the JOB/Master® data base. The JOB/
Master® Job Trigger feature allows a series of jobs to be dynamically submitted after the
first triggering job in the stream has been successfully completed. The successful completion of a step may submit up to eight trigger jobs.
A “triggered” job is one which is automatically submitted at the successful completion of
a previous job or jobstep. A job is defined as being triggered by entering a “Y” in the
appropriate field “TRIG JOB (Y/N)” on the Job Definition screen. A trigger job will
observe any predecessor relationship that is specified.
E:\Manuals\Product Manuals\ASO\OM (OPS Master)\Reference Guide\Current Release\OPS_C01.fm
Job triggering is designed to provide a simplified means of scheduling and submitting
jobs, the execution of which is based upon the completion of another job or job step.
If a job being triggered has a calendar or process keyword, it will only be triggered if it is
in the schedule queue at trigger time.
Job Triggering Concepts
Although most systems are more complex, the triggering concept shown below can apply
to any system:
JOBA
Mantissa Corporation © 2013
If OK
Trigger
JOBB
If OK
Trigger
JOBC
Page - 27
Chapter 1
OPS/MASTER®
Job Triggering
Introduction to JOB/Master®
Alternatively, Jobs B and C can be submitted simultaneously if Job A runs successfully, as
illustrated below:
JOBA
JOBB
If OK Trigger
JOBC
The JOB/Master® job triggering feature will perform the following basic scheduling functions:
1.
Submit a job or jobs based on the satisfactory completion of a job or job step, or
a standard dataset type function (open, close, etc).
2.
Check the condition code specified by the user in the JOB/Master® data base.
3.
Submit a repair job, if a job terminates abnormally as specified in the JOB/Master® data base.
4.
Notify the operator via the MVS system console if a job fails to process successfully or contrary to the data base criteria.
Steplevel Dependencies
JOB/Master® also provides the ability of triggering a job or repair job at the completion
of a jobstep. Each step within a job can have trigger jobs defined for each of its steps,
which can reduce total system processing time. It is also possible to trigger from the triggered jobs, thus providing an unlimited number of jobs to be triggered. Following this
paragraph is an example of multiple trigger jobs submitted at the step level. The repair job
is an alternate job which will be triggered only if the trigger job fails. The repair job
should also be defined as a triggered job. This function can be used to dynamically schedule backout processing for a failed job and save restart scheduling time.
If OK
Trigger
JOBB
STEP01
If OK
Trigger
JOBC
If OK
Trigger
JOBD
STEP02
STEP03
If Abend
Trigger
Page - 28
REPAIR01
Mantissa Corporation © 2013
E:\Manuals\Product Manuals\ASO\OM (OPS Master)\Reference Guide\Current Release\OPS_C01.fm
JOBA
OPS/MASTER®
Chapter 1
Introduction to JOB/Master®
Job Triggering
Dependency Based on Multiple Jobs
The dependency criteria for a job is sometimes set based on the successful completion of a
combination of jobs. For example, JOBE is to be submitted only if JOBB, JOBC and
JOBD run successfully. This relationship is specified in the job definition for JOBE.
)
JOB/Master® is very methodical in its operation and does exactly what users
have specified in the data base. The following specifications would result in
THREE submissions of JOBE (Multiple job triggers).
JOBE
AFTER
JOBB
JOBE
AFTER
JOBC
JOBE
AFTER
JOBD
When using Job Triggering, select only one of these jobs to submit JOBE. Then, regardless of the status of the other jobs, JOBE will be the next job to be submitted. Its dependency will be linked only to the job which triggered it.
Users may code predecessor dependencies to handle multiple job dependencies.
)
Coding a predecessor will cause the job to wait until the predecessor(s) has
completed.
E:\Manuals\Product Manuals\ASO\OM (OPS Master)\Reference Guide\Current Release\OPS_C01.fm
With predecessor checking, the JOB/Master® scheduler insures that all predecessor
dependencies have completed before allowing JOBE to run. In the following example,
JOBE without predecessors will be submitted when JOBD completes regardless of
whether JOBB and JOBC complete. In the second example, JOBE will wait on submission until all three jobs have completed.
Mantissa Corporation © 2013
Page - 29
Chapter 1
OPS/MASTER®
Externally Submitted Jobs
Introduction to JOB/Master®
Job Triggering
JOBA
If OK
Trigger
JOBB
JOBC
JOBD
If OK
Trigger
JOBE
Job Triggering with Predecessor Checking
If OK
Trigger
JOBA
PRED
JOBB
JOBC
JOBD
If OK
Trigger
JOBE
Multiple Job Dependency
(Predecessor)
Defined in JOBE
PRED
Predecessor coding requires that Jobs B, C, and D complete successfully in order for
JOBE to start. Jobs B and D are predecessors to JOBE. If JOBC triggers JOBE, JOBE
will submit only after JOBB and JOBD have ended. Since JOBC is the trigger job, it is an
implied predecessor.
JOB/Master® allows for the start of a jobstream through TSO, or any other submission
function, provided the job submitted contains a designated character in column 71 or that
NOTIFY=JOBMAST is coded on the job card. These jobs, if submitted on hold, can have
all the same dependency conditions assigned to them as any JOB/Master® submitted job.
After all dependencies are satisfied, JOB/Master® will release the job from the JES queue.
Dataset Contention Resolution
With the CONSOLE/Master® option of OPS/Master® installed, jobs which are held in an
initiator because of dataset enqueues are automatically resolved by JOB/Master®. The
Dataset Contention Monitor, which is activated by CONSOLE/Master®, will evaluate all
jobs which are in contention for the dataset being requested by the waiting job, and will
notify JOB/Master® of the conflict.
Page - 30
Mantissa Corporation © 2013
E:\Manuals\Product Manuals\ASO\OM (OPS Master)\Reference Guide\Current Release\OPS_C01.fm
Externally Submitted Jobs
OPS/MASTER®
Chapter 1
Introduction to JOB/Master®
Activating the Dataset Contention Monitor
JOB/Master® will, if the option has been selected in the Profile, update the waiting jobs
negative dependency list for all jobs which would cause this job to lock out the initiator.
Once the contention list has been processed, the jobs causing the contention will be treated
as negative dependencies, therefore eliminating the contention condition.
A message of the conflict and the jobs in contention is logged to the JOB/Master® audit
log. If automatic update of the resolution is not selected, you may review the audit log and
make any manual adjustments to the workload.
Additionally, a user exit, JMDSEXIT, is supplied in the INSTLIB dataset. This exit is
given control for each job which is found in contention for a waiting job. The sample exit
will write a message of each conflict to the operator console and will allow filtering of any
jobs which you may not want processed as part of the contention list. For instance, if a test
job is found to be holding a production job, you may want to eliminate that job from the
list, issue a message to the user, and cancel the test job. TSO users are not processed as
part of the contention list; they are, however, sent a message notifying them that they are
holding a dataset which is required for processing. The message sent indicates the job and
the dataset which is held.
The message format is:
OPSDSCM JOB JJJJJJJJ HELD, YOU HAVE DSN=DDDDDDD...
where JJJJJJJJ is the jobname of the job waiting, and DDDDDDDD is the dataset
name being held.
Activating the Dataset Contention Monitor
To activate the monitor, place a rule into the CONSOLE/Master® database. The rule has
the following options:
The console message text is:
IEF863I
Offset from beginning of console line is 000.
Command to be issued when rule is activated is:
E:\Manuals\Product Manuals\ASO\OM (OPS Master)\Reference Guide\Current Release\OPS_C01.fm
C=”S JMDSCM,STRING=’&JOBNAME,&4’”
Whenever a “waiting for dataset condition” is detected, the contention monitor will be
activated for the job being held, and will be passed the jobname and the dataset in contention. The monitor will determine the contention list, call the user exit, and communicate
the information to JOB/Master®. The procedure, JMDSCM, is in the INSTLIB dataset.
Mantissa Corporation © 2013
Page - 31
Chapter 1
OPS/MASTER®
Scheduling Flow
Introduction to JOB/Master®
Scheduling Flow
The following illustrates the JOB/Master® processing flow.
Selection
JOB/Master®
DATABASE
JMSCHED
TSO
HLQ.JMBD
Scheduling
Event
(Job Queue)
HLQ.JMJOBQ
JOBQ Display
Scheduling Event
Analysis/Reporting
STAGING PDS/DAILY
BASE PDS
JMSCHED2
Note
1
DDNAME=JMSUBPDS
Reports
DDNAME=JMSTGPDS/JMSUBxxx
where xxx is Mon, Tues, etc.
USER PDS
Note 2
Default
Submit
PDS
Note 1:
Any number of days JCL may
reside in the Staging PDS.
Alternatively, the user could use
7 daily PDSs to handle the
multiple days.
Note 2:
The BASE PDS and the
DEFAULT PDS may be the
same dataset.
Page - 32
JOB/Master®
JM00
Job Status Information
DDNAME=JMSUBPDS
History and
Audit
Information
HLQ.JMHIST
MVS
JES
SMF
Exit
Scheduling
Event
(Job Queue)
JES
Input Queue
HLQ.JMJOBQ
Mantissa Corporation © 2013
E:\Manuals\Product Manuals\ASO\OM (OPS Master)\Reference Guide\Current Release\OPS_C01.fm
Submit, Tracking
Event Recording
OPS/MASTER®
Chapter 1
Introduction to JOB/Master®
Security Function
Selection
In this part of the scheduling process, you tell the system the date and time frame for
which a schedule is to be created. Optionally, the schedule for a given system or even jobs
within a system can be created.
Scheduling Event Analysis/Reporting
This step is an automatic follow-up to the SELECTION process. The schedule events
selected are subjected to an analysis process that considers predecessor/successor relationships and JOB TRIGGER relationships. In this step the BASE PDS is used to create a
STAGING PDS or up to 7 daily PDS’s. Reports detailing the scheduling activity are also
produced.
Submit, Tracking, Event Recording
Unlike the first two parts of the scheduling flow, this stage of the scheduling flow is an
ongoing process. The scheduler checks the scheduling event file (the JOB QUEUE) on an
interval basis to determine if any jobs can be submitted. Based on information the scheduler received from SMF EXITS and from JES status inquiries, it determines how and
when to submit these JOBS. During this iterative scheduling process, the RERUN PDS
(optional) will have the JCL member updated/added and job history and audit information
will be logged.
Security Function
The use of each individual function and command in JOB/Master® is protected by the
Interactive Security Facility (ISF).
Security protection is available at three levels:
Highest level
Generally given to senior management, this access is for those who can
override any security assignment and globally prevent the use of a
specific command.
Varied usage
E:\Manuals\Product Manuals\ASO\OM (OPS Master)\Reference Guide\Current Release\OPS_C01.fm
Each TSO userid has a record which describes the range of authority
(which functions and commands are allowable or denied).
Authority can vary widely, based on the job function of the user.
General usage
Anyone not specifically defined to the security system has limited
access to functions and commands. Typically they receive display
only, NO UPDATING, which is the basic default level.
Mantissa Corporation © 2013
Page - 33
Chapter 1
OPS/MASTER®
Signing On
Introduction to JOB/Master®
Signing On
JOB/Master® on-line Tracking uses TSO as a monitor to drive its interactive sessions (a
TSO userid is needed). Illustrated below is a typical sign-on to JOB/Master® Job Tracking.
The ISPF Main Menu (ISP@PRIM) and sign-on procedures vary according to installation
standards and options. Consult the installation staff for more information.
CAUTION: JOB/Master® provides security via the Interactive Security Facility (ISF). JOB/Master® commands and functions are secured only if ISF is
installed.
E:\Manuals\Product Manuals\ASO\OM (OPS Master)\Reference Guide\Current Release\OPS_C01.fm
)
Page - 34
Mantissa Corporation © 2013
OPS/MASTER®
Chapter 1
Introduction to JOB/Master®
Signing On
After logging on to ISPF, the OPS/Master® Main Menu is displayed. To enter JOB/Master®, type J at the OPTION prompt (and press <ENTER>), as shown below:
-------Operations Productivity Systems - OPS/Master® by Mantissa v5.2.1------Option ===>
J
J2
J3
J4
C
-
JOB/Master® (JM01
JOB/Master® (JM02
JOB/Master® (JM03
JOB/Master® (JM04
CONSOLE/Master®
PF1 = HELP
Prod.)
)
)
)
I
I2
I3
I4
R
X
-
Interactive
Interactive
Interactive
Interactive
RUN/Master®
EXIT
Security
Security
Security
Security
Facility
Facility
Facility
Facility
(JM01)
(JM02)
(JM03)
(JM04)
User= P390K
Date= 98/09/01
98.244
Time= 17:05
OPSOPSOPSOPSOPSOPSOPSOPSOPSOPSOPSOPSOPSOPSOPSOPSOPSOPSOPSOPSOPSOPSOPSOPSOSPOPSOP
OPSOPSOPSOPSOPSO
SOPSOPSOPS
OPSOPSOPSOP
OPSOPSOPSOP
OPSOPSOPSOPSOPS SOPSOP PSOPSOPSO
SOPSOPS
OPSOPSOPS
OPSO
PSOPSOPSOP
OPSOPSOPSOPSOP PSOPSO OPSOPSOPS
OPSOPSOP
SOPOPSOPO
PSOPS
OPSOPSOPSOP
OPSOPSOPSOPSO OPSOPS SOPSOPSOP
SOPSOPS
OPSOPSOPSOPS
SOPSOPSOPSOPSOPSOP
OPSOPSOPSOPS SOPSOP PSOPSOPSO
PS
PSOPSOPSOPSOPSO
OPSOPSOPSOPSOPSOP
OPSOPSOPSOP PSOPSO OPSOPSOPS
OPSOPSOPSOPSOPSOPS
PSOP
OPSOPSOPSOPSOPSOP
OPSOPSOPSO OPSOPS SOPSOPSOP
SOPSOPSOPSOPSOPSOP
OPSO
OPSOPSOPSOPSOPSOP
OPSOPSOPS
PSOPSOPSO
PSOPSOPSOPSOPSOPSOPS
PSOPSOPSOPSOPSOPSOP
OPSOPSOPSOPSOPSOPSOPSOPSOPSOPSOPSOPSOPSOPSOPSOPSOPSOPSOPSOPSOPSOPSOPSOPSOPSOPSOP
OPSOPSOPSOPSOPSOPSOPSOPSOPSOPSOPSOPSOPSOPSOPSOPSOPSOPSOPSOPSOPSOPSOPSOPSOPSOPSOP
Type “J” or “J#” at the OPTION==> prompt (where # is the JOB/Master® Region
Desired). If multiple regions are defined at your installation, enter J1 through J4 to select
JOB/Master® regions associated with the subsystem IDs’ JM01 through JM04, respectively. The use of “J” is the same as “J1”.
To exit OPS/Master®, simply enter X in the OPTION field or press <PF3>.
E:\Manuals\Product Manuals\ASO\OM (OPS Master)\Reference Guide\Current Release\OPS_C01.fm
)
Mantissa Corporation © 2013
Page - 35
Chapter 1
OPS/MASTER®
JOB/Master® Primary Menu
Introduction to JOB/Master®
JOB/Master® Primary Menu
When you first enter into JOB/Master®, the Primary Menu is displayed as shown below:
------------------- Job Scheduling and Management by MANTISSA ----------------OPTION ===> D
z/OS V520
Data Base Creation : D
Job Tracking
: T
Profile
: P
JCL Substitution : J
Report Selection
: R
Current Selection = JM01
PF1 = HELP
USER= P390K
DATE= 98/09/01
98.244
TIME= 10:28
JMJMJMJMJMJMJMJMJMJMJMJMJMJMJMJMJMJMJMJMJMJMJMJMJMJMJMJMJMJMJMJMJMJMJMJMJMJMJMJM
JMJMJMJMJMJMJMJMJMJMJMJMJMJMJMJMJMJMJ MJMJMJMJMJMJMJMJMJMJMJMJMJMJMJMJMJMJMJMJM
JMJMJMJMJMJMJMJMJMJ
MJM JMJMJM
MJM
MJMJMJMJMJMJMJMJMJMJMJM
JMJMJMJMJMJMJMJMJMJMJMJM JMJMJMJMJ MJMJMJ
J M J
JMJMJMJMJMJMJMJMJMJMJMJM
JMJMJMJMJMJMJMJMJMJMJMJ MJMJMJMJM JMJMJM
MJ J JM
MJMJMJMJMJMJMJMJMJMJMJMJM
JMJMJMJMJMJMJMJMJMJMJM JMJMJMJMJ MJMJMJ
JMJ MJ
JMJMJMJMJMJMJMJMJMJMJMJMJM
JMJMJMJMJMJMJM JMJMJ MJMJMJMJM JMJMJM
MJMJMJM
MJMJMJMJMJMJMJMJMJMJMJMJMJM
JMJMJMJMJMJMJ MJMJ
JMJMJMJMJ MJMJMJ
MJMJMJM
JMJMJMJMJMJMJMJMJMJMJMJMJMJM
JMJMJMJMJMJMJ
JMJMJMJMJM JMJMJM
JMJMJMJ
MJMJMJMJMJMJMJMJMJMJMJMJMJMJM
JMJMJMJMJMJMJMJMJMJMJMJMJMJMJ MJMJMJMJMJMJMJMJMJMJMJMJMJMJMJMJMJMJMJMJMJMJMJMJM
JMJMJMJMJMJMJMJMJMJMJMJMJMJMJMJMJMJMJMJMJMJMJMJMJMJMJMJMJMJMJMJMJMJMJMJMJMJMJMJM
Enter D in the OPTION ==> field to enter the JOB/Master® data base creation function.
This option is used to create job definitions, calendars and process keyword definitions.
Enter P in the OPTION ==> field to enter the PROFILE option. This option is used to set
function key assignments, set job card JCL parameters, and display and update global
option settings.
)
All users are required to go through the PF key setup the first time they log on
to the JOB/Master® System.
Enter J in the OPTION==> field for JCL SUBSTITUTION. This option is used to enter
variable information to production job control.
Enter R in the OPTION==> field for Report Selection options.
Page - 36
Mantissa Corporation © 2013
E:\Manuals\Product Manuals\ASO\OM (OPS Master)\Reference Guide\Current Release\OPS_C01.fm
Enter T in the OPTION ==> field to enter the JOB TRACKING option. This option is
used to monitor jobs on the queue and sign off on manual tasks.
OPS/MASTER®
Chapter 1
Introduction to JOB/Master®
Logging Into JOB/Master® For The First Time
Logging Into JOB/Master® For The First Time
Use the PROFILE option to confirm the default function key assignments (or modify
them).
This must be done before any of the other job scheduling options can be accessed. Any
other option entered will force a profile to be established before the other function will be
processed. The following screen is an illustration of the Profile Screen:
-
------------------ JOB/Master® Profile Update/Display Options ----------------Command ===>
------------------------------------------------------------------------------Option
-------1
2
3
End
Functional Description
---------------------------------------Set PFKS and Job Card JCL Parameters
Display Global Option Settings
Update Global Option Settings
User= P390K
Date= 98/09/01
98.244
Time= 10:30
Exit
The first time you enter JOB/Master®, Option 1 must be selected and “CONFIRMed”
E:\Manuals\Product Manuals\ASO\OM (OPS Master)\Reference Guide\Current Release\OPS_C01.fm
You can simply confirm the default assignments by entering CONFIRM on the command
line or you can alter the default assignments by typing over the existing assignments.
Remember, if you specify an invalid assignment, the key will not function. If desired, you
can go back and modify the function key assignments at a later time. (A Suggestion: Use
PF keys 1-12 for the JOB/Master® functions. Use 13-24 for ISPF standard functions.
There are several ISPF browse sessions utilized within the JOB/Master® system).
Mantissa Corporation © 2013
Page - 37
Chapter 1
OPS/MASTER®
Interactive Help
Introduction to JOB/Master®
Interactive Help
OPS/Master® offers an interactive HELP facility that can be accessed by pressing <PF1>
or the ISPF HELP command key from any screen.
Help screens will be similar to the illustration below:
------------------------------- HELP SYSTEM ----------------- Profile Main Menu
Command ===>
------------------------------------------------------------------------------Panel Description: This panel will allow you to select the profile
maintenance functions for JOB/Master® global options.
------------------------------------------------------------------------------Option
=> 1 for setting PFK assignments which will be used during the
JOB/Master® sessions, and for defining a job card which will be used
for online forecast (simulation) requests, or online report
selection.
=> 2 for browsing the global option settings. No modifications can
be made while in browse mode.
=> 3 for updating the global option settings. Options are discussed
in the tutorial when this item & item #2 are selected.
Before continuing to any other selection within the scheduling
system, you must select option 1 here and update CONFIRM your
PFK assignments.
--------------------------------- End of HELP ---------------------------------
If an error or system message is displayed in the upper, right corner of the screen, pressing
<PF1> will display a brief explanation of the message. If you press <PF1> again, a help
screen will be displayed.
If a message is not displayed, pressing <PF1> will cause a help screen to be displayed
directly.
Interactive Help Screens are designed in a circular repeating manner. There may be several screens of information relating to the various fields on the screen. By pressing the
<ENTER> key, the user is moved through the various screens. When all fields have been
described, the last screen will return to the first screen presented in this help session.
Page - 38
Mantissa Corporation © 2013
E:\Manuals\Product Manuals\ASO\OM (OPS Master)\Reference Guide\Current Release\OPS_C01.fm
Screen Navigation
OPS/MASTER®
Chapter 3
Job Database Creation
Before You Begin
Chapter 3
Job Database Creation
The scheduling capabilities of JOB/Master® allow the user to easily manage and report
job scheduling. JOB/Master® offers flexible and easy-to-use customization features for all
scheduling needs.
We strongly suggest that you complete the tutorials in this manual before reviewing this
section.
Before You Begin
Be sure you are familiar with the following terms before proceeding:
System
E:\Manuals\Product Manuals\ASO\OM (OPS Master)\Reference Guide\Current Release\OPS_C03.fm
A system is a logical group of jobs to accomplish a specific goal. Examples include
accounts payable, accounts receivable and inventory. For Job/Master's purposes, a system
"value" is only used to group related jobs. If a system record is defined (it is optional), its
fields become default values for any jobs within that system and is a quick way to specify
some general values applicable to each job in that system.
Job
A job is a set of Job Control Language (JCL) statements containing one JOB statement
and one or more EXEC statements. The jobname defined to the JOB/Master® data base
should match the jobname on the job card used at submission time. Each job step record,
as defined to JOB/Master®, must be identical to the job’s step name on the EXEC statement in the job or procedure.
A JOB/Master® data base job definition is made up of one job record and as many step
record definitions as desired. The steps of a job need to be defined only if you want to collect step statistics or use step level controls. The term “job level” refers to the time from
the start of a job to its end. The term “step level” refers to the period of time from the start
of a step to its end.
Repair Job
Mantissa Corporation © 2013
Page - 57
Chapter 3
OPS/MASTER®
Job Fail and Condition Code Testing
Job Database Creation
A repair job is used to describe a job that is submitted if a failure occurs on the job or job
step. A repair job can be submitted after a job or job step and is considered to be a triggered job. A repair job is defined to JOB/Master® in the same way as any other job. The
job which abended can be specified as the job to be resubmitted, if the repair job successfully completes. This allows automatic recovery and restart of a job stream.
Triggered Job
A triggered job is one which is submitted based on the completion of another job step, or
some dataset function.
Non-Triggered Job
A non-triggered job is one which is submitted from the scheduling queue based on time or
event criteria.
Predecessor
A predecessor refers to a job that must successfully complete before the next job can be
submitted. All predecessor jobs can be defined on the job level for each job stream that is
submitted. For example, suppose JOBA is defined as a predecessor to JOBB. This means
that JOBA must successfully complete before JOBB can run. If this dependency relationship does not exist, JOBA should not be defined as a predecessor to JOBB.
Calendar
A calendar definition tells JOB/Master® which are valid run days for the job being
defined. A specific calendar only needs to be defined once. Any number of jobs can reference the same calendar definition.
Keyword
A keyword is a relative term used to define a set of conditions which pertain to the scheduling of a job. Some of these terms can be MON(Monday) TUE(Tuesday), etc. through out
the days of the week. There are many other standard keywords provided with you system.
Additional Keywords can also be defined as may be required. If you have a need to process a series of Accounts Payable jobs on the 1st, 10th, 20th, and 30th of a month a Keyword can be defined as APPROC. The keywords can be used in place or in addition to
calendars.
An exception calendar definition tells JOB/Master® which are not valid run days for the
job being defined. An exception calendar(s) is typically used to specify holidays. A specific exception calendar only needs to be defined once. Any number of jobs can reference
the same exception calendar(s). These are two (2) exception Calendar possibilities for
each Job.
Submission Dependencies
Submission dependencies are criteria that must be satisfied before the job being defined
can be submitted. Submission dependencies include, for example, the presence of an existing task in the CPU, the completion of a job or job step, and/or availability of a resource
(tape drive).
Job Fail and Condition Code Testing
If a job ABENDS, at any point, it will be assigned a Job Fail status. In addition, a job can
be assigned a Job Fail status if condition code test(s) are not satisfied. Up to four condition
Page - 58
Mantissa Corporation © 2013
E:\Manuals\Product Manuals\ASO\OM (OPS Master)\Reference Guide\Current Release\OPS_C03.fm
Exception Calendar
OPS/MASTER®
Chapter 3
Job Database Creation
Command Scheduling
code tests can be specified for each job step. All dependent jobs are not submitted, since
the job did not successfully complete. Optionally, it can be specified that any steps not
defined to the data base must complete with a condition code of zero to be considered successful.
JOB/Master® allows a global condition code test to be specified. However, a job level
condition code test overrides the global test. In addition, a step level condition code test
overrides both job level and global tests. It is not necessary to define a 0000 condition
code at either the job or step levels if within the Global Profile for Require Zero C.C.=”Y”
is present. JOB/Master® will recognize the zeros as being a successful completion.
JOBA is successful if either of the following is true:
OP
CODE
______
E
E
COND
CODE
______
0000
0004
Command Scheduling
To initiate a command stream, the CONSOLE/Master® portion of the OPS/Master® system must be installed. A command definition is designated by specifying a submit type of
“C” on the job or trigger job definition. The command definition can be scheduled or triggered, and may have all the dependencies assigned to it as any other job definition. When
the command definition is initiated, after all dependencies are satisfied, or the definition is
triggered, a message is sent to the console. The generated message is in the following format:
JMCN JOBNAME
where; JMCN-is a constant message identifier,
JOBNAME-is the command definition name,
The message rule for “JMCN JOBNAME” is defined to the CONSOLE/Master® knowledge base and is used to drive the command stream.
E:\Manuals\Product Manuals\ASO\OM (OPS Master)\Reference Guide\Current Release\OPS_C03.fm
)
Command scheduling requires CONSOLE/Master® or another console product to be not only installed but it must be running when the command job
issues the commands. If this is not the case, the command stream is ignored for
processing. If another product is utilized, the product must have the ability to
recognize the “JMCN” as described above.
Job Definition Screens
Up to 5 screens can be used to enter a job definition. However, many job definitions can
be completed by completing only the first screen. The job definition’s most vital parameters can be found on the first screen. All of the job definition screens are described on the
following pages. The number of the screen can be found in the upper left corner of each
screen. (i.e. AJ = Add Job).
To access the Data Base definition screens, first select “J” (JOB/Master®) from the OPS/
Master® Main Menu. Then select “D” (Data Base Creation) from the JOB/Master® Primary Menu. The JOB/Master® Data Base Functions Screen is displayed:
Mantissa Corporation © 2013
Page - 59
Chapter 3
OPS/MASTER®
Job Definition Screens
Job Database Creation
------------------------- JOB/Master® Data Base Functions ---------------------Command ===>
ID: JM01
User = P390K
Date = 98/09/01 - 98.244 Time = 11:12
-------------------------------------------------------------------------------Option ==> _
A dd / B rowse
/ U pdate
Type
J ob
C alendar
/ S ystem
/ N eg and Coreq
/ D ataset
==> _
/ D elete
/ I nquire Index
/ P rocess Keyword
/ G roup Message
/ M essage
Name
Stepname
Proc Stepname
==> ________
==> ________
==> ________
Data Set Name
==> ____________________________________________ (If Type D)
CONFIRM = PF4
CANCEL= PF5
(Stepname (PROC) if jobstep definition)
(Stepname (PGM=) if jobstep definition)
or type “CANCEL” or “CONFIRM” at Command
line when processing Data Base options
At this point, you can Add, Update, Delete, Browse or Inquire. Enter the letter associated
with the desired option in the OPTION ==> field. Next, you must select the item you want
to Add, Update, Delete, Browse, or Inquire. For job definitions, enter J in the TYPE
==>field. Then enter the name of the job definition in the first NAME ==> field. (The second NAME field is used to specify the name of a job step.) The following chart describes
the information that must be provided to select each option (applies to Add, Update,
Delete, and Browse - inquiries are discussed next):
Page - 60
NAME
NAME
PROC
DATA
SET
NAME
C = Calendar
Y
N/A
N/A
N/A
D = Dataset Definition
N/A
N/A
N/A
Y
G = Group Message Definition
Y
N/A
N/A
N/A
J = Job
Y
N/A
N/A
N/A
J = Job Step
Y
Y
M = Message Definition
Y
N/A
N/A
N/A
N = Neg/Coreq Definition
Y
N/A
N/A
N/A
P = Process Keyword Definition
Y
N/A
N/A
N/A
S = System Definition
Y
N/A
N/A
N/A
N/A
Mantissa Corporation © 2013
E:\Manuals\Product Manuals\ASO\OM (OPS Master)\Reference Guide\Current Release\OPS_C03.fm
OPTION
STEPNAME
OPS/MASTER®
Chapter 3
Job Database Creation
Data Base Index
Data Base Index
--------------------- JOB/Master® Data Base Index---------- Row 1 from 346
Command ===>
Scroll => PAGE
Display Select==> Job= ________ Cal= ________ Sys= ________ Pky= ________
-------------------------------------------------------------------->>SHIFT>>
|T|E|Sub |Process |Calendar|Exceptn |Execptn
S Type/Entry Name
|R|S|Time|Keyword | Name | Cal1
| Cal2
- ----------------------------- - - ---- -------- -------- -------- -------P/ TESTTABL
*PKYWORD
C/ CALTEST1
*CAL/REL
C/ CALTEST2
*CAL/REL
C/ EXCEPTN1
*CAL/ACT
C/ HOLIDY00
*CAL/ACT
C/ HOLIDY98
*CAL/ACT
C/ HOLIDY99
*CAL/ACT
C/ WORKDY00
*CAL/REL
C/ WORKDY98
*CAL/REL
C/ WORKDY99
*CAL/REL
N/ CONSMSTR
*NEGCOR*
G/ SUPPORT
*MSGGRP*
G/ SUPPORT1
*MSGGRP*
M/ GROUPDEF
*MSGDEF*
S/ CHEKMODE
S/ CONSTEST
This screen comes from issuing the ‘I’nquiry function from the JOB/Master® DATABASE FUNCTIONS screen. You may Inquire on the entire database or only the element
you wish to use. If you INQUIRE on the entire database it could take some time to build
the Inquiry ==> display. Generic Masking is possible on all elements (i.e. All jobs starting
with ABC should be called for by ABC*).
E:\Manuals\Product Manuals\ASO\OM (OPS Master)\Reference Guide\Current Release\OPS_C03.fm
At this point, specifying a U(update), D(delete), or B(browse) in the S(select) column will
bring up the appropriate function. Like ISPF, multiple selects will be handled one at a
time in order. Also, all commands from the Data Base Function screen can be entered on
the command line of this screen. For example:
AJ JOBNAME
= Add a JOB to the database.
AC CALENDAR
= Add a JOB to the calendar.
.
.
etc.
Mantissa Corporation © 2013
Page - 61
Chapter 3
OPS/MASTER®
Job Definition Screen 1
Job Database Creation
Job Definition Screen 1
In many cases, this first screen will be the only screen necessary to create an entire job
definition. The most important definition parameters can be found on this screen:
AJ ---------------------- JOB/Master® Job Definition --- Row 1 to 3 of 72
Command ===>
Scroll ==> PAGE
-------------------------Definition Last Updated by _______ on _____ at _____
Jobname
==> ________ Alt Name For => ________ System Name ==> ********
PDS Mem
==> ________ PDS ==> ____________________________________________
Trig Job ==> N (Y/N) Triggered By==>
Submit Type ==> A (ACMRST)
Res Name1 ==> ________ Res Name2
==> ________ Schedule/Net==> ********
Calendar ==> ________ Excep Cal1 ==> ________ Excep Cal2 ==> ________
Keywd Def ==> ________ Priority
==> _
Lib Type
==>
Neg/C Def ==> ________
Model / Count of Tapes: 3420 => 00
3480 => 00 Update Drive Usage=> Y
------------------------------- Submit Options ------------------------------Enter submit time (HHMM) & optionally "number of runs"/"minutes between runs"
Submit=> 0000 End=> 0000 Number Of Runs=> 00 Minutes Between Runs=> 0000
----------------------------- Dependency Options ----------------------------Pred
| Negative Coreq
| Process N-Proc
| Trig
Sub: OP Cond Trig
Jobs Typ|
Dep
Dep
| Keyword Keyword |
Job
Typ: CD Code Type
-------- - | -------- -------- | -------- -------- | -------- - : - ---- ________ _ | ________ ________ | ________ ________ | ________ _ : _ ____ _
________ _ | ________ ________ | ________ ________ | ________ _ : _ ____ _
________ _ | ________ ________ | ________ ________ | ________ _ : _ ____ _
The process of creating a job definition can be completed more rapidly by using the
COPY command. The command allows you to copy an existing job definition into the one
being created. Once the definition is copied, modifications can be made, as needed.
1.
COPY: Copies only the descriptive information from existing definition.
2.
COPYALL: Copies all fields of existing job definition, except those few which
must pertain only to this job being created.
Options are keyed at the COMMAND ==> line as follows:
COMMAND ==> COPY Jobname
COMMAND==> COPYALL Jobname
You may scroll this panel to view additional dependency options. (PF8)
GENERAL PARAMETERS
DEFINITION LAST UPDATED BY
This line will indicate when the job definition was last modified. In addition, the
user ID and time of the change will be shown. If you are creating a new job definition, this area will be blank.
JOBNAME
The name used to identify this job. The system will automatically display the jobname specified on the opening menu.
Page - 62
Mantissa Corporation © 2013
E:\Manuals\Product Manuals\ASO\OM (OPS Master)\Reference Guide\Current Release\OPS_C03.fm
The command has two (2) options:
OPS/MASTER®
Chapter 3
Job Database Creation
Job Definition Screen 1
ALT NAME FOR
This field is used when a job already defined to the JOB/Master® data base needs
to additionally execute with different scheduling criteria. By adding another job
definition and filling the ALT NAME field with the Jobname from an existing
job definition, JOB/Master® will execute the ALT NAME JCL using the new
JOBNAME and scheduling criteria.
SYSTEM NAME
This field is used to enter an application system name of which the job is a part.
PDS MEM
The PDS MEM field is used to specify the Partitioned Data Set Member name.
Only specify a member name if it is different from the jobname. The member
name will be utilized by the system when storing resolved JCL. If multiple jobs
are required for the same processing day, utilizing the same member, the jobs
MUST vary by at least 1 minute in their scheduled time.
PDS
This field specifies the dataset where the JCL resides if it is not in the master submit PDS.
TRIG. JOB (Y/N)
If the job being defined is triggered by another, enter Y in this field. This means
that another job must successfully complete before the job being defined can run.
If this is changed from a “Y” to “N” the field TRIGGERED BY will be cleared
when updated.
TRIGGERED BY
This field is updated at the time a job is triggered and can not be manually
updated, except for spacing out the entire field by the system if a job is no longer
triggered. This reflects the LAST job which triggered this job. Jobs may have
more than one job trigger them.
SUBMIT TYPE
E:\Manuals\Product Manuals\ASO\OM (OPS Master)\Reference Guide\Current Release\OPS_C03.fm
Type of submission required for the job being defined. Specify one of the following types of submission in this field:
Mantissa Corporation © 2013
A
Automatic (default).
Submitted by JOB/Master® from the submit PDS.
M
Manual.
Requires manual intervention. Submitted from the submit PDS, using
JOB/Master® submit commands. (Refer to Job Definiton Screen 3).
S
Started Task.
Started task initiated by JOB/Master®.
(Refer to the section on Started Tasks - Job Scheduling Concepts.)
R
Repeating.
The task will continue to be rescheduled and submitted, based on user
command until the last run is signaled complete by the user. This type of
submit is useful when the number of iterations for a job is variable. Any
job defined as a repeating job will now be treated as a Manual Submit
Page - 63
Chapter 3
OPS/MASTER®
Job Definition Screen 1
Job Database Creation
from the First Schedule Time. The first submission will no longer occur
automatically.
T
Timed Trigger.
The job is triggered, but will wait for its submit time, as coded on the
data base. If the submit time of the job is 0000 and the job isn’t on the
scheduling queue, when the job is triggered it will be placed on the
scheduling queue with the current system date and time. If the job
already exists on the scheduling queue with a 0000 time (having been
scheduled), then no other job with the same name is allowed on the
scheduling queue during the same day until the job with the 0000 time is
complete. These same conditions apply to jobs which may be triggered
and are not defined to the data base. If a manual task message is
applicable for the triggered job, the message will not begin being sent
until the job is actually triggered.
C
Command Stream.
Console commands may be scheduled, triggered, etc. (Refer to
Command Scheduling.)
RES NAME1
This field is used to assign a resource name to a particular CPU. The resource
name can be up to 8 characters in length. If no name is specified, the function
will be eligible on any processor. The system will attempt to execute the function
on the resource name specified in the RES NAME1 field. If that condition cannot
be satisfied, it will attempt to execute the function on the name specified in the
RES NAME2 field.
The Resource name(s) can be both a Real Resource or a Virtual Resource (not
physically there). These resources can be attached or detached from a system as
may be required. Attaching a resource will allow the scheduling system to release
the job(s) waiting for that resource to execute. (Refer to ATTACHING and
DETACHING commands in the JOB TRACKING Section.)
RES NAME2
This field is used to assign a second resource name to a particular CPU. Refer to
the description of RES NAME1 for more information.
This field provides a customer with the ability to group a schedule or network of
jobs into an identifiable entity. Security can be established on this group which
now limits any and all access to the various criteria specified as belonging to this
group.
The field is eight (8) characters in length and must be previously set up using ISF
(Security Feature). If 8 asterisks are specified, the job being defined has no security and anyone may perform the various functions for which they have security.
CALENDAR
A calendar name is specified in this field. The calendar tells the system which
days of the year are valid days to run the job being defined. The calendar must be
defined to the system for the job to be scheduled. You can, however, specify a
calendar name in the job definition and actually define the calendar at a later
Page - 64
Mantissa Corporation © 2013
E:\Manuals\Product Manuals\ASO\OM (OPS Master)\Reference Guide\Current Release\OPS_C03.fm
SCHEDULE/NETWORK
OPS/MASTER®
Chapter 3
Job Database Creation
Job Definition Screen 1
time. Calendars are not always required for a job. Use of Process Keywords serve
a similar function as calendars.
EXC CAL1
This stands for exception calendar. This calendar tells the system which days are
not valid for the job to run. The exception calendar(s) is typically used to specify
holidays.
EXC CAL2
This field can be used to specify a second exception calendar. For more information refer to the description of EXC. CAL1.
KEYWD DEF
Enter the name of a keyword definition in this field. Keywords are used to represent a set of conditions under which the job should be run. It may not be necessary, however, to use keywords to satisfy the requirements of the schedule. Some
keywords require references to calendars. Others represent conditions that the
system can interpret without a calendar. Refer to the description of the Keyword
Definition Screen in this section for more information.
The name keyed in this field refers to a list of keywords entered as a Keyword
Definition from the JOB/Master® main menu. This allows multiple jobs to use
the same set of keywords without entering the entire list on each job definition.
The set of keywords referenced here is merged with or combined with the keywords in the Dependency Options on the lower half of the screen. This allows for
flexibility of exceptions by job.
PRIORITY
The priority refers to the Submission Priority that will be assigned to the job in
the event other jobs are scheduled to be submitted at the same time and all Scheduling Criteria have been met. The following values are acceptable:
E:\Manuals\Product Manuals\ASO\OM (OPS Master)\Reference Guide\Current Release\OPS_C03.fm
A (Highest) through Z (Lowest)
Priority can be activated, changed, or stopped. If priority is desired, the submission sequencing is activated, changed, or stopped using the “SP” (Modify Priority
Selection List) command in the Tracking Facility. (Refer to the Tracking section
of this manual - SP Command). The feature allows for better control during job
submission to the JES initiators.
LIB. TYPE
This is a reserved field to be used later.
NEG/C DEF (NEGATIVE/CO-REQUISITE)
Enter the name of a definition that includes the desired negative and co-requisite
dependencies for the job being defined. You can, however, specify additional
dependency information at the bottom of the screen.
NEGATIVE Dependencies: The job being defined will not be submitted if the
named definition is either executing in MVS or in the JES input queue.
CO-REQUISITE Dependencies: The job being defined will only be submitted if
the specified co-requisites are executing.
Mantissa Corporation © 2013
Page - 65
Chapter 3
OPS/MASTER®
Job Definition Screen 1
Job Database Creation
These dependencies can be defined under a user-specified name. Enter that name
in this field. Refer to the description of the Negative/Co-Requisite Dependency
Screen in this section for more information.
MODEL / COUNT OF TAPES:
These fields define the model numbers and required number of concurrent drives
required to run the job. For example, 3490 => 02 3480 => 00 specifies that two
3490 drives and no 3480 drives are required. Setting the count to zeros indicates
no tapes of that model are required. The model numbers and counts are required
if the drives are to be checked for availability before job submission. The model
numbers can be any tape model defined in your system. If the model is not
found, a JM44 message will be displayed when the job is on the JOBQ. The
default models (if blanks are in the record) are 3420 and 3480 which were the
only models supported before version 5.2.1. If the job requires more than two
types of tapes, specify the two that have the most contention.
UPDATE DRIVE USAGE
You may enter a Y (yes) or N (no) in this field.
Y (Yes) = Update the number of drives used by this job after each run.
N (No) = Do not update the number of drives used.
(If you have responded “Y” to this field, the number of tape drives needed is
updated automatically by JOB/Master®).
SUBMIT OPTIONS
SUBMIT
This field is used to specify a time for the job to be submitted. Submit Time is
critical within the JOB/Master® system. Submission for execution is based on
the submit time. Any notification for delayed jobs is also based on the submit
time.
END
This optional field is used to specify a time for the job to end. Be sure you have
also specified a submit time. Additional submit/end times can be specified on the
Job Definition Screen 2.
This field is supplied for jobs needing to be executed multiple times during a
“Schedule Day.” A Submit time for the first execution is necessary. Enter the
number of required executions in this field.
MIN. BETWEEN RUNS
The number of minutes between each run is necessary for these multiple execution jobs. The minimum number of minutes that can be specified is ‘5’.
Example: If a job is to be run six (6) times beginning at 8:00 am and then every
20 minutes thereafter, the submit options would be as follows:
Page - 66
Mantissa Corporation © 2013
E:\Manuals\Product Manuals\ASO\OM (OPS Master)\Reference Guide\Current Release\OPS_C03.fm
NUMBER OF RUNS
OPS/MASTER®
Chapter 3
Job Database Creation
Job Definition Screen 1
SUBMIT 0800 END __ Number of Runs 06 Min. Between Runs 20
)
Using this feature, specifying the SUBMIT time and END times at 20 minute
intervals is not necessary. (Submit 0800 end 0820, submit 0820 end 0840, etc.)
If a previous execution does not complete successfully, the next execution will
not begin. The executions must complete normally, be purged, or be kept.
DEPENDENCY OPTIONS
This area of the screen allows you to enter a variety of dependency options. Many options
are independent of others. The options that are independent are separated by a vertical line
in the column header area.
The fields PRED JOBS (predecessor jobs) and TYP are associated. In addition, the
Dependencies are grouped together, as are the Keywords.
The last 5 columns are also grouped together. You can specify a condition code test. If the
condition code test is passed, you can specify a job to be triggered. If a trigger job(s) is
specified, be sure to enter an associated submit type(s). You can also enter a trigger type.
This area of the screen is scrollable. There is no practical limit to the number of dependency options you can specify. To view more dependency options at one time, go to Job
Definition Screen 2. All of these fields are described below:
PRED JOBS
E:\Manuals\Product Manuals\ASO\OM (OPS Master)\Reference Guide\Current Release\OPS_C03.fm
This stands for Predecessor Jobs. A predecessor job is any job that must run
before the job being defined can run. You can specify any job name, including
one that is not in the system currently being defined. Pred jobs have logical rules
which must become part of the scheduling process.
•
Pred jobs should have a logical flow with times. If jobs follow each other, the
times for the jobs should reflect the logical flow sequence of the jobs. Even if
they are scheduled just one minute apart the flow will retain its processing integrity.
•
Pred jobs can be both regular defined jobs or alternate definitions. If alternate
definition jobs are to be used as Pred’s then be sure they are defined as the Pred.
Do not use the regular defined job name. This is the purpose of alternate definitions.
Generic names can also be entered as a Pred. (i.e. AP1000-AP1001, etc., can be
entered as AP1*.) In this situation, the job being defined will not execute until all
jobs having “AP1” as their first 3 characters have completed successfully.
TYPE
The type of predecessor is entered here. Values are:
Mantissa Corporation © 2013
BLANK
Simple Predecessor. If the job specified is not on the
scheduling queue (JOBQ), then the job is considered
complete.
R
Required Predecessor. A Required Predecessor must
have been run for this job’s scheduled day and will be
checked even if the job is not on the JOBQ. This function requires additional checking and should not be
Page - 67
Chapter 3
OPS/MASTER®
Job Definition Screen 1
Job Database Creation
used indiscriminately. Additionally, if “R” is coded
then the predecessor cannot be bypassed on certain
days.
S
)
System Predecessor. Jobs in that system must be complete, not on the JOBQ, for the dependency to be satisfied.
If you select a job having a System Pred which belongs to the same system, you
may only have one of these jobs per schedule day.
N
Where N is a number from 1-9 indicating that the job
must have completed within N days to be considered
complete.
NEGATIVE DEP.
This column is used to specify any jobs that cannot be in the JES input queue or
be executing for the system to run the job being defined.
COREQ DEP.
This column is used to specify any jobs that must be running for the job being
defined to run.
PROCESS KEYWORD
A process keyword represents a set of conditions that, when true, causes the job
to be scheduled. If process keyword specified is not one of the standard keywords
provided with the system, be sure to define the keyword with the Keyword Definition Screen before the job is run. Refer to the description of the Process Keyword Definition Screen in this section for more information.
N-PROC KEYWORD
TRIG. JOB
Enter the name(s) of the trigger job(s) in this column which are to be triggered
from the execution of this job. You can also make the trigger dependent on
whether a condition code criteria is satisfied. If condition code criteria is desired,
enter the appropriate information in the OPCD and COND CODE columns on
the same row. If you specify a jobname, be sure to enter a submit type.
SUB TYP
Enter a submit type for each trigger job specified. (See previous reference in this
section.)
OP CD
This field is used if you want to run a condition code test, and to specify the operator for the test. One of the following operators can be specified:
Page - 68
Mantissa Corporation © 2013
E:\Manuals\Product Manuals\ASO\OM (OPS Master)\Reference Guide\Current Release\OPS_C03.fm
A non-process keyword represents a set of conditions that, when true, cause the
job not to be scheduled. If a non-process Keyword is used in conjunction with a
calendar, then a process Keyword must also be used. (The process keyword
WORKDAY will activate the calendar). Refer to the description of the Process
Keyword Definition Screen for more information.
OPS/MASTER®
Chapter 3
Job Database Creation
Job Definition Screen 1
L
Less Than. (excluding user and system abends)
G
Greater Than. (excluding user and system abends)
E
Equal To.
N
Not Equal To.
S
The value in the condition code field is a system abend code. Will compare as an Equal To.
U
The value in the COND code field is a user abend code. Will compare as
an Equal To.
COND CODE
Enter the value of the condition code for which you are testing.
TRIG TYPE
This field specifies what happens to a job (if TRIGGER JOB is blank) or a
TRIGGER JOB (if a JOBNAME is present).
I
Include this job if the COND code value is met (default).
E
Exclude this job if the COND code value is met.
F
Treats COND code value as a Failure condition.
O
This trigger job overrides all other trigger jobs.
(blank) If Jobname is blank then treat this job as successful if the condition code
value is met. If Jobname is not blank then process like (I) code.
E:\Manuals\Product Manuals\ASO\OM (OPS Master)\Reference Guide\Current Release\OPS_C03.fm
Trigger and Condition Code Information
The following table will indicate the possible options and outcomes when specifying the
Trigger and Condition Code information. The following information about whether a job
completes successfully or fails is dependent on the global option “REQ ZERO C.C.”. If
the option is equal to “Y”, then a zero condition code is the default successful completion
code but you may add other codes in this section which are to be considered successful
also. If the option is equal to “N”, then you must tell JOB/Master® in this section what
condition codes are to be considered successful. Remember if a Trigger jobname is
present, then the comparison and actions apply to that trigger job only. If a Trigger jobname is blank, then the comparisons and actions apply to the job itself AND the system
will set the successful/fail status based only on the comparisons found in the jobs definition. Also, the last code comparison found to match will be the one whose TRIGTYPE
value will apply.
TRIGJOB
SUBTYPE
Jobname
any
Jobname
any
Jobname
any
Mantissa Corporation © 2013
OPCD
COND
CODE
TRIGTYPE
RESULT
Triggers jobname if job
completed successfully.
any
any
F
Triggers jobname if job
failed.
not equal F
If OPCD & CONDCODE
match, process this job
based on trigger type if job
completes successfully.
Page - 69
Chapter 3
OPS/MASTER®
Job Definition Screen 1
Job Database Creation
SUBTYPE
OPCD
COND
CODE
TRIGTYPE
RESULT
Jobname
any
any
any
F
Trigger job if OPCD and
CONDCODE match and
job failed.
Blank
n/a
any
any
not equal F
If OPCD & CONDCODE
match, indicates this job
completed successfully.
Blank
n/a
any
any
F
If OPCD & CONDCODE
match, indicates this job
Failed.
E:\Manuals\Product Manuals\ASO\OM (OPS Master)\Reference Guide\Current Release\OPS_C03.fm
TRIGJOB
Page - 70
Mantissa Corporation © 2013
OPS/MASTER®
Chapter 3
Job Database Creation
Job Definition Screen 2
Job Definition Screen 2
--------------------- JOB/Master® Job Definition For TESTJ Row 1 to 11 of 72
Command ===>
Scroll ==> PAGE
------------------------------- Submit Options ------------------------------Submit=> 0000 End=> 0000 Number Of Runs=> 00 Minutes Between Runs=> 0000
Additional Submit Times
Submit End
Submit End
Submit End
Submit End
2 0000 0000
3 0000 0000
4 0000 0000
5 0000 0000
6 0000 0000
7 0000 0000
8 0000 0000
9 0000 0000
---------------------------> Dependency Options <--------------------------Pred
| Negative Coreq
| Process N-Proc
| Trig
Sub: OP Cond Trig
Jobs Typ|
Dep
Dep
| Keyword Keyword |
Job
Typ: CD Code Ttyp
-------- - | -------- -------- | -------- -------- | -------- - : - ---- ________ _ | ________ ________ | ________ ________ | ________ _ : _ ____ _
________ _ | ________ ________ | ________ ________ | ________ _ : _ ____ _
________ _ | ________ ________ | ________ ________ | ________ _ : _ ____ _
________ _ | ________ ________ | ________ ________ | ________ _ : _ ____ _
________ _ | ________ ________ | ________ ________ | ________ _ : _ ____ _
________ _ | ________ ________ | ________ ________ | ________ _ : _ ____ _
________ _ | ________ ________ | ________ ________ | ________ _ : _ ____ _
________ _ | ________ ________ | ________ ________ | ________ _ : _ ____ _
________ _ | ________ ________ | ........ ........ | ________ _ : _ ____ _
________ _ | ________ ________ | ........ ........ | ________ _ : _ ____ _
If you require additional submit/end times and dependency options, use this screen.
Remember, however, that the Dependency Options area of Screen 1 is scrollable. Any
submit options and dependency options specified on screen 1 will be displayed on screen
2.
Refer to the field descriptions of Job Definition screen 1 for more information on the individual fields.
Multiple submit times should not be specified for trigger jobs.
E:\Manuals\Product Manuals\ASO\OM (OPS Master)\Reference Guide\Current Release\OPS_C03.fm
)
Mantissa Corporation © 2013
Page - 71
Chapter 3
OPS/MASTER®
Job Definition Screen 3
Job Database Creation
Job Definition Screen 3
------------------- JOB/Master® Job Definition For
Command ===>
TESTJOB1
--------------
Run Mode
==> P
(P=Production, C=Check, S=Select)
Do Not Schedule Before ==> 00000
(YYDDD)
Do Not Schedule After ==> 00000
(YYDDD)
External Submit
==> N
(Y=Not Submitted By JOB/Master®)
Deadline Cancel
==> N
(Y=Cancel From JOBQ)
Wait ==> 000 Minutes
Job Fail Userid
==> _______
Send Fail Msg - (JM39) ==> N
(Y,N)
-----------------------------------------------------------------------------Message Definition
==> ________ Message Group ==> ________
Repair Job
==> ________ Submit Type
==> _ (A,C,M,R,S,T)
------------------------------------------------------------------------------***
Hold Job For
*** | *** Output Processing Information ***
DATA ENTRY
==> N (Y,N)
|
Burst
==> N (Y,N)
CARD INPUT
==> N (Y,N)
|
Fiche
==> N (Y,N)
TAPE INPUT
==> N (Y,N)
|
Decollate
==> N (Y,N)
CONSOLE ROUTED
==> N (Y,N)
|
Photocopy
==> N (Y,N)
JCL SETUP
==> N (Y,N)
|
Other
==> N (Y,N)
------------------------------------------------------------------------------Hold Job on Schedule Queue for Output Posting ==> N
(Y=Requires manual posting after job completion, through Job Tracking
Manual Task Display)
RUN MODE
The Run Mode option allows the user to schedule jobs according to the readiness
of the application. Jobs can be scheduled to actually execute or only simulate
execution. There are three possible Run Mode options:
PRODUCTION (P)
Global Record(Profile):
Can be overridden at the System and Job level.
System Record:
Can be overridden at the Job level.
Job Record:
Will place job onto LQ and actually run JCL.
Once JOB/Master® has been installed and system testing completed, the Global
Record in the Profile should be changed to production mode so jobs may begin
executing. From that point forward (taking into consideration site standards and
change control procedures) the majority of the jobs in the system will be executed.
CHECK (C)
Global Record(Profile):
Cannot be overridden at the System and Job level.
System Record:
Cannot be overridden at the Job level.
Job Record:
Will place job onto LQ but will simulate execution.
When To Use CHECK:
Check mode is most often used to test a job or system and its interaction with
JOB/Master® functions. Scheduling criteria can be defined to the JOB/Master®
Data Base before the programs are ready when the system or job is put in check
Page - 72
Mantissa Corporation © 2013
E:\Manuals\Product Manuals\ASO\OM (OPS Master)\Reference Guide\Current Release\OPS_C03.fm
When To Use PRODUCTION:
OPS/MASTER®
Chapter 3
Job Database Creation
Job Definition Screen 3
mode. Check mode only simulates the job execution, as none of the execution
JCL actually gets moved to the JMSTGPDS or is called at submit time. This
JMSTGPDS technique gives an opportunity to make certain everything is working properly, jobs are scheduling, predecessor relationships are met, triggers are
working etc. BEFORE all jobs are moved into production.
SELECT (S)
Global Record(Profile):
N/A
System Record:
Will default to check mode unless overridden at the
Job level.
Job Record:
Will default to check mode unless included on LQ
prior to submit.
When To Use SELECT:
During the last phase of testing, some jobs in a new or modified application
stream may not be ready to execute regularly in production. Also, User Departments may have a series of jobs that may or may not need to be executed that
night and they do not know before the schedule is run. Jobs with select mode,
will be placed on the JOBQ, but will default to executing in check mode, unless
the job is included from the LQ prior to submission.
)
Select mode should NOT be used indiscriminantly because of overhead and
storage issues in processing the JOBQ.
DO NOT SCHEDULE BEFORE
If you enter a date in this field, the system will not submit the job before the specified date (overriding keyword and calendar definitions). The date must be
entered in the form YYDDD.
DO NOT SCHEDULE AFTER
E:\Manuals\Product Manuals\ASO\OM (OPS Master)\Reference Guide\Current Release\OPS_C03.fm
If you enter a date in this field, the system will not submit the job after the specified date (overriding keyword and calendar definitions). The date must be in the
form YYDDD.
*The above 2 fields are very useful in pre-defining jobs and systems before they
are actually necessary to be in full production.
EXTERNAL SUBMIT
Enter Y in this field if the job is to be submitted from outside of JOB/Master®. If
you enter Y, the system will treat the job as if it were submitted from within a
JOB/Master® schedule. Jobs will be triggered, act as Predecessor jobs, etc.
DEADLINE CANCEL
This field is used only if a submit time(s) was specified on the first job definition
screen (or optionally on the second job definition screen). If you specify Y in this
field, the system will not run the job if it is submitted after the specified start
time(s). The job will be cancelled from the JOBQ after the required time has
elapsed. If you enter N (this is the default) in this field, the system will run the
job even if it is submitted past the specified start time(s).
Mantissa Corporation © 2013
Page - 73
Chapter 3
OPS/MASTER®
Job Definition Screen 3
Job Database Creation
WAIT
This field accompanies the Deadline Cancel ==> field. If you specify Y in the
Deadline Cancel, you can also specify a number of minutes from the time the
system discovers it should cancel the job until the job is actually cancelled. If 000
is used, the system will wait 1 schedule scan cycle and 1 minute before cancelling. (Refer to tracking section).
JOB FAIL USER ID
Specify the user ID of the person who should receive the Job Fail (JM02) message, if it is issued.
(SEND FAIL MSG) / USE JM39 MSG
“Y” would send JM39 error message to console if job failed. See ISF discussion
of the special handling of the JM39 message.
MESSAGE DEFINITION
This stands for Manual Task Message Group. The 8-character name specified in
this field refers to a pre-defined set of messages that will be displayed when
Manual Tasks must be completed for the job to run successfully. The messages
are defined within the Add Manual Task Message Definition..
MESSAGE GROUP
The 8-character name specified in this field represents the group of people who
will receive all manual task messages generated from this job. The notify group
is defined within the Add Message Group.
REPAIR JOB
Enter the name of a job to be run in the event that the scheduled job abends. The
repair job should be defined to the Database as a triggered job, no other fields are
required.
SUBMIT TYPE (A/M/S)
A
JOB/Master® will automatically submit the job from the
JOB/Master® PDS.
M
JOB/Master® will not submit the job without operator intervention.
S
JOB/Master® will issue an MVS start command for the jobname.
HOLD JOB FOR
There are five manual tasks for which the system can hold a job on the queue
until the tasks are complete and manually signed off. The default task names are
shown:
DATA ENTRY
CARD INPUT
TAPE INPUT
CONSOLE ROUTED
JCL SETUP
Page - 74
Mantissa Corporation © 2013
E:\Manuals\Product Manuals\ASO\OM (OPS Master)\Reference Guide\Current Release\OPS_C03.fm
This submit type refers to the repair job. There are three submit types available
for the repair job:
OPS/MASTER®
Chapter 3
Job Database Creation
Job Definition Screen 3
Specify Y next to the desired manual tasks and the system will not consider the
job eligible for submission until these tasks are manually signed off.
The names of these tasks can be changed in the Profile option of JOB/Master®
(described in this manual). You can also display messages on the console
prompting the operator to perform these tasks. The messages are entered on Job
Definition screen 4. If you specify Y to any manual task field, the message screen
will be presented for entry. An N in all manual task fields will by-pass the message screen.
If you plan to use symbolic substitution on JCL setup you must leave the 5th
manual task to specify JCL setup. Refer to the section on “Job Tracking” and the
tutorial “Signing Off On Manual Tasks” for more information.
OUTPUT PROCESSING REQUIREMENTS
Specify Y next to the desired output medias that will be used for the job. If you
want to tell the system to hold the job until the desired output media(s) are prepared and the task signed off, specify Y in the HOLD JOB ON SCHEDULE
QUEUE FOR OUTPUT POSTING ==> field. You cannot modify the names of
the output medias shown on the screen.
HOLD JOB ON SCHEDULE QUEUE FOR OUTPUT POSTING
E:\Manuals\Product Manuals\ASO\OM (OPS Master)\Reference Guide\Current Release\OPS_C03.fm
Specify Y in this field if you want the system to hold the job on the queue until
the specified output processing requirement(s) is manually signed off. Jobs held
for output processing will be marked successfully completed if they are successful, allowing for the triggering and predecessor functions to continue normally.
Refer to the section “Posting Manual Task Complete” in the tutorial “Signing Off
On Manual Tasks” for more information.
Mantissa Corporation © 2013
Page - 75
Chapter 3
OPS/MASTER®
Job Definition Screen 4
Job Database Creation
Job Definition Screen 4
-------------- JOB/Master® Manual Task Message Definition
Command ===>
TESTJOB1
--------
Desc: ______________________________________________________________________
Send
000 minutes before submit time or, after dependencies => N
(Y,N)
At a frequency interval of => 005 Minutes
1 DATA ENTRY
Message to Userid/Console => _______
Msg= ______________________________________________________________________
2 CARD INPUT
Message to Userid/Console => _______
Msg= ______________________________________________________________________
3 TAPE INPUT
Message to Userid/Console => _______
Msg= ______________________________________________________________________
4 CONSOLE ROUTED
Message to Userid/Console => _______
Msg= ______________________________________________________________________
5 JCL SETUP
Message to Userid/Console => _______
Msg= ______________________________________________________________________
DESC
Brief description to help understand the manual tasks required. The information
on this panel can be overridden by the Message Definition (to specify a standard
set of messages) and/or Message Group (to specify a large group of users). These
fields are specified on Job Definition Screen 3.
SEND 0000 MIN. BEFORE SUBMIT TIME
If a manual task message(s) is to be sent, you can specify that the message(s) be
issued a specific number of minutes before the scheduled submit time. Enter the
desired number of minutes in this field. The default is 0000 (zero).
If you want to issue the manual task message(s) after all the dependency jobs
have successfully completed, enter Y in this field. Only specify Y if you did not
enter a value in the SEND 0000 MIN. BEFORE SUBMIT TIME ==> field.
AT A FREQUENCY INTERVAL OF=> 005 MINUTES
You can specify how often you want to issue the manual task message(s). You
can enter a value in this field, regardless of whether you specified a value in the
SEND 0000 MIN. BEFORE SUBMIT TIME or AFTER DEPENDENCIES ==>
field. The default for this field is 005 minutes. That means, unless specified otherwise, the message(s) will be issued every 5 minutes until the task is manually
signed off. Refer to the tutorial “Signing Off On Manual Tasks” in this manual.
DATA ENTRY
Enter the desired message for the first manual task.
CARD INPUT
Page - 76
Mantissa Corporation © 2013
E:\Manuals\Product Manuals\ASO\OM (OPS Master)\Reference Guide\Current Release\OPS_C03.fm
OR, AFTER DEPENDENCIES => _ (Y,N)
OPS/MASTER®
Chapter 3
Job Database Creation
Job Definition Screen 4
Enter the desired message for the second manual task.
TAPE INPUT
Enter the desired message for the third manual task.
CONSOLE ROUTED
Enter the desired message for the fourth manual task.
JCL SETUP
Enter the desired message for the fifth manual task.
)
Each of these five manual tasks will have their respective messages sent to the
userid in the task specified in MSG to USERID/CONS==> field.
USERID/CONS
Enter the desired ID which is to receive the message. JM05 in the product default
record or user record must be set (See the Interactive Security Facility manual) in
order for these messages to be delivered.
= Any valid TSO userid.
= Any valid console address authorized to receive
message information or “0” for the Master Console.
E:\Manuals\Product Manuals\ASO\OM (OPS Master)\Reference Guide\Current Release\OPS_C03.fm
- USERID
- CONS
Mantissa Corporation © 2013
Page - 77
Chapter 3
OPS/MASTER®
Job Definition Screen 5
Job Database Creation
Job Definition Screen 5
--------------------- JOB/Master® Job Definition For
Command ===>
TESTJOB1
--------------
------------------------------------------------------------------------------Job Description
==> ____________________
Pprocedure Name
==> ________
Programmer Name
==> ____________________
Submitting Dept
==> ____________________
User Department
==> ____________________
Output Destination ==> ____________________
Delivery Method
==> ____________________
------------------------- Abending Contact Information -----------------------Contact Name ==> ____________________ Phone ==>( ___ ) ___
Beeper ==>( ___ ) ___
____ Ext ==> _____
____
------------------------------------------------------------------------------Run-Exit Ins= ___________________________________________________________
This is a job documentation screen. If the SYSTEM DEFINITION screen is used it will
provide the information which could be presented here. If the JOB DEFINITION DOCUMENTATION screen is used, the information will override the SYSTEM DEFINITION
screen.
JOB DESCRIPTION
This free-form field is used to enter a brief description of the job being defined.
PROCEDURE NAME
This field is used to enter the PROC name.
PROGRAMMER NAME
SUBMITTING DEPT
This free-form field is used to enter the name of the department which will be
submitting the job.
USER DEPARTMENT
This free-form field is used to enter the name of the department that will use the
output from the job.
OUTPUT DESTINATION
This free-form field is used to enter a description of the destination of the output
from the job.
Page - 78
Mantissa Corporation © 2013
E:\Manuals\Product Manuals\ASO\OM (OPS Master)\Reference Guide\Current Release\OPS_C03.fm
This free-form field is used to enter the name of the programmer who created the
job definition.
OPS/MASTER®
Chapter 3
Job Database Creation
Job Definition Screen 5
DELIVERY METHOD
This free-form field can be used to specify how the output will be delivered to the
user department.
CONTACT NAME
This free-form field can be used to enter the name of the person that the operator
should contact in the event of a job abend.
PHONE
This field can be used to enter the phone number of the abend contact.
EXT
This field can be used to enter the phone extension of the abend contact.
BEEPER
This field is used to enter the beeper number of the person who should be notified
in the event of a job abend.
RUN-EXIT INS
This free-form field can be used to specify instructions to be performed when the
job has completed.
E:\Manuals\Product Manuals\ASO\OM (OPS Master)\Reference Guide\Current Release\OPS_C03.fm
If the job being defined is a started task then the first data present in this field
should be the JMACT=&JID parameter. A space should separate this parm from
any other free-form description required for the Run-Exit Instructions.
Mantissa Corporation © 2013
Page - 79
Chapter 3
OPS/MASTER®
Job Step Definition Screen
Job Database Creation
Job Step Definition Screen
-------------------- JOB/Master® Jobstep Definition Screen - Row 1 to 8 of 8
Command ===>
Scroll ==> PAGE
For Job => TESTJOB1
Stepname => STEP010
Procstep => STEP010
Pgm Desc => ____________________
Programer Name => ____________________
Run Instructions = ________________________________________
Repair Job=> _______ Subtype=> _
Program Name
=> ________
--------------------------- Dependency Definitions --------------------------Triggered
Sub
OP
Cond
Trig
Jobs
Typ
CD
Code
Type
------------________
_
_
____
_
________
_
_
____
_
________
_
_
____
_
________
_
_
____
_
________
_
_
____
_
________
_
_
____
_
________
_
_
____
_
________
_
_
____
_
******************************* Bottom of data ********************************
The Job Step Definition need only be defined to the database for the following:
(1) trigger criteria will be necessary at the job step level,
(2) history tracking and statistics are required for the job step(s). Adherence to all MVS
naming conventions is required!
Defining of job steps begin at the JOB/Master® DATA BASE FUNCTIONS screen.
STEPNAME
The name of a procedure where the proc stepname is.
PROC STEPNAME
The name of the step to be processed. (It is the statement with
the pgm=).
The above screen will then be displayed.
)
To add a job step for a job, the job must be defined first. (An illogical add message will appear if this is attempted).
This screen is used to define any desired job steps. The process of creating a job step definition can be completed more rapidly by using the COPY command. The COPY command allows you to copy an existing job step definition into the one being created. Once
the definition is copied, modifications can be made, as needed. The COPY command will
copy only descriptive information about the job step. The COPYALL command will copy
all fields of the existing job definition. Certain fields specific to the “copy from” job step
will not be copied. Simply enter the desired command in the COMMAND ==> field and
press <ENTER>. (Refer to COPY - COPYALL in Job Definition this section.)
Page - 80
Mantissa Corporation © 2013
E:\Manuals\Product Manuals\ASO\OM (OPS Master)\Reference Guide\Current Release\OPS_C03.fm
From there, enter OPTION==> A. Type J and the NAME==> Jobname for the name of the
job that a step is to be defined for. Then fill out the following:
OPS/MASTER®
Chapter 3
Job Database Creation
Job Step Definition Screen
FOR JOB
The system automatically displays the name of the job, as specified on the JOB/
Master® DATA BASE FUNCTIONS screen.
STEPNAME
Refers to the step within the JCL which calls program or proc. The system automatically displays the name of the step, as specified on the JOB/Master® DATA
BASE FUNCTIONS screen.
PROC STEP
Refers to the step within the proc which calls the program.
PGM DESC.
This free-form field can be used to enter a brief description of the program run by
the job step.
PRGRMR NAME
This free-form field can be used to enter the name of the programmer who created the job step definition.
RUN INSTRUCTIONS
This free-form field can be used to enter instructions that are to be performed at
the end of the job step.
REPAIR JOB
This field is used to specify the name of a job to run in the event that the job step
abends.
Repair jobs should be defined as triggered jobs to the database. No other fields
are required.
ST
E:\Manuals\Product Manuals\ASO\OM (OPS Master)\Reference Guide\Current Release\OPS_C03.fm
This field is used to specify the submit type of the repair job. The following submit types can be specified:
A
JOB/Master® will automatically submit the job from the
JOB/Master® PDS.
M
JOB/Master® will not submit the job without operator intervention.
S
JOB/Master® will issue an MVS start command for the jobname.
PROGRAM NAME
This field is used to specify the name of the program that is to be run with this job
step.
DEPENDENCY DEFINITIONS
TRIGGERED JOBS
Enter the name(s) of the trigger job(s) in this column which are to be triggered
from the execution of this Job Step. You can also make the trigger dependent on
whether a condition code criteria is satisfied. If condition code criteria is desired,
enter the appropriate information in the OPCD and COND CODE columns on
the same row. If you specify a jobname, be sure to enter a submit type.
Mantissa Corporation © 2013
Page - 81
Chapter 3
OPS/MASTER®
Job Step Definition Screen
Job Database Creation
SUB TYP
Each trigger job specified must have an associated submit type. You can specify
one of the following submit types:
A
Automatic. Submitted by JOB/Master® from the submit PDS
(default).
C
Command Stream.
M
Manual. Requires manual intervention. Submitted from the submit PDS,
using JOB/Master® submit commands
R
Repeating. The task will continue to be rescheduled and submitted,
based on user command until the last run is signaled complete by the
user. This type of submit is useful when the number of iterations for a
job is variable. Refer to Job Tracking section (Submit or Restart).
S
Started Task. Started task initiated by JOB/Master®.
T
Wait for time.
OP CD
This field is used if you want to run a condition code test. This field is used to
specify the operator for the test. One of the following operators can be specified:
L
Less Than (excluding User and System Abends)
G
Greater Than (excluding User and System Abends)
E
Equal To
N
Not Equal To
S
The value in the condition code field is a system abend code. All “S”
COND codes are considered failed codes. Will compare as an Equal To.
U
The value in the COND code field is a user abend code. Will compare as
an Equal To.
COND CODE
Enter the value of the condition code for which you are testing.
This field specifies what happens to a job (if TRIGGER JOB is blank) or a
TRIGGER JOB (if a JOBNAME is present).
I
Include this job if the COND code value is met.
E
Exclude this job if the COND code value is met.
F
Treats COND code value as a Failure condition.
O
This trigger job Overrides all other trigger jobs.
(blank) If Jobname is blank, then treat this job as successful if the condition
code value is met. If Jobname is not blank then process like (I) code.
Trigger and Condition Code Information
The following table will indicate the possible options and outcomes when specifying the
Trigger and Condition Code information. The following information about whether a job
completes successfully or fails is dependent on the global option “REQ ZERO C.C.”. If
Page - 82
Mantissa Corporation © 2013
E:\Manuals\Product Manuals\ASO\OM (OPS Master)\Reference Guide\Current Release\OPS_C03.fm
TRIGGER TYPE
OPS/MASTER®
Chapter 3
Job Database Creation
Job Step Definition Screen
the option is equal to “Y”, then a zero condition code is the default successful completion
code but you may add other codes in this section which are to be considered successful
also. If the option is equal to “N”, then you must tell JOB/Master® in this section what
condition codes are to be considered successful. Remember if a Trigger jobname is
present, then the comparison and actions apply to that trigger job only. If a Trigger jobname is blank, then the comparisons and actions apply to the job itself AND the system
will set the successful/fail status based only on the comparisons found in the JOBSTEP
definition. Also, the last code comparison found to match will be the one whose TRIGTYPE value will apply.
TRIGJOB
SUBTYPE
OPCD
Jobname
any
Jobname
any
Jobname
any
any
Jobname
any
Blank
Blank
COND
CODE
TRIGTYPE
RESULT
Triggers jobname if step
completed successfully.
Triggers jobname if step
failed.
any
not equal F
Process this job based on
trigger type if OPCD &
CONDCODE match and
completes successfully.
any
any
F
Trigger job if OPCD and
CONDCODE match and
step failed.
n/a
any
any
not equal F
If OPCD & CONDCODE
match, indicates this step
completed successfully.
n/a
any
any
F
If OPCD & CONDCODE
match, indicates this step
failed.
E:\Manuals\Product Manuals\ASO\OM (OPS Master)\Reference Guide\Current Release\OPS_C03.fm
F
Mantissa Corporation © 2013
Page - 83
Chapter 3
OPS/MASTER®
Calendar Definition Screen
Job Database Creation
Calendar Definition Screen
The CALENDAR DEFINITION screen is used to establish a calendar or exception calendar for jobs in the database. For JOB/Master® to properly schedule, two calendars must be
created (WORKDYnn and HOLIDYnn, where; nn = the current year). Even if no dates are
marked in the calendar, they must be created for each calendar year. (Refer to Calendar
Propagation which describes the way JOB/Master® sets up a new calendar at the beginning of a new year.) The WORKDYnn calendar is the calendar which tells JOB/Master®
the valid work days in the year. The HOLIDYnn calendar is the calendar which tells JOB/
Master® the holidays in the year. JOB/Master® will read the default HOLIDYnn and
WORKDYnn Calendars without them being present in a job's Data Base Definition.
If the WORKDYnn calendar is not appropriate for a job, you can create a uniquely named
calendar which will meet its needs. If the HOLIDYnn calendar is not appropriate for a
job, you can create uniquely named exception calendars which will meet its needs. However, if you do so, they must be referenced in the job's database definition as a calendar
and/or an exception calendar. Uniquely named calendars that do not end with a year suffix
must be manually updated from year to year.
Defining Calendars begins at the JOB/Master® DATA BASE FUNCTIONS screen..
------------------------ JOB/Master® Data Base Functions ----------------------Command ===>
ID: JM01
User = P390K
Date = 98/09/01 - 98.244 Time = 11:56
-------------------------------------------------------------------------------Option ==> A
A dd / B rowse
/ U pdate
Type
J ob
C alendar
/ S ystem
/ N eg and Coreq
/ D ataset
/ D elete
/ I nquire Index
/ P rocess Keyword
/ G roup Message
/ M essage
Name
Stepname
Proc Stepname
==> CALTEST_
==> ________
==> ________
Data Set Name
==> ____________________________________________ (If Type D)
CONFIRM = PF4
(Stepname (PROC) if jobstep definition)
(Stepname (PGM=) if jobstep definition)
CANCEL= PF5
or type “CANCEL” or “CONFIRM” at Command
line when processing Data Base options
A
=
Add
C
=
Calendar
CALTEST
=
Name (Calendar being defined)
This same screen can be used to define base and exception calendars. The screen is shown
in the following illustration:
Page - 84
Mantissa Corporation © 2013
E:\Manuals\Product Manuals\ASO\OM (OPS Master)\Reference Guide\Current Release\OPS_C03.fm
==> C
OPS/MASTER®
Chapter 3
Job Database Creation
Calendar Definition Screen
---------------- JOB/Master® Calendar Definition Screen ----------------Command ===>
------------------------------------------------------------------------------Calendar Name => CALTEST
Year => 98 Schedule/Net => ********
Description => ____________________________________________________
Month
Week
Relday
Actdate
=>
=>
=>
=>
__
_
__
__
__
__
__
_
__
__
__
__
__
_
__
__
__
__
__
_
__
__
__
__
__
_
__
__
__
__
__
_
__
__
__
__
__
__
__
__
__
__
__
__
__
__
__
__
__
__
__
__
__
__
__
__
---------------------- Period Start and End Dates (MMDD) ---------------------1. 0000 0000
2. 0000 0000
3. 0000 0000
4. 0000 0000
5. 0000 0000
6. 0000 0000
7. 0000 0000
8. 0000 0000
9. 0000 0000
10. 0000 0000
11. 0000 0000
12. 0000 0000
13. 0000 0000
All the days of the calendar generated by the entries on this screen can be viewed or modified on the JOB/Master® CALENDAR DISPLAY/UPDATE screen. (Refer to JOB/Master® DATABASE FUNCTION screen.)
CALENDAR NAME
This field is used to specify the name of the calendar being created. This name
can be up to 8 alphanumeric characters.
SCHEDULE/NET
E:\Manuals\Product Manuals\ASO\OM (OPS Master)\Reference Guide\Current Release\OPS_C03.fm
This field provides a customer with the ability to group a schedule or network of
jobs into an identifiable entity. Security can be established on this group which
now limits any and all access to the various criteria specified as belonging to this
group.
The field is eight (8) characters in length and must be previously set up using ISF
(Security feature).
DESCRIPTION
This free-form field can be used to enter a description of the calendar application.
MONTH
This area is used to specify the months (01 through 12) that you want included in
this calendar. If you specify A in the first field, the system will assume that you
want to include all 12 months in the calendar.
If individual months are to be entered with variable weeks, days, etc., define the
first month, only fields necessary, and press enter. A second screen will be presented. Continue as may be required. The month’s number must be entered in it’s
positional slot (i.e., month 03 in slot 03, etc.).
Mantissa Corporation © 2013
Page - 85
Chapter 3
OPS/MASTER®
Calendar Definition Screen
Job Database Creation
WEEK
This area is used to specify the weeks (1 thru 6) that you want included in each
month. The extra weeks accommodate months that have partial weeks at the
beginning and end. If you specify A in the first field, the system will assume that
you want to include all weeks for each month in the calendar.This week’s number
must be entered in its positional slot (i.e., week 2 in slot 2, etc.).
RELDAY
This area is used to specify the relative days (Monday thru Sunday) you want
included in each week on the calendar. Enter the following day codes:
MO
Monday
TU
Tuesday
WE
Wednesday
TH
Thursday
FR
Friday
SA
Saturday
SU
Sunday
If you specify A in the first field, the system will assume that you want to include
all days of each week. Specifying relative days will create a relative calendar.
Calendar Rotation from year to year now becomes a Relative Day Rotation.
Refer to “Calendar Propogation” in this section.
ACTDATE
This area of the screen can be used to enter specific days (01 thru 31) you want
included in each month on the calendar. You do not need to place the Actual Date
in the appropriate blank field. (05 does not have to be in the fifth blank field if 12-3-4 are not used.)
PERIOD START END DATES
For example, suppose you want the first period (January) to begin on the 5th and
end on the 20th, you would enter 5 and 20 in the first period fields. The first
period corresponds to January, the second period corresponds to February, etc.
The thirteenth period corresponds to January of the following year. Format for
these fields:
MMDD MMDD - 0105 0120
If nothing is entered in these fields, the default is the first and last day of the
month.
To aid in the creation of Calendars requiring period date, the COPYPER (Copy
Period) command allows for the Period Dates to be copied from one calendar to
the next.
COPYPER xxxxxxxx (where x’s are another calendar having the desired
periods).
Page - 86
Mantissa Corporation © 2013
E:\Manuals\Product Manuals\ASO\OM (OPS Master)\Reference Guide\Current Release\OPS_C03.fm
This area of the screen is used to alter the start and end dates of each month (plus
January of the following year).
OPS/MASTER®
Chapter 3
Job Database Creation
Calendar Definition Screen
Calendar Display/Update
The CALENDAR DISPLAY/UPDATE screen can be used to view an entire calendar year
on one screen. The contents of this screen can be generated from the specifications on the
JOB/Master® CALENDAR DEFINITION screen. The changes can be made from the
DISPLAY/UPDATE screen. The literal characters show which days have been selected as
valid run days (or non-valid days if the calendar is an exception calendar). This screen
looks like the illustration below:
MON-FRI ------------ JOB/Master® Calendar Display/Update -----------Command ===>
-------------------------- Period Start and End Dates ------------------------1. 0000 0000
2. 0000 0000
3. 0000 0000 4. 0000 0000
5. 0000 0000
6. 0000 0000
7. 0000 0000
8. 0000 0000 9. 0000 0000 10. 0000 0000
11. 0000 0000 12. 0000 0000 13. 0000 0000
Description =>
Last Updated by P390K
on 98244 at 1201 ===========Schedule/Net=> ********
|Year: 98
| | | | | | | | | |1|1|1|1|1|1|1|1|1|1|2|2|2|2|2|2|2|2|2|2|3|3 |
| *CAL/REL | 1|2|3|4|5|6|7|8|9|0|1|2|3|4|5|6|7|8|9|0|1|2|3|4|5|6|7|8|9|0|1 |
|===========|===============================================================|
| Jan( THU )| H F - - M T W H F - - M T W H F - - M T W H F - - M T W H F - |
| Feb( SUN )| - M T W H F - - M T W H F - - M T W H F - - M T W H F |
| Mar( SUN )| - M T W H F - - M T W H F - - M T W H F - - M T W H F - - M T |
| Apr( WED )| W H F - - M T W H F - - M T W H F - - M T W H F - - M T W H
|
| May( FRI )| F - - M T W H F - - M T W H F - - M T W H F - - M T W H F - - |
| Jun( MON )| M T W H F - - M T W H F - - M T W H F - - M T W H F - - M T
|
| Jul( WED )| W H F - - M T W H F - - M T W H F - - M T W H F - - M T W H F |
| Aug( SAT )| - - M T W H F - - M T W H F - - M T W H F - - M T W H F - - M |
| Sep( TUE )| T W H F - - M T W H F - - M T W H F - - M T W H F - - M T W
|
| Oct( THU )| H F - - M T W H F - - M T W H F - - M T W H F - - M T W H F - |
| Nov( SUN )| - M T W H F - - M T W H F - - M T W H F - - M T W H F - - M
|
| Dec( TUE )| T W H F - - M T W H F - - M T W H F - - M T W H F - - M T W H |
=============================================================================
DESCRIPTION
If a description was entered on the JOB/Master® CALENDAR DEFINITION
SCREEN, this description will be automatically displayed. If it was not already
specified, enter a description of the calendar application in this free-form field.
E:\Manuals\Product Manuals\ASO\OM (OPS Master)\Reference Guide\Current Release\OPS_C03.fm
YEAR
If you specified a year on the JOB/Master® CALENDAR DEFINITION
SCREEN, the year will automatically be displayed. If it was not already specified, enter the last two digits of the year in this field.
CALENDAR DISPLAY
This area shows the days that were specified for the calendar based on the entries
on the JOB/Master® CALENDAR DEFINITION SCREEN. If the Calendar Definition screen was not used to specify all desired days, simply place an X on the
days you want to include in this calendar. It is not necessary to use the literal day
of week. The X will be converted to the appropriate literal.
PERIOD START AND END DATES
This area of the screen is used to alter the start and end dates of each month (plus
January of the following year).
Mantissa Corporation © 2013
Page - 87
Chapter 3
OPS/MASTER®
Calendar Definition Screen
Job Database Creation
For example, suppose you want the first period (January) to begin on the 5th and
end on the 20th, you would enter 5 and 20 in the first period fields. The first
period corresponds to January, the second period corresponds to February, etc.
The thirteenth period corresponds to January of the following year.
Format = MMDD MMDD
To aid in the creation of Calendars requiring period date, the COPYPER (Copy
Period) command allows for the Period Dates to be copied from one calendar to
the next.
COPYPER xxxxxxxx (where x’s are another calendar having the desired
periods).
Year End Calendar Propogation
Overview
JOB/Master® calendars do not have to be redefined each time a new year begins. The calendars will be automatically adjusted according to the calendar type, as defined to the
database. Those calendars which have been defined as CALNAMnn, where nn is the year
suffix, such as 92, 93, etc., will cause some special processing and will be discussed
below. Calendars will be changed based on the type of calendar. The type attribute of a
calendar can be determined by displaying the calendar or by looking on the table display
which results from the INQ function in database display. Refer to the section “What You
Need To Do” later in this section. A description of the types of calendars and the method
used to propogate calendars will be described below.
Relative Calendars
These are calendars (“CAL/REL”) which have been defined using relative terms such as
MO, WE, etc., and will be changed according to the following manner:
All days of the week, MO, WE, etc. will retain their relative meaning.
E.G.
JAN 1993
JAN 1992
SUN MON TUE WED THU FRI
Page - 88
1
8
15
2
9
16
3
10
17
4
11
18
5
12
19
6
13
20
22
29
23
30
24
31
25
26
27
SAT
7
14
21
28
SUN MON TUE WED THU FRI
7
14
1
8
15
2
9
16
3
10
17
4
11
18
5
12
19
21
28
22
29
23
30
24
31
25
26
SAT
6
13
20
27
Mantissa Corporation © 2013
E:\Manuals\Product Manuals\ASO\OM (OPS Master)\Reference Guide\Current Release\OPS_C03.fm
If Monday is the 2nd for 1992, then the calendar will retain Monday as the day
selected even though Monday will now be the 1st for 1993. This will be true for
all days of the week. For example, if a job is to be run on Mondays, the bold dates
show when they will run before and after propagation.
OPS/MASTER®
Chapter 3
Job Database Creation
Calendar Definition Screen
Actual Calendars
These are calendars ( “CAL/ACT”) which have been created with specific dates, such as a
holiday calendar, or relative calendars which have been updated will be changed in the following manner:
The date on the calendar will remain the actual date even though the relative day,
such as Monday, will change for that date.
E.G.
If the 2nd is a Monday for 1992, then the calendar will be changed so that the 2nd
is still a date which is selected on the calendar. In this case the 2nd will remain
selected even though the day of the week for the 2nd will become Tuesday for
1993.
For example, if a job is to be run on the 2nd, 9th, 16th, 23rd, and 30th of January,
the bold dates show when they will run before and after propagation.
JAN 1993
JAN 1992
SUN MON TUE WED THU FRI
1
8
15
2
9
16
3
10
17
4
11
18
5
12
19
6
13
20
22
29
23
30
24
31
25
26
27
SAT
7
14
21
28
SUN MON TUE WED THU FRI
7
14
1
8
15
2
9
16
3
10
17
4
11
18
5
12
19
21
28
22
29
23
30
24
31
25
26
SAT
6
13
20
27
Data Base Definition Name Change
Job and Process Keyword definitions which have a calendar name of the form CALNAMnn, for the year, such as 92, 93, etc. will be propogated at the first schedule day of
the new year. Both the CALENDAR and the EXCEPTION CALENDARS are changed to
the appropriate suffix which is the new year.
E:\Manuals\Product Manuals\ASO\OM (OPS Master)\Reference Guide\Current Release\OPS_C03.fm
Calendar Change Timing
Calendar propogation will take place on the first day a schedule is run in the new year.
Calendars will properly adjust to various years for simulation or future schedule creation,
however, that actual change to the calendars will not occur until the creation of a schedule
in the new year. The new year is determine by the system date.
What You Need To Do:
If it is necessary to create a very specific Date, Day, etc., Calendar from year to year then
the following is necessary. Job definition, JOBA, has a calendar name of WORKCL92 as
a calendar name. In 1993 the name on the definition will be changed to WORKCL93.
There will be no calendar, WORKCL93, created by the system. It is the users responsibility to have a calendar, WORKCL93 created on the database for the new year. It can be created at any time throughout the year, and is dynamic and ready for use after the <ENTER>
key is pressed. The old WORKCL92 calendar will also be propagated to the year 1993,
but it will still have the WORKCL92 name in the database. It shouldn’t be referenced anymore and could be deleted.
Mantissa Corporation © 2013
Page - 89
Chapter 3
OPS/MASTER®
Process Keyword Definition Screen
Job Database Creation
Process Keyword Definition Screen
Defining Process Keyword Definition begins at the JOB/Master® DATA BASE FUNTIONS screen.
--------------------- JOB/Master® Data Base Functions ------------------------Command ===>
ID: JM01
User = P390K
Date = 98/09/01 - 98.244 Time = 12:05
-------------------------------------------------------------------------------Option ==> A
A dd / B rowse
/ U pdate
Type
J ob
C alendar
/ S ystem
/ N eg and Coreq
/ D ataset
==> P
/ D elete
/ I nquire Index
/ P rocess Keyword
/ G roup Message
/ M essage
Name
Stepname
Proc Stepname
==> MONTHLY_
==> ________
==> ________
Data Set Name
==> ____________________________________________ (If Type D)
CONFIRM = PF4
(Stepname (PROC) if jobstep definition)
(Stepname (PGM=) if jobstep definition)
CANCEL= PF5
or type “CANCEL” or “CONFIRM” at Command
line when processing Data Base options
A
=
Add
P
=
Process Keyword Def.
DIANE01
=
Name (Process keyword being defined).
)
Page - 90
Both at the Keyword definition level and the process and non-processed keywords on the dependency options (job definition panel), if a non-process keyword is used in connection with a calendar, then a process keyword is also
required (WORKDAY).
Mantissa Corporation © 2013
E:\Manuals\Product Manuals\ASO\OM (OPS Master)\Reference Guide\Current Release\OPS_C03.fm
The PROCESS KEYWORD DEFINITION screen is used to create user-defined keywords. The keywords can specify conditions under which the system should run the job
(PROCESS KEYWORDS) and conditions under which the system should not run the job
(NON-PROCESS KEYWORDS). All user-defined keyword definitions consist of one or
more system-defined keywords (as illustrated in the tutorial section of this manual). This
screen looks like the following illustration screen.
OPS/MASTER®
Chapter 3
Job Database Creation
Process Keyword Definition Screen
---------------- JOB/Master® Process Keyword Definition Screen ------------Command ===>
Definition Last Updated by
on
at
Name
==> MONTHLY
Schedule/Net ==> ________
Calendar
==> ________
Exceptn Cal1 ==> ________ Excp Cal2 ==> ________
Description ==> _______________________________________
Process Keywords:
________
________
________
________
________
________
(Make Entries left to right from line 1)
________ ________ ________ ________ ________
________ ________ ________ ________ ________
________ ________ ________ ________ ________
________ ________ ________ ________ ________
________ ________ ________ ________ ________
________ ________ ________ ________ ________
Non-process Keywords: (Make
________ ________
________ ________
________ ________
________ ________
________ ________
________ ________
Entries left to right from line 1)
________ ________ ________ ________
________ ________ ________ ________
________ ________ ________ ________
________ ________ ________ ________
________ ________ ________ ________
________ ________ ________ ________
NAME
This field is used to enter the user-specified name for the keyword being defined.
The name can be up to 8 alphanumeric characters.
SCHEDULE/NET
This field provides a customer with the ability to group a schedule or network of
jobs into an identifiable entity. Security can be established on this group which
now limits any and all access to the various criteria specified as belonging to this
group.
The field is eight (8) characters in length and must be previously set up using ISF
(Security feature).
E:\Manuals\Product Manuals\ASO\OM (OPS Master)\Reference Guide\Current Release\OPS_C03.fm
CALENDAR
Some keywords require references to a calendar. For example, the keyword
LWKD (last workday of each month) will need a calendar to know when the last
workday of each month occurs. Calendars are typically used to specify all valid
work days. All holidays (exceptions) are typically specified on a holiday calendar. If a calendar is required for any system keywords being used, enter the calendar name in this field. The name can be up to 8 alphanumeric characters.
EXC.CAL1
This field provides for the entry of an exception calendar to be entered. All conditions for the exceptions (holidays, etc.), are brought forward and included with
the process keyword being defined. These conditions are not required to be
entered individually. There are two (2) exception fields provided for flexibility.
EXC. CAL2
Refer to EXE. CAL1.
Mantissa Corporation © 2013
Page - 91
Chapter 3
OPS/MASTER®
Process Keyword Definition Screen
Job Database Creation
DESCRIPTION
This free-form field is used to enter a brief description of the function of the keyword being defined. The description can be up to 30 alphanumeric characters.
PROCESS KEYWORDS
This area is used to specify system-defined keywords that create the conditions
under which the job should be run.
NON-PROCESS KEYWORDS
This area is used to specify system-defined keywords that create the conditions
under which the job should not be run.
AND/OR LOGIC
And/Or Logic can be used to clarify the relationships between process and non-process
keywords. “(“ left paren and “)” right paren are used to implement this function. The
parens signify an “or” function. Within the left and right paren pair an “and” function is
processed. From the sample;
MON or 01WKD or 02WKDJAN or ( LDAY and SAT) or (LDAY and SUN) or
HOLIDY+1
The parens must be the only value occupying the field. Interpretation occurs left to right
and top to bottom.
Process Keyword Table
The following is a list of system supplied keywords that can be specified on this screen.
)
All nn values must be two digits, zero filled if necessary.
BASE CALENDAR REQUIRED
Page - 92
FWKD
The first workday for the month.
FWKD+nn
WORKDAY + nn from the first workday of the month, where
nn is the numeric value, zero filled, from the first workday for
the month. If the first workday is 03, then FWKD+05 will be
the 8th for that month.
HLYDAY-W
The first workday before the holiday. If a job was scheduled to
process on Monday, and Monday is a holiday, the job will run
on the first workday prior to the holiday. A workday is any day
designated as such by the workday calendar which it references. The job would process on Friday, based on a MondayFriday workday calendar.
HLYDAY+W
The first workday after the holiday. If a job was scheduled to
process on Friday, and Friday is a holiday, the job would run on
the first workday after the holiday which would be Monday.
This is based on a Monday-Friday workday calendar.
Mantissa Corporation © 2013
E:\Manuals\Product Manuals\ASO\OM (OPS Master)\Reference Guide\Current Release\OPS_C03.fm
If no calenders are specified, JOB/Master will use the default
calendars WORKDY## and HOLIDY##.
OPS/MASTER®
Chapter 3
E:\Manuals\Product Manuals\ASO\OM (OPS Master)\Reference Guide\Current Release\OPS_C03.fm
Job Database Creation
Process Keyword Definition Screen
HLYDAY-1
The day before the holiday. If a job was scheduled to process
on Friday, and Friday is a holiday, the job will process on the
previous day, which would be Thursday.
HLYDAY+1
The day after the holiday. If a job was scheduled to process on
Monday, and Monday is a holiday, the job will process the next
day, which would be Tuesday.
HOLIDAY
Any day on the holiday calendar.
HOLIDY-W
The first workday before the holiday. If a job was scheduled to
process on Monday, and Monday is a holiday, the job will run
on the first workday prior to the holiday. A workday is any day
designated as such by the workday calendar which it references. The job would process on Friday, based on a MondayFriday workday calendar.
HOLIDY+W
The first workday after the holiday. If a job was scheduled to
process on Friday, and Friday is a holiday, the job would run on
the first workday after the holiday which would be Monday.
This is based on a Monday-Friday workday calendar.
HOLIDY-1
The day before the holiday. If a job was scheduled to process
on Friday, and Friday is a holiday, the job will process on the
previous day, which would be Thursday.
HOLIDY+1
The day after the holiday. If a job was scheduled to process on
Monday, and Monday is a holiday, the job will process the next
day, which would be Tuesday.
LWKD
The last workday for the month.
LWKD-nn
Workday - nn from the last workday of the month, where nn is
the numeric value, zero filled, from the last workday for the
month. If the last workday is 28, then LWKD-05 will be the
23rd for that month.
mmmWKD
Any workday in the workday calendar in the month mmm, i.e.,
JANWKD.
NHOLIDAY
Any day not on the holiday calendar.
nnWKD
The nth day of the month starting with the first (1st) workday,
and only counting workdays. If the first workday is the 3rd of
the month, and the next workday is the 6th of the month, then
the 6th is 02WKD.
nQTRB
First workday in the quarter (i.e., 1QTRB=Jan, 2QTRB=Apr,
etc.).
nQTRBLD
Last workday in first month of the quarter. (i.e., 1QTRBLD,
2QTRBLD, etc.).
nQTRE
Last workday of the quarter. (i.e., 1QTRE=Mar, 2QTRE=Jun,
etc.).
nxxxWKD
The nth xxx workday (MON, TUES,...etc.) in the month (i.e.,
2MONWKD is the 2nd Monday).
Mantissa Corporation © 2013
Page - 93
Chapter 3
OPS/MASTER®
Process Keyword Definition Screen
Job Database Creation
PERnnWKD
Any workday in the period, where nn is the period number 1 13, on the associated calendar.
PERWKD
Any workday. The workday is determined based on the associated calendar, and only if the period start and end dates are
used.
QTRB
First workday in Jan, Apr, Jul, and Oct.
QTRBLD
Last workday in the first month of the quarter (i.e., Jan, Apr,
Jul and Oct).
QTRE
Last workday in Mar, Jun, Sep and Dec.
WORKDAY
Any day on the workday calendar.
xxxxWKD
Where xxx is the day of the week (i.e., SAT, SUN, MON, TUE,
WED, THU, FRI) and is also a workday.
Page - 94
ALL
Any days MON-SUN except those dates marked on the HOLIDYnn Calendar. No other PKWDS may be used in conjunction
with ALL.
CYCLEnnn
nnn is the number of days being represented by the cycle.
CYCLE007 will schedule the job every seven days. Used
together, the CYCLS135 and CYCLE007 will begin scheduling a job on the 135th day of the year and every seven days
thereafter.
CYCLSnnn
nnn is the Julian date on which a cycle will begin processing. It
is no longer necessary to define a unique calendar in order to
control these types of jobs.
Dnn
The day of the month (i.e., MON, TUE, ... etc.) D03, the 3rd of
every month.
EVERY
EVERY DAY including days marked on Holiday/Exception
Calendars. EVERY can be used with non-process keywords.
LDAY
The last physical day (i.e., MON, TUE, ... etc.) of the month.
LDAY-nn
Last day of the month (i.e., MON, TUE, ... etc.) minus nn days
where nn is two numeric digits, zero filled if necessary.
Lxxx
The last day of the week in the month (i.e., LMON is the last
MON, LFRI is the last FRI, etc.).
Lxxxmmm
The last MON, TUE, etc. in a specified month LMONJUN is
the last Monday in June.
M-F
Any Monday thru Friday.
mmdd
The specified month and day of the month.
mmm
The month Jan, Feb, Mar, Apr, May, Jun, Jul, Aug, Sep, Oct,
Nov, or Dec.
mmddyy
The specific date, i.e., 110688.
Mantissa Corporation © 2013
E:\Manuals\Product Manuals\ASO\OM (OPS Master)\Reference Guide\Current Release\OPS_C03.fm
BASE CALENDAR NOT REQUIRED
OPS/MASTER®
Chapter 3
Job Database Creation
Negative Co-Requisite Dependency Screen
nxxx
The nth MON, TUES, ... etc. in the month (i.e., 2MON is the
2nd MON, 4FRI is the 4th FRI, etc.).
nxxxmmm
The nth MON, TUES, ... etc. in the specified month (i.e.
2MONFEB is the 2nd Monday and MMM is the month, JAN,
FEB, etc.).
T-S
Any Tuesday thru Saturday.
WKEND
SAT and SUN.
xxx
Where xxx is the day of the week, i.e., SAT, SUN, MON, TUE,
WED, THU, FRI.
xxxmmm
Where xxx is the day of the week (i.e.,SAT, SUN, MON, TUE,
WED, THU, or FRI) and mmm is the month JAN, FEB, etc.
MONFEB is any Monday in February.
Negative Co-Requisite Dependency Screen
Defining Negative/Corequisite Dependencies begins at the JOB/Master® DATA BASE
FUNCTIONS screen.
------------------------ JOB/Master® Data Base Functions ----------------------Command ===>
ID: JM01
User = P390K
Date = 98/09/01 - 98.244 Time = 12:05
-------------------------------------------------------------------------------Option ==> A
A dd / B rowse
/ U pdate
Type
J ob
C alendar
/ S ystem
/ N eg and Coreq
/ D ataset
==> N
E:\Manuals\Product Manuals\ASO\OM (OPS Master)\Reference Guide\Current Release\OPS_C03.fm
/ I nquire Index
/ P rocess Keyword
/ G roup Message
/ M essage
Name
Stepname
Proc Stepname
==> NEGTEST_
==> ________
==> ________
Data Set Name
==> ____________________________________________ (If Type D)
CONFIRM = PF4
Mantissa Corporation © 2013
/ D elete
CANCEL= PF5
(Stepname (PROC) if jobstep definition)
(Stepname (PGM=) if jobstep definition)
or type “CANCEL” or “CONFIRM” at Command
line when processing Data Base options
A
=
Add
N
=
Neg/COREQ Def.
NEGTEST
=
Name (Negative Corequisite being defined).
Page - 95
Chapter 3
OPS/MASTER®
Negative Co-Requisite Dependency Screen
Job Database Creation
The NEGATIVE/CO-REQUISITE DEPENDENCY screen is used to specify a definition
for a group of negative and co-requisite dependencies. The screen is shown below:
-------- JOB/Master® Negative/Corequisite Dependency For: NEGTEST
------Command ===>
Definition Last Updated by
on
at
Description => ______________________________________________________________
Schedule/Net=> ________ Failed Negative Dependencies are Preds => N (Y,N)
Will not be submitted if these tasks are in the MVS input Q, or executing
Jobname Jobname Jobname Jobname Jobname Jobname Jobname Jobname
-------- -------- -------- -------- -------- -------- -------- -------________ ________ ________ ________ ________ ________ ________ ________
________ ________ ________ ________ ________ ________ ________ ________
________ ________ ________ ________ ________ ________ ________ ________
________ ________ ________ ________ ________ ________ ________ ________
________ ________ ________ ________ ________ ________ ________ ________
________ ________ ________ ________ ________ ________ ________ ________
------------------------------------------------------------------------------Will only be submitted if the following tasks are executing:
Jobname Jobname Jobname Jobname Jobname Jobname Jobname
-------- -------- -------- -------- -------- -------- -------________ ________ ________ ________ ________ ________ ________
________ ________ ________ ________ ________ ________ ________
________ ________ ________ ________ ________ ________ ________
Jobname
-------________
________
________
DESCRIPTION
Free-form field to be used as desired.
SCHEDULE/NET
This field provides a customer with the ability to group a schedule or network of
jobs into an identifiable entity. Security can be established on this group which
now limits any and all access to the various criteria specified as belonging to this
group.
The field is eight (8) characters in length and must be previously set up using ISF
(Security feature).
This field enables the user to select in what manner the Negative Dependencies
are to effect the submission of jobs.
“Y” (yes) indicates if a negative dependent job does not complete successfully,
(abends) the waiting jobs are not to be submitted for processing.
“N” (no) indicates if a negative dependent job abnormally terminates the waiting
jobs can be released for processing.
NEGATIVE DEPENDENCIES:
This area of the screen is used to specify the names of the jobs that must not be in
the MVS input queue or executing for the system to submit the job being defined.
CO-REQUISITE DEPENDENCIES:
This area of the screen is used to specify the names of job that must be executing
for the system to submit the job being defined.
Page - 96
Mantissa Corporation © 2013
E:\Manuals\Product Manuals\ASO\OM (OPS Master)\Reference Guide\Current Release\OPS_C03.fm
FAILED NEGATIVE DEPENDENCIES ARE PREDS. (Y,N)
OPS/MASTER®
Chapter 3
Job Database Creation
Message Group
Message Group
Defining Group Message Definition begins at the JOB/Master® DATA BASE FUNCTIONS screen.
---------------------- JOB/Master® Data Base Functions ----------------------Command ===>
ID: JM01
User = P390K
Date = 98/09/01 - 98.244 Time = 12:11
-------------------------------------------------------------------------------Option ==> A
A dd / B rowse
/ U pdate
Type
J ob
C alendar
/ S ystem
/ N eg and Coreq
/ D ataset
==> G
/ D elete
/ I nquire Index
/ P rocess Keyword
/ G roup Message
/ M essage
Name
Stepname
Proc Stepname
==> MSGGROUP
==> ________
==> ________
Data Set Name
==> ____________________________________________ (If Type D)
CONFIRM = PF4
CANCEL= PF5
(Stepname (PROC) if jobstep definition)
(Stepname (PGM=) if jobstep definition)
or type “CANCEL” or “CONFIRM” at Command
line when processing Data Base options
A
=
Add
G
=
Group message def.
GRPTEST
=
Name (Group Message being defined).
The MESSAGE GROUP DEFINITION screen is used to specify a group of users that will
receive manual task messages. This screen allows you to indicate which type of messages
the system should display for these users and is shown below.
E:\Manuals\Product Manuals\ASO\OM (OPS Master)\Reference Guide\Current Release\OPS_C03.fm
-------------- JOB/Master® Message Group Definition For: MSG Row 1 to 13 of 21
Command ===>
Scroll => PAGE
Definition Last Updated by
on
at
Schedule/Net=> ________
Description => _______________________________________________________________
-------------------------------------------------------------------------------Msg Class/ DE =1 CI =2 TI =3 CR =4 JS =5
User
User
Msg
Send
On Shift
Do Not Send
ID
Type
Class
Type
Start End
Before After
(M)
1-5
F/L/M
(HHMM)
(YYDDD)
-------- --------------- -------- ----________
_
_
_
____ ____
_____ _____
________
_
_
_
____ ____
_____ _____
________
_
_
_
____ ____
_____ _____
________
_
_
_
____ ____
_____ _____
________
_
_
_
____ ____
_____ _____
________
_
_
_
____ ____
_____ _____
________
_
_
_
____ ____
_____ _____
________
_
_
_
____ ____
_____ _____
________
_
_
_
____ ____
_____ _____
________
_
_
_
____ ____
_____ _____
________
_
_
_
____ ____
_____ _____
________
_
_
_
____ ____
_____ _____
Mantissa Corporation © 2013
Page - 97
Chapter 3
OPS/MASTER®
Message Group
Job Database Creation
SCHEDULE/NET
This field provides a customer with the ability to group a schedule or network of
jobs into an identifiable entity. Security can be established on this group which
now limits any and all access to the various criteria specified as belonging to this
group.
The field is eight (8) characters in length and must be previously set up using ISF
(Security feature).
DESCRIPTION
This is a free-form field used to describe the Message Group being defined.
MSG CLASS/ KP=1 CI=2 TI=3 DI=4 JS=5
These are information only fields used to describe the different types of Manual
Tasks used for the installation. The two (2) character indicators may be different
from this document based on the characters used by each installation. These are
alterable via the Profile on the main JOB/Master® DATA BASE FUNCTIONS
SCREEN.
USER ID
The USER ID column is used to specify the IDs of the users you want to receive
the messages specified in the Message Class column. USER ID of “0” will send
message to console.
USER TYPE
The following user types must be specified:
M
Manual Task Station. Receives only manual task messages.
MSG CLASS
One of the following message classes must be specified:
1,2,3,4,5
Each number corresponds to one of the five manual task messages.
If a user is to receive more than one of the manual task messages, the User ID
must be entered once for each class of message user is to receive.
SEND TYPE
F
Send only to the first user if the user is logged on.
L
Send if the user is active.
M
Send unconditionally.
ON SHIFT START/END
These columns allow you to specify a time period during which this user can
receive messages.
DO NOT SEND BEFORE/AFTER
These columns allow you to specify a date period, between which this user can
receive messages.
Page - 98
Mantissa Corporation © 2013
E:\Manuals\Product Manuals\ASO\OM (OPS Master)\Reference Guide\Current Release\OPS_C03.fm
The following send types can be specified:
OPS/MASTER®
Chapter 3
Job Database Creation
System Definition
System Definition
Defining a System Definition begins at the JOB/Master® DATA BASE FUNCTIONS
screen.
----------------------- JOB/Master® Data Base Functions --------Command ===>
ID: JM01
User = P390K
Date = 98/09/01 - 98.244 Time = 13:31
-------------------------------------------------------------------------------Option ==> A
A dd / B rowse
/ U pdate
Type
J ob
C alendar
/ S ystem
/ N eg and Coreq
/ D ataset
==> S
/ D elete
/ I nquire Index
/ P rocess Keyword
/ G roup Message
/ M essage
Name
Stepname
Proc Stepname
==> SYSTEST
==> ________
==> ________
Data Set Name
==> ____________________________________________ (If Type D)
CONFIRM = PF4
CANCEL= PF5
(Stepname (PROC) if jobstep definition)
(Stepname (PGM=) if jobstep definition)
or type “CANCEL” or “CONFIRM” at Command
line when processing Data Base options
A
=
Add
S
=
System
SYSTEST
=
Name (System being defined).
E:\Manuals\Product Manuals\ASO\OM (OPS Master)\Reference Guide\Current Release\OPS_C03.fm
The SYSTEM DEFINITION screen allows you to specify parameters for all jobs that are
defined to this system. Utilization of the System Definition will decrease the amount of
time and effort required to implement a given system of related jobs. The first job definition screen allows you to specify a system for that job. All entries on this screen can be
overridden at the job level by specifying the desired value on the job definition screens. A
sample screen is shown on the following page:
Mantissa Corporation © 2013
Page - 99
Chapter 3
OPS/MASTER®
System Definition
Job Database Creation
------------------- JOB/Master® System Definition For
Command ===>
Definition Last Updated by
SYSTEST
--------------
on
at
------------------------------------------------------------------------------Run Mode
==> P (P=PROD/C=CHECK/S=SEL)
Message Def ==> ________
System Description==> TEST SYSTEM_________
Message Group==> ________
Programmer Name
==> DIANE KNIGHT________
Do Not Schedule
Submitting Dept
==> TECHNICAL SUPPORT___
Before
==> 98244 (YYDDD)
User Department
==> ACCOUNTING__________
After
==> 00000 (YYDDD)
Output Destination==> ADMINISTRATION_____
Priority
==> _
Delivery Method
==> SHANKS PONY_________
Schedule/Net ==> ********
Submit PDS
Lib Type
==> ____________________________________________
==> _
------------------------- Abending Contact Information -----------------------Contact Name ==> ____________________ Phone ==>( ___ ) ___
Beeper ==>( ___ ) ___
____ Ext ==> _____
____
RUN MODE
Specify:
)
P
if jobs in this system should run in Production Mode.
C
if jobs in this system should run in Check (simulation) Mode.
S
if jobs in this system should run in Select Mode. (See Run Mode
Options in Job Definition Screen 3).
The run mode, defined at this level, may be overidden at the job level unless the
Global Profile Run Mode has been set to check mode. If so, the mode of the
system and jobs cannot be overidden. If the Global Profile has been set in the
production mode, the jobs’ mode can be overidden.
This field contains the Message Definition name for the message screen defined
for this job. These messages are the Manual Tasks required of this system. This
feature allows a user to enter on a single screen those Manual Task messages
instead of entering each message at the job level.
The field is an eight (8) character field and the name must match the Message
Definition entered from the JOB/Master® DATA BASE FUNCTIONS screen.
SYSTEM DESCRIPTION
This is a free-form area used to describe the system being defined.
MESSAGE GROUP
This field can be used to specify the name of a message group which has been set
up to indicate which users receive the various types of messages. The Message
Page - 100
Mantissa Corporation © 2013
E:\Manuals\Product Manuals\ASO\OM (OPS Master)\Reference Guide\Current Release\OPS_C03.fm
MESSAGE DEF.
OPS/MASTER®
Chapter 3
Job Database Creation
System Definition
Group can be defined from within JOB/Master® from the JOB/Master® DATA
BASE FUNCTIONS screen option = G.
PROGRAMMER NAME
This free-form field can be used to specify the name of a programmer for jobs in
this system.
SUBMITTING DEPT
This free-form field can be used to specify the name of the department submitting jobs in this system.
USER DEPARTMENT
This free-form field can be used to specify the name of the department that will
be using the output (results) from jobs in this system.
OUTPUT DESTINATION
This free-form field can be used to specify the destination of all output from jobs
in this system.
DELIVERY METHOD
This free-form field can be used to specify how the output will be delivered to the
output destination for jobs in this system.
*To be used for future enhancements.
DO NOT SCHEDULE BEFORE
If you enter a date in this field, the system will not submit the job before the specified date (overriding keyword and calendar definitions). The date must be
entered in the form YYDDD.
DO NOT SCHEDULE AFTER
If you enter a date in this field, the system will not submit the job after the specified date (overriding keyword and calendar definitions). The date must be in the
form YYDDD.
E:\Manuals\Product Manuals\ASO\OM (OPS Master)\Reference Guide\Current Release\OPS_C03.fm
The above 2 fields are very useful is pre-defining jobs and systems before they are actually necessary to be in full production.
PRIORITY
The priority refers to the Submission Priority that will be assigned to the job in
the event other jobs are scheduled to be submitted at the same time and all Scheduling Criteria have been met.
The following values are acceptable:
A (Highest) through Z (Lowest)
Priority can be activated, changed, or stopped.
If priority is desired, the submission sequencing is activated, changed, or stopped
using the “SP” (Modify Priority Selection List) command in the Tracking Facility. (Refer to the Tracking section of this manual - SP Command). The feature
allows for better control during job submission to the JES initiators.
Mantissa Corporation © 2013
Page - 101
Chapter 3
OPS/MASTER®
System Definition
Job Database Creation
SCHEDULE/NET
This field is used to limit access to the jobs in this system to a specific user or
group of users. The SCHEDULE/NET is specified on the ISF (Interactive Security Facility) JOB/Master® Security Definition Screen.
SUBMIT PDS
This field can be used to specify the Submit PDS Dataset Name if different from
datasets used in the JMSUBPDS of JOB/Master® Control Region.
LIB TYPE
Reserved for a future release.
CONTACT NAME
Free-form field for the contact responsible for this system.
PHONE
This field is provided for the phone number of this contact.
EXT
The extension number if necessary.
BEEPER
E:\Manuals\Product Manuals\ASO\OM (OPS Master)\Reference Guide\Current Release\OPS_C03.fm
The beeper number of the contact if necessary.
Page - 102
Mantissa Corporation © 2013
OPS/MASTER®
Chapter 3
Job Database Creation
Manual Task Message Definition
Manual Task Message Definition
Defining a Message Definition begins at the JOB/Master® DATA BASE FUNCTIONS
screen.
------------------------ JOB/Master® Data Base Functions -------------------Command ===>
ID: JM01
User = P390K
Date = 98/09/01 - 98.244 Time = 13:38
-------------------------------------------------------------------------------Option ==> A
A dd / B rowse
/ U pdate
Type
J ob
C alendar
/ S ystem
/ N eg and Coreq
/ D ataset
==> M
/ D elete
/ I nquire Index
/ P rocess Keyword
/ G roup Message
/ M essage
Name
Stepname
Proc Stepname
==> MSGTEST_
==> ________
==> ________
Data Set Name
==> ____________________________________________ (If Type D)
CONFIRM = PF4
(Stepname (PROC) if jobstep definition)
(Stepname (PGM=) if jobstep definition)
CANCEL= PF5
or type “CANCEL” or “CONFIRM” at Command
line when processing Data Base options
A
=
Add
M
=
Message Defnition
MSGTEST
=
Name (Message being defined).
E:\Manuals\Product Manuals\ASO\OM (OPS Master)\Reference Guide\Current Release\OPS_C03.fm
The MANUAL TASK DEFINITION screen is used to define a group of messages which
will be sent to users if the job’s definition states that a particular manual task(s) must be
completed. The users who receive this message(s) depends on the Group Message Definition. It is possible for jobs requiring the same type of manual task messages to relate to the
same message definition. A sample screen is shown below:
Mantissa Corporation © 2013
Page - 103
Chapter 3
OPS/MASTER®
Manual Task Message Definition
Job Database Creation
-------------- JOB/Master® Manual Task Message Definition
Command ===>
MSGTEST
--------
Desc: MSGTEST_______________________________________________________________
Send
000 minutes before submit time or, after dependencies => N
(Y,N)
At a frequency interval of => 005 Minutes
1 DATA ENTRY
Message to Userid/Console => _______
Msg= ______________________________________________________________________
2 CARD INPUT
Message to Userid/Console => _______
Msg= ______________________________________________________________________
3 TAPE INPUT
Message to Userid/Console => _______
Msg= ______________________________________________________________________
4 CONSOLE ROUTED
Message to Userid/Console => _______
Msg= ______________________________________________________________________
5 JCL SETUP
Message to Userid/Console => _______
Msg= ______________________________________________________________________
DESC
This free-form area can be used to enter a description of the group of manual task
messages.
SEND 00000 MIN. BEFORE SUBMIT TIME OR, AFTER DEPENDENCIES
This area can be used to specify the desired number of minutes before submit
time that the manual task message(s) should be displayed. If you do not want to
specify the number of minutes, you can tell the system to display the message(s)
after the all dependencies have successfully completed by entering Y in the
AFTER DEPENDENCIES ==> field. Only one of these fields can be used.
This field can be used to continue displaying the manual task message(s) at the
specified frequency. The default is every 5 minutes.
MSG TO USERID/CONS
This area of each manual task message can be used to specify an ID for a particular user or for the console to which the message should be sent.
MSG =
This area of each manual task message is used to enter the text of the message.
)
Page - 104
The default names for the manual tasks are shown on the screen above. These
names can be customized in the Global Settings.
Mantissa Corporation © 2013
E:\Manuals\Product Manuals\ASO\OM (OPS Master)\Reference Guide\Current Release\OPS_C03.fm
AT FREQUENCY INTERVAL OF
OPS/MASTER®
Chapter 4
Dataset Dependency
Overview
Chapter 4
Dataset Dependency
Overview
Dataset dependency options are the function by which jobs can be triggered based on the
creation, deletion, or various other conditions associated with a dataset. This facility is
most often used where an event, such as the creation of a dataset, occurs independently or
without the start and end of a job, such as the creation of a dataset from an on-line transaction.
E:\Manuals\Product Manuals\ASO\OM (OPS Master)\Reference Guide\Current Release\OPS_C04.fm
The identification of the dataset dependency, referred to as a DSN event, is identified to
JOB/Master® by making a database definition for the dsname. The dsname can be fully
qualified or it can be any generic portion of a dsname. Generic definition allows for a simplified implementation where the creation of a group or set of files causes a job or set of
jobs to be processed.
The definition, deletion or update of the database DSN definition is all that is required for
the DSN event to be processed. There is no secondary tasks such as table assemblies, or
system library updates which need to be processed in order to have dataset dependencies
processed. Additionally, in a multi-CPU environment, the addition, deletion, or update of
the DSN definition is broadcast to each CPU, eliminating the need to again perform a secondary task for these functions.
The dataset is defined as a DSN event by adding it to the JOB/Master® database. This is
accomplished by the selection of the appropriate function from the Database options
panel. The dataset dependency is made available realtime once the addition or update is
processed.
Mantissa Corporation © 2013
Page - 105
Chapter 4
OPS/MASTER®
Dataset Definition Panel
Dataset Dependency
Dataset Definition Panel
Defining Dataset Triggers
Dataset events can be processed from JOB/Master® Data Base Function panel.
--------------------- JOB/Master® Data Base Functions ----------------------Command ===>
ID: JM01
User = P390K
Date = 98/09/01 - 98.244 Time = 13:41
-------------------------------------------------------------------------------Option ==> A
A dd / B rowse
/ U pdate
Type
J ob
C alendar
/ S ystem
/ N eg and Coreq
/ D ataset
==> D
/ D elete
/ I nquire Index
/ P rocess Keyword
/ G roup Message
/ M essage
Name
Stepname
Proc Stepname
==> ________
==> ________
==> ________
Data Set Name
==> TRSJ.TESTFILE.TRAIN_________________________ (If Type D)
CONFIRM = PF4
(Stepname (PROC) if jobstep definition)
(Stepname (PGM=) if jobstep definition)
CANCEL= PF5
A
=
D
=
TRSJ.TESTFILE.TRAIN =
or type “CANCEL” or “CONFIRM” at Command
line when processing Data Base options
Add
Dataset
Dataset Name (Dataset being defined)
-------------------- JOB/Master® Data Set Definition Screen ----------------Command ===>
Definition last updated by
on
at
For DSN
=> TRSJ.TESTFILE.TRAIN*
Type
=> S ( V =VSAM )
Not Before => 00000 After => 00000 (YYDDD)
Description => _________________________________________________________
Run Mode => P (C, P)
Process Trigger
Open for Output
VSAM Define
Open for Input
Job Name = ________
Job/Network => ********
Definitions if this dataset is: (Specify Y to set)
=> _
Open for Output and contains data
=> _
=> _
VSAM Delete => _
VSAM Update => _
=> _
Renamed
=> _
Scratched
=> _
Verify Control Information in record 1 of this dataset as follows:
If Pos => 0000 Is=> E ( E,G,N,L ) Value=> ____________________ Type=> C ( H,C )
----------------------------- Trigger Definitions ---------------------------Jobname ST
Jobname ST
Jobname ST
Jobname ST
-------- --------- --------- --------- -1 ________ _ 2 ________ _ 3 ________ _ 4 ________ _
5 ________ _ 6 ________ _ 7 ________ _ 8 ________ _
Page - 106
Mantissa Corporation © 2013
E:\Manuals\Product Manuals\ASO\OM (OPS Master)\Reference Guide\Current Release\OPS_C04.fm
The Data Set Definition will define, update, or display a dataset event for a dataset beginning with the above name. The dataset name can be any valid dataset name used in your
installation and can include GDG’s. Placing a trailing * in the dataset name specifies a
OPS/MASTER®
Chapter 4
Dataset Dependency
Dataset Definition Panel
Generic dataset. If a generic name is specified, this entry will affect any dataset with the
specified suffix. After pressing enter, the Dataset Definition panel will be presented.
----------------------- JOB/Master® Data Base DSN Index --------- Row 1 from 5
Command ===>
Scroll => PAGE
-----------------------------------------------------------------------------| From | Run
|
Not
S
Dataset Name
| Job
| Mode |Befor|After
- --------------------------------------------- -------- -------- ----- ----OPS.DSN.TRIG.TEST1
DSNJOB1
P
00000 00000
OPS.DSN.TRIG.TEST2
DSNJOB1
P
00000 00000
OPS.DSN.TRIG.TEST3
DSNJOB2
P
00000 00000
OPS.DSN.TRIG.TEST4
EXTSUB04
P
00000 00000
OPS.VSAM.TRIG.TEST1
DSNJOB2
P
00000 00000
******************************* Bottom of data ********************************
DATASET TYPE
DSN events can be defined for two types of datasets:
1.
Physical sequential files.
Sequential files are identified by type S.
2.
VSAM clusters.
VSAM clusters are identified by specifying type V.
LIMIT RANGE OF PROCESSING DAYS
E:\Manuals\Product Manuals\ASO\OM (OPS Master)\Reference Guide\Current Release\OPS_C04.fm
Processing based on DSN events can be limited in the following ways:
1.
The event can be limited so that it does not process before a specific date.
NOT BEFORE = 00000 (YYDDD)
2.
It can be limited so that it does not process after a specific date.
AFTER = 00000 (YYDDD)
3.
It can be limited so that it only processes between a start and end date.
NOT BEFORE = 00000
(93010)
AFTER = 00000
(93246)
This facility will aid in the pre-definition and testing of DSN events.
Mantissa Corporation © 2013
Page - 107
Chapter 4
OPS/MASTER®
Dataset Definition Panel
Dataset Dependency
Definition Data
DESCRIPTION
Free-form documentation.
RUN MODE
Valid entries:
P = Production
C = Check mode
If C is entered, the event will be processed. However, triggered jobs will not be
submitted and a message will be displayed acknowledging the event with a
checkmode designation.
JOB NAME
This field can be used to limit the processing of the specified event to a specific
task. If a job name is entered here then this dataset will only be processed if it
was generated from the specified job. Job name can be any task name, Batch,
STC, etc.
JOB/NETWORK
This field can be used to denote ownership. It has the same meaning as on the job
definition entries (SCHED/NET).
Process Trigger Definitions
Valid entries for the following attributes are Y and N:
Y
indicates the option, or type of event which should be processed for this dataset.
N
indicates the option is not being processed.
NOTE: At least one of these options must be specified.
SEQUENTIAL FILE PROCESSING ATTRIBUTES
The following event options are available for sequential datasets:
This event is processed if the dataset is opened for output. Creation of the dataset
through allocation, such as IEFBR14, is not sufficient for this event to be processed. The dataset must actually be opened and closed. The event is processed
when the file is closed.
OPEN FOR OUTPUT AND CONTAINS DATA
This event is processed in the same manner as open for output, however, the
dataset will be checked to insure that there is at least one record in the file. The
feature will allow for some level of integrity when triggering jobs based on the
creation of a dataset.
Page - 108
Mantissa Corporation © 2013
E:\Manuals\Product Manuals\ASO\OM (OPS Master)\Reference Guide\Current Release\OPS_C04.fm
OPEN FOR OUTPUT
OPS/MASTER®
Chapter 4
Dataset Dependency
Dataset Definition Panel
OPEN FOR INPUT
This event will be processed if the dataset is opened for input.
)
Care should be taken when using this option. An input event will be processed
when the file is closed and if defined for a file which is heavily used will cause
more trigger events to be processed than might be desired.
SCRATCHED
This event will be processed whenever the named dataset is scratched. The
scratch event can be any mechanism which removes the dataset from the DASD
device.
RENAMED
This event will be processed whenever the named dataset is renamed. The dataset
being defined, 'the old name', will produce the rename event. The new name, the
DSN to which it was renamed, will additionally produce an “open for output’
event, if desired.
VSAM FILE PROCESSING ATTRIBUTES
VSAM DEFINE
This event will be processed whenever a VSAM cluster is defined. The dsn event
name is the name of the VSAM cluster.
VSAM DELETE
This event is processed whenever a VSAM cluster is deleted. This function can
be used to insure that the deletion of a critical file does not go unnoticed. (Send a
Message to the Operator if this should occur)
VSAM UPDATE
E:\Manuals\Product Manuals\ASO\OM (OPS Master)\Reference Guide\Current Release\OPS_C04.fm
This event is processed if the named data component is updated. (This will not
function at the cluster level). An update is defined as any add, delete, or modification to a record in the data component. This feature can be particularly useful
in limiting the generation of reports for files which have not changed or had
activity against them.
Verifying Data
VERIFY CONTROL INFORMATION
These fields are optional and should only be used if data validation is required for
the file. Data Verification is performed on the first record of file. JOB/Master®
only supports QSAM verification.
IF POS. =>
Enter the starting position of the data to be verified, relative to 1, in the first
record of the dataset. This value is 4 positions in length and must be numeric. If a
value is entered which is beyond the logical size of the record an error message
will be displayed in the history file at trigger time and the entry will not be processed.
Mantissa Corporation © 2013
Page - 109
Chapter 4
OPS/MASTER®
Technical Considerations
Dataset Dependency
IS =>
Specifies the comparison operator equal to one of the following options:
E - Equal to
G - Greater than
L - Less than
N - Not equal to
VALUE =>
The data string or symbolic date value to be verified. The value entered will
determine the type of compare which will be used when validating the data.
Date values can be represented in symbolic form. The current, event date, can be
coded as YYDDD, YYYYDDD, MM/DD/YY or MM/DD/YYYY formats. Date
values are represented by the following symbolic strings:
@YDDD for julian dates
@YYYDDD for julian dates
@M @D @Y for gregorian.
@M @D @YYY for gregorian.
The symbolic representations can be placed in any order.
e.g. @M@D@Y, or @D@M@Y, or @Y/@D/@M, etc.
TYPE =>
This field defines the type of data which is entered in the value field. Select one
of the following options:
C
Character (up to 20 characters can be entered for verification).
H
Hexadecimal (20 characters of hexadecimal data, representing
10 hexadecimal bytes).
Trigger Definitions
These fields are used to define the jobs which will be triggered when the dataset event is
processed. These jobs are standard JOB/Master® triggers and may take on all the characteristics of any job definition.
Conditional, or filtering options for the dataset are Runmode and Jobname.
Specifying a Runmode value will allow testing of the event without actual triggering of
the dependent jobs. When this option is in effect, the DSN event will be processed by
JOB/Master®, however, only a message identified as a checkmode function will be produced. The trigger jobs will not be submitted.
The DSN event can also be defined as only to be processed if the dataset event is produced
from a specific jobname. For example, only process the trigger definitions if the dataset is
created by job ABC1.
Technical Considerations
The following SMF records are required for the different event options to be processed:
Page - 110
Mantissa Corporation © 2013
E:\Manuals\Product Manuals\ASO\OM (OPS Master)\Reference Guide\Current Release\OPS_C04.fm
Testing the Datasets
OPS/MASTER®
Chapter 4
Dataset Dependency
DSN Index Table Display Panel
Open for Input Functions
Open for Output Function
Scratched Sequential
Renamed Sequential
ICF Define
VSAM Define
VSAM Update
ICF Delete
VSAM Delete
)
Record type 14
Record type 15
Record type 17
Record type 18
Record type 61
Record type 63
Record type 64
Record type 65
Record type 67
If Data verification is requested, the file being processed must be freed at close
of the dataset. If FREE=CLOSE is used on the DD statement, then the file
must not be used later in any other steps of the job or the FREE function is not
honored. If the file was dynamically allocated, then the FREE on close option
should be specified.
DSN Index Table Display Panel
Datasets can also be processed by using the Dataset Name Index:
----------------------- JOB/Master® Data Base DSN Index --------- Row 1 from 5
Command ===>
Scroll => PAGE
E:\Manuals\Product Manuals\ASO\OM (OPS Master)\Reference Guide\Current Release\OPS_C04.fm
-----------------------------------------------------------------------------| From | Run
|
Not
S
Dataset Name
| Job
| Mode |Befor|After
- --------------------------------------------- -------- -------- ----- ----OPS.DSN.TRIG.TEST1
DSNJOB1
P
00000 00000
OPS.DSN.TRIG.TEST2
DSNJOB1
P
00000 00000
OPS.DSN.TRIG.TEST3
DSNJOB2
P
00000 00000
OPS.DSN.TRIG.TEST4
EXTSUB04
P
00000 00000
OPS.VSAM.TRIG.TEST1
DSNJOB2
P
00000 00000
******************************* Bottom of data ********************************
At this point, specifying a U(update), D(delete), or B(browse) in the S(select) column will
bring up the appropriate function. Like ISPF, multiple selects will be handled one at a
time in order. Also, all commands from the Data Base Function screen can be entered on
the command line of this screen. For example:
AD DSNAME
= Add a JOB to the database.
All Data Set Names are stored in the sequence listed by an Inquiry function. Data Sets will
be checked for triggering in the sequence displayed by the Inquiry.
Mantissa Corporation © 2013
Page - 111
Chapter 4
OPS/MASTER®
DSN Index Table Display Panel
Dataset Dependency
For example:
TEST.ABC*
TEST.ABCDEF
TEST.ABC* will have priority for triggering.
)
Be aware of the Data Set Sequencing.
A binary search routine has been coded and is part of the dataset scan routine. It could be
helpful if your installation has a large (in excess of 2000 entries) number of datasets in this
table. It has to be enabled by Mantissa Technical Support because of the following restriction.
In the previous example, the generic entry was always found first for a DSN. In the binary
search routine, this is not always the case since it is not a top down scan. For example:
TEST.ABC*
TEST.ABCABC
TEST.ABCDEF
TEST.ABCGHI
TEST.ABCJKL
E:\Manuals\Product Manuals\ASO\OM (OPS Master)\Reference Guide\Current Release\OPS_C04.fm
If your dataset was named TEST.ABCGGG, it may not trigger via the generic entry. So, if
the binary routine is enabled, there should not be any entries that would have the same suffix as the generic entry.
Page - 112
Mantissa Corporation © 2013
OPS/MASTER®
Chapter 5
Generating a Schedule
Scheduling Criteria
Chapter 5
Generating a Schedule
Scheduling Criteria
A job is selected for scheduling by one of two methods:
1.
Calendar Definition (Refer to Creating Calendars Section)
2.
Process Keywords (Refer to Creating and using Process Keywords)
Either method becomes the scheduling criteria for this job. If either method’s scheduling
criteria is met, the job is placed into the scheduling queue.
E:\Manuals\Product Manuals\ASO\OM (OPS Master)\Reference Guide\Current Release\OPS_C05.fm
A scheduled job will have its triggered jobs scheduled (placed onto the Scheduling
Queue), if they have calendar process keyword criteria and the criteria is met. If a triggered job has no calendar or process keyword, it has no scheduling criteria and will not be
placed onto the Scheduling Queue. When a job is triggered and is not on the scheduling
queue, it will be added automatically. Whether it was already on the queue or dynamically
added, it will be submitted when triggered and its other dependencies are satisfied. There
is less system overhead to let the trigger jobs get dynamically added to the scheduling
queue as needed. To do this do not specify a calendar or process keywords.
EXAMPLE 1:
EXAMP1 is scheduled for day 2, EXAMP1 has EXAMP2 as a
triggered job, the job does not have day 2 selected on its calendar definition.
EXAMP1 (Calendar has day 2)
Triggers
EXAMP2 (Has Calendar but Day 2 is not
present)
Because EXAMP2 has no scheduling criteria for day
2 it was never placed onto the Scheduling Queue. Since the
calendar was specified, EXAMP2 will receive a “DAY XXX
not scheduled” error.
EXAMPLE 2:
Mantissa Corporation © 2013
EXAMP1 is scheduled for day 2, EXAMP2 triggered by
EXAMP1 and has no calendar or process keywords.
Page - 113
Chapter 5
OPS/MASTER®
Schedule Generation Parameters
Generating a Schedule
EXAMP1 (Calendar has Day 2)
Triggers
EXAMP2 (Has no calendar or process keywords).
EXAMP1 is the only JOB scheduled onto Scheduling Queue.
When EXAMP1 is successfully completed, EXAMP2 will be
triggered and added to the Scheduling Queue for execution.
EXAMPLE 3:
EXAMP1 is scheduled to run on day 2 and triggers EXAMP2
which also has calendar criteria for day 2. EXAMP2 triggers
EXAMP3. EXAMP3 has no calendar criteria.
EXAMP1 (Has Calendar & day 2 is present)
Triggers
EXAMP2 (Has Calendar & day 2)
Triggers
EXAMP3 (Has no Calendar).
EXAMP1 and EXAMP2 are placed on the Scheduling Queue
at schedule time. When EXAMP2 successfully completes
EXAMP3 will be triggered and added to the JOBQ.
Schedule Generation Parameters
The schedule is accomplished via a scheduled operation job. The JOB/Master® control
region must be active when this job is run. The scheduling process creates the daily schedule and the scheduling reports. All backlogged jobs are carried over to the new schedule.
The batch scheduling job can, itself, be scheduled thus making the daily schedule creation
totally automated.
There are two (2) types of scheduling runs.
SIMULATION Schedule
This schedule is used to project what is going to be scheduled on a given day or
time. These simulation runs can schedule any number of consecutive days
desired. The jobs are not actually placed onto the scheduling queue, but are
shown in a report from the job execution. Use of the “GSS” commands in the
JOB/Master® tracking panel will provide the necessary selection criteria for
these runs.
)
If you attempt to create a simulation schedule for the current schedule day and
the regular jobs have already been scheduled, the jobs will not show on the
scheduling reports. They will appear on the Backlog Report.
2.
ACTUAL Schedule
The actual scheduling runs are completed for a 24 hour period only. They also
generate multiple reports showing different sequences of the scheduling process.
All jobs having the scheduling criteria for that day(s) will be placed on to the
scheduling queue (JOBQ). Only one 24 hour period may be scheduled at a time,
but you may execute as many 24 hour periods as desired. This is accomplished
by allowing JOB/Master® to place the next scheduled date and time into the
parameter or by a specific job (JMSCHED) being executed and changing the
Page - 114
Mantissa Corporation © 2013
E:\Manuals\Product Manuals\ASO\OM (OPS Master)\Reference Guide\Current Release\OPS_C05.fm
1.
OPS/MASTER®
Chapter 5
Generating a Schedule
Relationship of Calendars to Process Keywords
Scheduling dates within the execution JCL of the batch job or altering the
selected dates on the ONLINE “GS” commands from the tracking system of
JOB/Master®.
Relationship of Calendars to Process Keywords
During the schedule generation function those criteria defined to jobs within the data base
are evaluated for scheduling. Any process keyword or combination of process keywords
are verified for scheduling.
Process keywords requiring a calendar (refer to Process Keywords Generation), are verified against the calendar. If the calendar has the day scheduled as a processing day, then
the process keywords which are “WORKDAY” related are analyzed to determine if they
are acceptable for processing on this day. Only workday related keywords are checked
against the calendars. All other keywords ignore calendars.
Process keywords not requiring calendars (relative keywords) are verified for acceptance
based on the schedule creation date, i.e. MON, TUE, 2MON, 3FRI,...etc. The process also
takes into consideration whether your facility is using either Logical or Physical day processing.
JOB/Master® provides two methods of generating a schedule.
Batch Mode
Batch mode schedule generation consists of the following process:
Verify that the procedures have been installed into your PROCLIB during installation,
then execute the following job:
//SCHED
//STEP1
//
//
//
//
//
//
//
JOB
EXEC
(JOB CARD PARAMETERS)
JMSCHED,
STRTTME=0000, SCHD FROM TIME
STRTDTE=00000, SCHD FROM DATE
ENDTME=0000,
SCHD TO TIME
ENDDTE=00000, SCHD TO DATE
TYPE=‘ ’,
TYPE OF SCHD RUN
SUBID=JM01,
J/M SUBSYSTEM ID
REPTS=‘YYYNNN’ SCHD REPORTS
E:\Manuals\Product Manuals\ASO\OM (OPS Master)\Reference Guide\Current Release\OPS_C05.fm
Substitution variables are defined below.
STRTTME=HHMM
STRTTME is the beginning time which will be used in determining which jobs
fall into the period being scheduled. HH = Hour, MM = Minute
STRTDTE=YYDDD
STRTDTE is the beginning date used to determine the starting period being
scheduled. YY = Year, DDD = Day (Julian Date)
ENDTME=HHMM
ENDTME is the ending time which will be used in determining which job falls
into the period being scheduled. HH = Hour, MM = Minute
ENDDTE=YYDDD
ENDDTE is the ending date which will be used in determining which jobs fall
into the period being scheduled. YY = Year, DDD = Day (Julian Date)
Mantissa Corporation © 2013
Page - 115
Chapter 5
OPS/MASTER®
Batch Mode
Generating a Schedule
For Example:
STRTTME=0700
STRTDTE=93100
ENDTME=0000
ENDDTE=00000
will schedule all jobs whose calendar or process keyword criteria fall on 93100 or 93101
with a submit time between 0700 on 93100 and 0659 on 93101. Zero end specifications
default 24 hours.
STRTTME=0700
STRTDTE=93100
ENDTME=1600
ENDDTE=93100
will schedule all jobs whose calendar or process keyword criteria fall on 93100 with a submit time between 0700 and 1600.
STRTTME=0700
STRTDTE=93100
ENDTME=0000
ENDATE=93102
will schedule all jobs whose calender or process keyword criteria fall between 0700 on
93100 and 0659 on 93102. (This multiple day scheduling can be used in simulation scheduling only.)
)
A submit time of zero will always schedule the job on the STRTDTE cycle.
To request a STRTTME of 0000, you must specify 0001, since zero will default
to the same time as the last cycle.
BLANK
Run a schedule scanning the entire data base, and also input
cards for include/exclude processing.
I
Do not scan the data base. Use only input cards for include/
exclude processing.
C
Same as option BLANK, however, only a simulated paper
schedule will be produced.
M
Same as option I, however only a simulated paper schedule
will be produced.
B
Produce backlog report only, that is, only jobs retained on the
schedule.
XXXX
is the subsystem ID, the default is JM01, of the JOB/Master®
control region with which this schedule creation will be associated. This ID can be JM01, JM02, JM03 or JM04.
SUBID=
Page - 116
Mantissa Corporation © 2013
E:\Manuals\Product Manuals\ASO\OM (OPS Master)\Reference Guide\Current Release\OPS_C05.fm
TYPE=
OPS/MASTER®
Chapter 5
Generating a Schedule
Batch Mode
REPTS=
YYYNNN
123456
Scheduling reports selected for print out during the scheduling phase. The reports
are indicated by the position of the Y or N in the series. Values of these fields
within the distribution procedure are “YYYNNN”. These are changeable.
“Y”=Report wanted.
“N”=Report not wanted.
1.
Job Schedule by Date and Time (cannot be turned off).
2.
Jobs which are triggered by this scheduled job (cannot be turned off).
3.
Jobs which require the scheduled job as a Predecessor (cannot be turned off).
4.
Job schedule by System and Job.
5.
Job Schedule by Jobname.
6.
Jobs backlogged by Date and Time.
The following are considerations for the parameter selection during the scheduling run:
STRTDTE Value = 00000
Will cause a 24 hour period to be scheduled, beginning with the
date the last schedule ended. (which is visible on the PROFILE
screen) or the current date (whichever is later).
STRTDTE Value =
YYDDD
A schedule will be created for the 24 hour period of the date indicated.
STRTTME Value = 0000
Will cause the time to use the default time for the next schedule
creation. If you wish to create a schedule from midnight to midnight you must use the STRTTME = 0001. This will create a
schedule from 0001 to midnight the next day.
Include/Exclude Jobs
E:\Manuals\Product Manuals\ASO\OM (OPS Master)\Reference Guide\Current Release\OPS_C05.fm
JOB/Master® allows the user to both include jobs not normally selected, and/or to exclude
jobs normally selected.
The control cards are specified as parameters in the SYSIN DD statement of the scheduling job. The format of the control cards are:
Mantissa Corporation © 2013
Page - 117
Chapter 5
OPS/MASTER®
Online Mode
Generating a Schedule
Columns
Value
Description
1-3
JOB
SYS
Include a single job
Include a system
4
=
Equal sign
5-12
NAME
Eight character name of job or system, padded with
blanks
14
I
FORCE include the job or system regardless of scheduling criteria
E
Exclude the job or system
S
Select the job or system only if it would have normally
been selected based on scheduling criteria
YYDDD
The date, in Julian Date format, of the schedule to
include or exclude. Zero - 00000 will default to the
schedule cycle processed.
16-20
Online Mode
A schedule can also be requested on-line through Job Tracking. Refer to the description of
Job Tracking Command “GS” in this manual for more information.
This option will present JCL in an edit session which can be edited and submitted when
ready. The options presented will be the same as described previously in the Batch Mode
section.
Scheduling Jobs
A schedule that is created without the use of include or exclude parameters only selects
jobs from the database which meet the requested time and calendar criteria.
Modifications to the scheduled jobs JCL can be made to any job up until the time the job is
submitted to the JES queue. All modifications are made to the JOB/Master® Staging PDS
and not to the Base (Master) JCL PDS. Any modifications are accomplished via the JCL
substitution facilities (Option “J”) on the JOB/Master® Primary Menu.
Scheduling Individual Jobs or Systems
Individual jobs or systems can be scheduled by the generation of a full schedule. Individual job or system scheduling can be accomplished by running a schedule and specifying
the use of user-selected input only.
For instance, if a schedule is being run for a specific day and you want to include a job or
series of jobs that are not normally scheduled for that day, you may specify it in this manner.
Page - 118
1.
Following the regular schedule go to the Tracking Facility.
2.
Issue a “GS” to generate an additional schedule.
Mantissa Corporation © 2013
E:\Manuals\Product Manuals\ASO\OM (OPS Master)\Reference Guide\Current Release\OPS_C05.fm
The JCL for those jobs being scheduled is transferred from the BASE JCL (MASTER)
Library to the Staging PDS. The JCL is not placed into the Job Queue. The JOB/Master®
scheduling (Job) queue indicates a status of what is occurring or what is to occur.
OPS/MASTER®
Chapter 5
Generating a Schedule
Automatic Schedule Creation
3.
Specify the same Date and Time as the Regular Schedule.
4.
Use a “Y” in the field “USE SELECTIONS ONLY.”
5.
Place the jobs by JOBNAME you wish to schedule in the appropriate area.
6.
Use the character “I” to include the job(s) on the schedule regardless of what the
scheduling criteria indicates for the job(s).
Automatic Schedule Creation
Schedule creation can be performed automatically by defining the schedule creation job to
the JOB/Master® data base and specifying the calendar name and time frequency as with
any other job in the system.
For example, defining the job to run each day at 7:00 AM results in JOB/Master® scheduling the run each day and automatically submitting it at the specified time.
AD HOC - Dynamically Added Jobs
Dynamically adding jobs to an existing schedule can be accomplished through Job Tracking. Dynamically added jobs have all the same scheduling attributes as regularly scheduled jobs, such as manual tasks, predecessors, etc.
1.
From the JOB/Master® Main Menu select “T” <ENTER>
2.
Select OPTION ==> “AJ”
3.
JOB ==> JOBNAME <ENTER>
4.
Complete the screen with the information which may be required.
5.
CONFIRM (PF4).
The job has now been dynamically added to the schedule. To verify if desired, issue a LQ
<ENTER> and then locate the JOBNAME from the JOB Scheduling screen. The job will
show on the displayed scheduling screen.
E:\Manuals\Product Manuals\ASO\OM (OPS Master)\Reference Guide\Current Release\OPS_C05.fm
Job Schedule Confirmation
An on-line display of the jobs to be submitted to the system is always available through
the display under Job Tracking, Option = LQ. The sequence of jobs that JOB/Master® has
assembled can be changed interactively by adding a job dynamically to the scheduling
queue, cancelling a job, changing the setup requirements, changing job streams, etc. The
job requirements can be changed at any time prior to a jobs’ submission to the JES input
queue. If a job is on the schedule queue its scheduled submit time as defined on the data
base cannot be modified.
When the scheduled jobs are being added to the schedule, JOB/Master suspends, if active,
the submit facility. The status in the job queue will show that a compress is in progress.
Once done, the submit facility will be put back into the same status as when the upload
started. If the schedule ends prematurely, the submit facility can be manually restarted
using the “SS” command on the tracking screen.
Mantissa Corporation © 2013
Page - 119
Chapter 5
OPS/MASTER®
Using "Cycle" Processing
Generating a Schedule
Using "Cycle" Processing
------------------------------- JOB/Master® Job Definition --- Row 1 to 4 of 72
Command ===>
Scroll ==> PAGE
-------------------------Definition Last Updated by
on
at
Jobname
==> JOBCYC28 Alt Name For => ________ System Name ==> CYCLETST
PDS Mem
==> ________ PDS ==> ____________________________________________
Trig Job ==> N (Y/N) Triggered By==>
Submit Type ==> A (ACMRST)
Res Name1 ==> ________ Res Name2
==> ________ Schedule/Net==> ********
Calendar ==> CYCLEFRI Excep Cal1 ==> ________ Excep Cal2 ==> ________
Keywd Def ==> ________ Priority
==> _
Lib Type
==>
Neg/C Def ==> ________
Model / Count of Tapes: 3420 => 00
3480 => 00 Update Drive Usage=> Y
------------------------------- Submit Options ------------------------------Enter submit time (HHMM) & optionally “number of runs”/”minutes between runs”
Submit=> 0000 End=> 0000 Number Of Runs=> 00 Minutes Between Runs=> 0000
----------------------------- Dependency Options ----------------------------Pred
| Negative Coreq
| Process N-Proc
| Trig
Sub: OP Cond Trig
Jobs Typ|
Dep
Dep
| Keyword Keyword |
Job
Typ: CD Code Type
-------- - | -------- -------- | -------- -------- | -------- - : - ---- ________ _ | ________ ________ | CYCLE028 ________ | ________ _ : _ ____ _
________ _ | ________ ________ | ________ ________ | ________ _ : _ ____ _
________ _ | ________ ________ | ________ ________ | ________ _ : _ ____ _
The process keyword CYCLEnnn will determine the cycle frequency. In this example the
job will run every 28 days starting from the first day on the calendar.
CYCLEFRI ------------- JOB/Master®
Calendar Display/Update -------------------
Command ===>
-------------------------- Period Start and End Dates ------------------------1. 0000 0000
2. 0000 0000
3. 0000 0000 4. 0000 0000
5. 0000 0000
6. 0000 0000
7. 0000 0000
8. 0000 0000 9. 0000 0000 10. 0000 0000
11. 0000 0000 12. 0000 0000 13. 0000 0000
Description => FRIDAY CYCLE JOB
Last Updated by P390K
on 98244 at 1406 ===========Schedule/Net=> ********
|Year: 98
| | | | | | | | | |1|1|1|1|1|1|1|1|1|1|2|2|2|2|2|2|2|2|2|2|3|3 |
| *CAL/REL | 1|2|3|4|5|6|7|8|9|0|1|2|3|4|5|6|7|8|9|0|1|2|3|4|5|6|7|8|9|0|1 |
|===========|===============================================================|
| Jan( THU )| - - - - - - - - - - - - - - - - - - - - - - - - - - - - - - - |
| Feb( SUN )| - - - - - - - - - - - - - - - - - - - - - - - - - - - |
| Mar( SUN )| - - - - - - - - - - - - - - - - - - - - - F - - - - - - - - - |
| Apr( WED )| - - - - - - - - - - - - - - - - - - - - - - - - - - - - - |
| May( FRI )| - - - - - - - - - - - - - - - - - - - - - - - - - - - - - - - |
| Jun( MON )| - - - - - - - - - - - - - - - - - - - - - - - - - - - - - |
| Jul( WED )| - - - - - - - - - - - - - - - - - - - - - - - - - - - - - - - |
| Aug( SAT )| - - - - - - - - - - - - - - - - - - - - - - - - - - - - - - - |
| Sep( TUE )| - - - - - - - - - - - - - - - - - - - - - - - - - - - - - |
| Oct( THU )| - - - - - - - - - - - - - - - - - - - - - - - - - - - - - - - |
| Nov( SUN )| - - - - - - - - - - - - - - - - - - - - - - - - - - - - - |
| Dec( TUE )| - - - - - - - - - - - - - - - - - - - - - - - - - - - - - - - |
=============================================================================
The first day on the calendar will set the start of the cycle. In this case it is March 22.
Page - 120
Mantissa Corporation © 2013
E:\Manuals\Product Manuals\ASO\OM (OPS Master)\Reference Guide\Current Release\OPS_C05.fm
-
OPS/MASTER®
Chapter 5
Generating a Schedule
Special “JMSCHED” Processing
Special “JMSCHED” Processing
For installations which do not run 7 days a week! The job JMSCHED will run on MonFri, and on Saturday. The job will be placed into the schedule queue on Friday for Saturday morning at 7:45. Since the system is not up on Saturday or Sunday, the job will wait
until Monday to run. On Monday morning the Saturday job will start immediately,
because it is past its run time. The date to create a schedule will be Monday.
----------------------- JOB/Master® Job Definition -------- Row 1 to 4 of 72
Command ===>
Scroll ==> PAGE
-------------------------Definition Last Updated by
on
at
Jobname
==> JMSCHED
Alt Name For => ________ System Name ==> ********
PDS Mem
==> ________ PDS ==> ____________________________________________
Trig Job ==> N (Y/N) Triggered By==>
Submit Type ==> A (ACMRST)
Res Name1 ==> ________ Res Name2
==> ________ Schedule/Net==> ********
Calendar ==> ________ Excep Cal1 ==> ________ Excep Cal2 ==> ________
Keywd Def ==> ________ Priority
==> _
Lib Type
==>
Neg/C Def ==> ________
Model / Count of Tapes: 3420 => 00
3480 => 00 Update Drive Usage=> Y
------------------------------- Submit Options ------------------------------Enter submit time (HHMM) & optionally “number of runs”/”minutes between runs”
Submit=> 0745 End=> 0000 Number Of Runs=> 00 Minutes Between Runs=> 0000
----------------------------- Dependency Options ----------------------------Pred
| Negative Coreq
| Process N-Proc
| Trig
Sub: OP Cond Trig
Jobs Typ|
Dep
Dep
| Keyword Keyword |
Job
Typ: CD Code Type
-------- - | -------- -------- | -------- -------- | -------- - : - ---- ________ _ | ________ ________ | M-F_____ ________ | ________ _ : _ ____ _
________ _ | ________ ________ | SAT_____ ________ | ________ _ : _ ____ _
________ _ | ________ ________ | ________ ________ | ________ _ : _ ____ _
E:\Manuals\Product Manuals\ASO\OM (OPS Master)\Reference Guide\Current Release\OPS_C05.fm
The JCL for the job JMSCHED defined above is shown below. Note the Symbolic
Replacement for current system date (@YDDD). This value will be set to the current date
and will become the new schedule date. See the discussion about Date Substitution in the
chapter on Symbolic Substitution later in this manual.
Mantissa Corporation © 2013
Page - 121
Chapter 5
OPS/MASTER®
Scheduling Reports
Generating a Schedule
BROWSE -- TLCR.ALL.CNTL(JMSCDTE) - 01.00 ----------- LINE 00000000 COL 001 080
Command ===>
********************************** TOP OF DATA *******************************
//SCHED
JOB
(JOB CARD PARAMETERS)
//STEP1
EXEC
JMSCHED,
//
STRTTME=0000, SCHD FROM TIME
//*JMSYMY
<---START DATE SUBSTITUTION
//
STRTDTE=‘@YDDD’, SCHD FROM DATE
//*JMSYME
<---END DATE SUBSTITUTION
//
ENDTME=0000,
SCHD TO TIME
//
ENDDTE=00000, SCHD TO DATE
//
TYPE=‘ ’,
TYPE OF SCHD RUN
//
SUBID=JM01,
J/M SUBSYSTEM ID
//
REPTS=‘YYYNNN’ SCHD REPORTS
//STEP1.SYSIN DD *
/*
******************************* BOTTOM OF DATA *******************************
The JCL for the schedule job contains symbolic substitution variable in it for using the
current system date, as the value to be replaced. The date will be replaced in the STRTDTE parameter with the system date at submit time. So, on Monday it will have Mondays
date even if the job is left over from Saturday. This will work for normal weeks. On those
weeks where there are holidays, the job will still be scheduled on the holiday and because
the system is not up it will not run. However, when they start the system, the day after the
holiday, the job will again start to run and the current date will be substituted, generating
the schedule for that date.
Scheduling Reports
1.
Job schedule by Date and Time
2.
Jobs which require the scheduled job as a predecessor
3.
Jobs which are triggered by this scheduled job
4.
Job Schedule by System and Job
5.
Job Schedule by Jobname
6.
Jobs backlogged by Date and Time.
Reports 1 through 3 are created every time a schedule is run.
Reports 4 through 6 are optional and can be requested or suppressed by using the REPTS
parameter discussed in the Batch Mode section of schedule creation.
Sample JMSCHED reports follow:
09/24/93
Page - 122
J O B M A S T E R
J O B
S C H E D U L I N G
A N D
C O N T R O L
S Y S T E M
PAGE
1
Mantissa Corporation © 2013
E:\Manuals\Product Manuals\ASO\OM (OPS Master)\Reference Guide\Current Release\OPS_C05.fm
Schedule generation creates reports indicating the results of the scheduling cycle. There
are six (6) reports which can be requested.
OPS/MASTER®
Chapter 5
Generating a Schedule
Scheduling Reports
J O B
DATE
E:\Manuals\Product Manuals\ASO\OM (OPS Master)\Reference Guide\Current Release\OPS_C05.fm
93267
93267
93267
93267
93267
93267
93267
93267
93267
93267
93267
93267
93267
93267
93267
93267
93267
93267
93267
93267
93267
93267
93267
93267
93267
93267
93267
93267
93267
93267
93267
93267
93267
93267
93267
93267
93267
93267
93267
93267
93267
93267
93267
93267
93267
93267
93267
93267
93268
JOBNAME
JOB
DSNTRIG2
TRIG05
TRIG07
TRIG08
TRIG09
TRIG10
TRIG11
TRIG12
TRIG13
TRIG14
TRIG15
TRIG16
TRIG17
TRIG18
TRIG19
TRIG20
TRIG21
TRIG22
TRIG23
TRIG24
TRIG25
TRIG26
TRIG27
TRIG28
TRIG29
TRIG30
TRIG31
TRIG32
TRIG33
TRIG34
TRIG35
TRIG36
TRIG37
TRIG38
TRIG39
TRIG40
TRIG41
TRIG42
TRIG43
TRIG44
TRIG45
TRIG46
TRIG47
TRIG48
TRIG49
TRIG01
TRIG06
DSNTRIG1
TRIG03
TRG
NAME
Y
Y
Y
Y
Y
Y
Y
Y
Y
Y
Y
Y
Y
Y
Y
Y
Y
Y
Y
Y
Y
Y
Y
Y
Y
Y
Y
Y
Y
Y
Y
Y
Y
Y
Y
Y
Y
Y
Y
Y
Y
Y
Y
Y
Y
N
Y
N
Y
SYSTEM
SCHED
START
END
TRIGTEST 00:00
00:00
00:00
00:00
00:00
00:00
00:00
00:00
00:00
00:00
00:00
00:00
00:00
00:00
00:00
00:00
00:00
00:00
00:00
00:00
00:00
00:00
00:00
00:00
00:00
00:00
00:00
00:00
00:00
00:00
00:00
00:00
00:00
00:00
00:00
00:00
00:00
00:00
00:00
00:00
00:00
00:00
00:00
00:00
00:00
TRIGTEST 07:45
TRIGTEST 07:45
TRIGTEST 09:06
TRIGTEST 00:01
TOTAL JOBS SCHEDULED =
Mantissa Corporation © 2013
S C H E D U L E
SCHED
STAT
00:01
00:00
00:00
00:00
00:00
00:00
00:00
00:00
00:00
00:00
00:00
00:00
00:00
00:00
00:00
00:00
00:00
00:00
00:00
00:00
00:00
00:00
00:00
00:00
00:00
00:00
00:00
00:00
00:00
00:00
00:00
00:00
00:00
00:00
00:00
00:00
00:00
00:00
00:00
00:00
00:00
00:00
00:00
00:00
00:00
00:00
07:46
00:00
00:02
B Y
D A T E
SCHED SETUP PREDECESSOR
JOBS DEF. NAME
P
------------------------------------------------------------------------------------------------------------------------------------------------------------------------------------P
----- PRED01
P
----P
----P
-----
A N D
T I M E
ALTERNATE
NAME
CALENDAR
CALENDAR
EXCEP.
PKWRD.
NAME
ALL
M-F
49
Page - 123
Chapter 5
OPS/MASTER®
Scheduling Reports
J O B M A S T E R
SCHEDULED
DATE
JOB
92267
92267
92267
92267
92267
92267
93266
93266
93266
93267
93267
93267
DATE
92267 0000
92267 0000
92267 0000
OPSDUMY0
OPSDUMY1
R112DUMY
92267
92267
92267
92267
92267
92267
92267
92267
92267
92267
92267
92267
92267
92267
92267
92267
92267
93266
93266
93266
93266
93266
R1120X05
R1120001
R1120003
R1120004
R1121001
R1121005
R1121007
R1124001
R1124002
R1124006
R1124007
R1124008
R1124009
R1124010
R1127001
R1128002
R1128003
R1128001
TRIGJOBA
TRIGJOBJ
TRIGJOBN
TRIG01
93266 1001
93266 0745
TRIG02
TRIG06
93267
93267
93267
93267
93267
93267
93267
93267
93267
1401
1405
0000
1500
0000
0000
1001
0001
0745
JCLSUB03
JCLSUB04
OPSDUMY0
TRIGJOBA
TRIGJOBJ
TRIGJOBN
TRIG02
TRIG03
TRIG06
93268 0200
93268 0645
OBTRSYTO
SCHEDULE
Page - 124
A N D
C O N T R O L
S Y S T E M
PAGE
1
R1128003
R1124011
R1124011
R1124011
R1124011
R1124011
TRIG02
TRIG01
TRIGPURG
TRIG02
PRED04
TRIGPURG
J O B M A S T E R
SCHEDULED
TIME JOB
0000
0000
0000
0000
0000
0000
0000
0000
0000
0000
0000
0000
0000
0000
0000
0000
0000
1123
1500
0000
0000
0745
S C H E D U L I N G
----------------- JOBS WHICH REQUIRE THE SCHEDULED JOB AS A PREDECESSOR --------------------
RMSP1100*
R1124006
R1124007
R1124008
R1124009
R1124010
PREDTEST*
PRED01 *
TRIG06
PREDTEST*
PRED01 *
TRIG06
09/24/93
J O B
J O B
S C H E D U L I N G
A N D
C O N T R O L
----------------- JOBS WHICH ARE TRIGGERED BY THIS SCHEDULED JOB
CLSPR88
OPSPR88
R1120G00
R1120X04
R1124001
R1124002
R1124006
R1124012
R1127001
R1121007
R1121001
R1121005
R1121003
R1124007
R1124008
R1124009
R1124010
R1124011
R1128001
OPSDUMY1
R112DUMY
R1128002
TRIGJOBC
TRIGJOBN
TRIGJOBP
TRIG02
TRIG46
TRIG58
TRIG13
TRIG25
TRIG03
TRIG25
TRIG37
TRIG49
TRIG61
TRIG15
JCLSUB04
JCLSUB05
CLSPR88
TRIGJOBC
TRIGJOBN
TRIGJOBP
TRIG03
TRIG04
TRIG07
TRIG45
TRIG57
TRIG12
TRIG24
GC10C100
OPSDUMY0
S Y S T E M
PAGE
1
----------------------
R1120G01 R1120G02 R1120G03 R1120G04 R1120G05 R1120X00 R1120X01 R1120X02 R1120X03
R1120X05 R1120003 R1120004
R1120001 R1120004
R1121008 R1121009 R1121010 R1121011 R1121012
R112XREF R1121002
OPSDUMY0
R1128003
OO1102RF
TRIGJOBB
TRIGJOBO
TRIGJOBR
TRIG35
TRIG47
TRIG59
TRIG14
TRIG26
TRIG06
TRIG26
TRIG38
TRIG50
TRIG62
TRIG16
TRIGJOBG TRIGJOBH TRIGJOBI TRIGJOBD TRIGJOBJ TRIGJOBK TRIGJOBL TRIGJOBM
TRIG36
TRIG48
TRIG03
TRIG15
TRIG27
TRIG37
TRIG49
TRIG04
TRIG16
TRIG28
TRIG38
TRIG50
TRIG05
TRIG17
TRIG29
TRIG39
TRIG51
TRIG06
TRIG18
TRIG30
TRIG40
TRIG52
TRIG07
TRIG19
TRIG31
TRIG41
TRIG53
TRIG08
TRIG20
TRIG32
TRIG42
TRIG54
TRIG09
TRIG21
TRIG33
TRIG43
TRIG55
TRIG10
TRIG22
TRIG34
TRIG44
TRIG56
TRIG11
TRIG23
TRIG45
TRIG57
TRIG12
TRIG24
TRIG27
TRIG39
TRIG51
TRIG63
TRIG17
TRIG28
TRIG40
TRIG52
TRIG64
TRIG18
TRIG29
TRIG41
TRIG53
TRIG07
TRIG19
TRIG30
TRIG42
TRIG54
TRIG08
TRIG20
TRIG31
TRIG43
TRIG55
TRIG09
TRIG21
TRIG32
TRIG44
TRIG56
TRIG10
TRIG22
TRIG33
TRIG45
TRIG57
TRIG11
TRIG23
TRIG34
TRIG46
TRIG58
TRIG12
TRIG24
TRIG35
TRIG47
TRIG59
TRIG13
TRIG36
TRIG48
TRIG60
TRIG14
TRIG43
TRIG55
TRIG10
TRIG22
TRIG44
TRIG56
TRIG11
TRIG23
TRIGJOBJ TRIGJOBK TRIGJOBL TRIGJOBM TRIGJOBB TRIGJOBG TRIGJOBH TRIGJOBI TRIGJOBD
TRIGJOBO
TRIGJOBR
TRIG06
TRIG34
TRIG46
TRIG58
TRIG13
TRIG25
TRIG35
TRIG47
TRIG59
TRIG14
TRIG26
TRIG36
TRIG48
TRIG60
TRIG15
TRIG27
TRIG37
TRIG49
TRIG61
TRIG16
TRIG28
TRIG38
TRIG50
TRIG62
TRIG17
TRIG29
TRIG39
TRIG51
TRIG63
TRIG18
TRIG30
TRIG40
TRIG52
TRIG64
TRIG19
TRIG31
TRIG41
TRIG53
TRIG08
TRIG20
TRIG32
TRIG42
TRIG54
TRIG09
TRIG21
TRIG33
Mantissa Corporation © 2013
E:\Manuals\Product Manuals\ASO\OM (OPS Master)\Reference Guide\Current Release\OPS_C05.fm
09/24/93
Generating a Schedule
OPS/MASTER®
Chapter 5
Generating a Schedule
09/24/93
DATE
Scheduling Reports
J O B M A S T E R
J O B
JOBNAME
TRG SYSTEM
JOB
NAME
J O B
S C H E D U L I N G
A N D
S C H E D U L E
B Y
S Y S T E M
SCHED SCHED
START END
SCHED
STAT
SETUP
PREDECESSOR
JOBS
C O N T R O L
A N D
J O B
S Y S T E M
PAGE
1
ALTERNATE CALENDAR EXCEP. PKWRD.
DEF. NAME
NAME
CALENDAR NAME
COKE001
COKE002
COKE003
COKE004
COKE005
COKE006
COKE007
N
N
N
N
N
N
N
COKERES
COKERES
COKERES
COKERES
COKERES
COKERES
COKERES
16:00
16:00
16:00
16:00
16:00
16:00
16:00
00:00
00:00
00:00
00:00
00:00
00:00
00:00
B
B
B
B
B
B
B
-----------------------------
WORKDY93
WORKDY93
WORKDY93
WORKDY93
WORKDY93
WORKDY93
WORKDY93
93267
93267
R88PC11
R88PC12
N
N
CYCLE1
CYCLE1
20:00
20:00
00:00
00:00
B
B
---------
MON-FRI
MON-FRI
93267
93267
93267
93267
93267
93267
DRPPR001
DRPPR002
DRPPR003
DRPPR004
DRPPR005
DRPPR006
N
N
N
N
N
N
DRPPRES
DRPPRES
DRPPRES
DRPPRES
DRPPRES
DRPPRES
16:00
16:00
16:00
16:00
16:00
16:00
00:00
00:00
00:00
00:00
00:00
00:00
B
B
B
B
B
B
-------------------------
WORKDY93
WORKDY93
WORKDY93
WORKDY93
WORKDY93
WORKDY93
93267
93268
93268
GC10C100
OBTRSYTO
STS00297
Y
Y
N
GBANK
GBANK
GBANK
00:00
02:00
00:01
00:01
00:00
00:00
B
B
B
-------------
HOLIDY93
HOLIDY93
EVERY
EVERY
E:\Manuals\Product Manuals\ASO\OM (OPS Master)\Reference Guide\Current Release\OPS_C05.fm
93267
93267
93267
93267
93267
93267
93267
Mantissa Corporation © 2013
Page - 125
Chapter 5
OPS/MASTER®
Scheduling Reports
J O B M A S T E R
J O B
J O B
S C H E D U L I N G
S C H E D U L E
DATE
JOBNAME
TRG
JOB
SYSTEM
NAME
SCHED
START
SCHED
END
SCHED
STAT
SETUP
93267
93267
93268
93267
93267
93267
93267
93267
93267
93267
93267
93267
93267
93267
93267
93267
93267
93267
93267
93267
93267
93267
93267
93267
93267
93267
93267
93267
93267
93267
93267
93267
93267
93267
93267
93267
93267
93267
93267
93267
93267
93267
93267
93267
93267
93267
93267
93267
93267
93267
93267
93267
93267
93267
DSNTRIG1
TRIG01
TRIG03
TRIG05
TRIG06
TRIG07
TRIG08
TRIG09
TRIG10
TRIG11
TRIG12
TRIG13
TRIG14
TRIG15
TRIG16
TRIG17
TRIG18
TRIG19
TRIG20
TRIG21
TRIG22
TRIG23
TRIG24
TRIG25
TRIG26
TRIG27
TRIG28
TRIG29
TRIG30
TRIG31
TRIG32
TRIG33
TRIG34
TRIG35
TRIG36
TRIG37
TRIG38
TRIG39
TRIG40
TRIG41
TRIG42
TRIG43
TRIG44
TRIG45
TRIG46
TRIG47
TRIG48
TRIG49
TRIG50
TRIG60
TRIG61
TRIG62
TRIG63
TRIG64
N
N
Y
Y
Y
Y
Y
Y
Y
Y
Y
Y
Y
Y
Y
Y
Y
Y
Y
Y
Y
Y
Y
Y
Y
Y
Y
Y
Y
Y
Y
Y
Y
Y
Y
Y
Y
Y
Y
Y
Y
Y
Y
Y
Y
Y
Y
Y
Y
Y
Y
Y
Y
Y
TRIGTEST
TRIGTEST
TRIGTEST
09:06
07:45
00:01
00:00
07:45
00:00
00:00
00:00
00:00
00:00
00:00
00:00
00:00
00:00
00:00
00:00
00:00
00:00
00:00
00:00
00:00
00:00
00:00
00:00
00:00
00:00
00:00
00:00
00:00
00:00
00:00
00:00
00:00
00:00
00:00
00:00
00:00
00:00
00:00
00:00
00:00
00:00
00:00
00:00
00:00
00:00
00:00
00:00
00:00
00:00
00:00
00:00
00:00
00:00
00:00
00:00
00:02
00:00
07:46
00:00
00:00
00:00
00:00
00:00
00:00
00:00
00:00
00:00
00:00
00:00
00:00
00:00
00:00
00:00
00:00
00:00
00:00
00:00
00:00
00:00
00:00
00:00
00:00
00:00
00:00
00:00
00:00
00:00
00:00
00:00
00:00
00:00
00:00
00:00
00:00
00:00
00:00
00:00
00:00
00:00
00:00
00:00
00:00
00:00
00:00
00:00
00:00
00:00
P
P
P
-------------------------------------------------------------------------------------------------------------------------------------------------------------------------------------------------------------------------
TRIGTEST
TOTAL JOBS SCHEDULED =
Page - 126
P
B Y
A N D
C O N T R O L
S Y S T E M
PAGE
1
J O B N A M E
PREDECESSOR
JOBS
PRED01
ALTERNATE CALENDAR EXCEP. PKWRD.
DEF. NAME
NAME
CALENDAR NAME
M-F
ALL
63
E:\Manuals\Product Manuals\ASO\OM (OPS Master)\Reference Guide\Current Release\OPS_C05.fm
09/24/93
Generating a Schedule
Mantissa Corporation © 2013
OPS/MASTER®
Chapter 5
Generating a Schedule
09/24/93
Scheduling Reports
J O B M A S T E R
J O B S
DATE
TRG
JOB
TRIGJOBG*
TRIGJOBH
TRIGJOBI
TRIGJOBJ*
TRIGJOBK*
TRIGJOBL*
TRIGJOBM*
TRIGJOBN
TRIGJOBO
TRIGJOBP
TRIGJOBR
TRIG60
TRIG61
TRIG62
TRIG63
TRIG64
CLSPR88
TRIG06
TRIGJOBC*
TRIG04
TRIGPURG
TRIG02
MSGJOB
TRIGJOBD
JM01SCHD
MSGTEST
TRIGJOBA
COKE001
COKE002
COKE003
COKE004
COKE005
COKE006
COKE007
COKE008
COKE009
COKE010
COKE011
COKE012
COKE013
COKE014
COKE015
DRPPR001
DRPPR002
DRPPR003
DRPPR004
DRPPR005
DRPPR006
DRPPR007
Y
Y
Y
Y
Y
Y
Y
Y
Y
Y
Y
Y
Y
Y
Y
Y
Y
Y
Y
Y
N
Y
Y
Y
N
N
N
N
N
N
N
N
N
N
N
N
N
N
N
N
N
N
N
N
N
N
N
N
S C H E D U L I N G
B Y
SYSTEM
NAME
SCHED
START
SCHED
END
SCHED
STAT
SETUP
TRIGTEST
TRIGTEST
TRIGTEST
TRIGTEST
TRIGTEST
TRIGTEST
TRIGTEST
TRIGTEST
TRIGTEST
TRIGTEST
TRIGTEST
00:00
00:00
00:00
00:00
00:00
00:00
00:00
00:00
00:00
00:00
00:00
00:00
00:00
00:00
00:00
00:00
07:00
07:45
08:01
08:04
08:15
10:01
14:15
14:15
14:18
14:30
15:00
16:00
16:00
16:00
16:00
16:00
16:00
16:00
16:00
16:00
16:00
16:00
16:00
16:00
16:00
16:00
16:00
16:00
16:00
16:00
16:00
16:00
16:00
00:01
00:01
00:01
00:01
00:01
00:01
00:01
00:01
00:01
00:01
00:01
00:00
00:00
00:00
00:00
00:00
07:01
07:46
08:02
00:00
00:00
00:00
00:00
14:16
00:00
00:00
00:00
00:00
00:00
00:00
00:00
00:00
00:00
00:00
00:00
00:00
00:00
00:00
00:00
00:00
00:00
00:00
00:00
00:00
00:00
00:00
00:00
00:00
00:00
B
B
B
B
B
B
B
B
B
B
B
B
B
B
B
B
B
B
B
B
B
B
B
B
B
B
B
B
B
B
B
B
B
B
B
B
B
B
B
B
B
B
B
B
B
B
B
B
B
-----------------------------------------------------------------------------------------------------------------------------------------------------------------------------------------------------
MAINTDLY
TRIGTEST
TRIGTEST
TRIGTEST
TRIGTEST
TRIGTEST
MAINTDLY
TRIGTEST
********
CANSYS
TRIGTEST
COKERES
COKERES
COKERES
COKERES
COKERES
COKERES
COKERES
COKERES
COKERES
COKERES
COKERES
COKERES
COKERES
COKERES
COKERES
DRPPRES
DRPPRES
DRPPRES
DRPPRES
DRPPRES
DRPPRES
DRPPRES
A N D
D A T E
C O N T R O L
A N D
PREDECESSOR
JOBS
S Y S T E M
PAGE
1
T I M E
ALTERNATE CALENDAR EXCEP. PKWRD.
DEF. NAME
NAME
CALENDAR NAME
M-F
ALL
TRIG06
PREDTEST
M-F
WORKDY93
WORKDY93
WORKDY93
WORKDY93
WORKDY93
WORKDY93
WORKDY93
WORKDY93
WORKDY93
WORKDY93
WORKDY93
WORKDY93
WORKDY93
WORKDY93
WORKDY93
WORKDY93
WORKDY93
WORKDY93
WORKDY93
WORKDY93
WORKDY93
WORKDY93
FRI
ALL
E:\Manuals\Product Manuals\ASO\OM (OPS Master)\Reference Guide\Current Release\OPS_C05.fm
93267
93267
93267
93267
93267
93267
93267
93267
93267
93267
93267
93267
93267
93267
93267
93267
93267
93267
93267
93267
93267
93267
93267
93267
93267
93267
93267
93267
93267
93267
93267
93267
93267
93267
93267
93267
93267
93267
93267
93267
93267
93267
93267
93267
93267
93267
93267
93267
93267
JOBNAME
J O B
B A C K L O G G E D
Mantissa Corporation © 2013
Page - 127
Chapter 5
Generating a Schedule
E:\Manuals\Product Manuals\ASO\OM (OPS Master)\Reference Guide\Current Release\OPS_C05.fm
Scheduling Reports
OPS/MASTER®
Page - 128
Mantissa Corporation © 2013
OPS/MASTER®
Chapter 6
Job Submission
Submit Facility
Chapter 6
Job Submission
Submit Facility
The submit facility is the function which submits the JCL to the JES input queue. The submit facility can be set to be active or inactive at JOB/Master® initialization.
Starting and Stopping the Submit Facility
The following are examples of how to set the submission facility to either an active or
inactive status:
E:\Manuals\Product Manuals\ASO\OM (OPS Master)\Reference Guide\Current Release\OPS_C06.fm
JOB/Master® PROC PARMS (Check the INSTLIB for member JOBMASTR)
STRT=N
Default to bring JOB/Master® up with the submit facility
turned off.
STRT=Y
Default to bring JOB/Master® up with the submit facility
turned on.
By turning the submit facility on if there are jobs waiting to be submitted due to time and/
or dependencies being satisfied, JOB/Master® will attempt to submit them to the JES
input queue as soon as the control region is active.
The submit facility can also be manually activated or deactivated by using the two commands “PS” or “SS” from the tracking menu.
PS = Stop the submit facility (All submission to JES is halted).
SS = Start the submit facility (All submission to JES resumes).
All JOB/Master® functions are in effect, even if the submit facility is inactive. A job
which is defined to be automatically submitted by JOB/Master® will remain in “Submit
Waiting” Status, with a message of “Submit Facility Inactive” on the current status line of
the Tracking Menu (LQ). These two commands are selective in that they can be issued to
stop and start the submit facility on all processors or an individual processor.
Mantissa Corporation © 2013
Page - 129
Chapter 6
OPS/MASTER®
External Submits
Job Submission
The JOB/Master® JOBQ (JMJOBQ) retains the status of all scheduled jobs and can be
viewed by using the “LQ” command in the Tracking Menu. (Refer to JOB Tracking - List
Queue (LQ) Select Options).
The status of the submit facility can be reviewed by using the ST command on the Tracking Menu. It will indicate the System ID and whether it is started or stopped, plus the time
of the last function requested.
External Submits
JOB/Master® can track and control jobs that were not submitted by JOB/Master®. To
achieve this, a “¢” (cent sign), or the designated tracking character for the JOB/Master®
region desired, must be placed in column 71 of the job card.
The following considerations apply to all externally submitted jobs:
1.
If the job is not on the scheduling queue, it is considered scheduled and uses the
current system date as the assigned scheduled date.
2.
If the job is on the scheduling queue and in a failed or ABENDED status, it is
regarded as a rerun. If it is not in an ABENDED status, it is considered an ancillary job independent of the schedule. If the External Submit indicator is “N” on
the Job Definition Screen, the job will not be related to the job on the schedule. If
the indicator is “Y” it will be considered the scheduled job and processed accordingly.
3.
If the external submit flag for the job is set to “Y” on the job definition screen,
the job will not be submitted by JOB/Master®. If the job is submitted to the system, and TYPRUN=HOLD is used on the job card, then all scheduling dependencies can be applied to the job if it is scheduled.
After all predecessors and other dependencies are satisfied, JOB/Master® will
release the job in the JES Input Queue for execution. Using this method, jobs
submitted from remote locations can be automatically controlled by JOB/Master®.
JOB/Master® Library Management Facility allows for the management and synchronization of JCL SETUP activity for jobs that require JCL or control record changes from one
day to the next.
The Library Management feature allows each day’s JCL to be placed in a STAGING PDS.
The STAGING PDS may contain any number of days work. The number of retention days
to be kept is specified in the Global System Profile.
During the scheduling processing, when JOB/Master® is ready to submit a job to the Job
Entry Subsystem (JES) input queue, either the Daily PDSs are used or the STAGING PDS
is used for retrieving the JCL. If JOB/Master® cannot locate the JCL in the STAGING
PDS, it will then search the DEFAULT (JMSUBPDS) SUBMIT PDS and if the job is
found in the library, it will be submitted. If neither of the two libraries contain the job, a
“SUBMIT FAILED” message will be issued to the user. JOB/Master® will periodically
retry the submit process until either the job is added to one of the submit libraries, or the
job is cancelled from the JOB/Master® schedule.
Page - 130
Mantissa Corporation © 2013
E:\Manuals\Product Manuals\ASO\OM (OPS Master)\Reference Guide\Current Release\OPS_C06.fm
Library Management Facility
OPS/MASTER®
Chapter 6
Job Submission
Library Management Facility
USER Submit PDS
The USER submit PDS is optionally defined on the Job Definition Screen and, if used,
will override all other JCL search sequences. This PDS will be dynamically allocated at
job submit time and does not need to be defined in the JOB/Master® control task region
by use of a DD statement.
Submit PDS
JCL submit data sets are organized in an hierarchical manner. For example, if the STAGING PDS is used it will be searched first and then the DEFAULT SUBMIT PDS. These
data sets may be concatenated. The only exception to this rule is user specified data sets.
These PDS data sets are assigned to a specific job when the job is defined to the database.
If this option is used (done on a job by job basis or using the system record) then only the
user specified PDS will be searched.
The only required SUBMIT PDS is the DEFAULT PDS, which is defined by the DD name
“JMSUBPDS”.
STAGING PDS
The STAGING PDS is a powerful option to using standard Submit PDS’s during the
scheduling and execution phase of JOB/Master®. The Staging PDS is defined by the DD
name “JMSTGPDS” in the JOB/Master® Execution Region.
Using the STAGING PDS allows for the following functions to be supported:
•
STAGE JCL for more than 7 days in advance
•
Keep more than 1 member for the same job for a schedule
•
Have a user specified retention period for JCL members which have been executed and may need to be rerun at a later date, using the same parms as the original run.
E:\Manuals\Product Manuals\ASO\OM (OPS Master)\Reference Guide\Current Release\OPS_C06.fm
)
Activation of the Staging PDS is determined by the presence of the JMSTGPDS DD statement in the JOB/Master® control region startup proc JOBMASTR. If the DD statement is not commented out, activation of the Staging
PDS is automatic. If the Daily PDS’s are present and not commented out, they
will be used instead. Either the Staging PDS or the Daily PDS’s must be specified.
Placing Members Into The STAGING PDS
During execution, JMSCHED (the scheduling program) interrogates the JOB/Master®
database to locate all jobs which are to be scheduled with the criteria for this particular
scheduling run.
The following describes the scheduling process:
Mantissa Corporation © 2013
1.
JMSCHED contains the scheduling dates/systems/jobs etc. which are to be processed.
2.
JMSCHED begins execution and starts to scan the database to extract those jobs/
systems/etc., which meet the criteria for this run.
Page - 131
Chapter 6
OPS/MASTER®
Library Management Facility
Job Submission
3.
When a JOB is located having the criteria for processing, a job event is placed
onto the JOBQ to await processing. (This is not the JCL).
4.
JMSCHED will now go to the “JMSUBPDS” DD and extract the execution JCL
for each job using the DEFAULT SUBMIT PDS. (No JCL for jobs residing on a
User PDS will be extracted).
5.
The execution JCL is moved to the STAGING PDS. During the transfer to the
Staging PDS, the JCL member name is altered using the Staging Algorithm.
(This allows for the multiple existence of the same job on a schedule).
)
JCL is placed on the Staging PDS ONLY during the scheduling activity or
during the RESOLVE function of JCL substitution (Described below).
6.
Once the JCL has been transferred to the Staging PDS, all functions for execution
or Symbolic substitution can now be completed.
SCHEDULING USING STAGING PDS
JMDB
JMJOBQ
JMSCHED
REPORTS
*
Schedule
Submit
JMSTGPDS
USERPDS
JES
*
USERPDS
*If specified in Job Definition
Page - 132
Mantissa Corporation © 2013
E:\Manuals\Product Manuals\ASO\OM (OPS Master)\Reference Guide\Current Release\OPS_C06.fm
JMSUBPDS
OPS/MASTER®
Chapter 6
Job Submission
Library Management Facility
If the JOB/Master® profile option “COMPRESS JMSUBPDS SCHD” is specified as “Y”,
then the DD JMSUBPDS will be compressed.
The DD specified by JMSTGPDS, which must be the JOB/Master® Staging PDS, will
have all members which are older than N days scratched based on the JOB/Master® profile parameter “RUN JCL = NN”. The NN is the number of days to hold JCL.
JMSTGPDS will then be compressed. During compression of JMSTGPDS, the submit
facility will be turned off to protect file integrity. The message “WAITING - JMSCHED
COMPRESS IN PROGRESS” will appear on the LQ. When the compress is complete, the
submit facility will be turned on.
The JMSUBMON, ..., JMSUBSUN, and JMRERUN are not used if the staging PDS is
used. The staging PDS replaces the 7 Daily/Rerun PDS’s.
SCHEDULING WITH DAILY PDS’S
JMDB
REPORTS
JMSCHED
JMSUBPDS
JMJOBQ
Schedule
Submit
JMSUBMON
JMSUBTUES, JMSUBWED,
JMSUBTHURS, JMSUBFRI,
JMSUBSAT, JMSUBSUN
.
E:\Manuals\Product Manuals\ASO\OM (OPS Master)\Reference Guide\Current Release\OPS_C06.fm
RESOLVE
PDS
RERUN
PDS
.
*
USERPDS
*
USERPDS
JES
*If specified in Job Definition
The JCL for all scheduled jobs is copied from the PDS specified by the JMSUBPDS DD,
to the PDS specified by the JMSTGPDS DD or the Daily PDSs. This JCL can then be
modified for that schedule run, if needed, without having to modify the base or master
copy.
Mantissa Corporation © 2013
Page - 133
Chapter 6
OPS/MASTER®
Library Management Facility
Job Submission
All scheduled events are placed into the JOBQ at this time.
)
The JMSTGPDS or the Daily PDSs must have a SIZE (LRECL) equal to or
greater than the largest PDS that will be feeding it. (This is an IBM limitation).
Dynamically Added Jobs
Frequently during the process of JOB scheduling you may need to add a job to the existing
JOBQ. You may do this by running another schedule run, or by dynamically adding the
job(s) to the JOBQ using the “AJ” function within the tracking facility.
Jobs added to the JOBQ using the “AJ” function do not (within this release) automatically
having their execution JCL transferred to the staging PDS. In order to move the execution
JCL from the Submit/User PDS’s to the staging PDS it is necessary to utilize the
“RESOLVE” function within JCL/MASTER (Symbolic Substitution).
The following procedure will facilitate the JCL transfer:
Add the JOB to the JOBQ...“AJ JOBNAME” (Be certain to set the 5th Manual
task flag (JCL SETUP) during the add process to a “Y”).
2.
Any time after the job has been successfully added to the JOBQ go to the JCL/
MASTER (JCL Substitution) function from either the command line (“=J”), or
from the main menu.
3.
Select number “1” Resolve. (Do not use the JOBNAME FIELD). A table of all
JOBQ entries containing a “Y” in the JCL SETUP flag will be presented.
4.
Select the JOB you wish to Resolve by placing an “S” adjacent to the JOB.
5.
The job will be selected for resolution and the JCL will be transferred to the Staging PDS.
It is absolutely essential for the Staging PDS and the Resolve PDS to be the
same dataset as defined within the “ISF” facility. The resolved JCL will be
stored in this dataset and will be submitted for processing from this dataset.
E:\Manuals\Product Manuals\ASO\OM (OPS Master)\Reference Guide\Current Release\OPS_C06.fm
)
1.
Page - 134
Mantissa Corporation © 2013
OPS/MASTER®
Chapter 6
Job Submission
Library Management Facility
Browsing the JMSTGPDS
Menu Functions Confirm Utilities Help
ssssssssssssssssssssssssssssssssssssssssssssssssssssssssssssssssssssssssssssss
ISRUDSM BROWSE
OPS.V520.JMSTGPDS
Row 00001 of 00017
Command ===>
Scroll ===> PAGE
Name
Prompt
VV MM
Changed
Size Init
Mod
ID
_________ /.6.....
01.01 98/08/25 00:05
1
1
0 TSTPRED
_________ /...f...
01.01 98/08/25 00:10
1
1
0 JMPOSTB
_________ /....\tW
01.01 98/08/25 00:15
1
1
0 JMPOSTC
_________ /.B.X...
01.01 98/08/25 00:50
1
1
0 TSTPRED
_________ /.P¦.~..
01.01 98/08/25 00:55
1
1
0 JCLDATE
_________ /.P¦..c;
01.01 98/08/25 00:55
1
1
0 JCLSUBA
_________ /..eE..U
01.01 98/08/25 01:05
1
1
0 KEYTABL
_________ /..i....
01.01 98/08/25 02:00
1
1
0 PURGE03
_________ /..H....
01.01 98/08/25 02:00
1
1
0 RESTEST
_________ /..H....
01.01 98/08/25 02:00
1
1
0 RESTEST
_________ /..H....
01.01 98/08/25 02:00
1
1
0 RESTEST
_________ /..H....
01.01 98/08/25 02:00
1
1
0 RESTEST
_________ /..H...~
01.01 98/08/25 02:00
1
1
0 RESTEST
_________ /..H...s
01.01 98/08/25 02:00
1
1
0 RESTEST
_________ /.=...’F
01.01 98/08/28 03:00
1
1
0 JCLSUB2
_________ ..;G..~.
01.01 98/09/01 10:30
1
1
0 JCLSUB1
_________ .....¬Q.
01.01 98/09/02 00:32
1
1
0 SELMODE
**End**
The ISPF directory display of the STAGING PDS will now show the Scheduled job and
the Scheduled Date and Time.
E:\Manuals\Product Manuals\ASO\OM (OPS Master)\Reference Guide\Current Release\OPS_C06.fm
Some fields were changed from the usual defaults of an ISPF Display. The changed fields
are as follows:
NAME
A hashed value which contains the JOBNAME, date and time.
The hashing enables JOB/Master® to allow the same Job to be
scheduled multiple times on the queue.
CREATED
The scheduled date and time for the job to begin as indicated
on the JOBQ.
CHANGED
The Scheduled date and time for the job to begin as indicated
on the JOBQ.
ID
The first seven characters of the scheduled job name. ISPF will
not allow more than seven characters to be displayed for this
field.
Mantissa Corporation © 2013
Page - 135
Chapter 6
OPS/MASTER®
Library Management Facility
Job Submission
Submit Search Order
No User PDS specified on
Job Definition Panel.
User PDS specified on Job Definition Panel.
User PDS
A User PDS can be defined on the Job
Definition Screen and can be used
exclusively as the submit PDS. This
data set is dynamically allocated and
deallocated at Job submit time. If this
PDS is defined, none of the other PDS
categories will be used.
Staging PDS
Daily PDS
Default PDS
SUBMIT FAILED
SUBMIT FAILED
Any members which have exceeded their retention period specified on the global profile
screen, RUN JCL Field, will be removed from this library at schedule creation time and
the PDS will be compressed. This means that the library is automatically maintained, and
the only obligation the user has is to insure that the data set is large enough to accommodate user processing.
1.
If a USER PDS is defined, only that PDS will be used.
2.
At the time JOB/Master® is ready to submit a job to the JES input queue, the
DAILY PDS or STAGING PDS is used to select the appropriate job. The job is
then submitted to the JES queue by JOB/Master®.
3.
If JOB/Master® does not find the job in the STAGING PDS or the DAILY PDS
it will search and submit the job from DEFAULT SUBMIT PDS.
4.
If a job is not found in the DAILY PDS, STAGING PDS or the DEFAULT SUBMIT PDS, JOB/Master® will issue a “SUBMIT FAILED” message. JOB/Master® will retry the submit on a periodic basis, until either the job is added to one
of the submit data sets or the job is cancelled from the JOB/Master® scheduling
queue.
Submit Member
The jobname, which is coded at the time the job is defined to the JOB/Master® data base,
is used as the member name for selecting the job from the submit PDS. An alternate member name can be defined on the job definition screen, and can be overridden by the
“S”(Submit), “F”(Force Submit) or “R”(Restart) commands. (Refer to Job Tracking “LQ” commands.)
Remember, the jobname on the job card should match the jobname as it is defined to the
JOB/Master® data base. If the Jobname on the jobcard is different than the JOB/Master®
Page - 136
Mantissa Corporation © 2013
E:\Manuals\Product Manuals\ASO\OM (OPS Master)\Reference Guide\Current Release\OPS_C06.fm
In summary, the submit PDS processing occurs as follows:
OPS/MASTER®
Chapter 6
Job Submission
Force Submiting a Job
database, the History File will indicate the difference when the job is submitted. All job
names must conform to all existing MVS job naming conventions.
Force Submiting a Job
A job that is on the schedule queue can be forced into execution through the use of the “F”
command, under JOB/Master® Job Tracking. The command can be used to manually initiate a job that is waiting on dependency criteria, i.e., time, predecessor, etc.
The “F” command is used to manually submit a job which you want to run a job before all
the dependency criteria defined have been satisfied. The “S” command is similar to the
“F” command in that it also, manually submits a job. The “S” command will not override
the dependency criteria except for schedule submit time.
User Submit Exit
A user submit exit is available at the time of job submission, where user code can control
and modify the JCL being submitted. Various options are available, and are described in
the JOB/Master® Installation Manual.
Resource Routing
Resource routing is a unique JOB/Master® function allowing any resource to be assigned
to a particular CPU. Resources may be “REAL” or “VIRTUAL” in nature and can be
defined with any mnemonic desired.
Example 1:
SYSA = CPU Identification - Real
3480 = Real devices
CICSA = Real CICS started task
NODE4 = Real Device Name
BACKUP = Virtual Task
E:\Manuals\Product Manuals\ASO\OM (OPS Master)\Reference Guide\Current Release\OPS_C06.fm
Resources are defined to the Jobs when they are defined to the database. Each job may
have up to two (2) resources. (RES1 and RES 2 - See JOB Database Creation)
Resources are attached or detached from a particular processor by using the “RT” Command within the tracking Menu. It brings up the Workload Control Definition Screen
where resources are displayed. It is also possible to assign a concurrency variable for a
particular resource. The concurrency variable allows for a specific number of jobs requiring that resource to be processed concurrently. (This can be used effectively to control the
take over of all initiators by report jobs following a master file update). See Tracking
Menu “RT” command.
Example 2:
Job “BKUPJOB1” uses a string of 3480 tape drives which
must be varied offline from SYSTEMA and varied online for
SYSTEMB. To do this, the resource “3480” must be changed.
Change the SMFID from “SYSA” to “SYSB” and CONFIRM
(PF4) the update. The processing of all jobs requiring RES
3480 will begin on SYSB with a maximum of 8 jobs running
concurrently.
Example 3:
CICS is defined on the JOB/Master® data base as a started
task. The RES.NAME field is coded as CICSP to designate
CICS production. Using the “RT” command, the resource is
assigned to SYSA. When the job CICS is ready to be initiated,
Mantissa Corporation © 2013
Page - 137
Chapter 6
OPS/MASTER®
Dynamic Job Submission
Job Submission
JOB/Master® will issue a start command for CICS, but will
issue it on the system whose SMFID is SYSA.
)
The system designation can be moved from one processor to another by using
the RT command. The effect of the change is immediate. Utilizing this feature,
the schedules for different systems can be altered dynamically and immediately.
Dynamic Job Submission
Dynamic job submission is the submission of jobs without manual intervention. It eliminates delays between dependent jobs and removes the need for operator decisions. JOB/
Master® checks predecessor requirements, time criteria and input setup flags. The job is
submitted to the JES input queue when all criteria are satisfied. A job defined to run automatically, with no special conditions involved, is submitted dynamically by
JOB/Master® to the input queue.
When a job is dependent on a specific manual task or event, JOB/Master® waits until the
appropriate action is taken (the job control operator enters data, checks totals, feeds card
input, etc.). As soon as these events complete, the job is submitted automatically by JOB/
Master®, which prevents delays after the manual requirements have been satisfied.
Dynamic Repair
When a job ABENDS, typically a recovery process must occur. The repair job could be
held up while operators analyze the problem to decide how to proceed.
JOB/Master® can recognize the ABEND, as defined in the JOB/Master® data base, and
invoke a set of recovery procedures, without manual intervention. Repair jobs are run
automatically, which eliminates costly delays and potential human error.
E:\Manuals\Product Manuals\ASO\OM (OPS Master)\Reference Guide\Current Release\OPS_C06.fm
A failed or abended job can be restarted or resubmitted to the JES input queue by means of
the “E” command on the LQ display. The “E” command contains an option that will place
the job in single mode, stopping submission of any of its triggered jobs.
Page - 138
Mantissa Corporation © 2013
OPS/MASTER®
Chapter 7
Job Tracking
Introduction
Chapter 7
Job Tracking
Introduction
JOB/Master® automatically controls and tracks a job’s execution, which provides for
maximum efficiency in production control.
With JOB/Master®, authorized users in various departments, such as scheduling, can use
any TSO terminal to monitor occurrences in the system. Using simple commands, similar
to MVS commands, an operator can access the real-time status of the production workload.
Personnel in the distribution area can use JOB/Master® to track the status of output. They
can respond to questions from other departments that are awaiting output. Informed
answers can be provided to queries made on the completion of a job, whether a job is
behind schedule, or whether a job has been postponed or cancelled.
E:\Manuals\Product Manuals\ASO\OM (OPS Master)\Reference Guide\Current Release\OPS_C07.fm
JOB/Master® helps the supporting functions of production control. For example, operators in the print room can use any TSO terminal to inquire about output processing
requirements, or the method of output delivery. The information is stored in the JOB/Master® data base.
Job Tracking Screens
To monitor and control the system, operators can issue JOB/Master® commands to:
•
Display up-to-the-minute information on the status of each job
•
Issue commands to manipulate the workload (e.g., stop a job, add a job).
Job Run Documentation
The job tracking facility provides access to the following job data base information:
Mantissa Corporation © 2013
•
Name and telephone number of the person to call in the event of abnormal
processing
•
The purpose of the job
Page - 139
Chapter 7
OPS/MASTER®
Introduction
Job Tracking
•
Setup requirements for the job
•
Output processing requirements
•
Output destination
•
Programmer’s name
The documentation is available on-line or in hard copy report format. Much of the job run
documentation is optional. However, complete documentation can be entered during job
creation, if desired. The on-line documentation system eliminates the need to search for
job procedures, standardizes run instructions, and improves data center personnel productivity.
Job Statistics
Job statistical reporting can be accessed from on-line inquiries. Operator and production
support personnel can monitor and control the progress of all jobs, diagnose problem situations, and make scheduling adjustments based on real-time information.
Operations Reports
JOB/Master® retains a history file of job statistics that provide an audit trail for DP managers and production control personnel. Displays and reports provide job information at
the job and job step level.
Among other information, the history includes:
•
Maximum CPU time used
•
Minimum CPU time used
•
Maximum elapsed time used
•
Minimum elapsed time used
•
Total number of jobs run
•
Total number of jobs abended
On-line Job Tracking Facilities
JOB/Master®’s on-line job tracking facilities provide the following information:
Page - 140
•
Job run statistics, both current and historical
•
Job trigger/predecessor requirements
•
Schedule status of a job
•
Jobs waiting on dependency criteria requirements
•
ABEND/rerun tracking
•
Posting and on-line update of job scheduling criteria
•
On-line submit from the JOB/Master® PDS
•
On-line hold and release of scheduled jobs and systems
Mantissa Corporation © 2013
E:\Manuals\Product Manuals\ASO\OM (OPS Master)\Reference Guide\Current Release\OPS_C07.fm
The information in the history file of job statistics allows operations management to track
which phases of the schedule worked as planned and which phases went wrong. This, in
turn, allows management to track imbalances in shift workload.
OPS/MASTER®
Chapter 7
Job Tracking
Entering JOB/Master®
•
Status of JOB/Master® jobs executing
•
Tracking and posting of non-CPU tasks
•
Dynamic access to full MVS console facilities through JOB/Master®
•
Tracking of manual output processing
)
Jobs cancelled with the MVS FORCE command will not be tracked correctly.
The SMF records needed are not produced by MVS. The user/operator must
manually “P”urge the job from the JOBQ display to clear it before rerunning
the job.
Entering JOB/Master®
After selecting option J (JOB/Master®) from the main OPS/Master® Menu, the following
screen is displayed. (See Introduction to JOB/Master®, Chapter 1, “Logging Onto JOB/
Master® For The First Time.”)
To enter Job Tracking, type T in the OPTION ==> field and press <ENTER>.
----------------- Job Scheduling and Management by Mantissa ----------------Option ===> T
Data Base Creation : D
Profile
: P
Report Selection
: R
Job Tracking
: T
JCL Substitution : J
Current Selection = JM01
PF1 = HELP
E:\Manuals\Product Manuals\ASO\OM (OPS Master)\Reference Guide\Current Release\OPS_C07.fm
User= P390K
Date= 98/09/01
98.244
Time= 16:56
JMJMJMJMJMJMJMJMJMJMJMJMJMJMJMJMJMJMJMJMJMJMJMJMJMJMJMJMJMJMJMJMJMJMJMJMJMJMJMJM
JMJMJMJMJMJMJMJMJMJMJMJMJMJMJMJMJMJMJ MJMJMJMJMJMJMJMJMJMJMJMJMJMJMJMJMJMJMJMJM
JMJMJMJMJMJMJMJMJMJ
MJM JMJMJM
MJM
MJMJMJMJMJMJMJMJMJMJMJM
JMJMJMJMJMJMJMJMJMJMJMJM JMJMJMJMJ MJMJMJ
J M J
JMJMJMJMJMJMJMJMJMJMJMJM
JMJMJMJMJMJMJMJMJMJMJMJ MJMJMJMJM JMJMJM
MJ J JM
MJMJMJMJMJMJMJMJMJMJMJMJM
JMJMJMJMJMJMJMJMJMJMJM JMJMJMJMJ MJMJMJ
JMJ MJ
JMJMJMJMJMJMJMJMJMJMJMJMJM
JMJMJMJMJMJMJM JMJMJ MJMJMJMJM JMJMJM
MJMJMJM
MJMJMJMJMJMJMJMJMJMJMJMJMJM
JMJMJMJMJMJMJ MJMJ
JMJMJMJMJ MJMJMJ
MJMJMJM
JMJMJMJMJMJMJMJMJMJMJMJMJMJM
JMJMJMJMJMJMJ
JMJMJMJMJM JMJMJM
JMJMJMJ
MJMJMJMJMJMJMJMJMJMJMJMJMJMJM
JMJMJMJMJMJMJMJMJMJMJMJMJMJMJ MJMJMJMJMJMJMJMJMJMJMJMJMJMJMJMJMJMJMJMJMJMJMJMJM
JMJMJMJMJMJMJMJMJMJMJMJMJMJMJMJMJMJMJMJMJMJMJMJMJMJMJMJMJMJMJMJMJMJMJMJMJMJMJMJM
)
Mantissa Corporation © 2013
The first time each user signs on to JOB/Master® they must first enter the Profile function and “CONFIRM” their PFK settings. Until the profile has been
set, the profile option will be forced, regardless of the option selected.
Page - 141
Chapter 7
OPS/MASTER®
Entering JOB/Master®
Job Tracking
The next screen to appear is shown below:
------------------------ JOB/Master® Tracking Functions ----- Row 1 to 14 of 24
Command ===>
Scroll ==> PAGE
ID: JM01
User = P390K
Date = 98/09/01 - 98.244 Time = 16:58
-------------------------------------------------------------------------------Option ==> ____
Job
==> ________ (If applicable)
Options
-------LQ <==
AJ <==
GS <==
GSS <==
PQ <==
PS <==
SS <==
SP <==
TE <==
RT <==
ST <==
-
Function
(Scroll list for options)
------------------------------------------------------------List jobs on the Schedule Queue
Add a job to the Schedule Queue
Generate schedule creation JCL
Generate simulation schedule JCL
Purge entire Schedule Queue
Inactivate Auto Job submission
Activate Auto Job submission
Modify Priority Selection list
Update Tape Unit Exclusion list
Initiate Resource Table processing
Display Control Region settings
DH <== - Display job run data/log messages from History File
CO <== - Invoke MVS Console Facility
This screen will display a partial list of options at one time. Use the scroll keys (PF7 &
PF8) to scroll through the list of options. Pressing PF8 will display the following screen:
------------------------ JOB/Master® Tracking Functions ---- Row 15 to 24 of 24
Command ===>
Scroll ==> PAGE
Options
Function
(Scroll list for options)
-------------------------------------------------------------------DP <== - Display predecessor(s)
DT <== - Display trigger(s) and condition code(s)
DF <== - Display job failure contact
DM <== - Display manual task message definitions
DA <== - Display active JOB/Master® jobs in this CPU
DL <== - Display run data from the last 9 executions
DD <== - Display detail statistics from the last run
DO <== - Display output processing information
DR <== - Display run instruction data
DS <== - Display job status and schedule information
******************************* Bottom of data ********************************
Select the desired option by entering the associated 2-letter code in the OPTION ==>
field. If a job name is necessary, enter the name in the JOBNAME ==> field.
All of these options are described on the following pages.
Page - 142
Mantissa Corporation © 2013
E:\Manuals\Product Manuals\ASO\OM (OPS Master)\Reference Guide\Current Release\OPS_C07.fm
ID: JM01
User = P390K
Date = 98/09/01 - 98.244 Time = 16:58
-------------------------------------------------------------------------------Option ==> ____
Job
==> ________ (If applicable)
OPS/MASTER®
Chapter 7
Job Tracking
Entering JOB/Master®
LQ - List Jobs on the Schedule Queue
This command displays all jobs which are currently under JOB/Master® scheduling control. Jobs waiting to process are only submitted when they are ready to run, and the JCL is
submitted from the PDS as described in the Job Submission section. When you select this
option, the following screen is displayed:
----------------------- JOB/Master® Scheduling Queue ------------ Row 1 from 15
Command ===>
Scroll = PAGE
Set=> Job= -------- Sys= -------- Date= ----- AB - MT - EX - DC - OP <<(Shift)---------------- Date= 98/09/18 98.261 Time= 14:53 ---------------S | Job
|T|Date |Time|
C u r r e n t
S t a t u s
|M St|Alt Def
- -------- - ----- ---- ---------------------------------------- - -- --------- CC4TRIG2 Y 98261 0000 WAITING TO BE TRIGGERED BY -> CC4JOB
P P
-- U999TRG2 Y 98261 0000 WAITING TO BE TRIGGERED BY ->
P P
-- DSNJOB1 Y 98261 1010 J00180 ** FAILED ** -> STEP02
N CATLG2 P A
-- DSNTRIG1 Y 98261 1445 WAITING ON PRIOR SCHED RUN --> 1010
P P
-- JMPOSTB2
98262 0010 JCL STAGED, MANUAL TASKS COMPLETE
P P
-- JMPOSTC2
98262 0015 JCL STAGED, MANUAL TASKS COMPLETE
P P
-- CC4TRIG3 Y 98262 0025 TRIGGERED W/TIME WAIT BY -->
CC4JOB
P P
-- U999TRG3 Y 98262 0025 TRIGGERED W/TIME WAIT BY -->
U999JOB P P
-- U999TRG4 Y 98262 0027 WAITING TO BE TRIGGERED BY ->
P P
-- CC8TRIG2 Y 98262 0030 TRIGGERED W/TIME WAIT BY -->
CC8JOB
P P
-- S0C1TRG2 Y 98262 0030 TRIGGERED W/TIME WAIT BY -->
S0C1JOB P P
-- S0C1TRG3 Y 98262 0032 WAITING TO BE TRIGGERED BY ->
P P
-- TRIG000A Y 98262 0035 TRIGGERED W/TIME WAIT BY -->
TRIG0002 P P
-- TRIG000B Y 98262 0035 TRIGGERED W/TIME WAIT BY -->
TRIG0002 P P
-- DSNTRIG2 Y 98262 0040 TRIGGERED W/TIME WAIT BY -->
*DSNREQ* P P
******************************* Bottom of data ********************************
The SET command line can be used to limit the display to the desired subsets. The subsets
are categorized as follows:
E:\Manuals\Product Manuals\ASO\OM (OPS Master)\Reference Guide\Current Release\OPS_C07.fm
AB
MT
DC
EX
OP
Abended jobs
Jobs awaiting Manual Task
Jobs awaiting Deadline Cancel
Jobs in Execution
Jobs awaiting Output Posting
Simply place an X in the desired display criteria field on the SET command line.
A specific job or group of jobs can be displayed by entering the generic portion of the jobname, followed by an asterisk, in the JOB==> field of the SET command line. For example, to display all jobs beginning with EXA, enter EXA* in the JOB==> field. To display
all occurances of job BACKUP, enter “BACKUP” in the JOB ==> field.
A specific system can also be displayed by entering the desired system in the SYS==>
field. The Generic Mask “*” can also be used.
By utilizing the DATE field, selection for a specific days schedule can be made. This helps
to reduce the number of items shown on a screen.
S (SELECT-FIELD)
The following options can be specified in the S column:
C
Mantissa Corporation © 2013
Cancels a job from the schedule queue. All dependencies are
Page - 143
Chapter 7
OPS/MASTER®
Entering JOB/Master®
Job Tracking
processed and job ends with a Cond Code = 0000.
E
Reruns or restarts a job.
F
Force submits a job to the MVS input queue and overrides all
dependencies.
H
Holds a job from being submitted.
I
Include this Select Mode into the production cycle.
K
Keep condition code of zero in the History file and remove job
from the JOBQ. Generates a Cond Code = 0000.
P
Purges a job from the JOBQ. Dependencies are not processed
and Triggered Jobs will not be triggered. Generates a Cond
Code = 0022.
R
Releases a job from HOLD status.
S
Submits a job to the MVS input queue. 'S' only overrides time
dependency.
U
Updates a job on the JOBQ.
X
Exclude this Select Mode Job from the production cycle.
JOB FIELD
This field displays the name of the job(s).
T (TRIGGER FIELD)
Y indicates that the job is waiting to be triggered. A T indicates that the job has
been triggered. A blank indicates it is not a trigger job.
DATE
The date for submission.
TIME
The time for submission.
CURRENT STATUS FIELD
E:\Manuals\Product Manuals\ASO\OM (OPS Master)\Reference Guide\Current Release\OPS_C07.fm
The “Real Time” status of a job.
M (RUN MODE)
P
In production mode.
C
In check mode.
S
In select Mode
ST (STATUS)
Code for the current status for ease of reference.
Page - 144
A
Failed or abended status.
C
In check status.
Mantissa Corporation © 2013
OPS/MASTER®
Chapter 7
Job Tracking
Entering JOB/Master®
)
D
Job will be deleted from the queue.
E
In execution.
H
In Hold status.
N
NJE routed.
O
Waiting for output posting.
P
In production status.
Q
In the MVS input queue.
R
Repeating status. All repeating jobs must be manually submitted.
Any other status’ shown are for JOB/Master® internal use.
E:\Manuals\Product Manuals\ASO\OM (OPS Master)\Reference Guide\Current Release\OPS_C07.fm
The following commands can be entered on the command line on the LQ display.
AJ
ADD A JOB TO THE SCHEDULE QUEUE
GS
GENERATE SCHEDULE CREATION JCL
GSS
GENERATE SIMULATION SCHEDULE JCL
PQ
PURGE ENTIRE SCHEDULE QUEUE
PS
INACTIVATE AUTO JOB SUBMISSION
SS
ACTIVATE AUTO JOB SUBMISSION
SP
MODIFY PRIORITY SELECTION LIST
TE
UPDATE TAPE UNIT EXCLUSION LIST
RT
INITIATE RESOURCE TABLE PROCESSING
ST
DISPLAY CONTROL REGION SETTINGS
DH
DISPLAY JOB RUN DATA/LOG MESSAGES FROM HISTORY FILE
CO
INVOKE MVS CONSOLE FACILITY
DA
DISPLAY ACTIVE JOB/Master® JOBS IN THIS CPU
HOLD
HOLD THE ENTIRE SYSTEM
REL
RELEASE THE ENTIRE SYSTEM
The following commands, if entered on the command line, must have the desired jobname
entered also. Alternatively, they could be entered in the S column of the LQ display for a
specific job.
Mantissa Corporation © 2013
DP
DISPLAY JOBS PREDECESSOR DEFINITION
DT
DISPLAY JOBS TRIGGERED JOB(S) AND CONDITION
CODES
DF
DISPLAY JOB FAILURE CONTACT INFORMATON
Page - 145
Chapter 7
OPS/MASTER®
Entering JOB/Master®
Job Tracking
DISPLAY JOB MANUAL TASK MESSAGE DEFINITIONS
DL
DISPLAY JOB RUN DATE FROM THE LAST 9 EXECUTIONS
DD
DISPLAY DETAILED STATISTICS FROM THE LAST RUN
DO
DISPLAY OUTPUT PROCESSING INFORMATION
DR
DISPLAY RUN INFORMATION
DS
DISPLAY CURRENT STATUS OF A JOB
E:\Manuals\Product Manuals\ASO\OM (OPS Master)\Reference Guide\Current Release\OPS_C07.fm
DM
Page - 146
Mantissa Corporation © 2013
OPS/MASTER®
Chapter 7
Job Tracking
Entering JOB/Master®
LQ - List Abended/Failed Jobs (AB)
This option displays the jobs on the schedule which have abended. Place an X next to the
acronym AB on the SET line. Abends can also be listed for specific jobs or systems, by
entering on the SET line, the generic portion of the job or system desired, followed by an
asterisk and placing an X in the AB ==> field. The display will look similar to the illustration shown below:
------------------------ JOB/Master® Scheduling Queue ------ Row 12 from 15
Command ===>
Scroll = PAGE
Set=> Job= -------- Sys= -------- Date= ----- AB X MT - EX - DC - OP <<(Shift)---------------- Date= 98/09/01 98.244 Time= 17:28 ---------------S | Job
|T|Date |Time|
C u r r e n t
S t a t u s
|M St|Alt Def
- -------- - ----- ---- ---------------------------------------- - -- --------- R1331018 Y 98244 0947 J00082 ** FAILED ** -> RM80001 CC= 0012 P A
-- JCLSUB1
98244 1030 J00091 JCLERR OR TERMINATED IN INIT.
P A
-- RMTEST03
98244 1100 J00150 ** FAILED ** -> STEP04
N CATLG2 P A
******************************* Bottom of data ********************************
E:\Manuals\Product Manuals\ASO\OM (OPS Master)\Reference Guide\Current Release\OPS_C07.fm
The LQ display can be shifted left and right by entering the SHIFT command or pressing
the appropriate PFK. Repeated SHIFT commands will toggle you between screens. The
system default is PF10 = Shift. The PF keys are alterable within the Profile. Refer to Global Profiles.
Mantissa Corporation © 2013
Page - 147
Chapter 7
OPS/MASTER®
Entering JOB/Master®
Job Tracking
LQ - List Jobs Waiting on Manual Tasks (MT)
On the SET command line, place an X in the MT ==> field and press <ENTER>. Manual
task flags can be viewed by pressing PF10 (SHIFT) the screen to the right, as shown:
--------------------------- JOB/Master® Scheduling Queue ------ Row 12 from 16
Command ===>
Scroll = PAGE
Set=> Job= -------- Sys= -------- Date= ----- AB - MT X EX - DC - OP <<(Shift)---------------- Date= 98/09/01 98.244 Time= 17:32 ---------------S | Job
|T|Date |Time|
C u r r e n t
S t a t u s
|M St|Alt Def
- -------- - ----- ---- ---------------------------------------- - -- --------- JMBPOST
98244 0800 J00178 ** FAILED ** -> STEP01
CC= 3000 P A
-- R1331018 Y 98244 0947 J00082 ** FAILED ** -> RM80001 CC= 0012 P A
-- JCLSUB1
98244 1030 J00091 JCLERR OR TERMINATED IN INIT.
P A
-- RMTEST03
98244 1100 J00150 ** FAILED ** -> STEP04
N CATLG2 P A
******************************* Bottom of data ********************************
Jobs that are waiting for the completion of a manual task can have messages sent to individual users as soon as these jobs pass their start times. The message facility is requested
at the time of JOB/Master® Data Base Creation. The MT subset command allows the user
to display all jobs waiting on Manual Setup Requirements.
)
Page - 148
Tasks can be posted using a batch program (JMBPOST), which is described in
the chapter “Batch Functions”. Also, tasks can be posted using CONSOLE/
Master®. Refer to Job Definition Screen 4 and Profile for more information
on manual task posting.
Mantissa Corporation © 2013
E:\Manuals\Product Manuals\ASO\OM (OPS Master)\Reference Guide\Current Release\OPS_C07.fm
All jobs that contain manual tasks are displayed (shift the screen to the left to view manual
requirements). Cursor down to the job to be posted, and <TAB> over to the manual tasks.
Change the Y to an N for the desired task, indicating that this requirement has been satisfied, and press <ENTER>. The job will be submitted to the input queue for execution if all
other dependency criteria has been satisfied. All jobs that have manual setup flags coded
as Y, can be marked ready for submission by utilizing the JOBQ “MT” option, and changing the flag to N. Any or all flags can be changed at this time.
OPS/MASTER®
Chapter 7
Job Tracking
Entering JOB/Master®
LQ - List Executing Jobs (EX)
This option displays all jobs which are currently in execution. Move the cursor to the EX
=> field and place an X as shown below::
--------------------------- JOB/Master® Scheduling Queue ------- Row 1 from 18
Command ===>
Scroll = PAGE
Set=> Job= -------- Sys= -------- Date= ----- AB - MT - EX X DC - OP <<(Shift)---------------- Date= 98/09/01 98.244 Time= 17:36 ---------------S | Job
|T|Date |Time|
C u r r e n t
S t a t u s
|M St|Alt Def
- -------- - ----- ---- ---------------------------------------- - -- --------- TRIG000A
98244 0035 J00185 IN EXECUTION SID ->
O390
P E
******************************* Bottom of data ********************************
E:\Manuals\Product Manuals\ASO\OM (OPS Master)\Reference Guide\Current Release\OPS_C07.fm
Specific jobs or systems can be viewed by entering the generic portion of the job or system on the SET line, followed by an asterisk, and by placing an X in the EX ==> field.
Mantissa Corporation © 2013
Page - 149
Chapter 7
OPS/MASTER®
Entering JOB/Master®
Job Tracking
LQ - List Jobs Waiting on Output Processing (OP)
During JOB/Master® data base creation, a job can be defined requiring output posting by
coding a Y in the Hold job on scheduling queue for output posting ==> field on Job Definition Screen 3. If you enter an X in the OP ==> field of the SET line (as shown below),
the display will be limited to those jobs having output posting requirements that must be
met before getting cleared from the list queue.
------------------------- JOB/Master® Scheduling Queue ---------- Row 12 from 16
Command ===>
Scroll = PAGE
Set=> Job= -------- Sys= -------- Date= ----- AB - MT - EX - DC - OP X
<<(Shift)---------------- Date= 98/09/01 98.244 Time= 17:32 ---------------S | Job
|T|Date |Time|
C u r r e n t
S t a t u s
|M St|Alt Def
- -------- - ----- ---- ---------------------------------------- - -- --------- GRAY0011
98246 0810 J00179 JOBS WAITING FOR OUTPUT POSTING ->
-- GRAY0012 Y 98246 0947 J00180 JOBS WAITING FOR OUTPUT POSTING ->
******************************* Bottom of data ********************************
Output posting can only be done if the OP option is selected first as described above.
1.
Select the job desired by placing a U next to the job in the S ==> field.
2.
Move the cursor to the status area and enter the information desired.
(Bin Number, Truck number, how sent, etc.)
3.
Confirm the entry. The status is updated and posted to the History file as such.
To post a job’s output as complete, shift the screen to the left, change the Y to an N in the
OP ==> field of the manual task screen.
Page - 150
Mantissa Corporation © 2013
E:\Manuals\Product Manuals\ASO\OM (OPS Master)\Reference Guide\Current Release\OPS_C07.fm
Once the OUTPUT posting function has been selected, update the Current Status information on the item being selected.
OPS/MASTER®
Chapter 7
Job Tracking
Entering JOB/Master®
LQ - List Jobs Waiting on Deadline Cancel (DC)
Jobs can be defined to the data base or when they are dynamically added to the schedule to
have a dead line cancel time. It is possible to display all jobs which are waiting to be deadline canceled by JOB/Master® as soon as the submit facility is made active.
This function is essential during a period where the submit facility has been inactive for a
long period. Prior to activating the submit facility go to the LQ and move the cursor to the
DC ==> field, and place an X in the field. This will display all jobs which are waiting to
be canceled by the scheduling system.
Any jobs you wish not to cancel may be updated (U on the job line) and alter the deadline
cancel field on the JOBQ entry panel to an N for NO, or alter the cancel time to be longer
than the amount of time the submit facility has been inactive. This is very helpful if there
have been hardware outages for an extended period. See the update function description
later in this chapter for more information on how to do this. The JOBQ Entry panel for the
DC job is displayed below:
-------------------------- JOB/Master® Scheduling Queue -------- Row 1 from 9
Command ===>
Scroll = PAGE
E:\Manuals\Product Manuals\ASO\OM (OPS Master)\Reference Guide\Current Release\OPS_C07.fm
Set=> Job= -------- Sys= -------- Date= ----- AB - MT - EX - DC X OP <<(Shift)---------------- Date= 98/09/02 98.245 Time= 07:28 ---------------S | Job
|T|Date |Time|
C u r r e n t
S t a t u s
|M St|Alt Def
- -------- - ----- ---- ---------------------------------------- - -- --------- CANCEL01
98245 0000 * WILL DEADLINE CANCEL ON SS
P P
******************************* Bottom of data ********************************
Mantissa Corporation © 2013
Page - 151
Chapter 7
OPS/MASTER®
Entering JOB/Master®
Job Tracking
LQ - Cancel Specific Job (C)
To select this option, enter a C in the selection field next to the jobname, and press
<ENTER>. The job will be placed in cancelled status and it will be removed from the
schedule queue.
-------------------------- JOB/Master® Scheduling Queue -------- Row 9 from 9
Command ===>
Scroll = PAGE
Set=> Job= -------- Sys= -------- Date= ----- AB - MT - EX - DC - OP <<(Shift)---------------- Date= 98/09/02 98.245 Time= 07:31 ---------------S | Job
|T|Date |Time|
C u r r e n t
S t a t u s
|M St|Alt Def
- -------- - ----- ---- ---------------------------------------- - -- -------C- JOB387
98245 0000 J00000 * CANCEL FROM JOBQ BY > P390K
P R
******************************* Bottom of data ********************************
A job which is in the MVS input queue or executing should not be cancelled from the
JOB/Master® queue. The job must be cancelled on an MVS console, and JOB/Master®
will record the cancellation.
E:\Manuals\Product Manuals\ASO\OM (OPS Master)\Reference Guide\Current Release\OPS_C07.fm
The job can then be restarted or cancelled from the LQ display. Cancelling a job from the
schedule queue, ends the job with a condition code of ‘0000’. Cancelling the job from the
queue, also satisfies the triggering requirement for that job. Successor Jobs will be triggered.
Page - 152
Mantissa Corporation © 2013
OPS/MASTER®
Chapter 7
Job Tracking
Entering JOB/Master®
LQ - Rerun or Restart a Job (E)
This function is only valid for failed jobs and will rerun or restart a job from the schedule
queue. Enter an E next to the jobname which is to be restarted or rerun and press
<ENTER>.
A submit options screen will then be displayed.
PF4 to (CONFIRM) request.
--------------------------- JOB/Master® JOBQ Action
Command ===>
Schedule Job=> TRIGJOB1
Alternate
=>
Run Instr
Date
System
=> 98244
=>
------------------------
Time
Schedule/Network
=> *M SUBMIT FAILED, JCL MEMBER NOT FOUND
=> 0000
=> ********
Run Mode => P
-----------------------------------------------------------------------------Single Mode => _
Rerun JCL
=> N
Last Repeat =>
( If Y
( If Y
( If Y
then triggers will not be submitted)
JCL will be taken from RERUN PDS)
then job will not be rescheduled at completion )
SCHED. JOBNAME
The name of the job you selected to release from the schedule.
DATE
E:\Manuals\Product Manuals\ASO\OM (OPS Master)\Reference Guide\Current Release\OPS_C07.fm
The date on which the job was scheduled to be submitted.
TIME
The scheduled time the job is due to submit.
ALTERNATE
If the job is an alternate job definition, the alternate job name is displayed here.
SYSTEM
The system to which the job belongs.
SCHEDULE/NETWORK
The schedule/network defined for this job.
RUN INSTR.
The current status of the job.
Mantissa Corporation © 2013
Page - 153
Chapter 7
OPS/MASTER®
Entering JOB/Master®
Job Tracking
RUN MODE
The current run status of the job.
SINGLE MODE
Enter Y if trigger jobs are not to be submitted.
RERUN JCL
Enter Y if the JCL is to be taken from the rerun PDS. Enter N if the JCL is to be
taken from the regular JOB/Master® submit PDS.
LAST REPEAT
E:\Manuals\Product Manuals\ASO\OM (OPS Master)\Reference Guide\Current Release\OPS_C07.fm
Enter Y if the job is not to be placed back on the queue for repeat when the current run is complete. This option only applies to jobs that have been defined on
the data base as repeating.
Page - 154
Mantissa Corporation © 2013
OPS/MASTER®
Chapter 7
Job Tracking
Entering JOB/Master®
LQ - Force Release a Job from the Schedule (F)
This option submits the job requested to the JES input queue for processing, regardless of
dependency waiting factors. To select this option, enter F in the select column next to the
job you want to release, as shown below:
Page 157
Forcing a Job to Run from the LQ
--------------------------- JOB/Master® Scheduling Queue -------- Row 5 from 7
Command ===>
Scroll = PAGE
Set=> Job= -------- Sys= -------- Date= ----- AB - MT - EX - DC - OP <<(Shift)---------------- Date= 98/09/02 98.245 Time= 07:41 ---------------S | Job
|T|Date |Time|
C u r r e n t
S t a t u s
|M St|Alt Def
- -------- - ----- ---- ---------------------------------------- - -- --------- R1334010 Y 98244 2315 J00633 EXEC. JMHOLD
->
O390
P E
-- R1337001 Y 98244 2321 J00634 IN EXECUTION SID ->
O390
P E
F- JMPOSTB1
98245 0815 * WAITING FOR MANUAL TASKS
P P
******************************* Bottom of data ********************************
After typing F in the select column and pressing <ENTER>, the following screen is displayed:
-
F----------------------------- JOB/Master® JOBQ Action
Command ===>
Schedule Job=> JMPOSTB1
Alternate
=>
E:\Manuals\Product Manuals\ASO\OM (OPS Master)\Reference Guide\Current Release\OPS_C07.fm
----------------------
Run Instr
Date
System
=> 98245
=> JMPOST
=> * WAITING FOR MANUAL TASKS
Time
Schedule/Network
=> 0815
=> ********
Run Mode => P
-----------------------------------------------------------------------------Single Mode => _
Rerun JCL
=> N
Last Repeat =>
( If Y
( If Y
( If Y
then triggers will not be submitted)
JCL will be taken from RERUN PDS)
then job will not be rescheduled at completion )
-------------------------------------------------------------------------------
PF4 (CONFIRM) to submit the job.
Mantissa Corporation © 2013
Page - 155
Chapter 7
OPS/MASTER®
Entering JOB/Master®
Job Tracking
SCHED. JOBNAME
The name of the job you selected to release from the schedule.
DATE
The date on which the job was scheduled to be submitted.
TIME
The scheduled time the job is due to submit.
ALTERNATE
If the job is an alternate job definition, the alternate job name is displayed here.
SYSTEM
The system to which the job belongs.
SCHEDULE/NETWORK
The schedule/network defined for this job.
RUN INSTR.
The current status of the job.
RUN MODE
The current run status of the job.
SINGLE MODE
Enter Y if trigger jobs are not to be submitted.
RERUN JCL
Enter Y if the JCL is to be taken from the rerun PDS. Enter N if the JCL is to be
taken from the regular JOB/Master® submit PDS.
LAST REPEAT
E:\Manuals\Product Manuals\ASO\OM (OPS Master)\Reference Guide\Current Release\OPS_C07.fm
Enter Y if the job is not to be placed back on the queue for repeat when the current run is complete. This option only applies to jobs that have been defined on
the data base as repeating.
Page - 156
Mantissa Corporation © 2013
OPS/MASTER®
Chapter 7
Job Tracking
Entering JOB/Master®
LQ - Hold a Job from Being Submitted (H)
At times it may become necessary to hold a job from submission. A specific job can be
placed in HOLD status by typing an H in the selection field and pressing <ENTER>. A
message is then received that the job has been “PLACED ON HOLD BY USERID”.
H--------------------------- JOB/Master® Scheduling Queue -------- Row 5 from 7
Command ===>
Scroll = PAGE
Set=> Job= -------- Sys= -------- Date= ----- AB - MT - EX - DC - OP <<(Shift)---------------- Date= 98/09/02 98.245 Time= 07:44 ---------------S | Job
|T|Date |Time|
C u r r e n t
S t a t u s
|M St|Alt Def
- -------- - ----- ---- ---------------------------------------- - -- --------- R1337001 Y 98244 2321 J00634 EXEC. JMHOLD
->
O390
P E
-- R1331028 Y 98245 0743 * PLACED ON HOLD BY
-> P390K P
P H
-- JMPOSTB1
98245 0815 * WAITING FOR MANUAL TASKS
P P
******************************* Bottom of data ********************************
Any job that is held will remain in that status until the release (R) command is issued.
Notice the P following the USERID. This saves the Run Mode of the job placed on hold.
The status has been changed to H.
E:\Manuals\Product Manuals\ASO\OM (OPS Master)\Reference Guide\Current Release\OPS_C07.fm
Holding a job will put all jobs triggered by the executing job on hold. These jobs will be
held until a release command is issued.
Mantissa Corporation © 2013
Page - 157
Chapter 7
OPS/MASTER®
Entering JOB/Master®
Job Tracking
LQ - Include a Job Into Production Cycle (I)
The M ==> field reflects the mode in which a job has been defined to run: P,S, or C.
---------------------------- JOB/Master® Scheduling Queue -------- Row 1 from 6
Command ===>
Scroll = PAGE
Set=> Job= -------- Sys= -------- Date= ----- AB - MT - EX - DC - OP <<(Shift)---------------- Date= 98/09/02 98.245 Time= 07:47 ---------------S | Job
|T|Date |Time|
C u r r e n t
S t a t u s
|M St|Alt Def
- -------- - ----- ---- ---------------------------------------- - -- --------- TRIGJOB1
98244 0000 * IN EXECUTION
P P
-- JMBPOST
98244 0800 * IN EXECUTION
P A
-- JCLSUB1
98244 1030 * WAITING ON MANUAL TASK
P A
-- RMTEST03
98244 1100 J00186 ** FAILED ** -> STEP05
U= 0999 P A
-- R1331028 Y 98245 0743 * IN EXECUTION
P
P H
I SELMODE1
98245 0815 * SELECT MODE / ENTER I TO RUN
S P
******************************* Bottom of data ********************************
To alter the status for those jobs defined as Select Mode before the job goes into execution, take the cursor to the line in the S column of the LQ which corresponds with the job
to be changed:
I= INCLUDE
Include this job in production cycle.
Page - 158
•
The M(mode) ==> field represents the mode defined for each job.
•
Initially, the ST (status) ==> field represents the default for the mode (i.e., the
default status for Select mode is Check mode). Now, however, the ST ==> field
reflects the current execution status:
GRAY0001
P mode has been flagged to include; to run in Production; to
actually execute the JCL.
GRAY0002
P mode has been changed to now exclude; to run in Select
mode; to simulate.
GRAY0003
P mode has now been altered to exclude; to run in Check
mode; to simulate.
GRAY0004
P mode has now been altered to exclude; to run in Check
mode; to simulate.
Mantissa Corporation © 2013
E:\Manuals\Product Manuals\ASO\OM (OPS Master)\Reference Guide\Current Release\OPS_C07.fm
Note that the CURRENT STATUS ==> field reflects the changes made (GRAY0001, GRAY0002,
GRAY0003 and GRAY0004).
OPS/MASTER®
Chapter 7
Job Tracking
Entering JOB/Master®
At submit time, the LQ will look something like this:
(LQ) ----------------------- JOB/Master® SCHEDULING QUEUE ------- Row 1 from 14
COMMAND ===>
SCROLL = PAGE
SET=> JOB= -------- SYS= -------- DATE= ----- AB - MT - EX - DC - OP <<(SHIFT)---------------- DATE= 97/09/24 97.267 TIME= 11:52 ---------------S | JOB
|T|DATE |TIME|
C U R R E N T
S T A T U S
|M ST|ALT. DEF
- -------- - ----- ---- ---------------------------------------- - -- --------- JCLSUB02
97266 1401 * WAITING FOR MANUAL TASKS
P P
-- JCLSUB03
97266 1402 * WAITING FOR MANUAL TASKS
P P
-- JCLSUB04 Y 97266 1405 *WAITING ON TRIGGER AND MANUAL TASK
P P
-- JCLSUB05 Y 97266 1407 *WAITING ON TRIGGER AND MANUAL TASK
P P
-- JCLSUB06
97266 1408 * WAITING FOR MANUAL TASKS
P P
-- JCLSUB07
97266 1409 * WAITING FOR MANUAL TASKS
P P
-- JCLSUB08
97266 1410 * WAITING FOR MANUAL TASKS
P P
-- JCLSUB09
97266 1411 * WAITING FOR MANUAL TASKS
P P
-- JCLSUB10
97266 1412 * WAITING FOR MANUAL TASKS
P P
-- JCLSUB11 Y 97266 1413 *WAITING ON TRIGGER AND MANUAL TASK
P P
-- GRAY0002
97267 0000 * SELECT MODE /ENTER I TO RUN JOB
S C
-- GRAY0010
97267 0000 J02834 IN EXECUTION SID ->
OSR1
P E
-- GRAY0013
97267 0000 J02833 IN EXECUTION SID ->
OSR1
P E
-- JMJCLMB
97267 1010 WAITING ON COMP. OF SYSTEM -> 97266
P P
******************************* Bottom of data ********************************
F1=HELP
F2=SPLIT
F3=END
F4=CONFIRM
F5=CANCEL
F6=CO
F7=UP
F8=DOWN
F9=SWAP
F10=SHIFT
F11=RIGHT
F12=RETRIEVE
Jobs in Select or Check mode will indicate that the JCL was not submitted and the ST ==>
field will change to a status of D to indicate that the LQ record will be deleted.
Once the job(s) have entered the JES input queue and/or gone into execution;
it is TOO LATE to make the change to include or exclude.
E:\Manuals\Product Manuals\ASO\OM (OPS Master)\Reference Guide\Current Release\OPS_C07.fm
)
Mantissa Corporation © 2013
Page - 159
Chapter 7
OPS/MASTER®
Entering JOB/Master®
Job Tracking
LQ - Keep a Job which has Failed (K)
This function is only valid for jobs which are in a failed status and is used to remove the
failed job from the schedule queue and set a condition code of 0000 in the History file.
Select this option by entering a K in the select field and pressing <ENTER>.
---------------------------- JOB/Master® Scheduling Queue -------- Row 2 from 9
Command ===>
Scroll = PAGE
Set=> Job= -------- Sys= -------- Date= ----- AB - MT - EX - DC - OP <<(Shift)---------------- Date= 98/09/02 98.245 Time= 07:51 ---------------S | Job
|T|Date |Time|
C u r r e n t
S t a t u s
|M St|Alt Def
- -------- - ----- ---- ---------------------------------------- - -- --------- TRIGJOB1
98244 0000 *M SUBMIT FAILED, JCL MEMBER NOT FOUND
P P
-- RMTEST03
98244 1100 J00000 * KEEP FROM JOBQ BY >
P390K
P R
-- JCLDATE2 Y 98245 0055 J00637 SUBMITTED TO JES INPUT QUEUE
P Q
-- JCLSUBA Y 98245 0055 * WAITING FOR MANUAL TASKS
P P
-- R1331028 Y 98245 0743 * TRIG. ON HOLD BY EXEC REQ.
P
P H
-- CI33DOWN Y 98245 0746 * TRIG. ON HOLD BY EXEC REQ.
P
P H
-- CT33DOWN Y 98245 0746 * TRIG. ON HOLD BY EXEC REQ.
P
P H
-- JMPOSTB1
98245 0815 * WAITING FOR MANUAL TASKS
P P
******************************* Bottom of data ********************************
If the failed job does not need to be rerun, it can be kept and removed from the schedule
queue, satisfying all predecessor requirements. The KEEP command will trigger any jobs
specified in the job’s definition.
E:\Manuals\Product Manuals\ASO\OM (OPS Master)\Reference Guide\Current Release\OPS_C07.fm
If the output from the job has been held, the keep will not be executed. If you need to save
the output, issue the KEEP first.
Page - 160
Mantissa Corporation © 2013
OPS/MASTER®
Chapter 7
Job Tracking
Entering JOB/Master®
LQ - Purge a Job from the Schedule Queue (P)
The purge command is used to remove a job from the schedule queue without canceling it.
Enter a P next to the jobname which is to be purged and press <ENTER>.
--------------------------- JOB/Master® Scheduling Queue -------- Row 2 from 8
Command ===>
Scroll = PAGE
Set=> Job= -------- Sys= -------- Date= ----- AB - MT - EX - DC - OP <<(Shift)---------------- Date= 98/09/02 98.245 Time= 07:51 ---------------S | Job
|T|Date |Time|
C u r r e n t
S t a t u s
|M St|Alt Def
- -------- - ----- ---- ---------------------------------------- - -- -------P- TRIGJOB1
98244 0000 *M SUBMIT FAILED, JCL MEMBER NOT FOUND
P P
-- JCLDATE4 Y 98245 0000 TRIGGERED NO/TIME WAIT BY -->
JCLDATE2 P P
-- JCLSUBA Y 98245 0055 * WAITING FOR MANUAL TASKS
P P
-- R1331028 Y 98245 0743 * TRIG. ON HOLD BY EXEC REQ.
P
P H
-- CI33DOWN Y 98245 0746 * TRIG. ON HOLD BY EXEC REQ.
P
P H
-- CT33DOWN Y 98245 0746 * TRIG. ON HOLD BY EXEC REQ.
P
P H
-- JMPOSTB1
98245 0815 * WAITING FOR MANUAL TASKS
P P
E:\Manuals\Product Manuals\ASO\OM (OPS Master)\Reference Guide\Current Release\OPS_C07.fm
No Job history record is kept, but a record is posted into the “message” section of the History file. The record indicates the purge function with the date, time and who purged the
job. The purge function will satisfy predecessor relationships, but will not trigger any
defined trigger jobs. Purge will create a condition code = 0022 for the Job(s) purged.
Mantissa Corporation © 2013
Page - 161
Chapter 7
OPS/MASTER®
Entering JOB/Master®
Job Tracking
LQ - Release a Job from Hold Status (R)
The release command is used to remove a job from HOLD status. Select this option by
placing an R in the selection field next to the jobname and pressing <ENTER>.
---------------------------- JOB/Master® Scheduling Queue -------- Row 1 from 7
Command ===>
Scroll = PAGE
Set=> Job= -------- Sys= -------- Date= ----- AB - MT - EX - DC - OP <<(Shift)---------------- Date= 98/09/02 98.245 Time= 07:54 ---------------S | Job
|T|Date |Time|
C u r r e n t
S t a t u s
|M St|Alt Def
- -------- - ----- ---- ---------------------------------------- - -- --------- JCLSUB2 Y 98244 0000 * WAITING FOR MANUAL TASKS
P P
-- TRIGJOB1
98244 0000 *M SUBMIT FAILED, JCL MEMBER NOT FOUND
P P
-- JCLSUBA Y 98245 0055 * WAITING FOR MANUAL TASKS
P P
R R1331028 Y 98245 0743 * HOLD REMOVED BY
-> P390K
P P
-- CI33DOWN Y 98245 0746 * TRIG. ON HOLD BY EXEC REQ.
P
P H
-- CT33DOWN Y 98245 0746 * TRIG. ON HOLD BY EXEC REQ.
P
P H
-- JMPOSTB1
98245 0815 * WAITING FOR MANUAL TASKS
P P
******************************* Bottom of data ********************************
E:\Manuals\Product Manuals\ASO\OM (OPS Master)\Reference Guide\Current Release\OPS_C07.fm
You will receive a message that indicates that the job has been removed from HOLD status and submitted, if all other criteria have been satisfied.
Page - 162
Mantissa Corporation © 2013
OPS/MASTER®
Chapter 7
Job Tracking
Entering JOB/Master®
LQ - Submit a Job (S)
This option allows the manual submit of a job which is on the schedule queue. Enter an S
next to the jobname which is to be submitted and press <ENTER>. A submit options
screen will then be displayed, as shown:
----------------------------- JOB/Master® JOBQ Action
Command ===>
Schedule Job=> JCLSUB2
Alternate
=>
Run Instr
Date
System
=> 98244
=> JCLSUB
=> * WAITING FOR SUBMIT TIME
------------------------
Time
Schedule/Network
=> 0000
=> ********
Run Mode => P
-----------------------------------------------------------------------------Single Mode => _
Rerun JCL
=> N
Last Repeat =>
( If Y
( If Y
( If Y
then triggers will not be submitted)
JCL will be taken from RERUN PDS)
then job will not be rescheduled at completion )
-------------------------------------------------------------------------------
The S command and associated jobname is entered from the primary tracking menu or
from the command line of the LQ screen. The job being submitted does not have to be
defined to the data base. PF4 (CONFIRM) to submit the job.
SCHED. JOBNAME
The name of the job you selected to release from the schedule.
DATE
E:\Manuals\Product Manuals\ASO\OM (OPS Master)\Reference Guide\Current Release\OPS_C07.fm
The date on which the job was scheduled to be submitted.
TIME
The scheduled time the job is due to submit.
ALTERNATE
If the job is an alternate job definition, the alternate job name is displayed here.
SYSTEM
The system to which the job belongs.
SCHEDULE/NETWORK
The schedule/network defined for this job.
RUN INSTR.
The current status of the job.
Mantissa Corporation © 2013
Page - 163
Chapter 7
OPS/MASTER®
Entering JOB/Master®
Job Tracking
RUN MODE
The current run mode of the job.
SINGLE MODE
Single Mode processing is a special mode that ignores all dependencies and triggers. It processes only that job. Enter Y if trigger jobs are not to be submitted.
RERUN JCL
Enter Y if the JCL is to be taken from the rerun PDS. Enter N if the JCL is to be
taken from the regular JOB/Master® submit PDS.
LAST REPEAT
Enter Y if the job is not to be placed back on the queue for repeat when the current run is complete. This option only applies to jobs that have been defined on
the data base as repeating.
A manual submit of a job does not negate any other JOB/Master® functions
for that job. If a job is to be started ahead of it’s scheduled time and is in the
waiting queue, an S command must be used to start the job. If the job has
already been run for that schedule date, the user will receive a message “JOB
ALREADY RUN FOR SCHEDULED DATE”. At this point, the user will have
the option of pressing the PF4/16 key to continue the submit function, or the
PF5/17 key to terminate the request.
E:\Manuals\Product Manuals\ASO\OM (OPS Master)\Reference Guide\Current Release\OPS_C07.fm
)
Page - 164
Mantissa Corporation © 2013
OPS/MASTER®
Chapter 7
Job Tracking
Entering JOB/Master®
LQ - Update a Job on the JOBQ (U)
Used to update information about a job on the JOBQ. You may add predecessors or
change scheduling status by placing U next to the jobname and pressing <ENTER>.
-
U----------------------------- JOB/Master® JOBQ Entry
-----------------------
Command ===>
Schedule Job=> JMPOSTB1
Date
=> 98245
Alternate
=>
System => JMPOST
Run Instr
=> * WAITING FOR MANUAL TASKS
Time
=> 0815
Schedule/Network => ********
Run Mode => P
------------------------------------------------------------------------------Submit Mem => ________
Subtype => A
Priority
=> _
Use Rerun PDS For Submit JCL
=> N
Submit PDS => ____________________________________________
------------------------------------------------------------------------------Manual Task Criteria -----------> DE|CI|TI|CR|JS|
N Y N N N
------------------------------------------------------------------------------Dead Cancel => N Dead Cancel Wait=> 000 Min
Single Mode
=> _
-----------------
Additional Predecessor Dependency Criteria
Jobname=> ________
----------------
________
PF4 to (CONFIRM) request. The data entered on this screen is only kept for this scheduled run of the job.
E:\Manuals\Product Manuals\ASO\OM (OPS Master)\Reference Guide\Current Release\OPS_C07.fm
The following fields cannot be updated:
Sched. Job
System
Date
Schedule/Network
Time
Run Instr.
Alternate
Run Mode
SINGLE MODE
Single Mode processing is a special mode that ignores all dependencies and triggers. It processes only that job. Enter Y if trigger jobs are not to be submitted.
All other Fields can be altered and are described in the Job Definition section of JOB/Master®.
Mantissa Corporation © 2013
Page - 165
Chapter 7
OPS/MASTER®
Entering JOB/Master®
Job Tracking
LQ - Exclude a Job from Production (X)
As described earlier in the Job Tracking section, an additional field has been added on the
LQ screen. The M ==> field reflects the mode in which a job has been defined to run: P,S,
or C.
X-------------------------- JOB/Master® Scheduling Queue -------- Row 1 from 6
Command ===>
Scroll = PAGE
Set=> Job= -------- Sys= -------- Date= ----- AB - MT - EX - DC - OP <<(Shift)---------------- Date= 98/09/02 98.245 Time= 07:59 ---------------S | Job
|T|Date |Time|
C u r r e n t
S t a t u s
|M St|Alt Def
- -------- - ----- ---- ---------------------------------------- - -- --------- SELECT11 Y 98244 0000 * IN CHECK MODE, NOT RUN
C P
-- SELECT12
98244 0000 * IN CHECK MODE, NOT RUN
C P
-- SELECT13
98244 0000 * IN CHECK MODE, NOT RUN
C P
-- SELECT14
98244 0000 * IN CHECK MODE, NOT RUN
C P
-- SELECT15
98244 0000 * IN CHECK MODE, NOT RUN
C P
-- SELECT16
98244 0000 * IN CHECK MODE, NOT RUN
C P
-- JCLSUBA Y 98245 0055 * WAITING FOR MANUAL TASKS
S P
-- CI33DOWN Y 98245 0746 * TRIG. ON HOLD BY EXEC REQ.
P
P H
-- SELECT01 Y 98245 0746 * SELECT MODE / ENTER I TO RUN JOB
P H
-- JMPOSTB1
98245 0815 *EXCLUDED TO SIMULATE BY
P390K
P C
******************************* Bottom of data ********************************
To alter the status for those jobs defined as select or production mode before the job goes
into execution, take the cursor to the line in the S column of the LQ which corresponds
with the job to be changed:
Page - 166
Exclude this job from running in production; only simulate.
May be used for jobs which are flagged as select mode, and
having once been changed to include, now must be altered
back to exclude. (This feature can also be utilized to exclude a
job on the LQ in Production mode.)
•
Note that the CURRENT STATUS ==> field reflects the changes made
(SELECT03, SELECT04, SELECT11 and SELECT13).
•
The M(mode) ==> field represents the mode defined for each job.
•
Initially, the ST (status) ==> field represents the default for the mode (i.e., the
default status for Select mode is Check mode). Now, however, the ST ==> field
reflects the current execution status:
SELECT03
S mode has been flagged to include; to run in Production; to
actually execute the JCL.
SELECT04
S mode has been changed to now exclude; to run in Check
mode; to simulate.
SELECT11
P mode has now been altered to exclude; to run in Check
mode; to simulate.
Mantissa Corporation © 2013
E:\Manuals\Product Manuals\ASO\OM (OPS Master)\Reference Guide\Current Release\OPS_C07.fm
X=EXCLUDE
OPS/MASTER®
Chapter 7
Job Tracking
Entering JOB/Master®
SELECT13
P mode has now been altered to exclude; to run in Check
mode; to simulate.
At submit time, the LQ will look something like this:
--------------------------- JOB/Master® Scheduling Queue -------- Row 1 from 6
Command ===>
Scroll = PAGE
Set=> Job= -------- Sys= -------- Date= ----- AB - MT - EX - DC - OP <<(Shift)---------------- Date= 98/09/02 98.245 Time= 07:59 ---------------S | Job
|T|Date |Time|
C u r r e n t
S t a t u s
|M St|Alt Def
- -------- - ----- ---- ---------------------------------------- - -- --------- SELECT11 Y 98244 0000 * IN CHECK MODE, NOT SUBMITTED
C P
-- SELECT12
98244 0000 * IN CHECK MODE, NOT SUBMITTED
C P
-- SELECT13 Y 98244 0000 * IN CHECK MODE, NOT SUBMITTED
C P
-- SELECT14 Y 98244 0000 * IN CHECK MODE, NOT SUBMITTED
C P
-- SELECT15 Y 98244 0000 * IN CHECK MODE, NOT SUBMITTED
C P
-- SELECT16 Y 98244 0000 * IN CHECK MODE, NOT SUBMITTED
C P
-- JCLSUBA Y 98245 0055 * WAITING FOR MANUAL TASKS
S P
-- CI33DOWN Y 98245 0746 * TRIG. ON HOLD BY EXEC REQ.
P
P H
-- SELECT01 Y 98245 0746 * SELECT MODE / ENTER I TO RUN JOB
P H
-- JMPOSTB1
98245 0815 *EXCLUDED TO SIMULATE BY
P390K
P C
******************************* Bottom of data ********************************
Jobs in Select or Check mode will indicate that the JCL was not submitted and the ST ==>
field will change to a status of D to indicate that the LQ record will be deleted.
Once the job(s) have entered the JES input queue and/or gone into execution;
it is TOO LATE to make the change to include or exclude.
E:\Manuals\Product Manuals\ASO\OM (OPS Master)\Reference Guide\Current Release\OPS_C07.fm
)
Mantissa Corporation © 2013
Page - 167
Chapter 7
OPS/MASTER®
Entering JOB/Master®
Job Tracking
DS - Display Scheduling Criteria of a Job
Display the Scheduling Criteria, and Last Run status of a job, by placing DS in the selection field next to the jobname and pressing <ENTER>. When this option is selected, the
following screen is displayed:
DS------------------------- JOB/Master® Job Status
Command ===>
Jobname
Run-Exit Instr
------------------------
=> JCLSUBA
Alternate Definition for =>
=> JCL SUBSTITUTION USING MEMBER $GLOBAL$ - RUNS AFTER MIDNIT
System
=> JCLSUB
Job/Network => ********
Trigger By => JCLSUB1
Calendar
Excep Cal1
Excep Cal2
=>
=>
=>
Res Name1
=>
Res Name2
=>
Keyword Def =>
Job Level Process Keywords
=>
-----------------------------------------------------------------------------Last Run Date => 98243
Time => 09 16
Cond Code => CC= 0000
Tape Models and Required Units
3420 => 00
3480 => 00
----------------------------- Submit Time Options ---------------------------Submit=> 0055 End=> 0000
Submit End
2 0000 0000
6 0000 0000
Number of Runs=> 00
Submit End
3 0000 0000
7 0000 0000
Minutes Between Runs=> 0000
Submit End
4 0000 0000
8 0000 0000
Submit End
5 0000 0000
9 0000 0000
E:\Manuals\Product Manuals\ASO\OM (OPS Master)\Reference Guide\Current Release\OPS_C07.fm
Shown on this screen is the scheduling criteria as well as the submit times for the job. The
last run date, time, and condition code are also shown.
Page - 168
Mantissa Corporation © 2013
OPS/MASTER®
Chapter 7
Job Tracking
Entering JOB/Master®
AJ - Add a Job to the schedule queue
This option allows you to add a job to the scheduling queue, even if it is not defined to the
JOB/Master® data base. From the command line of the LQ or from the tracking menu
enter the following:
AJ JOBNAME
When you enter this option, the following screen is displayed:
AJ------------------------- JOB/Master® JOBQ Entry
Command ===>
Schedule Job=> LOOPDRV1
Date
=> 98245
Alternate
=>
System => PATTY
Run Instr
=> DYNAMICALLY ADDED TO SCHEDULE
------------------------
Time
=> 0000
Schedule/Network => ********
Run Mode => P
------------------------------------------------------------------------------Submit Mem => ________
Subtype => A
Priority
=> _
Use Rerun PDS For Submit JCL
=> N
Submit PDS => ____________________________________________
------------------------------------------------------------------------------Manual Task Criteria -----------> DE|CI|TI|CR|JS|
N N N N N
------------------------------------------------------------------------------Dead Cancel => _ Dead Cancel Wait=> 000 Min
Single Mode
=> _
----------------Jobname=> ________
Additional Predecessor Dependency Criteria
----------------
________
If the job has been defined to the JOB/Master® database, default values will appear in the
fields. Otherwise, complete the fields as necessary refering to the Job Definition section
for field values. If you override the default fields, the data entered is only kept for this
schedule run of the job. PF4 (CONFIRM) will add the job to the schedule.
SINGLE MODE
E:\Manuals\Product Manuals\ASO\OM (OPS Master)\Reference Guide\Current Release\OPS_C07.fm
Single Mode processing is a special mode that ignores all dependencies and triggers. It processes only that job.
Mantissa Corporation © 2013
Page - 169
Chapter 7
OPS/MASTER®
Entering JOB/Master®
Job Tracking
GS - Generate Schedule creation JCL
The parameters specified for the creation of a schedule can be specified on this screen, as
shown:
GS ------------------ JOB/Master® Schedule Run Parameters --------------------Command ===>
Scroll ==> PAGE
--------------------------------------------------------------------------------------- Date= 98/09/02 98.245 Time= 08:13 Next Sched Date= 98245 --------From Date = 98245 From Time = 0600
To Date = 00000 To Time = 0000
Simulation --------------> N (Y,N) Backlog report only -> N (Y,N)
Include selections only -> Y (Y,N)
------------------------------------------------------------------------------Enter System|Job and I nclude| E xclude| S elect value
System
Jobname
Inc/Exc
--------------- ------(I,S,E)
------------------------------------------------------------------------------******************************* Bottom of data ********************************
)
The JMSCHED member must be installed in the correct Proclib for the scheduling job to be executed properly. The JCL for this run will be generated from
the OPS.ISPSLIB.
NEXT SCHED DATE
FROM DATE/TIME
The lower bound date and time used to select jobs for the schedule queue. The
period for which the schedule is to be created is specified in the from date, from
time, to date and to time fields. The From Date default is the current system date.
TO DATE/TIME
The higher bound date and time used to select jobs for the schedule queue.
SIMULATION
A simulation schedule is produced if Y is specified. This schedule will place no
jobs on the schedule queue, but can be used to review a schedule before it is generated.
Page - 170
Mantissa Corporation © 2013
E:\Manuals\Product Manuals\ASO\OM (OPS Master)\Reference Guide\Current Release\OPS_C07.fm
This is the date of the next schedule creation cycle. This date is necessary if the
from/to date and time are specified as zero.
OPS/MASTER®
Chapter 7
Job Tracking
Entering JOB/Master®
USE ONLY EXCLUDE/INCLUDE
If Y is specified, only those jobs or systems, entered in the ENTER SYSTEMS
AND JOBS TO BE INCLUDED OR EXCLUDED part of the screen will be
scheduled.
BACKLOG REPORT ONLY
If Y is selected, only a report of jobs still waiting to process will be generated (at
the completion of all jobs on the queue).
ENTER SYSTEMS AND JOBS TO BE INCLUDED OR EXCLUDED
If including jobs or systems, the user may enter the system or jobname in the
appropriate field, and enter the appropriate parameter under INC/EXC and press
<ENTER>. Repeat this process until all desired entries have been made. When
you PF4 (CONFIRM) the function, an edit screen is displayed, where any other
changes may be made. Use the SUB command to submit the JCL for execution.
The following include/exclude parameters can be specified for each system or
job that is specified.
Will force include the job or system even if it was not scheduled for that
day.
E
Will exclude the job or system from being scheduled for that day.
S
Will select the job or system for that day only if it would be scheduled for
that day based on scheduling criteria.
E:\Manuals\Product Manuals\ASO\OM (OPS Master)\Reference Guide\Current Release\OPS_C07.fm
I
Mantissa Corporation © 2013
Page - 171
Chapter 7
OPS/MASTER®
Entering JOB/Master®
Job Tracking
GSS - Generate Simulation Schedule
This function is the same as GS; however, it will only allow selection of simulation mode.
This command can be given to users who want to generate a forecast run, but should not
be authorized for true job scheduling.
)
If the exclude is used during a multiple day simulation run, the exclude will
exclude jobs for all days scheduled. If the jobs trigger other jobs, the triggered
jobs will only be excluded for the last day of the schedule generation.
E:\Manuals\Product Manuals\ASO\OM (OPS Master)\Reference Guide\Current Release\OPS_C07.fm
For a more detailed discussion of generating both actual and simulated schedules, refer to
“Generating A Schedule,” in the scheduling section located in this manual.
Page - 172
Mantissa Corporation © 2013
OPS/MASTER®
Chapter 7
Job Tracking
Entering JOB/Master®
PQ - Purge the entire schedule Queue
This option is used if you want to purge all jobs or a system from the JOB/Master® scheduling queue. When you select this option, the following screen is displayed:
-
PQ ----- ---------------- JOB/Master® Schedule Queue Cancel ------------------Command ===>
---------------------- Date= 98/09/02
Schedule Date = 00000
98.245
Time= 08:16 ---------------------
System Name = ________
*******************************************************************************
*******************************************************************************
***
***
***
A Schedule Date of 00000 means all days
***
***
***
***
This Command will Cancel the entire Schedule Queue
***
***
for the above Parameters
***
***
***
*******************************************************************************
*******************************************************************************
CANCEL or CONFIRM
This screen allows for the cancellation of all jobs or system from the schedule, or the cancellation of jobs scheduled to run on the specified date. Enter the date in Julian form. An
entire system can be canceled for a specific date, by entering the system name in the
appropriate field, and indicating the date for which it is to be canceled.
E:\Manuals\Product Manuals\ASO\OM (OPS Master)\Reference Guide\Current Release\OPS_C07.fm
Enter PF4 (CONFIRM) to invoke the schedule cancel, or PF5 (CANCEL) to terminate the
function.
Mantissa Corporation © 2013
Page - 173
Chapter 7
OPS/MASTER®
Entering JOB/Master®
Job Tracking
PS - Inactivate Submit Facility
This command deactivates the JOB/Master® Submit Facility. If an SMF-ID is specified at
the time this command is issued, then only that CPU will be affected. Otherwise, the Submit Facility will be stopped on all processors in a multi-system environment. When this
option is selected, the following screen is displayed:
PS -------------------- JOB/Master® Local Complex Status ----------------------Command ===>
------------------------------------------------------------------------------Option => PS
SMF-ID = O390 JOB/Master® Control Region ID: JM01
Main
=>
(Submit Facility default processor)
------------------------------------------------------------------------------Priority:
A B C D E F G H I J K L M N O P Q R S T U V W X Y Z
(A,I)
=>
(BLANK=A)
A ctive will be selected for submit; I nactive will not be selected
------------------------------------------------------------------------------CPU
Submit
Last JOBQ
SMF-ID
Status
Scan
--------------------O390
STOPPED
09:47
The Submit Facility should never be stopped unless it is necessary to globally halt all job
submissions. LAST JOBQ SCAN - reflects the last time JOB/Master® scanned the queue
and is based on criteria in Startup Procedure.
This command does not suspend JOB/Master® Tracking or any other function, it only stops the submission of jobs to the JES input queue. When the Submit Facility is started again, any jobs which would have been submitted during
the dormant period will be submitted as soon as the SS command is issued.
E:\Manuals\Product Manuals\ASO\OM (OPS Master)\Reference Guide\Current Release\OPS_C07.fm
)
Page - 174
Mantissa Corporation © 2013
OPS/MASTER®
Chapter 7
Job Tracking
Entering JOB/Master®
If a processor is no longer being used in the facility, or the SMF-ID has been changed, it is
possible to remove the SMF-ID from this table. In order to accomplish this, enter QUIT in
the OPTION==> field and the SMF-ID of the processor which no longer exists and PF4
(CONFIRM) the command.
CAUTION: This should only be done if the processor has been physically
removed from the facility, or the SMF-ID has been changed.
This command should also be used if a CPU is shown active, but JOB/Master®
is not active on that CPU. If this is the case a message JM26 JOB/Master®
shutdown or locked out on system xxx will be issued to the console. To notify
the active processor that JOB/Master® is not active, use this command for that
processor.
E:\Manuals\Product Manuals\ASO\OM (OPS Master)\Reference Guide\Current Release\OPS_C07.fm
)
Mantissa Corporation © 2013
Page - 175
Chapter 7
OPS/MASTER®
Entering JOB/Master®
Job Tracking
SS - Activate Submit Facility
This command activates the JOB/Master® Submit Facility. When this option is selected,
the following screen is displayed:
SS--------------------- JOB/Master® Local Complex Status ----------------------Command ===>
------------------------------------------------------------------------------Option => SS
SMF-ID = O390 JOB/Master® Control Region ID: JM01
Main
=> O390
(Submit Facility default processor)
------------------------------------------------------------------------------Priority:
A B C D E F G H I J K L M N O P Q R S T U V W X Y Z
(A,I)
=>
(BLANK=A)
A ctive will be selected for submit; I nactive will not be selected
------------------------------------------------------------------------------CPU
Submit
Last JOBQ
SMF-ID
Status
Scan
--------------------O390
ACTIVE
09:52
If the SMFID field is left blank, the Submit Facility is activated on the CPU on which the
SS command is issued. If a valid SMFID is entered, then the JOB/Master® Submit Facility will be started on the CPU requested.
E:\Manuals\Product Manuals\ASO\OM (OPS Master)\Reference Guide\Current Release\OPS_C07.fm
The main submit processor is assigned to the processor where the SS is first issued. In
order to reassign the main or default submit processor a PS must first be issued, stopping
all processors, and an SS then issued (first, on the processor where the main tag is to be
assigned).
Page - 176
Mantissa Corporation © 2013
OPS/MASTER®
Chapter 7
Job Tracking
Entering JOB/Master®
SP- Set Priority Update Screen
This panel is used for selecting the priority of submission of JOBS by priority class as
defined in the JOB/Master® Data Base or as Updated for the JOB using the Update Command from the Tracking Facility.
SP-------------------- JOB/Master® Local Complex Status ----------------------Command ===>
------------------------------------------------------------------------------Option => SP
SMF-ID = O390 JOB/Master® Control Region ID: JM01
Main
=> O390
(Submit Facility default processor)
------------------------------------------------------------------------------Priority:
A B C D E F G H I J K L M N O P Q R S T U V W X Y Z
(A,I)
=>
(BLANK=A)
A ctive will be selected for submit; I nactive will not be selected
------------------------------------------------------------------------------CPU
Submit
Last JOBQ
SMF-ID
Status
Scan
--------------------O390
ACTIVE
09:53
E:\Manuals\Product Manuals\ASO\OM (OPS Master)\Reference Guide\Current Release\OPS_C07.fm
The purpose of PRIORITY MODIFICATION is based on the situation that many jobs are
ready for submission to JES for execution at the same time and all scheduling criteria have
been satisfied. The priority selection allows for different JOB/Master® classes (which are
assigned in the Priority field of the JOB/Master® Data Base record) to be held from submission or allowing only specific classes of JOBS to be submitted, (enabling the JES INITIATORS to be freed up for priority work).
The Priority is selected (turned on) by putting an A or a BLANK under the appropriate
class.
Priority selection is Inactivated (turned off) by placing an I under the appropriate class.
Valid characters are:
“A” and “I”
Mantissa Corporation © 2013
Page - 177
Chapter 7
OPS/MASTER®
Entering JOB/Master®
Job Tracking
TE - Tape Drive Exclusion
To enter this function you must enter the TE command from the Tracking Menu or the
command line from the LQ display. (Refer to Tracking in this manual for more information).
-
TE------ ------------ JOB/Master® Tape Unit Exclusion List -------------------Command ===>
------------------------------------------------------------------------------SYS-ID |-------------------- Tape Unit Address ----------------------|
... ... ... ... ... ... ... ... ... ... ... ... ... ... ... ...
... ... ... ... ... ... ... ... ... ... ... ... ... ... ... ...
The units entered here will not be evaluated by JOB/Master®’s dynamic
tape drive availability routines.
If System-id is entered, then those drives will pertain only to the
system specified. (Enter CANCEL or CONFIRM)
The units entered here will not be evaluated by JOB/Master®’s dynamic tape drive availability routines.
If System-ID is entered then those drives will pertain only to the system specified. (Enter Cancel or Confirm).
The ability to exclude certain tape drives from the availability list used by JOB/Master®
for tape drive verification (Tape Resource Pool), prior to submission of jobs to JES is now
part of the system.
Functions:
SYS-ID
If entered the list of Unit Addresses pertains only to that specific system. If no
SYS-ID is entered, then all addresses entered apply globally to all systems.
TAPE UNIT ADDRESS
The XXX represent the Unit Address of the Units being excluded.
Page - 178
Mantissa Corporation © 2013
E:\Manuals\Product Manuals\ASO\OM (OPS Master)\Reference Guide\Current Release\OPS_C07.fm
)
OPS/MASTER®
Chapter 7
Job Tracking
Entering JOB/Master®
RT - Initiate Resource Table processing
Resource routing is a unique JOB/Master® function which allows any resource to be
assigned to a particular CPU. The resource name used with this command must match the
resource name defined on the Job Definition Screen to be effective.
Any JOB/Master® Resource Table entry can be displayed, updated or deleted, by specifying this option. When this option is selected, the following screen is displayed:
------------ JOB/Master® Workload Control Definitions ------Row 1 to 3 of 3
Command ===>
Scroll ==> PAGE
Use ADD line to enter additions to resource table
Over type an entry to change a resource
Place a D next to the entry to delete the resource
To DETACH a resource enter "----" in the SMFid field
To ATTACH a resource enter a valid SMFID in the SMFID field
Enter END (PF3) to exit resource functions
Num
Node
Name
ID SMFID Jobs
Name
D e s c r i p t i o n
-------- - ------- -------- ---------------------------------------ADD> ________ _ ____
000 ________ ________________________________________
_ INITA
O390
002 ________ ________________________________________
_ INITR
O390
003 ________ ________________________________________
_ RESTEST
O390
002 ________ ________________________________________
******************************* Bottom of data ********************************
Cursor down the RESOURCE TABLE to the selection field and enter D to delete an
entry, or U to update an entry.
E:\Manuals\Product Manuals\ASO\OM (OPS Master)\Reference Guide\Current Release\OPS_C07.fm
To ADD a Resource Table entry, enter the name of the resource, the associated system ID,
and a description of the resource name on the add line (labeled with an “Add” in the first
column) and press <ENTER>. The entry will then be added to the table.
To attach a resource, enter the appropriate SMF-ID in the field provided for that resource.
To detach a resource, enter “----” (dashes) in the SMF-ID of the resource desired.
)
Specifying “****” for SMFID will allow for submission on any processor
without selectivity.
NAME
The Resource Name is an assigned mnemonic which can be either a Real or a
Virtual Device. It is possible to establish a group of virtual devices to assist in the
scheduling and work load balancing functions.
ID
Reserved for future use.
Mantissa Corporation © 2013
Page - 179
Chapter 7
OPS/MASTER®
Entering JOB/Master®
Job Tracking
SMFID
The SMFID is the system identification of the resource. This field is used to
uniquely identify resources which are attached to multiple processors. To move
or detach a resource, simply change or blank out this field. To add a resource,
simply enter SMFID on the resource to be attached.
NO. JOBS
The maximum number of Jobs which may run currently using this Resource .
NODE NAME
The Node Name is used to designate which node is used for the Remote Job Network Support. The node name is linked to the Resource Name, which is defined
to the job during the definition process. The nodes can be attached to the various
resources as may be required.
DESCRIPTION
The description in an information field indicating the description of the resource.
Example 1:
CICS is defined on the JOB/Master® data base as a scheduled or trigger job. The RES.
NAME field is coded as CICSA to designate CICS production. Using the RT command in
the Job Tracking Facility, the resource CICSA is assigned to SYSA. When the job CICS is
ready to be initiated, JOB/Master® will issue a start command for CICS, but will issue it
on the system whose SMFID is SYSA.
Example 2:
E:\Manuals\Product Manuals\ASO\OM (OPS Master)\Reference Guide\Current Release\OPS_C07.fm
Job “BKUPJOB1” uses a string of 3480 tape drives which must be varied offline from
SYSTEMA and varied online for SYSTEMB. The processing of all jobs requiring
resource “3480” will begin on SYSB with a maximum of 8 jobs running concurrently. To
do this, the resource “3480” must be changed. Change the SMFID from “SYSA” to
“SYSB” and CONFIRM (PF4) the update.
Page - 180
Mantissa Corporation © 2013
OPS/MASTER®
Chapter 7
Job Tracking
Entering JOB/Master®
ST - Display control region Settings
This command displays the status of the JOB/Master® Submit Facility. The status screen
indicates whether the Submit Facility is active or stopped. When this option is selected,
the following screen is displayed:
ST-------------------- JOB/Master® Local Complex Status ----------------------Command ===>
------------------------------------------------------------------------------Option => ST
SMF-ID = O390 JOB/Master® Control Region ID: JM01
Main
=> O390
(Submit Facility default processor)
------------------------------------------------------------------------------Priority:
A B C D E F G H I J K L M N O P Q R S T U V W X Y Z
(A,I)
=>
(BLANK=A)
A ctive will be selected for submit; I nactive will not be selected
------------------------------------------------------------------------------CPU
Submit
Last JOBQ
SMF-ID
Status
Scan
--------------------O390
ACTIVE
09:53
JOB/Master® Subsystem ID
The JOB/Master® control region associated with this online session.
MAIN = SYSC (SUBMIT FACILITY DEFAULT PROCESSOR)
The main field identifies the SMFID of the JOB/Master® Submit Facility default
processor. Jobs not specifically routed to other CPU’s, are submitted on the
default processor.
E:\Manuals\Product Manuals\ASO\OM (OPS Master)\Reference Guide\Current Release\OPS_C07.fm
CPU
SMF-ID
SUBMIT
STATUS
LAST JOBQ
SCAN
The information that is displayed under the above headings identifies whether
JOB/Master® is active or stopped on the corresponding CPU as captioned by
SMFID. The information also contains the last time, in HHMM format, that JOB/
Master® issued a time stamp.
Mantissa Corporation © 2013
Page - 181
Chapter 7
OPS/MASTER®
Entering JOB/Master®
Job Tracking
DH - Display job run data / log messages from
This option allows you to inquire about historical data. This screen chronologically lists
all the days of history currently on the History File. The Julian date is on the left of the
screen, and the corresponding day of the week and date on the right.
DH---------------------- JOB/Master® Audit Trail Selection -- Row 1 to 7 of 7
Command ===>
Scroll ==> PAGE
------------------------------------------------------------------------------Date: WEDNESDAY, SEPTEMBER 2, 1998 - 98.245
09:58
------------------------------------------------------------------------------Selection => M (M,J) Enter M for message log, J for job run data
Enter S TART day and E ND day in table to set dates or enter dates directly
Jdate
S => 98244
Jdate
E => 98245
CONFIRM to process END to quit
Jobname
=>
Sys Name =>
Used to limit selection for J
------------------------------------------------------------------------------(S,E) Jdate
Day For Jdate Selection
----------------------------------98.245
WEDNESDAY, SEPTEMBER 2, 1998
E
98.244
TUESDAY,
SEPTEMBER 1, 1998
98.243
MONDAY,
AUGUST
31, 1998
98.242
SUNDAY,
AUGUST
30, 1998
98.241
SATURDAY,
AUGUST
29, 1998
S
98.240
FRIDAY,
AUGUST
28, 1998
98.239
THURSDAY,
AUGUST
27, 1998
******************************* Bottom of data ********************************
The selection option is M for the audit log (all messages generated by JOB/Master® and J
for job run statistics).
The select column can be used to select the start and end date for the display data. The
default dates are current day for end date and current day-1 for start date. (Refer to JDATE
above).
JOBNAME and SYSTEM NAME are now available as selection criteria for the displaying of the History File when using the J for selection of Message Log Run Data. Generic
or Wild Card (*) can be used to LIMIT the selection.
JOBNAME ABC*
will display all jobs beginning with ABC as the first three characters.
SYSTEM ABC*
will display all system beginning with the ABC prefix.
It is no longer necessary to use the PF5 key (CANCEL) to end the display panel. The PF3
KEY can now be used to END out of the Display History Panel. In order to select the starting and ending dates, enter ‘S’ by the date you wish to start on and press ENTER. Then,
enter an ‘E’ by the date you wish to stop on and press ENTER. Alternately, you may enter
the dates manually in the S=> and E=> fields. When your selections are complete, enter
CONFIRM to process your selection. The resultant screen is an ISPF browse display with
full browse capabilities. The ISPF scroll commands; PF7/8 and PF10/11 and PF3 can be
used.
Page - 182
Mantissa Corporation © 2013
E:\Manuals\Product Manuals\ASO\OM (OPS Master)\Reference Guide\Current Release\OPS_C07.fm
JOBNAME and SYSTEM NAME:
OPS/MASTER®
Chapter 7
Job Tracking
Entering JOB/Master®
The following screen is displayed when M is selected for MESSAGES next to the selection field on the DH screen:
Menu Utilities Compilers Help
sssssssssssssssssssssssssssssssssssssssssssssssssssssssssssssssssssssssssssssss
SYS98245.T091146.RA000.P390K.R0100086
Line 00000000 Col 001 080
Command ===>
Scroll ===> PAGE
********************************* Top of Data **********************************
________________________________________________________________________________
SID >--DATE TIME
---< MSG /SUBID USERID
------>>>> MESSAGE TEXT ---________________________________________________________________________________
O390 98244 09/01/98 00.04.32 JM35/JM01
CT33U002 TRIGGERED BY R13380
O390 98244 09/01/98 00.04.45 JM03/JM01
CT33U002 (J00396) SUBMITTED
O390 98244 09/01/98 00.04.46 JM03/JM01
CT33U002 (J00396) MVS JOBNAM
O390 98244 09/01/98 00.05.51 JM35/JM01
LP330002 TRIGGERED BY CT33U0
O390 98244 09/01/98 00.06.00 JM03/JM01
LP330002 (J00399) SUBMITTED
O390 98244 09/01/98 00.06.00 JM03/JM01
LP330002 (J00399) MVS JOBNAM
O390 98244 09/01/98 00.15.14 JM35/JM01
CT33D002 TRIGGERED BY LP3300
O390 98244 09/01/98 00.15.28 JM03/JM01
CT33D002 (J00402) SUBMITTED
O390 98244 09/01/98 00.15.28 JM03/JM01
CT33D002 (J00402) MVS JOBNAM
O390 98244 09/01/98 00.15.44 JM35/JM01
R1337002 TRIGGERED BY CT33D0
________________________________________________________________________________
SID >--DATE TIME
---< MSG /SUBID USERID
------>>>> MESSAGE TEXT ---________________________________________________________________________________
O390 98244 09/01/98 00.15.53 JM44/JM01
WARNING - JOB R1337002 TAPE
O390 98244 09/01/98 00.15.56 JM03/JM01
R1337002 (J00404) SUBMITTED
O390 98244 09/01/98 00.15.57 JM03/JM01
R1337002 (J00404) MVS JOBNAM
The JOB/Master® log is an audit trail of what occurred on the day in question. This display can be used to answer questions such as, “Why was the Job held up?”, or “Who
removed the Job from the scheduling queue?”.
Auto Logging Facility
E:\Manuals\Product Manuals\ASO\OM (OPS Master)\Reference Guide\Current Release\OPS_C07.fm
JOB/Master® uses an Auto Logging Facility for all updates to the JOB/Master® database.
The information is captured with a “before” image of the record. Each field that is altered
is then recorded on the History File. Information is displayed with the Field being changed
and the data which was in the field prior to the change following the field identifier.
Mantissa Corporation © 2013
Page - 183
Chapter 7
OPS/MASTER®
Entering JOB/Master®
Job Tracking
The following screen results when selecting J for JOB DATA next to the selection field on
the DH screen:
Menu Utilities Compilers Help
sssssssssssssssssssssssssssssssssssssssssssssssssssssssssssssssssssssssssssssss
SYS98245.T091146.RA000.P390K.R0100086
Line 00000000 Col 001 080
Command ===>
Scroll ===> PAGE
********************************* Top of Data **********************************
________________________________________________________________________________
SID >--DATE TIME
---< SCHD JOBNAME JOBNO C. CODE
JOB/NET
SYSTEM
________________________________________________________________________________
O390 98244 09/01/98 00.04.35 YES R1338001 J00392 CC= 0000 ******** RMSP133
O390 98244 09/01/98 00.05.52 YES CT33U002 J00396 CC= 0000 ******** RMSP133
O390 98244 09/01/98 00.15.16 YES LP330002 J00399 CC= 0000 ******** RMSP133
O390 98244 09/01/98 00.15.45 YES CT33D002 J00402 CC= 0000 ******** RMSP133
O390 98244 09/01/98 00.18.56 YES R1337002 J00404 CC= 0000 ******** RMSP133
O390 98244 09/01/98 00.24.39 YES R1338002 J00405 CC= 0000 ******** RMSP133
O390 98244 09/01/98 00.26.35 YES CT33U003 J00406 CC= 0000 ******** RMSP133
O390 98244 09/01/98 00.35.54 YES LP330003 J00408 CC= 0000 ******** RMSP133
O390 98244 09/01/98 00.37.55 YES CT33D003 J00409 CC= 0000 ******** RMSP133
O390 98244 09/01/98 00.44.36 YES R1338005 J00410 CC= 0000 ******** RMSP133
________________________________________________________________________________
SID >--DATE TIME
---< SCHD JOBNAME JOBNO C. CODE
JOB/NET
SYSTEM
________________________________________________________________________________
O390 98244 09/01/98 00.45.09 YES CI33UP
J00411 CC= 0000 ******** RMSP133
O390 98244 09/01/98 00.45.12 YES CT33UP
J00412 CC= 0000 ******** RMSP133
O390 98244 09/01/98 00.46.39 YES R133GEN7 J00416 CC= 0000 ******** RMSP133
Additional data is available by scrolling the display screen. The screen can be scrolled by
using the standard ISPF functions.
In order to exit the DH function:
From the browse screens - PF3.
2.
Upon returning to the JOB/Master® AUDIT TRAIL SELECTION screen PF3,
PF5 or CANCEL will return you to the tracking function you left.
E:\Manuals\Product Manuals\ASO\OM (OPS Master)\Reference Guide\Current Release\OPS_C07.fm
1.
Page - 184
Mantissa Corporation © 2013
OPS/MASTER®
Chapter 7
Job Tracking
Entering JOB/Master®
CO - Invoke MVS Console Facility
You can invoke a JOB/Master® function that will provide full MVS operator functions
through the same JOB/Master® terminal on which they are currently logged. All MVS
and JES commands can be processed through this interface.
CO----------------------- JOB/Master® MVS Console Facility - Row 1 to 20 of 27
Command ===>
Scroll = PAGE
Console ID ====> 700
09.52.26
*IEE362A SMF ENTER DUMP FOR SYS1.MAN1 ON SCPMV5
09.52.26
IEE360I SMF NOW RECORDING ON SYS1.MAN2 ON SCPMV5
TIME=09:52:26
09.52.26
*IEE985A SMF IS PROCESSING ITS LAST AVAILABLE DATASET
09.52.28
IEE949I 09.52.28 SMF DATA SETS 099
U C
NAME
VOLSER SIZE(BLKS) %FULL STATUS
P-SYS1.MAN1 SCPMV5
3000
100 DUMP REQUIRED
S-SYS1.MAN2 SCPMV5
3000
1 ACTIVE
09.52.31 STC00062 $HASP100 SMFCLEAR ON STCINRDR
09.52.35 STC00062 $HASP373 SMFCLEAR STARTED
09.53.05 JOB00061 IEF404I OS1134S - ENDED - TIME=09.53.05
09.53.06 JOB00061 $HASP395 OS1134S ENDED
09.53.07
$HASP309 INIT
B INACTIVE ******** C=BA
09.53.10 JOB00061 $HASP150 OS1134S OUTGRP=1.1.1 ON PRT1
1,617 (1,
617) RECORDS
09.54.04 STC00062 IEF404I SMFCLEAR - ENDED - TIME=09.54.04
09.54.04 STC00062 $HASP395 SMFCLEAR ENDED
09.59.57 JOB00063 $HASP100 GENERBHW ON INTRDR
MANTISSA/BHAM
FROM TSU00056 P390J
10.00.02 JOB00063 $HASP373 GENERBHW STARTED - INIT
A - CLASS A - SYS
The JOB/Master® console displays, or mirrors, the MVS consoles. The console will not
roll like an ordinary console. <ENTER> must be pressed to refresh the display. The console facility will mirror the address selected, therefore there are no buffers which would
cause a buffer backup.
E:\Manuals\Product Manuals\ASO\OM (OPS Master)\Reference Guide\Current Release\OPS_C07.fm
JOB/Master® uses the authorization that has been defined in ISF, for this user. If the user
has only Console Display authority he will only be allowed to view MVS console messages; otherwise, the user will have full console facilities available and may enter commands.
CONSOLE ID
The console defaults to the Master Console ID when a console address is not
specified in the upper right hand corner of the screen. Authorized users can enter
MVS or JES commands. Any console address can be entered in the console ID
field of the screen. The console that is shown in the console ID field is the console address. Available console addresses can be obtained by entering the MVS
“D C” command. Only display consoles can be simulated. Hard copy consoles
will not be accepted.
)
Mantissa Corporation © 2013
The command syntax is the same as when entered from a standard MVS console. No special preceding character is required. Also, the “Retrieve” function
(default PF12) can help SAVE keystrokes by redisplaying previous commands.
Page - 185
Chapter 7
OPS/MASTER®
Entering JOB/Master®
Job Tracking
DP - Display jobs Predecessor function
The DP option will display all job predecessors for a specified job. Negative and Co-Requisite dependencies are also displayed, indicating that the job requested may not be submitted while any negative dependency job is executing, or the job requires a job to be in
execution.
This display is coming from the JOB/Master® Database record. The JOBQ is checked for
existing conditions relating to the definition. If the Predecessor condition is found the display indicates the current Predecessor status. This display IS NOT a display of ALL conditions existing on the JOBQ. If the same Predecessor exists multiple times on the JOBQ,
only the first condition is flagged for display. When the first condition is satisfied, the next
condition is displayed.
Command ===>
Scroll ==> PAGE
------------------------------------------------------------------------------Dependencies for: TSTPRED2 - 00000 - 0000
: JOB NOT IN SCHEDULE QUEUE
Dependency
Type
Position
Current Status of this Dependency
--------------------------- ---------------------------------------DSNTRIG2
PRED -R
LAST RUN C
CC= 0000 98244
12:43:36
JMJCL02
PRED -R
LAST RUN C
CC= 0000 98189
00:20:48
******************************* Bottom of data ********************************
The job which is being queried.
DEPENDENCY
The job name or dependency for which this job is waiting.
TYPE
This field displays the type of dependency.
POSITION
The current position of the dependency within the system.
CURRENT STATUS OF THIS DEPENDENCY
The current status of this dependency.
Page - 186
Mantissa Corporation © 2013
E:\Manuals\Product Manuals\ASO\OM (OPS Master)\Reference Guide\Current Release\OPS_C07.fm
DEPENDENCIES FOR:
OPS/MASTER®
Chapter 7
Job Tracking
Entering JOB/Master®
DT - Display Triggered jobs and job condition code entries
The DT option displays the condition code triggering criteria as coded on the data base for
each job. The sample screen shows the condition code criteria for job JOB4. Job level criteria is displayed, as well as the criteria for each step, as it is defined to the data base.
DT------------- JOB/Master® Trigger and Condition Code Depende Row 1 to 3 of 3
Command ===>
Scroll ==> PAGE
------------------------------------------------------------------------------Dependencies For: TRIGREPR :
Trigger ST Type
-------- -- ---TRIG0002 A
Op
--
CC
----
Comments
---------------------------------------<- DEPENDENCY APPLIED AT JOB END
******************************* Bottom of data ********************************
DEPENDENCIES FOR:
The JOBNAME being queried.
TRIGGER
The JOBNAME which will be triggered when the conditions are met.
ST
E:\Manuals\Product Manuals\ASO\OM (OPS Master)\Reference Guide\Current Release\OPS_C07.fm
The Submit Type of the job to be triggered.
TYPE
The Type of trigger condition which is required for the job to be triggered. If left
blank the job to be triggered is a normal trigger. If F is used, the job being triggered will only be triggered if the JOB FAILS.
OP
This field displays the Operation Code that was specified.
C.C.
This displays the condition code value which is to be tested by the system.
COMMENT AREA
This area displays where and when the dependency will be applied. Dependencies are applied at either Job Exec, Step Exec, or both.
Mantissa Corporation © 2013
Page - 187
Chapter 7
OPS/MASTER®
Entering JOB/Master®
Job Tracking
DF - Display job Failure contact
Job failure contact information, as coded on the JOB/Master® data base, will be displayed
by this command, as shown:
DF------------------------ JOB/Master® Failure Contact
Command ===>
----------------------
Jobname
Alt Def For
Run-Exit Instr
=> DSNJOB1
=>
=> CREATES 2 DATASETS THAT WILL TRIGGER OTHER JOBS
System
=> DSNTRIGS
Job/Network => ********
-----------------------------------------------------------------------------Job Description
Programmer Name
--------------------------------------DSN TRIGGERS TEST
PATTY SISBARRO
Failure Contact
-------------------PATTY SISBARRO
Phone
---------------------------( 205 )402-0280
Ext 2XX
Beeper
---------------(
)
This screen shows failure information for a specific job. Press <ENTER> to display the
trigger jobs, as coded on the data base, for the job requested. Press PF3/15 to return to the
menu.
SYSTEM NAME
This field contains the name of the system to which the job belongs.
JOB DESCRIPTION
PROGRAMMER NAME
This field displays the name of the programmer associated with the job.
FAILURE CONTACT NAME
This field displays the name of the person to contact in the event the job abends.
This information is only available if it was specified in the job’s definition.
FAILURE CONTACT PHONE
This field shows the phone number of the person to contact if the job abends.
Page - 188
Mantissa Corporation © 2013
E:\Manuals\Product Manuals\ASO\OM (OPS Master)\Reference Guide\Current Release\OPS_C07.fm
This field displays a brief description of the job.
OPS/MASTER®
Chapter 7
Job Tracking
Entering JOB/Master®
DM - Display job Manual task message definitions
This option displays the Manual Task entries as coded on the data base, for each job.
DM------------- JOB/Master® Manual Task Message Definition
Command ===>
JMPOSTB1
--------
Desc: ______________________________________________________________________
Send
015 minutes before submit time or, after dependencies => N
(Y,N)
At a frequency interval of => 015 Minutes
1 DATA ENTRY
Message to Userid/Console => _______
Msg= ______________________________________________________________________
2 CARD INPUT
Message to Userid/Console => P390W
Msg= MAKE SURE THIS TASK IS POSTED BY JMBPOST
3 TAPE INPUT
Message to Userid/Console => _______
Msg= ______________________________________________________________________
4 CONSOLE ROUTED
Message to Userid/Console => _______
Msg= ______________________________________________________________________
5 JCL SETUP
Message to Userid/Console => _______
Msg= ______________________________________________________________________
DESC
This field displays a brief description about these manual tasks.
SEND 000 MIN.
Amount of time before submitting that the MSG is to be sent.
AFTER DEPENDENCIES
Send MSG only after all dependencies are met.
E:\Manuals\Product Manuals\ASO\OM (OPS Master)\Reference Guide\Current Release\OPS_C07.fm
FREQUENCY INTERVAL
How often a reminder message is sent until the manual task is posted.
MANUAL TASK 1,2,3,4 and 5.
(Refer to Job Definition Screen 4 - Manual Task Messages)
Mantissa Corporation © 2013
Page - 189
Chapter 7
OPS/MASTER®
Entering JOB/Master®
Job Tracking
DA - Display Active jobs in execution for this control region
This option, displays only those jobs currently executing on the processor where the command is entered and only jobs under this JOB/Master® control region. When this option is
selected, the following screen is displayed. All jobs executing on all CPU’s will be shown
along with everything else on the LQ display - List jobs on the schedule Queue.
(DA) -------------------- JOB/Master®
COMMAND ===>
DISPLAY ACTIVE --- Row 1 to 1 of 1
SCROLL ==> PAGE
------------------------------------------------------------------------------JOBS IN EXECUTION FOR REGION ID: JM01
JOBNO. JOBNAME
LAST STEP EXECUTED
ALTDEF.
JOBQNAME SCHEDULED
------ -------- ------------------- -------- -------- --------J03360 SCHEDULE
IN FIRST STEP
SCHEDULE
YES
******************************* Bottom of data ********************************
F1=HELP
F7=UP
F2=SPLIT
F8=DOWN
F3=END
F9=SWAP
F4=CONFIRM
F10=SHIFT
F5=CANCEL
F11=RIGHT
F6=CO
F12=RETRIEVE
JOB NO.
The JES job number assigned to the job.
JOBNAME
The name of the job as it is known to MVS.
The step name of the last step completed for the job.
ALTDEF.
The name specified during an Alternate Definition, and is applicable only when
the job is for an Alternate Definition (see “Alternate Definition” in JOB/Master® Scheduling for additional information).
JOBQNAME
The name of the job as it was scheduled. The JOBQNAME can be different from
the jobname, if the jobname on the jobcard JCL statement was different from the
scheduled name.
SCHEDULED
If the job was on the schedule or submitted by JOB/Master®, this field will indicate “YES”.
Page - 190
Mantissa Corporation © 2013
E:\Manuals\Product Manuals\ASO\OM (OPS Master)\Reference Guide\Current Release\OPS_C07.fm
LAST STEP EXECUTED
OPS/MASTER®
Chapter 7
Job Tracking
Entering JOB/Master®
DL - Display run data from the Last 9 executions
The DL command generates the job run statistics for the last nine executions of a job. The
last nine runs of R88PC12 are shown in the following screen:
sssssssssssssssssssssssssssssssssssssssssssssssssssssssssssssssssssssssssssssss
DL
SYS98245.T091146.RA000.P390K.R0100086
Line 00000000 Col 001 080
Command ===>
Scroll ===> PAGE
********************************* Top of Data **********************************
________________________________________________________________________________
SID >--DATE TIME
---< SCHD JOBNAME JOBNO C. CODE
JOB/NET
SYSTEM
________________________________________________________________________________
O390 98236 08/24/98 09.38.32 YES JMPOSTB1 J00063 CC= 0000 ******** JMPOST
O390 98236 08/24/98 09.31.57 YES JMPOSTB1 J00000 CC= 0022 ******** JMPOST
O390 98231 08/19/98 10.37.04 YES JMPOSTB1 J00152 CC= 0000 ******** JMPOST
O390 98230 08/18/98 09.14.30 YES JMPOSTB1 J00094 CC= 0000 ******** JMPOST
O390 98226 08/14/98 09.05.10 YES JMPOSTB1 J00056 CC= 0000 ******** JMPOST
O390 98225 08/13/98 08.36.55 YES JMPOSTB1 J00051 CC= 0000 ******** JMPOST
O390 98222 08/10/98 16.19.35 YES JMPOSTB1 J00000 CC= 0022 ******** JMPOST
O390 98244 09/01/98 23.00.26 YES R1331010 J00497 CC= 0000 ******** RMSP133
---
)
END OF SELECTION
---
A condition code of 22 is the code generated by JOB/Master® for a purge from
the schedule.
E:\Manuals\Product Manuals\ASO\OM (OPS Master)\Reference Guide\Current Release\OPS_C07.fm
The DL display is an ISPF browse panel and can be scrolled left and right to display additional information. Refer to your PF key definition in the Profile “P” option.
The last nine executions will be displayed. However, the history file must be defined large
enough to retain the last nine runs for the job. The file is a wrap file, therefore, if it is not
large enough or a Job is run infrequently, i.e., yearly, there may not be 9 executions shown
since older entries may be overlayed.
Mantissa Corporation © 2013
Page - 191
Chapter 7
OPS/MASTER®
Entering JOB/Master®
Job Tracking
DD - Display Detail statistics from the last run
Overall Job Level Statistics
When the DD option is selected, the following screen is displayed:
DD---------------- JOB/Master® Detail Run Statistics For Last Run ------------Command ===>
For Job: CC4TRIG3 Step:
Procstep:
Date = 98.245
Time= 10:17
------------------------------------------------------------------------------RDR Date/Time | Start Date/Time| End Date/Time | Cond Code| Elaps Time
------------- | ---------------| ------------- | ---------| ---------00000 00:00:00 | 00000 00:00:00 | 98236 13:35:07 | CC= 0000 | 00:00:00
------------------------------------------------------------------------------------------------------------------------------------------------------------CPU Time
| Resident Time | Active Time | # Swaps | # Runs | #Abends
-------| ------------- | ----------- | ------- | ------ | ------00:00:00.00 | 00:00:00.00
| 00:00:00.00 | 00000 | 00037 | 00001
------------------------------------------------------------------------------------------------------------------------------------------------------------Min Run Time | Max Run Time | Min CPUtime | Max CPUtime
------------ | ------------ | ----------- | ----------00:00:08
| 00:00:00
| 00:00:00.00 | 00:00:01.08
-------------------------------------------------------------------------------
)
The first screen provides the user with overall job statistics. Each time
<ENTER> is pressed, overall statistics for each step are shown. Step statistics
are only available for those steps that have been defined to the JOB/Master®
data base. The Global Profile must also be defined to track Step Level Statistics
= Y.
Press <ENTER> to display the step statistics for each job step. The step name is indicated
to the right of the jobname, in the upper portion of the screen.
Page - 192
Mantissa Corporation © 2013
E:\Manuals\Product Manuals\ASO\OM (OPS Master)\Reference Guide\Current Release\OPS_C07.fm
Step Level Statistics
OPS/MASTER®
Chapter 7
Job Tracking
Entering JOB/Master®
The following is a sample step level statistics screen:
DD---------------- JOB/Master® Detail Run Statistics For Last Run ------------Command ===>
For Job: STEPTST5 Step:
Procstep: STEP01
Date = 98.245
Time= 11:11
------------------------------------------------------------------------------RDR Date/Time | Start Date/Time| End Date/Time | Cond Code| Elaps Time
------------- | ---------------| ------------- | ---------| ---------98236 10:38:47 | 98236 10:38:50 | 98236 10:38:55 | CC= 0000 | 00:00:04
------------------------------------------------------------------------------------------------------------------------------------------------------------CPU Time
| Resident Time | Active Time | # Swaps | # Runs | #Abends
-------| ------------- | ----------- | ------- | ------ | ------00:00:01.08 | 00:00:02.98
| 00:00:02.96 | 00000 | 00028 | 00000
------------------------------------------------------------------------------------------------------------------------------------------------------------Min Run Time | Max Run Time | Min CPUtime | Max CPUtime
------------ | ------------ | ----------- | ----------00:00:04
| 00:00:12
| 00:00:01.08 | : : .
-------------------------------------------------------------------------------
To obtain Step level statistics the steps must be defined to the JOB/Master®
database.
E:\Manuals\Product Manuals\ASO\OM (OPS Master)\Reference Guide\Current Release\OPS_C07.fm
)
Mantissa Corporation © 2013
Page - 193
Chapter 7
OPS/MASTER®
Entering JOB/Master®
Job Tracking
DO - Display jobs Output processing information
The following screen is displayed when this option is selected. The sample screen shows
output processing information for the job OUTPOST01. This data must be specified in the
job definition for it to be available in the tracking facility.
DO------------------------ JOB/Master® Output Processing ---------------------Command ===>
Jobname
Alt Def For
Run-Exit Instr
=> OUTPOST1
=>
=> ENSURE THAT JOB WAITS FOR MANUAL O/P POSTING
System
=> MISCTEST
Job/Network => ********
-----------------------------------------------------------------------------User Department
Submitting Department
--------------------------------------TECH SUPPORT
Output Destination
--------------------
Burst => N
Microfiche => N
Delivery Method
--------------------
Decollate => N
Photocopy => N
Other => N
(Refer to the Output Processing fields in the Job Definition Section- Screen 05)
ALT. DEF. FOR
This field shows the alternate name of the job if one has been defned.
RUN-EXIT INSTR.
Any special Run Exit instructions necessary for this job.
The name of the system to which the job is assigned.
USER DEPARTMENT
The department that uses the data generated by the job.
SUBMITTING DEPARTMENT
The department that submitted the job.
OUTPUT DESTINATION
The destination of the job’s output.
DELIVERY METHOD
How the output is sent to the output destination.
Page - 194
Mantissa Corporation © 2013
E:\Manuals\Product Manuals\ASO\OM (OPS Master)\Reference Guide\Current Release\OPS_C07.fm
SYSTEM NAME
OPS/MASTER®
Chapter 7
Job Tracking
Entering JOB/Master®
OUTPUT PROCESSES
Burst
Micro Fiche
Decollate
Photocopy
Other
E:\Manuals\Product Manuals\ASO\OM (OPS Master)\Reference Guide\Current Release\OPS_C07.fm
A “Y” in any field indicates the output process required for the completion of the job.
Mantissa Corporation © 2013
Page - 195
Chapter 7
OPS/MASTER®
Entering JOB/Master®
Job Tracking
DR - Display jobs Run instruction data
The DR option displays run instructions that have been coded at both the job level and the
step level.
This screen displays job run instructions for job OUTPUT01.
DR ---------- JOB/Master® Run Instructions Definition --------- Row 1 to 1 of 1
Command ===>
Scroll ==> PAGE
------------------------------------------------------------------------------Run Instructions For: KEYTABL1 :
For Definition At Run Instructions Field
----------------- ---------------------------------------------------------JOB LEVEL
TESTING PROCESS KEYWORD TABLES
******************************* Bottom of data ********************************
RUN INSTRUCTIONS FOR
The name of the job.
FOR DEFINITION AT
This column indicates the level at which the associated run instruction was specified.
RUN INSTRUCTIONS
Page - 196
E:\Manuals\Product Manuals\ASO\OM (OPS Master)\Reference Guide\Current Release\OPS_C07.fm
The free-form text of the specified instructions.
Mantissa Corporation © 2013
OPS/MASTER®
Chapter 7
Job Tracking
Entering JOB/Master®
HOLD / REL - Hold / Release System
Used to hold an entire system or to release an entire system for submission to the JES
input queue. The command is issued from the command line of the JOBQ Entry screen.
------------------- JOB/Master® Scheduling Queue ---------------- Row 1 from 3
Command ===>HOLD CI33DOWN
Scroll
= PAGE
Set=> Job= -------- Sys= -------- Date= ----- AB - MT - EX - DC - OP <<(Shift)---------------- Date= 98/09/02 98.245 Time= 11:18 ---------------S | Job
|T|Date |Time|
C u r r e n t
S t a t u s
|M St|Alt Def
- -------- - ----- ---- ---------------------------------------- - -- --------- CI33DOWN Y 98245 0746 * PLACED ON HOLD BY -> P390K
P
P H
-- CT33DOWN Y 98245 0746 * PLACED ON HOLD BY -> P390K.
P
P H
-- DTATNITE
98245 2200 DYNAMICALLY ADDED TO SCHEDULE
P P
******************************* Bottom of data ********************************
A system can be held from submission to the input queue or released to be submitted to
the Input Queue. The commands are used in the following manner:
Hold System=
From the LQ on the Tracking screen and at the command line
level, issue a “HOLD” followed by the system name you wish
to hold.
HOLD SYSTEMA
E:\Manuals\Product Manuals\ASO\OM (OPS Master)\Reference Guide\Current Release\OPS_C07.fm
Release System=
From the LQ on the Tracking screen and at the command line
level, issue a “REL” followed by the system name you wish to
release.
REL SYSTEMA
The above methods can be used to hold individual systems. The entire JOBQ can be held
by using the “PS” command to stop the job submission facility. (Refer to Job Submission).
Individual jobs may be held and released using the “H” and “R” operations specified in
the S (Select field) column next to the Job Name.
)
Mantissa Corporation © 2013
Some multi-session management software uses the HOLD command to hold
the current session and transfer to another session. If this occurs at your facility, please contact Mantissa Technical Support. A special PTM is available to
satisfy the requirement.
Page - 197
Chapter 7
Job Tracking
E:\Manuals\Product Manuals\ASO\OM (OPS Master)\Reference Guide\Current Release\OPS_C07.fm
Entering JOB/Master®
OPS/MASTER®
Page - 198
Mantissa Corporation © 2013
OPS/MASTER®
Chapter 8
Symbolic Substitution
Introduction
Chapter 8
Symbolic Substitution
Introduction
E:\Manuals\Product Manuals\ASO\OM (OPS Master)\Reference Guide\Current Release\OPS_C08.fm
The Symbolic Substitution capability in JOB/Master® provides an easy-to-use, yet flexible method of entering variable information to production job control. Possible benefits
include:
•
Standard application parameter entry interface
•
Date value substitution
•
Variable JCL parameter substitution for both novice and experienced users. The
novice user can gain access to the power afforded those experienced with JCL.
The advantage to the experienced user would be the time savings afforded by
being able to enter and see all the overrides (VOL-SER, DSN’s, ETC.) on one
panel.
•
Preventing access to Job Control at the user level. The JOB/Master® symbolic
substitution capability lets you give access to the variables and prevent access to
the actual job control. You simply use Interactive Security to prevent access to
the Library capability for that user.
Symbolic Substitution Flow
Symbolic substitution might seem a little complicated unless you consider it in the overall
context of the actual task to be accomplished. The primary objective is to successfully
schedule a job with a variable parameter or job control requirements.
Symbolic substitution assumes that the job on which the values are to be replaced meets
two very basic criteria.
1.
Mantissa Corporation © 2013
The job has been scheduled by or will be submitted for execution by
JOB/Master®.
Page - 199
Chapter 8
OPS/MASTER®
Symbolic Substitution Flow
Symbolic Substitution
2.
)
The job, when it was defined to the JOB/Master® database, was defined as needing Manual Task Intervention (MT#5 - JCL SETUP).
It is important to understand the value of not changing Manual Task #5 (JCL
SETUP) to another installation-specific manual task. If this feature is to be
used, DO NOT CHANGE THIS MANUAL TASK! Consider changing one of
the other tasks for the installation-specific task. (See JOB/Master® DATA BASE
Creation for more details on Manual Tasks.)
Determining which jobs on the JOBQ require Manual Task setup is accomplished Real
Time via the JOB TRACKING LQ SCREEN. (Refer to the JOB TRACKING commands in
the previous section of the manual.)
Each Manual Task has been associated with a TSO user ID, and the appropriate message
will be sent to that user, informing him/her, he/she should provide some type of input to
the job. This message to the TSO user or to the console will recur at given intervals until
the task is finally satisfied and marked as complete.
It is possible for jobs not containing symbolic variables to be processed via the Symbolic
Substitution feature (JCL/MASTER). The jobs will be staged into the JOB/Master® Staging PDS or Resolved PDS and will be handled as any other scheduled job. This allows for
JOB/JCL to be modified without altering the Base (Master) JCL. Audit trails are also provided indicating the JCL was changed and by whom.
A complete functional description is presented under Utilizing Substitution later in this
chapter.
)
To define data sets to be used by JCL Substitution, refer to the Interactive Security Facility manual under “Symbolic Substitution Security”.
The following PDS datasets are used by the symbolic substitution process.
If this PDS is being used, it should also be defined as your Resolved PDS and
Rerun PDS because it will be the library from which jobs will be submitted by
the JOB/Master® submit function.
MASTER JCL
This is the data set used as input for the symbolic substitution function. The JCL
will be copied from here leaving the “master” copy intact.
RESOLVED JCL
This is the data set in which the JCL member will be placed after symbolic substitution has been performed. It should be the same PDS as the Staging PDS if it
is being used.
RERUN PDS
This data set is used by JOB/Master® to save a copy of the JCL at job submit
time. This is an optional data set and it should be the same PDS as the Staging
PDS if it is being used.
Page - 200
Mantissa Corporation © 2013
E:\Manuals\Product Manuals\ASO\OM (OPS Master)\Reference Guide\Current Release\OPS_C08.fm
STAGING PDS
OPS/MASTER®
Chapter 8
Symbolic Substitution
Symbolic Substitution Flow
DOCUMENT DATASET
This data set contains free format, user-entered data for job documentation and
operational run instructions. The JOBNAME must be used as the member name
for specific job documentation reference.
SYMBOLIC SUBSTITUTION FLOW
JOB/Master® Schedules the Job
Place job on schedule queue.
Set status to AWAITING JCL SETUP.
Send message to TSO User/Console.
TSO User/Console Operator Enters/Verifies Information
1. Confirm defaults or enter values for variables.
2. Resolve JCL for values entered.
3. View operational setup instructions(optional).
4. Confirm JCL resolution.
Complete JCL Setup Process
E:\Manuals\Product Manuals\ASO\OM (OPS Master)\Reference Guide\Current Release\OPS_C08.fm
After confirmation, JCL is automatically moved to the
RESOLVED or STAGING JCL PDS.
JOB/Master® posts JCL SETUP complete.
Stops sending messages for this manual task.
At the time the job is submitted to JES (if no other dependencies
are outstanding), the resolved JCL is taken from the RESOLVED
OR STAGING JCL PDS.
Mantissa Corporation © 2013
Page - 201
Chapter 8
OPS/MASTER®
Symbolic Substitution Menu
Symbolic Substitution
Symbolic Substitution Menu
Selecting Symbolic Substitution
Symbolic substitution is accessed by selecting option J on the JOB/Master® MENU.
------------------- Job Scheduling and Management by MANTISSA ----------------OPTION ===> J
z/OS V520
Data Base Creation : D
Job Tracking
: T
Profile
: P
JCL Substitution : J
Report Selection
: R
Current Selection = JM01
PF1 = HELP
USER= P390K
DATE= 98/09/01
98.244
TIME= 10:28
JMJMJMJMJMJMJMJMJMJMJMJMJMJMJMJMJMJMJMJMJMJMJMJMJMJMJMJMJMJMJMJMJMJMJMJMJMJMJMJM
JMJMJMJMJMJMJMJMJMJMJMJMJMJMJMJMJMJMJ MJMJMJMJMJMJMJMJMJMJMJMJMJMJMJMJMJMJMJMJM
JMJMJMJMJMJMJMJMJMJ
MJM JMJMJM
MJM
MJMJMJMJMJMJMJMJMJMJMJM
JMJMJMJMJMJMJMJMJMJMJMJM JMJMJMJMJ MJMJMJ
J M J
JMJMJMJMJMJMJMJMJMJMJMJM
JMJMJMJMJMJMJMJMJMJMJMJ MJMJMJMJM JMJMJM
MJ J JM
MJMJMJMJMJMJMJMJMJMJMJMJM
JMJMJMJMJMJMJMJMJMJMJM JMJMJMJMJ MJMJMJ
JMJ MJ
JMJMJMJMJMJMJMJMJMJMJMJMJM
JMJMJMJMJMJMJM JMJMJ MJMJMJMJM JMJMJM
MJMJMJM
MJMJMJMJMJMJMJMJMJMJMJMJMJM
JMJMJMJMJMJMJ MJMJ
JMJMJMJMJ MJMJMJ
MJMJMJM
JMJMJMJMJMJMJMJMJMJMJMJMJMJM
JMJMJMJMJMJMJ
JMJMJMJMJM JMJMJM
JMJMJMJ
MJMJMJMJMJMJMJMJMJMJMJMJMJMJM
JMJMJMJMJMJMJMJMJMJMJMJMJMJMJ MJMJMJMJMJMJMJMJMJMJMJMJMJMJMJMJMJMJMJMJMJMJMJMJM
JMJMJMJMJMJMJMJMJMJMJMJMJMJMJMJMJMJMJMJMJMJMJMJMJMJMJMJMJMJMJMJMJMJMJMJMJMJMJMJM
The following panel is displayed after selection of option J from the JOB/Master® Primary Menu:
JCL/Master - Symbolic Substitution
Jobname =>
1
2
3
4
5
O
E
J
X
Page - 202
RESOLVE
RESET
DISPLAY
RECOVERY
LIBRARY
OPINS
E/OPINS
JCL/scan
EXIT
Schedule Date => 00000
-
-----------------------
Schedule Time => 0000
JCLMASTER symbolic substitution
Userid
Reset JOB submission parameters
Pf Keys
Display resolved JOB parameters
Time
Perform JOB recovery functions
Greg Date
Master JCL library maintenance
Jul Date
Operational recovery instructions
Auto Help
Edit operational recovery instructions
User written JCL scan interface exit
Return to Primary menu
-
P390K
12
11:25
98/09/02
98.245
N
Mantissa Corporation © 2013
E:\Manuals\Product Manuals\ASO\OM (OPS Master)\Reference Guide\Current Release\OPS_C08.fm
---------------Option ===>
OPS/MASTER®
Chapter 8
Symbolic Substitution
Symbolic Substitution Menu
You must select an option from those listed and optionally. enter the name of the JOB calling for JCL SETUP. If a Jobname and/or Date and Time are entered, the job must be in the
JMSTGPDS. If not, a “Member not Found” message is issued. Simply leaving the fields
blank will insure that you see all the possible jobs to be selected.
JOBNAME
(Only to be used when retrieving a Job from the JOBQ with a Prior Run Date).
Enter the Jobname of the job you desire to resolve.
If only the jobname is entered, with no Scheduled Date or Scheduled Time
entered, the job will take the attributes of the current system date and a time of
0000. A time and date may be entered in order to pull the execution JCL from a
prior run.
If no jobname is entered the user is presented with a JOBQ screen of all jobs currently in the scheduling queue requiring JCL SETUP. Use an S on the appropriate
line to select the specific job desired. Refer to Option 1 Resolve (No JOBNAME
Entered) this section.
SCHED. DATE
The Sched. Date ==> field provides the option to retrieve a job from a specific
prior run date. Enter the desired Scheduled Date (YYDDD).
SCHED. TIME
The Sched. Time ==> field provides the specific time that the job was scheduled
to run. Enter the desired Time (HHMM).
AUTO HELP (Y,N)
E:\Manuals\Product Manuals\ASO\OM (OPS Master)\Reference Guide\Current Release\OPS_C08.fm
This field allows the user to turn on the auto help feature. This feature relates specifically to Option 4 (Recovery) and Option O (Operations Recovery Instructions). Refer to these options in this section.
Mantissa Corporation © 2013
Page - 203
Chapter 8
OPS/MASTER®
Symbolic Substitution Menu
Symbolic Substitution
Option 1 - Resolve
Option 1 invokes Symbolic Substitution, which takes a copy of the selected JCL located in
the JMSTGPDS, and allows you to perform symbolic substitution to that job via an ISPF
symbolic table. Selecting Option 1 without entering the JOBNAME will result in the display of a JOBQ panel containing those jobs awaiting JCL SETUP. You may continue the
resolution process for a specific JOB by selecting (S) the JOB for which symbolic substitution is to take place.
---------------Option ===> 1
JCL/Master - Symbolic Substitution
Jobname => STEPTST1
1
2
3
4
5
O
E
J
X
RESOLVE
RESET
DISPLAY
RECOVERY
LIBRARY
OPINS
E/OPINS
JCL/scan
EXIT
-
Schedule Date => 00000
-----------------------
Schedule Time => 0000
JCLMASTER symbolic substitution
Userid
Reset JOB submission parameters
Pf Keys
Display resolved JOB parameters
Time
Perform JOB recovery functions
Greg Date
Master JCL library maintenance
Jul Date
Operational recovery instructions
Auto Help
Edit operational recovery instructions
User written JCL scan interface exit
Return to Primary menu
-
P390K
12
11:25
98/09/02
98.245
N
Use S to select the job desired, press <ENTER>. The job will be displayed as shown
below:
------------------ JOB/Master® JOBQ Selection For
Command ===>
RESOLVE
----- Row 1 from 1
Scroll = PAGE
E:\Manuals\Product Manuals\ASO\OM (OPS Master)\Reference Guide\Current Release\OPS_C08.fm
Set=> Job= ----------------- Date= 98/09/02 98.245 Time= 11:27 --------S
Job
| Date |Time| Altdef |
Wait Reason
- -------- ------ ---- -------- --------------------------------------------S STEPTST1 98245 1032
J00077 ** FAILED ** -> STEP02
U= 0999
******************************* Bottom of data ********************************
Page - 204
Mantissa Corporation © 2013
OPS/MASTER®
Chapter 8
Symbolic Substitution
Symbolic Substitution Menu
RESOLUTION PROCESS
Before allowing symbolic substitution to be performed, Symbolic Substitution ensures
that the requested job is: a) on today’s schedule and b) its JCL Setup flag has still to be
posted as ‘completed’.
In performing symbolic substitution, the system will ensure that positionality is retained in
any data images when replacing symbolic keywords. The JCL on which substitution has
been performed is copied to the RESOLVED, or STAGING JCL PDS from where JOB/
Master® will submit it to the input queue. JMBPOST is then called to post JCL SETUP as
completed for this job and make it eligible for processing. The MASTER JCL PDS member is left completely unchanged (i.e., it remains a master copy).
In the example above six symbolics are used in the JCL for OSLO0001.
They are:
CLS
S1CODE
S2CODE
DSNIN1
VOLSER
POSTIND
The user must supply the appropriate values.
AVAILABLE OPTIONS
Use PF keys or enter on the command line.
Causes the JCL member to be resolved with the value currently
in the sym bol ic field. The JCL i s then added to the
RESOLVED JCL PDS (Default PF4).
CANCEL -
Ends the resolution process and returns you to the main menu.
(Default PF5).
SETUP -
Causes the associated help dataset to be retrieved and presented for viewing.
E:\Manuals\Product Manuals\ASO\OM (OPS Master)\Reference Guide\Current Release\OPS_C08.fm
CONFIRM -
Mantissa Corporation © 2013
Page - 205
Chapter 8
OPS/MASTER®
Symbolic Substitution Menu
Symbolic Substitution
Option 2 - Reset
Option 2 offers the user the ability to remove jobs from the RESOLVED JCL PDS after
symbolic substitution and to re-post its JCL Setup flag in situations where perhaps, parameters were specified incorrectly, or additional information has been made available.
The system checks to see if JOB/Master® has already submitted the substituted JCL member from the RESOLVED JCL PDS and if so, a message is issued informing the user that
the job cannot now be reset. Otherwise, the RESOLVED JCL PDS member is deleted and
its JCL Setup flag is re-posted as ‘Awaiting Completion’ at the user’s request.
------------------JOB/Master® JOBQ Selection For Reset CI33DOWN-- Row 1 from 19
JM202 CI33DOWN-SYMBOL PDS MEMBER DELETED AND “JCL SETUP” RE-POSTED Scroll = PAGE
Set=> Job= -------- Sys= -------- Date= ----- AB - MT - EX - DC - OP <<(Shift)---------------- Date= 98/09/02 98.245 Time= 12:18 ---------------S | Job
|T|Date |Time|
C u r r e n t
S t a t u s
|M St|Alt Def
- -------- - ----- ---- ---------------------------------------- - -- --------- CI33DOWN
98245 1600 SUBMISION RESET
P P
-- CI33DOW1 Y 98245 1615 WAITING FOR SUBMIT TIME
P P
-- CI33DOW2 Y 98245 1615 WAITING FOR SUBMIT TIME
P P
-- CI33DOW3 Y 98245 1615 WAITING FOR SUBMIT TIME
P P
-- CI33DOW4
98245 2100 WAITING FOR SUBMIT TIME
P P
-- CI33DOW5 Y 98245 2115 WAITING ON TIME OR PREDECESSOR
P P
Notice the right side of Line #1.
CI33DOWN =SUBMISSION RESET
“JM202” CI33DOWN - SYMBOL PDS MEMBER DELETED AND JCL
SETUP REPOSTED.
This job is now waiting for the JCL to be resolved and will not be submitted until the manual task is completed. The job has been removed from the JOB RESET SELECTION
SCREEN.
Page - 206
Mantissa Corporation © 2013
E:\Manuals\Product Manuals\ASO\OM (OPS Master)\Reference Guide\Current Release\OPS_C08.fm
By pressing PF1 Line 3 displays exactly what has taken place.
OPS/MASTER®
Chapter 8
Symbolic Substitution
Symbolic Substitution Menu
Option 3 - Display
Option 3 allows users to display the JCL for a job in the RESOLVED JCL PDS after symbolic substitution has been performed. We can thereby provide both a method of viewing
the values to which each of the symbolic keywords was resolved and also, the JCL deck
that JOB/Master® will submit to the input queue when all schedule conditions are satisfied.
---------------- JOB/Master® JOBQ Selection For
Command ===>
DISPLAY
----- Row 1 from 6
Scroll = PAGE
Set=> Job= ----------------- Date= 98/09/02 98.245 Time= 14:02 --------S
Job
| Date |Time| Altdef |
Wait Reason
- -------- ------ ---- -------- --------------------------------------------- CI33DOWN 98245 0746
* TRIG. ON HOLD BY EXEC REQ.
P
- CT33DOWN 98245 0746
* TRIG. ON HOLD BY EXEC REQ.
P
- STEPTST1 98245 1032
*FAILED JOB, REQUIRES RESUBMIT
- DTATNITE 98245 2200
DYNAMICALLY ADDED TO SCHEDULE
S STEPTST3 98246 0100
TRIGGERED W/TIME WAIT BY -->
STEPTST1
- STEPTST8 98246 0100
TRIGGERED W/TIME WAIT BY -->
STEPTST5
******************************* Bottom of data *******************************
PROCEDURE
Select Option ==> 3.
2.
Do not use a JOBNAME just press <ENTER> . A JOBQ listing of all jobs in the
scheduling queue is presented.
3.
Select the job desired by placing an S on the appropriate line. The above screen is
displayed.
E:\Manuals\Product Manuals\ASO\OM (OPS Master)\Reference Guide\Current Release\OPS_C08.fm
1.
Mantissa Corporation © 2013
Page - 207
Chapter 8
OPS/MASTER®
Symbolic Substitution Menu
Symbolic Substitution
Option 4 - Recovery
Option 4 performs an ISPF EDIT on any member in the JOB/Master® RERUN PDS
(JMRERUN) or the JOB/Master® Staging PDS (JMSTGPDS). This option will be used to
recover failed jobs when the original JCL is needed.
There is a mandatory input sub-field within the Symbolic Substitution Main Menu display,
namely ‘AUTO HELP’. Either a Y (yes) or N (no) value must be assigned. If AUTO
HELP is set to Y, before entering the user into ISPF EDIT of the selected member of the
Rerun PDS, the OPINS or ‘Operational Recovery Instructions’ are displayed. The Operational Instructions come from the Document Data Set. (DOCLIB which is a free form text
PDS whose member names match the appropriate Job Names). They could be a series of
instructions on how to undertake a recovery against the failed job or just instructions on
who to contact in case of a failure. The OPINS are held as a member of the document
dataset as defined in ISF of JCLMASTR. (Refer to Interactive Security Facility). If no
OPINS can be located, a message will appear as the user enters EDIT mode, informing
them of that fact, otherwise they are displayed and the user enters edit mode after viewing
them.
RE-RUN INSTRUCTIONS FROM DOCUMENT DATASET
Page - 208
1.
Select OPTION ==> 4.
2.
Once this screen has been presented, PF3 will end this display and immediately
present the following EDIT.
Mantissa Corporation © 2013
E:\Manuals\Product Manuals\ASO\OM (OPS Master)\Reference Guide\Current Release\OPS_C08.fm
File Edit Confirm Menu Utilities Compilers Test Help
sssssssssssssssssssssssssssssssssssssssssssssssssssssssssssssssssssssssssssssss
Browse
HLQ.DOCLIB(STEPTST3) - 01.01
Columns 00001 00072
Command ===>
Scroll ===> PAGE
***************************** Top of Data ************************************
These are the Restart/Rerun Instructions from the Document Dataset *
STEP01
THIS IS A LOOPDRV STEP CONDITION CODE WILL BE 0000
STEP02
THIS IS A LOOPDRV STEP CONDITION CODE WILL BE 0000
RESET THE VOLSER TO PROCESS ON VOLID 338016
RESET THE POSTING INDICATOR TO BE OFF=(N)
*************************CRITICAL DO NOT FORGET********************************
CONTACT THE PROCESSING CONTROL DEPARTMENT FOR CORRECTIONS TO THE TAX
TABLES AND THE CITY AND COUNTY TAX BUILD ROUTINES
******************************Bottom of Data***********************************
OPS/MASTER®
Chapter 8
Symbolic Substitution
Symbolic Substitution Menu
Execution JCL to correct for Restart
File Edit Confirm Menu Utilities Compilers Test Help
sssssssssssssssssssssssssssssssssssssssssssssssssssssssssssssssssssssssssssssss
OPS.PROD.JCLLIB(STEPTST3) - 01.01
Columns 00001 00072
Command ===>
Scroll ===> PAGE
****** ***************************** Top of Data ******************************
000100 //STEPTST3 JOB (0000,0001),’MANTISSA/TEST’,CLASS=A,MSGCLASS=E
000110 //* TEST FOR STEP TRIGGERING. TRIGGERED BY STEPTST1.STEP01
000120 //* RUNS AFTER MIDNIGHT
000130 //*-------------------------------------------------------------------*
000140 //JOBLIB DD DSN=OPS.V520.LOADLIB,DISP=SHR
000141 //**************S1CODE= Condition Code for STEP1***********************
000150 //STEP1 EXEC PGM=LOOPDRV,PARM=’001,0008,001’
*
000160 //***********S2CODE= Condition Code for STEP2**************************
000162 //STEP2
EXEC PGM=LOOPDRV,PARMS=’001,0008,001’
000163 //DD1
DD DUMMY,DSN=OPS.V520.INPUTDS1,VOL=338015,Y
000170 //**********************************************************************
000171 //*
*
000172 //*
JCLMASTER - SYMBOLIC SUBSTITUTION
*
000173 //*
*
000174 //**********************************************************************
000180 //*
*
000181 //*
JCL JOB STEPTST3 WAS GENERATED BY P390K ON 98.921 AT 7:09:53PM *
000182 //*
*
000183 //*
JCLMASTER SYMBOLIC VARIABLE(S) WERE RESOLVED AS FOLLOWS:*
000184 //*
(D) CLS
==> A
000185 //*
(R) S1CODE ==> 0012
000186 //*
(R) S2CODE ==> 0008
000187 //*
(R) DSNTN1 ==> INPUTDS1
000188 //*
(R) VOLSER ==> 338015
000189 //*
(R) POSTIND==> Y
000190 //*
*
000191 //*
(D) - JCL SUPPLIED DEFAULT SYMBOL VALUE WAS TAKEN.
*
000192 //*
(R) - SYMBOL VALUE WAS SUPPLIED OR OVERRIDEN AT RESOLUTION TIME.*
000200 //*
000210 //**********************************************************************
****** **************************** Bottom of Data ****************************
Edit as needed.
4.
Press PF3 to file the new JCL back on the RERUN PDS.
5.
Return to the LQ display in job tracking and issue a restart(E) for the job.
If the RERUN PDS is not the same dataset as the STAGING PDS, make sure the
flag to use JCL from the RERUN PDS is set to “Y” on the restart panel.
E:\Manuals\Product Manuals\ASO\OM (OPS Master)\Reference Guide\Current Release\OPS_C08.fm
3.
Mantissa Corporation © 2013
Page - 209
Chapter 8
OPS/MASTER®
Symbolic Substitution Menu
Symbolic Substitution
Option 5 - Library
Option 5 allows users to edit and make any changes necessary to members of the MASTER JCL PDS dataset. The MASTER JCL library for each user (in this case the person
charged with the responsibility of entering the values for the JOB) is designated in the
Interactive Security Facility control record for that user.
)
Note that the MASTER JCL and RESOLVED JCL files may not be the same
file. Your MASTER JCL PDS is protected, so that only selected users can
update JCL within it.
File Edit Confirm Menu Utilities Compilers Test Help
sssssssssssssssssssssssssssssssssssssssssssssssssssssssssssssssssssssssssssssss
OPS.PROD.JCLLIB(STEPTST3) - 01.01
Columns 00001 00072
Command ===>
Scroll ===> PAGE
****** ***************************** Top of Data ******************************
==MSG> -Warning- The UNDO command is not available until you change
==MSG>
your edit profile using the command RECOVERY ON.
000100 //STEPTST3 JOB (,),’MANTISSA/TEST’,CLASS=A,MSGCLASS=E
000110 //*-------------------------------------------------------------------*
000120 //* TEST FOR STEP TRIGGERING. TRIGGERED BY STEPTST1.STEP01
000121 //* RUNS AFTER MIDNIGHT
000130 //*-------------------------------------------------------------------*
000140 //JOBLIB DD DSN=OPS.V520.LOADLIB,DISP=SHR
000150 //STEP01 EXEC PGM=LOOPDRV,PARM=’001,0000,001’
000160 /*
****** **************************** Bottom of Data ****************************
PROCEDURE
Page - 210
Select Option ==> 5.
2.
Enter a desired JOBNAME <ENTER>. The above screen is presented.
3.
Edit as needed.
4.
Press PF3 to save.
E:\Manuals\Product Manuals\ASO\OM (OPS Master)\Reference Guide\Current Release\OPS_C08.fm
1.
Mantissa Corporation © 2013
OPS/MASTER®
Chapter 8
Symbolic Substitution
Symbolic Substitution Menu
Option O - OPINS
Option O invokes the same section of code within the JMMENU program as AUTO
HELP. It is used to display the Operational Recovery Instructions (i.e. how to restart a job
in the event of a failure and what JCL restart and override parameters to use). If the
recovery instructions cannot be located in the Document dataset a message will be issued
to that effect.
File Edit Confirm Menu Utilities Compilers Test Help
sssssssssssssssssssssssssssssssssssssssssssssssssssssssssssssssssssssssssssssss
BROWSE
OPS.PROD.JCLLIB(STEPTST3) - 01.01
Columns 00001 00072
Command ===>
Scroll ===> PAGE
****** ***************************** Top of Data ******************************
==MSG> -Warning- The UNDO command is not available until you change
==MSG>
your edit profile using the command RECOVERY ON.
000000 * These are the Restart/Rerun Instructions from the Document Dataset *
000100 //STEPTST3 JOB (,),’MANTISSA/TEST’,CLASS=A,MSGCLASS=E
000110 //*-------------------------------------------------------------------*
000120 //* TEST FOR STEP TRIGGERING. TRIGGERED BY STEPTST1.STEP01
000121 //* RUNS AFTER MIDNIGHT
000130 //*-------------------------------------------------------------------*
000140 //JOBLIB DD DSN=OPS.V520.LOADLIB,DISP=SHR
000150 //STEP01 EXEC PGM=LOOPDRV,PARM=’001,0000,001’
000160 /*
****** **************************** Bottom of Data ****************************
PROCEDURE
Select OPTION ==> O.
2.
Enter desired JOBNAME and press <ENTER>. The above screen is presented.
E:\Manuals\Product Manuals\ASO\OM (OPS Master)\Reference Guide\Current Release\OPS_C08.fm
1.
Mantissa Corporation © 2013
Page - 211
Chapter 8
OPS/MASTER®
Symbolic Substitution Menu
Symbolic Substitution
Option E - E / OPINS
The operational recovery instructions include such information as how to restart a job in
the event of a failure and the correct usage of specific JCL restart and override parameters.
Option ==> E will invoke ISPF edit mode for the member to make the desired changes to
the operational recovery instructions.
File Edit Confirm Menu Utilities Compilers Test Help
sssssssssssssssssssssssssssssssssssssssssssssssssssssssssssssssssssssssssssssss
EDIT
OPS.PROD.JCLLIB(STEPTST3) - 01.01
Columns 00001 00072
Command ===>
Scroll ===> PAGE
****** ***************************** Top of Data ******************************
==MSG> -Warning- The UNDO command is not available until you change
==MSG>
your edit profile using the command RECOVERY ON.
000000 * These are the Restart/Rerun Instructions from the Document Dataset *
000100 //STEPTST3 JOB (,),’MANTISSA/TEST’,CLASS=A,MSGCLASS=E
000110 //*-------------------------------------------------------------------*
000120 //* TEST FOR STEP TRIGGERING. TRIGGERED BY STEPTST1.STEP01
000121 //* RUNS AFTER MIDNIGHT
000130 //*-------------------------------------------------------------------*
000140 //JOBLIB DD DSN=OPS.V520.LOADLIB,DISP=SHR
000150 //STEP01 EXEC PGM=LOOPDRV,PARM=’001,0000,001’
000160 /*
****** **************************** Bottom of Data ****************************
PROCEDURE
Select OPTION ==> E.
2.
Enter desired JOBNAME and press <ENTER>. The above screen is presented.
3.
Edit as needed.
4.
Press PF3 to save.
E:\Manuals\Product Manuals\ASO\OM (OPS Master)\Reference Guide\Current Release\OPS_C08.fm
1.
Page - 212
Mantissa Corporation © 2013
OPS/MASTER®
Chapter 8
Symbolic Substitution
Symbolic Substitution Menu
Option J - JCL SCAN
Provided inside of the JCL/MASTER module is an option which will allow the use of a
JCL Scanning Module from another Software Vendor. The JCL SCAN option allows the
customer to Edit run JCL, turn control over to the scanning product, and then return to
JCL/MASTER. There is an exit point provided.
USER WRITTEN JCL SCAN INTERFACE EXIT
1.
Upon entering the J from the JOB/Master® Main Menu, the user establishes contact with the JCL substitution module of the OPS/Master® product.
2.
The options presented on the JCL/MASTER Menu indicate #J for JCLSCAN.
When this option is selected, the user is presented with the Scheduling Queue
(JMJOBQ) for all jobs containing a Y in Manual Task #5.
3.
Select the job you want by placing an S next to the job.
4.
The JCL will be retrieved from any of the following: JMSUBPDS, or a USER
PDS. At this point ISPF is called and any symbolics needing replacement will be
presented with the appropriate screen so the symbolics can be replaced. An ISPF
Temporary Dataset will hold the JCL during the “Resolve” phase of the JCL
SCAN.
5.
Once the user CONFIRMS (PF4) the action required, the JMSCANEX EXIT is
called and control is given over to the JCL Scanning product. The Customer has
the responsibility to write the exit and during the exit all features and functions
will be part of the exit.
6.
Upon completion of the JMSCANEX exit, control is returned to JCL/MASTER
and the User is again presented with the JCL/MASTER Menu. A sample
JMSCANEX is located in the INSTLIB. Contact the person who installed OPS/
Master® for the location of this file.
E:\Manuals\Product Manuals\ASO\OM (OPS Master)\Reference Guide\Current Release\OPS_C08.fm
Technical Exit Information
1.
The Exit must be named JMSCANEX.
2.
Coming from the ISPF Screen, the Variable Name ZTEMPN contains the
DDNAME of the JCL file where the JCL is called from.
3.
REG. 1 points to an address which points to the JOBNAME of the job being
resolved.
Special Notes
Mantissa Corporation © 2013
1.
The JCL SCAN option should be used when JCL has been altered from the original production version for making certain the new changes are correct.
2.
The OVERHEAD of ALL JCL SCAN products is relatively high. Use in an ONLINE Environment should be restricted as much as possible. Most all of these
products have a Batch Mode for scanning JCL. The batch mode should be chosen
over the On-line interactive method.
3.
Once the JCL Scan phase has been completed, the JOB on the Scheduling queue
(JMLJOBQ), must be resolved and staged for submission to JES at the scheduled
time.
Page - 213
Chapter 8
OPS/MASTER®
Utilizing Substitution
Symbolic Substitution
The JCL SCAN will not write back the Scanned JCL into any of the libraries.
The module was not developed to perform this function.
Option X - Exit
Option ==> X will redisplay the JOB/Master® Primary Menu.
Utilizing Substitution
JCL or Data Replacement
Symbolic substitution will replace any value within JCL or the data parms with the JCL
through keyword resolution.
)
1.
When a job is selected for processing, Symbolic Substitution verifies that the job
is present on the JOB/Master® schedule Queue and the JCL SETUP flag (Manual Task 5) has not been posted “complete” (N). If these criteria are not satisfied,
substitution will be terminated with an error message indicating the condition.
2.
A Scan is made of the JCL member requested in either the JMSUBPDS (Whatever DSN contains the JCL to be used) or the staging PDS (JMSTGPDS) datasets
for any symbolic keywords. Keywords are names up to 8 characters in length
prefixed by an “&” (ampersand). JCL images are scanned from columns 1
through 69. Data images are scanned from columns 1 through 79. All JCL comment cards (//*) are ignored. Temporary system dataset names such as those prefixed by “&&” (double ampersand), are ignored and treated as part of the JCL
statement and not as a symbolic keyword.
3.
Each keyword is located and added to a TSO ISPF table with a keyword status
indicator of U (Update). The indicator is later displayed on the resolution screen.
This indicator signifies to the User that a value is required and should be assigned
to this field before the completion of the substitution. Substitution can not be
completed until all fields have been assigned values.
4.
JCL is scanned for “Default Control Records” or Default Values. Default Control
Records are individual images of the Symbolic keywords preceded by an “&”
and are placed prior to the JOBCARD. (They do not have any “//” or “//*” characters in columns 1 through 3). If the control records are included anywhere after
the Jobcard they are ignored.
Each control record contains a value associated with the symbolic keyword. This
value is the default value which will be assigned to the symbolic. These control
records are used when, in the majority of submissions, a keyword would be
resolved to one particular value.
Example 1:
Symbolic Keyword = &USER
Default Record value is to be TRSJ
Page - 214
Mantissa Corporation © 2013
E:\Manuals\Product Manuals\ASO\OM (OPS Master)\Reference Guide\Current Release\OPS_C08.fm
All standard naming conventions required by JES must be present within the
JCL.
OPS/MASTER®
Chapter 8
Symbolic Substitution
Utilizing Substitution
&USER=TRSJ
//JOBCARD JOB (0000,0000),etc.....,
// USER=&USER
It is possible to have Default Control Records reside in a standard PDS, which
then can be used to maintain the default values without having to alter the production JCL or require manual resolution of the job via the symbolic substitution
screens. The PDS must be the Master JCL PDS defined in the ISF facility for
JCL/MASTERwith a member called $GLOBAL$.
$GLOBAL$ contains all of the symbols and their associated values, for which
you may wish to establish default values. The values contained within $GLOBAL$ will be used for all jobs unless they are overridden by the job-level default
value. (If the job-level JCL has a default value then the $GLOBAL$ value is overridden).
5.
The table of keywords created in Step 3 is now ready for the substitution value to
be assigned and the update flag changed from a U (update) to a D (default
assigned). Now when the values are displayed during the Resolve function, the
screen indicates that the default value was included in the JCL and unless reassigned by the USER, will be used in substituting its associated symbol keyword.
6.
When the last image has been successfully processed, a series of environmental
records are appended to the JCL in the form of JCL Message (Comment) cards
(//*).
E:\Manuals\Product Manuals\ASO\OM (OPS Master)\Reference Guide\Current Release\OPS_C08.fm
These comment cards provide an Audit Trail of how the JCL was set up for this
run. This is done to assist both in problem determination and in performing job
recovery.
Mantissa Corporation © 2013
Page - 215
Chapter 8
OPS/MASTER®
Utilizing Substitution
Symbolic Substitution
Sample
JCL Setup Flag
The JCL setup indicator in the 5th manual task is posted as complete when the user CONFIRMS (PF4) the substitution. The flag was originally set to a Y and now gets set to an N.
If all dependencies have been satisfied for this job, the job is free to be submitted by the
scheduler.
Symbolic Substitution has been written in this manner to allow users to replace one or
more values in the table and repeat substitution as many times as is necessary to get those
values correct. If the facility had been coded to flag JCL Setup immediately after the first
substitution, the user, realizing one or more values had been incorrectly specified, would
have had to re-post JCL setup on the JOBQ via option 2 (RESET) of the JCL/MASTER
Primary Menu in order for the system to permit substitution to be performed again.
Page - 216
Mantissa Corporation © 2013
E:\Manuals\Product Manuals\ASO\OM (OPS Master)\Reference Guide\Current Release\OPS_C08.fm
In the above example you see the values placed into the symbolic keywords. Not only are
the keywords displayed but also the date and time, and the user who performed the resolve
function.
OPS/MASTER®
Chapter 8
Symbolic Substitution
Utilizing Substitution
Default Control Records
Format
Control records must begin in column 1 and precede the JCL Jobcard. If not prefixed by
an ampersand (&) AND undelimited by an equal sign (=), it is ignored.
Example:
&USER=XXXX
The keyword cannot exceed eight (8) characters in length and must be followed by the
equal sign (=). It will be ignored if this condition does not exist. The value itself must not
exceed fifty (50) characters. Any characters beyond the 50 will be ignored.
Example:
&USER=TRSJ ENTER USERID FOR RESPONSIBLE PERSON
A description is available to the User which appears on the update screen during the resolution process. The description is placed next to the symbolic variable name. The description is considered any character string found after the second blank column beyond the
default variable entry. The use of a description can give valuable meaning to an esoteric
variable name. The text on the default symbolic description cannot exceed 50 characters.
Example of Valid /Invalid Default Control Records:
----+----1----+----2----+----3----+----4----+----5
&WORKDAYS=27
WORKDAYS=27
&WORKINGDAYS=7
&WORKDAYS=
&WORKDAYS= 27
&WORKDAYS=27
(Valid)
(Invalid
(Invalid
(Invalid
(Invalid
-
Ignored,
Ignored,
Ignored,
Ignored,
No &)
Too Long)
No Data)
Space After =)
Enter The Number Of Workdays in a Month
(Valid Comment OK)
E:\Manuals\Product Manuals\ASO\OM (OPS Master)\Reference Guide\Current Release\OPS_C08.fm
//JOBA JOB (ACCOUNT),CLASS=X,...etc...
&TEST=XXX ENTER DATE OF TEST.
(Invalid - Not Prior To Job Card).
Mantissa Corporation © 2013
Page - 217
Chapter 8
OPS/MASTER®
Utilizing Substitution
Symbolic Substitution
After default values have been assigned, these values are displayed. Those keywords with
no defaults are positioned at the top of the table, before those with values.
The user can enter CANCEL (PF5) or END (PF3) to leave the table and return to the Primary Menu without performing substitution at any stage, whether they have begun to
assign values to keywords or not. The SETUP function can be entered to display help
information, relating to the substitution process being performed.
Symbolic Substitution inserts the keyword names and the value to which each was
resolved. After the CONFIRM command is entered a check is made to ensure that all keywords have been assigned a non-blank value. Symbolic substitution for JCL (cols 1-69)
and data (cols 1-79) images takes place.
Global Substitution Variables
Default symbolic variables can be globally defined. A global default variable will be used
for all jobs unless a job level variable is found. If a job level variable is found then it will
override the global default. All the same rules apply to global defaults as do to job level
defaults.
The global default variables are taken from the Master JCL PDS identified in the ISF
Facility under JCLMASTR, and are identified by the member name $GLOBAL$. If the
global member contains a variable for &CLASS=A, and the JCL member for the job also
contains the &CLASS=C variable, the job level variable will be used as the default value,
CLASS=C.
Page - 218
Mantissa Corporation © 2013
E:\Manuals\Product Manuals\ASO\OM (OPS Master)\Reference Guide\Current Release\OPS_C08.fm
Initiation of symbolic substitution requires all keywords within the table to be resolved to
some value. When the user overrides or replaces a value within the table, the keyword
STATUS indicator will change from either (D) or (U) to (R) (Resolved), indicating that the
value has been modified. After all keywords have been set to their required values, the
user enters the CONFIRM command to make the request to Symbolic Substitution that the
process now commences.
OPS/MASTER®
Chapter 8
Symbolic Substitution
Utilizing Substitution
Symbol Name Specification
Symbol names may be up to eight characters in length and must be a name (i.e., start with
A-Z) prefixed by an ‘&’ (ampersand). Symbolic Substitution will attempt to locate a
delimiter at the end of any symbol name, and by that method, it knows the symbol name in
full. Those delimiters are ‘&’ , ‘¢’ , ‘=’, ‘ ‘ , ‘.’ , ‘,’ , ‘’’, ‘(‘, ‘)’ , and ‘/’. For example:
----+----1----+----2----+---3----+----4---+----5----+----6
//SYSIN DD
DSN=&INDEX..SYSJOBS,DISP=(,CATLG,DELETE)
//SYSOUT DD
DSN=SYS1.PARMLIB(&MEMBER),DISP=SHR
//JOBA
JOB
(ACCOUNT),CLASS=&CLASS,MSGCLASS=&MSGCLASS
&DAYS&TIME
A ‘.’ (Full Stop) must be used to concatenate a keyword with any other value. For example, if you want the value of WORKED to be appended to the resolved value of &DAYS
use a (Full Stop) as a delimiter between the &DAYS keyword and WORKED. (See example). Otherwise, Symbolic Substitution attempts to locate a delimiter for &DAYSWORKED thinking that it is one complete keyword and will detect that its length is
greater than eight characters and display an error.
----+----1----+----2----+---3----+----4---+----5----+----6
&DAYSWORKED
(incorrect - excessive length)
&DAYS.WORKED
(correct)
)
Any full stop delimiting a keyword will be removed when Symbolic Substitution
substitutes its real value. If the value must retain a full stop after it, two full
stops should be included. If only one Full Stop is used to delimit the &INDEX
keyword (see next example) you can see the results are syntactically incorrect
and the job would fail when &INDEX was resolved to the value of ‘SYS1’.
All standard JCL naming conventions are applied to symbolic substitution.
----+----1----+----2----+---3----+----4---+----5----+----6
//SYSIN DD
DSN=&INDEX.PARMLIB,DISP=SHR
//SYSIN DD
DSN=SYS1PARMLIB,DISP=SHR
*resolved*
E:\Manuals\Product Manuals\ASO\OM (OPS Master)\Reference Guide\Current Release\OPS_C08.fm
This is how it should be specified:
----+----1----+----2----+---3----+----4---+----5----+----6
//SYSIN DD
DSN=&INDEX..PARMLIB,DISP=SHR
//SYSIN DD
DSN=SYS1.PARMLIB,DISP=SHR
*resolved*
Overflow of Card Images
A calculation is made to see whether the value will logically fit into the card image. The
JCL substitution will fit logically into a JCL image between columns 1 through 72. The
Data images are to fit into columns 1 through 79. If the data will fit into the images, then
the values will be substituted and an overflow error will not occur. An overflow error will
be displayed if the image, after being reassembled in the buffers, exceeds the logical
image of either the JCL or Data Cards.
All keywords are maintained in the JCL images required for standard JCL functions. This
positional integrity will be discussed in greater length later. JCL code is relatively free-
Mantissa Corporation © 2013
Page - 219
Chapter 8
Utilizing Substitution
OPS/MASTER®
Symbolic Substitution
form in structure, therefore, following the DD, EXEC, JOB keyword values are replaced
in position.
Symbolic Substitution makes a note of all keywords it replaces in any single image, so in
the event of an “overflow” condition, it is able to display all of the symbolic keywords that
may have caused the error. Symbolic Substitution will re-display the values on the table
and indicate a V (Validity) error. It will require the user to reverify the data value provided.
The user may re-specify or may CANCEL (PF5) this attempt to resolve this job. If a cancel is selected the user may then select another job for resolution. (Refer to Common
Errors in Substitution.)
Positional integrity, that is to say the location data resides within an image, is always
maintained by Symbolic Substitution after substitution is performed, regardless of the
length of the resolved data. This has been done because in certain instances, application
programs may need to be able to start fields at specific locations within the image.
Note how Symbolic Substitution would alter positional data and symbol keywords in the
following example. In all instances, the position of the value “1111” remains unchanged.
----+----1----+----2----+---3----+----4---+----5----+----6
&RUNNO
1111
01
1111
(&RUNNO IS RESOLVED AS 01)
000001
1111
(&RUNNO IS RESOLVED AS 000001)
99999999999999999991111
(&RUNNO IS RESOLVED AS
9999999999999999999)
----+----1----+----2----+---3----+----4---+----5----+----6
&RUNNO &DATE
1111
01
93099
1111
(&RUNNO IS RESOLVED AS 01)
(&DATE IS RESOLVED AS 93099)
----+----1----+----2----+---3----+----4---+----5----+----6
&RUNNO.&DATE
1111
0193099
1111
(&RUNNO IS RESOLVED AS 01)
(&DATE IS RESOLVED AS 93099)
It is possible for a ‘keyword overflow’ to occur within the data image, rather than at the
end of the image. For example, in resolving the keyword &RUNNO in the data image,
Symbolic Substitution detects that by resolving it with its associated value it would either
overlay another symbol keyword or other value in the image. The value is not replaced
and the table is displayed, requesting the re-specification of that value and any others substituted in the same image prior to this error.
This check is made to avoid destroying the integrity of the data image by specifying a
value with an excessive length. Here are some examples:
----+----1----+----2----+---3----+----4---+----5----+----6
&RUNNO &DATE
1111
**correct**
01
93099
1111
(&RUNNO IS RESOLVED AS 01)
(&DATE IS RESOLVED AS 93099)
Page - 220
Mantissa Corporation © 2013
E:\Manuals\Product Manuals\ASO\OM (OPS Master)\Reference Guide\Current Release\OPS_C08.fm
----+----1----+----2----+---3----+----4---+----5----+----6
&RUNNO&DATE
1111
0193099
1111
(&RUNNO IS RESOLVED AS 01)
(&DATE IS RESOLVED AS 93099)
OPS/MASTER®
Chapter 8
Symbolic Substitution
Utilizing Substitution
----+----1----+----2----+---3----+----4---+----5----+----6
&RUNNO &DATE
1111
**overflow**
0000000001
1111
(&RUNNO IS RESOLVED AS 0000000001)
(&DATE WOULD BE RESOLVED AS 93099)
In this example, Symbolic Substitution detects that it cannot insert the value of &DATE
into its correct location without destroying the last three characters of the resolved value
of &RUNNO.
Let’s look at another situation in which overflow occurs. The user resolves a symbol keyword to a value whose length is such that in replacing it, the value will extend past column
80 of a data image or column 71 of a JCL image. When this condition arises, the table is
re-displayed with the symbol keyword in error shown with a ‘status’ indicator of (V)
(Validity Check). For example:
... +----3----+----4----+---5----+----6---+----7----+----8
&RUNNO
(&RUNNO RESOLVED AS 01)
**correct** 01
(&RUNNO RESOLVED AS 0000000001) **overflow** 0000000001
It should be understood that users must adhere to the syntax rules that apply in the specification of symbol names in both JCL and resolve data images at all times. Although Symbolic Substitution will resolve the keywords, the results may be unpredictable.
)
Symbolic Substitution can ensure that overflow within an image does not
occur. However, it cannot validate the image after symbolic substitution has
been performed. Only the user can verify the results that are expected.
User ISPF Panels
You may define and display your own ISPF customized panels. This is accomplished by
placing a control statement in the default variable section of the jobs JCL member. The
format of the statement is:
&UPANEL=X
E:\Manuals\Product Manuals\ASO\OM (OPS Master)\Reference Guide\Current Release\OPS_C08.fm
where; X is the name of your ISPF panel.
The specified panel must be in an allocated ISPF ISPPLIB data set, and all variable display and store functions are the user’s responsibility. JCL/MASTER will perform the symbolic substitution for all variables which were entered by panel entry or specified as
default values through default variable statements, either at the job level or global level.
)
The function described below is only valid if you use file tailoring (ISF
JCLMASTR).
The user panel process may perform any editing or processing which is available to ISPF
panel processing logic. If you wish to deny or cancel the substitution function you can set
the variable JMJCLERR to a non-blank value, e.g., ‘ERROR’ on the panel display.
JCL/MASTER will terminate the substitution function with an appropriate error message.
If you would like to send a custom message to the user it can be accomplished by setting
Mantissa Corporation © 2013
Page - 221
Chapter 8
OPS/MASTER®
Utilizing Substitution
Symbolic Substitution
the variable JMJCLMSG to the text string you wish displayed. The length of the user control variables is:
JMJCLERR = 8 characters
JMJCLMSG = 70 characters
ISPF File Tailoring
ISPF file tailoring can optionally be used to complete the JCL tailoring and substitution
process. If this method is used the appropriate option must be turned on in the JCL/MASTER ISF default record.
If file tailoring is in effect, then the ISPSLIB dataset becomes the MASTER JCL PDS. All
functions are performed just as in non-file tailoring mode. At symbolic substitution time,
when the user enters CONFIRM, all variables are passed to ISPF file tailoring and the
ISPSLIB member is used by ISPF to perform all JCL tailoring and substitution functions.
Upon completion of the file tailoring process, JCL/MASTER will place the final JCL
stream into the JOB/Master® STAGING PDS and post JCL setup as complete (MT#5).
E:\Manuals\Product Manuals\ASO\OM (OPS Master)\Reference Guide\Current Release\OPS_C08.fm
The ISPSLIB dataset must contain the JCL member, and the member may contain JCL/
MASTER default variable control statements.
Page - 222
Mantissa Corporation © 2013
OPS/MASTER®
Chapter 8
Symbolic Substitution
Automatic Variable Substitution (AVS)
Automatic Variable Substitution (AVS)
You can invoke JCL substitution, through the use of JCL/MASTER, and have substitution
variables processed and replaced without manual intervention. This function is invoked
through the JOB/Master® program “JMJCLMB”, and through the use of the TSO batch
environment.
All JCL/MASTER resolve functions and options are available in the AVS environment.
For a complete description of options, such as data set usage, file tailoring, etc., refer to
the appropriate section of the manual.
Batch Substitution Processing
The JMJCLMB module can be used to scan the JOBQ and process all jobs which are waiting for the manual task, “JCL SETUP”. AVS will perform the following functions:
•
Determine which jobs are candidates for substitution;
•
Optionally assign a TSO userid to the AVS function;
•
Set up and invoke the TSO batch environment;
•
Log messages for actions taken.
Although all eligible jobs are processed for substitution, only those jobs which have ALL
variables assigned by user defaults will be substituted and placed into the JOB/Master®
STAGING PDS and the JCL setup flag will be turned off.
Any job which has an outstanding symbolic variable to be resolved by panel entry will not
be processed.
)
If a job has a user PDS defined, the JCL will be pulled from the User PDS for
substitution.
A sample batch job which can be used to invoke the AVS function is shown below and can
be found in the distributed HLQ.OPS.INSTLIB in member JMJCLMB. Apart from the
JCL statements needed for AVS processing, the required JCL is the same as would be
needed for execution of ISPF in a batch mode.
E:\Manuals\Product Manuals\ASO\OM (OPS Master)\Reference Guide\Current Release\OPS_C08.fm
//JMJCLMB
JOB
(1,1),CLASS=A,MSGCLASS=A
//JMJCL
EXEC PGM=JMJCLMB,PARM=’N,JM01,USERID’,
//
DYNAMNBR=25, REGION=3000K
//*---ALLOCATE ISPF LIBRARIES
//ISPPROF
DD
DSN=USERID.ISPF.ISPPROF,DISP=SHR
//ISPPLIB
DD
PANEL LIBRARIES
//ISPMLIB
DD
MESSAGE LIBRARIES
//ISPSLIB
DD
SKELETON LIBRARIES
//*---ALLOCATE ISPF TABLES IF REQUIRED
//ISPTLIB
DD
TABLE LIBRARY
//*---ALLOCATE DIALOG LIBRARIES
//ISPLLIB
DD
DSN=HLQ.OPS.ISPLLIB,DISP=SHR
//*---ADDITIONAL LIBRARIES
//*---ALLOCATE TMP DATASETS
//ISPLOG
DD
SYSOUT=*
//SYSTSPRT DD
SYSOUT=*
//SYSTSIN
DD
DSN=&&TMPCTL,UNIT=SYSDA,
//
SPACE=(CYL(1,1)),
//
DCB=(RECFM=FB,LRECL=80,BLKSIZE=3120)
Mantissa Corporation © 2013
Page - 223
Chapter 8
OPS/MASTER®
Automatic Variable Substitution (AVS)
Symbolic Substitution
Three parm field values can be supplied; all are optional. The first parm indicates whether
to turn off the submit facility during the resolve process.
Y
- will turn off submit
N
- will leave submit on
T
- will perform a trace function.
The second parm is the JOB/Master® region associated with this task, the default is JM01.
The third value is the userid to be used for processing the AVS function. The value must
be eight (8) characters, space fill if necessary. If no userid is supplied then the normal userid selection process used by MVS/TSO is used.
The user ID, which is used for the AVS function, must have “Resolve” authority through
either the ISF (Interactive Security Facility) or the user command exit. If Resolve authority is not indicated, no substitution will take place. The user ID, which is logged in the JCL
stream at substitution time, will be the name of the batch job which invokes AVS. The jobname is used so that one can distinguish an AVS function from an interactive function for
audit purposes.
If the ISP or ISR LOADLIB is dormant, remove the ISP/ISR from the DD statement
within the JCL.
AVS Audit Log
E:\Manuals\Product Manuals\ASO\OM (OPS Master)\Reference Guide\Current Release\OPS_C08.fm
In an AVS environment all informational and error messages are written to the ISPF log
file.
Page - 224
Mantissa Corporation © 2013
OPS/MASTER®
Chapter 8
Symbolic Substitution
JCL Override/Date Substitution
JCL Override/Date Substitution
Substitution Control
JCL statements can be inserted into the JCL stream and selectively activated or deactivated by JOB/Master® during the submission of the job. This selection has multiple
options and can be mixed with date value substitution. JCL substitution is not necessary to
use Override/Date Substitution. It is a stand alone process in the job submission logic.
Special JCL statements invoke JCL override or DATE substitution for a job stream. The
special JCL contain one of three actions:
1.
Y -coded at the end of a selection indicates activation of that selection.
2.
N -coded at the end of a selection indicates deactivation.
3.
E -indicates ending the selection.
JOB/Master® deactivates JCL statements by placing a comment (*) character after the //
(JCL statement indicator) when indicated. Selection and actions are based on the following control statements and are based on either the current or the submit date.
For JCL overrides:
//*JMJCLY
indicates that the JCL following this statement should be
activated for the date specified.
//*JMJCLN
indicates that the JCL following this statement should not be
activated for the date specified.
//*JMJCLE
end the previous JMJCLY or JMJCLN processing for date
substitution.
E:\Manuals\Product Manuals\ASO\OM (OPS Master)\Reference Guide\Current Release\OPS_C08.fm
For DATE substitution:
)
//*JMSYMY
indicates that any statements following this statement should
be checked for date value substitution and if found substituted
accordingly for the date specified.
//*JMSYMN
indicates that any statements following this statement should
not be checked for date value substitution for the date specified.
//*JMSYME
end the previous JMSYMY or JMSYMN processing.
These selection control cards are removed from the JCL stream.
Optional Parameters
An option is a means of limiting a selection and action by date. Options may be further
defined by indicating manual or automatic substitution activity. Manual activity is indicated by the presence of the statements in the JCL stream. Automatic activity is indicated
by use of the extended options DSN and MEM. These extended options indicate to JOB/
Master® where to look for the statements to be inserted.
If the options coded are not true for the date the job is being processed, the inserted statements will be commented out. Therefore, selections and options should be inserted for
Mantissa Corporation © 2013
Page - 225
Chapter 8
OPS/MASTER®
JCL Override/Date Substitution
Symbolic Substitution
actual substitution and not as comments in the job stream. It is not necessary to place
selections in an ordered format. They may be used in either order.
The following substitution keyword options are available for the selection and action
cards described.
Option
Definition
? | ONS =
Indicates the action based on schedule date.
@ | ONC =
Indicates the action based on current (submit) date.
DSN =
The name of the dataset to find the substitution statements to be
inserted.
MEM =
The member name in the dataset to find the substitution statements
to be inserted.
# | FLS =
From schedule date.
% | FLC =
From current (submit) date.
The values for ONS, ONC, FLS, or FLC can be any of the following:
• The day of the week - MON, TUE, WED, THU, FRI, SAT, SUN. ONC=WED
indicates the action is for Wednesday.
• A string specifying the days of the week where Y signifies YES and N signifies
NO. The string starts with Monday and ends on Sunday. ONC=YNYYNNY is
a string indicating the action is for Monday, Wednesday, Thursday and Sunday.
• A date representation of MMDDYY or MMDDYYYY. Any portion of MM,
DD, or YY can have a wild card entry designated by **. ONC=12**93 - specifies all current days in December of 1993. A generic year is specified by ** or
**** depending on the # of positions wanted. Substitution is based on the “?”
character for schedule date, “@” for current (submit) date, “#” for from schedule date, and “%” for from current (submit) date.
?M-?D-?Y
@M-@D-@Y
?YDDD
@YDDD
#M#D#Y
%D%M%Y
?M-?D-?YYY
?YYY-?M-?D
?YYYDDD
?DD
@DY
Page - 226
E:\Manuals\Product Manuals\ASO\OM (OPS Master)\Reference Guide\Current Release\OPS_C08.fm
Date substitution can be done based on two date types, schedule date or current (submit)
date. If date substitution is specified and the schedule date for the job is 12-10-93 and it is
submitted on 12-11-93 the following substitution will take place.
12-10-93
12-11-93
93344
93345
12-10-93
11-12-93
12-10-1993
1993-12-10
1993344
344
SAT
Mantissa Corporation © 2013
OPS/MASTER®
Chapter 8
Symbolic Substitution
JCL Override/Date Substitution
EXAMPLE 1: (Schedule Date April 15, 1993)
//JOB1
JOB
(1,1),’JOB RUN’,CLASS=A,MSGCLASS=A
//S1
EXEC PGM=PGM1
//DD1
DD DSN=PROD.FILE,DISP=SHR
//*JMJCLY ONS=WED DSN=PROD.INCLUDE.JCL MEM=JOB1WED
//DD2
DD DSN=PROD.FILE2,DISP=SHR
//*JMJCLE
//*JMSYMY
//SYSIN
DD
*
DATE=?M/?D/?Y JDATE=?YDDD
//*JMSYME
Results of Example 1:
STMT-4
Include the JCL in member JOB1WED from PROD.INCLUDE.JCL, if the
schedule day is Wednesday.
STMT-5
The DD2 statement will be left active if WED.
STMT-9
DATE= 04/15/93 JDATE=93105
E:\Manuals\Product Manuals\ASO\OM (OPS Master)\Reference Guide\Current Release\OPS_C08.fm
If no ONS, ONC, FLS, or FLC keyword is used the default is all days. If no DSN keyword
is used then only instream JCL is activated or deactivated. The ONS, ONC, FLS and FLC
control statements can be placed in the input stream and cause the date substitution values
to be incremented or decremented by a numeric value which can be from 1 to 3 digits. The
format of the control statement is:
ONS+NNN
Use schedule date+NNN dayse .
ONS-NNN
Use schedule date-NNN days.
ONC+NNN
Use current system date+NNN days.
ONC-NNN
Use current system date-NNN days.
FLS-NNN
From schedule date-NNN days.
FLC-NNN
From current date-NNN days.
FLS+NNN
From schedule date+NNN days.
FLC+NNN
From current date+NNN days.
These statements can be placed prior to the date symbolic variable and will be in effect
until the same type of control statement is encountered. Each statement must be on a line
by itself following the //*JMSYMY statement.
FLS-2 From Schedule Date minus 2 days.
ONS+2 Use Schedule Date plus 2 days.
Mantissa Corporation © 2013
Page - 227
Chapter 8
OPS/MASTER®
JCL Override/Date Substitution
Symbolic Substitution
EXAMPLE 2:
//JOB1
JOB
//S1
EXEC PGM=PGM1
//DD1
DD
DSN=PROD.FILE,DISP=SHR
//*JMSYMY ONS=WED WED=051593 93139
//SYSIN
DD *
DATE=?M/?D/?Y JDATE=?YDDD
ONS+7
DATER=?M/?D/?Y JDATR=?YDDD
ONS+00
Results of Example 2:
DATE=05/15/93
JDATE=93135
DATER=05/22/93
JDATER=93142
ONS+00
Reset the ONS date variables to default value.
Substitution Error Processing
If an error is encountered during substitution control card processing, the control card in
question will have positions 3-8 overlaid with a JCL substitution error code. This overlay
action will cause a JCL error to occur for the job and insures that an erroneous condition
will not cause inaccurate processing to occur. The following error codes are used.
Error Code
Description
//JMERR1
Invalid Keyword on Control Card.
//JMERR2
Invalid Data Set or member specified on the DSN or MEM option.
The DSN or MEM could not be located.
//JMERR3
The value for ONS or ONC is not valid, i.e., MON,TUE,ETC.
Controlling Execution Through JCL
A triggered job stream can be controlled through inserted JCL statements in two ways.
A job can be removed from the stream causing the trigger sequence to be interrupted.
If you want to remove the job from execution and discontinue the trigger chain,
place a //*JMNOEXC statement into the job’s JCL member. When JOB/Master® encounters this control statement the job will not be submitted and it will be
removed from the JOB/Master® schedule queue (JOBQ).
2.
A job can be bypassed, placed in checkmode, causing that job not to execute, but
the trigger chain to continue.
If you want to bypass execution of the job but continue with the next job in the
trigger chain, place a //*JMCHECK statement into the job’s JCL member. When
JOB/Master® encounters this control statement the job will not be submitted and
will be placed in checkmode status. The checkmode status will cause the jobs’
triggered jobs to be submitted, continuing the trigger chain.
Page - 228
Mantissa Corporation © 2013
E:\Manuals\Product Manuals\ASO\OM (OPS Master)\Reference Guide\Current Release\OPS_C08.fm
1.
OPS/MASTER®
Chapter 9
Profile
PROFILE Option
Chapter 9
Profile
PROFILE Option
The PROFILE option is used to set function key assignments, set job card JCL parameters, and display and update global option settings.
------------------- Job Scheduling and Management by MANTISSA ----------------OPTION ===> P
z/OS V520
Data Base Creation : D
Job Tracking
: T
Profile
: P
JCL Substitution : J
Report Selection
: R
E:\Manuals\Product Manuals\ASO\OM (OPS Master)\Reference Guide\Current Release\OPS_C09.fm
Current Selection = JM01
PF1 = HELP
USER= P390K
DATE= 98/09/01
98.244
TIME= 10:28
JMJMJMJMJMJMJMJMJMJMJMJMJMJMJMJMJMJMJMJMJMJMJMJMJMJMJMJMJMJMJMJMJMJMJMJMJMJMJMJM
JMJMJMJMJMJMJMJMJMJMJMJMJMJMJMJMJMJMJ MJMJMJMJMJMJMJMJMJMJMJMJMJMJMJMJMJMJMJMJM
JMJMJMJMJMJMJMJMJMJ
MJM JMJMJM
MJM
MJMJMJMJMJMJMJMJMJMJMJM
JMJMJMJMJMJMJMJMJMJMJMJM JMJMJMJMJ MJMJMJ
J M J
JMJMJMJMJMJMJMJMJMJMJMJM
JMJMJMJMJMJMJMJMJMJMJMJ MJMJMJMJM JMJMJM
MJ J JM
MJMJMJMJMJMJMJMJMJMJMJMJM
JMJMJMJMJMJMJMJMJMJMJM JMJMJMJMJ MJMJMJ
JMJ MJ
JMJMJMJMJMJMJMJMJMJMJMJMJM
JMJMJMJMJMJMJM JMJMJ MJMJMJMJM JMJMJM
MJMJMJM
MJMJMJMJMJMJMJMJMJMJMJMJMJM
JMJMJMJMJMJMJ MJMJ
JMJMJMJMJ MJMJMJ
MJMJMJM
JMJMJMJMJMJMJMJMJMJMJMJMJMJM
JMJMJMJMJMJMJ
JMJMJMJMJM JMJMJM
JMJMJMJ
MJMJMJMJMJMJMJMJMJMJMJMJMJMJM
JMJMJMJMJMJMJMJMJMJMJMJMJMJMJ MJMJMJMJMJMJMJMJMJMJMJMJMJMJMJMJMJMJMJMJMJMJMJMJM
JMJMJMJMJMJMJMJMJMJMJMJMJMJMJMJMJMJMJMJMJMJMJMJMJMJMJMJMJMJMJMJMJMJMJMJMJMJMJMJM
Enter P (Profile) the OPTION ==> field of the JOB/Master® Primary Menu as shown
above.
Mantissa Corporation © 2013
Page - 229
Chapter 9
OPS/MASTER®
Setting PFKS and Job Card JCL Parameters
Profile
After selecting the PROFILE option, the JOB/Master® PROFILE UPDATE DISPLAY
OPTIONS screen will be displayed, as shown below:
-
------------------ JOB/Master® Profile Update/Display Options ----------------Command ===>
------------------------------------------------------------------------------Option
-------1
2
3
End
Functional Description
---------------------------------------Set PFKS and Job Card JCL Parameters
Display Global Option Settings
Update Global Option Settings
User= P390K
Date= 98/09/02
98.245
Time= 14:14
Exit
The first time you enter JOB/Master®, Option 1 must be selected and “CONFIRMed”
Setting PFKS and Job Card JCL Parameters
Command ===>
------------------------------------------------------------------------------PFK01= HELP
PFK13= HELP
PFK02= SPLIT
PFK14= SPLIT
PFK03= END
PFK15= END
PFK04= CONFIRM
PFK16= CONFIRM
PFK05= CANCEL
PFK17= CANCEL
PFK06= CO
PFK18= CO
PFK07= UP
PFK19= UP
PFK08= DOWN
PFK20= DOWN
PFK09= SWAP
PFK21= SWAP
PFK10= SHIFT
PFK22= LEFT
PFK11= RIGHT
PFK23= RIGHT
PFK12= RETRIEVE
PFK24= >BACK
------------------------------------------------------------------------------JCL used for JOB/Master® “CRTE” schedule functions
------------------------------------------------> //P390KA
JOB (0000,0000),’P390KA
‘,CLASS=A,
<
> // MSGCLASS=E,NOTIFY=P390K
<
> //*
<
> //*
<
CONFIRM = PF4
CANCEL= PF5
or type “CANCEL” or “CONFIRM” at command line
Page - 230
Mantissa Corporation © 2013
E:\Manuals\Product Manuals\ASO\OM (OPS Master)\Reference Guide\Current Release\OPS_C09.fm
The JOB/Master® PROFILE PFK USAGE screen is used to confirm and modify the function key assignments. It is also used to enter the JCL that is used for schedule creation.
OPS/MASTER®
Chapter 9
Profile
Display Global Option Settings
When entering JOB/Master® for the first time, you must confirm the program function
key assignments. You can also make changes to the assignments. However, you must at
least CONFIRM the default assignments.
Follow the steps below to confirm the default settings:
1.
The JOB/Master® PROFILE PFK USAGE screen should be displayed.
2.
You can alter the default assignments by typing over the existing assignments. If
you specify an invalid assignment the key will not function.
3.
To confirm the settings, press <PF4> (CONFIRM).
The function keys can be set to any desired assignments. Three keys have been defined for
use with database creation (job definition):
PF4/PF16
Confirm (save) an ADD, UPDATE or DELETE.
PF5/PF17
Cancel the current function.
PF24
Go to previous job definition screen.
Enter the JCL that will be used for JOB/Master® schedule creation and online report functions in the area at the bottom of the screen, as shown in the sample screen above.
Display Global Option Settings
This JOB/Master® Profile feature allows users to view the global option settings. These
settings are effective for all users, unless alternate settings were defined for specific user
ID’s. This option is accessed by selecting option 2 on the JOB/Master® PROFILE
UPDATE/DISPLAY OPTIONS screen. This option is for display only. If changes need to
be made to the global settings, select UPDATE GLOBAL OPTION SETTING from the
JOB/Master® PROFILE UPDATE/DISPLAY OPTIONS screen.
Update Global Option Settings
E:\Manuals\Product Manuals\ASO\OM (OPS Master)\Reference Guide\Current Release\OPS_C09.fm
The GLOBAL OPTIONS SCREEN allows any authorized user to specify settings that
will be effective for all users, unless alternate settings are defined for specific User IDs.
Global Options can be changed only by a user who is authorized under the security facility
(ISF).
When OPTION 3 is selected, the same screen is displayed as when you select DISPLAY
GLOBAL OPTION SETTINGS. Refer to the description of DISPLAY GLOBAL
OPTION SETTINGS for detailed information on each field.
Mantissa Corporation © 2013
Page - 231
Chapter 9
OPS/MASTER®
Update Global Option Settings
Profile
When you select the display or update option, the following screen is displayed, showing
all current global option settings:
U----------------- JOB/Master® Global Scheduling Options -------------------Command ===>
Definition Last Updated by P390W
on 98231 at 1125
-----------------------------------------------------------------------------Run Mode (Prod/Check) ==> P (P,C) No MTSK msgs on Mode(C) ==> N (Y,N)
Migrate to JMRERUN PDS ==> N (Y,N) CPU Route User Resource ==> N (Y,N)
Require Zero C.C.
==> Y (Y,N) Zero Time is End of Day ==> N (Y,N)
Trigger Undefined Jobs ==> Y (Y,N) Set JCL Setup on Failure ==> Y (Y,N)
Verify Tape Drives
==> Y (Y,N) Send with “LOGON”
==> Y (Y,N)
Compress JMSUBPDS Schd ==> Y (Y,N) Record Step Detail Stats ==> Y (Y,N)
Default Message Group ==> ________ Dow Literal/ Sun - Sat
==> UMTWHFS
Use Logical Sched Day ==> Y (Y,N) Resolve DSN Contention
==> Y (Y,N)
Release TYPRUN=HOLD
==> Y (Y,N) Default Userid on Failure==> ________
PDS for “JMCMDEXT” Load==> ____________________________________________
-----------------------------------------------------------------------------Mn Task1=> DATA ENTRY______ ID=> D E M Task2=> CARD INPUT______ ID=> C I
Mn Task3=> TAPE INPUT______ ID=> T I M Task4=> CONSOLE ROUTED__ ID=> C R
Mn Task5=> JCL SETUP_______ ID=> J S
Next Schedule Creation Date
====> 98246
Time => 0600
Retention Days for History Records => 07
Run JCL => 07
History File Capacity : 034799 Last Used : 009310
Confirm = PF4
Cancel= PF5
or type “CANCEL” or “CONFIRM” at Command
RUN MODE
If you enter P in this field, the mode can be overridden by entering C at the system or job level. Global Check Mode (C) cannot be overridden at the job level.
P:
Selects Production Mode (all executable jobs will actually execute).
C:
Selects Check Mode (all jobs will simulate execution). This
specification will allow you to test JOB/Master®.
Y:
Enter if the JCL is to be removed from the individual daily
Submit PDS, and migrated to the Rerun PDS at job submission.
N:
Enter if the JCL is not to be removed from the individual daily
Submit PDS.
REQUIRE ZERO C.C.
Page - 232
Y:
Specify if a condition code equal to zero is required for job
steps which have not been defined to the database (do not have
OPS/Master® job definitions). If the condition code is not
zero, JOB/Master® will consider the job as ABENDED.
N:
Specify if a condition code equal to zero is not required.
Mantissa Corporation © 2013
E:\Manuals\Product Manuals\ASO\OM (OPS Master)\Reference Guide\Current Release\OPS_C09.fm
MIGRATE FROM DAILY PDS
OPS/MASTER®
Chapter 9
Profile
Update Global Option Settings
TRIGGER UNDEFINED JOBS
Suppose an update job (JOBA) completes and is setup to trigger 20 report jobs
(JOB 1-20). Jobs 1 through 20 do not have to be defined to JOB/Master® in
order to be triggered.
Y:
Indicates to JOB/Master® all jobs which are triggered and
undefined to the JOB/Master® database will be eligible for
submission by JOB/Master®.
N:
Will not allow undefined jobs to be triggered.
VERIFY TAPE DRIVES
Y:
Tape drive usage is to be used as a dependency requirement for
submitting jobs. If the job definition indicates a specific number of drives are required the system will submit the job only if
the number of drives available at least equals the number specified.
N:
Jobs should be submitted regardless of number of drives available at the time of submission.
COMPRESS JMSUBPDS SCHD
)
Y:
Compression of the PDS allocated in the DD statement for
JMSUBPDS will take place during the schedule run.
N:
The PDS pointed to by the JMSUBPDS DD statement during
schedule creation will not be compressed.
This function elongates the schedule creation run.
DEFAULT MESSAGE GROUP
Specify the name (up to 8 alphanumeric characters) of the desired group of messages. The message group is defined on the MESSAGE GROUP SCREEN. The
message group is used to specify the users who will receive specific groups of
messages and when they will receive those messages.
E:\Manuals\Product Manuals\ASO\OM (OPS Master)\Reference Guide\Current Release\OPS_C09.fm
USE LOGICAL SCHED DAY
For example, if you create your schedule for 08:00 to 08:00 on Monday then a
job which has a schedule time of 3:00 AM Tuesday will be scheduled because
24:00 to 08:00 on Tuesday will be treated as Monday. Any jobs falling into that
time range will be scheduled if their scheduling criteria is Monday.
Y:
The day used for scheduling will be treated as logical not physical.
N:
Invokes a Physical Day Scheduling Option. Jobs are defined
and scheduled using 0000 to 0000 (physical 24-hour period).
Physical Day also links to the ZERO TIME IS EOD described
later.
RELEASE TYPRUN=HOLD
Y:
Mantissa Corporation © 2013
A job which has a TYPRUN=HOLD on the JOBCARD will be
Page - 233
Chapter 9
OPS/MASTER®
Update Global Option Settings
Profile
released to execute when it is submitted to JES by JOB/Master®. Release is through the MVS command $A ’JOBNAME’.
N:
Will force the JOB to be manually released from JES by operator.
PDS FOR “JMCMDEXT” LOAD
Specify the name of the library in which OPS/Master® should look for JMCMDEXT. If you enter an asterisk ‘*’ in this field, the system will look for JMCMDEXT in the regular MVS library search order. This module is the security EXIT
for interface to the various security packages.
NO MTSK MSGS ON MODE(C)
Y:
No manual task messages will be sent for jobs which are in
check mode.
N:
Manual task messages will be sent if check mode processing is
active.
CPU ROUTE USER RESOURCE
Y:
To force jobs to be submitted by JOB/Master® only to the processor to which the resource name is assigned. JOB/Master
builds a CPU affinity statement.
N:
If the jobs can be submitted by JOB/Master® to any processor.
JOB/Master does not build a CPU affinity statement.
ZERO TIME IS EOD
Y:
If a submit time of 00:00 should be treated as 23:59 (one
minute before the end of the current day).
N:
If a submit time of 00:00 should be treated as 00:01 (one second after midnight). This designation is ignored if logical
schedule day is used (Y in USE LOGICAL SCHED DAY).
Y:
Sets the job queue’s JCL setup task (manual task #5) to Y in
the event of job failure. This would be equivalent to entering Y
in the Manual Task #5 field on the job definition screen.
N:
Avoids setting the job queue’s JCL setup task to Y if the job
abends.
SEND WITH “LOGON”
Y:
Saves the JM02 (Job Failed) Message if the user is not logged
in. The message would then be displayed upon login.
N:
System will attempt to send the JM02 message. If the user is
not logged in, the user will not know the message was sent.
RECORD STEP DETAIL STATS
Page - 234
Y:
Step statistics will be recorded in the History file.
N:
Step statistics will not be recorded for defined steps.
Mantissa Corporation © 2013
E:\Manuals\Product Manuals\ASO\OM (OPS Master)\Reference Guide\Current Release\OPS_C09.fm
SET JCL SETUP ON FAILURE
OPS/MASTER®
Chapter 9
Profile
Update Global Option Settings
DOW LITERAL/ SUN - SAT
This stands for day of week literal. Specify a single letter that represents each day
of the week. The default is UMTWHFS, where U=Sunday, M=Monday, T=Tuesday, W=Wednesday, H=Thursday, F=Friday, and S=Saturday. These literals are
used when displaying calendars. They indicate the various processing days. You
may use these or assign your own.
RESOLVE DSN CONTENTION
Y:
JOB/Master® will update the negative dependency list for job
on the database record as it encounters waiting on dataset conditions. (The CONSOLE/Master® module is required for
update. See the discussion about activating Dataset Contention
in the Introduction. If not installed the dataset contention message appears on the History Log.)
N:
One of two messages (JM12 or JM18) listing the conflicts, will
be produced in the History file.
DEFAULT USERID ON FAILURE
TSO USERID to be notified on all job failures if none are specified at job level.
MAN. TASK1 - 5
Manual task flags can be specified for any desired manual operation. These flags
are set at the time the jobs are defined using the job definition screen. If the user
specified (in the job definition) that a manual task (data entry, for example) is
required, the system will hold the job until the manual task is completed and
signed off (in job tracking). The fields on this screen are used to assign names
(that will be shown on the job definition screen) to the manual tasks. The defaults
are:
E:\Manuals\Product Manuals\ASO\OM (OPS Master)\Reference Guide\Current Release\OPS_C09.fm
Data Entry (task #1),
Card Input (task #2)
Disk Input (task #3)
Tape Input (task #4)
JCL Setup (task #5).
)
JCL Setup will require task #5. The title may be changed, but the function will
be for setup of JCL.
ID
The 2 position mnemonics are abbreviations for the manual task names that are
shown on the job tracking screen. These columns show the status of manual tasks
for the jobs that are listed on the job tracking screen. This screen is also used to
sign off on manual tasks (telling the system that the task is complete). The default
mnemonics are:
DE (Data Entry)
CI (Card Input)
DI (Disk Input)
TI (Tape Input)
JS (JCL Setup)
Mantissa Corporation © 2013
Page - 235
Chapter 9
OPS/MASTER®
Update Global Option Settings
Profile
NEXT SCHEDULE CREATION DATE ... TIME
The date and time of the next schedule creation cycle can be updated here. This
field should not be altered unless you have run an INCLUDE SCHEDULE for a
previous OR future day and want to reset the schedule date.
RETENTION DAYS FOR HISTORY RECORDS
Enter the number of days of history statistics that can be selected using the DH
(Display History) command. The number of days selected should be set based on
the history file size. If the number of days selected is large and the file size is
small, the wrap around feature of this file can cause older days to be overlaid.
(Refer to the Installation Guide for a formula to check the History file size.)
RUN JCL
Enter the number of days older than the schedule date that JCL should be kept in
the STAGING PDS. File should be large enough to contain the number of jobs in
relation to the number of days being kept.
HISTORY FILE CAPACITY
The number of History records is determined by space allocation given to the file
JMHIST (Refer to the Installation Guide for more information).
LAST USED
E:\Manuals\Product Manuals\ASO\OM (OPS Master)\Reference Guide\Current Release\OPS_C09.fm
The last record used in the history file. The number of records allowed in the history file is determined by the number specified in HISTORY FILE CAPACITY.
Page - 236
Mantissa Corporation © 2013
OPS/MASTER®
Chapter 10
Data Base Detail Reports
Introduction
Chapter 10
Data Base Detail Reports
Introduction
JOB/Master® provides a report facility which permits the user to generate a wide variety
of reports. This facility, provides the information in pre-formatted reports which range
from data base detail information to cross reference reports, as well as audit trail history
and job execution history.
While all information about a jobs dependency and scheduling criteria is available on-line,
some information, such as cross referenced information about calendars, etc. can be a
valuable tool when researching schedule modifications. Additionally, the historical reports
will give hard copy documentation about what occurred, either from a job execution point
of view, or, from a schedule processing and alteration view through the audit log report.
E:\Manuals\Product Manuals\ASO\OM (OPS Master)\Reference Guide\Current Release\OPS_C10.fm
JOB/Master® provides the user with an ISPF (Interactive System Productivity Facility)
dialog to facilitate the use of report selection. The panel below shows the report menu
panel from which the report selections are processed. It is selected by entering
OPTION ==> R in the JOB/Master® Primary Menu as shown.
Mantissa Corporation © 2013
Page - 237
Chapter 10
OPS/MASTER®
Introduction
Data Base Detail Reports
------------------- Job Scheduling and Management by MANTISSA ----------------OPTION ===> R
z/OS V520
Data Base Creation : D
Job Tracking
: T
Profile
: P
JCL Substitution : J
Report Selection
: R
Current Selection = JM01
PF1 = HELP
USER= P390K
DATE= 98/09/01
98.244
TIME= 10:28
JMJMJMJMJMJMJMJMJMJMJMJMJMJMJMJMJMJMJMJMJMJMJMJMJMJMJMJMJMJMJMJMJMJMJMJMJMJMJMJM
JMJMJMJMJMJMJMJMJMJMJMJMJMJMJMJMJMJMJ MJMJMJMJMJMJMJMJMJMJMJMJMJMJMJMJMJMJMJMJM
JMJMJMJMJMJMJMJMJMJ
MJM JMJMJM
MJM
MJMJMJMJMJMJMJMJMJMJMJM
JMJMJMJMJMJMJMJMJMJMJMJM JMJMJMJMJ MJMJMJ
J M J
JMJMJMJMJMJMJMJMJMJMJMJM
JMJMJMJMJMJMJMJMJMJMJMJ MJMJMJMJM JMJMJM
MJ J JM
MJMJMJMJMJMJMJMJMJMJMJMJM
JMJMJMJMJMJMJMJMJMJMJM JMJMJMJMJ MJMJMJ
JMJ MJ
JMJMJMJMJMJMJMJMJMJMJMJMJM
JMJMJMJMJMJMJM JMJMJ MJMJMJMJM JMJMJM
MJMJMJM
MJMJMJMJMJMJMJMJMJMJMJMJMJM
JMJMJMJMJMJMJ MJMJ
JMJMJMJMJ MJMJMJ
MJMJMJM
JMJMJMJMJMJMJMJMJMJMJMJMJMJM
JMJMJMJMJMJMJ
JMJMJMJMJM JMJMJM
JMJMJMJ
MJMJMJMJMJMJMJMJMJMJMJMJMJMJM
JMJMJMJMJMJMJMJMJMJMJMJMJMJMJ MJMJMJMJMJMJMJMJMJMJMJMJMJMJMJMJMJMJMJMJMJMJMJMJM
JMJMJMJMJMJMJMJMJMJMJMJMJMJMJMJMJMJMJMJMJMJMJMJMJMJMJMJMJMJMJMJMJMJMJMJMJMJMJMJM
The report selection panel functions as a toggle switch for report selection. When a report
is selected by specifying the number in the OPTION==> field as shown below, the selection flag next to the report number will be set to Y.
-
----------------------- JOB/Master® Report Selection -------------------------COMMAND ===>
Database Xref Reports
--------------------20. Calendar to job/Process Keyword
N 21. Process Keyword to Job
22. Negative/Corequisite to job
N 23. Messages to Job/System
24. Groups to Job/System
N 25. Job flow
N
N
N
N
History Recap Reports
--------------------30. Job Run/Audit Trail
Enter CONFIRM to process selections.
If, after selecting a report, you decide you do not want to produce that report, select it
again and the report flag will be turned off. Similarly, to request the report again, select the
report number once more, and the report selection will again be processed.
Page - 238
Mantissa Corporation © 2013
E:\Manuals\Product Manuals\ASO\OM (OPS Master)\Reference Guide\Current Release\OPS_C10.fm
ID: JM01
User = P390K
Date = 98/09/18 - 98.261 Time = 16:42
-------------------------------------------------------------------------------Option = 10
Database Detail Reports
----------------------Y 10. Job/Step definitions
N 11. Calendar definitions
N 12. Process Keyword def
N 13. Negative/Corequisite def
N 14. Message definitions
N 15. Group definitions
OPS/MASTER®
Chapter 10
Data Base Detail Reports
Introduction
After all selections have been made, you must enter CONFIRM in order to generate the
JCL for report processing. .
--------------- JOB/Master® Data Base Detail Report Selection --Row 1 to 2 of 2
Command ===>
Scroll ==> PAGE
System
Job
Job/Net
Level Step
-------------------------- ---Select> ________
________
________
1
N
-------------------------------------------------------------------------------SELECTION =>
_ SYS=JMPOST
LEVEL=1
STEP=N
SELECTION =>
_ JOB=JMPOSTB1
LEVEL=1
STEP=N
******************************* Bottom of data ********************************
E:\Manuals\Product Manuals\ASO\OM (OPS Master)\Reference Guide\Current Release\OPS_C10.fm
You now have the option to submit the job:
File Edit Confirm Menu Utilities Compilers Test Help
sssssssssssssssssssssssssssssssssssssssssssssssssssssssssssssssssssssssssssssss
ISREDDE2
SYS98261.T103910.RA000.P390K.R0100198
Columns 00001 00072
Command ===>
Scroll ===> PAGE
****** ***************************** Top of Data ******************************
000001 //P390KA
JOB (0000,0000),'P390KA
',CLASS=A,
000002 // MSGCLASS=E,NOTIFY=P390K
000003 //*
000004 //*
000005 //JOBLIB
DD DSN=HLQ.LOADLIB,DISP=SHR
000006 //
DD DSN=SYS1.SCEERUN,DISP=SHR
000007 //*-----------------------------------------------------------------*
000008 //* DATA BASE DETAIL REPORTS
*
000009 //*-----------------------------------------------------------------*
000010 //STEP1 EXEC PGM=JM2010
000011 //REPORT
DD SYSOUT=*
000012 //SYSOUT
DD SYSOUT=*
000013 //JMDB
DD DSN=OPS.INST.JMDB,DISP=SHR
000014 //JM2010
DD DSN=&TMP,DISP=(,PASS),UNIT=SYSDA,SPACE=(CYL,(10,5)),
000015 //
DCB=(RECFM=FB,LRECL=32,BLKSIZE=3200)
000016 //CARDIN
DD *
000017 SYS=JMPOST
LEVEL=1
STEP=N
Since some of the report selections have related secondary selection items each will be
discussed in further detail in this section. Once in the secondary panel, enter parameters
(names may be specified generically) and press PF3 to exit back to the report selection
menu.
Mantissa Corporation © 2013
Page - 239
Chapter 10
OPS/MASTER®
Definitions
Data Base Detail Reports
Definitions
Job/Step Definitions (10)
This report will produce detail information about the job definition. If no secondary selection is made, then all job entries on the data base will be selected. When this report is
selected a secondary selection panel is displayed as shown below.
---------------- JOB/Master® Data Base Detail Report Selection Row 1 to 3 of 3
Command ===>
Scroll ==> PAGE
System
Job
Job/Net
Level Step
-------------------------- ---Select> ________
________
________
1
N
-------------------------------------------------------------------------------SELECTION =>
_ SYS=JMPURGE
LEVEL=1
STEP=N
SELECTION =>
_ SYS=TYPEHOLD
LEVEL=1
STEP=N
SELECTION =>
_ SYS=STEPTEST
LEVEL=1
STEP=N
******************************* Bottom of data ********************************
The user has the option to request that only specific jobs, jobs related to systems, or, jobs
related to job/networks, be selected for reporting. This is accomplished by entering the
appropriate entry name in the selection area. Additional criteria can be specified for each
entry.
If STEP=N is requested, the default, then step definitions will not be reported for the jobs
selected.
You may remove a selected item from the selection list by placing a D next to the entry
and pressing enter.
Reports 11 through 15 have no secondary selection options and will produce reports for
the indicated category. All definitions for the category will be reported.
Page - 240
Mantissa Corporation © 2013
E:\Manuals\Product Manuals\ASO\OM (OPS Master)\Reference Guide\Current Release\OPS_C10.fm
If LEVEL=1 is requested, the default, only the first four dependencies for a job definition
will be reported. This is equivalent to panel 1 of the job definition display. A level 2
request will report all dependencies and result in a 2- page report for each job.
OPS/MASTER®
Chapter 10
Data Base Detail Reports
Definitions
Calendar Definitions (11)
Calendar data base definitions. The report will show each day defined for the year by
month and day. It will also list each Julian Day defined.
Process Keyword Definitions (12)
Process Keyword data base definitions.
Negative/Corequisite Dependencies (13)
Negative/Corequisite dependency data base definitions.
Message Definitions (14)
Message data base definitions.
Group Definitions (15)
E:\Manuals\Product Manuals\ASO\OM (OPS Master)\Reference Guide\Current Release\OPS_C10.fm
Group data base definitions.
Mantissa Corporation © 2013
Page - 241
Chapter 10
OPS/MASTER®
Data Base XREF Reports
Data Base Detail Reports
Data Base XREF Reports
When any cross reference report is requested a secondary selection panel is displayed as
shown below. You may use this panel to classify the report to a specific data base entry. If
no selections are made from this panel then all entries for that entry type will be cross referenced. The type of report being processed can be the selection header.
You may remove a selected item from the selection list by placing a D next to the item and
pressing enter.
-------------- JOB/Master® Data Base XREF Report Selection ------ Row 1 from 3
Command ===>
Scroll ==> PAGE
Select entry name for CALEN=
> ________
-------------------------------------------------------------------------------Selection =>
_ CALEN=
TSTPRED6
Selection =>
D CALEN=
SELECT01
Selection =>
_ CALEN=
KEYTABLE
******************************* Bottom of data ********************************
Calendar to Job/Process Keyword (20)
This report will cross reference a Calendar, or all Calendars to the Job and Process Keyword definitions which use them.
Report will cross reference a Process Keyword Definition, or all Process Keyword Definitions to the jobs which use them.
)
Only Process Keyword Definitions are evaluated for inclusion in the report.
Negative/Corequisite Dependencies to Job (22)
Report will cross reference a Negative/Corequisite Definition, or all Negative/Corequisite
Definitions to the jobs which use them.
)
Page - 242
Only Negative/Corequisite Definitions are evaluated for inclusion in the
report.
Mantissa Corporation © 2013
E:\Manuals\Product Manuals\ASO\OM (OPS Master)\Reference Guide\Current Release\OPS_C10.fm
Process Keyword to Job (21)
OPS/MASTER®
Chapter 10
Data Base Detail Reports
Data Base XREF Reports
Message to Job/System (23)
A cross reference report of a Message Definition, or all Message Definitions to the jobs
which use them will be created.
)
Only Message Definitions are evaluated for inclusion in the report.
Groups to Job/System (24)
Option 24 will create a reference report of a Group Definition, or all Group definitions to
the jobs which use them.
Job Flow (25)
This report will produce a trigger stream flow and predecessor cross reference report.
When requested a secondary panel of options will be displayed, shown below.
The additional criteria which can be selected are SYSTEM, JOB, and report format. If system is entered then all jobs in that system will be selected. If JOB is entered then that job
and its predecessors and triggers will only be selected.
SHORT=Y, the default will produce a report which produces 1 line for each applicable job
found. Part 1 consists of a cross-reference which shows each page number and type of reference for this job. The 3 types are (J)ob, (P)redecessor, and (T)rigger. For example: “JOB
XYZ 5(J) 9(T) 12(P)” identifies that JOB XYZ is referenced by a jobstream on Page-5, as
a trigger on Page-9, and as a predecessor on Page-12.
Press PF3 to return back to the initial selection panel.
------------------ JOB/Master® Job Flow - History Selection ------------------Command ===>
Job Flow Selection:
(Valid only if report selection is 25)
System=> ________ Job=> ________ Short=> Y
N
-------------------------------------------------------------------------------Recap Selection:
(Valid only if report selection is 30)
From=> 00000 To=> 00000 Audit Log=> Y System=> ********
E:\Manuals\Product Manuals\ASO\OM (OPS Master)\Reference Guide\Current Release\OPS_C10.fm
1. Successfully completed jobs=> N
3. Jobs scheduled, not run
=> N
5. Completion code summary
=> N
2. Failed jobs
=> N
4. Jobs run, not scheduled => N
6. Completion code by system=> N
Optional Sort Selection for reports 1 - 4
Sort - Key1=> 10
Key2=> 10
Key3=> 11
01
04
07
10
13
Mantissa Corporation © 2013
Jobname
Job/Network
Schedule Time
Start Date
Job Number
02
05
08
11
14
End Time
System Name
Reader Date
Start Time
Condition Code
Key4=> 01
03
06
09
12
15
System ID
Schedule Date
Reader Time
End Date
CPU Time
Page - 243
Chapter 10
OPS/MASTER®
History Recap Reports
Data Base Detail Reports
History Recap Reports
Job Run/Audit Trail (30)
This report will allow you to select job run statistics, and optionally print the audit log.
The parameters specified for this report are entered on the secondary panel which is displayed when the report is selected.
The start and end date can be entered. If either is left as zero, JOB/Master® will select history data which covers the current system date for the TO= parameter and one day previous for the FROM= parameter.
SYSTEM can be entered, which will cause only the jobs associated with that system
name, as defined on the data base to be reported.
AUDIT LOG=Y will produce the audit log report for the same date period as the job run
report. AUDIT LOG=N will not produce the log report. Press PF3 to return back to the
initial selection panel.
------------------ JOB/Master® Job Flow - History Selection ------------------Command ===>
Job Flow Selection:
(Valid only if report selection is 25)
System=> ________ Job=> ________ Short=> Y
N
-------------------------------------------------------------------------------Recap Selection:
(Valid only if report selection is 30)
From=> 98251 To=> 98252 Audit Log=> Y System=> ********
1. Successfully completed jobs=> Y
3. Jobs scheduled, not run
=> Y
5. Completion code summary
=> Y
2. Failed jobs
=> Y
4. Jobs run, not scheduled => Y
6. Completion code by system=> Y
Optional Sort Selection for reports 1 - 4
Sort - Key1=> 10
Key2=> 10
Key3=> 11
Jobname
Job/Network
Schedule Time
Start Date
Job Number
02
05
08
11
14
End Time
System Name
Reader Date
Start Time
Condition Code
Key4=> 01
03
06
09
12
15
System ID
Schedule Date
Reader Time
End Date
CPU Time
E:\Manuals\Product Manuals\ASO\OM (OPS Master)\Reference Guide\Current Release\OPS_C10.fm
01
04
07
10
13
Page - 244
Mantissa Corporation © 2013
OPS/MASTER®
Chapter 10
Data Base Detail Reports
Data Base Reporting by Selection
Data Base Reporting by Selection
JOB/Master® provides a set of batch programs which allows you to dynamically build a
report based upon information specified in a series of JCL input cards. This capability is
provided for both Job definitions and Dataset definitions in the JOB/Master® Database.
These reports differ from the XREF reports in several ways. The user can specify what
information is to be shown on the report, exactly what records to report on, and what order
the report is to be sorted. The basic idea is "You get what you ask for."
Making the Database Selection
JOB/Master® provides a batch program, JMJOBRPT, to generate reports based on Job
Definitions and JMDSNRPT, to generate reports based on Dataset Definitions. The concept is the same for both report programs. The only difference is the field-names which
are specified in the CARDIN input file. Tables 10.1 and 10.2 describe the field-names to
be used in the selection and sorting process for JMJOBRPT and JMDSNRPT, respectively.
For now, we will focus on the basic format of the input record statement.
//CARDIN DD
FIELD-NAME
FIELD-NAME
FIELD-NAME
/*
)
*
OPERATOR VALUE CONJUNCTION
OPERATOR VALUE CONJUNCTION
OPERATOR VALUE CONJUNCTION
.
.
.
Any number of spaces can separate the four fields in the record for readability.
FIELD-NAME
Any database definition field-name listed in Tables 10.1 and 10.2 can be used in
the selection process. As a general rule, the Names are close to what is on the
online definition screens and must begin in column-1.
OPERATOR
Valid operators are =, <, and >.
E:\Manuals\Product Manuals\ASO\OM (OPS Master)\Reference Guide\Current Release\OPS_C10.fm
VALUE
Any value up to the length of the input record can be entered. This may be left
blank.
EXAMPLE:
Report of jobs with no process keyword definition
KEYWDEF
=
An asterisk (*) can be used to show additional fields on the report
(other than what already shows), without placing a restricting value.
EXAMPLE:
Report deadline cancel jobs and show the wait time.
DEADCAN =
WAIT
=
Mantissa Corporation © 2013
Y
*
Page - 245
Chapter 10
OPS/MASTER®
Data Base Reporting by Selection
Data Base Detail Reports
Wild-cards are permitted. You may want to see a report of jobs that begin with a
specific character string.
EXAMPLE:
Report all jobs which begin with the letters ACCTG.
JOBNAME
= ACCTG*
CONJUNCTION
A conjunction is used to combine the logic of two or more field-names.
Valid conjunctions are AND, OR and EXC. AND is the default conjunction
which does not have to be specified. The AND conjunction allows
multiple fields/conditions to be grouped together as discussed previously, but its
use must be logical. For example, it is not logical to specify:
SYSTEM = ENVSYS AND
SYSTEM = PAYSYS
... because a job can only belong to one system. The report program
will run, but no jobs will be selected.
There are fields which have multiple values in their database definition. We call these
fields Multiple Value Fields and they are marked in Tables 10.1 and 10.2 under the "MultiValue" column. An example would be TRIG, since a job can have multiple triggers
defined. Here are just a few examples.
EXAMPLE:
Report jobs which belong to system ENVSYS which uses calendar SPECIAL
and have a runmode of P(production).
SYSTEM = ENVSYS
CALENDAR= SPECIAL
RUNMODE = P
EXAMPLE:
Report jobs belonging to either system ENVSYS or PAYSYS.
SYSTEM
SYSTEM
= ENVSYS OR
= PAYSYS
Report of jobs that do not run select mode (RUNMODE=S). Because there is no
“not equal” operator, we will need to combine two statements.
RUNMODE < S OR
RUNMODE > S
EXAMPLE:
Report jobs using any tape drive but whose tape drive usage is not updated.
TAPE1
TAPE2
UPDUSAGE
UPDUSAGE
> 0 OR
> 0 AND
= N OR
=
EXC (exclusive) can be used in the conjunction position but is not used to combine the logic for two fields. The exclusive option may only be used with multiple value fields (Tables 10.1 and 10.2). The function of EXC is to provide for
Page - 246
Mantissa Corporation © 2013
E:\Manuals\Product Manuals\ASO\OM (OPS Master)\Reference Guide\Current Release\OPS_C10.fm
EXAMPLE:
OPS/MASTER®
Chapter 10
Data Base Detail Reports
Data Base Reporting by Selection
these multi-value fields, a means for database selection based upon only one
value being true.
GIVEN:
JOBA triggers JOB1, JOB2, and JOB3
JOBB triggers JOB2
EXAMPLE:
Report jobs which trigger JOB2. The following statement will include JOBA and
JOBB in the report because it is true, JOB2 is a trigger of both JOBA and JOBB.
TRIG
= JOB2
EXAMPLE:
Report jobs which only trigger JOB2. The following statement, with the EXC
conjunction, will include JOBB in the report (JOBA is not included because it
contains other triggers).
TRIG
= JOB2EXC
Setting options
Optionally, the report can be sorted on any one or two database field-names. To accomplish this requires an additional input card(s). The format of this input card statement is as
follows:
//CARDIN
DD
*
SORT-OPTION=FIELD-NAME
SORT OPTION
This parameter should contain the value ‘SORT BY’ or ‘GROUP BY’.
‘SORT BY’ can be used alone or in conjunction with an input card for ‘GROUP
BY’. However, if ‘GROUP BY’ is used, ‘SORT BY’ must also be used.
‘GROUP BY’ is issued as the high level sort key.
EXAMPLE:
Report of all jobs sorted by JOBNAME.
E:\Manuals\Product Manuals\ASO\OM (OPS Master)\Reference Guide\Current Release\OPS_C10.fm
SORT BY = JOBNAME
JOBNAME = *
EXAMPLE:
Report of all triggered jobs sorted by JOBNAME within RUNMODE. Also, display the triggering job.
GROUP BY
SORT BY
TRIGJOB
TRIGBY
RUNMODE
= RUNMODE
= JOBNAME
=Y
=*
= * (To print RUNMODE on report)
FIELD NAME
This can be any database field in Table 10.1 or 10.2, except the ones flagged as
“multi-value”.
Mantissa Corporation © 2013
Page - 247
Chapter 10
OPS/MASTER®
Data Base Reporting by Selection
Data Base Detail Reports
Sample Job Definition Report
JMJOBRPT is the batch program that generates reports for the Job Definition fields. The
sample JCL below will create a report listing all job definitions meeting the following criteria:
1.
The jobs that run in production mode.
2.
The jobs that are externally submitted.
3.
The report will sort on two fields, system name and job name. That is, all jobs
belonging to a system will be grouped together and sorted, but jobs belonging to
system BACKUP will show on the report before jobs belonging to system PAYROLL.
Job Definition Fields
Below is a Table of Job Definition fields to be used in the CARDIN statements for JMJOBRPT. These fields are directly related to the fields used in the Database Creation screens
for job definitions.
Job Definition Fields
FIELD-NAME
Page - 248
Table 10.1
DESCRIPTION
JOBNAME
Jobname
ALTNAME
Alternate Name For
MULTI-VALUE
Mantissa Corporation © 2013
E:\Manuals\Product Manuals\ASO\OM (OPS Master)\Reference Guide\Current Release\OPS_C10.fm
//JMJOBRPT JOB
(0000,0001),'JOBMASTER',
//
CLASS=A,MSGCLASS=X
//*-------------------------------------------------*
//* JMDB / JOB LEVEL QUERY REPORT
//*
//*
CHANGE VALUES: HLQ.OPS|TO CONFORM
//*
CHANGE VALUES: VSMHLQ |TO SITE NAMING STANDARDS
//*--------------------------------------------------*
//JOBLIB
DD
DISP=SHR,DSN=HLQ.OPS.LOADLIB
//*
//STEP1
EXEC PGM=JMJOBRPT
//REPORT
DD
SYSOUT=*
//SYSOUT
DD
SYSOUT=*
//SYSUDUMP DD
SYSOUT=*
//JMDB
DD
DISP=SHR,DSN=VSMHLQ.JMDB
//JMREPORT DD
DSN=&TMP,DISP=(,PASS),UNIT=SYSDA,
//
SPACE=(CYL,(40,5)),
//
DCB=(RECFM=FB,
//
LRECL=2219,BLKSIZE=2219)
//CARDIN
DD
*
GROUP BY = SYSTEM
SORT BY = JOBNAME
RUNMODE = P OR
RUNMODE =
EXTSUB = Y
/*
//
OPS/MASTER®
Chapter 10
Data Base Detail Reports
Data Base Reporting by Selection
E:\Manuals\Product Manuals\ASO\OM (OPS Master)\Reference Guide\Current Release\OPS_C10.fm
Job Definition Fields
Table 10.1
SYSTEM
System
PDSMEM
PDS Member
SUBPDS
Submit PDS
TRIGJOB
Trigger Job (Y/N)
TRIGBY
Triggered By
SUBTYP
Submit Type
RESNAME1
Resource Name1
RESNAME2
Resource Name2
SCHEDNET
Schedule/Network
CALENDAR
Calendar
EXCAL1
Exception Calendar1
EXCAL2
Exception Calendar2
KEYWDEF
Keyword Definition
PRIORITY
Priority
LIBTYP
Library Type
NEGCDEF
Negative/Corequisitve Definition
TAPEMODEL1
Tape model number (ie 3480)
TAPE1
Number of “TAPEMODEL1”
tapes
TAPEMODEL2
Tape model number (ie 3490)
TAPE2
Number of “TAPEMODEL2”
tapes
UPDUSAGE
Update Tape Drive Usage
RUNS
Number of Runs
BETWNRUNS
Minutes Between Runs
STIME
Start Submit Time
Y
ETIME
End Submit Time
Y
PRED
Predecessor
Y
PREDTYP
Predecessor Type
Y
NEGDEP
Negative Dependency
Y
COREQDEP
Corequisite Dependency
Y
Mantissa Corporation © 2013
Page - 249
Chapter 10
OPS/MASTER®
Data Base Reporting by Selection
Data Base Detail Reports
Job Definition Fields
Page - 250
Table 10.1
Process Keyword
Y
NPKWD
Non-Process Keyword
Y
TRIG
Trigger Jobname
Y
TSUBTYP
Trigger Submit Type
Y
TRIGOPCD
Trigger OP CODE
Y
TRIGCC
Trigger Condition Code
Y
TRIGTYP
Trigger Type
Y
RUNMODE
Runmode
SCHEDBEFORE
Do Not Schedule Before
(YYDDD)
SCHEDAFTER
Do Not Schedule After
(YYDDD)
EXTSUB
External Submit
DEADCAN
Deadline Cancel
WAIT
Wait Minutes Before Deadline Cancel
FAILUSERID
Job Fail UserID
JM39MSG
Send Fail/JM39 Message
MSGDEF
Message Definition
MSGGROUP
Message Group
REPAIR
Repair Jobname
RSUBTYP
Repair Job Submit Type
MTASK1
Manual Task1 (Y/N)
MTASK2
Manual Task2 (Y/N)
MTASK3
Manual Task3 (Y/N)
MTASK4
Manual Task4 (Y/N)
MTASK5
Manual Task5 (Y/N)
MT1-MSG
Manual Task Message1
MT2-MSG
Manual Task Message2
MT3-MSG
Manual Task Message3
MT4-MSG
Manual Task Message4
MT5-MSG
Manual Task Message5
E:\Manuals\Product Manuals\ASO\OM (OPS Master)\Reference Guide\Current Release\OPS_C10.fm
PKWD
Mantissa Corporation © 2013
OPS/MASTER®
Chapter 10
Data Base Detail Reports
Data Base Reporting by Selection
E:\Manuals\Product Manuals\ASO\OM (OPS Master)\Reference Guide\Current Release\OPS_C10.fm
Job Definition Fields
Table 10.1
MT1-USERID
Send MT1 to UserID/
Console
MT2-USERID
Send MT2 to UserID/Console
MT3-USERID
Send MT3 to UserID/Console
MT4-USERID
Send MT4 to UserID/Console
MT5-USERID
Send MT5 to UserID/Console
MT-SENDBEF
Send Manual Task Msg Minutes Before Submit
MT-FREQ
Send Manual Task Msg Frequency of Minutes
MT-AFTER-DEP
Send Manual Task After
Dependency (Y/N)
OPROC1
Output Processing1 (Y/N)
OPROC2
Output Processing2 (Y/N)
OPROC3
Output Processing3 (Y/N)
OPROC4
Output Processing4 (Y/N)
OPROC5
Output Processing5 (Y/N)
OUTPOST
Hold Job on Queue for Output Posting
JOBDESC
Job Description
PROCEDURE
Procedure Name
PROGRAMMER
Programmer Name
SUBDEPT
Submitting Department
OUTDEST
Output Destination
DELMETHOD
Delivery Method
CONTACT
Contact Name on Abend
PHONE-NUM
Contact Phone Number
PHONE-EXT
Contact Phone Extension
BEEP-NUM
Contact Beeper Number
RUN-INS
Run-Exit Instructions
LAST-ELPTIME
Elapse time of last Run
LAST-ENDDATE
Ending date of last Run
LAST-ENDTIME
Ending time of last Run
Mantissa Corporation © 2013
Page - 251
Chapter 10
OPS/MASTER®
Data Base Reporting by Selection
Data Base Detail Reports
Sample Dataset Definition Report
JMDSNRPT is the batch program that generates reports for the Dataset Definition fields.
The sample JCL below will create a report listing all dataset definitions meeting the following criteria:
1.
The Dataset names begin with PROD.
2.
The Trigger jobs will also appear on the report.
3.
The report is Grouped by the type of dataset and Sorted by the Dataset name.
//JMDSNRPT JOB
(0000,0001),'JOBMASTER',
//
CLASS=A,MSGCLASS=X
//*-------------------------------------------------*
//* JMDB / DATASET LEVEL QUERY REPORT
//*
//*
CHANGE VALUES: HLQ.OPS|TO CONFORM
//*
CHANGE VALUES: VSMHLQ |TO SITE NAMING STANDARDS
//*--------------------------------------------------*
//JOBLIB
DD
DISP=SHR,DSN=HLQ.OPS.LOADLIB
//*
//STEP1
EXEC PGM=JMDSNRPT
//REPORT
DD
SYSOUT=*
//SYSOUT
DD
SYSOUT=*
//SYSUDUMP DD
SYSOUT=*
//JMDB
DD
DISP=SHR,DSN=VSMHLQ.JMDB
//JMREPORT DD
DSN=&TMP,DISP=(,PASS),UNIT=SYSDA,
//
SPACE=(CYL,(40,5)),
//
DCB=(RECFM=FB,
//
LRECL=380,BLKSIZE=380)
//CARDIN
DD
*
GROUP BY
= DSN-TYPE
SORT BY
= DSN
DSN
= PROD*
TRIG
= *
/*
//
Dataset Definition Fields
Dataset Definition Fields Table 10.2
FIELD-NAME
Page - 252
DESCRIPTION
DSN
Dataset Name
DSN-DESC
Dataset Description
DSN-TYPE
Type of Dataset
NOTBEFORE
Do Not Process Event Before
Date (YYDDD)
MULTI-VALUE
Mantissa Corporation © 2013
E:\Manuals\Product Manuals\ASO\OM (OPS Master)\Reference Guide\Current Release\OPS_C10.fm
Below is a Table of Dataset Definition fields to be used in the CARDIN statements for
JMDSNRPT. These fields are directly related to the fields used in the Database Creation
screens for dataset definitions.
OPS/MASTER®
Chapter 10
Data Base Detail Reports
Data Base Reporting by Selection
Dataset Definition Fields Table 10.2
E:\Manuals\Product Manuals\ASO\OM (OPS Master)\Reference Guide\Current Release\OPS_C10.fm
FIELD-NAME
DESCRIPTION
MULTI-VALUE
NOTAFTER
Do Not Process Event After
Date (YYDDD)
JOBNAME
Task Causing Dataset Event
to Occur
JOBNET
JOB/NETWORK to which
JOBNAME is Associated
RUNMODE
Run Mode
INPUT
Process Trigger If Dataset is
Open/Input
OUTPUT
Process Trigger if Dataset is
Open/Output
DEFINE
Process Trigger if Dataset is
VSAM Defined
OUTPUT-DATA
Process Trigger if Dataset is
Open/Output/Data
DELETED
Process Trigger if Dataset is
Deleted
UPDATED
Process Trigger if Dataset is
Updated
RENAMED
Process Trigger if Dataset is
Renamed
SCRATCHED
Process Trigger if Dataset is
Scratched
POSITION
Verify Information in Record
1 at Position
IS
Comparison for Data Verification (E,N,G,L)
VALUE
Character String Being Verified
TYPE
Type of Data Being Verified
(C=Char,H=Hex)
TRIG
Jobname to be Triggered if
Event Occurs
Y
TRIG-ST
Submit Type of Trigger Job
Y
Mantissa Corporation © 2013
Page - 253
Chapter 10
OPS/MASTER®
Sample Reports
Data Base Detail Reports
Sample Reports
Data Base Detail Reports
JM2020
DETAIL JOB LEVEL DEFINITION(10)
JM3010
CALENDAR DEFINITION REPORT(11)
JM3020
PROCESS KEYWORD DEFINITION REPORT(12)
JM3030
NEGATIVE/COREQUISITE DEPENDENCY JOBS(13)
JM3040
MESSAGE DEFINITIONS(14)
JM3050
NOTIFY GROUP DEFINITIONS(15)
Data Base XREF Reports
JM4010
CALENDAR DEFINITION JOB XREF(20)
JM4020
PROCESS KEYWORD JOB XREF(21)
JM4030
NEGATIVE/COREQ DEFINITION JOB XREF(22)
JM4040
MESSAGE DEFINITION JOB EXIT(23)
JM4050
MESSAGE GROUP DEFINITION JOB EXIT(24)
Job Flow
INDEX (25 - Part 1)
Job Flow
DETAIL (25 - Part 2)
History Recap Reports
JM5010
MESSAGE AUDIT LOG REPORT(30)
JM5020
ALL JOBS RUN(30-1)
JM5020F
FAILED JOBS(30-2)
JM5020S
JOBS SCHEDULED BUT NOT RUN(30-3)
JM5020R
JOBS RUN BUT NOT SCHEDULED(30-4)
JM5030
SUMMARY BY COMPLETION CODE(30-5/6)
Page - 254
JMJOBRPT
JOB DEFINITION QUERY REPORT
JMDSNRPT
DATASET DEFINITION QUERY REPORT
Mantissa Corporation © 2013
E:\Manuals\Product Manuals\ASO\OM (OPS Master)\Reference Guide\Current Release\OPS_C10.fm
Data Base Reporting By Selection
OPS/MASTER®
Chapter 10
Data Base Detail Reports
Sample Report(10): JM2020
Sample Report(10): JM2020
REPORT : JM2020
JOB/Master® REPORTING SYSTEM
PAGE:
1
SYSTEM : OPS
DETAIL JOB LEVEL DEFINITION REPORT
TIME:
10:04:51
RELEASE :
DATE:
08/20/93
---------------------------------------------------------------------------------------------------------------------------------MANTISSA CORPORATION - COPYRIGHT 1990 - ALL RIGHTS RESERVED
---------------------------------------------------------------------------------------------------------------------------------SYSTEM: DSNTEST
JOBNAME: JOBA
PDS MEMBER..:
PDS NAME....:
CLASS.......:
TRIGGER JOB.:
SUBMIT TYPE.:
RES NAME1...:
JOB NETWORK.:
CALENDAR....:
KEYWORD DEF.:
NEGCOR DEF..:
MSG DEF.....:
LIB TYPE....:
- ******************************
-
ALIAS:
TCJN.TSO.CNTL
Y
A
********
RUN MODE.............:
DON‘T SCHEDULE BEFORE:
DON‘T SCHEDULE AFTER.:
EXTERNAL SUBMIT......:
DEADLINE CANCEL......:
JOB FAIL USERID......:
REPAIR JOB...........:
HOLD JOB FOR (Y/N)...:
KEYPUNCH
:
CARD INPUT
:
TAPE INPUT
:
CONSOLE ROUTED :
JCL SETUP
:
RES NAME2:
MSG GROUP:
P
00000
00000
N
N
0
on 93228
16:24
PROGRAMMER NAME:
SUBMITTING DEPT:
USER DEPARTMENT:
OUT DESTINATION:
DELIVERY METHOD:
PRIORITY:
TRIGGERED BY:
EXC. CAL1:
LAST UPDATED BY: TCJN
EXC. CAL2:
** SUBMIT OPTIONS **
SUBMIT
END
SUBMIT
END
---------------------------------------------------------------NO OF RUNS.......: 00
1) 03:00 - 00:00 6) 00:00 - 00:00
MIN. BETWEEN RUNS: 0000
2) 00:00 - 00:00 7) 00:00 - 00:00
3) 00:00 - 00:00 8) 00:00 - 00:00
4) 00:00 - 00:00 9) 00:00 - 00:00
5) 00:00 - 00:00
(P-PRODUCTION/C-CHECK)
(YYDDD)
**** ABEND INFORMATION ****
(YYDDD)
--------------------------------------(Y-NOT SUBMITTED BY JOB MASTER)
CONTACT NAME.:
(Y-CANCEL FROM JOB QUE IN XXX MIN)
BEEPER NUMBER: (
)
(ROUTE MESSAGE TO)
PHONE NUMBER.: (
)
Ext.
SUBMIT TYPE:
(A,M,S)
RUN INSTRUCT.:
N BURST...........: N MESSAGE DEF:
N FICHE...........: N MESSAGE GRP:
N DECOLLATE.......: N
N PHOTOCOPY.......: N
N OTHER...........: N OUTPUT POSTING FLAG: N
**** FIRST JOB DEPENDENCY OPTIONS ****
+-----------------------------------------------------------------------------------------------------------------------+
PRED
NEGATIVE
COREQ
TRIGGER
SUB OPER COND TRIG
PROCESS
PROCESS
N-PROCESS N-PROCESS
JOB
TYPE
DEP.
DEP.
JOB
TYPE CODE CODE TYPE
KEYWORD
KEYWORD
KEYWORD
KEYWORD
-------------------------------------------------------------------------------------------------------------------JOBC
E
ALL
E:\Manuals\Product Manuals\ASO\OM (OPS Master)\Reference Guide\Current Release\OPS_C10.fm
+-----------------------------------------------------------------------------------------------------------------------+
**** MANUAL TASK MESSAGES ****
--------------------------------------------------------------------------------------------------------------------------------SEND
0 MIN. BEFORE SUBMIT TIME OR AFTER DEPENDENCIES =>
AT A FREQUENCY INTERVAL OF
0 MINUTES
--------------------------------------------------------------------------------------------------------------------------------TO USERID
MESSAGE TXT
--------- -------------------------------------------------MSG 1)
MSG 2)
MSG 3)
MSG 4)
MSG 5)
Mantissa Corporation © 2013
Page - 255
Chapter 10
OPS/MASTER®
Sample Report(11): JM3010
Data Base Detail Reports
Sample Report(11): JM3010
REPORT : JM3010
JOB/Master® REPORTING SYSTEM
PAGE:
1
SYSTEM :
CALENDAR DEFINITION REPORT
TIME:
10:05:52
RELEASE :
DATE:
08/20/93
----------------------------------------------------------------------------------------------------------------MANTISSA CORPORATION - COPYRIGHT 1990 - ALL RIGHTS RESERVED
----------------------------------------------------------------------------------------------------------------NAME: CALTS01
YEAR: 93
LAST UPDATED BY: TCJN
on 93067
13:03
DESC: TEST FOR XYZ COMPANY
MONTH
---------------------------------- DAY OF THE MONTH ---------------------------------*01 02 03 04 05 06 07 08 09 10 11 12 13 14 15 16 17 18 19 20 21 22 23 24 25 26 27 28 29 30 31 *
*-- -- -- -- -- -- -- -- -- -- -- -- -- -- -- -- -- -- -- -- -- -- -- -- -- -- -- -- -- -- -- *
*
*
JANUARY
*-- -- -- -- -- -- -- -- -- -- -- -- -- -- -- -- -- -- -- -- -- -- -- -- -- -- -- -- -- -- -- *
*
*
FEBRUARY
* X X X X X X X X X X X X X X X X X X X X X X X X X X X X
*
*
*
MARCH
*-- -- -- -- -- -- -- -- -- -- -- -- -- -- -- -- -- -- -- -- -- -- -- -- -- -- -- -- -- -- -- *
*
*
APRIL
*-- -- -- -- -- -- -- -- -- -- -- -- -- -- -- -- -- -- -- -- -- -- -- -- -- -- -- -- -- -*
*
*
MAY
*-- -- -- -- -- -- -- -- -- -- -- -- -- -- -- -- -- -- -- -- -- -- -- -- -- -- -- -- -- -- -- *
*
*
JUNE
*-- -- -- -- -- -- -- -- -- -- -- -- -- -- -- -- -- -- -- -- -- -- -- -- -- -- -- -- -- -*
*
*
JULY
*-- -- -- -- -- -- -- -- -- -- -- -- -- -- -- -- -- -- -- -- -- -- -- -- -- -- -- -- -- -- -- *
*
*
AUGUST
*-- -- -- -- -- -- -- -- -- -- -- -- -- -- -- -- -- -- -- -- -- -- -- -- -- -- -- -- -- -- -- *
*
*
SEPTEMBER *-- -- -- -- -- -- -- -- -- -- -- -- -- -- -- -- -- -- -- -- -- -- -- -- -- -- -- -- -- -*
*
*
OCTOBER
*-- -- -- -- -- -- -- -- -- -- -- -- -- -- -- -- -- -- -- -- -- -- -- -- -- -- -- -- -- -- -- *
*
*
NOVEMBER
*-- -- -- -- -- -- -- -- -- -- -- -- -- -- -- -- -- -- -- -- -- -- -- -- -- -- -- -- -- -*
*
*
DECEMBER
*-- -- -- -- -- -- -- -- -- -- -- -- -- -- -- -- -- -- -- -- -- -- -- -- -- -- -- -- -- -- -- *
***********************************************************************************************
JULIAN DAYS FOR CALENDAR
-----------------------32
33
34
35
36
37
38
39
40
41
42
43
45
46
47
4. 0000 0000
9. 0000 0000
48
49
50
51
52
53
54
55
56
57
58
59
5. 0000 0000
10. 0000 0000
E:\Manuals\Product Manuals\ASO\OM (OPS Master)\Reference Guide\Current Release\OPS_C10.fm
PERIOD START / END DATES (MMDD)
-------------------------------1. 0000 0000
2. 0000 0000
3. 0000 0000
6. 0000 0000
7. 0000 0000
8. 0000 0000
11. 0000 0000 12. 0000 0000 13. 0000 0000
44
Page - 256
Mantissa Corporation © 2013
OPS/MASTER®
Chapter 10
Data Base Detail Reports
Sample Report(12): JM3020
Sample Report(12): JM3020
REPORT : JM3020
JOB/Master® REPORTING SYSTEM
PAGE:
5
SYSTEM : OPS
PROCESS KEYWORD DEFINITION REPORT
TIME:
10:07:06
RELEASE :
DATE:
08/20/93
----------------------------------------------------------------------------------------------------------------MANTISSA CORPORATION - COPYRIGHT 1990 - ALL RIGHTS RESERVED
----------------------------------------------------------------------------------------------------------------NAME: DBASAT
LAST UPDATED BY: TCJN
on 93076
07:01
DESCRIPTION: SATURDAY IMAGE COPY
CALENDAR:
PROCESS KEYWORDS:
EXC. CAL2:
1) SAT
2) ________
3) ________
4) ________
5) ________
6) ________
7) ________
8) ________
9) ________
10) ________
11) ________
12) ________
13) ________
14) ________
15) ________
16) ________
17) ________
18) ________
19) ________
20) ________
21) ________
22) ________
23) ________
24) ________
25) ________
26) ________
27) ________
28) ________
29) ________
30) ________
31) ________
32) ________
33) ________
34) ________
35) ________
36) ________
1) 3SATFEB
2) 3SATMAY
3) 3SATAUG
4) 3SATNOV
5) ________
6) ________
7) ________
8) ________
9) ________
10) ________
11) ________
12) ________
13) ________
14) ________
15) ________
16) ________
17) ________
18) ________
19) ________
20) ________
21) ________
22) ________
23) ________
24) ________
25) ________
26) ________
27) ________
28) ________
29) ________
30) ________
31) ________
32) ________
33) ________
34) ________
35) ________
36) ________
E:\Manuals\Product Manuals\ASO\OM (OPS Master)\Reference Guide\Current Release\OPS_C10.fm
NON-PROCESS KEYWORDS:
EXC. CAL1:
Mantissa Corporation © 2013
Page - 257
Chapter 10
OPS/MASTER®
Sample Report(13): JM3030
Data Base Detail Reports
Sample Report(13): JM3030
REPORT : JM3030
JOB/Master® REPORTING SYSTEM
PAGE:
2
SYSTEM : OPS
NEGATIVE / COREQUISITE DEPENDENCY JOBS
TIME:
10:08:09
RELEASE :
DATE: 08/20/93
---------------------------------------------------------------------------------------------------------------------------------MANTISSA CORPORATION - COPYRIGHT 1990 - ALL RIGHTS RESERVED
---------------------------------------------------------------------------------------------------------------------------------NAME: DEMONEGC
A JOB WILL NOT BE SUBMITTED IF ANY OF THE FOLLOWING JOBS ARE IN THE MVS INPUT QUE OR EXECUTING:
3) ________
4) ________
5) ________
11) ________ 12) ________ 13) ________
19) ________ 20) ________ 21) ________
27) ________ 28) ________ 29) ________
35) ________ 36) ________ 37) ________
43) ________ 44) ________ 45) ________
OF THE FOLLOWING JOBS ARE EXECUTING:
3) ________
4) ________
5) ________
11) ________ 12) ________ 13) ________
19) ________ 20) ________ 21) ________
27) ________ 28) ________ 29) ________
6)
14)
22)
30)
38)
46)
________
________
________
________
________
________
7)
15)
23)
31)
39)
47)
________
________
________
________
________
________
8)
16)
24)
32)
40)
48)
________
________
________
________
________
________
6)
14)
22)
30)
________
________
________
________
7)
15)
23)
31)
________
________
________
________
8)
16)
24)
32)
________
________
________
________
E:\Manuals\Product Manuals\ASO\OM (OPS Master)\Reference Guide\Current Release\OPS_C10.fm
1) HOLDDJ1
2) HOLDJ5
9) ________ 10) ________
17) ________ 18) ________
25) ________ 26) ________
33) ________ 34) ________
41) ________ 42) ________
A JOB WILL ONLY BE SUBMITTED IF ANY
1) DREQ1
2) DREQ1
9) ________ 10) ________
17) ________ 18) ________
25) ________ 26) ________
Page - 258
Mantissa Corporation © 2013
OPS/MASTER®
Chapter 10
Data Base Detail Reports
Sample Report(14): JM3040
Sample Report(14): JM3040
---------------------------------------------------------------------------------------------------------------------------------SEND
10 MIN. BEFORE SUBMIT TIME OR AFTER DEPENDENCIES => N AT A FREQUENCY INTERVAL OF
5 MINUTES
---------------------------------------------------------------------------------------------------------------------------------TO USERID
MESSAGE TXT
--------- -------------------------------------------------MSG 1) DEUS1R1
TRANSACTIONS NEEDED. CLOSE OUT DAILY PROCESSING
MSG 2)
MSG 3)
TAPLIB
NEEDS TAPE WHICH WILL BE SENT TO REGION1
PUSER1
RUN PARAMETERS REQUIRED FOR PROCESSING
MSG 4)
MSG 5)
MESSAGE DEFINITION: MANT01
---------------------------------------------------------------------------------------------------------------------------------SEND
60 MIN. BEFORE SUBMIT TIME OR AFTER DEPENDENCIES => N AT A FREQUENCY INTERVAL OF
5 MINUTES
---------------------------------------------------------------------------------------------------------------------------------TO USERID
MESSAGE TXT
--------- -------------------------------------------------MSG 1)
MSG 2)
MSG 3)
MSG 4)
MSG 5)
VERIFY MANUAL SYMBOLICS AS REQUIRED.....
MESSAGE DEFINITION: SALESMSG
---------------------------------------------------------------------------------------------------------------------------------SEND
0 MIN. BEFORE SUBMIT TIME OR AFTER DEPENDENCIES => N AT A FREQUENCY INTERVAL OF
5 MINUTES
----------------------------------------------------------------------------------------------------------------------------------
1)
2)
3)
4)
5)
TO USERID
---------
MESSAGE TXT
-------------------------------------------------ENTER SALES QUOTAS AND SIGN OFF UPON COMPLETION
MOUNT SALES JOB TAPE AND SIGN OFF UPON COMPLETION
E:\Manuals\Product Manuals\ASO\OM (OPS Master)\Reference Guide\Current Release\OPS_C10.fm
MSG
MSG
MSG
MSG
MSG
Mantissa Corporation © 2013
Page - 259
Chapter 10
OPS/MASTER®
Sample Report(15): JM3050
Data Base Detail Reports
Sample Report(15): JM3050
REPORT : JM3050
JOB/Master® REPORTING SYSTEM
PAGE:
1
SYSTEM : OPS
NOTIFY GROUP DEFINITIONS
TIME:
10:12:12
RELEASE :
DATE:
08/20/93
---------------------------------------------------------------------------------------------------------------------------------MANTISSA CORPORATION - COPYRIGHT 1990 - ALL RIGHTS RESERVED
---------------------------------------------------------------------------------------------------------------------------------NAME: CAROYL
USER
USER
MSG
SEND
* ON SHIFT *
* DO NOT SEND *
ID
TYPE
CLASS
TYPE
START
END
BEFORE
AFTER
-------- -----------------------------------1) TCJN
M
1
M
07 00
15 30
00000
00000
2) TCJN
M
2
L
07 00
15 30
00000
00000
3) TRSJ
M
5
L
15 00
23 50
92325
00000
4) ________
_
_
_
00 00
00 00
00000
00000
5) ________
_
_
_
00 00
00 00
00000
00000
6) ________
_
_
_
00 00
00 00
00000
00000
7) ________
_
_
_
00 00
00 00
00000
00000
8) ________
_
_
_
00 00
00 00
00000
00000
_
_
_
00 00
00 00
00000
00000
_
_
_
00 00
00 00
00000
00000
11) ________
_
_
_
00 00
00 00
00000
00000
12) ________
_
_
_
00 00
00 00
00000
00000
13) ________
_
_
_
00 00
00 00
00000
00000
14) ________
_
_
_
00 00
00 00
00000
00000
15) ________
_
_
_
00 00
00 00
00000
00000
16) ________
_
_
_
00 00
00 00
00000
00000
17) ________
_
_
_
00 00
00 00
00000
00000
18) ________
_
_
_
00 00
00 00
00000
00000
19) ________
_
_
_
00 00
00 00
00000
00000
20) ________
_
_
_
00 00
00 00
00000
00000
21) ________
_
_
_
00 00
00 00
00000
00000
E:\Manuals\Product Manuals\ASO\OM (OPS Master)\Reference Guide\Current Release\OPS_C10.fm
9) ________
10) ________
Page - 260
Mantissa Corporation © 2013
OPS/MASTER®
Data Base Detail Reports
Chapter 10
Sample Report(20): JM4010
Sample Report(20): JM4010
E:\Manuals\Product Manuals\ASO\OM (OPS Master)\Reference Guide\Current Release\OPS_C10.fm
REPORT : JM4010
JOB/Master® REPORTING SYSTEM
PAGE:
1
SYSTEM : OPS
CALENDAR DEFINITION JOB XREF
TIME:
10:16:44
RELEASE :
DATE:
08/20/93
---------------------------------------------------------------------------------------------------------------------------------MANTISSA CORPORATION - COPYRIGHT 1990 - ALL RIGHTS RESERVED
---------------------------------------------------------------------------------------------------------------------------------NAME: WORKDY93
LAST UPDATED BY: TCJN
on 93062 11:03
DESC: WORKDAY 1993
SYSTEM
DESCRIPTION
SOURCE
USED BY
DESCRIPTION
-------- ---------------------------------------------- ---------- -------------------------------------1. ********
JOB
HASA1
2. BROWNFOR
JOB
BROWN001
3. CYCLESYS
JOB
CYCLEJOB
4. DATESUB
JOB
JCLDTE01
SYMBOLIC DATE SUBS
5. DATESUB
JOB
JMPOST0B
JMPOST-BATCH
6. EDSTEST
JOB
EDSJP1
7. FABTEST1
JOB
FAB00002
8. JCLSUBST
JOB
JCLSUB01
9. JCLSUBST
JOB
JCLSUB02
10. JCLSUBST
JOB
JCLSUB03
11. JCLSUBST
JOB
JCLSUB04
12. JCLSUBST
JOB
JCLSUB05
13. JCLSUBST
JOB
JCLSUB06
14. JCLSUBST
JOB
JCLSUB07
15. JCLSUBST
JOB
JMJCLMB
JMJCLMB/SYSP.JOBLIB
16. JMEVENT
JOB
JMEVENT
TEST FOR JMEVENT
17. JMPOST
JOB
JMPOST0A
JMPOST-BATCH
18. JMPOST
JOB
JMPOST00
BATCH POSTING TEST
19. JM4DSNTR
JOB
JM4DSN00
20. LWKDHOLW
JOB
JLWKDHOL
21. MAINTDLY
JOB
OP511001
J/M BACKUP
22. MAINTDLY
JOB
RMSPBR87
DAILY BKUP/REST R8.7
23. MAINTDLY
JOB
RMSPBR88
DAILY BKUP/REST R8.8
24. MANTASK
JOB
MANTASK
25. MANTASK
JOB
MANTASK2
26. MEMSYS1*
JOB
MEM002
27. MREORG
JOB
RJOB120
28. NAMIC
JOB
NAMIC001
29. OUTPTPST
JOB
OUTPOST1
OUTPUT POSTING JOB
30. PEPSIRES
JOB
PEPSI001
31. PEPSIRES
JOB
PEPSI002
32. PEPSIRES
JOB
PEPSI003
33. PEPSIRES
JOB
PEPSI004
34. PEPSIRES
JOB
PEPSI005
35. PEPSIRES
JOB
PEPSI006
36. PEPSIRES
JOB
PEPSI007
37. PEPSIRES
JOB
PEPSI008
38. PEPSIRES
JOB
PEPSI009
39. PERSTORE
JOB
PRSTJOB1
40. PERSTORE
JOB
PRSTJOB2
41. PRDADT
JOB
OJOB000
42. PRDADT
JOB
OJOB120
43. PRDADT
JOB
OJOB158
44. REPEAT
JOB
REPEAT01
REPEAT JOB
45. SYS
JOB
SYSTBAK1
46. TAPEXCLU
JOB
TAPEXCL1
TEST TAPE EXCLUSION
47. TAPEXCLU
JOB
TAPEXCL2
TEST TAPE EXCLUSION
48. TAPEXCLU
JOB
TAPEXCL3
TEST TAPE EXCLUSION
49. TAPEXCLU
JOB
TAPEXCL4
TEST TAPE EXCLUSION
50. TAPEXCLU
JOB
TAPEXCL5
TEST TAPE EXCLUSION
Mantissa Corporation © 2013
Page - 261
Chapter 10
OPS/MASTER®
Sample Report(21): JM4020
Data Base Detail Reports
Sample Report(21): JM4020
REPORT : JM4020
JOB/Master® REPORTING SYSTEM
PAGE:
1
SYSTEM : OPS
PROCESS KEYWORD DEFINITION JOB XREF
TIME:
10:48:50
RELEASE :
DATE:
08/20/93
---------------------------------------------------------------------------------------------------------------------------------MANTISSA CORPORATION - COPYRIGHT 1990 - ALL RIGHTS RESERVED
---------------------------------------------------------------------------------------------------------------------------------NAME: DEMOPKWD
LAST UPDATED BY: TLCR
on 90152
15:11
DESC: SALES REPORTS
SYSTEM
--------
JOBNAME
--------
JOB DESCRIPTION
----------------------------------------
DEMO01
DEMO02
DEMO01 SALES RECAP
DEMO01 SALES RECAP
E:\Manuals\Product Manuals\ASO\OM (OPS Master)\Reference Guide\Current Release\OPS_C10.fm
1. DEMOSYS1
2. DEMOSYS1
DESCRIPTION
---------------------------------------
Page - 262
Mantissa Corporation © 2013
OPS/MASTER®
Chapter 10
Data Base Detail Reports
Sample Report(22): JM4030
Sample Report(22): JM4030
REPORT : JM4030
JOB/Master® REPORTING SYSTEM
PAGE:
1
SYSTEM : OPS
NEGATIVE/CORREQ DEFINITION JOB XREF
TIME:
10:42:07
RELEASE :
DATE:
08/20/93
---------------------------------------------------------------------------------------------------------------------------------MANTISSA CORPORATION - COPYRIGHT 1990 - ALL RIGHTS RESERVED
---------------------------------------------------------------------------------------------------------------------------------NAME: RMSP1100
SYSTEM
-------RMSP1100
RMSP1100
RMSP1100
RMSP1100
RMSP1100
RMSP1100
RMSP1101
JOBNAME
--------
JOB DESCRIPTION
----------------------------------------
RMSPBR11
RM117001
RM118001
RM118002
RM118003
R1117001
R1118001
RELEASE
RELEASE
RELEASE
RELEASE
RELEASE
RELEASE
RELEASE
11
11
11
11
11
11
11
BACK/REST
BACK/REST
BACK/REST
BACK/REST
BACK/REST
BACK/REST
BACK/REST
E:\Manuals\Product Manuals\ASO\OM (OPS Master)\Reference Guide\Current Release\OPS_C10.fm
1.
2.
3.
4.
5.
6.
7.
DESCRIPTION
---------------------------------------
Mantissa Corporation © 2013
Page - 263
Chapter 10
OPS/MASTER®
Sample Report(23): JM4040
Data Base Detail Reports
Sample Report(23): JM4040
REPORT : JM4040
JOB/Master® REPORTING SYSTEM
PAGE:
1
SYSTEM : OPS
MESSAGE DEFINITION JOB XREF
TIME:
10:42:44
RELEASE :
DATE:
08/20/93
---------------------------------------------------------------------------------------------------------------------------------MANTISSA CORPORATION - COPYRIGHT 1990 - ALL RIGHTS RESERVED
---------------------------------------------------------------------------------------------------------------------------------NAME: MANT01
SYSTEM
-------NIGHTRPT
PRODSUPP
PRODSUPP
PRODSUPP
PRODSUPP
PRODSUPP
PRODSUPP
PRODSUPP
PRODSUPP
PRODSUPP
PRODSUPP
PRODSUPP
PRODSUPP
PRODSUPP
PRODSUPP
PRODSUPP
PRODSUPP
PRODSUPP
PRODSUPP
JOBNAME
--------
JOB DESCRIPTION
----------------------------------------
OPSRPT01
BKUPDB
BKUP0870
BKUP0871
BKUP0880
CMBACKUP
JMBACKUP
LSTCATDB
OPSLIST
OPSRPTDB
QXBK0870
QXBK0871
QXBK0880
QXRS0871
RMBACKUP
RMSLIST
RSTR0870
RSTR0871
RSTR0880
OPS/MSTR REPORTS
STRIP04 BACKUPS
BACKUP ONLINE 0870
BACKUP ONLINE 0871
BACKUP ONLINE 0880
BACKUP OF CM FILES
BACKUP OF JM FILES
STRIP04 LISTCATS
LIST OF OPS PDS'S
STRIP04 OPSRPTS
QXBKUP REL 0870
QXBKUP REL 0871
QXBKUP REL 0880
QXRECVR REL 0871
BACKUP OF RM FILES
IEHLIST JCL LIBS
RSTRONL REL0870
RSTR ONL REL0871
RSTRONL REL0880
E:\Manuals\Product Manuals\ASO\OM (OPS Master)\Reference Guide\Current Release\OPS_C10.fm
1.
2.
3.
4.
5.
6.
7.
8.
9.
10.
11.
12.
13.
14.
15.
16.
17.
18.
19.
DESCRIPTION
---------------------------------------
Page - 264
Mantissa Corporation © 2013
OPS/MASTER®
Chapter 10
Data Base Detail Reports
Sample Report(24): JM4050
Sample Report(24): JM4050
REPORT : JM4050
JOB/Master® REPORTING SYSTEM
PAGE:
3
SYSTEM : OPS
MESSAGE GROUP DEFINITION JOB XREF
TIME:
11:07:34
RELEASE :
DATE:
08/20/93
---------------------------------------------------------------------------------------------------------------------------------MANTISSA CORPORATION - COPYRIGHT 1990 - ALL RIGHTS RESERVED
---------------------------------------------------------------------------------------------------------------------------------NAME: DEMOGRP1
SYSTEM
--------
DESCRIPTION
---------------------------------------
USED BY
----------
DESCRIPTION
--------------------------------------
JOB
JOB
DEMO01
DEMO02
DEMO01 SALES RECAP
DEMO01 SALES RECAP
E:\Manuals\Product Manuals\ASO\OM (OPS Master)\Reference Guide\Current Release\OPS_C10.fm
1. DEMOSYS1
2. DEMOSYS1
SOURCE
--------
Mantissa Corporation © 2013
Page - 265
Chapter 10
OPS/MASTER®
Sample Report(25): Job Flow (Part 1)
Data Base Detail Reports
Sample Report(25): Job Flow (Part 1)
===============================================================================
10/29/93
J O B M A S T E R
J O B
F L O W
X R E F
PAGE
3
===============================================================================
JOBNAME
REFERENCES (J)OB, (P)REDECESSOR, (T)RIGGER
OSLOEXT1
OSLOEXT2
OSLOFIG
OSLO0001
OSLO0002
OSLO0003
OSLO0004
OSLO0005
OSLO0006
OSLO0007
OSLO0017
OSLO0018
OSLO0019
OSLO0020
OSLO0021
OSLO007A
OSLO007B
OSLO0400
OSLO1000
OSLO1001
OUTPUT01
OUTTRIG
1(J)
1(J)
1(J)
1(J)
1(J)
1(J)
1(J)
1(J)
1(J)
1(J)
2(J)
2(J)
2(T)
2(T)
2(T)
1(J)
1(J)
2(J)
2(J)
2(J)
2(J)
2(J)
1(P)
1(P)
1(P)
1(P)
1(T)
1(T)
1(T)
2(J)
1(T)
2(T)
2(J)
1(T)
1(T)
2(T)
2(T)
Sample Report(25): Job Flow (Part 2)
===============================================================================
10/29/93
J O B M A S T E R
J O B
F L O W
R E P O R T PAGE
1
===============================================================================
OSLOEXT1 <<<<<< JOBSTREAM ---------------------------------------------------OSLOEXT1 SYS=OSLOSYS1 CAL=
EXCAL=
PKYWRD=
RUN=00:04
DESC=EXT-SUB BEGINS TEST
SUBMIT TIME=15:35
OSLOEXT2 <<<<<< JOBSTREAM ---------------------------------------------------OSLOEXT2 SYS=OSLOSYS1 CAL=
EXCAL=
PKYWRD=
RUN=00:04
DESC=EXT-SUB BEGINS TEST
SUBMIT TIME=15:45
OSLOFIG <<<<<< JOBSTREAM ---------------------------------------------------OSLOFIG SYS=OSLOSYS1 CAL=
EXCAL=
PKYWRD=
RUN= 0: 0
DESC=EXT-SUB BEGINS TEST
SUBMIT TIME=00:00
OSLO0002 SYS=OSLOSYS1 CAL=
DESC=2ND JOB IN TEST
EXCAL=
PKYWRD=
RUN=00:11
SUBMIT TIME=09:35
OSLO0003 SYS=OSLOSYS1 CAL=
DESC=3RD JOB IN TEST
EXCAL=
PKYWRD=
RUN=00:09
SUBMIT TIME=09:45
OSLO0004 SYS=OSLOSYS1 CAL=
DESC=4TH JOB IN TEST
EXCAL=
PKYWRD=
RUN=00:10
SUBMIT TIME=12:00
E:\Manuals\Product Manuals\ASO\OM (OPS Master)\Reference Guide\Current Release\OPS_C10.fm
OSLO0001 <<<<<< JOBSTREAM ---------------------------------------------------PREDS. ==> OSLOEXT1
OSLO0001 SYS=OSLOSYS1 CAL=
EXCAL=
PKYWRD=
RUN=00:06
DESC=
SUBMIT TIME=09:30
TRIGGER => JOB/END OSLO0002 OSLO0003 OSLO0004
OSLO0005 <<<<<< JOBSTREAM ---------------------------------------------------PREDS. ==> OSLO0002
OSLO0005 SYS=OSLOSYS1 CAL=
EXCAL=
PKYWRD=
RUN=00:16
DESC=5TH JOB IN TEST
SUBMIT TIME=12:30
TRIGGER => STEP03
OSLO0007
JOB/END OSLO007B
OSLO0007 SYS=OSLOSYS1 CAL=
DESC=7TH JOB IN TEST
TRIGGER => JOB/END OSLO007A
EXCAL=
PKYWRD=
RUN=00:07
SUBMIT TIME=00:00
OSLO007B SYS=OSLOSYS1 CAL=
DESC=7TH JOB IN TEST
OSLO007A SYS=OSLOSYS1 CAL=
DESC=7TH JOB IN TEST
EXCAL=
PKYWRD=
EXCAL=
PKYWRD=
RUN=00:07
SUBMIT TIME=00:00
RUN=00:03
SUBMIT TIME=00:15
Page - 266
Mantissa Corporation © 2013
OPS/MASTER®
Chapter 10
Data Base Detail Reports
Sample Report(25): Job Flow (Part 2)
OSLO0006 <<<<<< JOBSTREAM ---------------------------------------------------PREDS. ==> OSLO0003 OSLO0004
OSLO0006 SYS=OSLOSYS1 CAL=
EXCAL=
PKYWRD=
RUN=00:10
DESC=6TH JOB IN TEST
SUBMIT TIME=13:00
===============================================================================
10/29/93
J O B M A S T E R
J O B
F L O W
R E P O R T PAGE
2
===============================================================================
OSLO0007 <<<<<< JOBSTREAM ---------------------------------------------------OSLO0007 SYS=OSLOSYS1 CAL=
EXCAL=
PKYWRD=
RUN=00:07
DESC=7TH JOB IN TEST
SUBMIT TIME=00:00
TRIGGER => JOB/END OSLO007A
OSLO007A SYS=OSLOSYS1 CAL=
DESC=7TH JOB IN TEST
EXCAL=
PKYWRD=
RUN=00:03
SUBMIT TIME=00:15
OSLO0017 <<<<<< JOBSTREAM ---------------------------------------------------OSLO0017 SYS=OSLOSYS1 CAL=
EXCAL=
PKYWRD=
RUN=00:36
DESC=7TH JOB IN TEST
SUBMIT TIME=08:00
TRIGGER => STEP1
OSLO0019
STEP2
OSLO0020
JOB/END OSLO0018 OSLO0021
OSLO0018 SYS=OSLOSYS1 CAL=
DESC=7TH JOB IN TEST
EXCAL=
PKYWRD=
RUN=00:00
SUBMIT TIME=10:00
OSLO0400 <<<<<< JOBSTREAM ---------------------------------------------------OSLO0400 SYS=OSLOSYS1 CAL=
EXCAL=
PKYWRD=
RUN=00:03
DESC=1ST JOB IN TEST
SUBMIT TIME=22:30
OSLO1000 <<<<<< JOBSTREAM ---------------------------------------------------OSLO1000 SYS=OSLOSYS1 CAL=
EXCAL=
PKYWRD=
RUN=00:03
DESC=SYSTEM1 TEST
SUBMIT TIME=08:00
OSLO1001 <<<<<< JOBSTREAM ---------------------------------------------------OSLO1001 SYS=OSLOSYS1 CAL=
EXCAL=
PKYWRD=
RUN=00:27
DESC=SYSTEM1 TEST
SUBMIT TIME=08:00
OUTPUT01 <<<<<< JOBSTREAM ---------------------------------------------------OUTPUT01 SYS=OSLOSYS1 CAL=
EXCAL=
PKYWRD=
RUN=00:00
DESC=1ST JOB IN TEST
SUBMIT TIME=08:00
TRIGGER => JOB/END OUTTRIG OUTTRIG
SYS=OSLOSYS1 CAL=
DESC=1ST JOB IN TEST
EXCAL=
PKYWRD=
RUN=00:10
SUBMIT TIME=08:00
E:\Manuals\Product Manuals\ASO\OM (OPS Master)\Reference Guide\Current Release\OPS_C10.fm
OUTTRIG
Mantissa Corporation © 2013
Page - 267
Chapter 10
Sample Report(30): JM5010
OPS/MASTER®
Data Base Detail Reports
Sample Report(30): JM5010
E:\Manuals\Product Manuals\ASO\OM (OPS Master)\Reference Guide\Current Release\OPS_C10.fm
REPORT : JM5010
JOB/Master® REPORTING SYSTEM
PAGE:
1
SYSTEM : OPS
MESSAGE AUDIT LOG REPORT
TIME:
18:11:39
RELEASE :
PERIOD 92336 THRU 92337
DATE:
12/02/92
---------------------------------------------------------------------------------------------------------------------------------MANTISSA CORPORATION - COPYRIGHT 1990 - ALL RIGHTS RESERVED
---------------------------------------------------------------------------------------------------------------------------------SYSTEM
MESSAGE REGION
USER
ID
*--- DATE ----*
TIME
ID
ID
ID
MESSAGE
------ --------------- -------- ------- ------ -------- ------------------------------------------------------------------SYSA
92336 12/01/92 06.45.48
JM03
JM01
SCHEDULE (J09976) SUBMITTED BY SCHEDULER FROM JMSTGPDS
SYSA
92336 12/01/92 07.00.27
JM03
JM01
B338002 (J09977) SUBMITTED BY SCHEDULER FROM JMSTGPDS
SYSA
92336 12/01/92 07.00.29
JM03
JM01
B338003 (J09978) SUBMITTED BY SCHEDULER FROM JMSTGPDS
SYSA
92336 12/01/92 07.00.30
JM32
JM01
B338004 * NEEDS TAPE DRIVES 3420S= 00 3480S= 01
SYSA
92336 12/01/92 07.27.43
JM02
JM01
JOB/STEP RMSPESF /JS010
.PS010
FAILED S= 222
SYSA
92336 12/01/92 07.29.47
JM03
JM01
B338004 (J09980) SUBMITTED BY SCHEDULER FROM JMSTGPDS
SYSA
92336 12/01/92 07.31.54
JM23
JM01
PURGE
ISSUED BY TCJN
FOR RMSPESF 92335 0000
SYSA
92336 12/01/92 07.31.56
JM23
JM01
PURGE
ISSUED BY TCJN
FOR R88PC11 92335 2000
SYSA
92336 12/01/92 07.31.58
JM23
JM01
PURGE
ISSUED BY TCJN
FOR R88PC12 92335 2000
SYSA
92336 12/01/92 07.32.00
JM23
JM01
PURGE
ISSUED BY TCJN
FOR O880PS1 92335 2100
SYSA
92336 12/01/92 07.32.02
JM23
JM01
PURGE
ISSUED BY TCJN
FOR O880P01 92335 2100
SYSA
92336 12/01/92 08.00.13
JM03
JM01
B338010 (J09992) SUBMITTED BY SCHEDULER FROM JMSTGPDS
SYSA
92336 12/01/92 08.00.15
JM03
JM01
B338011 (J09993) SUBMITTED BY SCHEDULER FROM JMSTGPDS
SYSA
92336 12/01/92 08.00.17
JM32
JM01
B338012 * NEEDS TAPE DRIVES 3420S= 00 3480S= 01
SYSA
92336 12/01/92 08.00.18
JM32
JM01
B338014 * NEEDS TAPE DRIVES 3420S= 00 3480S= 01
SYSA
92336 12/01/92 08.00.19
JM31
JM01
RDMSRGEN WAITING ON CO-REQ.
DEPENDENCY ==> RMSCTL
SYSA
92336 12/01/92 08.00.20
JM32
JM01
RMSPBR88 * NEEDS TAPE DRIVES 3420S= 00 3480S= 01
SYSA
92336 12/01/92 08.15.55
JM07
JM01
RDMSRGEN NOT STARTED, PREDECESSOR -> RDMSRGEN NOT COMPLETED
SYSA
92336 12/01/92 08.15.56
JM32
JM01
RMSPBESF * NEEDS TAPE DRIVES 3420S= 00 3480S= 01
SYSA
92336 12/01/92 08.30.39
JM07
JM01
RDMSRGEN NOT STARTED, PREDECESSOR -> RDMSRGEN NOT COMPLETED
SYSA
92336 12/01/92 08.33.18
JM03
JM01
B338012 (J00010) SUBMITTED BY SCHEDULER FROM JMSTGPDS
SYSA
92336 12/01/92 08.33.23
JM03
JM01
RMSPBR88 (J00011) SUBMITTED BY SCHEDULER FROM JMUSRPDS
SYSA
92336 12/01/92 08.33.23
JM03
JM01
RMSPBR88 (J00011) MVS JOBNAME = FROM JMUSRPDS USER PDS = SYSP.JOBLIB
SYSA
92336 12/01/92 08.33.25
JM03
JM01
RMSPBESF (J00012) SUBMITTED BY SCHEDULER FROM JMUSRPDS
SYSA
92336 12/01/92 08.33.26
JM03
JM01
RMSPBESF (J00012) MVS JOBNAME = FROM JMUSRPDS USER PDS = SYSP.JOBLIB
SYSA
92336 12/01/92 08.33.32
JM32
JM01
B338013 * NEEDS TAPE DRIVES 3420S= 00 3480S= 01
SYSA
92336 12/01/92 08.33.33
JM32
JM01
B338014 * NEEDS TAPE DRIVES 3420S= 00 3480S= 01
SYSA
92336 12/01/92 08.36.58
JM03
JM01
B338013 (J00014) SUBMITTED BY SCHEDULER FROM JMSTGPDS
SYSA
92336 12/01/92 08.38.18
JM32
JM01
B338014 * NEEDS TAPE DRIVES 3420S= 00 3480S= 01
SYSA
92336 12/01/92 08.46.04
JM07
JM01
RDMSRGEN NOT STARTED, PREDECESSOR -> RDMSRGEN NOT COMPLETED
SYSA
92336 12/01/92 08.47.53
JM35
JM01
RMSPESF TRIGGERED BY RMSPBESF
SYSA
92336 12/01/92 08.47.56
JM31
JM01
RMSPESF WAITING ON NEGATIVE
DEPENDENCY ==> RMSPBR88
SYSA
92336 12/01/92 08.50.46
JM35
JM01
RMSPBR87 TRIGGERED BY RMSPBR88
SYSA
92336 12/01/92 08.50.50
JM03
JM01
RMSPESF (J00020) SUBMITTED BY SCHEDULER FROM JMUSRPDS
SYSA
92336 12/01/92 08.50.50
JM03
JM01
RMSPESF (J00020) MVS JOBNAME = FROM JMUSRPDS USER PDS = SYSP.JOBLIB
SYSA
92336 12/01/92 08.50.54
JM03
JM01
RMSPBR87 (J00021) SUBMITTED BY SCHEDULER FROM JMUSRPDS
SYSA
92336 12/01/92 08.50.54
JM03
JM01
RMSPBR87 (J00021) MVS JOBNAME = FROM JMUSRPDS USER PDS = SYSP.JOBLIB
SYSA
92336 12/01/92 08.51.03
JM32
JM01
B338014 * NEEDS TAPE DRIVES 3420S= 00 3480S= 01
SYSA
92336 12/01/92 08.54.49
JM32
JM01
B338014 * NEEDS TAPE DRIVES 3420S= 00 3480S= 01
SYSA
92336 12/01/92 08.55.37
JM35
JM01
OPSPR88 TRIGGERED BY RMSPBR87
SYSA
92336 12/01/92 08.55.41
JM03
JM01
B338014 (J00025) SUBMITTED BY SCHEDULER FROM JMSTGPDS
SYSA
92336 12/01/92 09.01.11
JM07
JM01
RDMSRGEN NOT STARTED, PREDECESSOR -> RDMSRGEN NOT COMPLETED
SYSA
92336 12/01/92 09.04.00
JM03
JM01
B338005 (J00026) SUBMITTED BY SCHEDULER FROM JMSTGPDS
SYSA
92336 12/01/92 09.15.22
JM07
JM01
RDMSRGEN NOT STARTED, PREDECESSOR -> RDMSRGEN NOT COMPLETED
Page - 268
Mantissa Corporation © 2013
OPS/MASTER®
Chapter 10
Data Base Detail Reports
Sample Report(30-1): JM5020
Sample Report(30-1): JM5020
REPORT : JM5020
JOB/Master® REPORTING SYSTEM
PAGE:
1
SYSTEM : OPS
ALL JOBS RUN
TIME:
10:38:26
RELEASE :
PERIOD 93288 THRU 93288
DATE:
10/29/93
--------------------------------------------------------------------------------------------------------------------------------MANTISSA CORPORATION - COPYRIGHT 1990 - ALL RIGHTS RESERVED
---------------------------------------------------------------------------------------------------------------------------------
JOBNAME JOBNO
-------- -----
CPU
TIME
SYSID COND CODE MM.SS.TT
----- --------- --------
*SCHEDULED* *-READER--* *--START--* *---END---*
DATE
TIME DATE
TIME DATE
TIME DATE
TIME
JOB
YYDDD HH.MM YYDDD HH.MM YYDDD HH.MM YYDDD HH.MM NETWORK SYSTEM
----- ----- ----- ----- ----- ----- ----- ----- -------- --------
STS002E4
JMSCHED4
STS00296
STS00200
SYSA
SYSA
SYSA
SYSA
93287
93288
93288
93288
CC=
CC=
CC=
CC=
0000
0000
0000
0000
00.00.30
00.19.99
00.00.30
00.00.38
23:57
06:45
00:01
09:04
93288
93288
93288
93288
08:59
08:59
09:04
09:04
93288
93288
93288
93288
08:59
08:59
09:04
09:04
93288
93288
93288
93288
09:04
09:03
09:04
09:05
********
********
********
********
GBANKING
JMSCHED4
GBANKING
GBANKING
00.05.03
00.04.00
00.00.05
00.00.08
E:\Manuals\Product Manuals\ASO\OM (OPS Master)\Reference Guide\Current Release\OPS_C10.fm
04661
04662
04665
04666
ELAPSED
FAILED
TIME
HH.MM.SS
STEP
-------- --------
Mantissa Corporation © 2013
Page - 269
Chapter 10
OPS/MASTER®
Sample Report(30-2): JM5020F
Data Base Detail Reports
Sample Report(30-2): JM5020F
REPORT : JM5020
JOB/Master® REPORTING SYSTEM
PAGE:
SYSTEM : OPS
FAILED JOBS
TIME:
RELEASE :
PERIOD 93264 THRU 92365
DATE:
---------------------------------------------------------------------------------------------------------------------MANTISSA CORPORATION - COPYRIGHT 1990 - ALL RIGHTS RESERVED
----------------------------------------------------------------------------------------------------------------------
1
10:15:59
09/24/93
CPU
*SCHEDULED* *-READER--* *--START--* *---END---*
ELAPSED
FAILED
TIME
DATE
TIME DATE
TIME DATE
TIME DATE
TIME
JOB
TIME
JOBNAME JOBNO SYSID COND CODE MM.SS.TT YYDDD HH.MM YYDDD HH.MM YYDDD HH.MM YYDDD HH.MM NETWORK SYSTEM HH.MM.SS STEP
-------- ----- ----- --------- -------- ----- ----- ----- ----- ----- ----- ----- ----- -------- -------- -------SYSA
CC=
0022 00.00.00
93263 10:00
00000 00:00 00000 00:00 93264 07:02 ******** CANSYS
FAILED REASON: J07582 CANCELLED BEFORE EXECUTION
OO1102RF 04916
SYSA
CC=
0022 00.00.00
93256 21:10
00000 00:00 00000 00:00 93257 09:22 ********
FAILED REASON: J04916 ** FAILED ** -> ALLOC
RMSP1100 00.00.00
CC= 0012
PRSTJOB1 07998
SYSA
CC=
0546 00.00.00
93264 09:20
00000 00:00 00000 00:00 93264 14:14 ********
FAILED REASON: J07998 ** FAILED ** -> S1
PERSTORE 00.00.00
S= 222
PRSTJOB1 07569
SYSA
CC=
0546 00.00.00
93263 09:25
00000 00:00 00000 00:00 93264 07:02 ********
FAILED REASON: J07569 ** FAILED ** -> S1
PERSTORE 00.00.00
S= 222
RMSPBR88 04487
SYSA
CC=
0546 00.00.00
93256 07:00
00000 00:00 00000 00:00 93256 14:20 ********
FAILED REASON: J04487 ** FAILED ** -> STEP01
MAINTDLY 00.00.00
JCLERR
R1124001 05404
SYSA
CC=
0546 00.00.00
93258 07:28
00000 00:00 00000 00:00 93258 08:52 ********
FAILED REASON: J05404 ** FAILED ** -> RM80004
RMSP1100 00.00.00
S= 222
R1128001 04891
SYSA
CC=
0012 00.00.00
93256 22:13
00000 00:00 00000 00:00 93257 09:22 ********
FAILED REASON: J04891 ** FAILED ** -> JS001
RMSP1100 00.00.00
CC= 0012
R1128001 07843
SYSA
CC=
0546 00.00.00
93263 11:12
00000 00:00 00000 00:00 93263 18:07 ********
FAILED REASON: J07843 ** FAILED ** -> RM90008
RMSP1100 00.00.00
S= 222
R1128002 05371
SYSA
CC=
0012 00.00.00
93258 00:00
00000 00:00 00000 00:00 93258 07:00 ********
FAILED REASON: J05371 ** FAILED ** -> JS001
RMSP1100 00.00.00
CC= 0012
SYMTEST3 05091
SYSA
CC=
0022 00.00.00
93257 11:00
00000 00:00 00000 00:00 93257 13:15 ********
FAILED REASON: J05091 ** FAILED ** -> STEP1
******** 00.00.00
U= 0106
TAPEXCL1 07950
SYSA
CC=
0546 00.00.00
93264 08:00
00000 00:00 00000 00:00 93264 14:14 ********
FAILED REASON: J07950 ** FAILED ** -> STEP1
TAPEXCLU 00.00.00
JCLERR
TAPEXCL2 07952
SYSA
CC=
0546 00.00.00
93264 08:00
00000 00:00 00000 00:00 93264 09:35 ********
FAILED REASON: J07952 ** FAILED ** -> STEP1
TAPEXCLU 00.00.00
JCLERR
TAPEXCL3 04524
SYSA
CC=
0022 00.00.00
93256 08:00
00000 00:00 00000 00:00 93256 09:36 ********
FAILED REASON: J04524 ** FAILED ** -> STEP1
TAPEXCLU 00.00.00
JCLERR
TAPEXCL4 07953
SYSA
CC=
0546 00.00.00
93264 08:00
00000 00:00 00000 00:00 93264 09:35 ********
FAILED REASON: J07953 ** FAILED ** -> STEP1
TAPEXCLU 00.00.00
JCLERR
TAPEXCL6 07954
SYSA
CC=
0546 00.00.00
93264 08:00
00000 00:00 00000 00:00 93264 09:35 ********
FAILED REASON: J07954 ** FAILED ** -> STEP1
TAPEXCLU 00.00.00
JCLERR
TAPEXCL8 07955
SYSA
CC=
0546 00.00.00
93264 08:00
00000 00:00 00000 00:00 93264 09:35 ********
FAILED REASON: J07955 ** FAILED ** -> STEP1
TAPEXCLU 00.00.00
JCLERR
TRIGJOBA 07767
SYSA
CC=
0012 00.00.00
93263 15:00
00000 00:00 00000 00:00 93263 18:25 ********
FAILED REASON: J07767 ** FAILED ** -> STEP070
TRIGTEST 00.00.00
CC= 0008
Page - 270
00.00.00
Mantissa Corporation © 2013
E:\Manuals\Product Manuals\ASO\OM (OPS Master)\Reference Guide\Current Release\OPS_C10.fm
DEADCAN1 07582
OPS/MASTER®
Chapter 10
Data Base Detail Reports
Sample Report(30-3): JM5020S
Sample Report(30-3): JM5020S
REPORT : JM5020
JOB/Master® REPORTING SYSTEM
PAGE:
SYSTEM : OPS
JOBS SCHEDULED BUT NOT RUN
TIME:
RELEASE :
PERIOD 93264 THRU 92365
DATE:
-------------------------------------------------------------------------------------------------------------------MANTISSA CORPORATION - COPYRIGHT 1990 - ALL RIGHTS RESERVED
--------------------------------------------------------------------------------------------------------------------
1
10:16:03
09/24/93
E:\Manuals\Product Manuals\ASO\OM (OPS Master)\Reference Guide\Current Release\OPS_C10.fm
CPU
*SCHEDULED* *-READER--* *--START--* *---END---*
ELAPSED
FAILED
TIME
DATE
TIME DATE
TIME DATE
TIME DATE
TIME
JOB
TIME
JOBNAME JOBNO SYSID COND CODE MM.SS.TT YYDDD HH.MM YYDDD HH.MM YYDDD HH.MM YYDDD HH.MM NETWORK SYSTEM
HH.MM.SS STEP
-------- ----- ----- --------- -------- ----- ----- ----- ----- ----- ----- ----- ----- -------- -------- -------DEADCAN1
DEADCAN1
DEADCAN1
DEADCAN1
DEADCAN1
DEADCAN1
DEADCAN2
DEADCAN2
DEADCAN2
DEADCAN2
DEADCAN2
DEADCAN2
DEADCAN2
GC10C100
GC10C100
GC10C100
GC10C100
HAROLDJ
MSGTEST
OBTRSYTO
OBTRSYTO
OBTRSYTO
OBTRSYTO
OBTRSYTO
OO1102RF
OO1102RF
OO1102RF
OPSDUMY0
OPSDUMY0
OPSDUMY1
OPS51305
OPS51306
OPS51307
OPS51308
OPS51315
OPS51316
OPS51317
OPS51318
OP511001
OSPDUMY0
PRSTJOB1
PRSTJOB1
PRSTJOB1
PRSTJOB1
PRSTJOB1
PRSTJOB1
PRSTJOB1
PRSTJOB1
RMSCMND1
RMSPBR87
R112DMY
07582
00000
00000
00000
00000
00000
00000
00000
00000
00000
00000
00000
00000
00000
00000
00000
00000
00000
00000
00000
00000
00000
00000
00000
00000
00000
04916
00000
00000
00000
00000
00000
00000
00000
00000
00000
00000
00000
00000
00000
00000
00000
00000
00000
00000
00000
00000
00000
00000
00000
00000
SYSA
SYSA
SYSA
SYSA
SYSA
SYSA
SYSA
SYSA
SYSA
SYSA
SYSA
SYSA
SYSA
SYSA
SYSA
SYSA
SYSA
SYSB
SYSA
SYSA
SYSA
SYSA
SYSA
SYSA
SYSA
SYSA
SYSA
SYSA
SYSA
SYSA
SYSA
SYSA
SYSA
SYSA
SYSA
SYSA
SYSA
SYSA
SYSA
SYSA
SYSA
SYSA
SYSA
SYSA
SYSA
SYSA
SYSA
SYSA
SYSA
SYSA
SYSA
CC=
CC=
CC=
CC=
CC=
CC=
CC=
CC=
CC=
CC=
CC=
CC=
CC=
CC=
CC=
CC=
CC=
CC=
CC=
CC=
CC=
CC=
CC=
CC=
CC=
CC=
CC=
CC=
CC=
CC=
CC=
CC=
CC=
CC=
CC=
CC=
CC=
CC=
CC=
CC=
CC=
CC=
CC=
CC=
CC=
CC=
CC=
CC=
CC=
CC=
CC=
0022
0022
0022
0022
0022
0022
0022
0022
0022
0022
0022
0022
0022
0022
0022
0022
0022
0022
0022
0022
0022
0022
0022
0022
0022
0022
0022
0022
0022
0022
0022
0022
0022
0022
0022
0022
0022
0022
0022
0022
0022
0022
0022
0022
0022
0022
0022
0022
0022
0022
0022
00.00.00
00.00.00
00.00.00
00.00.00
00.00.00
00.00.00
00.00.00
00.00.00
00.00.00
00.00.00
00.00.00
00.00.00
00.00.00
00.00.00
00.00.00
00.00.00
00.00.00
00.00.00
00.00.00
00.00.00
00.00.00
00.00.00
00.00.00
00.00.00
00.00.00
00.00.00
00.00.00
00.00.00
00.00.00
00.00.00
00.00.00
00.00.00
00.00.00
00.00.00
00.00.00
00.00.00
00.00.00
00.00.00
00.00.00
00.00.00
00.00.00
00.00.00
00.00.00
00.00.00
00.00.00
00.00.00
00.00.00
00.00.00
00.00.00
00.00.00
00.00.00
Mantissa Corporation © 2013
93263
93260
93257
93256
93259
93258
93258
93259
93256
93257
93263
93260
93264
93260
93256
93256
93256
93261
93260
93257
93257
93257
93262
93261
93256
93258
93256
93257
93256
93257
93261
93261
93262
93262
93261
93261
93262
93262
93256
93258
93263
93263
93263
93263
93263
93263
93263
93263
93261
93256
93258
10:00
10:00
10:00
10:00
10:00
10:00
10:15
10:15
10:15
10:15
10:15
10:15
10:15
10:03
00:00
00:00
00:00
00:00
14:30
02:00
02:00
02:00
02:00
02:00
13:42
08:31
21:10
07:00
08:24
07:36
18:00
22:00
03:00
06:00
19:00
22:00
03:00
06:00
07:00
09:59
09:30
09:35
09:40
09:45
09:50
09:55
10:00
10:05
17:01
07:00
00:00
00000
00000
00000
00000
00000
00000
00000
00000
00000
00000
00000
00000
00000
00000
00000
00000
00000
00000
00000
00000
00000
00000
00000
00000
00000
00000
00000
00000
00000
00000
00000
00000
00000
00000
00000
00000
00000
00000
00000
00000
00000
00000
00000
00000
00000
00000
00000
00000
00000
00000
00000
00:00
00:00
00:00
00:00
00:00
00:00
00:00
00:00
00:00
00:00
00:00
00:00
00:00
00:00
00:00
00:00
00:00
00:00
00:00
00:00
00:00
00:00
00:00
00:00
00:00
00:00
00:00
00:00
00:00
00:00
00:00
00:00
00:00
00:00
00:00
00:00
00:00
00:00
00:00
00:00
00:00
00:00
00:00
00:00
00:00
00:00
00:00
00:00
00:00
00:00
00:00
00000
00000
00000
00000
00000
00000
00000
00000
00000
00000
00000
00000
00000
00000
00000
00000
00000
00000
00000
00000
00000
00000
00000
00000
00000
00000
00000
00000
00000
00000
00000
00000
00000
00000
00000
00000
00000
00000
00000
00000
00000
00000
00000
00000
00000
00000
00000
00000
00000
00000
00000
00:00
00:00
00:00
00:00
00:00
00:00
00:00
00:00
00:00
00:00
00:00
00:00
00:00
00:00
00:00
00:00
00:00
00:00
00:00
00:00
00:00
00:00
00:00
00:00
00:00
00:00
00:00
00:00
00:00
00:00
00:00
00:00
00:00
00:00
00:00
00:00
00:00
00:00
00:00
00:00
00:00
00:00
00:00
00:00
00:00
00:00
00:00
00:00
00:00
00:00
00:00
93264
93260
93257
93256
93259
93258
93258
93259
93256
93257
93263
93260
93264
93260
93256
93256
93256
93261
93260
93256
93256
93256
93263
93263
93256
93259
93257
93257
93256
93257
93263
93263
93263
93263
93263
93263
93263
93263
93256
93258
93264
93264
93264
93264
93264
93264
93264
93264
93263
93256
93258
07:02
10:04
10:04
10:04
10:04
10:04
10:20
10:20
10:20
10:20
10:20
10:20
10:20
06:38
13:28
14:20
13:38
17:38
14:32
13:38
13:28
14:20
06:58
06:57
14:44
09:13
09:22
07:12
09:15
15:50
06:57
06:57
06:58
06:58
06:57
06:58
06:58
06:58
08:30
10:30
07:01
07:01
07:02
07:02
07:02
07:02
07:02
07:02
06:57
14:20
07:01
********
********
********
********
********
********
********
********
********
********
********
********
********
********
********
********
********
********
********
********
********
********
********
********
********
********
********
********
********
********
********
********
********
********
********
********
********
********
********
********
********
********
********
********
********
********
********
********
********
********
********
CANSYS
CANSYS
CANSYS
CANSYS
CANSYS
CANSYS
CANSYS
CANSYS
CANSYS
CANSYS
CANSYS
CANSYS
CANSYS
GBANK
GBANK
GBANK
GBANK
********
CANSYS
GBANK
GBANK
GBANK
GBANK
GBANK
RMSP1100
RMSP1100
RMSP1100
RMSP1100
RMSP1100
RMSP1100
TSTEVERY
TSTEVERY
TSTEVERY
TSTEVERY
TSTALL
TSTALL
TSTALL
TSTALL
MAINTDLY
RMSP1100
PERSTORE
PERSTORE
PERSTORE
PERSTORE
PERSTORE
PERSTORE
PERSTORE
PERSTORE
RM11CMND
MAINTDLY
********
00.00.00
00.00.00
00.00.00
00.00.00
00.00.00
00.00.00
00.00.00
00.00.00
00.00.00
00.00.00
00.00.00
00.00.00
00.00.00
00.00.00
00.00.00
00.00.00
00.00.00
00.00.00
00.00.00
00.00.00
00.00.00
00.00.00
00.00.00
00.00.00
00.00.00
00.00.00
00.00.00
00.00.00
00.00.00
00.00.00
00.00.00
00.00.00
00.00.00
00.00.00
00.00.00
00.00.00
00.00.00
00.00.00
00.00.00
00.00.00
00.00.00
00.00.00
00.00.00
00.00.00
00.00.00
00.00.00
00.00.00
00.00.00
00.00.00
00.00.00
00.00.00
Page - 271
Chapter 10
OPS/MASTER®
Sample Report(30-4): JM5020R
Data Base Detail Reports
Sample Report(30-4): JM5020R
REPORT : JM5020
JOB/Master® REPORTING SYSTEM
PAGE:
SYSTEM : OPS
JOBS RUN BUT NOT SCHEDULED
TIME:
RELEASE :
PERIOD 93264 THRU 92365
DATE:
--------------------------------------------------------------------------------------------------------------------MANTISSA CORPORATION - COPYRIGHT 1990 - ALL RIGHTS RESERVED
---------------------------------------------------------------------------------------------------------------------
1
10:16:10
09/24/93
CPU
*SCHEDULED* *-READER--* *--START--* *---END---*
ELAPSED
FAILED
TIME
DATE
TIME DATE
TIME DATE
TIME DATE
TIME
JOB
TIME
JOBNAME JOBNO SYSID COND CODE MM.SS.TT YYDDD HH.MM YYDDD HH.MM YYDDD HH.MM YYDDD HH.MM NETWORK SYSTEM
HH.MM.SS STEP
-------- ----- ----- --------- -------- ----- ----- ----- ----- ----- ----- ----- ----- -------- -------- -------04638
04658
04665
04673
05013
05030
05057
05282
05283
05286
05287
05348
05372
05376
06202
06206
06229
06294
06310
06318
06390
06521
06533
06535
06613
06818
06831
SYSA
SYSA
SYSA
SYSA
SYSA
SYSA
SYSA
SYSA
SYSA
SYSA
SYSA
SYSA
SYSA
SYSA
SYSA
SYSA
SYSA
SYSA
SYSA
SYSA
SYSA
SYSA
SYSA
SYSA
SYSA
SYSA
SYSA
CC= 0000
CC= 0000
CC= 0000
CC= 0000
CC= 0000
CC= 0000
CC= 0000
CC= 0000
CC= 0000
CC= 0000
CC= 0000
CC= 0000
JCLERR
CC= 0000
CC= 0000
CC= 0000
CC= 0000
CC= 0000
CC= 0000
CC= 0000
CC= 0000
CC= 0000
CC= 0000
CC= 0000
CC= 0000
CC= 0000
S=
222
00.22.06
00.21.66
00.26.71
00.21.30
00.22.10
00.20.52
00.21.08
00.16.21
00.19.55
00.23.90
00.20.01
00.00.30
00.00.00
00.00.57
00.23.37
00.23.47
00.21.23
00.00.30
00.00.30
00.00.29
00.00.30
00.00.30
00.19.14
00.19.11
00.00.30
00.18.65
00.17.77
93256
93256
93256
93256
93257
93257
93257
93257
93257
93257
93257
93258
93258
93258
93259
93259
93259
93259
93259
93259
93259
93259
93259
93259
93260
93260
93260
11:57
13:31
13:39
14:23
09:15
09:33
09:51
18:04
18:08
18:28
18:32
00:05
07:00
07:01
09:07
09:12
09:21
11:27
12:42
13:00
14:07
16:18
17:24
17:50
00:04
06:33
06:43
93256
93256
93256
93256
93257
93257
93257
93257
93257
93257
93257
93258
93258
93258
93259
93259
93259
93259
93259
93259
93259
93259
93259
93259
93260
93260
93260
11:57
13:31
13:39
14:23
09:15
09:33
09:51
18:04
18:05
18:28
18:28
00:05
06:59
07:01
09:06
09:11
09:21
11:27
12:42
13:00
14:07
16:18
17:24
17:50
00:04
06:33
06:43
93256
93256
93256
93256
93257
93257
93257
93257
93257
93257
93257
93258
93258
93258
93259
93259
93259
93259
93259
93259
93259
93259
93259
93259
93260
93260
93260
11:57
13:31
13:39
14:23
09:15
09:33
09:51
18:04
18:08
18:28
18:32
00:05
06:59
07:01
09:07
09:12
09:21
11:27
12:42
13:00
14:07
16:18
17:24
17:50
00:04
06:33
06:43
93256
93256
93256
93256
93257
93257
93257
93257
93257
93257
93257
93258
93258
93258
93259
93259
93259
93259
93259
93259
93259
93259
93259
93259
93260
93260
93260
12:02
13:36
13:43
14:27
09:23
09:38
09:58
18:08
18:12
18:31
18:35
00:05
07:00
07:01
09:11
09:18
09:25
11:27
12:43
13:01
14:08
16:18
17:27
17:54
00:04
06:42
06:53
********
********
********
********
********
********
********
********
********
********
********
********
********
********
********
********
********
********
********
********
********
********
********
********
********
********
********
********
********
********
********
********
********
********
********
********
********
********
********
********
********
********
********
********
********
********
********
********
********
********
********
********
********
********
00.04.45
00.04.38
00.04.24
00.04.09
00.07.22
00.05.14
00.07.12
00.03.44
00.03.52
00.03.41
00.03.09
00.00.06
00.00.04
00.00.16
00.04.56
00.06.05
00.03.56
00.00.06
00.00.08
00.00.06
00.00.07
00.00.08
00.03.28
00.03.22
00.00.06
00.08.20
00.09.51
S1
E:\Manuals\Product Manuals\ASO\OM (OPS Master)\Reference Guide\Current Release\OPS_C10.fm
JM1TST02
JM01SCHD
JM01SCHD
JM01SCHD
JM01SCHD
JM01SCHD
JM01SCHD
JM01SCHD
JM01SCHD
JM01SCHD
JM01SCHD
STS00297
JMPURGE
JMPURGE
JM01SCHD
JM01SCHD
JM01SCHD
STS00297
STS00297
STS00297
STS00297
STS00297
JM01SCHD
JM01SCHD
STS00297
JM01SCHD
JM01SCHD
Page - 272
Mantissa Corporation © 2013
OPS/MASTER®
Chapter 10
Data Base Detail Reports
Sample Report(30-5/6): JM5030
Sample Report(30-5/6): JM5030
REPORT : JM5030
JOB/Master® REPORTING SYSTEM
PAGE:
1
SYSTEM : OPS
SUMMARY BY COMPLETION CODE
TIME:
10:16:14|
RELEASE :
PERIOD 93264 THRU 92365
DATE:
09/24/93
---------------------------------------------------------------------------------------------------------------------MANTISSA CORPORATION - COPYRIGHT 1990 - ALL RIGHTS RESERVED
---------------------------------------------------------------------------------------------------------------------COMPLETION
CODE
---------
NUMBER OF
JOBS
---------
ELAPSED
HH.MM.SS
--------
CPU TIME
HH.MM.SS.TT
-----------
CC= 0000
CC= 0004
CC= 0008
CC= 0012
CC= 0020
CC= 0022
CC= 0546
CC= 1769
JCLERR
S= 222
U= 0106
U= 0999
2,576
7
20
44
1
534
19
8
13
6
1
8
01.21.28
00.03.05
00.04.01
00.02.58
00.00.00
00.00.00
00.00.00
00.00.00
08.59.27
10.21.12
00.00.40
00.01.25
04.56.32.92
00.00.06.30
00.00.17.09
00.01.10.53
00.00.00.00
00.00.00.00
00.00.00.00
00.00.00.00
00.00.00.00
00.00.27.79
00.00.10.51
00.00.02.98
3,237
3,237
320.54.16
320.54.16
04.58.48.12
04.58.48.12
TOTAL:
GRAND TOTAL:
REPORT : JM5030
JOB/Master® REPORTING SYSTEM
PAGE:
SYSTEM : OPS
SUMMARY BY COMPLETION CODE BY SYSTEM
TIME:
RELEASE :
PERIOD 93264 THRU 92365
DATE:
--------------------------------------------------------------------------------------------------------------------MANTISSA CORPORATION - COPYRIGHT 1990 - ALL RIGHTS RESERVED
--------------------------------------------------------------------------------------------------------------------COMPLETION
NUMBER OF
ELAPSED
CPU TIME
SYSTEM
CODE
JOBS
HH.MM.SS
HH.MM.SS.TT
----------------------------------------********
CC= 0000
30
01.35.58
00.06.35.46
CC= 0022
3
00.00.00
00.00.00.00
JCLERR
1
00.00.04
00.00.00.00
S= 222
1
00.09.51
00.00.17.77
U= 0106
1
00.00.40
00.00.10.51
TOTAL:
36
01.46.33
00.07.03.74
BACKUP
CC= 0000
TOTAL:
CALTEST
CC= 0000
TOTAL:
69.41.47
00.42.45.96
39
69.41.47
00.42.45.96
8
00.04.58
00.00.02.41
8
00.04.58
00.00.02.41
CANSYS
CC= 0022
14
00.00.00
00.00.00.00
COKERES
TOTAL:
CC= 0000
14
122
00.00.00
01.27.45
00.00.00.00
00.00.36.70
TOTAL:
122
01.27.45
00.00.36.70
7
7
00.02.51
00.03.05
00.00.18.32
00.00.06.30
14
00.05.56
00.00.24.62
18
00.14.43
00.01.09.30
18
00.14.43
00.01.09.30
98
00.50.55
00.00.29.43
98
00.50.55
00.00.29.43
CYCLE1
E:\Manuals\Product Manuals\ASO\OM (OPS Master)\Reference Guide\Current Release\OPS_C10.fm
39
CC= 0000
CC= 0004
TOTAL:
DATESUB
CC= 0000
TOTAL:
DRPPRES
CC= 0000
TOTAL:
Mantissa Corporation © 2013
1
10:16:18
09/24/93
Page - 273
Chapter 10
OPS/MASTER®
JMJOBRPT
Data Base Detail Reports
JMJOBRPT
GROUP BY: SYSTEM
SORT BY: JOBNAME
JOB/Master® REPORTING SYSTEM
JOB DEFINITION QUERY REPORT
PAGE:
1
DATE: 10/11/93
TIME: 13:33:38
--------------------------------------------------------------------------------------------------------------------MANTISSA CORPORATION - COPYRIGHT - 1993 - ALL RIGHTS RESERVED
--------------------------------------------------------------------------------------------------------------------EXT SUB CALENDAR EXCEPTN. EXCEPTN.
ALT
SYSTEM
JOBNAME ADDITIONAL FIELDS TRIG SUB TIME
NAME
CAL1
CAL2
DEF
NAME
DESCRIPTION
-------- ----------------- ---- --- ---- -------- -------- -------- -------- -------- -----------------------OSLOETR1
EXSAKST1
EXTSUB01
EXTJOB1
EXTTRIG1
EXTTRIG2
EXTTRIG3
SC003211
SC003215
OSLOEXT1
OSLOEXT2
ROGLODC
SWTEST01
RUNMODE
=
P
RUNMODE
=
P
RUNMODE
=
P
RUNMODE
=
P
RUNMODE
=
P
RUNMODE
=
P
RUNMODE
=
P
RUNMODE
=
P
RUNMODE
=
P
RUNMODE
=
P
RUNMODE
=
P
RUNMODE
=
P
RUNMODE
=
P
Y
Y
0900
********
Y
Y
0000
ESTSAKS1
N
Y
0130
EXTSUBMT EXTERNAL SUBMIT
N
Y
0800
JOSTENS2
Y
Y
0200
JOSTENS2
Y
Y
0200
JOSTENS2
Y
Y
0200
JOSTENS2
N
Y
0000
MAREMONT
N
Y
0000
MAREMONT
N
Y
1535
OSLOSYS1 EXT-SUB BEGINS
TEST
N
Y
1545
OSLOSYS1 EXT-SUB BEGINS
TEST
N
Y
1800
OSLOSYS5
N
Y
0000
SHWNTEST
2
PAGE:
DATE: 10/11/93
TIME: 13:33:38
--------------------------------------------------------------------------------------------------------------------MANTISSA CORPORATION - COPYRIGHT - 1993 - ALL RIGHTS RESERVED
--------------------------------------------------------------------------------------------------------------------*** SELECTION CRITERIA ***
VALUE
------------------------------------------------------------
FIELD-NAME
-----------EXTSUB
RUNMODE
RUNMODE
Page - 274
JOB/Master® REPORTING SYSTEM
JOB DEFINITION QUERY REPORT
=
=
=
Y
P
CONJUNCTION
----------AND
OR
AND
Mantissa Corporation © 2013
E:\Manuals\Product Manuals\ASO\OM (OPS Master)\Reference Guide\Current Release\OPS_C10.fm
GROUP BY: SYSTEM
SORT BY: JOBNAME
OPS/MASTER®
Chapter 10
Data Base Detail Reports
JMDSNRPT
JMDSNRPT
GROUP BY: DSN-TYPE
SORT BY: DSN
JOB/Master® REPORTING SYSTEM
DATASET DEFINITION QUERY REPORT
-------------------------------------------------------------------------------------------------------------------MANTISSA CORPORATION - COPYRIGHT - 1993 - ALL RIGHTS RESERVED
-------------------------------------------------------------------------------------------------------------------DATASET / ADDITIONAL FIELDS
--------------------------PROD.ENV3.JOB125
TRIGGER & ST
PROD.ENV3.JOB135
TRIGGER & ST
PROD.ENV6.JOB400
TRIGGER & ST
PRODCNTL.BATCH.A
TRIGGER & ST
PRODCNTL.BATCH.DAILY
TRIGGER & ST
JOBNAME
-------
TYP
---
DSN PROCESS TRIGGER WHEN DATASET IS
OUT DEF INP DAT DEL UPD REN SCR POS IS
--- --- --- --- --- --- --- --- --- -S
=
=
1) ENVJ130
5)
A
2) ENVJ140
6)
=
=
1) ENVJ150
5)
A
2) ENVJ155
6)
=
=
1) JOB1945
5)
A
2)
6)
=
=
1) TEMPJOB1 A
5)
V
2) TEMPJOB2 A
6)
=
=
1) BATCH119 A
5)
2)
6)
S
A
S
V
Y
3)
7)
4)
8)
3) ENVJ160
7)
Y
3)
7)
3)
7)
Y
A
Y
3)
7)
4)
8)
4)
8)
4)
8)
4)
8)
VALUE
-----
PAGE:
1
DATE: 10/11/93
TIME: 13:34:00
TYP
---
0000 E
C
0000 E
C
0010 E
APPLES AND ORANGES
C
0000 E
C
0019 E
C
2
PAGE:
DATE: 10/11/93
TIME: 13:34:00
--------------------------------------------------------------------------------------------------------------------MANTISSA CORPORATION - COPYRIGHT - 1993 - ALL RIGHTS RESERVED
--------------------------------------------------------------------------------------------------------------------GROUP BY: DSN-TYPE
SORT BY: DSN
JOB/Master® REPORTING SYSTEM
DATASET DEFINITION QUERY REPORT
*** SELECTION CRITERIA ***
VALUE
------------------------------------------------------------
FIELD-NAME
-----------=
=
PROD*
*
AND
AND
E:\Manuals\Product Manuals\ASO\OM (OPS Master)\Reference Guide\Current Release\OPS_C10.fm
DSN
TRIGGER & ST
CONJUNCTION
-----------
Mantissa Corporation © 2013
Page - 275
Chapter 10
Data Base Detail Reports
E:\Manuals\Product Manuals\ASO\OM (OPS Master)\Reference Guide\Current Release\OPS_C10.fm
JMDSNRPT
OPS/MASTER®
Page - 276
Mantissa Corporation © 2013
OPS/MASTER®
Chapter 11
Batch Functions
Batch Programs
Chapter 11
Batch Functions
Batch Programs
Introduction
JOB/Master® has a number of its programs available through batch. This offers greater
control of throughput by enabling functions which would normally require manual intervention to be scheduled and automatically performed by JOB/Master®. The following
pages provide a brief overview of the functions performed, an example of the JCL and an
explanation of the various parms within the JCL.
E:\Manuals\Product Manuals\ASO\OM (OPS Master)\Reference Guide\Current Release\OPS_C11.fm
The JCL members are sent with the installation tape and are in the INSTLIB. For ALL the
JCL members listed, some changes will be necessary prior to execution:
•
VSMHLQ - a generic high-level qualifier assigned to the VSAM files. This must
be altered to conform to site naming standards.
•
TUNIT - a generic unit parameter used in the JCL to define tape. This must be
altered to reference site unit parameter.
•
HLQ/HLQ.OPS - a generic high-level qualifier assigned some files. This must
be altered to conform to site naming standards.
In many instances, the JCL will have SUBID parameter for the four possible regions:
JM01-JM04. When used, the JCL will execute the program against the specified region. If
no subid is indicated, the default is JM01.
Mantissa Corporation © 2013
Page - 277
Chapter 11
OPS/MASTER®
JMBACKUP
Batch Functions
JMBACKUP
JMBACKUP backs the JOB/Master® VSAM files to tape. Any or all of the three files
may be backed up by selecting the appropriate parameter:
Parm options:
J = JMDB
[JOB/Master® Data Base]
S = JMJOBQ
[JOB/Master® Job Queue]
H = JMHIST
[JOB/Master® History]
J,S,H = ALL
It is recommended that this be run on a daily basis just after the schedule has completed.
//JMBACKUP JOB
(0000,0001),'J/M',CLASS=A,MSGCLASS=X
//*-------------------------------------------------------*
//* THIS JOB BACKUPS ANY OR ALL OF THE J/M VSAM FILES
//*
//* PARM VALUES ARE AS FOLLOWS:
//* 'J,S,H' = BACKUP ALL FILES
//*
'J' = JMDB DATABASE
//*
'S' = JMJOBQ JOB QUEUE
//*
'H' = JMHIST HISTORY FILE
//*
//* CHANGE VALUES: HLQ.OPS | TO CONFORM
//* CHANGE VALUES: VSMHLQ | TO SITE STANDARDS AND
//* CHANGE VALUES: JM.BACKUP | NAMING CONVENTIONS
//*
//* IF DSN IS NOT CATALOGED, USE "TUNIT" AND "VVVVVV":
//* CHANGE VALUES: TUNIT
//* CHANGE VALUES: VVVVVV
//*
//*------------------------------------------------------*
//STEP1
EXEC PGM=JMBACKUP,PARM='J,S,H'
//STEPLIB
DD
DSN=HLQ.OPS.LOADLIB,DISP=SHR
//SYSUDUMP DD
SYSOUT=*
//JMBACKUP DD
DSN=JM.BACKUP,
//
DISP=(NEW,KEEP),
//
UNIT=TUNIT,
//
LABEL=(1,SL),
//
DCB=(RECFM=FB,LRECL=1000,BLKSIZE=15000)
//JMDB
DD
DSN=VSMHLQ.JMDB,DISP=SHR
//JMHIST
DD
DSN=VSMHLQ.JMHIST,DISP=SHR
//JMJOBQ
DD
DSN=VSMHLQ.JMJOBQ,DISP=SHR
//CONTROL
DD
DSN=VSMHLQ.CONTROL,DISP=SHR
JMBATSP
JMBATSP is a batch utility job that will allow a scheduler to "schedule" Job/Master
CLASS priority changes or activation/deactivation commands into the system that used to
require operators to enter via the ISPF interface.
//*
//*-----------------------------------------------------------------//*
//* JMBATSP IS A BATCH UTILITY PROGRAM THAT CAN BE USED
Page - 278
Mantissa Corporation © 2013
E:\Manuals\Product Manuals\ASO\OM (OPS Master)\Reference Guide\Current Release\OPS_C11.fm
The JCL must be modified for multiple JOB/Master® Control Regions by changing the
DD statements for JMDB, JMHIST, JMJOBQ and CONTROL.
OPS/MASTER®
Chapter 11
Batch Functions
JMBATSP
E:\Manuals\Product Manuals\ASO\OM (OPS Master)\Reference Guide\Current Release\OPS_C11.fm
//* TO CHANGE THE PRIORITY OF J/M CLASSES. IT WILL DO THE
//* SAME FUNCTION AS THE "SP" FUNCTION IN THE JOB TRACKING
//* SECTION. EACH CLASS TO BE CHANGED MUST BE SPECIFIED IN
//* THE CARDIN INPUT FILE (FORMAT SHOWN BELOW). IF THE
//* CLASS IS NOT SPECIFIED, IT WILL NOT BE CHANGED.
//*
//* DUPLICATE CLASS RECORDS WILL NOT BE ALLOWED
//* (ONLY 1 "A" ETC...)
//*
//*-----------------------------------------------------------------//* PARM VALUES: SUBID=XXXX,TRACE=TRAY
//*
//* CARDIN input record format:
//* Col 1 - 6 "CLASS="
//* Col 7 - 7 CLASS to be changed (A - Z)
//* Col 8 - 8 Blank
//* Col 9 -18 Action (DEACTIVATE/ACTIVATE )
//*
//* -or//* Col 1 - 1 "*" Indicates a comment
//* Col 2 -72 Comment
//*
//*-----------------------------------------------------------------//*
//STEP1
EXEC PGM=JMBATSP,REGION=1M,
//
PARM='SUBID=JM01'
//*
//STEPLIB
DD
DSN=OPS.V521.LOADLIB,DISP=SHR
//SYSPRINT
DD
SYSOUT=*
//REPORT
DD
SYSOUT=*
//SYSUDUMP DD
SYSOUT=*
//SYSABEND DD
SYSOUT=*
//JMJOBQ
DD
DISP=SHR,DSN=OPS.V521.JMJOBQ
//CONTROL
DD
DISP=SHR,DSN=OPS.V521.CONTROL
//JMHIST
DD
DISP=SHR,DSN=OPS.V521.JMHIST
//CARDIN
DD
*
*----------------------------------------------------------------*
*
*
* Sample comments to show how user can document the
*
* Priority list update in this JOB.
*
*
*
*----------------------------------------------------------------*
CLASS=A ACTIVATE
CLASS=B DEACTIVATE
CLASS=C ACTIVATE
CLASS=D DEACTIVATE
CLASS=E ACTIVATE
CLASS=F DEACTIVATE
CLASS=G ACTIVATE
CLASS=M ACTIVATE
CLASS=N ACTIVATE
CLASS=R ACTIVATE
CLASS=S ACTIVATE
CLASS=T ACTIVATE
CLASS=Z ACTIVATE
/*
//
Mantissa Corporation © 2013
Page - 279
Chapter 11
OPS/MASTER®
JMBPOST
Batch Functions
JMBPOST
JMBPOST posts any of the five manual task flags that have been set (see MANUAL TASK
discussed in Data Base Creation and Job Tracking section).
Parm options:
JJJJJJJJ=
JOBNAME for which the manual task applies. If the name has
less than eight (8) characters, it must be padded with spaces.
NNNNY=
Three correspond with the order of the Manual Task on the List
Queue: 1=DE, 2=CI, 3=TI, 4=DI, 5=JS. Changing the appropriate flag from Y to N will post the task completed.
X=
A 'Y' in this field will issue a user abend 1001 if the JOBNAME is not on the schedule queue.
SUBID=
Optional parm can be used to specify the JOB/Master® control
region (JM01-JM04) if multiple regions are being used.
Defaults to JM01.
ALL
All instructs JMBPOST to post all occurrances of a job on the
schedule queue.
//JMBPOST
JOB
(91Y6,0000),'J/M',CLASS=A,MSGCLASS=X
//*-------------------------------------------------------*
//*
//* THIS JOB POSTS MANUAL TASK FLAG(S)
//*
//* JJJJJJJJ = JOBNAME PADDED TO(8)CHARACTERS WITH BLANKS
//*
//* NNNNN = THE FIVE AVAILABLE MANUAL TASKS IN THE SAME
//*
ORDER AS ON THE JOBQ: DE, CI, TI, DI, JS.
//*
N = MANUAL TASK POSTED AS COMPLETE.
//*
Y = MANUAL TASK IS NOT POSTED; NOT COMPLETE
//*
//* X=ABEND OPTION: Y=A USER ABEND CODE OF 1001 IS ISSUED
//*
TO INDICATE THAT THE JOB IS NOT
//*
ON THE SCHEDULE QUEUE.
//*
N=NO ACTION WILL BE TAKEN IF JOB IS
//*
NOT ON THE SCHEDULE QUEUE.
//*
//* SUBID = OPTIONAL PARM WHICH CAN BE USED TO SPECIFY THE
//*
J/M CONTROL REGION WHEN MULTIPLE REGIONS ARE
//*
BEING USED. IF OMMITTED, JM01 IS THE DEFAULT.
//*
//*
ALL INSTRUCTS JMBPOST TO POST ALL OCCURRANCES OF
//*
A JOB ON THE SCHEDULE QUEUE (higher overhead if used).
//*
//*
CHANGE VALUES: HLQ.OPS |TO CONFORM
//*
CHANGE VALUES: VSMHLQ |TO SITE NAMING STANDARDS
//*----------------------------------------------------- *
//S1
EXEC PGM=JMBPOST,PARM='JJJJJJ ,NNNNN,X,SUBID,ALL'
//STEPLIB
DD
DSN=HLQ.LOADLIB,DISP=SHR
//SYSUDUMP DD
SYSOUT=*
//JMJOBQ
DD
DSN=VSMHLQ.JMJOBQ,DISP=SHR
//JMDB
DD
DSN=VSMHLQ.JMDB,DISP=SHR
//CONTROL
DD
DSN=VSMHLQ.CONTROL,DISP=SHR
Page - 280
Mantissa Corporation © 2013
E:\Manuals\Product Manuals\ASO\OM (OPS Master)\Reference Guide\Current Release\OPS_C11.fm
The JCL must be modified for multiple JOB/Master® Control Regions by changing the
DD statements for JMJOBQ and CONTROL.
OPS/MASTER®
Chapter 11
Batch Functions
JMCLEAN
JMCLEAN
JMCLEAN is executed to check for invalid records in the JOBQ file.
Parm Options:
V = Verify and print record to sysout.
D = Verify and Delete any invalid records.
The JCL must be modified for multiple JOB/Master® Control Regions by changing the
DD statements for JMJOBQ and CONTROL.
//JMCLEAN
JOB
(91Y6,0000),JOBMASTER,CLASS=A,MSGCLASS=X
//S1
EXEC PGM=JMCLEAN,PARM=’V’
//STEPLIB
DD
DSN=HLQ.LOADLIB,DISP=SHR
//REPORT
DD
SYSOUT=*
//SYSUDUMP DD
SYSOUT=*
//JMJOBQ
DD
DSN=VSMHLQ.JMJOBQ,DISP=SHR
//CONTROL
DD
DSN=VSMHLQ.CONTROL,DISP=SHR
JMCOMND
JMCOMND is a batch utility job that will allow a scheduler to "schedule" various Job/
Master commands into the system that used to require operators to enter via the ISPF
interface.
E:\Manuals\Product Manuals\ASO\OM (OPS Master)\Reference Guide\Current Release\OPS_C11.fm
//*-------------------------------------------------------------------*
//* J O B M A S T R
JOB/MASTER BATCH COMMAND PROCESSOR*
//*
*
//* EDIT "VSMHLQ" TO PROPER HLQ FOR VSAM DATASETS. *
//*
*
//* EDIT "HLQ" TO PROPER HLQ FOR OPS LIBRARIES. *
//*
*
//* EDIT "SYS1.SCEERUN" TO PROPER COBOL RUNTIME LIBRARY. *
//*
*
//*-------------------------------------------------------------------*
//* JOB WILL ISSUE JOBQ COMMAND AGAINST SCHEDULE QUEUE. *
//*
*
*
//*
INPUT PARMS: 'C,X,JJJJJJJJ,SSSS,DDDDD,TTTT'
//*
*
//*
C = JOBQ COMMAND TO BE EXECUTED
*
//*
F: FORCE JOB
*
//*
E: RESET JOB
*
//*
S: SUBMIT JOB
*
//*
R: RELEASE JOB
*
//*
C: CANCEL JOB
*
//*
K: KEEP JOB
*
//*
H: HOLD JOB
*
//*
P: PURGE JOB
*
//*
I: INCLUDE JOB INTO SCHEDULE
*
//*
X: EXCLUDE JOB FROM SCHEDULE
*
//*
Y: SET TRACE ON HERE & SEND TRAY TO J/M
*
//*
N: SET TRACE OFF HERE & SEND TRAN TO J/M.
*
//*
*
//*
X = ACTION FLAG:
*
//*
J: COMMAND ON 1ST OCCURRENCE OF A JOB
*
//*
Q: COMMAND ON ALL OCCURRENCES OF A JOB
*
//*
S: COMMAND ON SPECIFIC JOB/DATE/TIME
*
//*
*
//*
JJJJJJJJ = JOBNAME - PADDED TO (8)
*
//*
CHARACTERS WITH BLANKS
*
Mantissa Corporation © 2013
Page - 281
Chapter 11
OPS/MASTER®
JMDBCOPY
Batch Functions
//*
*
//*
SSSS = SUBSYSTEM ID - PADDED TO (4)
*
//*
CHARACTERS WITH BLANKS
*
//*
OPTIONAL PARAMETER WHICH CAN BE USED
//*
TO SPECIFY THE J/M CONTROL REGION WHEN
//*
MULTIPLE REGIONS ARE BEING USED.
*
//*
IF OMMITTED, JM01 IS THE DEFAULT.
*
//*
*
//*
DDDDD = 5 DIGIT JULIAN DATE FROM THE JOBQ
//*
ONLY USED WITH ACTION=S.
*
//*
*
//*
TTTT = 4 DIGIT TIME (HHMM) FROM THE JOBQ
//*
ONLY USED WITH ACTION=S.
*
//*
*
//*-------------------------------------------------------------------*
//S1
EXEC PGM=JMCOMND,
//
PARM='C,X,JJJJJJJJ,SUBS,JDATE,TIME,
//
RPTOPTS(ON),RPTSTG(ON),
//
TERMTHDACT(UADUMP),TRAP(OFF)'
//STEPLIB
DD
DSN=HLQ.LOADLIB,DISP=SHR
//
DD
DSN=SYS1.SCEERUN,DISP=SHR
//*
DD
DSN=CEE.SCEERUN,DISP=SHR
//SYSUDUMP DD
SYSOUT=*
//JMJOBQ
DD
DSN=VSMHLQ.JMJOBQ,DISP=SHR
//CONTROL
DD
DSN=VSMHLQ.CONTROL,DISP=SHR
*
*
*
*
JMDBCOPY
JMDBCOPY copies database definitions, in their entirety, from one database to another.
Multiple definitions may be copied in one execution of this batch program. This will
make moving jobs from a "test" database to "production" virtually error free.
The definitions to be copied are specified in the CARDIN input file. The format of the
record is record type, followed by a space, and the name of the definition.
The record types are:
J - Job
S - System
P - Process Keyword Definition
N - Negative/Corequisite Definition
G - Group Message Definition
D - Dataset Definition
M - Message Definition
//JMDBCOPY JOB
(0000,0001),'J/M',CLASS=A,MSGCLASS=X
//*-------------------------------------------------------*
//* THIS PROGRAM WILL COPY JOB/Master® DEFINITIONS
//* FROM ONE JOB/Master® DATABASE TO ANOTHER
//*
//*
CHANGE VALUES: HLQ.OPS | TO CONFORM
//*
CHANGE VALUES: VSMHLQ | TO SITE NAMING STANDARDS
//*--------------------------------------------------------*
//JOBLIB
DD
DISP=SHR,DSN=HLQ.OPS.LOADLIB
Page - 282
Mantissa Corporation © 2013
E:\Manuals\Product Manuals\ASO\OM (OPS Master)\Reference Guide\Current Release\OPS_C11.fm
C - Calendar
OPS/MASTER®
Chapter 11
Batch Functions
JMDBUPD
//*
//STEP1
EXEC PGM=JMDBCOPY
//SYSOUT
DD
SYSOUT=*
//SYSUDUMP DD
SYSOUT=*
//JMDBIN
DD
DISP=SHR,DSN=HLQ.OPS.JMDB
//JMDBOUT
DD
DISP=SHR,DSN=VSMHLQ.JMDB
//CARDIN
DD
*
J JOBA
J JOBB
C SPECIAL
S PAYSYS
D TLRG.TEST.DATASET
/*
//
This example will copy job JOBA and JOBB, SPECIAL calendar, system PAYSYS, and
TLRG.TEST.DATASET dataset from HLQ.OPS.JMDB to VSMHLQ.JMDB. All definitions must be directly specified (ie: specifying S PAYSYS will only copy the system definition, not the job definitions belonging to system PAYSYS).
JMDBUPD
JMDBUPD globally changes Job/Master database definitions based on whether the record
matches the criteria specified in the input parameter file. Multiple definitions may be
updated in one execution of this batch program. This will make changing jobs to virtually
error free. For example, changing the name of a submit PDS on all occurances in the database. The database records to be updated are specified in the CARDIN input file. The
basic format of the input record statement follows.
//CARDIN DD *
FIELD-NAME OPERATOR VALUE CONJUNCTION
FIELD-NAME OPERATOR VALUE CONJUNCTION
FIELD-NAME OPERATOR VALUE CONJUNCTION
.
.
.
/*
E:\Manuals\Product Manuals\ASO\OM (OPS Master)\Reference Guide\Current Release\OPS_C11.fm
)
FIELD-NAME values must start in column 1 but any number of spaces can
separate the four fields in the record for readability.
FIELD-NAME
Any database definition field-name listed in Tables 10.1 and
10.2 can be used in the selection process. As a general rule, the
Names are close to what is on the online definition screens.
OPERATOR
Valid operators are =, <, and >.
VALUE
Any value up to the length of the input record can be entered.
Wild-cards are permitted. You may want to update all jobs that
begin with a specific character string.
EXAMPLE:
Update all jobs which begin with the letters ACCTG.
JOBNAME
CONJUNCTION
Mantissa Corporation © 2013
=
ACCTG*
A conjunction is used to combine the logic of two or more
Page - 283
Chapter 11
OPS/MASTER®
JMFORCE
Batch Functions
field-names. Valid conjunctions are AND, OR and EXC. AND
is the default conjunction which does not have to be specified.
The AND conjunction allows multiple fields/conditions to be
grouped together as discussed previously, but its use must be
logical. For example, it is not logical to specify:
SYSTEM = ENVSYS AND
SYSTEM = PAYSYS
... because a job can only belong to one system. The update
program will run, but no jobs will be selected.
Making the Database Record Selection
JMDBUPD uses the same keyword field names that are used in the reporting jobs, JMJOBRPT and JMDSNRPT. They are listed in Tables 10.1 and 10.2.
Additional statements specific to JMDBUPD
REPLACE WITH
Control keyword. Any FIELD-NAME statements placed after
this statement will be updated with the "Value" specified on the
statement (even spaces).
ADD MULTI
Control keyword. Any FIELD-NAME statements placed after
this statement will be updated with the "Value" specified on the
statement (even spaces) in multiple value fields.
If HISTORY=Y, all changes will be logged into the history log. The file JMREPORT is a
work file and can be a temporary file.
It is very important to be careful with the use of this program. The safe procedure is to do
a backup of the JMDB database before starting the update and checking the results.
//CARDIN DD *
SELECT
JOBNAME = HOSP*
COREQDEP = R1134SUB
REPLACE WITH
COREQDEP = R1135SUB
/*
This will select all jobs beginning with HOSP and change any corequsite dependencies of
"R1134SUB" to "R1135SUB" (ie. a newer release).
JMFORCE
JMFORCE is used to reset a Job/Master internal buffer to reuseable on a job that was
forced by an operator. Before this job, the buffer would not be available for use on a
forced job until the system was cycled.
//* ---------------------------------------------------------------*
//* THIS JOB WILL SET A BUFFER TO REUSABLE ON A FORCED JOB *
//*
*
//* EDIT "HLQ" TO HIGH LEVEL QUALIFIER FOR OPS LIBRARIES. *
//*
*
//* ---------------------------------------------------------------*
//*
PARM KEYWORD:
*
Page - 284
Mantissa Corporation © 2013
E:\Manuals\Product Manuals\ASO\OM (OPS Master)\Reference Guide\Current Release\OPS_C11.fm
Examples:
OPS/MASTER®
Chapter 11
Batch Functions
JMPURGE
//*
SUBID=JM01
(JM01 IS THE DEFAULT)
*
//*
JOBNM=XXXXXXXX
*
//*
DATE=YYDDD
*
//*
TIME=HHMM
*
//*
*
//*
RC = 0000 SUCCESSFUL
*
//*
RC = 0008 PARTIALLY SUCCESSFUL - SEE MESSAGES *
//*
RC = 0012 UNSUCCESSFUL - SEE MESSAGES
*
//*
*
//* <<< NOTE >>> WILL DELETE THE BUFFER OF 1ST JOB FOUND *
//*
WITH NAME ENTERED IN PARM.
*
//*
WILL DELETE THE JOBQ RECORD THAT MATCHES
*
//*
WITH NAME/DATE/TIME ENTERED IN PARM.
*
//*
*
//* ---------------------------------------------------------------*
//STEP1 EXEC PGM=JMFORCE,REGION=1024K,
//
PARM='JOBNM=XXXXXXX,SUBID=JM01,DATE=00006,TIME=0928'
//*
//STEPLIB DD DSN=HLQ.LOADLIB,DISP=SHR
//SYSOUT DD SYSOUT=*
//SYSDBOUT DD SYSOUT=*
//SYSUDUMP DD SYSOUT=*
//
JMPURGE
JMPURGE will purge either a single job or all occurrences of a job on the JOBQ.
There are three (3) parms:
X=
'J' will purge the first occurrence of the JOB from the JOBQ.
'Q' will purge all occurrences of the JOB from the queue.
JJJJJJJJ=
JOBNAME to be purged. Less than eight (8) characters in the
name must be padded with spaces.
SUBID=
Specify JOB/Master® control region (JM01-JM04) when
using multiple regions. Default is JM01.
The JCL must be modified for multiple JOB/Master® Control Regions by changing the
DD statements for JMJOBQ and CONTROL.
E:\Manuals\Product Manuals\ASO\OM (OPS Master)\Reference Guide\Current Release\OPS_C11.fm
//JMPURGE
JOB (91Y6,0000),JOBMASTER,CLASS=A,MSGCLASS=X
//*-------------------------------------------------------*
//*
//* THIS JOB WILL PURGE A JOB(S) FROM THE SCHEDULE QUEUE
//*
//* X = J: FLAG TO PURGE ONLY THE 1ST OCCURANCE OF A JOB
//* Q: FLAG TO PURGE ALL OCCURANCES OF A JOB.
//*
ON THE SCHEDULE QUEUE.
//*
//* JJJJJJJJ = JOBNAME PADDED TO(8)CHARACTERS WITH BLANKS
//*
//* SUBID = OPTIONAL PARM WHICH CAN BE USED TO SPECIFY THE
//*
J/M CONTROL REGION WHEN MULTIPLE REGIONS ARE
//*
BEING USED. IF OMMITTED, JM01 IS THE DEFAULT
//*
//*
CHANGE VALUES: HLQ.OPS TO CONFORM
//*
CHANGE VALUES: VSMHLQ |TO SITE NAMING STANDARDS
//*----------------------------------------------------- *
//S1
EXEC PGM=JMPURGE,PARM='X,JJJJJJ ,SUBID'
Mantissa Corporation © 2013
Page - 285
Chapter 11
OPS/MASTER®
JMRESORC
Batch Functions
//STEPLIB
//SYSUDUMP
//JMJOBQ
//CONTROL
DD
DD
DD
DD
DSN=HLQ.LOADLIB,DISP=SHR
SYSOUT=*
DSN=VSMHLQ.JMJOBQ,DISP=SHR
DSN=VSMHLQ.CONTROL,DISP=SHR
JMRESORC
JMRESORC attaches or detaches resources (as defined in the JOB/Master® Data Base
definition).
The parms are as follows:
X=
'A' for Attach.
RRRRRRRRI
R-Resource name. Up to eight (8) characters, padded with
spaces if less. I=id reserved for future development. Pad with a
space.
SUBID =
JOB/Master® control region (JM01-JM04) when using multiple regions. Default is JM01.
//JMRESORC JOB (91Y6,0000),JOBMASTER,CLASS=A,MSGCLASS=X
//*------------------------------------------------------*
//* J M R E S O R C
*
//*------------------------------------------------------*
//*
//* THIS JOB WILL ATTACH OR DETACH JOB/Master® RESOURCES
//*
//* NOTE: SLASHES ARE REQUIRED IN THIS PARAMETER:
//*
'X/RRRRRRRRI/SUBID'
//*
//* X = A/: ATTACH RESOURCE
//* D/: DETACH RESOURCE
//*
//* RRRRRRRR = RESOURCE NAME PADDED TO (8) CHAR WITH
BLANKS
//*
//* I/ = PARM RESERVED FOR FUTURE DEVELOPMENT. BLANK FILL
//*
//* SUBID = OPTIONAL PARM WHICH CAN BE USED TO SPECIFY THE
//*
J/M CONTROL REGION WHEN MULTIPLE REGIONS ARE
//*
BEING USED. IF OMMITTED, JM01 IS THE DEFAULT
//*
//* CHANGE VALUES: HLQ.OPS TO CONFORM TO SITE STANDARDS
//*----------------------------------------------------- *
//S1
EXEC PGM=JMRESORC,PARM='X/RRRRRRRRI/SUBID'
//STEPLIB
DD
DSN=HLQ.LOADLIB,DISP=SHR
//SYSUDUMP DD
SYSOUT=*
Page - 286
Mantissa Corporation © 2013
E:\Manuals\Product Manuals\ASO\OM (OPS Master)\Reference Guide\Current Release\OPS_C11.fm
'D' for Detach.
OPS/MASTER®
Chapter 11
Batch Functions
JMRESTOR
JMRESTOR
JMRESTOR restores JOB/Master® VSAM files. This JCL assumes the backup has been
made to tape outside the control of a tape management system; thus the need to fill in the
appropriate UNIT= parm (site standard) and the VOLSER.
Any or all of the three files may be restored by selecting the appropriate parameter:
Parm options:
J=JMDB
[JOB/Master® Data Base]
S=JMJOBQ
[JOB/Master® Job Queue]
H=JMHIST
[JOB/Master® History]
E:\Manuals\Product Manuals\ASO\OM (OPS Master)\Reference Guide\Current Release\OPS_C11.fm
The JCL must be modified for multiple JOB/Master® Control Regions by changing the
DD statements for JMDB, JMHIST, JMJOBQ and CONTROL.
//JMRESTOR
JOB (0000,0001),'JOBMASTER',CLASS=A,MSGCLASS=X
//*-------------------------------------------------------*
//* THIS JOB RESTORES ANY OR ALL OF THE J/M VSAM FILES
//*
//* PARM VALUES ARE AS FOLLOWS:
//* 'J,S,H' = RESTORE ALL FILES
//*
'J' = JMDB DATABASE
//*
'S' = JMJOBQ JOB QUEUE
//*
'H' = JMHIST HISTORY FILE
//*
//* CHANGE VALUES: HLQ.OPS | TO CONFORM
//* CHANGE VALUES: VSMHLQ | TO SITE STANDARDS AND
//* CHANGE VALUES: JM.BACKUP | NAMING CONVENTIONS
//*
//* IF DSN IS NOT CATALOGED, USE "TUNIT" AND "VVVVVV":
//* CHANGE VALUES: TUNIT
//* CHANGE VALUES: VVVVVV
//*
//*------------------------------------------------------*
//S1
EXEC PGM=JMRESTOR,PARM='J,S,H'
//STEPLIB
DD
DSN=HLQ.LOADLIB,DISP=SHR
//SYSUDUMP DD
SYSOUT=*
//JMBACKUP DD
DSN=HLQ.JMBAKUP,
//
DISP=OLD ,
//
UNIT=TUNIT,
//
VOL=SER=VVVVVV
//JMDB
DD
DSN=VSMHLQ.JMDB,DISP=OLD
//JMHIST
DD
DSN=VSMHLQ.JMHIST,DISP=OLD
//JMJOBQ
DD
DSN=VSMHLQ.JMJOBQ,DISP=OLD
JMSHUT
JMSHUT cleanly brings down the JOB/Master® control region. In a multi-region environment, reference the appropriate SUBID: JM01-JM04. Default is JM01. For example, to
shutdown JM04, enter “S JMSHUT,PARM=JM04” on the system console.
//*------------------------------------------------------*
//* J M S H U T SHUTDOWN JOBMASTER CONTRL REGION
//*------------------------------------------------------*
//* SUBID = JM01-JM04. DEFAULT IS JM01.
*
//*------------------------------------------------------*
//JMSHUT
PROC SUBID=XXXX JOBMASTER REGION
IDENTIFIER
Mantissa Corporation © 2013
*
Page - 287
Chapter 11
OPS/MASTER®
JMSSCPSC
Batch Functions
//*
//JMSHUT
//STEPLIB
//SYSUDUMP
EXEC PGM=JMSHUT,PARM='&SUBID'
DD
DSN=HLQ.OPS.LOADLIB,DISP=SHR
DD
SYSOUT=*
JMSSCPSC
JMSSCPSC is used to stop and start the submit facility by altering the function parameter
accordingly:
FUNC=
PSCD
Stop submit facility
SSCD
Start submit facility
SUBID=
JOB/Master® control region (JM01-JM04) when using multiple regions. Default is JM01.
//JMSSCPSC
JOB
(0000,0001),'J/M',CLASS=A,MSGCLASS=E
//*-------------------------------------------------------*
//* J M S S C P S C START/STOP SUBMIT FACILITY FROM CONS *
//*-------------------------------------------------------*
//* THIS JOB IS USED TO STOP AND START SUBMIT FACILITY
//* BY ALTERING THE FUNCTION PARAMETER ACCORDINGLY.
//* FUNC: PSCD - STOP SUBMIT FACLITY
//*
SSCD - START SUBMIT FACLITY
//* SUBID: JM01-JM04. DEFAULT IS JM01.
//*-------------------------------------------------------*
//S1
EXEC PGM=JMSSCPSC,PARM='FUNC,SUBID'
//STEPLIB
DD
DSN=HLQ.OPS.LOADLIB,DISP=SHR
JMSTATUS
JMSTATUS will verify the status of the automatic submit facility and end with a return
code indicating the result..
Return Code 0016 indicates the submit facility is INACTIVE. Return Code 0000 indicates the submit facility is ACTIVE.
SUBID=
Optional parm can be used to specify the JOB/Master® control
region (JM01-JM04) if multiple regions are being used.
Defaults to JM01.
The JCL must be modified for multiple JOB/Master® Control Regions by changing the
DD statements for JMJOBQ and CONTROL.
//JMSTATUS
JOB
(0000,0001),'J/M',CLASS=A,MSGCLASS=X
//*-------------------------------------------------------*
//* THIS JOB CHECKS THE STATUS OF THE SUBMIT FACILITY.
//*
//* RC = 0016: SUBMIT FACLITY IS INACTIVE
//* RC = 0000: SUBMIT FACLITY IS ACTIVE
//*
//* SUBID = OPTIONAL PARM WHICH CAN BE USED TO SPECIFY THE
//* J/M CONTROL REGION WHEN MULTIPLE REGIONS ARE BEING
//* USED: JM01-04. IF OMMITTED, JM01 IS THE DEFAULT
//*
Page - 288
Mantissa Corporation © 2013
E:\Manuals\Product Manuals\ASO\OM (OPS Master)\Reference Guide\Current Release\OPS_C11.fm
Parm options:
OPS/MASTER®
Chapter 11
Batch Functions
JMTRACE
//*
CHANGE VALUES: HLQ.OPS | TO CONFORM
//*
CHANGE VALUES: VSMHLQ | TO SITE NAMING STANDARDS
//*-------------------------------------------------------*
//S1
EXEC PGM=JMSTATUS,PARM='SUBID'
//STEPLIB
DD
DSN=HLQ.OPS.LOADLIB,DISP=SHR
//SYSOUT
DD
SYSOUT=*
//JMJOBQ
DD
DSN=VSMHLQ.JMJOBQ,DISP=SHR
//CONTROLDDDSN=VSMHLQ.CONTROL,DISP=SHR
JMTRACE
JMTRACE will perform a diagnostic trace on a JOB/Master® control region. This is usually requested by Mantissa to assist in evaluating a problem:
FUNC=
TRAY
Turn the trace on.
TRAN
Turn the trace off.
SUBID=
JOB/Master® control region (JM01-JM04) when using
multiple regions. Default is JM01.
//JMTRACE
JOB
(0000,0001),'J/M',CLASS=A,MSGCLASS=X
//*-------------------------------------------------------*
//* J M T R A C E TURN ON/OFF JOBMASTER TRACE FACILITY *
//*-------------------------------------------------------*
//* JOB PERFORMS A DIAGNOSTIC TRACE ON THE JM02 MODULE
//* IN CONTROL REGION. THIS IS USUALLY REQUESTED BY
//* MANTISSA FOR PROBLEM DETERMINATION.
//*
//* FUNC: TRAY = TURN THE TRACE FUNCTION ON
//*
TRAN = TURN THE TRACE FUNCTION OFF
//*
//* SUBID = OPTIONAL PARAMETER USED TO SPECIFY A
//*
J/M CONTROL REGION WHEN MULTIPLE REGIONS
//*
ARE USED. IF OMITTED, JM01 IS THE DEFAULT.
//*
//* CHANGE VALUES: HLQ.OPS | TO CONFORM TO SITE STANDARDS
//*-------------------------------------------------------*
//S1
EXEC PGM=JMTRACE,PARM=’FUNC,SUBID’
E:\Manuals\Product Manuals\ASO\OM (OPS Master)\Reference Guide\Current Release\OPS_C11.fm
//STEPLIBDDDSN=HLQ.OPS.LOADLIB,DISP=SHR
Mantissa Corporation © 2013
Page - 289
E:\Manuals\Product Manuals\ASO\OM (OPS Master)\Reference Guide\Current Release\OPS_C11.fm
Chapter 11
OPS/MASTER®
JMTRACE
Batch Functions
Page - 290
Mantissa Corporation © 2013
OPS/MASTER®
Chapter 12
Tutorial
Introduction
Chapter 12
Tutorial
Introduction
This section contains several “hands-on” tutorials for the user to follow while performing
the steps on the system. You will learn how to define jobs and use the schedule monitoring
features. All sample jobs have been provided with the software so that you can actually
run the schedules that you produce with these tutorials.
E:\Manuals\Product Manuals\ASO\OM (OPS Master)\Reference Guide\Current Release\OPS_C12.fm
The following tutorials are contained in this section (detailed descriptions of the job
schedule requirements can be found at the beginning of each lesson):
1.
Inventory Job Schedule
2.
Sales Job Schedule
3.
Commissions Paid Job Schedule
4.
Running a Job Schedule Simulation
5.
Monitoring the Job Queue
6.
Posting Manual Task
Each tutorial introduces different features of the OPS/Master® scheduling system. The
topics covered become progressively more advanced as you proceed through this section.
We strongly suggest that you begin learning the system by following the instructions in
this section. Then proceed to set up actual production schedules, referring to the OPS/
Master® Reference documentation as necessary.
Sample Company Work Days and Holidays
The following is a list of all workdays and holidays that are used in the tutorials.
Work Days
The standard work days are Monday through Friday (excluding holidays).
Mantissa Corporation © 2013
Page - 291
Chapter 12
OPS/MASTER®
Creating a Sample Inventory Job Schedule
Tutorial
Holidays
For this tutorial, we will use HOLIDAY calendar, which will have all federal holidays and
weekends marked. Proceed with the tutorial to learn how to create HOLIDAY. (Refer to
Calendars - JOB/Master® Creation.)
Creating a Sample Inventory Job Schedule
Schedule Requirements
This schedule must allow for the following jobs to be run according to the schedule shown
below:
JOB NAME
SCHEDULED TO BE RUN:
INVNTRY1
Daily (each workday)
INVNTRY2
Last workday of week, with manual data entry task. If last
workday is a holiday, run on closest workday before the holiday. Data Entry message: Enter Time Cards and Sign Off upon
completion (message sent to USERID TJRM)
INVNTRY3
Last workday of month, with following documentation:
JOB DESCRIPTION: MONTH-END INVENTORY
SUBMITTING DEPT: INVENTORY MANAGEMENT
PROGRAMMER NAME: SMITH, JOE
USER DEPARTMENT: PAYROLL DEPT. DELIVERY
METHOD: HAND DELIVER
E:\Manuals\Product Manuals\ASO\OM (OPS Master)\Reference Guide\Current Release\OPS_C12.fm
Follow the steps below to define these jobs to the database according to the above requirements.
Page - 292
Mantissa Corporation © 2013
OPS/MASTER®
Chapter 12
Tutorial
Creating a Sample Inventory Job Schedule
Creating the Job Definition For INVNTRL1
Log into the OPS/Master® system. This is generally done with a menu option on the ISPF
menu screen. For more information, consult your system administrator.
1.
Go to the JOB/Master® Primary Menu screen as shown. Enter D (Data Base
Creation) in the OPTION ==> field and press <ENTER>.
------------------ Job Scheduling and Management by Mantissa ----------------Option ===> D
Data Base Creation : D
Profile
: P
Report Selection
: R
Job Tracking
: T
JCL Substitution : J
Current Selection = JM01
PF1 = HELP
User= P390K
Date= 98/09/09
98.252
Time= 13:26
JMJMJMJMJMJMJMJMJMJMJMJMJMJMJMJMJMJMJMJMJMJMJMJMJMJMJMJMJMJMJMJMJMJMJMJMJMJMJMJM
JMJMJMJMJMJMJMJMJMJMJMJMJMJMJMJMJMJMJ MJMJMJMJMJMJMJMJMJMJMJMJMJMJMJMJMJMJMJMJM
JMJMJMJMJMJMJMJMJMJ
MJM JMJMJM
MJM
MJMJMJMJMJMJMJMJMJMJMJM
JMJMJMJMJMJMJMJMJMJMJMJM JMJMJMJMJ MJMJMJ
J M J
JMJMJMJMJMJMJMJMJMJMJMJM
JMJMJMJMJMJMJMJMJMJMJMJ MJMJMJMJM JMJMJM
MJ J JM
MJMJMJMJMJMJMJMJMJMJMJMJM
JMJMJMJMJMJMJMJMJMJMJM JMJMJMJMJ MJMJMJ
JMJ MJ
JMJMJMJMJMJMJMJMJMJMJMJMJM
JMJMJMJMJMJMJM JMJMJ MJMJMJMJM JMJMJM
MJMJMJM
MJMJMJMJMJMJMJMJMJMJMJMJMJM
JMJMJMJMJMJMJ MJMJ
JMJMJMJMJ MJMJMJ
MJMJMJM
JMJMJMJMJMJMJMJMJMJMJMJMJMJM
JMJMJMJMJMJMJ
JMJMJMJMJM JMJMJM
JMJMJMJ
MJMJMJMJMJMJMJMJMJMJMJMJMJMJM
JMJMJMJMJMJMJMJMJMJMJMJMJMJMJ MJMJMJMJMJMJMJMJMJMJMJMJMJMJMJMJMJMJMJMJMJMJMJMJM
JMJMJMJMJMJMJMJMJMJMJMJMJMJMJMJMJMJMJMJMJMJMJMJMJMJMJMJMJMJMJMJMJMJMJMJMJMJMJMJM
2.
The cursor should be in the OPTION ==> field. A list of options is displayed on
the screen. To select an option, enter the first letter of the desired option.
Since you are adding a job to the schedule, enter A in the OPTION ==> field and
J in the TYPE==> field.
E:\Manuals\Product Manuals\ASO\OM (OPS Master)\Reference Guide\Current Release\OPS_C12.fm
3.
NAME ==> field is used to specify a name that is associated with the option, if
necessary. The name can be up to 8 alphanumeric characters in length and should
conform to the job name as it appears on the MVS JCL JOBCARD. Standard
IBM job naming convention should be used.
Enter INVNTRY1 in the first NAME==> field and press <TAB>.
4.
The STEP NAME ==> field is used to specify the name of the MVS job step, if
desired.
For this job definition, leave this field blank and press <ENTER>.
Mantissa Corporation © 2013
Page - 293
Chapter 12
OPS/MASTER®
Creating a Sample Inventory Job Schedule
Tutorial
----------------------- JOB/Master® Data Base Functions ----------------------Command ===>
ID: JM01
User = P390K
Date = 98/09/02 - 98.245 Time = 14:35
-------------------------------------------------------------------------------Option ==> A
A dd / B rowse
/ U pdate
Type
J ob
C alendar
/ S ystem
/ N eg and Coreq
/ D ataset
==> J
/ I nquire Index
/ P rocess Keyword
/ G roup Message
/ M essage
Name
Stepname
Proc Stepname
==> INVNTRY1
==> ________
==> ________
Data Set Name
==> ____________________________________________ (If Type D)
CONFIRM = PF4
5.
/ D elete
CANCEL= PF5
(Stepname (PROC) if jobstep definition)
(Stepname (PGM=) if jobstep definition)
or type “CANCEL” or “CONFIRM” at Command
line when processing Data Base options
You have specified all necessary information to enter the option to add a job to
the schedule. There are five job definition screens that can be used to define a
schedule. You must complete the first screen, the others are optional. The first
screen is shown below:
Jobname
==> INVNTRY1 Alt Name For => ________ System Name ==> INVNTRY
PDS Mem
==> ________ PDS ==> ____________________________________________
Trig Job ==> N (Y/N) Triggered By==>
Submit Type ==> A (ACMRST)
Res Name1 ==> ________ Res Name2
==> ________ Schedule/Net==> ********
Calendar ==> MON-FRI
Excep Cal1 ==> HOLIDAY
Excep Cal2 ==> ________
Keywd Def ==> ________ Priority
==> _
Lib Type
==>
Neg/C Def ==> ________
Model / Count of Tapes: 3420 => 00
3480 => 00 Update Drive Usage=> Y
------------------------------- Submit Options ------------------------------Enter submit time (HHMM) & optionally “number of runs”/”minutes between runs”
Submit=> 1045 End=> 0000 Number Of Runs=> 00 Minutes Between Runs=> 0000
----------------------------- Dependency Options ----------------------------Pred
| Negative Coreq
| Process N-Proc
| Trig
Sub: OP Cond Trig
Jobs Typ|
Dep
Dep
| Keyword Keyword |
Job
Typ: CD Code Type
-------- - | -------- -------- | -------- -------- | -------- - : - ---- ________ _ | ________ ________ | ________ ________ | ________ _ : _ ____ _
________ _ | ________ ________ | ________ ________ | ________ _ : _ ____ _
________ _ | ________ ________ | ________ ________ | ________ _ : _ ____ _
6.
Page - 294
You will notice that the first line on the screen contains the COMMAND ==>
line. This field is used to enter any desired JOB/Master® or SPF command (these
commands are not internal OPS/Master® commands). Refer to the SPF Manual
Mantissa Corporation © 2013
E:\Manuals\Product Manuals\ASO\OM (OPS Master)\Reference Guide\Current Release\OPS_C12.fm
AJ------------------------ JOB/Master® Job Definition ----- Row 1 to 4 of 72
Command ===>
Scroll ==> PAGE
-------------------------Definition Last Updated by P390W
on 98240 at 1006
OPS/MASTER®
Chapter 12
Tutorial
Creating a Sample Inventory Job Schedule
for more information on these commands. The COMMAND line appears at the
top of all OPS/Master® screens.
7.
Also notice that the top of the screen shows who last updated the job definition
and when the update was made. The system will automatically display the job
name specified on the previous screen.
8.
The ALT NAME ==> field is used to specify an alternate name for the job, if
desired. For this tutorial, you will not need an alternate name.
9.
The SYSTEM NAME ==> field is used to specify an application system name of
which the job is a part. For this tutorial, specify the system name INVNTRY.
10. The PDS MEM ==> field is used to specify the Partitioned Data Set Member
name. The PDS Member Name does not have to match the job name. This field is
only needed if the member name is different from the job name. For this tutorial,
leave this field blank.
11. The next field is the TRIG JOB ==> (Y/N) field. The JOB/Master® system
allows you to specify that the successful completion of one job will cause the
start of another job. This means that the second job is triggered by the first. For
this tutorial, skip this field and leave the default of N unchanged.
E:\Manuals\Product Manuals\ASO\OM (OPS Master)\Reference Guide\Current Release\OPS_C12.fm
12. The SUBMIT TYPE ==> field(A/C/M/R/S/T) can contain one of the six possible
values:
A
Automatic
(Submitted by JOB/Master®)
C
Command Stream
(Command - No JCL. Works with CONSOLE/Master®)
M
Manual Task
(Requires manual intervention)
R
Manual Submit
(Repeating task will continue being re-scheduled until the last
run is signaled complete).
S
Started Task
(Started task initiated by JOB/Master®)
T
Timed trigger waiting for submit time
(See Database Creation Section)
For this tutorial use A.
13. The RES NAME1 and RES NAME2 fields can be used to assign resource names
to a particular CPU. The resource name can be up to 8 characters. If no name is
specified, the function will be eligible on any processor. The system will attempt
to execute the function on the resource name in RES NAME1. If that condition
cannot be satisfied, it will attempt to execute the function on the resource in RES
NAME2.
14. The cursor is now in the SCHEDULE/NET ==> field. The SCHEDULE/NETWORK, if specified in this field, is used to limit access to this definition to a specific user or group of users (i.e, a group of users at a remote site). The
SCHEDULE/NET is defined on the ISF (Interactive Security Facility) JOB/Mas-
Mantissa Corporation © 2013
Page - 295
Chapter 12
OPS/MASTER®
Creating a Sample Inventory Job Schedule
Tutorial
ter® Security Definition Screen at the User ID level. For this job definition, leave
this field blank.
15. The CALENDAR ==> field is used to tell the system which days of the year to
run your jobs. You will learn how to set up a calendar later in this tutorial. Enter
the calendar name MON-FRI in this field.
16. You are now at the EXC. CAL1 ==> field. This stands for exception calendar.
You can specify up to two exception calendars. The exception calendar tells the
system which days are not valid to run the jobs. The exception calendar is typically used to specify holidays. For this job definition, enter HOLIDAY in this
field and press <TAB> to advance the cursor to the next field.
17. The cursor is now in the EXC. CAL2 ==> field. Press <TAB> again, since only
one exception calendar is necessary for this tutorial.
18. The cursor is now in the KEYWD. DEF ==> field. This stands for Keyword Definition. Keywords are used to represent a set of conditions for which the job
should be run. It may not be necessary to use keywords to satisfy the requirements of your schedule. Some keywords require references to calendars, others
represent conditions that the system can interpret without a calendar.
The system provides a list of keywords. If your conditions require the specification of more than one keyword, you should use the Keyword Definition Screen.
This screen allows you to group the system keywords into a user-defined keyword. The user-defined keyword can be specified in this field. You can specify a
user-defined keyword on the Job Definition Screen before defining it. A message
will be displayed implicating a keyword not found. Press the <TAB> key to
advance the cursor.
19. The PRIORITY ==> field is used to establish a potential submission sequencing.
Refer to “SP” in the Tracking section of this manual.For this job definition, leave
this field blank.
21. The NEG/C DEF ==> field stands for Negative/Co-requisite Definition. A negative dependency is a job that cannot be in the MVS input queue or in execution
for the job to be submitted. A corequisite dependency is a job that must be executing for the job being defined to be submitted. You can define a group of these
dependencies under a user-specified name. This can be done with the Add Negative/Corequisite definition from the JOB/Master® main menu. The user-defined
dependency group name can be specified in this field.
22. NO. OF TAPE DRIVES: The 3400 ==> field name refers to reel tape drives and
the 3480 ==> field name refers to cartridge tape drives. You can specify the number of each type of drive that is needed to run the job. When you enter a number
in these fields, the system will check to make sure the specified number of drives
are available before submitting the job.
If 00 (zero) is specified, the system won’t check tape drive availability. However,
the system will insert the number of drives that were required after running the
job each time if the update drive usage =>Y. For this job definition, leave the 00
default.
Page - 296
Mantissa Corporation © 2013
E:\Manuals\Product Manuals\ASO\OM (OPS Master)\Reference Guide\Current Release\OPS_C12.fm
20. The LIB.TYPE ==> field is unused at this time. For this tutorial, the JCL can be
found in the default library. The sample JCL was placed in this library when
JOB/Master® was installed.
OPS/MASTER®
Tutorial
Chapter 12
Creating a Sample Inventory Job Schedule
23. Now, <TAB> to the SUBMIT OPTIONS area of the screen. If you choose to
specify a submit option, you can either enter a submit and end time or specify a
number of times for the job to run and the minutes between runs. Do not specify
both.
The SUBMIT and END TIMES should be entered in the form HHMM. If additional submit/end times are desired, they can be specified on the second job definition screen.
If you specify a start and end time in this area of the screen (and/or on the second
job definition screen), you can also tell the system to cancel the job if it is past the
specified start time(s). The DEADLINE CANCEL feature is on Job Definition
Screen 3. For this job definition, you do not need to specify any start and end
times.
24. The NUMBER OF RUNS ==> field is used to specify the number of times you
want the job to run. If you specify a number of run times, you must also specify a
time interval between runs (described below). For this job definition, leave this
field blank.
25. The MIN. BETWEEN RUNS ==> field specifies the number of minutes from the
end of the job to the beginning of the next run. For this job definition, leave this
field blank.
26. The DEPENDENCY OPTIONS area is used to define conditions that must be
satisfied before the job can run. For example, you can specify jobs that must run
before the job being defined (predecessors). You can also specify process keywords that represent specific conditions that must be met. You can also test for a
specific condition code and trigger another job based on the value of the code.
You can specify a virtually unlimited number of dependency definitions. If additional dependency definitions are required, they can be entered on job definition
screen 2.
27. The PRED JOBS column stands for predecessor jobs. A predecessor job is any
job that must run before the job being defined can run. You can specify any job
name, including one that is not in the system currently being defined. Do not
enter a predecessor job or type this job definition.
E:\Manuals\Product Manuals\ASO\OM (OPS Master)\Reference Guide\Current Release\OPS_C12.fm
28. The TYP column works in conjunction with the predecessor job (if specified).
(Refer to Database Creation for more information).
29. The NEGATIVE DEP. column stands for negative dependency. A negative
dependency job cannot be in the input queue or be executing for the system to
run the job being defined. For this job definition, leave this field blank.
30. The COREQ DEP. column stands for corequisite dependency. If you specify a
job name in this field, that job must be running for the job being defined to run.
Leave this field blank.
31. The PROCESS KEYWORD ==> field represents a set of conditions that, when
true, causes the job to be scheduled.
This job definition does not require a process keyword because a calendar is
being used which tells the system to run the job Monday through Friday. The system refers to the exception calendar for holidays that may occur during the work
week. If a holiday occurs, the job will not run. Refer to the JOB/Master® Data-
Mantissa Corporation © 2013
Page - 297
Chapter 12
OPS/MASTER®
Creating a Sample Inventory Job Schedule
Tutorial
base Creation (Process Keywords) for a list of system keywords. Leave this field
blank.
32. The N-PROC KEYWORD ==> field represents a set of conditions that, when
true, cause the job not to be scheduled. Leave this field blank.
33. If there is a job(s) that should be submitted when the job being defined completes, enter the job name(s) in the TRIG. JOB (Trigger Job) column. Also
include the submit type (described below) for each job specified. Press the
<TAB> key to move the cursor.
34. The SUB TYPE column is associated with the TRIG. JOB and types. (For listing
of sub types, see #12).
35. The OP CD ==>field stands for operator code and works together with the
COND CODE and TRIG TYPE columns. These three columns are used to perform a condition code test. If the conditions of the test are met, the TRIG. JOB is
run (if a job is specified in this column). The following operator codes can be
specified:
L
Less than
G
Greater than
E
Equal to
N
Not equal to
You won’t be testing for a condition code in this tutorial.
36. The COND CODE ==>field (condition code) is a value of the condition code for
which you are testing. Since you are not testing a condition code in this tutorial,
this field can remain blank.
37. The TRIG TYPE column is not needed for this job definition.
E:\Manuals\Product Manuals\ASO\OM (OPS Master)\Reference Guide\Current Release\OPS_C12.fm
38. That completes the definition for the first job. The other screens are not needed
for this job definition. Press <PF4> to confirm the update.
Page - 298
Mantissa Corporation © 2013
OPS/MASTER®
Chapter 12
Tutorial
Creating a Sample Inventory Job Schedule
Creating the Workday Calendar
1.
The JOB/Master® DATA BASE FUNCTIONS Menu Screen should be displayed, as shown below:
------------------------ JOB/Master® DATA BASE FUNCTIONS ----------------------COMMAND ===>
ID: JM01
USER = P390K
DATE = 97/09/29 - 97.272 TIME = 10:40
-------------------------------------------------------------------------------OPTION ==> A
A DD / B ROWSE; / U PD;
TYPE
J OB
C ALENDAR
==> C
/ D EL;
/ S YSTEM
/ N EG/COREQ DEF.
/ D ATASET DEF.
/ I NQ. D.B. ENTRIES
/ P PROCESS KEYWORD DEF.
/ G ROUP MESSAGE DEF.
/ M ESSAGE DEFINITION
NAME
STEPNAME
PROC STEPNAME
==> MON-FRI_
==> ________
==> ________
DATA SET NAME
==> ____________________________________________ (IF TYPE D)
CONFIRM = PF4
F1=HELP
F7=UP
(STEPNAME (PROC) IF JOBSTEP DEFINITION)
(STEPNAME (PGM=) IF JOBSTEP DEFINITION)
CANCEL= PF5
F2=SPLIT
F8=DOWN
OR TYPE "CANCEL" "CONFIRM" AT COMMAND LINE
WHEN PROCESSING DATA BASE OPTIONS
F3=END
F9=SWAP
F4=CONFIRM
F10=SHIFT
F5=CANCEL
F11=RIGHT
F6=CO
F12=RETRIEVE
E:\Manuals\Product Manuals\ASO\OM (OPS Master)\Reference Guide\Current Release\OPS_C12.fm
You will now create the calendar that specifies all work days (Monday through
Friday). You only need to create this calendar once.
Mantissa Corporation © 2013
2.
To create a calendar, select OPTION ==> A and TYPE ==> C from the JOB/
Master® DATA BASE FUNCTIONS screen.
3.
The cursor should now be in the first NAME ==> field. Enter MON-FRI in this
field. Now press <ENTER> to display the JOB/Master® CALENDAR DEFINITION screen.
4.
Enter the data shown on the following screen. This screen is used to establish the
structure of the calendar. Any days that cannot be defined here, can be added to
the calendar on the Calendar Display/Update screen (explained later in this tutorial).
Page - 299
Chapter 12
OPS/MASTER®
Creating a Sample Inventory Job Schedule
-
Tutorial
AC------ ------------- JOB/Master®
Calendar Definition Screen ----------------
Command ===>
------------------------------------------------------------------------------Calendar Name => WORKDAY
Year => 98 Schedule/Net => ********
Description => MONDAY THROUGH FRIDAY WORKDAY CALENDAR____________
Month
Week
Relday
Actdate
=>
=>
=>
=>
A_
A
MO
__
__
__
__
_
TU
__
__
__
__
_
WE
__
__
__
__
_
TH
__
__
__
__
_
FR
__
__
__
__
_
__
__
__
__
__
__
__
__
__
__
__
__
__
__
__
__
__
__
__
__
__
__
__
__
---------------------- Period Start and End Dates (MMDD) ---------------------1. 0000 0000
2. 0000 0000
3. 0000 0000
4. 0000 0000
5. 0000 0000
6. 0000 0000
7. 0000 0000
8. 0000 0000
9. 0000 0000
10. 0000 0000
Page - 300
12. 0000 0000
13. 0000 0000
5.
The cursor should be in the DESCRIPTION==>field. Enter MONDAY
THROUGH FRIDAY WORKDAY CALENDAR (or any desired description) in
this free-form field.
6.
The system will automatically enter the calendar name specified on the JOB/
Master® DATA BASE FUNCTIONS screen. The system will enter the current
year. Press the <TAB> key until the cursor is in the MONTH area. This part of
the screen is used to specify the month(s) you want to include in the calendar. If
you want to include all months, you can specify A in the first entry (as shown
above). Otherwise, enter the numeric value for those months you want to include
(i.e., 01 = January, 02 = February, etc.). For this tutorial, specify A in the first
entry field. Press <TAB> to continue.
7.
The WEEK area is used to indicate the desired weeks of each month(s) you want
to include in the calendar. There are six weeks in order to accommodate the partial weeks that may occur at the beginning and end of the month. Just as in the
MONTH area, you can enter A in the first entry to include all weeks. Otherwise,
enter the numeric value of the week(s) you want to include (i.e., 1 = Week 1, 2 =
Week 2, etc.). For this tutorial, enter A in the first entry and press <TAB> to
advance the cursor.
8.
The cursor is now in the RELDAY area of the screen. You can specify the days of
the week you want to include in your calendar. Use the following abbreviations:
MO
MONDAY
TU
TUESDAY
WE
WEDNESDAY
TH
THURSDAY
FR
FRIDAY
Mantissa Corporation © 2013
E:\Manuals\Product Manuals\ASO\OM (OPS Master)\Reference Guide\Current Release\OPS_C12.fm
11. 0000 0000
OPS/MASTER®
Chapter 12
Tutorial
Creating a Sample Inventory Job Schedule
As shown on the sample screen, enter MO (Monday) through FR (Friday).
9.
The cursor is in the first field of the ACTDATE area. This area of the screen can
be used to indicate specific days (01 through 31) that you want to include for
each month specified in the MONTH area. For this calendar, you do not need to
specify any days here. The combination of MONTH, WEEK and RELDAY covers all days needed for this calendar.
10. You will notice the PERIOD START END DATES at the bottom of the screen.
This is used to alter the beginning and end days of any desired month(s). For
example, suppose you want the January period to begin on the 5th and end on the
25th. You would enter 5 and 25 in the first period in this area of the screen. There
is room to alter the periods for all 12 months, plus January of the following year.
These dates will not be altered for this definition.
11. You have now completed the Calendar Definition screen. Press <PF4> to confirm
the update. The JOB/Master® DATA BASE FUNCTIONS Menu screen will be
re-displayed.
Viewing/Updating the Workday Calendar
1.
You can now view the entire calendar you just created by specifying
OPTION==> U (Update a Calendar) and TYPE ==>C (as well as the CALENDAR NAME in the NAME==> field) on the JOB/Master® DATA BASE FUNCTIONS screen. Note that you can also view, (browse) the calendar, however, no
changes can be made within the view option.
2.
The JOB/Master® CALENDAR DISPLAY/UPDATE screen should be displayed, as shown below:
E:\Manuals\Product Manuals\ASO\OM (OPS Master)\Reference Guide\Current Release\OPS_C12.fm
UC
==> TRAIN001 ------------ JOB/Master® CALENDAR DISPLAY/UPDATE -----------COMMAND ===>
-------------------------- PERIOD START AND END DATES ------------------------1. 0104 0203
2. 0204 0303
3. 0304 0405 4. 0000 0000
5. 0000 0000
6. 0000 0000
7. 0000 0000
8. 0000 0000 9. 0000 0000 10. 0000 0000
11. 0000 0000 12. 0000 0000 13. 0000 0000
DESCRIPTION =: TEAM1
LAST UPDATED BY TEAM1
ON 97056 AT 0851 ===========SCHEDULE/NET=> ********
|YEAR: 97
| | | | | | | | | |1|1|1|1|1|1|1|1|1|1|2|2|2|2|2|2|2|2|2|2|3|3 |
| *CAL/REL | 1|2|3|4|5|6|7|8|9|0|1|2|3|4|5|6|7|8|9|0|1|2|3|4|5|6|7|8|9|0|1 |
|===========|===============================================================|
| JAN( WED )| - - - - - - - - H F S U M T W H F S U M T W H F S U M T W H F |
| FEB( SAT )| S U M T W H F S - - X X - - - U M T W H F S U M T W H F S - - |
| MAR( SAT )| U M T W H F S U M T W H F S U - - - - - - - M T W H F S U M T |
| APR( TUE )| W H F S U M T W H F S U M T W H F S U M T W - - - - - - W H - |
| MAY( THU )| F S U N T W H F S U M T W H F S U M T W H F S U M T W H - - - |
| JUN( SUN )| - - - H F S U M T W H F S U M T W H F S U T W H F S U M T - - |
| JUL( TUE )| W H F - - - - - - - S U M T W H F S U M T W H F S U M T W H F |
| AUG( FRI )| S U M T W H F S U M T W H F S U M T W H F S U M T W H F S U M |
| SEP( MON )| T W H F S U M T W H F S U M T W H F S U M T W H F S U M T W H |
| OCT( WED )| F S U M T W H F S U M T W H F S U M T W H F S U M T W H F S U |
| NOV( SAT )| M T W H F S U M T W H F S U M T W H F S U M T W H F S U M T W |
F1=HELP
F7=UP
3.
Mantissa Corporation © 2013
F2=SPLIT
F8=DOWN
F3=END
F9=SWAP
F4=CONFIRM
F10=SHIFT
F5=CANCEL
F11=RIGHT
F6=CO
F12=RETRIEVE
The entire calendar can be viewed on a single screen. The characters represent all
days you have selected to be included in the calendar. The screen above shows all
Mondays through Fridays as specified on the CALENDAR DEFINITION
Page - 301
Chapter 12
OPS/MASTER®
Creating a Sample Inventory Job Schedule
Tutorial
SCREEN. You can make changes at this point, if desired. However, no changes
need to be made for this tutorial. The characters used in the display are those
which have been defined on the global profile.
4.
Now press <PF4> (CONFIRM).
5.
That completes calendar creation and updating for this tutorial. Remember, we
are using the system default HOLIDAY calendar for the exception calendar.
Creating The HOLIDAY Calendar
1.
From the JOB/Master® Database Functions menu screen select:
OPTION ==> A; TYPE ==> C; NAME ==> HOLIDAY
2.
Press <ENTER> to display the JOB/Master® CALENDAR DEFINITION
SCREEN.
3.
Enter HOLIDAY in NAME==> field. Press <ENTER> to display the JOB/Master® CALENDAR DEFINITION SCREEN.
4.
Calendar Name will be automatically entered.
5.
<TAB> to Description and key in free-form description of the calendar: (i.e.,
HOLIDAYS AND WEEKENDS).
6.
As was done in the Mon-Fri tutorial calendar, key in an A at MONTH==> field;
and an A at WEEK==> field so that we use all months and all weeks.
7.
<TAB> to RELDAY and key is SA (Saturday), SU (Sunday) to mark the weekends.. Press (PF4) to confirm.
8.
Once confirmed, you must update the newly created calendar for the following
holidays: New Years, Good Friday, Memorial Day, Independence Day, Labor
Day, Thanksgiving, Christmas Eve and Christmas.
9.
At the JOB/Master® DATABASE FUNCTIONS MENU SCREEN key in a U in
OPTION==> field; C in TYPE ==> field and HOLIDAY in NAME==> field.
Press <ENTER> for JOB/Master® CALENDAR DEFINITION SCREEN.
)
)
Page - 302
*The “rule” is: If a HOLIDAY falls on Saturday, it is observed on Friday; if it
falls on Sunday, it is observed on the following Monday.
Keep in mind that it will be necessary to update this calendar EVERY year as
actual dates are being used, as well as relative dates and this calendar will not
propogate at year end. (Refer to “Year End Calendar Propogation” in Job
Database Creation).
Mantissa Corporation © 2013
E:\Manuals\Product Manuals\ASO\OM (OPS Master)\Reference Guide\Current Release\OPS_C12.fm
10. These days must be marked individually on the calendar by determining the
date* of the holiday and marking it with an X. Press (PF4) (CONFIRM).
OPS/MASTER®
Chapter 12
Tutorial
Creating a Sample Inventory Job Schedule
Creating the Job Definition for INVNTRY2
1.
Be sure the JOB/Master® DATA BASE FUNCTIONS Screen is displayed, as
shown below. If you need instructions on getting to this point, refer to the section
Creating the Job Definition for INVNTRY1.
2.
Enter ‘A’ in the OPTION ==> field and ‘J’ in the TYPE ==> field to add a job.
3.
Enter INVNTRY2 in the NAME ==> field. Press <ENTER>.
4.
The first job definition screen should now be displayed. Complete this screen as
shown below:
------------------------- JOB/Master® Job Definition --------- Row 1 to 4 of 72
Command ===>
Scroll ==> PAGE
-------------------------Definition Last Updated by
on
at
Jobname
==> INVNTRY2 Alt Name For => ________ System Name ==> INVNTRY
PDS Mem
==> ________ PDS ==> ____________________________________________
Trig Job ==> N (Y/N) Triggered By==>
Submit Type ==> A (ACMRST)
Res Name1 ==> ________ Res Name2
==> ________ Schedule/Net==> ********
Calendar ==> MON-FRI_ Excep Cal1 ==> ________ Excep Cal2 ==> ________
Keywd Def ==> ________ Priority
==> _
Lib Type
==>
Neg/C Def ==> ________
Model / Count of Tapes: 3420 => 00
3480 => 00 Update Drive Usage=> Y
------------------------------- Submit Options ------------------------------Enter submit time (HHMM) & optionally “number of runs”/”minutes between runs”
Submit=> 0000 End=> 0000 Number Of Runs=> 00 Minutes Between Runs=> 0000
----------------------------- Dependency Options ----------------------------Pred
| Negative Coreq
| Process N-Proc
| Trig
Sub: OP Cond Trig
Jobs Typ|
Dep
Dep
| Keyword Keyword |
Job
Typ: CD Code Type
-------- - | -------- -------- | -------- -------- | -------- - : - ---- ________ _ | ________ ________ | ________ ________ | ________ _ : _ ____ _
________ _ | ________ ________ | ________ ________ | ________ _ : _ ____ _
________ _ | ________ ________ | ________ ________ | ________ _ : _ ____ _
________ _ | ________ ________ | ________ ________ | ________ _ : _ ____ _
E:\Manuals\Product Manuals\ASO\OM (OPS Master)\Reference Guide\Current Release\OPS_C12.fm
)
Mantissa Corporation © 2013
Note that the same calendar is specified above as was used for the job definition of INVNTRY1. Once a calendar (base and exception calendars) is created,
it can be referenced from any job definition.
5.
No SUBMIT OPTIONS are needed for this job definition, press <TAB> or
<NEWLINE KEY> until you reach the PROCESS KEYWORD ==>field.
6.
This job will be scheduled for the last workday of the month. The system supplied keyword LWKD is entered into the PROCESS KEYWORD ==> field. This
specific keyword (LWKD) requires the use of a calendar in order to establish
which days are actual workdays. The calendar, defined earlier, is used for this
purpose.
7.
No other fields are required. Press <ENTER> to continue to the second JOB
DEFINITION screen.
8.
No other fields are required. Press <ENTER> to move to the next screen.
Page - 303
Chapter 12
OPS/MASTER®
Creating a Sample Inventory Job Schedule
9.
Tutorial
Complete the third job definition screen as shown below:
----------------------- JOB/Master® Job Definition For
Command ===>
INVNTRY2
--------------
Run Mode
==> P
(P=Production, C=Check, S=Select)
Do Not Schedule Before ==> 00000
(YYDDD)
Do Not Schedule After ==> 00000
(YYDDD)
External Submit
==> N
(Y=Not Submitted By JOB/Master®)
Deadline Cancel
==> N
(Y=Cancel From JOBQ)
Wait ==> 000 Minutes
Job Fail Userid
==> _______
Send Fail Msg - (JM39) ==> N
(Y,N)
-----------------------------------------------------------------------------Message Definition
==> ________ Message Group ==> ________
Repair Job
==> ________ Submit Type
==> _ (A,C,M,R,S,T)
------------------------------------------------------------------------------***
Hold Job For
*** | *** Output Processing Information ***
DATA ENTRY
==> Y (Y,N)
|
Burst
==> N (Y,N)
CARD INPUT
==> N (Y,N)
|
Fiche
==> N (Y,N)
TAPE INPUT
==> N (Y,N)
|
Decollate
==> N (Y,N)
CONSOLE ROUTED
==> N (Y,N)
|
Photocopy
==> N (Y,N)
JCL SETUP
==> N (Y,N)
|
Other
==> N (Y,N)
------------------------------------------------------------------------------Hold Job on Schedule Queue for Output Posting ==> N
(Y=Requires manual posting after job completion, through Job Tracking
Manual Task Display)
10. Remember, the requirements stated that this job would require a manual data
entry task to be performed before the system would consider the job complete.
Therefore, you must specify Y in the HOLD JOB FOR KEY PUNCH [DATA
ENTRY] ==> field (shown above).
11. Press <ENTER> to display the fourth JOB DEFINITION screen. Complete the
screen as shown below:
-------------JOB/Master® Manual Task Message Definition
Command ===>
INVNTRY2
--------
Desc: ______________________________________________________________________
000 minutes before submit time or, after dependencies => N
(Y,N)
At a frequency interval of => 005 Minutes
1 DATA ENTRY
Message to Userid/Console => _______
Msg= DATA ENTRY PENDING FOR INVENTORY SYSTEM_______________________________
2 CARD INPUT
Message to Userid/Console => _______
Msg= ______________________________________________________________________
3 TAPE INPUT
Message to Userid/Console => _______
Msg= ______________________________________________________________________
4 CONSOLE ROUTED
Message to Userid/Console => _______
Msg= ______________________________________________________________________
5 JCL SETUP
Message to Userid/Console => _______
Msg= ______________________________________________________________________
Page - 304
Mantissa Corporation © 2013
E:\Manuals\Product Manuals\ASO\OM (OPS Master)\Reference Guide\Current Release\OPS_C12.fm
Send
OPS/MASTER®
Tutorial
Chapter 12
Creating a Sample Inventory Job Schedule
12. According to the job requirements, INVNTRY2 should be defined with a manual
data entry task. You already specified Y in the DATA ENTRY==> field on the
previous screen. Here you are able to specify the actual message and USERID to
whom the message will be sent.
13. That completes the job definition for INVNTRY2. Remember, the calendars for
this job (MON-FRI and HOLIDAY) already exist. No further calendar definitions
are required.
14. Press <PF4> (CONFIRM). The JOB/Master® DATABASE FUNCTIONS
screen will be displayed.
E:\Manuals\Product Manuals\ASO\OM (OPS Master)\Reference Guide\Current Release\OPS_C12.fm
You are now ready to enter the definition for the user-defined keyword
LASTWKD (last workday of the week), used with INVNTRY3:
Mantissa Corporation © 2013
Page - 305
Chapter 12
OPS/MASTER®
Creating a Sample Inventory Job Schedule
Tutorial
Creating the LASTWKD Keyword Definition
1.
Be sure that the JOB/Master® DATA BASE FUNCTIONS screen is displayed.
2.
Enter A in the OPTION ==> field and press P in the TYPE ==> field. Follow by
pressing <ENTER>.
3.
The KEYWORD DEFINITION screen should be displayed. Complete this
screen as shown below:
--------------- JOB/Master® Process Keyword Definition Screen --------------Command ===>
Definition Last Updated by
on
at
Name
==> LASTWKDY
Schedule/Net ==> ________
Calendar
==> ________
Exceptn Cal1 ==> ________ Excp Cal2 ==> ________
Description ==> LAST WORKDAY OF THE MONTH______________
Process Keywords:
FRIWKD__
________
________
________
________
________
(Make Entries left to right from line 1)
HOLIDY-W ________ ________ ________ ________
________ ________ ________ ________ ________
________ ________ ________ ________ ________
________ ________ ________ ________ ________
________ ________ ________ ________ ________
________ ________ ________ ________ ________
Non-process Keywords: (Make
________ ________
________ ________
________ ________
________ ________
________ ________
________ ________
4.
Entries left to right from line 1)
________ ________ ________ ________
________ ________ ________ ________
________ ________ ________ ________
________ ________ ________ ________
________ ________ ________ ________
________ ________ ________ ________
There are two system keywords used to define LASTWKD (Last Workday of
each week):
FRIWKD
HLYDAY-W
This system keyword tells the system that if the scheduled day (in this case, Friday) is a holiday run the job on the closest workday before the holiday.
Page - 306
5.
The combination of the two system keywords achieves the desired results: run
the job on Friday of every week, except when Friday is a holiday. If a holiday,
run on the nearest workday before the holiday.
6.
That completes the keyword definition for INVNTRY3. Press <PF4> (CONFIRM); the JOB/Master® DATABASE FUNCTION screen is displayed.
Mantissa Corporation © 2013
E:\Manuals\Product Manuals\ASO\OM (OPS Master)\Reference Guide\Current Release\OPS_C12.fm
The format for this keyword is xxxWKD. This system keyword represents the
xxx day of each week, as long as it is a workday. In this case, xxx is FRIday. xxx
can be MON, TUE, WED, THU, FRI, SAT, or SUN.
OPS/MASTER®
Chapter 12
Tutorial
Creating a Sample Inventory Job Schedule
Creating the Job Definition for INVNTRY3
1.
Be sure the JOB/Master® DATA BASE FUNCTIONS screen is displayed, as
shown below. If you need instructions on getting to this point, refer to the section
Creating the Job Definition for INVNTRY1.
AP
-------------- JOB/Master® Process Keyword Definition Screen -----------Command ===>
Definition Last Updated By P390K
on 96089 at 1407
Name
==> LASTWKD
Schedule/Net => ________
Calendar
==> MON-FRI_
Exc. Cal1
==> HOLIDAY_ Exc. Cal2 ==> ________
Description ==> LAST WORK DAY OF THE WEEK______________
Process Keywords:
FRIWKD__
________
________
________
________
________
(Make entries from left to right of line
HLYDAY-W ________ ________ ________
________ ________ ________ ________
________ ________ ________ ________
________ ________ ________ ________
________ ________ ________ ________
________ ________ ________ ________
Non-Process Keywords: (Make
________ ________
________ ________
________ ________
________ ________
________ ________
F1=HELP
F7=UP
F2=SPLIT
F8=DOWN
entries from left to
________ ________
________ ________
________ ________
________ ________
________ ________
F3=END
F9=SWAP
F4=CONFIRM
F10=SHIFT
right of
________
________
________
________
________
1)
________
________
________
________
________
________
line 1)
________
________
________
________
________
F5=CANCEL
F11=RIGHT
F6=CO
F12=RETRIEVE
Enter A in the OPTION ==> field and J in the TYPE ==> field. Enter
INVNTRY3 in the first NAME ==> field. Remember, this job is to be run on the
last workday of each week.
3.
Press <ENTER> to display the first job definition screen.
E:\Manuals\Product Manuals\ASO\OM (OPS Master)\Reference Guide\Current Release\OPS_C12.fm
2.
Mantissa Corporation © 2013
Page - 307
Chapter 12
OPS/MASTER®
Creating a Sample Inventory Job Schedule
4.
Tutorial
Complete the first job definition screen as shown:
------------------------ JOB/Master® Data Base Functions ---------------------Command ===>
ID: JM01
User = P390K
Date = 98/09/09 - 98.252 Time = 13:18
-------------------------------------------------------------------------------Option ==> A
A dd / B rowse
/ U pdate
Type
J ob
C alendar
/ S ystem
/ N eg and Coreq
/ D ataset
==> J
/ I nquire Index
/ P rocess Keyword
/ G roup Message
/ M essage
Name
Stepname
Proc Stepname
==> INVNTRY3
==> ________
==> ________
Data Set Name
==> ____________________________________________ (If Type D)
CONFIRM = PF4
5.
/ D elete
CANCEL= PF5
(Stepname (PROC) if jobstep definition)
(Stepname (PGM=) if jobstep definition)
or type “CANCEL” or “CONFIRM” at Command
line when processing Data Base options
Note that the same calendars can be used for this job.
A new keyword was introduced: LASTWKD. This is a system keyword that tells
the system to run the job on the last workday of each week. This keyword
requires the base calendar (MON-FRI) to determine which days are workdays. In
addition, this keyword requires the holiday calendar (HOLIDAY) to determine
which days are holidays. This combination enables the system to find the last
workday of each week.
This completes the first JOB DEFINITION screen. The only other screen needed
for this job definition is the fifth screen. You will be entering the job documentation as specified in the job requirements.
E:\Manuals\Product Manuals\ASO\OM (OPS Master)\Reference Guide\Current Release\OPS_C12.fm
6.
Page - 308
Mantissa Corporation © 2013
OPS/MASTER®
Chapter 12
Tutorial
Creating a Sample Inventory Job Schedule
7.
Now press <ENTER> until the fifth JOB DEFINITION screen is displayed.
Complete this screen as shown:
----------------------- JOB/Master® Job Definition For
Command ===>
INVNTRY3
--------------
------------------------------------------------------------------------------Job Description
==> MONTH END INVENTORY_
Pprocedure Name
==> ________
Programmer Name
==> JOE SMITH___________
Submitting Dept
==> INVENTORY CONTROL___
User Department
==> PAYROLL/ACCOUNTING__
Output Destination ==> ____________________
Delivery Method
==> ____________________
------------------------- Abending Contact Information -----------------------Contact Name ==> JOE SMITH___________ Phone ==>( 218 ) 402
Beeper ==>( ___ ) ___
0280 Ext ==> 311__
____
------------------------------------------------------------------------------Run-Exit Ins= ___________________________________________________________
8.
This completes the job definition for INVNTRY3. Again, no calendar definitions
are required (MON-FRI and HOLIDAY are already created).
9.
Press <PF4> (CONFIRM). The JOB/Master® DATA BASE FUNCTIONS
screen is displayed.
E:\Manuals\Product Manuals\ASO\OM (OPS Master)\Reference Guide\Current Release\OPS_C12.fm
10. Now proceed to the next tutorial, which will illustrate other features of JOB/Master®.
Mantissa Corporation © 2013
Page - 309
Chapter 12
OPS/MASTER®
Defining a Sample Sales Job Schedule
Tutorial
Defining a Sample Sales Job Schedule
Schedule Requirements
This schedule must allow for the following jobs to be run at the times listed below:
JOB NAME
SCHEDULED TO BE RUN
REGSALE
First workday of week. If the first workday is a holiday, run on
first workday after holiday. This job should use the dependency
definition REGDEFS that includes the following requirements:
CICS cannot be running while REGSALE is running
ESF must be running while REGSALE is running
System = SALES
Res. Name = SYSTEMA
Calendar = MON-SAT
Exc. Cal = HOLIDAY
TOTSALES
First workday of month. Run twice at 120 minute intervals
starting at 0800.
System = SALES
Res. Name = SYSTEMA
Calendar = MON-SAT
Exc. Cal = HOLIDAY
The job step SALESTP1 should be defined.
System Definition
Description = Sales Jobs
Programmer Name = Smith, Joe
Submitting Dept = Programming
User Dept = Sales
Message Definition = SALESMSG
Message Group = SALESGRP
Message Definition
Data Entry Message:
Enter sales quotas and sign off upon completion.
Message Group
All messages should go to TS01 and TS02.
Calendar Requirements
Sales personnel work Monday through Saturday. The work (base) calendar must reflect
these workdays.
The holiday calendar contains all legal holidays.
Creating the System Definition for SALES
Follow the steps below to create the System Definition for SALES.
1.
Page - 310
Go to the JOB/Master® PRIMARY MENU screen.
Mantissa Corporation © 2013
E:\Manuals\Product Manuals\ASO\OM (OPS Master)\Reference Guide\Current Release\OPS_C12.fm
Tape Input Message:
Mount sales job tape and sign off upon completion.
OPS/MASTER®
Chapter 12
Tutorial
Defining a Sample Sales Job Schedule
2.
The following screen will be displayed, as shown:
------------------ Job Scheduling and Management by Mantissa ----------------Option ===> D
Data Base Creation : D
Profile
: P
Report Selection
: R
Job Tracking
: T
JCL Substitution : J
Current Selection = JM01
PF1 = HELP
User= P390K
Date= 98/09/09
98.252
Time= 13:26
JMJMJMJMJMJMJMJMJMJMJMJMJMJMJMJMJMJMJMJMJMJMJMJMJMJMJMJMJMJMJMJMJMJMJMJMJMJMJMJM
JMJMJMJMJMJMJMJMJMJMJMJMJMJMJMJMJMJMJ MJMJMJMJMJMJMJMJMJMJMJMJMJMJMJMJMJMJMJMJM
JMJMJMJMJMJMJMJMJMJ
MJM JMJMJM
MJM
MJMJMJMJMJMJMJMJMJMJMJM
JMJMJMJMJMJMJMJMJMJMJMJM JMJMJMJMJ MJMJMJ
J M J
JMJMJMJMJMJMJMJMJMJMJMJM
JMJMJMJMJMJMJMJMJMJMJMJ MJMJMJMJM JMJMJM
MJ J JM
MJMJMJMJMJMJMJMJMJMJMJMJM
JMJMJMJMJMJMJMJMJMJMJM JMJMJMJMJ MJMJMJ
JMJ MJ
JMJMJMJMJMJMJMJMJMJMJMJMJM
JMJMJMJMJMJMJM JMJMJ MJMJMJMJM JMJMJM
MJMJMJM
MJMJMJMJMJMJMJMJMJMJMJMJMJM
JMJMJMJMJMJMJ MJMJ
JMJMJMJMJ MJMJMJ
MJMJMJM
JMJMJMJMJMJMJMJMJMJMJMJMJMJM
JMJMJMJMJMJMJ
JMJMJMJMJM JMJMJM
JMJMJMJ
MJMJMJMJMJMJMJMJMJMJMJMJMJMJM
JMJMJMJMJMJMJMJMJMJMJMJMJMJMJ MJMJMJMJMJMJMJMJMJMJMJMJMJMJMJMJMJMJMJMJMJMJMJMJM
JMJMJMJMJMJMJMJMJMJMJMJMJMJMJMJMJMJMJMJMJMJMJMJMJMJMJMJMJMJMJMJMJMJMJMJMJMJMJMJM
3.
Enter D in the OPTION ===> field to create a database definition.
4.
The JOB/Master® DATA BASE FUNCTIONS screen is then displayed:
-
------------------------ JOB/Master® Data Base Functions ---------------------Command ===>
E:\Manuals\Product Manuals\ASO\OM (OPS Master)\Reference Guide\Current Release\OPS_C12.fm
ID: JM01
User = P390K
Date = 98/09/09 - 98.252 Time = 13:27
-------------------------------------------------------------------------------Option ==> A
A dd / B rowse
/ U pdate
Type
J ob
C alendar
/ S ystem
/ N eg and Coreq
/ D ataset
==> S
Mantissa Corporation © 2013
/ I nquire Index
/ P rocess Keyword
/ G roup Message
/ M essage
Name
Stepname
Proc Stepname
==> SALES___
==> ________
==> ________
Data Set Name
==> ____________________________________________ (If Type D)
CONFIRM = PF4
5.
/ D elete
CANCEL= PF5
(Stepname (PROC) if jobstep definition)
(Stepname (PGM=) if jobstep definition)
or type “CANCEL” or “CONFIRM” at Command
line when processing Data Base options
Enter A in the OPTION ==> field and S in the TYPE ==> field. Also enter
SALES in the NAME ==> field. Press <ENTER>.
Page - 311
Chapter 12
OPS/MASTER®
Defining a Sample Sales Job Schedule
6.
Tutorial
The SYSTEM DEFINITION screen is displayed, as shown. Remember that all
definitions on this screen can be overridden by a job’s definition.
-------------------- JOB/Master® System Definition For
Command ===>
Definition Last Updated by
SALES
-------------on
at
------------------------------------------------------------------------------Run Mode
==> P (P=PROD/C=CHECK/S=SEL)
Message Def ==> ________
System Description==> SALES JOBS__________
Message Group==> SALESGRP
Programmer Name
==> JOE SMITH___________
Do Not Schedule
Submitting Dept
==> SALES DEPARTMENT____
Before
==> 00000 (YYDDD)
User Department
==> ____________________
After
==> 00000 (YYDDD)
Output Destination==> ____________________
Priority
==> _
Delivery Method
==> ____________________
Schedule/Net ==> ********
Submit PDS
Lib Type
==> ____________________________________________
==> _
------------------------- Abending Contact Information -----------------------____ Ext ==> _____
____
7.
The cursor should be in the SYSTEM DESCRIPTION==> field. You can specify
whether jobs in this system should run in production mode or check (simulation)
mode. The RUN MODE may be changed by tabbing backwards.
8.
You may also enter MESSAGE DEF. ==> field. This allows you to specify the
name of a pre-defined group of users receiving system messages. This field may
be changed by tabbing backwards. Tab to this field and enter SALESMSG. Press
<TAB> .
9.
The SYSTEM DESCRIPTION ==> field is used to enter a brief description of
the system being defined by this screen. For this tutorial, enter Sales Jobs in this
field. Press <TAB> to advance.
10. The MESSAGE GROUP==> field is next and is used to specify the user-defined
name of a group which will receive the manual task messages. These messages
will be displayed concerning manual tasks that must be accomplished for the job
to be considered complete. The Manual Task message group definition can be
accessed from the JOB/Master® opening menu. Manual Task message group
definition will be described later in this tutorial. Enter SALESGRP. Press
<TAB> to continue.
11. The next field is the PROGRAMMER NAME ==> field. This field specifies the
name of a programmer who is responsible for the programs in this system. For
this tutorial, enter Smith, Joe in this field. Press <TAB> to continue.
12. The cursor should now be in the SUBMITTING DEPT ==> field. This free-form
field is used to specify the name of the department submitting jobs in this system.
For this tutorial, enter Programming in this field and press <TAB>.
Page - 312
Mantissa Corporation © 2013
E:\Manuals\Product Manuals\ASO\OM (OPS Master)\Reference Guide\Current Release\OPS_C12.fm
Contact Name ==> ____________________ Phone ==>( ___ ) ___
Beeper ==>( ___ ) ___
OPS/MASTER®
Tutorial
Chapter 12
Defining a Sample Sales Job Schedule
13. The cursor should be in the DO NOT SCHEDULE BEFORE ==> field. This is a
date that will be checked before any job assigned to this system is scheduled.
Leave this field by pressing <TAB>.
14. Now enter Sales in the USER DEPARTMENT ==> field and press <TAB>.
15. Now the cursor is in the DO NOT SCHEDULE AFTER ==> field. This is a field
that will prevent jobs assigned to this system from being scheduled after this
date. Skip to the next field by pressing <TAB>.
16. The next field is the OUTPUT DESTINATION ==> field. This free-form field is
used to specify the destination of output from this job. Now press <TAB>.
17. The free-form DELIVERY METHOD ==> field is used to specify the method by
which the job’s output will be delivered to the destination. Press the <TAB> key
to advance the cursor.
18. The SUBMIT PDS ==> field is used to specify the submitting PDS dataset name.
All JCL for jobs within this system will have their JCL submitted from this
library, if the jobs in the system do not have the associated JCL in the JOB/Master® default PDS library. If the JCL comes from a master JCL library defined in
the DD JMSUBPQS, this field can be blank. It’s primary function is to provide a
method to call the JCL from a specific “user” library. Press <TAB> to continue.
19. The LIB TYPE ==> field is reserved for future use. Press <TAB> to continue.
20. The Abending Contact Information is a free-form area used to specify a contact
and phone and/or beeper number in case a job(s) in this system abends.
E:\Manuals\Product Manuals\ASO\OM (OPS Master)\Reference Guide\Current Release\OPS_C12.fm
21. That completes the system definition. Now press <PF4> (CONFIRM) to save this
screen and re-display the JOB/Master® DATA BASE FUNCTIONS screen.
Mantissa Corporation © 2013
Page - 313
Chapter 12
OPS/MASTER®
Defining a Sample Sales Job Schedule
Tutorial
Creating the SALESMSG Message Definition
1.
The JOB/Master® DATA BASE FUNCTIONS screen should be displayed, as
shown:
-
------------------------ JOB/Master® Data Base Functions ---------------------Command ===>
ID: JM01
User = P390K
Date = 98/09/09 - 98.252 Time = 13:31
-------------------------------------------------------------------------------Option ==> A
A dd / B rowse
/ U pdate
Type
J ob
C alendar
/ S ystem
/ N eg and Coreq
/ D ataset
==> M
/ I nquire Index
/ P rocess Keyword
/ G roup Message
/ M essage
Name
Stepname
Proc Stepname
==> SALESMSG
==> ________
==> ________
Data Set Name
==> ____________________________________________ (If Type D)
CONFIRM = PF4
CANCEL= PF5
(Stepname (PROC) if jobstep definition)
(Stepname (PGM=) if jobstep definition)
or type “CANCEL” or “CONFIRM” at Command
line when processing Data Base options
To add a Manual Task Message Group, specify A in the OPTION ==> field, M in
the TYPE ==> field, and SALESMSG in the NAME ==> field.
E:\Manuals\Product Manuals\ASO\OM (OPS Master)\Reference Guide\Current Release\OPS_C12.fm
2.
/ D elete
Page - 314
Mantissa Corporation © 2013
OPS/MASTER®
Chapter 12
Tutorial
Defining a Sample Sales Job Schedule
3.
Now press <ENTER> and the Manual Task Message Group Screen is displayed.
Complete this screen as shown below (this is according to the original specifications):
--------------- JOB/Master® Manual Task Message Definition
Command ===>
SALESMSG
--------
Desc: _____________________________________________________________________
Send
000 minutes before submit time or, after dependencies => N
(Y,N)
At a frequency interval of => 005 Minutes
1 DATA ENTRY
Message to Userid/Console => _______
Msg= ______________________________________________________________________
2 CARD INPUT
Message to Userid/Console => _______
Msg= ______________________________________________________________________
3 TAPE INPUT
Message to Userid/Console => P390J__
Msg= MOUNT SALES JOB TAPE AND SIGN OFF UPON COMPLETION_________________
4 CONSOLE ROUTED
Message to Userid/Console => _______
Msg= ______________________________________________________________________
E:\Manuals\Product Manuals\ASO\OM (OPS Master)\Reference Guide\Current Release\OPS_C12.fm
5 JCL SETUP
Message to Userid/Console => _______
Msg= ______________________________________________________________________
Mantissa Corporation © 2013
4.
Notice that you can specify a number of minutes before the scheduled submit
time to display the messages on this screen. You can also specify to display these
messages after the dependency jobs are completed (by entering Y in the AFTER
DEPENDENCIES ==> field). Only specify one of these options. For either of
these options, tell the system how often you want the messages re-displayed by
entering a number of minutes in the AT A FREQUENCY INTERVAL OF ==>
field (the default is 5 minutes).
5.
If you enter a user ID on this screen, it will be in addition to the user IDs specified in the Notify Group (which can be specified in the System Definition and/or
on the third job definition screen). Complete the screen as indicated.
6.
That completes the message group. Press <PF4> (CONFIRM) to save the screen
and re-display the JOB/Master® DATA BASE FUNCTIONS screen.
Page - 315
Chapter 12
OPS/MASTER®
Defining a Sample Sales Job Schedule
Tutorial
Creating the SALESGRP Group Message Def.
1.
The JOB/Master® DATA BASE FUNCTIONS screen should be displayed, as
shown:
------------------------ JOB/Master® Data Base Functions -----------------Command ===>
ID: JM01
User = P390K
Date = 98/09/09 - 98.252 Time = 13:35
-------------------------------------------------------------------------------Option ==> A
A dd / B rowse
/ U pdate
Type
J ob
C alendar
/ S ystem
/ N eg and Coreq
/ D ataset
==> G
/ D elete
/ I nquire Index
/ P rocess Keyword
/ G roup Message
/ M essage
Name
Stepname
Proc Stepname
==> SALEGRP
==> ________
==> ________
Data Set Name
==> ____________________________________________ (If Type D)
CONFIRM = PF4
CANCEL= PF5
(Stepname (PROC) if jobstep definition)
(Stepname (PGM=) if jobstep definition)
or type “CANCEL” or “CONFIRM” at Command
line when processing Data Base options
To add a group of users that get the messages defined by SALESMSG, specify A
in the OPTION ==> field, G in the TYPE ==> field, and enter SALESGRP in the
NAME ==> field.
3.
The MESSAGE GROUP DEFINITION screen should be displayed. Complete as
shown in the following screen:
E:\Manuals\Product Manuals\ASO\OM (OPS Master)\Reference Guide\Current Release\OPS_C12.fm
2.
Page - 316
Mantissa Corporation © 2013
OPS/MASTER®
Chapter 12
Tutorial
Defining a Sample Sales Job Schedule
------------ JOB/Master® Message Group Definition For: SAL Row 1 to 11 of 21
Command ===>
Scroll => PAGE
Definition Last Updated by
on
at
Schedule/Net=> ________
Description => SALES REPORTS MESSAGE GROUPS
-------------------------------------------------------------------------------Msg Class/ DE =1 CI =2 TI =3 CR =4 JS =5
User
User
Msg
Send
On Shift
Do Not Send
ID
Type
Class
Type
Start End
Before After
(M)
1-5
F/L/M
(HHMM)
(YYDDD)
-------- --------------- -------- ----TSO1
M
1
F
0800 1600
0800_ 1600_
TSO2____
M
3
F
1600 2400
1600_ 2400_
________
_
_
_
____ ____
_____ _____
________
_
_
_
____ ____
_____ _____
________
_
_
_
____ ____
_____ _____
________
_
_
_
____ ____
_____ _____
________
_
_
_
____ ____
_____ _____
________
_
_
_
____ ____
_____ _____
________
_
_
_
____ ____
_____ _____
________
_
_
_
____ ____
_____ _____
________
_
_
_
____ ____
_____ _____
. . . . . . . . . . . . . . . . . . . . . . . . . . .
Menu Utilities Compilers Options Status Help
4.
You can specify each user that is assigned to this notify group. The ID should be
entered in the USER ID ==> field.
5.
The following USER TYPE code is available:
M
6.
The following MSG CLASS codes are available:
1,2,3,4,5
E:\Manuals\Product Manuals\ASO\OM (OPS Master)\Reference Guide\Current Release\OPS_C12.fm
7.
Manual Task Station. Receives only manual task messages.
Specify the number corresponding to the desired manual task
message. Must have user type M.
The following SEND TYPE codes are available:
F
Send to first logged on user.
L
Send if logged on.
M
Send unconditionally.
8.
The ON SHIFT area can be used to specify a time within a specific work shift
when the message can be sent.
9.
The DO NOT SEND (BEFORE/AFTER) can be used to specify a valid time
period during which the message can be sent.
10. That completes the Notify Group definition. Now press <PF4> (CONFIRM) to
save the screen and re-display the JOB/Master® DATA BASE FUNCTIONS
screen.
Mantissa Corporation © 2013
Page - 317
Chapter 12
OPS/MASTER®
Defining a Sample Sales Job Schedule
Tutorial
Creating the Job Definition for REGSALES
1.
At the JOB/Master® DATA BASE FUNCTIONS screen, select
OPTION ==> A, TYPE==> J, and enter REGSALES in the NAME == => field.
2.
The first job definition screen will be displayed. Complete this screen as shown:
------------------------ JOB/Master® Job Definition ----- Row 1 to 2 of 72
Command ===>
Scroll ==> PAGE
-------------------------Definition Last Updated by
on
at
Jobname
==> REGSALES Alt Name For => ________ System Name ==> SALES
PDS Mem
==> ________ PDS ==> ____________________________________________
Trig Job ==> N (Y/N) Triggered By==>
Submit Type ==> A (ACMRST)
Res Name1 ==> SYSTEMA_ Res Name2
==> ________ Schedule/Net==> ********
Calendar ==> MON-SAT_ Excep Cal1 ==> ________ Excep Cal2 ==> ________
Keywd Def ==> ________ Priority
==> _
Lib Type
==>
Neg/C Def ==> ________
Model / Count of Tapes: 3420 => 00
3480 => 00 Update Drive Usage=> Y
------------------------------- Submit Options ------------------------------Enter submit time (HHMM) & optionally “number of runs”/”minutes between runs”
Submit=> 0000 End=> 0000 Number Of Runs=> 00 Minutes Between Runs=> 0000
----------------------------- Dependency Options ----------------------------Pred
| Negative Coreq
| Process N-Proc
| Trig
Sub: OP Cond Trig
Jobs Typ|
Dep
Dep
| Keyword Keyword |
Job
Typ: CD Code Type
-------- - | -------- -------- | -------- -------- | -------- - : - ---- ________ _ | ________ ________ | MONWKD__ ________ | ________ _ : _ ____ _
________ _ | ________ ________ | ________ ________ | ________ _ : _ ____ _
. . . . . . . . . . . . . . . . . . . . . . . . . . .
Menu Utilities Compilers Options Status Help
You will create the MON-SAT calendar and the NEG/C.DEF for REGDEPS later
in this tutorial.
4.
Now press <PF4> (CONFIRM) and the JOB/Master® DATA BASE FUNCTIONS screen should be displayed.
5.
You are now ready to create the negative/co-requisite dependency definition
(specified as REGDEPS in the NEG/C DEF field).
E:\Manuals\Product Manuals\ASO\OM (OPS Master)\Reference Guide\Current Release\OPS_C12.fm
3.
Page - 318
Mantissa Corporation © 2013
OPS/MASTER®
Chapter 12
Tutorial
Defining a Sample Sales Job Schedule
6.
Select OPTION ==> A and TYPE==> N to Add a Negative/Corequisite Definition. Also enter REGDEPS in the NAME ==> field. The following screen should
then be displayed:
------------- JOB/Master® Negative/Corequisite Dependency For: REGDEPS
------Command ===>
Definition Last Updated by
on
at
Description => DEPENDENCIES FOR REGSALES JOBS________________________________
Schedule/Net=> ________ Failed Negative Dependencies are Preds => N (Y,N)
Will not be submitted if these tasks are in the MVS input Q, or executing
Jobname Jobname Jobname Jobname Jobname Jobname Jobname Jobname
-------- -------- -------- -------- -------- -------- -------- -------CICS____ ________ ________ ________ ________ ________ ________ ________
________ ________ ________ ________ ________ ________ ________ ________
________ ________ ________ ________ ________ ________ ________ ________
________ ________ ________ ________ ________ ________ ________ ________
________ ________ ________ ________ ________ ________ ________ ________
________ ________ ________ ________ ________ ________ ________ ________
------------------------------------------------------------------------------Will only be submitted if the following tasks are executing:
Jobname Jobname Jobname Jobname Jobname Jobname Jobname Jobname
-------- -------- -------- -------- -------- -------- -------- -------ESF_____ ________ ________ ________ ________ ________ ________ ________
________ ________ ________ ________ ________ ________ ________ ________
. . . . . . . . . . . . . . . . . . . . . . . . . .
Menu Utilities Compilers Options Status Help
.
7.
The above dependency definition means that CICS cannot be running or in the
MVS input queue for REGSALES to be submitted. In addition, ESF must be running for REGSALES to be submitted.
8.
That completes the screens for this job definition. Press <PF4> (CONFIRM) so
that the JOB/Master® DATA BASE FUNCTIONS screen is displayed.
E:\Manuals\Product Manuals\ASO\OM (OPS Master)\Reference Guide\Current Release\OPS_C12.fm
Creating the MON-SAT Calendar
Mantissa Corporation © 2013
1.
Be sure the JOB/Master® DATA BASE FUNCTIONS screen is displayed.
2.
Enter A in the OPTION ==> field, C in the TYPE ==> field, and MON-SAT in
the NAME ==> field.
3.
Press <ENTER> and the CALENDAR DEFINITION screen will be displayed.
4.
The only difference between this calendar and the one created previously (MONFRI) is a single day. We can take advantage of this by copying the MON-FRI calendar into the MON-SAT calendar definition. Then, only a simple addition will
be necessary to complete the MON-SAT calendar.
Page - 319
Chapter 12
OPS/MASTER®
Defining a Sample Sales Job Schedule
5.
Tutorial
Enter COPY MON-FRI <ENTER> in the COMMAND ==> field, as shown in
the following illustration:
-
---------------------- JOB/Master®
Calendar Definition Screen ----------------
Command ===> COPY MON-FRI
------------------------------------------------------------------------------Calendar Name => MON-SAT
Year => 98 Schedule/Net => ********
Description => ____________________________________________________
Month
Week
Relday
Actdate
=>
=>
=>
=>
__
_
__
__
__
__
__
_
__
__
__
__
__
_
__
__
__
__
__
_
__
__
__
__
__
_
__
__
__
__
__
_
__
__
__
__
__
__
__
__
__
__
__
__
__
__
__
__
__
__
__
__
__
__
__
__
---------------------- Period Start and End Dates (MMDD) ---------------------1. 0000 0000
2. 0000 0000
3. 0000 0000
4. 0000 0000
5. 0000 0000
6. 0000 0000
7. 0000 0000
8. 0000 0000
9. 0000 0000
10. 0000 0000
11. 0000 0000
.
. . .
Options
13. 0000 0000
. . . . .
Status Help
.
.
.
.
.
.
.
.
.
After you press <ENTER>, the screen will display edits.:
MON-SAT ------------ JOB/Master® Calendar Display/Update ------------------Command ===>
-------------------------- Period Start and End Dates ------------------------1. 0000 0000
2. 0000 0000
3. 0000 0000 4. 0000 0000
5. 0000 0000
6. 0000 0000
7. 0000 0000
8. 0000 0000 9. 0000 0000 10. 0000 0000
11. 0000 0000 12. 0000 0000 13. 0000 0000
Description =>
Last Updated by P390K
on 98244 at 1201 ===========Schedule/Net=> ********
|Year: 98
| | | | | | | | | |1|1|1|1|1|1|1|1|1|1|2|2|2|2|2|2|2|2|2|2|3|3 |
| *CAL/REL | 1|2|3|4|5|6|7|8|9|0|1|2|3|4|5|6|7|8|9|0|1|2|3|4|5|6|7|8|9|0|1 |
|===========|===============================================================|
| Jan( THU )| H F - - M T W H F - - M T W H F - - M T W H F - - M T W H F - |
| Feb( SUN )| - M T W H F - - M T W H F - - M T W H F - - M T W H F |
| Mar( SUN )| - M T W H F - - M T W H F - - M T W H F - - M T W H F - - M T |
| Apr( WED )| W H F - - M T W H F - - M T W H F - - M T W H F - - M T W H
|
| May( FRI )| F - - M T W H F - - M T W H F - - M T W H F - - M T W H F - - |
| Jun( MON )| M T W H F - - M T W H F - - M T W H F - - M T W H F - - M T
|
| Jul( WED )| W H F - - M T W H F - - M T W H F - - M T W H F - - M T W H F |
| Aug( SAT )| - - M T W H F - - M T W H F - - M T W H F - - M T W H F - - M |
| Sep( TUE )| T W H F - - M T W H F - - M T W H F - - M T W H F - - M T W
|
| Oct( THU )| H F - - M T W H F - - M T W H F - - M T W H F - - M T W H F - |
| Nov( SUN )| - M T W H F - - M T W H F - - M T W H F - - M T W H F - - M
|
. . . . . . . . . . . . . . . . . . . . . . . . . . .
Menu Utilities Compilers Options Status Help
Page - 320
7.
Enter the next available day location after each F (Friday) by placing an “X” in
the slot. JOB/Master® will translate the X’s to the appropriate letter for Saturday.
8.
Press <PF4>. The JOB/Master® DATA BASE FUNCTIONS screen will be displayed.
Mantissa Corporation © 2013
E:\Manuals\Product Manuals\ASO\OM (OPS Master)\Reference Guide\Current Release\OPS_C12.fm
6.
. . . . . . . . .
Menu Utilities Compilers
12. 0000 0000
OPS/MASTER®
Chapter 12
Tutorial
Defining a Sample Sales Job Schedule
Creating the Job Definition for TOTSALES
1.
Be sure the JOB/Master® DATA BASE FUNCTIONS screen is displayed.
2.
Enter OPTION ==> A, TYPE ==> , and TOTSALES in the NAME ==> field.
Press <ENTER>.
3.
The first job definition screen will be displayed. Complete this screen as shown:
----------------------- JOB/Master® Job Definition ------- Row 1 to 2 of 72
Command ===>
Scroll ==> PAGE
-------------------------Definition Last Updated by
on
at
Jobname
==> TOTSALES Alt Name For => ________ System Name ==> SALES
PDS Mem
==> ________ PDS ==> ____________________________________________
Trig Job ==> N (Y/N) Triggered By==>
Submit Type ==> A (ACMRST)
Res Name1 ==> SYSTEMA_ Res Name2
==> ________ Schedule/Net==> ********
Calendar ==> MON-SAT_ Excep Cal1 ==> HOLIDAY_ Excep Cal2 ==> ________
Keywd Def ==> ________ Priority
==> _
Lib Type
==>
Neg/C Def ==> REGDEPS_
Model / Count of Tapes: 3420 => 00
3480 => 00 Update Drive Usage=> Y
------------------------------- Submit Options ------------------------------Enter submit time (HHMM) & optionally “number of runs”/”minutes between runs”
Submit=> 0000 End=> 0000 Number Of Runs=> 00 Minutes Between Runs=> 0000
----------------------------- Dependency Options ----------------------------Pred
| Negative Coreq
| Process N-Proc
| Trig
Sub: OP Cond Trig
Jobs Typ|
Dep
Dep
| Keyword Keyword |
Job
Typ: CD Code Type
-------- - | -------- -------- | -------- -------- | -------- - : - ---- ________ _ | ________ ________ | MON_____ ________ | ________ _ : _ ____ _
________ _ | ________ ________ | HOLIDY+1 ________ | ________ _ : _ ____ _
. . . . . . . . . . . . . . . . . . . . . . . . . . .
Menu Utilities Compilers Options Status Help
You are now ready to complete the job step definition. Press <PF4> (CONFIRM)
to save the job definition screen and re-display the JOB/Master® DATA BASE
FUNCTIONS screen.
5.
To display the JOB STEP DEFINITION screen, specify option A (Add a Job or
job step) and enter SALESTP1 in the STEPNAME ==> and PROC STEPNAME
==> fields. The following screen will then be displayed. No dependency definitions need to be specified.
E:\Manuals\Product Manuals\ASO\OM (OPS Master)\Reference Guide\Current Release\OPS_C12.fm
4.
Mantissa Corporation © 2013
Page - 321
Chapter 12
OPS/MASTER®
Defining a Sample Sales Job Schedule
Tutorial
------------------------ JOB/Master® Data Base Functions -----------------Command ===>
ID: JM01
User = P390K
Date = 98/09/09 - 98.252 Time = 14:05
-------------------------------------------------------------------------------Option ==> U
A dd / B rowse
/ U pdate
Type
J ob
C alendar
/ S ystem
/ N eg and Coreq
/ D ataset
==> J
/ I nquire Index
/ P rocess Keyword
/ G roup Message
/ M essage
Name
Stepname
Proc Stepname
==> TOTSALES
==> SALESTP1
==> SALESTP1
Data Set Name
==> ____________________________________________ (If Type D)
CONFIRM = PF4
.
CANCEL= PF5
. . . . . . . . .
Menu Utilities Compilers
(Stepname (PROC) if jobstep definition)
(Stepname (PGM=) if jobstep definition)
or type “CANCEL” or “CONFIRM” at Command
line when processing Data Base options
. . .
Options
. . . . .
Status Help
.
.
.
.
.
.
.
.
.
Complete this screen as shown above. Now press <PF4> (CONFIRM) to save
this screen and re-display the JOB/Master® DATA BASE FUNCTIONS screen.
E:\Manuals\Product Manuals\ASO\OM (OPS Master)\Reference Guide\Current Release\OPS_C12.fm
6.
/ D elete
Page - 322
Mantissa Corporation © 2013
OPS/MASTER®
Chapter 12
Tutorial
Defining A Sample Commissions Job Schedule
Defining A Sample Commissions Job Schedule
Schedule Requirements
This schedule must allow for the following jobs to be run at the times listed below:
JOB NAME
SCHEDULED TO BE RUN:
COMM1
1st and 16th of each month and one day prior if this is a holiday
System = COMM
Resource = SYSTEMB
TOTCOMM
Last workday of each month
System = COMM
Resource = SYSTEMB
Test for Condition Code Equal to 0001. If equal to 0001, trigger job TOTSALES
Calendar Requirements
•
COMM1 has no need for a calendar. It will run on a specific day.
•
TOTCOMM will use the calendar MON - SAT.
•
Both jobs will use the Exception Calendar HOLIDAY created in previous tutorial.
Creating the Job Definition for COMM1
Follow the steps below to create the schedule according to the above requirements.
1.
Be sure, the JOB/Master® DATA BASE FUNCTIONS screen is displayed, as
shown:
--------------------- JOB/Master® Data Base Functions ---------------------Command ===>
E:\Manuals\Product Manuals\ASO\OM (OPS Master)\Reference Guide\Current Release\OPS_C12.fm
ID: JM01
User = P390K
Date = 98/09/09 - 98.252 Time = 14:12
-------------------------------------------------------------------------------Option ==> A
A dd / B rowse
/ U pdate
Type
J ob
C alendar
/ S ystem
/ N eg and Coreq
/ D ataset
==> J
==> COMM1___
==> ________
==> ________
Data Set Name
==> ____________________________________________ (If Type D)
.
Mantissa Corporation © 2013
/ I nquire Index
/ P rocess Keyword
/ G roup Message
/ M essage
Name
Stepname
Proc Stepname
CONFIRM = PF4
2.
/ D elete
CANCEL= PF5
. . . . . . . . .
Menu Utilities Compilers
(Stepname (PROC) if jobstep definition)
(Stepname (PGM=) if jobstep definition)
or type “CANCEL” or “CONFIRM” at Command
line when processing Data Base options
. . .
Options
. . . . .
Status Help
.
.
.
.
.
.
.
.
.
Enter OPTION ==>A and TYPE ==>J to create a job definition.
Page - 323
Chapter 12
OPS/MASTER®
Defining A Sample Commissions Job Schedule
Tutorial
3.
Enter COMM1 in the NAME ==> field and press <ENTER>.
4.
The first job definition screen should be displayed. Complete this screen as
shown:
:
------------------------------- JOB/Master® Job Definition --- Row 1 to 2 of 72
Command ===>
Scroll ==> PAGE
-------------------------Definition Last Updated by
on
at
Jobname
==> COMM1
Alt Name For => ________ System Name ==> COMM
PDS Mem
==> ________ PDS ==> ____________________________________________
Trig Job ==> N (Y/N) Triggered By==>
Submit Type ==> A (ACMRST)
Res Name1 ==> SYSTEMB_ Res Name2
==> ________ Schedule/Net==> ********
Calendar ==> MON-SAT_ Excep Cal1 ==> HOLIDAY_ Excep Cal2 ==> ________
Keywd Def ==> 1AND16__ Priority
==> _
Lib Type
==>
Neg/C Def ==> ________
Model / Count of Tapes: 3420 => 00
3480 => 00 Update Drive Usage=> Y
------------------------------- Submit Options ------------------------------Enter submit time (HHMM) & optionally “number of runs”/”minutes between runs”
Submit=> 0000 End=> 0000 Number Of Runs=> 00 Minutes Between Runs=> 0000
----------------------------- Dependency Options ----------------------------Pred
| Negative Coreq
| Process N-Proc
| Trig
Sub: OP Cond Trig
Jobs Typ|
Dep
Dep
| Keyword Keyword |
Job
Typ: CD Code Type
-------- - | -------- -------- | -------- -------- | -------- - : - ---- ________ _ | ________ ________ | ________ ________ | ________ _ : _ ____ _
________ _ | ________ ________ | ________ ________ | ________ _ : _ ____ _
. . . . . . . . . . . . . . . . . . . . . . . . . . .
Menu Utilities Compilers Options Status Help
This is the only job definition screen needed for this job. Now press <PF4>
(CONFIRM) to save the record and re-display the JOB/Master® DATA BASE
FUNCTIONS screen. You are now ready to define the keyword 1AND16.
E:\Manuals\Product Manuals\ASO\OM (OPS Master)\Reference Guide\Current Release\OPS_C12.fm
5.
Page - 324
Mantissa Corporation © 2013
OPS/MASTER®
Chapter 12
Tutorial
Defining A Sample Commissions Job Schedule
Defining the Process Keyword 1AND16
1.
Enter OPTION ==> A and TYPE ==> P on the JOB/Master® DATA BASE
FUNCTIONS screen (Add a process Keyword Definition). Press <ENTER>.
2.
The JOB/Master® PROCESS KEYWORD DEFINITION screen will be displayed. Complete the screen as shown:
---------------- JOB/Master® Process Keyword Definition Screen ------------Command ===>
Definition Last Updated by
on
at
Name
==> 1AND16
Schedule/Net ==> ________
Calendar
==> ________
Exceptn Cal1 ==> HOLIDAY_ Excp Cal2 ==> ________
Description ==> RUNS FOR THE 1ST AND 16TH OF THE MONTH_
Process Keywords:
D01_____
________
________
________
________
________
(Make Entries left to right from line 1)
D16_____ HOLIDY-1 ________ ________ ________
________ ________ ________ ________ ________
________ ________ ________ ________ ________
________ ________ ________ ________ ________
________ ________ ________ ________ ________
________ ________ ________ ________ ________
Non-process Keywords: (Make Entries left to right from line 1)
________ ________ ________ ________ ________ ________
________ ________ ________ ________ ________ ________
________ ________ ________ ________ ________ ________
________ ________ ________ ________ ________ ________
________ ________ ________ ________ ________ ________
. . . . . . . . . . . . . . . . . . . . . . . .
Menu Utilities Compilers Options Status Help
)
.
.
.
Three system keywords were specified. Two are in the form Dxx, where xx is
the actual date you want the job to run. Therefore, D01 and D16 means to run
the job on the 1st and 16th of each month. The addition of the HLYDAY-1
means that if the job is scheduled on the first or sixteenth and it happened to be
a holiday, then it would be scheduled the day before.
E:\Manuals\Product Manuals\ASO\OM (OPS Master)\Reference Guide\Current Release\OPS_C12.fm
Also note that no calendars were specified. The keyword Dxx does not require
calendar references since the specific day is specified by the keyword itself.
3.
Mantissa Corporation © 2013
You have now completed all definitions for this job. Now proceed to specify the
definitions for TOTCOMM by pressing PF4 (CONFIRM) to save the record and
re-display the JOB/Master® DATA BASE FUNCTIONS screen.
Page - 325
Chapter 12
OPS/MASTER®
Defining A Sample Commissions Job Schedule
Tutorial
Creating the Job Definition for TOTCOMM
1.
Enter OPTION ==> A and TYPE ==> J on the JOB/Master® DATA BASE
FUNCTIONS screen.
2.
Enter TOTCOMM in the NAME ==> field. Press <ENTER> and the first job
definition screen should be displayed. Complete this screen as shown:
----------------------- JOB/Master® Job Definition ------- Row 1 to 2 of 72
Command ===>
Scroll ==> PAGE
-------------------------Definition Last Updated by
on
at
Jobname
==> TOTCOMM
Alt Name For => ________ System Name ==> COMM
PDS Mem
==> ________ PDS ==> ____________________________________________
Trig Job ==> N (Y/N) Triggered By==>
Submit Type ==> A (ACMRST)
Res Name1 ==> SYSTEMB_ Res Name2
==> ________ Schedule/Net==> ********
Calendar ==> MON-SAT_ Excep Cal1 ==> HOLIDAY_ Excep Cal2 ==> ________
Keywd Def ==> LWKD____ Priority
==> _
Lib Type
==>
Neg/C Def ==> ________
Model / Count of Tapes: 3420 => 00
3480 => 00 Update Drive Usage=> Y
------------------------------- Submit Options ------------------------------Enter submit time (HHMM) & optionally “number of runs”/”minutes between runs”
Submit=> 0000 End=> 0000 Number Of Runs=> 00 Minutes Between Runs=> 0000
3.
Note that the keyword LWKD was specified. This keyword tells the system to
run the job on the last workday of each month. The system can reference the previously defined MON-SAT and HOLIDAY calendars to find the last workday of
each month.
4.
Press <TAB> to move down to the TRIG.JOB==> field. Enter TOTSALES here
and an A in the SUB TYP ==> field. This means that if the TOTCOMM job ends
and meets the condition code check (described next), TOTSALES will be automatically submitted to run. The choices for the SUB TYP are outlined in the
instruction text of INVNTRY1 in this tutorial section. Please reference.
5.
Use the condition code test to trigger TOTSALES when the COND CODE is
0001 and the OP CD is E (equal). The TRIG TYPE is I because we want to
include the job if the condition is met.
OP CD selections are:
6.
Page - 326
L
Less Than
G
Greater Than
N
Not Equal
E
Equal
That completes all definitions for this job. Press <PF4> (CONFIRM) to save the
record and re-display the JOB/Master® DATA BASE FUNCTION screen.
Mantissa Corporation © 2013
E:\Manuals\Product Manuals\ASO\OM (OPS Master)\Reference Guide\Current Release\OPS_C12.fm
----------------------------- Dependency Options ----------------------------Pred
| Negative Coreq
| Process N-Proc
| Trig
Sub: OP Cond Trig
Jobs Typ|
Dep
Dep
| Keyword Keyword |
Job
Typ: CD Code Type
-------- - | -------- -------- | -------- -------- | -------- - : - ---- ________ _ | ________ ________ | LWKD____ ________ | TOTSALES A : E 0001 I
________ _ | ________ ________ | ________ ________ | ________ _ : _ ____ _
. . . . . . . . . . . . . . . . . . . . . . . . . . .
Menu Utilities Compilers Options Status Help
OPS/MASTER®
Chapter 12
Tutorial
Running a Job Schedule Simulation
Running a Job Schedule Simulation
1.
To run a simulation, first select OPTION ==> J (JOB/Master® Scheduler from
the master menu) and press <ENTER>.
2.
From the JOB/Master® Primary Menu enter T for Job Tracking:
------------------ Job Scheduling and Management by Mantissa --------------Option ===> T
Data Base Creation : D
Profile
: P
Report Selection
: R
Job Tracking
: T
JCL Substitution : J
Current Selection = JM01
PF1 = HELP
User= P390K
Date= 98/09/09
98.252
Time= 14:20
JMJMJMJMJMJMJMJMJMJMJMJMJMJMJMJMJMJMJMJMJMJMJMJMJMJMJMJMJMJMJMJMJMJMJMJMJMJMJMJM
JMJMJMJMJMJMJMJMJMJMJMJMJMJMJMJMJMJMJ MJMJMJMJMJMJMJMJMJMJMJMJMJMJMJMJMJMJMJMJM
JMJMJMJMJMJMJMJMJMJ
MJM JMJMJM
MJM
MJMJMJMJMJMJMJMJMJMJMJM
JMJMJMJMJMJMJMJMJMJMJMJM JMJMJMJMJ MJMJMJ
J M J
JMJMJMJMJMJMJMJMJMJMJMJM
JMJMJMJMJMJMJMJMJMJMJMJ MJMJMJMJM JMJMJM
MJ J JM
MJMJMJMJMJMJMJMJMJMJMJMJM
JMJMJMJMJMJMJMJMJMJMJM JMJMJMJMJ MJMJMJ
JMJ MJ
JMJMJMJMJMJMJMJMJMJMJMJMJM
JMJMJMJMJMJMJM JMJMJ MJMJMJMJM JMJMJM
MJMJMJM
MJMJMJMJMJMJMJMJMJMJMJMJMJM
JMJMJMJMJMJMJ MJMJ
JMJMJMJMJ MJMJMJ
MJMJMJM
JMJMJMJMJMJMJMJMJMJMJMJMJMJM
JMJMJMJMJMJMJ
JMJMJMJMJM JMJMJM
JMJMJMJ
MJMJMJMJMJMJMJMJMJMJMJMJMJMJM
JMJMJMJMJMJMJMJMJMJMJMJMJMJMJ MJMJMJMJMJMJMJMJMJMJMJMJMJMJMJMJMJMJMJMJMJMJMJMJM
. . . . . . . . . . . . . . . . . . . . . . . . . . .
Menu Utilities Compilers Options Status Help
Enter GSS (GENERATE SIMULATION SCHEDULE CREATION JCL) in the
OPTION ==> field of the JOB/Master® tracking functions menu. No name is
necessary.
4.
Press <ENTER>.
E:\Manuals\Product Manuals\ASO\OM (OPS Master)\Reference Guide\Current Release\OPS_C12.fm
3.
Mantissa Corporation © 2013
Page - 327
Chapter 12
OPS/MASTER®
Running a Job Schedule Simulation
5.
Tutorial
The JOB/Master® SCHEDULE RUN PARAMETER screen will be displayed,
as shown:
-------------------- JOB/Master® Schedule Run Parameters --------------------Command ===>
Scroll ==> PAGE
--------------------------------------------------------------------------------------- Date= 98/09/09 98.252 Time= 14:22 Next Sched Date= 98253 --------From Date = 98252 From Time = 0700
To Date = 00000 To Time = 0000
Simulation --------------> N (Y,N) Backlog report only -> N (Y,N)
Include selections only -> Y (Y,N)
------------------------------------------------------------------------------Enter System|Job and I nclude| E xclude| S elect value
System
Jobname
Inc/Exc
--------------- ------(I,S,E)
------------------------------------------------------------------------------******************************* Bottom of data ********************************
Notice the Y in the INCLUDE SELECTIONS ONLY==> field. Enter the
desired system or job in the ENTER SYSTEM AND JOB INCLUDED SELECTIONS area of the screen. If more than one entry is required, enter the first entry
(sales system), followed by the INC/EXC value.
I
=
Include (No matter what the calendar or keywords may be).
E
=
Exclude (DO NOT schedule this entry).
S
=
Schedule only if it is due to be scheduled.
7.
Specify a FROM DATE/TIME and a TO DATE/TIME. These are the lower and
upper bounds to select jobs for the schedule queue. If TODATE=0000 and TO
TIME = 0000, the schedule generated will be a 24-hour period.
8.
You are restricted from changing the Y in the SIMULATION ==> field. This
screen will always produce a simulation run only. All jobs in a simulated schedule will not be placed on the queue, but can be used to review a schedule before it
is generated.
9.
Refer to the “Job Tracking” reference section in this manual for more information on this screen.
10. Proceed to the tutorial “Monitoring the Queue” to learn how to list the jobs on the
queue and check for the simulated job.
Page - 328
Mantissa Corporation © 2013
E:\Manuals\Product Manuals\ASO\OM (OPS Master)\Reference Guide\Current Release\OPS_C12.fm
6.
OPS/MASTER®
Chapter 12
Tutorial
Monitoring the Queue
Monitoring the Queue
1.
Log into the OPS/Master® system.
2.
The OPS/Master® Main Menu will be displayed, as shown below:
--------Operations Productivity Systems - OPS/Master® by Mantissa v5.2.1------Option ===>
J
J2
J3
J4
C
-
JOB/Master® (JM01
JOB/Master® (JM02
JOB/Master® (JM03
JOB/Master® (JM04
CONSOLE/Master®
Prod.)
)
)
)
PF1 = HELP
I
I2
I3
I4
R
X
-
Interactive
Interactive
Interactive
Interactive
RUN/Master®
EXIT
Security
Security
Security
Security
Facility
Facility
Facility
Facility
(JM01)
(JM02)
(JM03)
(JM04)
User= P390K
Date= 98/09/09
98.252
Time= 14:23
OPSOPSOPSOPSOPSOPSOPSOPSOPSOPSOPSOPSOPSOPSOPSOPSOPSOPSOPSOPSOPSOPSOPSOPSOSPOPSOP
OPSOPSOPSOPSOP
OPSOPSOPS
OPSOPSOPSOP
OPSOPSOPSOP
OPSOPSOPSOPSO
PSOPSOP
SOPSOPSO
SOPSOPS
OPSOPSOPS
OPSOPSO
PSOPSOPSOP
OPSOPSOPSOPS
OPSOPSO
PSOPSOPS
OPSOPSOP
SOPOPSOPO
SOPSOPS
OPSOPSOPSOP
OPSOPSOPSOP
SOPSOPS
OPSOPSOP
SOPSOPS
OPSOPSOPSOPS
OPSOPSOPSOPSOPSOPSOP
OPSOPSOPSO
PSOPSOP
SOPSOPSO
PSOPSOPSOPSOPSO
SOPSOPSOPSOPSOPSOP
OPSOPSOPS
OPSOPSO
PSOPSOPS
OPSOPSOPSOPSOPSOPS
OPSOPS
OPSOPSOPSOPSOPSOP
OPSOPSOP
SOPSOPS
OPSOPSOP
SOPSOPSOPSOPSOPSOP
SOPSOP
SOPSOPSOPSOPSOPSOP
OPSOPSO
SOPSOPSO
PSOPSOPSOPSOPSOPSOPS
PSOPSOPSOPSOPSOPSOP
OPSOPSOPSOPSOPSOPSOPSOPSOPSOPSOPSOPSOPSOPSOPSOPSOPSOPSOPSOPSOPSOPSOPSOPSOPSOPSOP
. . . . . . . . . . . . . . . . . . . . . . . . . . .
Menu Utilities Compilers Options Status Help
3.
Next, select OPTION => J (JOB/Master® Scheduler) and press <ENTER>.
4.
The JOB/Master® Introductory screen will then be displayed.
--------------- Job Scheduling and Management by Mantissa ----------------Option ===>
Data Base Creation : D
Profile
: P
Report Selection
: R
Job Tracking
: T
JCL Substitution : J
E:\Manuals\Product Manuals\ASO\OM (OPS Master)\Reference Guide\Current Release\OPS_C12.fm
Current Selection = JM01
PF1 = HELP
User= P390K
Date= 98/09/09
98.252
Time= 14:25
JMJMJMJMJMJMJMJMJMJMJMJMJMJMJMJMJMJMJMJMJMJMJMJMJMJMJMJMJMJMJMJMJMJMJMJMJMJMJMJM
JMJMJMJMJMJMJMJMJMJMJMJMJMJMJMJMJMJMJ MJMJMJMJMJMJMJMJMJMJMJMJMJMJMJMJMJMJMJMJM
JMJMJMJMJMJMJMJMJMJ
MJM JMJMJM
MJM
MJMJMJMJMJMJMJMJMJMJMJM
JMJMJMJMJMJMJMJMJMJMJMJM JMJMJMJMJ MJMJMJ
J M J
JMJMJMJMJMJMJMJMJMJMJMJM
JMJMJMJMJMJMJMJMJMJMJMJ MJMJMJMJM JMJMJM
MJ J JM
MJMJMJMJMJMJMJMJMJMJMJMJM
JMJMJMJMJMJMJMJMJMJMJM JMJMJMJMJ MJMJMJ
JMJ MJ
JMJMJMJMJMJMJMJMJMJMJMJMJM
JMJMJMJMJMJMJM JMJMJ MJMJMJMJM JMJMJM
MJMJMJM
MJMJMJMJMJMJMJMJMJMJMJMJMJM
JMJMJMJMJMJMJ MJMJ
JMJMJMJMJ MJMJMJ
MJMJMJM
JMJMJMJMJMJMJMJMJMJMJMJMJMJM
JMJMJMJMJMJMJ
JMJMJMJMJM JMJMJM
JMJMJMJ
MJMJMJMJMJMJMJMJMJMJMJMJMJMJM
JMJMJMJMJMJMJMJMJMJMJMJMJMJMJ MJMJMJMJMJMJMJMJMJMJMJMJMJMJMJMJMJMJMJMJMJMJMJMJM
. . . . . . . . . . . . . . . . . . . . . . . . . . .
Menu Utilities Compilers Options Status Help
Mantissa Corporation © 2013
Page - 329
Chapter 12
OPS/MASTER®
Monitoring the Queue
Tutorial
5.
Enter T for JOB TRACKING. Be sure you have already confirmed the function
key assignments with the PROFILE option.
6.
After entering T (JOB TRACKING), the scrollable JOB/Master® JOB TRACKING SYSTEM Menu is displayed, as shown below:.
------------------------ JOB/Master® Tracking Functions ----- Row 1 to 12 of 24
Command ===>
Scroll ==> PAGE
ID: JM01
User = P390K
Date = 98/09/09 - 98.252 Time = 14:26
-------------------------------------------------------------------------------Option ==> LQ__
Job
==> ________ (If applicable)
Options
-------LQ <==
AJ <==
GS <==
GSS <==
PQ <==
PS <==
SS <==
SP <==
TE <==
RT <==
ST <==
.
-
Function
(Scroll list for options)
------------------------------------------------------------List jobs on the Schedule Queue
Add a job to the Schedule Queue
Generate schedule creation JCL
Generate simulation schedule JCL
Purge entire Schedule Queue
Inactivate Auto Job submission
Activate Auto Job submission
Modify Priority Selection list
Update Tape Unit Exclusion list
Initiate Resource Table processing
Display Control Region settings
. . . . . . . . .
Menu Utilities Compilers
. . .
Options
. . . . .
Status Help
.
.
.
.
.
.
.
.
.
Enter LQ (List Jobs on the Schedule Queue) in the OPTION ==> field.
8.
The system will then display all jobs that are scheduled at that time or have any
outstanding requirements. You can scroll the screen up and down with the <PF7>
and <PF8> keys. You can scroll the screen right and left with the <PF10> and
<PF11> (these are the default key assignments). You can find out more information about this screen by refering to the “Job Tracking” chapter in this manual.
E:\Manuals\Product Manuals\ASO\OM (OPS Master)\Reference Guide\Current Release\OPS_C12.fm
7.
Page - 330
Mantissa Corporation © 2013
OPS/MASTER®
Chapter 12
Tutorial
Posting Manual Task Complete
Posting Manual Task Complete
1.
From the JOB/Master® Primary Menu enter T for Job Tracking. Press
<ENTER>.
2.
The scrollable Job Tracking Options Menu is displayed, as shown:
------------------------ JOB/Master® Tracking Functions ----- Row 1 to 12 of 24
Command ===>
Scroll ==> PAGE
ID: JM01
User = P390K
Date = 98/09/09 - 98.252 Time = 14:26
-------------------------------------------------------------------------------Option ==> LQ__
Job
==> ________ (If applicable)
Options
-------LQ <==
AJ <==
GS <==
GSS <==
PQ <==
PS <==
SS <==
SP <==
TE <==
RT <==
ST <==
E:\Manuals\Product Manuals\ASO\OM (OPS Master)\Reference Guide\Current Release\OPS_C12.fm
.
-
Function
(Scroll list for options)
------------------------------------------------------------List jobs on the Schedule Queue
Add a job to the Schedule Queue
Generate schedule creation JCL
Generate simulation schedule JCL
Purge entire Schedule Queue
Inactivate Auto Job submission
Activate Auto Job submission
Modify Priority Selection list
Update Tape Unit Exclusion list
Initiate Resource Table processing
Display Control Region settings
. . . . . . . . .
Menu Utilities Compilers
. . .
Options
. . . . .
Status Help
.
.
.
.
.
.
.
.
.
3.
Select OPTION ==> LQ (List All Jobs on the Schedule Queue).
4.
The system will then display all jobs in the queue.
5.
If you know the desired jobname, enter the name in the JOB ==> field on the
SET ==> command line and press <ENTER>. The listing for that job will be displayed. Remember Generic Masking is possible.
6.
If you do not know the desired jobname or you want to sign off on manual tasks
for multiple jobs, enter X in the MT ==> field of the SET ==> command line and
press <ENTER>.
7.
The system will then display all jobs that are awaiting manual tasks. A “SHIFT”
command, PF10 or PF11, is required to see the additional data.
8.
You will see a Y in one or more of the manual task columns (depending on the
job’s definition). The default column headers for the manual tasks are DE (data
entry), CI (card input), TI (tape input), DI (disk input), and CR (console routed).
These headers are user definable and may have been modified in the Global settings.
9.
When the required manual task(s) is complete, move the cursor over the Y in the
appropriate listing and enter N followed then by pressing <ENTER>. This tells
the system that the task is complete.
10. Jobs that were defined with output posting requirements may show a Y in the
OP==> field (this column header cannot be changed). You can sign off on an
output posting requirement in the same way as the manual tasks. Simply change
Mantissa Corporation © 2013
Page - 331
Chapter 12
OPS/MASTER®
Posting Manual Task Complete
Tutorial
the Y to an N when the requirements are met. To sign off on a job waiting for output processing, select the OP on the LQ. Set line by placing an X in the OP.
E:\Manuals\Product Manuals\ASO\OM (OPS Master)\Reference Guide\Current Release\OPS_C12.fm
11. That is all that is required to sign off on manual tasks (and output posting
requirements). Now press <PF4> (CONFIRM) to save the record and re-display
the JOB/Master® Main Menu.
Page - 332
Mantissa Corporation © 2013
MantissaCorporation
Operations Productivity System™
OPS/Master®System Reference Manual
Version 5.20.1
Mantissa ASO
Automated Systems Operation
OPS/MASTER®
OPS/MASTER®
Notice
The software described in this document is proprietary to Mantissa Corporation, and furnished under a license
agreement. The software may be used or copied only in accordance with the terms and conditions of that agreement.
Copying or usage other than as provided for in the agreement is unauthorized and unlawful.
This document is subject to change without notice.
Trademarks
E:\Manuals\Product Manuals\ASO\OM (OPS Master)\Reference Guide\Current Release\OPS_CVR2.fm
OPS and Operations Productivity System are trademarks of Mantissa Corporation. Other product name
references are trademarks of their respective holders.
Copyrights 1989 - 1996
Publication Information
Publication Name:
Publication Number
Release:
OPS/Master® System Reference Guide,
OPS002-JMIN
5.20.1
Print date:
November 24, 2013
Mantissa Corporation © 2013
Page - 334
OPS/MASTER®
Preface
Overview of Documentation
Preface
Overview of Documentation
The OPS/Master® Reference Guide contains the following sections:
JOB/Master® Reference
JOB/Master® is used to create all definitions required for schedule generation. This section contains illustrations of all JOB/Master® screens and detailed descriptions of the contents of these screens.
User Tutorials
This section contains step-by-step instructions for creating several job definitions and
other important tasks performed by OPS/Master® users. These tutorials also include
detailed instructions for creating calendar and process keyword definitions.
E:\Manuals\Product Manuals\ASO\OM (OPS Master)\Reference Guide\Current Release\OPS_P02.fm
CONSOLE/Master® Reference
This module simplifies MVS functions and automates console operations. This section
illustrates all CONSOLE/Master® screens and provides detailed descriptions of all fields
on these screens.
RUN/Master® Reference
This module is a rerun management system that automates the restarting or rerunning of a
batch job. All screens involved in the restart process are described in this section.
System Administration
This section of the reference guide contains information on setting up OPS/Master® security (for all modules), specifying Global Parameters, establishing user exits, and OPS/
Master® systems customization.
Mantissa Corporation © 2013
Page - 335
Preface
OPS/MASTER®
Overview of Documentation
Implementation Checklist
This section contains a list of all steps that are required to install and learn the system.
Although some items may only apply to certain personnel, this list will provide your site
with a list of all steps that should be completed before starting production.
Installation Guide
This section provides all the necessary information for the successful installation of all
OPS/Master® modules. Instructions are also provided for verifying the successful installation of OPS/Master® modules.
Messages and Codes
E:\Manuals\Product Manuals\ASO\OM (OPS Master)\Reference Guide\Current Release\OPS_P02.fm
This section contains a list of all messages and codes in the OPS system.
Page - 336
Mantissa Corporation © 2013
OPS/MASTER®
CONSOLE/Master®
E:\Manuals\Product Manuals\ASO\OM (OPS Master)\Reference Guide\Current Release\SECT2cvr.fm
Release 5.20.1
Mantissa Corporation®
1012 Edenton Street
Birmingham, Alabama 35242
Mantissa Corporation © 2013
Page - 337
OPS/MASTER®
OPS/Master® is a software product of Mantissa Corporation. All rights are reserved, and reproduction, use of, or distribution of this documentation is prohibited unless written consent is obtained from Mantissa Corporation. This document contains proprietary information and is intended for use only by licensees of OPS/Master® and those
evaluating its potential worth in their respective operating environment.
E:\Manuals\Product Manuals\ASO\OM (OPS Master)\Reference Guide\Current Release\SECT2cvr.fm
© Copywrite - Mantissa Corporation 1989-2013
Publication Information
Publication Name:
Publication Number
Release:
Mantissa Corporation © 2013
OPS/MASTER®
OPS002-JMIN
5.20.1
Page - 338
OPS/MASTER®
Chapter 2
Job Scheduling Concepts
Introduction
Chapter 2
Job Scheduling Concepts
Introduction
A wise man once said, “Any automated scheduling system is only as good as the concepts
utilized to implement the system”. In other words a poorly designed implementation of a
manual system will be a manual system processing much faster, but it will still be a manual system in concept.
It is for this reason this section on scheduling concepts has been added to this manual.
Each and every installation running production systems today will use an automated
scheduling system slightly different. There are however, some basic concepts which can
and should be reviewed in all facilities prior to embarking on automated scheduling.
E:\Manuals\Product Manuals\ASO\OM (OPS Master)\Reference Guide\Current Release\OPS_C02.fm
Manual schedules are being used to control the day to day processing in shops not running
an automated scheduling system. It is extremely important to recognize the major differences between manual and automated schedules.
Manual schedules tend to be singular in nature and will be released to process in this manner. The reasons for this are associated with the lack of computer operator time to adequately control a multi-processing environment. The interaction and interfacing
requirements of todays systems preclude operators from knowing all of the intricate relationships. These interfaces now can cause many scheduling errors, or they will force the
single stream processing concept.
Automated scheduling allows for all of the interfacing of systems to occur totally without
the operations staff being aware of the various parts. Now the systems can be processed in
a multi-processing environment. It is critical however, to include the operations staff in the
scheduling implementation. They are the individuals responsible for meeting the processing windows, and must understand the capabilities of the JOB/Master® system.
Mantissa Corporation © 2013
Page - 39
Chapter 2
OPS/MASTER®
Job Level and Step Level Concepts
Job Scheduling Concepts
Job Level and Step Level Concepts
All data base creation functions, with the exception of scheduling calendars, define jobstreams. A JOB/Master® record, when being built or displayed, should be thought of in
terms of general job information and separately-linked step information.
The term “Job Level” describes controllable or schedulable criteria that are built on a level
that will be valid at job end. Condition code checking can be performed for the job.
A user can also define dependencies at the Step Level. Trigger jobs can be submitted after
each step rather than at job completion. This allows a job’s successors to be controlled at
step completion time. Condition code checking criteria for step completion is also defined
at this level.
Coding or defining each step of a job in the data base, will allow JOB/Master® to keep
historical step information. Historical statistics can not be kept for steps which have not
been defined. Steps only need to be defined if statistics are desired or if steps are to be
used to trigger other jobs.
Design and Methodology
The JOB/Master® data base is defined through the use of interactive screens. The user can
ADD, DELETE, UPDATE, or BROWSE jobs, calendars and a variety of other definitions
controlled by JOB/Master®.
E:\Manuals\Product Manuals\ASO\OM (OPS Master)\Reference Guide\Current Release\OPS_C02.fm
Jobs are defined to the JOB/Master® data base in hierarchical form. Although there are
many different records in the actual data base, JOB/Master® logically links them in a
dynamic fashion, allowing for full or partial addition or deletion of a job and its steps. A
job is defined to JOB/Master® by job Level records and optionally by one or more step
Level records. The following is a sample structure of a data base job definition.
Page - 40
Mantissa Corporation © 2013
OPS/MASTER®
Chapter 2
Job Scheduling Concepts
Design and Methodology
Sample structure of a typical JOB/Master® data base job definition:
JOBLEVEL
CALENDAR
STEPLEVEL
Record #1
PROCESS KEYWORD
STEPLEVEL
Record#2
NEGATIVE/COREQ
Definition
STEPLEVEL
MESSAGE
PROCESSING
DATA SET
Records
Jobs
Records
E:\Manuals\Product Manuals\ASO\OM (OPS Master)\Reference Guide\Current Release\OPS_C02.fm
Record #3
)
Mantissa Corporation © 2013
Record
Definition
Before creating a data base, we suggest that you document job interrelationships within the system being defined, in flow chart format, as shown in the
following example.
Page - 41
Chapter 2
OPS/MASTER®
Job Scheduling Concepts
JOBC
STEP01
(
JOBFIX01 OK,
re-submit JOBC
(
Design and Methodology
JOBFIX01
(If UPDATE step not good, RUN)
STEP02
BCKUPJ1
STEP03
JOBA
JOBB
STEP04
JOBG
ETC.
STEP05
JOBH
ETC.
JOBD
ETC.
JOBE
ETC.
JOBF
(If JOBF ABENDS)
JOBFIX02
JOB1
If Scratched
DSN1
JOB2
If Opened
for OUTPUT
JOB3
If Opened
& Valid Data
In this example, processing a Dataset can trigger job execution!
Page - 42
Mantissa Corporation © 2013
E:\Manuals\Product Manuals\ASO\OM (OPS Master)\Reference Guide\Current Release\OPS_C02.fm
In the example above, JOBA, JOBB, JOBD, JOBE and JOBF only need to be coded on
the job level. However, JOBC releases jobs at step end, and therefore requires step level
coding.
OPS/MASTER®
Chapter 2
Job Scheduling Concepts
Sample System Worksheets
Sample System Worksheets
Another method which can be used as a preliminary coding tool is a worksheet like the
one shown below.
Worksheet For System=______________________________No. of Jobs in System=____________
Run Frequency=____________________________________________________________________
User Department=_____________________________________Dept. Submitting Job=__________
Person to be Contacted for Problems=__________________________________________________
Phone No. to be Contacted for Problems=____________ - ___________ - ______________
JOBNAME
Stepnames
Program
Names
Predecessor
To Run
Before
Triggered
Jobs
After
E:\Manuals\Product Manuals\ASO\OM (OPS Master)\Reference Guide\Current Release\OPS_C02.fm
or
Data set
Procname
Mantissa Corporation © 2013
Page - 43
Chapter 2
OPS/MASTER®
Sample System Worksheets
Job Scheduling Concepts
This is an example of how a general ledger system may flow for coding:
GENLEDGR
06
Worksheet For System=______________________________No.
of Jobs in System=_____________
RUN EVERY MONDAY MORNING FOR THE PREVIOUS WEEK
Run Frequency=_____________________________________________________________________
ACCOUNTING DEPARTMENT
MIS COMP SVS
User Department=_______________________________Dept.
Submitting Job=_________________
JOHN SMITH - PRG. DEPT.
Person to be Contacted for Problems=___________________________________________________
245
201
6881
Phone No. to be Contacted for Problems=____________
- ___________
- ______________
or
Data set
Procname
GENLGR01
GLPROC01
Stepnames
Program
Names
Predecessor
To Run
Before
GLSTP001
GLSTP002
GLSTP003
GLSTP004
GLPGM001
GLPGM002
GLPGM003
GLPGM004
--NONE--
GENLGR01
Triggered
Jobs
After
GENLGR02
GLRESTOR
*ONLY IF
ABEND
GENLGR01
*ONLY IF
GOOD RUN
GLRESTOR
GLRESTOR
RESTORE
GLPGMRS
GENLGR02
GENLGR02
GLSTPSRT
GLSTP002
GLSTP004
GLSTP005
SORT
GLPGM004
GLPGM005
GLPGM006
GENLGR03
GLPROC03
GLSTPSRT
GLSTPPRT
GLBCKUP
SORT
GLPGM007
GLBCKUP
GENLGR02
GLFINAL
GENLGR04
GLPROC04
GLSTPSRT
GLSTPPRT
GLBCKUP
SORT
GLPGM008
GLBCKUP
GENLGR02
GLFINAL
GENLGR05
GLPROC05
GLSTPSRT
GLSTPPRT
GLBCKUP
SORT
GLPGM009
GLBCKUP
GENLGR02
GLFINAL
GLFINAL
GLPROC06
GLSTP001
GLSTP002
GLSTP003
GLPGM010
GLMERGE
GLPGM011
GENLGR03
GENLGR04
GENLGR05
--NONE--
Page - 44
GENLGR03
GENLGR04
GENLGR05
GENLGR06
Mantissa Corporation © 2013
E:\Manuals\Product Manuals\ASO\OM (OPS Master)\Reference Guide\Current Release\OPS_C02.fm
JOBNAME
OPS/MASTER®
Chapter 2
Job Scheduling Concepts
Interactive Data Base Creation
Interactive Data Base Creation
The on-line JOB/Master® monitor provides a number of automatic facilities designed to
decrease the amount of time needed to define a master data base. The facilities are
grouped into four major functions as follows:
•
Job level Creation
•
Step level Creation
•
Dataset Level functions
•
Calendar or Process Keyword Creation
The functions use screens with cursor prompting, and need little explanation for coding
purposes.
A user may have as many JOB/Master® terminals active and performing maintenance as
the number of TSO userids and terminals available. All changes are dynamically made to
the data base from the terminal, therefore, a batch update does not need to be run for
changes and additions to take place.
Identifying Jobs Under JOB/Master® Control
JOB/Master® controls any job that is assigned to its control. A job can be marked for control by JOB/Master® with one of the following methods:
METHOD 1 - COL 71
The first method requires placing a tracking character (default is a cent sign “¢”) in column 71 of the job card.
)
The ¢ (cent sign) is a hexadecimal X’4A’. Keyboards may vary, depending
upon country of use, and the user must indicate the corresponding character of
this hexadecimal representation. For example, in the United Kingdom hexadecimal 4A is represented as a £ sign. In this manual, reference will be to the
cent sign. Any special character can be used and is specified in the JOB/Master® procedure as a parm. Refer to the “Installation Guide”.
E:\Manuals\Product Manuals\ASO\OM (OPS Master)\Reference Guide\Current Release\OPS_C02.fm
Jobs in the JOB/Master® data base which are submitted by JOB/Master® will have the
tracking character placed on the job card automatically, if column 71 is blank.
Any user submitted job that needs to be tracked will be tracked if the tracking character is
placed in column 71. Even jobs not defined to the JOB/Master® data base can be tracked
in this way. For example:
//JOBEXAMP
//
JOB
(ACTG),”EXAMPLE JOB”,
CLASS=A
(COL 71)¢
METHOD 2 - NOTIFY
The second method requires the coding of a notify parameter on the job card. The userid
used for the notify and the JOB/Master® region to be assigned can be found in the following table:
Mantissa Corporation © 2013
USERID
JM REGION
NOTIFY=JOBMST1|JOBMAST
JM01
NOTIFY=JOBMST2
JM02
Page - 45
Chapter 2
OPS/MASTER®
Identifying Jobs Under JOB/Master® Control
Job Scheduling Concepts
NOTIFY=JOBMST3
JM03
NOTIFY=JOBMST4
JM04
//JOBEXAMP
JOB
(ACTG),”EXAMPLE JOB”,
CLASS=A,NOTIFY=JOBMAST
However, if the UserID used is not defined to TSO, then a message will be issued by TSO
indicating an undefined UserID. This method should only be used if there is a problem
using METHOD 1 (i.e., a conflict with COL 71 in the JOB card). The IKJ144I message
could be suppressed with CONSOLE/Master®.
IMPORTANT
If neither Method 1 nor Method 2 is used on the job statement, no JOB/Master®
tracking or control functions will be performed for that job. The above two methods
have been chosen for performance reasons. JOB/Master® only processes data for
the jobs under its control. Because it is not necessary for JOB/Master® to process
every job and do a lookup against its data base, system overhead is reduced.
METHOD 3 - STARTED TASKS
JOB/Master® can track and control started tasks. This allows the started task to have
scheduling attributes similar to other jobs within the system. Condition code checking,
notification, recovery, plus all other criteria may be utilized for the started tasks. If the
started task is to be only tracked on the JOBQ without database processing, skip #1 and go
to #2 below. In order for the tracking to take place the following should be done:
1.
Define the Started Task to the JOB/Master® database as a Job. It must have a
submit type of “S”. The fifth screen of the job definition in the database contains
a field called RUN-EXIT-INS. The field should be filled out as follows:
“JMACT=&JID (+ any other descriptive data)”.
)
If the run instructions are incorrectly defined in the Job Definition Screen #5,
the started task will not be displayed on the Tracking Screen.
2.
The started task’s procedure must be altered as follows. The started task must
have a dummy DD with a DSN of &JMACT and the PROC statement should
have a Symbolic of JMACT=JMxx. If the started task is manually started at a
console, enter “S procname, JMACT=JM##” where ## is the ID (01 thru 04) of
the JOB/Master® region which will do the tracking. If the started task is started
by JOB/Master® , the following com mand is issued: “S procnam e,
JMACT=&JID” by JOB/Master®. The &JID will be filled in by JOB/Master® to
the appropriate ID for tracking.
An example is shown in the following screens:
Page - 46
Mantissa Corporation © 2013
E:\Manuals\Product Manuals\ASO\OM (OPS Master)\Reference Guide\Current Release\OPS_C02.fm
There must be a space between “&JID” and any Description on the Run-Exit Ins
data field. The &JID will be dynamically altered to indicate the JOB/Master®
Region which the started task will be tracked in.
OPS/MASTER®
Chapter 2
Job Scheduling Concepts
Identifying Jobs Under JOB/Master® Control
------------------------ JOB/Master® Job Definition --- Row 1 to 4 of 72
Command ===>
Scroll ==> PAGE
-------------------------Definition Last Updated by
on
at
Jobname
==> LOGINT
Alt Name For => ________ System Name ==> LOGSYS**
PDS Mem
==> ________ PDS ==> ____________________________________________
Trig Job ==> N (Y/N) Triggered By==>
Submit Type ==> S (ACMRST)
Res Name1 ==> ________ Res Name2
==> ________ Schedule/Net==> ********
Calendar ==> ________ Excep Cal1 ==> ________ Excep Cal2 ==> ________
Keywd Def ==> ________ Priority
==> _
Lib Type
==>
Neg/C Def ==> ________
Model / Count of Tapes: 3420 => 00
3480 => 00 Update Drive Usage=> Y
------------------------------- Submit Options ------------------------------Enter submit time (HHMM) & optionally “number of runs”/”minutes between runs”
Submit=> 0000 End=> 0000 Number Of Runs=> 00 Minutes Between Runs=> 0000
----------------------------- Dependency Options ----------------------------Pred
| Negative Coreq
| Process N-Proc
| Trig
Sub: OP Cond Trig
Jobs Typ|
Dep
Dep
| Keyword Keyword |
Job
Typ: CD Code Type
-------- - | -------- -------- | -------- -------- | -------- - : - ---- ________ _ | LOGWINT_ CONSMSTR | ALL_____ ________ | ________ _ : _ ____ _
________ _ | LOGWTR__ ________ | ________ ________ | ________ _ : _ ____ _
________ _ | ________ ________ | ________ ________ | ________ _ : _ ____ _
Nothing special here. Just the job definition with submit type S. Also, note the COREQ
dependency of the CONSMSTR control region All dependencies will be satisfied like any
other job before the task is started..
-------------------- JOB/Master® Job Definition For
Command ===>
LOGINT
--------------
------------------------------------------------------------------------------Job Description
==> ____________________
Procedure Name
==> ________
Programmer Name
==> ____________________
Submitting Dept
==> ____________________
User Department
==> ____________________
Output Destination ==> ____________________
Delivery Method
==> ____________________
------------------------- Abending Contact Information ------------------------
E:\Manuals\Product Manuals\ASO\OM (OPS Master)\Reference Guide\Current Release\OPS_C02.fm
Contact Name ==> ____________________ Phone ==>( ___ ) ___
Beeper ==>( ___ ) ___
____ Ext ==> _____
____
------------------------------------------------------------------------------Run-Exit Ins= ___________________________________________________________
The RUN-EXIT INS ==> field will cause the started task to be tracked. This field must
have JMACT=&JID as the value. After at least one blank, a description can be entered.
Mantissa Corporation © 2013
Page - 47
Chapter 2
OPS/MASTER®
Identifying Jobs Under JOB/Master® Control
Job Scheduling Concepts
Menu Utilities Compilers Help
sssssssssssssssssssssssssssssssssssssssssssssssssssssssssssssssssssssssssssssss
SYS3.STANDARD.PROCLIB(LOGWINT)
Line 00000000 Col 001 080
Command ===>
Scroll ===> PAGE
********************************* Top of Data **********************************
//LOGWINT PROC JMACT=JMXX
//*
//*
//*
//*
//IEFPROC EXEC PGM=IASXWR00,PARM=’PE’
//IEFRDER
DD
DISP=MOD,DSN=SYS3.SYSLOG
//DD1 DD DUMMY,DSN=&JMACT
******************************** Bottom of Data ********************************
The symbolic JMACT must be in the Started Task’s PROC. When JOB/Master® issues
the STC start command it will be with the JMACT added. e.g. S LOGWINT,
JMACT=JM01. The value of the JMACT variable will be the JOB/Master® region id,
JM01, JM02, JM03 or JM04.
For this to work properly, the SMF option for STC exits must be on. The SMF
option for STC should be: SUBSYS(STC,EXITS(IEFU83,IEFU84,IEFUJV,
IEFACTRT,IEFUJI))
E:\Manuals\Product Manuals\ASO\OM (OPS Master)\Reference Guide\Current Release\OPS_C02.fm
)
Page - 48
Mantissa Corporation © 2013
OPS/MASTER®
Chapter 2
Job Scheduling Concepts
Run Mode Option
Run Mode Option
The Run Mode option allows the user to schedule jobs according to the readiness of the
application. Jobs can be scheduled to actually execute or only simulate execution. There
are three possible Run Mode Options:
PRODUCTION (P)
Global Record(Profile):
Can be overridden at the System and Job level.
System Record:
Can be overridden at the Job level.
Job Record:
Will place job onto LQ and actually run JCL.
When To Use PRODUCTION:
Once JOB/Master® has been installed and system testing completed, the Global Record in
the Profile should be changed to production mode so jobs may begin executing. From that
point forward (taking into consideration site standards and change control procedures)
the majority of the jobs in the system will be executed.
CHECK (C)
Global Record(Profile):
Cannot be overridden at the System and Job level.
System Record:
Cannot be overridden at the Job level.
Job Record:
Will place job onto LQ but will simulate execution.
When To Use CHECK:
Check mode is most often used to test a job or system and its interaction with JOB/Master® functions. Scheduling criteria can be defined to the JOB/Master® database before
the programs are ready when the system or job is put in check mode. Check mode only
simulates the job execution, as none of the execution JCL actually gets moved to the
JMSTGPDS or is called at submit time. This JMSTGPDS technique gives an opportunity
to make certain everything is working properly, jobs are scheduling, predecessor relationships are met, triggers are working etc. BEFORE all jobs are moved into production.
E:\Manuals\Product Manuals\ASO\OM (OPS Master)\Reference Guide\Current Release\OPS_C02.fm
SELECT (S)
Global Record(Profile):
N/A
System Record:
Will default to check mode unless overridden at the Job level.
Job Record:
Will default to check mode unless included on LQ prior to
submit.
When To Use SELECT:
During the last phase of testing, some jobs in a new or modified application stream may
not be ready to execute regularly in production. Also, User Departments may have a series
of jobs that may or may not need to be executed that night and they do not know before the
schedule is run. Jobs in select mode will be placed on the JOBQ, but will default to executing in check mode, unless the job is included from the LQ prior to submission.
)
Mantissa Corporation © 2013
Select mode should NOT be used indiscriminantly because of overhead and
storage issues in processing the JOBQ.
Page - 49
Chapter 2
OPS/MASTER®
Select Mode On The List Queue
Job Scheduling Concepts
Select Mode On The List Queue
As described in the Job Tracking section, an additional field has been added on the LQ
screen. The M ==> field reflects the mode in which a job has been defined to run: P,S, or
C.
--------------------------- JOB/Master® Scheduling Queue -------- Row 1 from 6
Command ===>
Scroll = Page
Set=> Job= -------- Sys= -------- Date= ----- AB - MT - EX - DC - OP <<(Shift)---------------- Date= 98/09/02 98.245 Time= 07:59 ---------------S | Job
|T|Date |Time|
C u r r e n t
S t a t u s
|M St|Alt Def
- -------- - ----- ---- ---------------------------------------- - -- -------- SELECT12
98244 0000 * IN SELECT MODE / ENTER I TO RUN JOB
S P
-- SELECT13 Y 98244 0000 * IN SELECT MODE / ENTER I TO RUN JOB
S P
-- SELECT14 Y 98244 0000 * IN SELECT MODE / ENTER I TO RUN JOB
S P
-- SELECT15 Y 98244 0000 * IN SELECT MODE / ENTER I TO RUN JOB
S P
-- SELECT16 Y 98244 0000 * IN CHECK MODE, NOT SUBMITTED
C P
-- JCLSUBA Y 98245 0055 * WAITING FOR MANUAL TASKS
S P
-- CI33DOWN Y 98245 0746 * TRIG. ON HOLD BY EXEC REQ.
P
P H
-- SELECT01 Y 98245 0746 * SELECT MODE / ENTER I TO RUN JOB
S H
-- JMPOSTB1
98245 0815 *EXCLUDED TO SIMULATE BY
P390K
P C
******************************* Bottom of data ********************************
I= INCLUDE
Include this job in production cycle; at submit time call the
JCL from staging PDS or the user library.
X=EXCLUDE
Exclude this job from running in production; only simulate.
May be used for jobs which are flagged as select mode, and
having once been changed to include, now must be altered
back to exclude. (This feature can also be utilized to exclude a
job on the LQ in production mode).
Press <ENTER>.
Page - 50
•
The M(mode) ==> field represents the mode defined for each job.
•
Initially, the ST (status) ==> field represents the default for the mode (i.e., the
default status for Select mode is Check status). Now, however, the ST ==> field
reflects the current execution status.
•
Note that the CURRENT STATUS ==> field reflects the changes made
(SELECT04, SELECT05 and SELECT13) as described below:
SELECT04
No action is required to run this job in check status.
SELECT05
S mode has been flagged to include; to run in production status; to actually execute the JCL.
Mantissa Corporation © 2013
E:\Manuals\Product Manuals\ASO\OM (OPS Master)\Reference Guide\Current Release\OPS_C02.fm
To include/exclude those jobs defined as select mode, before the job goes into execution,
take the cursor to the line in the S column of the LQ which corresponds with the job to be
changed. Enter one of the following values:
OPS/MASTER®
Chapter 2
Job Scheduling Concepts
Adding Systems and Jobs
SELECT13
P mode has now been altered to exclude; to run in check status;
to simulate.
After the changes, the LQ screen will look like this:
------------------------- JOB/Master® Scheduling Queue ------- Row 1 from 15
Command ===>
Scroll = PAGE
Set=> Job= -------- Sys= -------- Date= ----- AB - MT - EX - DC - OP <<(Shift)---------------- Date= 98/09/01 98.244 Time= 11:02 ---------------S | Job
|T|Date |Time|
C u r r e n t
S t a t u s
|M St|Alt Def
- -------- - ----- ---- ---------------------------------------- - -- --------- SELECT04 Y 98244 1100 * SELECT MODE/ENTER 1 TO RUN JOB S
S C
-- SELECT05 Y 98244 1100 * INCLUDED TO RUN BY -> P390K
P
S P
-- SELECT13 Y 98244 1100 * EXCLUDED TO RUN BY -> P390K
P
P C
******************************* Bottom of data ********************************
Jobs in select or check mode will indicate that the JCL was not submitted and the ST ==>
field will change to a status of D to indicate that the LQ record will be deleted.
)
Once the job(s) have entered the JES input queue and/or gone into execution;
it is TOO LATE to make the change to include or exclude.
Adding Systems and Jobs
E:\Manuals\Product Manuals\ASO\OM (OPS Master)\Reference Guide\Current Release\OPS_C02.fm
Prior to using JOB/Master® in production, the user should do the following:
1.
Develop logical structures to represent each sequence of events or jobs that are to
be processed
2.
Give each logical group of regularly scheduled jobs a unique system name
3.
Define manual and automatic recovery procedures used at the installation
4.
Define data requirements and resources needed for each job stream or system
5.
Identify imbalances or problems in existing applications, in terms of triggered
jobs and scheduling criteria
6.
Identify those systems, or jobs within a system, that should be submitted automatically, manually, or as started tasks
JOB/Master® is a flexible scheduling product, with the ability to add jobs and systems to
the data base as they are added to the production workload. New systems or jobs can be
Mantissa Corporation © 2013
Page - 51
Chapter 2
OPS/MASTER®
Job Dependencies
Job Scheduling Concepts
added at any time by defining the proper information through the on-line data base creation session.
By identifying and understanding jobs, their flows and requirements, definition and implementation proceed more efficiently. The proper definition of predecessor and successor
relationships eliminates lag time due to job to job transition. This cuts many hours from
the production shift workload.
Job Dependencies
The most essential element of the JOB/Master® system is the dependency relationships
that are defined by the user. Jobs can be submitted based on time, scheduling calendars,
data sets, or the completion of other events such as manual tasks or setup postings.
Another type of dependencies are job and system predecesors which must be completed
before a job will be submitted. It is not necessary to have all the jobs in a system submitted
automatically. A system can have processing breaks defined, and the submission of jobs
can be halted by specifying a manual submit on any job in the system. Jobs can also be
dependent on externally submitted jobs utilizing JOB/Master® Tracking.
JOB/Master® verifies that all predecessors to a job have ended successfully or with the
proper condition code, before submitting any subsequent jobs for processing. Any attempt
to start a job out of sequence results in a predecessor check condition. At this time, a message is sent to inform the operator of this condition. If required, the operator can override
this condition and “FORCE” submit the job.
All scheduled jobs can be found on the JOB/Master® waiting queue (JOBQ), which are
displayed using various commands provided through the job tracking session. (See Job
Tracking Section.)
Alternate Job Definition
An alternate definition name can be given to a job when its predecessor or successor relationships change, and the user does not want to change the jobname.
The following scenario illustrates the requirement for this function:
1.
JOBA is the first job in the jobstream.
JOBB is the second job and has JOBA defined as a predecessor.
2.
The above stream executes Monday through Friday. However, on Friday JOBB
must execute first, therefore, on Friday, JOBA has JOBB as a predecessor.
To accomplish the above, the following steps should be performed:
1.
Define a calendar for Monday through Thursday.
Define JOBA and JOBB, establishing the relationship between them, and referencing the Monday through Thursday calendar.
2.
Define a calendar for Friday.
Code a new (alternate) definition for JOBA, specifying JOBB as its predecessor.
When coding this job's definition, using Job Definition Screen 1, the user must
specify that it is an Alternate Criteria Definition for JOBA.
Code a new (alternate) definition for JOBB, not containing JOBA as a predecessor.
Page - 52
Mantissa Corporation © 2013
E:\Manuals\Product Manuals\ASO\OM (OPS Master)\Reference Guide\Current Release\OPS_C02.fm
JOBC is the third job and has both JOBA and JOBB defined as predecessors.
OPS/MASTER®
Chapter 2
Job Scheduling Concepts
Validating Systems
3.
Define a calendar for Monday through Friday.
Define JOBC having JOBA, JOBB and the two alternate definitions as predecessors.
To summarize, JOBA and JOBB would reference a Monday through Thursday calendar.
The alternate definitions for JOBA and JOBB would reference a Friday calendar, and
JOBC would reference a Monday through Friday Calendar.
The Alternate Criteria function satisfies the need where a user has a specific requirement
of using the same jobname for more than one set of predecessor or successor criteria.
Another method recommended for the above situation, is to have a separate jobstream
with different job names for the alternate sequence. This can be accomplished via the following steps:
1.
Define a calendar for Monday through Thursday.
Define the first set of criteria for JOBA, JOBB and JOBC to execute in that order
and be scheduled for Monday through Thursday.
2.
Define a calendar for Friday.
Code a new definition for JOBD, JOBE and JOBF, specifying JOBE as a predecessor for JOBD, and both JOBE and JOBD as predecessors for JOBF. Under
this definition, JOBD, JOBE and JOBF correspond to JOBA, JOBB and JOBC,
respectively.
Validating Systems
JOB/Master® creates a number of data base reports, which list the jobs, calendars and systems that have been defined to the data base. Each of these reports should be reviewed,
and any errors should be corrected through the update facilities supplied by JOB/Master®.
Once the system has been created, all the information concerning scheduling criteria and
jobs is retained permanently on the JOB/Master® data base and need not be specified
again. The data base should be backed up on a regular basis, using the JMBACKUP program. (Refer to the Installation Guide or Batch Functions in this manual).
E:\Manuals\Product Manuals\ASO\OM (OPS Master)\Reference Guide\Current Release\OPS_C02.fm
Once one or more systems have been created, they can be checked for accuracy by creating and testing them using the Mantissa-supplied utility in place of the real programs in
each step. The LOOPDRV utility is located in the JOB/Master® load library.
LOOPDRV
A LOOPDRV is a Mantissa-supplied utility program, that performs the following functions:
1.
Executes for a user-defined amount of CPU time (mss)
2.
Issues a condition code (optional)
3.
Accumulates a user-defined amount of wall clock time (mss)
4.
Issues a user ABEND (U999) (optional)
Formats (mss); where m=minutes and ss=seconds.
The sample JCL is located in the hlq.INSTLIB. The actual program can be found in the
hlq.LOADLIB.
Mantissa Corporation © 2013
Page - 53
Chapter 2
OPS/MASTER®
LOOPDRV
Job Scheduling Concepts
LOOPDRV Examples
EXAMPLE 1:
//STEP1
//STEPLIB
EXEC
DD
PGM=LOOPDRV,PARM=’003,0004,005’
DSN=OPS.LOADLIB,DISP=SHR
PARM VALUES (Example 1):
003
0004
005
= 3 seconds of CPU time
= condition code value 0004
= 5 seconds of wall clock time
The above example of LOOPDRV executes for 3 seconds of CPU time, issues a condition
code of (4) at step termination, and accumulates 5 seconds of wall clock time.
EXAMPLE 2:
//STEP1
//STEPLIB
EXEC
DD
PGM=LOOPDRV,PARM=’003,0000,100,A’
DSN=OPS.LOADLIB,DISP=SHR
PARM VALUES (Example 2);
003
0000
100
A
= 3 seconds of CPU time
= has no value
= 1 minute of wall clock time
= abend U0999 at step completion
This example of LOOPDRV executes for 3 seconds of CPU time, accumulates 1 minute of
wall clock time, and issues ABEND U999 at step completion. The U999 ABEND is
requested by coding the “,A” after the wall clock time parameter.
How and When To Use LOOPDRV
The LOOPDRV program is supplied, as previously stated, to provide a method of verifying the accuracy of the job & system definitions without actually running the programs.
The network structures can be verified for processing accuracy, sequential continuity, and
all predecessor relationships.
A Sample system could be defined as follows:
JOB A (Triggers B if its Condition code = 0022)
JOB B (Triggers C & D)
JOB C JOB D
JOB E (Must wait until C & D completed before 10:00 P.M.)
Procedure
Page - 54
1.
Define the System to the Database (Add System SYSTEMX). Identify a TEST
Library where the LOOPDRV test jobs will reside.
2.
Define each of the Jobs to be Scheduled... (JOB A & JOB E are the only ones
needing a Start Time Defined - JOB A = 1800 and JOB E = 2200)
3.
After the system has been defined, create PDS members in the test library,
defined above, having the names of the executing jobs.
Mantissa Corporation © 2013
E:\Manuals\Product Manuals\ASO\OM (OPS Master)\Reference Guide\Current Release\OPS_C02.fm
This system is to run every Monday and Begins at 6:00 P.M.
OPS/MASTER®
Chapter 2
Job Scheduling Concepts
Schedule Events from Outside JOB/Master®
(JOBS A - E)
Place the criteria into the jobs as required.
JOB A should have PARM=’003,0022,100’
Values =
003 (3 Seconds CPU)
0022 (Cond Code)
100 (1 min Wall Clock)
4.
After the jobs have been defined into the Test library, create a schedule using the
Tracking Command GS for SYSTEMX.
5.
Monitor the processing via the tracking system or verify the accuracy by viewing
the Audit History log. The submission criteria may be adjusted as many times as
necessary until the system has been defined properly. All changes to the submission criteria are dynamic and take effect with the next Schedule Creation for
scheduled jobs, and immediately for triggered jobs.
6.
When the system is verified correct, change the test library name in the system
definition to the production library where the real jobs are. If necessary, place
into the system record of the database, the DO NOT SCHEDULE BEFORE
YYDDD field, the date you wish this system to begin scheduling.
7.
You are NOW ready for production. You may clean up your testing library or
reuse the jobs for other tests.
The actual amount of CPU time will vary based on the processor in use.
)
Mantissa has supplied LOOPDRV jobs for the inventory, sales, and commission jobs described in the tutorials in this manual.
Schedule Events from Outside JOB/Master®
E:\Manuals\Product Manuals\ASO\OM (OPS Master)\Reference Guide\Current Release\OPS_C02.fm
JOB/Master® provides for event completion from an external source by use of the program JMEVENT. For example, if you have a job, which starts a series of jobs beginning
after certain files are closed in an on-line system, then the transaction that closes the files
can issue a call to this JOB/Master® function, and start the first job in the stream. The following parameters are passed to JMEVENT:
JOBNAME
Eight (8) characters; padded with blanks.
STEPNAME
Eight (8) characters; padded with blanks.
SUBID
Four (4) characters.Values can be JM01 through JM04.
These parameters are passed in the following manner:
FOR COBOL (in Working Storage):
01 JOBM.
05 JMLEN
05 JMJOBNM
05 JMSTPNM
05 FILLER
05 JMSUBID
.
.
Mantissa Corporation © 2013
PIC
PIC
PIC
PIC
PIC
S9(4)COMP VALUE +21.
X(8).
X(8).
X
VALUE SPACE.
X(4) VALUE ‘JM01’.
Page - 55
Chapter 2
OPS/MASTER®
Schedule Events from Outside JOB/Master®
Job Scheduling Concepts
MOVE ‘JOBNAME’ TO JMJOBNM.
MOVE SPACES TO JMSTPNM.
CALL ‘JMEVENT ’ USING JOBM.
FOR ASSEMBLER:
PARMJ
JMEVTPM
JMJOBNM
JMSTPNM
JMSUBID
JMPRMEND
MVC
LA
CALL
.
.
.
DC
DC
DC
DC
DC
DC
EQU
JMJOBNM,=C‘JOBNAME ‘
R1,PARMJ
JMEVENT
A(JMEVTPM)
AL2(JMPRMEND-JMJOBNM)
CL8‘ ‘
CL8‘ ‘
CL1‘ ‘
CL4‘JM01’
*
The following example illustrates the process of posting event completion with
JMEVENT:
Job CICSP1 has been defined to the JOB/Master® data base. CLS1 has been
defined as a step with a dependent job, JOB1. CLS2 has been defined as a step
with a dependent job, JOB2. The following table shows the resultant JOB/Master® data base entries.
JOBNAME
CICSP1
STEPNAME
DEPENDENT JOB
CLS1
JOB1
CLS2
JOB2
2.
The steps CLS1 and CLS2 represent the transactions CLS1 and CLS2 respectively. Transaction CLS1 on CICS closes files and terminates the online processing for System1.
3.
Transaction CLS2 on CICS closes files and terminates the online processing for
System2.
When JMEVENT is called from transaction CLS1 with the jobname CICSP1 and the stepname CLS1, the simulated completion of CICSP1, step CLS1, will cause JOB1 to be triggered and System1 started.
The same will happen for transaction CLS2. It is not necessary to code these transactions
as separate steps because each could have been set up as a job. However, if there are multiple CICS regions with the same or different transactions, they can be defined as the jobname and each transaction as a stepname for ease of reference.
Page - 56
Mantissa Corporation © 2013
E:\Manuals\Product Manuals\ASO\OM (OPS Master)\Reference Guide\Current Release\OPS_C02.fm
1.
OPS/MASTER®
Chapter 13
Introduction to CONSOLE/Master®
Overview
Chapter 13
Introduction to CONSOLE/Master®
Overview
Today’s sophisticated data processing environments are utilizing the services of many data
processing professionals who are truly specialists in their field. While some professionals
master several software areas, it is becoming more and more difficult to find help with
many needed activities which are normal tasks for every data center. Each time a technical
task is required, several technicians may need to be consulted.
E:\Manuals\Product Manuals\ASO\OM (OPS Master)\Reference Guide\Current Release\OPS_C13.fm
Data center management is often forced to depend on help from Systems Programming or
Technical Services personnel because data center personnel may lack the skill or training
required for understanding the intricate details of MVS internals. Many times, as a stop
gap measure, which may eventually be automated, a cumbersome set of manual procedures is developed in-house. This often curbs initiative as well as productivity.
CONSOLE/Master® was designed to perform several complex functions by simply
selecting the task from a full screen menu. This initiates the chosen dialog which will
prompt the User by providing additional panels and tutorials as may be needed. The main
objective for CONSOLE/Master® is to offer higher productivity levels by simplifying
often cumbersome and complex tasks.
CONSOLE/Master® is a software management tool that exploits and simplifies MVS
functions. It was developed to be used in a TSO-ISPF environment. However, whenever
possible and appropriate, equivalent functions are provided via commands or callable load
modules for use outside of ISPF.
CONSOLE/Master® consists of ISPF dialogs which will assist the User in selecting the
specific function. Often one selection menu will lead to another where more functions or
utilities will be found.
CONSOLE/Master® is supported on all MVS versions from Base 3.8 (pre MVS / SP),
MVS/ESA through ZOS.
Mantissa Corporation © 2013
Page - 339
Chapter 13
OPS/MASTER®
Benefits
Introduction to CONSOLE/Master®
Benefits
•
The Automated Operator provides for programmatic control and management of
console message text.
- Re-route messages
- Suppress messages
- Reply to messages
- Make messages non-rollable
•
Initiate actions based on message text.
- Start/stop on-line systems
- Start/stop initiators, etc.
•
CICS, TSO, etc. can be started and shutdown automatically.
•
The MVS Console Facility can be provided to many departments in the data center: operations support, scheduling, distribution, etc. Although it is not recommended, potentially every TSO User could also be an MVS Console User.
•
The MVS Console can solve the often unfulfilled requirement of a full operator
console at a remote site.
•
Where channel extenders are used to make remote devices appear to be local, the
MVS Console Facility can be used to provide operator functions.
•
This facility can save hardware costs by eliminating the need for a separate 3270
type terminal. The User simply invokes the MVS Console from a TSO session.
•
The MVS Console can save maintenance requirements by eliminating the need to
SYSGEN another console when the intended User already has a terminal for
TSO use.
•
Job Scheduling communication can be automatically achieved through the JOB/
Master® interface of the Automated Operator.
- Automatically post manual tasks complete
E:\Manuals\Product Manuals\ASO\OM (OPS Master)\Reference Guide\Current Release\OPS_C13.fm
- Specify completion of an event
Page - 340
Mantissa Corporation © 2013
OPS/MASTER®
Chapter 13
Introduction to CONSOLE/Master®
CONSOLE/Master® Components
CONSOLE/Master® Components
The product concentrates control of console message processing, as shown in the following diagram:
CONSOLE/Master®
Automated Operator
MVS Console Facility
Profiles
Reports
Data Base Creation
WTO/WTOR Interceptor
WTO/WTOR Processor
Starting the Control Region
In order to initiate CONSOLE/Master®, execute the procedure CONSMSTR, which you
should have modified and placed into your PROCLIB. For additional information, refer to
the Installation section in this manual.
CONSOLE/Master® can be started in one of two ways:
E:\Manuals\Product Manuals\ASO\OM (OPS Master)\Reference Guide\Current Release\OPS_C13.fm
1.
As a started task, issue the command
S CONSMSTR
2.
As a batch job, place a JOB statement before the following execute statement.
//STEP1 EXEC CONSMSTR
Stopping the Control Region
In order to stop the execution of CONSOLE/Master®, issue the following command:
P CONSMSTR
Mantissa Corporation © 2013
Page - 341
Chapter 13
OPS/MASTER®
Starting CONSOLE/Master® On-line Sessions
Introduction to CONSOLE/Master®
Starting CONSOLE/Master® On-line Sessions
To start CONSOLE/Master®, select option C on the OPS/Master® Primary Menu and
press <ENTER>. Refer to the OPS/Master® Installation and User’s Guide for additional
information.
-----Operations Productivity Systems - OPS/Master® by Mantissa v5.2.1------Option ===> C
J
J2
J3
J4
C
-
JOB/Master® (JM01
JOB/Master® (JM02
JOB/Master® (JM03
JOB/Master® (JM04
CONSOLE/Master®
Prod.)
)
)
)
PF1 = HELP
I
I2
I3
I4
R
X
-
Interactive
Interactive
Interactive
Interactive
RUN/Master®
EXIT
Security
Security
Security
Security
Facility
Facility
Facility
Facility
(JM01)
(JM02)
(JM03)
(JM04)
User= P390K
Date= 98/09/10
98.253
Time= 16:25
OPSOPSOPSOPSOPSOPSOPSOPSOPSOPSOPSOPSOPSOPSOPSOPSOPSOPSOPSOPSOPSOPSOPSOPSOSPOPSOP
OPSOPSOPSOPSOP
OPSOPSOPS
OPSOPSOPSOP
OPSOPSOPSOP
OPSOPSOPSOPSO
PSOPSOP
SOPSOPSO
SOPSOPS
OPSOPSOPS
OPSOPSO
PSOPSOPSOP
OPSOPSOPSOPS
OPSOPSO
PSOPSOPS
OPSOPSOP
SOPOPSOPO
SOPSOPS
OPSOPSOPSOP
OPSOPSOPSOP
SOPSOPS
OPSOPSOP
SOPSOPS
OPSOPSOPSOPS
OPSOPSOPSOPSOPSOPSOP
OPSOPSOPSO
PSOPSOP
SOPSOPSO
PSOPSOPSOPSOPSO
SOPSOPSOPSOPSOPSOP
OPSOPSOPS
OPSOPSO
PSOPSOPS
OPSOPSOPSOPSOPSOPS
OPSOPS
OPSOPSOPSOPSOPSOP
OPSOPSOP
SOPSOPS
OPSOPSOP
SOPSOPSOPSOPSOPSOP
SOPSOP
SOPSOPSOPSOPSOPSOP
OPSOPSO
SOPSOPSO
PSOPSOPSOPSOPSOPSOPS
PSOPSOPSOPSOPSOPSOP
OPSOPSOPSOPSOPSOPSOPSOPSOPSOPSOPSOPSOPSOPSOPSOPSOPSOPSOPSOPSOPSOPSOPSOPSOPSOPSOP
OPSOPSOPSOPSOPSOPSOPSOPSOPSOPSOPSOPSOPSOPSOPSOPSOPSOPSOPSOPSOPSOPSOPSOPSOPSOPSOP
The CONSOLE/Master® Banner Panel will then be displayed, as illustrated below.
------------------------- CONSOLE/Master® by Mantissa ----------------------Option ===>
A - Automated Operator
C - MVS Console Facility
P - Profile
R - Reports
X - EXIT
CCCCCCC
OOOOOOO
NN
NN SSSSSSS
OOOOOOO
LL
EEEEEEE
CC
CC OO
OO NNN
NN SS
SS OO
OO LL
EE
CC
OO
OO NNNN NN SS
OO
OO LL
EE
CC
OO
OO NN NN NN
SSSSSS
OO
OO LL
EEEEEE
CC
OO
OO NN NNNN
SS OO
OO LL
EE
CC
CC OO
OO NN
NNN SS
SS OO
OO LL
EE
CCCCCCC
OOOOOOO NN
NN
SSSSSSS
OOOOOOO LLLLLLL EEEEEEEE
MMM
MMM
AAAAAAAA
SSSSSSS
TTTTTTTT
EEEEEE
RRRRRRR
MM M M MM
AA
AA
SS
SS
TT
EE
RR
RR
MM M M MM
AA
AA
SS
TT
EE
RR
RR
MM MM MM
AAAAAAAA
SSSSS
TT
EEEEE
RRRRRRRR
MM
MM
AA
AA
SS
TT
EE
RR RR
MM
MM
AA
AA
SS
SS
TT
EE
RR
RR
MM
MM
AA
AA
SSSSSS
TT
EEEEEE
RR
RR
F1=HELP
F7=UP
F2=SPLIT
F8=DOWN
F3=END
F9=SWAP
F4=RETURN
F10=LEFT
F5=RFIND
F11=RIGHT
F6=RCHANGE
F12=RETRIEVE
Enter A in the OPTION ==> field to access the Automated Operator.
Page - 342
Mantissa Corporation © 2013
E:\Manuals\Product Manuals\ASO\OM (OPS Master)\Reference Guide\Current Release\OPS_C13.fm
-------------------------------------------------------------------------------
OPS/MASTER®
Chapter 13
Introduction to CONSOLE/Master®
Starting CONSOLE/Master® On-line Sessions
Enter C in the OPTION==> field to access the MVS Console Facility.
Enter P in the OPTION ==> field to access the Profile option.
Enter R in the OPTION==> field to access the Reports facility.
Enter X in the OPTION ==> field to exit CONSOLE/Master®. The OPS/Master® Primary Menu will be re-displayed.
These options are described in the following sections.
F
The function keys must be set (using option P;1) before other CONSOLE/Master® functions can be used. Refer to the chapter “Profiles” for information on
how to do this.
CONSOLE/Master® provides an interactive HELP facility via standard convention of
PF1 or the ISPF HELP command. The HELP/Tutorial mode can be entered from any
online screen by pressing the PF1 key.
When a message is displayed in the upper right corner, a brief explanation can be displayed by pressing the PF1 key. If the PF1 key is pressed a second time, a tutorial screen is
displayed.
E:\Manuals\Product Manuals\ASO\OM (OPS Master)\Reference Guide\Current Release\OPS_C13.fm
If the PF1 key is pressed when there is no message in the upper right corner, then a tutorial
screen is displayed immediately.
Mantissa Corporation © 2013
Page - 343
Chapter 13
Introduction to CONSOLE/Master®
E:\Manuals\Product Manuals\ASO\OM (OPS Master)\Reference Guide\Current Release\OPS_C13.fm
Starting CONSOLE/Master® On-line Sessions
OPS/MASTER®
Page - 344
Mantissa Corporation © 2013
OPS/MASTER®
Chapter 14
Automated Operator
Overview
Chapter 14
Automated Operator
Overview
The WTO/WTOR Processor, an integral part of the Automated Operator, provides systematic recognition and handling of “Write To Operator” traffic. It can also be used to reply to
WTOR messages.
Automated Operator was designed as a system management aid which allows OPS personnel to automatically manage and control the MVS operating system console functions.
Automated Operator Components
Data Base Creation and Maintenance
E:\Manuals\Product Manuals\ASO\OM (OPS Master)\Reference Guide\Current Release\OPS_C14.fm
The Data Base Creation and maintenance portion provides an easy to use ISPF dialog to
input and control console message and reply functions. These data base parameters are
used to automatically process WTO traffic and reply to “Write To Operator” with reply
(WTOR) messages. An interface to the JOB/Master® job scheduling system is also provided.
WTO/WTOR Processor
The Message Interceptor/Processor monitors all console activity and takes the appropriate
action, as specified on the data base entry for the message being processed.
Mantissa Corporation © 2013
Page - 345
Chapter 14
OPS/MASTER®
Automated Operator Data Base Session
Automated Operator
Automated Operator Data Base Session
To display the Automated Operator Data Base, select A from the CONSOLE/Master®
Facilities menu and press <ENTER>. The following screen is then displayed:
---------------- Automated Operator - Data Base Functions -----------------User= P390K
Option ===>
Date= 98/09/10
98.253
Time= 15:58
Option
-------1 - ADD
2 - ENTER
Functional Description
--------------------------------------------Add Console Message definition
Display Messages on Data Base for ADD/UPDATE
or BROWSE processing
Menu Options
Add a Console Message Definition.
2 = ENTER
Displays messages defined on the Data Base for Add/Update,
Delete or Browse Processing. This entry will display all messages currently defined in the system.
E:\Manuals\Product Manuals\ASO\OM (OPS Master)\Reference Guide\Current Release\OPS_C14.fm
1 = ADD
Page - 346
Mantissa Corporation © 2013
OPS/MASTER®
Chapter 14
Automated Operator
Automated Operator Data Base Session
Console Message Table
The Automated Operator - Console Message Table is an ISPF table of the “KEY” elements of the Automated Operator data base. A key element is defined as the command,
message or a character string which is identifiable within data entered by a console operator or within a WTO/WTOR line.
--------------- Automated Operator - Console Message Table -Row 1 to 8 of 74
Option ===> ADD
Scroll ===> CSR
B
D
U
_ -
Command or Message Key
---------------------- Date
SID
Job
String
----------------TEST OPSMASTER
_ -
SYSLOG
_ -
POW
_ -
PONDFROG
_ -
MARKSMF
_ -
JMCN JMCOMAND
_ -
JMCN DTATNITE
_ -
JMCN DSNFIX
Time
Start
End
-------
A
C
T
-
Last Update
Date
Time
By
------ -----------
Y
98043
08:03
P390W
Y
95142
08:27
TCJN
Y
97140
09:08
P390C
Y
98065
11:08
P390W
Y
97163
09:22
P390W
Y
98159
16:20
P390M
Y
97049
10:43
P390C
Y
00001
00:33
P390W
Users can enter ADD in the OPTION ==> field to enter new message or L, followed by
the desired string, to locate a specific message in the table. Be sure there is a space
between the L and the specified string.
The functions B (browse), D (delete) , and U (update) can be entered in the select field
next to the desired message (as shown above).
E:\Manuals\Product Manuals\ASO\OM (OPS Master)\Reference Guide\Current Release\OPS_C14.fm
If selection limitation has been specified for the message, it will be displayed under the
message text. Message processing can be limited by system ID, jobname, date or day of
week values, and time range.
The Console Message Table is displayed in descending order of key elements. This corresponds to the order in which the elements are matched to the console line, providing recognition of most specific to least specific strings. For example, string IEF233A will be
processed before a less specific string such as IEF.
Functional Fields
This screen contains a two (2) line associated display. Each line will be described by field
and function.
LINE 1
This is the highlighted line on the screen.
BDU
Mantissa Corporation © 2013
Page - 347
Chapter 14
OPS/MASTER®
Automated Operator Data Base Session
Automated Operator
This field is used to select the line and the function desired when the line is
selected.
1.
Move the cursor to the message line desired.
2.
Select the action desired.
B
=
Browse
D
=
Delete
U
=
Update
3.
The Console Message Definition Screen will be displayed.
4.
Perform the necessary action.
5.
If a U or D were selected press CONFIRM (PF4) to update the screen or CANCEL (PF5) to cancel the action and return to the Console Message Table Screen.
If a B was selected press END (PF3).
Refer to the Update, Browse, and Delete section of the manual.
COMMAND OR MESSAGE KEY
This line identifies the message number or the message key (how System recognizes this message as unique).
LINE 2
This line is the un-highlighted line on the screen.
)
All items in the following four field definitions are used by the CONSOLE/
Master® system to act as selection limits for the Message Processing.
SID
This field identifies the SYSTEM which provides this message for processing.
JOB
DATE STRING
These are the dates for which the message will be effective. The Date String field
has four (4) different types of date formats.
Page - 348
1.
YYDDD Julian Date.
2.
MMDDYY This format is used to handle the various month/day/year. You may
use ** to assist in the need for complete months without having to enter each day.
(i.e. 04**90 = all of April 1990).
3.
Day of Week Mon, Tue, Wed, Thu, Fri, Sat, Sun are all valid.
4.
XXXXXXX The X’s represents Monday - Sunday. To activate a day, place a Y in
the corresponding position. (i.e. Mon & Fri = YXXXYXX)
Mantissa Corporation © 2013
E:\Manuals\Product Manuals\ASO\OM (OPS Master)\Reference Guide\Current Release\OPS_C14.fm
This is the JOBNAME of the job which will provide the message. The message
will only be processed if it has been issued from this job.
OPS/MASTER®
Chapter 14
Automated Operator
ADD - Console Message Definition
TIME / START / END
These fields provide for a specific time range for which the message is valid.
(HHMM - use 24 hour time.)
ACT
This field designates whether the message is active or inactive.
Y
=
Active
N
=
Inactive.
LAST UPDATE / DATE / TIME / BY
This area shows the Date and Time of the Last message update, and the ID of the
person who generated the update.
CONSOLE/Master® takes advantage of the ISPF feature which allows for multiple selections to be made from the Message Table Screen. Each message will be processed one at a
time until all selections have been completed. When all have been finished the Console
Message Table will be re-displayed.
ADD - Console Message Definition
When the ADD option is entered on the command line of the Console Message Table
Screen or Option 1 was entered on the Data Base Function Selection panel, the following
panel is displayed:
------------ Automated Operator - Console Message Definition --------------Command ===>
User=P390K
Date=98/09/10
Message Text From The Console Line:
Time=16:03
________________________________________________________________
Offset From Beginning Of Console Line: => 000 <= Scan to E-O-M: => N <= (Y,N)
For SID: ____ Job: ________ Date: ________
Time Start: ____ End: ____
Command (C=’XXX’), Reply (R=’XXX’) or Wait (W=nnnn) Text:
________________________________________________________________
________________________________________________________________
E:\Manuals\Product Manuals\ASO\OM (OPS Master)\Reference Guide\Current Release\OPS_C14.fm
Route Code: ==> 0_ <==
Add or Replace Route Code: ==> A <== (A,R)
Console Message Action:
Display on SYSLOG Only:
Intensify and Keep:
==> N <== (Y,N)
==> N <== (Y,N)
Extended Rule: ==> N <== (Y,N)
Last User=>P390K
<=
Roll Message: ==> N <== (Y,N)
This Rule is Active: ==> Y <== (Y,N)
Last Update=>98253
<=
Time Last Update=>16:03
<=
The previous panel is required for adding console message definitions to the data base for
automatic console action. Each field on this screen is described below.
Mantissa Corporation © 2013
Page - 349
Chapter 14
OPS/MASTER®
ADD - Console Message Definition
Automated Operator
Once the screen is complete, enter CONFIRM or CANCEL in the COMMAND ==> field,
and press <ENTER>. If the <PF3> or END key is used and BROWSE was selected, CONSOLE/Master® will exit the session..
Automated Operator performs most validations and editing on fields as they are entered.
Not all fields are required. However, optional information can be used for documentation
purposes. It is recommended that as many fields as possible be coded, so that this information will then be available for future reference as documentation.
MESSAGE TEXT FROM THE CONSOLE LINE
The text of the message, as it appears on the MVS operator console (for the portion being defined), should be entered in this field in the exact format. This data
element is the key to the data base file, and is also the message that appears in the
Console Message Table (described previously). The maximum number of characters is 64. The character string identified in this field is the portion of the MVS
console line which will be used as a trigger for WTO/WTOR processing.
OFFSET FROM BEGINNING OF THE CONSOLE LINE
This field is used to specify the beginning position of the character string identified in the “MESSAGE TEXT FROM THE CONSOLE LINE” field. It is zero
(0) relative from the beginning of the message line on the MVS operator console.
SCAN TO E-O-M
This field can be used to identify message strings which cannot be defined by a
simple offset, such as multi-line messages. If this field is coded as Y, the entire
line will be scanned for the occurence of the message text. Obviously, this option
requires more overhead than using an offset with no E-O-M scan.
FOR
The data elements on this line are used if the processing of the console message
is to be limited by system ID, jobname, date, or time range.
SID
JOB
This data element can be used to restrict the processing of this message by specifying the job name. The message will only be processed if issued by the job
entered in this field.
DATE
These are the dates for which the message will be effective. The Date String field
has four (4) different types of date formats.
1.YYDDD - Julian Date.
2.MMDDYY - This format is used to handle the various month/day/year. You
may use ** to assist in the need for complete months without having to enter
each day. (i.e. 04**90 = all of April 1990).
Page - 350
Mantissa Corporation © 2013
E:\Manuals\Product Manuals\ASO\OM (OPS Master)\Reference Guide\Current Release\OPS_C14.fm
This data element can be used to limit the system on which the message should
be acted upon. The value specified here is the SMF ID of the processing system.
If entered, the message will be processed only if issued on the specified processor.
OPS/MASTER®
Chapter 14
Automated Operator
ADD - Console Message Definition
3.Day of Week - Valid values are Mon, Tue, Wed, Thu, Fri, Sat or Sun.
4.XXXXXX - The X’s represents Monday - Sunday. To activate a day, place a Y
in the corresponding position.
(i.e. Mon & Fri = YXXXYXX).
TIME START
This field can be used to restrict the processing of this message to a start time.
The message will not be processed before the time specified. The format is
HHMM on a 24-hour clock.
END
This field can be used to restrict the processing of this message to an upper bound
time. The message will not be processed after the time specified. The format is
HHMM on a 24-hour clock.
COMMAND (C=’XXX’), REPLY (R=’XXX’) OR WAIT (W=NNNN) TEXT
This data element serves three functions. It can be a command to perform a specific function. It can act as a “REPLY” text to a WTOR message, or it can be
used to suspend the processing of the following request(s) for NNNN number of
seconds. The text for each command must be preceded by a C= for a Command,
R= for a Reply or W= for a Wait request, with the text enclosed in single quotes.
The quotes can be omitted if the text does not contain any imbedded blanks. In
the case of a Wait request, up to four numeric characters can be used to specify
the wait time (in seconds). Multiple commands, one reply, and/or waits can be
specified, provided each is separated by a comma and each has a command string
(C=,R=,W=) specified.
For example:
C=’D T’,C=$SI25,W=15,C=$ZI25,W=5,R=’U’
The above requests are interpreted as follows:
1.Display Time
2.Start Initiator 25
3.Wait 15 seconds
E:\Manuals\Product Manuals\ASO\OM (OPS Master)\Reference Guide\Current Release\OPS_C14.fm
4.Halt Initiator 25
5.Wait 5 seconds
6.Reply U
The processing of commands or replies which are subject to waits, as illustrated
above, is performed in an asynchronous manner via an attached task. The waits
Mantissa Corporation © 2013
Page - 351
Chapter 14
OPS/MASTER®
ADD - Console Message Definition
Automated Operator
in no way affect any processing performed on behalf of any other rule coded for
other “Message Text from the Console Line” specifications.
)
)
R='XXXX',C='YYYYYY' will give a syntax error.
Only one reply (R=) is valid per message and it must be last.
If R= is specified, a replacement message is not valid. If specified, the reply will
not be satisfied by CONSOLE/Master®.
If you to issue a MODIFY command to CONSOLE/Master, you must issue a
WAIT first. Example, “W=0001,C=’F CONS MSTR,.....’”.
You can issue a command that contains variable information. There are 3 types of
variables:
Word Variable
Complex Variable
Global Variable
Word variables are in the form:
&nn
where nn is the number of the desired word (left to right) within the message
specified in the Message text field. The end of a word is a comma, or one or
more spaces. For example, if the message “ISTIO5I NYC02 MODE NOW
INACTIVE” were specified in the Message Text field, the word variable &2
would contain the mode name NYC02. &0 is a special word variable defined
for persistent store processing (described at the end of this chapter).
Complex variables are in the following form:
&(l,r)
where l represents the position of the first character of the desired string in the
message text. The r can either represent the length (including the first character)
of the string or the character immediately following the last character in the
string. For example, suppose the following message were specified in the Message Text field:
The complex variable &(25,5) represents the word ABEND. It indicates that the
string begins at the 25th position (A in ABEND) and the length of the string is
five characters. The complex variable &(25,=) would produce the same result.
Global variables are in the following form:
&name
Page - 352
Mantissa Corporation © 2013
E:\Manuals\Product Manuals\ASO\OM (OPS Master)\Reference Guide\Current Release\OPS_C14.fm
IEF450I TESTJOB STEP05 - ABEND=5013
OPS/MASTER®
Chapter 14
Automated Operator
ADD - Console Message Definition
Global variables are predefined in CONSOLE/Master® and represent the internal name for that specific item. The global variables are shown in the chart
below:
Variable
Name
Length
Type
Formal
Description
JOBNAME
8
Fixed
Character
Job Name
MSG
125
Variable
Character
WTO(R) text
SMFID
4
Fixed
Character
SMFID
TCBTYPE
3
Fixed
Character
JOB,STC,TSO
DATE
8
Fixed
Character
MM/DD/YY
DAY
3
Fixed
Character
Character day
(i.e., SAT,
SUN, MON,
TUE, WED,
THU, FRI)
JDATE
6
Fixed
Character
YY.DDD
PROGRAM
8
Fixed
Character
Program name
TIME
8
Fixed
Character
HH:MM:SS
The maximum length of this field is (128) characters. Each command and/or
reply is edited by the system. If an error is detected in the text, the message
“ERROR WITH TEXT” appears in the upper right hand portion of the panel.
ROUTE CODE
E:\Manuals\Product Manuals\ASO\OM (OPS Master)\Reference Guide\Current Release\OPS_C14.fm
The two digit MVS Route Code specifies the routing codes to be assigned unsolicited messages which are broadcast. The Route Code dictates on which console
the message will be displayed, if it is issued. A Route Code of 0(zero) will indicate no change is required.
ADD OR REPLACE ROUTE CODE
A one-character code which identifies the action to be taken (A=Add or
R=Replace) for the Route Code as previously described. The “R” option will
cause the originally assigned code to be replaced with the route code specified in
the ROUTE CODE field (described above). An “A” will add the route code specified above to the route code(s) embedded in the original message.
CONSOLE MESSAGE ACTION
The following is a list of mutually exclusive actions which can be requested.
These actions govern the disposition of the MVS message. To request the particular action, enter Y; to decline the action, enter N.
DISPLAY ON SYSLOG ONLY
The message is re-routed to the MVS System Log only and not displayed on any operator console.
Mantissa Corporation © 2013
Page - 353
Chapter 14
OPS/MASTER®
Multi-line Messages
Automated Operator
INTENSIFY AND KEEP
The message is highlighted and retained on the operator console until it
is manually removed by the operator.
ROLL MESSAGE
The MVS Descriptor Code for the message is altered so that the message will not be highlighted. The same message will roll off the screen
automatically without any further intervention from the operator.
)
Route Code Add/Replace Route Code and Console Message Action may not be
specified for a message with a “R=” reply specified.
EXTENDED RULE
If this value is specified as Y then the “Extended Console Message Definitions”
panel (described later) is displayed for additional definition or requirements.
)
In order to delete anything on the extended panel, you must clear the data first
then go back and set the EXTENDED RULE field to N. Just changing the
EXTENDED RULE field without clearing the data will not clear extended
information.
RULE IS ACTIVE
A rule refers to the specifications on the “Console Message Definition” and
“Console Message Definition Extended” screens.
Any rule can be deactivated by setting this value to N. This feature can be used to
add rules to the Automated Operator Data Base while leaving them in an “inactive” status. Later, these rules can be reviewed and activated by changing this
value to a Y.
Multi-line Messages
Multi-line messages are currently being used in MVS components. If there is a need to
process a multi-line message by CONSOLE/Master®, several considerations must be
taken into account:
Page - 354
Mantissa Corporation © 2013
E:\Manuals\Product Manuals\ASO\OM (OPS Master)\Reference Guide\Current Release\OPS_C14.fm
In order to implement the change of rule status to active (Y) or inactive (N), the
CONSOLE/Master® Control Region must be refreshed. See the REFRESH
Function described in the Advanced Functions chapter of this manual for information on how refreshing the rules is accomplished.
OPS/MASTER®
Chapter 14
Automated Operator
Persistent Store Processing
•
To use data in lines past the first one as a key, use SCAN E-O-M if specifying an
offset will not work.
•
Any variable &1 ... &N may not be correct after the first line.
•
Replacing the message or changing the route or descriptor codes may not work
correctly.
The various considerations are summarized below (where 1 = line 1, 2+ = lines 2....N):
Type of Multi-Line PLIST
Variable
Rep-msg.
Rt.-Desc.
Control
Region
Multiple lines in one PLIST
1 - Yes
2+ - No
No
1 - Yes
2+ -Scan
E-O-M
Multiple single line PLISTs chained together
Yes
1 - No
2+ - Yes
Yes
Multiple single line PLISTs CONNECTED
together
Yes
Yes
Yes
Persistent Store Processing
The persistent store feature will allow the saving of data or JES Reply Number from a
message in a table to be available for use by any other message until the next IPL. It will
be available even if CONSOLE/Master® is brought down and back up.
Implementation
To implement the persistent store feature, two (2) new symbolic variables are provided.
They are:
&&????????
where the eight question marks (?) signify the name assigned
to identify the persistent store value (1 to 8 characters).
&0
the variable used to retrieve the JES Reply Number if needed.
&0 is only valid in ‘C=’ commands.
E:\Manuals\Product Manuals\ASO\OM (OPS Master)\Reference Guide\Current Release\OPS_C14.fm
The format of the persistent store storage command is:
C=’CMPSV=name(value)’
Where name is the name used to reference the stored value. CMPSV= and the parenthesis
are required.
These values are implemented using the existing command statement. For example:
C=’CMPSV=replyid(&0)’
sets the current JES Reply Number into a persistent store symbolic named replyid. To
retrieve the value, enter the following command in the appropriate message:
C=”R &&replyid,’response’”
This will send a reply to the MVS console using the value in &&replyid as the Reply
Number.
This capability can be used to save up to 30 characters of information for later reference.
For example:
Mantissa Corporation © 2013
Page - 355
Chapter 14
OPS/MASTER®
Persistent Store Processing
Automated Operator
C=’CMPSV=holdname(&3)’
will pull a name from position &3 in the current message and save it in a persistent store
symbolic named holdname. To retrieve the value, enter the following command:
C=’S &&holdname,PARM=TEST’
E:\Manuals\Product Manuals\ASO\OM (OPS Master)\Reference Guide\Current Release\OPS_C14.fm
This will send a start command for holdname to the MVS console.
Page - 356
Mantissa Corporation © 2013
OPS/MASTER®
Chapter 14
Automated Operator
Extended Console Message Definition
Extended Console Message Definition
The following panel is displayed if Y is specified on the EXTENDED RULE field of the
ADD - Console Message Definition Screen.
----------- Automated Operator - Console Message Definition Extended ---------COMMAND ===>
(Use BACK command to view previous panel)
User=P390K
Date=97/09/29
Time=13:56
Extended Action:
Cancel Issuer
==> N <== (Y,N)
Replacement Message ==> ____________________________________________________
_________________________________________________________________________
User Comments:
________________________________________________________________
________________________________________________________________
________________________________________________________________
________________________________________________________________
JOB/Master® ACTION:
JOBNAME ==> ________ <==
POST DE
N (Y,N) BR
N (Y,N) TI
N (Y,N) DI
N (Y,N)
SIGNAL COMPLETE:
JOBNAME ==> ________ <==
STEPNAME ==> ________ <==
F1=HELP
F7=UP
F2=SPLIT
F8=DOWN
F3=END
F9=SWAP
F4=>CONFIRM F5=>CAN
F10=
F11=
Send To:
________
________
________
________
JS
N (Y,N)
F6=RCHANGE
F12=RETRIEVE
EXTENDED ACTION
CANCEL ISSUER
If a “Y” is entered in this field, then the task issuing the message will be
cancelled. The task is cancelled by issuing an OS cancel command.
E:\Manuals\Product Manuals\ASO\OM (OPS Master)\Reference Guide\Current Release\OPS_C14.fm
REPLACEMENT MESSAGE
This field allows a replacement message to be entered. The original
message is received and can be reformatted to issue a different response.
In re-formatting, you may use the three types of variables described in
the COMMAND TEXT field of the ADD Console Message Definition
section.
)
Replacement message may not be specified for a message with a “R=” reply
specified.
USER COMMENTS
This field is used to specify a sixty four (64) character, free format field,
for User comments. This character string can also be sent to a TSO User
as documented below. Variables are also valid in this field. Refer to
COMMAND TEXT field in the Add Console Message Definition section.
Mantissa Corporation © 2013
Page - 357
Chapter 14
OPS/MASTER®
Extended Console Message Definition
Automated Operator
SEND TO
This data element is used to indicate the Userid of the User you want to
notify. This field is 8 characters long. When the notify is performed, the
message sent is the “USER COMMENTS” character string entered in
the USER COMMENTS field adjacent to this SEND TO field.
The two fields USER COMMENTS and SEND TO are closely coupled. They
can appear multiple times in each rule. Their processing depends on the presence
or absence of its counterpart. If no SEND TO Userids are specified, then each
USER COMMENTS field is used as documentation only.
When SEND TO Userids are specified, then the first Userid will receive the first
USER COMMENTS; the second Userid will receive the second USER COMMENTS; etc. The first USER COMMENTS field is also the default notify text.
Therefore, when more than one Userid is specified, without any corresponding
USER COMMENTS, the notify text will be taken from the first USER COMMENTS.
JOB/Master® ACTION
Used to specify the completion of a manual task for a job on the JOB/Master®
Scheduling Queue. This function is applicable only if the JOB/Master® Scheduling Product is also installed.
JOBNAME
Identifies the job for which the manual task has been completed.
POST XX
This data element identifies the manual task which has been completed.
The entry to be posted complete should be set to “Y”. Each manual task,
represented here by ‘XX’, is described in the JOB/Master® documentation supplied with the JOB/Master® software.
SIGNAL COMPLETE
The job or jobstep defined on the JOB/Master® Data Base will be considered as
ended and will cause any specified jobs to be triggered. This function is applicable only if the JOB/Master® Scheduling Product is also installed.
Identifies the job which should be considered as ended.
STEPNAME
Identifies the jobstep which should be considered as ended.
Either JOB/Master® action or signal complete may be specified. If both are specified,
only JOB/Master® action will be processed.
The remainder of this screen indicates the current User ID, date and time.
Once the screen is complete, specify CONFIRM or CANCEL on the command line when
<ENTER> is pressed. If the <PF3> or END key is used, then the system will ignore the
command, and exit the session without saving the data.
Page - 358
Mantissa Corporation © 2013
E:\Manuals\Product Manuals\ASO\OM (OPS Master)\Reference Guide\Current Release\OPS_C14.fm
JOBNAME
OPS/MASTER®
Chapter 14
Automated Operator
UPDATE / BROWSE Console Message Definition
UPDATE / BROWSE Console Message Definition
The UPDATE and/or BROWSE processing is entered when the Console Message Table
option U or B is selected.
The U option is for updating, and B is for browse only. No data can be updated when
option B is selected.
Once data entry is complete on update, specify CONFIRM or CANCEL on the command
line, when the ENTER key is pressed. If the PF3 or END key is used, then the system will
ignore the command, and exit the session without saving the data.
DELETE Request
The Verify Delete Request panel is accessed by entering D in the Select (S) field on the
Console Message Table, for the message(s) you want to delete.
Once the messages are selected, press <ENTER> key, and the Verify Delete Request panel
is displayed.
To delete the message(s) selected, enter CONFIRM in the COMMAND field. If you want
to ignore the delete, then enter CANCEL in the COMMAND field. You must either Confirm or Cancel to exit this panel. The <PF3> (END) key will not function.
E:\Manuals\Product Manuals\ASO\OM (OPS Master)\Reference Guide\Current Release\OPS_C14.fm
When delete request is confirmed, a message of “RECORD DELETED” will appear on
the next display panel, in the upper right hand corner.
Mantissa Corporation © 2013
Page - 359
Chapter 14
Automated Operator
E:\Manuals\Product Manuals\ASO\OM (OPS Master)\Reference Guide\Current Release\OPS_C14.fm
DELETE Request
OPS/MASTER®
Page - 360
Mantissa Corporation © 2013
OPS/MASTER®
Chapter 15
MVS Console Facility
Overview
Chapter 15
MVS Console Facility
Overview
The MVS Console Facility provides full MVS operator functions through the same TSO
terminal on which the User is currently logged. All MVS and JES commands can be processed through this interface. Besides productivity, this facility provides many benefits
which are partially listed below. The MVS Console can be individually secured via Interactive Security Facility (ISF).
E:\Manuals\Product Manuals\ASO\OM (OPS Master)\Reference Guide\Current Release\OPS_C15.fm
The MVS Console Facility is a sophisticated ISPF dialog, which is capable of scanning
the buffers of any operator console. After the proper buffers are located, MVS Console
will display, or mirror, the contents of console buffers. With this method, there is no need
to worry about backing up on console buffers. The console will not roll like an ordinary
operator console; to see a new display you must press <ENTER> each time.
ISF is used to define the security of functions within the MVS Console. The ISF administrator can define “display only” Users, as well as full-function Users. In the absence of an
individual User record, ISF will use the default security record. The default record is normally set by the ISF administrator according to each installation’s security guidelines.
Usually, the default Users are allowed display only mode.
Mantissa Corporation © 2013
Page - 361
Chapter 15
OPS/MASTER®
Invoking the MVS Console
MVS Console Facility
Invoking the MVS Console
To bring up the MVS Console, enter C in the OPTION ==> field of the CONSOLE/Master® Banner Menu and <ENTER>.
The next panel will be displayed, as illustrated:
--------------------- MVS Console Facility -------------------- ROW 8 OF 25
Command ===>
Scroll ===> CSR
Console Id ===> 700
13.56.40 STC03350
STORCLAS (STANDARD) MGMTCLAS (INTERIM)
DATACLAS (NONTMM)
13.56.44 STC00153 -RM7818
83 % SPOOL UTILIZATION
13.56.48 STC03350 IGD17042I EXPIRATION DATE FOR DATA SET
PROD.R132.D970929.A1135638.DEFAULT#.RMSARC WAS OVERRIDDEN
13.56.49 STC03350 DURING DELETE PROCESSING
13.56.49 STC00040 %RM7106 FILE
5953 PURGED, OWNER=RMSC0007 =RMSC0007
13.57.18 STC00153 -RM7818
83 % SPOOL UTILIZATION
13.57.29 STC03350 RM0337I ARCHIVE(1) SERVER IS WAITING FOR WORK ON
09/29/97 AT 13:57:29.
(RM10001 (ARCHSERV))
13.57.54 STC00153 -RM7818
83 % SPOOL UTILIZATION
13.58.24 STC00153 -RM7818
83 % SPOOL UTILIZATION
13.58.58 STC00153 -RM7818
83 % SPOOL UTILIZATION
13.59.14 JOB03392 $HASP100 P390NA
ON INTRDR
P390N TSU03386 P390N
13.59.15 JOB03392 $HASP904 CONVERSION COMPLETE (HASX06A).
13.59.17 JOB03392 $HASP373 P390NA
STARTED - INIT
A - CLASS A - SYS
13.59.34 STC00153 -RM7818
83 % SPOOL UTILIZATION
**END**
F1=HELP
F7=UP
F2=SPLIT
F8=DOWN
F3=END
F9=SWAP
F4=>CONFIRM F5=>CAN
F10=
F11=
F6=RCHANGE
F12=RETRIEVE
The address of the console being mirrored is shown in the Console ID ==> field of the
panel. The Console ID will default to the address defined under ISF in the Initial Console
Address ==> field. This address will be taken from the Userid record, if available or the
Product Default record. For more information, refer to the description of the Interactive
Security Facility in this guide.
)
The ability to change Console ID is controlled by ISF. The user must be authorized for this function.
The display will not automatically refresh itself. Pressing <ENTER> will refresh the display with current information. This may be necessary after entering the commands discussed below.
Page - 362
Mantissa Corporation © 2013
E:\Manuals\Product Manuals\ASO\OM (OPS Master)\Reference Guide\Current Release\OPS_C15.fm
To change Console ID, move the cursor to the Console ID ==> field and key in the new
console address, then press <ENTER>.
OPS/MASTER®
Chapter 15
MVS Console Facility
Entering JES Commands
Entering JES Commands
JES commands can be entered on the command line. In the following example, the display
of JES2 initiators is requested:
--------------------- MVS Console Facility -------------------- ROW 8 OF 25
Command ===> $di
Scroll ===> CSR
Console Id ===> 700
13.56.40 STC03350
STORCLAS (STANDARD) MGMTCLAS (INTERIM)
DATACLAS (NONTMM)
13.56.44 STC00153 -RM7818
83 % SPOOL UTILIZATION
13.56.48 STC03350 IGD17042I EXPIRATION DATE FOR DATA SET
PROD.R132.D970929.A1135638.DEFAULT#.RMSARC WAS OVERRIDDEN
13.56.49 STC03350 DURING DELETE PROCESSING
13.56.49 STC00040 %RM7106 FILE
5953 PURGED, OWNER=RMSC0007 =RMSC0007
13.57.18 STC00153 -RM7818
83 % SPOOL UTILIZATION
13.57.29 STC03350 RM0337I ARCHIVE(1) SERVER IS WAITING FOR WORK ON
09/29/97 AT 13:57:29.
(RM10001 (ARCHSERV))
13.57.54 STC00153 -RM7818
83 % SPOOL UTILIZATION
13.58.24 STC00153 -RM7818
83 % SPOOL UTILIZATION
13.58.58 STC00153 -RM7818
83 % SPOOL UTILIZATION
13.59.14 JOB03392 $HASP100 P390NA
ON INTRDR
P390N TSU03386 P390N
13.59.15 JOB03392 $HASP904 CONVERSION COMPLETE (HASX06A).
13.59.17 JOB03392 $HASP373 P390NA
STARTED - INIT
A - CLASS A - SYS
13.59.34 STC00153 -RM7818
83 % SPOOL UTILIZATION
**END**
F1=HELP
F7=UP
F2=SPLIT
F8=DOWN
F3=END
F9=SWAP
F4=>CONFIRM F5=>CAN
F10=
F11=
F6=RCHANGE
F12=RETRIEVE
Key in $DI and press <ENTER>. The following panel is then displayed:
--------------------- MVS Console Facility -------------------- ROW 12 OF 29
Command ===>
Scroll ===> CSR
14.02.22 STC00153
14.02.22 STC03350
-RM7818
RM0339I
14.02.22 STC03350
RM0338I
14.02.22 STC03350
E:\Manuals\Product Manuals\ASO\OM (OPS Master)\Reference Guide\Current Release\OPS_C15.fm
14.02.24
14.02.24
14.02.24
14.02.24
14.02.24
14.02.24
14.02.24
14.02.24
14.02.24
14.02.24
**END**
F1=HELP
F7=UP
Mantissa Corporation © 2013
RM0339I
$HASP605
$HASP605
$HASP605
$HASP605
$HASP605
$HASP605
$HASP605
$HASP605
$HASP605
$HASP605
F2=SPLIT
F8=DOWN
Console Id ===> 700
83 % SPOOL UTILIZATION
OUTPUT (1) SERVER HAS BEEN DETACHED.
(RM99999 (MAIN
))
RECOVER(1) SERVER HAS ENDED. (NORMALLY )
(RM99999 (MAIN
))
RECOVER(1) SERVER HAS BEEN DETACHED.
(RM99999 (MAIN
))
INIT
A ACTIVE
JOB03392 C=AS
INIT
B INACTIVE ******** C=BA
INIT
C DRAINED ******** C=CBA
INIT
D DRAINED ******** C=DCBA
INIT
E DRAINED ******** C=EDCBA
INIT
F INACTIVE ******** C=R
INIT
G INACTIVE ******** C=R
INIT
H INACTIVE ******** C=R
INIT
I INACTIVE ******** C=R
INIT
R INACTIVE ******** C=RS
F3=END
F9=SWAP
F4=>CONFIRM F5=>CAN
F10=
F11=
F6=RCHANGE
F12=RETRIEVE
Page - 363
Chapter 15
OPS/MASTER®
Entering MVS Commands
MVS Console Facility
Entering MVS Commands
MVS commands can be entered on the command line. In the following example, the MVS
Display Active is requested:
Key in D A,L and press <ENTER>. The following screen is then displayed:
--------------------- MVS Console Facility -------------------- ROW 12 OF 29
Command ===>
Scroll ===> CSR
14.03.31 STC00153
14.03.32 JOB03392
NOT BE USED
14.03.32 JOB03392
NOT BE USED
14.03.32 JOB03392
NOT BE USED
14.03.32 JOB03392
NOT BE USED
14.03.32 JOB03392
NOT BE USED
14.03.32 JOB03392
NOT BE USED
14.03.32 JOB03392
NOT BE USED
14.03.32 JOB03392
NOT BE USED
**END**
F1=HELP
F7=UP
Console Id ===> 700
-RM7818
83 % SPOOL UTILIZATION
JMDD - DATASET FOR DDNAME=JMSUBSUN NOT SUPPLIED WILL
JMDD - DATASET FOR DDNAME=JMSUBMON NOT SUPPLIED WILL
JMDD - DATASET FOR DDNAME=JMSUBTUE NOT SUPPLIED WILL
JMDD - DATASET FOR DDNAME=JMSUBWED NOT SUPPLIED WILL
JMDD - DATASET FOR DDNAME=JMSUBTHU NOT SUPPLIED WILL
JMDD - DATASET FOR DDNAME=JMSUBFRI NOT SUPPLIED WILL
JMDD - DATASET FOR DDNAME=JMSUBSAT NOT SUPPLIED WILL
JMDD - DATASET FOR DDNAME=JMRERUN
F2=SPLIT
F8=DOWN
F3=END
F9=SWAP
NOT SUPPLIED WILL
F4=>CONFIRM F5=>CAN
F10=
F11=
F6=RCHANGE
F12=RETRIEVE
Ending the Console Facility
E:\Manuals\Product Manuals\ASO\OM (OPS Master)\Reference Guide\Current Release\OPS_C15.fm
Press the END (PF3) key to terminate the MVS Console Facility and re-display the CONSOLE/Master® Banner Menu.
Page - 364
Mantissa Corporation © 2013
OPS/MASTER®
Chapter 16
Profiles
Chapter 16
Profiles
The CONSOLE/Master® Profile maintenance is selected from the CONSOLE/Master®
Banner panel by entering P in the OPTION ==> field and pressing <ENTER>.
-------------------------- CONSOLE/Master® by Mantissa ------------------------Option ===> P
A - Automated Operator
C - MVS Console Facility
P - Profile
R - Reports
X - EXIT
------------------------------------------------------------------------------CCCCCCC
OOOOOOO
NN
NN SSSSSSS
OOOOOOO
LL
EEEEEEE
CC
CC OO
OO NNN
NN SS
SS OO
OO LL
EE
CC
OO
OO NNNN NN SS
OO
OO LL
EE
CC
OO
OO NN NN NN
SSSSSS
OO
OO LL
EEEEEE
CC
OO
OO NN NNNN
SS OO
OO LL
EE
CC
CC OO
OO NN
NNN SS
SS OO
OO LL
EE
CCCCCCC
OOOOOOO NN
NN
SSSSSSS
OOOOOOO LLLLLLL EEEEEEEE
E:\Manuals\Product Manuals\ASO\OM (OPS Master)\Reference Guide\Current Release\OPS_C16.fm
MMM
MMM
AAAAAAAA
SSSSSSS
TTTTTTTT
EEEEEE
RRRRRRR
MM M M MM
AA
AA
SS
SS
TT
EE
RR
RR
MM M M MM
AA
AA
SS
TT
EE
RR
RR
MM MM MM
AAAAAAAA
SSSSS
TT
EEEEE
RRRRRRRR
MM
MM
AA
AA
SS
TT
EE
RR RR
MM
MM
AA
AA
SS
SS
TT
EE
RR
RR
MM
MM
AA
AA
SSSSSSS
TT
EEEEEEEE
RR
RR
Mantissa Corporation © 2013
Page - 365
Chapter 16
OPS/MASTER®
Profiles
The next panel displayed is the CONSOLE/Master® Profile Update/Display Options
panel:
---------------- CONSOLE/Master® Profile Update/Display Options --------------Command ===>
User= P390K
Date= 98/09/10
98.253
Option
Functional Description
Time= 16:14
----------------------------------------------1
Set PF Keys
2
Display Profile parameters
3
Update Profile parameters
END
Exit
Select 1 to set Program Function (PF) keys.
Select 2 to DISPLAY all Profile Parameters for a specific installation.
Select 3 to set Profile Parameters for a specific installation.
The function keys must be set (using option 1) before other CONSOLE/Master® functions can be used.
E:\Manuals\Product Manuals\ASO\OM (OPS Master)\Reference Guide\Current Release\OPS_C16.fm
)
Page - 366
Mantissa Corporation © 2013
OPS/MASTER®
Chapter 16
Profiles
Profile Function Keys
Profile Function Keys
The PF keys can be set to conform to the standards specified at any installation. When
option 1 is selected from the previous panel, the Profile PFK Definitions panel is displayed:
----------------- CONSOLE/Master® - Profile PF Key Definitions ---------------Command ===>
PFK01=
PFK02=
PFK03=
PFK04=
PFK05=
PFK06=
PFK07=
PFK08=
PFK09=
PFK10=
PFK11=
PFK12=
HELP
SPLIT
END
>CONFIRM
>CAN
RCHANGE
UP
DOWN
SWAP
RETRIEVE
PFK13=
PFK14=
PFK15=
PFK16=
PFK17=
PFK18=
PFK19=
PFK20=
PFK21=
PFK22=
PFK23=
PFK24=
HELP
SPLIT
END
>CONFIRM
>CAN
RCHANGE
UP
DOWN
SWAP
RETRIEVE
------------------------------------------------------------------------------JCL used for batch funtions
--------------------------//P390K
JOB (0000,0000),’P390K
‘,CLASS=A,MSGCLASS=X
//*
//*
The default PF keys are displayed, and the User can override any or all of them. The Jobcard at the bottom of the panel can also be modified to your installation’s specifications.
E:\Manuals\Product Manuals\ASO\OM (OPS Master)\Reference Guide\Current Release\OPS_C16.fm
To exit this panel, you must enter CONFIRM or CANCEL in the COMMAND ==> field.
Mantissa Corporation © 2013
Page - 367
Chapter 16
OPS/MASTER®
Profile Parameters
Profiles
Profile Parameters
The CONSOLE/Master® Profile Parameters panel is selected with option 2 for the display
of current settings, or option 3 for adding or updating the Profile Parameters. The following panel is displayed when these options are selected:
--------------------- CONSOLE/Master® - Profile Parameters -------------------Command ===>
------------------------------------------------------------------------------Installation Name
Procedure Name
==>
==>
MANTISSA CORPORATION___________
CMREPORT
The Profile Parameters is a record used for the batch report feature of CONSOLE/Master®.
INSTALLATION NAME
This is a 30-character field for the title used on the reports.
PROCEDURE NAME
E:\Manuals\Product Manuals\ASO\OM (OPS Master)\Reference Guide\Current Release\OPS_C16.fm
An eight (8) character name is required which names the PROCLIB member
used for execution of the batch reports.
Page - 368
Mantissa Corporation © 2013
OPS/MASTER®
Chapter 17
Report Facility
Initiating the Report Facility
Chapter 17
Report Facility
Initiating the Report Facility
The Report Facility is accessed by selecting option R from the CONSOLE/Master® Banner panel and pressing <ENTER>. The next panel displayed is the CONSOLE/Master®
Report Facility menu, as shown:
------------------------ CONSOLE/Master® Report Facility ---------------------User= P390K
Command ===>
Date= 98/09/10
98.253
Time= 16:16
Option ==>
E:\Manuals\Product Manuals\ASO\OM (OPS Master)\Reference Guide\Current Release\OPS_C17.fm
Option
-------1 - PRT
2 - PRC
3 - PRJ
4 - PRU
Functional Description
-------------------------------------------Automated Operator Reports - All
Automated Operator Reports - By Message
Automated Operator Reports - By Jobmaster
Automated Operator Reports - By Notify/User ==> P390K___ <==
This panel allows the user to select the type of report, or package of all reports, currently
provided by CONSOLE/Master®.
Option 1:
Mantissa Corporation © 2013
PRT, allows the user to print all available reports. It can be
Page - 369
Chapter 17
OPS/MASTER®
Initiating the Report Facility
Report Facility
selected either by keying 1 or PRT in the OPTION field.
Option 2:
PRC, is a report listing of all console message records.
Option 3:
PRJ, is a listing of all console message records that are JOB/
Master®-related.
Option 4:
PRU, produces a listing of all console message records that
hav e th e NOTIFY USER O F CO NSOLE MESSAGE
ACTION==> field defined with a specified Userid. When this
option is selected, the NOTIFY/USER ==> field must be completed with the Userid for whom the report is requested. The
NOTIFY/USER==> field is initialized with the Userid of the
currently logged User. If this field is not modified then the
report will be generated for the currently logged on User.
After the selection is complete, the next panel to be displayed is the Job Submit panel for
the report option selected.
This panel is an ISPF edit-type panel which allows the user to modify the JCL as desired.
The standard ISPF submit convention is used by keying SUB in the COMMAND ==>
field once the JCL is correct.
CMREPORT is the distributed procedure name and can be found in the INSTLIB.
Page - 370
Mantissa Corporation © 2013
E:\Manuals\Product Manuals\ASO\OM (OPS Master)\Reference Guide\Current Release\OPS_C17.fm
---------CONSOLE/Master® Report Submit Facility ------------- Columns 000 000
Command ===>
Scroll ===> Page
****** ***************************** Top of Data ******************************
==MSG> -Warning- The UNDO command is not available until you change
==MSG>
your edit profile using the command RECOVERY ON.
000001 //P390K
JOB (0000,0000),’P390K
‘,CLASS=A,MSGCLASS=X
000002 //*
000003 //CMREPORT EXEC CMREPORT
000004 //STEP2.FILE715 DD *
000005 CMPRT PRJ
000006 /*
****** **************************** Bottom of Data ****************************
OPS/MASTER®
Chapter 17
Report Facility
Sample Report
Sample Report
The following is a sample report, generated from option 1 on the REPORT FACILITY
screen.
.=================================================================================================================================
M A N T I S S A
C O R P O R A T I O N
PAGE
1
10/29/93
AUTOMATED OPERATOR CONSOLE MESSAGE FILE
==================================================================================================================================
RECORD NO. 00001
0
1
2
3
4
5
6
7
8
9
0
0....5....0....5....0....5....0....5....0....5....0....5....0....5....0....5....0....5....0....5....0
MESSAGE =
<RMS100 SIMPLE
SYSA
TFES
OFFSET = 000
*
RESPONSE=
(1) C=’S RMSCTL’
(2)
NOTIFY/COMMENT =
CONSOLE
MESSAGE
ACTION:
ROLL MESSAGE = N
INTENSIFY AND KEEP = N
DISPLAY ON SYSLOG ONLY = N
NOTIFY USER OF CONSOLE MESSAGE ACTION:
ROUTE CODE = 000
RECORD NO. 00002
0
1
2
3
4
5
6
7
8
9
0
0....5....0....5....0....5....0....5....0....5....0....5....0....5....0....5....0....5....0....5....0
MESSAGE =
$HASP100 LOG
TLCR
OFFSET = 000
*
RESPONSE=
(1) C=’W’
(2)
NOTIFY/COMMENT =
CONSOLE
MESSAGE
ACTION:
ROLL MESSAGE = N
INTENSIFY AND KEEP = N
DISPLAY ON SYSLOG ONLY = N
NOTIFY USER OF CONSOLE MESSAGE ACTION:
ROUTE CODE = 000
RECORD NO. 00003
0
1
2
3
4
5
6
7
8
9
0
0....5....0....5....0....5....0....5....0....5....0....5....0....5....0....5....0....5....0....5....0
MESSAGE =
$HASP190
TLCR
OFFSET = 000
*
RESPONSE=
(1) C=’$SPRT1’
(2)
NOTIFY/COMMENT =
CONSOLE
MESSAGE
ACTION:
ROLL MESSAGE = N
INTENSIFY AND KEEP = N
DISPLAY ON SYSLOG ONLY = N
NOTIFY USER OF CONSOLE MESSAGE ACTION:
RECORD NO. 00004
0
1
2
3
4
5
6
7
8
9
0
0....5....0....5....0....5....0....5....0....5....0....5....0....5....0....5....0....5....0....5....0
$HASP375 ESTIMATE EXCEEDED BY
20,000
TCJN
*
MESSAGE =
OFFSET = 000
RESPONSE=
(1)
(2)
NOTIFY/COMMENT =
E:\Manuals\Product Manuals\ASO\OM (OPS Master)\Reference Guide\Current Release\OPS_C17.fm
CONSOLE
MESSAGE
ACTION:
ROLL MESSAGE = N
INTENSIFY AND KEEP = Y
DISPLAY ON SYSLOG ONLY = N
NOTIFY USER OF CONSOLE MESSAGE ACTION:
Mantissa Corporation © 2013
ROUTE CODE = 000
ROUTE CODE = 000
Page - 371
Chapter 17
OPS/MASTER®
Sample Report
Report Facility
Report Data Items
The following is a list of the Report Data Items and a description of each.
RECORD NO.
This field indicates the position of the record in the file.
)
The file is shown in ascending sequence on Report Output, but is scanned in
descending sequence when looking for a match!
MESSAGE
This field is the record key and console message which is interpreted by the automated operator internals. The message is printed under a ruled header which indicates the offset position of the message on the console. The Message Limiters
(SID, JOB, DATE & TIME) are shown at the right of the message.
OFFSET
The offset is a three character numeric field indicating the starting position of the
console message on the console. This position is shown under the rule header by
an asterisk.
RESPONSE
The response is two lines of 64 characters which show the command or reply to
be executed on the console. These responses are labeled as C for command, R for
reply and W for wait.
NOTIFY/COMMENT
This field serves two purposes. First, it can be used as a user comment field if the
notify user field is blank. Second, it is used as a message routing field when the
notify user field contains a valid userid. This message is routed to the terminal of
the specified userid.
CONSOLE MESSAGE ACTION
These actions govern the disposition of the MVS message.
The MVS Descriptor Code for the message is altered so that the message will not be highlighted. The message will roll off the screen automatically without any intervention from the operator.
INTENSIFY AND KEEP
The message is highlighted and retained on the operator console until it
is manually removed by the operator.
DISPLAY ON SYSLOG ONLY
If Y is specified, the message will only be displayed on the system log
and not on the console. If N is specified, the message will be displayed
on the system log and the console.
Page - 372
Mantissa Corporation © 2013
E:\Manuals\Product Manuals\ASO\OM (OPS Master)\Reference Guide\Current Release\OPS_C17.fm
ROLL MESSAGE
OPS/MASTER®
Chapter 17
Report Facility
Sample Report
NOTIFY USER OF CONSOLE MESSAGE ACTION
Identifies the Userid of the user you wish to notify of this console message. The
message sent is the “NOTIFY/COMMENT” character string documented above.
ROUTE CODE
The 2 digit MVS Route Code which is to be added to the current Route Codes
assigned to the message text, or the code which is to replace the Route Codes
which are currently assigned to the message text.
JOB/Master® ACTION
Used to specify the completion of a manual task for a job on the JOB/Master®
Scheduling Queue.
JOBNAME
Identifies the job for which the manual task is completed.
POST
Identifies the manual task.
SIGNAL COMPLETE
Identifies processing which will signal that a job or a jobstep has completed processing.
JOBNAME
Identifies completed job.
STEPNAME
E:\Manuals\Product Manuals\ASO\OM (OPS Master)\Reference Guide\Current Release\OPS_C17.fm
Identifies completed jobstep.
Mantissa Corporation © 2013
Page - 373
E:\Manuals\Product Manuals\ASO\OM (OPS Master)\Reference Guide\Current Release\OPS_C17.fm
Chapter 17
Sample Report
Page - 374
OPS/MASTER®
Report Facility
Mantissa Corporation © 2013
OPS/MASTER®
Chapter 18
Technical Specifications
Architecture
Chapter 18
Technical Specifications
Architecture
The CONSOLE/Master® product for MVS systems provides control and monitoring of
Write-to-Operator and Write-to-Operator-with-Reply traffic.
E:\Manuals\Product Manuals\ASO\OM (OPS Master)\Reference Guide\Current Release\OPS_C18.fm
The CONSOLE/Master® system consists primarily of:
Mantissa Corporation © 2013
•
The Data Base Creation functions are a set of interactive TSO dialogs utilizing
full screen and menu driven functions to fill in required information for console
message recognition. The data base also describes the action to be performed
when a WTO/WTOR is recognized.
•
The CONSOLE/Master® control region is a control task which handles all processing commands, replies and user notification as requested during Automated
Operator Data Base creation. When the JOB/Master® product is also installed,
CONSOLE/Master® performs additional functions which augment the scheduling system. The CONSOLE/Master® controller must be active at all times for
Automated Operator to perform its functions, and must be active on each CPU, in
a multi CPU environment, where automated operations are desired.
•
The WTO/WTOR dynamic front-end processor intercepts all traffic normally
handled by SVC 35. Performs Multiple Console Support (MCS) actions, such as
adding or changing Routing and Description codes as requested by the Automated Operator Data Base rules, and depending on the same rules, passes a copy
of the WTO/WTOR buffer to the CONSOLE/Master® control region for further
processing.
•
The MVS Console Facility is a full function operator console under the control of
an ISPF dialog.
Page - 375
Chapter 18
OPS/MASTER®
Machine and Software Environment
Technical Specifications
Machine and Software Environment
CONSOLE/Master® operates on any IBM processor or IBM compatible processor that
meets the following requirements:
MVS release 3.8, MVS/ESA THROUGH z/OS with the Time Sharing Option
(TSO), and ISPF release 2.0 or higher.
•
Access methods, QSAM, VSAM.
•
IBM or IBM compatible display terminals. Any terminals supported by ISPF can
be used by CONSOLE/Master®.
•
Approximately 10 cylinders of IBM 3380 DASD space for installation.
•
Approximately 20 cylinders of IBM 3380 DASD space for data files and production use.
•
The CONSOLE/Master® control region task must execute from an APF authorized library, and executes in a region size of 4096K.
E:\Manuals\Product Manuals\ASO\OM (OPS Master)\Reference Guide\Current Release\OPS_C18.fm
•
Page - 376
Mantissa Corporation © 2013
OPS/MASTER®
Chapter 19
File Backup and Recovery
Backing Up Files
Chapter 19
File Backup and Recovery
Backing Up Files
Job CMBACKUP, which is available as member CMBACKUP in the INSTLIB data set,
will back up the CONSOLE/Master® data base.
To back up the data base, modify the JCL in member CMBACKUP according to your
installation standards and submit for execution.
)
CONSOLE/Master® data base should be backed up on a regularly scheduled
basis.
Restoring Files
Job CMRESTOR in the INSTLIB data set will restore the CONSOLE/Master® data base.
E:\Manuals\Product Manuals\ASO\OM (OPS Master)\Reference Guide\Current Release\OPS_C19.fm
To restore the data base, modify the JCL in member CMRESTOR according to your
installation standards and submit for execution.
Mantissa Corporation © 2013
Page - 377
Chapter 19
File Backup and Recovery
E:\Manuals\Product Manuals\ASO\OM (OPS Master)\Reference Guide\Current Release\OPS_C19.fm
Restoring Files
OPS/MASTER®
Page - 378
Mantissa Corporation © 2013
OPS/MASTER®
Chapter 20
Advanced Functions
Fast Path Message Processing
Chapter 20
Advanced Functions
Fast Path Message Processing
Many console messages are triggered by certain unpredictable incidents such as I/O
errors. While their arrival is sporadic, when errors do occur, these messages arrive at an
extremely fast pace. Furthermore, usually there are no commands or replies associated
with these messages. Such messages can and should be defined to the CONSOLE/Master® Data Base to be expedited through the system taking advantage of the Fast Path Message Processing.
E:\Manuals\Product Manuals\ASO\OM (OPS Master)\Reference Guide\Current Release\OPS_C20.fm
All console messages defined to CONSOLE/Master® with the following specifications
are automatically eligible for Fast Path Message Processing.
1.
Route code changes, console message actions, or replacement message.
2.
Does not require any additional command, reply or notification processing.
Such messages will not be passed on to the CONSOLE/Master® control region. The Multiple Console Support (MCS) actions will be handled entirely by the WTO/WTOR Interceptor module which will alter the appropriate Route Code or Descriptor Code as
necessary to achieve the requested “CONSOLE MESSAGE ACTION”.
REFRESH Function
This function provides dynamic implementation of new or replacement message processing rules which have been defined to CONSOLE/Master® data base via the Automated
Operator on-line session.
To request the REFRESH function, enter the following command from an operator console or via the MVS Console Facility.
F CONSMSTR,REFRESH
This procedure builds a new copy of CONSOLE/Master® message processing rules and
then replaces the old copy with this new copy.
Mantissa Corporation © 2013
Page - 379
Chapter 20
OPS/MASTER®
JOB/Master® Interface
Advanced Functions
JOB/Master® Interface
When the JOB/Master® product is also installed, CONSOLE/Master® performs additional functions which augment the scheduling system.
•
Manual task, as defined to JOB/Master®, may be posted complete based on a
console message action.
•
Events, jobs/steps, can be posted as complete causing dependent jobs to be triggered.
Initial Command Stream Processing
The presence or absence of the Initial Command Stream is totally at your discretion. Upon
successful initialization of CONSOLE/Master® Control Region, the system parameter
library (SYS1.PARMLIB) will be interrogated for the presence of a member which is used
to contain the Initial Command Stream.
The member name consists of seven (7) characters. It is composed of the three (3) characters “SIS” which are followed by four characters used as the name of the subsystem entry
(default is “CM01”). Therefore, using defaults, the member name used for initial commands is SISCM01.
The contents of columns 1 through 72 of each record within this member are presented to
your system, via standard SVC 34 interface, as if they were entered from an operator console. Columns 73 through 80 are ignored by CONSOLE/Master®.
The purpose of this function is to provide an unconditional command execution at startup. Since this is not dependent on recognition of any system message, it can be used to initiate tasks that will then generate messages which will be recognized and acted upon by
CONSOLE/Master®.
For example, member SISCM01 contains the following commands:
S NET
$SI1-10
V A80-AFF,OFFLINE
Global Status Change And Display
The Automated Operator can be disabled and subsequently enabled via the MODIFY (F)
command. For example:
F CONSMSTR,INACT
The above command will cause CONSOLE/Master® Control Region to halt its processing
without terminating its address space. The intercept and processing of new WTO/WTOR
lines will be suspended.
However, any commands and/or replies which may have been scheduled for delayed execution via the Wait (W=) specification will be issued once their wait interval has expired.
Normal processing may be reinstated by the following command:
F CONSMSTR,ACT
Page - 380
Mantissa Corporation © 2013
E:\Manuals\Product Manuals\ASO\OM (OPS Master)\Reference Guide\Current Release\OPS_C20.fm
The system messages, generated when the above commands are issued, can be used to
trigger subsequent actions. The actions may include starting other system tasks (TSO,
CICS, DB2, etc.), starting teleprocessing lines, varying paths or other device online/
offline, etc.
OPS/MASTER®
Chapter 20
Advanced Functions
Global Status Change And Display
The modify command can also be used to display the current Global Status of the Automated Operator.
F CONSMSTR,STATUS
E:\Manuals\Product Manuals\ASO\OM (OPS Master)\Reference Guide\Current Release\OPS_C20.fm
The display may include additional information which is intended for CONSOLE/Master® Product support personnel.
Mantissa Corporation © 2013
Page - 381
Chapter 20
Advanced Functions
E:\Manuals\Product Manuals\ASO\OM (OPS Master)\Reference Guide\Current Release\OPS_C20.fm
Global Status Change And Display
OPS/MASTER®
Page - 382
Mantissa Corporation © 2013
RUN/Master®
Version 5.20.1
Mantissa Corporation®
1012 Edenton Street
Birmingham, Alabama 35242
OPS/MASTER®
OPS/Master® is a software product of Mantissa Corporation. All rights are reserved, and reproduction, use of, or distribution of this documentation is prohibited unless written consent is obtained from Mantissa Corporation. This document contains proprietary information and is intended for use only by licensees of OPS/Master® and those
evaluating its potential worth in their respective operating environment.
E:\Manuals\Product Manuals\ASO\OM (OPS Master)\Reference Guide\Current Release\SECT3cvr.fm
© Copywrite - Mantissa Corporation 1989-2013
Publication Information
Publication Name:
Publication Number
Release:
Mantissa Corporation © 2013
RUN/Master®
OPS002-JMIN
5.20.1
Page - 384
OPS/MASTER®
Chapter 21
Introduction to RUN/Master®
Overview
Chapter 21
Introduction to RUN/Master®
Overview
RUN/Master® is a sophisticated rerun management system designed to automatically
handle the manual tasks of restarting or rerunning a batch job.
RUN/Master® is a module of The Operations Productivity Systems (OPS/Master®) that
provides data center personnel with a significant tool for performing high level tasks, with
easy to use full screen dialogs. OPS/Master® is supported on all versions of MVS from
MVS/SP, MVS/ESA through z/OS.
E:\Manuals\Product Manuals\ASO\OM (OPS Master)\Reference Guide\Current Release\OPS_C21.fm
The system provides an online database and tracking facility which operates with an ISPF
dialog. The online system supports both an inquiry and edit feature to the RUN/Master®
database, which contains historic and real-time information on each production and rerun
job. The tracking facility is invaluable in analyzing production status and recurrent causes
of job resubmissions.
RUN/Master® automatically controls the entire job rerun procedure. It accounts for the
adjustment of GDG relative numbers and the uncataloging of datasets that are to be recreated in the rerun and dataset scratching. It also handles temporary datasets, volume referbacks and dsn referbacks that affect the step restartability of a job.
RUN/Master® utilizes expert systems technology which is used to build and maintain the
Knowledge Base. This Knowledge Base is then used to determine which steps of the failing job are restartable.
Features
Mantissa Corporation © 2013
•
Adjustment of GDG relative (bias) numbers.
•
Determination of restart step in an abended job.
•
Uncataloging of datasets that are to be recreated in the rerun.
•
Track temporary datasets, volume referbacks, and dsn referbacks that affect the
step restartability of a job.
•
ISPF based online access to the data base and system functions.
Page - 385
Chapter 21
OPS/MASTER®
Components
Introduction to RUN/Master®
•
Online verification/override of all restart functions performed.
Benefits
•
Decreases the amount of time it takes to recover in an abend situation.
•
Prevents errors that occur during reruns (such as uncataloging the wrong file,
JCL errors, or putting in the wrong GDG number).
•
Documents problem areas in the workload that have a history of abending with
the same cause. This helps reduce future abend/restart situations.
Components
The following diagram shows the various aspects of RUN/Master®:
RUN/Master®
On-line Assist Function
Profiles
Reports
Expert System Functions
JCL Interceptor
JCL/SMF Processor
Knowledge Base Creation
Job Indicator Flag
RUN/Master® will build restart entries for any job which has a ¢ (cent sign) in column 71
of the Job Card. The value chosen for this indicator flag can be changed during RUN/Master® control region initialization.
Page - 386
Mantissa Corporation © 2013
E:\Manuals\Product Manuals\ASO\OM (OPS Master)\Reference Guide\Current Release\OPS_C21.fm
SMF Interceptor
OPS/MASTER®
Chapter 21
Introduction to RUN/Master®
Starting the Control Region
Starting the Control Region
In order to initiate RUN/Master®, execute the procedure RUNMASTR, which you should
have modified and placed into your PROCLIB. For more information, refer to the Installation section of this manual.
RUN/Master® can be started in one of two ways.
1.
As a started task, issue the command:
S RUNMASTR
2.
As a batch job, place a JOB statement before the following execute statement:
//STEP1 EXEC RUNMASTR,PARM='CHAR=¢'
PARM Options:
CHAR=xxxx
Where x is the job indicator flag(s) which will be used in the job card. Up to four
values can be assigned. If JOB/Master® is installed, one of the characters
should be the same as the JOB/Master® character.
Stopping the Control Region
In order to stop the execution of RUN/Master®, issue the following command:
P RUNMASTR
Starting On-Line Sessions
To invoke RUN/Master® select option R on the OPS/Master® Primary Menu and press
<ENTER>.
--------Operations Productivity Systems - OPS/Master® by Mantissa v5.2.1------Option ===> R
J
J2
J3
J4
C
-
JOB/Master® (JM01
JOB/Master® (JM02
JOB/Master® (JM03
JOB/Master® (JM04
CONSOLE/Master®
PF1 = HELP
Prod.)
)
)
)
I
I2
I3
I4
R
X
-
Interactive
Interactive
Interactive
Interactive
RUN/Master®
EXIT
Security
Security
Security
Security
Facility
Facility
Facility
Facility
(JM01)
(JM02)
(JM03)
(JM04)
E:\Manuals\Product Manuals\ASO\OM (OPS Master)\Reference Guide\Current Release\OPS_C21.fm
User= P390K
Date= 98/09/10
98.253
Time= 16:25
OPSOPSOPSOPSOPSOPSOPSOPSOPSOPSOPSOPSOPSOPSOPSOPSOPSOPSOPSOPSOPSOPSOPSOPSOSPOPSO
OPSOPSOPSOPSOP
OPSOPSOPS
OPSOPSOPSOP
OPSOPSOPSOP
OPSOPSOPSOPSO
PSOPSOP
SOPSOPSO
SOPSOPS
OPSOPSOPS
OPSOPSO
PSOPSOPSOP
OPSOPSOPSOPS
OPSOPSO
PSOPSOPS
OPSOPSOP
SOPOPSOPO
SOPSOPS
OPSOPSOPSOP
OPSOPSOPSOP
SOPSOPS
OPSOPSOP
SOPSOPS
OPSOPSOPSOPS
OPSOPSOPSOPSOPSOPSOP
OPSOPSOPSO
PSOPSOP
SOPSOPSO
PSOPSOPSOPSOPSO
SOPSOPSOPSOPSOPSOP
OPSOPSOPS
OPSOPSO
PSOPSOPS
OPSOPSOPSOPSOPSOPS
OPSOPS
OPSOPSOPSOPSOPSOP
OPSOPSOP
SOPSOPS
OPSOPSOP
SOPSOPSOPSOPSOPSOP
SOPSOP
SOPSOPSOPSOPSOPSOP
OPSOPSO
SOPSOPSO
PSOPSOPSOPSOPSOPSOPS
PSOPSOPSOPSOPSOPSOP
OPSOPSOPSOPSOPSOPSOPSOPSOPSOPSOPSOPSOPSOPSOPSOPSOPSOPSOPSOPSOPSOPSOPSOPSOPSOPSO
OPSOPSOPSOPSOPSOPSOPSOPSOPSOPSOPSOPSOPSOPSOPSOPSOPSOPSOPSOPSOPSOPSOPSOPSOPSOPSO
Mantissa Corporation © 2013
Page - 387
Chapter 21
OPS/MASTER®
Starting On-Line Sessions
Introduction to RUN/Master®
The RUN/Master® Banner Panel will be displayed, as illustrated:
------------------------ RUN/Master® - By Mantissa -------------------------Option ===> A
A - On-Line Assist
R - Reports
P - Profile
X - EXIT
z/OS
Tutorial = PF1/HELP
------------------------------------------------------------------------------RRRRRRRR
UU
UU
NNN
NN
RR
RR
UU
UU
NNNN
NN
RR
RR
UU
UU
NN NN
NN
RRRRRRRR
UU
UU
NN NN NN
RR RR
UU
UU
NN
NN NN
RR
RR
UU
UU
NN
NNNN
RR
RR
UUUUUUUU
NN
NNN
MMM
MMM
AAAAAAAA
SSSSSSS
TTTTTTTT
EEEEEEEE
RRRRRRR
MM M M MM
AA
AA
SS
SS
TT
EE
RR
RR
MM M M MM
AA
AA
SS
TT
EE
RR
RR
MM MM MM
AAAAAAAA
SSSSS
TT
EEEEEEEE
RRRRRRRR
MM
MM
AA
AA
SS
TT
EE
RR RR
MM
MM
AA
AA
SS
SS
TT
EE
RR
RR
MM
MM
AA
AA
SSSSSSS
TT
EEEEEEEEE
RR
RR
F1=HELP
F7=UP
F2=SPLIT
F8=DOWN
F3=END
F9=SWAP
F4=RETURN
F10=LEFT
F5=RFIND
F11=RIGHT
F6=RCHANGE
F12=RETRIEVE
Enter A in the OPTION ==> field to access the On-line Assist feature.
Enter P in the OPTION ==> field to access the profile screens.
Enter R in the OPTION ==> field to access the report feature.
Enter X on the RUN/Master® Banner Panel to exit RUN/Master®.
These options are described on the following pages.
The function keys must be set (using option P;1) before other RUN/Master®
functions can be used. Refer to the chapter “Profiles” for information on how
to do this.
RUN/Master® provides an interactive HELP facility via standard convention of PF1 or
the ISPF HELP command. The HELP/Tutorial mode can be entered from any online
screen by pressing the PF1 key.
When a message is displayed in the upper right corner, a brief explanation can be displayed by pressing the PF1 key. If the PF1 key is pressed a second time, a tutorial screen is
displayed.
If the PF1 key is pressed when there is no message in the upper right corner, then a tutorial
screen is displayed immediately.
Page - 388
Mantissa Corporation © 2013
E:\Manuals\Product Manuals\ASO\OM (OPS Master)\Reference Guide\Current Release\OPS_C21.fm
)
OPS/MASTER®
Chapter 22
On-line Assist Functions
Starting the On-line Assist Functions
Chapter 22
On-line Assist Functions
Starting the On-line Assist Functions
To invoke the On-line Assist Function, select option A from the RUN/Master® Banner
panel (as shown below) and press <ENTER>.
-------------------------- RUN/Master® - by Mantissa -------------------------Option ===> A
A - On-Line Assist
R - Reports
P - Profile
X - EXIT
OS/390
Tutorial = PF1/HELP
------------------------------------------------------------------------------RRRRRRRR
UU
UU
NNN
NN
RR
RR
UU
UU
NNNN
NN
RR
RR
UU
UU
NN NN
NN
RRRRRRRR
UU
UU
NN NN NN
RR RR
UU
UU
NN
NN NN
RR
RR
UU
UU
NN
NNNN
RR
RR
UUUUUUUU
NN
NNN
E:\Manuals\Product Manuals\ASO\OM (OPS Master)\Reference Guide\Current Release\OPS_C22.fm
MMM
MMM
AAAAAAAA
SSSSSSS
TTTTTTTT
EEEEEEEE
RRRRRRR
MM M M MM
AA
AA
SS
SS
TT
EE
RR
RR
MM M M MM
AA
AA
SS
TT
EE
RR
RR
MM MM MM
AAAAAAAA
SSSSS
TT
EEEEEEEE
RRRRRRRR
MM
MM
AA
AA
SS
TT
EE
RR RR
MM
MM
AA
AA
SS
SS
TT
EE
RR
RR
MM
MM
AA
AA
SSSSSSS
TT
EEEEEEEEE
RR
RR
F1=HELP
F7=UP
Mantissa Corporation © 2013
F2=SPLIT
F8=DOWN
F3=END
F9=SWAP
F4=RETURN
F10=LEFT
F5=RFIND
F11=RIGHT
F6=RCHANGE
F12=RETRIEVE
Page - 389
Chapter 22
OPS/MASTER®
Starting the On-line Assist Functions
On-line Assist Functions
The RUN/Master® On-Line Assist panel will then be displayed, as illustrated below.
-------------------- RUN/Master® - On-Line Assist Functions -------------------Command =>
Restart Assist For Job ==>
(Enter Jobname of Generic Jobname)
Only Failed Jobs Y
from 97271 (YYDDD) to 97272 (YYDDD)
Log Review Facility ==>
User= P390K
Date= 97/09/29
(L,J)
97.272
Time= 14:24
RMRMRMRMRMRMRMRMRMRMRMRMRMRMRMRMRMRMRMRMRMRMRMRMRMRMRMRMRMRMRMRMRMRMRMRMRMRMRMRM
RMRMRMRMRMRMRMRMRMRMRMRMRMRMRMRMRMRMR MRMRMRMRMRMRMRMRMRMRMRMRMRMRMRMRMRMRMRMRM
RMRMRMRMRMRMRMRMRMRMR
MRMRM RMRMRM
MRM
MRMRMRMRMRMRMRMRMRMRMRM
RMRMRMRMRMRMRMRMRMRM
MRMRM
MRMR MRMRMR
R M R
RMRMRMRMRMRMRMRMRMRMRMRM
RMRMRMRMRMRMRMRMRMR
RMRMR
RMRM RMRMRM
MR R RM
MRMRMRMRMRMRMRMRMRMRMRMRM
RMRMRMRMRMRMRMRMRM
RMRMR MRMRMR
RMR MR
RMRMRMRMRMRMRMRMRMRMRMRMRM
RMRMRMRMRMRMRMRMR
R
RMRMRMRM RMRMRM
MRMRMRM
MRMRMRMRMRMRMRMRMRMRMRMRMRM
RMRMRMRMRMRMRMRM
MRM
MRMRMR MRMRMR
MRMRMRM
RMRMRMRMRMRMRMRMRMRMRMRMRMRM
RMRMRMRMRMRMRMR
RMRMR
RMRM RMRMRM
RMRMRMR
MRMRMRMRMRMRMRMRMRMRMRMRMRMRM
RMRMRMRMRMRMRMRMRMRMRMRMRMRMRMRMRMRMRMRMRMRMRMRMRMRMRMRMRMRMRMRMRMRMRMRMRMRMRMRM
F1=HELP
F7=UP
F2=SPLIT
F8=DOWN
F3=END
F9=SWAP
F4=>CONFIRM F5=>CANCEL
F10=
F11=
F6=RCHANGE
F12=RETRIEVE
From this screen, jobs can be selected for restart processing, or historical run data can be
displayed. In addition, RUN/Master® messages that were logged can be reviewed. These
selections can be limited by date range and can represent all jobs or only failed jobs.
RESTART ASSIST FOR JOB
Page - 390
VALUE
ACTION
Blank
Will list jobs on the JOB/Master® schedule queue.
*
Will list jobs from the RUN/Master® database.
Jobname
Will select a specific job from the RUN/Master data base.
JJJ*
Generic jobname. Any job from the RUN/Master database
matching the jobname characters (represented by JJJ) entered
up to the * will be listed for selection.
Mantissa Corporation © 2013
E:\Manuals\Product Manuals\ASO\OM (OPS Master)\Reference Guide\Current Release\OPS_C22.fm
This field is used to specify the job to be restarted. The values which can be
entered in this field and the resulting action are listed below:
OPS/MASTER®
Chapter 22
On-line Assist Functions
Starting the On-line Assist Functions
The following chart shows which fields are required based on what type of Jobname is entered:
JOBNAME
DAILY
FAILED
JOBS
FROM DATE
TO DATE
(blank)
A
N/A
N/A
*
A
A
A
JOBNAME
A
A
A
JJJ*
A
A
A
Log
N/A
A
A
A = applies
N/A = not applicable
ONLY FAILED JOBS
Enter Y to cause the selection being performed to be limited to failed jobs. Enter
N to select all jobs.
FROM
This field specifies the lower bound date for the specified restart selection.
TO
This field specifies the upper bound date for the specified restart selection.
LOG REVIEW FACILITY
E:\Manuals\Product Manuals\ASO\OM (OPS Master)\Reference Guide\Current Release\OPS_C22.fm
This field specifies the type of selection from the history file. Place an L in this
field to select a display of the RUN/Master® log. Place a J in this field to display
job run data. These options will be discussed later in this chapter in the section
entitled, “RUN/Master® Audit Trail”.
Mantissa Corporation © 2013
Page - 391
Chapter 22
OPS/MASTER®
Starting the On-line Assist Functions
On-line Assist Functions
The following list of jobs on the JOB/Master® Schedule Queue is displayed if no jobname
or log review facility parameter is specified on the ON-LINE ASSIST FUNCTIONS
screen.
------------------ RUN/Master® JOBQ Selection For Restart Jobs ----------------Command ===>
Scroll =
--------------------- Date= 97/09/29 97.272 Time= 14:51 --------------------S
Job
| Date |Time| ALTDEF |
Wait Reason
- -------- ------ ---- -------- --------------------------------------------- LOOPDRV9 97271 0828
J01889 ** FAILED ** -> STEP1
CC= 009
******************************* Bottom of data ********************************
F1=HELP
F7=UP
F2=SPLIT
F8=DOWN
F3=END
F9=SWAP
F4=>CONFIRM
F10=
F5=>CANCEL
F11=
F6=RCHANGE
F12=RETRIEVE
E:\Manuals\Product Manuals\ASO\OM (OPS Master)\Reference Guide\Current Release\OPS_C22.fm
You can then select a job(s) for restart processing by entering an S in the Select Column
(labeled S) and the TABLE OF RESTART JOBNAMES is displayed, as shown on the
next page.
Page - 392
Mantissa Corporation © 2013
OPS/MASTER®
Chapter 22
On-line Assist Functions
Table of Restart Jobnames
Table of Restart Jobnames
This screen lists all abended jobs that were selected for restart.
Now select a specific job to display the TABLE OF STEPNAMES by entering S in the
Select column next to the desired job. Then press (PF4) (CONFIRM) to continue restart
processing.
-------------------- RUN/Master® - Table of Restart Jobnames ------------------Command ===>
Scroll ===> CSR
------------------------------------------------------------------------------Auto
Res
JES
Reader
Ended
Completion
S
Jobname
Restart Flag Jobno
Date Time
Date Time
Code
-------- ------- ---- --------- -------- ------------LOOPDRV9
01889
97271 0828
97271 0828
CC= 0099
******************************* Bottom of data ********************************
F1=HELP
F7=UP
F2=SPLIT
F8=DOWN
F3=END
F9=SWAP
F4=>CONFIRM
F10=
F5=>CANCEL
F11=
F6=RCHANGE
F12=RETRIEVE
AUTO RESTART
The auto restart option can be overriden for a job by changing the flag to Y or N
on this panel. The designation will remain in effect until changed. The values N
and null both indicate no auto restart.
See the discussion of Auto Restart in the Profile Chapter. Do not use unless
instructed to do so.
E:\Manuals\Product Manuals\ASO\OM (OPS Master)\Reference Guide\Current Release\OPS_C22.fm
RES FLAG
If the restart flag is shown as Y, the job has been restarted, but the restarted job
has not run yet.
JES JOBNO
The number assigned to the job by JES.
READER DATE/TIME has not run yet
The reader date and time fields reflect the date and time the job was read into the
system when it first failed. Restart processing does not update these fields.
ENDED DATE/TIME
Date and time of when the job ended.
COMPLETION CODE
Mantissa Corporation © 2013
Page - 393
Chapter 22
OPS/MASTER®
Table of Stepnames
On-line Assist Functions
Overall job completion code. Completion code SYS indicates system ABEND,
CC indicates a program-assigned cond. code, USR is a user-assigned abend code.
The END command can be used at any point in the process to terminate restart processing.
The CONFIRM command is used at each point to continue restart processing.
Table of Stepnames
The Table of Stepnames screen lists all the steps for the job selected from the Table of
Restart Jobnames screen.
The member field is the member name of the JCL in the PDS. You must verify that the
correct rerun PDS and member name is displayed. If either name is incorrect, you must
overtype the name with the correct PDS or member name.
----------------------- RUN/Master® - Table of Stepnames ---- Row 1 to 10 of 11
Command ===>
Scroll ===> CSR
For Job => SI9010
Assign Rerun To = ______ Dept./Loc.
Rerun Reason ==> _______________________________________________________
Rerun PDS ==> OPS.PROD.JMSTGPDS___________________________ ( SI9010__ )<=
Staging
==> Y
Start Procstep:
Start Step: STEP11
End Procstep:
End Step: STEP10
------------------------------------------------------------------------------S
Procstep
Step
Compcode
Decision Support Information
-------- -------- --------- --------------------------------------_
STEP11
CC= 0000
_
STEP02
CC= 0000
_
STEP03
NOEXEC
_
STEP04
_
STEP05
NOEXEC
_
STEP05A
_
STEP06
_
STEP07
_
STEP08
_
STEP09
F1=HELP
F7=UP
F2=SPLIT
F8=DOWN
F3=END
F9=SWAP
F4=>CONFIRM F5=>CANCEL
F10=
F11=
F6=RCHANGE
F12=RETRIEVE
FOR JOB
This field displays the name of the restart job.
A user-defined code can be entered in this field representing the department or
location that is responsible for the rerun. This data can be used for reporting purposes.
RERUN REASON
The rerun reason can be assigned by entering a rerun reason code. The rerun reason codes are defined in the profile menu, option-4 “Update Rerun Reason
Codes”. If the code is not known, a question mark (?) in this field will display the
table for selection of the code.
RERUN PDS
The rerun PDS field is the name of the dataset where the original JCL for this run
is stored.
Page - 394
Mantissa Corporation © 2013
E:\Manuals\Product Manuals\ASO\OM (OPS Master)\Reference Guide\Current Release\OPS_C22.fm
ASSIGN RERUN TO = (DEPT./LOC.)
OPS/MASTER®
Chapter 22
On-line Assist Functions
Table of Stepnames
STAGING
Indicates whether member is in staging PDS (Y or N).
)
The default for this flag is in each user’s ISF record for RUN/Master®.
START/END PROCSTEP
These fields are used to indicate the name of the first and last proc steps to be run.
These fields are changed by entering S or E in the S(select) column next to the
desired jobstep in the table described below.
START/END STEP
These fields are used to indicate the start and end jobsteps to be run. These fields
are changed by entering S or E in the S(select) column next to the desired jobstep
in the table described below.
TABLE ENTRIES
Steps may be selected for bypass and/or inclusion in the restart process by using the Select
(S) field described below:
S (SELECT)
The selection characters define to RUN/Master® which steps are to be RERUN.
They will update the START/END STEP|PROCSTEP fields above. The following values can be entered in this field:
S
Specify Start step.
E
Specify End step.
B
Bypass Step.
PROCSTEP
This column displays the stepname given to the execute statement that executes
this PROC.
STEP
E:\Manuals\Product Manuals\ASO\OM (OPS Master)\Reference Guide\Current Release\OPS_C22.fm
This column displays the stepname within the PROC.
COMPCODE
This column displays the step completion code. SYS indicates system ABEND,
CC indicates a program-assigned condition code, USR indicates a user-assigned
ABEND code.
DECISION SUPPORT INFORMATION
This field provides information on the step’s restartability (i.e., “VSAM File
Updated”).
By pressing the ENTER key, the selected steps are updated and the Decision Support
Information field is updated. ENTER must be pressed to update the variables before confirming or canceling. Pressing the PF4(CONFIRM) will tell RUN/Master® to continue
with recovery Assist Processing.
Mantissa Corporation © 2013
Page - 395
Chapter 22
OPS/MASTER®
Online Assist JCL Processing
On-line Assist Functions
Online Assist JCL Processing
Once the steps have been selected for processing, the Table of Replacement JCL will be
displayed. Before pressing <PF4> to CONFIRM the replacement JCL, you may want to
view the actions to be taken for restart processing or the job’s original JCL.
•
To display the Table of Restart Actions, enter MESSAGES in the
COMMAND ==> field.
•
To display the Table of Original JCL, enter OLDJCL in the
COMMAND ==> field.
•
To re-display the Replacement JCL, enter NEWJCL in the
COMMAND ==> field.
Pressing CONFIRM once from any of these three tables brings up the Post Confirmation
panel.
)
You can only display the Restart Actions and Original JCL before confirming
the new JCL (shown in the Table of Replacement JCL).
Table of Replacement JCL
The replacement JCL screen displays the JCL that will be submitted to rerun the job.
The restart JCL will be displayed as follows:
.
Page - 396
F1=HELP
F7=UP
. . .
.
F2=SPLIT
F8=DOWN
. . .
.
F3=END
F9=SWAP
. . .
.
.
F4=>CONFIRM F5=>CANCEL
F10=
F11=
. . . . . . . .
F6=RCHANGE
F12=RETRIEVE
. . . . .
Mantissa Corporation © 2013
E:\Manuals\Product Manuals\ASO\OM (OPS Master)\Reference Guide\Current Release\OPS_C22.fm
Edit ----- P390K.SPFTEMP1.CNTL---------------------------- COLUMNS 00001 00072
Command ===>
Scroll ===> PAGE
****** ***************************** Top of Data ******************************
000001 //SI9010
JOB (D1001910,PD,RQ,N1,DA000124),'PROD',
¢
000002 //
REGION=3072K,MSGCLASS=X,CLASS=A,
000003 //
MSGLEVEL=(1,1),
000004 // RESTART=STEP02
000005 //**********************************************************************
000006 //STEP01
EXEC PGM=LOOPDRV,PARM='001,0000,001'
000007 //STEPLIB DD DSN=OPS.PROD.LOADLIB,DISP=SHR
000008 //**
000009 //** THIS STEP STOPS THE SALES INFORMATION DATABASES
000010 //**
000011 //**********************************************************************
000012 //STEP02
EXEC PGM=LOOPDRV,PARM='001,0000,001'
000013 //STEPLIB DD DSN=OPS.PROD.LOADLIB,DISP=SHR
000014 //**
000015 //** QUIESCE TABLESPACES FOR THE SALES INFORMATION SYSTEM
000016 //**
000017 //**********************************************************************
OPS/MASTER®
Chapter 22
On-line Assist Functions
Online Assist JCL Processing
Table of Restart Actions
This table displays the actions that will be taken to restart the job and can be displayed by
entering MESSAGES in the COMMAND ==> field of the Table of Replacement JCL
Screen.
To display the Original JCL, enter OLDJCL in the COMMAND ==> field.
To display the Replacement JCL, enter NEWJCL in the COMMAND ==> field.
RUN/Master® Table of Action results as shown below in illustration screen:
------------------------ RUN/Master® - Table of Actions ------- Row 1 to 8 of 8
Command ===>
Scroll ===> CSR
Restart Job: SI9010__ Start Step: STEP02
Start Procstep:
End Step: STEP11
End Procstep:
------------------------------------------------------------------------------Actions To Be Taken For Restart Processing
------------------------------------------------------------------------------_
RM27 I RESTART ANALYSIS
JOB SI9010
_
RM24 A RC
SCRATCH DSN=TRSJ.TEMP.IBKUP2(+1)
_
RM24 A RC
SCRATCH DSN=TRSJ.TEMP.IBKUP3(+1)
_
RM24 A RC
SCRATCH DSN=TRSJ.TEMP.IBKUP4(+1)
_
RM24 A RC
SCRATCH DSN=TRSJ.TEMP.IBKUP5(+1)
_
RM24 A RC
SCRATCH DSN=TRSJ.TEMP.IBKUP6(+1)
_
RM24 A RC
SCRATCH DSN=TRSJ.TEMP.IBKUP7(+1)
_
RM28 I END OF RESTART ANALYSIS
******************************* Bottom of data ********************************
F1=HELP
F7=UP
. . .
.
F2=SPLIT
F8=DOWN
. . .
.
F3=END
F9=SWAP
. . .
.
F4=>CONFIRM F5=>CANCEL
F6=RCHANGE
F10=
F11=
F12=RETRIEVE
. . . . . . . . . . . . . .
E:\Manuals\Product Manuals\ASO\OM (OPS Master)\Reference Guide\Current Release\OPS_C22.fm
.
Mantissa Corporation © 2013
Page - 397
Chapter 22
OPS/MASTER®
Online Assist JCL Processing
On-line Assist Functions
Table of Original JCL
This table displays the job’s original JCL and can be accessed by entering OLDJCL in the
COMMAND field of the Table of Replacement JCL Screen.
To display the restart actions, enter MESSAGES in the COMMAND field.
To display the Replacement JCL, enter NEWJCL in the COMMAND field.
Edit ----- P390K.SPFTEMP1.CNTL---------------------------- COLUMNS 00001 00072
Command ===>
Scroll ===> PAGE
****** ***************************** Top of Data ******************************
000001 //SI9010
JOB (D1001910,PD,RQ,N1,DA000124),'PROD',
¢
000002 //
REGION=3072K,MSGCLASS=X,CLASS=A,
000003 //
MSGLEVEL=(1,1),
000004 // RESTART=STEP02
000005 //**********************************************************************
000006 //STEP01
EXEC PGM=LOOPDRV,PARM='001,0000,001'
000007 //STEPLIB DD DSN=OPS.PROD.LOADLIB,DISP=SHR
000008 //**
000009 //** THIS STEP STOPS THE SALES INFORMATION DATABASES
000010 //**
000011 //**********************************************************************
000012 //STEP02
EXEC PGM=LOOPDRV,PARM='001,0000,001'
000013 //STEPLIB DD DSN=OPS.PROD.LOADLIB,DISP=SHR
000014 //**
000015 //** QUIESCE TABLESPACES FOR THE SALES INFORMATION SYSTEM
000016 //**
000017 //**********************************************************************
F1=HELP
F7=UP
. . .
.
F2=SPLIT
F8=DOWN
. . .
.
F3=END
F9=SWAP
. . .
.
.
F4=>CONFIRM F5=>CANCEL
F10=
F11=
. . . . . . . .
F6=RCHANGE
F12=RETRIEVE
. . . . .
E:\Manuals\Product Manuals\ASO\OM (OPS Master)\Reference Guide\Current Release\OPS_C22.fm
.
Page - 398
Mantissa Corporation © 2013
OPS/MASTER®
Chapter 22
On-line Assist Functions
Table of Actions - Postconfirmation
Table of Actions - Postconfirmation
Entering CONFIRM from any of the previous three screens (Table of Replacement JCL,
Table of Restart Actions, Table of Original JCL) will cause the actions specified for backout of this job to be performed. The Table of Actions - Postconfirmation panel will then be
displayed with an indication of the completion of each action. After completion of the
actions, the CONFIRM command must be entered.
------------------------ RUN/Master® - Table of Actions ------- Row 1 to 8 of 8
Command ===>
Scroll ===> CSR
Restart Job: SI9010__
Start Step: STEP02
Start Procstep:
End Step: STEP11
End Procstep:
------------------------------------------------------------------------------Actions To Be Taken For Restart Processing
------------------------------------------------------------------------------_
RM27 I RESTART ANALYSIS
JOB SI9010
_
RM24 A RR01 SCRATCH DSN=TRSJ.TEMP.IBKUP2(+1)
_
RM24 A RR01 SCRATCH DSN=TRSJ.TEMP.IBKUP3(+1)
_
RM24 A RR01 SCRATCH DSN=TRSJ.TEMP.IBKUP4(+1)
_
RM24 A RR01 SCRATCH DSN=TRSJ.TEMP.IBKUP5(+1)
_
RM24 A RR01 SCRATCH DSN=TRSJ.TEMP.IBKUP6(+1)
_
RM24 A RR01 SCRATCH DSN=TRSJ.TEMP.IBKUP7(+1)
_
RM28 I END OF RESTART ANALYSIS
******************************* Bottom of data ********************************
.
F1=HELP
F7=UP
. . .
.
F2=SPLIT
F8=DOWN
. . .
.
F3=END
F9=SWAP
. . .
.
.
F4=>CONFIRM F5=>CANCEL
F10=
F11=
. . . . . . . .
F6=RCHANGE
F12=RETRIEVE
. . . . .
The actions required to be taken for backout processing can be terminated by entering the
END command. In order to perform backout processing, you must enter CONFIRM in the
COMMAND ==> field.
E:\Manuals\Product Manuals\ASO\OM (OPS Master)\Reference Guide\Current Release\OPS_C22.fm
When backout processing is complete the table of actions is redisplayed. The RC (Return
Code) value next to each action will indicate the completion of that action. A non-zero
return code is an indication that the function did not need to be performed; i.e., the dataset
was already scratched or uncataloged. The Return Code consists of 4-bytes. The first byte
is always an ‘R’; the second byte indicates the failing function.
R = REQUEST ERROR
S = SCRATCH ERROR
U = UNCATALOG ERROR
The final two bytes are the return codes from the “scratch” or “catalog” macros for the S
and U function. If function = R, then Ø1 (one) is trying to scratch a tape; Ø2 (two) is no
DSN to process.
To continue, enter CONFIRM in the COMMAND ==> field. The JCL submit screen will
then be displayed.
Mantissa Corporation © 2013
Page - 399
Chapter 22
OPS/MASTER®
Submit JCL Screen
On-line Assist Functions
Submit JCL Screen
This screen displays the JCL that will be used to rerun the job.
Edit ----- P390K.SPFTEMP1.CNTL---------------------------- Columns 00001 00072
Command ===>
Scroll ===> PAGE
****** ***************************** Top of Data ******************************
000001 //SI9010
JOB (D1001910,PD,RQ,N1,DA000124),'PROD',
¢
000002 //
REGION=3072K,MSGCLASS=X,CLASS=A,
000003 //
MSGLEVEL=(1,1),
000004 // RESTART=STEP02
000005 //**********************************************************************
000006 //STEP01
EXEC PGM=LOOPDRV,PARM='001,0000,001'
000007 //STEPLIB DD DSN=OPS.PROD.LOADLIB,DISP=SHR
000008 //**
000009 //** THIS STEP STOPS THE SALES INFORMATION DATABASES
000010 //**
000011 //**********************************************************************
000012 //STEP02
EXEC PGM=LOOPDRV,PARM='001,0000,001'
000013 //STEPLIB DD DSN=OPS.PROD.LOADLIB,DISP=SHR
000014 //**
000015 //** QUIESCE TABLESPACES FOR THE SALES INFORMATION SYSTEM
000016 //**
000017 //**********************************************************************
.
F1=HELP
F7=UP
. . .
.
F2=SPLIT
F8=DOWN
. . .
.
F3=END
F9=SWAP
. . .
.
.
F4=>CONFIRM F5=>CANCEL
F10=
F11=
. . . . . . . .
F6=RCHANGE
F12=RETRIEVE
. . . . .
Enter SUB in the COMMAND ==> field to submit the job for rerun processing.
If the JCL is not submitted, the “R”estart flag in the database record will not be reset. The
next time this job is run, the system still believes this job is in restart status and will not
save anything but the new job number.
Ending the On-line Assist Functions
E:\Manuals\Product Manuals\ASO\OM (OPS Master)\Reference Guide\Current Release\OPS_C22.fm
Press the <END> key to terminate the On-line Assist Function and RETURN to RUN/
Master® Banner panel.
Page - 400
Mantissa Corporation © 2013
OPS/MASTER®
Chapter 22
On-line Assist Functions
RUN/Master® Audit Trail
RUN/Master® Audit Trail
The Audit Trail is displayed by entering L or J in the LOG REVIEW FACILITY ==> field
on the On-Line Assist Functions Panel and pressing <ENTER>. Use “Only Failed Jobs”
and From/To dates to tell RUN/Master what log data is presented.
-------------------- RUN/Master® - On-Line Assist Functions -------------------Command =>
Restart Assist For Job ==>
(Enter Jobname or Generic Jobname)
Only Failed Jobs Y
From 97272 (YYDDD) To 97273 (YYDDD)
Log Review Facility ==> L
User= P390K
Date= 97/09/30
(L,J)
97.273
Time= 11:20
RMRMRMRMRMRMRMRMRMRMRMRMRMRMRMRMRMRMRMRMRMRMRMRMRMRMRMRMRMRMRMRMRMRMRMRMRMRMRMRM
RMRMRMRMRMRMRMRMRMRMRMRMRMRMRMRMRMRMR MRMRMRMRMRMRMRMRMRMRMRMRMRMRMRMRMRMRMRMRM
RMRMRMRMRMRMRMRMRMRMR
MRMRM RMRMRM
MRM
MRMRMRMRMRMRMRMRMRMRMRM
RMRMRMRMRMRMRMRMRMRM
MRMRM
MRMR MRMRMR
R M R
RMRMRMRMRMRMRMRMRMRMRMRM
RMRMRMRMRMRMRMRMRMR
RMRMR
RMRM RMRMRM
MR R RM
MRMRMRMRMRMRMRMRMRMRMRMRM
RMRMRMRMRMRMRMRMRM
RMRMR MRMRMR
RMR MR
RMRMRMRMRMRMRMRMRMRMRMRMRM
RMRMRMRMRMRMRMRMR
R
RMRMRMRM RMRMRM
MRMRMRM
MRMRMRMRMRMRMRMRMRMRMRMRMRM
RMRMRMRMRMRMRMRM
RMR
RMRMRM RMRMRM
RMRMRMR
MRMRMMRMRMRMRMRMRMRMRMRMRMRM
RMRMRMRMRMRMRMRMRMRMRMRMRMRMRMRMRMRMRMRMRMRMRMRMRMRMRMRMRMRMRMRMRMRMRMRMRMRMRMRM
RMRMRMRMRMRMRMRMRMRMRMRMRMRMRMRMRMRMRMRMRMRMRMRMRMRMRMRMRMRMRMRMRMRMRMRMRMRMRMRM
F1=HELP
F7=UP
. . . .
F2=SPLIT
F8=DOWN
. . . .
.
F3=END
F9=SWAP
. . .
.
F4=>CONFIRM F5=>CANCEL
F10=
F11=
. . . . . . . . .
F6=RCHANGE
F12=RETRIEVE
. . . . .
E:\Manuals\Product Manuals\ASO\OM (OPS Master)\Reference Guide\Current Release\OPS_C22.fm
The Audit Trail Screen is then displayed. This panel displays the RUN/Master® log of
actions performed. This data can be scrolled using standard ISPF facilities.
Mantissa Corporation © 2013
Page - 401
Chapter 22
On-line Assist Functions
E:\Manuals\Product Manuals\ASO\OM (OPS Master)\Reference Guide\Current Release\OPS_C22.fm
RUN/Master® Audit Trail
OPS/MASTER®
Page - 402
Mantissa Corporation © 2013
OPS/MASTER®
Chapter 23
Profiles
Chapter 23
Profiles
The RUN/Master® Profile maintenance is selected by entering a P in the OPTION ==>
field of the RUN/Master® Banner Panel.
-------------------------- RUN/Master® - By Mantissa -----------------------Option ===> P
A - On-Line Assist
R - Reports
P - Profile
X - EXIT
OS/390
Tutorial = PF1/HELP
------------------------------------------------------------------------------RRRRRRRR
UU
UU
NNN
NN
RR
RR
UU
UU
NNNN
NN
RR
RR
UU
UU
NN NN
NN
RRRRRRRR
UU
UU
NN NN NN
RR RR
UU
UU
NN
NN NN
RR
RR
UU
UU
NN
NNNN
RR
RR
UUUUUUUU
NN
NNN
E:\Manuals\Product Manuals\ASO\OM (OPS Master)\Reference Guide\Current Release\OPS_C23.fm
MMM
MMM
AAAAAAAA
SSSSSSS
TTTTTTTT
EEEEEEEE
RRRRRRR
MM M M MM
AA
AA
SS
SS
TT
EE
RR
RR
MM M M MM
AA
AA
SS
TT
EE
RR
RR
MM MM MM
AAAAAAAA
SSSSS
TT
EEEEEEEE
RRRRRRRR
MM
MM
AA
AA
SS
TT
EE
RR RR
MM
MM
AA
AA
SS
SS
TT
EE
RR
RR
MM
MM
AA
AA
SSSSSSS
TT
EEEEEEEEE
RR
RR
F1=HELP
F7=UP
Mantissa Corporation © 2013
F2=SPLIT
F8=DOWN
F3=END
F9=SWAP
F4=RETURN
F10=LEFT
F5=RFIND
F11=RIGHT
F6=RCHANGE
F12=RETRIEVE
Page - 403
Chapter 23
OPS/MASTER®
Profiles
The next panel displayed is the RUN/Master® Profile Update/Display Options:
------------------ RUN/Master® Profile Update/Display Options --------------Command ===>
User= P390K
Date= 98/09/11
98.254
Option
Functional Description
Time= 11:57
----------------------------------------------1
Set PFKS
2
Display Profile Parameters
3
Update Profile Parameters
4
Update Rerun Reason Codes
END
Exit
Select 1 to set Program Function (PF) keys.
Select 2 to DISPLAY all Profile Parameters for a specific installation.
Select 3 to set Profile Parameters for a specific installation.
Select 4 to set Rerun Reason Codes for a specific installation.
The function keys must be set (using option 1) before other RUN/Master®
functions can be used.
E:\Manuals\Product Manuals\ASO\OM (OPS Master)\Reference Guide\Current Release\OPS_C23.fm
)
Page - 404
Mantissa Corporation © 2013
OPS/MASTER®
Chapter 23
Profiles
Profile Function Keys
Profile Function Keys
The PF keys can be set to conform to the standards specified at any installation. When
option 1 is selected from the RUN/Master® PROFILE/UPDATE DISPLAY OPTIONS
screen, the Profile PFK Definitions panel is displayed:
--------------------- RUN/Master® - Profile PFK Definitions ----------------Command ===>
PFK01=
PFK02=
PFK03=
PFK04=
PFK05=
PFK06=
PFK07=
PFK08=
PFK09=
PFK10=
PFK11=
PFK12=
HELP
SPLIT
END
>CONFIRM
>CANCEL
RCHANGE
UP
DOWN
SWAP
RETRIEVE
PFK13=
PFK14=
PFK15=
PFK16=
PFK17=
PFK18=
PFK19=
PFK20=
PFK21=
PFK22=
PFK23=
PFK24=
HELP
SPLIT
END
>CONFIRM
>CANCEL
RCHANGE
UP
DOWN
SWAP
>NEWJCL
>MESSAGES
>OLDJCLE
------------------------------------------------------------------------------JOB CARD FOR BATCH JCL
---------------------//P390K
JOB (0000,0000),’P390K
‘,CLASS=A,MSGCLASS=X
//*
//*
E:\Manuals\Product Manuals\ASO\OM (OPS Master)\Reference Guide\Current Release\OPS_C23.fm
The default PF keys are displayed, and can be modified by overtyping the desired function
next to the PF key number. The Jobcard at the bottom of the panel can also be modified to
your installations’ specifications. To exit this panel, enter CONFIRM or CANCEL in the
COMMAND ==> field and press <ENTER>.
Mantissa Corporation © 2013
Page - 405
Chapter 23
OPS/MASTER®
Profile Parameters
Profiles
Profile Parameters
This screen is displayed with option 2 (DISPLAY PROFILE PARAMETERS) and 3
(UPDATE PROFILE PARAMETERS) on the Profile Update/Display Options screen.
-------------- RUN/Master® - Profile Parameters ----------------------Command ===>
-------------------------------------------------------------------------Installation Name ==>
Procedure Name
==>
________________________________________
________
--------------------------------------------------------------------------
The Profile Parameters is a record used for the batch report feature of RUN/Master®.
INSTALLATION NAME
The installation name is a 30 character field that is used in the title of RUN/Master® reports.
PROCEDURE NAME
The procedure name is an 8 character field which names the PROCLIB member
used for execution of the batch reports.
This option is not shown on the distributed panel - SEE NOTE BELOW. The
Auto Restart Mode option automatically starts backout processing for all
abended jobs which are RUN/Master® controlled. Backout processing will
scratch and uncatalog datasets which will be created or cataloged in the current
run. Generation (GDG) datasets will not be affected. The “Repair Job” feature of
JOB/Master® can be used to handle datasets when a job abends. This could be a
more flexible way of backing out datasets.
The options specified on this screen are global and apply to all jobs. The options
can be overridden (or turned on or off) at the job level.
)
Page - 406
If you plan to use AUTO RESTART, contact Mantissa Product Support.
Mantissa Corporation © 2013
E:\Manuals\Product Manuals\ASO\OM (OPS Master)\Reference Guide\Current Release\OPS_C23.fm
AUTO RESTART MODE
OPS/MASTER®
Chapter 23
Profiles
Update Rerun Reason Codes
Update Rerun Reason Codes
This screen is displayed with option 4 (UPDATE RERUN REASON CODES) on the Profile Update/Display Options screen.
------------------------- RUN/Master®
Command ===>
Rerun CodeTable --------------------Scroll =CSR
--------------------------------------------------------------------------Rerun
S
Code
Rerun Reason Text
----- ------------------------------------------------------>>>>>> A
____ _______________________________________________________
************************** Bottom of daa********************************
A rerun reason can be specified for any job which is rerun. The code can be selected and
the associated text can be specified at the time the job is being restarted. The rerun code
table entries are added, updated, or deleted from this table display.
E:\Manuals\Product Manuals\ASO\OM (OPS Master)\Reference Guide\Current Release\OPS_C23.fm
Entries are added on the first line of this screen (indicated by an A in the Select column)
by specifying the RERUN CODE and any desired text for the RERUN REASON. Entries
can be updated by placing a U in the Selection column next to the code and overtyping the
reason text. Entries can be deleted by placing a D in the Selection ==> field next to the
code.
When table maintenance is complete, you must enter the CONFIRM command to exit this
function and update the table. The CANCEL command will exit this function without
recording the table updates.
Examples:
D037
Space exhausted
S722
Lines exceeded - check results
S222
Job cancelled by operations
1001
JOB/Master® user abend
Run/Masters predefined rerun reason codes.
RM20
F
RESTART JOB NOT FOUND xxxxxxxx
RM21
F
RESTART PROC/STEP NOT FOUND xxxxxxxx.xxxxxxxx
RM22
I
DATASET UPDATED PROC = 12345678 STEP = 12345678 DD = 12345678
Mantissa Corporation © 2013
Page - 407
Chapter 23
OPS/MASTER®
Run/Masters predefined rerun reason codes.
Profiles
RM23
F
CAN NOT RESTART THIS STEP TEMP DSN DD = 12345678
RM24
A
RC SCRATCH DSN= xxxxxxxxxxxxxxxxxxxxxxxxxx vvvvvvv uuuu
RM25
I
OVERIDE PROC = xxxxxxxx STEP = xxxxxxxx DD = xxxxxxxx
RM26
I
PARAMETER OVERIDDEN DSN = xxxxxxxx....
RM27
I
RESTART ANALYSIS
RM28
I
END OF RESTART ANALYSIS
RM29
I
JCL UPDATED PROC = xxxxxxxx STEP = xxxxxxxx DD = xxxxxxxx
RM30
I
FIRST JCL RECORD NOT JOB CARD
RM31
F
JCLMERGE FAILED PROC = xxxxxxxx STEP = xxxxxxxx DD = xxxxxxxx
RM32
I
DATA SET SCRATCHED
RM33
I
DATA SET UNCATALOGED
JOB = xxxxxxxx
DSN = xxxxxxxx....
E:\Manuals\Product Manuals\ASO\OM (OPS Master)\Reference Guide\Current Release\OPS_C23.fm
DSN = xxxxxxxx....
Page - 408
Mantissa Corporation © 2013
OPS/MASTER®
Chapter 24
Report Facility
Initiating the Report Facility
Chapter 24
Report Facility
Initiating the Report Facility
)
The Reporting Function is not currently implemented.
The Report Facility is accessed by selecting option R on the RUN/Master® Banner panel.
----------------------- RUN/Master® - By Mantissa -------------------------Option ===> R
E:\Manuals\Product Manuals\ASO\OM (OPS Master)\Reference Guide\Current Release\OPS_C24.fm
A - On-Line Assist
R - Reports
P - Profile
X - EXIT
z/OS
Tutorial = PF1/HELP
------------------------------------------------------------------------------RRRRRRRR
UU
UU
NNN
NN
RR
RR
UU
UU
NNNN
NN
RR
RR
UU
UU
NN NN
NN
RRRRRRRR
UU
UU
NN NN NN
RR RR
UU
UU
NN
NN NN
RR
RR
UU
UU
NN
NNNN
RR
RR
UUUUUUUU
NN
NNN
MMM
MMM
AAAAAAAA
SSSSSSS
TTTTTTTT
EEEEEEEE
RRRRRRR
MM M M MM
AA
AA
SS
SS
TT
EE
RR
RR
MM M M MM
AA
AA
SS
TT
EE
RR
RR
MM MM MM
AAAAAAAA
SSSSS
TT
EEEEEEEE
RRRRRRRR
MM
MM
AA
AA
SS
TT
EE
RR RR
MM
MM
AA
AA
SS
SS
TT
EE
RR
RR
MM
MM
AA
AA
SSSSSSS
TT
EEEEEEEEE
RR
RR
F1=HELP
F7=UP
F2=SPLIT
F8=DOWN
F3=END
F9=SWAP
F4=RETURN
F10=LEFT
F5=RFIND
F11=RIGHT
F6=RCHANGE
F12=RETRIEVE
The next panel displayed is the RUN/Master® Report Facility Menu.
Mantissa Corporation © 2013
Page - 409
Chapter 24
OPS/MASTER®
Initiating the Report Facility
Report Facility
.
------------------------ RUN/Master® Report Facility ----------------------User= P390K
Command ===>
Date= 98/09/11
98.254
Time= 12:30
Option ==>
1
Option
-------1 - Prt
Functional Description
-------------------------------------------Database Listing - All
This panel allows the user to select the type of report, or package of all reports currently
provided by RUN/Master®. The first selection, 1 (PRT), allows the user to print all available reports. It can be selected either by keying 1 or PRT in the OPTION ==> field.
The next panel to be displayed is the Job Submit panel for the report option selected. This
panel is an ISPF-style edit panel that allows the user to modify the JCL as required. The
standard ISPF submit convention is used by entering SUB in the COMMAND ==> field
once the JCL reads as desired.
------------- RUN/Master® Report Submit Facility ------------- Columns 000 000
Command ===>
Scroll ===> Page
****** ***************************** Top of Data ******************************
000001 //P390K
JOB (0000,0000),'P390K
',CLASS=A,MSGCLASS=X
000002 //*
000003 //
EXEC
000004 //STEP2.FILE715 DD *
000005 PRINT PRT
000006 /*
****** **************************** Bottom of Data ****************************
.
Page - 410
F1=HELP
F7=UP
. . .
.
F2=SPLIT
F8=DOWN
. . .
.
F3=END
F9=SWAP
. . .
.
F4=>CONFIRM F5=>CANCEL
F6=RCHANGE
F10=
F11=
F12=RETRIEVE
. . . . . . . . . . . . . .
Mantissa Corporation © 2013
E:\Manuals\Product Manuals\ASO\OM (OPS Master)\Reference Guide\Current Release\OPS_C24.fm
This JCL, when submitted, will print the report information.
OPS/MASTER®
Chapter 25
Technical Specifications
Architecture
Chapter 25
Technical Specifications
Architecture
The RUN/Master® product for MVS systems provides automatic capture of JCL images
which are used to maintain a Knowledge Base which supports the restart processing.
E:\Manuals\Product Manuals\ASO\OM (OPS Master)\Reference Guide\Current Release\OPS_C25.fm
The RUN/Master® system consists primarily of:
•
JCL Interceptor, which captures all JCL and passes a copy of the JCL image to
the RUN/Master® control region for further processing.
•
SMF Interceptor, which captures selected SMF records and passes a copy of the
required SMF data to the RUN/Master® control region.
•
The RUN/Master® control region is a control task that handles all JCL and
selected SMF data and performs automatic Knowledge Base creation. The RUN/
Master® controller must be active at all times for JCL Interceptor, SMF Interceptor and JCL/SMF Processor to perform its functions, and must be active on each
CPU (in a multi CPU environment) where automated job restarts are desired.
•
On-line Assist Functions, which are a set of ISPF dialogs for viewing the selection of abended jobs. The jobs may be restarted via easy to use selection panels.
The dialogs include Knowledge Base override processing as well as automated
reports.
Machine and Software Environment
RUN/Master® operates on any IBM processor or IBM-compatible processor that meets
the following requirements:
Mantissa Corporation © 2013
•
MVS release 3.8 MVS/ESA through z/OS with the Time Sharing Option (TSO),
and ISPF release 2.0 or higher.
•
Access methods, QSAM, VSAM.
•
IBM or IBM-compatible display terminals. Any terminals supported by ISPF can
be used by RUN/Master®.
Page - 411
Chapter 25
OPS/MASTER®
Machine and Software Environment
Technical Specifications
Approximately 10 cylinders of IBM 3380 DASD space for installation.
•
Approximately 50 cylinders of IBM 3380 DASD space for data files and production use.
•
The RUN/Master® control region task must execute from an APF authorized
library, and execute in a region size of 4096K.
E:\Manuals\Product Manuals\ASO\OM (OPS Master)\Reference Guide\Current Release\OPS_C25.fm
•
Page - 412
Mantissa Corporation © 2013
OPS/MASTER®
Chapter 26
File Backup and Recovery
Backing Up Files
Chapter 26
File Backup and Recovery
Backing Up Files
Job RMBACKUP, which is available as member RMBACKUP in the INSTLIB data set,
will back up the RUN/Master® data base.
To back up the data base, modify the JCL in member RMBACKUP according to your
installation standards and submit for execution.
)
RUN/Master® Knowledge Base should be backed up regularly.
Restoring Files
Job RMRESTOR in the INSTLIB data set will restore the RUN/Master® data base.
E:\Manuals\Product Manuals\ASO\OM (OPS Master)\Reference Guide\Current Release\OPS_C26.fm
To restore the data base, modify the JCL in member RMRESTOR according to your
installation standards and submit for execution.
Mantissa Corporation © 2013
Page - 413
Chapter 26
File Backup and Recovery
E:\Manuals\Product Manuals\ASO\OM (OPS Master)\Reference Guide\Current Release\OPS_C26.fm
Restoring Files
OPS/MASTER®
Page - 414
Mantissa Corporation © 2013
SECURITY ADMIN
Release 5.20.1
Mantissa Corporation®
1012 Edenton Street
Birmingham, Alabama 35242
OPS/MASTER®
OPS/Master® is a software product of Mantissa Corporation. All rights are reserved, and reproduction, use of, or distribution of this documentation is prohibited unless written consent is obtained from Mantissa Corporation. This document contains proprietary information and is intended for use only by licensees of OPS/Master® and those
evaluating its potential worth in their respective operating environment.
E:\Manuals\Product Manuals\ASO\OM (OPS Master)\Reference Guide\Current Release\SECT4cvr.fm
© Copywrite - Mantissa Corporation 1989-2013
Publication Information
Publication Name:
Publication Number
Release:
Mantissa Corporation © 2013
SECURITY ADMINISTRATION
OPS002-JMIN
5.20.1
Page - 416
OPS/MASTER®
Chapter 27
Interactive Security Facility (ISF)
Introduction
Chapter 27
Interactive Security Facility (ISF)
Introduction
INTERACTIVE SECURITY FACILITY (ISF) is a Proprietary Software Product designed
to provide controlled access to individual functions within OPS/Master® modules.
Interactive applications bring out many concerns about security. The issues transcend the
simple matter of having the ability to logon to a time-sharing option (TSO), having access
to a particular data set, or having authority to use a specific program or a TSO command.
Most on-line applications are a composite of many separate programs referred to as transactions. Each transaction may perform one or more different functions. At the same time,
a given function may consist of one or more transactions.
E:\Manuals\Product Manuals\ASO\OM (OPS Master)\Reference Guide\Current Release\OPS_C27.fm
Each OPS/Master® product has clearly defined functions and interfaces with ISF to determine whether the logged on TSO user has the necessary authority to perform that particular function that he/she has requested. ISF does not replace Security systems such as
ACF2 and RACF; it secures the individual functions, of a given on-line application in a
manner consistent with the objectives of data center management and with their approval
for or against an individual TSO userid.
For each product, such as JOB/Master®, at least two records must be present on the security data base. These records serve to define the individual functions of the product, and
provide a default authorization in the event that an individual TSO userid is not explicitly
defined for that product. Additional records, one for each TSO userid, may be created to
explicitly authorize an individual for a given function within the software product.
The ISPF dialogs that maintain the data base are written to allow similar functions that
ISPF/PDF itself allows, i.e., BROWSE, DELETE and EDIT of the security records. EDIT
and DELETE of course means that the records can be modified, deleted or saved via that
function by the TSO users who are assigned the responsibility of ISF administration.
Benefits
ISF provides the following benefits:
•
Mantissa Corporation © 2013
Easy installation using standard IBM utilities
Page - 417
Chapter 27
OPS/MASTER®
Introduction
Interactive Security Facility (ISF)
•
Ease of authorization of non-pervasive functions via the use of a product default
record
•
Control over access to specific functions by only those TSO users who are
authorized to perform the given functions
•
Global on/off switch availability for individual functions within a software
product
•
ISPF dialogs that support other concurrent ISPF functions via “split screen”
•
Support for ISF HELP/tutorials via a standard ISPF HELP command or PF key
(usually PF1) as defined for ISPF
•
A security function that has already been approved by both internal and external
auditors at other installations
Data Base Components
The security data base consists of records which are identified with a product name and
TSO userid. These two fields can be referred to as the record key to the security data base.
PRODUCT DEFAULT RECORD
The product default record defines which functions are accessible to TSO users
who are not specifically defined for that software product. The product default
record is uniquely identified with a product name in the product field and blanks
in the userid field.
USERID RECORD
The userid record defines which functions are accessible to individual TSO userids. In effect, this record overrides the product default record, but only for that
userid. It can be used either to place more restrictions on the individual or to offer
access to additional functions.
Global Security Attributes
PRODUCT LIMITATION RECORD
The product limitation record defines all available functions within the software
product and globally authorizes or shuts off a specific function. This record can
also be used to temporarily withdraw a specific function. For example, this can
apply when a given function is present in the software product, regardless of
whether it is allowed for the individual TSO user via his/her own userid record
or through the product default record. The product limitation record can be used
to turn off the particular function. In effect, this causes that function to be disallowed for any TSO userid.
The product limitation record can be used to shut down a specific function, or to
impose cutoff time for one function without affecting other functions in the same
software product. Subsequently the same function can be reinstated for authorized TSO users via a single interactive transaction that modifies the product limitation record.
Page - 418
Mantissa Corporation © 2013
E:\Manuals\Product Manuals\ASO\OM (OPS Master)\Reference Guide\Current Release\OPS_C27.fm
The product limitation record is identified by a product name in the product field
and eight dollar signs ($$$$$$$$) in the userid field.
OPS/MASTER®
Chapter 27
Interactive Security Facility (ISF)
Accessing ISF
SPECIAL SECURITY ATTRIBUTE
The Special Security Attribute indicator is related to the Product Limitation
Record. For those Userids which have a Y coded in this field, the Product Limitation Record is not used. This means that even if the function is globally disallowed (through the Product Limitation Record) the Userid with the Special
Security Attribute flag will still be allowed access to the command (if that command is allowed in his/her Userid record).
ISF ACCESS RESTRICTED
The ISF Access Restricted indicator can be used to prevent unauthorized maintenance of the Security Data Base. Any explicitly defined User who has this indicator set to “Y” will not be allowed to modify (EDIT or DELETE) any ISF record.
If the logged on TSO User is not defined to ISF, the access level to the ISF Security Data Base will depend on the associated Product Default Record. When the
ISF Access Restricted indicator in the Product Default Record is set to Y, only
explicitly defined users with the indicator coded as N, will be permitted to update
the ISF Security Data Base.
Accessing ISF
To access ISF, select option I, I2, I3 or I4 based on the appropriate JOB/Master® region,
from the OPS/Master® Primary Menu:
--------Operations Productivity Systems - OPS/Master® by Mantissa v5.2.1--Option ===> I
J
J2
J3
J4
C
-
JOB/Master® (JM01
JOB/Master® (JM02
JOB/Master® (JM03
JOB/Master® (JM04
CONSOLE/Master®
PF1 = HELP
Prod.)
)
)
)
I - Interactive
I2 - Interactive
I3 - Interactive
I4 - Interactive
R - RUN/Master®
X - EXIT
Security
Security
Security
Security
Facility
Facility
Facility
Facility
(JM01)
(JM02)
(JM03)
(JM04)
E:\Manuals\Product Manuals\ASO\OM (OPS Master)\Reference Guide\Current Release\OPS_C27.fm
User= P390K
Date= 98/09/11
98.254
Time= 12:36
OPSOPSOPSOPSOPSOPSOPSOPSOPSOPSOPSOPSOPSOPSOPSOPSOPSOPSOPSOPSOPSOPSOPSOPSOSPOPSP
OPSOPSOPSOPSOPSO
SOPSOPSOPS
OPSOPSOPSOP
OPSOPSOPSOP
OPSOPSOPSOPSOPS SOPSOP PSOPSOPSO
SOPSOPS
OPSOPSOPS
OPSO
PSOPSOPSOP
OPSOPSOPSOPSOP PSOPSO OPSOPSOPS
OPSOPSOP
SOPOPSOPO
PSOPS
OPSOPSOPSOP
OPSOPSOPSOPSO OPSOPS SOPSOPSOP
SOPSOPS
OPSOPSOPSOPS
SOPSOPSOPSOPSOPSOP
OPSOPSOPSOPS SOPSOP PSOPSOPSO
PS
PSOPSOPSOPSOPSO
OPSOPSOPSOPSOPSOP
OPSOPSOPSOP PSOPSO OPSOPSOPS
OPSOPSOPSOPSOPSOPS
PSOP
OPSOPSOPSOPSOPSOP
OPSOPSOPSO OPSOPS SOPSOPSOP
SOPSOPSOPSOPSOPSOP
OPSO
OPSOPSOPSOPSOPSOP
OPSOPSOPS
PSOPSOPSO
PSOPSOPSOPSOPSOPSOPS
PSOPSOPSOPSOPSOPSOP
OPSOPSOPSOPSOPSOPSOPSOPSOPSOPSOPSOPSOPSOPSOPSOPSOPSOPSOPSOPSOPSOPSOPSOPSOPSOPSP
OPSOPSOPSOPSOPSOPSOPSOPSOPSOPSOPSOPSOPSOPSOPSOPSOPSOPSOPSOPSOPSOPSOPSOPSOPSOPSP
Mantissa Corporation © 2013
Page - 419
Chapter 27
OPS/MASTER®
Accessing ISF
Interactive Security Facility (ISF)
The ISF Banner Screen is displayed:
------------------------------------------------------------------------------Command ===>
Press Enter Key When Ready
------------------------------------------------------------------------------******************
********************
***
***
***
SECURITY
***
***
***
***
SYSTEM
***
***
***
**********************
**********/\**********
*********( )*********
*********/ \*********
*********| |*********
*********| |*********
*********----*********
**********************
.
F1=HELP
F7=UP
. . .
.
F2=SPLIT
F8=DOWN
. . .
.
IIIIII
II
II
II
IIIIII
SSSSSSS
SS
SSSSS
SS
SSSSSSS
*******
*********
***
***
***********************
***
**********************
***
******
***
***
** **
*********
** **
*******
F3=END
F9=SWAP
. . .
.
F4=RETURN
F10=LEFT
. . . .
.
F5=RFIND
F11=RIGHT
. . .
FFFFFF
FF
FFFF
FF
FF
INTERACTIVE
SECURITY
FACILITY
.
F6=RCHANGE
F12=RETRIEVE
. . . . .
Press <ENTER> to display the SECURITY DATA BASE MAINTENANCE SCREEN.
This screen provides access to all “security definition” records.
------------------ Security Data Base Maintenance ----------------------Option ===>
B
D
E
X
or Blank - Browse Security Records
- Delete a Security Record
- Edit (Add or Change) Security Record
- Exit Data Base Maintenance
Security Data Base:
Product ===>
Userid ===>
OPS.V520
(Required if Option “D”, or “E” is Selected)
(If only Product is specified with option “Blank” will limit display to the specific Product)
When the product ==> field is completed and the userid ==> field is blank, then all userid
records for that product are displayed. When both fields are omitted, then all userid
records for all products are displayed.
Page - 420
Mantissa Corporation © 2013
E:\Manuals\Product Manuals\ASO\OM (OPS Master)\Reference Guide\Current Release\OPS_C27.fm
(If Product and Userid are specified with option “Blank” will limit display to the specific Product and Userid)
OPS/MASTER®
Chapter 27
Interactive Security Facility (ISF)
Accessing ISF
•
Enter B (or blank) in the OPTION ==> field to browse a table of existing security
data base records.
•
Enter D in the OPTION ==> field to delete a security data base record. You must
also specify the name of the product for which you want to delete the record.
•
Enter E in the OPTION==> field to add or change a security data base record.
You must also specify the name of the product for which you want to add or
change the record.
•
Enter X in the OPTION ==> field to return to the OPS/Master® Primary Menu.
If you select option E, specify the PRODUCT (and the USERID, if desired) and press
<ENTER>. The SECURITY DATA BASE RECORD SELECTION SCREEN is displayed. The following product names can be specified:
JOBMASTR
- JOB/Master®
JCLMASTR
- Symbolic Substitution
RUNMASTR
- RUN/Master®
CONSMSTR
- CONSOLE/Master®
The Security Data Base Record Selection Screen is displayed like an ISPF table. Once a
table is displayed, one or more entries can be Browsed, Edited or Deleted, by specifying
B, E or D in the field immediately preceding the product and userid fields.
---------------- Security Data Base Record Selection -- Row 1 to 18 of 18
Option ===>
Scroll ===>CSR
Product
Userid
Last Function
-------------------------------------------------------------------------CONSMSTR
CONSMSTR
$$$$$$$$
CONSMSTR
P390C
CONSMSTR
P390E
CONSMSTR
P390G
CONSMSTR
P390K
CONSMSTR
P390M
CONSMSTR
P390N
CONSMSTR
P390Q
CONSMSTR
P390W
JCLMASTR
JCLMASTR
$$$$$$$$
JOBMASTR
JOBMASTR
$$$$$$$$
RUNMASTR
RUNMASTR
$$$$$$$$
E:\Manuals\Product Manuals\ASO\OM (OPS Master)\Reference Guide\Current Release\OPS_C27.fm
******************************* Bottom of data*****************************
Mantissa Corporation © 2013
•
The product default record can be identified by the blank USERID.
•
The product limitation record can be indentified by the USERID of $$$$$$$$.
•
Multiple requests are processed, one at a time, until all requests are completed.
Page - 421
Chapter 27
OPS/MASTER®
Accessing ISF
Interactive Security Facility (ISF)
JOB/Master® Security
)
For JOB/Master®, use the product name “JOBMASTR” when defining security records.
All JOB/Master® commands are listed on the screen below. The screen is divided into
three sections: data base creation commands, job tracking commands, and special functions. The commands correspond to the JOB/Master® Main Menu selections and the JOB/
Master® Job Tracking Menu selections.
-----------| Jobmaster Security Definition For ===> $$$$$$$$------------Command ===>
Indicate if function or message should be supplied to userid (Y or N):
--------------------- Jobmaster Data Base Functions ---------------------Add:
JOB=> Y SYS=> Y CAL=> Y PKY=> Y N/C=> Y GRP=> Y MSG= Y DSN=> Y
Upd:
JOB=> Y SYS=> Y CAL=> Y PKY=> Y N/C=> Y GRP=> Y MSG= Y DSN=> Y
Del:
JOB=> Y SYS=> Y CAL=> Y PKY=> Y N/C=> Y GRP=> Y MSG= Y DSN=> Y
Browse: JOB=> Y SYS=> Y CAL=> Y PKY=> Y N/C=> Y GRP=> Y MSG= Y DSN=> Y
------------------- Jobmaster On-Line
LQ => Y AJ => Y GS => Y PQ =>
DA => Y DJ => Y DL => Y DD =>
DM => Y DP => Y DO => Y DS =>
U => Y H => Y R => Y E =>
Post ==> Y MT1 ==> Y MT2 ==>
Tracking Functions -----------------Y PS => Y SS => Y SJ => Y DR => Y
Y DT => Y DH => Y DF => Y GSS => Y
Y ST => Y RT => Y UR => Y RR => Y
Y F => Y C => Y P => Y K
=> Y
Y MT3 ==> Y MT4 ==> Y MT5 ==> Y
---------------------------- Special Functions ------------- --------------Allow User Submit PDS ==> Y
Authorized for Schedule/Net ==> ********
MVS Console (Display Authority) ==> Y (Command Authority) ==> Y
Allow Edit of Crte JCL => Y
Update Profile
==> Y
Jobmaster Shutdown Authority ==> Y
ISF Access Restricted ==> Y
Special Security Attribute
==> Y
To allow use of a particular command, enter Y; to disallow the use of a command, enter N.
JOB/Master® ON-LINE TRACKING FUNCTIONS
POST AND MANUAL SETUP REQUIREMENTS
The indicator for the POST command affects and controls the functionality of its subset
indicators for manual setup requirements (MT1/DE, MT2/CI, MT3/TI, MT4/DI, and MT5/
JS) as follows:
Page - 422
1.
If the post indicator is set to N (POST ==> N), then the user has no authority for
POST, and therefore, the manual setup indicators are not functional.
2.
If the post indicator is set to Y (POST ==> Y) and at least one manual setup indicator is set to Y, then posting of only those manual setup requirements, which
correspond to the indicators that have been set to Y, is allowed.
3.
To maintain upward compatibility with previous versions of JOB/Master® and
ISF, if the post indicator is set to Y (POST ==> Y) and all manual setup indicators are set to N, then the POST function is allowed for all manual setup require-
Mantissa Corporation © 2013
E:\Manuals\Product Manuals\ASO\OM (OPS Master)\Reference Guide\Current Release\OPS_C27.fm
Refer to Tracking Facility in OPS System Reference Manual Volume 1.
OPS/MASTER®
Chapter 27
Interactive Security Facility (ISF)
Accessing ISF
ments. That is, MT1/DE, MT2/CI, MT3/TI, MT4/DI, and MT5/JS are logically
set to Y and function as if they were physically set to Y.
The post subset indicators correspond to the five manual task functions as defined on the
Global Profile Record and the Job Security Definition Screen (03).
SPECIAL FUNCTIONS
ALLOW USER SUBMIT PDS
Specify Y to allow the user to be able to specify a PDS library in the job definition.
AUTHORIZED FOR SCHEDULE/NET
This field identifies a station which is owned by this user. This field corresponds
to the SCHEDULE/NET field on Job Definition Screen 1. When this field is
used, the user is only able to control jobs that have been defined for that Schedule/Network. A default of eight asterisks (********) denotes access to all jobs.
Generic names may be specified (i.e., AP*) to allow access to several related stations.
MVS CONSOLE (DISPLAY AUTHORITY) (COMMAND AUTHORITY)
Specify Y to allow user access to console display and commands.
ALLOW EDIT OF CRTE JCL
Specify Y to allow user to make changes to job schedule create JCL.
UPDATE PROFILE
The update profile indicator refers to user’s authority to set and maintain the global values that control options within the JOB/Master® scheduler. See the JOB/
Master® Installation Manual for further information on JOB/Master® initialization options.
JOB/Master® SHUTDOWN AUTHORITY
Specify Y to allow user to shutdown the JOB/Master® Control Region in Job
Tracking.
E:\Manuals\Product Manuals\ASO\OM (OPS Master)\Reference Guide\Current Release\OPS_C27.fm
ISF ACCESS RESTRICTED
The ISF Access Restricted indicator can be used to prevent unauthorized maintenance of the security data base. Any explicitly defined user who has this indicator
set to Y will not be allowed to modify (EDIT or DELETE) any ISF record. In the
event that the logged on TSO user is not explicitly defined to ISF, his/her authority to maintain the ISF security data base will depend on the appropriate product
default record. That is, when the ISF access restricted indicator in the product
default record is set to Y, only explicitly defined users with indicator coded as N
are permitted to update the ISF security data base.
SPECIAL SECURITY ATTRIBUTE
The Special Security Attribute indicator has additional meaning concerning the
product limitation record (see the section on Product Limitation Record). For
those userids that have a Y coded in this field, the product limitation record is not
used. This means that even if the function is globally disallowed through the
product limitation record, the userid with the Special Attribute flag is still
Mantissa Corporation © 2013
Page - 423
Chapter 27
OPS/MASTER®
Accessing ISF
Interactive Security Facility (ISF)
allowed access to the command provided that command is allowed in his/her userid record. This attribute is useful if a function is disallowed for general use for
problematic reasons; however, function testing needs to be done.
MESSAGE ROUTING
From the First Security Definition Screen press <ENTER>. The Message Routing Screen
is displayed.
The product default record, which is identified by a blank userid, controls the sending of
messages to the operator console. Messages can be sent or suspended by coding Y or N in
the same manner as for individual userids. Messages can be suppressed from being sent to
the MVS console. This option is controlled by the default ISF record for JOB/Master®,
which has a blank userid. For example, if the job failed message is to be sent every time a
job fails, then message JM02 should be coded as Y in this record.
----------| Jobmaster Security Definition For
Option ===>
===> $$$$$$$$-------------
Indicate if message should be supplied to userid (Y, N or A):
-------------------------- Jobmaster Messages: ---------------------JM01 ==> Y JM11 ==> Y JM21 ==> Y JM31 ==> Y JM41 ==> Y JM51 ==>Y
JM02 ==> Y JM12 ==> Y JM22 ==> Y JM32 ==> Y JM42 ==> Y JM52 ==>Y
JM03 ==> Y JM13 ==> Y JM23 ==> Y JM33 ==> Y JM43 ==> Y JM53 ==>Y
JM04 ==> Y JM14 ==> Y JM24 ==> Y JM34 ==> Y JM44 ==> Y JM54 ==>Y
JM05 ==> Y JM15 ==> Y JM25 ==> Y JM35 ==> Y JM45 ==> Y JM55 ==>Y
JM06 ==> Y JM16 ==> Y JM26 ==> Y JM36 ==> Y JM46 ==> Y JM56 ==>Y
JM07 ==> Y JM17 ==> Y JM27 ==> Y JM37 ==> Y JM47 ==> Y JM57 ==>Y
JM08 ==> Y JM18 ==> Y JM28 ==> Y JM38 ==> Y JM48 ==> Y JM58 ==>Y
JM09 ==> Y JM19 ==> Y JM29 ==> Y JM39 ==> Y JM49 ==> Y JM59 ==>Y
JM10 ==> Y JM20 ==> Y JM30 ==> Y JM40 ==> Y JM50 ==> Y JM60 ==>Y
JOB/Master® messages can be routed to the operator console by specifying Y next to each
desired message. Any message that is coded as A generates an alert on the operator console. The alert message is held until it is deleted by the console operator. Specify N to
supress the sending of a message. (Refer to the Messages and Codes for a description of
each message). JM05 should be set to a ‘Y’ or ‘A’ if the Maunal Task message definitions
are used.
)
The specification of A to indicate that a message is to generate a console alert,
as described above, is applicable to the product default record only.
MESSAGE POSTING TO SPECIFIC USERID
The ability to send messages to specific userids will be implemented in the same
manner as console messages by setting the Y flag in the individual userid record.
This function is currently not active.
Page - 424
Mantissa Corporation © 2013
E:\Manuals\Product Manuals\ASO\OM (OPS Master)\Reference Guide\Current Release\OPS_C27.fm
Note 1: Code “A” is applicable only to the product default record.
OPS/MASTER®
Chapter 27
Interactive Security Facility (ISF)
Accessing ISF
Symbolic Substitution Security
For symbolic substitution, use the product name JCLMASTR when defining security
records. All symbolic substitution functions are listed on the screen shown below.
------| JCL/Substitution Security Definition for
Option ===>
===> $$$$$$$$----------
Indicate if function should be supplied to Userid (Y OR N):
------------------------- JCL/Master Functions ------------------------RESOLVE ==> Y
RESET ==> Y
DISPLAY ==> Y
LIBRARY ==> Y
OPINS ==> Y
RECOVERY ==> Y
JCLSCAN ==> Y
E/OPINS=> N
--<== Use staging PDS (JMSTGPDS) Y,N
|
|
Master JCL
==>
--> Resolved JCL
==>
|
Document Data Set ==>
--> Rerun PDS
==>
Use ISPF File Tailoring for symbolic substitution ==>
--------------------------- Special Functions --------------------------ISF Access Restricted ==> Y
Special Security Attribute
==> Y
To allow use of a particular function, enter Y; to disallow the use of a function, enter N.
JCL/MASTER FUNCTIONS
See “Symbolic Substitution” in the JOB/Master® User Manual for a description of these
functions.
The PDS data sets used by the symbolic substitution process are defined on this panel. The
product default record must specify the data sets which will be used. All or any individual
data sets can be overriden on the userid record.
E:\Manuals\Product Manuals\ASO\OM (OPS Master)\Reference Guide\Current Release\OPS_C27.fm
USE STAGING PDS (JMSTGPDS)
Specify Y to allow use of the staging PDS. This field is related to the Resolved
JCL and Rerun PDS fields. If using staging PDS, the Resolved JCL and Rerun
PDS should be your staging PDS because it will be the library from which jobs
will be submitted by the JOB/Master® submit function.
MASTER JCL
This is the data set used as input for the symbolic substitution function. This is
the PDS library from which the JCL member will be copied for the substitution
to be made leaving the “master” copy intact.
RESOLVED JCL
This is the data set in which the JCL member will be placed after symbolic substitution has been performed. It should be the same PDS as the Staging PDS if it
is being used.
Mantissa Corporation © 2013
Page - 425
Chapter 27
OPS/MASTER®
Accessing ISF
Interactive Security Facility (ISF)
DOCUMENT DATASET
This data set contains free format, user-entered data for job documentation and
operational run instructions. The JOBNAME must be used as the member name
for specific job documentation reference.
RERUN PDS
This data set is used by JOB/Master® to save a copy of the JCL at job submit
time. This is an optional data set for JOB/Master® and it should be the same PDS
as the Staging PDS if it is being used.
USE ISPF FILE TAILORING
Specify Y to allow use of File Tailoring Symbolic Substitution. See ISPF documentation for more information.
SPECIAL FUNCTIONS
ISF ACCESS RESTRICTED
Specify N to disallow user access to security setup.
SPECIAL SECURITY ATTRIBUTE
Specify Y to allow this user to override the limitation record.
RUN/Master® Security
For RUN/Master®, use the product name RUNMASTR when defining security records.
All RUN/Master® functions are listed on the screen shown:
----------| RUN/Master® Security Definition for
Option ===>
===> $$$$$$$$|------------
Indicate if function should be supplied to Userid (Y OR N):
------------------------ Knowledge Base Functions------------------------RESTART
RESTART
HISTORY
REVIEW ==> Y
ACTION ==> Y
DISPLAY ==> Y
------------------------ On-line Assist Functions -----------------------ALTER JCL ==> Y
RERUN SUBMIT ==> Y
--------------------------- Special Functions --------------------------ISF ACCESS RESTRICTED ==> Y
SPECIAL SECURITY ATTRIBUTE
==> Y
)
Page - 426
If no re-run PDS is specified and JOB/Master® staging PDS=Y, enter the staging PDS for this default library.
Mantissa Corporation © 2013
E:\Manuals\Product Manuals\ASO\OM (OPS Master)\Reference Guide\Current Release\OPS_C27.fm
Default Rerun PDS ==>
Use JOB/Master®
Staging PDS ==>
OPS/MASTER®
Chapter 27
Interactive Security Facility (ISF)
Accessing ISF
To allow use of a particular function, enter Y, to disallow use of a particular function enter
N.
KNOWLEDGE BASE FUNCTIONS
RESTART REVIEW
Specify Y to allow viewing of restart actions which RUN/Master® will perform.
RESTART ACTION
Specify Y to allow the execution of the restart actions.
HISTORY DISPLAY
Specify Y to allow viewing of the history file.
ONLINE ASSIST FUNCTIONS
ALTER JCL
Specify Y to allow the altering of the Restart JCL prepared by RUN/Master®.
RERUN SUBMIT
Specify Y to allow the prepared JCL to be submitted.
DEFAULT RERUN PDS
Specifies the default PDS to be used to retrieve JCL of Jobs to be restarted. This
PDS must be specified in JOB/Master® with a DD of JMRERUN.
USE JOB/Master® STAGING PDS
Allows the use of the JOB/Master® Staging PDS instead of the rerun PDS.
SPECIAL FUNCTIONS
ISF ACCESS RESTRICTED
Specify N to disallow user access to Security setup.
SPECIAL SECURITY ATTRIBUTE
E:\Manuals\Product Manuals\ASO\OM (OPS Master)\Reference Guide\Current Release\OPS_C27.fm
Specify Y to allow this user to override the limitation record.
Mantissa Corporation © 2013
Page - 427
Chapter 27
OPS/MASTER®
Accessing ISF
Interactive Security Facility (ISF)
CONSOLE/Master® Security
To create security records for CONSOLE/Master® use the Product Name CONSMSTR.
CONSOLE/Master® functions are listed on the panel shown below.
In order to allow a particular function, enter Y; to disallow the use of a function enter N.
--------| CONSOLE/Master® Security Definition for
Option ===>
===> $$$$$$$$|-----------
Indicate if function should be supplied to Userid (Y OR N):
---------------------- Automated Operator Functions ---------------------BROWSE ==> Y
DELETE ==> Y
ADD/UPDATE ==> Y
-------------------------- MVS Console Facility -------------------------SELECT ==> Y
DISPLAY ==> Y
COMMAND ==> Y
REPLY ==> Y
INITIAL CONSOLE ADDR ==> 700
--------------------------- Special Functions ---------------------------ISF ACCESS RESTRICTED ==> Y
SPECIAL SECURITY ATTRIBUTE
==> Y
AUTOMATED OPERATOR FUNCTIONS
Each function such as browse, add/update and delete can be individually secured.
MVS CONSOLE FACILITY
This area secures or allows specific privileges under the MVS Console Facility.
Specify Y to allow the User to specify or change the Console ID for the current
session. When this field is specified as N, the user will only be able to see the
buffers of the console specified in the INITIAL CONSOLE ADDR field.
DISPLAY
Specify Y to allow the user to display console buffers.
COMMAND
When set to Y, this function allows the User to enter any command which can
normally be entered via operator console.
REPLY
When set to Y, this function allows the User to reply to any outstanding Write-toOperator-with-Reply (WTOR). CONSOLE/Master® supports both long (R nn,..)
format as well as short (nn,..) format of operator reply.
Page - 428
Mantissa Corporation © 2013
E:\Manuals\Product Manuals\ASO\OM (OPS Master)\Reference Guide\Current Release\OPS_C27.fm
SELECT
OPS/MASTER®
Chapter 27
Interactive Security Facility (ISF)
Accessing ISF
INITIAL CONSOLE ADDR
Specifies the console address which will be used as the default Console ID for
the specific User. If this field is omitted on an individual Userid record, the Console ID value will be taken from this field in the Product Default record. The
specified value may be “locked” for the User by entering N in the SELECT==>
field.
SPECIAL FUNCTIONS
ISF ACCESS RESTRICTED
The ISF Access Restricted supplemental security feature is fully implemented
within CONSOLE/Master®. For functional description of this indicator see ISF
Access Restricted documented under “Global Security Attributes”.
SPECIAL SECURITY ATTRIBUTE
E:\Manuals\Product Manuals\ASO\OM (OPS Master)\Reference Guide\Current Release\OPS_C27.fm
The Special Security Attribute is fully implemented within CONSOLE/Master®.
For functional description of this indicator see Special Security Attribute as documented under “Global Security Attributes”.
Mantissa Corporation © 2013
Page - 429
Chapter 27
Interactive Security Facility (ISF)
E:\Manuals\Product Manuals\ASO\OM (OPS Master)\Reference Guide\Current Release\OPS_C27.fm
Accessing ISF
OPS/MASTER®
Page - 430
Mantissa Corporation © 2013
OPS/MASTER®
Chapter 28
Interactive Help
Chapter 28
Interactive Help
ISF provides an interactive HELP facility via standard convention of PF1 or the ISPF
HELP command. The HELP/Tutorial mode can be entered from any ISF screen by pressing the PF1 key.
When a message is displayed in the upper right corner, a brief explanation can be displayed by pressing the PF1 key. If the PF1 key is pressed a second time, a tutorial screen is
displayed.
E:\Manuals\Product Manuals\ASO\OM (OPS Master)\Reference Guide\Current Release\OPS_C28.fm
If the PF1 key is pressed when there is no message in the upper right corner, then a tutorial
screen is displayed immediately.
Mantissa Corporation © 2013
Page - 431
E:\Manuals\Product Manuals\ASO\OM (OPS Master)\Reference Guide\Current Release\OPS_C28.fm
Chapter 28
Page - 432
OPS/MASTER®
Interactive Help
Mantissa Corporation © 2013
INSTALLATION
Release 5.20.1
Mantissa Corporation®
1012 Edenton Street
Birmingham, Alabama 35242
OPS/MASTER®
OPS/Master® is a software product of Mantissa Corporation. All rights are reserved, and reproduction, use of, or distribution of this documentation is prohibited unless written consent is obtained from Mantissa Corporation. This document contains proprietary information and is intended for use only by licensees of OPS/Master® and those
evaluating its potential worth in their respective operating environment.
E:\Manuals\Product Manuals\ASO\OM (OPS Master)\Reference Guide\Current Release\SECT5cvr.fm
© Copywrite - Mantissa Corporation 1989-2013
Publication Information
Publication Name:
Publication Number
Release:
Mantissa Corporation © 2013
OPS/Master®System Reference Manual
OPS002-JMIN
5.20.1
Page - 434
OPS/MASTER®
Chapter 29
OPS/Master® Installation
Introduction
Chapter 29
OPS/Master® Installation
Introduction
Preliminary steps may be taken prior to a first-time installation of OPS/Master®, making
the process more efficient. The preliminaries are documented below in steps with subtasks. Each must be completed in order and documented for proper verification to assure
that your first-time install will be correct. Each task has a check box for you to check or
initial when the task has been successfully completed.
STEP 1: Preliminary Setup
E:\Manuals\Product Manuals\ASO\OM (OPS Master)\Reference Guide\Current Release\OPS_C29.fm
Task
1.0
Select a High Level Qualifier (VSMHLQ) for your VSAM files. They will be
defined later in the install process. Enter the qualifier in the box below for reference.
A list of the VSAM files are:
CMMASTER
CONSOLE/Master® Database
CONTROL
OPS/Master® Control File
JMDB
JOB/Master® Data Base
JMJOBQ
JOB/Master® Job Scheduling Queue
JMSCHQ
JOB/Master® Scheduling Work File
JMHIST
JOB/Master® History File
RMLOG
RUN/Master® Log File
RMASTR
RUN/Master® Database
SECFILE
Interactive Security File
Mantissa Corporation © 2013
Page - 435
Chapter 29
OPS/MASTER®
STEP 1: Preliminary Setup
Task
1.1
OPS/Master® Installation
Select VOLSER(S) for your VSAM files. Enter selections in box below for any
future reference.
We recommend you use the following DASD configuration guidelines:
File Name
Comment
CONTROL
Separate DASD from
JMJOBQ/JMDB.
High I/O
JMJOBQ
JMDB
Same DASD.
Reserves done dictate these files be
set up together.
CMMASTER
OK to put on same pack as
JMJOBQ/JMDB.
High activity restricted to rules refresh
command.
JMHIST
On different DASD from
JMJOBQ/JMDB.
High I/O.
JMSCHQ
Such minimal use this may be put
anywhere.
Low I/O. Low activity. Only used for
JMSCHED.
RMASTR
Separate DASD from
JMJOBQ/JMDB/RMLOG.
Medium I/O.
RMLOG
Separate DASD from
JMJOBQ/JMDB/RMASTR.
Medium I/O.
SECFILE
Separate DASD from
JMJOBQ/JMDB.
Used in TSO maintenance of the database and online authorization of OPS
functions by users.
Select a High-level Qualifier (HLQ) for non-VSAM files.
Enter your selection in box below for future reference.
These non-VSAM files can be preallocated. They include the files in the
following table. (See attached OPS/Master® DASD requirements at the end of this
chapter).
Page - 436
Mantissa Corporation © 2013
E:\Manuals\Product Manuals\ASO\OM (OPS Master)\Reference Guide\Current Release\OPS_C29.fm
Task
1.2
Configuration
OPS/MASTER®
Chapter 29
OPS/Master® Installation
STEP 1: Preliminary Setup
File Name
Description
Allocated
JMSUBPDS**
JOB/Master® Submit PDS
In Task 4.0
JMSTGPDS*
JOB/Master® Staging PDS
In Task 4.0
JMSUBddd*
JOB/Master® Daily Submit PDS
In Task 4.0
JMRERUN*
JOB/Master® Rerun PDS
In Task 4.0
PROCLIB**
OPS/Master® Proclib
In Task 4.0
DOCLIB
Job Rerun Documentation PDS
In Task 4.0
INSTLIB
Installation Library contains members necessary for all functions within OPS/Master®.
Initials/Date
In Task 3.0
$INDEX$ - This member describes all
INSTLIB members
ISPLLIB
Contains the load modules for executing
ISPF dialogs for OPS.
In Task 3.0
ISPMLIB
Contains the OPS ISPF messages.
In Task 3.0
ISPPLIB
Contains the OPS panels required to execute the ISPF dialogs.
In Task 3.0
ISPSLIB
Contains OPS file tailoring skeletons used
in JCL creation.
In Task 3.0
LOADLIB
Load Modules for OPS/Master®
In Task 3.0
* We recommend using the JMSTGPDS, but you have the option to use the seven Daily PDS’s
(where ddd=MON,TUE,WED,THU,FRI,SAT,SUN). If you choose this option, you must also
allocate a JMRERUN PDS to be used in conjunction with JMSUBddd. The PDS blocksizes must
be equal to the largest blocksize of any dataset in the JMSUBPDS concatenation (the largest
should be first).
**Only allocate if you wish to use a unique library for OPS/Master®. An existing PDS library
may be used for the PROCLIB and JMSUBPDS (existing JCL for jobs).
E:\Manuals\Product Manuals\ASO\OM (OPS Master)\Reference Guide\Current Release\OPS_C29.fm
Task
1.3
SITE specific considerations.
SMF
Tracking
OPS uses byte 8 of the user
identification field in the
SMF common area.
Work files
A zap is available to change the allocation unit for temp
Check site standards for
work files on TSO volumes. DSN’s used under ISPF.
Mantissa Corporation © 2013
If another product at your site is using byte 8, a zap
(JMSMFZAP) is available to assign one of the other 7
bytes or, if all 8 bytes are used, to change one of the four
user commarea bytes. If this byte is used (not = x'40')
when a job is submitted, it will not be tracked correctly.
The JOBQ display will indicate the job is being cancelled
or having JCL errors. This can be sporatic depending on
values in the USERID. If USERID = 'APDEPT ' the job
will track, but if equal to 'SALEDEPT' the job will not
track.
Page - 437
Chapter 29
OPS/MASTER®
STEP 1: Preliminary Setup
SYSMDUMP
For problem resolution
Resource
Management
The following are our major/minor names for a resource manager:
Storage
Requirements
COBOL
Preallocate a SYSMDUMP for JOB/Master®, RUN/Master® and CONSOLE/Master®. (After installation is complete, prior to testing, a DD statement will need to be
added to each of the startup procs).
DCB Parms:
RECFM=FB
LRECL=4160
BLKSIZE=4160
Major Names
Minor Names
JMASTR
JMASTR
JMASTR
CMMASTER
RMASTR
JMSCHED
OPSENQ
JMDB.(36 BYTE QUALIFIER FROM J/M)
MINOR.NAME.FOR.TSO.SERIALIZATION
JMDB
DATABASE
DATABASE
JM SCHEDULE
(ENQ/DEQ ONLY)
(8 byte TSOid)
(ENQ/DEQ ONLY)
JOB/Master®
The number of buffers used are specified in the JOB/Master® startup proc. Each buffer will require 1K of dataspace
storage. The default and minimum requirement is 61 buffers.
CONSOLE/Master®
CONSOLE/Master® uses a variable amount of SQA storage to hold the fast path rules (WTOs which do not require
notification/processing by the C/M control region, i.e.,
WTO suppression, route or DESC changes, etc.) Each
rule can take from 72 to 128 bytes. The rules are stored in
4K segments.
OPS/Master® uses the L/E environment for COBOL. Applicable JCL samples will have
a reference to “hlq.SCEENRUN” in the STEPLIB concantenation. This should be
changed to your runtime library. Note, ISPF must also have this library allocated in the
ISPLLIB concantenation.
Modify current SYS1.PARMLIB (Members)
E:\Manuals\Product Manuals\ASO\OM (OPS Master)\Reference Guide\Current Release\OPS_C29.fm
Task
1.4
OPS/Master® Installation
Page - 438
Mantissa Corporation © 2013
OPS/MASTER®
Chapter 29
OPS/Master® Installation
STEP 1: Preliminary Setup
IEAAPFxx
The name of the LOADLIB for OPS/Master® must be in this PARMLIB member.
Several members in the LOADLIB must execute authorized. An alternative would be to
place the LOADLIB in the dynamic authorization list (See member PROG??). To
authorize add the following statement:
APF ADD DSNAME=OPS.V521.LOADLIB VOLUME=MAN002.
Another alternative is to place an authorization command in the COMMND?? parmlib
member:
COM='SETPROG APF,ADD,DSNAME=OPS.V521.LOADLIB,VOLUME=MAN002’.
SMFPRMxx
SMF exits to be turned on:
IEFUJV
IEFUJI
IEFACTRT
IEFU83
IEFU84
SMF records to be written:
14, 15, 17, 18, 30, 61, 63, 64, 65, 67
Note:
Record types 14, 15, 17, 18, 61, 63, 64, 65 and 67 are only required if dataset dependency processing is wanted. Record types 15, 30 and 64 are required if RUN/Master® is
to be installed. See the “Dataset Dependency” chapter in Volume 1 of the JOB/Master®
Manual for details. In order for J/M to track subsystems, these exits/records must be
specified in the SUBSYS parameter if it is specified.
E:\Manuals\Product Manuals\ASO\OM (OPS Master)\Reference Guide\Current Release\OPS_C29.fm
An alternative to using SMFPRMxx would be to add the following statements to
PARMLIB member PROG??.
/*
*/
/* DYNAMIC EXIT DEFINITIONS (V 5.2.1 only) */
/*
*/
EXIT ADD EXITNAME(SYS.IEFUJV),MODNAME(OPSUJV)
EXIT ADD EXITNAME(SYS.IEFUJI),MODNAME(OPSUJI)
EXIT ADD EXITNAME(SYS.IEFACTRT),MODNAME(OPSACTRT)
EXIT ADD EXITNAME(SYS.IEFU83),MODNAME(OPSU85)
EXIT ADD EXITNAME(SYS.IEFU84),MODNAME(OPSU85)
DIAGxx
ALLOWUSERKEYCSA option.
VSM ALLOWUSERKEYCSA(YES) is required for V 5.2.1.
VSM ALLOWUSERKEYCSA(NO) is now valid for V 5.2.1.
IEAIPSxx
IEAICSxx
The dispatching priority for the OPS/Master® products should be sufficiently high so as
to prevent any possibility of loss of service. The recommendation is to place them in a
performance group (P6) under System Resource Manager (SRM) at a dispatching priority equivalent to other critical applications with CONSOLE/Master® first, followed by
JOB/Master®, and then RUN/Master®.
IEASYSxx
MAXCAD defines the maximum number of scope=common dataspaces. The default is
50. JOB/Master uses one common dataspace.
IEFUSI
IEFUSI is used to limit a dataspace size. JOB/Master uses a dataspace size of 10MB.
If this is done, an IPL can be performed prior to product installation and everything will be
ready to test after installation. An IPL can be avoided if the SMF requirements are already
in place and by copying the modules from “HLQ.OPS.LOADLIB” to an existing authorized library or dynamically authorizing the LOADLIB.
Check to verify successful completion
Mantissa Corporation © 2013
Page - 439
Chapter 29
OPS/MASTER®
OPS/Master® Installation
OPS/Master® Installation
OPS/Master® Installation
Overview
OPS/Master® is easily implemented into your MVS environment.
Mantissa's OPS Release 5.2.1 product is now distributed via files obtained from our FTP
site (ftp.mantissa.com) or on a CD. The files that comprise this release were created on the
z/OS operating system using the XMIT(TSO TRANSMIT) function. There are six files
and each file must be FTP'd to your z/OS system and then TSO TRANSMIT RECEIVEd
to be able to use them in various Tasks to complete the installation process. To make sure
the files are usable, they must be uploaded using the binary command (no CRLF or ASCII
translation).
Throughout the installation, the following variables are used in JCL and should be
replaced to conform to site standards:
DDDDD
Site UNIT name assigned to DASD for output data sets.
VVVVVV
Volume serial number where output data sets will reside.
HLQ
High Level Qualifier used at your installation for OPS/Master® Libraries.
VSMHLQ
High Level Qualifier used at your installation for OPS/Master® VSAM
datasets.
STEP 2: Product Installation
Task
2.0
Preallocate FTP files.
The z/OS output datasets must be preallocated with an LRECL=80 and record format of
fixed. This is very important! The RECEIVE command requires the XMIT files be
LRECL=80 and fixed. We used the following attributes for each of the XMIT files when
creating them:
LRECL=80 BLKSIZE=3120 RECFM=FB.
The six files are:
• hlq.OPS.V521.ISPL.XMIT (615 blocks)
• hlq.OPS.V521.ISPM.XMIT (60 blocks)
• hlq.OPS.V521.ISPP.XMIT (555 blocks)
• hlq.OPS.V521.ISPS.XMIT (30 blocks)
• hlq.OPS.V521.LOAD.XMIT (1200 blocks)
As an alternative to pre-allocating, append an SMS defined qualifier to the dataset names
and let SMS build the datasets.
Task
2.1
Page - 440
Upload OPS system files.
Mantissa Corporation © 2013
E:\Manuals\Product Manuals\ASO\OM (OPS Master)\Reference Guide\Current Release\OPS_C29.fm
• hlq.OPS.V521.INST.XMIT (450 blocks)
OPS/MASTER®
Chapter 29
OPS/Master® Installation
The input files can be found in Mantissa's FTP server in the Outgoing\OPS\V521 folder
and have a prefix of OPSV521. The "hlq" for the put command might be "DIST".
Put the files to z/OS with the following commands from FTP:
bin
put OPSV521.INST 'hlq.OPS.V521.INST.XMIT' (rep
put OPSV521.ISPL 'hlq.OPS.V521.ISPL.XMIT' (rep
put OPSV521.ISPM 'hlq.OPS.V521.ISPM.XMIT' (rep
put OPSV521.ISPP 'hlq.OPS.V521.ISPP.XMIT' (rep
put OPSV521.ISPS 'hlq.OPS.V521.ISPS.XMIT' (rep
put OPSV521.LOAD 'hlq.OPS.V521.LOAD.XMIT' (rep
Check to verify successful completion.
Task
3.0
Use TSO XMIT RECEIVE to build OPS system files.
Once the files have been uploaded via FTP, execute the following commands on TSO.
Note the UNIT and VOLUME are optional. When prompted for restore parameters, enter
the output dataset name (see note) and allocation values shown below.
•
RECEIVE INDATASET('hlq.OPS.V521.INST.XMIT'). When prompted by message “INMR906A Enter restore parameters or 'DELETE' or 'END' +”, enter:
da('OPS.V521.INSTLIB') blksize(3120) new unit(unit) volume(volume)
•
RECEIVE INDATASET('hlq.OPS.V521.ISPL.XMIT'). When prompted by message “INMR906A Enter restore parameters or 'DELETE' or 'END' +”, enter:
da('OPS.V521.ISPLLIB') blksize(19069) new unit(unit) volume(volume)
•
RECEIVE INDATASET('hlq.OPS.V521.ISPM.XMIT'). When prompted by
message “INMR906A Enter restore parameters or 'DELETE' or 'END' +”, enter:
da('OPS.V521.ISPMLIB') blksize(3120) new unit(unit) volume(volume)
E:\Manuals\Product Manuals\ASO\OM (OPS Master)\Reference Guide\Current Release\OPS_C29.fm
•
RECEIVE INDATASET('hlq.OPS.V521.ISPP.XMIT'). When prompted by message “INMR906A Enter restore parameters or 'DELETE' or 'END' +”, enter:
da('OPS.V521.ISPPLIB') blksize(3120) new unit(unit) volume(volume)
•
RECEIVE INDATASET('hlq.OPS.V521.ISPS.XMIT'). When prompted by message “INMR906A Enter restore parameters or 'DELETE' or 'END' +”, enter:
da('OPS.V521.ISPSLIB') blksize(3120) new unit(unit) volume(volume)
•
RECEIVE INDATASET('hlq.OPS.V521.LOAD.XMIT'). When prompted by
message “INMR906A Enter restore parameters or 'DELETE' or 'END' +”, enter:
da('OPS.V521.LOADLIB') blksize(19069) new unit(unit) volume(volume)
Mantissa Corporation © 2013
Page - 441
Chapter 29
OPS/MASTER®
OPS/Master® Installation
)
)
NOTE: The dataset names used for the RECEIVE RESTORE parameter statements specify 'OPS.V521...' which is changable and should reflect the production names for the datasets at your installation. Please note that all the
installation JCL refers to either HLQ... or OPS.V521... in front of the OPS
datasets. If you change this value to match your installation standards, the JCL
(specifing OPS.V521) will have to be modified. The JCL specifing hlq... will
have to be modified regardless.
NOTE: The UNIT() and VOLUME() operands are optional but shown in case
your installation puts RECEIVE files on work packs by default. If the datasets
are pre-allocated then the blksize, new, unit, and volume information does not
have to be entered.
Once all the data files are successfully transferred and received, you are
ready to begin the installation of OPS.
Check to verify successful completion.
Task
4.0
OPS/Master® PDS’s.
hlq.LOADLIB can be used as a STEPLIB library. Be certain to update all execution JCL
specifying the appropriate DD statement. The use of STEPLIB statement can be avoided if
the modules are moved to a LINKLIST library. Some members are required to run authorized.
Allocate the JOB/Master PDS’s using sample member JMALLOC in the hlq.INSTLIB.
E:\Manuals\Product Manuals\ASO\OM (OPS Master)\Reference Guide\Current Release\OPS_C29.fm
Check to verify successful completion.
Page - 442
Mantissa Corporation © 2013
OPS/MASTER®
Chapter 29
OPS/Master® Installation
Task
5.0
Install OPS Panels.
Edit your ISPF/PDF panel library (ISPPLIB) updating member ISP@PRIM to include the
following statement within the “)BODY” section:
% O +OPS - OPS/Master® by Mantissa Corporation
Also include the following statement within the “)PROC” section:
O,'PANEL(OPSBANNR)'
Many installations have modified the native ISPF environments. If this applies at your
site, make the above modifications to the panel which OPS/Master® is to be initiated
from.
The following panels in the HLQ.ISPPLIB will need to have the default VSHM HLQ
(VSMHLQ) modified to reflect the site standard High Level Qualifier for OPS/Master®
files:
OPSBANNR
CMBANNER
RMP000
Be sure to key all changes in UPPER CASE.
Specify the OPS ISPLLIB, ISPMLIB, ISPPLIB and ISPSLIB file names in the appropriate ISPF procedure. If your installation would like to use the LIBDEF clists to invoke the
OPS/Master® ISPF libraries, refer to member OPSCLIST in the INSTLIB. To invoke this
CLIST add to the “)PROC” section of panel ISP@PRIM the following: “O,
‘CMD(%OPSCLIST) NOCHECK’.
E:\Manuals\Product Manuals\ASO\OM (OPS Master)\Reference Guide\Current Release\OPS_C29.fm
Check to verify successful completion.
Task
6.0
Allocate and Initialize OPS/Master® Files.
The following members of the INSTLIB are to be used to allocate and initialize the files.
Modify the JCL according to site standards:
OPSVDEF1 - allocates the following VSAM Clusters;
SECFILE - Interactive Security Facility
CONTROL - maintains VSAM sharing support. This database sharing
technique is unique to OPS/Master®.
OPSVINIT - initializes the OPS/Master® VSAM clusters.
Mantissa Corporation © 2013
Page - 443
Chapter 29
OPS/MASTER®
OPS/Master® Installation
If you are converting from version 5.2.1, simply change sample job OPSVINIT to use an
IDCAMS REPRO backup of the SECFILE 5.2.1 dataset. If this is a new installation,
bypass step STEP 3.
Check to verify successful completion.
Task
7.0
Allocate and Initialize JOB/Master® Files.
The following members of the INSTLIB are to be used to allocate and initialize JOB/Master® files. Modify the JCL according to site standards:
JMVDEF1 - allocates the following VSAM Clusters:
JMDB - JOB/Master® database
JMJOBQ - JOB/Master® scheduling event queue
JMHIST - JOB/Master® history file
JMSCHQ - JOB/Master® scheduling work queue file
JMVINIT - initializes the JOB/Master® VSAM Clusters.
JMVINIT
STEP01 EXEC PGM=JMINIT
PARM='Q=X, J=X'
where X= Y=(Yes)
N=(No)
This parameter gives the option to initialize one or both files.
Copies the database records from the distribution tape or restores a database from
backup (as in the case of some dasd error that requires a site to initialize and
restore on one or both of these files).
STEP03 EXEC PGM=OPSLINIT
This step initializes the History File. It seeds records to correspond with space
available and creates a special record which holds the total number of records.
Considerations for JMVINIT:
Messages produced:
Page - 444
1.
Event file initialization complete.
2.
Record seeded NNNNNN.
NNNNNN is the number of logical records that can be kept on the history file.
This file is self purging, and the oldest records are dropped as the file fills.
Mantissa Corporation © 2013
E:\Manuals\Product Manuals\ASO\OM (OPS Master)\Reference Guide\Current Release\OPS_C29.fm
STEP02 EXEC PGM=IDCAMS
OPS/MASTER®
Chapter 29
OPS/Master® Installation
MSG IEC0701 203-204 is issued for the JMHIST file, the message should be ignored.
)
DO NOT CHANGE the space parameter of the JMHIST cluster to include secondary allocation. Leave the value as zero (0).
Hint: If JOB/Master® receives a S0C1 upon Startup after the initialization process, review
the steps taken and the output. The most likely suspect is an uninitialized JOBQ file.
Repeat the process only for the JOBQ, altering the JMVDEF1 and JMVINIT to point
ONLY to the JOBQ file. When successfully completed, start JOB/Master® again.
Once JMDB is defined, JOB/Master® provides a utility to help you copy data from an
existing JMDB. This is useful for building test databases, etc. Refer to the chapter “Batch
Functions” in the JOB/Master® manual for more information on using the utility “JMDBCOPY”.
If you are converting from version 5.2.1, simply change sample job JMVINIT to use an
IDCAMS REPRO backup of the JMJOBQ and JMDB 5.2.1 datasets. If this is a new
installation, bypass step 02. In either case, the JCL is setup to initialize the Job history.
Check to verify successful completion.
Task
8.0
Allocate and Initialize RUN/Master® files.
The following members of the INSTLIB are to be used to allocate and initialize the files.
Modify the JCL according to site standards:
RMVDEF1- allocates the following VSAM Clusters.
RMLOG - RUN/Master® logging file.
RMASTR - RUN/Master® database
E:\Manuals\Product Manuals\ASO\OM (OPS Master)\Reference Guide\Current Release\OPS_C29.fm
RMVINIT - initializes the RUN/Master® VSAM Clusters.
Check to verify successful completion.
Task
9.0
Allocate and initialize CONSOLE/Master® files.
The following members of the INSTLIB are to be used to allocate and initialize the CONSOLE/Master® files. Modify the JCL according to site standards:
CMVDEF1- allocates the following VSAM Clusters:
CMMASTER - CONSOLE/Master® database
CMVINIT - initializes the CONSOLE/Master® VSAM Clusters.
Mantissa Corporation © 2013
Page - 445
Chapter 29
OPS/MASTER®
OPS/Master® Installation
If you are converting from version 5.2.1, simply change sample job CMVINIT to use an
IDCAMS REPRO backup of the CMMASTER 5.2.1 dataset. If this is a new installation,
bypass step RESTORC.
Check to verify successful completion.
Task
10.0
Modify the procs and make applicable startup procs available to system.
Product Name
Procedure Name
OPS/Master®
OPSMASTR (See task 12 for specific instructions for this
PROC.)
JOB/Master®
JMSCHED
JMSHUT
JOBMASTR
JMDSCM (Optional)
JMRESORC (Optional)
JMSCSPSC (Optional)
JMEVENT (Optional if used)
JMTRACE (Optional if used)
JMBPOST (Optional if used)
JMSTATUS (Optional if used)
JMPURGE (Optional if used)
JMTRACE (Optional if used)
JOBMASTV (Optional if used)
RUN/Master®
RUNMASTR
CONSOLE/Master®
CONSMSTR
CMREPORT
The startup procs are JOBMASTR, RUNMASTR, CONSMSTR and OPSMASTR. Information about the startup procs and the tailorable batch procs can be found in the back of
this chapter.
Member JMREPTS in the ISPF skeleton library HLQ.ISPSLIB needs to be modified to
use the correct “HLQ.LOADLIB” and “SYS1.SCEERUN” L/E runtime library.
Check to verify successful completion.
Task
11.0
Page - 446
Apply PTMs.
Mantissa Corporation © 2013
E:\Manuals\Product Manuals\ASO\OM (OPS Master)\Reference Guide\Current Release\OPS_C29.fm
The following PROC members can be found in “HLQ.INSTLIB”. They should be updated
to contain the appropriate file names and any site standards and then be copied into the
appropriate PROCLIB if necessary:
OPS/MASTER®
Chapter 29
OPS/Master® Installation
If there are any PTMs to apply do so now. They will be provided on tape, 3.5 diskettes or
hard copy printout.
Check to verify successful completion.
Task
12.0
Start OPS/Master®.
The proc OPSMASTR is used to initialize all run time requirements. This member should
be put in your PROCLIB. OPSMASTR will insure that all SUBSYSTEM name entries are
built for all OPS/Master® components and all data capture routines are properly installed.
We recommend that the ‘S OPSMASTR’ command be put in
SYS1.PARMLIB(COMMNDxx) with PARM='REFRESH=ALL'. Once initialized, all
routines are valid for the life of the IPL.
For the first execution you may enter 'S OPSMASTR' on the system console.
)
Failure to start OPSMASTR could result in an S047 abend.
Check to verify successful completion of OPSMASTR.
Task
13.0
Start JOB/Master®, RUN/Master® and CONSOLE/Master®.
S JOBMASTR*
S RUNMASTR*
E:\Manuals\Product Manuals\ASO\OM (OPS Master)\Reference Guide\Current Release\OPS_C29.fm
S CONSMSTR*
*Whatever you named your startup proc.
Check to verify successful startup.
Task
14.0
Update profiles and set security.
Refer to chapter 32 for information on how to assign global information for each product.
Refer to chapter 33 for setting up ISPF security.
Also, each new TSO user must complete the profile update to set user PF keys and JCL
defaiults before using OPS panels.
Check to verify successful startup.
Mantissa Corporation © 2013
Page - 447
Chapter 29
OPS/MASTER®
OPS/Master® Installation
Task
15.0
Miscellaneous operational procedures.
JOB/Master®
The JOB/Master® Controller may be deactivated by entering the command Z in the data
base creation job tracking session. Because the Z command has such broad implications to
an installation running under JOB/Master® control, it has been purposely left off the command menu and it is secured using ISF. The JOB/Master® Controller can also be closed
down using the procedure JMSHUT, which has been supplied in the INSTLIB data set.
The procedure is activated from the console with an "S" start command, for example:
S JMSHUT
When no parms are supplied, the default SUBID is “JM01”. To shutdown another JOB/
Master® region, enter:
S JMSHUT,PARM=JM02
where JM02 is the SUBID assigned to the second control region.
RUN/Master®
In order to stop the execution of RUN/Master®, issue the following command:
P RUNMASTR
CONSOLE/Master®
In order to stop the execution of CONSOLE/Master®, issue the following command:
P CONSMSTR
Task
16.0
Setting up your system.
Refer to chapter 34 for notes about initially setting up your JOB/Master database calendars.
Refer to chapter 36 for miscellaneous information about JOB/Master’s testing modes.
Page - 448
Mantissa Corporation © 2013
E:\Manuals\Product Manuals\ASO\OM (OPS Master)\Reference Guide\Current Release\OPS_C29.fm
Refer to chapter 35 for information about how to track jobs.
OPS/MASTER®
Chapter 29
OPS/Master® Installation
OPS/Master® DASD Requirments and Installation Defaults
MODULE
NAME
FILE
NAME
SPACE
ALLOC.
(CYL)
DIR.
BLOCKS
REQUIRED
# OF
MEMBERS
FILE
FORMAT
FUNCTION
INSTLIB
(2,0)
43
59
PDS
System JCL
LOADLIB
(8,0)
35
67
PDS
Execution Module
ISPLLIB
(5,0)
35
14
PDS
ISPF Executables
ISPMLIB
(3,0)
35
16
PDS
ISPF Messages
ISPPLIB
(6,0)
120
270
PDS
ISPF Panels
ISPSLIB
(2,0)
35
6
PDS
ISPF JCL Skeleton
CONTROL
(1,0)
SECFILE
(3,1)
VSAM
Security
CMMASTER
(10,5)
VSAM
Console DB
JMDB
(50,5)
VSAM
Job DB
JMJOBQ
(10,5)
VSAM
Scheduling Queue
JMSCHQ
(10,5)
VSAM
Scheduling work
Queue
JMHIST
(20,0)
VSAM
History File
RMASTR
(50,10)
VSAM
Rerun DB
RMLOG
(5,0)
VSAM
History File
JMSTGPDS*
User def
User def
User def
PDS
Staging JCL
DOCLIB
User def
User def
User def
PDS
Job Documentation for
JCL/Master
JCLLIB**
User def
User def
User def
PDS
Master Sub Lib
PROCLIB**
User def
User def
User def
PDS
OPS Proc Lib
SYSTEM
OPS/
Master
Control
Console/
Master
Job/
Master
E:\Manuals\Product Manuals\ASO\OM (OPS Master)\Reference Guide\Current Release\OPS_C29.fm
Run/
Master
User
Files
**Allocate these libraries only if you do not want to include OPS members in existing production libraries.
*JMSTGPDS- Site requirements vary. STGPDS should be large enough to accomodate the JCL for X number of jobs for
N number of days.
Mantissa Corporation © 2013
Page - 449
E:\Manuals\Product Manuals\ASO\OM (OPS Master)\Reference Guide\Current Release\OPS_C29.fm
Chapter 29
Page - 450
OPS/MASTER®
OPS/Master® Installation
Mantissa Corporation © 2013
OPS/MASTER®
Chapter 30
JOB/Master® Advanced Functions
Operating Multiple Control Regions
Chapter 30
JOB/Master® Advanced Functions
Operating Multiple Control Regions
Multiple JOB/Master®s can be run with each region having its own data base. This facility can be useful if one wishes to have a test version of JOB/Master® for new releases or
user testing. Any job can be assigned to the specific JOB/Master® region with the use of
an associated character on the job card.
SUBID=XXXX=Y
(DEFAULT = JM01=¢)
where:
E:\Manuals\Product Manuals\ASO\OM (OPS Master)\Reference Guide\Current Release\OPS_C30.fm
)
XXXX
is the subsystem ID assigned to this control region.
Y
is the job card character which will associate the job with this
JOB/Master® region.
Some procedures have a parameter to be coded for multiple regions. JOB/Master can support up to 4 regions in one ISPF panel structure. The second
through fourth system would be identified as JM02, JM03 and JM04. Refer to
the following information.
The following considerations apply when setting up a multiple region environment. The
parameters to associate functions with a specific JOB/Master® region is specified as
"SUBID" for the subsystem ID associated with the region in the new JOB/Master® control region procedure.
1.
Define and initialize files for the new system. All files must be uniquely defined
with the exception of the security file and the default submit PDS which can be
shared as desired.
2.
Create new procedures, specifying the new control region’s SUBID, for the following:
JOBMASTR
JMSHUT
Mantissa Corporation © 2013
Page - 451
Chapter 30
OPS/MASTER®
Job Submit User Exit Facility
JOB/Master® Advanced Functions
JMSCHED
3.
Create new procedures, specifying the new control region’s SUBID, for all batch
jobs.
In order to remove extra JOB/Masters from z/OS or change the SMF/ID (moving to a new
processor), you must do the following:
1.
To remove or inactivate a JOB/Master control region, the control region’s
PROCs and batch JCL should be removed from production libraries. You must
also change all of the panels referring to the subsystem.
2.
To remove or change the SMF/ID, you must use the PF command in the tracking
panel (LQ function) to disable the old SMF/ID.
Job Submit User Exit Facility
The JOB/Master® job submit facility allows for a user exit (JMSUBEXT) to gain control
during job submission. The use of this exit is optional and does not need to be used unless
user modifications are to be made to the JCL as it is being submitted to the MVS system.
When JOB/Master® is about to retrieve a job from the submit PDS it first calls the user
exit JMSUBEXT, which can take over the JCL retrieval task of the submit function, or
modify the JCL being submitted.
Exit JMSUBEXT is loaded when the first job is submitted. If the exit is not in the load
library or Linklist dataset, a message is issued by JOB/Master® and the exit will not be
called again. Ignore the MODULE NOT FOUND message for JMSUBEXT if you are not
using a submit exit.
The exit can be dynamically retried or reloaded by issuing a JOB/Master® submit (S)
command under Job Tracking, for a job that is defined to the database with a submit type
of E. The E type is not documented in the Job Definition chapter for performance reasons.
At job submission time, JOB/Master® will insert three statements into the submit JCL
stream. They are:
The statements can be used by the user in the submit exit to assign specific attributes to the
job. For example, the //*JMSECURE statement can be used to overlay security information such as Logon ID or password variables.
SAMPLE EXITS
Member JMJES3XT in the INSTLIB dataset is a sample Job Submit exit which will
change all //*NET control cards to comment cards. With this exit, JES3 users can phase in
jobs under JOB/Master®. When JOB/Master® submits the JCL, job netting is nullified;
when JOB/Master® is not used netting is in effect.
Member JMSUBEXT in the INSTLIB dataset is a null job submit exit. It contains an entry
and exit coding similar to IEFBR14. It provides the framework for a user-developed job
submit exit.
Member JMRACFXT in the INSTLIB dataset is a sample job submit exit that changes all
//*JMRACF cards to hold RACF user and password information. With this exit, RACF
information can be dynamically added to a job’s JOBCARD without having to be held in
the submit PDS.
Page - 452
Mantissa Corporation © 2013
E:\Manuals\Product Manuals\ASO\OM (OPS Master)\Reference Guide\Current Release\OPS_C30.fm
//*JMUSER
//*JMSECURE
//*JMCPUAFF
OPS/MASTER®
Chapter 30
JOB/Master® Advanced Functions
Job Submit User Exit Facility
EXIT PARAMETER LIST
Upon entry to JMSUBEXT, register 1 (R1) points to a parameter list that contains the
address of the submit exit data area:
.
R1
A(EXLIST)
Exit Parameter List
E:\Manuals\Product Manuals\ASO\OM (OPS Master)\Reference Guide\Current Release\OPS_C30.fm
Length
Name
Definition
8
UEJOB
PDS member name that contains the job to be submitted. This
name may differ from Jobname in entry 5 if an alternate submit
name is being used.
80
UEREC
JCL image to be submitted. This field contains blanks on first call
to JMSUBEXT.
60
UERUNINS
Run Instructions field as it appears on the JOBMASTER Database
for the job being submitted.
8
UEDBNAME
Field which contains the Jobname as it is defined on the JOBMASTER Database.
8
UERESNAM
Resource Name that was assigned to this job on the Job Definition.
4
UERESYS
SMFID where this job is to be routed based on the Resource Name
from the Resource Table.
8
UEUSRID
Field that contains the USERID that last updated the job definition.
8
UETRIGBY
If the job being submitted is a triggered job this is the field that
contains the triggering job name.
80
UEMESG
Message area which can be used to indicate action taken by the
user exit. If the submit is denied by the exit, then this message will
be logged for the job.
EXIT RETURN CODES
Upon return from JMSUBEXT, a valid return code is expected in register 15 (R15). The
following return codes control the submission processing:
VALUE
ACTION
0
A return code of zero from the first call to exit JMSUBEXT
will signal JOB/Master® to read the PDS and pass records to
the user exit one by one for inspection. Modification of each
record is allowed. The first call is identified by passing to the
exit all blanks, instead of JCL image, in entry 2.
4
A return code of 4 from the first call to exit JMSUBEXT sig-
Mantissa Corporation © 2013
Page - 453
Chapter 30
OPS/MASTER®
Logon and Command Intercept Facility
JOB/Master® Advanced Functions
nals JOB/Master® to call the exit for the submission JCL. The
user exit is responsible for passing the JCL images to JOB/
Master®. The exit will be called for additional JCL images
until a return code of 8 is returned by the exit.
8
This indicates that JCL has been passed to JOB/Master® for
this job.
12
On the first call, a return code of 12 signals JOB/Master® not
to submit the job, and not to call the exit again for this submission. After the first call, a return code of 12 causes JOB/Master® to cancel the job being submitted on the internal reader.
Logon and Command Intercept Facility
The Logon and Command Intercept Facility allows a user exit to gain control for the purpose of interfacing JOB/Master® application security with a data center’s main security
system. The exit will allow the user to bypass ISF security and control access via their
own security system. The exit will be invoked at the following points.
1.
When an on-line session is initiated.
2.
When any JOB/Master® command is executed.
3.
By JMSCHED program when a schedule is generated.
4.
When JMEVENT program is run.
5.
When JMBPOST program is run.
The exit is loaded during session initialization. The library in which the exit can be found
is specified on the JOB/Master® SCHEDULING OPTIONS screen in the PDS FOR
“JMCMDEXT” LOAD field. If the exit is not found, a message will be issued and the exit
will not be activated. If the exit is subsequently installed, the user should terminate the
session and reinitiate it in order to activate the exit.
Specification of the library to be used for loading the exit can be made in the JOB/Master® profile. If a library is specified in the profile then only that PDS will be used when
loading the exit.
Member JMCMDEXT in the INSTLIB dataset is a sample logon and command exit. It
contains an entry and exit coding similar to IEFBR14. It provides the framework for a
user-developed logon and command exit. A table of JOB/Master® commands is contained
in this exit.
EXIT PARAMETER LIST
Upon entry to JMCMDEXT, register 1 (R1) points to a parameter list that contains the
address of the command exit data area.
R1
A(EXLIST)
Page - 454
Mantissa Corporation © 2013
E:\Manuals\Product Manuals\ASO\OM (OPS Master)\Reference Guide\Current Release\OPS_C30.fm
SAMPLE EXIT
OPS/MASTER®
Chapter 30
JOB/Master® Advanced Functions
JOB/Master® History File
Offsets
Type
Length
Description
0
Character
8
USERID issuing command
8
Character
8
Command Being Issued.
16
Character
8
JOBNAME being acted upon, if applicable.
24
Character
1
Current ISF authorization for function:
Y=Yes, N=No
25
Character
70
Message area. A message displayed to
the user if the command is denied.
EXIT RETURN CODES
Upon return from JMCMDEXT there is no required return code, however, register 15
(R15) should contain zeros. The current authorization field is used as the indicator for continued processing. If the value is a “Y” then processing continues for the function; if it is
“N” then processing will be denied for the function.
JOB/Master® History File
General Information
The History file is a ‘wrap file’ and will overwrite records when file capacity has been
reached. JMHIST will not abend or issue a message for space shortage. Your first indication may be when the ‘DL’ command is issued from Job Tracking to display a list of the
last 9 executions of a job and 'garbage' (i.e., unrelated data or blank spaces) appears in the
earlier entries. Running an IDCAMS Print against the JMHIST file will show you where
the file began overwriting. With version 5.21 the garbage blank lines have been removed
— hence the display may not show all nine entries.
E:\Manuals\Product Manuals\ASO\OM (OPS Master)\Reference Guide\Current Release\OPS_C30.fm
If you are uncertain as to the actual JMHIST file capacity your site will need, you can follow the simple instructions in the “History File Calculation” section on the next pages to
make that determination. This will be possible after a few weeks of “production” experience. The maximum number of days retention is 366.
)
When the history file is initialized, all records prior to it are lost, unless a
restore (JMRESTOR) is done after initialization. Whenever possible it is recommended a JMBACKUP be performed prior to any initialization process.
History File Calculation
1.
On a daily basis (same time each day) over a period of ‘X’ days:
• Check the LAST USED record in JOB/Master® Profile.
• Deduct that amount from the previous day’s count.
• Record the difference.
At the end of the time period, the average Records/Day can be determined by
summarizing the differences and dividing by ‘X’.
Mantissa Corporation © 2013
Page - 455
Chapter 30
OPS/MASTER®
JOB/Master® History File
JOB/Master® Advanced Functions
2.
In JMVDEF1 (usually in site install library):
• Verify number of cylinders that were allocated to accomodate the History File
Capacity (JOB/Master® Profile).
• Divide History File Capacity by number of cylinders for Records/Cylinder.
3.
Determine number of days of retention desired. The maximum number of days
retention is 366.
4.
Multiply the number of days retention by the Average Records/Day.
(This is the needed HISTORY FILE CAPACITY).
5.
Divide the needed HISTORY FILE CAPACITY by the number of Records/Cylinder. This will indicate how many cylinders you need to accomodate the History
File.
STEP 1:
Day 1: Last Used Record: 22550
Day 2: Last Used Record: 25500
Day 3: Last Used Record: 28750
Day 4: Last Used Record: 31500
Day 5: Last Used Record: 33000
Day 6: Last Used Record: 35500
Total number of records
Total number of days
=
Difference: 2950
Difference: 3250
Difference: 2750
Difference: 1500
Difference: 2500
Total number of records 12950
Average Records/Day
12950 =2590
5
STEP 2:
JMVDEF1 indicates 20 cylinders was used to create a file to hold 34800 rcords.
History File Capacity
=
Number of Cyl/JMVDEF1
Number of Records/Cyl
34800 = 1740
20
STEP 3:
Number of days retention: 40
STEP 4:
STEP 5:
Needed History File Capacity = Total Cylinders Needed
Number of Records/Cyl
103600 =59.5(60)
1740
Increasing History File
Once you have determined the necessary capacity, take the following steps to properly
increase the JMHIST file:
Page - 456
1.
Exec JMBACKUP selecting ‘H’ to only backup the history file. The JCL for this
resides in the INSTLIB. Modify for your site naming standards.
2.
Exec JMVDEF1 for the JMHIST file only, increasing the CYL as previously
determined in the History file calculation.
Mantissa Corporation © 2013
E:\Manuals\Product Manuals\ASO\OM (OPS Master)\Reference Guide\Current Release\OPS_C30.fm
(Number of days retention) X (Average Records/Day): 40 X 2590 = 103600
OPS/MASTER®
Chapter 30
JOB/Master® Advanced Functions
JOB/Master® History File
3.
Exec OPSLINIT (in JMVINIT JCL). This will seed records according to the size
of the file.
4.
Exec JMRESTOR selecting 'H' for only the history file and reference the backup
created in Step 1. This JCL resides in the INSTLIB. Modify for your site naming
standards.
Example: JMVINIT JCL can be found in INSTLIB.
//JMVINIT
JOB
(0000,0001),'JOBMASTER',CLASS=A,
//
MSGCLASS=X
//*---------------------------------------------*
//* REMOVED JMDB AND JMJOBQ INITIALIZATION STEPS*
//*---------------------------------------------*
//STEP03
EXEC PGM=OPSLINIT
//SYSUDUMP DD
SYSOUT=*
//OPSLOG
DD
DSN=VSMHLQ.JMHIST,DISP=SHR
This procedure will only increase the space at the end of the file. The current
pointer will not change. So, any new data will continue to overlay existing
records until the new records are reached.
E:\Manuals\Product Manuals\ASO\OM (OPS Master)\Reference Guide\Current Release\OPS_C30.fm
)
Mantissa Corporation © 2013
Page - 457
Chapter 30
JOB/Master® Advanced Functions
E:\Manuals\Product Manuals\ASO\OM (OPS Master)\Reference Guide\Current Release\OPS_C30.fm
JOB/Master® History File
OPS/MASTER®
Page - 458
Mantissa Corporation © 2013
QUICK START
Version 5.20.1
Mantissa Corporation®
1012 Edenton Street
Birmingham, Alabama 35242
OPS/MASTER®
OPS/Master® is a software product of Mantissa Corporation. All rights are reserved, and reproduction, use of, or distribution of this documentation is prohibited unless written consent is obtained from Mantissa Corporation. This document contains proprietary information and is intended for use only by licensees of OPS/Master® and those
evaluating its potential worth in their respective operating environment.
E:\Manuals\Product Manuals\ASO\OM (OPS Master)\Reference Guide\Current Release\SECT6cvr.fm
© Copywrite - Mantissa Corporation 1989-2013
Publication Information
Publication Name:
Publication Number
Release:
Mantissa Corporation © 2013
QUICK START GUIDE
OPS002-JMIN
5.20.1
Page - 452
OPS/MASTER®
Introduction to QuickStart
Introduction to QuickStart
QuickStart is a guide to steps required to fully implement OPS/Master® functions. It
answers the question: “So what do I do now that OPS/Master® is installed? By following
this guide carefully, you should be able to execute the various OPS/Master® functions
with minimum effort.
E:\Manuals\Product Manuals\ASO\OM (OPS Master)\Reference Guide\Current Release\OPS_P03.fm
From this point, we assume that the installation procedures have been followed and completed; that all OPS/Master® products applicable are started. These include JOB/Master®,
RUN/Master® and CONSOLE/Master®.
Mantissa Corporation © 2013
Page - 453
E:\Manuals\Product Manuals\ASO\OM (OPS Master)\Reference Guide\Current Release\OPS_P03.fm
OPS/MASTER®
Introduction to QuickStart
Page - 454
Mantissa Corporation © 2013
OPS/MASTER®
Chapter 31
Procs
OPSMASTR
Chapter 31
Procs
These procs are in the INSTLIB downloaded during installation and should be copied into
the appropriate procedure library for execution:
OPSMASTR
This procedure sets up the OPS/Master® system environment and installs the SMF front
ends. It must be executed before any other OPS/Master® product is started.
OPS/Master® Procedure Parameters
SYSS=XXXX
Default OPS1
REFRESH=XXXXXXXXRefresh=ALL
TRACE
Prints address of locations of exits.
E:\Manuals\Product Manuals\ASO\OM (OPS Master)\Reference Guide\Current Release\OPS_C31.fm
This procedure requires security information to be available to be validated before continuing. Member OPSMASTP in HLQ.INSTLIB contains a sample. This member must be
updated with the values included in your installation instructions.
SAMPLE:
CODE=ASEFDGTJK754FG
COMPANY=MANTISSA CORPORATION
JOBMASTR
This procedure brings up the JOB/Master® Control Region.
)
Mantissa Corporation © 2013
The dispatching priority for JOB/Master® should be sufficiently high so as to
prevent any possibility of loss of service to the JOB/Master® Control Region.
The recommended approach is to establish JOB/Master® in a performance
Group (PG) under System Resource Manager (SRM) at a dispatching priority
equivalent to other critical on-line applications, certainly above batch workload.
Page - 459
Chapter 31
OPS/MASTER®
JOBMASTR
Procs
JOBMASTR Procedure Parameters
SSYS=XXXX
(Not Required). This parameter defines the name of the JES
subsystem. If omitted the primary subsystem name is used.
TIME=NNN
The time parameter indicates the number of seconds to idle
before looking for work on the scheduling queue (JMJOBQ).
The parameter must be a three (3) digit number. The Scan time
is only used if there is not activity in the system. Work is event
driven and will start as dependencies and triggers are satisfied.
Default=300
STRT=
This parameter indicates whether JOB/Master® should begin
submitting jobs at startup or wait until an “SS” (start submit)
command is issued. The parameter must be either a Y or N. Set
STRT=Y for the first time even if you want to manually start
the submit facility. After the first time you would set it to NO.
Default=N
FORC=
If JOB/Master® is cancelled from the system and does not
have an opportunity to do resource cleanup, then at the next
startup of JOB/Master®, the message “JM00 JOB/Master®
ALREADY ACTIVE” may be issued. If JOB/Master® is truly
not active, use FORC=Y to initiate resource cleanup and then
restart JOB/Master®.
Default=N
SUBID=XXXX=Y
The SUBID=XXXX assigns this JOB/Master® Control
Region to a specific subsystem ID other than the default region
which is assigned to subsystem ID JM01. (This parameter
allows the running of up to four (4) separate JOB/Master®
regions within the same processor).
The Y represents the tracking character on the job card which
will associate the job(s) to this JOB/Master® subsystem.
LEVEL=
This parameter specifies the high level qualifier for the OPS/
Master® files. This qualifier, along with the standard suffix for
each file, will be used in allocating the main files.
Default=VSMHLQ (It should be changed to your high level
qualifier).
RJT=
This parameter specifies the Remote Job Tracking indicator. Y
indicates this Control Region will be tracking a remote system
via NJE. N indicates remote tracking is not implemented.
Default=N.
BUFFS=
Page - 460
This parameter specifies the number of Buffers to be allocated
for JOB/Master®. A good rule of thumb is one buffer per initiator, + 11 for miscellaneous buffers, + 10 for dataset triggers, +
10 for database access by TSO sessions. If your installation has
Mantissa Corporation © 2013
E:\Manuals\Product Manuals\ASO\OM (OPS Master)\Reference Guide\Current Release\OPS_C31.fm
Default=JM01= ¢ (cent sign)
OPS/MASTER®
Chapter 31
Procs
JMSCHED
more requirements, consider increasing the number of buffers.
Each buffer will require 1K of dataspace storage. Previous versions allocated the buffers out of CSA, but now the buffers are
allocated out of one dataspace. The number of buffers can be
specified larger than the above guidelines without impacting
your system.
Default= 061 (minimum number of buffers)
Cycle Processing
The cycle interval, which is used by the scheduler for scanning the JOB/Master® scheduling file for jobs to be submitted, can be user defined rather than using the following
default values:
SCHEDULER SUBMIT FACILITY DEFAULT = INACTIVE
SCHEDULER SUBMIT FACILITY SCAN = 5 MINUTES
The parameters, TIME= and STRT= described above, can alter the default values when
initiating the JOB/Master® control region.
)
The scan time is used only if the system is idle. Under normal circumstances,
jobs are started as events are completed. However, if there is no activity, then
the scan time interval will cause JOB/Master® to see if any time dependency
has been satisfied.
JMSCHED
Schedule Generation Parameters
The schedule is accomplished via a scheduled operation job. The JOB/Master® control
region must be active when this job is run. The scheduling process creates the daily schedule and the scheduling reports. All backlogged jobs are carried over to the new schedule.
The batch scheduling job can, itself, be scheduled thus making the daily schedule creation
totally automated.
There are two (2) types of scheduling runs.
E:\Manuals\Product Manuals\ASO\OM (OPS Master)\Reference Guide\Current Release\OPS_C31.fm
1.
SIMULATION Schedule
This schedule is used to project what is going to be scheduled on a given day or
time. These simulation runs can schedule any number of consecutive days
desired. The jobs are not actually placed onto the scheduling queue, but are
shown in a report from the job execution. Use of the “GSS” commands in the
JOB/Master® tracking panel will provide the necessary selection criteria for
these runs.
)
Mantissa Corporation © 2013
If you attempt to create a simulation schedule for the current schedule day
and the regular jobs have already been scheduled, the jobs will not show on
the scheduling reports. They will appear on the Backlog Report.
Page - 461
Chapter 31
OPS/MASTER®
JMSCHED
Procs
2.
ACTUAL Schedule
The actual scheduling runs are completed for a 24 hour period only. They also
generate multiple reports showing different sequences of the scheduling process.
All jobs having the scheduling criteria for that day(s) will be placed on to the
scheduling queue (JOBQ). Only one 24 hour period may be scheduled at a time,
but you may execute as many 24 hour periods as desired. This is accomplished
by allowing JOB/Master® to place the next scheduled date and time into the
parameter or by a specific job (JMSCHED) being executed and changing the
Scheduling dates within the execution JCL of the batch job or altering the
selected dates on the ONLINE “GS” commands from the tracking system of
JOB/Master®.
Batch Mode
Batch mode schedule generation consists of the following process:
Verify that the procedures have been installed into your PROCLIB during installation,
then execute the following job:
//SCHED
//STEP1
//
//
//
//
//
//
//
JOB
(JOB CARD PARAMETERS)
EXEC JMSCHED,
STRTTME=0000, SCHD FROM TIME
STRTDTE=00000, SCHD FROM DATE
ENDTME=0000, SCHD TO TIME
ENDDTE=00000, SCHD TO DATE
TYPE= ,
TYPE OF SCHD RUN
SUBID=JM01 J/M SUBSYSTEM ID.
REPTS=‘YYYNNN’ SCHD REPORTS
Substitution variables are defined below.
STRTTME=HHMM
STRTTME is the beginning time which will be used in determining which jobs
fall into the period being scheduled. HH = Hour, MM = Minute
STRTDTE=YYDDD
ENDTME=HHMM
ENDTME is the ending time which will be used in determining which job falls
into the period being scheduled. HH = Hour, MM = Minute
ENDDTE=YYDDD
ENDDTE is the ending date which will be used in determining which jobs fall
into the period being scheduled. YY = Year, DDD = Day (Julian Date)
For Example:
STRTTME=0700
STRTDTE=93100
ENDTME=0000
ENDDTE=00000
Page - 462
Mantissa Corporation © 2013
E:\Manuals\Product Manuals\ASO\OM (OPS Master)\Reference Guide\Current Release\OPS_C31.fm
STRTDTE is the beginning date used to determine the starting period being
scheduled. YY = Year, DDD = Day (Julian Date)
OPS/MASTER®
Chapter 31
Procs
JMSCHED
will schedule all jobs whose calendar or process keyword criteria fall on 93100 or 93101
with a submit time between 0700 on 93100 and 0694 on 93101. Zero end specifications
default 24 hours.
STRTTME=0700
STRTDTE=93100
ENDTME=1600
ENDDTE=93100
will schedule all jobs whose calendar or process keyword criteria fall on 93100 with a submit time between 0700 and 1600.
STRTTME=0700
STRTDTE=93100
ENDTME=0000
ENDATE=93102
will schedule all jobs whose calender or process keyword criteria fall between 0700 on
93100 and 0659 on 93102. (This multiple day scheduling can be used in simulation
scheduling only.)
)
A submit time of zero will always schedule the job on the STRTDTE cycle.
To request a STRTTME of 0000, you must specify 0001, since zero will default
to the same time as the last cycle.
E:\Manuals\Product Manuals\ASO\OM (OPS Master)\Reference Guide\Current Release\OPS_C31.fm
TYPE=
BLANK
Run a schedule scanning the entire data base, and also input
cards for include/exclude processing.
I
Do not scan the data base. Use only input cards for include/
exclude processing.
C
Same as option BLANK, however, only a simulated paper
schedule will be produced.
M
Same as option I, however only a simulated paper schedule
will be produced.
B
Produce backlog report only, that is, only jobs retained on the
schedule.
XXXX
is the subsystem ID, the default is JM01, of the JOB/Master®
control region with which this schedule creation will be associated. This ID can be JM01, JM02, JM03 or JM04.
SUBID=
REPTS=
YYYNNN
123456
Scheduling reports selected for print out during the scheduling phase. The reports
are indicated by the position of the Y or N in the series. Values of these fields
within the distribution procedure are “YYYNNN”. These are changeable.
“Y”=Report wanted.
Mantissa Corporation © 2013
Page - 463
Chapter 31
OPS/MASTER®
Include/Exclude Parms
Procs
“N”=Report not wanted.
)
Reports 1, 2 and 3 cannot be turned off.
JOB SCHEDULING
Scheduling Event
Analysis/Reporting
BASE
PDS
DDNAME=JMSUBPDS
Reports
JMSCHED
STAGING PDS
DAILY PDS
JMSCHEDN
JMSCHQ
1.
Job Schedule By Date and Time - This is a listing of the jobs that were scheduled as a result of this run of the JMSCHED JCL.
2.
Jobs Which Are Triggered by This Scheduled Job - This is a list by triggered
job that shows those jobs which trigger the listed job.
3.
Jobs which Require the Scheduled Job as a Predecessor - This is a list of jobs
that require the listed job as a predecessor.
4.
Job Schedule by System and Job - This is a list of the schedule sorted by system and Job.
5.
Job Schedule by Jobname - This is a list of the schedule sorted by Jobname
only.
6.
Jobs Backlogged by Date and Time - This is a list of jobs that are backlogged.
Include/Exclude Parms
JOB/Master® allows the user to both include jobs not normally selected, and/or to exclude
jobs normally selected.
Page - 464
Mantissa Corporation © 2013
E:\Manuals\Product Manuals\ASO\OM (OPS Master)\Reference Guide\Current Release\OPS_C31.fm
JMJOBQ
OPS/MASTER®
Chapter 31
Procs
Include/Exclude Parms
The control cards are specified as parameters in the SYSIN DD statement of the scheduling job. The format of the control cards are:
Columns
Value
Description
1-3
JOB
SYS
Include a single job
Include a system
4
=
Equal sign
5-12
NAME
Eight character name of job or system,
padded with blanks
14
I
FORCE include the job or system regardless of scheduling criteria
E
Exclude the job or system
S
Select the job or system only if it would
have normally been selected based on
scheduling criteria
16-20
)
Not currently being used. For future
development.
Jobs scheduled will only appear on the List Queue (LQ) if they have calendars
or process keywords in their database definition.
JCL date override in JMSCHED
E:\Manuals\Product Manuals\ASO\OM (OPS Master)\Reference Guide\Current Release\OPS_C31.fm
JCL override parms will ensure that the current date is always pulled in when executing
JMSCHED. This job must be submitted by JOB/Master®.
000001
000002
000003
000004
000005
000006
000007
000008
000009
000010
000011
000012
000013
000014
000015
000016
000017
000018
Mantissa Corporation © 2013
//SCHEDULE
JOB (0000,0000),'TCJN',CLASS=A,
//
MSGCLASS=E,NOTIFY=TCJN
//JOBLIB
DD DSN=OPS.R5.LOADLIB,DISP=SHR
//STEP1
EXEC
JMSCHED,
//*JMSYMY
//STRTDTE=’@YDDD,'STRTTME='0000'
//*JMSYMN
// ENDDTE='00000',ENDTME='0000',TYPE='I',SUBID='JM01'
//STEP1.SYSIN
DD *
SYS=BACKUP
S 00000
SYS=MAINTDLY
S 00000
SYS=CANSYS
S 00000
SYS=JOBMASTR
S 00000
SYS=CYCLE1
S 00000
SYS=PTM880
S 00000
SYS=RMSP1100
S 00000
SYS=RMSP110A
S 00000
SYS=PTM0871
S 00000
Page - 465
Chapter 31
OPS/MASTER®
JMJCLMB
Procs
000019 /*
000020 //
Job Schedule Include/Exclude List - This is a listing of the jobs that have been included
that are not normally scheduled or jobs that are normally scheduled and have been
excluded from this schedule. These exceptions were the ones in the control cards in the //
SYSIN DD statement.
JMJCLMB
If you intend to use the JCL AVS (automated variable substitution) feature, the following
JCL should be copied to the proclib. The JCL is sent for both ISPF2.3 and ISPF 3.5 - 4.1.
Select the version of ISPF for your site. Modify proc to reflect site naming standards:
//*
ISPF VERSION 2.3
//*
//*************************** N O T E *******************************
//*************************** N O T E *******************************
//*
//*
1. CHG VSMHLQ TO REFLECT HIGH LEVEL QUALIFIER FOR
//*
J/M VSAM FILES
//*
//*
2. CHG HLQ.OPS TO SITE HIGH LEVEL QUALIFIER FOR LOADLIB
//*
//*************************** N O T E *******************************
//*************************** N O T E *******************************
//*************************** N O T E *******************************
//*************************** N O T E *******************************
//JMJCLMB JOB (0000,0001),'-- JMJCLMB -- ',CLASS=A,MSGCLASS=E,
//
NOTIFY=P390N
//*
//*
ISPF VERSION 2.3
//*
OPTIONAL PARM
PARM='N,JM01,USERID'
//*
"N" = DO NOT STOP SUBMIT FACILITY DURING THE RESOLVE PROCESS
//*
"Y" = STOP SUBMIT FACILITY DURING THE RESOLVE PROCESS
//*
"T" = ENABLE THE TRACE FUNCTION DURING THE RESOLVE PROCESS
//*
//*************************** N O T E *******************************
//*
IF YOU HAVE THE ISP & ISR LOADLIB'S LOCATED IN YOUR LPA
//*
TAKE OUT THE REFERENCE TO THESE LIBRARIES IN THE ISPLLIB
//*
BELOW... THEY ARE NOT NECESSARY AND COULD CAUSE PROBLEMS
//*************************** N O T E *******************************
//*-----------------------------------------------------------------//STEP01
EXEC PGM=JMJCLMB,
//
DYNAMNBR=25,REGION=3000K
//STEPLIB DD DSN=HLQ.OPS.LOADLIB,DISP=SHR
//*------------------------------------------------------------------//*
ALLOCATE OPS/Master® FILES
//*------------------------------------------------------------------//SECMSTR DD DSN=VSMHLQ.SECFILE,DISP=SHR
//JMDB
DD DSN=VSMHLQ.JMDB,DISP=SHR
//JMJOBQ
DD DSN=VSMHLQ.JMJOBQ,DISP=SHR
//JMHIST
DD DSN=VSMHLQ.JMHIST,DISP=SHR
//CONTROL DD DSN=VSMHLQ.CONTROL,DISP=SHR
//*------------------------------------------------------------------//ISPPROF DD DSN=&&ISPPROF,UNIT=SYSDA,SPACE=(CYL,(1,,5)),
//
DCB=(RECFM=FB,LRECL=80,BLKSIZE=3120)
//*------------------------------------------------------------------//ISPPLIB DD DSN=ISP.V2R3M0.ISPPLIB,DISP=SHR
<==== PANELS
//
DD DSN=ISR.V2R3M0.ISRPLIB,DISP=SHR
//*
DD DSN=USER.ISPPLIB,DISP=SHR
<==== USER
//
DD DSN=VSMHLQ.ISPPLIB,DISP=SHR
<==== OPS
//*------------------------------------------------------------------//ISPSLIB DD DSN=ISP.V2R3M0.ISPSLIB,DISP=SHR
<==== SKELETONS
//
DD DSN=ISR.V2R3M0.ISRSLIB,DISP=SHR
//
DD DSN=USER.ISPSLIB,DISP=SHR
//*------------------------------------------------------------------//ISPMLIB DD DSN=ISP.V2R3M0.ISPMLIB,DISP=SHR
<==== MESSAGES
//
DD DSN=ISR.V2R3M0.ISRMLIB,DISP=SHR
Page - 466
Mantissa Corporation © 2013
E:\Manuals\Product Manuals\ASO\OM (OPS Master)\Reference Guide\Current Release\OPS_C31.fm
ISPF Version 2.3
OPS/MASTER®
Chapter 31
Procs
JMJCLMB
//
DD DSN=VSMHLQ.ISPMLIB,DISP=SHR
<===== OPS
//*------------------------------------------------------------------//ISPTLIB DD DSN=ISP.V2R3M0.ISPTLIB,DISP=SHR
<===== TABLES
//
DD DSN=ISR.V2R3M0.ISRTLIB,DISP=SHR
//*------------------------------------------------------------------//ISPLLIB DD DSN=ISP.V2R3M0.ISPLOAD,DISP=SHR
<==== DIALOGS
//
DD DSN=ISR.V2R3M0.ISRLOAD,DISP=SHR
//
DD DSN=VSMHLQ.ISPLLIB,DISP=SHR
<==== OPS
//*------------------------------------------------------------------//ISPCTL1 DD DSN=&&SPFCTL,UNIT=SYSDA,SPACE=(CYL,(5,1)),
//
DCB=(RECFM=FB,LRECL=80,BLKSIZE=3120)
//ISPLOG
DD SYSOUT=*,DCB=(LRECL=121,BLKSIZE=1210,RECFM=FBA)
//SYSTSPRT DD SYSOUT=*
//SYSTSIN DD DSN=&&TMPCTL,UNIT=SYSDA,SPACE=(CYL,(2,1)),
//
DCB=(RECFM=FB,LRECL=80,BLKSIZE=3200)
//
//*
//*************************** N O T E *******************************
//*************************** N O T E *******************************
//*************************** N O T E *******************************
//*
E:\Manuals\Product Manuals\ASO\OM (OPS Master)\Reference Guide\Current Release\OPS_C31.fm
ISPF Version 3.5
//*
ISPF VERSION 3.5
//*
//*************************** N O T E *******************************
//*
1. CHG OPS.PROD TO REFLECT HIGH LEVEL QUALIFIER FOR
//*
J/M VSAM FILES
//*
//*
2. CHG OPS.PROD TO SITE HIGH LEVEL QUALIFIER FOR LOADLIB
//*
//*************************** N O T E *******************************
//*************************** N O T E *******************************
//*************************** N O T E *******************************
//JOBNAME JOB (0000,0001),'-- JMJCLMB -- ',CLASS=A,MSGCLASS=X,
//
NOTIFY=USERID
//*
//*
ISPF VERSION 3.5
//*************************** N O T E *******************************
//*
OPTIONAL PARM
PARM='N,JM01,USERID'
//*
"N" = DO NOT STOP SUBMIT FACILITY DURING THE RESOLVE PROCESS
//*
"Y" = STOP SUBMIT FACILITY DURING THE RESOLVE PROCESS
//*
"T" = ENABLE THE TRACE FUNCTION DURING THE RESOLVE PROCESS
//*
//*************************** N O T E S ******************************
//*
//*
ISP.V3R5M0.???LPA EXECUTION LIBRARIES NEEDS TO EITHER BE
//*
LINK-LISTED OR PLACED IN THE LPA. THEY CANNOT BE
//*
CONCATENATED WITH THE STEPLIB FOR THE OPS LOADLIB.
//*
//*
IF YOU HAVE THE ISP & ISR LOADLIB'S LOCATED IN YOUR LPA
//*
TAKE OUT THE REFERENCE TO THESE LIBRARIES IN THE ISPLLIB
//*
BELOW... THEY ARE NOT NECESSARY AND COULD CAUSE PROBLEMS
//*
//*************************** N O T E S ******************************
//*-----------------------------------------------------------------//STEP01
EXEC PGM=JMJCLMB,
//
DYNAMNBR=25,REGION=3000K,PARM='T,JM01,TCJN'
//STEPLIB DD DSN=HLQ.OPS.LOADLIB,DISP=SHR
//*------------------------------------------------------------------//*
ALLOCATE OPS/Master® FILES
//*------------------------------------------------------------------//SECMSTR DD DSN=VSMHLQ.SECFILE,DISP=SHR
//JMDB
DD DSN=VSMHLQ.JMDB,DISP=SHR
//JMJOBQ
DD DSN=VSMHLQ.JMJOBQ,DISP=SHR
//JMHIST
DD DSN=VSMHLQ.JMHIST,DISP=SHR
//CONTROL DD DSN=VSMHLQ.CONTROL,DISP=SHR
//SYSOUT DD SYSOUT=(,)
//*------------------------------------------------------------------//ISPPROF DD DSN=&&ISPPROF,UNIT=3380,SPACE=(CYL,(1,,5)),
//
DCB=(RECFM=FB,LRECL=80,BLKSIZE=3120)
//*------------------------------------------------------------------//ISPPLIB DD DSN=ISP.V3R5M0.ISPPENU,DISP=SHR
<==== PANELS
//
DD DSN=ISR.V3R5M0.ISRPENU,DISP=SHR
//
DD DSN=VSMHLQ.ISPPLIB,DISP=SHR <==== OPS
Mantissa Corporation © 2013
Page - 467
Chapter 31
OPS/MASTER®
JMJCLMB
Procs
//*------------------------------------------------------------------//ISPSLIB DD DSN=ISP.V3R5M0.ISPSLIB,DISP=SHR
<==== SKELETONS
//
DD DSN=ISR.V3R5M0.ISRSENU,DISP=SHR
//
DD DSN=VSMHLQ.JCLLIB,DISP=SHR
<==== OPS
//*------------------------------------------------------------------//ISPMLIB DD DSN=ISP.V3R5M0.ISPMENU,DISP=SHR
<==== MESSAGES
//
DD DSN=ISR.V3R5M0.ISRMENU,DISP=SHR
//
DD DSN=VSMHLQ.ISPMLIB,DISP=SHR <==== OPS
//*------------------------------------------------------------------//ISPLLIB DD DSN=ISP.V3R5M0.ISPLOAD,DISP=SHR
<==== DIALOGS
//
DD DSN=ISR.V3R5M0.ISRLOAD,DISP=SHR
//
DD DSN=VSMHLQ.ISPLLIB,DISP=SHR <==== OPS
//*------------------------------------------------------------------//ISPTLIB DD DSN=ISR.V3R5M0.ISRTLIB,DISP=SHR
<==== TABLES
//
DD DSN=ISP.V3R5M0.ISPTENU,DISP=SHR
<==== TABLES
//*------------------------------------------------------------------//ISPCTL1 DD DSN=&&SPFCTL,UNIT=3380,SPACE=(CYL,(5,1)),
//
DCB=(RECFM=FB,LRECL=80,BLKSIZE=3120)
//ISPLOG
DD SYSOUT=*,DCB=(LRECL=121,BLKSIZE=1210,RECFM=FBA)
//SYSTSPRT DD SYSOUT=(,)
//SYSTSIN DD DSN=&&TMPCTL,UNIT=3380,SPACE=(CYL,(2,1)),
//
DCB=(RECFM=FB,LRECL=80,BLKSIZE=3200)
//*************************** N O T E *******************************
//*************************** N O T E *******************************
//*
//*
ISPF VERSION 4.1
//*
//*************************** N O T E *******************************
//*************************** N O T E *******************************
//*
//*
1. CHG VSMHLQ TO REFLECT HIGH LEVEL QUALIFIER FOR
//*
J/M VSAM FILES
//*
//*
2. CHG HLQ.OPS TO SITE HIGH LEVEL QUALIFIER FOR LOADLIB
//*
//*************************** N O T E *******************************
//*************************** N O T E *******************************
//JMJCLMB JOB (0000,0001),'-- JMJCLMB -- ',CLASS=A,MSGCLASS=X
//
//*
OPTIONAL PARM
PARM='N,JM01,USERID'
//*
"N" = DO NOT STOP SUBMIT FACILITY DURING THE RESOLVE PROCESS
//*
"Y" = STOP SUBMIT FACILITY DURING THE RESOLVE PROCESS
//*
"T" = ENABLE THE TRACE FUNCTION DURING THE RESOLVE PROCESS
//*
//*
//*
ISPF V4.1 SYS1.SISPLPA EXECUTION LIBRARY
//*
NEEDS TO EITHER BE LINK-LISTED
//*
OR IN THE LPA. IT CANNOT BE
//*
CONCATENATED WITH THE STEPLIB FOR THE OPS LOADLIB.
//*
//*
IF YOU HAVE THE SYS1.SISSPLOAD LOADLIB LOCATED IN YOU LPA
//*
TAKE OUT THE REFERENCE TO THIS LIBRARY IN THE ISPLLIB
//*
BELOW... IT IS NOT NECESSARY AND COULD CAUSE PROBLEMS
//*
//*************************** N O T E S ******************************
//*-----------------------------------------------------------------//STEP01
EXEC PGM=JMJCLMB,
//
DYNAMNBR=25,REGION=3000K,PARM='T,JM01,USERID'
//STEPLIB DD DSN=HLQ.OPS.LOADLIB,DISP=SHR
//*------------------------------------------------------------------//*
ALLOCATE OPS/Master® FILES
//*------------------------------------------------------------------//SECMSTR DD DSN=VSMHLQ.SECFILE,DISP=SHR
//JMDB
DD DSN=VSMHLQ.JMDB,DISP=SHR
//JMJOBQ
DD DSN=VSMHLQ.JMJOBQ,DISP=SHR
//JMHIST
DD DSN=VSMHLQ.JMHIST,DISP=SHR
//CONTROL DD DSN=VSMHLQ.CONTROL,DISP=SHR
//SYSOUT DD SYSOUT=(,)
//*------------------------------------------------------------------//ISPPROF DD DSN=&&ISPPROF,UNIT=3380,SPACE=(CYL,(1,,5)),
//
DCB=(RECFM=FB,LRECL=80,BLKSIZE=3120)
//*------------------------------------------------------------------//ISPPLIB DD DSN=SYS1.SISPPENU,DISP=SHR
<==== PANELS
Page - 468
Mantissa Corporation © 2013
E:\Manuals\Product Manuals\ASO\OM (OPS Master)\Reference Guide\Current Release\OPS_C31.fm
ISPF Version 4.1
OPS/MASTER®
Chapter 31
Procs
CONSMSTR
//
DD DSN=VSMHLQ.ISPPLIB,DISP=SHR
<==== OPS
//*------------------------------------------------------------------//ISPSLIB DD DSN=SYS1.SISPSENU,DISP=SHR
<==== SKELETONS
//
DD DSN=VSMHLQ.JCLLIB,DISP=SHR
<==== OPS
//*------------------------------------------------------------------//ISPMLIB DD DSN=SYS1.SISPMENU,DISP=SHR
<==== MESSAGES
//
DD DSN=VSMHLQ.ISPMLIB,DISP=SHR
<==== OPS
//*------------------------------------------------------------------//ISPLLIB DD DSN=SYS1.SISPLOAD,DISP=SHR
<==== DIALOGS
//
DD DSN=VSMHLQ.ISPLLIB,DISP=SHR
<==== OPS
//*------------------------------------------------------------------//ISPTLIB DD DSN=SYS1.SISPTENU,DISP=SHR
<==== TABLES
//*------------------------------------------------------------------//ISPEXEC DD DSN=SYS1.SISPEXEC,DISP=SHR
<==== ISP PROGRAMS
//*------------------------------------------------------------------//ISPCTL1 DD DSN=&&SPFCTL,UNIT=3380,SPACE=(CYL,(5,1)),
//
DCB=(RECFM=FB,LRECL=80,BLKSIZE=3120)
//ISPLOG
DD SYSOUT=*,DCB=(LRECL=121,BLKSIZE=1210,RECFM=FBA)
//SYSTSPRT DD SYSOUT=(,)
//SYSTSIN DD DSN=&&TMPCTL,UNIT=3380,SPACE=(CYL,(2,1)),
//
DCB=(RECFM=FB,LRECL=80,BLKSIZE=3200)
CONSMSTR
This procedure brings up the CONSOLE/Master® Control Region.
)
The dispatching priority for CONSOLE/Master® should be sufficiently high so
as to prevent any possibility of loss of service to the CONSOLE/Master® Control Region. The recommended approach is to establish CONSOLE/Master® in
a performance Group (PG) under System Resource Manager (SRM) at a dispatching priority equivalent to other critical on-line applications, certainly
above batch workload.
If you are not going to use the JOB/Master® interface “JOB/Master® ACTION” or “SIGNAL COMPLETE”, comment the DD statements for JMDB and JMJOBQ found in the
procedure CONSMSTR. Information about the interface can be found in the chapter
“Automated Operator” under the section “Extended Console Message Definition”.
RUNMASTR
This procedure brings up the RUN/Master® Control Region.
E:\Manuals\Product Manuals\ASO\OM (OPS Master)\Reference Guide\Current Release\OPS_C31.fm
)
The dispatching priority for RUN/Master® should be sufficiently high so as to
prevent any possibility of loss of service to the RUN/Master® Control Region.
The recommended approach is to establish RUN/Master® in a performance
Group (PG) under System Resource Manager (SRM) at a dispatching priority
equivalent to other critical on-line applications, certainly above batch workload.
As a batch job, place a JOB statement before the following execute statement:
//STEP1
EXEC
PARM Options:
CHAR=xxxx
RUNMASTR,PARM='CHAR=¢'
Where x is the job indicator flag(s) which will be used in the job card. Up to four
values can be assigned. If JOB/Master® is installed, one of the characters
should be the same as the JOB/Master® character.
Mantissa Corporation © 2013
Page - 469
E:\Manuals\Product Manuals\ASO\OM (OPS Master)\Reference Guide\Current Release\OPS_C31.fm
Chapter 31
RUNMASTR
Page - 470
OPS/MASTER®
Procs
Mantissa Corporation © 2013
OPS/MASTER®
Chapter 32
Set Profile
JOB/Master® Primary Menu
Chapter 32
Set Profile
JOB/Master® Primary Menu
When you first enter into JOB/Master®, the Primary Menu is displayed as shown below:
------------------ Job Scheduling and Management by MANTISSA ----------------Option ===> P
Data Base Creation : D
Profile
: P
Report Selection
: R
Job Tracking
: T
JCL Substitution : J
Current Selection = JM01
PF1 = HELP
E:\Manuals\Product Manuals\ASO\OM (OPS Master)\Reference Guide\Current Release\OPS_C32.fm
USER= P390K
DATE= 97/09/30
97.273
TIME= 11:52
JMJMJMJMJMJMJMJMJMJMJMJMJMJMJMJMJMJMJMJMJMJMJMJMJMJMJMJMJMJMJMJMJMJMJMJMJMJMJMJM
JMJMJMJMJMJMJMJMJMJMJMJMJMJMJMJMJMJMJ MJMJMJMJMJMJMJMJMJMJMJMJMJMJMJMJMJMJMJMJM
JMJMJMJMJMJMJMJMJMJ
MJM JMJMJM
MJM
MJMJMJMJMJMJMJMJMJMJMJM
JMJMJMJMJMJMJMJMJMJMJMJM JMJMJMJMJ MJMJMJ
J M J
JMJMJMJMJMJMJMJMJMJMJMJM
JMJMJMJMJMJMJMJMJMJMJMJ MJMJMJMJM JMJMJM
MJ J JM
MJMJMJMJMJMJMJMJMJMJMJMJM
JMJMJMJMJMJMJMJMJMJMJM JMJMJMJMJ MJMJMJ
JMJ MJ
JMJMJMJMJMJMJMJMJMJMJMJMJM
JMJMJMJMJMJMJM JMJMJ MJMJMJMJM JMJMJM
MJMJMJM
MJMJMJMJMJMJMJMJMJMJMJMJMJM
JMJMJMJMJMJMJ MJMJ
JMJMJMJMJ MJMJMJ
MJMJMJM
JMJMJMJMJMJMJMJMJMJMJMJMJMJM
JMJMJMJMJMJMJ
MJMJMJMJM JMJMJM
JMJMJMJ
MJMJMJMJMJMJMJMJMJMJMJMJMJMJM
JMJMJMJMJMJMJMJMJMJMJMJMJMJMJMJMJMJMJMJMJMJMJMJMJMJMJMJMJMJMJMJMJMJMJMJMJMJMJMJM
.
F1=HELP
F7=UP
. . .
.
F2=SPLIT
F8=DOWN
. . .
.
F3=END
F9=SWAP
. . .
.
F4=RETURN
F10=LEFT
. . . .
.
F5=RFIND
F11=RIGHT
. . .
.
F6=RCHANGE
F12=RETRIEVE
. . . . .
The first logon to JOB/Master® will force the first user to establish a profile. At this point
the Default Product record entered in ISF must allow this user to update the profile.
Refer to Chapter 9 in the JOB/Master® section for details on how to setup a profile. Use
main menu panel, OPTION P to assign the profile information. This information must be
set prior to using any TSO panels for each user.
Mantissa Corporation © 2013
Page - 471
Chapter 32
OPS/MASTER®
RUN/Master® Profile
Set Profile
RUN/Master® Profile
Refer to Chapter 23 in the RUN/Master® section for details on how to setup a profile. Use
main menu panel, OPTION P to assign the profile information. This information must be
set prior to using any TSO panels for each user.
CONSOLE/Master® Profile
E:\Manuals\Product Manuals\ASO\OM (OPS Master)\Reference Guide\Current Release\OPS_C32.fm
Refer to Chapter 16 in the CONSOLE/Master® section for details on how to setup a profile. Use main menu panel, OPTION P to assign the profile information. This information
must be set prior to using any TSO panels for each user.
Page - 472
Mantissa Corporation © 2013
OPS/MASTER®
Chapter 33
Interactive Security Facility (ISF)
Setting up security
Chapter 33
Interactive Security Facility (ISF)
Setting up security
The next step is to set up the necessary security within each of the OPS/Master® products.
In addition to security, the appropriate libraries to be referenced are indicated in ISF
(Interactive Security Facility).
ISF Opening Screen
Key ‘I’ at command line. Press <ENTER> to bring up ISF panel.
--------Operations Productivity Systems - OPS/Master® by Mantissa v5.2.1------Option ===> I
J
J2
J3
J4
C
-
JOB/Master® (JM01
JOB/Master® (JM02
JOB/Master® (JM03
JOB/Master® (JM04
CONSOLE/Master®
E:\Manuals\Product Manuals\ASO\OM (OPS Master)\Reference Guide\Current Release\OPS_C33.fm
PF1 = HELP
Prod.)
)
)
)
I - Interactive
I2 - Interactive
I3 - Interactive
I4 - Interactive
R - RUN/Master®
X - EXIT
Security
Security
Security
Security
Facility
Facility
Facility
Facility
(JM01)
(JM02)
(JM03)
(JM04)
User= P390K
Date= 98/09/11
98.254
Time= 13:02
OPSOPSOPSOPSOPSOPSOPSOPSOPSOPSOPSOPSOPSOPSOPSOPSOPSOPSOPSOPSOPSOPSOPSOPSOSPOPSP
OPSOPSOPSOPSOPSO
SOPSOPSOPS
OPSOPSOPSOP
OPSOPSOPSOP
OPSOPSOPSOPSOPS SOPSOP PSOPSOPSO
SOPSOPS
OPSOPSOPS
OPSO
PSOPSOPSOP
OPSOPSOPSOPSOP PSOPSO OPSOPSOPS
OPSOPSOP
SOPOPSOPO
PSOPS
OPSOPSOPSOP
OPSOPSOPSOPSO OPSOPS SOPSOPSOP
SOPSOPS
OPSOPSOPSOPS
SOPSOPSOPSOPSOPSOP
OPSOPSOPSOPS SOPSOP PSOPSOPSO
PS
PSOPSOPSOPSOPSO
OPSOPSOPSOPSOPSOP
OPSOPSOPSOP PSOPSO OPSOPSOPS
OPSOPSOPSOPSOPSOPS
PSOP
OPSOPSOPSOPSOPSOP
OPSOPSOPSO OPSOPS SOPSOPSOP
SOPSOPSOPSOPSOPSOP
OPSO
OPSOPSOPSOPSOPSOP
OPSOPSOPS
PSOPSOPSO
PSOPSOPSOPSOPSOPSOPS
PSOPSOPSOPSOPSOPSOP
OPSOPSOPSOPSOPSOPSOPSOPSOPSOPSOPSOPSOPSOPSOPSOPSOPSOPSOPSOPSOPSOPSOPSOPSOPSOPSP
OPSOPSOPSOPSOPSOPSOPSOPSOPSOPSOPSOPSOPSOPSOPSOPSOPSOPSOPSOPSOPSOPSOPSOPSOPSOPSP
Mantissa Corporation © 2013
Page - 473
Chapter 33
OPS/MASTER®
Security Database Maintenance Screen
Interactive Security Facility (ISF)
The ISF Banner Screen is displayed:
------------------------------------------------------------------------------Command ===>
Press Enter Key When Ready
------------------------------------------------------------------------------******************
********************
***
***
***
SECURITY
***
***
***
***
SYSTEM
***
***
***
**********************
**********/\**********
*********( )*********
*********/ \*********
*********| |*********
*********| |*********
*********----*********
**********************
.
F1=HELP
F7=UP
. . .
.
F2=SPLIT
F8=DOWN
. . .
.
IIIIII
II
II
II
IIIIII
SSSSSSS
SS
SSSSS
SS
SSSSSSS
FFFFFF
FF
FFFF
FF
FF
*******
*********
***
***
***********************
***
**********************
***
******
***
***
** **
*********
** **
*******
F3=END
F9=SWAP
. . .
.
F4=RETURN
F10=LEFT
. . . .
.
F5=RFIND
F11=RIGHT
. . .
INTERACTIVE
SECURITY
FACILITY
.
F6=RCHANGE
F12=RETRIEVE
. . . . .
Press <ENTER> here.
Security Database Maintenance Screen
---------------------- Security Data Base Maintenance ------------------Option ===>
B
D
E
X
or Blank - Browse Security Records
- Delete a Security Record
- Edit (Add or Change) Security Record
- Exit Data Base Maintenance
Security Data Base:
Product ===>
Userid ===>
OPS.V520
(Required if Option “D”, or “E” is Selected)
(If only Product is specified with option “Blank” will limit display to the specific Product)
ISF has the records seeded during the installation process. If <ENTER> is pressed from
this screen, two records will be listed for each of the OPS/Master® products.
Page - 474
Mantissa Corporation © 2013
E:\Manuals\Product Manuals\ASO\OM (OPS Master)\Reference Guide\Current Release\OPS_C33.fm
(If Product and Userid are specified with option “Blank” will limit display to the specific Product and Userid)
OPS/MASTER®
Chapter 33
Interactive Security Facility (ISF)
Security Database Maintenance Screen
----------------- Security Data Base Record Selection --- Row 1 to 18 of 18
Option ===>
Scroll ===>CSR
Product
Userid
Last Function
--------------------------------------------------------------------------CONSMSTR
B CONSMSTR
$$$$$$$$
CONSMSTR
P390C
CONSMSTR
P390E
CONSMSTR
P390G
CONSMSTR
P390K
CONSMSTR
P390M
CONSMSTR
P390N
CONSMSTR
P390Q
CONSMSTR
P390W
JCLMASTR
JCLMASTR
$$$$$$$$
JOBMASTR
JOBMASTR
$$$$$$$$
RUNMASTR
RUNMASTR
$$$$$$$$
******************************* Bottom of data ****************************
1.
From this screen you can BROWSE, EDIT or DELETE (B, E or D).
Multiple requests will be handled one record after another until all are processed.
2.
The product record with blank spaces in the userid field is known as the default
record. If no specific userid is defined, the default attributes will apply.
3.
The product record with eight (8) dollar signs in the userid field is called the
product limitation record. Attributes set here will limit the functionality of the
product itself.
There are two philosophies regarding establishing security for OPS/Master®:
E:\Manuals\Product Manuals\ASO\OM (OPS Master)\Reference Guide\Current Release\OPS_C33.fm
Option 1:
The default record contains all authority necessary and overrides security (this means
security internal to OPS established elsewhere in ISF). This may be acceptable in a shop
where only a few Operations Support people are accessing OPS/Master®. This would
eliminate the need to set up individual ids.
Option 2:
The default record would be applicable to the majority of the OPS/Master® users, while
the Security Administrator would be uniquely defined to ISF as all powerful.
The approach your site takes will determine the next course of action. If using Option 1,
only the default record (blank userid) needs to be edited, setting ISF ACCESS
RESTRICTED==>N and SPECIAL SECURITY ATTRIBUTE==>Y. Key CONFIRM at
the command line and hit <ENTER>.
Option 2 requires the default record first be altered as described above. Once this is done,
edit ISF to add the Security Administrator userid, setting the appropriate attributes. Make
certain that the above parameters are set exactly as indicated. Key in CONFIRM on the
Command line and hit <ENTER>. With the addition of the Security Administrator’s id,
Mantissa Corporation © 2013
Page - 475
Chapter 33
OPS/MASTER®
JOB/Master® Security Panel #1
Interactive Security Facility (ISF)
the default record can be reset to restrict authority: ISF ACCESS RESTRICTED==>Y
and SPECIAL SECURITY ATTRIBUTE==>N. Key in CONFIRM at command line and
hit <ENTER>.
In either case, this process must be done for each of the OPS/Master® products:
JOBMASTR
RUNMASTR
CONSMSTR
JCLMASTR
JOB/Master® Security Panel #1
-----------| Jobmaster Security Definition For ===> TESTUSER|------------Command ===>
Indicate if function or message should be supplied to userid (Y or N):
-------------------- Jobmaster Data Base Functions -----------------------Add:
JOB=> Y SYS=> Y CAL=> Y PKY=> Y N/C=> Y GRP=> Y MSG= Y DSN=> Y
Upd:
JOB=> Y SYS=> Y CAL=> Y PKY=> Y N/C=> Y GRP=> Y MSG= Y DSN=> Y
Del:
JOB=> Y SYS=> Y CAL=> Y PKY=> Y N/C=> Y GRP=> Y MSG= Y DSN=> Y
Browse: JOB=> Y SYS=> Y CAL=> Y PKY=> Y N/C=> Y GRP=> Y MSG= Y DSN=> Y
------------------ Jobmaster On-Line
LQ => Y AJ => Y GS => Y PQ =>
DA => Y DJ => Y DL => Y DD =>
DM => Y DP => Y DO => Y DS =>
U => Y H => Y R => Y E =>
Post ==> Y MT1 ==> Y MT2 ==>
Tracking Functions ------------------Y PS => Y SS => Y SJ => Y DR => Y
Y DT => Y DH => Y DF => Y GSS => Y
Y ST => Y RT => Y UR => Y RR => Y
Y F => Y C => Y P => Y K
=> Y
Y MT3 ==> Y MT4 ==> Y MT5 ==> Y
Page - 476
1.
Select “JOBMASTER” as the product Name.
Enter “E” to edit. Enter “Y” to authorize or “N” to restrict.
2.
POST = Y will allow the modification of all 5 manual tasks.
These will post manual task complete.
3.
MVS CONSOLE - Allows a user to display and enter console functions.
4.
UPDATE PROFILE - May set profile indicators for JOB/Master®.
5.
JOB/Master® SHUTDOWN - The user has the authority to shutdown the system
using ‘Z’ as a hot key from job tracking.
6.
ISF ACCESS RESTRICTED - N = no restrictions on ISF records.
7.
SPECIAL SECURITY ATTRIBUTE - This user is special. Even the Limitation record does not limit this user.
Mantissa Corporation © 2013
E:\Manuals\Product Manuals\ASO\OM (OPS Master)\Reference Guide\Current Release\OPS_C33.fm
--------------------------- Special Functions ----------------------------Allow User Submit PDS ==> Y
Authorized for Schedule/Net ==> ********
MVS Console (Display Authority) ==> Y (Command Authority) ==> Y
Allow Edit of Crte JCL => Y
Update Profile
==> Y
Jobmaster Shutdown Authority ==> Y
ISF Access Restricted ==> Y
Special Security Attribute
==> Y
OPS/MASTER®
Chapter 33
Interactive Security Facility (ISF)
JOB/Master® Security Panel #2
JOB/Master® Security Panel #2
--------------| JOB/Master® Security Definition For ===> TEAM4
OPTION ===>
Indicate if message should be supplied to userid
----------------------------- JOBMASTER
JM01 ==> Y JM11 ==> Y JM21 ==> Y
JM02 ==> Y JM12 ==> Y JM22 ==> Y
JM03 ==> Y JM13 ==> Y JM23 ==> Y
JM04 ==> Y JM14 ==> Y JM24 ==> Y
JM05 ==> Y JM15 ==> Y JM25 ==> Y
JM06 ==> Y JM16 ==> Y JM26 ==> Y
JM07 ==> Y JM17 ==> Y JM27 ==> Y
JM08 ==> Y JM18 ==> Y JM28 ==> Y
JM09 ==> Y JM19 ==> Y JM29 ==> Y
JM10 ==> Y JM20 ==> Y JM30 ==> Y
|----------
(Y, N OR A):
MESSAGES: ----------------------------JM31 ==> Y JM41 ==> Y JM51 ==> Y
JM32 ==> Y JM42 ==> Y JM52 ==> Y
JM33 ==> Y JM43 ==> Y JM53 ==> Y
JM34 ==> Y JM44 ==> Y JM54 ==> Y
JM35 ==> Y JM45 ==> Y JM55 ==> Y
JM36 ==> Y JM46 ==> Y JM56 ==> Y
JM37 ==> Y JM47 ==> Y JM57 ==> Y
JM38 ==> Y JM48 ==> Y JM58 ==> Y
JM39 ==> Y JM49 ==> Y JM59 ==> Y
JM40 ==> Y JM50 ==> Y JM60 ==> Y
Note 1: Code “A” is applicable only to the product default record.
.
E:\Manuals\Product Manuals\ASO\OM (OPS Master)\Reference Guide\Current Release\OPS_C33.fm
)
)
Mantissa Corporation © 2013
F1=HELP
F7=UP
. . .
.
F2=SPLIT
F8=DOWN
. . .
.
F3=END
F9=SWAP
. . .
.
F4=RETURN
F10=LEFT
. . . .
.
F5=RFIND
F11=RIGHT
. . .
.
F6=RCHANGE
F12=RETRIEVE
. . . . .
1.
Press <ENTER> on the previous screen to access this screen.
2.
Y in the message field will cause the message to be sent to MVS console.
3.
A in the message field means that an “Alert” will be sent. The Alert will remain
on the console until deleted by operator.
MESSAGE POSTING TO SPECIFIC USERID- The ability to send messages
to specific userids will be implemented in the same manner as console messages by setting the Y flag in the individual userid record. This function is currently not active.
JM39 is critical abend. We recommend this be turned on: ‘Y’ or ‘A’.
Page - 477
Chapter 33
OPS/MASTER®
JCL /Substitution Security Screen
Interactive Security Facility (ISF)
JCL /Substitution Security Screen
--------| JCL/Substitution Security Definition for
Option ===>
===> TESTUSER--------
Indicate if function should be supplied to Userid (Y OR N):
-------------------------- JCL/Master Functions ------------------------RESOLVE ==> Y
RESET ==> Y
DISPLAY ==> Y
LIBRARY ==> Y
OPINS ==> Y
RECOVERY ==> Y
JCLSCAN ==> Y
E/OPINS=> N
--<== Use staging PDS (JMSTGPDS) Y,N
|
|
Master JCL
==>
--> Resolved JCL
==>
|
Document Data Set ==>
--> Rerun PDS
==>
Use ISPF File Tailoring for symbolic substitution ==>
1.
Edit “JCLMASTR”.
2.
Enter “Y” to authorize: .
3.
Page - 478
RESOLVE
Allow user to resolve JCL scheduled for
submission.
LIBRARY
Allow user to edit the Master Submit PDS.
JCLSCAN
This is an exit inside JCL/Master which will allow the
use of a JCL scanning module from another software
vendor. If implemented, the user may edit JCL, turn control over to the scanning product, and then return to JCL/
Master.
RESET
Allow the user ability to remove jobs from the Resolved
PDS after symbolic substitution has taken place and
repost the JCL Setup flag (MT #5).
OPINS
Allow user access to the doclib which contains operator
instructions.
E/OPINS
Allow user edit capability of doclib members for operator instructions.
DISPLAY
Allow user to display the JCL for a job which has been
resolved.
RECOVERY
Allow user to edit JCL residing in the JMSTGPDS or
JMRERUN PDS.
Datasets usage A.
STAGING PDS - Where the scheduled job’s JCL is placed ready for submission. Enter ‘Y’ if you are using JMSTGPDS.
B.
MASTER JCL - Where unmodified JCL is taken from for
substitution.
Mantissa Corporation © 2013
E:\Manuals\Product Manuals\ASO\OM (OPS Master)\Reference Guide\Current Release\OPS_C33.fm
--------------------------- Special Functions --------------------------ISF ACCESS RESTRICTED ==> Y
SPECIAL SECURITY ATTRIBUTE
==> Y
OPS/MASTER®
Chapter 33
Interactive Security Facility (ISF)
4.
RUN/Master® Security Screen
C.
RESOLVE JCL - Where the modified JCL is placed and readied for submission by JOB/Master® after the substitution has
taken place.
D.
DOCUMENT DATA SET - Where free format documentation is stored for browsing or updating online. (OPINS-E/
OPINS)
E.
RERUN PDS - Submitted JCL saved here following each submit, if the option is selected at “Profile” level.
Use ISPF file tailoring
Specify Y to allow use of File Tailoring Symbolic Substitution. See OPS System
Reference Manual for information on ISPF.
5.
Special Functions
ISF ACCESS RESTRICTED
Specify N to allow user access to security setup.
SPECIAL SECURITY ATTRIBUTE
Specify Y to allow this user to override the limitation record.
RUN/Master® Security Screen
----------| RUN/Master® Security Definition for
Option ===>
===> TESTUSER|-----------
Indicate if function should be supplied to Userid (Y OR N):
------------------------ Knowledge Base Functions ----------------------RESTART
RESTART
HISTORY
REVIEW ==> Y
ACTION ==> Y
DISPLAY ==> Y
------------------------ On-line Assist Functions ----------------------ALTER JCL ==> Y
RERUN SUBMIT ==> Y
Default Rerun PDS ==>
Use JOB/Master®
Staging PDS ==>
E:\Manuals\Product Manuals\ASO\OM (OPS Master)\Reference Guide\Current Release\OPS_C33.fm
--------------------------- Special Functions --------------------------ISF ACCESS RESTRICTED ==> Y
SPECIAL SECURITY ATTRIBUTE
==> Y
Mantissa Corporation © 2013
1.
Illustrated here are RUN/Master® functions that are discussed in the OPS/Master® Manual. Set the flag to allow or restrict functions.
2.
Edit to reflect name of Rerun PDS.
Page - 479
Chapter 33
OPS/MASTER®
CONSOLE/Master® Security Screen
3.
Interactive Security Facility (ISF)
ISF ACCESS RESTRICTED - Remember to use “N” on the first default record
added. This will allow you to add user records for this product. After one user
record with “N” is added, return to the default record and change accordingly.
CONSOLE/Master® Security Screen
---------| CONSOLE/Master® Security Definition for
Option ===>
===> TESTUSER|---------
Indicate if function should be supplied to Userid (Y OR N):
---------------------- Automated Operator Functions --------------------BROWSE ==> Y
DELETE ==> Y
ADD/UPDATE ==> Y
-------------------------- MVS Console Facility ------------------------SELECT ==> Y
DISPLAY ==> Y
COMMAND ==> Y
REPLY ==> Y
INITIAL CONSOLE ADDR ==> 700
--------------------------- Special Functions --------------------------ISF ACCESS RESTRICTED ==> Y
SPECIAL SECURITY ATTRIBUTE
==> Y
Page - 480
Illustrated here are CONSOLE/Master® data base functions: Browse, Delete,
Add/Update. Set the flag to allow or restrict these functions.
2.
Select “Allow user to Select the MVS Console” option.
3.
COMMAND - Allows the user to enter console commands.
4.
DISPLAY - Allows the user to display console buffers.
5.
INITIAL CONSOLE ADDR - The console address for commands to apply.
“N” at user level will use the default.
6.
REPLY - Allows replies to the WTO messages.
7.
SELECT - The user may select console ID.
E:\Manuals\Product Manuals\ASO\OM (OPS Master)\Reference Guide\Current Release\OPS_C33.fm
1.
Mantissa Corporation © 2013
OPS/MASTER®
Chapter 34
JOB/Master® Database set up
Creating WORKDYnn/HOLIDYnn
Chapter 34
JOB/Master® Database set up
Before you execute JMSCHED to schedule jobs, two (2) calendars, WORKDYnn and
HOLIDYnn (where nn represents the numeric value for the year), must be added to the
JOB/Master® database. This must be done even if you have made the decision to specify
your own calendars in the job definitions. You need not mark any dates on these two calendars. If no Holiday/exception calendar is specifically referenced in JOB/Master® database definition JMSCHED will default to the HOLIDYnn calendar.
The HOLIDYnn and WORKDYnn calendars will be automatically propagated to the next
year (refer to Calendar Propagation in the JOB/Master® Manual). If the HOLIDYnn is
not appropriate for your site, you can create unique HOLIDAY (exception) calendars
which will meet your needs. However, you must reference them accordingly in the database and make certain they are properly updated from year to year.
Creating WORKDYnn/HOLIDYnn
E:\Manuals\Product Manuals\ASO\OM (OPS Master)\Reference Guide\Current Release\OPS_C34.fm
To create the calendars, enter OPS/Master® as described earlier. Enter the JOB/Master®
Database by selecting ‘D’.
Mantissa Corporation © 2013
Page - 481
Chapter 34
OPS/MASTER®
Creating WORKDYnn/HOLIDYnn
JOB/Master® Database set up
------------------ Job Scheduling and Management by MANTISSA ----------------OPTION ===> D
Data Base Creation : D
Profile
: P
Report Selection
: R
Job Tracking
: T
JCL Substitution : J
Current Selection = JM01
PF1 = HELP
USER= P390K
DATE= 97/09/30
97.273
TIME= 11:52
JMJMJMJMJMJMJMJMJMJMJMJMJMJMJMJMJMJMJMJMJMJMJMJMJMJMJMJMJMJMJMJMJMJMJMJMJMJMJMJM
JMJMJMJMJMJMJMJMJMJMJMJMJMJMJMJMJMJMJ MJMJMJMJMJMJMJMJMJMJMJMJMJMJMJMJMJMJMJMJM
JMJMJMJMJMJMJMJMJMJ
MJM JMJMJM
MJM
MJMJMJMJMJMJMJMJMJMJMJM
JMJMJMJMJMJMJMJMJMJMJMJM JMJMJMJMJ MJMJMJ
J M J
JMJMJMJMJMJMJMJMJMJMJMJM
JMJMJMJMJMJMJMJMJMJMJMJ MJMJMJMJM JMJMJM
MJ J JM
MJMJMJMJMJMJMJMJMJMJMJMJM
JMJMJMJMJMJMJMJMJMJMJM JMJMJMJMJ MJMJMJ
JMJ MJ
JMJMJMJMJMJMJMJMJMJMJMJMJM
JMJMJMJMJMJMJM JMJMJ MJMJMJMJM JMJMJM
MJMJMJM
MJMJMJMJMJMJMJMJMJMJMJMJMJM
JMJMJMJMJMJMJ MJMJ
JMJMJMJMJ MJMJMJ
MJMJMJM
JMJMJMJMJMJMJMJMJMJMJMJMJMJM
JMJMJMJMJMJMJ
MJMJMJMJM JMJMJM
JMJMJMJ
MJMJMJMJMJMJMJMJMJMJMJMJMJMJM
JMJMJMJMJMJMJMJMJMJMJMJMJMJMJMJMJMJMJMJMJMJMJMJMJMJMJMJMJMJMJMJMJMJMJMJMJMJMJMJM
.
F1=HELP
F7=UP
. . .
.
F2=SPLIT
F8=DOWN
. . .
.
F3=END
F9=SWAP
. . .
.
F4=RETURN
F10=LEFT
. . . .
.
F5=RFIND
F11=RIGHT
. . .
.
F6=RCHANGE
F12=RETRIEVE
. . . . .
Defining Calendars begins at the JOB/Master® DATA BASE FUNCTIONS screen.
------------------------ JOB/Master® DATA BASE FUNCTIONS ----------------------COMMAND ===>
J
ID: JM01
USER = P390K
DATE = 97/09/30 - 97.273 TIME = 12:29
-------------------------------------------------------------------------------OPTION ==> A
A DD / B ROWSE; / U PD;
TYPE
J OB
C ALENDAR
/ D EL;
/ S YSTEM
/ N EG/COREQ DEF.
/ D ATASET DEF.
/ I NQ. D.B. ENTRIES
/ P PROCESS KEYWORD DEF.
/ G ROUP MESSAGE DEF.
/ M ESSAGE DEFINITION
NAME
STEPNAME
PROC STEPNAME
==> WORKDYNN
==> ________
==> ________
DATA SET NAME
==> ____________________________________________ (IF TYPE D)
(STEPNAME (PROC) IF JOBSTEP DEFINITION)
(STEPNAME (PGM=) IF JOBSTEP DEFINITION)
CONFIRM = PF4
CANCEL= PF5
OR TYPE "CANCEL" "CONFIRM" AT COMMAND LINE
F1=HELP
F2=SPLIT
F3=END
F4=CONFIRM
F5=CANCEL
F6=CO
F7=UP
F8=DOWN
F9=SWAP
F10=SHIFT
F11=RIGHT
F12=RETRIEVE
. . . . . . . . . . . . . . . . . . . . . . . . . . .
A
C
WORKDYnn
nn
<ENTER>
Page - 482
=
=
=
=
Add
Calendar
Name (Calendar being defined)
where nn = yy
Mantissa Corporation © 2013
E:\Manuals\Product Manuals\ASO\OM (OPS Master)\Reference Guide\Current Release\OPS_C34.fm
==> C
OPS/MASTER®
Chapter 34
JOB/Master® Database set up
Creating WORKDYnn/HOLIDYnn
Upon hitting <ENTER> the following screen will appear:
AC
----------------- JOB/Master® CALENDAR DEFINITION SCREEN ----------------COMMAND ===>
------------------------------------------------------------------------------J
CALENDAR NAME =: WORKDYNN
YEAR => 97 SCHEDULE/NET => ********
DESCRIPTION => ____________________________________________________
MONTH
WEEK
RELDAY
ACTDATE
=>
=>
=>
=>
A_
A
MO
__
__
__
__
_
TU
__
__
__
__
_
WE
__
__
__
__
_
TH
__
__
__
__
_
FR
__
__
__
__
_
__
__
__
__
__
__
__
__
__
__
__
__
__
__
__
__
__
__
__
__
__
__
__
__
------------------------ PERIOD START END DATES (MMDD) -----------------------1. 0000 0000
2. 0000 0000
3. 0000 0000
4. 0000 0000
5. 0000 0000
6. 0000 0000
7. 0000 0000
8. 0000 0000
9. 0000 0000
10. 0000 0000
11. 0000 0000
F1=HELP
F7=UP
. . . .
F2=SPLIT
F8=DOWN
. . . .
.
12. 0000 0000
F3=END
F9=SWAP
. . .
.
13. 0000 0000
F4=CONFIRM
F5=CANCEL
F6=CO
F10=SHIFT
F11=RIGHT
F12=RETRIEVE
. . . . . . . . . . . . . .
Fill in the necessary fields: Make certain the YEAR==> is reflecting the appropriate year
(i.e., if you are creating for anything other than the current year, this field must be
changed).
DESCRIPTION
This field is free form.
MONTH==>
Keying in an ‘A’ will select ‘all’ months.
WEEK==>
Keying in an ‘A’ will select ‘all’ weeks.
RELDAY/ACTDATE
Select the days appropriate for your site or leave blank and no days/dates will
be marked. PF4 to CONFIRM.
E:\Manuals\Product Manuals\ASO\OM (OPS Master)\Reference Guide\Current Release\OPS_C34.fm
Following the same steps, add the HOLIDYnn calendar. PF4 to CONFIRM. See the OPS
Systems Reference Manual discussion on “Job Database Creation” for more information
regarding calendars: creating, updating and propagating.
Mantissa Corporation © 2013
Page - 483
Chapter 34
OPS/MASTER®
JOB/Master® Database set up
Page - 484
Mantissa Corporation © 2013
E:\Manuals\Product Manuals\ASO\OM (OPS Master)\Reference Guide\Current Release\OPS_C34.fm
Creating WORKDYnn/HOLIDYnn
OPS/MASTER®
Chapter 35
Job Tracking
Chapter 35
Job Tracking
The JOBQ record sent with the product is seeded during installation with data that is necessary for successfully bringing up the JMJOBQ. However, the information (SMF-ID,
etc.) might not correspond with site standards, so before beginning to use JOB/Master®,
enter OPS/Master® by selecting ‘O’, from ISPF Primary Menu; this will give you access
to JOB/Master® main menu panel. Select ‘J’ for JOB/Master® region (JM01). Select ‘T’
for Job Tracking.
Once in tracking, perform the following task: key in either PS or SS at the OPTION ==>
line of the tracking screen.
This is what you should see appear on your screen:
E:\Manuals\Product Manuals\ASO\OM (OPS Master)\Reference Guide\Current Release\OPS_C35.fm
----------------------- Job./Master Local Complex Status-------------------Command ===>
------------------------------------------------------------------------------Option => PS
SMF-ID = OSR1 JOB/Master® Control Region ID: JM01
Main
=> OSR1
(Submit Facility Default Processor
------------------------------------------------------------------------------Priority:
A B C D E F G H I J K L M N O P Q R S T U V W X Y Z
(A,I)
=>
(BLANK=A)
A ctive will be selected for submit; I nactive will be selected
------------------------------------------------------------------------------CPU
Submit
Last JOBQ
SMF-ID
Status
Scan
--------------------OSR1
.
Mantissa Corporation © 2013
F1=HELP
F7=UP
. . .
ACTIVE
.
F2=SPLIT
F8=DOWN
. . .
12:34
.
F3=END
F9=SWAP
. . .
.
F4=CONFIRM
F5=CANCEL
F6=CO
F10=SHIFT
F11=RIGHT
F12=RETRIEVE
. . . . . . . . . . . . . .
Page - 485
Chapter 35
OPS/MASTER®
Job Tracking
At the OPTION==> line key in QUIT and enter the SMF-ID which was sent with the
product: SYSB.
----------------------- Job./Master Local Complex Status -----------------Command ===>
---------------------------------------------------------------------------Option => QUIT
SMF-ID = OSR1 JOB/Master® Control Region ID: JM01
Main
=> SYSC
(Submit Facility Default Processor)
---------------------------------------------------------------------------Priority:
A B C D E F G H I J K L M N O P Q R S T U V W X Y Z
(A,I)
=>
(Blank=A)
A ctive will be selected for submit; I nactive will be selected
---------------------------------------------------------------------------CPU
Submit
Last JOBQ
SMF-ID
Status
Scan
--------------------SYSB
SYSC
.
F1=HELP
F7=UP
. . .
STOPPED
ACTIVE
.
F2=SPLIT
F8=DOWN
. . .
15:18
06:57
.
F3=END
F9=SWAP
. . .
.
F4=CONFIRM
F5=CANCEL
F6=CO
F10=SHIFT
F11=RIGHT
F12=RETRIEVE
. . . . . . . . . . . . . .
PF4 to <CONFIRM>
Now, when either an SS or PS are issued, you should only see site specific SMF-ID:
----------------------- JOB/Master® Local Complex Status -------------------Command ===>
---------------------------------------------------------------------------Option => PS
SMF-ID = OSR1 JOB/Master® Control Region ID: JM01
Main
=> SYSC
(Submit Facility Default Processor)
---------------------------------------------------------------------------Priority:
A B C D E F G H I J K L M N O P Q R S T U V W X Y Z
(A,I)
=>
(Blank=A)
A ctive will be selected for submit; I nactive will not be selected
---------------------------------------------------------------------------CPU
Submit
Last JOBQ
SMF-ID
Status
Scan
---------------------
Page - 486
ACTIVE
F1=HELP
F7=UP
. . . .
F2=SPLIT
F8=DOWN
. . . .
07:00
.
F3=END
F9=SWAP
. . .
.
F4=CONFIRM
F5=CANCEL
F6=CO
F10=SHIFT
F11=RIGHT
F12=RETRIEVE
. . . . . . . . . . . . . .
Mantissa Corporation © 2013
E:\Manuals\Product Manuals\ASO\OM (OPS Master)\Reference Guide\Current Release\OPS_C35.fm
SYSC
OPS/MASTER®
Chapter 36
Additional Information
LOOPDRV
Chapter 36
Additional Information
LOOPDRV
LOOPDRV is a utility program developed by Mantissa Corporation and delivered with the
product in the INSTLIB. It provides the user with a ‘job’ which can execute without
impacting normal production environment, while, at the same time, testing OPS functionality. This is accomplished by appointing the appropriate LOOPDRV parms and executing
the program.
Examples
EXAMPLE 1:
E:\Manuals\Product Manuals\ASO\OM (OPS Master)\Reference Guide\Current Release\OPS_C36.fm
000210//JOBLIBDD DSN=OPS.R5.LOADLIB,DISP=SHR
000220//STEP1 EXEC PGM=LOOPDRV,PARM=’000,0000,005’
PARM VALUES (example 1) :
000 = zero CPU time
0000 = no condition code value
005 = 5 seconds wall clock time
The above example of LOOPDRV executes for 5 seconds of wall clock and issues a condition code of 0 at step termination.
EXAMPLE 2:
000210//JOBLIBDD DSN=OPS.R5.LOADLIB,DISP=SHR
000220//STEP1 EXEC PGM=LOOPDRV,PARM=’005,0016,000’
PARM VALUES (example 2) :
005 = 5 seconds CPU time
0016 = condition code of 16
000 = zero wall clock time
The above example of LOOPDRV executes for 5 seconds of CPU time and issue a condition code of 16 at step termination.
Mantissa Corporation © 2013
Page - 487
Chapter 36
OPS/MASTER®
Run Mode Option
Additional Information
EXAMPLE 3:
000210//JOBLIBDD DSN=OPS.R5.LOADLIB,DISP=SHR
000220//STEP1 EXEC PGM=LOOPDRV,PARM=’000,0000,100,A’
PARM VALUES (example 3) :
000 = zero CPU time
0000 = condition code value 0
100 = 1 minute wall clock time
A = ABEND U999 at step completion
The above example of LOOPDRV executes for 1 minute wall clock time and issue a
U999 abend at step completion. The U999 abend is requested by the ‘A’ after the wall
clock parameter.
)
Use either CPU time or Wall Clock time. Don’t use both in the same parm.
Multiple Step LOOPDRV
000100
000200
000210
000220
000230
000240
000250
//LOOPDRV JOB (,),‘MANTISSA/TEST’,
//
MSGCLASS=E
//JOBLIB
DD DD
DSN=OPS.R5.LOADLIB,DISP=SHR
//STEP1
EXEC PGM=LOOPDRV,PARM=’000,0000,100’
//STEP10
EXEC PGM=LOOPDRV,PARM=’000,0016,001’
//STEP15
EXEC PGM=LOOPDRV,PARM=’000,0000,035’
//STEP20
EXEC PGM=LOOPDRV,PARM=’000,0004,010’
1.
Testing a new system
2.
Testing new jobs to an application
3.
Testing step triggering and condition code checking (REPAIR JOBS)
4.
Testing JOB/Master® interaction with CONSOLE/Master® - i.e. JMCN
5.
Testing CONSOLE/Master® rules
6.
Testing RUN/Master®
7.
Any time a dummy job is needed.
Run Mode Option
The Run Mode option allows the user to schedule jobs according to the readiness of the
application. Jobs can be scheduled to actually execute or only simulate execution. There
are three possible Run Mode Options:
PRODUCTION (P)
Page - 488
Global Record(Profile):
Can be overridden at the System and Job level.
System Record:
Can be overridden at the Job level.
Job Record:
Will place job onto LQ and actually run JCL.
Mantissa Corporation © 2013
E:\Manuals\Product Manuals\ASO\OM (OPS Master)\Reference Guide\Current Release\OPS_C36.fm
When to use LOOPDRV:
OPS/MASTER®
Chapter 36
Additional Information
Run Mode Option
When To Use PRODUCTION:
Once JOB/Master® has been installed and system testing completed, the Global Record in
the Profile should be changed to production mode so jobs may begin executing. From that
point forward (taking into consideration site standards and change control procedures)
the majority of the jobs in the system will be executed.
CHECK (C)
Global Record(Profile):
Cannot be overridden at the System and Job level.
System Record:
Cannot be overridden at the Job level.
Job Record:
Will place job onto LQ but will simulate execution.
When To Use CHECK:
Check mode is most often used to test a job or system and its interaction with JOB/Master® functions. Scheduling criteria can be defined to the JOB/Master® database before
the programs are ready when the system or job is put in check mode. Check mode only
simulates the job execution, as none of the execution JCL actually gets moved to the
JMSTGPDS or is called at submit time. This technique gives an opportunity to make certain everything is working properly, jobs are scheduling, predecessor relationships are
met, triggers are working etc. BEFORE all jobs are moved into production.
SELECT (S)
Global Record(Profile):
N/A
System Record:
Will default to check mode unless overridden at the Job level.
Job Record:
Will default to check mode unless included on LQ prior to
submit.
E:\Manuals\Product Manuals\ASO\OM (OPS Master)\Reference Guide\Current Release\OPS_C36.fm
When To Use SELECT:
During the last phase of testing, some jobs in a new or modified application stream may
not be ready to execute regularly in production. Also, User Departments may have a series
of jobs that may or may not need to be executed that night and they do not know before the
schedule is run. Jobs in select mode will be placed on the JOBQ, but will default to executing in check mode, unless the job is included from the LQ prior to submission. Jobs in
Select Mode will actually have JCL moved to JMSTGPDS.
)
Mantissa Corporation © 2013
Select mode should NOT be used indiscriminately because of overhead and
storage issues in processing the JOBQ.
Page - 489
Chapter 36
OPS/MASTER®
Select Mode On The List Queue
Additional Information
Select Mode On The List Queue
As described in the Job Tracking section, an additional field has been added on the LQ
screen. The M ==> field reflects the mode in which a job has been defined to run: P, S, or
C.
(LQ) ----------------------- JOB/Master® Scheduling Queue ------- Row 1 from 14
Command ===>
Scroll = Page
Set=> Job= -------- Sys= -------- Date= ----- AB - MT - EX - DC - OP <<(Shift)---------------- Date= 98/09/29 98.272 Time= 10:12 ---------------S | Job
|T|Date |Time|
C u r r e n t
S t a t u s
|M ST|Alt.Def
- -------- - ----- ---- ---------------------------------------- - -- --------- SELECT01
98272 0800 * SELECT MODE /ENTER I TO RUN JOB
S C
I- SELECT02
98272 0802 * SELECT MODE /ENTER I TO RUN JOB
S C
-- SELECT03
98272 0805 *INCLUDED TO RUN BY --->
P390K
S P
-- SELECT04
98272 0808 * SELECT MODE /ENTER I TO RUN JOB
S C
-- SELECT05
98272 0810 * SELECT MODE /ENTER I TO RUN JOB
S C
-- SELECT12
98272 0845 J03364 IN EXECUTION SID ->
OSR1
P E
X- SELECT13
98272 0845 DYNAMICALLY ADDED TO SCHEDULE
P P
-- SELECT14
98272 0845 J03366 SUBMITTED TO JES INPUT QUEUE
P Q
-- SELECT15
98272 0845 J03367 SUBMITTED TO JES INPUT QUEUE
P Q
-- SELECT21
98272 0845 * IN CHECK MODE, NOT SUBMITTED
C D
-- SELECT22
98272 0845 * IN CHECK MODE, NOT SUBMITTED
C D
-- SELECT23
98272 0845 * IN CHECK MODE, NOT SUBMITTED
C D
-- SELECT24
98272 0845 * IN CHECK MODE, NOT SUBMITTED
C D
-- SELECT25
98272 0845 * IN CHECK MODE, NOT SUBMITTED
C D
******************************* Bottom of data ********************************
F1=HELP
F7=UP
F2=SPLIT
F8=DOWN
F3=END
F9=SWAP
F4=CONFIRM
F10=SHIFT
F5=CANCEL
F11=RIGHT
F6=CO
F12=RETRIEVE
I= INCLUDE
Include this job in production cycle; at submit time call the
JCL from staging PDS or the user library.
X=EXCLUDE
Exclude this job from running in production; only simulate.
May be used for jobs which are flagged as select mode, and
having once been changed to include, now must be altered
back to exclude. (This feature can also be utilized to exclude a
job on the LQ in production mode).
Press <ENTER>.
Page - 490
•
The M(mode) ==> field represents the mode defined for each job.
•
Initially, the ST (status) ==> field represents the default for the mode (i.e., the
default status for Select mode is Check status). Now, however, the ST ==> field
reflects the current execution status.
•
Note that the CURRENT STATUS ==> field reflects the changes made
(SELECT04, SELECT05 and SELECT13) as described below:
SELECT04
No action is required to run this job in check status.
SELECT05
S mode has been flagged to include; to run in production status; to actually execute the JCL.
Mantissa Corporation © 2013
E:\Manuals\Product Manuals\ASO\OM (OPS Master)\Reference Guide\Current Release\OPS_C36.fm
To include/exclude those jobs defined as select mode, before the job goes into execution,
take the cursor to the line in the S column of the LQ which corresponds with the job to be
changed. Enter one of the following values:
OPS/MASTER®
Chapter 36
Additional Information
Select Mode On The List Queue
SELECT13
P mode has now been altered to exclude; to run in check status;
to simulate.
After the changes, the LQ screen will look like this:
(LQ) ----------------------- JOB/Master® Scheduling Queue ------- Row 1 from 14
Command ===>
Scroll = Page
Set=> Job= -------- Sys= -------- Date= ----- AB - MT - EX - DC - OP <<(Shift)---------------- Date= 97/09/29 98.272 Time= 10:12 ---------------S | Job
|T|Date |Time|
C u r r e n t
S t a t u s
|M ST|Alt.Def.
- -------- - ----- ---- ---------------------------------------- - -- --------- SELECT01
98272 0800 * SELECT MODE /ENTER I TO RUN JOB
S C
-- SELECT02
98272 0802 *INCLUDED TO RUN BY --->
P390K
S P
-- SELECT03
98272 0805 *INCLUDED TO RUN BY --->
P390K
S P
-- SELECT04
98272 0808 * SELECT MODE /ENTER I TO RUN JOB
S C
-- SELECT05
98272 0810 * SELECT MODE /ENTER I TO RUN JOB
S C
-- SELECT12
98272 0845 J03364 IN EXECUTION SID ->
OSR1
P E
-- SELECT13
98272 0845 *EXCLUDED TO SIMULATE BY --->
P390K
P P
-- SELECT14
98272 0845 J03366 SUBMITTED TO JES INPUT QUEUE
P Q
-- SELECT15
98272 0845 J03367 SUBMITTED TO JES INPUT QUEUE
P Q
-- SELECT21
98272 0845 * IN CHECK MODE, NOT SUBMITTED
C D
-- SELECT22
98272 0845 * IN CHECK MODE, NOT SUBMITTED
C D
-- SELECT23
98272 0845 * IN CHECK MODE, NOT SUBMITTED
C D
-- SELECT24
98272 0845 * IN CHECK MODE, NOT SUBMITTED
C D
-- SELECT25
98272 0845 * IN CHECK MODE, NOT SUBMITTED
C D
******************************* Bottom of data ********************************
F1=HELP
F7=UP
F2=SPLIT
F8=DOWN
F3=END
F9=SWAP
F4=CONFIRM
F10=SHIFT
F5=CANCEL
F11=RIGHT
F6=CO
F12=RETRIEVE
Jobs in select or check mode will indicate that the JCL was not submitted and the ST ==>
field will change to a status of D to indicate that the LQ record will be deleted.
Once the job(s) have entered the JES input queue and/or gone into execution;
it is TOO LATE to make the change to include or exclude.
E:\Manuals\Product Manuals\ASO\OM (OPS Master)\Reference Guide\Current Release\OPS_C36.fm
)
Mantissa Corporation © 2013
Page - 491
Chapter 36
Additional Information
E:\Manuals\Product Manuals\ASO\OM (OPS Master)\Reference Guide\Current Release\OPS_C36.fm
Select Mode On The List Queue
OPS/MASTER®
Page - 492
Mantissa Corporation © 2013
MESSAGES & CODES
Release 5.20.1
Mantissa Corporation®
1012 Edenton Street
Birmingham, Alabama 35242
OPS/MASTER®
OPS/Master® is a software product of Mantissa Corporation. All rights are reserved, and reproduction, use of, or distribution of this documentation is prohibited unless written consent is obtained from Mantissa Corporation. This document contains proprietary information and is intended for use only by licensees of OPS/Master® and those
evaluating its potential worth in their respective operating environment.
E:\Manuals\Product Manuals\ASO\OM (OPS Master)\Reference Guide\Current Release\SECT7cvr.fm
© Copywrite - Mantissa Corporation 1989-2013
Publication Information
Publication Name:
Publication Number
Release:
Mantissa Corporation © 2013
MESSAGES AND CODES
OPS002-JMIN
5.20.1
Page - 494
OPS/MASTER®
Chapter 37
JOB/Master® Region Messages
Descriptions
Chapter 37
JOB/Master® Region Messages
This section contains messages which are prefixed with the characters “JM”. These messages pertain to JOB/Master® software product. Messages from other components of
OPS/Master® Base software which are issued on behalf of JOB/Master® are prefixed
with other than characters “JM” and are therefore documented in other sections of this
manual.
Descriptions
JMCN dbname COMMAND REQUEST FOR desc.
Description: A database definition identified as a console command, SUBMIT
TYPE (C), has been initiated. The message is sent to the console and can be used
to trigger other events.
dbname = database entry name
desc. = description field from the database definition
E:\Manuals\Product Manuals\ASO\OM (OPS Master)\Reference Guide\Current Release\OPS_C37.fm
Action:
None
JMIA JOBMASTER CONTROL REGION SHUTDOWN
Description: The control region has been shutdown through the online tracking
system, or by the JMSHUT procedure.
Action:
None
JMIB GETMAIN FAILED FOR CSA STORAGE
Description: Common storage could not be acquired.
Action:
Determine if CSA has been fragmented and enough storage is not
available or all CSA storage has been used. In the latest version, OPS only uses
less than 1K of storage. Restart JOB/Master® when enough CSA is available.
Mantissa Corporation © 2013
Page - 495
Chapter 37
OPS/MASTER®
Descriptions
JOB/Master® Region Messages
JMIC “JMVTAMS” COULD NOT BE ATTACHED
Description: JM0V tried to attach program JMVTAMS but could not.
Action:
Verify that JMVTAMS is in the load lib where JMBV is being executed from.
JMID JOB/Master® DETECTED ITS SUBTASK WAS
CANCELLED
Description: JOB/Master® detected that its Dataset Triggering subtask ‘JMDSNMON’ was cancelled. JOB/Master® will attempt to reattach it.
Action:
Determine the reason the subtask was cancelled. The most likely
reason is that a security product did not like the subtask accessing a dataset that
was specified as containing data etc. JOB/Master® needs access to all datasets to
validate.
JMIE JOB/Master® RESTARTED ITS SUBTASK 10 TIMES
Description: JOB/Master® restarted its subtask ten (10) times.
Action:
Determine the reason JOB/Master®’s subtask cannot remain up!
Note: This may prevent JOB/Master® from stopping normally. If so, use force.
JMIN CONTROL REGION INITILIZATION COMPLETE V#.#.#
Description: Initialization of scheduling files has been completed.
PTMS APPLIED => xxxxxxxxxxxxxx xxxxx ...
Any PTMS which have been applied to the base release will be
listed by x. This message will be found in the History File Message
Log.
Action:
None. Information may be required by Mantissa support assistance.
JMI0 JOBMASTER CONTROL REGION ACTIVE V#.R#.M#
Description: The control region is active. This message preceeds the initialization of scheduling files.
None.
JMI1 ssss SUBSYSTEM ENTRY NOT FOUND
Description: The subsystem entry for ssss could not be located.
Action:
Master.
Make sure that OPSMASTR has been run before starting up JOB/
JMI2 x PARM FIELD ERROR CORRECT AND RESTART
Description: The startup parameter identified by x is invalid.
Action:
Check the control region startup parameters for valid values and
correct those in error. Restart the control region.
Page - 496
Mantissa Corporation © 2013
E:\Manuals\Product Manuals\ASO\OM (OPS Master)\Reference Guide\Current Release\OPS_C37.fm
Action:
OPS/MASTER®
Chapter 37
JOB/Master® Region Messages
Descriptions
JMI3 JOBMASTER LOADLIB NOT IN APF LIST
Description: The library from which JOB/Master® has been loaded is not an
authorized library.
Action:
The library must be in the linklist or authorized through the
IEAAPFxx member of SYS1.PARMLIB. Insure that the VOLSER of the entry in
IEAAPFxx is the volume on which the executing library resides.
JMI4 JOBMASTER ALREADY ACTIVE ON THIS PROCESSOR
Description: JOB/Master® being started for a subsystem id, JM01 through
JM04, which is already initialized.
Action:
Verify that the control region is not executing. Restart the region
with the FORC=Y parameter. This will free the resources assigned to the subsystem and reinitialize resources.
JMI5 UNRECOVERABLE ERROR - JOBMASTER TERMINATING
Description: An abend condition has been detected. JOB/Master® will issue a
standard U999 abend and terminate after releasing its resources.
Action:
Master®.
Determine the cause of the abend and if correctable restart JOB/
JMI6 JOBMASTER TRIAL EXPIRED - PROCESSING TERMINATED
Description: The JOB/Master® trial period has expired.
Action:
If additional time is required, call your sales representative.
JMI7 JOBMASTER RESOURCE CLEANUP INITIATED
Description: JOB/Master® has been terminated and will attempt to release its’
acquired resources.
Action:
None
E:\Manuals\Product Manuals\ASO\OM (OPS Master)\Reference Guide\Current Release\OPS_C37.fm
JMI8 JOBMASTER RESOURCE CLEANUP COMPLETED
Description: The resources for this control region have been released.
Action:
None
JMI9 FREEMAIN UNSUCCESSFUL FOR CSA STORAGE
Description: The resources for the common storage area could not be freed.
Probably some other system abend has corrupted storage control blocks.
Action:
See Message JMIB.
JMI10W ** WARNING ** - OPS WILL EXPIRE ON MM/DD/YY
Description: This is a warning message to let users know the OPS product is
scheduled to expire on the date shown in the message.
Action:
Mantissa Corporation © 2013
Contact Mantissa Product Support to arrange for a new password.
Page - 497
Chapter 37
OPS/MASTER®
Descriptions
JOB/Master® Region Messages
JMI11 ** OPS HAS EXPIRED **
Description: This is a error message to let users know the OPS product key is no
onger valid.
Contact Mantissa Product Support ASAP for a new password
Action:
ASAP to enable the product to initialize.
JMI12 ** UNRELATED SECURITY CODE **
Description: This is a error message to let users know the OPS product key as
entered is invalid. This could be caused by entry error (please use cut and paste
for accuracy), the wrong key was used (accidental use of one of our other product
keys) or too many codes were provided in the parameter member (a maximum of
5 CODE= statements are supported).
Verify the key(s) that were used and if unable to determine the
Action:
error, contact Mantissa Product Support for assistance.
JMI13 ** INVALID SECURITY CODE **
Description: This is a error message to let users know the OPS product key as
entered is invalid. This could be caused by entry error (please use cut and paste
for accuracy), the wrong key was used (accidental use of one of our other product
keys) or the COMPANY= parameter does not match the value in the key.
Verify the key(s) that were used and if unable to determine the
Action:
error, contact Mantissa Product Support for assistance.
JMI14 ** INVALID CPU-ID **
Description: This is a error message to let users know the OPS product key as
entered is invalid. This could be caused by entry error (please use cut and paste
for accuracy), the wrong key was used (accidental use of one of our other product
keys) or the machine's CPU ID does not match one of the CPU ID's generated in
one of the codes were provided in the parameter member (a maximum of 5
CODE= statements are supported).
JMRD JOBMASTR(xxxx) CONTROLLER NOT ACTIVE
Description: The JMRD message is sent by a subroutine that passes a unit of
work over to subsystem xxxx (i.e., JM01) to be processed. The subroutine found
the subsystem entry in the subsystem control table but when it was ready to move
the data, the pointer to our global buffers was cleared. This is usually the case
when Job/Master is shutdown.
Action:
error.
Make sure that Job/Master is up and retry the task which gave the
JMSC SYNC ERROR
Description: The JMSC message is sent by JMSCHED2 when starting up to
inform us it couldn't dynamically allocate the files. The reason JMSCHED2
couldn't is because it couldn't find the high-level qualifiers stored in the CSA
buffers chained off of the subsystem control table.
Page - 498
Mantissa Corporation © 2013
E:\Manuals\Product Manuals\ASO\OM (OPS Master)\Reference Guide\Current Release\OPS_C37.fm
Verify the key(s) that were used and if unable to determine the
Action:
error, contact Mantissa Product Support for assistance.
OPS/MASTER®
Chapter 37
JOB/Master® Region Messages
Descriptions
The only way this could happen is that Job/Master is down.
Action:
error.
JMSUBMIT-01
Make sure that Job/Master is up and retry the task which gave the
INTERNAL ERROR - PARAM FIELD
Description: The information passed from the control region was corrupted.
Action:
Stop and restart JOB/Master when able and retry. If this error reoccurs, contact Mantissa Product Support.
JMSUBMIT-02
INTERNAL ERROR - INVALID SUBMIT TYPE
Description: The information passed from the control region was corrupted.
Action:
Stop and restart JOB/Master when able and retry. If this error reoccurs, contact Mantissa Product Support.
JMSUBMIT-03 RC/Reason code from WLM query routine ==>
cccccccc ssssssss <==
Description: Return code(cccccccc) and reason code(sssssss) from the WLM
query routine describes the error when trying to determine where to submit the
job. If RC=4, routine will use what’s available and submit the JOB to least used.
If RC greater than 4, then JOB/Master will revert to using the */JOBPARM
SYSAFF=(………) JCL statement.
JMSUBMIT-04
MASTER CONSOLE NOT FOUND - MVS
Description: The MVS master console was not found.
Action:
Stop and restart JOB/Master when able and retry. If this error reoccurs, contact Mantissa Product Support.
JMSUBMIT-05
CANNOT DETERMINE OPERATING SYSTEM
Description: JOB/Master cannot determine what operating system it is running
on.
E:\Manuals\Product Manuals\ASO\OM (OPS Master)\Reference Guide\Current Release\OPS_C37.fm
Action:
JMSUBMIT-06
Contact Mantissa Product Support.
JMSUBEXT NOT FOUND, EXIT NOT ACTIVE
Description: JMSUBEXT was not found in the hlq.LOADLIB used by JOB/
Master.
Make sure the OPS hlq.LOADLIB was available and the member
Action:
JMSUBEXT exists.
JMSUBMIT-07
INVALID RETURN CODE FROM USER EXIT (EXIT DISABLED)
Description: JMSUBEXT returned an invalid return code.
Action:
Make sure the changes made to the exit do not violate the required
parameters or use the original distributed copy of JMSUBEXT that simply
returns without doing anything.
Mantissa Corporation © 2013
Page - 499
Chapter 37
OPS/MASTER®
Descriptions
JOB/Master® Region Messages
JMSUBMIT-08
****** ERROR ON INTRDR1 ******
Description: Internal error in the JES internal reader routine.
Action:
and retry.
JMSUBMIT-09
Check with your systems programmer to evaluate what is wrong
***** JOB # NOT FOUND ON INTRDR1 *****
Description: The job JOB/Master just submitted was not found in JES when
JOB/Master tried to retrieve the JOB number.
Action:
and retry.
JMSUBMIT-10
Check with your systems programmer to evaluate what is wrong
SUBMIT CANCELLED BY USER EXIT
Description: Your user exit JMSUBEXT determined this job did not meet some
criteria established by you operations staff.
Check with your operations staff to evaluate what is wrong, correct
Action:
the error and retry.
JM00 CONTROL RECORD NOT LOCATED FOR ddname
Description: The file, identified by ddname, has no control record.
Action:
1.
Verify that the file was correctly initialized.
2.
If the file was initialized properly at installation.
3.
Verify that the file has not been overwritten.
4.
Inspect to see that there are no hardware errors.
Description: The job has entered the system with an identifying JOB/Master®
character in col. 71 of the jobcard. The job was found on the JOBQ and the JOB/
Master® database, and the EXTERNAL SUBMIT flag for this job on the database was set to “N”. The job will be tracked. However, the job on the schedule
queue, (JOBQ), will remain as the scheduled job for processing.
If the job is to be tracked as the scheduled job update the Database
Action:
definition in the External Submit Field, by changing it to a “Y”.
JM02 JOB/STEP jobname/procstep.step FAILED completion
Description: The job or job step failed. The completion code was not a valid
completion code for this job or job step according to the jobs database definition.
j = jobname
p = procstep name
s = step name (pgm= exec card)
Page - 500
Mantissa Corporation © 2013
E:\Manuals\Product Manuals\ASO\OM (OPS Master)\Reference Guide\Current Release\OPS_C37.fm
JM01 jobname number EXTERNAL JOB, MATCH ON JOBQ, NOT
PROCESSED EXTERNAL SUBMIT FLAG = N
OPS/MASTER®
Chapter 37
JOB/Master® Region Messages
Descriptions
Action:
No JOB/Master® action required.
1.
The job can be resubmitted for completion after the error has been corrected.
2.
Keep “K” the Job (Force completion - allows all triggered jobs from this
job to begin submission).
3.
Cancel “C” the job (Cancel the job and allow all triggered jobs to begin
submission).
4.
Purge “P” the job (Purge without allowing the triggered jobs to begin
submission).
JM03 jobname number SUBMITTED BY function FROM ddname
ALTERNATE DEF.= dbname MVS JOBNAME = mvsname
USER PDS = pdsname
Description: The job was submitted by the scheduling system.
jobname
number
function
ddname
dbname
mvsname
=
=
=
=
=
=
pdsname
=
Action:
jobname
job number
who initiated the submit
DD name of PDS from which JCL was taken
alternate definition name if applicable
name of job in the jobcard if not the same as the
scheduled name.
user PDS name if applicable.
None
JM04 JOB/STEP jobname/procstep.step NOT DEFINED TO JOB/
Master® DATA BASE
Description: The job is running under JOB/Master® control, but there is no
entry in the database for the job step.
E:\Manuals\Product Manuals\ASO\OM (OPS Master)\Reference Guide\Current Release\OPS_C37.fm
jobname
procstep
step
Action:
=
=
=
jobname
procstep name
step name (pgm = exec card)
Define the job step(s) to the database if desired.
JM05 MANUAL TASK FOR x NEEDS TO BE COMPLETED
Description: This message is the default message sent for a job which is
assigned a manual task and no specific message was defined for the job.
If a custom message is desired, make a message entry for the jobs
Action:
database definition.
JM06 MVS START COMMAND ISSUED FOR task
Description: Task has been started by an MVS start command. The job definition is defined with a submit type of S on the database.
Action:
Mantissa Corporation © 2013
None
Page - 501
Chapter 37
OPS/MASTER®
Descriptions
JOB/Master® Region Messages
JM07 jjjjjjjj NOT STARTED PREDECESSOR -> pppp NOT COMPLETED
Description: Job jjjjjjjj was ready to be submitted but was held because job pppp
has not completed.
Complete the predecessor and job will begin else force Submit “F”
Action:
the job (This should be the last alternative and care should be taken not to
destory the scheduling integrity).
JM09 jobname NOT SUBMITTED --> reason.
Description: The jobname was not submitted. The reason is identified.
Action:
Informative message only.
JM11 jobname HAS HAD DSN CONTENTION RESOLVED FOR x
x...
Description: Jobname was found waiting on datasets. The jobs in contention for
the dataset, defined by x were set as negative dependencies for jobname.
None The database has been updated for negative dependencies for
Action:
these two jobs.
JM12 jobname DSN CONTENTION CANNOT BE RESOLVED
FOR x,x...
Description: An attempt was made to update the negative dependency list on the
database. The list already exceeds 48 jobs and could not be completed.
This job has no more negative dependencies available. Review the
Action:
entire job criteria and find optional criteria to use. A negative/corequisite definition may be necessary.
JM16 jobname/procstep.step IN type msg
type=
msg=
Check mode
single mode
//*JMNOEXEC or //*JMCHECK
dependencies bypassed submit simulated
No action necessary unless a change in the running status is
Action:
required. Update the database for the processing flag or type flag.
JM17 TRIGGERED JOB jobname NOT SUBMITTED, CALENDAR
DAY ddd FOR reason
Description: The job was not submitted for the schedule date ddd because of the
reason listed.
reason
not matched=
holiday match=
Page - 502
The schedule day was not on the calendar associated with the jobs definition.
The schedule day matched a day on the exception
calendar associated with the jobs definition.
Mantissa Corporation © 2013
E:\Manuals\Product Manuals\ASO\OM (OPS Master)\Reference Guide\Current Release\OPS_C37.fm
Description: The processing of the job or job step is the following.
OPS/MASTER®
Chapter 37
JOB/Master® Region Messages
Descriptions
Action:
1. None
2. If desired, change the calendar.
JM18 TRIGGERED JOB jobname NOT SUBMITTED, reason ddd
NOT SCHEDULED
Description: The jobname was not submitted for the scheduled day ddd because
of the reason listed.
Reason
DAY
Explanation
The job had a process keyword definition but it
was not on the JOBQ.
EXCLUDED FOR DAYThe job was excluded by use of an exclude option
during schedule creation.
EXCLUDED DUE TO-------- msg --------Action:
None
JM20 jobname date time CANCELLED FROM SCHEDULE DUE
TO DEADLINE REQUEST
Description: The job for the schedule date and time was removed from the
JOBQ
because of the deadline cancel option.
Action:
None
JM21 EVENT COMPLETION TRIGGERED FOR JOB/STEP jobname/procstep.step
Description: The job jobstep has been scheduled for processing by the
JMEVENT function.
Action:
None
JM22 JOB jobname NOT DEFINED TO JOB/Master® DATA BASE
E:\Manuals\Product Manuals\ASO\OM (OPS Master)\Reference Guide\Current Release\OPS_C37.fm
Description: The job has not been defined to the JOB/Master® database.
Action:
If desired, define the job to the database and then continue with the
requested operation.
JM23 command ISSUED BY user FOR jobname date time manual
tasks
Description: The JOB/Master® command was initiated by the user for the jobname with the schedule date and time shown.
Action:
None
JM26 JOB/Master®(subsys) LOCKED OUT ON PROCESSOR
smfid
Description: In a multi-cpu environment, the control region, on this processor,
has not detected any activity from the JOB/Master® region identified by subsys
on the processor smfid.
Mantissa Corporation © 2013
Page - 503
Chapter 37
OPS/MASTER®
Descriptions
JOB/Master® Region Messages
Action:
1.
Determine if the region is active (Tracking ST).
2.
Issue a PS for that smfid.
3.
If the region is active determine if the cpu is locked or stopped.
4.
Activate or unlock the cpu in question.
JM27 jobname DEPENDENT JOB NOT SUBMITTED DUE TO
PREVIOUS CANCEL COMMAND
Description: The job identified by jobname, which had been cancelled from the
JOBQ, has been cancelled again. The second cancel will remove the job from the
JOBQ without submitting trigger jobs.
Action:
None
JM29 jobname NOT TRIGGERED. NOT DEFINED TO DATA
BASE
Description: Jobname was triggered by a completing job or step. The global profile option specifies that undefined jobs should not be triggered.
Action:
Review the job, and Define to the database if desired.
JM30 jobname msg....
Description: Informational message for jobname.
Action:
None
JM31 jobname * WAITING ON NEGATIVE DEPENDENCY = = >
negative
Wait until the Completion of the negative job. If desired, Force “F”
Action:
the job (Caution...”F” should be used with care)
JM32 jobname * NEEDS TAPE DRIVES mmmmS = n mmmmS = n
Description: Jobname cannot be submitted because the number of mmmm tape
drives are not available, and the global profile option specifies that tape drive
dependencies should be verified. The number of drives required are determined
by each execution of the job. “mmmm” represents the model number (i.e. 3480).
Review the job and determine if the job actually needs the number
Action:
of tape drives specified (Job Step Level). You may Force “F” the job to submit
(The job may get a waiting for devices in JES). If the profile is set to allow
update of tape drives, then the tape drive fields will be updated upon job completion.
Page - 504
Mantissa Corporation © 2013
E:\Manuals\Product Manuals\ASO\OM (OPS Master)\Reference Guide\Current Release\OPS_C37.fm
Description: Jobname cannot be submitted because the negative dependency,
defined on the database for jobname, is active. The job identified by negative is
either in the MVS input Q or executing.
OPS/MASTER®
Chapter 37
JOB/Master® Region Messages
Descriptions
JM33 jobname NOT DEFINED AS TRIGGER JOB. NOT SUBMITTED ALTERNATE DEF. = altname
Description: The jobname was triggered. The trigger job field on the database
was not set to Y, indicating that this is a triggered job. If the job is an alternate
definition, the alternate name is displayed.
Review the job to see if the job is a triggered job. If yes, update the
Action:
database field Triggered Job to a “Y”.
JM35 jobname TRIGGERED BY trjob ALTERNATE DEF. = altjob
Description: Jobname was triggered by the job trjob. If the triggered job is an
alternate definition it is identified by altjob.
Action:
None
JM36 jobname SETUP = xxxxx SINGLE MODE = s PDS MEMBER
= member ALT = altjob PDS = pdsname PREDECESSORS =
j1,j2
Description: The jobname was dynamically added to the schedule queue. The
values entered for the job are identified in the message.
SETUP
SINGLE MODE
PDS MEMBER
ALT
PDS
PREDECESSORS
=
=
=
=
=
=
manual task values
single mode option
alternate submit member name
alternate definition name
user submit pds
additional predecessor jobs
JM37 user ISSUED COMMAND cmd
Description: The MVS cmd has been issued by user through the console function.
Action:
None
E:\Manuals\Product Manuals\ASO\OM (OPS Master)\Reference Guide\Current Release\OPS_C37.fm
JM38 RESOURCE func res BY “JMRESORC” REQUEST
Description: The batch interface was used to attach or detach the JOB/Master®
resource.
func=
res=
ATTACH, or DETACH
The name of the RESOURCE.
Action: None
JM39 ** CRITICAL ** JOB/STEP job/procstep.step FAILED comp
Description: The job or job step failed for the completion reason identified by
comp. This message is the same as JM02, but can be used for those jobs which
are considered critical. This message can be highlighted so that the failure does
not go unnoticed.
Action:
Mantissa Corporation © 2013
None
Page - 505
Chapter 37
OPS/MASTER®
Descriptions
JOB/Master® Region Messages
JM40 INTERNAL ERROR UNKNOWN CODE; CODE = code
Description: A request has been made to the control region. The requested function code is invalid and cannot be determined.
Review the Request and correct any errors Contact JOB/Master®
Action:
support at Mantissa Corp.
JM41 REQUEST FAILED file STATUS 1 = code1 S2 = code2 MSG
=message ENTRY = entryname
Description: The requested function for the file was not successful. Additional
information, if applicable, is represented by file return code1 and code2. If a message has been returned it is displayed for the record being accessed and is identified by entryname.
Action:
None
JM42 DSN TRIGGER ACTIVATED FOR DSN = dsname FROM
TASK = j xxxx
Description: The DSN event for dsname was produced from task j. Any additional message is given in xxxx. Any jobs identified to be triggered by the dataset
definition will be triggered.
Action:
None
JM43 NO DS TRIGGER FOR d xxxx....
Description: The DSN event for dataset d will not be processed due to the reason
identified by xxxx.
Action:
None
JM44 INVALID CPU-ID FOR JOB/Master® EXECUTION
JOB/Master TRIAL DATE HAS EXPIRED
Action:
Call Mantissa Support. The CPU ID for the computer you are running on does not match, or a new expiration date will need to be assigned.
Description: There was a problem detected in the dynamic tape processing.
Action:
1. IF xxxxxxxx = *MVS* and msg = USES MORE THAN 5
TAPE then call Mantissa Product Support to adjust the tape model table if you
are unable to delete the unused tape models in your system.
2. IF xxxxxxxx = jobname and msg = TAPE MODEL # NUMBER NOT FOUND then correct the model number # (1 or 2) in the job definition.
Currently Mantissa's master tape group table has 5 models. They
are 3420, 3423, 3480, 3490 and 3590.
JM45 UPDATE TO D/B
Description: This message is a Problem determination message used in JOB/
Master® to Log Before and After updates to the data base.
Page - 506
Mantissa Corporation © 2013
E:\Manuals\Product Manuals\ASO\OM (OPS Master)\Reference Guide\Current Release\OPS_C37.fm
JM44 WARNING - JOB xxxxxxxx msg
OPS/MASTER®
Chapter 37
JOB/Master® Region Messages
Descriptions
JM46 ***NOTICE*** JOB/Master® NEEDS MORE BUFFERS
Description: One of the data collection modules couldn’t find a free buffer to
pass the information to the JOB/Master® control region.
E:\Manuals\Product Manuals\ASO\OM (OPS Master)\Reference Guide\Current Release\OPS_C37.fm
Action:
Increase the number of buffers by adding/modifying the parm
“BUFFS” in the startup JCL for JOB/Master®. See installation guide for more
information about the parm.
Mantissa Corporation © 2013
Page - 507
Chapter 37
JOB/Master® Region Messages
E:\Manuals\Product Manuals\ASO\OM (OPS Master)\Reference Guide\Current Release\OPS_C37.fm
Descriptions
OPS/MASTER®
Page - 508
Mantissa Corporation © 2013
OPS/MASTER®
Chapter 38
JOB/Master® Online Messages
Descriptions
Chapter 38
JOB/Master® Online Messages
The standard short message (first line) is displayed for the error. If PF1 is entered, the
longer form of the message (second+ line) is displayed.
Descriptions
E:\Manuals\Product Manuals\ASO\OM (OPS Master)\Reference Guide\Current Release\OPS_C38.fm
IS... xxxxx msg
ERROR RETURNED FROM ISPF FILE TAILORING FUNCTION
Description:
ISPF file tailoring option has been selected and an
ISPF error, identified by xxxxx msg, has been
returned from ISPF.
Action:
Correct the error.
JM105 NO AUTHORITY(PFK1)
User YOU ARE NOT AUTHORIZED TO PERFORM THIS
FUNCTION
Description:
A command has been entered for which user is not
authorized. The ISF definition is set to N for the
command.
Action:
Contact your System Security Group.
JM106 ALLOC-E(PFK1)
DS:dsn - member CANNOT BE ALLOCATED
Mantissa Corporation © 2013
Description:
The dataset, dsn, and member could not be allocated
for the selected function.
Action:
Insure the dataset is not exclusively held by another
task.
Page - 509
Chapter 38
OPS/MASTER®
Descriptions
JOB/Master® Online Messages
JM109 OPINS UNAVAILABLE
DS:dsn - member CANNOT BE ALLOCATED
Description:
The dataset, dsn, and member could not allocated for
the documentation dataset.
Action:
Insure the dataset is not exclusively held by another
task.
JM202 jobname SUBMISSION RESET
jobname - SYMBOL PDS MEMBER DELETED AND “JCL
SETUP” RE-POSTED
Description:
The job was selected for RESET processing. The jcl
member was deleted from the staging or resolved pds,
and the manual task for jcl setup has been reset to Y.
Action:
None
JM203 jobname NOT FOUND
jobname - NOT FOUND IN dsn
Description:
The job was not found in the dsn for the selected
function.
Action:
1. Verify the DSN is the correct dsn.
2. Verify the jobname is consistent with the DSN
Jobname.
3. Verify the concatenation of the libraries being used.
4. Verify the Interactive Security Facility (ISF) library
name to be used.
Description:
An I/O error has occurred in the Master PDS
identified by dsn.
Action:
Contact your technical support personnel.
JM205 SYMBOL PDS I/O ERROR
AN I/O HAS OCCURED IN THE SYMBOL JCL DATASET
Description:
An I/O error has occurred in the Resolved PDS
identified by dsn.
Action:
Contact your local Technical Support Group.
JM206 RERUN PDS I/O ERROR
AN I/O HAS OCCURED IN THE RERUN JCL DATASET
Page - 510
Description:
An I/O error has occurred in the Rerun PDS identified
by dsn.
Action:
Contact your local Technical Support Group.
Mantissa Corporation © 2013
E:\Manuals\Product Manuals\ASO\OM (OPS Master)\Reference Guide\Current Release\OPS_C38.fm
JM204MASTER PDS I/O ERROR
AN I/O HAS OCCURED IN dsn
OPS/MASTER®
Chapter 38
JOB/Master® Online Messages
Descriptions
JM207HELP PDS I/O ERROR
AN I/O HAS OCCURED IN THE HELP DATASET
Description:
An I/O error has occurred in the Help/Document PDS
identified by dsn.
Action:
Check for hardware errors.
JM208 DSN CONFLICT
MASTER JCL AND RESOLVED JCL PDS MAY NOT BE
THE SAME
Description:
The output of jcl substitution, the RESOLVED PDS,
cannot be the same PDS as the input, the MASTER
PDS.
Action:
See the Installation Guide for information on the
setup of PDS datasets.
JM209 DSN ERROR
FOR STAGING, RESOLVED PDS AND RERUN PDS MUST
BE THE SAME
Description:
The STAGING PDS, if used, is also used as the
RERUN PDS. JCL is archived in this PDS for user
specified days.
Action:
Make certain the fields for the STAGING,
RESOLVED, and RERUN PDS libraries are the
same.
E:\Manuals\Product Manuals\ASO\OM (OPS Master)\Reference Guide\Current Release\OPS_C38.fm
JM200A OPEN ERROR
FOR dd, FILE COULD NOT BE OPENED. INSURE ALLOCATION
Description:
The file for dd name could not be opened.
Action:
Determine if the file exists and can be allocated.
Allocate the file and restart.
JM200B MEMBER ERROR
jcl member OR A )IM MEMBER COULD NOT BE FOUND
IN ISPSLIB
Description:
ISPF file tailoring has been selected to perform
symbolic substitution through JCL/Master and an
ISPSLIB member could not be found.
Action:
Correct the JCL skeleton or fix the JOB/Master®
member name or place the JCL skeleton in the
ISPSLIB DD or add the JCL PDS to the ISPSLIB
concatenation.
JM200C JMSCANEX ERROR
“JMSCANEX” MODULE NOT FOUND, MODULE NOT IN
Mantissa Corporation © 2013
Page - 511
Chapter 38
OPS/MASTER®
Descriptions
JOB/Master® Online Messages
LOADLIB LIST
Description:
JCL scan has been selected and the user written
module JMSCANEX cannot be loaded.
Action:
None
JM200D JCLSCAN COMPLETE
“JMSCANEX” HAS COMPLETED THE JCLSCAN FUNCTION, END TO TERMINATE’
Description:
The JCLSCAN has been completed for the job.
Action:
To terminate the function and return to the normal
screen press end.
JM200F USER CANCEL
xxx.....
Description:
JCL/Master symbolic substitution has been selected
and a custom user defined panel is being used. The
user panel has set the variable JMJCLERR to a non
blank value specifying that the substitution function
should be terminated in error.
Action:
Refer to the panel selected and verify the error
condition.
JM200G I/O ERROR
ERROR HAS OCCURRED IN THE RESOLVED PDS dsn
Description:
There has been an I/O error in the RESOLVED JCL
PDS.
Action:
Verify the file for no continued I/O errors. Check for
Hardware Error Conditions.
Description:
The job named could not be located in the JOB/
Master® RERUN PDS.
Action:
1. Verify the Jobname as a JOB/Master® defined Job.
2. Verify the job was scheduled on the date & time
requested.
JM302 jobname NOT FOUND
jobname - COULD NOT BE FOUND IN dsn
Description:
The job named could not be located in the Dataset
indicated.
Action:
1. Verify the dataset name and the Jobname.
2. Verify the database is correctly calling for the job
Page - 512
Mantissa Corporation © 2013
E:\Manuals\Product Manuals\ASO\OM (OPS Master)\Reference Guide\Current Release\OPS_C38.fm
JM301 jobname NOT FOUND
jobname - COULD NOT BE LOCATED IN THE JOBMASTER RERUN DATASET
OPS/MASTER®
Chapter 38
JOB/Master® Online Messages
Descriptions
from this dataset.
3. Verify the Interactive Security Facility (ISF) for
JCL/MASTER is calling for this DSN as the base or
User library.
JM303 jobname OPINS MISSING
jobname - OPINS COULD NOT BE FOUND IN dsn
Description:
The Operations instructions for the job named can not
be located in the dataset indicated.
Action:
1. Verify that the indicated dataset contains the
jobname.
2. Verify the dataset is being called correctly from the
ISF facility for JCL/MASTER.
JM304 UNAVAILABLE
dsn NOT FOUND OR COULD NOT BE ALLOCATED
Description:
The dataset can not be located.
Action:
1. Verify the dataset name is a cataloged dataset.
2. Verify the dataset has been entered correctly within
the job or the database definition.
JM307 jobname NOT SCHEDULED
jobname - NOT ON THE JOBMASTER SCHEDULE - JOB
RESET IGNORED
Description:
RESET has been selected for jobname but the job was
not found on the schedule queue.
Action:
1. Add the job to the schedule. Either Dynamically or
via a Generate Schedule.
E:\Manuals\Product Manuals\ASO\OM (OPS Master)\Reference Guide\Current Release\OPS_C38.fm
2. Let the job submit according to the criteria or Force
submit the job.
JM308 PARM ERROR
MANUAL TASK FOR JCL SETUP NOT POSTED ON JOB
QUEUE
Description:
RESOLVE has been selected for a job and the
function could not be performed.
Action:
1. Set the Manual Task flag for JCL setup for the job
required to a Y.
2. Retry the resolve function.
JM309 CONTROL ERROR
JOB/Master® CONTROL REGION(subsys) NOT ACTIVE
Description:
Mantissa Corporation © 2013
JOB/Master® access was selected for subsys, but the
control region was not active.
Page - 513
Chapter 38
OPS/MASTER®
Descriptions
JOB/Master® Online Messages
Action:
Activate the requested control region and retry.
JM401 jobname - EMPTY MEMBER
jobname - dsn PDS MEMBER IS EMPTY
Description:
There is no data in the PDS member of the dsn for the
jobname.
Action:
1. Verify the member and the dataset.
2. Restart the function.
JM403 ENTER VALUE
ALL VALUES MUST BE RESOLVED BEFORE SUBSTITUTION CAN BE PERFORMED
Description:
A value must be entered for all symbols in order to
complete the resolve process.
Action:
Make sure all symbols have a value.
JM404 SUBSTITUTION COMPLETE
jobname - SYMBOLIC SUBSTITUTION AND “JCL SETUP”
FLAGGED AS COMPLETE
Description:
The JCL substitution for the requested job has been
completed.
Action:
None
Description:
RESOLVE has been selected for the jobname. The jcl
member does not contain a JOB card.
Action:
Repair the job and resubmit.
JM406 (V)ALUE ERROR
“(V)” - TYPE SYMBOL(S) WILL NOT LOGICALLY FIT
INTO THE OUTPUT RECORD
Description:
A symbolic variable has been entered which does not
fit into remainder of the JCL record. (The symbolic is
too long for a single card).
Action:
Repair the Job JCL in question. Resolve the job again.
JM407 symbolic - KEYWORD ERROR
SYMBOL NAME LENGTH IS > 8 CHARACTERS (NO
DELIMITER)
Page - 514
Description:
The symbolic variable in the jcl record is greater than
8 characters. Insure that delimiter is not missing.
Action:
Repair the JCL. Resolve the job again.
Mantissa Corporation © 2013
E:\Manuals\Product Manuals\ASO\OM (OPS Master)\Reference Guide\Current Release\OPS_C38.fm
JM405 jobname - MISSING JCL
jobname - CONTAINS NO JCL “JOBCARD” - CALL SUPPORT GROUP
OPS/MASTER®
Chapter 38
JOB/Master® Online Messages
Descriptions
JM408 INTERNAL ERROR
TABLE ERROR PERFORMING SYMBOLIC SUBSTITUTION
Description:
Symbolic substitution failed. A variable in the JCL
can no longer be found.
Action:
1. Verify the job JCL for the presence of the variable.
2. Resolve the job again.
JM409 jobname - JCL ERROR
jobname - “JCL” CARD CONTAINS SYMBOL KEYWORD
WHICH STARTS IN OR SPANS COLUMN 70
Description:
A symbolic has been added to the job JCL which has
made the JCL card exceed the column 70 limit.
Action:
1. Divide the JCL card into two (2) cards or shorten
the
symbolic desired.
2. Resolve the job again.
JMER001A SUBSYSTEM ENTRY NOT FOUND
SUBIN NOT FOUND IN THE SUBSYSTEM TABLE - START
JOB/Master®
Description:
Access has been selected but OPS/Master® and JOB/
Master® has not been started.
Action:
Start the OPS/Master® procedure, then activate the
JOB/Master® Region.
E:\Manuals\Product Manuals\ASO\OM (OPS Master)\Reference Guide\Current Release\OPS_C38.fm
JMER001B ISPF ERROR service
msg
Description:
The ISPF error identified by msgid and msg has
occurred.
Action:
Refer to the ISPF Message Manual.
JMER001C REQUEST FAILED
msg
Description:
The requested function failed. The error is identified
by msg.
Action:
Correct the indicated error.
JMER002A JOBMASTER NOT ACTIVE
THE JOBMASTER = (subsys) CONTROL REGION IS NOT
ACTIVE
Mantissa Corporation © 2013
Description:
Access has been selected but JOB/Master® has not
been started.
Action:
Activate the JOB/Master® Region.
Page - 515
Chapter 38
OPS/MASTER®
Descriptions
JOB/Master® Online Messages
JMER003A CONTROL RECORD ERROR
THE JOB/Master (SUBSYS) CONTROL RECORD WAS NOT
FOUND
Description:
The JOB/Master® control record could not be
retrieved.
Action:
1. Verify that JOB/Master® has not been shutdown.
2. If the region is active contact Mantissa Support.
JMER003B PROFILE ERROR
PROFILE NOT FOUND. ENTER PROFILE AND CONFIRM
PFKS
Description:
An ISPF profile entry for JM01 has not been created.
Action:
Incorrect application ID &ZAPPLID.
Make sure the NEWAPPL(JM01) value was not
changed in panel JMENBANR.
JMER004A OPEN ERROR
“JMBROWS” INTERNAL ERROR, FILE NOT AVAILABLE
Description:
The ISPF list datasets could not be accessed.
Action:
Be sure that the required ISPF datasets are available
to your ISPF session.
JMER005A AUTHORIZATION
reason
Description:
The requested function has been denied by the user
command exit. The reason is displayed.
Action:
Check with your Security Administration Group for
JOB/Master®.
Description:
Function xxxxx is not authorized for this user in the
ISF default or user record.
Action:
Check with your Security Administration Group.
JMER008A JOBNETWORK ERROR
user CAN ONLY ACCESS JOBS FOR SCHEDULE/NET
********/jobnet
Page - 516
Description:
The user ISF record specifies the job network name
which can be accessed by this user. Only jobs
associated with jobnet and job definitions containing
a job/network id of ******** can be accessed.
Action:
Contact your local Security Administration Group.
Mantissa Corporation © 2013
E:\Manuals\Product Manuals\ASO\OM (OPS Master)\Reference Guide\Current Release\OPS_C38.fm
JMER006A NOT AUTHORIZED BY ISF
USER NOT AUTHORIZED for xxxxx FUNCTION
OPS/MASTER®
Chapter 38
JOB/Master® Online Messages
Descriptions
JMER009A INVALID OPTION
option OPTION UNKNOWN INVALID REQUEST
Description:
An invalid option was specified.
Action:
Re-enter a correct option for this panel.
JMER009B INVALID KEYWORD
PROCESS KEYWORD kwd INVALID, RE-ENTER
Description:
A process keyword is invalid. The invalid keyword is
listed.
Action:
Re-enter a valid keyword. Create a definition for the
keyword desired.
JMER009C optn ALREADY EXISTS
entry ALREADY DEFINED TO DB
Description:
The option selected for the entry cannot be performed,
the entry already exists on the database.
Action:
Use another entry for the option desired.
JMER009D NO DB TABLE
DATA BASE “INQ” MUST BE IN PROCESS FOR
EXTENDED COPY
Description:
A copy function has been selected without an entry
name, (extended copy), but the session is not being
processed from INQ.
Action:
Select I (INQ) from the main menu in order to be able
to select from the db list. Retry the copy command.
E:\Manuals\Product Manuals\ASO\OM (OPS Master)\Reference Guide\Current Release\OPS_C38.fm
JMER009I SYNTAX ERROR
COMMAND MUST SPECIFY PROPER DATA BASE ENTRY
NAME
Description:
An appropriate entry name must be specified for the
function requested.
Action:
Use the correct command and retry.
JMER009J ILLOGICAL ADD
STEP CANNOT BE ADDED IF JOB RECORD DOES NOT
EXIST
Description:
You have attempted to define a Step record without a
Job record already defined.
Action:
1. Verify the Job name you are entering.
2. Define the Job to the database.
3. Retry the definition of the step.
JMER009K panel PANEL ERROR
Mantissa Corporation © 2013
Page - 517
Chapter 38
OPS/MASTER®
Descriptions
JOB/Master® Online Messages
msg
Description:
An ISPF panel error has occurred. The error is
identified by msg.
Action:
Perform the corrective action required in the ISPF
message.
JMER009L hhmm - hhmm INVALID TIME
TIMES MUST BE IN THE RANGE 00-23 HOURS AND 00-59
MINUTES
Description:
You have attempted to use a time range outside of the
boundaries listed.
Action:
Correct the entry and retry.
JMER009R INVALID CONSOLE
CONSOLE cid IS AN INVALID TYPE OR NOT AVAILABLE
Description:
The console address cid is not valid.
Action:
Enter a valid device address. Console addresses can
be verified by issuing an MVS D C command.
JMER009S INVALID STATUS
JOB NOT IN PROPER STATUS FOR THIS ACTION,
IGNORED
Description:
An improper function was selected for the job, such as
KEEP for a job which is not abended.
Action:
None
Description:
Only one JOB/Master® session is permitted.
Action:
None
JMIM001A CMD EXIT NOT ACTIVE
“JMCMDEXT” NOT FOUND IN LOAD LIBRARY, EXIT
INACTIVE
Description:
A user command exit has been specified, but the exit
could not be loaded from the library.
Action:
Insure that the module is in the library specified.
JMIM001B ENTRY NOT FOUND
Description:
The entry requested was not found on the database.
Action:
Verify the entry is correct. Add the entry to the
database.
JMIM001C ENTRY NOT FOUND
Page - 518
Mantissa Corporation © 2013
E:\Manuals\Product Manuals\ASO\OM (OPS Master)\Reference Guide\Current Release\OPS_C38.fm
JMER009U REQUEST DENIED
OPS/MASTER®
Chapter 38
JOB/Master® Online Messages
Descriptions
COPY FAILED ENTRY NOT FOUND ON DATA BASE.
Description:
The entry entered to be copied was not on the
database.
Action:
Verify the entry name is correct.
JMIM001E MUTUALLY EXCLUSIVE
ACTUAL DATES CANNOT BE SPECIFIED WITH WEEKS
OR RELDAYS
Description:
When defining calendars, only actual days, or relative
days can be specified. Both cannot be used in the
same definition.
Action:
Correct the definition and CONFIRM.
JMIM001F optn SUCCESSFUL
Description:
The selected option was completed sucessfully.
Action:
None
JMIM001G COPY CANCELLED
Description:
The selected copy function was cancelled. The entry
will not be copied.
Action:
None
JMIM001K CRTE GENERATED
Description:
The generate schedule function has been confirmed.
Action:
The JCL can now be submitted, using the SUB
command.
E:\Manuals\Product Manuals\ASO\OM (OPS Master)\Reference Guide\Current Release\OPS_C38.fm
JMIM001L ENTER CAN/CONFIRM
YOU MUST ENTER “CANCEL” OR “CONFIRM” TO END
THIS FUNCTION
Description:
You have requested an action within the JOB/
Master® system.
Action:
Enter either CONFIRM or CANCEL.
JMIM001M optn CANCELLED
THE optn FUNCTION WAS ENDED WITH THE “CANCEL”
COMMAND
Description:
The operation requested has been cancelled with no
alterations being made to any field.
Action:
None
JMIM001N MSG RETURNED PF1
Mantissa Corporation © 2013
Page - 519
Chapter 38
OPS/MASTER®
Descriptions
JOB/Master® Online Messages
msg...
Description:
An informational message has been returned from the
control region.
Action:
Hit PF1 for additional information.
JMIM006B CALENDAR NAME ERR.
calendar EXISTS AS A PROCESS KEYWORD DEFINITION
Description:
The calendar specified on the job definition exists as a
process keyword definition.
Action:
This is an informational message only. Do not use the
same name for a calendar name and a Process
Keyword Name.
JMIM006C pkywrd NAME ERR.
pkywrd EXISTS AS A CALENDAR DEFINITION
Description:
The process keyword specified on the job definition
exists as a calendar definition.
Action:
This is an informational message only. Do not use the
same name for a calendar name and a Process
Keyword Name.
JMIM006D CALENDAR NAME
calendar DOES NOT EXIST ON THE DATABASE
Description:
The calendar specified on the job definition does not
exist.
Action:
This is an informational message only. Do not use the
same name for a calendar name and a Process
Keyword Name.
Page - 520
Description:
The process keyword specified on the job definition
does not exist.
Action:
This is an informational message only.
Mantissa Corporation © 2013
E:\Manuals\Product Manuals\ASO\OM (OPS Master)\Reference Guide\Current Release\OPS_C38.fm
JMIM006E PKYWRD NAME
pkywrd DOES NOT EXIST ON THE DATABASE
OPS/MASTER®
Chapter 39
JOB/Master® Remote Tracking Support Messages
Descriptions
Chapter 39
JOB/Master® Remote Tracking Support Messages
Descriptions
JMV01I REQUEST TO CONNECT ssssssss TO=> pppppppp
Description:
The secondary location, ssssssss, has requested connection to
the main or primary location, pppppppp.
Action:
None
JMV02I ssssssss ACTIVATED TO pppppppp
Description:
The request to connect the secondary session, ssssssss, to the
main location, pppppppp, has been successfully completed.
Action:
None
E:\Manuals\Product Manuals\ASO\OM (OPS Master)\Reference Guide\Current Release\OPS_C39.fm
JMV03I VTAM SESSION CLOSED
Description:
This VTAM session has been closed.
Action:
None
JMV04IVTAM CLOSE FORCED
Description:
This session has been forced to complete due to operator or
VTAM function. A VARY INACT command may have been
issued.
Action:
1. Verify the reason the session was closed.
2. Vary the session active.
JMV05Ixxxxxxxx JM/RJT SUPPORT ACTIVE
Description:
Mantissa Corporation © 2013
The JOB/Master® main, primary, session has been activated
and is ready to receive connection from any secondary locaPage - 521
Chapter 39
OPS/MASTER®
Descriptions
JOB/Master® Remote Tracking Support Messages
tions.
Action:
None
JMV06IAN OPS/RJT SESSION HAS BEEN TERMINATED
Description:
A secondary location has had the JOB/Master® session terminated either by choice, or, an error has occurred.
Action:
Restart the RJT task at the secondary location. The connection
will be re-established when the secondary location restarts the
RJT task.
JMV07Ixxxxxxxx CONNECTION ACCEPTED
Description:
The secondary location, xxxxxxxx, has been accepted for communication and job status information will be processed on
behalf of the remote site.
Action:
None
JMV08IREQ=rq; R0=nn; FDBK=nnnn; SENSE=ssssssss
Description:
A VTAM request, rq, has failed. The return code from register
zero is displayed along with the feed back code and sense data
from the RPL.
Action:
1. Determine the reason for failure.
2. Re-issue the VTAM request.
JMV09IPRIMARY SESSION NOT ACTIVE JM/RJT ENDED
Description:
The request to connect to the main or primary session has been
rejected because the main session is not active.
Action:
1. Verify JOB/Master® is active at the primary location.
2. If not active - Activate.
JMV10IPRIMARY OPS/RJT SESSION ENDED
Description:
The primary, or main, session has ended. The session is terminated.
Action:
1. Restart JOB/Master® at primary location.
2. Restart this session when the primary session is restarted.
JMV11IOPEN FAILED TO VTAM - JM/RJT INACTIVE
Description:
The primary, or main, session could not be opened.
The communication session is not available.
Action:
1. Determine that the APPL name is defined to VTAM.
2. Verify that the stepname on the execute card matches the
VTAM APPL name.
Page - 522
Mantissa Corporation © 2013
E:\Manuals\Product Manuals\ASO\OM (OPS Master)\Reference Guide\Current Release\OPS_C39.fm
3. If active, verify the PARM RJT=Y is present.
OPS/MASTER®
Chapter 39
JOB/Master® Remote Tracking Support Messages
Descriptions
3. Correct the problem and restart JOB/Master®.
JMV12IOPEN TO VTAM APPL FAILED JM/RJT ENDED
Description:
The secondary session could not be opened. The remote tracking function is terminated.
Action:
1. Determine that the APPL name is defined to VTAM.
E:\Manuals\Product Manuals\ASO\OM (OPS Master)\Reference Guide\Current Release\OPS_C39.fm
2. Verify that the stepname on the execute card matches the
VTAM APPL name.
3. Correct and restart the RJT task.
Mantissa Corporation © 2013
Page - 523
Chapter 39
JOB/Master® Remote Tracking Support Messages
E:\Manuals\Product Manuals\ASO\OM (OPS Master)\Reference Guide\Current Release\OPS_C39.fm
Descriptions
OPS/MASTER®
Page - 524
Mantissa Corporation © 2013
OPS/MASTER®
Chapter 40
RUN/Master® Messages
Descriptions
Chapter 40
RUN/Master® Messages
This section contains messages which are prefixed with the characters “RM”. These messages pertain to RUN/Master® software product. Messages from other components of
OPS/Master® Base software which are issued on behalf of RUN/Master® are prefixed
with other than characters “RM” and are therefore documented in other sections of this
manual.
E:\Manuals\Product Manuals\ASO\OM (OPS Master)\Reference Guide\Current Release\OPS_C40.fm
Descriptions
RMCR000A
RUN/Master® LOADLIB not in APF list.
RMCR000E
Unable to establish ESTAE.
RMCR000I
RUN/Master® initialization complete.
RMCR000S
RUN/Master® Subsystem table RM01 not found.The startup
procedure for OPS/Master® must be run before starting RUN/
Master®.
Action:
Run the OPS/Master® procedure before trying to start RUN/
Master®.
RMCR000X
Disastrous error in RUN/Master®.
RMCR000Y
RUN/Master® resource cleanup initiated.
RMCR001S
Stop requested.
RMCR005S
SYSEVENT DONTSWAP unsuccessful.
RMDB003E
No JRJB entries left.
RMDB004W
Job not found - will be ignored.
RMDB005E
No space left for JCL entries
RMDB006W
Incomplete set of JCL.
RMDB007W
BAD JCL CARD JOB=XXXXXXXX.
Mantissa Corporation © 2013
Page - 525
Chapter 40
OPS/MASTER®
Page - 526
RUN/Master® Messages
Action:
Review the Jobs JCL.
RMDB008E
JCL test does not match code.
RMDB009E
GETMAIN error can not proceed.
RMDB010W
Invalid record passed from RM00.
RMDB011W
Invalid JCL type passed from RM00.
RMDB012E
Reader time is invalid
RMDB013I
Duplicate Job Cards.
RMDB014E
JCL error encountered with EXEC.
RMDB015E
Internal text table out of space.
RMDB016E
Bad database ADD return code.
RMDB017E
JCL error encountered with PROC.
RMCR009R
Unexpected RC 12 from wait task.
RMDE014E
JCL ERROR ENCOUNTERED WITH EXEC.
Action:
Verify EXEC statement on the JCL.
RMDB015E
Internal text table out of space.
Action:
Call Mantissa Support. Ask for Special User PTM to “expand
the text table in RUN/Master®. No record of profile for this
USERID.
RMDB016E
Bad database add.
RMDB017E
JCL ERROR ENCOUNTERED WITH PROC.
Action:
Check proc being called. Correct error.
RMTM000P
PROFILE NOT FOUND.
No record of profile for this USERID.
RMTM003B
NO APPLICATION.
Incorrect application ID &ZAPPLID. Make sure the
NEWAPPL(RM01) value was not changed in panel OPSBANNR.
RMTM009B
CONFIRM REQUEST.
To confirm update, enter CONFIRM on command line.
Mantissa Corporation © 2013
E:\Manuals\Product Manuals\ASO\OM (OPS Master)\Reference Guide\Current Release\OPS_C40.fm
Descriptions
OPS/MASTER®
Chapter 41
OPS/Master® Messages
Descriptions
Chapter 41
OPS/Master® Messages
This section contains messages for the OPS/Master® Base software as well as other
related software products. Messages issued under an ISPF dialog consist of three parts:
1.
The MESSAGE ID refers to the ISPF message number as it exists in the ISPMLIB data set.
2.
The SHORT MESSAGE is the message which is displayed by the dialog in the
upper right corner of the dialog panel.
3.
The LONG MESSAGE refers to the message which is displayed on the third line
of an ISPF panel whenever a HELP command (usually PF1 key) is issued following the display of a SHORT MESSAGE.
In the following messages, symbolic parameters (keywords which are prefixed with an
ampersand (&)) will be filled in during execution.
E:\Manuals\Product Manuals\ASO\OM (OPS Master)\Reference Guide\Current Release\OPS_C41.fm
This section contains messages which are prefixed with the characters “OMC”. These
messages originate in Control Region Assist component of OPS/Master® Base software
and are issued on behalf of various software products.
Descriptions
OMCR000A
Control region LOADLIB not in APF list
OMCR000E
Unable to establish ESTAE
OMCR000P
PARM field contains invalid option
OMCR000S
Unidentified subsystem name
OMCR000U
Unidentified JCL PARM option or console REQUEST
OMCR001F
Modify request contains invalid parameters
OMCR001S
STATUS = XXXXXXXX where XXXXXXXX is the specific
keyword which represents the status of the Control Region or
Mantissa Corporation © 2013
Page - 527
Chapter 41
OPS/MASTER®
Descriptions
OPS/Master® Messages
of the specific option. The keywords are associated with the
following meanings:
•
ACT/INACT - The Control Region is ACTIVE/INACTIVE.
•
CHAR = YYYY - the YYYY can be one (1) to four (4) default control characters
associated with and having specific meaning for a given software product. Presently this convention is used to identify jobs which will execute under RUN/
Master® control.
•
SYS = YYYY - the YYYY identifies the four character Subsystem name
assigned to the Control Region.
OMCR005L
Modify command length error
OMCR009R
Unexpected return code from wait task
Page - 528
OPDA000
? SEE SVC99 ERROR
Undetermined error from SVC 99 function - check ERROR/
INFO fields.
OPDA001
INVALID CHOICE
Characters used are not within the allowable choices for the
field.
OPDA002
BLKSIZE UNAVAILABLE
Space request in blocks failed to provide BLKSIZE.
OPDA003
DSNAME UNAVAILABLE
Either VOL or DCB reference to DSNAME which was not
provided.
OPDA004
GREATER THAN 59
Allocation request for more than the limit of 59 units.
OPDA005
REQUISITE KEY MISS.
Requisite data not provided - e.g. DSNAME is a requisite for
MEMBER.
OPDA006
MUTUAL EXC KEY USED
Mutually exclusive or conflicting data specified.
OPDA204
REAL STORAGE UNAVAIL
Real storage unavailable.
OPDA210
DATA SET UNAVAILABLE
Requested data set unavailable - allocated to another job.
OPDA214
UNIT UNAVAILABLE
Unit not available or all internal readers allocated.
OPDA218
VOLUME NOT MOUNTED
Specified volume not mounted, user does not have mounting
authority.
OPDA220
VOLUME UNAVAILABLE
Mantissa Corporation © 2013
E:\Manuals\Product Manuals\ASO\OM (OPS Master)\Reference Guide\Current Release\OPS_C41.fm
This section contains messages which are prefixed with the characters “OPD”. These messages originate in OPS/Master® dynamic allocation components and are issued on behalf
of various software products.
OPS/MASTER®
Chapter 41
OPS/Master® Messages
Descriptions
E:\Manuals\Product Manuals\ASO\OM (OPS Master)\Reference Guide\Current Release\OPS_C41.fm
Requested volume not available.
OPDA224
NO ELIGIBLE DEVTYPE
Eligible device types do not contain enough units.
OPDA228
UNIT/VOL IN USE
Specified volume or unit in use by system.
OPDA230
RES VOL ON REQ UNIT
Permanently resident or reserved volume on required unit.
OPDA234
MORE THAN 1 DEV REQ
More than one device required for a request for a specific unit.
OPDA238
TIOT FULL
Space unavailable in task INPUT OUTPUT TBLE (TIOT).
OPDA240
REQ DEV IS A CONSOLE
Requested device is a console.
OPDA244
TP DEV UNAVAILABLE
Telecommunication device not accessible.
OPDA250
SYSBSYS RESOURCE U/A
Subsystem resource not available.
OPDA254
COND ENQ RES. U/A
The TIOT resource is unavailable and user requested conditional ENQ.
OPDA258
NOT ENOUGH UNITS
Insufficient number of non-restricted units to satisfy the
request.
OPDA260
UNIT STATUS NOT MET
Unit does not meet specified status requirements.
OPDA264
INVAL. REQ FOR UNIT
Invalid request due to current unit status.
OPDA268
TAPE DEVICE BROKEN
Tape device is broken.
OPDA358
DISP OVERRIDE INVAL
Overriding disposition of delete is invalid for a data set allocated as SHR.
OPDA360
INVALID KEY IN TU
Invalid key specified in text unit.
OPDA364
FILE RESTRICTED
Restricted name specified as DDNAME or associated with
REQ. DSNAME.
OPDA368
UNAUTHORIZED USER
Authorized function requested by unauthorized user.
OPDA374
INVALID # IN TU
Invalid # specified in text unit.
Mantissa Corporation © 2013
Page - 529
Chapter 41
OPS/MASTER®
Page - 530
OPS/Master® Messages
OPDA378
DUPLICATE KEY IN TU
Duplicate key specified in text unit.
OPDA380
MUTUAL EXC KEY
Mutually exclusive key specified.
OPDA384
MUTUAL INC KEY N/A
Mutually inclusive key not specified.
OPDA388
REQ KEY NOT USED
Required key not specified.
OPDA390
GDG NAME TOO LARGE
GDG name specified with relative generation number exceeds
35 chars.
OPDA394
INCOMPAT STAT/GDG
Status and relative generation number are incompatible.
OPDA398
VOL SEQ TOO LARGE
Volume sequence number exceeds the number of volumes.
OPDA410
DDNAME UNAVAILABLE
Specified DDNAME unavailable.
OPDA420
DATA SET IS OPEN
Specified DDNAME or DSNAME associated with an open
data set.
OPDA424
DECONCAT INTO DUP DD
De-concatenation would result in duplicate DDNAMES.
OPDA434
DDN CONVERT/NON-PERM
DDNAME is associated with a convertible or non-perm alloc
resource.
OPDA438
DDNAME NOT FOUND
Specified DDNAME not found.
OPDA440
DSNAME NOT FOUND
Specified DSNAME not found.
OPDA444
REL REQ # NOT FOUND
Relative entry number specified in info retrieve request not
found.
OPDA448
DS ALREADY EXISTS
Request for a new data set failed, the data set already exists.
OPDA450
MAX ALLOC EXCEEDED
Request would exceed the limit of 1635 concurrent allocations.
OPDA454
NO DDN FOR DCB REF
DDNAME in DCB reference not found.
OPDA458
NO DSN FOR DCB/VOL
DSNAME in DCB or VOL reference is a GDG group name.
OPDA460
DSN/MEMBER VS DDN
Specified DSNAME or MEMBER is not associated with specMantissa Corporation © 2013
E:\Manuals\Product Manuals\ASO\OM (OPS Master)\Reference Guide\Current Release\OPS_C41.fm
Descriptions
OPS/MASTER®
Chapter 41
OPS/Master® Messages
Descriptions
E:\Manuals\Product Manuals\ASO\OM (OPS Master)\Reference Guide\Current Release\OPS_C41.fm
ified DDNAME.
OPDA464
DSN IS PRIV CATALOG
Specified DSNAME to be deallocated is a private catalog.
OPDA468
CAT ALLOC/OPEN ERR
Error while allocating or opening a private catalog.
OPDA470
USER UNAUTHORIZED
User unauthorized for job entry subsystem request.
OPDA474
SELECT OPT DEV ERR
Error while attempting to select optimum device.
OPDA478
UNABLE TO PROCESS
Unable to process job entry subsystem request.
OPDA480
MAX UNITS EXCEEDED
The number of units needed to satisfy the request exceeds the
limit.
OPDA484
DENIED BY OPERATOR
Request denied by operator.
OPDA488
PATTERN DSCB U/A
GDG pattern DSCB not mounted.
OPDA490
ALLOC ASSIGN ERR
Error changing allocation assignments.
OPDA494
ERROR ON OS CVOL
Error processing OS CVOL.
OPDA498
MSS VOLUME UNAVAIL
MSS virtual volume not accessible.
OPDM017X
DS NOT CATALOGED
Locate error, see data management for return code, RC=&RC.
OPDM020C
EXCLUSIVE DS UNAVAIL
Request for exclusive use of a shared data set cannot be honored.
OPDM021C
INVALID UNITNAME
Unit name specified is undefined.
OPDM022C
INELIGIBLE/RES UNIT
Volume mounted on ineligible permanently resident or
reserved unit.
OPDM023C
CATALOG NOT MOUNTED
Required catalog not mounted, user does not have mount
authority.
OPDM024C
OS MANAGED RESOURCE
Operating-system-managed resource was unavailable to the
subsystem.
OPDM025C
DEVICE IS BOXED
Requested device is boxed and cannot be accessed.
Mantissa Corporation © 2013
Page - 531
Chapter 41
OPS/MASTER®
Page - 532
OPS/Master® Messages
OPDM035C
INVALID PARM IN TU
Invalid PARM specified in text unit.
OPDM036C
INVALID PARAM LIST
Invalid parameter list format.
OPDM037C
INVALID LEN IN TU
Invalid LEN specified in text unit.
OPDM038C
DUPLICATE DDNAMES
Duplicate DDNAMES specified.
OPDM039C
INCMPAT DEVTPE/VOL
Device type and volume are incompatible.
OPDM043C
NOT ENOUGH RESOURCES
The system could not de-allocate enough resources to meet
limit.
OPDM044C
DISP NOT HONORED
Request made for a data set with DISP of delete, req. not honored.
OPDM045C
DSN IS PERM-CONCAT
Specified DSN to be deallocated is a member of PERM-CONCAT group.
OPDM046C
RMT NOT DEF TO JES
Remote work station not defined to job entry subsystem.
OPDM047C
UNABLE TO ESTAE
Unable to establish ESTAE environment.
OPDM047X
DADSM ALLOCATE ERROR
DADSM allocate error, see info reason code.
OPDM048C
PATTERN DSCB UNAVAIL
GDG pattern DSCB not found.
OPDM049C
MSS VOLUME UNAVAIL
MSS virtual volume not defined.
OPDM057X
CATALOG ERROR
Catalog error, RC=&RC, see data management for return code.
OPDM067X
OBTAIN ERROR
Obtain error, RC=&RC, see data management for return code.
OPDM077X
SUBSYSTEM ERROR
Subsystem error, see both error and info reason codes.
OPDM087X
*MSTJCL* ERROR
Scheduler JCL facility error.
OPDM300
SUBSYS INVAL PARAM
Subsystem detected an invalid parameter.
OPDM304
UNABLE TO PROTECT
Unable to protect data set/volume because of conflicting keyword.
Mantissa Corporation © 2013
E:\Manuals\Product Manuals\ASO\OM (OPS Master)\Reference Guide\Current Release\OPS_C41.fm
Descriptions
OPS/MASTER®
Chapter 41
OPS/Master® Messages
Descriptions
MSVGP NOT DEFINED
Specified MSVGP name not defined.
OPDM402
SUBSYS NOT WORKING
Subsystem is not operational.
OPDM404
SUBSYS REQ ERROR
Subsystem request in error.
OPDM408
KEY NOT SUPPORTED
Subsystem does not support allocation via key DALSSNM.
OPDM410
SUBSYS UNKNOWN
Subsystem does not exist.
OPDM412
MSS VOL SELECT ERROR
MSS volume select error.
OPDM414
RACF NOT ACTIVE
Protect request not processed. RACF not in system or not
active.
OPDM418
MSS NOT INITIALIZED
MSS not initialized for allocation.
OPDM420
USER UNKNOWN TO RACF
Protect request failed, user not defined to RACF.
OPDM422
BAD REF TO OUTPUT
Invalid reference to an output JCL statement.
OPDM424
VOL=REF EXCEEDS LIM
Request for VOL=REF to a DSNAME that exceeded 972
referbacks.
OPDM428
RC0 FROM ALLOC/JFCB
R15=0 from ALLOC or JFCB routines but SIOT RC not set,
check EDT.
E:\Manuals\Product Manuals\ASO\OM (OPS Master)\Reference Guide\Current Release\OPS_C41.fm
OPDM400
Mantissa Corporation © 2013
Page - 533
Chapter 41
OPS/Master® Messages
E:\Manuals\Product Manuals\ASO\OM (OPS Master)\Reference Guide\Current Release\OPS_C41.fm
Descriptions
OPS/MASTER®
Page - 534
Mantissa Corporation © 2013
OPS/MASTER®
Chapter 42
CONSOLE/Master® Messages
Descriptions
Chapter 42
CONSOLE/Master® Messages
This section contains messages which are prefixed with the characters “CM”. These messages pertain to CONSOLE/Master® software product. Messages with the CMC prefix
originate in the CONSOLE/Master® Controller.
E:\Manuals\Product Manuals\ASO\OM (OPS Master)\Reference Guide\Current Release\OPS_C42.fm
Descriptions
CMCR000I
CONSOLE/Master® initialization complete
CMCR000O
OPEN ERROR
Unable to open PARMLIB data set.
CMCR000P
PARM field contains invalid option
CMCR000R
ONSOLE/MASTER refresh complete
CMCR000S
CONSOLE/Master® subsystem name table (CM01) not found.
Action:
Run OPSMASTR proc before trying to start
CONSOLE/Master®.
CMCR000X
Disastrous error in CONSOLE/Master®
CMCR000Y
CONSOLE/Master® resource cleanup initiated
CMCR001F
Modify request invalid parameters
CMCR001S
Stop requested
CMCR002C
Initial command stream processing completed.
CMCR002I
Initial command stream processing initiated.
CMCR005L
Modify CMD length error
CMCR009R
Unexpected RC 12 from wait task
Description:
A rule has been recognized which has a wait and the rule can
not be satisfied at this time.
Mantissa Corporation © 2013
Page - 535
Chapter 42
OPS/MASTER®
Descriptions
CONSOLE/Master® Messages
CMCR100E
THE PERSISTANT STORE TABLE HAS BEEN CORRUPTED
Description:
CONSOLE/Master® has been abended.
Action:
See if you can determine what overlayed table in area around
the R2 value. Abend out dump was produced. See what is overlaying storage.
CMCR101E
THE PSV TABLE EXPANSION GETMAIN FAILED.
Description:
CONSOLE/Master® has been abended.
Action:
Determine who is using your SQA storage.
CMCR102E
THE PSV TABLE EXPANSION FREEMAIN FAILED.
Description:
CONSOLE/Master® has been abended.
Action:
Determine who is freeing your SQA storage.
CMCR200T
TASK CONTROL TABLE IS FULL. NOTIFY CONSOLE/
Master® SUPPORT.
CONSOLE/Master® has several tasks queued up for processing. There are replies and commands that have been prefixed
with a wait parameter. If this message is received contact Mantissa technical support for further instructions.
CMCR200W
UNABLE TO STOP. WAITING ON nnnn TASKS TO COMPLETE; ESTIMATED COMPLETION TIME= MIN TO
MAX SECONDS.
CONSOLE/Master® has several tasks queued up for processing. There are replies and commands that have been prefixed
with a wait parameter. nnnn signifies the number of tasks
queued up. min signifies the minimum wait time and max signifies the maximum wait time for the queue to clean. You must
retry the stop command after the maximum interval has passed.
Page - 536
CMTE000C
More than 512K of CSA required for saving all rules
CMTE000E
No rules found on data base
CMTE000R
more than 4MB required for saving all rules
CMTE001L
Invalid syntax within following record - bypassed
CMTM000K
INVALID KEY FORMAT
Data entered as part of user key has invalid key format.
CMTM000N
ERROR WITH TEXT
Format error with command or reply text.
CMTM000P
PROFILE NOT FOUND
No record of profile for this USERID.
Mantissa Corporation © 2013
E:\Manuals\Product Manuals\ASO\OM (OPS Master)\Reference Guide\Current Release\OPS_C42.fm
This section contains messages which are prefixed with the characters “CMT”. These
messages pertain to the CONSOLE/Master® software product. Messages with the CMT
prefix originate in the CONSOLE/Master® online dialogs.
OPS/MASTER®
Chapter 42
CONSOLE/Master® Messages
Descriptions
JOB/Master® NOT FOUND
JOB/Master® record not read for values.
CMTM003B
NO APPLICATION
Incorrect application ID &ZAPPLID. Make sure the
NEWAPPL(CM01) value was not changed in panel
OPSBANNR.
CMTM009B
CONFIRM REQUEST
To confirm update, enter CONFIRM on command line.
E:\Manuals\Product Manuals\ASO\OM (OPS Master)\Reference Guide\Current Release\OPS_C42.fm
CMTM001J
Mantissa Corporation © 2013
Page - 537
Chapter 42
CONSOLE/Master® Messages
E:\Manuals\Product Manuals\ASO\OM (OPS Master)\Reference Guide\Current Release\OPS_C42.fm
Descriptions
OPS/MASTER®
Page - 538
Mantissa Corporation © 2013
OPS/MASTER®
Chapter 43
ISPF Short Messages
Descriptions
Chapter 43
ISPF Short Messages
In the following messages, symbolic parameters (keywords that are prefixed with an
ampersand (&)) will be filled in during execution.
The MESSAGE ID refers to the ISPF message number as it exists in the ISPMLIB data
set. The SHORT MESSAGE is the message that is displayed by the dialog in the upper
right corner of the dialog screen. LONG MESSAGE refers to the message that is displayed on the third line of an ISPF screen whenever a PF1 key is pressed following the
display of a SHORT MESSAGE.
Descriptions
INFO002D
CONFIRM DELETE
Press enter to confirm end command to delete.
INFO009A
RECORD ADDED
Record add was successful.
E:\Manuals\Product Manuals\ASO\OM (OPS Master)\Reference Guide\Current Release\OPS_C43.fm
INFO009D
RECORD DELETED
Record delete was successful.
INFO009R
RECORD REPLACED
Record update was successful.
This section contains messages which are prefixed with the characters “MIS”. These messages originate in miscellaneous OPS/Master® Base software components and are issued
on behalf of various software products.
MISC000
UNAUTHORIZED
You are not authorized for this option or command.
MISC001A
INVALID/MISSING ARGUMENT
Command syntax requires one argument.
MISC001C
INVALID COMMAND
Mantissa Corporation © 2013
Page - 539
Chapter 43
OPS/MASTER®
Descriptions
ISPF Short Messages
“&ZCMD” is an invalid command. RC=&RC.
MISC001M
MULTIPLE REQUESTS
Multiple requests (command and select) are not handled.
MISC001O
INVALID OPTION
Selected option is invalid for this function.
MISC002D
DISPLAY UNSUCCESSFUL
Display of &PANEL panel was not successful, RC=&RC.
MISC019
SERVICE=&SERVICE RC=&RC
Unexpected return code from ISPF &SERVICE service,
RC=&RC.
This section contains messages which are prefixed with the characters “VSA”. These messages originate in OPS/Master® Base software (VSAM Driver) component and are issued
on behalf of various software products.
VSAM000F
UNEXPECTED FEEDBACK
Unexpected feedback; CODE=&CODE, DD=&DDNAME,
FDBK=&FDBK. RC=&RC.
VSAM000N
RECORD NOT FOUND
No record on file for key; DD=&D.
VSAM000F
UNEXPECTED
Unexpected feedback; FEEDBACK CODE=&CODE,
DD=&DDNAME, FDBK=&FDBK. RC=& RC.
VSAM000N
RECORD NOT FOUND
No record on file for key; DD=&DDNAME.
This section contains messages which are prefixed with the characters “VSR”. These messages originate in OPS/Master® Base software (Reserve/Release) component and are
issued on behalf of various software products.
RESERVE/RELEASE - parm field
VSRE002
RESERVE/RELEASE - file not found
VSRE003
RESERVE/RELEASE - invalid function
E:\Manuals\Product Manuals\ASO\OM (OPS Master)\Reference Guide\Current Release\OPS_C43.fm
VSRE001
Page - 540
Mantissa Corporation © 2013
OPS/MASTER®
Chapter 44
Security Messages
Descriptions
Chapter 44
Security Messages
This section contains messages which are prefixed with the characters “SEC”. These messages originate in the Interactive Security Facility component of OPS/Master® Base software and are issued on behalf of various software products.
E:\Manuals\Product Manuals\ASO\OM (OPS Master)\Reference Guide\Current Release\OPS_C44.fm
Descriptions
SECU000A
UNAUTHORIZED OPT/CMD
You are not authorized for this option or command.
SECU009A
UNAUTHORIZED FUNCTION
You are not authorized for this function.
SECU009C
NO LIMITATION REC
Limitation record ($$$$$$$$) for product &PRODUCT not
found.
SECU009D
NO DEFAULT REC
Default record for product &PRODUCT not found.
SECU009P
UNKNOWN PRODUCT
Product &PRODUCT unknown - please check spelling.
SECU009U
NO USERID RECORD
Product or function requires USERID records - access denied.
Mantissa Corporation © 2013
Page - 541
E:\Manuals\Product Manuals\ASO\OM (OPS Master)\Reference Guide\Current Release\OPS_C44.fm
Chapter 44
Descriptions
Page - 542
OPS/MASTER®
Security Messages
Mantissa Corporation © 2013
APPENDICES
Version 5.20.1
Mantissa Corporation®
1012 Edenton Street
Birmingham, Alabama 35242
OPS/MASTER®
OPS/Master® is a software product of Mantissa Corporation. All rights are reserved, and reproduction, use of, or distribution of this documentation is prohibited unless written consent is obtained from Mantissa Corporation. This document contains proprietary information and is intended for use only by licensees of OPS/Master® and those
evaluating its potential worth in their respective operating environment.
E:\Manuals\Product Manuals\ASO\OM (OPS Master)\Reference Guide\Current Release\SECT8cvr.fm
© Copywrite - Mantissa Corporation 1989-2013
Publication Information
Publication Name:
Publication Number
Release:
Mantissa Corporation © 2013
APPENDICES
OPS002-JMIN
5.20.1
Page - 544
OPS/MASTER®
Appendix A
Glossary
Appendix A
Glossary
ACTUAL CALENDAR
An actual calendar is a calendar created using the actual date to indicate which
days are to be used for processing days.
ACTUAL DAY
An actual day is the exact calendar date used with in a calendar.
ALT NAME
An alternate name to be used in place of the job being defined. (Used for alternate scheduling criteria requirements where the jobname must remain the same).
BASE CALENDAR
The default calendar used to schedule a job (i.e., WRKDY##)
E:\Manuals\Product Manuals\ASO\OM (OPS Master)\Reference Guide\Current Release\appen_a.fm
CALENDAR
A calendar definition tells JOB/Master® which are valid run days for the job
being defined.
CLASS
The class will be used in a future release in order to specify a processing class
different from the class designated on the JOBCARD.
CONDITION ZERO CODE
The standard return code used to indicate a successful completion of a job.
COPY
The COPY command is used to transfer non-job specific information from one
defined job to another. (Think of it as a template).
COPYALL
Mantissa Corporation © 2013
Page - 545
Appendix A
OPS/MASTER®
Glossary
The COPYALL command is used to copy all essential fields from one defined
job to another. All fields which are not specifically unique to the job being
defined are copied.
COPYPER
The COPYPER command is used to copy the period dates from one defined calendar to another.
CO - REQ DEPENDENCIES
A definition dependency used to indicate that a job must only run when this job is
in execution.
DEADLINE CANCEL
A field used to specify if a job isn't submitted by a specific time then the job will
be cancelled from the scheduling queue.
DO NOT SCHEDULE AFTER
The scheduling of a job, system, or function will not take place after a specific
date.
DO NOT SCHEDULE BEFORE
The scheduling of a job, system, or function will not take place prior to a specific
date.
DYNAMIC REPAIR
When a job is defined to the system, a repair job can be defined. If the job being
defined abnormally terminates then the repair job will be submitted for processing.
EXCEPTION CALENDAR
An exception calendar tells JOB/Master® which days are not valid run days.
EXTERNAL SUBMIT
An external submit is a job which is not submitted by the scheduling system but
is tracked by JOB/Master®.
The include/exclude parms used within the scheduling process provide a method
to selectively schedule jobs and/or systems without having to have an entire days
schedule built.
JOB
A job is a set of Job Control Language (JCL) statements containing one JOB
statement and one or more EXEC statements.
JOB FAIL CONTACT
This is the User ID of the contact if a JOB fails.
JOB HISTORY
Job history is maintained via the tracking menu for audit trails, refer back, and
problem resolution functions.
Page - 546
Mantissa Corporation © 2013
E:\Manuals\Product Manuals\ASO\OM (OPS Master)\Reference Guide\Current Release\appen_a.fm
INCLUDE/EXCLUDE
OPS/MASTER®
Appendix A
Glossary
JOB SUBMISSION
Job submission is the process used by JOB/Master® to submit jobs from the
scheduling queue to the JES processing queue.
JOB TRACKING
Job tracking is the function used by JOB/Master® to monitor the events of all
activities associated with jobs and systems throughout their processing cycle.
KEYWORD
A keyword is a relative term used to define a set of conditions which pertain to
the scheduling of a job. Keywords that use workday relationships require calendars. All other keywords are relative in nature and require no calendars.
KEYWORD DEFINITION
A keyword definition is a group of processing conditions used to define under
what situations a job or group of jobs are to run. Many jobs can utilize the same
keyword definitions.
LAST UPDATED BY
A field used at the JOB level definition, to indicate the last user to update this
job.
LIB. TYPE
The library type will be used to specify whether the job being defined has its JCL
in a PDS, Librarian file, or a PANVALET file.
LITERAL CHARACTER
Literal characters are the characters used when calendars are displayed indicating
the days of the week. They are selected on the profile screen as part of the global
options.
LOOPDRV
LOOPDRV is a Mantissa supplied program which creates a controlled looping
condition for testing the scheduling schemes defined without having to run the
actual programs.
E:\Manuals\Product Manuals\ASO\OM (OPS Master)\Reference Guide\Current Release\appen_a.fm
SCHEDULE/NETWORK
A schedule/network is a group of logically controlled jobs or systems which have
a requirement for secured control. This function is designed to facilitate and
secure the decentralized scheduling requirements of an organization.
MESSAGE DEFINITION GROUP
This a message task definition used to define a specific group of messages which
can be utilized by many jobs to generate messages concerning jobs.
NEGATIVE DEPENDENCIES
A definition used to indicate that a job can not run concurrently with this job.
NON-PROCESS
Non-process keywords are mnuemonics selected by the user to define a set of
processing criteria for not scheduling jobs or systems.
Mantissa Corporation © 2013
Page - 547
Appendix A
OPS/MASTER®
Glossary
NON-TRIGGERED
A non-triggered job is one which is submitted from the JOB scheduling queue
based on time or event criteria
OP CD
An OP CD is the operation code used during a conditional check to determine if
the condition is Equal, Less Than, Greater Than, Not Equal, or abended conditions.
OPEN for INPUT
A dataset has been opened for input. Any scheduling conditions linked to this
dataset and condition will be activated.
OPEN for INPUT and CONTAINS DATA
A dataset has been opened for input and contains any data. Any scheduling conditions linked to this dataset and condition will be activated.
OPEN for OUTPUT
A dataset has been opened for output. Any scheduling conditions linked to this
dataset and condition will be activated.
PDS MEMBER
A PDS member is a member name used to identify a set of JCL located within a
PDS library and used by the scheduling system.
PERIOD DATES
Period dates are those calendar dates which do not fall on the standard physical
calendar months. These dates are used most frequently with "FISCAL" accounting periods.
PROCESS KEYWORDS
Process keywords are any mnuemonics selected by the user to define a set of processing criteria for the scheduling of jobs or systems.
A predecessor refers to a job that must successfully complete before the next job
can be submitted.
RELATIVE CALENDAR
A relative calendar is a calendar created using the relative days required to indicate which days are to be used for processing days.
RELATIVE DAY
A relative day is a calendar day not a specific date (MON, TUE, WED, THU,
FRI, SAT, SUN).
RENAMED
A dataset has been renamed. Any scheduling conditions linked to this dataset and
condition will be activated.
REPAIR JOB
Page - 548
Mantissa Corporation © 2013
E:\Manuals\Product Manuals\ASO\OM (OPS Master)\Reference Guide\Current Release\appen_a.fm
PREDECESSOR
OPS/MASTER®
Appendix A
Glossary
A Repair Job is used to describe a job submitted if a failure occurs on the job or
jobstep.
RESOURCE NAME
The resource name is an arbitrary name used to define a set of resource(s) either
real or virtual which can be attached to or detached from a processor for selective
control over a schedule.
SCRATCHED
A dataset is scratched. Any scheduling conditions linked to this dataset and condition will be activated.
SEND TYPE
A group of codes used to define in what circumstances a manual task message is
to be sent to the appropriate User ID(s).
SIMULATION
A simulation is a schedule which is run and report(s) generated which simulate
how an actual schedule would be built and which jobs and systems would be
added to the scheduling queue.
SUBMISSION DEPENDENCIES
Submission dependancies are criteria that must be satisfied before the job being
defined can be submitted.
SUBMIT TYPE
The submit type is the method of submission to be used when this job is selected
for submission to the JES queue for processing.
SYMBOLIC DATA
Symbolic data is characters used to represent other characters or character strings
within JCL or data strings of a job, or dataset.
SYSTEM NAME
A system name is an application system of which the job is a part.
E:\Manuals\Product Manuals\ASO\OM (OPS Master)\Reference Guide\Current Release\appen_a.fm
TRIGGERED BY
A field used at the JOB level definition, to indicate the last job that triggered this
job.
TRIGGERED JOB
A triggered job is one which is submitted based on the completion of another
job or jobstep.
VERIFYING DATA
Data within the first record of a sequential file will be compared against a specific character string. If the character string matches the data within the file, any
scheduling events defined for this dataset will be activated.
VSAM DEFINE
Mantissa Corporation © 2013
Page - 549
Appendix A
OPS/MASTER®
Glossary
A VSAM dataset has been defined. Any scheduling events associated with this
function will be activated.
VSAM DELETE
A VSAM dataset has been deleted. Any scheduling events associated with this
function will be activated.
VSAM UPDATE
E:\Manuals\Product Manuals\ASO\OM (OPS Master)\Reference Guide\Current Release\appen_a.fm
A VSAM dataset has been updated. Any scheduling events associated with this
function will be activated.
Page - 550
Mantissa Corporation © 2013
OPS/MASTER®
INDEXED REFERENCES
OPS/Master®System Reference Manual
INDEXED REFERENCES
E:\Manuals\Product Manuals\ASO\OM (OPS Master)\Reference Guide\Current Release\OM_05v20IX.fm
Symbols
# 228
$GLOBAL$ 217
% 228
&UPANEL 223
//*JMCHECK 30
//*JMCPAUFF 440
//*JMJCLE 227
//*JMJCLN 227
//*JMJCLY 227
//*JMNOEXC 30
//*JMSECURE 440
//*JMSYME 227
//*JMSYMN 227
//*JMSYMY 227
//*JMUSER 440
//JMERR1 230
//JMERR2 230
//JMERR3 230
? 228
@ 228
¢ 47, 132
Mantissa Corporation © 2013™
A
AB 149
AB - Abended jobs 145
abends 60
ACT 372
Activate Submit Facility(SS) 178
Actual Calendars 89
ACTUAL Schedule 116, 457
Add a Job to the schedule queue(AJ) 171
Advanced Functions 439
AJ 136, 171
Alternate Job 54
APF authorized 24, 368, 402
Appendix 545
APPL 443
Audit Trail 217, 392
Authority to perform a function 407
Auto Help 210, 213
Auto Restart Mode 396
Automated Operator
Data Base Creation and Maintenance 339
WTO/WTOR Processor 339
Page - 551
INDEXED REFERENCES
OPS/MASTER®
OPS/Master®System Reference Manual
B
Backing Up Files
RUN/Master® 403
Backing up files
CONSOLE/Master® 369
Backup
CMBACKUP 369
RMBACKUP 403
Batch Functions 279
Batch mode schedule generation 117, 458
binary search routine 114
BPAM 23
BROWSE
Console message definition 352
BSAM 23
BUFFS= parameter 456
C
C 154
Calendar 60
Calendar Definition Screen 84
Calendar Display/Update 87
Cancel Specific Job (C) 154
Cent sign 47
check mode 51, 73, 101, 491
CL Setup 237
CMBACKUP 369
CMREPORT 362
CMRESTOR 369
CO 187
Column 71 47, 378
COMMAND 345
Command Scheduling 61, 66
Complex variables 346
condition code = 0022 163
Condition Code Testing 60
CONSMSTR procedure 335
Console facility 353
Console message definition
ADD 343
Page - 552
Extended 350
UPDATE 352
Console message table 341
CONSOLE/Master®
Components 335
Global Status 372
Help facility 337
Overview 333
Starting the Control Region 335
Stopping the Control Region 335, 437
CONSOLE/Master® Security 418
Controlling Execution Through JCL 30
COPY 64, 81
COPYALL 64, 81
CSA buffers 456
Cycle interval 457
Cycle Processing 122
D
DA 192
DAILY PDS 138
Daily PDS’s 133
Data Base
ISF 408
JOB/Master® 61
Data Base Detail Reports 239
Data Base Index 63
Data base session
CONSOLE/Master® 340
Data Replacement 216
Dataset Contention 33
Dataset contention 33
Dataset Contention User Exit 33
Dataset Definition Panel 108
Dataset Dependency 107
Dataset Triggers 108
Dataset Type - VSAM or sequential 109
Date Substitution 227
DC 153
DC - Jobs awaiting Deadline Cancel 145
DD 194
Default Control Records 216, 219
DEFAULT PDS 133
DEFAULT SUBMIT PDS 138
Default Values 216
DELETE
Mantissa Corporation © 2013
E:\Manuals\Product Manuals\ASO\OM (OPS Master)\Reference Guide\Current Release\OM_05v20IX.fm
Automatic Schedule Creation 121
Automatic Variable Substitution 225
AVS 225
AVS Audit Log 226
OPS/MASTER®
INDEXED REFERENCES
OPS/Master®System Reference Manual
E:\Manuals\Product Manuals\ASO\OM (OPS Master)\Reference Guide\Current Release\OM_05v20IX.fm
Console Message Definition 352
DEPENDENCY OPTIONS 68
DF 190
DH 184
Dispatching priority
JOB/Master® 455, 466
Display 184, 209
Display control region Settings(ST) 183
Display Detail statistics(DD) 194
Display job Failure contact(DF) 190
Display job Manual task messages(DM)
191
Display job run data / log messages
from(DH) 184
Display jobs Output processing info(DO)
196
Display jobs Predecessor function(DP) 188
Display jobs Run instruction data(DR) 198
Display run data(DL) 193
Display Scheduling Criteria of a Job (DS)
170
Display Triggered jobs(DT) 189
DL 193
DM 191
DO 196
DP 188
DR 198
DS 170
DSN 228
DT 189
Dynamic Job Submission 140
Dynamic Repair 140
Dynamically Added Jobs 121, 136
E
E 155
E / OPINS 214
ENDDTE= parameter 117, 458
ENDTME= parameter 117, 458
Error Code 230
Errors 497
event options for sequential datasets 110
event options for VSAM clusters 111
EX - Jobs in Execution 145
Exception Calendar 60
EXCLUDE 168
Mantissa Corporation © 2013™
exclude 52, 492
Exclude a Job from Production (X) 168
Execution 335
Exit Parameter List 441, 442
Exit Return Codes 443
Exits
Dataset Contention Exit 33
JCL Scan Interface Exit 215
Job Submit User Exit 440
Logon and Command Intercept Facility 442
External Submits 132
Externally Submitted Jobs 32
F
F 157
Fast Path Message Processing 371
File Tailoring 224
FLC 228
FLS 228
FORC= parameter 456
FORCE 54
Force Release a Job from the Schedule (F) 157
Force Submiting a Job 139
G
Generate Schedule creation JCL(GS) 172
Generate Simulation Schedule(GSS) 174
Generic 63, 109, 184
Global Option Settings 233
Global Security Attributes 408
Global Substitution Variables 220
Global variables 346
Glossary 545
GS 120, 172
GSS 116, 174, 457
H
H 159
HELP
ISF 421
JOB/Master® 40
RUN/Master® 380
Help
CONSOLE/Master® 337
HLQ/HLQ.OPS 279
Page - 553
INDEXED REFERENCES
OPS/MASTER®
HOLD 159
Hold a Job from Being Submitted (H) 159
Hold System(HOLD) 199
I
I 160
INACT 372
Inactivate Submit Facility(PS) 176
INCLUDE 160
include 52, 492
Include a Job Into Production Cycle (I) 160
Initial Command Stream 372
Initiate Resource Table processing(RT) 181
Interactive Security Facility (ISF) 407
Invoke MVS Console Facility(CO) 187
ISF 407
CONSOLE/Master® Security 418
HELP 421
JOB/Master® Security 412
product names 411
RUN/Master® Security 416
Symbolic Substitution Security 415
ISF ACCESS RESTRICTED 409
J
JCL Override 227
JCL Replacement 216
JCL SCAN 215
JCL Scan Interface Exit 215
JCL SETUP 225
JCL Setup Flag 218
JES commands 355
JM05 78
JM26 177
JMBACKUP 280, 448, 462
JMBPOST 282
JMCLEAN 285
JMCMDEXT 442
JMCN 61
JMDB 462
JMDBCOPY 286
JMDSCM 33
JMDSEXIT 33
JMDSNRPT 247
JMEVENT 57
Page - 554
JMHIST 462
JMJCLMB 225, 463
JMJES3XT 440
JMJOBQ 462
JMJOBRPT 247
JMO5 414
JMPURGE 283
JMRACFXT 440
JMRESORC 284
JMRESTOR 285, 448, 462
JMSCANEX 215
JMSCHED 124, 133, 172, 457
JMSHUT 280, 437
JMSSCPSC 281
JMSTATUS 282
JMSTGPDS 133, 415
JMSUBEXT 440
JMSUBPDS 133
JMTRACE 281
Job 59
Job Database Creation 59
Job Definition Screen 1 64
Job Definition Screen 2 72
Job Definition Screen 3 73
Job Definition Screen 4 77
Job Definition Screen 5 79
Job Definition Screens 61
Job Dependencies 54
Job Fail 60
Job Level 42
Job Step Definition Screen 81
Job Submission 131
Job Submit User Exit Facility 440
Job Tracking 141
Job Triggering 29
JOB/Master®
HELP 40
Security 35
Stopping the Control Region 436
JOB/Master®
Cycle Processing 457
Resource cleanup 456
JOB/Master® Installation 439
JOB/Master® Interface 372
JOB/Master® Region Messages 497
JOB/Master® Security 412
JOBMAST 48
Mantissa Corporation © 2013
E:\Manuals\Product Manuals\ASO\OM (OPS Master)\Reference Guide\Current Release\OM_05v20IX.fm
OPS/Master®System Reference Manual
OPS/MASTER®
INDEXED REFERENCES
OPS/Master®System Reference Manual
JOBMASTER procedures 456
JOBMASTR 455
JOBMST1 48
JOBMST2 48
JOBMST3 48
JOBMST4 48
K
K 162
Keep a Job which has Failed (K) 162
Keyword 60
keyword overflow 222
keyword resolution 216
Knowledge Base 377
KNOWLEDGE BASE FUNCTIONS 417
L
E:\Manuals\Product Manuals\ASO\OM (OPS Master)\Reference Guide\Current Release\OM_05v20IX.fm
LEVEL= parameter 456
Library 212
Library Management Facility 132
List Abended/Failed Jobs (AB) 149
List Executing Jobs (EX) 151
List Jobs on the Schedule Queue(LQ) 145
List Jobs Waiting on Deadline Cancel (DC)
153
List Jobs Waiting on Manual Tasks (MT)
150
List Jobs Waiting on Output Processing
(OP) 152
logical day 472
Logon and Command Intercept Facility 442
LOOPDRV 55
LQ 145
M
MAN. TASK1 - 5 237
Manual Task #5 202, 215
Manual task flags 237
manual task flags 282
Manual Task Intervention 202
Manual Task Message Definition 104
Master Console ID 187
MEM 228
Message Group 98
Messages
Mantissa Corporation © 2013™
CONSOLE/Master® 535
ISPF Short 539
JOB/Master® Online 509
JOB/Master® Region 497
JOB/Master® Remote Tracking Support 521
OPS/MASTER 527
RUN/Master® 525
Security 541
MT 150
MT - Jobs awaiting Manual Task 145
MT#5 224
MT#5 - JCL SETUP 202
Multi-line Messages 348
Multiple Control Regions 439
MVS 23, 368, 401
N
Negative Co-Requisite Dependency 96
NJE 443
NJE support 447
Non-Triggered Job 60
NOTIFY 48
O
ONC 228
On-line Assist Functions 381
Online Assist JCL Processing 387
ONS 228
OP 152
OP - Jobs awaiting Output Posting 145
OPINS 213
OPS/MASTER Messages 527
Output posting 152
Overflow of Card Images 221
Overview
CONSOLE/Master® 333
RUN/Master® 377
P
P 163
Persistent Store Processing 349
PF keys
CONSOLE/Master® 359
JOB/Master® 232
RUN/Master® 395
Page - 555
INDEXED REFERENCES
OPS/MASTER®
physical day 95, 117, 235, 472
Post 351
PQ 175
Predecessor 60
predecessor jobs 69
Process Keyword Definition Screen 91
Process Keyword Table 93
Process keywords/calendars 117
PRODUCT DEFAULT RECORD 408
PRODUCT LIMITATION RECORD 408
production mode 51, 73, 101, 491
Profile
CONSOLE/Master® 357
JOB/Master® 231
RUN/Master® 393
PS 176
PS stop the submit facility 131
Purge a Job from the Schedule Queue (P)
163
Purge the entire schedule Queue(PQ) 175
Q
QSAM 23, 368, 401
R
R 164
RACF 440
Recovery 210
CMRESTOR 369
RMRESTOR 403
recovery instructions 213, 214
REFRESH Function 371
Relative Calendars 89
Release a Job from Hold Status (R) 164
Release System(REL) 199
Remote Job Tracking 199
Remote job tracking indicator 456
Repair Job 59
REPLY 345
Report Facility
CONSOLE/Master® 361
JOB/Master® 239
RUN/Master® 399
Reports
Data Base Reporting by Selection 247
Page - 556
Data Base XREF Reports 244
History Recap Reports 246
REPTS= parameter 119, 459
REQUIRE ZERO C.C. 234
Rerun or Restart a Job (E) 155
Rerun Reason Codes 397
Reset 208
RESOLVE 136
Resolve 206
Resource cleanup 456
Resource Routing 139
Resource routing 181
Resource Table 181
Restoring Files
RUN/Master® 403
Restoring files
CONSOLE/Master® 369
RJT= parameter 444, 456
RMBACKUP 403
RMRESTOR 403
RT 181
RUN MODE 101, 234
Run Mode 51, 73
RUN/Master®
Audit Trail 392
Components 378
HELP 380
Online Assist Functions 381
Online Assist JCL Processing 387
Overview 377
Starting the Control Region 379
Stopping the Control Region 379, 437
Submit JCL Screen 391
Table of Actions - Postconfirmation 390
Table of Original JCL 389
Table of Replacement JCL 387
Table of Restart Actions 388
Table of Restart Jobnames 384
Table of Stepnames 385
RUN/Master® Security 416
RUN-EXIT INS 80
RUN-EXIT-INS 48
RUNMASTR procedure 379
S
S 165
Mantissa Corporation © 2013
E:\Manuals\Product Manuals\ASO\OM (OPS Master)\Reference Guide\Current Release\OM_05v20IX.fm
OPS/Master®System Reference Manual
OPS/MASTER®
INDEXED REFERENCES
E:\Manuals\Product Manuals\ASO\OM (OPS Master)\Reference Guide\Current Release\OM_05v20IX.fm
OPS/Master®System Reference Manual
Sample Reports 256
Sample System Worksheets 45
Schedule control cards 119, 461
Schedule Events from Outside JOB/Master® 57
Schedule Exclude 119
Schedule Generation Parameters 116
Schedule generation parameters 457
Schedule Include 119
Scheduling Criteria 115
Scheduling Flow 34
Scheduling Individual Jobs or Systems 120
Scheduling Jobs 120
scheduling process 133
scheduling program 133
Scheduling Reports 124
select mode 51, 74, 101, 160, 491
sequential files 109
Set Priority Update Screen(SP) 179
Shutdown Procedures - Remote Tracking
446
Signal complete 351
SIMULATION Schedule 116, 457
Single Mode 166, 167, 171
SMF 50
SMF records 112
SMF-ID 177, 181
SMFID 181, 182
SMFPRMxx 443
SP 179
SPECIAL SECURITY ATTRIBUTE 409
splay Active jobs(DA) 192
SS 178
SS start the submit facility 131
SSYS= parameter 456
ST 183
STAGING PDS 133, 137, 138, 415
Started tasks 48
Starting and Stopping the Submit Facility
131
Starting the Control Region
RUN/Master® 379
Startup Procedure - Remote Tracking 445
Statistics 194
STATUS 373
STC exits 50
Step Level 42
Mantissa Corporation © 2013™
Steplevel Dependencies 31
Stopping the Control Region
CONSOLE/Master® 437
JOB/Master® 439
RUN/Master® 379
RUN/Master® 437
STRT= parameter 131, 456
STRTDTE= parameter 117, 458
STRTTME= parameter 117, 458
SUBID= parameter 118, 456, 459
Submission Dependencies 60
Submit a Job (S) 165
Submit Facility 131
SUBMIT FAILED message 138
Submit JCL Screen 391
SUBMIT OPTIONS 68
SUBMIT PDS 133
Symbol Name Specification 221
Symbolic Substitution 201
Display 209
E / OPINS 214
JCL SCAN 215
Library 212
OPINS 213
Recovery 210
Reset 208
Resolve 206
Symbolic Substitution Security 415
SYS1.PARMLIB 372, 443
SYS1.VTAMLST 443
System Definition 100
System Worksheets 45
T
Table of Actions - Postconfirmation 390
Table of Original JCL 389
Table of Replacement JCL 387
Table of Restart Actions 388
Table of Restart Jobnames 384
Table of Stepnames 385
Tape Drive Exclusion(TE) 180
TE 180
Technical Specifications
CONSOLE/Master® 367
JOB/Master® 23
RUN/Master® 401
Page - 557
INDEXED REFERENCES
OPS/MASTER®
OPS/Master®System Reference Manual
TIME= parameter 456
tracking character 132
trigger job 29
Triggered Job 60
TSO 202, 225, 407
TUNIT 279
Tutorial 287
TYPE= parameter 118, 459
U
U 167
Update a Job on the JOBQ (U) 167
USER PDS 138
USER Submit PDS 133
USERID RECORD 408
Utilizing Substitution 216
V
Variable
Complex 346
Global 346
Word 346
Verifying Data 111
VSAM 23, 109, 368, 401
VSMHLQ 279
VTAM 23, 368, 401, 443
W
E:\Manuals\Product Manuals\ASO\OM (OPS Master)\Reference Guide\Current Release\OM_05v20IX.fm
WAIT 345
Word variables 346
WORKDAY 70, 91
X
X 168
Y
Year End Calendar Propogation 89
Page - 558
Mantissa Corporation © 2013