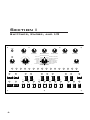
1
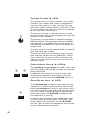
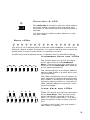
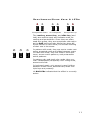
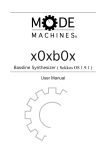
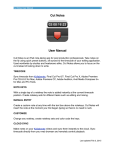
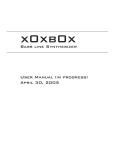
 x0xb0x
Bass line Synthesizer
User Manual
Get the latest version of this manual at:
http://www.x0xsource.com/manual.pdf
Get additional help at the x0xb0x forum:
http://forums.ladyada.net/index.php?c=2
Note: This manual is for version 1.9.1 of the SokkOS firmware.
Other firmwares have important differences.
Copyright 2009, x0x Source, Copyright 2005, Limor Fried
Some rights reserved.
This work is licensed under the Creative Commons Attribution-ShareAlike License. To view a copy of this license, visit http://creativecommons.org/licenses/
by-sa/2.0/ or send a letter to Creative Commons, 559 Nathan Abbott Way, Stanford, California 94305, USA.
table of Contents
INTRODUCTION
4
FEATURE OVERVIEW
5
SECTION I: SWITCHES, KNOBS, AND I/O
SECTION II: METHODS OF OPERATION
7
12
Keyboard Mode
13
MIDI Play
14
Pattern Edit Mode
15
Selecting the Pattern (Bank and LocAtion) Editing Patterns in Run-write Mode Editing Patterns in Step-write Mode Pattern Play
Selecting single patterns to play Chaining patterns Using Sync Out Using MIDI Sync Using DINSYNC Pitch Shifting Rest, Accent & Slide Track Edit
Selecting the track Step-write mode Track Play
Selecting single tracks to play Chaining tracks Using Sync Out Using External Sync
Pitch Shifting Rest, Accent & Slide Control Software
16
16
17
19
20
20
21
21
22
22
23
24
24
25
26
27
27
28
29
29
30
31
Updating Firmware
33
Developing (advanced)
34
Introduction
This manual is intended to teach you the various functions of the
synthesizer. The manual is divided up into 3 sections. The first section describes all of the buttons, switches and ports individually. You
should at least skim this section first so you know what we mean
when we refer to the ‘bank knob.’ The second section is divided up
by function and describes each function in detail and also provides
examples for how to peform common tasks. The third section describes how to use the optional control software.
Since the x0xb0x is a ‘living project,’ there may be new versions of
this document describing new functions. Be sure to check that this
manual corresponds to the hardware, firmware and software version
you have. The hardware version is written on the mainboard PCB.
The firmware and software version can be verified through the computer control software.
This manual is written for:
x0xb0x 1.0 Hardware
SokkOS 1.9.1 Firmware
x0xb0x 1.0 Software
No manual is perfect, but we can strive for completeness. If you feel
like there’s something amiss (whether it be poor spelling, obfuscated
language, or confusing pictures) send your suggestions and corrections to [email protected]. Chances are, you’re not the only
one.
We hope you enjoy using your x0xb0x to make hardcore acid tracks.
4
Feature Overview
Synthesizer capabilites:
•Monophonic, 4 octave VCO
•Saw and square waveform
•Adjustable cutoff frequency, resonance, envelope
modulation, decay, and accent
Sequencer capabilites:
•Easy-to-use sequencer allows for quick pattern & track
entry and editing with combined pitch and time
•Intuitive track and pattern play with 2 octaves of pitch
shift, rest, accent and slide override, as well dynamic
chaining of up to 16 patterns or tracks
•Syncing with MIDI and Roland DIN (DINSYNC)
•MIDI, DINSYNC, and CV/Gate output
•EEPROM memory (no lithium battery)
• Up to 128 patterns of up to 16 notes each
• Up to 64 tracks of up to 16 patterns each
•Upgradable firmware (additional features possible)
Input/Output interfaces:
•Headphone output (¼”)
•Line-level output (¼”)
•Line-level input (¼”)
•MIDI-in/out/thru
•DINSYNC-in/out
•CV-out (⅛”), Gate-out (⅛”)
•USB for computer interface and control
5
Section I
Switches, Knobs, and I/O
DINSYNC
MIX IN
MIDI IN
MIDI THRU
MIDI OUT
MIX OUT
USB
CV
GATE
PHONE
9VAC
SAW
SQR
TUNE
15
16 1
CUTOFF
3
4
6
12
1
7
11
2
3
9
R/S
6
NEXT
PATTERN (DINSYNC)
RANDOM
PATTERN (MIDISYNC)
DECAY
ACCENT
PATTERN EDIT
USER A
TRACK (SYNC OUT)
USER B
TRACK (DINSYNC)
USER C
TRACK (MIDISYNC)
BOOTLOAD
8
VOLUME
TRACK EDIT
COMPUTER CONTROL
4
5
C#
PREV
MIDI PLAY
KEYBOARD
5
13
10
ENV MOD
PATTERN (SYNC OUT)
2
14
TEMPO
RESONANCE
6
7
8
D#
9
F#
10
G#
11
12
13
14
15
16
A#
C
D
E
F
G
A
B
C´
1
2
3
4
5
6
7
8
DONE
D
U
CHAIN
R
A
S
Sequencer Controls
IN
MIDI THRU
The great thing about the x0xb0x is that it’s not just a synthesizer, it also has a sequencer. Most of the buttons, except the seven
analog potentiometers, are dedicated to interfacing with the sequencer. In fact, the sequencer cannot read or control the analog
sound parameters, such as resonance, cutoff, and env. mod. This
means that although the x0xb0x plays pre-recorded patterns, it
MIX OUT
USB
CV
GATE
PHONE
9VAC
is a live musical instrument.
MIDI OUT
ENV MOD
CUTOFF
Function
Knob
DECAY
ACCENT
RESONANCE
The function knob sets the mode of the synthesizer. It’s functionality is the same in every
mode: the x0xb0x is in the mode indicated by
the knob. If the knob is changed, the current
mode will be VOLUME
exited and all modifications (such
as unsaved patterns or tracks, chains, pitch
shifts, etc.) will be discarded. The only exception
to13this14rule15is Bootload
Mode which is only active
16
if the x0xb0x is powered on with the function
knob in this position.
PATTERN (SYNC OUT)
3
4
MIDI PLAY
PATTERN (DINSYNC)
RANDOM
PATTERN (MIDISYNC)
KEYBOARD
5
6
7
PATTERN EDIT
USER A
TRACK (SYNC OUT)
USER B
TRACK (DINSYNC)
USER C
TRACK (MIDISYNC)
BOOTLOAD
TRACK EDIT
COMPUTER CONTROL
5
6
7
8
D#
F#
DINSYNC
10
G#
MIX IN
11
MIDI THRU
F
G
A
B
TUNE
3
4
15
16 1
5
2
4
5
13
6
12
EV
7
11
10
2
3
9
8
4
5
C#
NEXT
6
3
C
D
U
6
Another use of the bank knob is to change the
MIDI
address
of the
device
in MIDI
Play
or Key8
9
10
11
12
13
14
15
16
board mode.
7
D#
D
Bank KnobDONE
RESONANCE
ENV MOD
DECAY
use is to select
between
banks
CUTOFF
14
TEMPO
C´
The bank knob has many uses. Its primary
ofACCENT
memory when
writing or reading patterns and tracks. When
PATTERN (SYNC OUT)
MIDI PLAY
PATTERN patterns,
(DINSYNC)
7
8 addressing
R
A
S there are 16 banks and
RANDOM
PATTERN (MIDISYNC)
so all positions
address a seperate bank. When
KEYBOARD
PATTERN EDIT
USER A
TRACK
(SYNC
OUT)
addressing tracks, however, there are 8 banks.
USER B
TRACK (DINSYNC)
Therefore,
bank position 9-16 are equivalent to
USER C
TRACK (MIDISYNC)
VOLUME
BOOTLOAD
TRACK EDIT
positions 1-8 (respectively).
COMPUTER CONTROL
SQR
1
EachMIX
mode
is USB
described
in detail
in section
II.
OUT
CV
GATE
PHONE
9VAC
MIDI OUT
E
2
12
A#
MIDI IN
SAW
D
9
F#
E
F
G#
G
A#
A
B
C´
DONE
D
U
7
Tempo Knob & LED
The tempo knob is a rotary encoder, not a potentiometer. This means that tempo is adjusted by
MIX IN
MIDI IN
MIDI THRU MIDI OUT
MIX OUT
USB
CV
GATE
turning it left (down) or right (up) but that the
particular location of the knob is irrelevant. (That
is, turning the knob while the x0xb0x is powered
off will not affect the tempo.)
DINSYNC
SAW
SQR
TUNE
14
SAW
DINSYNC
1
DECAY
4
The tempo
is incremented
or decremented
one
USER A
TRACK (SYNC OUT)
5
USER
B
TRACK
(DINSYNC)
12 BPM per6 detent. The minimum tempo is 20BPM,
USER C
TRACK (MIDISYNC)
7
11
BOOTLOAD
EDIT
the
is 300BPM. The TRACK
current
tempo is
8
10 9maximum
COMPUTER CONTROL
indicated
by the
tempo LEDRESONANCE
which sits above
the
TUNE
CUTOFF
ENV
MOD
tempo knob.
2
3
SAW
KEYBOARD
ACCENT
CV
GATE
PATTERN EDIT
MIX IN
MIDI THRU
MIDI OUT
MIX OUT
DECAY
USB
4
CV
15
1
2
3
CHAIN
1
MIDI PLAY
3
14
13 2
4
3
5 4
KEYBOARD
5 USER A6
2
PATTERN (MIDISYNC)
10
11 EDIT 12
PATTERN
13
8TRACK (SYNCROUT)
7
In addition, the next key is used to start stepwrite editing method in both pattern edit and
4
5 E case
6 the
8
9
track
in which
nextGLED
will
litB
C 3 edit D
F 7
A be 10
C#
D#
Run/Stop
Key
& LEDF#
DECA
DONE
PATTERN (DINSYNC)
RANDOM
The next
keyD#and
prev key
are
used
track
USER
B
TRACK
(DINSYNC)
F#
G# in the
A#
6
12C#
USER
C index through
TRACK
(MIDISYNC)
edit and
pattern
edit
modes
to
pat7
11
BOOTLOAD
TRACK EDIT
10 9 8
terns and tracks.
COMPUTER CONTROL
TEMPO
1
2
PATTERN EDIT
Prev/Next
Keys
& 8LEDs
4
5
6
7
9
15
NEXT
16 1
KEYBOARD
GAT
16
The tempo knob
is notUSER
functional
when TRACK
syncing
A
(SYNC OUT)
5
13
with
external
signals
such
as
DINSYNC
or
MIDI
USER B
TRACK
(DINSYNC)
6
12
USER C LED will always
TRACK
(MIDISYNC)
Sync.
However,
the
tempo
indi11
TUNE7
CUTOFF
RESONANCE
ENV MOD
BOOTLOAD
TRACK EDIT
8
10
C
D current
E
F
G
A
B
C´ an D
9
cate
the
tempo,
even
when
sync’d
to
U
COMPUTER CONTROL
external signal.
PATTERN (SYNC OUT)
PREV
TEMPONEXT
PREV
MIDI IN
VOLUME
PATTERN
(SYNC 1
OUT)
5
6
7
8
9
10
1
12
13
14
It is416also
1 2used as the tap-tempo button in pattern
MIDI PLAY
PATTERN (DINSYNC)
15 C#and D#
3
F#
G#
A#
play
track
play modes.
RANDOM
PATTERN (MIDISYNC)
14
SQR
G#
11
14
A
S
C´ 12
13
D
A#
The run/stop key is used to start and stop the
sequencer. In pattern edit and track edit modes,
1
2
3 will start
4
5
6 run or
7
pressing
run/stop
or stop
either
NEXT
run-edit.
play
play
sync
C In pattern
D
E and track
F
G with A
out, it will start or stop playing the selected patterns and tracks. The R/S LED indicates when
the sequencer is running.
CHAIN
PREV
R/S
8
ENV MOD
9VAC
13
TEMPO
SQR
R/S
RESONANCE
The tempo is stored in internal memory on the
microcontroller
andTHRU
can be
precisely
set OUT
using the
PATTERN
(SYNC
OUT)OUT
MIX IN
MIDI IN
MIDI
MIDI
MIX
USB
16 1 2
MIDI PLAY
PATTERN (DINSYNC)
15
3
x0xb0x control RANDOM
software.
PATTERN (MIDISYNC)
DINSYNC
R/S
CUTOFF
PHONE
pattern play and track play modes with external sync
the
1 (such 2as MIDI
3 clock or
4 DINSYNC),
5
6
button doesn’t do anything, but the R/S LED
will still light up when the sequencer receives the
proper external start command.
8
R
B
C´
7
8
In
CHAIN
D
12
10
1
2
USER C
7
11
TEMPO
3
9
TRACK EDIT
COMPUTER CONTROL
4
5
C#
PREV
TRACK (MIDISYNC)
BOOTLOAD
8
6
7
8
D#
9
F#
G#
NEXT
D
EOUT
F OUT
G
MIX IN
MIDI C
IN
MIDI
THRU
MIDI
MIX
USB
Chain
Key
&
LED
DINSYNC
SAW
CHAINTUNE
1
15
3
4
5
6
12
Bank LEDs
MIDI IN
MIDI THRU
MIDI OUT
11
TEMPO
W
13
14
MIX OUT 7
10 9 8
USB
USER A
TRACK (SYNC OUT)
USER B
TRACK (DINSYNC)
USER C
CV
GATE
BOOTLOAD
PHONE
9VAC
CVA GATE
BPHONE C´9VAC
D
TRACK (MIDISYNC)
VOLUME
TRACK EDIT
15
1CUTOFF2
16 1
COMPUTER CONTROL
2
14
6
12
7
2
3
In
PREV
9
5
C#
PATTERN (DINSYNC)
RANDOM
PATTERN (MIDISYNC)
TRACK (SYNC OUT)
TRACK (DINSYNC)
USER C
TRACK (MIDISYNC)
C
D
6
7
8
9
F#
10
G#
11
E
MIDI IN
1
E
12
F
13
A#
F
MIDI THRU
2
3
2
G
A
MIDI OUT
4
MIX OUT
5
6
3
B
C´
USB
CV
7
8
GATE
R
TUNE
CUTOFF
14
4
6
12
7
11
2
3
PATTERN (DINSYNC)
RANDOM
PATTERN (MIDISYNC)
DECAY
PATTERN EDIT
USER A
TRACK (SYNC OUT)
USER B
TRACK (DINSYNC)
USER C
TRACK (MIDISYNC)
BOOTLOAD
8
TRACK EDIT
COMPUTER CONTROL
4
5
C#
NEXT
MIDI PLAY
KEYBOARD
5
13
9
ENV MOD
PATTERN (SYNC OUT)
2
3
10
RESONANCE
6
7
8
D#
9
F#
10
G#
11
12
13
14
15
16
E
F
G
A
B
C´
1
2
3
4
5
6
7
8
CHAIN
B
C´
DONE
Numbered Keys and LEDs
15
D
U
16
S
PHONE
9VAC
The
numbered
keys are used to address
R
A
S
patterns and tracks in a bank while playing and editing.
The ACCENT
LEDs indicate the current pattern or
track selected. In pattern play and track
play modes, a blinking LED indicates the
currently playing pattern or track and lit
LEDsVOLUME
indicate patterns and tracks “waiting to be played.”
14
A#
D
A
Note Keys and LEDs
13
C
G
14
W
PO
12
The 8 white keys as a group are sometimes referred to as the numbered
4
6
7
8
A
DONE
keys.5 (These
keys
are also
usedR and reD
U
ferred to as as note keys when used as
a one-octave keyboard.)
CHAIN
D
16 1
11
VOLUME
TRACK EDIT
1
15
10
MIDI
NEXT Play and Keyboard mode, it indicates the current MIDI address.
D#
C
YNC
CHAINMIX IN
8 ACCENT
9
COMPUTER CONTROL
R/S
NEXT
DECAY
7
PATTERN EDIT
USER A
USER B
BOOTLOAD
8
4
MIDI PLAY
KEYBOARD
5
10
6
The strip of 16 numbered
LEDs is used
as
C#
D#
F#
G# visual
A# feedback in many of the
different x0xb0x modes. In general, it is used to indicate the currently selected bank or the current position in a pattern or track.
4
13
PO
ENV
5MOD
PATTERN (SYNC OUT)
3
11
RESONANCE
3
4
D
15
U
R
R
TUNE
1
A#
PLAY used to create
PATTERN random
(DINSYNC)
It is MIDI
also
patterns in patRANDOM
PATTERN (MIDISYNC)
ternKEYBOARD
edit mode.
PATTERN EDIT
2
13
MIX IN
12
PATTERN (SYNC OUT)
16 1
14
YNC
11
The chain key is primarily used to create pattern
and track chains in pattern play and track play:
the button
is held down
while
chain
is
CUTOFF
RESONANCE
ENV
MOD the desired
DECAY
ACCENT
entered.
2
3
4
5
6
7
8
SQR
R/S
10
16
These 13 keys as a group are referred to
as the note
DONE keys. They are also someU
times individually referred to by their
label (i.e. “press the C’ key”). The note
keys are used to enter musical informaR
A
S
tion.
In pattern edit mode, they are used to
edit notes in a pattern.
9
GATE
PHONE
DECAY
UT
9VAC
ACCENT
USB
CV
GATE
In track edit and track/pattern play mode, they
are also used to enter in the desired pitch shift.
PHONE
9VAC
In keyboard mode, they are used as a one octave
keyboard.
VOLUME
ENV MOD
13
In some case the octave can be changed with the
Up and Down keys.
DECAY
15
16
14
ACCENT
Done Key & LED
The done key is used to save tracks and patterns in pattern edit and track edit mode.
TTERN (DINSYNC)
TTERN (MIDISYNC)
TTERN EDIT
The done LED often indicates the end of a pattern or track (in pattern edit and track edit
ACK (MIDISYNC)
DINSYNC
MIX
IN USB
MIDI
THRU
MIDI OUT
MIX
OUT PHONE
USB
CV
GATE
PHONE
DINSYNC
IN MIDIMIDI
IN MIX
MIDI
THRU
MIDIMIDI
OUT
OUT
USB
CV
GATE
DI IN
MIDI MIX
THRU
OUT
OUT
CVIN MIX
GATE
PHONE
mode)
or
that
a 9VAC
pattern
or track
is9VAC
empty
(in
patVOLUME
ACK EDIT
DONE
tern play and track play modes)
U
SAW
SAW D
ACK (SYNC OUT)
ACK (DINSYNC)
2
TUNE
CUTOFF
RESONANCE
TUNE
CUTOFF
RESONANCE
ENV MOD
DECAY ENV MOD
ACCENT DECAY
CUTOFF
RESONANCE
MOD
ACCENT
11
12
13
14 ENV 15
16 DECAY
The up key and down key are used to extend
the range of the single-octave keyboard. In patR
A
S
tern edit and keyboard mode, pressing the down
USEROUT)
A
TRACK (SYNC OUT)
5
USER
A
TRACK (SYNC
USER
5
TRACK (SYNC
13 OUT)
13 A
key
will
the octave
lower than the lowUSER B
TRACK (no
(DINSYNC)
USER B
TRACKlower
(DINSYNC)
USER B
TRACK (DINSYNC)
6
6
12
12
USER C
TRACK (MIDISYNC)
USER C
TRACK (MIDISYNC)
USER C
TRACK (MIDISYNC)
7
11
7
11
est
octave)
and
pressing
the upVOLUME
key will raise VOLUME
VOLUME
TEMPO TRACK
BOOTLOAD
TRACK EDIT
BOOTLOAD
TRACK
EDIT
BOOTLOAD10
EDIT
10 9 8
9 8
COMPUTER CONTROL
COMPUTER CONTROL
COMPUTER CONTROL
the
octave (no higher than the 3rd octave). The
DONE
C´
LEDs
will also indicate which octave is in use.
D
U
MIDI PLAY 16
15
RANDOM
14
KEYBOARD
3
4
5
6
7
B
15
26
37
159
48
C#
F#
D#
7
D
NEXT
E
D#
G#
8PREV
FC
26
10
D
G
3711
R
AE
59
13
C#
F#
A#
NEXT
48
12
D#
G#
A
C
BF
610
14
7115
1
812
16
S
D
G
C´
E
DA
2
CHAIN
3
R/S
41
52
CHAIN
63
1
74
2
85
3 R
6
913
F#
A#
F
UB
lowest octave
S
ACCENT
PATTERN (SYNC OUT)
PATTERN (SYNC OUT)
PATTERN (SYNC OUT)
1 2
1 2
MIDI(DINSYNC)
PLAY
PATTERN (DINSYNC)
MIDI
PLAY16
PATTERN
PATTERN
(DINSYNC)
15
3
3
RANDOM
PATTERN (MIDISYNC)
RANDOM
PATTERN
(MIDISYNC)
PATTERN
(MIDISYNC)
14
4
4
KEYBOARD
PATTERN EDIT
KEYBOARD
PATTERN
EDIT
PATTERN
EDIT
A#
TEMPO
8
EV
Down/Up Keys & LEDs
SQR
SQR
10
9VAC
4 A
7
10
14
G#
DONE
G´
C
11
15
12
16
13
15
16
A#
DA
6
R
7
DONE
DONE
UB
C´
second octave
5 S
8
14
A
D
U
third octave
8
S
R
A
In track edit and track play mode, the up/down
keys are used to transpose patterns and tracks.
Patterns can be transposed either up (one octave) or down (one octave). Pressing the relavent
button will display the amount of transpose in
that direction on the note keys. the LEDs will
also indicate if the pattern/track is transposed
and in which direction.
10
S
SQR
SQR
E
CUTOFF
B
1
SAW
SAW
CV
GATE
ACCENT
9VAC
PATTERN (SYNC OUT)
PATTERN (SYNC OUT)
PATTERN (SYNC OUT)
1 2
1 2
MIDI(DINSYNC)
PLAY
PATTERN (DINSYNC)
MIDI
PLAY16
PATTERN
PATTERN
(DINSYNC)
15
3
3
RANDOM
PATTERN (MIDISYNC)
RANDOM
PATTERN
(MIDISYNC)
PATTERN
(MIDISYNC)
14
4
4
KEYBOARD
PATTERN EDIT
KEYBOARD
PATTERN
EDIT
PATTERN
EDIT
3
4
USEROUT)
A
TRACK (SYNC OUT)
5
USER
A
TRACK (SYNC
USER
5
TRACK (SYNC
13 OUT)
13 A
USER B
TRACK (DINSYNC)
USER B
TRACK (DINSYNC)
USER B
TRACK (DINSYNC)
6
6
12
12
USER C
TRACK (MIDISYNC)
USER C
TRACK (MIDISYNC)
USER C
TRACK (MIDISYNC)
7
11
7
11
VOLUME
VOLUME
TEMPO TRACK
BOOTLOAD
TRACK EDIT
BOOTLOAD
TRACK
EDIT
BOOTLOAD10
EDIT
10 9 8
9 8
COMPUTER CONTROL
COMPUTER CONTROL
COMPUTER CONTROL
5
6
7
8
DTEMPO
9
15
NC)
C#
PHONE
MIDI PLAY 16
15
RANDOM
14
KEYBOARD
2
C)
TUNE
CUTOFF
RESONANCE
TUNE
CUTOFF
RESONANCE
ENV MOD
DECAY ENV MOD
ACCENT DECAY
RESONANCE
ENV MOD
DECAY
ACCENT
DECAY
26
VOLUME
ACCENT
37
159
48
C#
F#
D#
26
10
D#
G#
3711
48
12
Rest/Accent/Slide Keys & LEDs
59
13
C#
F#
A#
610
14
D#
G#
7115
1
812
16
913
F#
A#
10
14
G#
11
15
12
16
13
14
15
16
A#
T)
)
REV
D
NEXT
FC
E
PREV
D
G
VOLUME
NEXT
AE
C
BF
D
G
C´
E
DA
F
UB
transposed down
13
R / S 12 CHAIN
2
3
C´
8
14R / S 15CHAIN16
41
52
63
1
74
DONE
D
U
R
A
S
DONE
G´
C
DA
UB
no transpose
DONE
DONE
C´
D
U
transposed up
The rest key, accent key, and slide key (and
3 R
4 A
5 S
6 R
7 A
8 S
R
A
6
7
8
leds) are
used
to apply
and indicate mute, accenting and portamento. Since they are often
used as a group, they are sometimes referred to
as the RAS keys and leds. While they have different effects in each mode, the overall meaning
of their use is the same:
2
85
S
In pattern edit mode, they are use to create rest
notes, accented notes and slides between notes.
In track edit mode, they are used to mute patterns, accent entire patterns, and portamento
entire patterns.
In pattern play and track play mode, they provide ‘instantanous’/temporary over-riding mute,
accent and slide.
In keyboard mode, only accent is used (sliding
between notes occurs automatically when multiple keys are pressed).
Lit RAS LEDs indicate that the effect is currently
active.
11
I IN
Section
MIDIII
OUT
MIDI THRU
MIX OUT
USB
CV
G
Methods of Operation
CUTOFF
RESONANCE
ENV MOD
DE
PATTERN (SYNC OUT)
3
4
MIDI PLAY
PATTERN (DINSYNC)
RANDOM
PATTERN (MIDISYNC)
KEYBOARD
5
6
7
PATTERN EDIT
USER A
TRACK (SYNC OUT)
USER B
TRACK (DINSYNC)
USER C
TRACK (MIDISYNC)
BOOTLOAD
TRACK EDIT
COMPUTER CONTROL
5
6
7
8
D#
D
12
9
F#
E
F
10
G#
G
11
12
13
A#
A
B
C´
Keyboard Mode
Introduction
Keyboard mode is the quickest way to get sound out of the x0xb0x.
In keyboard mode, the x0xb0x acts like a monophonic MIDI keyboard. Use it to try out pattern ideas or to test the electronics.
Mode Inputs:
Sound on Mix-In
Mode Outputs:
Sound on Mix-Out and Headphone
MIDI information on MIDI-Out
CV/Gate analog information on CV and Gate
13
Playing the keyboard
To enter keyboard mode, turn the function knob to Keyboard
Play notes by using the 13 notekeys. Each notekey’s LED will turn
on when the key is pressed.
You can slide between notes by pressing a new notekey without
releasing the old one.
You can change octaves by pressing the UP or DOWN keys. The
x0xb0x is capable of four octaves. The first octave is active when
the DOWN LED is lit. The second is active when no LEDs are lit
(the default octave). The third when UP LED is lit. The fourth
when UP LED is flashing. The lowest note is 32.7 Hz C, and the
highest is 523 Hz C.
Notes can be accented by pressing the ACCENT key. When accent
is on, the accent LED will be lit.
Every time a notekey is pressed, a corresponding MIDI “Note On”
signal is sent. Every time a notekey is released, the corresponding “Note Off” message is sent. Accented notes have the maximum MIDI velocity value.
The current MIDI address (1 through 15) is displayed on the
strip of 16 LEDs. You can change the MIDI address by turning
the bank knob.
Whenever the x0xb0x is generating sound, its CV and Gate outputs are active. Use them to drive an analog synth like the SH101. The CV voltage can be tuned with TM6, although TM5 and
TM4 will then have to be retuned.
14
MIDI Play Mode
Introduction
MIDI Play mode is the most common way to connect the x0xb0x
to a computer or external sequencer.
The x0xb0x is a monophonic synthesizer, so it can only play MIDI
tracks created with that in mind. Tracks with overlapping notes
will sound incorrect.
This mode doesn’t allow playing patterns or tracks while sync’d to
MIDI. Instead, use Pattern Play (MIDISYNC) or Track Play (MIDISYNC) modes.
Mode Inputs:
Sound on Mix-In
MIDI information on MIDI-In and MIDI-Thru
Mode Outputs:
Sound on Mix-Out and Headphone
MIDI information on MIDI-Out
Tempo information on DINSYNC
CV/Gate analog information on CV and Gate
15
Using MIDI To enter MIDI play mode, turn the Function knob to MIDI play.
The current MIDI address (1-15) is displayed on the strip of 16
LEDs. To change the MIDI address, turn the Bank knob.
To accent notes, make the MIDI velocity value larger than 100
(0x64 decimal).
16
Pattern Edit Mode
Introduction
The x0xb0x contains a sequencer that can play patterns and
tracks, and drive other synthesizers. Patterns are sequences of
notes. Tracks are sequences of patterns.
A patterns can contain up to 16 elements. Each element is either
a note, an accented note, a rest, or a slide.
There are 16 ‘banks’ and 8 ‘sub-banks’ per bank, allowing the
storage of 128 patterns.
Mode Inputs:
Sound on Mix-In
Mode Outputs:
Sound on Mix-Out and Headphone
MIDI information on MIDI-Out
Tempo information on DINSYNC
CV/Gate analog information on CV and Gate
Comparison with TB-303
The original TB-303 saved patterns in volatile RAM. If the internal
lithium battery failed, the patterns would be lost. In the x0xb0x,
patterns are saved on an EEPROM chip.
17
The The Roland TB-303 used a strange method of programming
which required entering notes and timebases separately. It was
difficult to use, although it would sometimes lead to “interesting
patterns.” The x0xb0x sequencer features a simplified patternentry. If one desires “interesting patterns,” one may drink heavily.
Creating Patterns
To enter pattern edit mode, turn the Function knob to Pattern
Edit
The basic method by which one programs patterns is:
1. Load pattern from permanent memory into a ‘scratch pad.’
2. Use either step-write (go though each note one at a time,
adding or changing notes) or run-write (play the pattern
repeatedly and change notes as buttons are pressed)
mode to modify the scratch pad
3. Save the scratch pad to permanent memory.
Selecting the Pattern Bank
Begin by rotating the bank knob. Note: scratchpad memory will
be cleared and unsaved changes will be lost!
Specify the bank by turning the bank knob. Specify the sub-bank
by pressing one of the notekeys labeled ‘1’ through ‘8’. A corresponding LED will turn on.
The scratchpad is now loaded with previously saved data. At this
point, you can start editing the scratch pad using either run-write
or step-write mode.
Editing Patterns in Step-write Mode
Step-write mode is the comprehensive way to write new patterns
or edit existing patterns. To enter step-write mode, press the
NEXT key.
The strip of 16 LEDs indicates the current note, and the other
LEDs display its parameters.
Press a notekey to change the note’s pitch. Press NEXT to edit
the next note. Press PREV to change a previous note (this LED
doesn’t turn on). Press DONE twice to save the new pattern.
18
Press R/S to hear it play.
Each note has a pitch, but can also have additional parameters.
UP and DOWN specify the octave (see: Octaves). ACCENT creates
an accented note (see: Accent). SLIDE continues or bends the
previous note instead of “plucking the string.” Use SLIDE to create longer notes. REST deletes note data and inserts a pause (a
skipped note).
If the DONE LED is lit, the current note is the last note in the pattern. If NEXT is pressed, the note location will be reset back to 1.
To add notes to the pattern, press one of the notekeys.
The active pattern can be rotated (note 1 becomes note 2, note
2 becomes note 3, and the last note becomes note 1). Hold PREV
and press NEXT to rotate one step forward. Hold NEXT and press
PREV to rotate one step backward.
To save the scratch pad into permanent memory at the current
bank/location (and exit step-write mode), the DONE key must be
pressed twice on the last note of the pattern. For example, if the
pattern is 4 notes long, the DONE key must be pressed when the
LED #4 is lit.
You can save to a different bank/location by pressing DONE once,
selecting the bank using the BANK knob, selecting the location
using a numbered key, and pressing DONE again to save to that
bank/location.
To listen to the pattern in the scratch pad, press R/S to enter runwrite mode. Save the scratch pad before doing this or it will be
erased!
Pressing CHAIN doesn’t do anything in step-write mode.
Pressing the NEXT key while in run-write mode will allow you to
edit in step-write mode while the sequencer continues to play in
the background.
Editing Patterns in Run-write Mode
Run-write mode allows you to listen to the pattern and modify it
as it plays. New notes cannot be added in run-write mode, nor
can the pattern be shortened. The tempo at which the pattern is
‘run’ is set by the tempo knob (no other syncs are available).
To enter run-write mode, press R/S. The R/S key should light up.
Unsaved scratch pad data will be erased.
19
The pattern will now loop in time with the tempo. Each note location (out of 16) is indicated on the light-strip. The current note
data (rest, accent, slide, octave, note) is indicated using the
LEDs.
The current note data can be changed by pressing REST (turns
note into a rest note), ACCENT & SLIDE (toggles accent and slide
on that note), octave UP (raises note one octave, no higher than
‘high’ octave), octave DOWN (lowers note one octave, no lower
than ‘low’ octave) or any of the 13 note keys, changing to the
note in the same octave as the previous.
The active pattern can be rotated backward or forward one step
at a time. Hold PREV and press NEXT to rotate one step forward.
Hold NEXT and press PREV to rotate one step backward.
To erase the pattern in the scratch pad hold CHAIN and press the
TEMPO knob. To erase the pattern from permanent memory, the
now empty scratch pad should be saved using the DONE key.
Pressing the DONE key twice at any time saves the entire scratch
pad back into permanent memory in the original bank/location,
effectively replacing the previous pattern. To save into a different bank/location, press DONE once and use the BANK knob and
numbered keys to choose the bank and location. Press DONE
again to save it to that bank/location. The DONE LED should
blink, and the pattern will continue looping.
To leave run-write mode (retaining the scratch pad data but not
saving it to permanent memory) press the R/S key again at any
time.
Run-write mode outputs MIDI note data while playing.
Pressing CHAIN during run-write mode will reshuffle the current
pattern in the scratch pad in the following way:
[1 2 3 4 5 6 7 8 9 10 11 12 13 14 15 16] -->
[7 8 9 12 13 14 15 16 2 3 4 5 6 1 10 11]
20
Pattern Play Mode
Introduction
Pattern play mode is used to play various patterns programmed
into the x0xb0x memory in an arbitrary order. Theres a lot of
functionality in pattern-play mode, allowing for looping multiple
patterns together, changing pitch, tap-tempo, different syncs, allrest, all-slide and all-accent modes, etc.
There are 3 different pattern play modes - SYNC OUT, MIDISYNC,
and DINSYNC. The difference between the modes is the tempo.
In SYNCOUT mode, the tempo is internally generated by the microcontroller, and adjusted by the tempo knob or by tap-tempo,
and MIDI sync & DINSYNC signals are sent out to control other
synthesizers or drum machines. In MIDISYNC, the tempo comes
from MIDI Clock messages on the MIDI IN port. In DINSYNC, the
tempo comes from the DINSYNC port. Otherwise, all three modes
have the same functionality.
Mode Inputs:
Sound on Mix-In
MIDI tempo information on MIDI-In and MIDI-Thru
Tempo information on DINSYNC
Mode Outputs:
Sound on Mix-Out and Headphone
MIDI information on MIDI-Out
Tempo information on DINSYNC
CV/Gate analog information on CV and Gate
21
Selecting single patterns to play
There are 16 banks and 8 sub-banks for storing patterns, for a
total of 128 total possible patterns to play.
To select the pattern bank, turn the pattern BANK knob to the desired bank. The pattern location will be set to 1 by default.
To select the pattern location, press one of the 8 numbered keys.
If the x0xb0x is not playing a pattern, the selected pattern location LED will be lit and this pattern will be immediately played
when it receives a start signal (from internal or external sync)
If the x0xb0x is playing a pattern, the newly selected pattern location LED will start blinking and this pattern will be played after
the current pattern is finished.
To play multiple patterns, use pattern chaning, descibed below.
Chaining patterns
Patterns within one bank can be chained together, in arbitrary
order, up to 32 patterns in a row. In this way, repetitions of patterns can be programmed, either for playing or for trying out possible tracks.
Press and hold down the CHAIN key. The CHAIN LED will light up
and the numbered key LEDs will be cleared, showing that a new
chain is ready to be entered.
While still holding down the CHAIN key, select the patterns to be
put in the chain by pressing the 8 numbered keys, one at a time.
The patterns will be entered in order of selection. The same pattern can be entered multiple times. Chains can be 1 to 32 patterns long. Patterns in the chain will light up solid as they are selected.
Once the chain has been decided on, release the CHAIN key. The
chain will start playing at the end of the next pattern.
While a chain is playing, the patterns in the chain will light up
solid, the current pattern playing will be blinking
Essentially, selecting a single pattern is the same as creating a
1-pattern-long chain.
22
Using Sync Out
When using Pattern Play (sync out) the tempo is created by the
x0xb0x using either the TEMPO knob or tap-tempo. Whenever the
tempo is changed, it is displayed via the TEMPO LED. Turning the TEMPO knob clockwise increases the tempo by 1 BPM
per ‘click.’ Turning the TEMPO knob counter-clockwise decreases
the tempo by 1 BPM per ‘click.’
Tap-tempo allows the tempo to be set by measuring the time between button presses. To set the tempo via tap-tempo, press the
TEMPO knob two or more times. The tempo will be set by measuring the delay between the last two knob presses.
In sync out mode, the x0xb0x can be used to control other synthesizers via MIDI out or DINSYNC by generating clocking signals.
By default the sync rate is 24 DINSYNC pulses and 24 MIDI clocks
per quarter note. Start signals (MIDI start and DINSYNC start line
high) are generated when the pattern starts playing (by pressing the RUN/STOP key) and stop signals (MIDI stop and DINSYNC
start line low) are generated when the pattern stops (pressing
RUN/STOP again, or changing out of pattern play.)
To start playing patterns, press the RUN/STOP key. The pattern
will always start playing at note step #1. This will also send DINSYNC and MIDI start signals.
The pattern(s) will continue playing until the RUN/STOP key is
pressed again, or the FUNCTION knob is changed to a different
function. This will also send DINSYNC and MIDI stop signals.
Using MIDI Sync
MIDI sync allows the x0xb0x tempo, start/stop and pattern selection to be controlled via another computer or synthesizer. Make
sure the MIDI cable is plugged into the MIDI IN jack. The x0xb0x
listens for “MIDI Start,” “MIDI Continue,” “MIDI Stop,” and “MIDI
Clock” messages. These messages do not use the MIDI address
specification.
To start playing the current pattern, send a MIDI Start message.
There should be 24 MIDI Clock messages per quarter note.
To stop playing the current pattern, send a MIDI Stop message
23
DINSYNC
Older (pre-MIDI) synths and drum machines such as the Roland
TR-606/808/909 used a proprietary sync signal that made use
of a DIN connector and MIDI-like cables. The DINSYNC port can
both output and input tempo and pattern start/stop information.
Pitch Shifting
Pitch-shifting allows the current pattern to be played at a higher
or lower scale than was originally programmed in. The pitch can
be shifted in either direction, in 1/2 note increments, up to one
octave. Pitch-shifting is available in all three modes.
To shift the pitch up, hold down the UP key. The current pitch
shift is displayed as a blinking light on the note keys. A pitch
shift of 0 is displayed as low C, a pitch shift of +1/2 note is displayed as C#, A pitch shift of +1 octave is displayed as high C. If
no LEDs light, the current pitch shift is negative. To select a new
pitch shift, press a note key while the UP key is held down. The
new pitch shift value will light up solid and will become effective
at the start of the next pattern.
To shift the pitch down, hold down the DOWN key. The current
pitch shift is displayed as a blinking light on the note keys. A
pitch shift of 0 is displayed as high C, a pitch shift of -1/2 note
is displayed as B, etc. If no LEDs light, the current pitch shift is
positive. To select a new pitch shift, press a note key while the
DOWN key is held down. The new pitch shift value will light solid
and will become effective at the start of the next pattern.
Pitch shifts are cleared when a new chain is started.
Rest, Accent & Slide
The REST, ACCENT, and SLIDE keys can be used to turn on allrest (treat all notes as rests), all-accent (accent all notes), and
all-slide (slide all notes).
To turn on all-rest, press and hold the REST key. The REST LED
will light up and no new notes will be gated while the REST key is
pressed.
To turn on all-accent, press and hold the ACCENT key. The ACCENT LED will light up and all notes will be accented while the
ACCENT key is pressed.
24
To turn on all-slide, press and hold the SLIDE key. The SLIDE
LED will light up and all notes will be slid while the SLIDE key is
pressed.
Swing Timing
Swing timing creates an inconsistent, syncopated tempo. (Some
notes are delayed, while others played too soon.)
Press NEXT or PREV while the pattern is playing to increment or
decrement the amount of swing. There are five levels of swing
available.
The swing tempo is output on DINSYNC and MIDI, and will cause
other synthesizers to swing.
Loop Mode
Loop mode allows a portion of a patern to be repeated indefinitely.
To enter loop mode, hold the DONE key, and choose the start and
end points of the loop using the 13 note keys and the three RAS
keys (together, these represent the 16 notes in the pattern). Release DONE. To exit loop mode, press and release DONE.
Loop mode can be used to play a pattern backwards by choosing
a later note first.
To restart a loop from the first step, hold CHAIN and press PREV.
Note Nudge
While a pattern is playing, a note may be nudged so that it is
skipped or repeated.
To skip a step, hold PREV and press NEXT. To repeat a step, hold
NEXT and press PREV.
Half Tempo
For a currently playing pattern, the tempo can be halved by holding DONE and pressing the TEMPO knob. This will keep everything
in sync and will affect the whole pattern. Hold DONE and press
the TEMPO knob again to return to the normal tempo.
25
Track Edit
Introduction
Tracks are composed of patterns. Once you have written a few
patterns you like, you can string them together into patterns.
There are 16 different tracks, and each track can be 16 patterns
long. Tracks, like patterns, are stored in the EEPROM.
Each pattern in a track also has, associated with it, a ‘rest’ flag,
an ‘accent’ flag, a ‘slide’ flag, and 5 bits of pitch-shift. These allow
the pattern to be completely muted, accented, slid, or shifted up
or down a little more than an octave.
To enter track edit mode, turn the Function knob to Track Edit
Like Pattern Edit mode, tracks are loaded from EEPROM into a
scratch pad which is then modified by the user. When you feel like
the scratch pad contains the track you want, it can be saved back
into the EEPROM.
Mode Inputs:
Sound on Mix-In
Mode Outputs:
26
Sound on Mix-Out and Headphone
CV/Gate analog information on CV and Gate
Selecting the track
While not in step-write or run mode, one can select the track to
be edited.
Make sure you’re not in run or step-write mode, the R/S and
STEP LEDs should not be lit.
The current track being edited (#1-16) is displayed on the strip of
16 LEDs by a blinking LED.
To change the track, turn the Bank knob. This will throw out the
current scratch-pad and load the newly selected track from EEPROM.
Step-write mode
Unlike pattern edit mode, there is no ‘run-write’ method to modifying tracks. Therefore you must use step-write mode, which
goes through the 16 patterns in a track and individually select the
pattern, pitch shift, and RAS flags.
To begin step-write, press the NEXT button (you can do this from
track-selection or run mode).
The current location (1-16) in the track is indicated by a blinking
light in the light strip.
The bank and location of the current pattern in the track location
is indicated by a solid light in the light strip, and a solid light in
the numbered keys. The current pattern will also play in a loop.
To set the pattern in the current track location: turn the BANK
knob (to set the bank) and press the one of the numbered keys
(to set the location in the bank).
To set the all-rest, all-accent or all-slilde flags for that track location, press any of the RAS keys. The current flag status is displayed by the LED above the corresponding button.
To shift the pitch up, hold down the UP key. The current pitch
shift is displayed as a blinking light on the note keys. A pitch
shift of 0 is displayed as low C, a pitch shift of +1/2 note is displayed as C#, A pitch shift of +1 octave is displayed as high C. If
no LEDs light, the current pitch shift is negative. To select a new
pitch shift, press a note key while the UP key is held down. The
new pitch shift value will start blinking
27
To shift the pitch down, hold down the DOWN key. The current
pitch shift is displayed as a blinking light on the note keys. A
pitch shift of 0 is displayed as high C, a pitch shift of -1/2 note is
displayed as B, A pitch shift of -1 octave is displayed as low C. If
no LEDs light, the current pitch shift is positive. To select a new
pitch shift, press a note key while the DOWN key is held down.
The new pitch shift value will start blinking.
To advance to the next track location, press the NEXT key.
To save the track to EEPROM, press the DONE key while at the
last location of the track. This will also exit step-write mode.
28
Track Play
Introduction
Track play mode is used to play various tracks programmed into
the x0xb0x memory in an arbitrary order. Theres a lot of functionality in track-play mode, allowing for multiple tracks to be
looped together, changing pitch, tap-tempo, different syncs, allrest, all-slide and all-accent modes, etc.
There are 3 different pattern play modes - SYNC OUT, MIDISYNC,
and DINSYNC. The difference between the modes is the tempo.
In SYNCOUT mode, the tempo is internally generated by the microcontroller, and adjusted by the tempo knob or by tap-tempo,
and MIDI sync & DINSYNC signals are sent out to control other
synthesizers or drum machines. In MIDISYNC, the tempo comes
from MIDI Clock messages on the MIDI IN port. In DINSYNC, the
tempo comes from the DINSYNC port. Otherwise, all three modes
have the same functionality.
Mode Inputs:
Sound on Mix-In
MIDI tempo information on MIDI-In and MIDI-Thru
Tempo information on DINSYNC
Mode Outputs:
Sound on Mix-Out and Headphone
MIDI information on MIDI-Out
Tempo information on DINSYNC
CV/Gate analog information on CV and Gate
29
Selecting single tracks to play
There are 8 banks and 8 locations per bank for storing tracks, for
a total of 64 total possible tracks to play. Tracks are selected this
way for all three modes. In addition, tracks can be chained together as described later.
To select the track bank, turn the track BANK knob to the desired
bank. Since there are only 8 banks, the knob will ‘repeat’ twice
(e.g. bank #13 is the same as #5) The track location will be set
to 1 by default.
To select the track location, press one of the 8 numbered keys.
If the x0xb0x is not playing a track, the selected track location
LED will be lit and this track will be immediately played when it
receives a start signal (from internal or external sync)
If the x0xb0x is playing a track, the newly selected track location
LED will start blinking and this track will be played after the current track is finished.
To play multiple track, use track changing, described below.
Chaining tracks
Tracks within one bank can be chained together, in arbitrary order, up to 32 tracks in a row. In this way, repetitions of tracks can
be programmed to make a full song.
Press and hold down the CHAIN key. The CHAIN LED will light up
and the numbered key LEDs will be cleared, showing that a new
chain is ready to be entered.
While still holding down the CHAIN key, select the tracks to be
put in the chain by pressing the 8 numbered keys, one at a time.
The tracks will be entered in order of selection. The same track
can be entered multiple times. Chains can be 1 to 32 tracks long.
Tracks in the chain will light up solid as they are selected.
Once the chain has been decided on, release the CHAIN key. The
chain will start playing at the end of the next track.
While a chain is playing, the tracks in the chain will light up solid,
the current track playing will be blinking
Essentially, selecting a single track is the same as creating a
1-track-long chain.
30
Using Sync Out
When using Pattern Play (sync out) the tempo is created by the
x0xb0x using either the TEMPO knob or tap-tempo. Whenever
the tempo is changed, it is displayed via the TEMPO LED. Turning the TEMPO knob clockwise increases the tempo by 1 BPM
per ‘click.’ Turning the TEMPO knob counter-clockwise decreases
the tempo by 1 BPM per ‘click.’
Tap-tempo allows the tempo to be set by measuring the time between button presses. To set the tempo via tap-tempo, press the
TEMPO knob two or more times. The tempo will be set by measuring the delay between the last two knob presses.
In sync out mode, the x0xb0x can be used to control other synthesizers via MIDI out or DINSYNC by generating clocking signals. By default the sync rate is 24 DINSYNC pulses and 24 MIDI
clocks per quarter note. Start signals (MIDI start and DINSYNC
start line high) are generated when the pattern starts playing
(by pressing the RUN/STOP key) and stop signals (MIDI stop and
DINSYNC start line low) are generated when the pattern stops
(pressing RUN/STOP again, or changing out of pattern play.)
To start playing patterns, press the RUN/STOP key. The pattern
will always start playing at note step #1. This will also send DINSYNC and MIDI start signals.
The pattern(s) will continue playing until the RUN/STOP key is
pressed again, or the FUNCTION knob is changed to a different
function. This will also send DINSYNC and MIDI stop signals.
Using MIDI Sync
MIDI sync allows the x0xb0x tempo, start/stop and pattern selection to be controlled via another computer or synthesizer. Make
sure the MIDI cable is plugged into the MIDI IN jack. The x0xb0x
listens for “MIDI Start,” “MIDI Continue,” “MIDI Stop,” and “MIDI
Clock” messages. These messages do not use the MIDI address
specification.
To start playing the current pattern, send a MIDI Start message.
There should be 24 MIDI Clock messages per quarter note.
To stop playing the current pattern, send a MIDI Stop message
31
DINSYNC
Older (pre-MIDI) synths and drum machines such as the Roland
TR-606/808/909 used a proprietary sync signal that made use
of a DIN connector and MIDI-like cables. The DINSYNC port can
both output and input tempo and pattern start/stop information.
Pitch Shifting
Pitch-shifting allows the current pattern to be played at a higher
or lower scale than was originally programmed in. The pitch can
be shifted in either direction, in 1/2 note increments, up to one
octave. Pitch-shifting is available in all three modes.
To shift the pitch up, hold down the UP key. The current pitch
shift is displayed as a blinking light on the note keys. A pitch
shift of 0 is displayed as low C, a pitch shift of +1/2 note is displayed as C#, A pitch shift of +1 octave is displayed as high C. If
no LEDs light, the current pitch shift is negative. To select a new
pitch shift, press a note key while the UP key is held down. The
new pitch shift value will light up solid and will become effective
at the start of the next pattern.
To shift the pitch down, hold down the DOWN key. The current
pitch shift is displayed as a blinking light on the note keys. A
pitch shift of 0 is displayed as high C, a pitch shift of -1/2 note
is displayed as B, etc. If no LEDs light, the current pitch shift is
positive. To select a new pitch shift, press a note key while the
DOWN key is held down. The new pitch shift value will light solid
and will become effective at the start of the next pattern.
Pitch shifts are cleared when a new chain is started.
Rest, Accent & Slide
The REST, ACCENT, and SLIDE keys can be used to turn on allrest (treat all notes as rests), all-accent (accent all notes), and
all-slide (slide all notes).
To turn on all-rest, press and hold the REST key. The REST LED
will light up and no new notes will be gated while the REST key is
pressed.
To turn on all-accent, press and hold the ACCENT key. The ACCENT LED will light up and all notes will be accented while the
ACCENT key is pressed.
32
To turn on all-slide, press and hold the SLIDE key. The SLIDE
LED will light up and all notes will be slid while the SLIDE key is
pressed.
Swing Timing
Swing timing creates an inconsistent, syncopated tempo. (Some
notes are delayed, while others played too soon.)
Press NEXT or PREV while the pattern is playing to increment or
decrement the amount of swing. There are five levels of swing
available.
The swing tempo is output on DINSYNC and MIDI, and will cause
other synthesizers to swing.
Note Nudge
While a pattern is playing, a note may be nudged so that it is
skipped or repeated.
To skip a step, hold PREV and press NEXT. To repeat a step, hold
NEXT and press PREV.
33
Control Software
Introduction
The c0ntr0l software is available on the supplied CD.
The c0ntr0l software is used mainly for updating the firmware. It
can also back up patterns and do a few other things.
Drivers for the x0xb0x are built into most operating systems, but
can also be downloaded here: http://www.ftdichip.com/Drivers/
VCP.htm
c0ntr0l is provided as a Windows .exe and as a cross-platform
Python script.
Updating Firmware on Windows
1. Turn on your x0x in bootload mode.
2. Verify that the USB port was found and installed.
34
3. Start c0ntr0l software
4. Select the correct port in Serial->Port (in this case, COM3)
5. Select x0xb0x->Upload firmware..
(Do NOT select “connect to x0xb0x”)
6. Select the firmware file, press OK.
7. Wait for success response, quit the software.
8. Restart the x0x in non-bootload mode
Backing up Patterns on Windows
1. Start c0ntr0l software
2. Select the correct port in Serial->Port
1. Select Serial->Connect
2. The tempo slider should adjust, and turning the tempo
knob should change the slider and vice versa
3. You can now read/write patterns from memory, back up
the entire EEPROM (patterns & tracks), cut/paste patterns, rotate, etc.
4. To load a pattern, select the bank/location in the dropdown menus
5. To edit the loaded pattern, set the length with the drop
down menu, then click on the top boxes and type in a
note (a,b,c,d,e,f,g,h and A,C,D,F,G for sharps) click on the
note symbol to change to a rest, and add accent (A), slide
(S) and transpose up/down (U/D)
6. Save a pattern by clicking on Save Pattern
35
Developing (advanced)
Introduction
The x0xb0x firmware is responsible for all of the digital functionality: driving LEDs, reading switches, gating notes to the analog
synthesizer, running the sequencer, etc. The firmware is essentially a compiled program that is burned into the microcontroller
chip (in this case, the ATmega162). The x0xb0x firmware is written in C and can be (re)-compiled using the ubiquitous and free
avr-gcc compiler. You are encouraged to add functionality to the
x0xb0x, fix any bugs, etc. and exchange firmware updates with
others!
You may eventually decide that you want to write firmware modifications for the x0xb0x. Since x0xb0x is an open source platform
and the code is written using free tools in a well-known language,
it’s pretty easy to get started with writing new code.
Normally, upgrading the firmware is performed by placing the microcontroller into a special device that programs it. However, to
make it easier to upload new firmware the microcontroller that
ships with the x0xb0x contains a bootloader. The bootloader is
a small piece of code (.5K) that is separate from the main firmware and is executed first. The bootloader checks to see if the
FUNCTION knob is turned to Bootload mode. If it is, it proceeds
to download the new firmware, and if it isn’t, it executes the rest
of the firmware. (See previous section of the manual.) The maximum size of user firmware is 15.5KB. (Check avr-gcc output for
size.)
Installing Dev Tools
The AVR microcontroller has a wide variety of development tools
available. On Windows, AVR Studio is the free, easy-to-use IDE.
36
1. Download and install AVR Studio. This includes avr-gcc.
2. Download the latest x0xb0x firmware source code distribution from SourceForge. (Or the source code to an alternate community firmware, such as SokkOS.) Unzip the
code.
3. The x0xb0x source code does not come with an AVR Studio project file, but includes a WinAVR makefile. To create
a project from the makefile:
•Open AVR Studio.
•Create New Project
• Project type: AVR GCC
• Project name: x0xb0x
• Uncheck “create initial file”
• Change Location to the folder containing the source code
• Click Finish
•Go to Project menu > Configuration Options
• Check “Use External Makefile” and select “Makefile.txt” in the
source code directory
• Click OK
•Right-click on “x0xb0x (default)” in main project
treeview on the lefthand side.
• Select “Add Existing File(s)...”
• In the new dialog box select all .c and .h files. (For convenience,
use ctrl-click and sort by file type.)
•Save the new AVR Studio Project to the source code
directory. (The project file will be called ‘x0xb0x.aps’)
4. Open the project file in AVR Studio.
5. Go to Build menu > Rebuild All
6. Verify that build completes successfully. Check that you
can program the new x0xb0x.hex file. (See previous instructions.)
7. Make changes to the source code and see if they work!
37
38