1
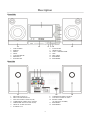
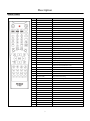
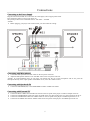
P-300 Multi Format Hi-Fi Karaoke System with Ripping & Recoding Function USER’S MANUAL Safety Warnings CLASS 1 LASER PRODUCT KLASSE 1 LASER PRODUKT LUOKAN 1 LASER LAITE KLASS 1 LASER APRARAT PRODUCTO LASER CLASE1 CLASS 1 LASER PRODUCT This player is classified as a CLASS 1 LASER product. Use of controls, adjustments or performance of procedures other than those specified herein may result in hazardous radiation exposure. CAUTION RISK OF ELECTRIC SHOCK. DO NOT OPEN CAUTION: TO REDUCE THE RISK OF ELECTRIC SHOCK, DO NOT REMOVE REAR COVER. NO USER SERVICEABLE PARTS INSIDE. REFER SERVICING TO QUALIFIED SERVICE PERSONNEL Thi symbol indicates that dangerous voltage which can cause electric shock is present inside this unit. This symbol alerts you to important operating and maintenance instructions accompanying the unit. WARNING: To reduce the risk of fire or electric shock, do not expose this appliance to rain or moisture. 1 Precautions Ensure that the AC power supply in your house complies with the identification sticker located on the back of your player. Install your player horizontally, on a suitable base(furniture), with enough space around it for ventilation(7.5~10cm). Make sure the ventilation slots are not covered. Do not stack anything on top of the player. Do not place the player on amplifiers or other equipment which may become hot. Before moving the player, ensure the disc tray is empty. This player is designed for continuous use. Switching off the Player to the stand-by mode does not disconnect the electrical supply. In order to disconnect the player completely from the power supply, remove the main plug from the wall outlet, especially when left unused for a long period of time. During thunderstorms, disconnect AC main plug from the wall outlet. Voltage peaks due to lighting could damage the unit. Do not expose the unit to direct sunlight or other heat sources. This could lead to overheating and malfunction of the unit. Protect the player from moisture(e.g. vases), and excess heat(e.g. fire place) or equipment creating strong magnetic or electric fields(e.g. speakers…). Disconnect the power cable from the AC supply if the player malfunctions. Your player is not intended for industrial use. Use of this product is for personal use only. Condensation may occur if your player or disc have been stored in cold temperatures. If transporting the player during the winter, wait approximately 2 hours until the unit has reached room temperature before using. The battery used with this product contain chemicals that are harmful to the environment. Do not dispose of batteries in the general household trash. Handling discs Do not touch the playback side of the disc. Hold the disc the edges so that fingerprints will not get on the surface. Do not stick paper or tape on the disc. Do not fall or impact the disc Storing discs After playing, store the disc in its case. Do not expose the disc to direct sunlight or sources of heat, or leave it in a parked car exposed to direct sunlight, as there may be a considerable temperature increase inside the car. Cleaning discs Fingerprints and dust on the disc can cause poor picture quality and sound distortion. Before playing, clean the disc with a clean cloth. Wipe the disc from the center out. Do not use strong solvents such as alcohol, benzene, thinner, commercially available cleaners, or anti-static spray intended for older vinyl records. Handling the Unit When setting up the unit, the picture and sound of a nearby TV, VCR, or radio may be distorted during playback. In this case, position the unit away from the TV, VCR, or radio, or turn off the unit after removing the disc. Cleaning the unit To clean the cabinet, use a soft, dry cloth. If the surfaces are extremely dirty, use a soft cloth lightly moistened with a mild detergent solution. Do not use strong solvents such as alcohol, benzene, or thinner, as these might damage the surface of the unit. 2 Before Use Playable Media DVD, SVCD, VCD, HDCD, Audio CD, DVD+/-R, DVD+/-RW, SVCD and CD-R/RW that contains Audio titles, NEO+G, MP3+G, CD+G, MP3, WMA, JPEG, MPEG4 or DivX files. Regional code This unit plays the DVD discs labeled “All” Remote Control Operation Range Point the remote control at the remote sensor and press the buttons Distance: about 23ft(7m) from the front of the remote sensor Angle: About 30° in each direction of the front of the remote sensor Remote control battery installation Detach the battery cover on the rear of the remote control and insert two AAA size batteries with + and – aligned correctly. *Do not expose batteries to heat or flame Table of Contents PREPARATION Safety Warnings-----------------------------------------------------------------------------------------------------------1 Precautions-----------------------------------------------------------------------------------------------------------------2 Before Use------------------------------------------------------------------------------------------------------------------3 DESCRIPTION Front Side and Rear Side--------------------------------------------------------------------------------------------------4 Remote Control-----------------------------------------------------------------------------------------------------------5 CONNECTIONS Connecting to the Power Supply-----------------------------------------------------------------------------------------6 Connecting with Microphone-----------------------------------------------------------------------------------------6 Connecting with Speaker(L/R)-------------------------------------------------------------------------------------------6 Connecting with TV--------------------------------------------------------------------------------------------------------6 Connecting with CARD/USB devices-----------------------------------------------------------------------------------7 OPERATION Basic Operation----------------------------------------------------------------------------------------------------------8 Special Operation---------------------------------------------------------------------------------------------10 NEO+G Karaoke Operation---------------------------------------------------------------------------------------------11 SYSTEM SETUP System Setup-------------------------------------------------------------------------------------------------------------14 Language Setup----------------------------------------------------------------------------------------------------------14 Audio Setup---------------------------------------------------------------------------------------------------------------14 Video Setup---------------------------------------------------------------------------------------------------------------15 Speaker Setup------------------------------------------------------------------------------------------------------------15 Digital Setup--------------------------------------------------------------------------------------------------------------15 MISCELLANEOUS Trouble Shooting-----------------------------------------------------------------------------------------------------16 Specification----------------------------------------------------------------------------------------------------------17 3 Description Front Side 1. 2. 3. 4. 5. 6. 7. LCD SCREEN POWER MODE NEXT VOLUME KNOB PREVIOUS PLAY/PAUSE 8. 9. 10. 11. 12. 13. 14. LCD ON/OFF OPEN/CLOSE 3-IN-1 CARD READER USB DISC TRAY SPEAKER L SPEAKER R Rear Side 1. 2. 3. 4. 5. 6. 7. MIC INPUT JACK 1/2 MIC VOLUME KNOB 1/2 DVD 2CH AUDIO OUTPUT(L/R) COMPONENT VIDEO OUT (Y,Pb,Pr) AMPLIFIER AUDIO OUTPUT(L/R) OPTICAL AUDIO OUTPUT S-VIDEO OUT 8. COMPOSITE VIDEO OUTPUT 9. COAXIAL AUDIO OUTPUT 10. POWER CORD (AC100-240V, 50/60HZ) 11. SPEAKER-L 12. SPEAKER-R 4 Description Remote Control NO BASIC KARAOKE 1 POWER 2 OPEN/CLOSE 3 VOL -/+ 4 Key b/# Control -Key b/# Control 5 ECHO -/+ -Echo -/+ Control 6 USB/DISC -Drive Change between Disc, USB and SD 7 MPX(Multiplex)=L/R/ST -Vocal ON/OFF/Auto for DAT and Vocal Song with 2CH 8 AUDIO -Vocal ON/OFF/Auto for VOB file with 2 audio 9 EQ -EQ Control 10 PLAY/PAUSE 11 STOP -Stop Playback 12 NUMBERS(0~9) -Numbers & Alphabet Character Input 13 CANCEL -Cancel of the Wrong Digit Input 14 PROGRAM -Program of Songs 15 SONG LIST -Open/Close of the Neo+G Song List on the Screen 16 NUMBER INPUT -Input the Neo+G song's number directly 17 RECORD -Record singing sound with Neo+G &CD+G music 18 -Music Volume -/+ Control RIPPING -Rip the Neo+G & CD+G disc to USB at MP3+G format 19 ARROW(◀▶) -Song List Page UP/DOWN 20 ARROW(▲▼) -Song List Line UP/DOWN 21 ENTER -Play Songs (=PLAY) 22 RETURN 23 MENU 24 LCD MENU(for LCD only) -Return to the previous step on the file list -Creating of Neo+G/ MP3+G/AVI Song List into USB at TXT format(SONGLIST.TXT) -Set the built-in LCD display 25 REPEAT -Repeat One/All/Off 26 FAST REVERSE() 27 FAST FORWARD( ) 28 PREVIOUS( ) -Skip to the Previous Song 29 NEXT( ) -Skip to the Next Song 30 PBC 31 INFO 32 GOTO 33 ZOOM 34 TITLE 35 A-B 36 SUBTITLE 37 ANGLE 38 SETUP 39 STEP 40 SLOW 41 V-MODE 42 MUTE 5 Connections Connecting to the Power Supply Plug the main lead (marked AC Cord on the rear of the player) into an appropriate socket Press the Power button to switch your Player on. The present product can be used under the AC 100~240V~. 50/60Hz <NOTE> Before plugging your player into a main socket, you must check the voltage. Connecting with Microphones Connect the Microphone to the MIC JACK on the rear panel of the unit Adjust the Microphone Volume Level with MIC VOL on the rear panel of the unit. <NOTE> To avoid feedback noise, do not place your hands near the top of the microphone and do not point the microphone directly at the output speaker. If feedback occurs, lower the volume control. Connecting with Speaker(L/R) Connect the SPEAKER(L/R) to the AMPLIFIER OUTPUT AUDIO-L/R JACK. Connecting with External TV Connect the RCA CABLE from AUDIO L/R JACK on the rear panel of the player to Audio L/R Input of the TV. Connect the COMPONENT cable from Y, Pb, Pr JACK on the rear panel of the player to Y, Pb, Pr Input of the TV or Connect the COMPOSITE cable from VIDEO JACK on the rear panel of the player to VIDEO Input of the TV or Connect the S-VIDEO cable from S-VIDEO JACK on the rear panel of the player to S-VIDEO Input of the TV. 6 Connections Connecting with SD Card or USB devices You can play NEO+G, MP3+G, MP4, AVI, DAT, VOB, MP3, WMA and JPEG files from SD/USB. Connect the SD CARD or USB device to each slot on the player. If any Disc is not in the Disc tray, the player will read the SD CARD or USB directly. If any Disc is in the Disc tray, press “USB/DISC” key at stop mode repeatedly to select SD CARD or USB mode. And then press “ENTER or PLAY” key to start playback. Supported file format from SD/USB: NEO+G, MP3+G, MPEG1(*.MPG, *.DAT), MPEG4(*.AVI), DivX(*.AVI), XviD(*.AVI), MP3, JPEG(*.JPG) Supported system: FAT16/32 files system only ※NTFS file system is not supported. Supported devices: USB memory: USB2.0 or USB 1.1 3-in-1 Card: SD/SDHC(up to 32GB), MMC and MINI SD Card (Class 4 or up SD card are recommended for smoothly playback and recording.) MP3 Player: IPOD and flash type MP3 Player. USB HDD: Devices that support USB2.0 or USB 1.1. (※For the USB HDD, make sure to connect an auxiliary power cord to the USB HDD for proper operation and you must turn on the power of USB HDD before connecting to the player and must pull out the USB HDD from the player before turning the power of the player off.) < NOTE > The player may not fully support parts of USB Devices or Memory Card. Some High Resolution Video files cannot be played properly from USB because of the USB Host(v.2.0) speed of the player. Some MP3 players may not operate depending on the sector size of their file system. We cannot guarantee to read & play for the un-authorized USB/SD card. In this case, please check with your local memory dealer. Try different USB/SD brand. Do not insert or pull out the USB Devices or Memory card from the player during operating. If use a USB extension cable, the USB device might not be recognized. 7 Basic Operation Basic Operation POWER: LCD POWER: OPEN/CLOSE: PLAY/PAUSE: STOP: VOLUME CONTROL: NUMERIC(0~9): CANCEL: PROGRAM (MP3/VCD/ MPEG4): USB/DISC: MPX (MULTIPLEX =L/R/ST): PREV/NEXT ( / ): FR/FF ( / ): ARROW (▲▼◀▶): ENTER: AUDIO (DVD/MPEG4): EQ (Equalizer): Press “POWER” knob on the front panel to turn ON/OFF the Main Power of unit. Press “LCD POWER” knob on the front panel to turn ON/OFF the power of LCD Display only. Press “OPEN/CLOSE” to open and close the disc tray. Press PLAY once to play the file/track desired and press PAUSE again to pause the playback. To return to normal playback, press PLAY/PAUSE again. Press STOP key to end playback. On DVD/VCD, you can resume playback by pressing the PLAY key. Press the STOP key twice to stop playback completely. “VOLUME” knob on the Front Panel: adjust the Volume of the built-in Amplifier Output only. “VOLUME(-/+)” keys on the Remote: adjust the Volume of the built-in DVD Audio L/R Output only Press Numeric button to select a File/Track number to play. E.g.) File Number is 1234, Press 1-2-3-4 in order and press PLAY or ENTER to start playback. Press Cancel button to clear the wrong number input. Press “PROGRAM” key at stop mode and input the desired Chapter/Track/File Number and press “PLAY” to start playing in programmed order. In case of VCD, it works at PBC off mode. In case of MP3, it works in one folder only. E.g.) If want to program Chapter/Track/File No. 5. 3, 6 in order, press “PROGRAM + 5, +3, +6 and PLAY”. To terminate the program playback, press “PROGRAM” Button in STOP mode and click “CLEAR” Icon on the TV Screen. Or OPEN and CLOSE the disc tray. Device Change between DISC and CARD or USB This function works only when the USB or SD Card was connected to the Player. Press “USB/DISC” key to switch between DISC MODE and CARD or USB mode at stop mode. <NOTE> In case, both SD Card and USB was connected to the player. The Player won’t work at the same time. In case, no disc is being played, the device mode will automatically switch to USB device and play the first track on the device. Vocal On/Off/Auto This is used to select the left and right tracks of VCD/ MP3/CD discs which have a multiplex demonstration vocal track. LEFT VOCAL(Vocal Auto): When Vocals are on the Left and Music is on the Right, when singing with Mic., the Left Vocal will be canceled automatically. When singing with Mic. Stop, The Left Vocal comes up again automatically. RIGHT VOCAL(Vocal Auto): In case of Music on Left and Vocal on Right, when sing with Mic., the Right Vocal will be canceled automatically. When stop singing with Mic., the Right Vocal comes up again automatically. MONO LEFT(Vocal Off): Playing of Left Channel Sound only MONO RIGHT(Vocal Off): Playing of Right Channel Sound only STEREO (Vocal On): Stereo playback of Demo Vocals and music. Skip to another Chapter/ Track Press either NEXT or PREV button to skip the song, track or file forward or reverse. Fast Search(MPEG4/ DVD/ VCD/ CD/ MP3 only) At each time you press the button, you can modify the speed as follows; FR(Fast Reverse) : 2X, 4X, 8X, 20X, Normal Play. FF(Fast Forward): 2X, 4X, 8X, 20X, Normal Play. Press ARROW keys to navigate the File/Folder Press ENTER key to confirm the desired menu. Press AUDIO key to select different audio channel or languages of DVD disc or AVI files. You can enjoy diverse genres of music with the Equalizer. Select a desired genre by pressing EQ button from following EQ modes. “CLASSIC/ ROCK/ JAZZ/ POP/ USER/ STANDARD” If you selected USER mode, you can adjust the elements by pressing arrow buttons. 8 Basic Operation RETURN: Press RETURN key to return to previous level of the Menu. MENU (DVD/MPEG4): Press MENU key to the disc menu mode on the screen. Press ARROW buttons or NUMERIC buttons (0~9) to select a play option and press ENTER button to confirm. Press LCD MENU key to set the condition of built-in LCD Display. LCD MENU: REPEAT (DVD/ VCD/ CD/ MP3/MPEG4): PBC: INFO : GOTO: ZOOM(MPEG4/ DVD/VCD/JPEG): TITLE (VCD/DVD): A-B (DVD/MPEG4/ VCD/ CD): You can play a chapter, track, title or entire disc repeatedly. Press REPEAT continuously to choose a Repeat mode during playback. DVD: “CHAPTER /TITLE / REP-ALL/ OFF” VCD, CD: “REP-1/ REP-ALL/ OFF” (*You can activate repeat function at PBC OFF mode.) MP3/MPEG4: “REP-1/ REP-DIR/ REP-ALL/ OFF” Playback Control for VCD 2.0 only If your CD case is marked as VCD2.0 or PBC, you can select desired information or image in the MENU on the screen. You may have different initial image according to the contents included in the Disc. PBC ON: When inserting a disc, a menu (if available) may be displayed before playback. Using the Numeric Keys (0-9), enter the desired track number and press ENTER to being playback. PBC OFF: Select PBC OFF to skip the Disc menu and play directly from the beginning You can display the playback time and disc information on the screen. Press “INFO” repeatedly to change the display mode including singles time C, title time T, countdown and cancel. Time Search ( DVD/ MPEG4/ VCD) The Time Search function allows you to start playback at any chosen time on the disc. Press GOTO key and use ARROW keys to select chapter or input the chapter or time by the Numeric Keys (0-9) and press ENTER key to play. (*CD+G GOTO function is not supported) You can aggrandize the image during the playback or pause mode by pressing the “ZOOM” button repeatedly. (“2X 3X 4X 1/21/31/4OFF”) Press “TITLE” key to enter the TITLE mode of Disc. SLOW: Press A-B once at point (A) where you wish to begin the repeat. Press A-B again at point (B) where you wish to end the repeat. Then the player will repeat playback between A and B. Press A-B key at third time to turn off A-B repeat mode. When press STOP during playback, A-B repeat is canceled. Press SUBTITLE repeatedly to select different subtitle languages. Depending on the Disc, you can have different language options for subtitle. Press ANGLE to enjoy multi angle viewing when your DVD disc is recorded with multi angle. The current angle appears on the Screen. Press SLOW repeatedly to play slow forward/ reverse motion. STEP: Press STEP to play V-MODE (VIDEO MODE): Press V-MODE repeatedly to cycle Video mode (S-Video/ Interlaced YUV/ TV RGV/ P-SCAN YPbPr/ PC VGA) MUTE : Press MUTE repeatedly to disable and enable the sound output. SETUP: Press SETUP button to enter or close the setup mode. SUBTITLE (DVD/ MPEG4): ANGLE(DVD): 9 Special Operation Special MPEG4 Operation SUPPORTED VIDEO FORMATS: DivX 4.x, 5.x, XviD, DivX Pro(Excluding QPEL and GMC) <NOTE> Bit rate may fluctuate; Device may skip encoding the high bit rate portions and begin decoding again when Bit rate returns to normal. Maximum bit rate: 4Mbps.720*480 @30fps, 720*576 @25fps Aspect Ratio: Although default DivX resolution is 640*480 pixels (4:3), this product supports 720*480 pixels. Video resolution higher than 800 pixels will not be supported. SUPPORTED AUDIO FORAMTS: Format MP3 WMA AC3 DTS Bit Rate 80~348kbps 56~192kbps 128~348kbps 1.5Mbps Sampling 44.1khz 44.1khz 44.1/48khz 44.1khz Frequency DivX files, including audio and video files, created in the DTS format can only support up to 6Mbps. When you play a disc whose sampling frequency is higher than 48khz or 320kbps, you may experience shaking on the screen during playback. Smi, Srt, Sub with English SUPPORTED SUBTITLE: < NOTE ! > It is normal to experience an occasional pixilation during MPEG4 playback due to clarity of digital contents during internet downloading. Some MPEG4 files created on a personal computer may not be played back. That is why Codec Type, Version and Higher resolution over the above specification is not supported. This unit supports CD-R/RW written in MPEG4 in accordance with the “ISO9660 format” Special JPEG Operation DIGEST FUNCTIONS (JPEG) This function shows the content of the current folder or the whole disc. Press PBC at stop mode, A thumbnail of 6 pictures appears on the TV screen. Press ARROW keys to highlight one of the pictures and press ENTER to start playback. Press STOP key during the playback of Picture to return to the File menu. PLAYBACK WITH MULTI-ANGLE (JPEG) During playback, press Arrow(◀▶ ▲ ▼) buttons to rotate the picture on the TV screen. ◀: rotate the picture anti-clockwise ▶: rotate the picture clockwise ▲: flip the picture vertically ▼: flip the picture horizontally 10 NEO+G Karaoke Operation PLAYING NEO+G DISC: MICTROPHONE SETTING: ECHO (+/-): KEY +/- : SONG SEARCH Insert a Karaoke Disc(NEO+G/MP3+G) into the Tray of the player. Select a desired song with “SONG NUMBER INPUT” or with “SONG LIST WINDOW” Press PLAY/PAUSE or ENTER button to start play. To stop playing Karaoke Music, press STOP button. Connect the microphone to the MICROPHON INPUT JACK on the rear panel. Turn the MIC VOL 1 &2 to adjust the voice volume of the Microphone. Adjust the Echo level of voices with “ECHO +/- ” keys on the remote control. Press ‘KEY +/ -’ to modify the KEY of the music to match your vocal. WITH NEO+G/MP3+G SONG’S NUMBER: Insert the NEO+G/MP3+G Karaoke Disc or USB/SD into the player. Input desired Song’s Number with the NUMERIC(0-9) keys on the remote control. (In case of MP3+G disc, after change to number input mode by pressing “NUMBER INPUT” key on the remote and input desired Song’s Number) Press ENTER or PLAY key to start play To stop playing Music, press STOP key. To delete wrong number input, press CANCEL key. WITH SONG LIST ON THE SCREEN. At the “Select Song” mode, press “SONG LIST” key to display all SONG LIST in the disc on the Screen. ① Input ALPHABET of Song’s Title with NUMERIC(2-9) keys on the remote. ② After select a desired song and press PLAY or ENTER key to start play. ③ To stop playing music, press STOP key. Eg) To search “All By Myself” , write “ALL BY MYSELF” on the SONG LIST as follows; NUMERIC(0~9): CANCEL: EQ(Equalizer): MPX (MULTIPLEX) AUDIO REPEAT: You can input a desired SONG NUMBER on the Select Song mode. You can input ALPHABET of the Song Title on the SONG LIST. You can remove the Wrong Number input. Press “EQ” button repeatedly to select EQ mode from “CLASSIC/ ROCK/ JAZZ/ POP/ USER/ STANDARD”. You can cancel the Vocal sound in Left or Right Channel of Music. You can cancel the Vocal sound in Dual Audio of VOB or AVI files. Press REPEAT to change the repeat mode of programmed songs by ALL, ONE and OFF. ONE: Repeat the current played song until press stop button. ALL: Repeat all songs continuously until press stop button. OFF: Repeat Off 11 NEO+G Karaoke Operation RECORDING OF SINGING: (NEO+G, MP3+G) You can record your singing sound & graphics with Neo+G & MP3+G songs into USB/SD at MP3+G format. ① Please connect a USB/SD Card and Microphone into the Player in advance and play a NEO+G or MP3+G song from Disc or USB/SD. ② After select a desired song on the all NEO+G/MP3+G SONG LIST, press “RECORD” key to start recording into USB/SD. ③ Your Singing Sound, Music and Graphic of NEO+G/MP3+G Music will be saved at “RECORD” folder in USB/SD at MP3+G format. ④ To stop recording, press “STOP” key. ⑤ After recording finished, enter the “RECORD” folder in USB/SD and can re-play the recorded MP3+G files from “RECORD” folder. NEO+G/ MP3+G Disc Ripping You can rip the NEO+G/ MP3+G Disc with High speed (8X) into USB/SD at MP3+G format including Music and Graphics. ① After connect a USB/SD Card with the Player in advance and insert a NEO+G Disc to the Player. ② Press “SONG LIST” key to display the all NEO+G SONG LIST. ③ After select desired song on the NEO+G/ MP3+G SONG LIST, press “RIPPING” key ④ When “Do you want to copy it to USB or SD?” displayed, select “ONE or ENTIRE” to start Ripping or select “CANCEL” to cancel Ripping. ONE: You can rip only one song only. ENTIRE: You can rip from a selected file to the end file entirely. ⑤ The Ripped song will be saved at “DISC TO MP3G” folder in USB/SD at MP3+G format. ⑥ ⑦ If want to rip more NEO+G songs, please repeat from step ② to ④. After Ripping finished, press “USB/DISC” key to enter the USB/SD mode and you can replay the ripped files at “DISC TO MP3G” folder in USB/SD. 12 NEO+G Karaoke Operation CD+G Disc Ripping SONG LIST CREATING (NEO+G/MP3+G/ AVI) You can rip the CD+G Disc with High speed (4X) into USB/SD at MP3+G format including Music and Graphics. ① After connect a USB/SD Card into the Player in advance, insert a CD+G Disc to the player. ② Press “RIPPING” key at stop or playback mode. ③ Set the ripping OPTION such as “SPEED(1X-4X)/ BITRATE/ ID3 TAG/ PLAYLIST”. ④ Then select desired TRACK of the CD+G Disc. ⑤ Then, select START and press ENTER to begin Ripping. ⑥ During the Ripping, you can change the Ripping Speed between 1X and 4X. ⑦ When the Ripping done, select QUIT and press ENTER to Exit ripping mode. ⑧ The Ripped song will be saved at “DISC TO MP3G” folder in USB/SD at MP3+G format with following file name order automatically.. E.g) TRKAAA01 *AAA: It means the Disc ID and it will be changed TRKAAA02 according to each CD+G disc. ….. *Number(01, 02...etc): It means the Track No. of TRKAAA10 etc. each CD+G Disc. ⑨ After Ripping finished, press “USB/DISC” key to enter the USB/SD mode and you can replay the ripped files from “DISC TO MP3G” folder in USB/SD. ⑩ If want to rip more CD+G Disc, please repeat from step ① to ⑦. You can create the SONG LIST of NEO+G/ MP3+G/ AVI files in DISC/USB/SD into USB/SD at TEXT(SONG LIST.txt) format and you can make the SONG BOOK with this file. [In case of NEO+G/ MP3+G files] Please open “SONG LIST” by pressing “SONG LIST” key at the stop mode of NEO+G/ MP3+G Disc/USB/SD. Then, press “MENU” key to create “SONG LIST.txt” file at USB/SD. [In case of AVI files] Press “MENU” key directly on the AVI file list to create “SONG LIST.txt” file at USB/SD. PROGRAM (NEO+G/MP3+G/ AVI) Press “PROGRAM” key in stop mode and input the desired NEO+G File Number one by one and press “PLAY” to start playing in programmed order. E.g.) If want to program NEO+G File Number 00001, 00200, 00450 in order, press “PROGRAM + 00001, +00200, +00450 and PLAY”. To terminate the program playback, press “PROGRAM” key in STOP mode and click “CLEAR” Icon on the TV Screen. Or OPEN and CLOSE the disc tray. 13 System Setup System Setup TV System SCREEN SAVER: HDTV Output: VIDEO: TV Type: PASSWORD: RATING: DEFAULT: RESUME: The TV setup is for switching to different TV system (NTSC, PAL60, PAL and AUTO). *If you don’t know which TV system you have, just select AUTO. Turn the screen saver ON and OFF. If the disc is HD, select the corresponding HD resolution (HD OFF/ 720P / 1080i / 1080P). If your TV is not a HDTV but with video type set on 720P or 1080P, the image will not be displayed well. In this case, TURN OFF and ON the player to reset the setup back to the regular TV image (HD OFF) or Press V-MODE key repeatedly to the regular TV image. Select a Video Output according to your equipment setup. For a normal TV, select 4:3PS (Pan and Scan) or 4:3(Letter Box). For a wide-screen TV, select 16:9. Input 4 numbers to setup your own password. When you set up a password, the player may ask you to enter password if you want to change some system settings. Please save your password safely because once your password has been set, We will not able to retrieve it. *Default password: 0000 When changing the setting, you need to enter your password. Rating level is base on the information of the discs. 1 KID SAFE: It will play all discs. 2 G: General Audience; recommended as acceptable for viewers of all ages. 3 PG: Parental Guidance suggested. 4 PG13: Material is unsuitable for children under age 13. 5-6 PG-R: Parental Guidance - Restricted; recommended that parents restrict children under 17 from viewing or allow to view only when supervised by a parent or adult guardian. 7 NC-17: No children under age 17; not recommended viewing for children under age 17. 8 ADULT: Mature material; should be viewed only by adults due to graphic sexual material, violence or language. Change back to factory setting. Turn the resume ON and OFF Language Setup OSD LANGUAGE: AUDIO LANG: SUBTITLE LANG: MENU LANG: You can select a language of the screen. Factory Default OSD is ENGLISH. You can select a language of the audio. You can select a language of the subtitle. You can select a language of the menu. Audio Setup AUDIO OUT: SCORE: KEY: ECHO: MIC VOL: Select an Audio Output according to your audio connection. To cancel COAXIAL or OPTICAL connection, use SPDIF/OFF. SPDIF/OFF: Analog audio output through the jacks on back panel (FL, FR, RL, RR, Center, Sub-Woofer). SPDIF/RAW: Through the Coaxial/Optical jack to output Dolby 5.1CH digital or DTS digital audio. SPDIF/PCM: Through the Coaxial/Optical jack to output PCM digital audio. In order to get the Score Output after singing with Microphone, please set to “AUTO” If no need to get the Score, please set to “OFF”. Change the key of music, same function as the key controls on the remote control. (-6, -4, -2, 0, 2, 4, 6) Change the Echo Level of Microphone Sound Output(OFF/2/4/6/8). Change the Microphone Sound Volume(OFF/2/4/6/8). 14 System Setup Video Setup BRIGHTNESS: CONTRAST: HUE: SATURATION: Set the brightness of the video from range 0-12. Set the contrast of the video from range 0-12 Set the hue of the video. +color to increase red color, -color to increase green color. Set the degree of the saturation of the video. Speaker Setup DOWNMIX: SUB WOOFER: CENTER DELAY: REAR DELAY: FONT: Switch the audio output from LT/RT Mono, STEREO, VSS and 5.1CH mode. In LT/RT Mono Mode, two sound tracks will be mixed and the difference between these two tracks will be enhanced. In VSS mode, two sound tracks will be mixed and the difference between these two tracks will be decrease. You can turn ON the sub woofer in 5.1CH mode. You can adjust the center speaker delay upto 0-5MS according to the position of your center speaker. You can adjust the rear speaker delay upto 0-15MS according to the position of your rear speaker. Change the font to LARGE or SMALL. Digital Setup OP MODE: To set the Dolby digital output, you can switch between Line Out(encode signal) and RF REMOD(raw signal) DYNAMIC RANGE: DUAL MONO: To set the scale of dynamic range in Dolby digital logic sound effect. In Dolby sound effect, to set the Dual Mono modes from STEREO, MONO L, MONO R and MIX MONO. STEREO: The proper channels output through both right and left speakers. MONO L: the left side channel output through both right and left speakers MONO R: the right side channel output through both right and left speakers. MIX-MONO: the mixed two channel output through both right and left speakers. 15 Trouble Shooting Symptom No power Play fails to start even when PLAY is pressed. Play starts but then stops immediately No Picture C O M M O N No sound Distorted sound Picture is distorted during fast forward or fast reverse. Picture freezes momentarily during playback No fast forward or reverse play. No 4:3(16:9) picture No operations can be performed with the remote control. No key operation (by the unit and/or the remote control) is effective. On-Screen Menu Icons not displayed or only partially displayed on the TV Screen. The main unit is not working. The DVD player is not working normally. Play does not start even when title is selected. Audio soundtrack and/or subtitle language is not the one selected at the initial settings. No subtitles D V D Alternative audio soundtrack (or subtitle) languages fail to be selected. Angle cannot be changed. No menu play Unable to play MPEG4 movies Microphone does not work. O T H E R S When using the microphone, the speaker makes a noise. Scoring has no function Unable to recognize USB/SD CARD device Remedy Insert the AC power plug securely into the power outlet and press “Power” button on the front panel. Condensation has formed: wait about 1 to 2 hours to allow the player to dry out. This player cannot play discs other than DVDs, VCD and CDs The disc may be dirty and may require cleaning. Ensure that the disc is installed with the label side up. Ensure that the equipment is connected properly. Ensure that the input setting for the TV is “Video” Ensure that the equipment is connected properly. Ensure that the input setting for the TV and stereo system are correct. The picture will be somewhat distorted at times: this is normal. Check the disc for fingerprints/scratches and clean with a soft cloth wiping from centre to edge. Some discs may have section which prohibit fast forward or fast reverse. Choose the correct setup “TV” item which matches the TV set used. Check the batteries are installed with the correct polarities (+and-). The batteries are depleted: replace them with new ones. Point the remote control unit at the remote control sensor and operate. Operate the remote control unit at a distance of not more than 7 meters(23feet) from the remote control sensor. Remove the obstacles between the remote control unit and remote control sensor. Set the POWER button to OFF and then back to ON. Alternatively, turn off the power, disconnect the power plug and then re-connect it. Select the appropriate TV Screen type by consulting the operating manual for the TV. While “NO DISC” message appears on the display of main unit, enter the SETUP mode and select DEFAULT and all settings will return to the default values. Press POWER button. Confirm the ‘RATING” setting. If the audio soundtrack and/or subtitle language does not exist on the disc, the language selected at the initial settings will not be seen/heard. Subtitles appear only with discs which contain them. Subtitles are cleared from the TV monitor. Perform the steps to display the subtitles. An alternative language is not selected with discs which do not contain more than one language. In the case of some discs, the alternative language cannot be selected by operating the AUDIO or SUBTITLE button. Try selecting it from the DVD menu if one is available. This function is dependent on software availability. Even if a disc has a number of angles recorded, these angles may be recorded for specific scenes only This function works only for VCD with playback control (PBC). Check that the MPEG4 file is encoded in Home Theater mode with DivX 5.x encoder. Check if the microphone is switched ON. Check if the Microphone volume of the Player and or Amplifier is fixed at the minimum level and adjust it. Check if the microphone is detective. If so, exchange it. Keep the microphone far from the speaker. Do not place it toward the speaker either. Connect the MIC to the Player correctly and check the Score Setting at Setup. Please sing each song with enough voice output level for over 1 minute. Pull out USB/SD Card and re-connect to the player. Check if the USB/SD Card were formatted at FAT32 format. Check if the USB cable was plugged in correctly. Check the USB HDD whether have the auxiliary Power input. If not, you must connect the auxiliary power cord to them for proper operation. 16 Specification Supported Format System Video Output Audio Output Input Others Supported Media: DVD, VCD, SVCD, MPEG4, DivX, Xvid, HDCD, Audio CD, DVD+R/RW, CD+R/RW, MP3, WMA, OGG and JPEG. Video Format: NEO+G, MP3+G, CD+G, MPEG1(*.dat, *.mpg), MPEG2(*.vob), MPEG4(*.avi), DivX(*.avi), XviD(*.avi), JPG Audio Format: PCM, Dolby Digital AC3, DTS, MP3, WMA and OGG Subtitle Format: .smi, .srt, .sub TV System: PAL/NTSC/Multi System Frequency response: DVD(PCM 96kHz): 4Hz-44kHz DVD(PCM 48kHz): 4Hz-22kHz CD/VCD(44.1kHz): 4Hz-20kHz Built-in 7 inch LCD Screen Compotiste, S-Video, Component(Y, Pb, Pr) Output Progressive Scan up to 720P, 1080i, 1080P Support PAL & NTSC Disc Amplifier Audio Output Power(L+R): 25W + 25W DVD Analog 2CH Output: AUDIO L, AUDIO R DVD Digital 5.1CH output: Optical, Coaxial Microphone Input: 2EA USB Host: 1EA, 2.0 Full Speed, compatible with external HDD (FAT32 Format only). Card reader: 1EA, support SD, SDHC, MMC, MS up to 32GB 2 Speaker Provided Power source : AC 100-240V~ 50/60Hz(Free Volt) Power consumption : < 30W Operating temperature : +5° ~+38°(41°F to 95°F) Operating Humidity: 10% ~ 75% 17