1
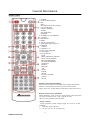
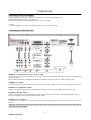
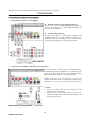
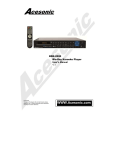
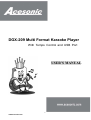
DGX-209 Multi Format Karaoke Player
With Tempo Control and USB Port
USER’S MANUAL
1
www.acesonic.com
Table of Contents
Safety Precautions…………………………………………………………………………………………….3
Caution
Warning
Precautions
Notes on Discs
Before Use……………………………………………………………………………………………………..4
Playable Media
Regional code
Copy Protection
MP3+G Introduction
General Information
Front Panel Functions………………………………………………………...………………………………..5
Rear Panel Functions…………………………………………………………….……………………………..5
Remote Control………………………………………………………………………….……………………..6
Connections
Connecting the Power Supply…………………………………………………………..….......………………7
Connecting the Video-Out to a TV……...……………………………….………………….…...……………7
Connecting the Audio-Out to a Amplifier……………………………………….………………………….…8
Connecting with Microphones……………………………………….……………….………………………9
Connecting with USB devices……………………………………….……………………………………… 9
Basic Operation…………………………..……………………………………………………………….…10
Special Karaoke Operation…………………………..……………………………………………………..13
Special VCD, SVCD and MPEG4 Operation……………………………..…………….…………………15
Special MP3, WMA and JPEG Operation…………………………………………………………………16
Special USB Operation
Special USB Operation……………………………………………………...……..…………………………17
MP3 Ripping (Audio CD to USB)….....……………………..……………………………………….………18
DATA Transferring (Disc to USB) ……..……..……………..……………………………………….………18
System Setup
General Setup…………………………..………………………………..……………………………………19
Speaker Setup…………………………..………………………………..……………………………………19
Audio Setup…………………………..………..………………………..………………….…………………20
Video Setup…………………………..…..……………………………..……….……………………………20
Preference Setup…………………………..………………………………..…………………………………21
Troubles Shooting…………….…………..………………………………..………………………………22
Specifications………………………..………………………………..……………………….……………24
Safety Precautions
2
www.acesonic.com
Caution:
▪ This appliance is a class laser product. However this player uses a visible laser beam, which could cause hazardous
radiation exposure if directed. Be sure to operate the player correctly as instructed.
▪ When this player is plugged to the wall outlet, do not place your eyes close to the opening of the disc tray and other
openings to look into the inside of this player.
▪ Use of controls or adjustments or performance of procedures other than those specified herein may result in hazardous
radiation exposure.
▪ To prevent risk of electric shock, do not remove cover.
▪ No user serviceable parts inside.
▪ Dripping or splashing liquid can damage the unit, and no objects filled with liquids, such as vases etc, shall be placed
on the apparatus.
Warning:
▪ To prevent fire or shock hazard, do not expose this appliance to rain or moisture.
▪ To reduce the risk of fire or electric shock, and annoying interference, use the recommended accessories only.
▪ This device is not intended for continuous operation.
Precautions
Cleaning the Unit
Use a soft, dry cloth. If the surfaces are extremely dirty, use a soft cloth lightly moistened with a mild detergent
solution. Do not use strong solvents such as alcohol, benzene, or thinner, as these might damage the surface or the
unit.
Power supply voltage
Check that the operating voltage (AC 90V ~ 240V 50/60Hz) indicated on the type plate is identical to the voltage of
your local power supply. If not, please consult your dealer.
Power consumption
When the system is switched to Standby mode, it is still consuming power. To disconnect the system from the power
supply completely, remove the AC power plug from the wall jack.
Avoid high temperatures, moisture, water and dust
Do not expose the player, batteries or discs to humidity, rain, sand or excessive heat (caused by heating equipment or
direct sunlight).
Avoid condensation
The lens may cloud over when the player is suddenly moved from cold to warm surroundings, making it impossible
to play a disc. Leave the player in a warm environment until the moisture evaporates.
Do not block the vents
Do not operate the DVD Player in an enclosed cabinet, allow about 10 cm (4 inches) of free space all around the
player for adequate ventilation.
Do not stack anything on top of the Player
Do not stack anything on top of the player. Tt will make the top cover touch the disc or DVD loader.
Notes on Discs
Care of Discs
Hold the disc by the edges so that fingerprints will not get on the surface.
Do not touch the playing surface (unprinted side).
Do not stick paper or tape on the disc.
Storing Discs
Keep the disc in its case after playing.
Do not use cracked, heavily scratched, or warped disc.
Keep the disc away from heat of direct sunlight
Cleaning Discs
Fingerprints and dust on the disc can cause poor picture quality and sound distortion. Before
playing, clean the disc with a clean cloth. Wipe the disc from the center out.
Do not use any abrasive materials or solvents such as benzene and alcohol, thinner,
commercially available cleaners, or anti-static spray intended for older vinyl records..
3
www.acesonic.com
Before Use
Playable Media
DVD: DVD disc (8cm/12cm disc)
Video CD: VCD disc (8cm/12cm disc)
Audio CD: Audio CD (8cm/12cm disc)
In addition, this unit can play a DVD+/-R, DVD+/-RW, SVCD and CD-R/CD-RW that contains audio titles, MP3+G,
CD+G, MP3, WMA, JPEG or DivX files
<NOTE>
¾ Depending on the conditions of the recording equipment or the CD-R/RW, DVD+/-R/RW discs cannot be played
on the player.
¾ Do not attach any seal or label to either side of a disc
¾ Do not use irregularly shaped CDs, It may result in malfunction.
Regional code
This player can play only DVD discs labeled same as the rear of the unit or “All”
Copy Protection
Many DVD discs are encoded with copy protection. Because of this, you should only connect your DVD player directly
to your TV not to the VCR. Connecting to the VCR results in a distorted picture from copy-protected DVD discs.
MP3+G Information
The MP3+G consist of two files, the audio track compressed to the MP3 format and a separate CDG file that contains
the graphic (Lyric) data. MP3+G is derived from the CD+G disc format. MP3+G is created by extracting the CD-Audio
packets from the CD+G disc with a CD-ROM that is capable of also extracting the RW channels from the disc. The
digital audio portion is compressed to MP3 and the RW Channels (CD+G graphics) are stored to a CDG file.
This is a great way to back up your karaoke discs to your USB, Hard drive or CD's. The player reads each file and
synchronizes the information to display the interpreted graphics along with the music.
The two files of an MP3+G (one with a *.cdg extension and one with a *.mp3 extension) must have exactly the same
name with the exception of their file extension.
Burning MP3+G Files To Disc
There are several software applications. “Nero burning rom” one of applications makes creating karaoke MP3+G discs
from MP3+G files a snap. Simply select the MP3+G songs that you want and this program will encode them and then
burn them to a blank CDR or DVD-R disc with the click of a button. No other software is required. It will also work
with most modern CD and DVD writers.
Ripping Tracks From CDG Discs
There are several software applications that will rip tracks from a CDG and convert them to MP3+G files. A popular
one is Audio Grabber, Keep in mind that in order to rip tracks from a CDG you must have a CD-ROM or CD writer that
can read sub channel data.
Not all CD writers support the CDG format. Though virtually any writer will read and write the audio portion of a CDG,
you must have the proper drive to read and write the graphic data.
Supported MP3+G Format (Specially MP3 file):
The specification of MP3 in MP3+G file must keep the following specifications otherwise the MP3G file will not play
properly.
Format
MP3
Bit Rate
80~348kbps
Sampling Frequency
44.1khz
4
www.acesonic.com
General Information
Front Panel Functions
1.
2.
3.
4.
5.
6.
7.
8.
9.
10.
11.
12.
13.
14.
POWER ON/OFF: Turns the power ON and OFF, when the power is ON, indicator lights and display on.
USB PORT: to connect USB devices such as USB memory, MP3 Player or external HDD.
OPEN/CLOSE: to open or close the CD Tray.
PLAY/PAUSE: to start playing or to pause the disc.
STOP: stops/ends playback.
PREV/NEXT: skip to Previous/Next track
MIC INPUT JACK: to connect the Microphone.
MIC VOLUME: to adjust the MIC volume
ECHO: to adjust the Echo level
MUSIC VOLUME: to adjust the Music output level
NUMBER(0~9): to select the file or track number
TEMPO(-/+): to adjust the TEMPO of music.
KEY(b/#): to change the Key of voice
Multiplex(=L/R/ST): to select Vocal ON/OFF
Rear Panel Functions
1.
KARAOKE 2CH OUT: Karaoke ON or Scoring ON modes use analog 2CH (FR/FL) out.
2.
5.1CH ANALOG AUDIO OUT: Karaoke OFF and Prologic ON modes use analog 5.1CH.
3.
COMPONENT(Y, Pb, Pr) VIDEO OUT: Connect to the Y, Cb, Cr Video Input of your TV using YUV cable
for best picture.
COMPOSITE VIDEO OUT: Connect to the Video Input of your TV using RCA cable.
EXT(External Scoring Input): Connect the RCA Cable from Mic output port of Amplifier in order to get
Scoring input signal.
COAXIAL DIGITAL AUDIO OUT: Connect to Coaxial Digital Input of the amplifier for better quality
surround sound using Coaxial Cable.
S-VIDEO OUTPUT: Connect to the S-Video Input of your TV using S-Video cable for better picture.
OPTICAL DIGITAL AUDIO OUT: Connect to Optical Digital Input of the amplifier for best quality
surround sound using Optical Cable.
SCART OUT: connection mainly used for TV’s in Europe. TV display (4:3) built-in video, RGB out and
4.
5.
6.
7.
8.
9.
5
www.acesonic.com
audio.
10. VGA OUT: Connects to the VGA port of TV or monitor
11. AC POWER CORD: Connection to auto-detect AC power supply (AC100V~240V, 50/60Hz)
6
www.acesonic.com
General Information
Remote Control
1. POWER
2. OPEN/CLOSE (EJECT)
3. PBC
INFO
M/F (Male/Female Key Change)
CUE (Single Play)
L/R/ST (=Multiplex)
AUDIO
N/P (NTSC/PAL)
USB/DISC
4. NUMERIC (0~9 & Alphabet)
5. CANCEL
6. PROGRAM
7. MENU
8. TITLE (=Song Search)
9. PgUp/PgDn (Page Up/Down)
10. ARROW
ENTER
11. TEMPO (+/-)*
12. KEY (#/b) CONTROL
13. VOLUME (+/-)
14. PLAY/PAUSE
STOP
PREV (PREVIOUS TRACK)
NEXT (NEXT TRACK)
FR (FAST REVERSE)
FF (FAST FORWARD)
SUBTITLE
REPEAT
RETURN
A-B
GOTO
ZOOM
SETUP
EQ (EAUALIZER)
ANGLE
MUTE
Remote Control Operation Range
Point the remote control at the remote sensor and press the buttons
Distance: about 23ft(7m) from the front of the remote sensor
Angle: About 30° in each direction of the front of the remote sensor
Remote control battery installation
Detach the battery cover on the rear of the remote control and insert
two AAA size batteries with + and – aligned correctly.
*Do not expose batteries to heat or flame
*Tempo Control:
Tempo (playback speed) changes might not work on several
situations:
1. VOB file from USB Port
2. sub title will be off on DVD disc
7
www.acesonic.com
3.
some special CDG/VCD/DVD format
8
www.acesonic.com
Connections
Connecting to the Power Supply
Plug the main lead (marked AC Cord on the rear of the player) into an appropriate socket
Press the Power button to switch your Player on.
The present product can be used under the AC 100~240V~. 50/60Hz
<NOTE>
¾ Before plugging your player into a main socket, you must check the voltage.
Connecting the Video Out to TV
METHOD 1, COMPONENT (Progressive Scan) Video
Connect a component video cable from the Pr, Pb and Y jacks on the back panel of the player to the corresponding jacks
on your television.
This outputs monochrome(Y), Blue(Pb) and Red(Pr) separately and produces the best quality image of 720P.
METHOD 2, S-VIDEO
Connect the S-Video out jack on the back panel of the player to the S-VIDEO in jack on the TV using the S-Video cable
METHOD 3, COMPOSITE VIDEO
Connect the supplied video cable from the VIDEO OUT jack on the player to the VIDEO IN jack on your TV.
METHOD 4, SCART VIDEO
Connect a SCART cable from the SCART OUT jack on the back panel of the player to the SCART IN jack on your TV.
It has the Composite Video output and Analog Audio output.
METHOD 5, VGA VIDEO
Connect a VGA cable from the VGA OUT jack on the back panel of the player to the VGA IN jack on your TV or
Monitor.
※[NOTE] You must turn On the power of VGA monitor before connecting the VGA cable to the player. Otherwise, the
player may not work normally.
9
www.acesonic.com
*SCART, S-Video, VGA and Component Video connection cables are not included.
Connections
Connecting the Audio Out to Amplifier
¾
Connection to a 2CH or 5. 1CH amplifier
z Karaoke Audio Out (2CH Analog Audio Out)
Please connect the Audio (FL and FR) Out terminals on
the rear of the player to the Audio (Red and White) IN
terminals of the Amplifier.
z 5.1CH Analog Audio Out
If using audio cables for 5.1CH Analog Amplifier (not
included) connect the 5.1CH ANALOG AUDIO OUT
terminals on the rear of the player to the 5.1CH ANALOG
AUDIO IN terminals of the 5.1CH Analog Amplifier.
¾
Connection to an amplifier with Dolby Pro Logic support
If using an optical or coaxial cable (not included), connect
the DIGITAL AUDIO OUT(OPTICAL or COAXIAL) jack
on the back panel of the player to the DIGITAL AUDIO
IN(OPTICAL OR COAXIAL ) jack of the Amplifier.
*Dolby Pro Logic: Using five speakers, it recreates the
original sound of the music or audio and provides the sense
of presence, as if you were in a movie theater or concert hall.
< NOTE >
¾ The type of audio output from the connector can be
selected by the Audio setting.
¾ Please turn the volume down when you turn on the
Amplifier. Sudden loud sound may cause damage to the
speakers and your ears.
10
www.acesonic.com
Connections
Connecting with Microphones
When you connect the Microphone to the Player directly
¾ Connect the Microphone plug into the jack on the front of the player
¾ Turn the microphone “On” using the ON/OFF switch on the body of the microphone
¾ Adjust the Microphone Volume and Echo Level to a desired level
<NOTE> To avoid feedback noise, do not place your hands near the top of the microphone and do not point the
microphone directly at the output speaker. If feedback occurs, lower the volume control.
When you connect the Microphone to the Amplifier
¾ Connect the Microphone into the Amplifier
¾ Turn the microphone “On” using the ON/OFF switch on the body of the microphone
¾ Adjust the Microphone Volume and Echo Level to a desired level
¾ In order to get scoring after singing each song, you must connect the RCA cable from MIC out Jack of Amplifier to
“EXT” jack of the player.
Connecting with USB devices
You can enjoy the Karaoke and media files such as MP3+G, Movies, Music and Photos saved in USB memory, MP3
Player, IPOD, External HDD in high audio quality of 5.1CH home theater sound by connecting the storage device to the
USB port of the player.
¾
¾
¾
Connect the USB device to the USB port on the front of the player.
If a disc does is not in the DVD tray, the player will read the USB directly. However if a disc is in the DVD tray,
press “USB/DISC” button on the remote control at stop mode to select USB mode.
Use the arrow buttons to select the file and press “ENTER or PLAY”
SUPPORTED FILE FORMAT: MP3+G, MPEG1(*.MPG, *.DAT), MPEG4(*.AVI, *.MP4), MP3, JPEG(*.JPG)
SUPPORTED SYSTEM: FAT16/32 files system only ※NTFS file system is not supported.
SUPPORTED DEVICES:
The player has the USB Host (V.1.1) port so you can connect following devices with the player.
¾
¾
¾
¾
¾
USB devices that support USB Mass Storage v 1.0.
MP3 Player: IPOD and flash type MP3 Player.
USB card Reader: One slot USB card reader and Multi slot card reader
Digital camera: Cameras that support USB Mass Storage v.1.0.
USB HDD and USB flash drive: Devices that support USB2.0 or USB 1.1.
※For the USB HDD, make sure to connect an auxiliary power cord to the USB HDD for proper operation and you
must turn on the power of USB HDD before connecting to the player and must pull out the USB HDD from the
player before turning the power of the player off.
< NOTE >
¾ Some High Resolution Video files cannot be played properly from USB because of the USB Host(v.1.1) speed of
the player.
¾ Some MP3 players may not operate depending on the sector size of their file system.
¾ Digital Cameras that use PTP protocol or require additional program installation when connected to a PC are not
supported.
¾ The player may not fully support parts of memory card or a multi card reader.
¾ Do not insert or pull out the memory card from the card reader when using the card reader.
¾ If you use a USB extension cable, the USB device might not be recognized.
11
www.acesonic.com
Basic Operation
Basic Operation
OPEN/CLOSE: Loading a Disc
Press Eject to open the disc tray and place a disc in the disc tray
Press Eject to close the disc tray to play the disc automatically
¾ For DVD Discs
Use the arrow keys to select the track desired
Press Enter to play selected track
¾ For VCD Discs
Press the numeric buttons to select a desired track to play that track
¾ MP3+G/MPEG4/MP3/JPEG Discs
From File Player, use the numeric keys 0~9 to input the number of the desired file number or use the arrow key to
navigate through folders and/or files.
Press Enter to play the selected track
¾ CD+G/Audio CD
From File Player, use the numeric keys 0~9 to input the number of the desired file number or use the arrow key to
navigate through folders and/or files.
Press Enter to play the selected track
PLAY/PAUSE:
Press PLAY to play the file/track desired
Press PAUSE to pause the playback. To return to normal playback, press PLAY/PAUSE.
STOP:
Press STOP key to end playback.
On DVD/VCD, you can resume playback by pressing the PLAY key.
Press the STOP key twice to stop playback completely.
PREV/NEXT: Move to another Chapter/ Track
Press either NEXT or PREV button.
Each time you press the button, you can skip songs forward or reverse.
FR/FF: Fast Search(MPEG4/ DVD/ VCD/ CD/ MP3 only)
At each time you press the button, you can modify the speed as follows;
¾ FR(Fast Reverse) : 2X, 4X, 8X, 16X, 32X, Normal Play.
¾ FF(Fast Forward): 2X, 4X, 8X, 16X, 32X, Normal Play.
(MP3:Max 8X, VCD:Max16X, MP4:Max 16X, DVD:Max32X)
ARROW(▲▼◀▶): Press to navigate the File/Folder
ENTER: Press ENTER to confirm the desired menu.
PAGE UP/DOWN: Press “PgUp or PgDn” to search a desired song quickly on the file navigation screen of Disc or
USB.
VOLUME(+/-)
Press ‘+’ to raise the sound volume. Press ‘-‘ to lower the sound volume.
NUMERIC(0~9):
Press Numeric button to select a File/Track number to play.
E.g) File Number is 1234, Press 1-2-3-4 in order and press PLAY or ENTER to start playback.
12
www.acesonic.com
Basic Operation
PROGRAM(MP3/VCD/MPEG4):
¾ Press “PROG.” button in stop mode and input the desired Chapter/Track/File Number and press ENTER button. In
For VCDs, it works at PBC off mode, for MP3+G and MP3, it works in one folder only.
E.g.) If you want to program Chapter/Track/File No. 5. 3, 6 in order, press “5+ENTER, 3+ENTER, 6 and ENTER”
button.
Screen Display: Program 03:0006
03: Total Programmed Quantity
0006: Track/Chapter/File Number input.
¾ Press STOP when program done
¾ Press PLAY button to start playing in programmed order.
¾ To terminate the program playback, press “PROG.” Button in STOP mode or press OPEN and CLOSE the disc tray.
CANCEL:
Press Cancel button to clear the wrong number input.
TITLE (DVD/MPEG4):
Press TITLE. If the current title has a menu, the menu will appear on the screen, otherwise, the disc menu may appear.
The menu can list camera angles, spoken language and subtitle options and chapters for the title.
To remove the title menu, press TITLE again.
USB/DISC: Playback Mode Change
Press USB/DISC button in STOP mode to switch between USB mode and Disc mode.
CUE: Single play ON/OFF (VCD/ CD+G only )
CUE ON: Player will be automatically stop after one song finishes. To continue playing, press the PLAY button.
CUE OFF: All tracks on the disc will be played sequently without stopping. *Does not work for DVD.
RETURN: Press RETURN to return to the previous level in SETUP screen or Navigation Screen.
INFO : Press INFO repeatedly to show the playback time on the TV screen such as Single Elapsed, Single Remain,
Total Elapsed, Total Remain, OFF.
¾ DVD/MPEG4:
Title/Chapter Remain: displays the remaining time of the current title/ chapter.
Title/Chapter Elapsed: displays the elapsed time of the current title/chapter.
¾ VCD:
Title/Single Remain: displays the remaining time of the current title/single track.
Title/Single Elapsed: displays the elapsed time of the current title/single track.
GOTO: Time Search ( DVD/ MPEG4/ VCD)
The Time Search function allows you to start playback at any chosen time on the disc.
¾ Press GOTO repeatedly until time search edit box appears.
¾ Press ARROW buttons to highlight time search box.
¾ The on-screen display shows the total playing time of the title/chapter.
¾ Enter hours, minutes and seconds from left to right in the time edit box using remote control numeric button.
(E.g.: 0:34:27)
ZOOM (MPEG4/ DVD/ VCD/ JPEG)
Zooming allows you to enlarge the video image during the playback or pause.
¾ MP4: You can aggrandize the image(2XÆNormal)
¾ DVD/VCD: You can aggrandize the image by pressing the button. (“1.5X Æ 2X Æ 3X Æ Normal”)
¾ JPEG: You can select “Zoom On/Off” and you can aggrandize the image by pressing “FR/FF” button.
( 25% Æ 50% Æ100% Æ150% Æ200%)
In ZOOM ON mode, if press MENU, you can see digest screen(3*3=9).
13
www.acesonic.com
Basic Operation
L/R/ST(=MULTIPLEX): Vocal On/Off/Auto
This is used to select the left and right tracks of MP3+G/CD+G/Karaoke VCD/ MP3/CD discs which have a multiplex
demonstration vocal track.
¾ LEFT VOCAL(Vocal Auto): When Vocals are on the Left and Music is on the Right, when singing with Mic., the
Left Vocal will be canceled automatically. When singing with Mic. Stop, The Left Vocal comes up again
automatically.
¾ RIGHT VOCAL(Vocal Auto): In case of Music on Left and Vocal on Right, when sing with Mic., the Right Vocal
will be canceled automatically. When stop singing with Mic., the Right Vocal comes up again automatically.
¾ MONO LEFT(Vocal Off): Playing of Left Channel Sound only
¾ MONO RIGHT(Vocal Off): Playing of Right Channel Sound only
¾ STEREO(Vocal On): Stereo playback of Demo Vocals and music.
AUDIO (DVD)
Press AUDIO repeatedly to select different audio channel or languages. (Audio1, 2, 1+Vocal, 2+Vocal…etc.)
SUBTITLE (DVD/ MPEG4)
Press SUBTITLE repeatedly to select different subtitle languages.
If the Disc contains subtitles, you can choose a language by pressing the button.
Depending on to the Disc, you can have different language options for subtitle.
REPEAT (DVD/ VCD/ CD/ MP3)
You can play a chapter, track, title or entire disc repeatedly.
Press REPEAT continuously to choose a Repeat mode during playback.
¾ DVD: ‘CHAPTER REPEAT ON /TITLE REPEAT ON / REPEAT OFF’ appears on the TV.
¾ VCD, CD: You can activate repeat only after you set PBC OFF by pressing the PBC button.
‘REP-ONE / REP-ALL / OFF’ appears on the TV.
¾ MP3/MPEG4: ‘FOLDER/ REP-ONE/ FOLDER REP/ DISC/ DISC-REP/ DISC SCAN/ SINGLE’ appears on the
TV.
MENU (DVD/MPEG4):
Press MENU and the menu of the disc will appear on the screen.
Press ARROW buttons or NUMERIC buttons (0~9) to select a play option and press ENTER button to confirm.
A-B (DVD/ MPEG4/ VCD/ CD)
During playback, press A-B button at the point (A) where the repetition will start. Press A-B button again at point (B)
where the repetition will end. Then the player will play the programs between A and B. Press A-B button the third time
to finish the repetition.
MUTE : Press MUTE repeatedly to disable and enable the sound output.
EQ (Equalizer):
You can enjoy diverse genres of music with the Equalizer.
¾ Start Equalizer function by pressing EQ button.
¾ Select a desired genre by pressing PLAY button. Equalizer sign will appear.
¾ You can cancel the equalizer function by pressing EQ button consecutively.
¾ Genre modes contain STANDARD/ CLASSIC/ JAZZ/ ROCK/ POP/ BALLAD/ DANCE/ PERSONAL/ OFF.
¾ If you selected PERSONAL mode, you can adjust the elements by pressing arrow buttons.
<NOTE> To use this function, the Karaoke Setup should be set at “KARAOKE ON” or “KARAOKE Scoring On”.
ANGLE (DVD):
Press ANGLE to enjoy multi angle viewing when your DVD disc is recorded with multi angle. The current angle
appears on the Screen.
N/P: TV Type Selection (NTSC/PAL/Multi)
Press the N/P button to switch the video output signal of the DVD player (NTSC/PAL/Multi)
SETUP: Press SETUP button to enter the setup mode, press again to close and exit the setup mode.
14
www.acesonic.com
Special Karaoke Operation
Special KARAOKE Operation (MP3+G/ CD+G/ Karaoke VCD/ Karaoke DVD)
SETUP: Press SETUP and set the Karaoke Mode
¾ KARAOKE OFF: You cannot use Karaoke functions such as Scoring, Tempo, Key, Echo control and Mic.
output…etc.
¾ KARAOKE ON: You can use Karaoke functions such as Tempo, Key, Echo control and Mic. Output except
scoring function.
¾ KARAOKE SCORING ON: You can get the Score after singing each song of MP3+G, CD+G, Karaoke VCD
and Karaoke DVD.
MIC VOLUME: You can adjust the MIC VOLUME level of MIC sound with “MIC VOL” KNOB.
ECHO (+/-) VOLUME: You can adjust the echo level of voices with “ECHO VOL” KNOB on the front panel.
MUSIC VOLUME(VOLUME): You can adjust the MUSIC VOLUME level of audio output with “MUSIC VOL”
KNOB on the front panel or “VOLUME(+/-) buttons on the remote control.
TEMPO(+/-) CONTROL:
Press ‘TEMPO+” repeatedly to play faster and press ‘TEMPO-’ repeatedly during singing to play slower.
¾ In Disc mode: This tempo function works with CD+G, MP3+G, VCD, DVD, CDDA and MP3 Discs.
¾ In USB mode: This tempo function works with MP3+G and MP3 files only and does not works with MPEG1
(*.mpg) and MPEG4 (*.avi, *.mp4) files from USB devices.
KEY (#/b) CONTROL:
Press ‘KEY b/ #’ to modify the KEY of the music to match your vocal.
M/F(Male/Female) CONTROL:
Press ‘Male/Female’ button one time to move to the Male KEY at one time.
Press ‘Male/Female’ button twice to move to the Female KEY at one time.
CUE: Single Play (VCD/ CD+G only )
CUE ON: Player will be automatically stop after one song finishes. Press PLAY button to continue playing, press.
SINGLE OFF: All tracks on the disc will be played normally without stopping. *Does not work for DVD.
NUMERIC(0~9):
0~9: Use for fast selection of track or file. Just press track/file number you want to play.
Ex) File Number is 1234, Press 1-2-3-4 by order and press PLAY or ENTER to start playback.
L/R/ST(=MULTIPLEX): Vocal On/Off/Auto
This is used to select the left and right tracks of MP3+G/CD+G/Karaoke VCD/ MP3/CD disc which have a multiplex
demonstration vocal track.
¾ LEFT VOCAL(Vocal Auto): When Vocals on the Left and Music is on the Right, when singing with Mic., the
Left Vocal will be canceled automatically. When stop singing with Mic., The Left Vocal comes up again
automatically.
¾ RIGHT VOCAL(Vocal Auto): In case of Music on Left and Vocal on Right, when sing with Mic., the Right Vocal
will be canceled automatically. When stop singing with Mic., the Right Vocal comes up again automatically.
¾ MONO LEFT(Vocal Off): Playing of Left Channel Sound only
¾ MONO RIGHT(Vocal Off): Playing of Right Channel Sound only
¾ STEREO(Vocal On): Stereo playback of Demo Vocals and music.
AUDIO: Vocal On/Off (Karaoke DVD)
Press AUDIO to hear the Lead Demonstration Vocal through the right channel of the audio output. Press again to turn
off the Lead Demonstration Vocal.
NEXT/ PREV:
Press NEXT button to skip to the next track or song. Press PREV button to skip back to the previous track or song.
15
www.acesonic.com
Special Karaoke Operation
REPEAT(MP3+G):
You can play a FOLDER/REP-ONE/FOLDER REP/DISC/DISC-REP/DISC SCAN/SINGLE repeatedly.
Press REPEAT repeatedly to choose a Repeat mode during playback.
A-B (Karaoke DVD/ Karaoke VCD)
During playback, press A-B at the point (A) where the repetition will start and press A-B button again at point (B)
where the repetition will end. Then the player will play the programs between A and B.
Press A-B button the third time to finish the repetition.
EQ (Equalizer) Change
You can enjoy diverse genres of music with the Equalizer.
¾ Start Equalizer function by pressing EQ button.
¾ Select a desired genre by pressing PLAY button. Equalizer sign will appear.
¾ You can cancel the equalizer function by pressing EQ button consecutively.
¾ Genre modes contain STANDARD/ CLASSIC/ JAZZ/ ROCK/ POP/ BALLAD/ DANCE/ PERSONAL/ OFF.
¾ If you selected PERSONAL mode, you can adjust the elements by pressing arrow buttons.
<NOTE> To use this function, the Karaoke Setup should be set at “Karaoke ON” or “Karaoke Scoring On”.
PROGRAM:
You can program the title, track and chapter on a disc and play them in the programmed order.
¾ Press “PROG.” button at stop mode and input the desired Chapter/Track/File Number and press ENTER button.
In case of VCD, it works at PBC off mode, In case of MP3+G and MP3, it works in one folder only.
E.g.) If you want to program Chapter/Track/File No. 5. 3, 6 in order, press “5+ENTER, 3+ENTER, 6 and ENTER”.
Program 03:0006, It means that you programmed the file No. 6 and total 3 files are programmed.
03: Total Programmed Quantity
0006: Track/Chapter/File Number input.
¾
¾
¾
Press STOP when program done
Press PLAY button to start playing in programmed order.
To terminate the program playback, press “PROG.” Button in STOP mode or press OPEN and CLOSE the disc tray.
SCORING:
You will get a Score and/or comments on the screen after singing a song in MP3+G/CD+G/VCD/DVD Karaoke disc.
E.g.) Score 100: Excellent!
90~99: Very Good!
80~89: Good! ect.
<NOTE> To use this function, the Karaoke Setup should be set at “Karaoke On” or “Karaoke Scoring On”.
16
www.acesonic.com
Special VCD, SVCD and MPEG4 Operation
Special VCD and SVCD Operation
PBC: Playback Control for VCD 2.0 only
If your CD case is marked as VCD2.0 or PBC, you can select desired information or image in the MENU on the screen.
You may have different initial image according to the contents included in the Disc.
¾
¾
PBC ON: When inserting a disc, a menu (if available) may be displayed before playback. Press the numeric
buttons to select a desired track to play that track.
PBC OFF: Select PBC OFF to skip the Disc menu and play directly from the beginning
Special MPEG4 Operation
REPEAT: Press REPEAT continuously to access different ‘PLAY Mode’.
¾ SINGLE: Play the selected file once.
¾ REP-ONE: Play the selected file repeatedly.
¾ FOLDER: Play the files in the folder one by one.
¾ FOLDER REP: Play all files in the folder repeatedly in order.
¾ DISC SCAN: Explore the files in the Disc playing only same tunes.
¾ DISC: Play the files in the Disc once.
¾ DISC REP: Play the files in the Disc repeatedly
SUPPORTED VIDEO FORMATS: DivX3.11, 4.x, 5.x, XviD, DivX Pro(Excluding QPEL and GMC)
<NOTE>
¾ Bit rate may fluctuate; Device may skip encoding the high bit rate portions and begin decoding again when Bit rate
returns to normal. Maximum bit rate: 4Mbps.720*480 @30fps, 720*576 @25fps
¾ Aspect Ratio: Although default DivX resolution is 640*480 pixels (4:3), this product supports 720*480 pixels.
Video resolution higher than 800 pixels will not be supported.
SUPPORTED AUDIO FORAMTS:
Format
MP3
WMA
AC3
DTS
Bit Rate
80~348kbps
56~192kbps
128~348kbps
1.5Mbps
Sampling
44.1khz
44.1khz
44.1/48khz
44.1khz
Frequency
¾ DivX files, including audio and video files, created in the DTS format can only support up to 6Mbps.
¾ When you play a disc whose sampling frequency is higher than 48khz or 320kbps, you may experience shaking on
the screen during playback.
Supported Subtitle: Smi, Srt, Sub, TXT with English
< NOTE ! >
¾ It is normal to experience an occasional pixilation during MPEG4 playback due to clarity of digital contents during
internet downloading.
¾ Some MPEG4 files created on a personal computer may not be played back. That is why Codec Type, Version and
Higher resolution over the above specification is not supported.
¾ This unit supports CD-R/RW written in MPEG4 in accordance with the “ISO9660 format”
17
www.acesonic.com
Special MP3, WMA and JPEG Operation
Special MP3, WMA and JPEG Operation
PLAY MODE Selecting
¾ SINGLE: Play the selected song once.
¾ REP-ONE: Play the selected song repeatedly.
¾ FOLDER: Play the songs in the folder one by one.
¾ FOLDER REP: Play the songs in the folder repeatedly in order.
¾ DISC SCAN: Explore the songs in the Disc playing only same tunes.
¾ DISC: Play the songs in the Disc once.
¾ DISC REP: Play the songs in the Disc repeatedly
DIGEST FUNCTIONS (JPEG)
This function shows the content of the current folder or the whole disc.
¾ Press MENU during playback. A thumbnail of 9 pictures appears on the TV screen.
¾ Press arrow button to highlight one of the picture and press ENTER to start playback.
¾ Move the cursor to highlight SLIDE SHOW on the bottom of the page to start playback from the first picture on
the current page.
¾ Press MENU to return to MP3/Picture CD menu.
PLAYBACK WITH MULTI-ANGLE (JPEG)
During playback, press Arrow(◀▶ ▲ ▼) buttons to rotate the picture on the TV screen.
¾
◀: rotate the picture anti-clockwise
¾
▶: rotate the picture clockwise
¾
¾
▲: flip the picture vertically
▼: flip the picture horizontally
18
www.acesonic.com
Special USB Operation
Special USB Operation
USB/DISC: Device selection
After connecting a USB device to the player at stop mode , press “USB/DISC” to select USB mode
USB menu screen is displayed and press “PLAY” button after selecting a desired file to play.
To stop playback, press STOP button.
To go back to Disc mode, press “USB/DISC” at stop mode again.
PBC: Target Folder selection
In order to copy or rip some data from Disc to USB, you can select a target folder with PBC button in USB mode.
Select a Target folder by pressing “PBC” button in USB mode only.
INFO: File management menu selection.
In order to manipulate all files or folders in USB, you can use the INFO button to operate the following functions in
USB mode.
Press “INFO” button at stop mode and the following menus appear on the Screen.
¾
Copy ( DVD ->USB, USB -> USB )
a) You can copy some files from Disc or a certain folder in USB to the Target Folder in USB.
b) After selecting the desired file or folder, press “INFO” and then select “COPY” menu.
c) File size and copy information will be displayed on the screen and when copying is complete, “Finish” will be
displayed on the screen.
d) In case the Target Folder name or file names are same as the selected Folder or File names. It will not work.
¾
Move ( USB -> USB )
a) You can move the selected files from a certain folder to another folder in USB only.
b) Operation process is same as above “COPY” menu but select “MOVE” menu instead of “COPY”
¾
Delete ( works in USB only )
a) You can delete some File or Folder in USB only.
b) Operation process is same as above “A. COPY” but select “DELETE” instead of “COPY”
¾
Rename ( works in USB only )
a) You can change the name of a selected file or folder in USB only.
b) Selecting a file or folder in USB to change the name, press “INFO” then select “RENAME”.
c)
d)
e)
Please input the name with On-Screen Keyboard by pressing ARROW(▲▼◀▶) and “ENTER” button.
Press “STOP” button to finish the name input.
If want to cancel the name change, press “CANCEL” and if want to move back, press “PREV” button.
¾
Select( DVD, USB )
a) You can use SELET menu to copy or delete many files at one time from Disc or USB.
b) Press “INFO” then press “SELECT” and select the desired files by pressing the “ENTER” button.
c) Press “STOP” to finish the file selection.
d) Press “INFO” then select “COPY” or “DELETE” menu to start copy or delete at one time.
e) When the select function completed, the select mode will be cancelled automatically.
f) To cancel the select function without using “COPY” or “DELETE” menu, press “SELECT” menu again and
“SELECT OFF” message will be displayed on the screen.
¾
New Folder
a) You can create a New Folder in USB only.
b) Press “INFO” and select “New Folder” then input new folder name with On-Screen Keyboard by pressing
ARROW(▲▼◀▶) and “ENTER” button
¾
Properties( DVD, USB)
a) Press “INFO” and select “PROPERTIES” then you can see the file or folder information.
19
www.acesonic.com
¾
Cancel: It cancels all above functions.
Special USB Operation
MP3 Ripping from Audio CD to USB
Use this function to rip the audio data from Audio CD or CDG disc to USB in MP3 file format.
¾
¾
¾
¾
¾
Insert Audio CD or CDG disc to the Disc tray and plug USB memory into the Player.
Press “USB/DISC” button at stop mode to move to USB mode and set “TARGET FOLDER” by pressing “PBC”
button to save the ripped data and return to DVD disc mode by pressing “USB/DISC” button.
Press “TITLE” button to select the ripping option such as ON, ON-PLAY or OFF.
9 RIP ON: There is no audio sound out while ripping audio data.
9 RIP ON-PLAY: There is buffering audio output during ripping data in order to increase the recording speed
into USB. It is not related with the sound quality of ripped MP3 file.
The ripped data will be saved in “TARGET FOLDER” by Track order with the file name of “TRK-****.mp3”
E.g.) In case, the Track #10 in the disc ripped, the ripped file name will become “TRK-0010.mp3”.
Please move to USB mode by pressing “USB/DISC” and check the ripped data.
DATA Transferring from Disc to USB
¾
¾
¾
¾
¾
Insert a DATA disc into the player and connect USB memory to the player.
Press “USB/DISC” at stop mode to move to USB mode and set “TARGET FOLDER” by pressing “PBC” button
to save the transferred data and return to Disc mode by pressing “USB/DISC” button.
Press “INFO” then select “SELECT” menu and select all desired files to transfer by pressing “ENTER” button
and press “STOP” to finish the selection.
※Data means a Small size Movie file (MPEG1, MPEG4, DivX, XviD files), Music file (MP3 file) and Photo files
(JPEG file)
Press “INFO” and then press “COPY” button to start data transferring to “TARGET FOLDER” in USB memory.
If do you not select the “TARGET FOLDER”, it will be saved in the ROOT folder of USB memory automatically.
Please move to USB mode by pressing “USB/DISC” and check the transferred data.
<NOTE>
¾ If you unplug-out the USB device or turn off the power of the player during transfer, it will cause damage to other
files in USB.
20
www.acesonic.com
System Setup
General Setup
Press SETUP button in stop or playback mode.
Select desired setting with ARROW and ENTER button .
You can come out of the detailed settings page by pressing RETURN.
PIC MODE: IMAGE DETAILS SETTINGS
¾ AUTO: Sets the screen resolution automatically.
¾ FILM: Setting for a film or a progressive
¾ VIDEO: Sets to the high Resolution Mode
¾ SMART: Sets to the high Resolution Mode that supports the Progressive.
¾ SUPER SMART: Sets to the High Resolution Mode that supports the Progressive.
ANGLE MARK: CAMERA MARK
If you have some TITLES filmed from different angles, you will see a camera icon on the screen by pressing ON button.
This icon means that you can see different pieces of TITLES.
OSD LANG: SCREEN INDICATION LANGUAGE SETTING
You can select a language of the screen. Factory Default OSD is ENGLISH.
CAPTIONS: BACKGROUND OF SUBTITLE
You can see the background of subtitle during playback of DVD titles.
SCREEN SAVER: SCREEN SAVER
After certain duration of STOP/PAUSE state, screen protector starts to work.
MAIN PAGE: RETURN TO MAIN SETUP PAGE
You can return to the Main MENU on the SETUP page.
Speaker Setup
DOWNMIX: AUDIO CHANNEL COMPOSITION
This allows you to have a roper Audio output when the Audio channel composition recorded in the Disc is different
from the one that should be output
¾ LT/RT: When connected to Dolby Pro Logic Decoder Amp.
¾ STEREO: When connected to STEREO Amp.
¾ OFF: Down mix off.
CENTER: CENTRAL SPEAKER SETTING
You can set the central speaker for use by pressing ON button.
REAR: REAR SPEAKER SETTING
You can set the rear speaker for use by pressing ON button.
SUB WOOFER: SUB WOOFER SPEAKER SETTING
You can set the sub woofer speaker for use by pressing ON button.
CENTER DELAY: CENTRAL SPEAKER DELAY SETTING
You can select central speaker’s delay duration up to 0~5MS.
REAR DELAY: REAR SPEAKER DELAY SETTING
You can select rear speaker’s delay duration up to 0~15MS.
TEST TONE: SPEAKER TEST
You can test speaker’s sound output by pressing ON button in the following order:
Front(L)-Center-Front(R)-Rear(R)-Rear(L).
21
www.acesonic.com
System Setup
Audio Setup
SPDIF OUT: AUDIO OUTPUT SETTING
¾ OFF: Analog audio output through the jacks on back panel (FL, FR, RL, RR, Center, Sub-Woofer). If Karaoke is
precedence, you must select analog audio.
¾ SPDIF/RAW: Through the Coaxial/Optical jack to output Dolby 5.1CH digital or DTS digital audio.
¾ SPDIF/PCM: Through the Coaxial/Optical jack to output PCM digital audio.
OP MODE :
¾ LINE OUT: Line out mode, with digital dialog normalization. DEFAULT
¾ RF REMOD: RF re-modulation mode, with heavy compression and digital dialog normalization.
DUAL MONO
This is SIMILAR TO Multiplex television and can work only for the Disc designed for DUAL MONO program.
¾ STEREO: Output proper channels through both right and left speakers.
¾ R-MONO: Output the channel of the right side through both right and left speakers.
¾ L-MONO: Output the channel of the left side through both right and left speakers.
¾ MIX-MONO: Outputs through both right and left speakers by mixing up two channels.
COMPRESSION: SOUND OUPUT REINFORCEMENT
This is a function to adjust the sound dynamic range.
PRO LOGIC : There are three modes of OFF/ON/Auto.
LPCM OUPUT:
If you connect the DVD Player to a PCM compatible receiver via the digital terminals, such as coaxial or optical etc,
you may need to adjust ‘LPCM Output’.
Discs are recorded at a certain sampling rate. The higher sampling rate, the better sound quality.
¾ LPCM 48K: Playback a disc recorded at the sampling rate of 48kHz.
¾ LPCM 96K: Playback a disc recorded at the sampling rate of 96kHz.
CDDA RIP TYPE
¾ WAV: Audio file shall be encoded at WAV format into USB.
¾ MP3: Audio file shall be encoded at MP3 format into USB.
CDDA RIP MODE
¾ TRACK: Audio file shall be ripped by one TRACK into USB
¾ DISC: All audio files in the DISC shall be ripped into USB in order.
MP3 ENCODING:
When you encode the Audio file from Audio CD, you may need to adjust MP3 sampling late. The higher rate, the better
sound quality.
¾ 96K: Audio file will be encoded at the sampling rate of 96K.
¾ 128K: Audio file will be encoded at the sampling rate of 128K.
Video Setup
VIDEO OUT PUT
¾ S-VIDEO: You have to select S-Video mode to connect with TV via S-Video or Composite port.
¾ YPbPr: You have to select YPbPr mode to connect with TV via Component or Composite port.
¾ RGB: You have to select RGB mode to connect with Monitor via VGA or Composite port.
22
www.acesonic.com
System Setup
TV DISPLAY:
¾ NORMAL PS( 4:3 PAN SCAN): If you have a normal TV and want both sides of the picture to be trimmed or
formatted to fit your TV screen, press ENTER.
¾ NORMAL LB(4:3 LETTER BOX): If you have a normal TV, In this case, a wide picture with black bands on
the upper and lower portions of the TV Screen will be displayed.
¾ WIDE HDTV(16:9): If you have a wide-screen TV.
TV TYPE: TV MODE SETTING
¾ PAL: Select this if the connected TV is PAL system. It will change the video signal of a NTSC
disc and output in PAL format.
¾ NTSC: Select this if the connected TV is NTSC system. It will change the video signal of a PAL
disc (VCD only) and output in NTSC format.
¾ AUTO: Select this if the connected TV is compatible with both NTSC and PAL (multi-system). The output format
will be in accordance with the video signal of the disc.
RESOLUTION: VIDEO RESOLUTION SETTING
¾ 480i: Select this to get normal Video quality of 480i (Interlaced) via Composite Cable.
¾ 480P: Select this to get the Progressive Scan Video Quality of 480P via Component Cable (Y,Pb,Pr).
¾ 720P: Select this to connect with HDTV and to get the HD Video Quality of 720P via Component Cable (Y,Pb,Pr).
[NOTE]
¾ 720p does not output simultaneously with composite video so you must select 720p after connecting component
cables (Y,Pb,Pr) to the TV in advanced.
¾ In case you select “RGB” in VIDEO OUTPUT to connect with a VGA Monitor, 480i and 720P resolutions may
have some problem according to the VGA monitor. So, you must turn On the power of VGA monitor before
connecting the VGA cable to the player. Otherwise, the player may not work normally.
Preference Setup
AUDIO: AUDO LANGUAGE SETTING
You can play the Disc in the language of your choice. (ENGLISH/FRENCH/SPANISH/CHINESE/JAPANESE)
SUBTITLE: SUBTITLE LANGUAGE SELECTION
You can set the subtitle in the language of your choice.(ENGLISH/FRENCH/SPANISH/CHINESE/JAPANESE/ OFF)
DISC MENU: You can see the DISC MENU in the language of your choice.
(ENGLISH/FRENCH/SPANISH/CHINESE/JAPANESE)
LOCALE: You can select the right region to play a DVD disk has region code. (USA/CHINA/FRANCE/HONG
KONG/TAIWAN/GBR)
PARENTAL: Some DVDs may have a parental level assigned to the complete disc or to certain scenes on the disc.
This feature lets you set a playback limitation level. The rating levels are from 1 to 8 and are country dependent. You
can prohibit the playing of certain discs that are not suitable for your children or have certain discs played with
alternative scenes.
¾ 1G: It will play all discs.
¾ 2 G: General Audience; recommended as acceptable for viewers of all ages.
¾ 3 PG: Parental Guidance suggested.
¾ 4 PG13: Material is unsuitable for children under age 13.
¾ 5-6 PG-R: Parental Guidance - Restricted; recommended that parents restrict children under 17 from viewing or
allow to view only when supervised by a parent or adult guardian.
¾ 7 NC-17: No children under age 17; not recommended viewing for children under age 17.
¾ 8 ADULT: Mature material; should be viewed only by adults due to graphic sexual material, violence or language.
PASSWORD: You can set a password. The default password is “0000”.
DEFAULTS: You can reset all options and your personal settings to the factory defaults.
SMART NAV: You can set this option as NO Menu or With Menu.
23
www.acesonic.com
Trouble Shooting
Trouble Shooting
Tray does not come out.
Check if the AC cord is plugged in correctly.
After pressing PLAY button, it takes long before displaying the image
If you press PLAY/STOP/OPEN buttons quickly again and again, the Player stops all movement for certain duration of
time to protect the Disc drive monitor.
Check if your batteries in remote control are strong enough.
Disc can’t be played or read
The DVD+R/CD-R must be finalized.
Ensure the disc label is facing up.
Check if the disc is defective by trying another disc.
If you have recorded a Picture CD or MP3 disc yourself, ensure that your disc contains at least 10 Pictures or 5 MP3
tracks.
Please reset the player to the factory default in the setup mode and play the DVD/CD again.
Use a commonly available cleaning CD/DVD to clean the lens before sending the DVD Player for repair.
Buttons do not work
To completely reset the player, unplug the AC cord from the AC outlet for 5-10 seconds.
Player does not respond to some operating commands during playback
Operations may not be permitted by the disc. Refer to the instructions of the disc.
No power
Check if the AC power cord is properly connected.
Press the ON-OFF button on the front of the Player to turn on the power.
No return to start-up screen when disc is removed
Reset the unit by switching the player off, then on again.
Shooting angle modification does not work during the playback.
You can modify the angle only if the DVD Disc contains different angles of screens.
It works only if the Disc and Screen have ANGLE mark.
During DVD playback, the MENU page doesn’t appear although I press the MENU button.
Check if your Disc has MENU.
Check the angle, distance and obstacles of the remote control.
Check if the batteries of the remote control are strong enough.
I cannot select a screen ratio
You can see the DVD Disc in 16:9 Wide, 4:3 L/B (Letter Box), 4:3 P/S (Pan Scan) according to the filmed state.
However, Discs made in 4:3 can provide only 4:3 screen modes. Check the DVD case and select a Proper function.
No picture
Check if the TV is switched ON, Check its connections.
Check if the Disc is stained by any foreign substances on it or damaged.
Check if the Disk is not inferior goods.
Check if the setting of Video Output, TV type and Resolutions are correct.
If the screen display moves to a bright image from a dark one suddenly, the image can tremble instantaneously. This is
not a mechanical malfunction.
Distorted picture
Sometimes a small amount of picture distortion may appear depending on the disc being played back. This is not a
malfunction.
24
www.acesonic.com
Trouble Shooting
Completely distorted picture or black/white picture with DVD
Connect the player directly to the TV.
Make sure the disc is compatible with the DVD/Player.
Ensure that the Player’s TV System is set to match that of the Disc and your TV.
Picture freezes momentarily during playback
Check the disc for fingerprints/scratches and clean with a soft cloth wiping from centre to edge.
Unable to play MPEG4 movies
Check that the MPEG4 file is encoded in Home Theater mode with DivX 5.x encoder.
No sound or distorted sound
Adjust the volume.
Check the connections among equipment (Amp, TV, and Speaker) and initial settings.
Check if the Disc is not harmed and clean the Disc.
Check if the speaker is defective. If so, exchange it.
No audio at digital output
Check the digital connections.
Check if your receiver can decode MPEG-2 or DTS and if not, please make sure the digital output is set to PCM.
Check if the audio format of the selected audio language matches your receiver capabilities.
Poor sound quality
Check the connections with Amp.
Check if the connection plugs are not loosened.
Check if the connection terminals have foreign substances stained.
Check the sound volume settings of each audio device and adjust it.
When using the microphone, the speaker makes a noise.
It can happen when the microphone and speakers do not keep sufficient distance.
Keep the microphone far from the speaker. Do not place it toward the speaker either.
Microphone does not work
Check if the microphone is switched ON.
Check if the Microphone volume of the Player is fixed at the minimum level and adjust it.
Check if the sound volume of the Amp is fixed at the minimum level and adjust it.
Check if the microphone is detective. If so, exchange it.
The player does not respond to the Remote Control
Aim the Remote Control directly at the sensor on the front of the player.
Reduce the distance to the player.
Replace the batteries in the Remote Control.
Re-insert the batteries with their polarities (+/–signs) as indicated.
Scoring does not function
Check if the Karaoke Settings is set as Karaoke OFF in the setup mode. If so, modify the setting at Karaoke Scoring On.
Please sing each song with enough voice output level for over 1 minute.
Unable to recognize USB device
Pull out USB device and re-connect to the player.
Check if the USB cable is plugged in correctly.
Check if the USB device is normal or broken.
Check the USB HDD and Digital Camera whether have the auxiliary Power input or not. If not, you must connect the
auxiliary power cord to them for proper operation.
How to convert CDG files to MP3G files from my CDG disc
Please see page 4 for detail introduction.
25
www.acesonic.com
Specification
General Specification
Format
System
Video Output
Audio Output
Input
.Power source : AC 100-240V~ 50/60Hz(Free Volt)
.Power consumption : <20W
.Weight : 3.5Kg
.Dimensions: 430mm(W) x 250mm(D) x 77mm(H)
.Operating temperature : +5° ~+38°(41°F to 95°F)
.Operating Humidity: 10% ~ 75%
.Supported Disc: MP3+G, CD+G, VCD, DVD, MPEG4, SVCD, HDCD, Audio CD,
DVD-R/RW, CD-R/RW, MP3, WMA and JPEG.
Video Format: MP3+G, CD+G, MPEG1(*.dat, *.mpg), MPEG2(*.vob), MPEG4(*.avi,
*.mp4), JPEG(*.jpg)
Audio Format: PCM, Dolby, DTS, MP3, WMA,
Subtitle Format: .smi, .srt, .sub, .txt
Signal System: PAL/NTSC/Multi System
Laser: Semiconductor laser, Wavelength: 660nm
DA Converter: 24bit
Frequency response:
DVD(PCM 96kHz): 4Hz-44kHz
DVD(PCM 48kHz): 4Hz-22kHz
CD/VCD(44.1kHz): 4Hz-20kHz
Signal-Noise(1kHz):110dB
Harmonic Distortion: Less than 0.5%
Dynamic range(1Khz):100dB
C-Video output: 1.0Vpp(75 Ω )
S-Video output: Brightness signal: 1.0Vpp(75 Ω )
Color Signal:0.3Vpp(75 Ω)
Component video out: Y: 1.0Vpp(75 Ω)
Pb/Pr: 0.7Vpp(75 Ω)
Scart output
VGA output
Video output: Progressive Scan(480p/576p/720p)
PAL & NTSC disc compatible
Karaoke Audio Output: F/L, F/R(2Channel)
5.1Channel output: F/L, F/R, C, S/W, R/L, R/R
Output level: 2.0 Vrms(1Khz, 0dB)
Frequency response: 20Hz-20Khz
Signal to Noise: 110dB
Total harmonic distortion: Less than 0.5%(1KHz, 0dB)
Digital out(Optical): 0.3Vpp(75 Ω)
Digital out(Coaxial): 0.5Vpp(75Ω)
Analog output: 2.0Vrms(1Khz, 0dB)
MIC input: 2
USB Host interface: v 1.1
SCORING input: 1
26
www.acesonic.com