1
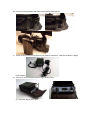
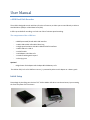
User Manual eHDR Hard Disk Recorder The e‐HDR is designed to work with Sony EX‐series of cameras, to allow you to record directly to either a Hard Disk Drive (HDD) or a Solid State Drive (SSD). It offers up to 84GB of recording, or a little over 5hrs of uninterrupted recording. The components of the eHDR are: ‐ ‐ ‐ ‐ ‐ ‐ ‐ ‐ e‐HDR Expresscard/34 with Mini‐USB interface 1 x Mini‐USB to Mini‐USB cable 150cm long 1 x High speed enclosure with Mini‐USB and e‐SATA interfaces 1 x Mini‐USB to 2 x USB‐A 1 x e‐SATA cable 1 x AC Adapter 110‐240v to 5v 1 x Leather belt bag with lanyard. 1 x Carrying case Optional ‐ Dolgin Power EX‐V adapter which adapts BPU‐30 Battery to 5v The HDD or SSD ( let’s call it SSD from now on ), is powered by either an AC adapter or a battery pack. Initial Setup Please begin by installing your choice of 2.5” SATA II HDD or SSD drive into the enclosure, by unscrewing the front face plate of the enclosure. The maximum capacity read by the camera extends to 84GB, so a 120GB drive will have 36GB of unused space on it. Install the HDD or SSD, and Re‐assemble. Once this has been compeleted, 1) You insert the e‐HDR Expresscard into an EX‐Series camera. 2) Connect the supplied Mini‐USB cable to Expresscard and enclosure. 3) Power on the enclosure using either the AC adapter provided or a BPU‐30 installed in a Dolgin Power adapter. 4) Place units into the supplied Leather bag, and then either: A) Attach SSD bag to your tripod. B) on the bag. [Picture required] C) Thread your belt througgh the loop o D) Use the lan nyard to go around neck for front usage, or over necck and should der for side of body usage. E)) F)) If this is ne ew install of the SSD, the ccamera will assk whether yo ou want to fo ormat the SSD D. Go ahead and d select “Form mat Media”. P Please note th hat it will cleaar everything on the SSD w when you do this. Once the format has been completeed you are reeady to record d. The cameera will record d up to 5h 8m m without swaapping slots. W When the SSD D is full, the ccamera will sw witch to other sslot and continue recording. So if you have an e‐LCR in that slot w with a 32GB card in it you ccan record continuously for 7hrs before needing to swap any media. Or alternately you could swap out the e‐HDR, move the data off it to another device and reconnect once the e‐LCR is full, and continue recording for another 5hrs. When recording has been completed Once the recording has been completed the unit can be attached to a computer by the e‐SATA or USB connectors provided, powering either via the 5v input from the AC adaptor or by battery, or via the USB cable provided plugging both USB‐A plugs into the computer to provide power. Then the contents can then be either edited directly, or copied for editing or archiving. Once the recordings have been copied you can either use the camera to format the drive again, (recommended), or use Explorer in Windows or Finder in OSX to delete the data manually. Which drives are supported? Hard Disk Drives tested Seagate Hitachi Western Digital Solid State Drives tested Transcend Silicon Power