1
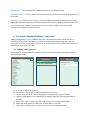
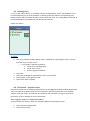
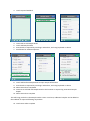
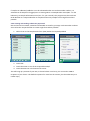
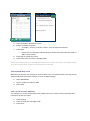
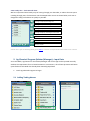
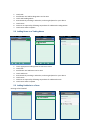
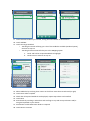
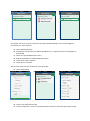
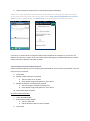
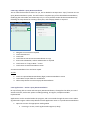
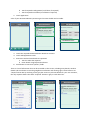
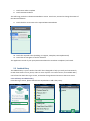
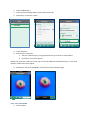
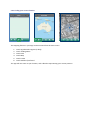
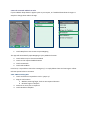
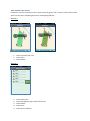
BACK PADDOCK BACK PADDOCK MOBILE USER MANUAL COMPANY Integrity | Innovation | Mateship | Copyright 2013 Contents 1. Overview – What does this App do? ............................................................................................... 3 2. Get this App! ................................................................................................................................... 3 3. Setting up your App – Add Data...................................................................................................... 4 3.1 Output data to CornerPost – for subscribers ......................................................................... 4 3.1.1 Adviser details ........................................................................................................................ 4 3.1.2 Recommendation Template .................................................................................................. 4 3.1.3 Master Database .................................................................................................................... 4 3.1.4 Clients, Trading Names, Farms, Paddocks, Spray Recs, Logo................................................. 4 3.1.5 SoilMate data ......................................................................................................................... 4 4. 3.2 Log in ....................................................................................................................................... 5 3.3 Where to go first? ................................................................................................................... 6 3.4 Synchronise and Open! First time and every time ................................................................. 6 Soil Health Program (SoilMate) – Input data .................................................................................. 7 4.1 Adding Trading Names ............................................................................................................ 7 4.2 Adding Farms to a Trading Name............................................................................................ 8 4.3 Add Contact Details................................................................................................................. 8 4.4 Add Paddocks .......................................................................................................................... 9 4.5 Deleting Data ........................................................................................................................ 10 4.6 Soil Health – Sample Orders ................................................................................................. 10 4.6.1 Logging a Sample in a designated Paddock ......................................................................... 10 4.6.2 Viewing and Sending submission paperwork ...................................................................... 12 4.6.3 Send SMS Alert of SOF ......................................................................................................... 13 4.6.4 Turn off automatic SMS Alert .............................................................................................. 13 4.6.5 Handy Hint – Limit Barcode View ........................................................................................ 14 5. Ag-Chemical Program (Adviser/Manager) – Input Data ............................................................... 14 5.1 Adding Trading Names .......................................................................................................... 14 5.2 Adding Farms to a Trading Name.......................................................................................... 15 5.3 Adding Paddocks to a Farm................................................................................................... 15 5.4 Ag-Chemical - Spray Recommendations ............................................................................... 16 5.4.1 Create a Spray Recommendation ........................................................................................ 16 5.4.2 View a Spray Recommendation ........................................................................................... 19 5.4.3 Send Spray Recommendation by Email ............................................................................... 20 5.4.4 Copy and Edit a Spray Recommendation ............................................................................. 21 5.4.5 Applications – Action a Spray Recommendation ................................................................. 21 5.5 Paddock Diary ....................................................................................................................... 23 5.5.1 Add Entry to Paddock Diary ................................................................................................. 23 5.5.2 Send Paddock Entry by email ............................................................................................... 25 5.6 Mapping ................................................................................................................................ 26 5.6.1 Finding your current location............................................................................................... 27 5.6.2 Finding a different location .................................................................................................. 28 5.6.3 Creating a Paddock Boundary .............................................................................................. 29 5.6.4 Adding a Hole to a Paddock ................................................................................................. 30 5.6.5 Edit a Created Paddock or Hole ........................................................................................... 31 5.6.6 Removing Holes, or entire Paddocks from Mapping ........................................................... 33 5.6.7 Mapping Help ....................................................................................................................... 33 5.6.8 Mapping Settings ................................................................................................................. 33 6. Help please! .................................................................................................................................. 34 6.1 I like to talk to real people .................................................................................................... 34 6.2 I like to see things visually..................................................................................................... 34 6.3 Visually, yes, big crowd no!................................................................................................... 34 6.4 I like to work through notes in my own time ........................................................................ 34 6.5 I want an answer now, but can’t call .................................................................................... 34 6.6 I just had a thought, and want an answer in the next few days. No big deal ....................... 34 BACK PADDOCK MOBILE 1. Overview – What does this App do? Thank you for selecting Back Paddock, and welcome to your new mobile application! First, let’s just go through what you can expect your new application to do. The new and improved Back Paddock Mobile App is designed to be your Friend in the Field! Capturing all the best functions of both our Adviser and SoilMate App, it certainly knows how to keep it together. From viewing, creating and recording Spray Recommendations to capturing photos, videos and voice clicks for a nominated paddock, mapping or logging samples, this App is right there with you. We’ve plucked and teased our way down to make this App simple and streamlined, performing the functions you require on the spot without too much unnecessary bulk. No internet out in the back field? Not a problem! With this App it is completely interactive in the field, storing all data until you are within wi-fi range, then just one button and up she goes! Synching through CornerPost with your program to ensure you always have the information you require. Sounds pretty good so far? Read on to learn more about your App, and how to use it. 2. Get this App! 1. Go to the App store on your iPhone or iPad 2. Type Back Paddock into the search box 3. Click Search You will see there are a few options that come up, some “Free” others for $149.99. If you are a Back Paddock Adviser Professional or Manager Premium subscriber, you get this App for free! We also recognise the desire for some to have just the App; maybe you’re a sub-contractor doing observations? The stand-alone $149.99 App is the pick of the litter for you. 4. 5. 6. 7. Scroll on your device to find your selection Click FREE or $149.99 on your selection Click INSTALL APP Follow prompts for your password if required, or input Name and Trading Name details as requested to create an account with Back Paddock Your new App is ready to go, but it’s just a shell! Time to put some data in. If you are a subscriber, follow the instructions to input data from your computer or skip these to Log In and Input Data Manually. 3. Setting up your App – Add Data 3.1 Output data to CornerPost – for subscribers To make it just that little bit easier, we have set up this App so that information from your computer can be sent to your new App through CornerPost. The following information can be synchronised: 3.1.1 Adviser details The Adviser details that will be carried over into your mobile App are those found in the Spray Recommendations tab of your Adviser / Manager program. Update these if required! 3.1.2 Recommendation Template Any of the Spray Recommendation templates you have constructed can be sent to your App through CornerPost. 1. Click File in your Adviser / Manager program 2. Click CornerPost 3. Click Upload Recommendation Template to CornerPost 3.1.3 Master Database This is a huge component of the customisation of your program. Upload your Master Database to CornerPost ready to retrieve to your App! 1. Open Master Database in Adviser / Manager 2. Select CornerPost 3. Select Upload. This can take several minutes to synchronise. Retry if initially unsuccessful. 3.1.4 Clients, Trading Names, Farms, Paddocks, Spray Recs, Logo This data is all synchronised to the Back Paddock Mobile App through the standard CornerPost synchronisation tool. If preferred, these can be manually entered into the App. 1. 2. 3. 4. 5. Open Client File in your Adviser / Manager program Click File Select CornerPost Send – Upload Updated Data from Current File to CornerPost. This can take several minutes. Repeat for each Client File 3.1.5 SoilMate data This data is synchronised through the CornerPost tool. 1. 2. 3. 4. Select Tools Upload Data to CornerPost Yes. Data will upload, this can take several minutes A notification should come up; “Upload to CornerPost: Successful”, Select OK 3.2 Log in To log in to your App, a Username and Password will be required as seen below. For subscribers: Username – your email address Password – your standard Back Paddock password (CornerPost / SoilMate online) Enter your Email address and Password and press OK to proceed. If you are unsure, we can easily re-set this if contacted by phone or email. For newcomers: Welcome! Please contact the HelpDesk on 1800 557 166 or [email protected] and we will be more than happy to provide you with your new Username and Password. To Log in from the Home screen shown below, press the cog wheel in the top right corner of the screen and select Sign In to enter details as above. 3.3 Where to go first? Okay, so we’re all Signed In and ready to go! But where are we going? As seen on the Home Screen below, we have four options. These options are multi-taskers, they both open each section of the App, and for subscribers, automatically synchronise them so you can view the latest available information for your Client Files. The two Kings of the App are Soil Health Program (SoilMate) and Ag-Chemical Program (Adviser/Manager) – our two vastly different PC programs. These have very different functionality, which will be explored in the following manual. Log In & Settings Synchronises and opens SoilMate Synchronises and opens Adviser “Skip” to open without Synchronising Synchronises Master Database View and enter Log in Paddock Diary As illustrated, each of the options on this page opens and / or synchronises a different aspect of your App. 3.4 Synchronise and Open! First time and every time Your data is all at your fingertips, now we just need to put it into your App. On your App, the same buttons are pressed to both Upload and Download data from CornerPost. This is conducted on the Home Page as seen above. Soil Health Program – The SoilMate King designed to make Logging Samples in the field quick and easy. Touching the words synchronises all the client details from SoilMate, including Trading Names and sample submissions. Pressing “Skip” should be used in non-wifi areas or for nonsubscribers; it allows all the functionality of the App but skips the synchronisation step. Ag-Chemical Program – The Adviser/Manager King designed to create Spray Recommendations, Maps, Paddock Diary and more. Touching the words synchronises information uploaded from the Adviser or Manager programs, including Client details and Spray recommendations. Press “Skip” in non-internet areas or when synchronisation is not required. Operations – This synchronises the Master Database for use within the App Paddock Diary – Just as it sounds, this option links to our innovative note taking program for use in the field. Settings – This allows the user to Log In, and some additional settings including Switch Account, Signing Off and Resetting the Synchronisation clock (Timestamp) on specific components. This reset forces all data to be “pushed” to CornerPost at the next synchronisation and can be used if incomplete data appears to have been sent. 4. Soil Health Program (SoilMate) – Input data Adding Trading Names, Farms, Paddocks and Areas is all possible manually without the use of CornerPost or any of our other programs. The key to following this App through any steps is to remember this rule of thumb: Edit is your friend. The Edit button in the top right corner allows us to Add through most areas of the App. 4.1 Adding Trading Names Once Logged in, select Soil Health Program (or Skip) to produce the Organisation page. Meet our friend the Edit button! 1. 2. 3. 4. Press Edit to Add Trading Name Scroll down if required, until Add Trading Name is on screen To Add, touch the words “Add Trading Name” or the green plus sign to the left Type in Trading Name when prompted, by touching in white bar and using keyboard on monitor 5. Touch Done when complete, this will bring you back to the Organisation screen. 6. Select Add Trading Name to add more, or select Done to continue. 7. This will show the Organisation screen, with your New Trading Name listed. When ready, select the correct Trading Name by touching on the Name to continue on to Farms. 4.2 Adding Farms to a Trading Name Adding Farms to Trading Names follows a similar procedure to Adding Trading Names. 1. Touch Edit to begin 2. Select Add Farm by touching the words or the green plus sign to the left 3. Enter Farm Name as prompted, by touching in the white bar and using the keyboard on your device 4. Select Return on your keyboard 4.3 Add Contact Details Contact Data for your Grower must be entered here, this will be Farm specific. 1. 2. 3. 4. Touch Link a Contact Touch Edit Touch Add Contact Enter details as prompted by touching in the white bar, and using the keyboard on your device 5. 6. 7. 8. Touch Done Continue to Add Contacts if required following steps above Touch Done when ready Touch the name of the Contact for your Farm, this will take you back to the Add Farm screen o Note: if you touch “Link a Contact” again now, your correct contact will be ‘ticked’ 9. Touch Done 10. Continue to Add Farms following steps above 11. Touch Done when complete 4.4 Add Paddocks 1. 2. 3. 4. Touch appropriate Farm name Touch Edit to Add Paddocks Touch Add Paddock Enter details as prompted, by tapping in the white bar and using the keyboard on your device 5. Touch Done when complete 6. Continue to add other Paddocks as required 7. Touch Done when complete 4.5 Deleting Data For any of the options above, it is possible to delete Trading Names, Farms and Paddocks. This is recommended only on an empty database, as deleting these also deletes corresponding data. Deleting entries will also delete secondary entries down the chain. If a Trading Name is deleted, all Farms and Paddocks associated with this will also be removed. Please use caution. To delete: 1. Find entry to delete (Trading Name, Farm or Paddock) by “following the chain” until the incorrect entry is on the screen o For example, if deleting a paddock: a. Touch correct Trading Name b. Touch correct Farm c. Stay on page with Paddock 2. Touch Edit 3. Touch the red Negative sign beside the entry to be deleted 4. Touch Delete on the right hand side 5. Touch Done when complete 4.6 Soil Health – Sample Orders Samples for submission to designated laboratories can be logged in the Back Paddock Mobile App, which can then be emailed to your choice of recipients, and synchronised with your SoilMate program ready for results. This function also works for sub-contractors, using our CornerPost technology. Visit our website for more information! 4.6.1 Logging a Sample in a designated Paddock To log a sample, we need to ‘open’ the required paddock by following the chain. 1. Touch required Trading Name 2. Touch required Farm 3. Touch required Paddock 4. 5. 6. 7. Touch Edit to Add Sample Order Touch Add Sample Order Enter details as required by touching in white bars, and using keyboard on device Scroll down for additional options 8. 9. 10. 11. Touch Add Surface Sample Detail to input sample information Enter details as required by touching in white bars, and using keyboard on device Select Done when completed Continue to Add Sub-Soil Sample Detail to this location as required eg. Associated sample depths 12. Select Done when complete This will bring you back to the Sampler Order screen. From here, additional samples can be added to this Paddock as required following steps above. 13. Touch Done when complete If samples in additional paddocks are to be submitted under one Purchase Order number, it is advised that all samples are logged prior to creating either our Sample Order Form (SOF – for the laboratory) or Sample Information Form (SIF – for your records). The program uses this Purchase Order Number as a unique identifier to compile all necessary samples into a single form where possible. 4.6.2 Viewing and Sending submission paperwork SOF and SIF can be created, viewed and forwarded via email by your App. Purchase Order numbers are used as the unique identifier to create single forms where possible. 1. Follow chain to the Sample Order form (SOF) within the required paddock 2. Touch Edit 3. Touch the name on one of the required barcode/s 4. Touch the PDF icon in the bottom left corner This will bring up a preview of your SOF, as shown below. From here, you can email or SMS to recipients of your choice. The default recipients for email are the contact, plus the Laboratory as a Carbon Copy. 5. Touch envelope in bottom left corner 6. Confirm or modify recipients o To modify – touch in To and/or CC bars, and use keyboard on device 7. Touch Send o Please note: an automatic SMS may pop up, follow instructions below to send an SMS, or press Cancel 8. Touch Edit at top left to go back 9. Touch Done twice to return to Sample Orders Please note: Although only one barcode was selected, it has shown the SOF for all samples logged using the Purchase Order number associated with that barcode. 4.6.3 Send SMS Alert of SOF SMS alerts can be sent, that notify that a PDF has been sent to a specified email. This may pop up automatically after your SOF is emailed. To send an SMS manually: 1. Touch SMS bubble 2. Type in recipient number for SMS 3. Touch Send 4.6.4 Turn off automatic SMS Alert The Settings icon on the Preview SOF screen enables the user to choose if they would like SMS notification of the sent report. 1. Touch Settings 2. Touch or Swipe On to change to Off 3. Touch Done 4.6.5 Handy Hint – Limit Barcode View We’ve incorporated some handy ways of sorting through your barcodes; to reduce the time spent trawling through years of submissions. On the Sample Order screen as shown below, each icon is designed to help you find data as quickly as possible. Arranges samples by descending date Arranges samples by ascending date Arranges samples by descending barcode number Arranges samples by ascending barcode number Show barcodes date from: xxxx Show barcodes date to: xxxx Show all samples Please note: refer to Deleting Data guide (3.4.5) to delete unrequired barcodes. Please use caution. 5. Ag-Chemical Program (Adviser/Manager) – Input Data As in Soil Health, Ag Chemical or the Adviser/Manager side of this App can be inputted manually without the requirement for a PC based situation or CornerPost. A lot of these processes will seem quite familiar if Soil Health has already been manually populated! 1. Touch Ag-Chemical Program to begin. 5.1 Adding Trading Names 1. 2. 3. 4. 5. 6. 7. Touch Edit Scroll down until Add Trading Name can be seen Touch Add Trading Name Enter details by touching in white bar, and using keyboard on your device Touch Done Continue as required by following steps above for additional Trading Names Touch Done when complete 5.2 Adding Farms to a Trading Name 1. 2. 3. 4. 5. 6. 7. 8. Touch appropriate Trading Name to see Farm screen Touch Edit Scroll down until Add Farm can be seen Touch Add Farm Enter details by touching in white bar, and using keyboard on your device Touch Done Continue as required by following steps above for additional Farms Touch Done when complete 5.3 Adding Paddocks to a Farm Starting to feel familiar? 1. 2. 3. 4. 5. Touch appropriate Farm name to show Paddock screen Touch Edit Scroll down if required until Add Paddock can be seen Touch Add Paddock Enter details as required, by touching in the white bar and using the keyboard on device o Please Note: To set Paddock Boundaries in Map see section 3.9.3 – Creating a Paddock Boundary starting at step 4 6. Touch Done when complete 7. Repeat to add additional Paddocks 8. Touch Done when complete 5.4 Ag-Chemical - Spray Recommendations Spray Recommendations can be created manually in the App, or synchronised from your PC. See Synchronisation for information on how to bring these across. There are a few steps involved here but just follow the process along, step by step for success! 5.4.1 Create a Spray Recommendation 1. Touch on appropriate Trading Name until the Farm screen can be seen, as below 2. 3. 4. 5. Touch Recommend in the bottom left corner Touch Edit Scroll down until Add Recommendation can be seen Touch Add Recommendation Please note: Job number is automatically populated, but can be changed. 6. Touch in white bar to enter or modify details for Job Number, Advice Type and/or Remarks 7. Touch Done when complete 8. Touch Done on Recommendation screen to continue 9. Touch Recommendation just created, noting date and number as identification 10. Touch Add Mix 11. Touch Set Target Paddock o Touching the words will bring you a list of the Paddocks available (standard option), continue to step 12 o Touching the blue arrow will take you to the Mapping option a. Touch and hold on required Paddocks to highlight b. Touch Done to continue at step 14 12. 13. 14. 15. 16. Select Paddocks by Touching their names on the left to move them to Selected (on right) Touch Done when complete Check that all required Paddocks are displayed, repeat steps above until satisfied Touch Next Enter details by touching in white bars and scrolling to crop and variety selections and/or using the keyboard on your device 17. Scroll down to add Undersown details as required 18. Touch Next to continue The option now exists to enter reasons for the Spray Recommendation. This can be skipped if unnecessary for your situation. 19. Touch Add Reason/Pest 20. Scroll down to find (from your Master Database list), or type first letter of reason/pest to jump ahead 21. Touch on required Reason/Pest entry 22. Repeat steps above for additional Reason/Pests 23. Touch Done when complete 24. Touch Next to continue We are now ready to enter Products for your Spray Mix. 25. Touch Add Product 26. 26. Touch in the white Product bar 27. In the provided list, scroll until required Product is found or manually type Product name 28. 29. 30. 31. 32. 33. 34. 35. 36. 37. Products are synchronised from your Master Database for subscribers Tip: Type the first letter of your product to jump ahead Touch on Product to select Rate, units and other information may be brought across, this is from your PC Master Database Adjust Rate / Units by touching in white bars and using keyboard on your device Touch Add another Product if required Touch Done to continue Repeat above for additional Products Touch Next to continue Enter Application Data details as required a. Touch in white bars and use keyboard on device to type or scroll as prompted Touch Finish when complete Repeat steps above for additional Mixes Touch Done Your Recommendation is now complete! 1. Touch on the big R next to the required Recommendation and follow steps below to View / Send starting at step 6 5.4.2 View a Spray Recommendation From the App, it is possible to Preview a PDF of the created Spray Recommendation that can then be sent by email. The screen below can be found by touching on the Recommend button in the Farm screen following these instructions: From Log-In screen: 1. 2. 3. 4. 5. Touch Ag-Chemical program (or Skip) Touch appropriate Trading Name Touch appropriate Farm Name Touch Recommend in bottom left corner Touch appropriate Recommendation number Shows PDF of Spray Rec that can be then emailed Additional Report and Entry settings including Spray Operator Records and PDF File Name Links to Quick Sync page to upload Spray Rec to CornerPost This takes you back to Trading Names 6. Touch Preview to see PDF of your created Spray Recommendation Please note: Logos and further Contact Details can be added in the PC program, and synchronised across to be used in this report. See our Help Sheets online http://www.backpaddock.com.au/helpdesk/ for help on adding details, and Synchronise in this guide for how to bring them across. From here, an email can be sent with this PDF as the attachment to recipients of your choice. An SMS can also be sent to notify of the sent email. Choose Settings to turn SMS notification on and off. Follow instructions below to send PDF by email. 5.4.3 Send Spray Recommendation by Email Follow instructions above to first View Spray Recommendation, then continue as per below. This will require a wi-fi connection. 7. Touch Send 8. Modify or Add recipients as required a. Touch in white To or CC bars b. Enter details using the keyboard on your device 9. Modify the Subject or Email body if required a. Touch in Subject or below the subject line b. Enter details using the keyboard on your device 10. Touch Send when complete To send an SMS notification: 1. Touch the SMS bubble 2. Enter mobile number details a. Touch in white bar b. Use keyboard on device to enter number 3. Touch Send 5.4.4 Copy and Edit a Spray Recommendation Just to make life that little bit easier for you, we’ve decided to incorporate a “Copy” function into our Spray Recommendation system. This will create a complete copy of the selected Recommendation, modifying the Job number and Timestamp only. It is then possible to Edit this Recommendation by following the steps above for Creating a Spray Rec, and changing details as required. 1. 2. 3. 4. 5. 6. 7. Navigate to Farm Screen required Touch Recommend Touch Edit Touch blue arrow next to Recommendation to copy Enter new Job Number, Advice and Remarks as required Touch Done on “Copy to New..” screen Touch Done on Recommendation screen Your Recommendation has now been copied. To edit 1. Touch on required Recommendation (big R) on Recommendation screen 2. Touch Mix1 to open fields for modification 3. Follow steps above to Create a Spray Recommendation 5.4.5 Applications – Action a Spray Recommendation On top of being able to create and view Spray Recommendations, the App has the ability to record Actions on these, with status options including Pending, In Progress, Complete and Not Implemented. Applications can be recorded within the program, and are accessed through the Farm screen within Ag-Chemical Program. Follow steps below to make Application notes on a specific Recommendation. 1. Open Farm screen for appropriate Trading Name a. From Log in screen, Touch Ag-Chemical Program (or Skip) b. Touch required Trading Name (scroll down if required) c. Touch required Farm Name (scroll down if required) 2. Touch Application A list of your Recommendations pertaining to this Farm should now be visible. 3. Touch the required Recommendation details to continue 4. Touch Add Application Event 5. Enter Start and End time details as requested a. Touch in white bar required b. Enter details using keyboard on device 6. Scroll down to view more options / fields There is a lot of information that can be recorded on this screen, including entry details, weather details and even down to recording neighbour notification and warning signs. These buttons are “swiped” ON or OFF by touching on the grey dot. Enter any relevant details for your own situation, the only requisite data is that with “required” written in grey in each white bar. 7. Touch Done when complete 8. Touch Recommendation This will bring you back to the Recommendation screen. From here, we need to change the Status of the Recommendation. 9. Touch the blue arrow next to the required Recommendation 10. Touch the required status (Pending, In Progress, Complete, Not Implemented) 11. Touch blue arrow again to confirm selection The Application record of your Spray Recommendation has now been completed, and saved. 5.5 Paddock Diary The Paddock Diary is your Friend in the Field! This is designed to help you easily and conveniently record observations in text, photo, video or voice clip form. For ease of access, the Paddock Diary can be found on both the Log In screen, and within the Ag-Chemical section at the Farm screen. 5.5.1 Add Entry to Paddock Diary From the Log in screen, please follow these steps below to add a diary entry. 1. Touch Paddock Diary 2. Touch required Trading Name (scroll if required to find) 3. Touch Diary on the farm screen 4. Touch Add Diary 5. Enter details as required a. Touch in each white bar, using the keyboard on your device to enter details b. Scroll down for further options Media such as photos, videos and voice clips can also be added to the Paddock Diary. To use these facilities, follow instructions below: 6. Scroll down and touch Add Media at the bottom of the Add Diary page 5.5.1.1 For visual media 1. Touch Capture To take a photo 1. 2. 3. 4. Focus on the image required Touch the camera at the bottom of your screen To continue, press Use. Retake image if incorrect Touch Done when complete To take a video 1. Swipe from the camera picture to the video picture in the bottom right corner of your screen 2. Press red dot to record 3. Press red dot again to finish recording 4. Select Use or Retake as required 5. Touch Done when complete 5.5.1.2 For audio media 1. Touch Talk 2. Record your voice clip 3. Touch Talk Off when complete 4. Touch ‘Play’ arrow to hear back 5. Touch Done when complete Repeat steps above to add additional media. Several options are now available; this can be viewed and sent to an email or incorporated into a Recommendation. 5.5.2 Send Paddock Entry by email Paddock Entry files can be sent by email for your records. Please note: Internet connection required. 1. Touch Preview 2. Touch Send to continue a. Touch Add Diary to modify prior to sending 3. Enter recipients a. Touch in white bar next to To or CC and use keyboard on device 4. Touch Send An automatic SMS may pop up at this point, press Cancel if this is not required and follow instructions below to turn this function off, or enter recipient number and touch Send. To send SMS notification manually: 1. Touch SMS bubble 2. Enter recipient mobile number using keyboard on device 3. Touch Send To turn automatic SMS function Off or On 1. Touch Settings 2. Touch “SMS after sending report by email” On or Off as required 3. Touch Done 5.6 Mapping Farms and Paddocks can be mapped in the Back Paddock Mobile App to provide a visual representation of your area. The following is designed to help familiarise yourself with the processes involved in using this tool. 5.6.1 Finding your current location The mapping feature in your App can be accessed from the Farm screen. 1. 2. 3. 4. 5. 6. Touch Ag-Chemical Program (or Skip) Touch Trading Name Touch Farm Touch Map Touch Locate Touch Satellite if preferred The App will now zoom to your location, with a blue dot representing your current position. 5.6.2 Finding a different location To search on your App for a different location close to your current position, it is often easiest to use the processes above to give yourself a reference point from which the map can be manipulated. Manipulation of the map follows standard iPhone / iPad processes; you “pinch in” to zoom out on your screen, and “pinch out” to zoom in. 1. Touch Map on the Farm screen to open Mapping component 2. Zoom in on map of Australia Place your two fingers over area on map to expand Retain contact to screen and slowly spread your fingers apart 3. Move map left or right as required To move map left, touch on right side of map and slide finger Left across screen To move map right, touch on left side of map and slide finger Right across screen 4. Continue to “zoom” and “move” map until desired location is found Please note: View can be changed from map view (as above) to Satellite by touching “Satellite” icon in bottom bar of map. Troubleshooting during Mapping: The screen shown below is displayed when the App is zoomed too far in. To show image, zoom out slightly by pinching fingers together on screen from the edges to the centre of the screen. 5.6.3 Creating a Paddock Boundary Once the farm and paddock have been located, zoom in as much as possible for improved accuracy. To stop your screen jumping to your searched location, turn “Locate Off” if it is turned on. 1. Touch Commands 2. Touch Add Layer for Paddock 3. Touch the Paddock Name required 4. Drop Pins in corners of your paddock in a clockwise direction a. Touch and hold on corner of Paddock to Drop Pin b. Move erroneous pins by touching and holding on Pin until it jumps up, drag to new location 5. Touch OK when complete A polygon of your paddock will appear as above. If satisfied, this Paddock has been mapped. 6. Touch Farm to save these changes 5.6.4 Adding a Hole to a Paddock It is simple to add Holes to a Paddock from within the Back Paddock Mobile App. 1. 2. 3. 4. 5. 6. Touch Map from Farm screen to open Mapping Touch Select Layer Touch Paddock name required Touch Commands Touch Add Hole to Paddock Drop Pins in corners of the hole, in a clockwise direction o Touch and Hold on first corner to Drop Pin o Repeat for remaining corners o Move Pin by touching and holding Pin until it jumps up, drag to new location 7. Touch OK when complete 8. Touch Farm to save changes to Paddock A Hole has now been created in your Paddock. 5.6.5 Edit a Created Paddock or Hole If your Paddock shape doesn’t appear quite as you require, or if Paddock boundaries change it is simple to change these within the App. 1. Touch Map from Farm screen to open Mapping The App will automatically open Mapping at your paddocks location. 2. 3. 4. 5. Touch Select Layer to choose a Paddock Touch on the required Paddock Name Touch Commands Touch Edit Paddock From here, it is possible to move the existing Pin/s, or simply delete them and start again. Follow relevant option below to continue. 5.6.5.1 Move existing Pins 1. Touch and hold on required Pin until it ‘jumps up’ 2. Drag to new location a. Without removing finger, slide to new required location b. Remove finger to drop Pin 3. Continue to move pins as required 4. Touch OK when complete 5.6.5.2 Delete a Pin entirely Sometimes, the Pins we drop just don’t want to play the game, and it’s easier to start from scratch. There are two ways of deleting these Pins, both equally effective. Method 1: 1. Touch erroneous pin once 2. Touch red X 3. Touch Delete Method 2: 1. 2. 3. 4. 5. Touch Select a Pin Touch red Negative sign to left of errant Pin Touch Delete Touch Done Touch OK to complete 5.6.6 Removing Holes, or entire Paddocks from Mapping 1. Touch Map from Farm screen to open Mapping 2. Touch Select Layer 3. Touch Appropriate Layer to Edit / Delete a. This could be your Paddock Boundary, or Interior Polygon (Hole) 4. Touch Commands 5. Touch Delete Layer (as shown for Paddocks) or Delete Interior Layer (for Holes) The App will prompt you – “Do you want to delete the Layer: xxx” 6. Touch OK to Delete 7. Touch Cancel to return without deleting 5.6.7 Mapping Help From any point within the program, a Help section is available by touching on the Help icon in the bottom right corner. This contains four pages of information that provide a general guide to different steps within the Mapping system. 5.6.8 Mapping Settings Settings are available at all points within the Mapping system, and allows the user to turn Snap Point on or off. Snap Point is used for boundary fences, and allows the user to “snap” to the closest pin when adding a secondary boundary fence. This should be turned Off if paddocks do not share a boundary, for example, if there was a gully or non-arable land between the two. 6. Help please! We at Back Paddock understand that everyone is different and learns in different ways. To facilitate this and make our products more accessible for everyone, we have a plethora of different ways and means of obtaining assistance in any situation. 6.1 I like to talk to real people That’s fine by us! We have a HelpDesk service that operates Monday to Friday 7:30am – 5pm on free call 1800 557 166 and we are always happy to take your call. 6.2 I like to see things visually Easy done. We hold webinar sessions every week that are a free for all. There are designated session times for each of our products, but with two solid days a week chockas full of webinars, we’re sure we can help you out quickly. Check out: http://www.backpaddock.com.au/services/back-paddocktraining/back-paddock-system-training/ for more info. 6.3 Visually, yes, big crowd no! Never you fear; we cater for you too. Private sessions can be arranged if you say please very nicely, and send an email through to [email protected] Alternately, there are a few videos on various processes available online at http://www.backpaddock.com.au/help-desk/ This gets updated frequently, so if you have a question about something that’s not up there, let us know and we may just create one inspired by your request! 6.4 I like to work through notes in my own time Not a problem! As well as this user manual, we have a heap of Help Sheets available online to point you in the right direction, get you started, and save you from any sticky situations you might find yourself in. Visit: http://www.backpaddock.com.au/help-desk/ for the full list organised by program. 6.5 I want an answer now, but can’t call Have you seen met our Online Consultant? She’s friendly, patient, knowledgeable and about three clicks away! Reach her at http://www.backpaddock.com.au/help-desk/ by clicking on the Site Consultant button. 6.6 I just had a thought, and want an answer in the next few days. No big deal How about an email? We’ve usually responded by the end of the next business day, and this gives you a chance to send us your thoughts or questions at any hour of the day or night! Give us a yell at [email protected] Good luck, and have fun! Back Paddock Team. Ph: 1800 755 166 E: [email protected] W: www.backpaddock.com.au