1
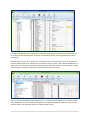
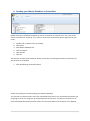
ADVISER MANUAL – About the MDB
Integrity | Innovation | Mateship | Copyright 2013
Contents
1.
Overview ......................................................................................................................................... 2
2.
Quick Question and Answer time ................................................................................................... 2
3.
4.
2.1
What is a Master Database? ................................................................................................... 2
2.2
Can I have more than one Master Database? ........................................................................ 2
2.3
Can I share my Master Database? .......................................................................................... 2
2.4
Can I synchronise my Master Database? ................................................................................ 2
2.5
Can I share my Master Database with another user through CornerPost?............................ 2
2.6
Can I keep my old one if I get updated? ................................................................................. 3
2.7
Can I adjust my Master Database down the track? ................................................................ 3
2.8
Can we merge Master Databases? ......................................................................................... 3
The Buttons ..................................................................................................................................... 3
3.1
Hide Excluded Items................................................................................................................ 3
3.2
Exclude All Items in Table ....................................................................................................... 3
3.3
Un-exclude All Items in Table ................................................................................................. 3
3.4
Show Product Codes ............................................................................................................... 4
3.5
Tools Tab ................................................................................................................................. 4
Choose Master Database file .......................................................................................................... 4
4.1
5.
Alternate method to set Master Database file ....................................................................... 5
Customise your Master Database ................................................................................................... 6
5.1
Reducing your Master Database ............................................................................................. 6
5.2
Adding items to / modifying your Master Database............................................................... 8
5.3
Default Map Colours ............................................................................................................... 8
5.4
Update Client From Master .................................................................................................... 9
6.
Sending your Master Database to CornerPost ............................................................................. 10
7.
Help please! .................................................................................................................................. 11
7.1
Talking to Real People ........................................................................................................... 11
7.2
See things Visually................................................................................................................. 11
7.3
Notes to look at it in my own time ....................................................................................... 11
7.4
Phones are down, need help! ............................................................................................... 11
7.5
Non-urgent brainwave in the middle of the night? .............................................................. 11
1|Page
ADVISER MANUAL – About the MDB
1. Overview
By now, there may be some confusion surround the Master Database. What is it? Can you have
more than one? Can you share them? Can you synchronise it with other devices under your account,
or share with someone else through CornerPost? Read on to learn all the ins and outs of the Master
Database (MDB). If you are looking for a basic Set Up guide, jump back through Adviser Manual –
Create the Shell for a quick overview.
2. Quick Question and Answer time
2.1 What is a Master Database?
The Master Database is a catalogue of crop, fertiliser, chemical and timing information that is used
throughout your program. In the Master Database provided with your program, we have prepopulated some of the common vendors, chemicals, fertilisers and crops to give you a bit of starting
point. Once this has been installed on your computer, you are able to modify and expand as your
need dictates. This also incorporates some basic pricing information for you to refine with prices
relevant to your situation. This enables what you see in your program to be 100% relevant to your
area, and even more importantly, your business.
2.2 Can I have more than one Master Database?
Yes, these are saved on your local directory and can be accessed individually through your program.
One example of this might be if you are contracted to do work with an organisation that also uses
Back Paddock, they may wish for you to use their Master Database to ensure correlation of
products, seeds and pricing. This is easily achievable.
2.3 Can I share my Master Database?
Absolutely, once that Master Database has been installed on your computer you may do with it as
you will. These are manually shared by email or USB to other users through each local directory.
2.4 Can I synchronise my Master Database?
Your Master Database can be synchronised and shared with your devices (for example, iPad,
iPhone).
2.5 Can I share my Master Database with another user through CornerPost?
On your computer this is not available. However, we are now able to set up a special link to enable
your Master Database to be shared with another users’ Mobile App. Contact our Help Desk to see if
you may be eligible for this exciting new development.
2|Page
2.6 Can I keep my old one if I get updated?
Absolutely. By design, an update should not affect your Master Database. However, to ensure data
preservation and to make your database easily identifiable when switching between multiple .pm
files, renaming “AdviserManager.pm” to a unique name is best practice, ensuring you keep the
“.pm” extension. You will need to Choose Master Database file after this process to tell your
program what the new name of your Master Database file is.
2.7 Can I adjust my Master Database down the track?
You sure can. This can be modified at any time; however, the changes will need to be pushed
through to your Client File once complete. Any modifications that you would like to synchronise will
need to be re-sent to CornerPost and retrieved on other devices. We recommend keeping this type
of manipulation to a minimum once your program is in the full swing of things, with perhaps
scheduled quarterly modifications as required.
2.8 Can we merge Master Databases?
Unfortunately not. While Master Databases can be shared between Users there is no functionality to
allow your list to be ‘combined’ with that of another user.
3. The Buttons
The buttons above are what will be shown throughout your Master Database. While these are
mostly self-explanatory some do justify a bit of an explanation.
3.1 Hide Excluded Items
This tells the program that you only want to visually see the list of things that you have “unexcluded”
in your Master Database. This is great to double check against your required entries and reduces the
cross-eyed glaze that some of us get when staring at tiny tables with hundreds of entries! This can
be clicked on or off, and does not affect the information available as such.
3.2 Exclude All Items in Table
This will sweep everything in your highlighted table (visible in the right pane) with one large Exclude
brush. Clicking this will generate a warning, as this can potentially overwrite any prior customisation
you have done. Select this if you are in the basic set up mode, or giving your Master Database a
complete overhaul and want to override existing customisation.
3.3 Un-exclude All Items in Table
This will make everything in your Master Database in the highlighted table available in your program.
This will also come up with a confirmation message as this overrides any existing exclusions.
3|Page
3.4 Show Product Codes
Clicking this will show you a generally hidden column in your table for Product Code information.
3.5 Tools Tab
This is a quick way to allow the user to allocate individual chemicals to a new/different Vendor if
required.
4. Choose Master Database file
If you are one of the lucky people that have several Master Database files to choose from, you will
need to tell the program which one you want it to use. The easiest way to choose this is through the
Master Database itself.
1. Double click on the Adviser icon on your desktop
2. Click Home tab
3. Click Master Database disc
You will now have the screen as shown above. This is the Master Database file that your program is
currently looking at.
4. Click on Disc in top left corner
5. Click Set Master File
6. Click Browse
4|Page
You are now taken to your local directory. Navigate to where your required Master Database file is
located.
7. Click required Master Database (.pm type) to highlight
8. Click Open
9. Click Done
Your Master Database file has now been set.
4.1 Alternate method to set Master Database file
Sometimes, you just need another way of doing things.
1.
2.
3.
4.
5.
6.
7.
8.
9.
10.
Double click on Adviser icon on your desktop
Click on File
Click on Options
Click on Current Master Data File to highlight
Click on the three dots (to the right) to open directory
Navigate to your required Master Database file (.pm type)
Click on your required Master Database file to highlight
Click Open
Click Apply
Click OK
5|Page
5. Customise your Master Database
Picture this: we have information for about 95% of any of the crops, varieties, fertilisers, operations
and timing comments that our users require all located in our Master Database. These populate the
drop down menus throughout your program. Chances are there are going to be large chunks of
information that you never use. Our goal here is to cut this list down to things that you actually use
to save you flicking through acres of superfluous information.
1. Double click on Adviser icon on desktop to open program
2. Click Home
3. Click Master Database
The terminology we use within the Master Database is “Exclude” and “Unexclude”. If something has
a tick next to it that means it is Excluded (not included) in the lists within the program. Items without
ticks are Unexcluded (included). Well confused? Just take it steady, one section at a time and be
methodical.
5.1 Reducing your Master Database
Starting at the beginning, so with Crops. There are layers in the Master Database, they are classified
by Crop first, then variety. Excluding an item at the top of the ladder will exclude items underneath it
further down the ladder. For example, if you exclude all Narrow Leaf Monocots, you will not be able
to see any barley, sorghum, oats, wheat etc.
6|Page
Clicking on the plus sign to the left of the classification (eg. Narrow Leaf Monocot) will show you a
list of Crops in the left hand pane, and their corresponding Variety in the right hand pane. Layer
upon layer!
Exclude crops that you don’t require first, and then varieties. You may find it easier to “Exclude All
Items in Table” and then un-tick the ones you want to see. As a check, click “Hide Excluded Items” to
show you a list of only those you have included for your database. Click this red cross again to make
all lines appear. Continue to Exclude or Unexclude down the list of crops.
By now, you have probably got the hang of this. It’s a similar story for Fertilisers. If you click on the
word “Fertilisers” the list of vendors will appear in the right hand pane for selection. Click on each
vendors name in the left hand pane to see their fertiliser range.
7|Page
5.2 Adding items to / modifying your Master Database
We’ve tried to follow a central theme here. It is easily possible to add new items to your Master
Database by selecting “Add New Record” from your chosen location. This is situated in the top left
corner of your screen and appears as per below.
Clicking this will enter a new line at the bottom of the screen that you are on (right hand pane). In
the example below, Add New Record has been clicked with Crops highlighted. This will allow us to
add a new Crop Category.
Details should then be entered as required. Click in any cell on the right hand pane to make
adjustments to names or spelling as required.
Real time data editing is used to save changes to the Master Database, meaning that when data is
entered into a cell the very minute you click off that cell the data is saved as a permanent record.
Close out of your Master Database by clicking on the X in the top right corner of your screen.
The Master Database also includes default information for prices, expected yields, nutrient levels,
rates and much more. These are easily modified to suit your situation by clicking in each cell and
typing the new number. This will save you modifying it in your program each and every time that
product is selected.
5.3 Default Map Colours
Default map colours for each variety are also set in your Master Database. Selecting these will
ensure that colours remain the same each time.
8|Page
1.
2.
3.
4.
5.
Open Master Database
Click on plus sign next to required Crop Type
Click on the Crop name
Adjust the “Default Map Colour” in the right hand Variety pane
Close Master Database to save changes
We now want these changes to be implemented in the program.
5.4 Update Client From Master
This button allows the changes that we have just made to be immediately implemented in the
program. The steps below are for Default Map colours specifically, but ticking other boxes will adjust
what is updated appropriately.
6. Click on “Update Client from Master” in the Home tab
7. Tick “Default Map Formatting”
8. Click OK
These changes will now be pushed through from your Master Database to your active client file.
9|Page
6. Sending your Master Database to CornerPost
Unlike Client Files, the Master Database is sent to CornerPost in a section of its’ own. This can be
sent to CornerPost as a back-up, or in order to synchronise with another device registered in your
name.
1.
2.
3.
4.
5.
6.
Double click on Adviser icon on desktop
Click Home
Click Master Database disc
Click CornerPost
Click Upload
Click Yes
This process can take several minutes. Please ensure that you have good internet connectivity for
the duration of the Upload.
7. Click OK following successful upload.
Thanks for joining me in understanding your Master Database!
You are now in a position where you have customised the product, crop and timing information you
are going to see in your program. By completing these set-up steps, you will save yourself a lot of
time and complication down the track. Take a rest and come back to the next part of our Manual.
10 | P a g e
7. Help please!
We at Back Paddock understand that everyone is different and learns in different ways. To facilitate
this and make our products more accessible for everyone, we have a plethora of different ways and
means of obtaining assistance in any situation.
7.1 Talking to Real People
That’s fine by us! We have a HelpDesk service that operates Monday to Friday 7:30am – 5pm on free
call 1800 557 166 and we are always happy to take your call.
7.2 See things Visually
Private webinar sessions can be arranged if you say please very nicely, and send an email through to
[email protected] Alternately, there are a few videos on various processes available
online at http://www.backpaddock.com.au/help-desk/ This gets updated frequently, so if you have
a question about something that’s not up there, let us know and we may just create one inspired by
your request!
7.3 Notes to look at it in my own time
Not a problem! As well as this user manual, we have a heap of Help Sheets available online to point
you in the right direction, get you started, and save you from any sticky situations you might find
yourself in. Visit: http://www.backpaddock.com.au/help-desk/ for the full list organised by program.
7.4 Phones are down, need help!
Have you seen met our Online Consultant? She’s friendly, patient, knowledgeable and about three
clicks away! Reach her at http://www.backpaddock.com.au/help-desk/ by clicking on the Site
Consultant button.
7.5 Non-urgent brainwave in the middle of the night?
How about an email? We’ve usually responded by the end of the next business day, and this gives
you a chance to send us your thoughts or questions at any hour of the day or night! Give us a yell at
[email protected]
Good luck, and have fun!
Back Paddock Team.
Ph: 1800 755 166
E: [email protected]
W: www.backpaddock.com.au
11 | P a g e