1
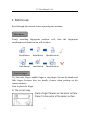
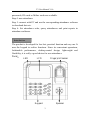
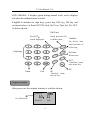
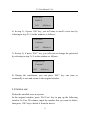
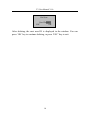
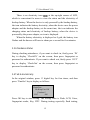
T2 User Manual
T2 User Manual V1.0
Contents
1. Before use .........................................................................................................1
2. Enrollment and Identification.............................................................................5
2.1 Fingerprint Enrollment............................................................................6
2.2 Password Enrollment ..............................................................................8
2.3 Delete a user...........................................................................................9
3. Other functions................................................................................................ 11
3.1 Time Setting ......................................................................................... 11
3.2 Power Management .............................................................................. 11
3.3 Attendance Status..................................................................................12
3.4 Test Automatically ................................................................................12
4. Attendance Management..................................................................................13
I
T2 User Manual V1.0
1. Before use
Read through this manual before operating this machine.
Must know
Firstly installing fingerprint machine well, then the fingerprint
enrollment and identification will be taken.
Enrollment
Installation
Identification
Enrollment
Installation
Identification
Enroll a finger
Use the index finger, middle finger or ring finger, but not the thumb and
little finger (because they are usually clumsy when pushing on the
sensor window).
How to place the finger:
1) The correct way:
Place a finger flatware on the sensor surface
Place it to the center of the sensor surface
1
T2 User Manual V1.0
2) The wrong ways:
Components
Component
USB
name
cable
Quantity
1
Switch power
Universal Adaptor plug
Backup
battery
1
1
1
About Use
The recommended steps:
Step 1: install the machine completely and power on.
Step 2: enroll the administrator and users. That is to enroll fingerprints,
passwords, ID cards or Mifare cards.
Step 3: user identification. Confirm whether the enrolled fingerprints,
2
T2 User Manual V1.0
passwords, ID cards or Mifare cards are available.
Step 4: user attendance
Step 5: connect with PC and use the corresponding attendance software
to download data etc.
Step 6: Set attendance rules, query attendances and print reports in
attendance software.
Introduction
The product is developed for low-lost, practical function and easy use. It
uses the keypad to realize functions. Since its convenient operations,
fashionable performance, desktop-seated design, lightweight and
flexibility, it is really a good choice for user attendance.
Panel:
LED
LCD
Fingerprint sensor
Keypad
Speaker
3
T2 User Manual V1.0
LED indicator: it displays green during normal work, and it displays
red when the authentication is failed.
Keypad: It includes the digit keys, power key, ESC key, OK key, and
six function keys of Enroll FP, PW/Card, Del User, Time Set, IN, OUT.
As below shown:
PW/Card:
Enroll FP:
Enroll password, ID
Enroll fingerprint
or Mifare cards
TimeSet:
Set device time
and fixed-time of
bell to ring
Digit keys
Del User:
Delete users
OUT:
‘CheckOut’ status
and ‘down’ key
Power
IN:
‘Check-in’ status
and ‘up’ key
Exit
Original window
After power on, the original window is as below shown:
Check-In
Or ‘Check-Out’
10:12
09-08-11
TUE
4
OK
T2 User Manual V1.0
2. Enrollment and Identification
For the first time to use the device, no administrator at this moment,
press the function key to enroll the administrator and users. Only one
administrator can be enrolled in the system, the number is 8888. Firstly
enrolling the administrator is recommended. If the administrator is
enrolled in the device, only users can be enrolled.
If there is no administrator, users can be enrolled by anyone. If
there is an enrolled administrator, users can’t be enrolled until passing
the administration identification.
Two enrollment modes of fingerprint, password are applied to
people groups with different fingerprint quality individually. Fingerprint
enrollment is applied to the people group with good fingerprint quality,
and most people are in this group. Fingerprint enrollment as well as
password enrollment is applied to the people group who can enroll
easily but authenticate difficultly, and a small part of people are in this
group. Password enrollment is applied to the people group who can’t
enroll fingerprints successfully, and about 1% percent of people are in
this group, maybe a little change in the actual use.
Before enrolling users, if there is an enrolled administrator, you
must authenticate the administrator status, Firstly press ‘Enroll’ key,
then the device displays ‘Administrator affirm’, at last press the
fingerprint or password of administrator to authenticate.
Note: if no administrator is enrolled, you don’t need the administrator
authentication.
5
T2 User Manual V1.0
2.1 Fingerprint Enrollment
1) In the original window, press ‘Enroll FP’ key to pop up the window
as follows:
Enroll FP
New Enroll?
ESC
OK
2)Press OK key to continue to display the window as follows:
Note: The ID number is 5 bits. If your ID number is less than 5 bits,
system will add 0 at the front of the digit automatically. For example:
the ID number is 1, the machine will display it as 00001.
New Enroll
User ID:
ESC
00001
OK
3) In ‘User ID’ column, input the number you want to enroll (the
number is from 1-65534) and press ‘OK’ key to confirm, then the screen
will inform ‘Place finger …’ as follows:
Note: If the User ID is 8888, you will enroll the only administrator.
New Enroll
00001-0
Place Finger……
ESC/Exit
4) After pressing the fingerprint for three times, system will enter into
the following window automatically. The fingerprint is enrolled
successfully. In this window, press ‘OK’ key to enroll new users, or
6
T2 User Manual V1.0
press ‘ESC’ key to enroll backup fingerprints of just enrolled user.
New Enroll
00001-0
ESC
OK (Save)
5) In step 4), if press ‘OK’ key, you can continue to enroll new users by
referring to step 1)-4) in the windows as follows:
New Enroll
Continue?
ESC
OK
6) In step 4) 5), if press ‘ESC’ key, you will start to enroll the backup
fingerprints by referring to step 1)-4) in the window as follows. You can
enroll nine backup fingerprints of the same user at most.
Backup Enroll
Continue?
User ID 00001
ESC
OK
7) During the enrollment, you can press ‘ESC’ key one time or
continually to exit and return to the original window.
7
T2 User Manual V1.0
2.2 Password Enrollment
1) Press ‘PW/Card’ key to enter into the menu. In User ID column, input
the number that you want to enroll (the number is from 1-65534), and
press ‘OK’ key to confirm.
New Enroll
User ID 00003
ESC
OK
3) In Input Pwd column, input the password (5 bits) and press ‘OK’ key.
New Enroll
Input Pwd *****
ESC
OK
4) Input the password again, if two passwords are not in the same,
system will inform you to input the password again.
New Enroll
Input Pwd *****
Pwd Affirm *****
5) If they are in the same, you will enter into the following window
automatically. The password is enrolled successfully. Press ‘OK’ key to
continue enrolling the password of new user, or press ‘ESC’ key to
change the password of just enrolled user.
Note: the letter ‘P’ in 00003-P indicates the password.
8
T2 User Manual V1.0
New Enroll
00003-P
ESC
OK(Save)
6) In step 5), if press ‘OK’ key, you will start to enroll a new user by
referring to step 2)-5) in the window as follows:
New Enroll
Continue?
ESC
OK(Save)
7) In step 5), if press ‘ESC’ key, you will start to change the password
by referring to step 2)-5) in the window as follows:
Chg Password
Continue?
ESC
OK(Save)
8) During the enrollment, you can press ‘ESC’ key one time or
continually to exit and return to the original window.
2.3 Delete a user
Delete the enrolled users in system.
In the original window, press ‘Del User’ key to pop up the following
window. In User ID column, input the number that you want to delete,
then press ‘OK’ key to delete it from the device.
9
T2 User Manual V1.0
Del User
User ID 00001
ESC
OK
After deleting, the next user ID is displayed in the window. You can
press ‘OK’ key to continue deleting, or press ‘ESC’ key to exit.
10
T2 User Manual V1.0
3. Other functions
3.1 Time Setting
In the original window, click ‘TimeSet’ key to enter into the time setting
window.
Scheduled 00:00
2009-7-30
9:38:55
ESC
OK
Press up or down key (IN or OUT key) to move the cursor to the
different position, and then change the corresponding time.
When the cursor is located in Scheduled, you can set the time for
the bell to ring. Then the bell will ring at the fixed-time 00:00. If the
cursor in located in Scheduled, you can press ‘Del User’ to change the
time as ‘--: --’, that is to close the fixed-time bell.
After setting, press ‘OK’ key to save the time and exit from the
time setting window with prompt voice ‘Thanks’
3.2 Power Management
The device is equipped with power with USB connector and backup
battery. When use power adapter with USB connector to supply power,
the backup battery is charged at the same time and the charging time
shouldn’t be less than 8 hours. When the power is off or unable to be
powered by power with USB connector, the device will be powered by
backup battery automatically and the saturated backup battery can
supply power to device for 3 hours.
11
T2 User Manual V1.0
There is an electricity icon
at the up-right corner of LCD,
which is convenient for users to view the status and the electricity of
backup battery. When the device is only powered by the backup battery,
the icon indicates the battery electricity; when the device uses the power
adapter and the backup battery at the same time, the icon indicates the
charging status and electricity of backup battery; when the device is
powered by the power adapter, no icon is displayed.
When the battery electricity is displayed as 0 grid, the battery icon
flashes and the buzzer will buzz to alarm per a second for five minutes.
3.3 Attendance Status
During checking attendance, if you want to check in, firstly press ‘IN’
key to display ‘Check-IN’ on the screen, then press fingerprint or
password to authenticate. If you want to check out, firstly press ‘OUT’
key to display ‘CheckOut’ on the screen, then press fingerprint or
password to authenticate.
3.4 Test Automatically
In the original window, press ‘6’ digital key for four times, and then
press ‘TimeSet’ key to display as follows:
Flash Test
Pls Keep Pwr ON
Continue?
ESC
OK
Press OK key to start testing. The testing order is Flash, LCD, Voice,
fingerprint reader, Key, RTC. During testing especially flash testing,
12
T2 User Manual V1.0
please guarantee the stability of power, otherwise the hardware of
system maybe be damaged.
4. Attendance Management
This device is to record attendance time, and the attendance software is
to deal with report statistics. The device can be connected with PC
directly through USB cable. The way to operation the attendance
software, please refer to <<Management System Explanation>>.
13