1
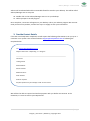
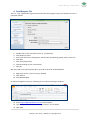
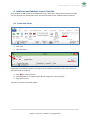
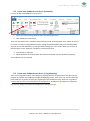
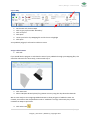
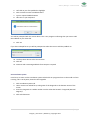
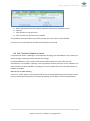
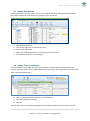
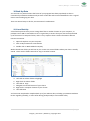
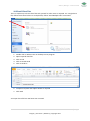
Adviser / Manager – Create the Shell
Contents
1.
Overview ........................................................................................................................................................ 1
2.
Download and Install Adviser ........................................................................................................................ 1
3.
Provide Contact Details .................................................................................................................................. 2
4.
Send Request File ........................................................................................................................................... 3
5.
Activate your Adviser program ...................................................................................................................... 4
6.
Create a Client File ......................................................................................................................................... 5
7.
Enter Client Details ........................................................................................................................................ 6
8.
Add Farms and Paddocks to your Client File .................................................................................................. 7
8.1
Create new Farms ................................................................................................................................. 7
8.2
Create new Paddocks and Areas (manually) ......................................................................................... 8
8.3
Create new Paddocks and Areas (using Mapping) ................................................................................ 8
Import Map .................................................................................................................................................... 9
Assign Paddock Name .................................................................................................................................... 9
Set Coordinate System ................................................................................................................................. 10
8.4
Edit / Exclude Paddocks or Farms ....................................................................................................... 11
Word to the wise RE: Deleting ..................................................................................................................... 11
9.
Customise your Master Database ................................................................................................................ 12
9.1
Reducing your Master Database ......................................................................................................... 13
9.2
Adding items to / modifying your Master Database ........................................................................... 13
9.3
Default Map Colours ........................................................................................................................... 14
9.4
Update Client From Master................................................................................................................. 14
10.
Back Up Data ........................................................................................................................................... 15
10.1
Local Back Up ...................................................................................................................................... 15
10.2
Back up to CornerPost ......................................................................................................................... 16
10.3
Email Client Files ................................................................................................................................. 17
Send Multiple Files ....................................................................................................................................... 18
11.
Help please! ............................................................................................................................................. 19
11.1
Talking to Real People ......................................................................................................................... 19
11.2
See things Visually ............................................................................................................................... 19
11.3
Notes to look at it in my own time ...................................................................................................... 19
11.4
Phones are down, need help! ............................................................................................................. 19
11.5
Non-urgent brainwave in the middle of the night? ............................................................................ 19
Adviser / Manager – Create the Shell
ADVISER MANUAL – Create the shell
1. Overview
Welcome to Back Paddock Adviser! It is assumed at this point that the decision has been made to
purchase this product, so you are all well aware of the basic functionality of the program. This guide
will take you through some of the start-up procedures we recommend in the Adviser program, and
the basics of getting started. This user guide will cover Adviser Professional, please note not all
features will be available in Adviser Standard but none shall differ. This is going to start right at the
beginning, so please feel free to skip ahead until you hit something you aren’t aware of.
2. Download and Install Adviser
So, the decision has been made to purchase the Adviser program, congratulations! This program is
downloaded from our website.
1.
2.
3.
4.
5.
6.
7.
8.
9.
Open Internet Explorer (preferred browser)
Go to www.backpaddock.com.au
Click on the heading “Products”
Click on Back Paddock Adviser
Click on Download Adviser v10
Click on correct link – Internet Explorer or Other browsers
Click Save
Choose Desktop as Save location
Click OK
1|Page
Integrity | Innovation | Mateship | Copyright 2013
Adviser / Manager – Create the Shell
Adviser will now download and the executable file will be saved to your desktop. This will be called
Adviser/Manager.exe or setup.exe
10. Double click on the Adviser/Manager.exe icon on your desktop
11. Follow prompts to install program
Once complete, a new icon will appear on your desktop. This is your Adviser program. We are now
ready to licence this product, and the first step is to supply us with your information.
3. Provide Contact Details
If this has not already been completed, we will require the following information to set you up as a
customer in our system. This can be emailed to [email protected] following the
template below.
To: [email protected]
Subject: New client – Requesting **** Program
__________________________________________________________________
Full Name:
Trading Name:
Postal Address:
Phone Number:
Mobile Number:
Email address:
Product required:
Payment preference: for example; credit card or invoice
We will then be able to respond and confirm payment with you before we continue. In the
meantime, it is time to send us your Request File.
2|Page
Integrity | Innovation | Mateship | Copyright 2013
Adviser / Manager – Create the Shell
4. Send Request File
This is a “.req” type file that is generated from within the program using your computer ID. This is
computer specific.
1.
2.
3.
4.
5.
6.
7.
Double click on the new Adviser icon on your desktop
Click Request Licence
Enter your full name, trading name, and location (eg. Desktop, laptop, office, home etc)
Click Next
Click Save (request file)
Choose Desktop as your save location
Click OK
We now need to send this request file in an email to the team at Back Paddock.
8. Right click on the “.req” file on your desktop
9. Click Send To
10. Click Mail Recipient
An email message box will open, allowing you to continue entering a recipient.
11. Enter [email protected] as the recipient
12. Type “Request file for <name>, <product name>” as the subject
13. Click Send
3|Page
Integrity | Innovation | Mateship | Copyright 2013
Adviser / Manager – Create the Shell
Your email message will now be on the way to us. Once we receive this and have confirmed
payment, we will issue you with your Licence File that will activate your program. Instructions for
this will be provided in the email and below.
If you have not received communication within 2 business days please don’t hesitate to contact us.
We may not have received your Request File.
5. Activate your Adviser program
Once payment has been received for your new program, you will be issued with an email that will
have your Licence File attached. This file activates your product, and has an expiry date of your
subscription term. These are generally replaced annually. Follow these steps to save the licence file,
called “Adviser.lic” into the correct location to activate your program.
1. Right click on the “Adviser.lic” file in your email
2. Click Save As
3. Navigate to this location: Documents\Back Paddock Company\Adviser
Note; you should see files as per below screen in front of you.
4. Click OK to save file in this location
Your program has now been activated. Double click on the Adviser icon on your desktop to open the
program for the first time.
Your program will open at the File tab, listing Recents, Open, New and Help. Click Help to read a bit
more about your program including version number, and licence expiry date. We may ask for this
information if you ever have any difficulties negotiating your new software.
4|Page
Integrity | Innovation | Mateship | Copyright 2013
Adviser / Manager – Create the Shell
1. Click on File
2. Click on Help
This information is located in the centre of your screen, as above.
At this point, it is well worth familiarising yourself with other sections of this Help tab to see what is
available within the program.
6. Create a Client File
Adviser users are able to create multiple Client Files, one per Client or Trading Name. This will
contain all of the information pertaining to them including Trading Names, Farms, Paddocks and the
Plan you create.
Before we begin, take a moment to think about your nomenclature. It’s important to stick to a
common format when creating multiple files. Are you going to use Trading Names or Client Names
as the file name? If you use Client names are they going to be “Surname, First name” or “Full name”?
Think about your clients, are there any that double up either way? In the program this will be listed
as the Trading Name, with Farms and Paddocks allocated under this.
5|Page
Integrity | Innovation | Mateship | Copyright 2013
Adviser / Manager – Create the Shell
1.
2.
3.
4.
5.
Double click on the Adviser icon on your desktop to open
Click on File
Click on New
Enter decided name of file
Click Save
Your new Client File will open at the Home page, ready to start entering more data.
7. Enter Client Details
Now, we suggest entering the client details including name and postal address. These details will be
displayed when reports are generated for the Client.
1.
2.
3.
4.
5.
6.
Click File
Click Info
Click Client Options
Click Client Details tab
Enter details as required
Click OK
Your client details are now entered.
6|Page
Integrity | Innovation | Mateship | Copyright 2013
Adviser / Manager – Create the Shell
8. Add Farms and Paddocks to your Client File
Now, we want to add the Farms and Paddocks to your client file in preparation for planning. Make
sure you have all your information ready, we will need Farm names, Paddock names and Areas.
8.1 Create new Farms
1. Click Farm
2. Click Edit Farms
Home Farm is the default name for your Farm. Click in the box to edit this name, and continue to
add more Farms as required.
3. Click
for extra Farm lines
4. Enter Information as required (Farm Name compulsory, other optional)
5. Click Close to save.
Your Farms are now successfully added.
7|Page
Integrity | Innovation | Mateship | Copyright 2013
Adviser / Manager – Create the Shell
8.2 Create new Paddocks and Areas (manually)
It’s time to add some Paddocks to your Farms.
1. Select correct Farm using the drop down box above Edit Farms
2. Click Add New to insert a line
There are two options here; standard and quick entry mode. Choosing Quick Entry allows the user to
hit “Enter” to create a new paddock line after typing the Paddock Name and Area. Standard mode
requires you to click Add New to create the fields; hitting Enter in this mode allows you to fill in all
tabs along the screen. Selection is based on personal preference.
3. Enter details as required
4. Select Broadacre in the drop down box under Prod System for each paddock (required)
Your paddocks are now created.
8.3 Create new Paddocks and Areas (using Mapping)
This is an exciting new feature of the program, enabling the user to import kml or shp files into our
program and create new paddocks through the Mapping system. Auto-areas can also be calculated
from these files. If you do not have any mapping files and would like some, check out our guide to
“Import KML files from created paddocks on Google Earth” available on our website to create kml
files for free! Simply download Free Google Earth and away you go.
8|Page
Integrity | Innovation | Mateship | Copyright 2013
Adviser / Manager – Create the Shell
Import Map
1.
2.
3.
4.
5.
6.
On the Farm tab, click on Maps
Click on grey square under “Boundary”
Click on Import
Click Open
Locate your kml or shp Mapping file and click on it to highlight
Click Open
Your paddock polygon/s will now be visible on screen.
Assign Paddock Name
1. Click Edit
If you would like the program to calculate the area of your paddocks through your Mapping files, this
should be selected now. Alternately, continue with step 4.
2. Click Auto-Area
3. Select 0.00 (two decimal places) for greatest accuracy using the drop down box beneath
We are now ready to start assigning Paddock Names to these polygons. If Paddock names are
created, we could use the drop down box next to “Paddocks” to assign. Alternately they can be
created from Maps as per below.
4. Click Select Tool
9|Page
Integrity | Innovation | Mateship | Copyright 2013
Adviser / Manager – Create the Shell
5.
6.
7.
8.
Left click on your first paddock to highlight
Click in white bar next to Paddock Name
Type in required Paddock Name
Hit Enter on your keyboard
You will be prompted with the screen above. This is our program confirming that you want to add
this Paddock to your client file.
9. Click Yes
If you have multiple farms you will be prompted to select the Farm to add this paddock to.
10. Use drop down box to select correct Farm
11. Click OK
12. Continue with remaining Paddocks from Step 4 as required
Set Coordinate System
From here, we must set the Coordinate system which tells our program where in the world our farm
is sitting. This is set by Zone, based on the longitude.
1. Click Coordinate System tab
2. Hover mouse over whole farm, taking note of the longitude in the bottom-centre of the
screen
3. Enter this longitude as a whole number into the white bar beneath “Longitude (Decimal
Degrees)”
4. Click Calculate Zone
10 | P a g e
Integrity | Innovation | Mateship | Copyright 2013
Adviser / Manager – Create the Shell
5.
6.
7.
8.
Select appropriate zone (for example Zone 55 in above) from drop down menu
Click OK
Click Save disc in top left corner
Click round circle, and Exit to close module
Your paddock names have been successfully created, and your maps correctly labelled.
From here, we recommend that the Master Database be customised.
8.4 Edit / Exclude Paddocks or Farms
To edit these in Adviser / Manager is a simple matter of typing over the Paddock or Farm name you
wish to change. Clicking off this bar will save the change.
Excluding Paddocks or Farms ensures that historical data remains for those fields, but this
information is not included in reporting. This is particularly useful if perhaps a Farm or Paddock is on
seasonal lease, has been flooded or is spelling. Tick in the Exclude box next to the required Farm or
Paddock to Exclude.
Word to the wise RE: Deleting
There is no “Undo” button in this program! We do not recommend deleting entries without careful
scrutiny of potential ramifications. For example, deleting a Farm deletes all associated Paddocks.
11 | P a g e
Integrity | Innovation | Mateship | Copyright 2013
Adviser / Manager – Create the Shell
9. Customise your Master Database
Next up, we will customise our Master Database. Picture this: we have information for about 95% of
any of the crops, varieties, fertilisers, operations and timing comments that our users require all
located in our Master Database. These populate the drop down menus throughout your program.
Chances are there are going to be large chunks of information that you never use. Our goal here is to
cut this list down to things that you actually use to save you flicking through acres of superfluous
information.
1. Double click on Adviser icon on desktop to open program
2. Click Home
3. Click Master Database
The terminology we use within the Master Database is “Exclude” and “Unexclude”. If something has
a tick next to it that means it is Excluded (not included) in the lists within the program. Items without
ticks are Unexcluded (included).
12 | P a g e
Integrity | Innovation | Mateship | Copyright 2013
Adviser / Manager – Create the Shell
9.1 Reducing your Master Database
Starting at the beginning, with Crops. There are layers in the Master Database, they are classified by
Crop first, then variety. Excluding an item at the top of the ladder will exclude items underneath it
further down the ladder. For example, if you exclude all Narrow Leaf Monocots, you will not be able
to see any barley, sorghum, oats, wheat etc.
Clicking on the plus sign to the left of the classification (eg. Narrow Leaf Monocot) will show you a
list of Crops in the left hand pane, and their corresponding Variety in the right hand pane. Layer
upon layer!
Exclude crops that you don’t require first, and then varieties. You may find it easier to “Exclude All
Items in Table” and then un-tick the ones you want to see. As a check, click “Hide Excluded Items” to
show you a list of only those you have included for your database. Click this red cross again to make
all lines appear. Continue to Exclude or Unexclude down the list of crops.
Continue to expand and contract each of the Headings on the left hand side. For example, if you click
on the word “Fertilisers” the list of vendors will appear in the right hand pane for selection. Click on
each vendors name in the left hand pane to see their fertiliser range.
9.2 Adding items to / modifying your Master Database
It is easily possible to add new items to your Master Database by selecting “Add New Record” from
your chosen ‘new record’ destination, this icon is situated in the top left corner of your screen.
Clicking this will enter a new line at the bottom of the screen that you are on (right hand pane).
Details should then be entered as required. Click in any cell on the right hand pane to make
adjustments to names or spelling as required.
Real time data editing is used to save changes to the Master Database, meaning that when data is
entered into a cell the very minute you click off that cell the data is saved as a permanent record.
Close out of your Master Database by clicking on the X in the top right corner of your screen
The Master Database also includes default information for prices, expected yields, nutrient levels,
rates and much more. These are easily modified to suit your situation by clicking in each cell and
typing the new number. This will save you modifying it in your program each and every time that
product is selected.
13 | P a g e
Integrity | Innovation | Mateship | Copyright 2013
Adviser / Manager – Create the Shell
9.3 Default Map Colours
Default map colours for each variety are set in your Master Database. Selecting these will ensure
that colours remain the same each time a Layer by crop is produced.
1.
2.
3.
4.
5.
Open Master Database
Click on plus sign next to required Crop Type
Click on the Crop name
Adjust the “Default Map Colour” in the right hand Variety pane
Close Master Database to save changes
9.4 Update Client From Master
This button allows the changes that we have just made to be immediately implemented in the
program. The steps below are for Default Map colours specifically, but ticking other boxes will adjust
what is updated appropriately.
6. Click on “Update Client from Master” in the Home tab
7. Tick “Default Map Formatting”
8. Click OK
These changes will now be pushed through from your Master Database to your active client file.
14 | P a g e
Integrity | Innovation | Mateship | Copyright 2013
Adviser / Manager – Create the Shell
10.Back Up Data
You are now in a position where the basics of your program have been populated, we have a
customised your Master Database and you have a client file with Farms and Paddocks. This is a good
time to start backing up your data.
There are several ways to do this, we recommend a combination.
10.1 Local Back Up
A local back up means that you are saving these files to another location on your computer, or
perhaps even a USB or external drive. This is a good way to ensure that your data is always backed
up in the event of a computer failure, and it is very simple to then transfer information without
internet connection.
1. Open File Explorer on your computer
2. Click on My Documents or Documents
3. Double click on Back Paddock Company
Within the Adviser folder you will see on your screen are several folders where your data is actually
stored. These are the folders we wish to copy to another location.
4.
5.
6.
7.
8.
9.
Left click on Adviser folder to highlight
Right click on Adviser folder
Left click on Copy
Navigate to external location of your choice
Right click in computer location of your choice
Left click Paste
You have now completed a complete back up of your Adviser data, including your Master Database.
Do this regularly (monthly, or more often during peak periods) to ensure data safety.
15 | P a g e
Integrity | Innovation | Mateship | Copyright 2013
Adviser / Manager – Create the Shell
10.2 Back up to CornerPost
CornerPost is the name we give our database system; this is used to back up or synchronise data
between devices and as a reporting tool. Using this as a back up location creates a file on the server
that is available to download at any point, on to any device that uses your credentials.
1.
2.
3.
4.
Double click on Adviser icon on your desktop to open program
Open required client file
Click on File
Click on CornerPost
It is from here that we can send and retrieve from CornerPost, and see what files might be available
for us.
5. Click on Send
This may take several minutes. Once complete, the box below will appear as confirmation.
6. Click OK
Your data has now been successfully backed up to CornerPost, to retrieve to your PC or other
devices as required.
Click here to read our CornerPost module and become a professional ‘CP’ user.
16 | P a g e
Integrity | Innovation | Mateship | Copyright 2013
Adviser / Manager – Create the Shell
10.3 Email Client Files
This is a simple way to share client files with yourself or other users as required. For a single client
file, follow instructions below. For multiple files, follow “Send Multiple Files” instructions.
1.
2.
3.
4.
5.
Double click on Adviser icon on desktop to start program
Open required client file
Click on File
Click on Save & Send
Click on Send to…
6. Complete recipient and subject details as required
7. Click Send
Your open client file has now been sent via email.
17 | P a g e
Integrity | Innovation | Mateship | Copyright 2013
Adviser / Manager – Create the Shell
Send Multiple Files
Exact steps may differ with different computers, but it is easily possible to ‘bulk share’ client files for
emailing or saving purposes.
1.
2.
3.
4.
5.
Open File Explorer on your computer
Click on My Documents or Documents
Double click on Back Paddock Company
Double click on Adviser
Double click on Clients
This is where your client files are actually stored. These will be file type “.adv” and can only be
opened through the Adviser program. Follow instructions below to send to a mail recipient.
6. Left click on required client file
Tip: Hold Control and left click on multiple if required
7. Right click on highlighted file
8. Left click on “Send To”
9. Left click on Mail Recipient
An email should now be opened with several client files attached
10. Enter recipient details and subject as required
11. Click Send
Take care not to delete these files. They are your actual client file data including Farms, Paddocks
and client information as created in this document.
Thanks for joining me in setting up your client file!
You are now in a position where you have created the shell to populate with your data. By
completing these set-up steps, you will save yourself a lot of time and complication down the track.
Take a rest and come back to the next part of our Manual.
18 | P a g e
Integrity | Innovation | Mateship | Copyright 2013
Adviser / Manager – Create the Shell
11.Help please!
We at Back Paddock understand that everyone is different and learns in different ways. To facilitate
this and make our products more accessible for everyone, we have a plethora of different ways and
means of obtaining assistance in any situation.
11.1 Talking to Real People
That’s fine by us! We have a HelpDesk service that operates Monday to Friday 7:30am – 5pm on free
call 1800 557 166 and we are always happy to take your call.
11.2 See things Visually
Private webinar sessions can be arranged if you say please very nicely, and send an email through to
[email protected] Alternately, there are a few videos on various processes available
online at http://www.backpaddock.com.au/help-desk/ This gets updated frequently, so if you have
a question about something that’s not up there, let us know and we may just create one inspired by
your request!
11.3 Notes to look at it in my own time
Not a problem! As well as this user manual, we have a heap of Help Sheets available online to point
you in the right direction, get you started, and save you from any sticky situations you might find
yourself in. Visit: http://www.backpaddock.com.au/help-desk/ for the full list organised by program.
11.4 Phones are down, need help!
Have you seen met our Online Consultant? She’s friendly, patient, knowledgeable and about three
clicks away! Reach her at http://www.backpaddock.com.au/help-desk/ by clicking on the Site
Consultant button.
11.5 Non-urgent brainwave in the middle of the night?
How about an email? We’ve usually responded by the end of the next business day, and this gives
you a chance to send us your thoughts or questions at any hour of the day or night! Give us a yell at
[email protected]
Good luck, and have fun!
Back Paddock Team.
Ph: 1800 755 166
E: [email protected]
W: www.backpaddock.com.au
19 | P a g e
Integrity | Innovation | Mateship | Copyright 2013