1
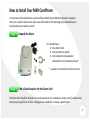
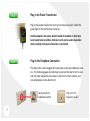
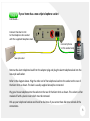
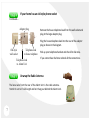
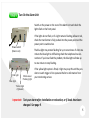
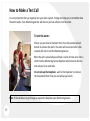
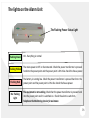
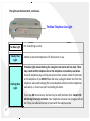
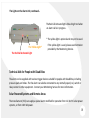
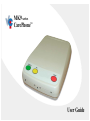
MK9 series
CarePhone™
User Guide
Please test your alarm regularly by making a test call to the Monitoring Service
and speaking to the Operator.
Also test your Alarm if the equipment has been moved or changed in any way.
If this equipment does not make a call to the Monitoring Service when activated,
or if help does not arrive as expected use another method to call for help.
Call your Monitoring Service for assistance BEFORE you enter into any
service contract for the National Broadband Network (NBN).
1
Table of Contents
Introduction
3
Installation:
How to Install Your MK9 CarePhone
Testing a New Installation
Mode-3 telephone Connection
ADSL Filters
Connecting Through a PABX
4
9
10
10
11
Operation:
Pendant and Watch Triggers
Making an Emergency call
How to Cancel an alarm
Answering the Phone with the Pendant or Watch
How to Make a Test Call
12
13
14
14
15
The Lights on the Alarm Unit
Questions & Answers
Notices
16
19
22
2
.
.
.
u
o
y
k
n
T ha
…for using the MK9 CarePhone medical alarm. We believe this equipment will help you to live independently in the safety and security of your own home for as long as possible.
This manual is a guide for operating and testing the MK9 CarePhone medical Alarm. In most cases the
alarm will be installed by a monitoring service, however the Installation section describes how to install the Alarm yourself if necessary.
The MK9 CarePhone should give many years of trouble free service, however, there are things you
need to know about the operation, testing and potential limitations of the equipment.
Your equipment consists of a Pendant or Watch and an Alarm Unit which is connected to the telephone line and a power point. When the button on the pendant, the watch, or the Alarm Unit is
pressed, the Alarm Unit will call the Monitoring Service.
The Monitoring Service Operator will automatically know who you are and that you need help, and
will then attempt to speak to you through the loudspeaker in the Alarm Unit. It is not necessary for
the Operator to speak to you, but if they can speak to you they will be able to determine the nature
of the problem and offer reassurance that help is on the way.
This equipment is designed and manufactured in Australia by VC International Pty. Ltd. (VCi), a design
and manufacturing company which benefits from over 30 years experience.
Please read this manual carefully, including the Notices section.
3
How to Install Your MK9 CarePhone
In most cases the medical alarm system will be installed by the Monitoring Service, however
there are occasions when some alarms are self-installed. The following steps describe how to
install and test your alarm yourself.
Unpack the Alarm
You should have:
● One Alarm Unit
● One pendant or watch
● One telephone line adaptor
connected to the telephone lead*
* supplied connected to the Alarm Unit.
Find a Good Location for the Alarm Unit
The Alarm Unit should be located next to a power point and a telephone socket, and if possible close
to where you spend a lot of time. A living area or a bedroom is always a good choice.
4
Plug in the Power Transformer
Plug in the power transformer and turn on the power-point. Check the
green light on the transformer comes on.
Double adaptors and power boards should be avoided as they have
been found to be unreliable. Extension cords can be used but position
them carefully so they do not become a trip hazard.
Plug-in the Telephone Connection
The Alarm Unit can be plugged into new-style or old-style telephone sockets. The following pages describe how to connect the Alarm Unit to new
and old style telephone wall sockets, and how to then connect your
house telephone to the Alarm Unit.
New style RJ-11
telephone socket
5
Old style 610
telephone socket
If your home has a new style telephone socket
Continued….
Connect the Alarm Unit
to the telephone line socket
with the supplied telephone lead
Connect phone
to this socket only
New style socket
Remove the alarm telephone lead from the adaptor plug and plug the alarm telephone lead into the
new-style wall socket.
Refer to the diagram above. Plug the other end of the telephone lead into the socket on the rear of
the Alarm Unit as shown. The lead is usually supplied already be connected.
Plug your house telephone into the socket on the rear of the Alarm Unit as shown. This socket is often
masked-off with a plastic cover which must be removed.
Pick-up your telephone handset and check for dial-tone. If you cannot hear dial-tone recheck all the
connections.
6
If your home has an old-style phone socket
Continued….
Adapter plug
Remove the house telephone lead from the wall socket and
plug-in the large adaptor plug.
Plug the house telephone lead into the rear of the adaptor
plug as shown in the diagram.
Old-style
wall socket
Telephone lead
to house telephone
Telephone lead
to Alarm Unit
Pick-up your telephone handset and check for dial-tone.
If you cannot hear dial tone recheck all the connections.
Unwrap the Radio Antenna
The loose wire from the rear of the Alarm Unit is the radio antenna.
Stretch it out to it’s full length and let it hang out behind the Alarm Unit.
7
Turn On the Alarm Unit
Switch-on the power on the rear of the Alarm Unit and check the
lights flash on the front panel.
If the lights do not flash, or if a light remains flashing yellow or red,
check the transformer is fully pushed into the power-point and the
power point is switched on.
Power switch
(Down is on)
Red light
The blue light may remain flashing for up to one minute. If after one
minute the blue light is still flashing check the telephone line connections. If you have fixed the problem, the blue light will take up
to one minute to stop flashing.
Multi-colour
Flashing light
If the yellow light option is fitted, it light may stay ON until the pendant or watch trigger is first operated. Refer to information from
your monitoring service
Blue light
Yellow light
(Optional)
Important: Test your alarm after installation or relocation, or if leads have been
changed. See page 9.
8
Installation Testing Procedure
Your new alarm system must be tested. Please follow these steps:
Let the Alarm Service Provider Know You’re Testing
Telephone the Monitoring Service and tell them that you are about to test your
new alarm and follow their instructions.
Determine the Range of the Pendant or Watch
To determine the range of the pendant or watch, have one person standing
by the Alarm Unit ready to push the cancel button, while a second person
operates the trigger from various locations around the home and garden.
Each time the alarm sounds push the cancel button to cancel the alarm.
To give a margin of safety, do not rely on more than half the actual range
found.
Make Your First Test Call
Refer to the section “Making a Test Call” on page 10 of this manual.
9
Mode-3 Telephone Connection
A Mode-3 telephone connection is a way of wiring a telephone line so the alarm will still work if any
extension telephones are left off-the-hook. If you have more than one telephone, or any other telephone equipment such as a dial-up modem or a FAX, we strongly recommend that the telephone line
is wired in Mode-3. Contact your Monitoring Service for more information.
Note: A Mode-3 connection will not be required if only ‘cordless’ phones are used and if the base station is connected to the telephone socket on the rear of the Alarm Unit or the adaptor supplied.
Important: If you do not have a Mode-3 connection the alarm will not work if any extension telephones, or any other equipment such as FAX machines or dial-up modems, are off-hook or in-use.
ADSL Filters
If the Internet is connected using an ADSL service you will need to connect an ADSL filter to stop the
ADSL signal interfering with the medical alarm.
The ADSL filter will remove the ADSL signal from
the alarm and any telephone connected to the
the Alarm Unit. It will also remove the ADSL from
any telephone socket wired in Mode-3.
To telephone
wall socket
Connect ADSL filter
in the Alarm Unit
telephone cord
Important: If an ADSL filter is not installed when required, the alarm may not work.
10
Connecting Through a PABX
To set the alarm to work through a PABX, locate the small switches on the bottom of the Alarm Unit
and set the PABX switch, as shown below.
The PABX access digit dialled is 0. Other access digits can be programmed on request.
PABX Access Switch
To dial through a PABX
set Switch 2 to ON.
Note: This equipment cannot be connected to a DIGITAL PABX system
11
Pendant and Watch Triggers
When pressed, the pendant or watch activates the Alarm Unit.
The red light shows that the pendant/watch button has been activated and a signal is being sent to the Alarm Unit.
The pendant/watch will normally work from around the home and
garden. Please see the information regarding the pendant/watch
range in the Notices section and the range testing procedure on
page 9.
The pendant/watch is waterproof to International Environmental
Protection Standard IP-67, but if you wear it in the bath or shower
please be certain to very regularly check its operation.
The internal battery will last for many years and cannot be replaced.
However, if for some reason the internal battery is getting low a
signal is sent to the Monitoring Service when you make a test call
and the Monitoring Service will send you a new pendant/watch.
Note: Watch triggers should be used with caution as an event
which incapacitates a users other hand will make it impossible to
activate activate the watch.
12
Making an Emergency Call
An emergency call can be made by pressing the pendant/watch or
the HELP button on the Alarm Unit.
Press the red button firmly for a few seconds and you will hear the
alarm sound from the Alarm Units loud speaker.
After about 10 seconds the Alarm Unit will start to call the Monitoring Service.
When the call is answered you will hear a series of tones, and after
a short time the Monitoring Service Operator will come onto the
line.
Remember it is not necessary for the Operator to be able to talk to
you for you to get help. They already have your details and will
know what to do.
If not successful on the first call attempt, the Alarm Unit will continue to make up to 30 calls in order to get help. The Alarm Unit will
automatically reset, ready for another activation, when the Operator has finished with the call.
13
How to Cancel the Alarm
The Cancel button on the Alarm Unit will stop the alarm. However,
a call can only be cancelled while the alarm is sounding and before
the Alarm Unit starts to make calls.
Don’t worry If you accidentally trigger the alarm and do not have
time to cancel the call. Just wait for the Operator to come on the
line and tell them you are OK.
Answering the Phone with the Pendant/Watch
You can answer a telephone call using the pendant/watch, and then hold a ‘hands-free’ telephone conversation through the loudspeaker in the Alarm Unit.
To answer a telephone call, press the pendant/watch while the telephone is ringing. At any time during
a ‘hands-free’ call, you can pick-up the telephone handset to change from ‘hands-free’ to a private telephone handset call.
To hang-up the call, press the pendant/watch again, or pick-up and replace the telephone handset.
Note: During a pendant/watch answered hands-free telephone call, an alarm activation will require
two presses of the pendant at least 4 seconds apart.
14
How to Make a Test Call
It is very important that you regularly test your alarm system. Testing also helps you to remember how
the alarm works. Your Monitoring Service will instruct you how often to test the alarm.
To test the alarm:
Ensure you are close to the Alarm Unit. Press the pendant/watch
button to activate the alarm. The alarm will sound and after a few
seconds will start to call the Monitoring Service.
When the call is answered you will hear a series of tones and, after a
short time the Monitoring Service Operator will come onto the line
and ask you if you need help.
Do not pick up the telephone - wait for the Operator to come on
the line and tell them that you are testing your alarm.
Note: If the call does not go through as expected, telephone your Monitoring Service.
15
The lights on the Alarm Unit
The Flashing Power Status Light
Flashing Green
OK - Everything is normal
Flashing Yellow
The mains power is OFF or disconnected. Check the power transformer is pressed
hard into the power point and the power point is ON. Also check the house power.
Flashing Red
The battery is running low. Check the power transformer is pressed hard into the
power point and the power point is ON. Also check the house power.
No Flashing
Light
The equipment is not working. Check that the power transformer is pressed hard
into the power point and it is switched on. Check the alarm is switch on.
Telephone the Monitoring Service for assistance.
16
The Lights on the Alarm Unit, continued…
The Blue Telephone Line Light
No Blue Light
OK - Everything is normal.
Steady Blue
Light
A Mode-3 connected telephone is off-the-hook or in-use.
Flashing Blue
Light
If the blue light remains flashing for a long time the alarm will not work. There
may a fault with the telephone line or the telephone connections, see below.
Check all telephone plugs are fully pressed into their sockets. Check for dial-tone
on the telephone. If you DO NOT hear dial tone, unplug the Alarm Unit from the
telephone wall socket and plug the house telephone directly into the telephone
wall socket, i.e. how it was prior to installing the alarm.
If you now DO hear dial-tone, the fault may be with the Alarm Unit. Contact the
Monitoring Service for assistance. Your telephone company may charge a call-out
fee if they are called and no fault is found with the telephone line.
17
The Lights on the Alarm Unit, continued…
The Red Call Activated light shines bright red when
an alarm call is in progress .
* The yellow light is optional and may not be used.
The Yellow Light*
If the yellow light is used, please see information
provided by the Monitoring Service.
The Red Call Activated Light
Technical Aids for People with Disabilities
The alarm can be supplied with various trigger devices suitable for people with disabilities, including
pressure pads and tubes. The the alarm can also be connected to any normally open (n.o.) switch or
relay contact in other equipment. Contact your Monitoring Service for more information.
Solar Powered Systems and Remote Areas
The manufacturer (VCi) can supply a special alarm modified for operation from 12-32V DC solar power
systems, or from 110V AC power.
18
Questions and Answers
Q How do I clean the equipment?
A Use a mild detergent on a damp cloth. Do not use harsh detergents or chemicals,
or too much water.
Q Should the alarm be tested?
A Yes, we recommend testing the equipment regularly. You should test your pendant
or watch regularly so you know how to use it in an emergency.
Q Can the alarm be installed with more than one phone?
A Yes, but see the important information in the section ‘Mode-3 Telephone Connection’.
Q What happens if the power fails, or during a black-out?
A The alarm will run for up to 70 hours on its internal battery.
(Unless the equipment is connected to the NBN in which case it will be 3-6 hours)
Q What if I set my alarm off by accident?
A The alarm can be cancelled while the alarm is sounding. If the call goes through
don’t worry, just tell the Operator you are OK.
Q I am changing my telephone company. Will this affect the Alarm?
A Not normally. If you are keeping the existing telephone line (PSTN) it should not affect the alarm.
19
Questions and answers continued ….
Q Can I use the alarm in an electrical storm?
A Yes, unlike your telephone, there is no danger in using the pendant or watch to call for help during
an electrical storm. However, avoid touching the wires or the Alarm Unit. Only use the pendant or
watch. After a severe storm it is always a good idea to test the telephone for dial-tone and also
test the alarm. See ‘Testing’ in this manual.
Q What happens if the telephone line is disconnected?
A The alarm cannot work without a working telephone line. The blue light will flash if the telephone
line is disconnected and will extinguish after it is re-connected. There are other telephone line
faults which cannot be detected. See the ‘Notices’ section in this manual.
Q Will the pendant or watch battery ever need replacing?
A Not normally. The battery is designed to last for many years, even if the pendant or watch is used
every day. The battery is automatically tested every time the button is pressed. If the yellow
Pendant Reminder Light on the front of the Alarm Unit is flashing, the pendant battery is getting
low. Contact the Monitoring Service provider for a replacement pendant.
Q What should I do with the pendant or watch when I’m in the shower or bath?
A The pendant and watch is designed to be waterproof to International Environmental Protection
Standard IP-67, so they can be taken into the shower or bath.
Make sure you test the pendant or watch regularly.
20
Questions and answers continued ….
Q Will the alarm still work with the internet (also known as ADSL, DSL or broadband) connected
to my telephone line?
A Yes, but if you have an ADSL service, an ADSL filter must be installed in the telephone line.
See the section on ‘ADSL filters’.
Q My telephone service is going to be changed to a wireless, cable, or Internet service. Will this
affect my medical alarm?
A It may. Please see the section ‘Compatibility with Other Equipment’ in this manual.
Call your Monitoring Service for assistance.
Q The NBN is being installed in my area. Will this affect my medical alarm?
A The MK9s CarePhone is expected to work with the NBN, however it is vitally important that the
NBN equipment is correctly set-up correctly by your NBN service provider .
Call your Monitoring Service for assistance before you enter into any service contract for the
NBN.
Q From what distance will the pendant or watch operate?
A In most situations, anywhere around the home and in the garden. The pendant or watch range
can vary widely depending on the type of construction of the building and other environmental
factors. The pendant or watch range should be tested as described in the Testing section.
Also see the ‘Notices’ section in this manual.
21
Notices
Other Telephone Technologies and the NBN
The alarm is designed to operate over a standard telephone exchange line, often called the Public
Switched Telephone Network (PSTN) or Plain Old Telephone System (POTS). Some telephone services
are now provided over wireless, cable TV systems, optical fibre, or the Internet. Your alarm may not
work with these services.
If your telephone service is to be changed over to something other than a standard telephone line, call
your Monitoring Service immediately for advice. The alarm may be connected to the National Broadband Network, (the NBN), but the NBN must be correctly configured. The NBN will only operate for
3-6 hours during a power failure.
Note: Call the Monitoring Service before entering into any service contract for the NBN..
Telephone Network Performance
This equipment makes telephone calls in order to summon help. If unsuccessful, the equipment will
continue making calls to the maximum number of call attempts allowed by Government telecommunication regulation. Although modern telephone networks are very reliable, there are times when, due
to network congestion, fault conditions or other causes beyond our control, the telephone calls may
not be successful.
22
Notices continued….
Portable (cordless) Phones
Some portable phones (DECT) may interfere with the Alarm Unit and may reduce the range of the
pendant/watch. The base unit for DECT cordless portable phones should be placed at least 300 mm
away from the Alarm Unit and the range of the pendant/watch should be determined after installing
the portable phone system.
Extension Telephones or Other Telephone Equipment
If there are other pieces of equipment on the telephone line such as extension phones, fax machines,
modems, answering machines, or any other device, the telephone line should be wired in Mode-3. If
the telephone line is not wired correctly in Mode-3, an emergency call will not be made if any other
telephone equipment is left off-hook, or is being used. We strongly advise the telephone line is wired
correctly in Mode-3 by a suitably qualified person. The equipment will also work in Mode-5.
Range of Trigger Devices
In most cases the pendant/watch will operate around an average size home and garden, however radio range can vary greatly depending on environmental and other factors. It is very important that the
radio range be determined at the time of installation. To provide a margin of safety, do not rely on
more than half of the radio range found, (unless using the radio test mode which incorporates receiver
desensitisation during range testing).
23
Notices continued….
Moisture
The Alarm Unit is resistant to accidental spillage on its top surface only. The pendant and watch is designed to be waterproof to International Environmental Protection Standard IP-67. Do not put the pendant or watch into a washing machine or leave immersed for long periods. Do not leave the
pendant/watch in damp locations for long periods. Do not leave the pendant/watch in a soap holder.
Life Support Policy
The MK9 CarePhone provides an effective response system. However, this equipment is not a life saving device and cannot provide a guaranteed level of performance beyond what can be expected from
technology of this kind. To ensure that the system performs as designed, it must be installed, operated,
maintained, and regularly tested in accordance with the information contained in this guide and other
supporting documentation.
Trademarks
FirstCall, Gemini, Companion, The Caretaker, CarePhone, Life Alert, Life Assist, Pinpoint, Safeguard, Xtracare from
Safeguard, and Viconic are registered trademarks owned by or licensed to VC International Pty Ltd.
24
The MK9 CarePhone Medical Alarm is designed and manufactured in Australia by:
VC International Pty Ltd
Unit 26, 34-36 Abel Street,
Penrith, NSW, 2750
Website: www.vcint.com.au
Regulatory Notices:
Caution
Warning
For safety reasons, only connect approved telephone equipment to the rear terminal.
This equipment has been tested to show compliance with the
relevant regulations, which are designed to provide reasonable
protection against electromagnetic interference. If this equipment causes interference due to localized environmental conditions, the user shall, at their own expense be required to take
appropriate measures to correct the interference.
No user serviceable parts are inside.
Do not attempt to open the equipment. Do not cut
any wires connecting the equipment.
Disclaimer. VC International Pty Ltd (VCi) has exercised its best efforts in relation to the information in this manual.
However, no warranty of reliability or accuracy is given and VCi shall not be responsible for any error or omission
(whether negligent or otherwise). This information may change without notice.
TELEPERMIT
25
MK9 CarePhone Rev2.3