1
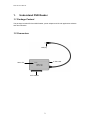
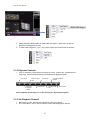
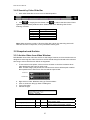
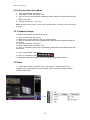
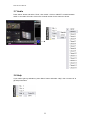
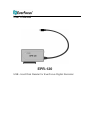
User´s Manual EPR-120 USB - Hard Disk Reader for EverFocus Digital Recorder EPR120 User’s Manual WARNING TO REDUCE RISK OF FIRE OR ELECTRIC SHOCK, DO NOT EXPOSE THIS APPLIANCE TO RAIN OR MOISTURE. WARNING: This equipment has been tested and found to comply with the limits for a Class “A” digital device, pursuant to part 15 of the FCC Rules. These limits are designed to provide reasonable protection against harmful interference when the equipment is operated in a commercial environment. This equipment generates, uses and can radiate radio frequency energy and, if not installed and used in accordance with the instruction manual, may cause interference to radio communications. Operation of this equipment in a residential area is likely to cause harmful interference in which case the users will be required to correct the interference at their own expense. Changes or modifications not expressly approved by the party responsible for compliance could void the user’s authority to operate the equipment. This Class A digital apparatus meets all requirements of the Canadian Interference Causing Equipment Regulations. ATTENTION! This is a class A product which may cause radio interference in a domestic environment; in this case, the user may be urged to take adequate measures. Your EverFocus product is designed and manufactured with high quality materials and components which can be recycled and reused. This symbol means that electrical and electronic equipment should be disposed of separately from your household waste at their end-of-life. Please dispose of this equipment at your local community waste collection / recycling centre. In the European Union, there are separate collection systems for used electrical and electronic products. Please help us to conserve the environment we live in! This product is RoHS compliant. The information in this manual was current when published. The manufacturer reserves the right to revise and improve its products. All specifications are therefore subject to change without notice. Before installing and using this unit, please read this manual carefully. Please make sure to keep it handy for later reference. 1 EPR120 User’s Manual Table of Contents 1. UNDERSTAND DVR READER ...............................................................3 1.1 Package Content ................................................................................................................ 3 1.2 Connectors ......................................................................................................................... 3 1.3 Minimum System Requirements....................................................................................... 4 1.4 Specifications..................................................................................................................... 4 2. SETUP DVR READER .............................................................................5 2.1 Install DVR Reader software ............................................................................................. 5 2.2 Connect DVR Reader to PC............................................................................................... 5 2.3 Connect HDD to EPR120 ................................................................................................... 6 2.4 Remove HDD carrier from DVR Reader............................................................................ 6 3. USING DVR READER SOFTWARE ........................................................7 3.1 Start DVR Reader Software ............................................................................................... 7 3.2 Understand User Interfaces .............................................................................................. 7 3.3 Basic Operations................................................................................................................ 7 3.3.1 Open DVR HDD/File ..................................................................................................... 7 3.3.2 Playback Controls......................................................................................................... 8 3.3.3 Set Playback Channel................................................................................................... 8 3.3.4 Select Display Mode ..................................................................................................... 9 3.4 Search Video ...................................................................................................................... 9 3.4.1 Search by Date/Time .................................................................................................... 9 3.4.2 Search by Video Slide Bar .......................................................................................... 10 3.5 Snapshot and Archive ..................................................................................................... 10 3.5.1 Archive Video from Video Window.............................................................................. 10 3.5.2 Archive Video from Menu............................................................................................ 12 3.5.3 Snapshot Image.......................................................................................................... 12 3.6 View................................................................................................................................... 12 3.7 Audio................................................................................................................................. 13 3.8 Help ................................................................................................................................... 13 3.9 Exit .................................................................................................................................... 14 2 EPR120 User’s Manual 1. Understand DVR Reader 1.1 Package Content The package includes EPR120 HDD Reader, power adapter and CD with application software and documentation. 1.2 Connectors USB plug 12 VDC socket Status LED SATA interface 3 EPR120 User’s Manual 1.3 Minimum System Requirements CPU Memory HDD USB Peripherals OS Intel® Pentium® 4, 3GHz processor or faster 512MB RAM 100MB hard disk space; additional disk space for video capture USB 2.0 or USB 3.0 port Windows-compatible display with at least 1024x768 resolution Windows-compatible mouse or pointing device Windows-compatible sound card Windows-compatible CD-ROM drive Microsoft® Windows® 2000/XP™/7 1.4 Specifications Supported DVR Models Lights Power switch USB interface EMV400 1 LED for power / connection status Power ON/OFF USB 3.0 (USB 2.0 compatible), connector cable with USB plug type A 12V DC, 2A max via power adapter 110/230 VAC, 5,5mm socket Power Software Functions Operations Search Archive 1/4/9/16 multi-channel playback Playback forward/backward at 0.1~16x speed Audio playback for 1~60FPS recordings (MPEG4 4CH/8CH/16CH will not support audio function) Pause Step forward/backward Jump to beginning or end of a segment Search video by segment list, date/time and alarm list Slide bar to move video pointer Display current video date/time Save still image to BMP or JPEG file Print still image Save video to Motion JPEG AVI file up to 4GB Save disk raw data into proprietary file *: Length limitation depends on various PC hardware, disk and OS configurations. Operational Environment Temperature 0 C ~ 50C (32 F ~ 122F) Dimensions & Weight Dimensions (W/H/D) Weight 78 x 60 x 16 mm 200 g 4 EPR120 User’s Manual 2. Setup DVR Reader Note: Please carefully follow these instructions to insert or remove the HDD carrier to avoid damages to the DVR Reader or hard disk. 2.1 Install DVR Reader software Please make sure, that the PC fulfills the minimum system requirements! 1. Turn on your PC 2. Insert DVR Reader CD-ROM 3. Run the file setup.exe on CD, if the program does not automatically run 4. Click “Next” and follow the instructions to install DVR Reader software 2.2 Connect DVR Reader to PC Step 1: Connect the USB cable to DVR Reader and your PC. Step 2: Connect power adapter’s cable to DVR Reader. Keep the power switch in OFF position. Connect the power adapter to mains voltage. 5 EPR120 User’s Manual 2.3 Connect HDD to EPR120 1. Take out HDD carrier from DVR (Please refer to DVR user’s manual). 2. Connect the HDD to the SATA interface of the HDD reader. 3. Turn on DVR Reader from power switch. The LED at EPR120 lights red. 4. Connect the USB plug to a free USB 2.0/3.0 port of the PC. 5. Wait until the Remove/Eject icon shows up in System Tray. The LED at EPR120 lights purple. 2.4 Remove HDD carrier from DVR Reader 1. 2. 3. 4. Exit from DVR Reader application. Click on Remove/Eject icon in System Tray to stop the USB Mass Storage Device. Turn off the power of the EPR120. Remove HDD carrier from EPR120. 6 EPR120 User’s Manual 3. Using DVR Reader Software 3.1 Start DVR Reader Software Start DVR HD Reader software from desktop shortcut or from Start Menu Start -> Program Files -> EverFocus HD Reader > EverFocus HD Reader 3.2 Understand User Interfaces Video Window DVR model HDD/File information Archive Time Setting HDD/File Menu Close window Start Date/Time Display Mode Snapshot button Playback Time Video Slide bar Playback Control Buttons End Date/Time Time frame Adjustment Minimize window 3.3 Basic Operations 3.3.1 Open DVR HDD/File 1. Press “Menu” button and select “File”, then “Load Drive”. The PC will automatically detect all the DVR models available. Choose the proper DVR model to be viewed. Or, select “Open File” to load a disk image file ( *.edr). Note that HDD/File Menu only shows the HDD’s, which are recognized by DVR Reader software. 7 EPR120 User’s Manual 2. Please wait while DVR Reader is reading disk information. “Status Bar” shows the progress of reading disk process. 3. To load a disk image file ( *.edr / *.avr), select “Open File”) and browse file location. 3.3.2 Playback Controls 1. Click on Playback Control Buttons to Playback, Pause, reverse play, forward/reverse single step, fast forward/rewind and increase/decrease playback speed. Fast rewind Reverse single step Decrease Playback Speed Play/Pause Reverse play Increase Playback Speed Forward single step Fast forward Note: Playback speed range is 0.1~16x and they are approximate speeds. 3.3.3 Set Playback Channel 1. Right click on Video Window where playback channel is to be set. 2. In Function Menu, click on Set Channel to choose desired playback channel. 8 EPR120 User’s Manual Note: One channel can only be shown in one window. If two windows are set to playback the same channel, only the last one set will show video correctly. 3.3.4 Select Display Mode 1. Right click on Video Window to bring up Function Menu. 2. Click on Display Mode and choose desired display mode. 3.4 Search Video 3.4.1 Search by Date/Time 1. Set desired Date/Time on Date/Time search drop-down box. Click on the value to be adjusted first, then click 2. Click on GO button 9 EPR120 User’s Manual 3.4.2 Search by Video Slide Bar 1. Grab Video Slide Bar cursor to move to desired position. 2. Click to magnify the time frame. Click to reduce the time frame. Event types are represented by different colors. Please refer to the following chart for the meaning of events. Color Gray Blue Orange Red Yellow Event Type No event Video Loss Motion Alarm Other event Note: When searching a video, if file size of the disk is large, the searching action will take time and has no response, nor any notification will be given. 3.5 Snapshot and Archive 3.5.1 Archive Video from Video Window DVR Reader can archive video into AVI file or disk image. However, archive functions are not designed to save long time video. Archive to AVI file should always be limited to the minimum time range. Archive AVI file over 4GB is not supported. 1. To set archive in/out points, click on Archive In button or Archive Out button when video playback at the point you wish to set. Note: for Disk Image (.edr) format, the actual Archive In time will be equal or earlier than specified time, and Archive Out time will be equal or later. Archive In Archive Out 2. 3. 4. 5. Right click on Video Window to bring up Function Menu. Click on Archive to bring up Save As dialog box. Type in file name. Choose file type. Type Motion JPEG Full Size (.avi) Disk Image (.avr) Data only - Text (.txt) Video Data * 10 Stretched and recompressed single channel video. Slow. Complete multi-channel archive. Fast. Can only be read by DVR Reader software Data saved in text mode (reserved) EPR120 User’s Manual *Optional to save to a separate file Table 3.1 Archive Type Comparison (Please refer to Appendix A for detail Recommended Download (Free Software to play the enlarged avi video)) 6. Check “Full Size” checkbox if full size video is desired. Best view with 720x240 screen mode 7. Check “Capture Data” and choose Text or Binary if data capture is desired. 8. Select Archiving Encoder. 9. Text Overlay: select the color of Date/Time and Channel that will be shown on the archived video. 10. Check “Add Text” if you wish to add text, you can select the text color as well. 11. Select “Interlaced” for the text interlaced. 12. Click “Save” to start archiving. Archive Encoder Selection dialog box will show up. Please choose a video compressor available for your computer. 11 EPR120 User’s Manual 3.5.2 Archive Video from Menu 1. Click on the desired channel first. 2. Press “Menu” button and select “Tool”. 3. Click on “Archive” and browse the destination folder where the image will be archived to. 4. Type in file name. 5. Choose file type: .avi , .avr or .txt. Note: During Archive process, do not press “Cancel” button, as it may cause crash to the program. 3.5.3 Snapshot Image 3 methods are available to snapshot an image: 1.1 Click on the desired channel first. 1.2 Right click on Video Window to bring up Function Menu. 1.3 Click on Snapshot and browse the destination folder where the snapshot image will be saved to. 2.1 Click on the desired channel first 2.2 Press “Menu” button and select “Tool”. 2.3 Click on “Snapshot” and browse the destination folder where the snapshot image will be saved to. 3.1 Click on the desired channel first. 3.2 Click on “Snapshot” button. 3.3 Browse the destination folder where the snapshot image will be saved to. 3.6 View 1. Press “Menu” button and select “View”, then “Overlay”. Select the item to be displayed from camera title, time and meta data. Click on the item to switch between show and hide mode. 12 EPR120 User’s Manual 3.7 Audio Press “Menu” button and select “Tools”, then “Audio”. Click on “ON/OFF” to switch between audio on and audio off mode. Click on the channel number for the camera to be set. 3.8 Help If you need to get any assistance, press “Menu” button and select “Help”, then “Contact Us” to get help information. 13 EPR120 User’s Manual 3.9 Exit To exit from EPR120, press “Menu” button and select “Exit”. Or, press the “X” button located beside “Menu” button. OR 14 EPR120 User’s Manual EverFocus Electronics Corp. EverFocus Taiwan: 12F, No.79, Sec. 1, Shin-Tai Wu Road, Hsi-Chih, Taipei, Taiwan TEL: +886 2 2698 2334 FAX: +886 2 2698 2380 www.everfocus.com.tw [email protected] EverFocus Europe - Germany: Albert-Einstein-Strasse 1, D-46446 Emmerich, Germany TEL: +49 2822 93940 FAX: +49 2822 939495 www.everfocus.de [email protected] EverFocus China - Beijing: Room 609, Technology Trade Building, Shangdi Information Industry Base, Haidian District, Beijing 100085, China TEL: +86 10 6297 3336~39 FAX: +86 10 6297 1423 www.everfocus.com.cn [email protected] EverFocus China - Shenzhen: 4F, No. 2, D4 Building, Wan Yelong Industrial Park, Tangtou Road, Shiyan, Baoan, Shenzhen, Guangdong 518101, China TEL: +86 755 2765 1313 FAX: +86 755 2765 0337 www.everfocus.com.cn [email protected] EverFocus USA - California: 1801 Highland Avenue, Unit A, Duarte, CA 91010, USA TEL: +1 626 844 8888 FAX: +1 626 844 8838 www.everfocus.com [email protected] EverFocus Japan: 5F, Kinshicho City Building, 2-13-4 KotoBashi,Sumida-Ku, Tokyo, 130-0022, Japan TEL: +81 3 5625 8188 FAX: +81 3 5625 8189 www.everfocus.co.jp [email protected] EverFocus India: Suite 803, Housefin Bhavan, C-21, Bandra Kurla Complex, Bandra (East), Mumbai 400051, India TEL: +91 22 6128 8700 FAX: +91 22 6128 8705 www.everfocus.in [email protected] EverFocus USA - New York: 415 Oser Avenue, Unit S, Hauppauge, NY 11788, USA TEL: +1 631 436 5070 FAX: +1 631 436 5027 www.everfocus.com [email protected] Your EverFocus product is designed and manufactured with high quality materials and components which can be recycled and reused. This symbol means that electrical and electronic equipment, at their end-oflife, should be disposed of separately from your household waste. Please, dispose of this equipment at your local community waste collection/recycling centre. In the European Union there are separate collection systems for used electrical and electronic product. Please, help us to conserve the environment we live in! EverFocus Europe - UK: Unit 12, Spitfire Business Park, Hawker Road, Croydon Surrey, CR0 4WD, UK TEL: +44 20 8649 9757 / +44 845 430 9999 FAX: +44 20 8649 9907 www.everfocusuk.co.uk [email protected] Ihr EverFocus Produkt wurde entwickelt und hergestellt mit qualitativ hochwertigen Materialien und Komponenten, die recycelt und wieder verwendet werden können. Dieses Symbol bedeutet, dass elektrische und elektronische Geräte am Ende ihrer Nutzungsdauer vom Hausmüll getrennt entsorgt werden sollen. Bitte entsorgen Sie dieses Gerät bei Ihrer örtlichen kommunalen Sammelstelle oder im Recycling Centre. Helfen Sie uns bitte, die Umwelt zu erhalten, in der wir leben! P/N: 4605P1EPR1B010A 15