1
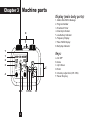
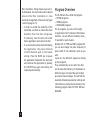
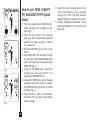
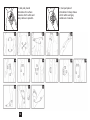
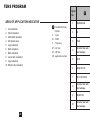
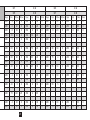
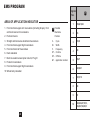
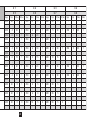
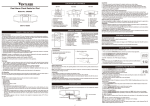
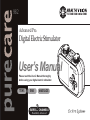
982
Advanced Pro.
Digital Electric Stimulator
User’s Manual
Please read this User’s Manual thoroughly
before using your digital electric stimulator.
TENS
EMS
SUPER
MASSAGE
2
CHANNELS
Handheld, Advanced
Health Vision’s - PL982
Index
1.Introduction
2
2. Three Modes- Tens/EMS & Massage
2
3. General Safety Instructions
4
4. Machine parts & function keys
5. Machine Operation- Start up
6&7
8
6. 30 Program Overview
10
7. How to Use Tens/Ems &Massage modes
10
8. How to change settings
11
9. How to customize own program
12
10.Maintenance 14
11.Problems & Solutions
15
12.Technical Specification
13.Electrode Placement Guide
1
Page no.
17
18 & 19
14.Tens Pre Program Settings
20
15.EMS Pre-Program Settings
22
16.Massage Pre-Program Settings
24
INTRODUCTION
Chapter 1
Thank you for purchasing Health Vision PL-982 Digital Electric Stimulator (
TENS/EMS & MASSAGE MACHINE).
All of our products undergo rigorous testing to ensure maximum quality.
Please read the manual and understand the operation thoroughly before
using the Tens machine.
Health Vision’s PL 982 digital Electrical
Stimulator is easy and comfortable to use.
It’s TENS/EMS & MASSAGE programmes are
Drug free pain relief solution.
Also helps to tone the muscles of leg,
buttocks, abdominal and arms as well as
increasing the strength.
The individual intensity setting of each
channel also allows you to massage two
different parts of the body at the same time.
2
Three Different modes
programs:
1) TENS ( Transcutaneous Electrical
Nerve Stimulation) means Electrical
Stimulation of Nerves through the
skin.
2) EMS (Electrical Muscle Stimulation)
is a widespread and generally recognized
method. It has been used for years by the
sports-men & women .
In sports and fitness fields, one of the use
of EMS is to supplement the conventional
muscle training to increase the efficiency of
muscles and adapt physical proportions to
the desired aesthetic results. EMS has two
application.
First one to strengthen the musculature
(activating application) and the second one
to achieve relaxing resting effect (relaxing
application).
3) MASSAGE
• Muscle relaxation in order to loosen up
muscular tension
• Improving muscular fatigue symptoms
• Accelerating muscle regeneration after
high muscular performance
3
GENERAL SAFETY INSTRUCTIONS
Chapter 2
1. Inspect the device before use to
ensure that it is in a good condition
and accessories like--- four eletrodes,
two pairs of connecting wire and 3
AAA,batteries and manual are with the
pack. If anything missing please contact
the distributor ASAP.
2. The device must not be used by children
or the disabled without supervision.
3. Do not use if you are pregnant.
4. Do not use if you suffer from cardiac or
other disorders.
5. Do not use the device if you are suffering
from disease such as cancer.
6. Do not use if are suffering from attack
(e.g.) epilepsy
7. Do not use the device after operations
where increased muscle contractions
might impair the healing process.
8. Do not use directly on varicose veins or
open wounds.
9. Do not use with any implanted electrical
devices e.g. peacemakers
10.D o n ot u se i f t h e re a re a n y m e t a l
implants.
11.Do not use near the genitals.
4
12.Do not use on injured or inflamed skin.
13.T he device must not be used near the
heart.
14.Do not apply on the forehead.
15.Do not use the device near the throat /
carotid artery.
16.If you are suffering from acute diseases,
especially if hypertension is suspected or
actually exists, or blood clotting disorders
consult your medical doctor before using
the device.
17.C onsult your doctor before using the
device if you have any skin disease.
18.If you have chronic pain disorders which
have not been clarified, regardless of the
region of the body consult your doctor
before using the device
19.People having medical treatments should
consult GP before using the device.
20.People suffering from diabetes should
consult their doctor before using it.
21.People suffering from constant skin
irritation as a result of prolonged
stimulation at the same electrode point
and should see their GP before using the
device again.
22.You should consult your medical doctor if
you have complaints arising as a result of
the stimulation treatment
23.D o not use the device in damp/humid
conditions and prevent it from getting
wet while it is operating. Under any
circumstances this device must not be
used in the bath or shower.
24.Do not use after consuming alcohol.
25.F or reason of hygiene, the electrodes
should only be used on one person.
26.If the device is not functioning properly,
or if you start feeling unwell or there
is any pain, stop the application
immediately.
27.Do not use when asleep, when driving a
vehicle or operating equipment
28.Keep the device away from heat sources
and never use it near (-1m) short-wave
or microwave equipment (e.g. mobile
phones), as this may lead to current
spikes.
29.Do not use when high frequency surgical
device is connected at the same time.
30.E nsure that no metallic objects such
as belts buckles or necklaces can come
in contact with the electrodes during
stimulation.
31.Do not use it near any high flammable
5
substances, gases or explosive.
32.A lways remove the electrodes from
the skin with a moderate pull in order
to avoid injury in the event of highly
sensitive skin.
33.To remove or move the electrodes, switch
off the device first or the appropriate
channel in order to avoid unwanted
irritation.
34.N e v e r a p p l y e n r i c h i n g c r e a m s o r
ointments to the skin beforehand, as this
greatly increases electrode wear or else
unpleasant current spikes may occur.
35.To p r e v e n t t h e r i s k o f l e a k a g e o r
explosions, never recharge the batteries
or applying heat to them.
36.Do not expose the device to sunlight or
high temperatures.
37.I f you notice that the device is not
operating correctly, do not attempt
t o r e p a i r, d i s m a n t l e o r m o d i f y i t .
Unauthorised repairs may cause injury,
in addition to breaking the terms of
the warranty. Contact your technical
assistance service.
Machine parts
Chapter 3
Display (main body parts):
1. Modes-Tens/EMS & Massage
2. Program Number
3. Treatment Timer
4. Intensity Indicators
5. Low Battery Indicator
6. Frequency Display
7. Pulse Width Display
8. Body Map Indicator
e
E
fF
7
Keys:
1
2
3
a
C
4
8 5
6
D c
A
6 b
B
d
A.On/OFF
B.Menu
C.Up & Down
D.Enter
E.Intensity adjust dial (CH1/CH2)
F. Pause/Stop key
A. ON/OFF key
1. Press on-off key to switch on the device.
If the key is held down more than 10
seconds when switching on, the unit
automatically switches off again.
2. Hold ON/OFF key down ( a pprox. 3
seconds) to switch off the device.
B. MENU KEY
1. Navigation between the submenus--TENS, EMS and MASSAGE.
2. Return to (A) program selection window
or (B) main menu.
3. Press and hold to unlock when keys are
locked during stimulation.
C. UP & DOWN KEY
1. Use to select treatment programe and
treatment time.
D. ENTER KEY
1. Use to confirm selection and move to
next step.
7
E. Intensity adjust dial (CH1/CH2)
1. When stimulating, rotate dials clockwise
to increase intensity and vice versa
2. In manual setting mode (at P0), CH1 dial
is used to set frequency (Hz) and CH2 dial
is used to adjust pulse width (μs).
F. Pause/Stop key
1. Press to interrupt stimulation
Accessories:
• 2x connection cable
• 4x adhesive electrodes (45 x 45 mm)
• 3 AAA Bateries
OPERATION
Chapter 4
Start Up
1. Press on the battery cover at the back of
the device and push it to the left side.
2. Install 3 AAA 1.5 V alkaline batteries.
Ensure that you insert the batteries with
the correct polarity as marked.
3. Replace the battery cover carefully.
4. Attach the connecting cable to the
electrodes.
Note: The electrodes have a clip fastener to
ensure easy connection.
5. Insert the connecting cable connectors
into the socket at the bottom of the
device.
6. Do not pull, twist or make any sharp
angles in the cables.
If the device is not used within 3 minutes, it
switches off automatically (automatic switch
off function). When it is switched on again,
the LCD main menu screen appears, with the
last used submenu flashing.
When a key is pressed, this is acknowledged
by a signal tone in order to ensure that any
unintentional pressing of a key is detected.
This signal tone cannot be switched off.
8
If an admissible key is pressed, there is one
short beep. If an inadmissible key is pressed,
there are two short beeps.
Electrodes placement
For the desired success of any stimulation
application, it is important that electrodes
are placed sensibly. The electrode positions
are suggested on page no.18 & 19 , (Figs. 1–
32) as a guide.
Electrode distance
• Most reasonable distance: approx. 5 –15
cm.
• Below 5 cm, it is mainly surface
structures which are strongly stimulated.
• Over 15 cm, large area and deep
structures are stimulated very weakly.
Electrode relationship to muscle fiber
orientation
Choice of current flow direction to be
selected for the desired muscle layer.
If surface muscles are to be stimulated the
electrodes must be placed parallel to the
fiber orientation. If deep tissue layers are to
be stimulated the electrodes must be placed
across to the fiber orientation or cross
electrode arrangement. Please see the figure
1 and 2 on page no 19.
• In order to extend the durability of the
electrodes, use them on clean skin which
should be free from hair and grease.
If necessary, clean the skin with water
before application and remove the hair.
• If an electrode becomes detached during
the application, the pulse intensity
of both channels goes to the lowest
setting. Press the PAUSE key to pause
the application. Reposition the electrode
and continue the application by pressing
the ON/OFF key again and setting the
required pulse intensity.
9
Program Overview
The PL-982 unit has a total 30 programs:
• 10 TENS programs
• 10 EMS programs
• 10 MASSAGE programs
For all programs, you can set the length
of application from 5 minutes to 90 minutes.
And also can set different intensity levels ,
if required for each channel.
Besides this for TENS and EMS programs P0,
you can also change the pulse frequency &
pulse width of the individual cycles as you
wish.
Cycles are the different sequences making
up the programs.
They automatically run one after the other
and increase the efficiency of stimulation on
different types of muscle fiber and combat
pre-mature muscle fatigue. You will find the
standard stimulation parameter settings and
information on placing the electrodes in the
following program charts for TENS, EMS and
MASSAGE.
How to use TENS / EMS P1P9, MASSAGE P0-P9 (quick
start)
1. From the program charts ( PAGE 20 & 22),
select a program that is suitable for your
pain (Fig 1).
2. Place the electrodes in the selected
pain area. The corresponding suggested
positions are shown on page no 18 & 19
for a guide line.
3. Press the ON/OFF key to switch on the
device.
4. Press MENU KEY and navigate through
the sub-menus (TENS/EMS/MASSAGE) and
select the mode you want by pressing the
ENTER KEY(Fig. 1).
5. Using the UP/DOWN keys, select the
program you want and confirm it by
pressing the ENTER KEY(Fig.2).
6. Using the UP/DOWN keys, select the total
treatment time and confirm by pressing
the ENTER KEY. Now the device is in stand
by status (Fig. 3).
7. Press ON/OFF to start the stimulation
treatment. The operation status display
starts to change.
Fig.1
Fig.2
Fig.3
10
8. Select the pulse intensity which is the
most comfortable for you by rotating
the key CH1+/CH2+. The pulse intensity
display indicate the strength of the pulse.
9. All keys, including intensity dials, will be
locked automatically for 20 seconds after
last action.
How to change the settings
Automatic Key Lock Function
To avoid accidentally change of intensity,
PL-982 integrated auto key lock for safety
purpose.
Changing intensity (during
stimulation)
• Before making any change during
stimulation, press and hold MENU for 3
seconds to unlock.
Rotate the CH1 and / or CH2:
channel dial to increase/decrease the level
of intensity. After intensity set, press the
dial again to prevent further change of
intensity or it will automatically lock after
20 seconds.
Interrupting stimulation
Press the pause key:(which is located
between CH1 and CH2 intensity adjustment
dials). To resume stimulation,press ON/OFF
key and adjust desired intensity level using CH1 /CH2 dials.
11
Switching Off the Machine-
Press and hold the ON /OFF key for 10
seconds or till all Graphics disappears.
Changing application (completely or
single parameters)
1. Interrupt stimulation by pressing Pause
key
2. Press MENU to return to previous menu
3. Set required parameters. Confirm with
E N T E R . Pr e s s O N / O F F t o c o n t i n u e
stimulation.
Chapter 5
How to use TENS/EMS
program P0 Only
Program P0 is preset program which you
can also customize. To customize your own
programe follow the following procedure.
1. From the program charts (page 20 & 22),
select a program that is suitable for your
pain.
2. Place the electrodes in the area selected
and connect these to the device. The
corresponding positions suggested on
page 18 & 19 may be helpful to you.
3. Press the ON/OFF key in order to switch
on the device.
4. Press MENU and navigate through the
submenus (TENS/EMS) and confirm your
selection with ENTER KEY (Fig. 1).
5. Using the UP/DOWN keys, select the
program P0 and confirm with ENTER
key (Fig.2). C1 will appear in place of
Programe 0.
6. Using intensity dials (CH1 for Frequency
setting and CH2 for Pulse width setting
) adjust frequency and pulse width you
want for Cycle 1 and confirm with ENTER
Key (Fig.3).Repeat this process for all
subsequent 7 Cycles.
Fig.1
Fig.2
Fig.3
12
7. Using the UP/DOWN keys, select the
desired treatment time and confirm with
ENTER (Fig. 4).
Fig.4
8. The device is standby for stimulation (Fig.
5).
9. Press ON/OFF to start the stimulation
treatment. The operation status display.
The graphic will starts flashing (Fig 6)
10.Adjust the pulse intensity which is the
most comfortable for you by rotating
intensity adjustment dials (CH 1/CH 2).
(Fig. 7).
Fig.5
Note: Your customized program settings are stored
and automatically retrieved when you select it
next.
Fig.6
Fig.7
13
MAINTENANCE
Chapter 5
1. In order to increase the life of the
electrodes, they should be cleaned
carefully with a damp lint free cloth.
2. After use, stick the electrodes onto the
plastic film.
3. Clean the unit after use with a soft,
slightly moistened cloth. In case of more
extreme soiling you can also moisten the
cloth with mild soapy water.
4. Ensure that no water penetrates into the
device. If this should ever happen, only
use the device again once it is completely
dry.
5. Do not use any chemical cleaners or
abrasive agents for cleaning.
6. Remove the batteries from the unit if you
are not going to use it for longer period.
Leaking batteries can damage the unit.
7. Used batteries must be disposed off at
the BATTERY waste collection centres You
are under legal obligation to dispose off
the batteries correctly.
8. Do not make any sharp bends in the
connecting leads and electrodes.
9. Detach the connecting cable from the
electrodes after use.
14
10.Store the device in a cool, well-ventilated
place.
11.N ever place any heavy objects on the
device.
Problems and solutions
The device does not switch on when
the ON/OFF key is pressed. What
should I do?
1. Make sure that the batteries are Installed
with right polarity.
2. Change the batteries if necessary.
3. Contact customer service.
The electrodes are detaching
themselves from the body. What
should I do?
1. C l e a n t h e a d h e s i v e s u r f a c e o f t h e
electrodes with a damp, lint-free cloth.
Then let them dry in the air and attach
them again. Should the electrodes still
not adhere firmly, they must be replaced.
2. Before each application, clean the skin,
avoiding using any skin cream or oils
before treatment. Shaving can increase
adhesion of the electrodes.
The device is giving out abnormal
signal tones during treatment. What
should I do?
1. Look at the display. Is any channel
flashing? Interrupt the program by
15
pressing the ON/OFF key. Make sure
that the connecting leads are properly
connected to the electrodes. Make sure
that there is a firm contact between the
electrodes and the treatment area.
2. Make sure that the plug of the connecting
lead is firmly connected to the device.
3. If the signal tones do not stop and the
channel is flashing, change the connecting
cable.
4. If the display shows a flashing battery
signal, change the batteries.
There is no noticeable stimulation.
What should I do?
1. If a warning signal sounds, go through the
steps described above.
2. Press the ON/OFF key to start the
program again.
3. Check that the electrodes are positioned
properly and make sure that the adhesive
electrodes are not overlapping.
4. Increase pulse intensity in stages.
5. The battery life finished need
replacement.
In case electrodes gives uncomfortable
feeling, what should I do?
1. The electrodes are badly positioned.
Check positioning and if necessary
reposition the electrodes.
2. The electrodes are worn. Due to the fact
that current distribution can no longer
be guaranteed evenly over the entire
surface, these may lead to skin irritation.
You must therefore replace these.
The skin in the treatment area
becomes red. What should I do?
Stop treatment immediately and wait
until the skin has returned to normal. If
any redness beneath the electrode soon
disappears, this is not dangerous and is
due to the increased circulation which has
been stimulated locally. If, however, the
skin irritation remains and there is possibly
itching or inflammation,
Please consult your doctor before further
use. It may possibly be caused by an allergy
to the adhesive surface.
16
Chapter 7 TECHNICAL SPECIFICATION
17
MODEL
Health Vision PL-982 Digital Electric Stimulator
PULSE DURATION
40-300µs
PULSE FREQUENCY
1-120 Hz
OUTPUT VOLTAGE
Max. 90 Vpp (500 0hm)
OUTPUT CURRENT
Max. 108 mApp (at 500 0hm)
BATTERY
3x AAA batteries
ELECTRODE PLACEMENT SUGGESTION
18
1.) Gel pad placed
stimulates for surface
muscles which white and
Gray cable are parallel.
19
2.)Gel pad placed
stimulates for deep tissue
which white and gray
cables are crosswise.
TENS PROGRAM
EN
Program
No.
AREA OF APPLICATION INDICATOR
1. Arm relaxation
2. Chest relaxation
3. Abdominal relaxation
4. Articulation area
5. Legs relaxation
6. Neck relaxation
7. Back relaxation
8. Lower back relaxation
9. Legs relaxation
10. Whole body relaxation
P Possible Electrode
C-
Position
Cycle
W-
Width
F-
Frequency
OT- On time
OF- Off time
AP- application number
1
04,05,06,18,22
2
03
3
07,20
4
Ver nota / See note /
Voir remarque
5
27,29
6
02,09,10,11,12
7
10,11,12,13,14,19
8
9
10
20
P
Ver nota / See note /
Voir remarque
25,30,31,32
Ver nota / See note /
Voir remarque
Wi(µs)
F(Hz)
250
250
C1
C2
C3
C5
C6
C7
OT(Sec)
OF(Sec)
Wi(µs)
F(Hz)
4
30
0
250
6
20
0
250
250
6
30
0
C4
C8
OT(Sec)
OF(Sec)
Wi(µs)
F(Hz)
OT(Sec)
OF(Sec)
Wi(µs)
F(Hz)
OT(Sec)
OF(Sec)
4
30
0
250
5
30
0
250
5
30
0
6
20
0
250
8
30
0
250
8
30
0
250
6
30
0
250
8
20
0
250
8
20
0
250
10
20
0
250
10
20
0
-
-
-
-
-
-
-
-
250
2
10
0
250
4
8
0
250
6
6
0
-
-
-
-
250
60
20
0
250
70
20
0
250
80
30
0
250
80
30
0
-
-
-
-
-
-
-
-
-
-
-
-
-
-
-
-
250
80
20
0
250
80
20
0
250
75
4
0
250
10
20
0
250
70
4
0
250
65
4
0
-
-
-
-
-
-
-
-
250
40
30
0
250
45
30
0
250
55
30
0
250
60
30
0
-
-
-
-
-
-
-
-
-
-
-
-
-
-
-
-
250
4
30
0
250
4
20
0
250
6
30
0
250
6
20
0
250
10
20
0
-
-
-
250
8
30
0
250
8
20
0
250
10
30
0
250
40
5
0
250
6
10
0
250
50
5
0
-
-
-
-
-
-
-
-
-
-
-
-
250
75
0.25
0.25
250
2
0.5
0
-
-
-
-
-
-
-
-
-
-
-
-
-
-
-
-
-
-
-
-
-
-
-
250
4
30
0
250
4
30
0
250
5
30
0
250
5
30
0
250
6
30
0
250
6
30
0
250
8
30
0
250
8
30
0
21
EMS PROGRAM
EN
Program
No.
AREA OF APPLICATION INDICATOR
1. Front and back upper arm musculature (Including biceps), front
and back lower arm musculature.
2. Pectoral muscle
3. Straight and transverse abdominal musculature
4. Front and back upper thigh musculature
5. Front and back calf musculature
6. Neck relaxation
7. Back musculature near spinal column, Prog III
8. Posterior musculature
9. Front and back upper thigh musculature
10. Whole body relaxation
22
P Possible
Electrode
Position
CWFOTOFAP-
Cycle
Width
Frequency
On time
Off time
application number
P
1
05,06,18,22
2
03
3
07,20
4
29
5
25,27
6
02,09,21
7
14,15,19
8
28
9
31
10
02,03,04,07,10,13,
14,25,27,28,29,31
Wi(µs)
F(Hz)
250
30
-
-
C1
C2
C3
C5
C6
C7
OT(Sec)
C4
C8
OF(Sec)
Wi(µs)
F(Hz)
OT(Sec)
OF(Sec)
Wi(µs)
F(Hz)
OT(Sec)
OF(Sec)
Wi(µs)
F(Hz)
OT(Sec)
OF(Sec)
5
1
250
10
15
1
250
50
5
1
-
-
-
-
-
-
-
-
-
-
-
-
-
-
-
-
-
1
250
4
30
1
250
4
20
1
250
5
30
1
250
5
20
250
6
30
1
250
6
20
1
-
-
-
-
-
-
-
-
250
2
10
1
250
4
10
1
250
6
10
1
-
-
-
-
-
-
-
-
-
-
-
-
-
-
-
-
-
-
-
-
250
4
30
1
250
4
30
1
250
4
30
1
250
5
30
1
250
5
30
1
-
-
-
-
-
-
-
-
-
-
-
-
250
6
15
1
250
8
15
1
250
10
15
1
-
-
-
-
-
-
-
-
-
-
-
-
-
-
-
-
-
-
-
-
250
2
20
1
250
2
20
1
250
1
30
1
250
1
30
1
-
-
-
-
-
-
-
-
-
-
-
-
-
-
-
-
250
4
30
1
250
4
20
1
250
6
30
1
250
6
20
1
250
8
30
1
250
8
20
1
-
-
-
-
-
-
-
-
250
20
5
1
250
6
5
1
250
30
5
1
-
-
-
-
-
-
-
-
-
-
-
-
-
-
-
-
-
-
-
-
250
20
5
1
250
6
8
1
250
25
5
1
-
-
-
-
-
-
-
-
-
-
-
-
-
-
-
-
-
-
-
-
250
30
5
0
250
10
5
0
250
50
5
0
-
-
-
-
-
-
-
-
-
-
-
-
-
-
-
-
-
-
-
-
23
MASSAGE PROGRAM
EN
AREA OF APPLICATION INDICATOR
1. Tap and grasp massage
2. Knead and grasp massage
3. Tap massage
4. Side of hand/pressing massage
5. Side of hand/pressing massage
6. Vibratory massage
7. Tap massage (switch between electrodes)
8. Massage jet (switch between electrodes)
9. Pressure massage jet (Switch between electrodes)
10. Combination program (Switch between electrodes)
Note: Electrodes must be placed so that they surround the muscle segments in
question. For optimal effect, electrode distance must not be greater than
approx.15cm.
24
C-
Cycle
W-
Width
FOTOFAP-
Frequency
On time
Off time
application number
Program
No.
1
2
3
4
5
6
7
8
9
10
C1
C2
C5
Wi(µs)
F(Hz)
250
8
C3
C6
OT(Sec)
OF(Sec)
Wi(µs)
F(Hz)
60
-
250
60
-
-
-
-
-
-
250
110
60
-
250
70
-
-
-
-
-
-
250
5
15
0
250
10
-
-
-
-
-
-
250
20
5
0
250
250
60
5
0
250
250
20
60
0
250
250
60
60
0
20Hz 40µs~250µs~40µs200
C4
C7
OT(Sec)
OF(Sec)
Wi(µs)
F(Hz)
250ms 250ms
250
15
-
-
250ms 250ms
-
-
250
80
-
-
-
-
15
0
250
15
-
-
-
-
30
5
0
250
75
5
0
250
30
60
0
250
75
60
8
30
0
C8
OT(Sec)
OF(Sec)
Wi(µs)
F(Hz)
OT(Sec)
60
-
250
60
250ms 250ms
-
-
250ms 250ms
-
-
250
90
-
-
-
-
15
0
-
-
-
40
5
0
90
5
0
250
40
60
0
250
90
-
-
-
OF(Sec)
-
-
60
-
-
-
250 20~80~20HZ
-
-
-
250
50
5
0
250
110
5
0
0
250
50
60
0
60
0
250
110
60
0
-
-
-
-
-
-
-
-
-
-
-
-
-
-
-
-
-
-
-
-
-
250
6
-
0
-
-
-
-
-
-
-
-
-
-
-
-
-
-
-
-
-
-
-
-
-
-
-
-
-
-
-
-
250
25
-
0
-
-
-
-
-
-
-
-
-
-
-
-
-
-
-
-
-
-
-
-
-
-
-
-
-
-
-
-
250
60
-
0
-
-
-
-
-
-
-
-
-
-
-
-
-
-
-
-
-
-
-
-
-
-
-
-
-
-
-
-
250
100
-
0
-
-
-
-
-
-
-
-
-
-
-
-
-
-
-
-
-
-
-
-
-
-
-
-
-
-
-
-
25
26
27
Labeling & Information
This product meets the regulations of Directive 93/42 EEC
in medical device
EU Representative
Manufactured by
Manufacture Date
Attention, see instructions
Dispose of the device in accordance with the directive
2002/96/EC – WEEE (Waste Electrical and Electronic Equipment)
Application part type BF
HIVOX BIOTEK B.V
De Run 4428, 5503 LR
Veldhoven, Netherlands
HIVOX BIOTEK INC. 5F, No.123, Shingde Rd.,
Sanchong District 241, New Taipei City, Taiwan R.O.C
©All
right reserved.
All rights
reserved.450-2304A
450-xxxxA MADE IN TAIWAN