1
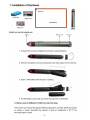
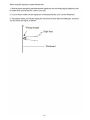
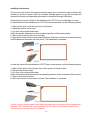
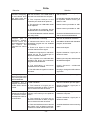
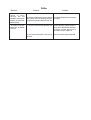
User Manual for IMAGE
IQ UI Corner Interactive System
Software Version 5.0
Copyright(C) 2009 A Brighter Image Pty Ltd
Web: www.abimage.com.au
Tel: +02 9938 6866
Fax: +02 9938 6899
E-mail: [email protected]
Contents
Brief Introduction ............................................................................................................ 4 -5
1:Specifications ................................................................................................................ 5
2: Warning prior to Installation ......................................................................................... 6
Installation Method ........................................................................................................ 7-10
1: Installation of Hardware ......................................................................................... 7-10
2: Installation and Uninstall of Software ......................................................................... 10
Uninstall software .................................................................................................... 10
3: Connect the data line ................................................................................................. 10
Hardware use ............................................................................................................... 11-12
1: Start using the System ............................................................................................... 11
2: Orientation ........................................................................................................... 11-12
FAQs ................................................................................................................................13-14
Product Service and Copyright .....................................................................................15
Brief Introduction
The IMAGE IQ UI Corner Interactive System incorporates the latest equipment for
teaching, training and conference presentation. It incorporates the latest high-tech research
results, such as top electronic technology, software technology, internet technology, etc. It
enables static presentations on whiteboards or flat screen displays to be made interactive,
ideal for conference, distance education and training. It will gradually replace traditional
teaching methods and conference modes. It may be used by any profession in different
situations
The IMAGE IQ UI Corner provides abundant software functions. It provides users with
reliable, rapid and nimble operation. Its functions are as follows:
1. Operation technology: Ultrasonic technology.
2. System supported: Laptop, PC; Multi-country-language; Win2000/ XP/ 2003/Vista; Mac
10.3 or later.
3. Board Compatibility: Can be fitted to any standard whiteboard, flat panel monitor (LCD,
or LCD TV), or Rear Projection TV.
4. Physical properties: Supports any kind of projector image resolution; 1.5cm Induction
Height for writing or clicking; 240/S processing rate; High response rate, sensitive
operation.
5. Installation: Provide with corner attachment to fit to board or monitor. Receiver slides
into corner attachment.
6. Computer Connection: Standard USB slot, Plug & Play, no need of external power. 5m
of connection length included. (max 20m extended cable in addition is acceptable).
7. Driver: Corresponding hardware driver and USB driver are needed (supplied).
8. Software functions:
1) Enables PC interaction, save and print, send email, copy and paste, write and
erase, capture screen, move and zoom, revolve combination, hyperlink, transmit
export, spotlight, magnification, reveal and so on.
2) Mode storehouse, figure label storehouse, standard figure storehouse auto-edit
functions are provided. Support figure format such as JPG, GIF, and figure stratification
technology.
3) Real time video can be saved as AVI format; auto-control of video play, video
handwriting labels are supported by operating system above WINDOWS SP2.
4) Save original label trace of PPT in its original format, and operate directly in the
relevant application software.
5) Edit functions of text, figure and image.
6) Achieves long-distance interactive teaching through Internet and Intranet.
7) Provides various working modes, such as mouse, writing and sign note, edit and
long-distance interaction, etc.
8) Software upgrades provided FREE. Visit website www.iqboard.com.au for the
latest software version.
-4-
Product Specifications:
Dimension of receiver: 115 mm×68 mm×32mm
Dimension of controller: 115 mm×75 mm×28mm
Dimension of package: 370 mm×207 mm×128 mm
Standard Net Weight: 1.5kg ±100g
Specification and Configuration
1. Standard package supplied:
# 1 x Receiver incl receiver attachment mount
# 1 x Controller
# 1 x ePen
# 1 x 2m Din cable; 1 x 3m USB cable
# 1 x AAA battery
# Manual
# CD containing driver and software
2. Technical Parameters:
# Power consumption less than 0.5W
# OS: Win2000/XP/2003/Vista
# Signal: 40 KHz ultrasonic + 880nm infrared
# Minimum Height of writing or clicking: 1.5cm, Speed of writing or clicking: 240point/s,
Speed of signal tracking: 3m/s
# Effective resolution: 9600×4800, 300dpi.
# Effective diagonal: 80” (4:3); 100” (16:9). Active area: up to 1.2m X 2.4m
# Working hours of signal pen battery: more than 52 hours; sensible pressure: >10g
# Working hours of electronic eraser battery: more than 20hours; sensible pressure: >10g
# Connect PC through USB port, plug and play, external power is not required unless
using Bletooth connection. Length of cable: 2m from receiver to controller, 3m from
controller to PC
# Power supply: signal pen and electronic eraser use battery, the receiver and controller are
powered by USB port (unless bluetooth wireless used; power adaptor then required).
3. System Requirement: (In addition to Projector + Whiteboard or flat panel display.
CPU: Based on X86 CPU;pentium166 or above
Memory: 128 MB RAM
Hard Disk: 30 MB free space
USB Port: at least one available USB port
4. Storage and Operating Specifications:
Storage:
Temperature:-40 degrees to 60 degrees; Humidity: 0% to 95%
Operation: Temperature: 0 degree to 40 degrees; Humidity: 15% to 85%.
-5-
Warning prior to Installation
z
Do not look directly at the projector light.
z
Don’t leave cables that may causing tripping. If the cables must be put on the floor,
straighten and tape them to the floor using “gaffer” tape.
Environment
z
Avoid using the EWB in dusty, damp or smog bound environments.
z
Read the EWB Maintenance section (p.19) prior to installation and use.
Projecting
z
Use the projector output format that matches the whiteboard format being used..
z
When ceiling mounting the projector, please make the projector lens level with the
top edge of the whiteboard. The centre of the lens must on the horizontal centre of
the Whiteboard. The distance from the screen is determined by the optics of the
projector. Keystone correction should be used if necessary.
z
The Image of the projector must be in the centre of the effective area, to the lower
right of the receiver.
Extended Cable
z
When the USB data line needs to be extended, please use shielded twisted pair
(Max length should be less than 30m, otherwise there may be loss of signal).
Production Certification and Warranty
The product has passed FCC, CE, and ISO9001, and a three year warranty forthe receiver,
and a one year warranty for other accessories is offered.
-6-
Installing the receiver
The receiver can receive the signal emitted by signal pen or electronic eraser, detect their
location on screen or board, send it to controller through signal line, and the controller will
transmit the location and operating information to computer through USB cable.
Generally the receiver is fixed on the whiteboard or LCD TV by two-sided tape or screw.
In case the frame of the whiteboard or LCD TV is level and smooth, use the following method:
1. Wipe out the dust on the left top corner of the frame
2. Install the receiver on its base,
3. Cut 5cm of the double-sided tape,
4 Affix the double-sided tape on the correspond position of the receiver base,
5. Take off the protective layer from the tape,
6. Align the two sides of the receiver base with those of the frame corner, push the base down
until the base and the frame are firmly stuck. The installation is complete.
IIn case the frame of the whiteboard or LCD TV has curved corners, use the following method:
1. Wipe out the dust on the left top corner of the screen or board surface
2. Remove the receiver base
3. Cut 5cm of the double-sided tape,
4 Affix the double-sided tape on the corresponding position to the underside of the receiver,
5. Take off the protective layer,
6. Stick the receiver on the screen or board. The installation is complete.
Caution: Ensure that the sides of the receiver are parallel ro the frame of the whiteboard or
flat panel. Also, the receiver must be parallel with the surface of the board or panel to ensure accuracy in the operation of the system.
-9-
2: Installation and Uninstall of Software
Install driver and interactive whiteboard software
Note: There are 2 software programs to load. Please double click on the software
in the CD supplied, and follow the instructions:
a. WhiteBoardGeniusDRIVE.exe - Board drivers and calibration software
Follow the installation prompts.
To uninstall, go to Start/Programs/ReturnStar Whiteboard Genius/Uninstall, and follow
prompts.
b. Easiteach Starter- Board Presentation software
(1)
(2)
(3)
(4)
Do not connect the data line before installing the software.
Lowest Specification of PC: Pentium III (500MHz) or above recommended, 128MB
RAM, 1G HDD, one USB port, Resolution: 1024×768 (16bit high color or above)
System Requirement: MS Windows 98/Me/2000/XP
Some special functions may be limited by the OS used.
Run the file on the CD and install it according the prompts.
.Uninstall
Click Start > Programs > Easiteach >Uninstall to uninstall
this software. You also can open “Control Panel”, select “Add/Remove Programs”, and in
the list of currently installed Programs, select “Easiteach Software”,then press the “Change/Remove”
button to remove.
- 10 -
Start Using the System:
Select Start > Programs > Returnstar Whiteboard Genius > Start, or click the shortcut on the
desktop to start the Whiteboard Genius. A taskbar icon will appear on the right bottom of the
screen, as follows. If the system prompts “Hardware not found! Please check your connection!”
Please check the controller indicator and refer to “Chapter 7 FAQ” for solution. After you start
the Whiteboard Genius, the red controller indicator should turn green.
Mouse Right-key: If you click this item, you can use the mouse right-key function for one
time.
Start Whiteboard Genius/Pause Whiteboard Genius: Click “Start Whiteboard Genius”
to use the signal pen to operate the board. If you want to stop using Whiteboard Genius
temporarily, click “Pause Whiteboard Genius”.
Orient: Click this item to enter the orientation interface and orient the whiteboard. If no
hardware has been found, the system will popup a prompt window, as follows:
In order to make the Whiteboard Genius work normally, you need to orient it the first time you
use it.After you start the Whiteboard Genius, click the taskbar icon and select “Orient” option on
the popup box, the Orientation Window will appear, as follows:
- 11 -
FAQs
Behavior
1. The controller
indicator is not lighting,
or the indicator turns
red after start the
Whiteboard Genius
Reason
Solution
1. The signal line is not well connected
with the controller, or the USB cable is
not well connected with the computer
2. The computer USB port or the
controller port needs to be replaced.
Check the USB port or the signal port,
and re-connect.
In case the controller port needs to
be replaced, Please contact your
dealer or ABI.
3. The signal line or USB cable needs
to be replaced.
Please contact your dealer or ABI.
4. The indicator is not lighting, but the
IQ Whiteboard can be normally used.
Please contact your dealer or ABI.
5. The IQ Whiteboard has been started
too many times.
Close the IQ Whiteboard start icons
and re-start the IQ Whiteboard.
1. IQ Whiteboard not working
Start the IQ Whiteboard software.
2. Whiteboard Genius driver and
orientation program are not installed
successfully.
Uninstall the old driver and orientation
program, and reinstall.
3. There is an object in front of the
receiver that blocks the signal.
Remove the object.
4. Batteries of signal pen or electronic
eraser are run out, or signal pen or
electronic eraser is broken.
Replace batteries, signal pen or
electronic eraser.
5. The computer is not rebooted after
installing the driver and orientation
program of IQ Whiteboard.
Reboot your computer, and then start
IQ Whiteboard again.
6. The application of electronic
whiteboard is not installed.
Install electronic whiteboard
application.
7. The USB cable or signal line is loose
or broken.
Re-plug or change the USB cable or
signal line.
3. Signal pen or
electronic eraser could
only control part of the
virtual whiteboard.
The orientation is not precise.
Start the orientation process again.
4.Drawing line is
irregular, or it is hard to
handle while remote
control.
1. Bad orientation
Start the orientation process again.
2. The batteries of signal pen or
electronic eraser are run down, or signal
pen or electronic eraser is broken.
Replace batteries, signal pen or
electronic eraser.
5. When writing or
operating by signal pen
or electronic eraser,
the response is slow or
inconsecutive.
1. The computer is not under normal
running or the memory is occupied too
much.
Close some opened applications or
restart the computer.
2. The batteries of signal pen or
electronic eraser are run down, or signal
pen or electronic eraser is broken.
Replace batteries, signal pen or
electronic eraser.
3. There are interference source around
the system, such as flashing red light,
continuous mental collision sound, etc.
Avoid the interference source and try
again.
2.Signal pen or
electronic pointer
cannot control the
virtual whiteboard, or it
can control the
computer but cannot
write
- 13 -
FAQs
Behavior
Reason
Solution
6. The orientation is not
precise, or when
orienting, the red
orientation cross moves
randomly or the cursor
flashes greatly.
1. Trapezoid distortion in projector.
Keystone correct the projector.
2.There are interference source around
the system, such as flashing red light,
continuous mental collision sound, etc.
Avoid the interference source and
try again.
7. The action of click or
double-click is difficult
to control.
1. You are not used to the operation yet.
When operating, please close the
pen point to the surface and keep
it steady. Please practice 2-5
minutes until you master it.
2. The mouse response is too slow or
too fast.
Slow the mouse response speed.
Product Service
1. Software Upgrade: Free Updates of the software will be supplied when available. Check
the website for information on the latest version. It is listed under “Downloads” on the
Home Page www.iqboard.com.au.
2. Technology Service: A copy of the User Manual will also be located in the same Downloads
section. If you have any technical queries, contact ABI staff on 02.9938 6866.
3. Quality Warranty:
Three years warranty is provided on the receiver & controller, and its operation. The service
“back to base”, so the client has to return the board to ABI and ABI will organize the return
of the board to the user. It does not include:
(1) Accessories (pens, batteries, cable).
(2) Physical damage, including surface scratching, marks, build up of dirt and pen ink,
and distortion caused by faulty installation.
(3) Damage resulting from operation not as stipulated in the user manual.
(4) Warranty on the product will be voided if the board is disassembled by the user or an
unauthorized repairer.
(5) Damage caused by force majeure such as natural disaster, thunder and lightning and
accident.
(6) Product accessories, consumable parts such as CD, user manual, package, fixing
parts, batteries, the shell, the consumption components are all not include into the
free repairing or exchanging a purchase clause.
(7) The user must be able to provide a copy of the original invoice.
4. After Sale Service:
1) ABI provides a service centre support to service and repair the IQ Whiteboard. Contact
ABI on 02.9938 6866 to discuss any problems or organize a service.
2) Repairing: When the warranty period has expired or the damage is not a warranty
issue, the customer will be charged for any repair. Customers can purchase related
parts from ABI Pty Ltd. When sending the damaged parts back to ABI for repair, the
customer has to pay the transportation costs and repair.
Copyright
This user manual is for the IMAGE IQ Whiteboard; the copyright belongs to A Brighter Image
Pty Ltd. We have the right to modify the content of user manual without notice.