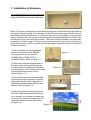
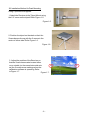
1
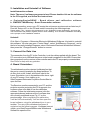
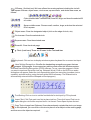
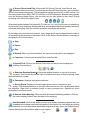
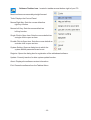
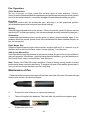
User Manual for IMAGE
IQLaser Virtual Interactive Whiteboard
Software Version 4.0
Copyright(C) 2007 A Brighter Image Pty Ltd
Web: www.abimage.com.au
Tel: +02 9938 6866
Fax: +02 9938 6899
E-mail: [email protected]
Software explanation, usage assistance and upgrades, visit: www.iqboard.com.au
Contents
Brief Introduction ........................................................................................................... 4 - 6
1: Introduction ............................................................................................................ 4 - 5
2: Specifications ............................................................................................................... 5
3: Warning prior to Installation ......................................................................................... 6
Installation Method ........................................................................................................ 7 - 9
1: Installation of Hardware - Ceiling Mounting ................................................................ 7
2: Installation of Hardware - Desk Mounting .................................................................... 8
3: Installation and Uninstall of Software ........................................................................... 9
Uninstall software ...................................................................................................... 9
4: Connect the data line ................................................................................................... 9
5: Orientation ................................................................................................................... 9
Use of the Whiteboard Software ............................................................................... 10-18
1: Menu ........................................................................................................................... 10
2: Windows/Board .......................................................................................................... 11
3: Control Box Toolbar ............................................................................................. 11-12
4:Draw Toolbar ......................................................................................................... 12-15
5. Board Software Tools ........................................................................................... 16-18
Taskbar Menu ..................................................................................................................... 19
Editing Objects ............................................................................................................ 20-21
Page and Resource Manager ................................................................................... 21-22
Other Features .................................................................................................................. 23
Pen Operation and Maintenance .................................................................................. 24
FAQs ...................................................................................................................................... 25
Product Service and Copyright ..................................................................................... 26
Brief Introduction
The IMAGE IQLaser Interactive System is the latest equipment for teaching, training and
conference presentation. It incorporates the latest high-tech research results, such as top
electronic technology, software technology, internet technology, etc. It will be the major
instrument for modern information-based teaching, conference, distance education and
training, gradually substituting for traditional teaching methods and conference mode. It
may be used by any profession in different situations. The IQ Laser is particularly suitable
as a portable tool for use by Presenters on the move.
The IMAGE IQLaser provides abundant software functions using the Interboard Board
software. It provides users with reliable, rapid and nimble operation. Its functions are as
follows:
1. Operation technology: Infrared Wireless + Laser technology.
2. System supported: Laptop, PC; Multi-country-language; Win2000/ XP/ 2003.
3. Virtual Board: The projector image can be projected onto any surface - projection
screen, whiteboard, painted wall, etc. A quality projection screen is recommended as the
best medium, particularly when the audience will be viewing the screen for longer periods.
A hard surface may be more suitable if the system is intended to be used for a lot of virtual
hand writing. In this case, a wall mounted rigid projection screen would be the best
surface.
4. Physical properties: Supports any kind of projector image resolution; 1.5cm Induction
Height for writing or clicking; 240/S processing rate; High response rate, sensitive
operation.
5. Installation: An optional ceiling mount bracket to suit the IMAGE ceiling projector mount
is available for fixed installations, to avoid the need to re-calibrate the system. A small
tripod is provided for desk mounting of the Receiver when being used in multiple venues.
6. Computer Connection: Standard USB slot, Plug & Play, no need of external power. 10m
of connection cable provided (max 20m extended cable in addition is acceptable).
7. Driver: Corresponding hardware driver and USB driver are needed (supplied on disk).
8. Software functions:
a) Enables PC interaction, save and print, send email, copy and paste, write and
erase, capture screen, move and zoom, revolve combination, hyperlink, transmit export,
spotlight, magnification, reveal and so on.
2) Mode storehouse, figure label storehouse, standard figure storehouse auto-edit
functions are provided. Support figure format such as JPG, GIF, and figure
stratification technology.
3) Real time video can be saved as AVI format; auto-control of video play, video
handwriting labels are supported by operating system above WINDOWS SP2.
4) Save original “Office” files (Word, Excel & Powerpoint) in its original format, and
operate directly in the relevant application software.
-4-
5) Edit functions of text, figure and image.
6) Achieves long-distance interactive teaching through Internet and Intranet.
7) Provides various working modes, such as mouse, writing and sign note, edit and
long-distance interaction, etc.
8) Software upgrades provided FREE. Visit website www.iqboard.com.au for the
latest software version.
IQLaser System Specifications:
Receiver Dimension:
Controller Dimension:
Standard Nett Weight:
Signal:
Effective Resolution:
Screen Size:
Signal parameters:
121 x 126 x 26mm
370 x 207 x 128mm
1.6kg +/- 100g
880 nm infrared
9600 x 4800, 300dpi
Max 150” Daigonal
Minimum recommended height of writing is 1.5cm
Max distance of controller to image: 15m
Speed of Writing or Clicking: 240 point/sec
Speed of signal tracking: 3 m/s
Max Length of USB cable: 30m without power amplifier
Power:
Signal pen: battery; Receiver & Controller: Via USB from P; Consumption <0.5W.
Pen:
Pressure Induction: >10g; Battery Life: more than 52 hours
Storage:
Temp: -40oC to 60oC; Humidity: 0% - 95%
Operation:
Temp: 0oC to 40oC; Humidity: 15% - 85%
Configuration
1. Standard package supplied:
# Receiver (1) + Controller (1),
# 82cm Extendable Laser Pointer (1) incl battery,
# 2m USB cable (1),
# 10m USB cable (1)
# Desktop Tripod Mount (1)
# Manual (1),
# CD containing driver and software (1),
# Carry Bag (1)
Optional Accessories:
# Writing Laser Pen
# Ceiling IMAGE projector bracket mount (1)
2. System Requirements
# PC: Pent166 or above, 128MB RAM, 200MB HDD space, one USB port;
# OS: Any Microsoft OS such as Win98/2000/XP/2003/Vista.
# Projector: 1024*768, Keystone correction function available, VGA port.
# Projections Surface: Projection screen, whiteboard, flat wall, etc.
-5-
Warning prior to Installation
Operation Hints:
1. Face the whiteboard when operating and writing on the projected image. To avoid harm
to your sight, do not look straight at the projector when you turn back to face the students.
2. Don’t leave cables that may causing tripping. If the cables must be put on the floor,
straighten and tape them to the floor using “gaffer” tape.
3. Instruct students on the use the whiteboard before they use it, warning the students not to
look directly at the strong light from the projector.
4. Please change the battery of the pen when handwriting is unstable. Normally, the battery
of the pen will last for one year. Dispose of the old battery sensibly.
5. Please restart the computer and try again if the board fails to control computer by
pointing pressing in front of the whiteboard.
6. If computer control can be achieved by pointing and pressing on the whiteboard, but the
writing function fails, please exit the EWB application software, and restart it;. If it is still
unable to write, there may be a problem with the EWB application software , and we
recommend downloading the latest software version from our website for re-installation.
Environment
1. Please direct bright lights in the adjacent vicinity of the projection surface. While the
system works fine in ambient light, lighting too close or too directional towards the
projection surface may interfere with the normal operation of the infra red sensor.
2. Avoid using the system in dusty, damp or smog bound environments.
Projecting
1. When ceiling mounting the projector, please make the projector lens level with the
top edge of the projection surface. The centre of the lens must on the horizontal centre
of the Whiteboard. The distance from the screen is determined by the optics of the
projector. Keystone correction should be used if necessary.
2. TheReceiver will not receive the signal if the Presenter is between the projection
surface and the Receiver. The extendable pointer is recommended for standard use to
ensure the Presenter does not stand in the viewing area of the Receiver. If using the
writing pen, ensure the Presenter’s body is to the side of the writing area.
Transportation
It is suggested to repack the laser system components in the carry bag provided with
the original packaging when not in use or during transportation. If the original package
is unavailable, insert as much padding as possible between all the components to
avoid damage from vibration or impact.
Extended Cable
When the USB data line needs to be extended, please use shielded twisted pair (Max
length should be less than 30m, otherwise there may be loss of signal).
-6-
1: Installation of Hardware
1A. Installation Method for Ceiling Mounting
Optional IMAGE projector Mount Bracket:
Steps: The mount is designed to mount below the projector and will work with the majority
of projector brands/models. The calibration of the Receiver requires that the Receivers 2
laser beams be located either on or outside the centre of the side edges of the projected
image. If the projector is a very short throw projector (not standard projection throw), then
the IQLaser will not work with the projector. The Laser reception distance vs laser beam
separation is listed on page . Please ensure that the projector to be used will project an
image width either equal to or smaller than the laser beam spread at a specific projection/
reception distance.
(1) Remove the 4 screws holding the
bottom square plate of the IMAGE
ceiling projector mount (models
LCDMOUNT, LCDMOUNTE or
LCDMOUNTEX). Refer to Figure 1-1
Figure 1-1.
(2) Place the Laser Mounting Bracket in
the place of the bottom plate so that the
4 screw holes line up between the bracket
and the projector mount. Insert the 4 screws
to secure the bracket to the mount.
Refer to Figure 1-2
(3) When the projector mount is attached
to the ceiling and the projector is in place,
attach the Laser Receiver using the 1/4”
adjustable thread supplied with the Laser
bracket. Refer to Figure 1-3.
Figure 1-2.
Figure 1-3.
(4) Adjust the position of the Receiver so
that the 2 laser beams arte located either
on or outside (on the same horizontal axis
as) the 2 centre arrow markings when the
calibration software is operating. Refer
to Figure 1-4.
Figure 1-4.
-7-
1B. Installation Method for Desk Mounting
Using Tripod Mount Supplied:
1. Attach the Receiver to the Tripod Mount using
the 1/4” screw on the tripod. Refer Figure 1-5.
Figure 1-5.
2. Position the tripod on the desk so that the
2 laser beams line up with the 2 arrows in the
centre of either side. Refer Figure 1-6.
Figure 1-6.
3. Adjust the position of the Receiver so
that the 2 laser beams arte located either
on or outside (on the same horizontal axis
as) the 2 centre arrow markings when the
calibration software is operating. Refer
to Figure 1-7.
Figure 1-7.
-8-
2: Installation and Uninstall of Software
Install Interactive software
Note: There are 2 software programs to load. Please double click on the software
in the CD supplied, and follow the instructions:
a. ProjectorGeniusDRIVE - Board drivers and calibration software
b. EWBSOFTWAREsetup - Board Presentation software
Before proceeding, ensure your PC meets the miniumum requirements as listed on p5.
Run the “Setup.exe” on the CD and install it according the following steps:
Please select “Yes, I agree to this agreement” in the “Software License Agreement”, and enter the
user information and product register number when installing. Then finish the installation according
to the prompt on the Installation Interface.
Uninstall
Click Start > Programs > Returnstar Electronic Whiteboard Software >Uninstall to uninstall
this software. You also can open “Control Panel”, select “Add/Remove Programs”, and in
the list of currently installed Programs, select “Returnstar Electronic Whiteboard Software”,
then press the “Change/Remove” button to remove.
3: Connect the Data Line
The connection from the PC to the Controller is via the cable supplied with the board. The
PC connection is via USB and the power to the board is supplied via the USB. Ensure that
the connectors from the receiver to the controller and to the PC are properly connected also.
See FAQs for help with any problem.
4. Board Orientation:
The whiteboard must be oriented (calibrated) so that
the pen is correctly located by the board software. To
do this, click on the “Install and Orient” label in the
Laser Orientation icon in the taskbar at the lower right
of your PC screen. If not visible, go to
Start/Programs/Returnstar Projection Genius/Start to
open the icon.
The Receiver must be connected to your PC, and the
projector must be projecting the PC image onto the
screen surface to be able to use the calibration
software. Follow the initial setup screens (click the
appropriate boxes) and ensure the 2 red laser dots
are correctly positioned as per Fig 1-7 on the
previous page. After completing the calibration,
it will shut off automatically. You can then open the
board software, using the whiteboard icon in your
taskbar. The use of the whiteboard software is
explained on the following pages. If software icon not
visible, go to Start/Programs/Returnstar Whiteboard
Software to open the icon.
-9-
EWB
Software
Icon
Laser
Orientation
Icon
Use of the Whiteboard Software:
The Software sits in minimised mode in the lower Right Desktop, and uses the
whiteboard icon. Simply click on the whiteboard icon, and left click “Tools” to maximise
the software. Alternatively, or select “Returnstar Electronic Whiteboard Software” in
Start>Programs>Retrnstar Electronic Whiteboard Software
The Software Control Panel will operate in conjunction with other windows programs,
and will sit as an “overlay” screen. The Control Panel can be moved around the screen by
holding the left button on the blue top frame of the Control Panel, and moving the Panel to
nthe required location. Alternatively, the position can be locked by clicking the padlock icon
(centre of 3 icons) on the top right of the control panel. The Control Panel can be minimised
by clicking the minimise icon to the right of the padlock icon.
1. Menu: Click the Menu button on the top left of the control panel. This opens the Menu
dialog box as per pic :
New: Creates new file
Open: Opens existing file
Close: Closes file that is open
Mouse right-key: Makes mouse click act as right mouse
key until “make left key” clicked
Mouse left-key: Makes left mouse click act as
left mouse key
Single Click to open item: Makes a single click OK
to open file
Double Click to open item: Makes a double click
necessary to open file
File Protection: Creates password protection to
open file
Save: Save an existing file
Save as: Saves a file to direction/name as typed
Saves as template: Saves a file as a Template file
for this program
Print: Opens default printer to print file
Print Current Page: Opens default printer to print
the current page
Prnit Preview: Previews the page/s to be printed
before printing
Print Setup: Allows the print parameters to be set
before printing
About: Displays the software version be used
Exit: Exits the Whiteboard software program
- 10 -
2. Windows/Board: Button at lower left of Control Panel. Toggles between a standard
windows screen and a blank whiteboard screen.
3, Control Box Toolbar: The following Toolbar on the left side of the Control Panel. The
Toolbar functions are:
Insert to Office:
Page & Resource Manager: Opens Page & Resource Viewer on left of screen. Click
on the icon to open the Manager Window on the left of the working area:
There are 5 tabs on the Manager Window: Preview, Graph, Template, Source & Local.
a. Preview: Displays the pages in the current document
and provides tools to work on the document, including
arrows to move around the document and a range of
editing tools. See page for an explanation of Page
functions.
b. Graph: Provides an extensive range of regular figures
(lines, arrowhead, basic figure, flow chart and geometry
figures, etc. ), regular characters and symbols (English
letters, common numbers, decorative figures, teaching
figures , etc. These figures can achieve various teaching
and demo effects, and can be integrated into your
resource base.
c. Template: This area is to store templates that you
have developed for later use. The Template file is the
basis of lesson preparation, and the post script name
of the file is CDF. It is often used as the basis for
topic lessons and so is convenient in the preparation of lessons and lecture material. Edit
the content of the file (includes character, sound, picture, animation, picture and so on) in
the work area. After that, choose “Save as template” in “File” menu. All pages will then be
saved as a template.
- 11 -
d. Source: Contains a huge library of clipart, stored by subject
topic, that can be used for lesson preparation. Items such as
Agriculture, Chemistry, Physics, Maths, etc are included here.
Note that Music symbols are stored in b. Graph (above). All
items are inserted into the working page as an object and can
be edited. The system can automatically remember the last
used figure (element), template, Favorite and local picture or
file, and displays them in the “Recently used” column.
e. Local: Provides access to the PC and LAN from
within the whiteboard software for retrieval & placement
of objects and files for use in working documents.
Right Mouse Key: Turns to mouse click into right mouse for 1 operation
(Note: go via Menu commands to permanently change to right mouse key).
Mouse: Turns the cursor back to left mouse mode after being used as another tool
Undo: Undoes the last operation
Redo: Redoes the last operation if accidently undone
4. Draw Toolbar: The following Toolbar is in the centre of the Control Panel. Note that as
you click on the top line icon, a new set of relevant sub-bar (lower line) icons appear. For
the first 11 icons (prior to paint bucket icon), the sub-bar menu remains similar (although
the default settings for each top line icon can be varied). The last 3 top line icons have
noticeably different sub-bar icon listings.
The Toolbar functions are:
a. Pen functions (first 5 icons):
All pen icons have the same
sub-bar icons: 7 x colour defaults; 3 x line thickness defaults, & 2 x colour density defaults.
Each pen can save its respective defaults.
Pencil: The “Pencil” allows you to write, note and paint on the writing board, or under
the edit mode of some picture and file editors that have object processing function,
such as Microsoft Office Word, Excel, and PowerPoint, etc. It has the characteristic of trim
and smooth writing, and is writing a letter, figure and common character. You can choose
the thickness, colour, transparency and arrow effect of strokes. Double clicking the “Pencil”
button sets the defaults for the pencil.
- 12 -
Brush Pen: The “Brush Pen” is a writing effect based on the characteristics of
traditional calligraphy from some Asian countries such as China, Korea, and Japan. It
shows the writing art of brush pen brilliantly. You can choose the thickness, colour, and
transparency of strokes. Double clicking the “Brush Pen” button sets the defaults for the
brush pen.
Pen: The “Pen” has the pen-writing characteristics which can show the art of
pen-writing brilliantly and is fit for superscription, signature, and other cases that need
pen-writing effect. You can choose the thickness, colour, and transparency of strokes.
Double clicking the “Pen” buttonsets the defaults for the pen.
Washing Brush: The “Washing Brush” is a writing effect based on the writing feature
of Arabic. You can choose the thickness, colour, and transparency of strokes. Double
clicking the “Washing Brush” button sets the defaults for the washing brush.
Board Brush: : The “Broad Brush” is a writing effect of using several washing brushes
in different colors to write together, usually used in cases requiring special
emphasizing such as title and frame, etc. You can choose the thickness, colour, and
transparency of strokes. Double clicking the “Broad Brush” button sets the defaults for the
broad brush.
Note: The “Broad Brush” can include up to 7 colours. Select different colours in order,
you will get a combined writing effect of using Washing Brushes in these colours together. In
case you don’t intend to use 7 colours, for instance only 3, then set the last 4 colour icons as
white.
Colour Pallettes: 7 pallettes provided; click on pallette to choose the colour; double click on
a pallette to select a new colour.
After you click OK, the toolbar disappears.
Line Width: 3 width pallettes; click on pallette to choose width; double click
pallette to change the line width. After you click OK, the toolbar disappears.
Colour Density: 2 density pallettes; click on pallette to choose % colour removed
(ie: 0% is full colour; 30% is 70% colour density, etc; double click on pallette to
select new %. After you click OK, the toolbar disappears.
Arrow: The default arrow effect is solid arrow. If you need other arrow effect, doubleclick the arrow button and select other arrow effect in the extended toolbar. After your
selection, the new arrow button will replace the old one, and the toolbar will disappear
automatically.
- 13 -
b. Line Functions: (6th & 7th icons).
Both line icons have the same
sub-bar icons: 7 x colour defaults; 3 x line thickness defaults, 2 x colour density & arrow
defaults. Each line can save its respective defaults.
Line: You can choose the thickness, colour, transparency and arrow effect of lines.
Double clicking the “Solid Line” button sets the defaults for the line.
Dashed Line: You can choose the thickness, colour, transparency and arrow effect of
dashed lines. Double clicking the “Solid Line” button sets the defaults for the line.
c. Shape Functions: (8th to 10th icons).
All shape icons have the same
sub-bar icons: 7 x colour defaults; 3 x line thickness defaults, and 2 x colour density
defaults. Each shape can save its respective defaults.
Circle: You can choose the thickness, colour, transparency and arrow effect of circles.
Double clicking the “Circle” button sets the defaults for the circle. After selecting the
“Circle” button, select a point on screen and drag to create a circle, its size and shape is
changed accordingly by your dragging.
Square: You can choose the thickness, colour, transparency and arrow effect of
squares or rectangles. Double clicking the “Square” button sets the defaults for the
circle. After selecting the “Square” button, select a point on screen and drag to create a
square or rectangle, its size and shape is changed accordingly by your dragging.
Rubber Line: If you want to create a geometrical shape or a zigzag line, you can use
“Rubber Line”. Click the “Rubber Line”, select a point on screen as the start point of
the first line, and select another point as the end point of the first line (which is also the start
point of the second line), then select the end point of the second line, and so forth, ……
Until you have created a geometrical shape or a zigzag line.
d. Table: (4th last icon) You can choose the thickness, colour, transparency of the
table frame, as well as the column and row number. After selecting the “Table” button,
select a point on screen and drag to create a table, its size and shape (width of column
and row) will change according to the defaults. To change the defaults, double click on the
table icon, and set the number of rows & columns.
e. Fill: (3rd last icon) You can fill colour or gridded pattern (such as cross bar, column
bar, slanted bar grid, etc) in any closed geometrical shape and table.
The first 4 icons are colour icons, the fifth is a “no fill” icon, the next 6 are grid pattern icons,
and the last is a picture fill (insert picture) icon. To change the defaults where possible,
double click on the lower row icon.
- 14 -
f. Eraser: (2nd last icon) We have offered ten erasing options including the circle &
square fill erase, object erase, circle erase, square erase, and whole area erase, as
follows:
Circle middle erase: Choose small, medium, large, and clear the selected fill
of a circle.
Square middle erase: Choose small, medium, large, and clear the selected
fill of a square.
Object erase: Clear the designated object (click on the edge of circle, etc).
Circle erase: Clear the selected circle.
Square erase: Clear the selected area
Erase All: Clear the whole page
g. Text: (Last icon) There are 5 icons in the Text sub-bar.
Keyboard: Click on icon to display windows system keyboard for on screen text input.
Hand Writing Recognition: We offer the handwriting recognition program that can
support 16 languages. It can support any edition mode under the Windows system.
Activates Hand Writing Recognition (OCR) software. To use, open the program in which
you want to use/save the written text (eg. Notepad, Word). Click on the OCR icon and a
writing box will appear. Select the icon representing what you are writing (numbers, text or
symbols), and start writing, using the tools at the kleft if necessary. The finished text is
automatically entered into the Notepad or Word program).
Font Setting: Click on icon to set the font defaults for text input by PC keyboard.
Import Text: Click Text main icon first to place text box. Then click Import Text icon to
open dialog box to find the required text in .txt format. Press Open to place the text.
Copy Text or Image from Clipboard: I have have already copied either text or an image
to the clipboard, you can click on this icon to place it as an object on the working page,
and then move the object as required.
- 15 -
6. Board Software Tools:
As with the previous toolbar group, the main top icons have a sub-bar display of icons (on
the bottom line). Working through each of the top line icons:
1. Screen Tool: Click on Screen Tool to display 6 options on bottom line:
a. Spotlight: The default shape is round, you can drag the rim to stretch, zoom and
move the Spotlight, and click thered “tick” button in the top right of screen to open the
tool menu and change the Spotlight shape, colour, background image, and brightness, etc.
The spotlight area does not affect the mouse operation, and can be used for emphasis.
Click outside circle to drag circle position; click on spotlight perimeter colour & drag to
enlarge/reduce spotlight size. Click red cross to exit spotlight.
b: Reveal (all directions): Click the “Reveal Screen” button to use the reveal screen
function. You can drag the curtain edge to reveal screen from top to bottom, from left to
right, and from centre to all directions. You also can click the red “tick” tool button in the top
right of screen to call the tool menu and change the curtain shape, colour, background
image, and brightness, etc. Through the Reveal Screen function, you can cover some of the
area and emphasize the important content for the convenience of demonstration. In the
revealed area, you can use your mouse that will operate normally. Click red cross to exit
reveal.
c. Reveal Up/Down: Reveals up & down directions only from centre; pull
handle to reveal. Operation as for Reveal above.
d. Reveal Left/Right: Reveals left & right directions only from centre; pull
handle to reveal. Operation as for Reveal above.
e. Screen Arrow: Places an arrow on the working area. Click on arrow to drag it to
required position. Double click on arrow to change its direction. The parameters of the
arrow (colour, direction & transparency) can be changed by right mouse clicking on the
placed arrow.
f. Blank Screen: Click on the icon to place a blank screen, with or without a message,
over the working area. The parameters of the blank screen (colour, message, font,
transparency, time, and background picture) can be changed by right mouse clicking on the
blank screen.
- 16 -
2. Maths Tools: Click on Maths Tools on top line to display 6 options on bottom
line:
a. Length Measurement: You can measure between 2 points and the
measurement is displayed on the screen.
b. Angle Measurement: You can measure an angle and the measurement will
be displayed on the screen.
c. Dividers: Provides an interactive set of dividers to use on the work area. After
clicking the icon, click once on the work area to mark the centre of the required circle.
Drag your mouse to measure the radius of the required circle. Click again at the correct
distance to draw the circle based on the parameters you selected. If you move the mouse
along the circle circumference, you can trace the circumference to the desired position, to
either mark out an arc or the complete circle. Click a final time to lock the arc or circle.
d. Ruler: The default ruler is 10 units long. It can be rotated in any angle or stretched
to 100 units.
e. Protractor: Protractor can be rotated about the origin, and can be zoomed in and
out. We also provide an origin-coordinate for more accurate angle measurement.
f. Set Square: Click on the set square icon, select either the 450 or 60/300 square,
and click on the work area to place the square. The position, size and orientation of
the square can then be changed using the object tools.
3. Screen Capture: Click on screen capture on the top line to display 4 options
on the bottom line:
a. Full Screen Capture: Click to capture the full screen and display in a new
page or the current page.
b. Custom Screen Capture: Click the button, use your mouse to mark out the
required screen area for capture, and double click within the marked area to capture
the screen and display in a new page or the current page.
c. Current Screen Capture: Click the button, and a red frame will be displayed to
mark the area of window required for capture. Pull the line to mark out the required
screen area for capture, and double click within the marked area to capture the screen
and display in a new page or the current page.
d. Insert Method: Provides you with the option to insert the captured image to the
Current page or to a New page.
- 17 -
4. Screen Record and Play: We provide Full Screen Record, Area Record, and
Windows Record functions. If you activate the Sound Record function, the sound also
can be recorded simultaneously. The recorded file can be saved in AVI or WMV format. You
also can convert AVI to WMV, SWF (FLASH file), or EXE to playback. Besides many players
such as Windows Media Player, you can also use our own player to play them. During
recording, click this button again to exit.
When playing the playable file (media file, FLASH file, PPT file) in full screen, all operations
on the screen (such as writing, drawing and other special demo effects and auxiliary functions)
will pause the playing. After you exit this operation, the playing will resume.
By recording the construction of a lesson, every single stroke can be played back in order to
re-create the entire process on the board. Click on the Screen Record button on the top line
to display the 5 Functions Keys:
a. Stop
b. Pause
c. Play
d. Record: When you click the button, the various record options are displayed.
e. Converter: Converts the recorded file to other formats.
5. Special Tool: Click on the Special Tool button on the top line to display the
following Function Keys:
a. Generate Random Number: Generate random number or a group of random
numbers. This function the can be used in student nomination or other teaching cases
that need random number.
b. Calculator: Displays the system calculator.
c. Screen Zoom: Displays zoomed image where cursor is located on split
screen. The default position is on the right side of the screen. You can drag and adjust
the Magnifier. Right click on zoomed image to open command box. Options set zoom
parameters; exit closes zoom.
d. Remote Video Meeting: OPerates with Windows NetMeeting software. Click on
the icon to display to box ti input the data for the meeting.
User Extended: Click on this button on top line to display windows programs that can
be added to the toolbar, and which will appear in the bottom line. And simply by clicking
these shortcuts, you can start these application programs directly. Open the Taskbar Menu/
System Setting/User Extended to add more programs.
- 18 -
Software Taskbar Icon - located in taskbar area at bottom right of your PC:
Most functions are reasonably straight forward
Tools: Displays the Control Panel.
Mouse Right Key: Sets the mouse default as
right key function.
Mouse Left Key: Sets the mouse default as
left key function.
Single Click to Open item: Sets the mouse default as
a single click to open an item.
Double Click to Open item: Sets the mouse default as
a doube click to open an item.
System Setting: Opens a dialog box in which the
system default parameters can be set.
Register: Opens the dialog box for registration of the whiteboard software.
Update: Currently inactive; for later system update function.
About: Displays the software version information.
Exit: Closes the software from the Taskbar Menu.
- 19 -
Editing Objects:
Every stroke, image and element inserted is an independent object, and can be edited in
object edit mode, (e.g. copy, cut, paste, delete, select all, rotate, stretch, zoom, move, combine,
cancel combine, place in bottom or top, move to previous or next layer, insert to background,
lock position, sort, hyperlink, etc). You can use the eraser to separate one object into many.
When clicked with the left mouse, every object has a circle above centre (for rotating the
object), a circle at the lower right (for enlarging/reducing the object), and a white triangle in
blue square in top right corner (properties and edit options). After you click on the object ,
either left click on the top right triangle or click with the right mouse on the object to display the
edit options for the object.
Copy, Cut, Paste, and Delete: Select one or more objects, and choose the relevant function
in right-key menu or relevant icon in extended toolbar to, copy, cut, paste, and delete object.
Select all: Select one or more objects, and choose the “Select all” in right-key menu or
relevant button in extended toolbar to select all objects in current page.
Rotate: Every object is encircled in a marquee, on the top of which you can find a circular
rotate handle. You can rotate the object by dragging the handle.
Stretch and Zoom: Drag the size adjusting handle in the right bottom of the marquee to
stretch and zoom the object. In case of you select several objects, dragging handle in any
object marquee is ok.
Move: Select one or more object, then drag to a new position of current page. You can drag
the object from current page to other page by dragging them on the folder icon in current
page or Explorer.
Combine: This function allow you to combine the selected objects into a object group. You
can also use “Cancel Combine” to extract all objects from the object group. Once combined,
these objects can not be edited, resized or moved separately, until you cancel the combine.
Sort: By using “Place in Top or Bottom”, “Move to Previous or Next Layer” functions, you
can alter the overlap status of selected objects.
Insert to background: You can select one or more objects and insert them into background,
after that these objects can not be edited. If you decide to restore all protected objects to
foreground for further edition, use “Acquire background object” function.
Lock position: This function allow you to protect object against further move or edit, until you
cancel the lock.
Hyperlink: You can set the Hyperlink for any object. Click the object will link to the preset
webpage, file, picture or media. After you set the Hyperlink, a small box with a curvy arrow will
appear in the left bottom of the marquee. Click the arrow to hyperlink.
Alter the subject attribute: After you select the object, you can alter its attributes, such as
thickness, color, transparency, etc. In order to adjust the font for text and symbol, double click
the object in text box to operate.
- 20 -
Save object into Favorite: Select one or more object, and drag it into the Favorite folder
of resource base, then you can save it in “.edf “ format, We call it graph file or element file.
Page & Resource Manager/Preview/Page Functions:
Clicking the “Page Edit” button in the first function area of the whiteboard software toolbar
can pop-up the Page Layout & Explorer in the left side. Then select “Preview”, the Page
Manage Box will appear. You can edit the page by selecting the relevant button above the
Page Manage Box or the relevant option in the right-key menu.
Page Extension: By moving the page control button horizontally and longitudinally, you
can infinitely extend the page. If you choose the button in center, the page will be locked in
current editing area, and cannot be extended. Click this button again to unlock. The page is
locked in default setting.
Page Zoom in & out: The page can be zoomed in/out through the page control button in
toolbar. If you choose the button in center, the page will be locked in current editing area,
and cannot be extended. Click this button again to unlock. The page is locked in default
setting
Create, Insert, Copy, Cut, Paste, and Delete page: Select one or more page in Page
Preview area, then you can Create, Insert, Copy, Cut, Paste, and Delete page by selecting
the relevant button above the Page Manage Box or the relevant option in the right-key
menu.
Page Background: The Extended Color Toolbar will popup for page edition by selecting
the “Current Page Background” or “All Backgrounds” button above the Page Manage Box
or the relevant option in the right-key menu. You can also insert various background images
into the page background from the background image folder in Favorite, such as graph
paper, English homework paper, normal letter paper, grid letter paper, staff composing
paper, crystal lattice designing paper, coordinate designing paper, etc.
Insert Page Number: Selecting the “Insert Page Number” button above the Page
Manage Box or the “Insert Page Number” option in the right-key menu can pop-up the
Page Number Editor. After you finish the setting, the page number will be displayed on the
pages.
Open Page: You can open a page by selecting it in the Page Preview Area
Adjust Page Arrangement: You can adjust the Page Arrangement by dragging one or
more pages to other position in the Page Preview Area.
Save, Save as, Save as template: You can select a page in Page Preview Area then save
it . Object s (such as pen, text, image) and pages in .CDF file can be re-edited. You can also
save the page in other formats like, BMP, JPG, GIF, PNG, HTML, PDF, DOC, PPT, XLS, etc.
- 21 -
3.11 File
Clicking the Menu button in the software toolbar will pop-up an extended toolbar, as follows:
3.11.1 New: Select “New” to create a new CDF file, if you have opened one, the system will
prompt you to save.
3.11.2 Open: Select “Open” to open a CDF, HTML, DOC, PPT, XLS file, if you have opened
one, the system will prompt you to save.
3.11.3 Close: Select “Close” to close the current opened CDF file, the system will prompt
you to save if you haven’t.
3.11.4 Save, Save as, Save as template: Save as CDF file, or save in Template folder in
.CDF format. Object (such as pen, text, image) and page in .CDF file can be re-edited. You
can also save the file in other formats like, BMP, JPG, GIF, PNG, HTML, PDF, DOC, PPT,
XLS, etc.
3.11.5 Encrypt: We provide Encrypt function for both CDF file and other files such as PDF,
HTML, DOC, PPT, XLS, in order to prevent others form duplicating and utilizing the file. You
have to enter the correct password to open the encrypted file.
3.11.6 Print, Print current page, Print preview, Print setting: Same as most editor, we
provide Print, Print current page, Print preview and Print setting function, thumbnails of all
pages will be displayed in Print preview.
Note: If you used Page Extension function, please set and preview your printing, we will
cut and print the page according to your Print Setting.
- 22 -
Other Features
Direct Saving
We support writing, text editing, marking, inserting picture, drawing, and various special
demonstrating effect and assistant function in PPT demonstrating and slide mode, and the
editing mode of third party edit software, such as WORD, EXCEL, etc. File can be saved
without changing its format.
Electronic autograph and hand-writing embedding in 3rd party software
You can directly write and send hand-writing message through some massagers (MSN, ICQ,
and QQ) and through e-mail. You also can embed your autograph in Webpage and various
file in OA system, secure and reliable.
Long-distance Conference and Network Teaching
EWB software support Multi-connection, through Netmeeting or other third party network video
software, you can share your drawing, video, audio, screen and send them anywhere through
Internet, thus realized the powerful interactive teaching and demonstrating functions such as
long-distance conference and teaching. People in different time and place can have
real-time communication using network whiteboard. The long distance interactive teaching
is not only a dream now, and communication has become infinite.
Courseware Making (Animation Editing and Slide Making)
Multi Users Management
Multi Users Management function will be added in our next upgrade version of electronic
whiteboard software. Users can be added, modified, and deleted, so different teacher can
use the same computer to lecture and demonstrate according to their own requirements. Pay
attention to the release of V5.0 for detailed introduction.
Windows Dynamic Mode
We support writing, marking, drawing, and various special demonstrating effect and assistant
function in any dynamic Windows screen. You can use mouse and keyboard to operate the
computer without exiting these operations. It’s a fully breakthrough for the global conventional
limitation that electronic whiteboard software must write and mark after screen capture, and
guarantee the perfect effect of dynamic computer teaching. E.g., anti-virus software may
dynamically display the virus killing process, and you can write and mark in other area of
Windows screen. Afterward, when you select mouse to open any program window, the writings
will remain.
- 23 -
Pen Operation:
Click, Double click:
Do not move pen or finger; press the surface lightly in close quarters (1-2mm).
(Note: Since the whiteboard and the whiteboard pen are delicate electronic products, please
do not hit the surface heavily, o avoid the damage of the whiteboard and the pen point)
Dragging:
Press the surface with the whiteboard pen, and drag it to the appointed position
(the whiteboard pen should not leave the surface midway)
Writing:
Select writing mode and write on the surface . If there is no stroke, please lift the pen up and
wait for the PC to finish processing. (Use the same strength as using a normal fountain pen.)
Orientation:
If space appears between cursor and the point you press, please orientate again. If the
problem cannot be solved, please check if the whiteboard has been installed properly as
per the instructions.
Right Mouse Key:
Press the Right mouse key button on the tool bar, and then wait for 0.5 or 1 second, or go to
the Menu box on the Control Panel, select “mouse right-key” from the menu.
Shift to Left Mouse Key:
If the Right Mouse Key was pressed on the pentray toolbar, the pen will revert to Left Mouse
after one operation. If the Mouse - right Key was pressed in the Menu, go to the Menu box on
the Control Panel, select “mouse left key” from the menu.
Note: Please use 1024x768 image resolution. Close all energy saving modes to avoid
performance delay caused by dormancy. To lengthen life span of the battery, please take it
out if you will not use the electronic pen for a long time.
Maintenance of Pen
1. Take hold of the front point of the pen with left hand, take hold of the rear of the pen with right
hand to open the pen, and slowly pull apart..
2.
Remove the rear of the pen to expose the batteries.
3.
Take out & replace the batteries. Take care with the positive and negative pole.
4.
Replace the rear cover.
- 24 -
FAQs
Indicator Light
1. Indicator light
does not shine
red
(1)The connection of USB port and PC is
not good or the connection between PC
and Receiver is not stable.
Check the USB connection between
PC and Receiver. Then connect them.
(2)The USB port or the COM port of white
board needs to be replaced.
If the COM port of white board needs to
be replaced, please contact the agent
or call ABI.
(3) USB data line should be changed.
Please contact ABI.
(4) Indicator light doe t shine but the EWB
works normal.
Please contact ABI.
(4)The driver of USB data line did not
install.
(2) The installation of EWB software is
not succeeding.
Toolbar
1. The mouse
does not work.
1. Laser
pointer cannot
control the
EWB
Install USB data line again.
Uninstall the old white board
software driver and install it again.
(1) The tool software of EWB will not
start.
Click on “Tools” in Taskbar icon
menu.
(2) The installation of EWB software is
not succeeding.
Uninstall the old white board
software driver and install it again.
(1) The tool software of EWB does not start.
Click on “Tools” in Taskbar icon
menu.
(2) The battery of electronic pen is no
longer working properly or the pen needs
to be replaced.
Replace the battery or pen
(1) Orientation is not coorect
Virtual Board Functions
2. Laser
Pointer only
can control
part of the
PC image.
3. It is out of
alignment
when a line is
drawn.
4. Mouse is
not working
properly.
The relative position of Projector, Receiver
and image has changed; PC has been
replaced;Software has been installed
again.
Do orientation again
(2) The software is configured
wrongly.
Re-run the orientation procedure.
(1) The horizontal lines (ordinate) of
whole board have part bend in some
column (line) when draw horizontal line
(ordinate), that means the orientation is
not good.
It needs orientation again.
(2)The horizontal lines (ordinate) of whole Check the positioning and orientation
board have part bend in some column
of your projector. It is probably not
(line) when draw horizontal line (ordinate) properly centred on the screen.
(1) Some times the mousedoesn’t work
and some times it works normally. This
means there is a light source pointing
directly on the projected image or
interfering with the Receiver.
- 25 -
Shut off or block any light source or
direct sunlight reflection that is
causing the problem.
Product Service
1. Software Upgrade: Free Updates of the software will be supplied when available. Check
the website for information on the latest version. It is listed under “Downloads” in the “Dealer
Info” section (left side) of the Home Page www.abimage.com.au.
2. Technology Service: A copy of the User Manual will also be located in the same Downloads
section. If you have any technical queries, contact ABI staff on 02.9938 6866.
3. Quality Warranty:
Three year warranty is provided on the Receiver and its operation. The service “back to
base”, so the client has to return the board to ABI and ABI will organize the return of the
board to the user. It does not include:
(1) Accessories (pens, batteries, cable).
(2) Physical damage, including surface scratching, marks, build up of dirt and pen ink,
and distortion caused by faulty installation.
(3) Damage resulting from operation not as stipulated in the user manual.
(4) Warranty on the product will be voided if the Receiver is disassembled by the user or
an unauthorized repairer.
(5) Damage caused by force majeure such as natural disaster, thunder and lightning and
accident.
(6) Product accessories, consumable parts such as CD, user manual, package, fixing
parts, batteries, the shell, the consumption components are all not include into the
free repairing or exchanging a purchase clause.
(7) The user must be able to provide a copy of the original invoice.
4. After Sale Service:
1) ABI provides a service centre support to service and repair the IQLaser. Contact
ABI on 02.9938 6866 to discuss any problems or organize a service.
Copyright
This user manual is for the IMAGE IQLaser; the copyright belongs to A Brighter Image Pty
Ltd. We have the right to modify the content of user manual without notice.
- 26 -