1
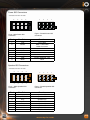
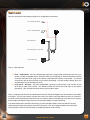
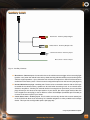
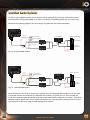
USER MANUAL
Advanced Bluetooth Music Streaming
Car Kit with High Contrast OLED Screen
®
5
Introduction
6
Installation
Choosing a Mounting Location6
Product Components7
Adhesive Pads7
Control Box7
Controller8
Display8
Microphone9
Wiring10
Connections Overview10
Connector Pinouts11
24 Way Main Harness Connector
11
12 Way Auxiliary Harness Connector
12
Power ISO Connectors 13
Speaker ISO Connectors 13
Main Loom14
Auxiliary Loom15
Factory Audio System16
Amplified Audio Systems 17
Aftermarket Audio Systems18
Auxiliary Input Connections18
Low Level Amplifier Connection 19
Testing19
Operation
20
Getting Started20
Pairing and Connecting a Phone20
Pairing and Connecting a Second Phone
21
Connecting an iPod or iPhone21
Connecting an Auxiliary Device21
Connecting an Audio Device via Bluetooth22
Handsfree (HFP) Functions23
Music Streaming (A2DP) Functions23
Your Home Screen24
Making & Receiving a Call25
Phonebook Dialling 25
Call History Dialling26
Manual Dialling
26
Voice Dialling
27
Last Number Redial27
Transferring a Call Between iO PLAY2 and a Handset
27
Swapping Between Help or Incoming Calls
28
Call Privacy29
Ending a Call29
2
Streaming Music from an A2DP Compatible Phone
Swapping Between the Radio and iO PLAY 30
30
31
Menu
Functions
Phonebook31
Call History31
Test Messages32
Car Radio32
iPod Control33
iO ZooM Structure35
A2DP Music36
AUX Input36
Audio EQ37
Music EQ37
Call EQ38
Settings Menu38
Bluetooth38
Pairing a New Device38
Listing Paired Devices39
Removing All Devices40
Pairing with a Specific PIN40
Turning Bluetooth Visibility On or Off40
Enabling eSCO41
Ringtone41
System Volume41
Sat-Nav Volume42
Synchronisation42
Turning Autosync On or Off42
Manually Syncing a Phonebook43
Brightness43
Advanced Settings43
Muting the AUX Output when a Call is Received43
Selecting the Internal Amplifier Mode of Operation43
Car Radio on Music Pause Feature43
Turning the Vocal Announcements On or Off
44
Selecting the Reverse Priority44
Turning the iO ZooM Feature On or Off44
Choosing the Language for Display and 45
Announcements
Choosing your Vehicle Type45
Feature Reset45
System Status45
System Reboot46
Factory Reset46
3
47
Appendix
FAQ’s / Troubleshooting47
Glossary48
Specifications49
50
Legals
Warranty50
Trademark50
Copyright50
Modifications
50
Declaration of Conformity51
FCC Compliance Statement51
Bluetooth51
Correct Disposal of this Product51
iPod/iPhone52
C-Tick52
53
Accessories
Charging Kits53
Replacement Screens53
Steering Wheel Adaptors (PC10)53
Vehicle Specific Harnesses (SOT Leads)
53
54
Product Registration
Benefits
54
More
Information
55
More Information55
Contact Us55
4
Thank you for purchasing an iO PLAY2 handsfree music streaming
device.
iO PLAY2 is the next generation of iO product which
introduces significant improvements in functionality
to enhance sound quality, driver safety and ease of
use. This technology enables you to play music stored
from most portable mobile devices as well as make and
receive mobile calls safely from within your vehicle.
ABC
ABC
AUX IN
Multipoint Pro™ - Connect up to 2
devices at any one time
Reversing Aid compatible
Removable OLED screen
Specially designed technology for integrating
your portable Satellite Navigation device
Text to Speech - Phonebook,
Menu, Text Messages and iPod
album/track
Make and receive handsfree mobile phone
calls wirelessly
iPod & iPhone compatible
Easy to use illuminated iO PLAY2 controller
iO ZooM advanced music search
function
Enjoy auto-connect when you enter your
vehicle by storing up to 5 devices in iO
PLAY2’s memory
Audio-sensing 3.5mm AUX IN
Excellent sound quality, streamed through
your vehicles speaker
Automatic Phonebook synchronisation
of up to 9,000 contacts
RCA
5
ISO
Line-level RCA output for amplified or
AUX in connection
AMP
CLASS D
High quality audio performance using 180
watts Class-D amplifier technology
* may require additional parts
Multi-lingual support
Innovative design that will integrate with
your existing vehicle audio system*
5
Choosing A Mounting Location
Before mounting any of the components please read and understand the following warning.
All components must be mounted in a manner that ensures they will not impede any of the vehicles
controls. They should also not be mounted in a way that obscures the driver’s field of vision.
Special care must be taken to ensure that the operation of airbags is not affected and the units should not
be mounted on the dashboard panel that the airbag deploys from.
Please also note that cables should be cable tied or secured neatly and should not be run in front of any
airbags.
Fig.1 – Placement Drawing
6
Product Components
Adhesive Pads
The controller, display and microphone can all be secured with the supplied adhesive pads. All mounting
surfaces should be clean and dry before application. Please ensure that all mounting locations are
confirmed before application of adhesive pads as these should not be removed and reapplied as adhesion
will be reduced.
Control Box
Care should be taken when mounting the control box to ensure that it is not covered or obstructed by
metal work or any large wiring looms. This is to ensure that connectivity and signal strength is optimised.
Please also avoid mounting the control box near fuse box’s or vehicle ECU’s to minimise the chances of
interference.
Do not mount the control box under the stereo as this could impede the Bluetooth signal range and
operation.
Once a suitable location has been found, secure the unit in place with large cable ties or ‘P’ clips and
screws.
Cable Tie Fixing
www.my-io.com
P Clip Fixing
Fig.2 – Control Box Mounting
7
Controller
The controller should be mounted within easy reach of the driver. Where possible it should be mounted on
a flat surface to ensure maximum adhesion.
The wire for the controller can be routed either to the bottom, top or either side to allow for the most
suitable mounting.
Possible Cable Routes
Fig.3 – Controller Cable Routing
Display
The display should be mounted in a location that is easily viewed by all kit users. The mounting base for
this display is flexible and should provide good adhesion even on slightly curved surfaces. Once mounted,
the display can be swivelled to provide the most effective viewing angle. Should you require, the mounting
dock can be removed from the base to allow for flush fitting. To accomplish this remove the OLED display
from the dock which will reveal a screw. Undo this screw and the mounting base will be separated from
the dock.
If the display mount requires tightening before fitting you can tighten the 2 phillips screws seen at the base
of the mounting foot. This should be done prior to fixing the mounting foot with the self adhesive pad.
When installing the screen ensure enough room is allowed for it to be removed from the mounting dock.
When reconnecting the display be sure not to damage any of the pins. The cable exit from the mounting
dock can be routed either to the bottom or either side to allow for the most suitable mounting.
Allow room to remove OLED display
Possible cable exit routes
Fig.4 – Display Mounting
8
Microphone
The microphone should be mounted along the centre line of the vehicle (not on the A pillar) to optimise
performance, and should be kept at least 6” away from the windscreen. Make sure that when running the
lead for the microphone you do not obstruct the curtain airbags if fitted.
The microphone is supplied with two different types of fixing to allow for various mounting options.
Roof
6” Minimum
Windscreen
Fig.5 – Microphone Location
9
Wiring
Connections Overview
Now all the separate component’s locations have been chosen you can start routing the cables from the
various components to the control box. You will also need to route the main harness from the control box
to your vehicles radio.
The diagram below shows all components of the IO PLAY2 system.
The USB lead for the programing port does not use a latching connector, so we recomend that it is cable
tied to the control box to stop it working loose.
USB Programming Port
PLAY2 Only
Cable Tie
CONTROL BOX
(Bottom View)
iPod
Pink - Audio Mute Output
iPod
iPod / iPhone Connector
Microphone
Brown - HFP Mute Output
ISO
AUX
iO Controller
Male ISO Harness
PLAY2
Brown Link Cable - Factory Mute
OLED Screen
PLAY2 Only
Red Phono - Auxilliary Output Right
Female ISO Harness
White Phono - Auxilliary Output Left
Blue / Green - Reverse Input
3.5mm Jack Socket - Auxilliary input
Fig. 6 - System components
Please note that the programming port will not accept music files or any other files from a USB dongle.
It must be connected to a PC/Laptop for updating software only.
10
Connector Pinouts
24 Way Main Harness Connector
* Connector view from Pin side
13
24
1
12
Fig.7 – 24 Way Main Harness Connector
Pin #
Wire Colour
Function
1
Pink
Audio Mute
2
Brown
HFP Mute
3
Not Used
Not Used
4
Green / Black
Speaker Out LR-
5
Purple / Black
Speaker Out RR-
6
White / Black
Speaker Out LF-
7
Grey / Black
Speaker Out RF-
8
Green / Black
Speaker In LR-
9
Purple / Black
Speaker In RR-
10
White / Black
Speaker In LF-
11
Grey / Black
Speaker In RF-
12
Not Used
Not Used
13
Yellow
Permanent +12V
14
Red
Ignition Switched +12V
15
Black
Earth
16
Green
Speaker Out LR+
17
Purple
Speaker Out RR+
18
White
Speaker Out LF+
19
Grey
Speaker Out RF+
20
Green
Speaker In LR+
21
Purple
Speaker In RR+
22
White
Speaker In LF+
23
Grey
Speaker In RF+
24
Not Used
Not Used
11
12 Way Auxiliary Harness Connector
* Connector view from Pin side
7
12
1
6
Fig.8 – 12 Way Auxiliary
Pin #
Wire Colour
Function
1
Not Used
Not Used
2
Blue / Green
Reverse Input +VE
3
Not Used
Not Used
4
Not Used
Not Used
5
White Phono Center Pin
AUX Out L+
6
White Phono Outer Shield
AUX Out L-
7
Red Phono Center Pin
AUX Our R+
8
Red Phono Outer Shield
AUX Our R-
9
Not Used
Not Used
10
3.5mm Jack Plug Center Pin
AUX In L+
11
3.5mm Jack Plug Middle Shield
AUX In R+
12
3.5mm Jack Plug Outer Shield
AUX In -
12
Power ISO Connectors
* Connector view from Pin side
8
6
4
2
7
5
3
1
7
5
3
1
8
6
4
2
Fig.10 – Female Power ISO
Connector
Fig.9 – Male Power ISO
Connector
Pin #
Wire Colour
Function
1
Red
Link Cable
2
Brown
Mute - Linked with
Bullet Connector
3
Grey
Link Cable
4
Yellow
Permanent +12V
5
Blue
Electric Antenna Link Cable
6
Orange
Illumination Link Cable
7
Red
Ignition Switched +12V
8
Black
Earth
Speaker ISO Connectors
* Connector view from Pin side
8
6
4
2
7
5
3
1
Fig.11 – Male Speaker ISO
Connector
7
5
3
1
8
6
4
2
Fig.12 – Female Speaker ISO
Connector
Wire Colour
Function
1
Purple
Speaker RR+
2
Purple / Black
Speaker RR-
3
Grey
Speaker RF+
4
Grey / Black
Speaker RF-
5
White
Speaker LF+
6
White / Black
Speaker LF-
7
Green
Speaker LR+
8
Green / Black
Speaker LR-
Pin #
13
Main Loom
The main harness has the following optional or configurable connections.
Pink - Audio Mute Output
Brown - HFP Mute Output
ISO
Male ISO Harness
Brown Link Cable - Factory Mute
Female ISO Harness
Fig. 13 - Main Harness
>> Pink – Audio Mute: This wire will generate a ground (-) output when streaming music from your
phone or A2DP compatible device, and also when you are playing an iPod connected to the iPod
connector and also when using an Aux device connected to the 3.5mm Jack socket. You should
connect this wire to the mute input of your stereo (if present). This will mute the stereo when you
are listening to any of the above sources.
>> Grey/Yellow – HF Mute: This wire will generate a ground (-) output when a call is active on the
iO PLAY2 or when TTS is active. You should connect this wire to the mute input of your stereo
(if present). This will mute the stereo when a phone call is active.
Note: If required, both the HFP and Audio Mute wires can be joined together and connected to your radio’s
mute input. You may only need to connect one mute if you wish to mute the radio only when on a call and
not when music streaming (if using AUX IN on your factory radio for example) You may also wish to use the
Audio output to energise a relay to turn on an external amplifier for music streaming.
In an aftermarket stereo with ISO connectors you will most likely find the mute wire will be in the pin
location that has the brown jumper wire in the iO harness. You can unplug the bullet connection and
connect either or both of the mute wires to enable the stereos mute function.
14
Auxiliary Loom
AUX
Red Phono - Auxilliary Output Right
White Phono - Auxilliary Output Left
3.5mm Jack Socket - Auxilliary input
Blue / Green - Reverse Input
Fig. 14 - Auxiliary Harness
>> Blue/Green – Reverse Input: Connect this wire to the vehicles reverse trigger wire or reversing light
(positive +12V) when the vehicle has a factory fitted reversing aid that audibly transmits through the
vehicles original speakers. Upon activation this will mute all outputs from the iO PLAY2 and return
audio back to the factory radio. There are some configurable options for this function (see page 44)
>> Red and White Phono plugs – Auxiliary out: These can be connected to stereos with an AUX input
to enable all the vehicles factory speakers to be used when streaming music or to external audio
devices or amplifiers*. Should your external device not accept phono inputs then you can cut these
plugs off and join the wires to the input section of your device, (the outer copper braid of the wire
is the negative on each plug) or use an RCA to 3.5mm RCA Adaptor (Autoleads part PC7-200) to
connect to the 3.5mm jack of your stereo.
>> 3.5mm Stereo Jack – Auxiliary Input: This is used to connect any device with a 3.5mm stereo jack
to the IO PLAY2 to allow music streaming i.e. a satellite navigation or other portable music storage
device. This input has confirgurable options (see page 36).
* may require additional parts
15
Factory Audio System
If your radio has an industry standard ISO connector (see figure 10 & 12) you should not require additional
harness adaptors to connect iO PLAY2 to your vehicle. Please note that some vehicles will use the same
ISO plug that is present on the iO PLAY2 but the pin configuration may be different so please check before
connecting.
For some installations (French wiring configurations) you may need to swap the red and yellow power
wires. This can be done by prising open the in-line fuse holders and swapping the wires.
If your radio does not have standard ISO connectors you may find that you will need an Autoleads SOT
lead to adapt the wiring harness to your vehicles specific type. These can be purchased from your local iO
or Autoleads dealer.
CONTROL BOX
(Bottom View)
iPod
For factory fitted audio systems that do not use an external amplifier refer to the following diagram.
Audio Mute
ISO
HF Mute
To Head Unit
Mute Input (neg)
Head Unit Mute Input
Vehicle Specific Plug
To
Head Unit Plug
Head Unit Factory Mute
To Vehicle
Original Loom
Fig. 15 - Non Amplified Connection
+12V Ignition (If required)
16
Amplified Audio Systems
For half or fully amplified systems you will need to use an Autoleads SOT accessory lead which can be
purchased from the supplying dealer or to check your vehicle compatibility please visit: www.my-io.com
CONTROL BOX
(Bottom View)
iPod
Please see the following diagrams for connecting to a system that uses external amplifiers.
Audio Mute
HF Mute
ISO
To Head Unit
Mute Input (neg)
SOT 1000 Range
Vehicle Specific Plug
To
Head Unit Plug
AMI-030
Head Unit Factory Mute
To Vehicle
Original Loom
+12V Ignition (If required)
CONTROL BOX
(Bottom View)
iPod
Fig. 16 - Fully Amplified System
Audio Mute
ISO
HF Mute
To Head Unit
Mute Input (neg)
SOT 1000 Range
Vehicle Specific Plug
To
Head Unit Plug
AMI-030
Head Unit Factory Mute
To Vehicle
Original Loom
Fig. 17 - Half Amplified System
+12V Ignition (If required)
Some vehicles do not include an accessory or ignition wire in the standard radio harness so you will need
to route the red wire on the harness to a switched 12V accessory or ignition source. This can often be
found at the cigarette lighter but please verify with a multi-meter before making the connection. On CAN or
Multiplex systems please refer to your vehicle manufacturer for a safe accessory pickup point as incorrect
connection can cause error codes or other damage to the vehicle.
17
After Market Audio System
When using aftermarket amplifiers refer to the following diagram.
iPod
FR Input
CONTROL BOX
(Bottom View)
To Head
Unit RCA
Outputs
FL Input
RR Input
RL Input
Audio Mute
SOT 1000 Range
To Head
Unit Mute Input (neg)
HF Mute
ISO
Head Unit Mute Input
To Head
Unit Plug
AMI-030
Head Unit Factory Mute
To Vehicle
Original Loom
FR Output
FL Output
To Amplifier
Inputs
RR Output
Fig. 18 - Aftermarket Amplified System
RL Output
Auxiliary Input Connection
CONTROL BOX
(Bottom View)
iPod
You are able to use the Low Level (RCA) outputs to connect to the AUX input of your audio system which
may be located o nthe stereo itself or often in the glove box or centre console.
MD/LD
PS
A/
TA
AF
PT
Y
P
DIS
AUX IN
BD/ENT
SCAN
1 PAU
2 RPT
3 INT
4 RDM
5
6
MUTE
Audio Mute
AUX
ISO
Car Stereo AUX In Jack
HF Mute
Head Unit Factory Mute
Red Phono - Auxilliary Output Right
Autoleads part (PC7-200)
White Phono - Auxilliary Output Left
3.5mm Jack Socket - Auxilliary input
Blue / Green - Reverse Input
Fig. 19 - Low Level AUX In connection
18
Low Level Amplifier Connection
If you wish to use the Low Level (RCA) outputs to connect to an existing external amplifier you will require
an iO RCA Interface as per Fig 20.
iPod
Aftermarket amplifier
CONTROL BOX
(Bottom View)
Car Stereo
EJ
MU
AF
AF
UP
PTY
SEEK
TILT
DN
MENU
Audio Mute
BD/LD
REL
MODE
AUX
ISO
HF Mute
Original RCA routing (No Longer Used)
Head Unit Factory Mute
iO RCA Interface
Red Phono - Auxilliary Output Right
New RCA Wiring
White Phono - Auxilliary Output Left
GND
+12V Ignition
+12V
3.5mm Jack Socket - Auxilliary input
Blue / Green - Reverse Input
Fig. 20 - Low Level Amplifier Connection
Testing
Once installation is complete, please ensure the kit is tested to verify full functionality and correct
Bluetooth operation. To do this we recommend connecting a phone to the kit, making and receiving a call,
streaming music from the phone and an iPod.
19
Getting Started
All Features & Functionality are dependant on the connected handset. You should check with your phone
manufacturer or alternatively visit www.my-io.com for device compability.
Pairing and Connecting a Phone
(when visibility is turned on in your iO PLAY2 menu):
The iO PLAY2 has the ability to have 5 phones paired to it at any one time. If an attempt is made to pair
another device then the screen will display a message advising that you need to delete a device before
pairting a new one. There is also the ability to use Multipoint ProTM technology to connect up to 2 devices
to the kit simultaneously.
To pair a phone to the iO PLAY2,
>> Turn on the vehicle’s ignition or start the engine
>> Enable Bluetooth on your phone and initiate a search for new devices
>> On your phone locate and select iO PLAY2 from the list of discovered devices
>> Pair to iO PLAY2 using the pin code 0000. If Simple Secure Pairing is used, the Authentication
Code will be displayed on screen
>> When/if you are prompted, connect to iO PLAY2
>> You should also enable the auto connect feature on your handset to allow automatic reconnection each time.
>> A message will be displayed on the screen saying pairing successful.
>> You will then return to the ‘home screen’ displaying the connected handset’s information.
Note:
If Bluetooth visibility is NOT turned on in the iO PLAY2 you will need to refer to the ‘Pair
menu (Page 37)
Menu
Settings
Bluetooth
New Device’
Pair New Device
Pairing and connection procedures may differ from phone to phone, please check your phone’s user
manual for further information.
Fig.21 – Home screen
20
Pairing and Connecting a Second Phone
Your iO PLAY2 has the ability to connect two phones simultaneously. To accomplish this, follow the same
procedure as previously mentioned to pair the first phone.
Once complete, both phones details are displayed on the home screen. (Fig.22) Phone 1 is the first phone
listed in the display, and Phone 2 is the second
Fig.22 – Two Phones paired simultaneously
Connecting an iPod or iPhone
via the iPod connection cable.
Your iPod will plug in directly to your iO PLAY2 system via the supplied iPod accessory cable. Once
connected you will be able to charge, play and control your device by accessing the ‘iPod’ menu.
Using
you are able to search your iPod in the same manner as you would normally i.e. by artist
or album etc. The search will be split into alphabetical segments until you have less than 50 entries left at
which point you will be able scroll through all entries individually.
You are also able to turn off the
Menu
iPod
function and use the iPod screen to select tracks (see page 44)
Playlist
Choose Song
Play
Connecting an Auxiliary Device
via the 3.5mm stereo jack.
You are able to connect many audio devices to the 3.5mm jack with a suitable lead. Once connected you
will be able to listen to this device’s audio playback through your vehicles speakers. To listen to audio from
this device you will need to go to the ‘Aux In’ menu and select this source.
Menu
Aux Input
Play / Stop
21
Connecting an Audio Device via Bluetooth
For pairing a product such as a Satelite Navigation device via Bluetooth please refer to the accessory’s
user manual.
Once the devices are paired they will connect automatically each time the iO PLAY2 is powered up.
Note: To enable pairing, the iO PLAY2 must have Bluetooth visibility turned on
Menu
Settings
Bluetooth
Bluetooth Visibility
On / Off
If the device you are trying to pair does not use one of the standard ‘handshake’ sequences and ‘PIN
codes’ you may need to enter the device’s specific PIN code to allow pairing, which should be in the
device’s instruction manual.
Menu
Settings
Bluetooth
Pair with User PIN
Enter PIN Code
For a more detailed explanation please refer to page 40
22
Hands Free (HFP) Functions
The diagram below illustrates the controller functions when connected with your mobile phone on the HFP
(Hands Free Profile).
Volume Up / Down (rotate)
Last Number Redial (hold for 3 secs)
Transfer Call to Handset (hold for 3 secs during call)
Enter Manual Dial Screen
(hold for 3 secs)
Show Menu
DTMF (hold during call)
Answer Call
Reject Call / End Call
Swap Call (when 2 calls active)
Initiate Voice Dialling
(hold for 3 secs)
Call Privacy (during call)
Music Streaming (A2DP) Functions
The diagram below illustrates the controller functions when connected with your mobile phone or Bluetooth
enabled device on the Music Streaming profile (A2DP) or when connected to an iPod.
Volume Up / Down (rotate)
Show Menu (hold for 3 secs)
Play / Pause Music
Skip / Scan Backwards
Skip / Scan Forward
Fig.23 – Controller Functions
23
Your Home Screen
This is the screen that is displayed when the iO PLAY2 is in idle state with a phone connected. (Fig.24)
The Home Screen shows the information about each phone that is connected to iO Play2 including charge
level, signal strength and network information.
Fig 24 – Home screen
From this screen you are able to activate your phones voice dialling option by holding down the red
button for 3 seconds. You can also call your last dialled number by holding down the green button for 3
seconds.
To manually dial a number hold down the centre rotary button.
If you are playing music whilst in the home screen from a device which supports AVRCP the display will
look slightly different and the buttons will perform different functions. These functions are listed on the
previous page (Fig.23)
Fig.25 – Playing music whist in the Home Screen
In addition to the standard information you will also have five icons to mimic the button functions of the
music playing device.
To access the menu when a music device is playing just press and hold the centre button which will take
you to the main menu screen (‘Phonebook’)
24
Making & Receiving a Call
An outgoing call can be made in one of six ways:
>> Via the phonebook on the iO PLAY2
>> Via the call history on the iO PLAY2
>> Using the iO PLAY2 manual dialling feature
>> Via voice recognition (dependant on handset)
>> Using the phone keypad as normal
>> Using last number redial
Phonebook Dialling
To dial using contacts from the phonebook enter the ‘Phonebook’ menu and select your chosen name
and then click the rotary button. If there is more than one phone number stored for that particular contact
then you will be given the option of which number you wish to use. If your phone uses AT commands
during phonebook sync rather than PBAP sync then you will not have multiple numbers listed under one
contact. Instead you will have multiple entries in the phonebook listing for each number associated with
the contact. Once the correct number is highlighted then click the rotary button to dial (Fig.26). If you have
two phones connected you will need to choose which handset’s phonebook you wish to access.
Menu
Phonebook
Choose Letter
Choose Name
Choose Number
Click to Dial
Fig.26 – Phonebook
In various screens you will be shown a left and right arrow (as shown in Fig 26). These signify there are
further options available to you in each direction.
25
Call History Dialling
To dial using call history just enter the ‘Call History’ menu and then select the desired number from your
recent calls dialled, missed or received and then click the rotary button on the controller (Fig.27).
Fig.27 – Call History
Menu
Call History
Dialled, Missed, Received
Choose Number
Click to Dial
If you do not have any call history available then ‘Call History Empty’ will be displayed.
Manual Dialling
To manually dial from the iO PLAY2, enter the ‘Phonebook’ menu and use the number entry screen
located under the
icon. Alternatively you can access this menu by holding down the rotary button
whilst in the Home Screen. Please note manual dialling will always use ‘Phone 1’. Once in the ‘Manual
Dial’ screen rotate the rotary button to select the number. Confirm the selection by clicking the rotary
button. If you make an error then use the button to delete the digit. As you click on each number the
number will be displayed at the top of the screen. Once the number is entered click on the
to dial
(Fig.28).
Menu
Phonebook
Dial Number
to Dial
Fig.28 – Manual dialing
26
Voice Dialling
To use the voice dialling feature on compatible phones you need to hold down the red button for 3
seconds whilst in the home screen. Please note that this will always activate the voice dialling feature of
‘Phone 1’.
Fig.29 – Call History
When prompted you should clearly state the name of the contact that you wish to call. This will then start
the dialling process for your chosen contact.
The voice dialling process will be activated in the same fashion as your handset so if confirmation of the
desired contact is required on your handset then this will be the case when using the iO PLAY2.
Some devices allow operation of other features via voice control (for example; music selection)
Last Number Redial
You are able to dial the last dialled number on a compatible phone by holding down the green button
whilst in the home screen. Please note that this will always dial the last number dialled from ‘Phone 1’
if two phones are connected
Transferring a Call Between iO PLAY2 and a Handset
To transfer a call between iO PLAY2 and a handset, just hold down the rotary control during a call for 3
seconds. Each 3 second press will alternate between the handset and the iO PLAY2. You will be notified
of this by the “Handset Transfer” icon (Fig.30). If multiple calls are active then all calls will be transferred to
the handset.
Fig 30 - Handset transfer icon
27
Swapping Between Held or Incoming Calls.
iO PLAY2 has the ability to handle multiple calls simultaneously but this feature is only available on one
handset at a time.
If you have a current active call on either connected handset and a second call is received on the same
handset you will be notified by a low “beep” tone and also the display will announce the incoming caller.
You are then able to accept the new call and put the first call on hold by pressing the green button, or you
can end the current call by pressing the red button and then choose to answer the second call.
If you have chosen to accept the second call and place the first call on hold you can then swap between
calls by pressing the green button. The red button will always end the currently active call.
You will be shown which call is active and which one is on hold on the display.
Fig.31 – Call on Hold
If you are on a call from one handset and the other handset receives an incoming call you will be shown a
message asking if you wish to end all current calls and accept the new one. Pressing green will accept the
incoming call on the iO PLAY2 and end all current calls. Pressing red will ignore the incoming call, however
the call will still be available to answer on the handset itself. This is due to the fact that calls cannot be
handled simultaneously from two different handsets.
You are of course still able to answer the call from the second handset by pressing the answer button on
the second phone. This will route the call through the phone without interrupting the current call on the iO
PLAY2.
28
Call Privacy
To temporarily mute the microphone during a call click the green button. This will then mean that
the other party will not be able to hear you although you will still be able to hear them. To un-mute the
microphone, click the green button again. When Call Privacy is active you will see the microphone muted
symbol (Fig.32).
Fig.32 – Microphone muted icon
Ending a Call
To end the current call click the red
will need to ended individually.
button during the call. If you have multiple active calls then each one
29
Streaming Music from an A2DP Compatible Phone
Your iO PLAY2 has the ability to stream music that you have stored in your A2DP enabled phone through
the car speakers.
NOTE: If you have chosen to disable keypad tones in the ‘Settings’ menu then you will need to select the
‘A2DP Music’ source option from the main menu (Fig.33).
Fig.33 – A2DP Music Source
Menu
A2DP Music
Select Phone (if more than 1 phone connected)
Once this is completed you will be able to select the music on your phone and press play and music
streaming will begin.
If you have NOT disabled keypad tones, then depending on the handset being used you can start music
streaming either by selection ‘A2DP Music’ from the main menu or by pressing play on the handset.
If your handset supports the AVRCP function then you will also be able to control the play/pause and track/
scan up/down functions from your iO PLAY2. (Check with your phone manufacturer)
Swapping Between the Radio and iO PLAY2
To start listening to music from your iO PLAY2 when using your vehicles radio, just enter the menu and
select your chosen source. To revert back to the vehicle radio when listening to music from your iO PLAY2,
then enter the menu by holding the centre button for 2 seconds and then select ‘Car Stereo’.
30
The following section will now list the iO PLAY2’s menu structure and features.
Phonebook
To call a number from your phonebook, at the home screen click the rotary button to enter the menu and
the first displayed setting will be phonebook. Click again and you will be presented with the following
screen.
Fig.34 – Phonebook Letter Selection
Should you have 2 phones connected to the kit then you will be asked to choose which phonebook you
wish to access.
You can then select the first letter for your desired contact by turning the rotary control. Once selected,
click the rotary button to access this letter and rotate the wheel to select your desired contact. You can
then click to confirm this choice. You will now be presented with the call screen or if this contact has
more than one number you will be presented with all available numbers. If your phone uses AT commands
during phonebook sync rather than PBAP sync then you will not have multiple numbers listed under one
contact. Instead you will have multiple entries in the phonebook listing for each number associated with
the contact. Select the number and click the rotary button then highlight ‘Dial’.and press the rotary button
to initiate the call.
Menu
Phonebook
Choose Letter
Choose Name
Click to Dial
Call History
You can view your call history for Missed, Dialled & Received Calls. Once you select your chosen history
you will be able to scroll through all entries listed in chronological order. You can also then call any of these
numbers by clicking the rotary button whilst the chosen number is highlighted.
Menu
Call History
Missed, Dialled, Received Calls
If two phones are connected you will be asked to choose which history you would like to view.
31
Text messages
Reading and displaying text messages can be accomplished in this menu. If your phone is not compatible
with this feature you will see the message “Unable to Retrieve” displayed.
Messages will be display in chronological order with the most recent displayed first. To read the message,
push the rotary button.
Menu
Text Messages
Newest / Unread
Read Message
Fig.35 – Text Message
Once a message is selected you will also have the option to call the message sender. If the Text to Speech
(TTS) feature is switched on the kit will read the message.
Car Radio
This is used to allow you to revert audio back to the vehicles’ original radio when listening to another audio
source through the iO PLAY2 (i.e. iPod, AUX, etc).
32
iPod Control
Once an iPod or iPhone is connected via the supplied iPod connection lead you are able to search your
iPod and play music either by using the iO ZooM feature or alternatively you can disable this feature and
use the iPod itself to search and select music.
Menu
iPod Control
Search Mode
Choose Song
Play
If you have disabled the iO ZooM feature you will need to reboot the kit to complete the process (this is
also true if you then re-select the iO ZooM feature). More explanation of this feature can be found on page
44
Using the iO ZooM feature makes navigating large numbers of items on your iPod much quicker and easier
than selecting the desired item from a large list and when coupled with the iPod TTS feature enables you to
quickly and easily find the desired track without having to take your eyes off the road.
To use the iO ZooM feature, enter the iPod menu from the top level menu and you will be presented with
the main iPod menu (NOW PLAYING). Scroll right and you will see the first search category (PLAYLISTS)
Fig.36 – Playlist Category
iO ZooM works by breaking down the contents of that particular category into sections alphabetically.
Your artists for example might be displayed as follows: ABBA – DIRE STRAITS, DIZZEE RASCAL –
HAPPY MONDAYS etc. Selecting one of these entries will ZooM you in further and will again break down
that section into smaller sections so you may now see ABBA – BANANARAMA, BARENAKED LADIES –
COOLIO etc. This process will continue until there are less than 50 entries left in your chosen category
(artists in this case) at which point you will be shown the artists in an alphabetical list.
Fig.37 – iO ZooM Level 1
Fig.38 – iO Zoom Level 2
Please Note - Truncated Text will expand if you wait two seconds on any iPod ZooM screen.
33
You can then select your chosen artist and you now be taken back into a ZooM menu but this time
showing songs where you can repeat the process to find your desired track.
At each level you will also be given the ‘ALL’ option which will show all items in the category BELOW the
one you have selected (i.e. in the artists category, selecting ALL ALBUMS will show all albums by all
artists). If you select a specific artist you will then automatically be shown all albums by that artist and will
be given the option to see ALL SONGS in all albums
If you have disabled iO ZooM then use the iPod to select your desired track or tracks. You are still able
to control track skip and scan from the kit but iPod menu navigation will only be available from the device
itself.
When you are using the iO ZooM System you are able to control the iPod from two different screens on
the kit. Once you have selected a song to play you will be in the ‘Now Playing’ Screen. If you press and
hold the rotary control at this time you will be returned back to the iO ZooM menu. Pressing the red button
will now take you back to the home screen but you will see that you have the iPod control icons shown at
the bottom of the screen. You are still able to view the connected handsets in this screen along with the
relevant phone battery and signal information.
To stop iPod playback return to the home screen and press and hold the rotary control and then select
‘CAR RADIO’. This will pause the connected iPod and return the audio to the Car Radio.
On the next page is a flow chart structure showing the iO ZooM navigation structure.(Fig 39)
34
iO ZooM Structure
iPod/iPhone
Push
Playlist
Rotate
Artist
Rotate
Album
Rotate
ETC
Push
All Albums
Rotate
ABBA - Dire Straits
Rotate
ETC
Push
Push
Bat Out Of Hell - Devil’s Night
Push
ABBA - Bananarama
Rotate
ETC
Push
ETC
Rotate
ABBA
Rotate
Aerosmith
Bananarama
Rotate
ETC
Push
Rotate
All Albums
Pump
Rotate
Young Lust
Push
My Girl
Rotate
The Other Side
Rotate
Voodoo Medicine Man
Rotate
ETC
Push
Play
iPod/iPhone
Push
Playlist
Rotate
Artist
Rotate
Rotate
Album
ETC
Push
All Songs
Rotate
Push
American Idiot - Cafe Del Mar
Push
ETC
Rotate
Bat Out Of Hell - Devil’s Night
ETC
Push
Bat Out Of Hell - Brothers In Arms
Rotate
ETC
Push
Bat Out Of Hell
Rotate
Black Ice
Rotate
ETC
Push
Anything Goes
KEY
Rotate
Decibel
Rotate
ETC
Push
Artist Level
Play
Album Level
Song Level
Playing Track
Fig. 39 - iO ZooM structure
35
A2DP Music
Your iO PLAY2 has the ability to stream music that you have stored in your A2DP enabled phone through
the car speakers.
To listen to music stored on your phone enter the ‘A2DP Music’ source menu and select the desired
handset from which you wish to stream music. (Fig.12)You will then be returned to the music playing home
screen. Dependant on your handset, music may start playing automatically or you may be required to start
playback manually from your phone. Some phones may not require you to enter the ‘A2DP Music’ menu
to start playback. In this case you can initiate playback by just pressing play on the phone.
Fig.43 – A2DP Source
Menu
A2DP Music
Select Phone (if more than one phone connected)
If your handset supports the AVRCP (Audio Video Remote Control Profile) function then you will also be
able to control the play/pause and track/scan up/down functions from your iO PLAY2. (Check with your
phone manufacturer)
AUX INput
Selecting this option will allow you to listen to audio from a device connected to the 3.5mm AUX input jack.
To select this source, press ‘Play’. To stop audio from this source, press ‘Stop’.
Menu
AUX Input
Play / Stop
Fig.41 –AUX In Play
36
You can also select the mode in which this input works. SAT-NAV mode will enable the kit to detect when
there is audio present on the AUX input and automatically switch to source so that this audio can be
heard. This is useful if you have connected a SAT-NAV to the AUX in jack. In this situation the audio will be
switched automatically to hear the vocal announcements from the satelite navigation device.
Menu
AUX Input
Mode
Sat-Nav/Manual
The volume for this function can be adjusted in the ‘SAT-NAV volume’ menu.
Menu
Settings
SAT-NAV volume
Manual mode will mean that no automatic detection occurs. To play music through the AUX in jack you
must manually select ‘PLAY’
AUDIO EQ
With iO PLAY 2 you have the ability to customise both the incoming call audio and the music audio by
using one of the available preset EQ curves included (ten for music and six for call).
The presets can be found in the following location
Menu
Audio EQ
Music / Call
Choose Preset
Music EQ
There are ten available presets to choose from in this menu and they affect the audio heard when listening
to music either from an iPod/iPhone via the 30 pin connector, streaming music from an A2DP compatible
device or listening to music via the AUX IN jack.
The available settings are as follows.
Bass Boost
Dance
Flat
Hip Hop
Drum & Bass
R&B
Spoken Word
Treble Boost
Treble Reduce
Bass Reduce
Increases the bass output in the 40-80Hz region.
For high energy dance style music with vocal accompaniment.
Gives a flat frequency output across the entire audible range.
Increases response at the lower and higher end of the audio spectrum.
Specifically tailored for drum and bass music with limited vocals.
Similar to Hip Hop but has slightly reduced treble output.
Designed primarily for Audio Books / Podcasts that do not contain music.
Beneficial for cars that do not have tweeters fitted to boost treble response.
Reduces treble output for car audio systems that are quite bright.
Reduces bass output - useful for speakers that have low power handling.
The above descriptions are for reference only and you are advised to try each one in turn to find the type
most suitable for you.
37
Call EQ
There are 6 call EQ settings available. These will alter the sound of the incoming call audio and will have no
effect on the far end party’s audio quality (your outgoing voice) with the exception of the Mic Gain setting.
Dynamic
Flat
Mic Gain
Low Reduce
Mid Softener
Treble Boost
.
Increases output in the upper mid section to make voices more intelligible.
Gives a flat frequency output across the entire audible range.
Increases the gain of the microphone to increase volume at the far end.
Reduces the lower frequencies if the incoming voice is too ‘bassy’.
Good for female voices where the midrange sound can be a bit sharp.
Increases the high frequency output for naturally soft voices .
Settings Menu
Bluetooth
Pairing a New Device
If you have turned Bluetooth visibility off then you will need to pair a device through this menu.
Menu
Settings
Bluetooth
Pair New Device
To pair a new Device to your IO PLAY2 enter this menu and click the rotary wheel button to activate the
pairing process then search on your device for iO PLAY2. The kit will remain discoverable for 30 seconds
in this mode
Fig.42 – Pairing a New Device
Pair to your iO PLAY2 device using the pin code 0000. If Simple Secure Pairing is used, the Authentication
Code will be displayed on screen
If successful the display will show ‘pairing completed’.
38
Listing Paired Devices
You can view a list of all paired devices (up to 5) in this menu and it will also display which ones are active
(connected) at that time.
Fig.43 – Listing Paired Devices
Menu
Settings
Bluetooth
List Paired Devices
Disconnect Device
Connect a Device
Delete a Device
Disable Keypad Tones
Enable Advanced
Call Status
If you highlight and click on a paired handset the following options become available
>>
You are able to disconnect the device from the kit.
>>
You can connect a different device to the kit (this will automatically disconnect the most recently connected device if 2 devices are already connected).
>>
>>
You can delete a device from memory (this means that you will not be able to connect to this device again without re-pairing it).
If required you can disable the phones keypad tones. This last option will only be necessary on some phones where a keypad press or notification tone is transmitted through the iO PLAY2 and heard through the vehicles speakers. Disabling this function will prevent those tones from being
sent to the iO PLAY2 but will not affect your keypad tones on the phone. If you disable the keypad
tones on a device then you will need to enter the A2DP music menu in order to play music (see page 30). If you have streamed music from a handset you will need to reselect the ‘Disable Keypad Tones’ to activate this feature.
>>
On some older handsets you may find that you experience some difficulties in operation
(connection, phonebook sync, making and receiving calls etc).
If this is the case you should turn OFF the advanced call status option for that handset ONLY. This option
is independently adjustable for each paired handset and can be found in the following location. Please
contact our Technical Department for compatibility information. (See Page 55)
39
Removing All Devices
You can remove all paired devices at once by selecting this option. Once selected, this option you will be
asked to confirm that you want to remove all devices. Selecting yes will delete all pairings from the iO
PLAY2 but will not remove the IO PLAY2 from the phones memory (please refer to your phones user guide
for instructions on how to do this).
Menu
Settings
Bluetooth
Remove All Devices
Pairing with a Specific PIN
If you are using a non-iO Bluetooth device it may not be possible for it to auto connect to the iO PLAY2
due to the fact that the device may be using a different PIN code to connect. This information should be
provided in your devices user manual. Enter the ‘Pair with user PIN’ menu and input the required PIN
code. Once entered click on the tick icon and the screen will instruct you to ‘pair device now’. You should
now start your device pairing process. Connection should occur automatically. Should the pairing be
unsuccessful the screen will display ‘pairing timed out’. You will then need to re-enter the PIN code and
attempt the process again.
Fig.44 – Pairing with a User PIN
Menu
Settings
Bluetooth
Pair with User PIN
Enter PIN Code
Turning Bluetooth Visibility On or Off
You can make the IO PLAY2 permanently visible to other devices or turn this feature off. If the device is not
visible it will not appear on any list of Bluetooth devices when a search is carried out from a phone. This
feature must be turned on to connect a device unless the ‘pairing a new device menu is used’ (page 38)
Menu
Settings
Bluetooth
Bluetooth Visibility
On / Off
The default setting is ‘ON’
40
Enabling eSCO
If your phone supports eSCO (enhanced SCO) you are able to configure the kit to connect to it using this
profile.
Using the eSCO function can improve the call quality both at the near and far end.
This option can be found in the following menu.
Menu
Settings
Bluetooth
Enable eSCO
On / Off
Once you have changed this selection you will be required to reboot the kit to activate the change. This
can be done by turning the ignition off and then on again or by using the reboot function in the advanced
menu section.
Please note that if this option is enabled then it will be active on ALL phones connected to the kit even if
they do not support eSCO.
If you are using a phone that does not support the eSCO profile you may find that you experience difficulty
in making and receiving calls from that device
In this scenario you should disable eSCO. The default setting is ‘OFF’
Ringtone
For phones that do not support ‘in-band’ ringtones (the phones internal ringtone) one of 5 preset ringtones
can be selected to alert you to an incoming call. If your phone does support ‘in band’ ringing the iO Kit will
automatically use the phones ringtone. Please check your handsets user guide for information.
The default setting is to use the phones ringtone where this is available, if not then tone 1 will be used as
the default. When a ringtone option is highlighted you will hear a demo of that tone. To select the tone
click the rotary control.
Menu
Settings
Ringtone
Choose Ringtone
System Volume
The main volume of the system can be adjusted in this menu. This volume controls the TTS
announcements and can be adjusted independently from other volumes. If TTS is turned on then you
will hear a vocal confirmation of each volume step up or down. If TTS is turned off then a beep will be
transmitted each time the volume is changed.
Menu
Settings
System Volume
Increase / Decrease
41
Sat-Nav Volume
This will adjust the volume of incoming announcements when the AUX In Mode is set to ‘Sat Nav Mode’.
Announcements will be made each time the volume is changed.
Menu
Settings
Sat-Nav Volume
Increase / Decrease
Synchronisation
The contacts from a compatible phone can be transferred to your IO PLAY2 to make calling a contact
easier. You will also then be shown the caller ID when a call is made to or received from a contact in your
phonebook.
Whenever the kit is syncing with a phone you will see the syncronisation icon activate on the home screen.
This is the cross icon in the top middle of the screen shown below.
Fig.45 – Syncing Phone
Turning Auto Sync On or Off
In the synchronisation menu you have the option to turn the Auto Sync feature on or off. When turned on
your phonebook will be automatically syncronised when the iO PLAY2 is powered up.
Menu
Settings
Synchronisation
Auto Sync
On / Off
Manually Syncing Phonebook
You can initiate a phonebook sync manually by selecting it from the Settings > Synchronisation menu.
Menu
Settings
Synchronisation
Sync Now
This feature can be used if you have edited the contents of your phones phonebook whilst connected to
the kit.
42
Brightness
The brightness of the display and controller can be set to one of three options from within this menu. The
‘day’ setting will adjust the display to its maximum brightness, the ‘night setting’ will dim the display to
approximately half brightness and the auto setting will adjust itself automatically using the light sensor built
into the IO PLAY2 controller.
Menu
Settings
Brightness
Auto / Day / Night
Advanced Settings
Muting the Aux Output when a Call is Received
Should you be using the AUX output for music streaming you may find that you do not want phone call
transmissions to be relayed through all speakers in the vehicle. This option will allow you to have phone
call audio to be output only from the ISO connectors on the iO harness and not through the AUX output.
Menu
Settings
Advanced Settings
Mute RCA Output
On / Off
Selecting the Internal Amplifier Mode of Operation
The ‘Enable Amp for Calls Only’ option means that the internal amp of the iO PLAY2 will only be
active when a call is made or received. This is useful if you are using the RCA outputs to feed an ‘Auxiliary
In’ on your source unit for music streaming. If you do not have this option turned to ‘ON’ and you stream
music into your source units AUX IN jacks then you would not hear the music from the source unit as the
outputs would be interrupted by the iO PLAY2.
Menu
Settings
Advanced Settings
Enable Amp for Calls Only
On / Off
Car Radio on Music Pause Feature
With this option you are able to configure whether or not the car radio can be heard when music is paused
on the kit.
If this option is enabled, when you pause music on the kit (music streaming, AUX IN or iPod) the kit will
route the audio back to the factory car radio.
If the feature is disabled, when the music is paused there will be no audio heard from either the kit or the
car radio.
This function can be found in the following menu.
Menu
Settings
Advanced Settings
Car Radio on Music Pause
On / Off
43
Turning the Vocal Announcements On or Off
Turning this feature on or off will enable or disable the vocal confirmation of actions carried out.
There are three locations where vocal announcements are available, each of which can be turned on or off
independently.
>> Menu TTS will enable vocal announcements to be heard for all menu options (i.e. ‘Settings’,
‘Phonebook’ etc)
>> Caller ID will verbally announce the name (or number for non phonebook contacts) of any incoming
calls on devices that do not support inbound ringing.
>> iPod - when iPod TTS is turned on all iPod selections will be announced (i.e. album, artist, song, etc)
Menu
Menu
Settings
Advanced
Settings
Vocal
Announcements
Caller ID
On / Off
iPod
Selecting the Reverse Priority
This feature will allow you to select how the reversing input works (if connected). You are able to instruct
the iO PLAY2 to mute its audio output and revert the audio back to the factory radio either when any audio
is present in the iO PLAY2 (reverse has priority), or alternatively you can instruct it to only mute the signal if
you are listening to music streaming (phone has priority). This second option will mean that if you are on a
phone call and select reverse then the phone call will not be muted. If you are listening to music streaming
and select reverse gear then the iO PLAY2 will mute and audio will be reverted back to the factory radio
enabling you to hear the parking tones through the factory speakers.
Menu
Settings
Advanced Settings
Reverse Priority
Phone has priority
Reverse has priority
Turning the iO ZooM feature ON or OFF
The iO ZooM feature makes navigating music on your iPod much quicker and easier than selecting the
desired item from a large list and when coupled with the iPod TTS feature enables you to quickly and easily
find the desired track without having to take your eyes off the road.
You do however have the option to disable it and use the iPod screen to select your desired track if you
want to.
If you turn off the iO ZooM feature you will not be able to view the Track / Artist Data etc on the iO screen ,
you will however still be able to control next / previous track and play / pause from the kit.
This function can be found in the following menu.
Menu
Settings
Advanced Settings
iO ZooM
On / Off
Once you have changed this selection you will be required to reboot the kit to activate the change. This
can be done by turning the ignition off and then on again or by using the reboot function in the advanced
menu section.
44
Choosing the Language for Display & Announcements
You can select which language you wish on screen text and vocal announcements to be in by using this
menu. You are able to choose from English, French, Italian, German and Spanish by turning the rotary
control and clicking on your desired choice.
The default language is English.
English
French
Menu
Settings
Advanced Settings
Language
Italtian
German
Spanish
Choosing your Vehicle Type
This option can provide improved call quality by allowing the iO PLAY2 to make small adjustments to the
way audio is heard in the vehicle. This will take into account vehicle size, noise cancellation and typical
vehicle interior structures etc. This will not affect any EQ settings that you have made.
The options are:
>> Passenger Car which is suitable for any generic non convertible car
>> Commercial which should be used for panel vans or vehicles with large open uncovered panels
>> Convertible vehicles which should be used for vehicles with removable or retractable roofs, this
setting is specifically tailored for when the roof is in the lowered position.
Passenger Car
Menu
Settings
Advanced Settings
Vehicle Type
Commercial
Convertable
Feature Reset
Selecting this option will reset all programmable features to the factory default setting but it will not delete
any paired handsets.
Menu
Settings
Advanced Settings
Feature Reset
Yes / No
PLEASE NOTE - The default language setting is English.
45
System Status
Within this menu you can find out details about your IO PLAY2 including Software Version, iO Information
& Serial Number.
Menu
Settings
Advanced Settings
System Info
Choose Information
System Reboot
This feature will shut down and restart your kit in the same manner as turning the ignition off then on
This can be used when a feature has been changed that requires a reboot or if you are experiencing any
undesired behaviour.
Menu
Settings
Advanced Settings
System Reboot
Factory Reset
There is a factory reset feature built into your iO PLAY2. This should only be used as a last resort if you
are experiencing any problems with your kit. This feature will revert all settings back to the factory default
and remove all paired devices and stored contacts etc. This feature is not the same as the ‘feature reset’
mentioned earlier
To activate the factory reset hold down both the red and green buttons whilst in the home screen for 10
seconds. The kit will then briefly power down and then back on again with all features and settings reset.
You will then need to re-pair your phones etc.
When Re-Pairing your phones you will need to delete PLAY2 from your phones paired device memory and
then search and re-pair again.
46
FAQ’s / Troubleshooting
My kit does not turn on when I turn on the car’s ignition
>> Check that you have +12V on the red wire at the control box when the iginition is on. If not then your
vehicle may not have a 12V feed to the stereo and you will need to source one elsewhere or use an
Autoleads 06-SENSE.
My Bluetooth device does not pair with the iO PLAY2
>> Please check that your device uses a standard PIN code for automatic recognition. If it does not
then please refer to the ‘pairing with user pin’ menu to assign a specific PIN code to your device.
Please also check that you do not have 5 devices already paired.
My device will not connect to iO PLAY2
>> Please ensure that Bluetooth is turned on on your device and that it is within range of the iO PLAY2.
Please also ensure that there are not two devices already connected to iO PLAY2.
Is my device compatible with iO PLAY2?
>> If your device has Bluetooth built in then it will be able to connect and function with iO PLAY2.
Please note - Not all features are compatible with all handsets. Please visit www.my-io.com
for more information.
I cannot control track up / down or play / pause from the kit
>> Your device is most likely not AVRCP compatible or you are using the Aux input jack which does
not support the AVRCP feature.
How do I perform a full reset on my kit?
>> To activate the factory reset hold down both the red and green buttons whilst in the home screen
for 10 seconds. The kit will then briefly power down and then back on again with all features and
settings reset. You will then need to re-pair your phones etc.
My Kit does not turn off?
>> Please check that you have used the correct ignition wire in the vehicle as some ignition feeds do
not shut down immediately.
47
Glossary
>> A2DP – This is the term for the ability to stream music from a phone or other portable device.
>> AT - This is used for Phonebook syncronisation when PBAP is not supported on the handset
>> AVRCP – This is the term used for the ability to control audio streaming from a device connected to
the iO PLAY2 Module.
>> CONNECTED - This is when a device has an active current connection to iO PLAY2
>> HFP - Handsfree Profile. The method of audio communication used between iO PLAY2 &
a connected handset whilst on a call
>> OLED – Organic Light Emitting Diode. This is the type of display used in iO PLAY2.
>> PAIRED - This is when a device has authenticated with iO PLAY2.
This does not mean its ‘CONNECTED’
>> PBAP - Phonebook Access Profile. This is a means of syncronising the Phonebook contacts stored
on a device with iO PLAY2.
>> TTS - Text to Speech. This function allows vocal commands to be read out to the user.
48
Specifications
System
Voltage range
Current draw
Operating temp range
Vehicle interface
9 – 15V, under/over voltage protected
7Amps max, fused in main harness
-10 to +55 Degrees
Dedicated harness with ISO connectors
Bluetooth
Spec 2.1+EDR
Range: 10mtrs
Major profiles
Handsfree, A2DP, PBAB, AVRCP
Chipset
CSR BC5MM, inc DSP, 16bit CPU, Flash / Static memory
Audio
Power AmpClass ‘D’
Power
Max 45W x 4
RMS 22.5W x 4
Heatsink
Internal aluminium, for extended full power use
Display
Technology
High contrast OLED
Pixels128*32
FontsProportional, multi height
Rotary Controller
Rotary encoder
360degree, continuous rotation
Illumination
2 colour LED
Environment sensor
Optical, auto brightness control
ProcessorEmbedded 8bit
49
Warranty
Armour Automotive Ltd. warrants this product to be free from defects in material and workmanship under
normal use for a period of 12 months from the date of original purchase. Should service be necessary
under this warranty for any reason due to manufacturing defect or malfunction during the warranty period,
Armour Automotive will repair or replace (at its discretion) the defective product with an equivalent product.
The warranty excludes damage or abuse caused by customer misuse. All warranties are to be handled by
the original retailer where the goods were purchased.
This warranty is valid only for the original purchaser and is not extended to owners of the product
subsequent to the original purchaser. Any applicable implied warranties are limited in duration to a period
of the express warranty as provided herein beginning with the date of the original purchase at retail, and no
warranties, whether express or implied, shall apply to this product thereafter.
Armour Automotive Ltd. does not warrant failure of an iO product caused by incorrect installation by a non
approved installation centre.
Trademark
All rights reserved. The iO trademarks are the sole and exclusive property of Armour Automotive Ltd.
Any other trademarks or names used in iO documentation are copyright protected and are the sole and
exclusive property of their respective owners.
Copyright
Copyright 2012; Armour Automotive Ltd. All rights reserved. The total or even partial reproduction,
transmission or storage of this guide in any form or by any process whatsoever (electronic, mechanical,
photocopy, recording or otherwise) is strictly prohibited without prior consent from Armour Automotive Ltd.
Modifications
The explanations and specifications in this guide are given for information purposes only and may be
modified without prior notice. They are deemed to be correct at the time of going to press. The utmost
care has been taken when writing this guide, as part of the aim to provide you with accurate information.
However, Armour Automotive Ltd. shall not be held responsible for any consequences arising from any
errors or omissions in the guide. Armour Automotive Ltd. reserves the right to amend or improve the
product design or user guide without any restrictions and without any obligation to notify users.
As part of our ongoing product development, the product that you have purchased may differ slightly from
the model described in this guide. The latest version of this guide is available in electronic format at
www.my-io.com.
50
Declaration of Conformity
Armour Automotive Ltd. of Bordon, Hampshire, UK hereby declare that the device described
in this guide is in compliance with the essential requirements and other relevant provisions of
the European Directive 1999/5/EC (R&TTE). The declaration of conformity (DoC) concerned
has been signed. Please contact the company if you require a copy of the original.
FCC Compliance Statement
This device complies with Part 15 of the FCC Rules. Operation is subject to the following two
conditions: (1) this device may not cause harmful interference, and (2) this device must accept
any interference received, including interference that may cause undesired operation.
Changes or modifications not expressly approved by the party responsible for compliance could void
the user’s authority to operate the equipment. The manufacturers are not responsible for any radio or TV
interference caused by unauthorised modification or incorrect installation to this equipment.
FCC ID: VUHIOPLY2
FCC ID: VUHIOTLK2
Bluetooth
The Bluetooth word mark and logos are owned by the Bluetooth® SIG,
Inc. and any use of such marks by Armour Automotive Ltd. and Armour
Automotive Ltd’s brand iO is under licence. Other trademarks and trade
names are those of their respective owners.
B017581
Correct Disposal of this Product
(Waste Electrical Electronic Equipment – WEEE)
This marking shown on the product or its literature, indicates that it should not be disposed
with other household wastes at the end of its working life. To prevent possible harm to the
environment or human health from uncontrolled waste disposal, please separate this from
other types of wastes and recycle it responsibly to promote the sustainable reuse of material
resources. Household users should contact either the retailer where they purchased this
product, or their local government office. Business users should contact their supplier and refer to the
terms and conditions of the purchase contract. This product should not be mixed with other commercial
wastes for disposals.
51
iPod/iPhone
C-Tick
This device complies with the C-Tick EMC Regulatory Arrangement.
Supplier Identification: N15013
52
The iO brand also encompasses a range of accessories to enhance the use of your iO PLAY2 device e.g.
aiding installations, increase functionality, replacement parts and device charging). These accessories are
avaialble from any authorised iO retailer.
Charging Kits
The iO PHONECK is a multi device, phone and tablet charging kit. Supplied with 8
adaptors it allows charging of most modern mobile communication devices. With a
current capability of up to 3 amps it is also compatible with the latest iPad devices
Replacement Screen
Replacement OLED screens for your iO PLAY2 device are available to replace lost
or damaged items (Part Number: iO-OLED1).
Steering Wheel Control Interface (PC10)
Optional steering wheel control interfaces are available for most makes/models of vehicles which will allow
control of your iO PLAY2 directly from your factory steering wheel controls.
Vehicle Specific Harnesses (SOT Leads)
A SOT Interface Lead (supplied by Autoleads) allows iO Products
to be installed into vehicles with different types of Plug & Play
connectors. We have a comprehensive range of interface leads for
all types of different automotive original equipment audio systems
and applications.
For the full range of vehicle specific harnesses (SOT’s) please refer
to the Autoleads Product Finder at
www.autoleads.co.uk/productfinder
53
Receive greater benefits by registering your iO product in five easy steps.
Benefits
>> Access to online product support.
>> Warranty and after sales service.
>> Exclusive online login to www.my-io.com.
Step 1
Visit www.my-io.com/register
Step 2
Log-in or register for an account.
Step 3
Enter the serial number and product details found on the box and follow the registration steps.
Registration is now complete.
Enjoy your iO Experience with total peace of mind.
54
Contact Us
Web:
www.my-io.com
Technical Email:
[email protected]
Technical Help Line:
0900 1020 119*
Opening hours: 9:00am - 5:30pm Mon-Thu
9:00am -4.30pm Fri
*Calls cost 61p per minute.
Mobile phone costs vary.
Please ask permission of the bill payer before calling.
55
56