1
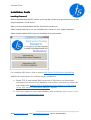
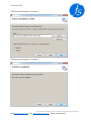
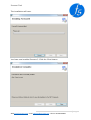
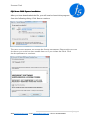
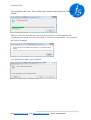
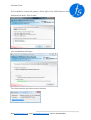
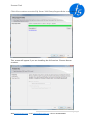
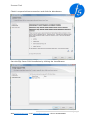
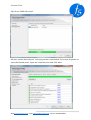
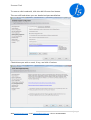
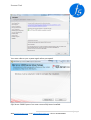
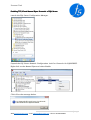
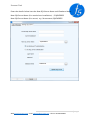
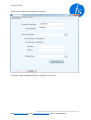
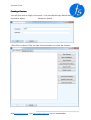
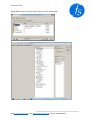
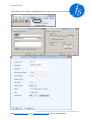
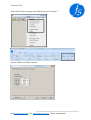
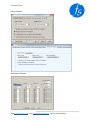
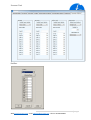
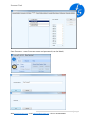
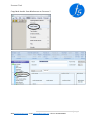
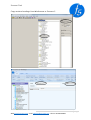
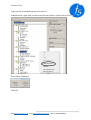
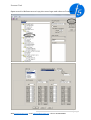
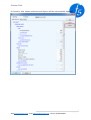
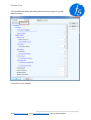
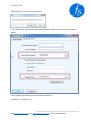
Forecast 5 Ltd
Forecast 5 User Manual
1. User Agreement
2. Installation guide
a. Installing Forecast 5
b. SQL Server 2008 Express Installation
c. Enable TCP/IP and Named Pipes Protocol of SQL
d. Initial Forecast 5 setup
e. Creating a Forecast
f. Adding users without admin rights
3. Converting your Forecast
4. Importing/exporting Actuals
5. Upgrading your Terminal Server version
1|Page
Web www.forecast5.com email [email protected] Phone +64 9 820 9960
Forecast 5 Ltd
User Agreement
1 Rights Granted Under This Licence
This agreement grants you use of the Forecast 5 Ltd Software, payment for which is
to be made to entitle use
The software includes:
Software installed on your PC, server or third party Host server regardless of
transaction volumes, size of data files or number of companies. Note: extra
payment is required for additional users or if the Software is used in a
commercial data processing bureau.
Software maintenance & information services.
Forecast 5 user Helpline service (clause 6).
Time for payment shall be of the essence of this Agreement. If any amount payable
is in arrears, then, without prejudice to any other rights and remedies it may have,
Company shall be entitled to suspend the performance of any of its obligations
under this Agreement, including, without limitation, suspending Customer’s right to
Use the Software and Documentation, without Company incurring any liability to
Customer or any third party. Late payment fees will apply.
This Agreement includes Software maintenance & information services. Updated
Software versions will be released as appropriate.
You must provide an email address to ensure that you receive notice of updates,
pre-release information & support newsletters.
Specifically excluded from any rights granted under this licence:
The Total Amount excludes installation, data conversion, on site help & training &
such like, which are matters between you & your Supporting Forecast 5 Consultant.
Extra users, functions, products or services may be added at any time to the
Software by adding the appropriate amount to the Total Annual Amount.
2|Page
Web www.forecast5.com email [email protected] Phone +64 9 820 9960
Forecast 5 Ltd
2 Term
You may terminate this Agreement, by giving Forecast 5 Ltd written notice, 60 days
prior to the annual renewal date. Your licence will terminate if the annual renewal
payment is not made. On termination, the Software must be uninstalled.
3 Obligations
Software title, Intellectual Property & copyright remain with Forecast 5 Ltd. You
must protect that ownership of the Software & not attempt to sell, hire, copy
(except for back up), transfer or deal with it in any other way.
Neither may you reverse engineer, decompile or disassemble the software product,
except and only to the extent that such activity is expressly permitted by applicable
law notwithstanding this limitation.
The above obligations survive the term of this Agreement and the termination of
your usage of the Software.
4 Warranties
You must rely on your own judgment as to the suitability of the Software &
computer systems that it is installed on. You must rely on your own professional
accounting & financial advice services. No warranties are given other than those
implied by law.
IN NO EVENT WILL FORECAST 5 LTD BE LIABLE TO YOU FOR ANY DAMAGES,
INCLUDING LOSS OF PROFIT OR OTHER INCIDENTAL OR CONSEQUENTIAL DAMAGES
ARISING OUT OF YOUR USE OR FAILURE OF OR FAULT IN THE SOFTWARE PRODUCT.
5 Payments
Your Total Annual Amount tax invoice will be delivered to the email address stated
in this Agreement. Payments are annually in advance, by direct debit from your
bank account or credit card. Once paid the amounts are not refundable for any
reason. You agree to Forecast 5 Ltd paying commissions or fees to any party who
introduces you to or supports the Software. Forecast 5 Ltd has the right to review
and increase the Total Annual Amount. You will be advised of such increase by
invoice.
3|Page
Web www.forecast5.com email [email protected] Phone +64 9 820 9960
Forecast 5 Ltd
6 Forecast 5 Helpline
This Agreement provides access for named users to email & telephone help in using
the Software. The cost for this service is included in the Annual Amount.
The Helpline operates 8.30am – 5pm (NZT) Mon-Fri (excluding public holidays).
Help is not offered to those, who in the opinion of Forecast 5 Ltd, are untrained
operators and suitable training will be recommended.
7 Notices / Law
You agree to advise us, in writing, if you change your location, email, postal
address, payment details or if there is any information that we should know about
your ability to comply with this Agreement. Forecast 5 Ltd can give notice by
delivering it to your last known Software location, email, or postal address.
We reserve the right to amend this agreement with 30 days’ notice by email of any
changes to this agreement
The laws of New Zealand govern this Agreement.
This license is valid through your use of the Forecast 5 software Ltd.
www.forecast5.com
Current as at 1st June 2013
Customer Name:
Customer Acceptance:
4|Page
Web www.forecast5.com email [email protected] Phone +64 9 820 9960
Forecast 5 Ltd
Installation Guide
Installing Forecast 5
Before downloading the file, ensure you have the correct user permissions on to the
single computer or the server.
After you have downloaded the file, click the Forecast.exe.
Select Install with SQL if you are installing on a server or on a single computer.
Select Install without SQL if you are installing on a workstation.
For installing SQL Server, refer to section SQL Server 2008 Express Installation.
Additional configuration for terminal server installation:
a. Enable TCP/IP and Named Pipes protocols of SQL Server, to allow client
computers to connect to the database on the server, you need to. Follow the
steps under the Enabling TCP/IP and Named Pipes Protocols of SQL Server
Using “SQL Server Configuration Manager” section.
b. Give users rights to access the database, refer to section SQL Scripts to add
users without administrator rights.
5|Page
Web www.forecast5.com email [email protected] Phone +64 9 820 9960
Forecast 5 Ltd
Click the Next button to continue.
Select I Agree.
Click the Next button to continue.
6|Page
Web www.forecast5.com email [email protected] Phone +64 9 820 9960
Forecast 5 Ltd
Click the Next button to continue.
Click the Next button to continue.
7|Page
Web www.forecast5.com email [email protected] Phone +64 9 820 9960
Forecast 5 Ltd
The installation will start.
You have now installed Forecast 5. Click the Close button.
8|Page
Web www.forecast5.com email [email protected] Phone +64 9 820 9960
Forecast 5 Ltd
SQL Server 2008 Express Installation
After you have downloaded the file, you will need to launch the program
from the following dialog. Click Run to continue.
The next screen requests you accept the license agreement. Please make sure you
do that or you could run into trouble later on if you violate the EULA. Click
the Accept button to continue.
9|Page
Web www.forecast5.com email [email protected] Phone +64 9 820 9960
Forecast 5 Ltd
The installation will start. The installer will examine and patch your operating
system.
After you start the installation, you will see this dialog. It will reappear after
completing the install, and you may need to click the Cancel button. The program
will still be installed.
You will need to restart your machine.
10 | P a g e
Web www.forecast5.com email [email protected] Phone +64 9 820 9960
Forecast 5 Ltd
The installation screen will appear. Select SQL Server 2008 Express with
Advanced Services. Click Install.
Your installation will begin.
The file extraction will take several minutes.
11 | P a g e
Web www.forecast5.com email [email protected] Phone +64 9 820 9960
Forecast 5 Ltd
Click OK to continue once the SQL Server 2008 Setup Support Rules screen shows.
This screen will appear if you are installing the full version. Choose Next to
continue.
12 | P a g e
Web www.forecast5.com email [email protected] Phone +64 9 820 9960
Forecast 5 Ltd
Check I accept the license terms box and click the Next button.
Start the SQL Server 2008 installation by clicking the Install button.
13 | P a g e
Web www.forecast5.com email [email protected] Phone +64 9 820 9960
Forecast 5 Ltd
SQL Server 2008 will install.
All rules should have passed. You may get the screen below if you have forgotten to
open the firewall ports. Open the required ports and click Next.
14 | P a g e
Web www.forecast5.com email [email protected] Phone +64 9 820 9960
Forecast 5 Ltd
You will get this prompt if any ports were open at the beginning of the
install. Click OK to continue.
When the Feature Selection screen appears, select the same as shown below:
15 | P a g e
Web www.forecast5.com email [email protected] Phone +64 9 820 9960
Forecast 5 Ltd
Click Next to accept the installation of SQL Express.
Accept the disk space requirements by clicking Next.
16 | P a g e
Web www.forecast5.com email [email protected] Phone +64 9 820 9960
Forecast 5 Ltd
To set up SQL with local system authentication against Operating
System accounts, you must select from the list of values. If you want
to provide credential’s manually, leave the space blank.
Click Next to continue.
17 | P a g e
Web www.forecast5.com email [email protected] Phone +64 9 820 9960
Forecast 5 Ltd
To enter a valid credential, click the Add Current User button.
The user will load where you see Authorised password below.
Check those you wish to send, if any, and click Continue.
18 | P a g e
Web www.forecast5.com email [email protected] Phone +64 9 820 9960
Forecast 5 Ltd
The install will check the rules you have entered. Click Next.
After verifying the install is possible, click Install.
19 | P a g e
Web www.forecast5.com email [email protected] Phone +64 9 820 9960
Forecast 5 Ltd
The install will begin.
The install has been successful. Click Next.
You will see the final installation dialog and log file. Click Close.
20 | P a g e
Web www.forecast5.com email [email protected] Phone +64 9 820 9960
Forecast 5 Ltd
You must reboot your system again when prompted.
SQL Server 2008 Express has now successfully been installed.
21 | P a g e
Web www.forecast5.com email [email protected] Phone +64 9 820 9960
Forecast 5 Ltd
Enabling TCP/IP and Named Pipes Protocols of SQL Server.
Launch the SQL Server Configuration Manager.
Expand the SQL Server Network Configuration. Look for Protocols for SQLEXPRESS.
Right click on the Named Pipes and select Enable.
Click OK to the message below.
22 | P a g e
Web www.forecast5.com email [email protected] Phone +64 9 820 9960
Forecast 5 Ltd
Right click TCP/IP and select Enable.
Click OK to the below message.
Click the SQL Server Services. Right click on the SQL Server (SQLEXPRESS) and select
Restart.
The service will restart. Remote connection has now been enabled.
23 | P a g e
Web www.forecast5.com email [email protected] Phone +64 9 820 9960
Forecast 5 Ltd
Initial Forecast 5 setup
Launch the program from your desktop or Start Menu.
Enter Product Key and Company Name (check that the name is spelt exactly as in
the email you received). Click Activate Online Now button to continue.
Click OK.
24 | P a g e
Web www.forecast5.com email [email protected] Phone +64 9 820 9960
Forecast 5 Ltd
Enter the details below into the New SQL Server Name and Database Name.
New SQL Server Name (for stand alone installation): .\SQLEXPRESS
New SQL Server Name (for server): e.g. Servername\SQLEXPRESS
25 | P a g e
Web www.forecast5.com email [email protected] Phone +64 9 820 9960
Forecast 5 Ltd
Click Update SQL Server button to continue.
You have now completed the initial setup for Forecast 5.
26 | P a g e
Web www.forecast5.com email [email protected] Phone +64 9 820 9960
Forecast 5 Ltd
Creating a Forecast
You will first need to Login to Forecast 5. Use the default login details below.
Username: admin
Password: (blank)
Click OK to continue. Click the New Forecast button to create the forecast.
27 | P a g e
Web www.forecast5.com email [email protected] Phone +64 9 820 9960
Forecast 5 Ltd
SQL Scripts to add users without administrator rights
Login to computer as an administrator
Type the following commands in the command prompt (replace the italics with your
own username and domain):
1. SQLCMD –S.\SQLEXPRESS –E
2. CREATE LOGIN [DOMAIN_NAME\USER_NAME\ FROM WINDOWS WITH
DEFAULT_DATABASE=[master], DEFAULT_LANGUAGE=[us_english]
3. GO
4. EXEC sp_addsrvrolemember ‘DOMAIN_NAME\USER_NAME’, ‘sysadmin’
5. GO
28 | P a g e
Web www.forecast5.com email [email protected] Phone +64 9 820 9960
Forecast 5 Ltd
Converting your forecast to Forecast
Forecast 5
Open Forecast 5 and log in.
Click New Forecast.
29 | P a g e
Web www.forecast5.com email [email protected] Phone +64 9 820 9960
Forecast 5 Ltd
Open WinForecast and open the Forecast to be converted.
30 | P a g e
Web www.forecast5.com email [email protected] Phone +64 9 820 9960
Forecast 5 Ltd
Copy the Forecast details from Winforecast to the new Forecast in Forecast 5.
31 | P a g e
Web www.forecast5.com email [email protected] Phone +64 9 820 9960
Forecast 5 Ltd
Enter the Forecast settings from Winforecast to Forecast 5.
Payroll Tables and Other Options
32 | P a g e
Web www.forecast5.com email [email protected] Phone +64 9 820 9960
Forecast 5 Ltd
GST Rates & Details:
33 | P a g e
Web www.forecast5.com email [email protected] Phone +64 9 820 9960
Forecast 5 Ltd
Other Options:
Parameter defaults:
34 | P a g e
Web www.forecast5.com email [email protected] Phone +64 9 820 9960
Forecast 5 Ltd
Profiles:
35 | P a g e
Web www.forecast5.com email [email protected] Phone +64 9 820 9960
Forecast 5 Ltd
Save Forecast – enter Forecast name and password (can be blank)
36 | P a g e
Web www.forecast5.com email [email protected] Phone +64 9 820 9960
Forecast 5 Ltd
Copy Bank details from Winforecast to Forecast 5.
37 | P a g e
Web www.forecast5.com email [email protected] Phone +64 9 820 9960
Forecast 5 Ltd
Copy sections headings from Winforecast to Forecast 5.
38 | P a g e
Web www.forecast5.com email [email protected] Phone +64 9 820 9960
Forecast 5 Ltd
Copy records from Winforecast to Forecast 5.
In Winforecast, right click on the record list and select “Export Record List”.
Then select Clipboard.
Click OK.
39 | P a g e
Web www.forecast5.com email [email protected] Phone +64 9 820 9960
Forecast 5 Ltd
In Forecast 5, under the Import section, click Record List.
40 | P a g e
Web www.forecast5.com email [email protected] Phone +64 9 820 9960
Forecast 5 Ltd
41 | P a g e
Web www.forecast5.com email [email protected] Phone +64 9 820 9960
Forecast 5 Ltd
Open record in Winforecast and copy the record type and values to Forecast 5.
42 | P a g e
Web www.forecast5.com email [email protected] Phone +64 9 820 9960
Forecast 5 Ltd
Click Save to save the Forecast.
43 | P a g e
Web www.forecast5.com email [email protected] Phone +64 9 820 9960
Forecast 5 Ltd
Importing and Exporting Actuals from Forecast 5.
In Forecast, under Actuals, click Start Actuals. Then click Enter Actuals.
Enter the actual figures manually or click Export to copy table to clipboard.
44 | P a g e
Web www.forecast5.com email [email protected] Phone +64 9 820 9960
Forecast 5 Ltd
Open Excel workbook and paste (Ctrl+V) onto a new spreadsheet.
After editing, highlight the appropriate columns and copy (Ctrl+C) back to
clipboard.
45 | P a g e
Web www.forecast5.com email [email protected] Phone +64 9 820 9960
Forecast 5 Ltd
In Forecast, click Import and the actual figures will be automatically updated.
46 | P a g e
Web www.forecast5.com email [email protected] Phone +64 9 820 9960
Forecast 5 Ltd
Click the Balance Sheet tab and repeat the above steps for actual
balance values.
Click OK to close Actuals.
47 | P a g e
Web www.forecast5.com email [email protected] Phone +64 9 820 9960
Forecast 5 Ltd
Upgrading Forecast
Forecast 5, if SQL was not installed with the default path
(e.g. Terminal Server)
Before running the installer, run the existing version of Forecast 5, log in and go to
Change SQL Server tab.
Note down the fields Current SQL Server Name and Current Database as below:
Exit Forecast 5.
Extract and run the installer, follow the instructions through the setup process.
Start Forecast 5.
If you do not see any error message, Forecast 5 is ready to use. No further steps are
required.
48 | P a g e
Web www.forecast5.com email [email protected] Phone +64 9 820 9960
Forecast 5 Ltd
Click No if you see this error message
In the fields New SQL Server Name and Database Name, enter the values noted in
earlier.
Click Update SQL Server and login when prompted.
Forecast 5 is ready to use.
49 | P a g e
Web www.forecast5.com email [email protected] Phone +64 9 820 9960