1
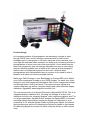
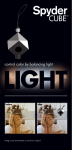
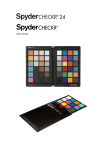
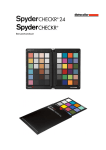
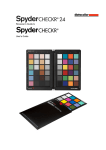
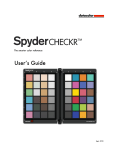
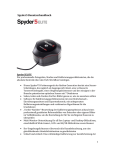
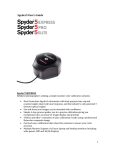
SpyderHDTM User’s Guide Color Control for Photo & Video SpyderHD™ is Datacolor’s premiere calibration solution for advanced photographers and videographers. The SpyderHD bundle allows you to control color easily and effectively from scene, to camera, to editing, to final output; for consistent, superb color and brilliant contrast. No more trial and error loops; get color right the first time, every time, and put more of your time and effort into your creative work. SpyderHD comes in a fitted metal case, containing: Spyder®4ELITE HD – Easy-to-Master Computer and Video Reference Display Calibration with Spyder4 sensor technology. Photographers and videographers can calibrate their desktop and laptop computer screens to photo and video editing standards, to save time, money and frustration. Custom tune for your studio’s ambient lighting. Match side-by-side displays. TV and Video Reference Display Calibration allow hi-definition screen adjustment for accurate viewing of video, from production to final viewing. TVs and Reference Displays are more realistic with incredible highlight and shadow detail when properly adjusted. SpyderCUBE® – The SMALL calibration and white balancing tool that makes a BIG impact on correct color temperature and exposure settings. Its unique multi-faceted design detects primary and secondary light sources in any situation. Portable, mountable, and extremely durable. SpyderCUBE is a favorite that belongs in every photographer or videographer’s bag. SpyderCHECKR® –The professional, 48-color test chart. Durable, foldable, and tripod-mountable. Obtain quick, easy camera color correction with SpyderCHECKR software. Can be used for still and video work, with an increasing number of editing tools. What’s in the box: Spyder®4ELITE HD and desktop cradle with tripod mount SpyderWEB for large screens SpyderCUBE® with storage pouch SpyderCHECKR® in integrated case Software CDs including new integrated display calibration application, and camera color calibration utility DVD and Blu-Ray Test Pattern Discs Micro-fiber cleaning cloth Quick Start Guides and Warranty Card Product Web Page: datacolor.com/spyderhd System Requirements: Win 7 32/64, Win 8 32/64, Mac OS X 10.7, 10.8 & 10.9, Monitor resolution 1024x768 or greater, 16-bit video card (24-bit recommended), 128MB of available RAM, 100MB of available hard disk Supported Languages (in Software): English, French, Italian, German, Spanish, Russian, Japanese, Simplified Chinese, Traditional Chinese, Korean Product Usage: An increasing number of photographers are becoming involved in video, through DSLR video, as well as action cameras such as GoPros and timelapse work. Lower prices on HD video cameras, action cameras, and even high-bit dedicated video cameras, are allowing an increasing number of photographers to shoot more video than ever before. At the same time the lower cost equipment, plus increasingly affordable and easy to use editing tools are allowing experts from all areas of the video and cinematography fields to take on independent projects of their own. What all these photographers and videographers have in common is the need to control, balance, and match color across multiple devices. Match your DSLR footage to your BlackMagic or Camera RED work. Match your GoPro quadcopter footage to your DSLR footage. Or match your video footage to your still images and timelapses. Edit all your images and footage and preview them in their final format. This requires scene lighting and camera calibration, as well as computer display and video reference display calibration. SpyderHD was designed to provide it all. The new component in the SpyderHD bundle is Spyder4ELITE HD. This is an integrated display calibration tool, including the first app of its kind, with calibration functions for computer displays, video reference displays, and TVs in a single application. SpyderHD also includes the SpyderWEB, a universal mounting system that securely mounts the Spyder for calibration of most screens up to 70” and the Spyder Cradle for holding the Spyder for ambient light monitoring as well as for attaching the Spyder to tripods or light stands for calibrating projection screens for either computer-driven or video-stream uses. The sections below describe the various functions of the SpyderHD bundle. Further information on the products included in the SpyderHD suite can be found on the Datacolor website. For Video and TV Tuning, you will need: The Spyder®4ELITE HD device. The SpyderWEB, if your Reference Display or TV is large or vertically mounted. A laptop running the Spyder4ELITE HD software (a desktop computer can be used, but it must be close to the Reference Display or TV that you will be tuning.) A DVD or Blu-Ray player, connected to your Ref Display or TV. The DVD disk for the standard you use (NTSC, PAL/SeCAM) or the Blu-Ray disk. The remote control for your TV or Reference Display, or you can use the front panel controls on some displays. The remote control for your DVD or Blu-Ray player. What you will be doing: Setting the display to optimal adjustments for viewing video content. These adjustments are: Brightness Contrast Color Tint Whitepoint Preset Sharpness Launch the Spyder4ELITE HD software, choose the Video Reference Display or TV option, and follow the on-screen directions. You will be prompted to bring up the appropriate test patterns on screen from the DVD/Blu-Ray player and adjust the display controls. The software will save info on your adjustments and produce optimized settings for editing or viewing your video content. You can use the before and after feature to view the difference in the test images, particularly the shadow detail and highlight detail. For Computer Display Calibration and Profiling, you will need: The Spyder®4ELITE HD device. The SpyderWEB, if your display is exceptionally large, or vertically mounted. A Mac or Windows laptop or desktop running the Spyder4ELITE HD software. The display must be within a few feet of the computer and the computer must have a fully powered USB port for attaching the Spyder. What you will be doing: Measuring the color, brightness, and tone curve of your display. Setting the display’s video card to optimal VLUT (Video Look Up Table) adjustments for viewing computer displayed content (this is called software calibration; it neutralizes the grays and corrects the gamma curve). Building an ICC profile that describes the color and tone response of your display that can be used by color managed application to correct the color and density of images and other content the applications display on this screen. These adjustments can be to various calibration standards, depending on your needs. But typically they will be: A white point of 6500k. This means all colors will be adjusted to that white balance. A Gamma of 2.2. This is a common standard not far from the human eye’s own response curve. A white luminance (brightness) of 120 candela. This will vary with your room’s brightness as the ambient light, and the screen brightness, need to coordinate with one another. Note: If your room is very dim, the Spyder4ELITE HD software may recommend calibrating your display at a lower brightness, and to a white point of 5800k, or even 5000k. This is because the eye responds to color differently in low light. Launch the Spyder4ELITE HD software, choose the Computer Display option, and follow the on-screen directions. You will be asked what type of computer display you are calibrating and other basic questions, and then the software will run the calibration routine. The software will save VLUTS for your videocard, and a Profile for your color managed applications. You will notice the difference in the test images on the SpyderTune screen, particularly the shadow detail and highlight detail (if your gamma was off) or in the overall color tone, if the white balance was off. You may also want to use the advanced features of Spyder4ELITE HD, especially side-by-side display tuning (found under the SpyderTune tab) and Iterative Gray Balance (an Advanced Calibration option). Be sure to run the Advanced Display Analysis suite available from the last screen. This will test many characteristics of your display. The “heat maps” from the display color uniformity and luminance uniformity tests are particularly interesting. The Color Accuracy test results, with accuracy ratings for 12, 24, or 48 real-world colors, and how closely your display can reproduce them, is also useful. For Scene Exposure and Lighting Correction, you will need: The SpyderCUBE® An Interesting Lighting Condition A Camera that will shoot RAW: this means a DSLR or Mirrorless camera with RAW still capabilities, or an advanced Cinematic Camera for RAW video capture. (Please note that DSLRs do not shoot RAW video, so it is best to set all white balance and exposure settings in-camera using the SpyderCHECKR’s gray face, and not adjust these settings more than needed in Post-Production.) A RAW editor (such as Lightroom or Photoshop ACR for still imaging, or an advanced NLE/Utility that accepts RAW footage and allows RAW adjustments, for video. What you will be doing: Place the SpyderCUBE under the scene lighting (shooting it in lighting that does not reflect your scene will not offer meaningful results) with the face containing the black trap rotated towards the camera, and equal amounts of the two white/gray combined faces showing on each side. Take a RAW capture of the scene including the SpyderCUBE. Open your RAW editor, and make the following key RAW adjustments, using the SpyderCUBE for reference: White Balance: With RAW images, adjusting white balance (also called gray balance or color balance) in Post Processing does not degrade image quality. Use the white balance eyedropper tool, but click on the gray portion of the lighter of the two gray/white faces. This face represents your primary light source; the darker of the two faces represents your secondary light source, and in most cases it is desirable to white balance to the primary light source. The gray surface is more spectrally neutral than the white surface so it provides a more accurate balance. It also is assured of not being clipped in any channel, which can occur on the white portion of the face, if the camera settings allow too much exposure. Exposure: Typically this controls the overall brightness of the scene. It may or may not affect the end points, depending on your RAW editor. If it does not (as is the case with ACR and Lightroom) you can use the Exposure control to move the midtones to the optimal range. The gray segments of the primary and secondary light source faces represent the midtones of your image. Set them to an appropriate midtone value. Blacks: The SpyderCUBE offers both an absolute black (in the black trap) and a card black (the face surrounding the black trap). These can be used to set the black clipping point and to assure optimal shadow detail. Click in the black trap with the black eyedropper in your RAW software to set the black level. In tools like Lightroom and ACR there is not a black eyedropper, this adjustment is achieved by turning on the black clipping warning and adjusting the blacks control until the entire black trap shows the clipping color. This will clean up noise in the blacks. Shadow Detail: Now turn off the black clipping indicator so that a visual comparison between the black trap and the black face can be performed. An inability to distinguish between the two will produce clogged shadows, but extra punch. Too much distinction between them will create excessive shadow detail, and less punch. Whites: The SpyderCUBE shows primary and secondary card white on the two white/gray faces, plus absolute white in the specular highlights (catchlights) in the chrome ball. Turn on the white clipping warning and adjust the white slider until white clipping is apparent, but not too large in the chrome ball catchlights. If your software has a white clipping eyedropper, set it from one of these specular highlights. Highlight Detail: Now adjust your software’s highlight control until the primary lightsource’s white face is an appropriate amount darker than the specular highlights, assuring good highlight detail. These key adjustments can now be applied to other images from the same scene, or to all video shot under these conditions. For Camera Color Calibration, you will need: The SpyderCHECKR® target with the Color Faces exposed The SpyderCHECKR software installed on your computer, and activated with the SpyderCHECKR serial number included with the product. One or more cameras that shoot RAW. An application that supports HSL Presets for RAW files: Adobe Photoshop CS or CC (which will include ACR), or Adobe Lightroom, or Hasselblad Phocus Raw images shot with that same camera or that same camera/lens combination to test the resulting calibration. What you will be doing: The SpyderCHECKR is unique; it allows you to calibrate your camera or camera and lens combination, once, and use that calibration for virtually any lighting condition. This is because it does not use DNG profiles for color correction, it uses HSL Presets. Set up the CHECKR target on a stand or tripod. Light it with a single light, from a distance, with no reflector. Be sure the light is at 45 degrees to the face of the target. Set up the camera or camera and lens to calibrate perpendicular to the target. Do not fill the entire frame with the target in order to avoid lens imperfections in the corners from being included in the target area. Using appropriate camera settings for the conditions, shoot the target into a RAW image file. Open the resulting RAW file in ACR, Lightroom, or Phocus. Crop the image to the four white dots at the corners of the target, rotating as needed. Use your application’s white balance tool to balance the image. Use one of the light gray patches on the SpyderCHECKR as your balancing location. Patch E2 is ideal. Adjust your application’s white and black controls until the white patch on the target (E1) is approximately 90% or RGB 230, 230, 230. Adjust the black control until the black patch (E6) is at approximately 5% or RGB 10, 10, 10. Do not try to raise a black value lower than this; it’s better to reshoot the target if your blacks are too dark. You can export the resulting file as an Eight bit per channel TIF file in AdobeRGB color space, or trigger the SpyderCHECKR software directly from Lightroom, if you have set it up as your auxiliary image editing application in Lightroom Preferences’ External Editor pane. If you saved as a TIF, then drag the file to the SpyderCHECKR software icon and it will launch SpyderCHECKR for you. If the image was properly cropped, then no adjustment of the positioning will be needed. If you wish to make minor positioning adjustments, the edges and corners of the target image can be dragged. You can now choose a calibration mode. Colorimetric would be the likely choice for initial testing. Choose the application you are working in so that the resulting preset file can be placed into its preset folder. Restart your application, so that it will refresh the preset list, and choose your new camera calibration preset from your application’s preset list. Apply the preset to your test images, and there should be a subtle adjustment of colors. This is typically most notable in reducing over-saturation in reds and purples, depending on the camera involved. For In-Camera White Balance, you will need: The SpyderCHECKR® A Specific Lighting Condition One or more cameras with an in-camera white balance function. This is most important for DSLR video, which does not offer RAW capture, so getting the white balance correct in-camera is especially important. The same would be true for still cameras used to shoot JPG or TIFF images, instead of RAW files. What you will be doing: Fill most, or all, of the camera’s frame with the SpyderCHECKR, with the gray cards exposed. Shoot a white balance shot. Set as camera white balance (how this is done will vary from camera to camera, check your camera user’s guide). It is also possible to set camera exposure from this face of the CHECKR; the cards average to Kodak 18% gray. To bias exposure up or down, move the camera up or down, to include fewer of the light patches, or fewer of the dark ones, and the resulting autoexposure setting will increase or decrease accordingly. For More Information visit: datacolor.com/spyderhd