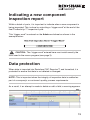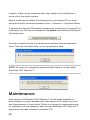
1
User’s guide
H-2000-6505-01-A
Renishaw CNC Reporter™
© 2007 Renishaw plc. All rights reserved.
This document may not be copied or reproduced in whole or in part, or
transferred to any other media or language, by any means, without the
prior written permission of Renishaw.
The publication of material within this document does not imply
freedom from the patent rights of Renishaw plc.
Disclaimer
Considerable effort has been made to ensure that the contents of
this document are free from inaccuracies and omissions. However,
Renishaw makes no warranties with respect to the contents of this
document and specifically disclaims any implied warranties. Renishaw
reserves the right to make changes to this document and to the
product described herein without obligation to notify any person of
such changes.
Trademarks
RENISHAW® and the probe emblem used in the RENISHAW logo are
registered trademarks of Renishaw plc in the UK and other countries.
apply innovation is a trademark of Renishaw plc.
Microsoft, Windows, and Excel are either registered trademarks or
trademarks of Microsoft Corporation in the United States and/or other
countries.
All other brand names and product names used in this document are
trade names, service marks, trademarks, or registered trademarks of
their respective owners.
Renishaw part no: H-2000-6505-01-A
Issued: 05.2007
Contents
Welcome ................................................................................1
Software requirements ..........................................................1
Before you begin....................................................................2
Customising the Productivity+™ post processor
(*.RenMF file) ...................................................................2
Indicating a new component inspection report .................3
Installation .............................................................................4
Using Renishaw CNC Reporter™ .........................................7
Launching the application .................................................7
Demo mode ......................................................................9
Product registration ........................................................10
Setting up, importing and analysing data ............................11
Selecting the post processor ..........................................11
Setting headers and previewing inspection reports ........12
Customising the inspection report template ...................13
Importing data ................................................................15
Creating control charts ...................................................16
Setting control limits ..................................................17
Deleting existing data ................................................17
Appending new imported data to existing data .........18
Creating an archive of imported results data and
control charts.............................................................18
Indicating a new component inspection report ....................19
Data protection ....................................................................19
Maintenance ........................................................................20
i
ii
Welcome
Renishaw CNC Reporter™ is a software package designed to display and
process inspection results from Productivity+™. It allows you to create
multiple inspection reports and to track a measured feature between several
measured parts.
Renishaw CNC Reporter™ runs from within the Microsoft® Excel®
spreadsheet package, providing a familiar environment in which to work.
We hope that Renishaw CNC Reporter™ satisfies your reporting
requirements. If you do require any support, please contact your local
Renishaw representative. Details are available at www.renishaw.com/contact.
Software requirements
Renishaw CNC Reporter™ is compatible with the following Microsoft®
operating systems:
• Windows® 98
• Windows® 2000
• Windows® XP
Renishaw CNC Reporter™ requires Microsoft® Excel® to function and is
compatible with the following Microsoft® products:
• Excel® 97
• Excel® 2000
• Excel® 2002
• Excel® 2003
The probing results data collected and analysed by Renishaw CNC
Reporter™ is compatible with the output from the following Renishaw
Productivity+™ products:
• Renishaw Productivity+™ Active Editor
• Renishaw Productivity+™ Active Editor Pro
• Renishaw Productivity+™ GibbsCAM® plug-in
1
Before you begin
Customising the Productivity+™ post
processor (*.RenMF file)
The Renishaw Productivity+™ post processor is a text file with a *.RenMF
file extension. It contains a series of commands and switches that can be
configured to suit your particular control and application. This includes the
DELIM# function that is used to configure the system to output delimited
data.
When the post processor is first installed, the DELIM# function is disabled
using a semi-colon (;) to render the function inactive. When using Renishaw
CNC Reporter™, it is imperative that the DELIM# symbol is reactivated by
removing the semi-colon. The appropriate delimiter character (for example
“/”) must appear after the DELIM# character.
Edit the RenMF file and change the section:
_ROTATE_Z_AXIS_VECTOR# 0,0,1
;_DELIM# /
_CAN_READ_ACTIVE_WCS 1
so that it appears as follows:
_ROTATE_Z_AXIS_VECTOR# 0,0,1
_DELIM# /
_CAN_READ_ACTIVE_WCS 1
2
Indicating a new component inspection report
Within a batch of parts, it is important to indicate when a new component is
being inspected. This is done by outputting a “trigger word” at the end of the
final Productivity+™ inspection cycle using DPRNT (or equivalent) followed
by a particular word or string of characters. This is added as a G Code block
or equivalent.
An example of a G Code block for an ISO controller would be:
POPEN
G103P1
DPRNT[COMPONENTEND]
G4P50
G103
PCLOS
!
CAUTION: The “trigger word” used within the macro program must
match exactly the entry in the “trigger word” field on the Admin worksheet
(see page 19).
3
Installation
Insert the CD into the CD drive of your computer. Installation begins
automatically. The following screens are provided to guide you through the
process:
Initial set-up screen
No action required.
Warning screen
(only shown if reinstalling the
product)
Click Yes.
Introduction screen
Click Next.
License agreement
Please read through then
click Yes to accept and
proceed.
4
Installation summary
Click Install.
End of set-up process
Click Finish.
The installation process is now complete.
5
The following shortcuts are added to the desktop:
Renishaw CNC Reporter
This is the main application.
Demo Results
This is a text file containing five samples of
typical Fanuc-based Productivity+™ output.
CNCReporterTemplate.xlt
This is the inspection report template that
can be customised.
6
Using Renishaw CNC Reporter™
Launching the application
The Renishaw CNC Reporter™ application can be launched from the Start
menu by selecting All Programs and following the sequence shown below:
Alternatively, double-click on the
icon on the desktop.
This opens the Microsoft® Excel® application. If a security warning appears,
select Enable Macros.
The Start worksheet is displayed as shown below.
7
There are two other worksheets available as follows:
• The Control Chart Data worksheet, where control charts are generated.
• The Admin worksheet.
8
Demo mode
When Renishaw CNC Reporter™ is first installed, it runs in demo mode
until registration has taken place. Demo mode operates under the following
restrictions:
•
The application may be launched only 30 times. After this, access to all
key functionality is denied.
•
Only the Demo Results.txt file may be run.
The Admin worksheet displays the license status. When the product is first
installed, the status is as shown below:
9
Product registration
Registration allows full unrestricted usage of the product, and is carried out
from the Admin worksheet as follows:
1. Click the Register License button shown below:
2. Fill in the Serial Number, Company ID and Activation boxes. The
information required can be found on the back cover of this book,
otherwise contact your local Renishaw distributor.
NOTE: All registration codes are case sensitive.
3. Click the Validate License button. If validation is successful, the Admin
worksheet displays the following message:
10
Setting up, importing and analysing
data
Selecting the post processor
Renishaw CNC Reporter™ must be set up to accept data from the
appropriate Renishaw Productivity+™ post processor. From the Start
worksheet, click the option corresponding to your controller type. The
Delimiter Character(s) option allows the use of other characters if required.
NOTE: Many Fanuc and similarly styled ISO format post processors may
appear under the Fanuc & Fanuc Clones drop-down list.
11
Setting headers and previewing inspection
reports
From the Start worksheet, set the initial inspection report tab. This can ONLY
be set when no data has been imported into Renishaw CNC Reporter™.
NOTE: The First Sample Number MUST be a number rather than text.
Click the Preview Inspection Report Header Template button. The
following confirmation message appears:
Click Yes to import the inspection report template file into Renishaw CNC
Reporter™ as Sheet 1.
!
report.
12
CAUTION: DO NOT change the worksheet name of this inspection
Customising the inspection report template
To customise the report, click the
shortcut on the desktop.
The report template opens in Excel® as a single editable worksheet.
13
The border at the top of the worksheet may be changed to include a
customised logo and colour scheme. Graphics may also be added to suit
specific inspection requirements (see example below):
!
CAUTION: Do not change any of the cell positions.
On the header, the Sample ID box may be edited, but all other areas are
protected.
When you have made the desired changes, save the customised template as
CNCReporterTemplate.xlt in the Renishaw CNC Reporter™ folder
(C:\Program Files\Renishaw CNC Reporter).
!
CAUTION: Take care to save the file as an Excel® template (.xlt) and
not a workbook (.xls).
14
Importing data
On the Start worksheet, click the following button:
From the file list, select the text file containing the probing results and click Open.
The data is automatically loaded into Renishaw CNC Reporter™, with
a separate inspection report (i.e. worksheet) created for each individual
component within a batch of components. The data is formatted according
to whether features are in or out of tolerance. The header of each inspection
report shows whether the component has passed or failed.
!
CAUTION: DO NOT change the worksheet names (Sheet1, Sheet2 etc).
Once the data is loaded, it can be compiled into individual control charts
based on a combination of feature and dimension names.
15
Creating control charts
Control charts (run time charts) can be created from the inspection reports
to highlight trends over the differing samples in sequential order. ONLY data
with upper and lower tolerances are available for viewing in control chart
format.
To create control charts, click the following button on the Start worksheet:
There may be a short delay while the data is processed. Once the data
is compiled, an initial control chart appears on the Control Chart Data
worksheet.
To create a chart for a different feature, click the down arrow at the top of the
Feature column and select a new feature from the list of features available:
A chart is then generated for the selected feature.
16
A number of automatic calculations are made within the chart:
• Maximum “actual” value within the range
• Minimum “actual” value within the range
• Mean “actual” value within the range
• Standard deviation of the range
• Cpk index
Setting control limits
The chart also shows the control limits. These are based on a percentile
proportion of the overall specified tolerance limits.
The control limits multiplier is set on the Admin worksheet. The default is
90% but can be changed as required.
Deleting existing data
To remove all existing inspection reports and control charts, go to the Start
worksheet and click the following button:
NOTE: Once this has been done, the data is no longer retrievable.
17
Appending new imported data to existing data
It is possible to combine multiple sets of results by importing multiple text
files in the order in which they are received. You are warned that the file you
are importing will be appended to the existing data:
Creating an archive of imported results data and control charts
If you wish to keep a copy of all the imported, formatted and controlled data,
go to the Start worksheet and click the following button:
This creates a duplicate Excel® file but without the Start and Admin
worksheets. Although many of the automation macros are removed, the
control chart data filter is still active.
18
Indicating a new component
inspection report
Within a batch of parts, it is important to indicate when a new component is
being inspected. This is done by outputting a “trigger word” at the end of the
final Productivity+™ inspection cycle.
This “trigger word” is entered on the Admin worksheet as shown in the
example below:
!
CAUTION: The “trigger word” entered here must match exactly the
term used in the macro program (see page 3).
Data protection
When data is imported into Renishaw CNC Reporter™ and formatted, it is
protected to ensure that data is not deleted or changed.
NOTE: This is important when the integrity of inspection data is audited as
part of a company’s or customer’s quality process requirements.
As a result, if an attempt is made to delete or edit a field, a warning appears.
19
However, there may be instances when data needs to be altered due to
errors within the quality system.
Before a field can be edited, the sheet must be unprotected. This is done
using the Excel® command sequence Tools > Protection > Unprotect Sheet.
A password is required. The default password on installation is “password” (in
lowercase), but this can be changed on the Admin worksheet by clicking the
following button:
You are prompted to enter the old password and then the new password
twice. Once this has been done, you are prompted to save.
NOTE: You may only change the password when there is no data within
Renishaw CNC Reporter™.
Maintenance
New versions of Renishaw CNC Reporter™ will be made available for
downloading from www.renishaw.com. New versions will contain bug fixes
and improvements to functionality. There is no charge for maintenance and
no reactivation will be necessary after the new Renishaw CNC Reporter™
application has been installed on licensed PCs.
20
Renishaw plc
New Mills, Wotton-under-Edge,
Gloucestershire, GL12 8JR
United Kingdom
Renishaw Inc
5277 Trillium Blvd,
Hoffman Estates, IL 60192
USA
T
F
E
+44 (0)1453 524524
+44 (0)1453 524901
[email protected]
www.renishaw.com
T
F
E
+1 847 286 9953
+1 847 286 9974
[email protected]
www.renishaw.com
For worldwide contact details,
please visit our main web site at
www.renishaw.com/contact
*H-2000-6505-01*