1
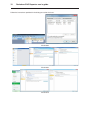
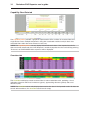
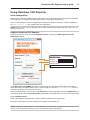
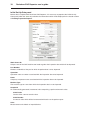
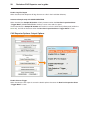
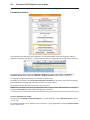
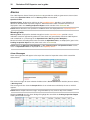
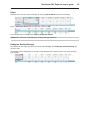
User’s guide
Renishaw CNC Reporter
Import measurement results
Review statistical data
Determine process capability
2
Renishaw CNC Reporter user’s guide
© 2012 Renishaw plc. All rights reserved.
This document may not be copied or reproduce in whole or in part, or transferred to any other media or
language, by any means, without the prior written permission of Renishaw plc.
The publication of material within this document does not imply freedom from the patent rights of
Renishaw plc.
Disclaimer
RENISHAW HAS MADE CONSIDERABLE EFFORTS TO ENSURE THE CONTENT OF THIS
DOCUMENT IS CORRECT AT THE DATE OF PUBLICATION BUT MAKES NO WARRANTIES
OR REPRESENTATIONS REGARDING THE CONTENT. RENISHAW EXCLUDES LIABILITY,
HOWSOEVER ARISING, FOR ANY INACCURACIES IN THIS DOCUMENT.
Trademarks
RENISHAW and the probe emblem used in the RENISHAW logo are registered trademarks of
Renishaw plc in the UK and other countries.
apply innovation is a trademark of Renishaw plc.
All other brand names and product names used in this document are trade names, trademarks, or
registered trademarks of their respective owners.
Renishaw part no:
H-5465-8501-01-A
Issued:10.2012
Renishaw CNC Reporter user’s guide
3
IMPORTANT - PLEASE READ CAREFULLY
RENISHAW - PRODUCT LICENCE
Licensee: you, the person, firm or company accepting the terms of this Licence
Renishaw: Renishaw plc, New Mills, Wotton-under-Edge, Gloucestershire, GL12 8JR, United Kingdom
Product: this software (“Renishaw CNC Reporter”) including all modules and components, manuals and any software protection devices incorporated within or issued with it
Licence to use:
non-exclusive licence to use the product on a single installation at any one time using a Renishaw licence key. The licence to use may be transferred from one installation to another installation in accordance with the procedures specified by Renishaw
If the Product is licensed for a time-limited trial or demonstration only:
•
the Product will not operate after expiry of the specified time;
•
Renishaw provides no warranties regarding the performance of the Product and the first sentence
of Condition 2 below does not apply.
By opening any shrink-wrap or packaging in which the Product is contained and/or installing and/
or using the Product you indicate your acceptance of the terms of the Licence. If you do not agree
to the terms of this Licence, do not install or use the software and promptly return the Product and
accompanying documentation to the person who supplied it to you in order to obtain a refund of any
licence fee paid. If you are installing the Product on a computer that is not owned by you, you are
bound by this Licence both individually and as agent for the end user and your actions bind the end
user. The end user means the person, firm or company that is the user of the computer.
Renishaw grants the Licensee a Licence to use the Product on condition the Licensee accepts the
following terms and conditions:
1.
All rights in and title to the Product are and shall remain vested in Renishaw and its licensors.
2.
Renishaw shall replace or repair the Product if it does not materially perform to specification
under proper use within 90 days of delivery. Except as stated in this paragraph, all warranties,
conditions and terms implied by law are excluded. In particular, no warranty is given that the
Product is bug or error-free.
3.
NOTE - LIMITATION OF LIABILITY IN CONNECTION WITH USE OF THE PRODUCT
•
Renishaw does not exclude liability for personal injury or death caused by Renishaw’s
negligence.
•
For Products supplied free of charge to the Licensee, Renishaw has no other liability to
Licensee.
•
For Products paid for by the Licensee, Renishaw’s liability is limited to (a) the warranty
contained in paragraph 2 and (b) direct losses up to a maximum of £50,000.
•
Renishaw has no liability to the Licensee for any indirect, consequential or economic loss
(including, without limitation, loss of data, profits or goodwill).
•
The Product has been designed for use with Renishaw’s machine tool probing systems and
Renishaw has no liability for the results of using the Product with another manufacturer’s
machine tool probing systems.
•
By accepting the terms of this Licence the Licensee agrees that this limitation of liability is
reasonable.
4.
The Licensee may not make any copies of the Product except as provided in this Licence or as
permitted by applicable law. The Licensee is authorised to make a backup copy of the Product
for security purposes. The Licensee must not remove any licence and copyright notices, labels
or marks contained in the original and shall ensure all copies contain such notices without
modification.
4
Renishaw CNC Reporter user’s guide
5.
If the Product contains electronic manuals the Licensee may print out the manuals in part or
in full, provided that the print outs or copies are not supplied to any third party that is not an
employee or contractor for the Licensee without Renishaw’s written permission.
6.
The Licensee shall not reverse engineer, decompile, or modify the Product or re-use any
components separately from the Product unless permitted by applicable law provided that
Licensee has first contacted Renishaw to request any information required to interface with
Licensee’s other software.
7.
The Licensee shall not make the Product available to any third party in any manner whatsoever
nor may this Licence and the Product be transferred to a third party without Renishaw’s prior
written agreement. Any agreement by Renishaw is conditional on the permitted transferee
agreeing to all terms of this Licence and the Licensee not retaining any copies of the Product.
8.
The Licensee shall not export the Product in contravention of any applicable export control laws.
9.
The Licensee shall permit reasonable auditing and tracing of copies of the Product by
Renishaw or its licensors.
10. Renishaw shall have the right to terminate this Licence immediately if the Licensee fails to
comply with any of these terms and conditions. The Licensee agrees upon receipt of notice
of termination from Renishaw to immediately return or destroy all copies of the Product in its
possession or control.
11. Statement concerning United States Government users - This Product is commercial computer
software and commercial computer software documentation (as used in 48 CFR 12.212 and
48 CFR 227.7202-1 to 227.7202-4) that has been developed exclusively at private expense. If
this Product is acquired directly or indirectly on behalf of a unit or agency of the United States
Government under the terms of (i) a United States Department of Defense contract, then
pursuant to DOD FAR Supplement 227.7202-3(a), the United States Government shall only have
the rights set forth in this Licence; or (ii) a civilian agency contract, then use, reproduction, or
disclosure is subject to the restrictions set forth in FAR clause 27.405(b)(2)(i), entitled Acquisition
of Existing Computer Software, and any restrictions in the agency’s FAR supplement and any
successor regulations thereto, and the restrictions set forth in this Licence.
12. This Licence is governed by English law and the parties submit to the exclusive jurisdiction of the
English courts.
Renishaw CNC Reporter user’s guide
5
Contents
About Renishaw CNC Reporter................................................................................................7
Compatibility and system requirements.....................................................................................7
Data output package..........................................................................................................................7
PC specification..................................................................................................................................7
Customise the Productivity+ post processor.............................................................................8
Indicating a new component in an inspection report.................................................................8
Installation and product registration...........................................................................................9
Install Renishaw CNC Reporter.........................................................................................................9
Renishaw CNC Reporter screen layout...................................................................................13
Start tab............................................................................................................................................13
Capability Chart Data tab.................................................................................................................14
Overview tab....................................................................................................................................14
Admin tab ........................................................................................................................................15
Templates tab...................................................................................................................................16
Using Renishaw CNC Reporter...............................................................................................17
Initial configuration...........................................................................................................................17
Register Renishaw CNC Reporter...................................................................................................17
Initial Set Up Data panel ..................................................................................................................18
Importing data.........................................................................................................................20
Data collection - FILE IMPORT method...........................................................................................20
Data collection - REAL TIME method...............................................................................................21
Review and analyse data........................................................................................................22
Review data: Probing Inspection Reports........................................................................................22
Analyse data: Capability Chart.........................................................................................................23
Control limits.....................................................................................................................................24
Analyse data: Overview tab..............................................................................................................24
Archive data.....................................................................................................................................25
Additional features...................................................................................................................26
Custom templates............................................................................................................................26
CNC Reporter Options: Admin Options............................................................................................27
CNC Reporter Options: Output Options...........................................................................................28
Password protection.........................................................................................................................30
Poll time............................................................................................................................................31
Lock setup........................................................................................................................................31
Alarms.....................................................................................................................................32
Warning Limits..................................................................................................................................32
Alarm Messages...............................................................................................................................32
Notes................................................................................................................................................33
Redisplay Quality Warnings..............................................................................................................33
Upgrading and retaining settings.............................................................................................34
6
Renishaw CNC Reporter user’s guide
Contents (continued)
Data Manager..........................................................................................................................35
Data Manager screen layout...................................................................................................36
Archive Query tab.............................................................................................................................36
Overview tab....................................................................................................................................36
Trend Analysis Chart tab .................................................................................................................37
Comparison Chart tab .....................................................................................................................37
Using Data Manager................................................................................................................38
Select machine.................................................................................................................................38
Select date range.............................................................................................................................38
Select part number...........................................................................................................................39
Review and analyse data........................................................................................................40
Review data: Archive query..............................................................................................................40
Review data: Overview.....................................................................................................................40
Analyse data: Trend Analysis Chart .................................................................................................40
Analyse data: Comparison Chart ....................................................................................................41
Additional features...................................................................................................................42
Create hyperlinks.............................................................................................................................42
Clear data.........................................................................................................................................42
Use of wildcards...............................................................................................................................42
Troubleshooting.......................................................................................................................43
Renishaw CNC Reporter user’s guide
7
About Renishaw CNC Reporter
Renishaw CNC Reporter is a software package designed to display and process inspection results
from Renishaw probing software. It allows users to create multiple inspection reports and to track a
measured feature between several measured parts.
An additional, complementary application - Data Manager - allows the historical analysis of inspection
data that has previously been processed using Renishaw CNC Reporter.
Both CNC Reporter and Data Manager run within the Microsoft Excel spreadsheet package, providing
a familiar operating environment in which to work.
We hope that Renishaw CNC Reporter meets your reporting requirements. If you have any questions,
or require technical assistance, please contact your local Renishaw representative. Details are
available at www.renishaw.com/contact
Compatibility and system requirements
Data output package
Renishaw CNC Reporter is compatible with inspection data produced by the following software
packages:
•
Productivity+™ Active Editor Pro
•
Productivity+™ GibbsCAM® plug-in
•
Renishaw Inspection Plus *
* Configuration by Renishaw engineers is required before Inspection Plus data can be used with Renishaw CNC Reporter.
PC specification
For optimum performance ensure the target PC meets or exceeds the following PC specification.
Operating system
Microsoft Windows XP or later
Processor
2.0 GHz Intel Core 2 Duo (or equivalent)
Memory
2 GB RAM, 1 GB hard disk space (32-bit operating systems)
4 GB RAM, 1 GB hard disk space (64-bit operating systems)
Other
CD/DVD drive for software installation
An existing installation of Microsoft Excel 2003 or later
(Excel 2010 recommended)
NOTE: Microsoft Excel 2003 with a Windows 7 operating system is not a supported combination for
the use of Renishaw CNC Reporter.
NOTE: It is not possible to use a 64-bit version of Microsoft Excel in combination with a 32-bit
operating system.
Renishaw CNC Reporter is available in English only.
8
Renishaw CNC Reporter user’s guide
Customise the Productivity+ post processor
The Renishaw Productivity+ post processor is a text file with a .RenMF file extension containing a
series of commands and switches that can be configured to suit a particular CNC machine tool and
application.
The post processor includes a DELIM# function that is used to configure the system to output
delimited data. When the post processor is first installed, the DELIM# function is disabled, rendering
the function inactive. In order to use Productivity+ generated inspection data in Renishaw CNC
Reporter, the DELIM# function must be activated and the appropriate delimiter character, for example
“/” must be defined.
Example post processor content:
DELIM# function inactive with “/” delimiter character
;_DELIM# /
DELIM# function active with “/” delimiter character
_DELIM# /
DELIM is located in the Reporting section of the Renishaw .RenMF editing tool.
Indicating a new component in an inspection report
When inspecting a batch of components it is important to identify each instance of a new component
being inspected. This is achieved by outputting a ‘trigger word’ at the end of the Productivity+
inspection cycle using DPRNT (or equivalent) followed by a particular word or string of characters
added as, for example, a G-code block.
A sample G-code block for an ISO controller
would be:
POPEN
G103P1
DPRNT[COMPONENTEND]
G4P50
G103
PCLOS
CAUTION: The ‘trigger word’ used within the
macro program must exactly match the New Part
Inspection Sheet “Trigger Word” defined in
the Initial Set Up Data panel in the Start tab of
Renishaw CNC Reporter.
Sample output results (as per the Demo Results.
txt file) would appear:
PNUM-A001/OPERATION/1/
/
02 BORE 40.00MM T02/
SIZE/40.0000/39.991/-0.009/-0.1000/0.1000/
POSITION X/12.5000/12.5024/0.0024/0.0500/0.0500/
POSITION Y/-10.0000/-9.9868/0.0132/0.0500/0.0500/
MAT CON/0.0000/0.009/0.009/-0.1000/0.1000/
/
03 WEB 25.20MM T02/
SIZE/25.2000/25.204/0.0040/-0.0500/0.0500/
POSITION Y/25.0000/24.8909/-0.1091/New Part
0.0000/0.0000/
Inspection Sheet
MAT CON/0.0000/0.0040/0.0040/-0.0500/0.0500/
“Trigger Word”
/
COMPONENTEND/
PNUM-A001/OPERATION/1/
/
02 BORE 40.00MM T02/
SIZE/40.0000/39.999/-0.0010/-0.1000/0.1000/
POSITION X/12.5000/12.6498/0.1498/0.0500/0.0500/
POSITION Y/-10.0000/-9.9541/0.0459/0.0500/0.0500/
MAT CON/0.0000/0.001/0.001/-0.1000/0.1000/
/
03 WEB 25.20MM T02/
SIZE/25.2000/25.259/0.059/-0.0500/0.0500/
POSITION Y/25.0000/24.9752/-0.0248/New Part
0.0000/0.0000/
Inspection Sheet
MAT CON/0.0000/0.059/0.059/-0.0500/0.0500/
“Trigger Word”
/
COMPONENTEND/
Renishaw CNC Reporter user’s guide
9
Installation and product registration
Install Renishaw CNC Reporter
NOTE: Admin rights for the target PC are required to install Renishaw CNC Reporter.
Insert the Renishaw CNC Reporter software disc into your CD/DVD drive.
Navigate to the CD/DVD drive and double click to select the software file to install based on the version
of Microsoft Excel (32-bit or 64-bit) currently installed on the target PC.
A setup wizard will guide you through the installation process.
If the installer cannot detect a copy of Microsoft Excel, notification will be given and the installation
process will cease.
A dialog will indicate that additional, prerequisite software packages are required by Renishaw CNC
Reporter: ensure the tick boxes are selected to install these packages.
NOTE: When installing Renishaw CNC Reporter on PCs with early versions of Microsoft Windows and
Microsoft Excel, additional components such as Windows Installer; .NET Framework v2.0; Microsoft
Data Access Components v2.8; Excel 2003 .NET patch may also be installed.
Screenshots may vary from those shown depending on the version of Renishaw CNC Reporter installed.
10
Renishaw CNC Reporter user’s guide
Once installation is complete a Renishaw CNC Reporter icon will be visible on the PC desktop.
Double click this icon (or single click and press Enter) to open Renishaw CNC Reporter.
Depending on the configuration and permission settings of the target PC, a Security Warning dialog
(Microsoft Excel version dependent) may be displayed when Renishaw CNC Reporter is first launched:
Excel 2003
Excel 2007
Excel 2010
Select the option to enable content / trust the publisher as appropriate and allow CNC Reporter to run.
Renishaw CNC Reporter user’s guide
11
Depending on the target PC configuration and permission settings, a Macro Security Trust Settings
dialog may now be displayed:
Excel 2003
Excel 2007
Excel 2010
Renishaw CNC Reporter will close down allowing the ‘trust access to Visual Basic / VBA Project’ to be
checked.
12
Renishaw CNC Reporter user’s guide
Follow the instructions provided in the dialog to resolve the issue.
Excel 2003
Excel 2007
Excel 2010
Renishaw CNC Reporter user’s guide
13
Renishaw CNC Reporter screen layout
(For detailed operational information, please see “Using Renishaw CNC Reporter” on page 17.)
Use the tabs at the bottom of the screen to navigate through Renishaw CNC Reporter.
Start tab
Floating
window
The Renishaw CNC Reporter Start tab comprises two panels:
CNC Reporter Control Panel
Initial Set Up Data
The CNC Reporter Control Panel is used to select the data file for import and to initiate the creation
of the Capability Chart. Options allow the calculation of warning limits, derived from tolerance values
within the inspection data, and the display of Specified Limits (tolerance) and Warning Limits on the
chart.
The Initial Set Up Data panel is used to define information contained within the header section of each
Probing Inspection Report, and specifies how the inspection of a new component and the end of a
report are identified within the imported inspection data file.
14
Renishaw CNC Reporter user’s guide
Capability Chart Data tab
The Capability Chart provides a graphical representation of the variation in measured data for a
single feature across multiple components, along with associated statistical analysis data. User
selectable filters allow data to be refined as necessary.
NOTE: The Capability Chart can only display toleranced results data. If the imported results file
does not contain toleranced data, CNC Reporter is unable to populate the chart and a dialog advising
‘There was no TOLERANCED data to process’ will be displayed.
Overview tab
The Overview tab displays actual measured data in colour coded data cells, providing a visual
indication of features which are in tolerance (green), approaching tolerance (yellow) and out of
tolerance (red).
NOTE: The Overview tab can only display toleranced results data. If the imported results file does not
contain toleranced data, the Overview tab will remain empty.
Renishaw CNC Reporter user’s guide
15
Admin tab
Administration
About
The Admin tab displays the current license status, and allows background functionality (as described
in the ‘Advanced features’ section) to be set.
The CNC Reporter Multiple Instance Position panel provides the option to run four instances of
CNC Reporter concurrently. Select Set Instance Position and use the Multiple Instance Manager to
position the windows.
NOTE: In order to use the multiple instance function, a minimum screen resolution of
1920 × 1080 is required. If this minimum resolution is not met, the following dialog will be displayed.
16
Renishaw CNC Reporter user’s guide
Templates tab
The Templates tab allows users to vary the templates used for Probing Inspection Reports
depending on the part number of the inspected component.
NOTE: To access the Templates tab, select Custom Templates OFF in the Initial Set Up Data panel
within the Start tab. This setting will then toggle to Custom Templates ON and the Templates tab will
be visible.
Once clicked
Templates tab
is active
Renishaw CNC Reporter user’s guide
17
Using Renishaw CNC Reporter
Initial configuration
When first run, Renishaw CNC Reporter will display a message indicating that registration is required.
Until registration is complete the application will run using a time limited license.
The time limited license allows the application to operate for 30 days and limits analysis capability to
the Demo Results.txt file (supplied with the application).
NOTE: License status is always displayed in the Administration panel (located on the Admin tab - as
shown on page 15).
Register Renishaw CNC Reporter
Navigate to the Admin tab and select Register License to display the CNC Reporter License
Registration dialog.
ABCDEFG CNC Reporter
Serial ID
Company ID
Activation Code
In the Work Centre ID (WCID) field enter a unique name for the CNC machine tool used to gather
inspection data. (The default ‘Demo’ entry is only valid for use with the Demo Results.txt file and
cannot be used with real inspection data files.)
In the remaining fields enter the seven digit Serial ID, the seven digit alpha-numeric Company ID and
the 32 digit alpha-numeric Activation Code (provided on a product label on the rear of the packaging).
Select Validate License.
Read, acknowledge and accept the resulting software product license agreement.
Renishaw CNC Reporter is now activated and available for unlimited use.
NOTE: If Renishaw CNC Reporter is uninstalled from a PC and then reinstalled at a later date it is not
necessary to reactivate the software as the PC will retain license information.
18
Renishaw CNC Reporter user’s guide
Initial Set Up Data panel
Before data is imported into Renishaw CNC Reporter, it is necessary to populate the Initial Set Up
Data panel (within the Start tab) to define the information which will be displayed in the header section
of Probing Inspection Reports.
Work Centre ID
Unique name of the CNC machine tool used to gather the inspection data which will be imported.
Part Number
Number or identifier of the part for which inspection data is to be imported.
Operation
Operation name or number associated with the inspection data to be imported.
Name
Company or operator name associated with the inspection data to be imported.
Machine Type
The machine type or name from which the inspection data is to be imported.
Sample ID
An automatically generated, incremental value comprising a prefix and numeric value.
Initial Prefix
Can be either a text or numeric value.
Initial Number
A numeric value which will be incremented with each new inspection report.
Units
Measurement units: Metric or Imperial/Inches.
Renishaw CNC Reporter user’s guide
19
Delimiter
Defines the delimiter character used in the inspection data file to be imported. The default character is “/”.
See “Customise the Productivity+ post processor” on page 8 for further information, and for an
example of how the delimiter character should appear as part of the function.
Set Controller Type
Click Set Controller Type to initiate the Set Controller Wizard.
Within the wizard select the probing software used for data collection then press Next.
Select the CNC controller type then press Finish. (For CNC machine controllers similar to Fanuc, select
the arrow to the right of the Fanuc field and select the appropriate control from the drop-down list.)
NOTE: Some NC control platforms which are compatible with Renishaw probing software do not
support the output of inspection report data and are therefore not compatible with Renishaw CNC
Reporter.
Backup Directory Location
Defines the location to which Excel Archives and data Text Logs are stored.
New Part Inspection Sheet “Trigger Word”
Defines the word used in the inspection data to indicate the end of a report.
See also “Indicating a new component in an inspection report” on page 8.
Maximum Number of Worksheets
Defines the number of inspection reports that will trigger the automatic archive process. The entered
value must be between 5 and 400 inspection reports.
See “Archive data” on page 25 for more information.
Inspection Sheets checkbox
When this tick box is checked, all Probing Inspection Reports will be archived during the automated
archive process.
Chart/Overview checkbox
When this tick box is checked, the Capability Chart and Overview sheets will be archived during the
automated archive process.
NOTE: Select Inspection Sheets and Chart/Overview checkboxes to ensure all data is archived.
20
Renishaw CNC Reporter user’s guide
Importing data
Two methods of data import are available: FILE IMPORT and REAL TIME.
Data collection - FILE IMPORT method
FILE IMPORT is a manual process which imports all inspection data from a text (or similar) file in a
single operation. This is expected to be the most common method of data import.
Select Collect Data - FILE IMPORT from the Start tab.
Click OK in the Import a Data File dialog, then navigate to and select the data file for import.
NOTE: By default the Open dialog will display files with a .txt file extension. This can be modified and
any file type supported by Microsoft Excel can be imported.
Renishaw CNC Reporter user’s guide
21
Data collection - REAL TIME method
The REAL TIME data import method periodically accesses (polls) a file to retrieve inspection data. The
time between each access, the poll time, can be any whole value between 5 and 999 seconds (default
setting is 20 seconds) and is defined in the Poll Time field. (See also “Poll time” on page 31.)
If the file is locked by another application, CNC Reporter skips over the file by the defined poll time.
To import data, select Collect Data - REAL TIME (from the Floating Window or the CNC Reporter
Control Panel within the Start tab).
Floating
window
In the resulting dialog, navigate to and select the data file to import.
NOTE: By default the Open dialog will display files with a .txt file extension. This can be modified and
any file type supported by Microsoft Excel can be imported.
Once all data has been imported the file is deleted, but the application will continue to interrogate the
folder location periodically (as defined by the poll time) for any additional results files that may be added.
22
Renishaw CNC Reporter user’s guide
Review and analyse data
Review data: Probing Inspection Reports
A Probing Inspection Report is created for each inspected component, with a new worksheet
created for each report. Worksheet tabs are named sequentially using the data from the Initial Prefix
field and the Initial Number field (defined in the Initial Set Up Data panel of the Start tab).
Each report comprises a header section and a body section.
Header
section
Feature name
Feature attribute
(toleranced)
Feature attribute
(untoleranced)
Body
section
New report
trigger word
The header section is populated using data defined in the Initial Set Up Data panel and provides a
summary of any failures found.
The body section is populated with colour coded inspection data.
•
Feature Names appear in bold blue font.
•
Toleranced Feature Attributes appear in bold red or bold green font (depending on adherence
to tolerance).
•
Untoleranced Feature Attributes and Process Information appear in non-bold black font.
Renishaw CNC Reporter user’s guide
23
Analyse data: Capability Chart
Select View Capability Chart (from the Floating Window) or Compile Capability Chart (from the
CNC Reporter Control Panel located on the Start tab).
The Capability Chart Data tab will become active and a graphical display showing the variation of
actual measured values for a single feature across all inspected components is visible.
Statistical data such as mean, standard deviation, Cp and Cpk values for the feature is displayed to the
right of the chart.
Data can be filtered by Feature, Part Number, Operation and Sample ID. Microsoft Excel custom
filters can also be used. Statistical data is updated automatically as filters are applied.
NOTE: The Renishaw CNC Reporter Capability Chart shows data for a single feature across multiple
components. Users of Microsoft Excel 2010 can use the Comparison Chart within Data Manager to
compare data across multiple features.
24
Renishaw CNC Reporter user’s guide
Control limits
Red lines on the capability chart are Specified Limits, determined by the tolerance value set within
the probing cycles. Visibility of these limits on the capability chart is determined by the status of the
Specified Limits tick box in the CNC Reporter Control Panel (on the Start tab).
Orange lines are Warning Limits, defined as a percentage of the tolerance value. Visibility of these
limits on the compatibility chart is determined by the status of the Warning Limits tick box in the CNC
Reporter Control Panel (on the Start tab). The percentage of tolerance (Warning Limits Multiplier) is
also set in the Control Panel. By default the Warning Limits Multiplier is 75%.
Analyse data: Overview tab
The Overview tab shows a Red Amber Green (RAG) chart for the data and a range of statistical data.
Data can be filtered by Feature, Part Number, Operation, Sample ID or Sheet Index to change,
add or remove attributes. Microsoft Excel custom filters can also be used. Statistical data is updated
automatically as filters are applied.
Colour coding of the actual data cells is dependent on the Specified Limits and Warning Limits. Red
indicates actual data is outside the Specified Limit; green indicates actual data is inside the Warning
Limit; yellow indicates that actual data is outside the Warning Limit but inside the Specified Limit.
Colour of Cp and Cpk data cells are determined using Conditional Formatting within Microsoft Excel.
The default settings are Red ≤ 1; yellow > 1 and < 1.33; green ≥ 1.33
These values can be amended using the Conditional Formatting Rules Manager within Microsoft
Excel.
Renishaw CNC Reporter user’s guide
25
Archive data
An Excel workbook archive containing Inspection Reports, Capability charts and Overviews can be
saved automatically or manually to the Backup Directory Location defined in the Initial Set Up Data
panel.
(The type of data archived is dependent on selections made in the Initial Set Up Data panel within the
Start tab.)
Manual archive
Select Create Archive from the CNC Reporter Control Panel (on the Start tab). All data will be
processed, and a date stamped Excel workbook created in the defined backup location.
The same archive workbook will be overwritten on each manual archive operation unless Clear Data
is selected, which will create a new archive workbook for subsequent archive data.
NOTE: Where more than one archive is created in a single day, an incremental prefix is applied to the
name of the Excel workbook.
Automatic archive
When the number of inspection reports (worksheets) equals the number defined in the Maximum
Number of Worksheets field (defined in the Initial Data Set Up panel on the Start tab), Renishaw
CNC Reporter will automatically pause, process and archive data before resuming collection.
26
Renishaw CNC Reporter user’s guide
Additional features
Custom templates
By default Renishaw CNC Reporter is configured to use a standard template for all Probing Inspection
Reports. The location and name of this template file is defined in the Administration panel (on the
Admin tab) as C:\Renishaw plc\Renishaw CNC Reporter\CNCReporterTemplate.xlt
If required, the white area at the top of this template can be modified and images can be added to
create a customised template that can be used instead.
To create a customised template, open the existing template file in a new instance of Microsoft Excel,
make the necessary amendments and save as an Excel template (.xlt or .xltx file extension).
NOTE: Do not amend cell positions or data column headings.
To use a customised template for all Probing Inspection Reports relating to a single data results file,
navigate to the Admin tab, and select the ellipsis button
to the right of the location and file name
of the default template within the Administration panel. Navigate to and select the required alternative
template. The location and file name of this template will now be displayed in the Initial CNC Reporter
Template field.
Where a results file contains inspection data for multiple parts, it is also possible to vary the template
used dependent on the part inspected.
Select Custom Templates OFF in the Initial Set Up Data panel within the Start tab. This will toggle the
setting to Custom Templates ON/ and will make the Part number and Operation fields in this panel
inactive. A Templates tab will open and CNC Reporter will jump to this tab.
Renishaw CNC Reporter user’s guide
27
In the Part number column enter the part numbers that appear in the results data file. Click the
relevant cell in the Template column to select the template to be used for each part.
Text string to indicate
new part number
Part number within
the results file
Custom template to use
for specified part number
In the New Part Number “Trigger Word” area at the top of the worksheet enter the unique text string
used in the results data file to indicate the inspection of a new part number.
CNC Reporter Options: Admin Options
Enable Auto Start
When checked, CNC Reporter will go straight into Collect Data - REAL TIME mode when CNC
Reporter is opened.
NOTE: This option must be used in conjunction with the Lock Setup check box (CNC Reporter
Control Panel, Start tab).
Enable AutoSave
When checked, CNC Reporter will auto save hourly.
Allow Nulls/Blanks in Input Boxes
When checked, Input Box fields used for Custom Template information can remain empty.
If left unchecked and Input Box fields remain empty, a prompt will be displayed until sufficient valid
information is entered.
28
Renishaw CNC Reporter user’s guide
Enable Log File Output
When checked, CNC Reporter will log all events to a file in the installation directory.
Increment Sample only with COMPONENTEND
When checked, the Sample ID Number will only increment when the New Part Inspection Sheet
“Trigger Word” (COMPONENTEND or similar) is seen at the end of a report.
If left unchecked, the Sample ID Number will remain as set in the Initial Set Up Data panel (within the
Start tab), and will not increment when the New Part Inspection Sheet “Trigger Word” is seen.
CNC Reporter Options: Output Options
Enable Print on Trigger
When checked, the live report is sent to the default printer whenever the New Part Inspection Sheet
“Trigger Word” is seen.
Renishaw CNC Reporter user’s guide
29
Enable SPC Text Output
When checked, a text file called [wcid_name]_SPC_ARCHIVE_DATA.txt of inspection results data
for toleranced features is produced in the specified backup directory location.
This data can then be imported into an external SPC package for further analysis. The structure of the
output is as follows.
Part number /
A001/
Operation Number / 1/
Machine Type / Demo Machine/
Work Centre ID / Demo/
Company Name / Renishaw plc/
Sample Number / Sample1/
Date / 02 June 2012/
Units / Metric/
Feature Name & Attribute / POINT1 POSITION X/
Nominal / 0/
Actual / -0.03/
Deviation / -0.03/
Lower Tolerance / -0.05/
Upper Tolerance / 0.05/
In Tolerance? / YES/
Pass\Fail /PASS/
Enable Data Manager Output
When checked, this option enables toleranced results data to be written to a local database for
subsequent access and analysis using Data Manager.
An on screen dialog will advise if the database is unaccessible, and a message will be added to the
Probing Inspection Report.
Only Output on “Trigger Word”
When checked, results are only sent to the database when the New Part Inspection Sheet “Trigger
Word” (COMPONENTEND or similar) is seen at the end of a report.
Leave this option unchecked during component or job prove out, where a disproportionate number of
failures could be expected. This will prevent data obtained during the prove out process being sent to
database within Renishaw CNC Reporter and processed by the application.
Once the prove out process is complete, check the option to allow Renishaw CNC Reporter to import
and analyse results data.
30
Renishaw CNC Reporter user’s guide
Password protection
Data imported into Renishaw CNC Reporter is password protected to prevent deletion or editing.
Attempts to edit data will display a warning that cells are password protected and therefore read-only.
To unprotect a worksheet open the Unprotect Sheet dialog (Excel 2003: Tools > Protection >
Unprotect Sheet; Excel 2007/2010: Review > Unprotect Sheet) and enter the password.
As shipped the required password is ‘password’ (all lower case).
To modify the password, select Change Protection Password (on the Admin tab). Enter the default
password when prompted, then enter and confirm the new password.
Save Renishaw CNC Reporter to retain the new password.
NOTE: The password can only be changed when there is no data within CNC Reporter. If necessary,
perform a Clear Data operation before changing the password.
Protect / Unprotect all sheets
To unprotect all Probing Inspection Reports in a single operation, select Unprotect Sheets (on the
Admin tab).
Password protection can be applied to all the sheets in a single operation by selecting Protect Sheets
(on the Admin tab).
Renishaw CNC Reporter user’s guide
31
Poll time
NOTE: Poll time is only applicable when using the REAL TIME method of data import.
The period of time between accessing a results data file can be adjusted by amending the Poll Time
(secs) value in the CNC Reporter Control Panel (on the Start tab). Poll Time can be any whole
number between 5 and 999 seconds.
Lock setup
The Lock Setup check box allows users to prevent changes to a number of fields within the Initial
Set Up Data panel. With this option ticked, only Part Number, Operation, Name, Machine Type and
Sample ID remain editable.
The method of data retrieval, the results file being imported and the poll time are also locked when this
check box is selected.
To unlock, deselect the check box and enter the Unprotect Sheet password.
32
Renishaw CNC Reporter user’s guide
Alarms
The CNC Reporter Control Panel (on the Start tab) provides the ability to generate on screen alarms
when either Specified Limits and / or Warning Limits are exceeded.
Specified Limits
Specified Limits, displayed as red lines on the Capability Chart, provide a visual indication of
tolerances defined within inspection programs. Measured values which exceed these limits are
displayed in red in the Probing Inspection Report and in red cells in the Overview tab.
NOTE: Where tolerances are specified as ±0.000 no limits are displayed on the Capability Chart.
Warning Limits
Warning Limits, displayed as dashed orange lines on the Capability Chart, provide a visual
indication of features approaching tolerance. These limits are generated by Renishaw CNC Reporter
and are defined as a percentage of the Specified Limit (Warning Limits Multiplier).
Measured values exceeding these limits but within the Specified Limits, are displayed in green in the
Probing Inspection Report and in yellow cells in the Overview tab.
NOTE: Where the Warning Limit Multiplier is 100% Warning Limits and Specified Limits are the
same: no Specified Limits are displayed on the Capability Chart.
Alarm Messages
Alarm message boxes will appear at the top of the screen for inspection values which exceed the
defined limits.
The alarm message will show whether the dimension is Out of Tolerance or outside (above or below)
a Warning Limit.
The message will also show the Sample ID that is out of tolerance and identify the row on which it
appears.
NOTE: Where multiple alarm messages are generated they may stack on top of one another.
Selecting Look Up from the alarm dialog will highlight the row within the Probing Inspection Report
relating to the error message.
Renishaw CNC Reporter user’s guide
Notes
Add notes to, and clear alarm messages by pressing Reset Alarm from the alarm dialog.
Enter a Corrective Action into the input box and press OK.
The note will then be added to the Probing Inspection Report.
NOTE: Alarm notes are not displayed in the Data Manager database.
Redisplay Quality Warnings
To redisplay all warnings after they have been acknowledged, click Redisplay Quality Warning (on
the Start tab).
All warnings will be redisplayed at the top of CNC Reporter. Be aware that they may stack on top of
one another.
33
34
Renishaw CNC Reporter user’s guide
Upgrading and retaining settings
When upgrading to a new version of Renishaw CNC Reporter it is possible to save settings from the
existing installation which can then be loaded to the new version.
•
Select Save Settings (Settings panel, Admin tab).
•
Install the latest version of Renishaw CNC Reporter. This will overwrite the currently installed
version, but will not affect software registration and database files.
•
Open the new installation.
•
Select Load Settings (Settings panel, Admin tab).
NOTE: Before loading the saved settings, any existing Probing Inspection Report data should be
cleared by selecting Clear Data (CNC Reporter Control Panel, on the Start tab).
Renishaw CNC Reporter user’s guide
35
Data Manager
Data Manager is a separate, complementary application for the analysis of historical data which has
previously been processed using Renishaw CNC Reporter.
Data can be viewed in tabular (Archive Query tab), Overview and chart formats to determine trends
and variations.
The application installs alongside Renishaw CNC Reporter, and a Data Manager icon is added to the
desktop.
NOTE: Only toleranced data is available for review and analysis in Data Manager.
Two versions of Data Manager exist, the version installed with Renishaw CNC Reporter being
dependent on the version of Microsoft Excel installed on the target PC.
36
Renishaw CNC Reporter user’s guide
Data Manager screen layout
Use the tabs at the bottom of the screen to navigate through Data Manager.
(Tabs shown below are from an installation with Microsoft Excel 2010.)
Archive Query tab
The Archive Query tab presents a tabular view of the inspection data retrieved by Data Manager
based on Machine, Date range and Part number selections.
Overview tab
The Overview tab shows actual measured data in colour coded data cells indicating adherence
to tolerance. (This is the same information as displayed by the Overview tab in Renishaw CNC
Reporter.)
Renishaw CNC Reporter user’s guide
37
Trend Analysis Chart tab
(Installations with Excel 2003 and Excel 2007 only)
The Trend Analysis Chart provides a graphical representation of measured data for a single feature
across multiple components.
Comparison Chart tab
(Installations with Excel 2010 only)
The Comparison Chart provides a graphical representation of measured data for one or more
features across multiple components.
38
Renishaw CNC Reporter user’s guide
Using Data Manager
Select machine
Select Get Machines (from the Archive Query tab) to display a list of the CNC machine tools from
which data has been collected.
Click on the red cell to open a drop-down box listing all machines.
Select the required CNC machine tool from the list.
Select date range
Select Set Dates and use the resulting calendar to set the required start and end dates of the machine
data to be analysed.
Renishaw CNC Reporter user’s guide
39
Select part number
Select Get Parts. Parts are listed in the database alphabetically, and by default the first part number in
the database is selected. Click in the green coloured cell to open a drop down box allowing other parts
to be selected.
Based on these selections, data is retrieved and analysed.
The Archive Query, Overview and Trend Analysis Chart tabs are all populated during the data
retrieval process.
NOTE: Progress bars may be visible on screen depending on the volume of data being retrieved. If
retrieval times are prohibitive, select a smaller date range.
40
Renishaw CNC Reporter user’s guide
Review and analyse data
Review data: Archive query
The Archive Query tab presents a tabular view of retrieved data.
User selectable filters allow data to be refined. For example, select a single feature, and Fail instances
of that feature.
Review data: Overview
The Overview tab provides the same information as the Overview tab in Renishaw CNC Reporter
with the addition of a filterable Date field.
Cells are colour-coded to identify whether data is in tolerance (green) or out of tolerance (red) .
Analyse data: Trend Analysis Chart
(Excel 2003/2007 only)
The Trend Analysis Chart shows a single stream of data representing data in the Archive Query tab.
NOTE: Whatever the number of features selected, only a single line will be plotted.
Renishaw CNC Reporter user’s guide
41
Analyse data: Comparison Chart
(Excel 2010 only)
The Comparison Chart shows an individual line for each feature selected using the Feature slicers
located to the top right of the chart.
To clear the filters, click on the filter cross.
NOTE: Both the Overview tab and Archive Query tab are linked to the Feature slicers. To disable the
link, press DISABLE AUTO-REFRESH OF OVERVIEW.
Where features with different tolerances have been selected is it possible to adjust the tolerances
used. Select Change Tolerances and specify the new upper and lower tolerances to be applied to all
currently filtered features.
NOTE: This will affect the display on the Comparison Chart but will not affect data in the source
database.
42
Renishaw CNC Reporter user’s guide
Additional features
Create hyperlinks
Hyperlinks can be added to individual rows within the Archive Query tab to link back to an archived
Probing Inspection Report containing the original toleranced data.
Select Create Hyperlinks (in the Archive Query tab).
Data Manager will process the filtered Archive Query fields and create a blue ‘GO’ hyperlink. When
the hyperlink is clicked, Data Manager will retrieve the relevant archive and open the Probing
Inspection Report containing the toleranced data.
NOTE: Hyperlinks will not work if the archives have been moved from their original location.
Clear data
Press Clear Data to return Data Manager to its original state, and remove all applied filters.
Use of wildcards
If there is a requirement to analyse data obtained using multiple CNC machines, use a wildcard
character (*) in the red Select Machines field.
Renishaw CNC Reporter user’s guide
43
Troubleshooting
Problem
‘NO TOLERANCED DATA FOUND’ displayed at the end of a Probing Inspection Report.
In addition to this message, no coloured data is shown in Probing Inspection Reports, the
Capability Chart, Overview tab or Data Manager.
Cause
This message is displayed when no tolerance data is received from the CNC machine tool.
Solution
Ensure tolerance values are set in the probing cycles.
Problem
‘There is a Format Problem with the Feature’ displayed in the Notes column within a Probing
Inspection Report or when attempting to export to Data Manager or a statistical process control
(SPC) package.
Cause
This is the result of corrupt numerical data (spurious characters being output from the CNC).
Solution
Check for possible issues with the data transfer process. Re-inspect the component and import new
data.
Problem
CNC Reporter dialog with the message ‘Data Manager Database at C:\CNC_Reporter\ is currently
NOT available’ displayed and ‘DATA MANAGER DATABASE AT C:\CNC_REPORTER\ WAS NOT
AVAILABLE’ displayed at the end of a Probing Inspection Report.
Cause
Data Manager not installed correctly, was not installed to the correct location, or the data base file
could not be found.
Solution
Reinstall Renishaw CNC Reporter, ensuring to accept all default file locations offered.
Problem
‘Cross talk’ between multiple instances of Renishaw CNC Reporter or Data Manager, where one
instance of Renishaw CNC Reporter attempts to access data specified by another instance of the
application.
Cause
Registry key changes which allow each instance of Renishaw CNC Reporter to open in a new instance
of Microsoft Excel have not been made.
Solution
Reinstall Renishaw CNC Reporter to automatically make the necessary adjustments to the necessary
registry keys, or make the amendments manually.
These registry keys and the changes made are:
hkey_classes_root\excel.sheet.8\shell\open\command
hkey_classes_root\excel.sheet.12\shell\open\command
hkey_classes_root\Excel.SheetMacroEnabled.12\shell\open\command
The (Default) key setting of /e or /dde is changed to: “%1”
44
Renishaw CNC Reporter user’s guide
The command key (just below (Default)) is deleted
The ddeexec key has [open(“%1”)] removed from the (Default) key
(See also Microsoft Knowledgebase Article 2636670 covering ‘How to open Excel files in separate
windows in Windows 7’.)
NOTE: Microsoft Office updates may restore these registry keys to their original settings. CNC
Reporter will detect this, and when next opened will ask to run an executable (AMEND_EXCEL_
REGISTRY.exe) which will return these registry keys to the settings CNC Reporter requires.
Administration rights on the PC are required to enable this executable to run.
Problem
When using REAL TIME data import, multiple instances of the results data are imported and the
source file is not deleted.
Cause
The results data file being imported into Renishaw CNC Reporter contains the word ‘demo’ in the file
name.
Solution
Rename the results data file. In the CNC Reporter Control Panel (on the Start tab) select Collect Data
- REAL TIME and in the File Open dialog, navigate to and select the renamed file.
Renishaw CNC Reporter user’s guide
This page in intentionally left blank
45
Renishaw plc
New Mills, Wotton-under-Edge
Gloucestershire GL12 8JR
United Kingdom
T +44 (0) 1453 524524
F +44 (0) 1453 524901
E [email protected]
www.renishaw.com
For worldwide contact details,
please visit our main web site at
www.renishaw.com/contact
*H-5464-8501-01*