1
User Guide
QAD Business Intelligence
Using QAD BI, OpenEdge 10 Edition
Using QAD BI, Progress 9 Edition
Reference
78-0704A
Business Intelligence 2.7
MFG/PRO 9.0 through QAD 2008 Standard and Enterprise
March 2008
This document contains proprietary information that is protected by copyright and other
intellectual property laws. No part of this document may be reproduced, translated, or modified
without the prior written consent of QAD Inc. The information contained in this document is
subject to change without notice.
QAD Inc. provides this material as is and makes no warranty of any kind, expressed or
implied, including, but not limited to, the implied warranties of merchantability and fitness for a
particular purpose. QAD Inc. shall not be liable for errors contained herein or for incidental or
consequential damages (including lost profits) in connection with the furnishing, performance,
or use of this material whether based on warranty, contract, or other legal theory.
QAD and MFG/PRO are registered trademarks of QAD Inc. The QAD logo is a trademark of
QAD Inc.
Designations used by other companies to distinguish their products are often claimed as
trademarks. In this document, the product names appear in initial capital or all capital letters.
Contact the appropriate companies for more information regarding trademarks and
registration.
Copyright © 2008 by QAD Inc.
QAD Inc.
100 Innovation Place
Santa Barbara, California 93108
Phone (805) 684-6614
Fax (805) 684-1890
http://www.qad.com
About This Guide . . . . . . . . . . . . . . . . . . . . . . . . . . . . . . . . . . . . . . . . . . . 1
Overview . . . . . . . . . . . . . . . . . . . . . . . . . . . . . . . . . . . . . . . . . . . . . . . . . . . . . . .
Other Related Documentation . . . . . . . . . . . . . . . . . . . . . . . . . . . . . . . . . . . . . . .
QAD Web Site . . . . . . . . . . . . . . . . . . . . . . . . . . . . . . . . . . . . . . . . . . . . . . . . . . .
Conventions . . . . . . . . . . . . . . . . . . . . . . . . . . . . . . . . . . . . . . . . . . . . . . . . . . . . .
Chapter 1
2
2
3
4
Using QAD BI, OpenEdge 10 Edition . . . . . . . . . . . . . . . . 5
Overview . . . . . . . . . . . . . . . . . . . . . . . . . . . . . . . . . . . . . . . . . . . . . . . . . . . . . . . 6
QAD ERP Databases . . . . . . . . . . . . . . . . . . . . . . . . . . . . . . . . . . . . . . . . 7
QAD BI Data Transformer . . . . . . . . . . . . . . . . . . . . . . . . . . . . . . . . . . . 7
Data Warehouse . . . . . . . . . . . . . . . . . . . . . . . . . . . . . . . . . . . . . . . . . . . . 8
BI Monitor . . . . . . . . . . . . . . . . . . . . . . . . . . . . . . . . . . . . . . . . . . . . . . . . 8
Impromptu Query Definition (.iqd) files . . . . . . . . . . . . . . . . . . . . . . . . . 8
Cognos PowerPlay . . . . . . . . . . . . . . . . . . . . . . . . . . . . . . . . . . . . . . . . . . 9
QAD-Provided Business Models . . . . . . . . . . . . . . . . . . . . . . . . . . . . . . 9
QAD-Provided Dashboards . . . . . . . . . . . . . . . . . . . . . . . . . . . . . . . . . . 10
Data Transformer User Interface . . . . . . . . . . . . . . . . . . . . . . . . . . . . . . . . . . . . 11
Starting . . . . . . . . . . . . . . . . . . . . . . . . . . . . . . . . . . . . . . . . . . . . . . . . . 11
Navigating . . . . . . . . . . . . . . . . . . . . . . . . . . . . . . . . . . . . . . . . . . . . . . . 12
Setting Up the QAD BI Data Transformer . . . . . . . . . . . . . . . . . . . . . . . . . . . . . 17
Define Database Connections . . . . . . . . . . . . . . . . . . . . . . . . . . . . . . . . 18
Manage Domains . . . . . . . . . . . . . . . . . . . . . . . . . . . . . . . . . . . . . . . . . . 26
Select Tables . . . . . . . . . . . . . . . . . . . . . . . . . . . . . . . . . . . . . . . . . . . . . 27
Set Up Replication . . . . . . . . . . . . . . . . . . . . . . . . . . . . . . . . . . . . . . . . . 29
Rename Table . . . . . . . . . . . . . . . . . . . . . . . . . . . . . . . . . . . . . . . . . . . . 42
Create Subsets . . . . . . . . . . . . . . . . . . . . . . . . . . . . . . . . . . . . . . . . . . . . 44
Add Indexes . . . . . . . . . . . . . . . . . . . . . . . . . . . . . . . . . . . . . . . . . . . . . . 45
iv
User Guide — QAD Business Intelligence
Maintain Business Keys . . . . . . . . . . . . . . . . . . . . . . . . . . . . . . . . . . . . . 47
Preview Data . . . . . . . . . . . . . . . . . . . . . . . . . . . . . . . . . . . . . . . . . . . . . 49
Delete Target Data . . . . . . . . . . . . . . . . . . . . . . . . . . . . . . . . . . . . . . . . . 50
Validate Tables . . . . . . . . . . . . . . . . . . . . . . . . . . . . . . . . . . . . . . . . . . . 51
Create Custom Tables . . . . . . . . . . . . . . . . . . . . . . . . . . . . . . . . . . . . . . 54
Create Custom ETL Scripts . . . . . . . . . . . . . . . . . . . . . . . . . . . . . . . . . . 55
Merge Data from Multiple Databases . . . . . . . . . . . . . . . . . . . . . . . . . . 58
Use System Tasks . . . . . . . . . . . . . . . . . . . . . . . . . . . . . . . . . . . . . . . . . 59
Use the Task List . . . . . . . . . . . . . . . . . . . . . . . . . . . . . . . . . . . . . . . . . . 61
Export Tables . . . . . . . . . . . . . . . . . . . . . . . . . . . . . . . . . . . . . . . . . . . . . 64
Rebuild Links . . . . . . . . . . . . . . . . . . . . . . . . . . . . . . . . . . . . . . . . . . . . . 64
Using the SQL Query Analysis Tool . . . . . . . . . . . . . . . . . . . . . . . . . . . 66
Maintaining Parameters . . . . . . . . . . . . . . . . . . . . . . . . . . . . . . . . . . . . . 67
Working with the Model . . . . . . . . . . . . . . . . . . . . . . . . . . . . . . . . . . . . 69
Using QAD-Provided Model Data . . . . . . . . . . . . . . . . . . . . . . . . . . . . . . . . . . . 73
Load Metadata . . . . . . . . . . . . . . . . . . . . . . . . . . . . . . . . . . . . . . . . . . . . 74
Bulk Generate and Validate Scripts . . . . . . . . . . . . . . . . . . . . . . . . . . . . 76
Complete Model Setup . . . . . . . . . . . . . . . . . . . . . . . . . . . . . . . . . . . . . . 77
Modifying Application Settings . . . . . . . . . . . . . . . . . . . . . . . . . . . . . . . . . . . . . 77
Data Warehouse . . . . . . . . . . . . . . . . . . . . . . . . . . . . . . . . . . . . . . . . . . . 78
ODBC Connection . . . . . . . . . . . . . . . . . . . . . . . . . . . . . . . . . . . . . . . . . 80
Cognos Transformer . . . . . . . . . . . . . . . . . . . . . . . . . . . . . . . . . . . . . . . 81
Replication . . . . . . . . . . . . . . . . . . . . . . . . . . . . . . . . . . . . . . . . . . . . . . . 82
Batch Process . . . . . . . . . . . . . . . . . . . . . . . . . . . . . . . . . . . . . . . . . . . . . 83
AppServer . . . . . . . . . . . . . . . . . . . . . . . . . . . . . . . . . . . . . . . . . . . . . . . 86
Notification . . . . . . . . . . . . . . . . . . . . . . . . . . . . . . . . . . . . . . . . . . . . . . 88
Performing Administration Tasks . . . . . . . . . . . . . . . . . . . . . . . . . . . . . . . . . . . . 88
Update User Records . . . . . . . . . . . . . . . . . . . . . . . . . . . . . . . . . . . . . . . 88
Set Up Windows Task Scheduler . . . . . . . . . . . . . . . . . . . . . . . . . . . . . . 90
Using BI Monitor . . . . . . . . . . . . . . . . . . . . . . . . . . . . . . . . . . . . . . . . . . . . . . . . 91
BI Monitor User Interface . . . . . . . . . . . . . . . . . . . . . . . . . . . . . . . . . . . 91
Monitor and Manage Currently Running Tasks . . . . . . . . . . . . . . . . . . 93
View Tasks and Task Sets Logs . . . . . . . . . . . . . . . . . . . . . . . . . . . . . . 94
Archive Tasks and Task Sets Logs . . . . . . . . . . . . . . . . . . . . . . . . . . . . 94
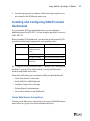
Installing and Configuring QAD-Provided Dashboards . . . . . . . . . . . . . . . . . . . 95
Contents
Create Data Source Connections . . . . . . . . . . . . . . . . . . . . . . . . . . . . . . 95
Install QAD-Provided Dashboards . . . . . . . . . . . . . . . . . . . . . . . . . . . . 97
Configure Cognos Server Settings . . . . . . . . . . . . . . . . . . . . . . . . . . . 101
Perform Report Synchronization . . . . . . . . . . . . . . . . . . . . . . . . . . . . . 103
Create Menu Entries for the Dashboards . . . . . . . . . . . . . . . . . . . . . . . 105
Chapter 2
Using QAD BI, Progress 9 Edition . . . . . . . . . . . . . . . . 107
Overview . . . . . . . . . . . . . . . . . . . . . . . . . . . . . . . . . . . . . . . . . . . . . . . . . . . . .
MFG/PRO . . . . . . . . . . . . . . . . . . . . . . . . . . . . . . . . . . . . . . . . . . . . . .
QAD BI Data Transformer . . . . . . . . . . . . . . . . . . . . . . . . . . . . . . . . .
Data Warehouse . . . . . . . . . . . . . . . . . . . . . . . . . . . . . . . . . . . . . . . . . .
Microsoft Access Database . . . . . . . . . . . . . . . . . . . . . . . . . . . . . . . . .
Cognos PowerPlay . . . . . . . . . . . . . . . . . . . . . . . . . . . . . . . . . . . . . . . .
QAD-Provided Models . . . . . . . . . . . . . . . . . . . . . . . . . . . . . . . . . . . .
Data Transformer User Interface . . . . . . . . . . . . . . . . . . . . . . . . . . . . . . . . . . .
Starting . . . . . . . . . . . . . . . . . . . . . . . . . . . . . . . . . . . . . . . . . . . . . . . .
Navigating . . . . . . . . . . . . . . . . . . . . . . . . . . . . . . . . . . . . . . . . . . . . . .
Setting Up QAD BI Data Transformer . . . . . . . . . . . . . . . . . . . . . . . . . . . . . . .
Define Database Connections . . . . . . . . . . . . . . . . . . . . . . . . . . . . . . .
Manage Domains . . . . . . . . . . . . . . . . . . . . . . . . . . . . . . . . . . . . . . . . .
Select Tables . . . . . . . . . . . . . . . . . . . . . . . . . . . . . . . . . . . . . . . . . . . .
Set Up Replication . . . . . . . . . . . . . . . . . . . . . . . . . . . . . . . . . . . . . . . .
Rename Table . . . . . . . . . . . . . . . . . . . . . . . . . . . . . . . . . . . . . . . . . . .
Create Subsets . . . . . . . . . . . . . . . . . . . . . . . . . . . . . . . . . . . . . . . . . . .
Add Indexes . . . . . . . . . . . . . . . . . . . . . . . . . . . . . . . . . . . . . . . . . . . . .
Add Business Key Indexes . . . . . . . . . . . . . . . . . . . . . . . . . . . . . . . . .
Preview Data . . . . . . . . . . . . . . . . . . . . . . . . . . . . . . . . . . . . . . . . . . . .
Delete Target Data . . . . . . . . . . . . . . . . . . . . . . . . . . . . . . . . . . . . . . . .
Validate Tables . . . . . . . . . . . . . . . . . . . . . . . . . . . . . . . . . . . . . . . . . .
Create Custom Tables . . . . . . . . . . . . . . . . . . . . . . . . . . . . . . . . . . . . .
Create Custom ETL Scripts . . . . . . . . . . . . . . . . . . . . . . . . . . . . . . . . .
Merge Data from Multiple Databases . . . . . . . . . . . . . . . . . . . . . . . . .
Use the Task List . . . . . . . . . . . . . . . . . . . . . . . . . . . . . . . . . . . . . . . . .
Update Links . . . . . . . . . . . . . . . . . . . . . . . . . . . . . . . . . . . . . . . . . . . .
108
109
109
109
110
110
110
111
112
113
118
119
124
126
128
137
139
140
142
143
144
145
148
149
152
153
154
v
vi
User Guide — QAD Business Intelligence
Export Tables . . . . . . . . . . . . . . . . . . . . . . . . . . . . . . . . . . . . . . . . . . . . 155
Rebuild Links . . . . . . . . . . . . . . . . . . . . . . . . . . . . . . . . . . . . . . . . . . . . 155
Working with the Model . . . . . . . . . . . . . . . . . . . . . . . . . . . . . . . . . . . 157
Using QAD-Provided Model Data . . . . . . . . . . . . . . . . . . . . . . . . . . . . . . . . . . 160
Load Metadata . . . . . . . . . . . . . . . . . . . . . . . . . . . . . . . . . . . . . . . . . . . 161
Bulk Generate and Validate Scripts . . . . . . . . . . . . . . . . . . . . . . . . . . . 163
Complete Model Setup . . . . . . . . . . . . . . . . . . . . . . . . . . . . . . . . . . . . . 164
Modifying Application Settings . . . . . . . . . . . . . . . . . . . . . . . . . . . . . . . . . . . . 164
Data Warehouse . . . . . . . . . . . . . . . . . . . . . . . . . . . . . . . . . . . . . . . . . . 165
Table Linking . . . . . . . . . . . . . . . . . . . . . . . . . . . . . . . . . . . . . . . . . . . . 166
Cognos Transformer . . . . . . . . . . . . . . . . . . . . . . . . . . . . . . . . . . . . . . 168
Batch Process . . . . . . . . . . . . . . . . . . . . . . . . . . . . . . . . . . . . . . . . . . . . 169
Notification . . . . . . . . . . . . . . . . . . . . . . . . . . . . . . . . . . . . . . . . . . . . . 171
AppServer . . . . . . . . . . . . . . . . . . . . . . . . . . . . . . . . . . . . . . . . . . . . . . 172
Performing Administration Tasks . . . . . . . . . . . . . . . . . . . . . . . . . . . . . . . . . . . 173
Update User Records . . . . . . . . . . . . . . . . . . . . . . . . . . . . . . . . . . . . . . 173
Set Up Windows Task Scheduler . . . . . . . . . . . . . . . . . . . . . . . . . . . . . 175
Chapter 3
Reference . . . . . . . . . . . . . . . . . . . . . . . . . . . . . . . . . . . . 177
QAD BI Parallel Replication Setup . . . . . . . . . . . . . . . . . . . . . . . . . . . . . . . . . 178
Overview . . . . . . . . . . . . . . . . . . . . . . . . . . . . . . . . . . . . . . . . . . . . . . . 178
Configure the AppServer . . . . . . . . . . . . . . . . . . . . . . . . . . . . . . . . . . . 178
Configure Data Transformer . . . . . . . . . . . . . . . . . . . . . . . . . . . . . . . . 183
Multicurrency Configuration . . . . . . . . . . . . . . . . . . . . . . . . . . . . . . . . . . . . . . 184
Overview . . . . . . . . . . . . . . . . . . . . . . . . . . . . . . . . . . . . . . . . . . . . . . . 184
Configure the Data Warehouse Currency . . . . . . . . . . . . . . . . . . . . . . 185
Configure Multicurrency Custom Scripts . . . . . . . . . . . . . . . . . . . . . . 185
Modifying Currency . . . . . . . . . . . . . . . . . . . . . . . . . . . . . . . . . . . . . . . 187
Setting the Replication Task Sequence . . . . . . . . . . . . . . . . . . . . . . . . . . . . . . . 189
Overview . . . . . . . . . . . . . . . . . . . . . . . . . . . . . . . . . . . . . . . . . . . . . . . 189
Single-Currency Sequence Dependencies . . . . . . . . . . . . . . . . . . . . . . 189
Multicurrency Sequence Dependencies . . . . . . . . . . . . . . . . . . . . . . . . 190
Creating Translatable Cognos Transformer Models . . . . . . . . . . . . . . . . . . . . . 191
Overview . . . . . . . . . . . . . . . . . . . . . . . . . . . . . . . . . . . . . . . . . . . . . . . 191
Contents
Cognos Transformer Model . . . . . . . . . . . . . . . . . . . . . . . . . . . . . . . .
Data Transformer User-Defined Labels . . . . . . . . . . . . . . . . . . . . . . .
Manually Loading Custom Scripts . . . . . . . . . . . . . . . . . . . . . . . . . . . . . . . . . .
Overview . . . . . . . . . . . . . . . . . . . . . . . . . . . . . . . . . . . . . . . . . . . . . . .
Load Custom Scripts . . . . . . . . . . . . . . . . . . . . . . . . . . . . . . . . . . . . . .
191
192
194
194
194
Index . . . . . . . . . . . . . . . . . . . . . . . . . . . . . . . . . . . . . . . . . . . . . . . . . . . 199
vii
viii
User Guide — QAD Business Intelligence
About This Guide
Overview
2
Other Related Documentation
QAD Web Site
Conventions
3
4
2
2
User Guide — QAD Business Intelligence
Overview
This document describes how to implement and use QAD Business
Intelligence.
The product is available in Progress 9 and OpenEdge 10 editions.
For ease of use, the document provides a stand-alone chapter that covers
implementation and use of each edition:
• Chapter 1, “Using QAD BI, OpenEdge 10 Edition,” on page 5
• Chapter 2, “Using QAD BI, Progress 9 Edition,” on page 107
Additionally, Chapter 3, “Reference,” on page 177, provides reference
information that applies to both editions.
This guide applies to multiple versions of QAD’s Enterprise Resource
Planning (ERP) application, from MFG/PRO 9.0 through the current
release of QAD 2008 Enterprise.
During the product life cycle, QAD changed the name of the former
MFG/PRO eB2.1 product to QAD 2008 Standard. Individual releases are
identified by a decimal number; for example, QAD 2008.1 Standard. (The
Service Pack 5 and 6 releases were branded as QAD 2007 and QAD
2007.1, respectively.) The Enterprise Financials version of the product is
called QAD 2008 Enterprise and follows the same convention of
identifying individual releases with a decimal number.
This document uses QAD ERP throughout to refer to those products,
except in situations where it discusses a specific release.
Other Related Documentation
• For information on how to install QAD Business Intelligence, see
Installation Guide: QAD Business Intelligence.
About This Guide
• For information about Cognos 8, see the documentation from
Cognos.
• For information on the QAD-provided models and key performance
indicators (KPIs), see Reference Guide: QAD Business Intelligence
Key Performance Indicators. This is provided on the installation CD
for each model you purchased.
• For information about functions in QAD ERP, see the relevant user
guide.
• For information about implementing the QAD .NET user interface,
see Installation Guide: QAD User Interfaces.
• For information about QAD ReportNet Bundle, see QAD .NET UI 2.7
Release Notes.
• For information about Access, see the documentation from Microsoft
Corporation.
QAD Web Site
QAD’s Web site provides a wide variety of information about the
company and its products. You can access the Web site at:
http://www.qad.com
For users with a QAD Web account, product documentation is available
for viewing or downloading from the QAD Online Support Center at:
http://support.qad.com/
You can register for a QAD Web account at the QAD Online Support
Center. Your customer ID number is required. Access to certain areas is
dependent on the type of agreement you have with QAD.
Most user documentation is available in two formats:
• Portable document format (PDF). PDF files can be downloaded from
the QAD Web site to your computer. You can view them with the free
Adobe Acrobat Reader.
• HTML. You can view user documentation through your Web browser.
The documents include search tools for easily locating topics of
interest.
3
4
User Guide — QAD Business Intelligence
Conventions
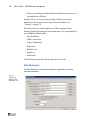
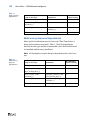
This document uses the text or typographic conventions listed in the
following table.
If you see:
It means:
monospaced text
A command or file name.
italicized
monospaced text
A variable name for a value you enter as part of an operating
system command; for example, YourCDROMDir.
indented
command line
A long command that you enter as one line, although it
appears in the text as two lines.
Note
Alerts the reader to exceptions or special conditions.
Important
Alerts the reader to critical information.
Warning
Used in situations where you can overwrite or corrupt data,
unless you follow the instructions.
Chapter 1
Using QAD BI,
OpenEdge 10 Edition
Overview
6
Data Transformer User Interface
11
Setting Up the QAD BI Data Transformer
Using QAD-Provided Model Data
Modifying Application Settings
Performing Administration Tasks
Using BI Monitor
17
73
77
88
91
Installing and Configuring QAD-Provided Dashboards
95
6
User Guide — QAD Business Intelligence
Overview
The QAD Business Intelligence (QAD BI) product lets users extract and
restructure data from the QAD ERP and other data sources into a
Progress-based data warehouse presenting a business-oriented view of the
enterprise. Analysts can use Cognos 8 to perform powerful
multidimensional analysis against the data warehouse.
QAD BI Data Transformer can also connect to other QAD BI data
warehouse databases as its data source. Multiple data warehouse
databases can be chained together where data residing in lower-level
databases are aggregated to the high-level data warehouse for analysis.
This multi-layer data warehousing architecture has several benefits:
• Data residing in legacy databases that can not be directly accessed by
QAD BI Data transformer can be retrieved through intermediate data
warehouse databases.
For example, if you installed QAD BI on OpenEdge 10, QAD BI
Data Transformer can not directly connect to legacy Progress 8 data
sources due to Progress backward compatibility limitations.
However, you can overcome this by connecting to a QAD BI Progress
9 edition data warehouse that stores data extracted form Progress 8
databases.
• Data replication performance is boosted.
• Data Transformer can extract data from physically distributed data
sources more efficiently.
• QAD BI can work in conjunction with previous versions of QAD BI
in extracting, transforming, and loading data.
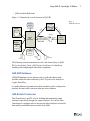
The QAD BI solution includes:
• One or more existing data sources
• Data Transformer Extract-Transform-Load (ETL) tool
• Data warehouse
• BI Monitor
• Impromptu Query Definition (.iqd) files
• The PowerPlay application from Cognos
• QAD-provided business models
Using QAD BI, OpenEdge 10 Edition
7
• QAD-provided dashboards
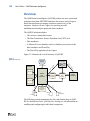
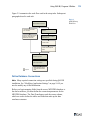
Figure 1.1 illustrates the overall structure of QAD BI.
Fig. 1.1
QAD BI Overview
Cognos
OLAP Cubes
Windows
Scheduler
O
Batch Execute
ld
ui
eb
-R
IQD Files
4GL
QAD BI
QAD BI
Data
Data
Transformer
Transformer
Other QAD BI
Instances
is
lys
na
-A
M
O
C
Progress
P
LA
QAD ERP
4GL
Data
ODBC
Warehouse
(Progress)
Run SQL
Cognos
Cognos
PowerPlay
PowerPlay
W
Scripts
e
rit
QAD BI
Configuration
(Progress)
W
rite
Data
Warehouse
(Progress)
Admin
Log
Im
po
rt
XML
Configuration
The following sections summarize the role each element plays in QAD
BI. See Installation Guide: QAD Business Intelligence for details on
installing and configuring the individual components.
QAD ERP Databases
QAD ERP databases are the primary source of the data that is made
available within the data warehouse by the ETL process for analysis in
Cognos PowerPlay.
In a multi-database environment, the data warehouse can be configured to
populate the same table from more than one source database.
QAD BI Data Transformer
Data Transformer is an ETL tool for building and maintaining a data
warehouse specifically designed to support analysis. You can use Data
Transformer to configure tasks to structure the data warehouse or load and
then modify predefined business models from QAD.
8
User Guide — QAD Business Intelligence
Data Transformer generates a set of Progress scripts to synchronize the
data warehouse with the source databases. Progress developers can
customize the automatically generated scripts or create new scripts to
extend the ETL process.
This guide includes detailed information on using the features of Data
Transformer to configure your QAD BI environment.
Data Warehouse
The data warehouse is a Progress database that is populated with data
from the QAD ERP database and/or other data sources during the ETL
process. The data warehouse is an environment separate from the source
databases where data can be specially structured to support analysis.
BI Monitor
BI Monitor is a tool for monitoring and managing tasks. You can use BI
monitor to:
• View detailed information of currently running tasks and task
batches.
• Stop a running task.
• View logs of tasks and task batches stored in the administration
database.
• Archive logs of tasks and task batches in the administration database.
Impromptu Query Definition (.iqd) files
Impromptu Query Definition (.iqd) files are query definition files to be
used in Cognos PowerPlay Transformer. One file with native SQL
corresponds to each query subject or dimension externalized for use in
Transformer.
See the Cognos 8 documentation for details on the IQD method.
Using QAD BI, OpenEdge 10 Edition
Cognos PowerPlay
An important part of the QAD BI solution is supplied by Cognos
PowerPlay—an online analytical processing (OLAP) software application
that lets users perform multidimensional analysis, create reports, and
share them to make better decisions.
PowerPlay draws information from the data warehouse using the proxy to
model and build Cubes—the Cognos term for optimized,
multidimensional data sets that enable users to perform analysis with
quick response times.
See the Cognos documentation for information on configuring and using
PowerPlay, as well as on how to configure Cubes.
QAD-Provided Business Models
QAD sells the following seven models to provide out-of-the-box analysis
for standard QAD ERP installations. The seven models together provide
support for more than 100 key performance indicators (KPIs).
• Inventory monitoring, providing insight into current and historic
inventory trends
• Manufacturing performance, including statistics on work orders,
production costs, productivity, and throughput
• Forecasting performance
• Sales analysis, including statistical trends in sales and revenue
margins
• Financial controls, encompassing gauges for profitability,
investments, and the effectiveness of financial management
• Purchasing controls, from patterns in purchase price and cost, to
materials delivery
• Service performance insights, including service profitability and
trends in customer calls and contract selection
For information on the models and KPIs, see Reference Guide: QAD
Business Intelligence Key Performance Indicators. This is provided on
the installation CD for each model you purchased.
A model is realized by the following components:
9
10
User Guide — QAD Business Intelligence
• Replication tasks to extract, transform, and load selected data from
QAD ERP into the data warehouse.
• Relationship definitions for the model tables in the data warehouse
defined in IQD files.
• Cognos OLAP model defining the multidimensional representation of
the tables in the data warehouse. Building the OLAP model creates an
OLAP cube that can be analyzed using the Cognos reporting tools.
See “Using QAD-Provided Model Data” on page 73 for information on
how to implement models.
QAD-Provided Dashboards
A dashboard is a collection of navigable reports accessible from a
dashboard home page. These reports graphically represent businesscritical KPIs in the form of charts.
Dashboards add an interactive element to reports. They let you:
• Drill up and down to see higher and lower levels of detail.
• Include multiple charts derived from different data sources in a single
report.
Note You can only view dashboards in QAD 2007.1 or later using the
applicable version of QAD .NET UI.
QAD sells the following three dashboards to provide out-of-the-box
navigable reports for standard QAD ERP installations.
• Sales Management, a collection of reports on sales revenue, gross
margin, product profitability, forecast, and so on, providing at-aglance business visibility to CEOs, sales VPs, and sales directors
alike.
• Warehouse Management, a collection of reports on inventory
turnover, on-hand quantity, warehouse usage, inventory carrying cost,
and so on.
• Purchasing Management, a collection of reports on received and
returned purchased quantities, goods receipt efficiency and related
cost, and so on. It helps better manage raw material costs and supplier
performance.
Using QAD BI, OpenEdge 10 Edition
11
See “Installing and Configuring QAD-Provided Dashboards” on page 95
for information on implementing dashboards.
Data Transformer User Interface
Important This guide is limited mainly to descriptions of the features of
the QAD BI Data Transformer. For information on user interfaces for
associated tools such as Cognos PowerPlay, see the user documentation
for those products.
The QAD BI Data Transformer features a Windows-based graphical user
interface. Windows conventions are used throughout the product; for
example, drop-down menus, shortcut menus, drag-and-drop, and so on.
This section describes user interface features specific to the QAD BI Data
Transformer.
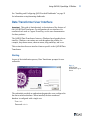
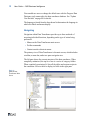
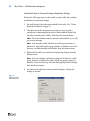
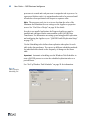
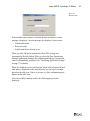
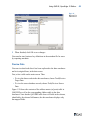
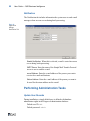
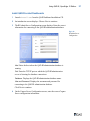
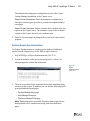
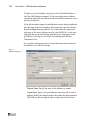
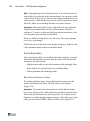
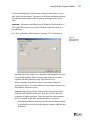
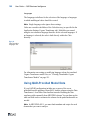
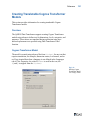
Starting
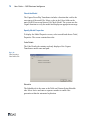
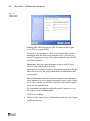
As part of the initialization process, Data Transformer prompts for user
credentials.
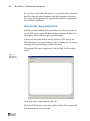
Fig. 1.2
QAD BI Data
Transformer Log-in
Screen
The credentials provided are authenticated against the users configured in
the data warehouse database. When installed, the data warehouse
database is configured with a single user:
User: dwh
Password: admin
12
User Guide — QAD Business Intelligence
You can add new users or change the default user with the Progress Data
Dictionary tool connected to the data warehouse database. See “Update
User Records” on page 88 for details.
The language selected from the drop-down list determines the language in
which text labels and menus display.
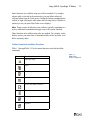
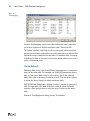
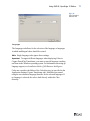
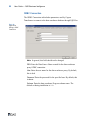
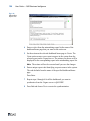
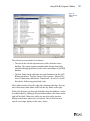
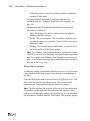
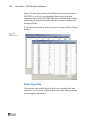
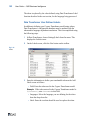
Navigating
Navigation within Data Transformer provides up to three methods of
accessing individual functions, depending on the type of action being
performed:
• Menus on the Data Transformer main screen
• Toolbar commands
• Context-sensitive shortcut menus
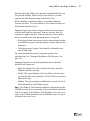
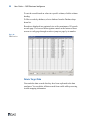
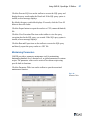
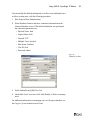
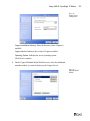
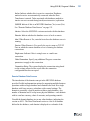
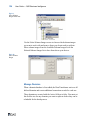
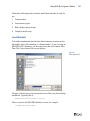
The primary view of Data Transformer is the main screen, which includes
a toolbar, a menu bar, and a two-pane navigation tree.
The left pane shows the current structure of the data warehouse. When
completely minimized, the top-level tree is a series of category folders.
When completely maximized, it lists all the tables and custom scripts in
the warehouse. Select a table to display its fields in the right pane.
Fig. 1.3
QAD BI Data
Transformer Main
Screen
Using QAD BI, OpenEdge 10 Edition
13
Some functions are available using any of these methods. For example,
when a table is selected in the main menu, you can define subsets by
clicking Subset from the Tools menu, clicking the Subset command on the
toolbar, or right-clicking the table name and selecting Subset. Whichever
method you use, the same Map Table screen displays.
Note Some screens include their own toolbars, typically containing two
or three additional commands that apply only to the current function.
Other functions are available using only one method. For example, on the
Indexes screen, you must click a command to add or delete an index, or to
define a primary index.
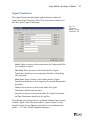
Toolbar Commands and Menu Functions
Table 1.1 through Table 1.5 list the menu functions and related toolbar
commands.
Table 1.1
Command
Menu Function
Replication Setup
Subset
Check Scripts
Execute Now
Preview Data (data warehouse)
Refresh
Field Mapping
Properties
Main Screen
Toolbar Commands
14
User Guide — QAD Business Intelligence
Command
Menu Function
Task List
Add Database
Application Settings
Rebuild Links
Internal Progress Editor
SQL Query Analysis Tool
Parameter Maintenance Table
Table 1.2
Field Selection
Toolbar Commands
Command
Menu Function
Field Properties
Add Field
Delete Field (custom tables only)
Table 1.3
Indexes Toolbar
Commands
Command
Menu Function
Add Index
Using QAD BI, OpenEdge 10 Edition
Command
15
Menu Function
Delete Index
Designate as Primary Index
Table 1.4
Command
Menu Function
Import Metadata
Toolbar Commands
Open and load metadata file
Exit screen without loading metadata
Table 1.5
Command
Menu Function
Select all on this page
Deselect all on this page
Select all on all pages
Deselect all on all pages
Note Toolbar commands are context-sensitive; they are enabled only
when the function they represent is appropriate to the current task or
selection. Unavailable commands display in gray.
Other situations require you to right-click to display and choose available
functions. For example, to assign tables to the data warehouse structure,
you must right-click the appropriate database and choose the Select
Tables command. There is no other access point for this function.
Tasklist Toolbar
Commands
16
User Guide — QAD Business Intelligence
Source System Icons
Data Transformer distinguishes items in the left pane of the main screen
(the tree) using icons. Table 1.6 lists the icons and their descriptions.
Table 1.6
Source System
Icons
Icon
Description
Icon
Description
Server
Table with script error
Schema holder
Subset
Connected domain database
Validated code table
Disconnected domain
database
Non-validated code table
Connected database or
domain
Code table with script error
Disconnected database or
domain
Validated custom script
Logical grouping
Non-validated custom script
Source table prior to
replication setup
Custom script with script error
Validated table
Cube
Non-validated table
Custom table
Audit-based replication is
used, but the table is not auditenabled
Merged table
Audit-based replication is
used and the table is auditenabled
Audit-based replication is not
used but the table is auditenabled
Using QAD BI, OpenEdge 10 Edition
Setting Up the QAD BI Data Transformer
This section describes the steps necessary to connect to a QAD ERP
database that provides source data to the QAD BI analysis tools, as well
as define the tables and fields that are included in the analysis models.
Additionally, you control how and when data is replicated between this
database and the data warehouse, which serves as the actual source of
data used in analysis.
You can use one of the following methods to set up Data Transformer:
• Perform a manual setup by defining tables and fields based on the
QAD ERP database schema.
• If you purchased one or more of the QAD-developed business
models, load table definitions and scripts; then use Data Transformer
tools to fine-tune your environment as needed.
See “Using QAD-Provided Model Data” on page 73 for information.
17
18
User Guide — QAD Business Intelligence
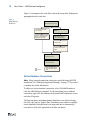
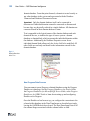
Figure 1.4 summarizes the work flow used in the setup tasks. Subsequent
paragraphs describe each task.
Fig. 1.4
QAD BI Setup
Work Flow
Define
Definedatabase
databaseconnections.
connections.
Load
LoadQAD-defined
QAD-definedmodels
models
from
frommeta
metadata.
data.
IfIfrequired,
required,adjust
adjusttable
tableand
andfield
field
properties;
properties;create
createadditional
additional
subsets
subsetsand
andcustom
customdata.
data.
Select
Selecttables
tablesfrom
fromERP
ERP
database.
database.
Set
Setup
upreplication
replicationby
byadding
adding
ERP
ERPdatabase
databasetables
tablesand
and
fields
fieldstotodata
datawarehouse.
warehouse.
Create
Createsubsets.
subsets.
Create
Createcustom
customscripts
scriptsand
and
tables.
tables.
Schedule
Schedulereplication.
replication.
Add
Addororadjust
adjustindexes.
indexes.
Optional
Modify
Modifyapplication
applicationsettings
settings
and
andperform
performadministrative
administrative
tasks.
tasks.
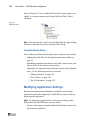
Define Database Connections
Note Many required connection settings are specified during QAD BI
installation. See “Modifying Application Settings” on page 77 if you need
to modify any of this information.
To add a new source database connection, select File|Add Database or
click the Add Database command. To edit an existing source database
connection, right-click the database on the main Data Transformer screen
and select Properties.
The data warehouse and administration databases were deployed using
the utf-8 code page by default. Data Transformer can connect to multiple
source databases using different code pages and data is automatically
converted to utf-8 when replicated to the data warehouse.
Using QAD BI, OpenEdge 10 Edition
19
If you update existing properties, you must disconnect and reconnect to
the database to use the new settings.
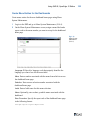
QAD ERP Database Data Sources
Before you begin mapping fields from the source QAD ERP database to
the data warehouse, you must define the connection parameters for the
QAD ERP database. Data Transformer reads the source schema, which
are used to define the tables and fields that make up the data warehouse
structure.
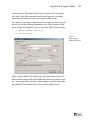
Fig. 1.5
Database Properties
(QADDB)
Physical Name. Specify the name of the database to connect.
Logical Name. Specify a logical database name that will be used to
uniquely identify the database and its data within the data warehouse.
This field can only be updated when a connection is first defined.
20
User Guide — QAD Business Intelligence
Active. Indicate whether this is an active connection. Databases
marked as active are automatically connected when Data Transformer
is started. Tasks associated with databases marked as inactive are not
executed during batch (non-interactive) replication.
Data Source Type. Indicate if this is a QAD ERP database, a QAD BI
data warehouse database (DWH), or other type of data source such as
ODBC.
See “QAD BI Data Warehouse Database Data Sources” on page 20.
Version. When the data source type is QADDB, select the QAD
version associated with the QAD ERP database.
See “Domain Database Data Sources” on page 23.
Remote. Indicate whether the database server is local or remote.
Host. When Remote is Yes, enter the host where the database server is
running.
Service. When Remote is Yes, specify the service name or TCP-IP
Port on which the remote database server is listening for database
connections.
Single-user. When Remote is No, indicate if this is a single-user or a
multi-user connection.
Other Parameters. Specify any additional Progress connection
parameters to apply to this connection.
Connection String. The system displays the connection string based
on the settings entered on the screen after the connection
configuration has been accepted.
QAD BI Data Warehouse Database Data Sources
QAD BI Data Transformer can connect to other QAD BI 2.5 and up data
warehouse databases as its data source. Multiple data warehouse
databases can be chained together where data residing in lower-level
databases are aggregated to the high-level data warehouse for analysis.
Using QAD BI, OpenEdge 10 Edition
21
Important If you want to connect to DWH databases of previous
versions of QAD BI, you must upgrade prior releases of QAD BI to QAD
BI 2.5 first. For information on upgrading QAD BI, see Installation
Guide: QAD Business Intelligence.
To connect to QAD BI data warehouse databases, select DWH as data
source type in the Database Properties window.
Fig. 1.6
Database Properties
(DWH)
Physical Name. Specify the name of the database to connect.
Logical Name. Specify a logical database name that will be used to
uniquely identify the database and its data within the data warehouse.
This field can only be updated when a connection is first defined.
Important Do not use DWH as logical name. The name is reserved
by the system.
22
User Guide — QAD Business Intelligence
Active. Indicate whether this is an active connection. Databases
marked as active are automatically connected when Data Transformer
is started. Tasks associated with databases marked as inactive are not
executed during batch (non-interactive) replication.
Data Source Type. Indicate if this is a QAD ERP database (QADDB)
or a QAD BI data warehouse database (DWH).
Version. When the data source type is QADDB, select the QAD
version associated with the QAD ERP database.
See “Domain Database Data Sources” on page 23.
Remote. Indicate whether the database server is local or remote.
Host. When Remote is Yes, enter the host where the database server is
running.
Service. When Remote is Yes, specify the service name or TCP-IP
Port on which the remote database server is listening for database
connections.
Single-user. When Remote is No, indicate if this is a single-user or a
multi-user connection.
User and Password. Enter the user name and password for
connecting to the database server if required.
Other Parameters. Specify any additional Progress connection
parameters to apply to this connection.
Connection String. The system displays the connection string based
on the settings entered on the screen after the connection
configuration has been accepted.
DWH-ADMIN Host. Enter the host where the data warehouse
administration database server is running.
DWH-ADMIN Service. Specify the service name or TCP-IP Port on
which the data warehouse administration database server is listening
for database connections.
Domain Selection. Click the Import from DWH-ADMIN button to
retrieve a list of all domains defined in the data warehouse database;
then from the domain list, select the domains you want to connect to.
Using QAD BI, OpenEdge 10 Edition
23
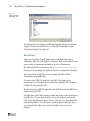
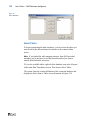
Domain Database Data Sources
The introduction of the domain concept in the QAD ERP database
provides flexible implementation options for supporting multiple business
operations within a single database and eliminates the need for a single
database-wide base currency or database-wide control settings. The
domain is essentially a logical partition within a single database. Any
number of domains can be set up in one physical database—each domain
with its own base currency, chart of accounts, and operating controls.
You add the domain database just as any other database. Data
Transformer retrieves a list of all domains defined in the database; each
domain is displayed as a subnode of the domain database. From that point
forward, a domain is treated exactly as any other database in the system
and represented with the Database Connected and Database Disconnected
icons.
Important Only the domain database itself can be connected or
disconnected. Individual domains cannot be connected or disconnected
because they are physically realized in a single database. All domains are
connected based on their domain database’s status.
Text is appended to the logical names of the domain database and each
domain in the tree, to indicate the type of source system—domain
database or domain blade, which represents the individual domains within
the database. Additionally, the Database Properties screen for an
individual domain allows only the Active field to be modified. All other
fields are read-only and based on the information entered for the domain
database.
Fig. 1.7
Domain Database
in the Tree
24
User Guide — QAD Business Intelligence
Non-Progress Data Sources
You can connect to non-Progress relational databases using the Progress
DataServer technology. See the OpenEdge Data Management:
DataServer for Oracle Guide, the Data Management: DataServer for
Microsoft SQL Server Guide, or the Data Management: DataServer for
ODBC Guide to learn about setting up and configuring DataServers in
Progress.
Once the DataServer has been set up, you configure the connection to the
schema holder database in Data Transformer as described previously,
leaving the QADDB check box cleared. Data Transformer lists all of the
schema images associated with the schema holder as child connections
after the schema holder has been connected. You can right-click each of
the child connections and choose Properties to configure connection
information specific to the targeted schema image.
For example, if the schema image references an Oracle database, you will
need to provide the following information in the Other Parameters field
on the Connection Properties screen to use Oracle SQL*Net networking:
-U [ORACLE-USERNAME]@[ORACLE-SID]
-P [ORACLE-PASSWORD]
Using QAD BI, OpenEdge 10 Edition
25
Fig. 1.8
Schema Image
Database Properties
When a schema holder is first added, Data Transformer retrieves all
defined schema images and creates additional connection records for each
one. You can limit the selection of schema images to include using either
the standard Delete function or the Select Schema Images screen.
Fig. 1.9
Select Schema
Images Menu Item
26
User Guide — QAD Business Intelligence
Use the Select Schema Images screen to choose which schema images
you want to work with and remove those you do not need to replicate.
Move schema images from the Available Schema Images list to the
Selected Schema Images list to have them show up in the tree.
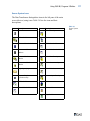
Fig. 1.10
Select Schema
Images
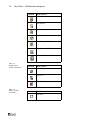
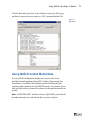
Manage Domains
When a domain database is first added, Data Transformer retrieves all
defined domains and creates additional connection records for each one.
These domains are created with the Active field set to false. You must set
this field to true for any domains you want to replicate before they can be
scheduled for the batch process.
Select domains to include using either the standard Delete function or the
Select Domains screen.
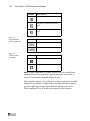
Fig. 1.11
Select Domains
Menu Item
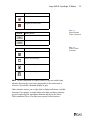
Using QAD BI, OpenEdge 10 Edition
Use the Select Domains screen to choose which domains you want to
work with and remove those you do not need to replicate. Move domains
from the Available Domains list to the Selected Domains list to have them
show up in the tree.
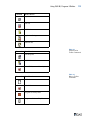
Fig. 1.12
Select Domains
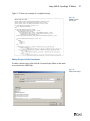
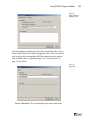
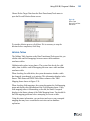
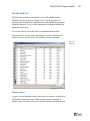
Select Tables
To begin constructing the data warehouse, you first select the tables you
want to add to the data warehouse from those in the connected data
source.
Note If you loaded the table mapping structure from QAD-provided
metadata, you do not have to use this procedure unless you want to
modify the default table selections.
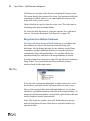
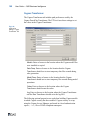
To view the available tables, right-click the database icon in the left pane
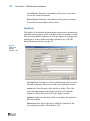
of the main Data Transformer screen. Then choose Select Tables.
The system scans the schema definitions of the connected database and
displays the Select Source Tables screen illustrated in Figure 1.13.
27
28
User Guide — QAD Business Intelligence
Fig. 1.13
Select Source
Tables
The selection screen consists of six frames:
• The two on the left side represent source tables from the source
database. The system separates standard table listings from fields
controlled through generalized codes when connecting to a QADDB
database.
• The four frames on the right side represent destinations in the QAD
BI data warehouse. These are shown in three groups—Master Files,
Active Transactions, and Historic Transactions—as well as a fourth
division for fields using generalized codes.
Move tables from the left to the right side using drag-and-drop. You can
move tables from either frame on the left into any frame on the right.
If this is the first time you have selected tables from the database—unless
you added tables by loading QAD-provided metadata—the frames on the
right will be blank. Otherwise, tables you moved in earlier sessions
display in the frames where they were placed. Once a table has been
moved, it no longer displays in the source frame.
Using QAD BI, OpenEdge 10 Edition
Note Drag-and-drop works in both directions. If you decide you do not
want a table to be replicated to the data warehouse, you can move it back
to the left side of the screen. If you save your changes and then decide you
want to remove a table that has not yet been set up for replication, reopen
the Select Tables screen and drag the table to its source location.
Important Removing a table from the right to the left once replication
setup has been completed has no effect on the structure of the data
warehouse. To remove a replicated table from the data warehouse, select
it on the main screen and choose Tools|Delete.
When you finish selecting tables, close the screen. The system prompts
you to save your changes.
The directory tree on the main screen updates to display a folder for each
of the destination frames that have had tables added.
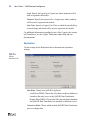
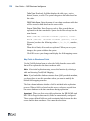
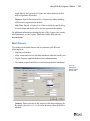
Set Up Replication
After selecting the tables to be included in the data warehouse, you must
define how data should be extracted from the source table into the data
warehouse. Activities include:
• Map the source table to a new data warehouse table and apply filters.
• Select fields to be replicated and create calculated fields.
• Define replication and scheduling modes.
Map Tables to Warehouse Tables
To start the replication setup, select a table from the main screen and
choose Tools|Replication Setup. The Map Table screen displays
(Figure 1.15).
Important You cannot choose this option for a table that has already
been set up. Instead, select a table and choose individual options from the
Tools menu for the function you want to perform. For example, choose
Properties to modify the table mapping structure. If the table type is code
table, you can use the WHERE clause to define a filter (Figure 1.14).
29
30
User Guide — QAD Business Intelligence
Fig. 1.14
Table Properties
Mapping Filter
You can configure replication for all of the records in the table or for a
subset of the records in the table by applying a filter. Filters can also be
used to split a table into multiple table-like entities known as subsets,
each of which can be a replication target. See “Create Subsets” on
page 44 for details.
Fig. 1.15
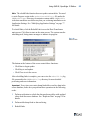
Map Table
Source Table Name. The system displays the source table name.
Using QAD BI, OpenEdge 10 Edition
Table Type. Read-only field that displays the table type—active,
historic, master, or code. The system categorizes the tables based on
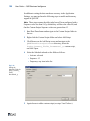
this value.
DWH Table Name. Enter the name of a new data warehouse table that
will be created to hold data from the source table.
Source Table Filter. Enter Progress code to filter records that are
replicated to the data warehouse. Syntax for the filter always has the
same format:
WHERE {&SRC-DB}.tablename.fieldname [operator] <value>
AND/OR {&SRC-DB}. tablename.fieldname [operator] <value>
[Operator] can have the following values: = , >= , <= , <> , matches ,
begins.
When this is blank, all records are replicated. When you save your
changes, the system validates the syntax.
Click OK to save your changes and display the field mapping screen.
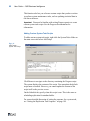
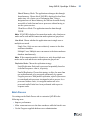
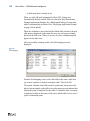
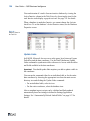
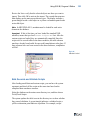
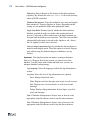
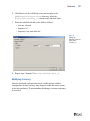
Map Fields to Warehouse Fields
Use the Field Selection frame to select the fields from the source table
that will be replicated to the data warehouse table.
Note After initial replication setup, access this function by selecting a
table and choosing Tools|Field Mapping.
Note If you loaded the database structure from QAD-provided metadata,
you do not have to use this procedure unless you want to modify the
default field mapping structure.
The first column indicates whether a field is included in the replication
process. When a field is selected on this screen, values are copied from
the source database to the data warehouse during replication.
Important When you first set up table replication, the DB-NAME (and
REC-ID for Progress data sources) fields are automatically configured.
These system-defined fields are used to maintain links between the data
source and the data warehouse. You cannot deselect them.
31
32
User Guide — QAD Business Intelligence
Fig. 1.16
Field Selection
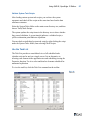
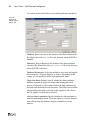
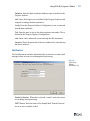
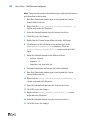
Specifying Field Properties
To define the properties associated with each field, select it and click the
Properties command.
Note You can also define custom calculated fields by clicking the Add
Field command. The system displays a Field Properties screen with all
data fields blank and input enabled.
Fig. 1.17
Field Properties
DWH Field Name. Enter the name used to represent this field in the
data warehouse. The default is the QAD ERP schema field name.
Note You also can rename a field directly on the field selection
screen by selecting its name and overtyping it.
Using QAD BI, OpenEdge 10 Edition
Field Type. The system displays the field data type from the
QAD ERP schema. You cannot change it.
Convert String to Upper Case. If the field type is Character, set this to
Yes to convert the field values to upper-case in the ETL script. This
can be used to rationalize data that is entered in mixed cases in the
data source for use in Cognos PowerPlay (a case-sensitive tool).
Precision, Decimals. If the field type is Decimal, change precision
and decimal places of values stored in the field.
Description. Enter a text description of the field.
Expression. The system displays the field name or formula associated
with the field.
Click OK to save the properties of an individual field. When you finish
specifying field properties for the table, click OK to save your
configuration.
The system validates each field record for syntax.
• Valid: A green triangle on the table icon on the main screen indicates
that replication setup is complete for the table.
• Invalid: A yellow exclamation point displays on the table icon and a
message indicates the nature of the error.
Important To modify field properties for tables that have already
completed replication setup, you cannot access the Field Mapping
function through the Replication Setup screen. You must first select the
table on the main screen, and then choose Tools|Field Mapping. Select the
field you want to edit and click the Field Properties command.
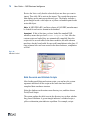
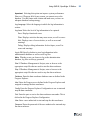
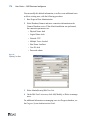
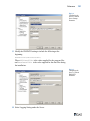
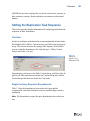
Define Replication Method
To specify how the system replicates data between the data source and the
data warehouse, select a table on the main screen and choose Tools|
Properties. Then click the Replication tab.
Important The Properties tool is available only for tables that have
completed the replication.
33
34
User Guide — QAD Business Intelligence
Fig. 1.18
Table Properties,
Replication Tab
Note If you loaded the table warehouse structure from QAD-provided
metadata, you do not have to use this procedure unless you want to
modify the default setup.
Choose one of four replication methods:
• Incremental Load. Only records that have never been replicated to the
data warehouse are selected for replication. This method is typically
used for tables that contain historical records such as tr_hist and
ih_hist, or a combination of historical and active transaction records
such as wod_det or pod_det. Incremental load generally is not as time
consuming as a full refresh.
Important The replication process for incremental load does not
determine whether a record has been modified since the last
replication—only that it has been created. Be aware that using this
method for records that are commonly updated—master records, for
example—can create data synchronization problems between the
QAD ERP database and the data warehouse.
• Full Refresh. The system performs the following actions:
• Updates records that already exist in the data warehouse
• Copies records that have never been replicated to the data
warehouse
• Deletes all other records in the data warehouse that are neither
updated nor newly created in this full refresh
Using QAD BI, OpenEdge 10 Edition
A new integer field Updated_Seq_ is available for each table in the
data warehouse to identify each full refresh.
This is typically used to replicate master data—often including tables
that do not contain more than 10,000 records. It is the default for
newly defined tables.
• Audit-Based. The system replicates data based on audit information
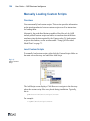
stored in the source database. Only created, updated, and deleted data
in the source database is synchronized to the target database, which
significantly improves replication performance.
When the audit-based replication method is selected for a table, the
table icon in the navigation tree changes to an icon with a capitalized
A, indicating that the table is audit-enabled.
Important This method requires that the source database is
OpenEdge 10.1B or higher and is audit-enabled and the user
connecting to the source database has the authenticated audit
administrator privileges for that database. You must also perform
additional steps to audit-enable source tables you want to replicate
data from and configure replication settings before you can
successfully execute audit-based replication tasks. See “Set Up for
Audit-Based Replication” on page 35.
• Custom. Whether a table is replicated depends on some user-defined
condition; for example, replication only takes place when an item is
associated with a product line.
The system displays a default Progress replication script based on the
selected method. If you modify the code, Replication Mode is
automatically set to Custom. When you click OK, the system validates the
syntax. If there are errors, the table icon on the main screen displays a
yellow warning sign to indicate that a problem exists.
Set Up for Audit-Based Replication
If you want to perform data replication from a source database that is
OpenEdge 10.1B or higher, you can take advantage of OpenEdge auditing
features and replicate data based on audit information stored in the source
database. Using the audit-based replication method, only created,
35
36
User Guide — QAD Business Intelligence
updated, and deleted data in the source database is synchronized to the
target database, which significantly improves the replication
performance.
This method requires that the source database is OpenEdge 10.1B or
higher and is audit-enabled and the user connecting to the source database
has the authenticated audit administrator privileges for that database. You
must also perform additional steps to audit-enable source tables you want
to replicate data from and configure replication settings before you can
successfully execute audit-based replication tasks.
Use Audit-Based Replication with Enhanced Controls
If you use QAD BI’s audit-based replication feature and QAD ERP’s
auditing solution at the same time, you must institute the following
practices to preserve data integrity.
If you have already enabled BI audit-based replication and then want to
implement QAD ERP’s Enhanced Controls module, you must execute
audit-based replications first before you enable the audit trail functions of
Enhanced Controls.
Archiving audit data moves data from audit data tables to a specially
designated database. If you archive audit data that has not been used by
the BI audit-based replication process, audit information will be lost from
the source database and changes will not be synchronized to the data
warehouse database during subsequent audit-based replications.
Therefore, before audit data in the source database is archived, make sure
that all audit information has been processed by BI audit-based
replication and corresponding data changes have been synchronized.
It is safe practice to always archive audit data in the source database to the
point in time before recent BI audit-based replications were performed for
the database. For example, if you schedule BI audit-based replication to
take place on a daily basis, modify the audit data archive scripts to archive
two days’ worth of data so that no audit information will be moved away
before it is processed.
Enabling/disabling auditing for a table in the Enhanced Controls module
may change identifying fields of the table. If this happens, data changes to
the table since the last audit-based replication up until this event will not
Using QAD BI, OpenEdge 10 Edition
be synchronized during the next replication. Therefore, it is important to
avoid any data changes or audit data generation between audit-based
replication and an audit configuration change. A possible solution is to
perform audit configuration maintenance for the source table immediately
after performing audit-based replication and make sure no changes are
made to the table during this time interval.
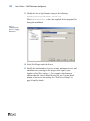
Enable the Source Database for Auditing
Perform the following steps to audit-enable the source database:
1
Add a storage area to the source database to hold audit data.
Execute the following command in a command prompt to add a
storage area using a database structure file provided with QAD BI.
prostrct add ICFDB
qadbiinstalldir/data/utilities/audit_utilities/addaud
it.st
2
Enable auditing for the database, as shown:
proutil <database-name> -C enableauditing area
Audit_Data indexarea Audit_Index deactivateidx
When you do this, the audit tables, which are hidden tables, are
created in the database.
For more information, see the OpenEdge document Getting Started: Core
Business Services.
Assign Audit-Related Privileges
1
Connect to the database as the database administrator.
2
Use Data Administration or the Data Dictionary (character version)
to:
• Set up any internal accounts (_User) necessary to define audit
administrators and audit data archives.
• Set up audit security.
• Create a database pass phrase so you can make sure audit data has
not been tampered with.
37
38
User Guide — QAD Business Intelligence
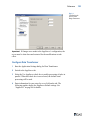
Audit-Enable Source Table and Configure Replication Settings
Perform the following steps to audit-enable a source table and configure
its audit-based replication settings:
1
Set audit-based as the replication method for the table. See “Define
Replication Method” on page 33.
2
The table icon in the navigation tree changes to an icon with a
capitalized A, indicating that the table is audit-enabled. Right-click
the table icon and choose Enable Audit from the shortcut menu.
Note The source database must be already audit-enabled, or you will
get an error message.
Note You can audit-enable all tables in a table group, domain, or
database by right-clicking the group, domain, or database icon in the
directory tree and choosing Audit-Enable from the shortcut menu.
3
Right-click the table icon and choose Replication Settings from the
shortcut menu.
Note You can configure replication settings for all tables in a table
group, domain, or database by right-clicking the group, domain, or
database icon in the directory tree and choosing Replication Settings
from the shortcut menu.
4
Fig. 1.19
Table Properties,
Replication Tab
An audit-based replication settings window displays. Change the
settings as needed.
Using QAD BI, OpenEdge 10 Edition
Initial Status. Set the initial table replication status to determine how
far back to synchronize changes to the data warehouse based on the
audit information stored in the source database.
Not Synchronized: This is the default initial status when you set up
audit-based replication for the table and no replication task has been
executed yet. When the initial status is Not Synchronized, the system
synchronizes all the changes recorded by the source database audit
information to the data warehouse during the next replication.
Synchronized: After audit-based replication has been executed, the
status changes to Synchronized, and the system only synchronizes
data changes since the last replication based on audit data in the
source database. However, you can change that replication time point
or reset the status to Not Synchronized to change the amount of
changes to be synchronized.
Replicate From. Specify the time point after which to capture data
changes in the source table. The system only synchronizes data
changes taking place after that specific time point in the source table
to the data warehouse based on audit information. Every time a
replication task is executed for the table, the time stamp is updated to
the latest task run time.
5
Click OK to save the settings. The table is set up for audit-based
replication.
Replicate Data
You can synchronize data between a data warehouse table and the
associated QAD ERPERP table using two methods:
• Automatically, by setting up scheduling for each table
• Manually, by selecting the table on the main screen, then clicking
Execute Now on the Tools menu
The following sections describe these methods.
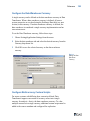
Scheduling Automatic Replication
Automatic replication takes place using either a serial or parallel strategy.
In serial replication, each task is processed sequentially based on its
defined sequence—that is, its priority. With parallel replication, a pool of
39
40
User Guide — QAD Business Intelligence
processors is created and each processor is assigned a task to process. As
a processor finishes a task, it is assigned another task to be processed until
all tasks have been performed with respect to sequence order.
Note The processor pool size is set to one less than the value of the
Minimum and Maximum Servers settings on the AppServer properties
screen. See “Pool Size of Script” on page 86 for details.
In order to use parallel replication, the Progress AppServer must be
installed and configured on the same machine as the QAD BI Data
Transformer. For information on setting up and using parallel replication
and configuring the AppServer, see “QAD BI Parallel Replication Setup”
on page 178.
Use the Scheduling tab to define when replication takes place for each
table in the data warehouse. You can set up different scheduling methods
for individual tables based on the frequency of changes to the source
table.
Important Automatic scheduling uses the Windows Task Scheduler to
start a QAD BI process to review the scheduled replication tasks on a
periodic basis.
See “Set Up Windows Task Scheduler” on page 90 for information.
Fig. 1.20
Table Properties,
Scheduling Tab
Using QAD BI, OpenEdge 10 Edition
Activate. Select this field to have automatic replication take place on
the specified schedule. When Activate is not selected, you must
replicate this table manually using Tools|Execute Now.
When a database is marked as Inactive, you cannot change the
Activate check box. To set the database’s Active/Inactive status, use
the Database Properties screen.
Sequence. Specify the relative order in which the task associated
with this table should be replicated. Tasks are executed from low
sequences to higher sequences. Tasks that share the same sequence
may be executed in any order among themselves. In general:
• Tasks that pull data from sources into the data warehouse should
be scheduled to precede tasks that operate on data within the data
warehouse.
• Tasks that generate Cognos Cubes should be scheduled to run
after all other tasks.
For a more detailed discussion of setting the sequence for a
replication task, see “Setting the Replication Task Sequence” on
page 189.
Frequency. Specify how often the replication task for this table
should be run. Options are:
• Daily (the default). The table is replicated each day when the
Windows scheduler starts up.
• Weekly. The system displays a list of weekdays; select the days
you want this table to be replicated. Use Ctrl+Click to select more
than one list entry.
• Monthly. The system displays available dates, as well as First of
the Month and Last of the Month options.
Note The Windows Task Scheduler should be configured to run the
QAD BI process at least as frequently as the most frequent replication
task. For example, if the Windows Task Scheduler is set to run every
week, even if a table replication task is scheduled to run every day, it
will only be run every week.
41
42
User Guide — QAD Business Intelligence
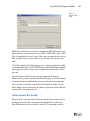
Running Manual Replication
In addition to setting up scheduled replication processes, you can refresh
a data warehouse table with updated values from the source database at
any time.
Select the table on the main screen and choose Tools|Execute Now. Click
Start on the Record Processing Status screen. The system runs the
replication task, listing status messages to indicate its progress.
Note The moving status bar at the top of the screen will not necessarily
fill completely to the right when the replication task completes. Since
each new status message is added to the top of the list, you can determine
that replication is finished when the Total Update Time message displays.
Fig. 1.21
Record Processing
Status
The buttons at the bottom of the screen control this function:
• Click Start to begin replication.
• Click Stop to end replication.
Note Replication may not stop immediately when you click the
button depending on the nature of the script being executed.
• Click Close to exit the screen.
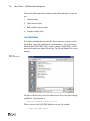
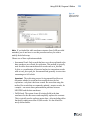
Rename Table
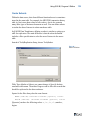
When you perform Replication Setup, tables are created in the data
warehouse. If necessary, you can change a table name by using the
Rename Table function on the Data Transformer|Tools menu. This
function opens the Rename Table screen.
Using QAD BI, OpenEdge 10 Edition
Fig. 1.22
Rename Table
If the old table name cannot be found in the data warehouse, an error
message is displayed. An error message also displays if a user enters:
• A blank table name
• Reserved words
• A table name that is already in use
When you click OK and Automatically Check ETL-Scripts and
Automatically Refresh Linked Tables is selected in Data Transformer|
Settings|Applications Settings, the validation and linking of scripts and
tables is automatically performed. See “Modifying Application Settings”
on page 77 for details.
When the validation is successful and the linked table refreshed, the new
table name is displayed on the main directory tree and a green triangle
placed on the table icon. If there is an error, a yellow exclamation point
appears on the table icon.
After successfully renaming a table, the field mapping screen is
displayed.
43
44
User Guide — QAD Business Intelligence
Fig. 1.23
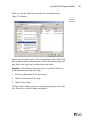
Field Mapping
From the field mapping screen, select the fields in the source table that
you want to replicate to the data warehouse table. Then click OK.
The system validates each field record for syntax and, when successful,
places a green triangle on the table icon on the main screen to indicate that
replication setup is completed for that table. If validation fails, a message
is displayed to indicate the nature of the error, and the table icon is set to a
yellow exclamation point.
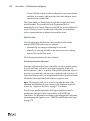
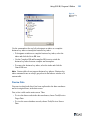
Create Subsets
Within the data source, data from different functional areas is sometimes
stored in the same table. For example, the QAD ERP transaction history
table (tr_hist) stores data related to sales orders—but it also contains
many other types of business documents as well. You can define subsets
to isolate the data of interest in a data warehouse table.
In QAD BI Data Transformer, defining a subset is similar to setting up a
table for replication. The main difference is that the subset definition
includes a filter specification to select the area of interest in the source
table.
Instead of Tools|Replication Setup, choose Tools|Subset.
Using QAD BI, OpenEdge 10 Edition
45
Fig. 1.24
Subset Definition
Table Type defaults to Subset; you cannot change it. Specify the data
warehouse table name. Then enter Progress code to filter the records that
should be replicated in the data warehouse.
Syntax for the filter always has the same format:
WHERE {&SRC-DB}.tablename.fieldname [operator] <value>
AND/OR {&SRC-DB}. tablename.fieldname [operator] <value>
[Operator] can have the following values: = , >= , <= , <> , matches ,
begins.
After defining the subset, you can continue to define fields and replication
settings just as in the standard replication setup.
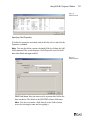
Add Indexes
When you select tables for the data warehouse, the system disregards any
indexes defined in the data source. Instead, you can custom-design
indexes for each table after adding it to the warehouse. This lets you test
the performance of your data models first, then add indexes that are
appropriate to your specific needs.
Note You can view a list of indexes defined in the data source by
selecting the table on the main screen and choosing Tools|Source indexes.
46
User Guide — QAD Business Intelligence
To add an index to a table, select the table on the main screen and choose
Tools|Target Indexes. The Indexes screen displays any existing indexes.
Note By default, the system creates a primary index for each table called
DB-NAME. It includes the system-maintained DB-NAME field (and
REC-ID for Progress data sources). You cannot modify or delete this
index, unless you create a new index and set it as the primary index.
Fig. 1.25
Indexes
Use the commands at the top left to add or delete an index, or designate it
as primary.
Using QAD BI, OpenEdge 10 Edition
When you click the Add Index command, the screen illustrated in
Figure 1.26 displays.
Fig. 1.26
Add Index
Enter a name for the new index. The left pane displays all the fields in the
data warehouse table or subset that are available for indexing. Drag-anddrop fields to the right pane to include them in the index.
Important After adding or deleting an index, you should validate the
synchronization script using these steps:
1
Select the updated table on the main screen.
2
Choose Check Scripts.
If the new index validates properly, a green triangle displays on the table
icon. Otherwise, a yellow warning icon displays.
Maintain Business Keys
For Progress data sources, QAD BI Data Transformer uses the
DB-NAME and REC-ID fields to maintain links between the data source
and the data warehouse. However, this approach is not always reliable in
some circumstances:
• When the user dumps and loads tables in the source database, the
REC-ID values of the records in these tables are changed.
47
48
User Guide — QAD Business Intelligence
• Data is archived and no longer exists in the source database.
In both cases, the links between the data source and the data warehouse
are broken and can no longer be used for replication purposes. Continuing
to perform data replication without first rebuilding the links may cause
data corruption in the data warehouse.
This is where business keys comes into play. You can designate key fields
that can represent unique identifiers of records to construct more reliable
links between the data source and the data warehouse. You can then use
the business keys to synchronize the REC-ID values between the source
and target databases to re-establish the links based on the REC-ID field
for replication purposes.
If you purchased one or more of QAD-provided business models, default
business key definitions for each standard table are included in metadata
files and are loaded into the administration database when metadata is
imported.
You can also modify default business keys or create new business key
definitions.
To maintain business keys for a table:
1
Right-click a table in the directory tree and choose Business Keys
from the shortcut menu.
2
The business key maintenance window displays. Double-click a field
in the Available Fields frame to move it to the Business Key Fields
frame and designate it as a business key field. Move a field in the
opposite direction to remove it as a business key field.
Using QAD BI, OpenEdge 10 Edition
Fig. 1.27
Business Key
Maintenance
3
When finished, click OK to save changes.
You can also store business key definitions in the metadata file for reuse
by exporting metadata.
Preview Data
You can view data both after it has been replicated to the data warehouse
and in its original form, in the data source.
First, select a table on the main screen. Then:
• To view the data records in the data warehouse, choose Tools|Preview
Target Data.
• To view the source database records, choose Tools|Preview Source
Data.
Figure 1.28 shows the contents of the address master (ad_mstr) table in
QAD ERP, as well as the corresponding Address table in the data
warehouse. Note that the QAD ERP table shows all fields in the schema,
identified by the schema field names; the data warehouse displays only
the mapped fields.
49
50
User Guide — QAD Business Intelligence
To sort the records based on values in a specific column, click the column
heading.
To filter records by database, select a database from the Database dropdown list.
Records are displayed in a paginated view with a maximum of 50 records
on each page. You can use the navigation controls at the bottom of these
screens to easily page through records or jump to a page by its number.
Fig. 1.28
Table Preview
Delete Target Data
You can delete data records after they have been replicated to the data
warehouse. You can delete all data records from a table while preserving
its table mapping information.
Using QAD BI, OpenEdge 10 Edition
51
Choose Delete Target Data from the Data Transformer|Tools menu to
open the Record Deletion Status screen.
Fig. 1.29
Delete Data
Records from Data
Warehouse
To start the deletion process, click Start. If it is necessary to stop the
deletion before completion, click Stop.
Validate Tables
The Validate Table function on the Data Transformer|Tools menu lets you
validate table and field mappings between source tables and data
warehouse tables.
Validation takes place in two phases. The system first checks for valid
tables; then it checks each field mapping between source table and data
warehouse table.
When checking for valid tables, the system determines whether a table
has changed, is unchanged, or is missing. This information displays in the
Source Table Status and DWH Table Status columns of the Table
Mapping frame shown in Figure 1.30.
When checking field mappings, the system determines the field mapping
status and displays this information in the Field Mapping frame. If any
field mapping status is Mismatching or Invalid, the status Corrupted
displays in the Status column of the Table Mapping frame. You should fix
the field mapping problems before attempting to recreate a table.
Using this status information, you can detect and recover any corrupted
mapping that may have occurred after activities such as database
replication.
52
User Guide — QAD Business Intelligence
Fig. 1.30
DWH Table
Mapping Validation
Table Mapping Display and Functions
The following fields display in the Table Mapping frame:
Status. Displays the status of the table, based on the status of
associated fields:
OK: No invalid or mismatched field mappings exist.
Corrupted: At least one invalid or mismatched field mapping exists.
Description. This field displays detailed table error information, such
as a table is missing.
Source DB Logical Name. The alias for the source database.
Source DB. The physical path to the source database.
Source Table. The name of the table from the source database.
Source Table Status and DWH Table Status. These status fields
indicate if mappings between the source and data warehouse are new,
unchanged, or missing:
Unchanged: Field mappings are unchanged.
Changed: Field mappings have changed. Either source table fields or
data warehouse fields have changed.
Using QAD BI, OpenEdge 10 Edition
Missing: Either the source table or the data warehouse table is
missing.
Use the two buttons in the Table Mapping frame to delete tables or
recreate them.
Deleting Table Mapping
Clicking the Delete Table Mapping button lets you delete both table and
field mapping information. The data warehouse table is also deleted.
Recreating Data Warehouse Table
You can use the Recreate DWH Table button to resolve any mismatching
between source and data warehouse tables. You can also use it to delete
data from the data warehouse table.
When you click the Recreate DWH Table button, the system:
1
Deletes all mapped data from the data warehouse table and deletes the
data warehouse table
2
Creates a data warehouse table based on the original table mapping
stored in data warehouse-admin
Before recreating a data warehouse table, ensure that you have deleted
any field mappings with the status of Invalid shown in the Field Mapping
frame.
Field Mapping Display and Functions
The following fields display in the Field Mapping frame:
Status. Status information is displayed as follows:
OK: Both source and data warehouse fields exist and are consistent.
Invalid: The source table field cannot be found and the field mapping
must be deleted.
Mismatch: The source table field or the data warehouse field has
changed and are inconsistent. This field mapping can be rebuilt by
overriding the target field with the source field.
53
54
User Guide — QAD Business Intelligence
Description. For mismatched or invalid fields, a brief description of
the error.
Source Field. The name of the field in the source table.
DWH Field. The name of the field in the data warehouse table.
DWH Expression. The expression used to calculate the value that
populates the data warehouse field.
Function. Currently not used.
When you click Delete Field Mapping after selecting the relevant check
boxes, the selected field mapping information stored in data warehouseadmin is deleted but the field data in the data warehouse tables is retained.
When you click Close after performing Delete Field Mapping, the system
performs the Recreate DWH Table function.
Create Custom Tables
Not all tables in the data warehouse have to be based on table definitions
from the connected data sources. You can create custom tables that exist
only in the data warehouse.
Custom tables are populated with data using custom scripts. They can
contain virtually any data the designer wants to put in them.
To create a new table, right-click the Custom Tables folder on the main
screen and select Create Table. The Map Table screen displays.
Using QAD BI, OpenEdge 10 Edition
Fig. 1.31
Custom Table
Setup
While the overall process is similar to mapping a QAD ERP table to the
data warehouse, you can only access one field—DWH Table Name. Table
Type is automatically set to Custom Table, and you cannot define code to
filter records because a custom table is not directly based on any source
table.
Click OK to display the field mapping screen. Again, navigation is similar
to standard table setup. Use the Field Properties and Add Field commands
in the upper left corner of the screen to update an existing field or add a
new one.
You can define a field to be any data type supported by Progress.
However, once you have initially specified a data type, you cannot change
it. Instead, delete the field and add a new one with the correct data type.
Once you have created the custom table and defined its fields, you can
define indexes for the table using the Indexes right-click option while the
custom table is selected in the tree.
Create Custom ETL Scripts
Because of the way some types of data are stored in data sources, data is
not always directly usable as management information. In such cases,
Data Transformer lets you reference custom ETL scripts that you have
55
56
User Guide — QAD Business Intelligence
written to convert the QAD ERP data into warehouse data more
appropriate for use in analysis. Custom scripts are associated with custom
tables, which were described in the previous section.
Important You must be familiar with writing Progress queries to create
custom scripts. See the Progress documentation for information.
Note Custom ETL scripts are used to restructure data in the data
warehouse. A related type of script—a custom replication script—is used
when the Replication Method of a table replication task is set to Custom.
It moves data into the data warehouse using custom extraction logic.
Script Guidelines
For a custom script to be usable by QAD BI, it should follow several
guidelines:
• Field references must include the full namespace reference to the
field, from the database level down; for example,
databasename.tablename.fieldname.
• The database name must be the logical database name for the data
warehouse, followed by the letter q; for example, dwhq. The
following shows an example of a correct field reference:
dwhq.Balance_Sheet_totals_.Cost_Center_
• For scripts that reference the data warehouse, include the following
alias as the first line to be used in the script implementation:
&SCOPED-DEFINE TRG-DB DWHQ
• Similarly, for scripts that reference the source database, include the
following alias:
&SCOPED-DEFINE SRC-DB SRCDB
• Check the syntax of the saved script using the Progress tools or use
the Check Scripts function after adding it.
Using QAD BI, OpenEdge 10 Edition
57
Figure 1.32 shows an example of a completed script.
Fig. 1.32
Sample Custom
ETL Script
Adding Scripts to Data Transformer
To add a custom script, right-click the Custom Scripts folder on the main
screen and select Add Script.
Fig. 1.33
Add Custom Script
58
User Guide — QAD Business Intelligence
Click Browse to navigate to the directory containing the Progress script.
The system displays the contents of the script. You can update the default
script name as needed. However, you cannot update the content of the
script itself on the preview screen.
On the Schedule tab, specify when this script is run. This is the same as
scheduling replication for standard tables.
For a more detailed discussion of setting the sequence for a replication
task, see “Setting the Replication Task Sequence” on page 189.
Merge Data from Multiple Databases
You can use the merge feature in Data Transformer to consolidate data
from multiple data sources that share the same underlying table
definitions. After defining replication for one database, use the Merge
command to configure additional databases to reuse the replication
configuration of the configured database. You can then redefine the
replication method for each table in the merged database as needed.
To merge in data from a data source, right-click the data source and select
Merge Tables. The system displays the data warehouse structure
associated with all other data sources.
Fig. 1.34
Merge Tables
To use the same replication configuration as another data source, select
the check box associated with the replication tasks you want to reuse.
After you have merged tables from additional databases, you can then
redefine the replication method for each table in the merged database. To
change the replication method for a merged table, right-click the table and
choose Properties from the shortcut menu.
In the Table Properties window, select Self Defined Script script type
under the Replication tab; then select the new replication method you
want for the table.
Using QAD BI, OpenEdge 10 Edition
59
Fig. 1.35
Merge Table
Replication Method
When you choose Settings|Task List, the system displays a separate ETL
script for each database.
Fig. 1.36
Task List with
Merged Item Tables
Use System Tasks
QAD BI provides two system tasks to manage ETL log files and BI
monitor archives.
60
User Guide — QAD Business Intelligence
This function also lets you reference custom scripts that you have written
to perform system maintenance tasks, such as updating statistical data in
the data warehouse.
Important You must be familiar with writing Progress queries to create
custom system task scripts. See the Progress documentation for
information.
Adding Custom System Task Scripts
To add a custom system task script, right-click the System Tasks folder on
the main screen and select Add Script.
Fig. 1.37
Add Custom
System Task Script
Click Browse to navigate to the directory containing the Progress script.
The system displays the contents of the script. You can update the default
script name as needed. However, you cannot update the content of the
script itself on the preview screen.
On the Schedule tab, specify when this script is run. This is the same as
scheduling replication for standard tables.
For a more detailed discussion of setting the sequence for a system task,
see “Setting the Replication Task Sequence” on page 189.
Using QAD BI, OpenEdge 10 Edition
Validate System Task Scripts
After loading custom system task scripts, you can have the system
regenerate and check all the scripts at the same time based on the data
warehouse structure.
Select the System Tasks folder on the main screen directory tree, and then
choose Tools|Check Scripts.
The system updates the script icons in the directory tree to show whether
they passed validation. A green triangle indicates a validated script; a
yellow exclamation point indicates a problem.
You can check an individual system task script by right-clicking the script
under the System Tasks folder, then selecting Check Scripts.
Use the Task List
The Task List provides a consolidated view of all scheduled tasks
(whether activated or not) on a single screen. It is an alternative to
selecting each element in the application tree and scheduling it using the
Properties function. Use it to select and deselect elements scheduled for
automated replication.
To view the task list, click the Task List command on the toolbar.
Fig. 1.38
Task List
61
62
User Guide — QAD Business Intelligence
Task Sets
Tasks can be grouped into task sets and scheduled respectively to run in
separate batches. When you first use QAD BI Transformer, a Default task
set exists. You can create new task sets to contain groups of selected tasks.
To create a new task set:
1
Click the Create button next to the Task Set drop-down list.
2
In the New Task dialogue box, enter a task set name and select an
existing task set to copy from.
3
Click OK. The screen displays the tasks in the new task set as
selected.
4
Select tasks to add them to the current task set or deselect tasks to
remove them from the current task set; then click Apply to save the
task set.
To delete a task set, select the task from the Task Set drop-down list and
click the Delete button.
Note The Default task set is the system task set and can not be deleted.
Selecting a task set from the Task Set shows the corresponding task set
view. Tasks in the task set are displayed as selected.
Note If a table is deleted from the data warehouse database, the
corresponding task is removed from all task sets it belongs to.
Tasks
Tasks are displayed in a paginated view with a maximum of 50 records on
each page. Use the navigation controls at the bottom of the screen to
easily page through records or jump to a page by its number.
You can select or deselect tasks individually. To select or deselect all the
tasks on the current page at once, use the Select All on This Page and
Deselect All on This Page commands. To select or deselect all the tasks
on all pages, use the Select All on All Pages and Deselect All on All
Pages commands.
Using QAD BI, OpenEdge 10 Edition
63
Enter the whole task name (or part of one) in the Task text box and choose
from the Database drop-down list; then click Search to display tasks that
meet the search criteria or filter tasks by databases.
Database Status
A source system (database) can be either active or inactive, as defined on
the Database Properties screen. When a source system is marked as
inactive, none of its tasks will execute under the batch replication process.
You can determine if a task is from an inactive database by viewing the
Active/Inactive column in the Task List or by observing the icon for the
task. Inactive tasks display a grayed-out icon. See page 20 for details.
When a database is marked as Inactive you cannot change the Activate
check box. To set the database’s Active/Inactive status, use the Database
Properties screen.
Fig. 1.39
Database Status in
the Task List
64
User Guide — QAD Business Intelligence
Export Tables
You can export table information in XML format on any level of the main
screen directory tree by selecting the icon on the appropriate level and
choosing an export command from the Tools menu. For example, to
export the entire directory structure, select the database icon and choose
Tools|Export Tables. For an individual table, select the table and choose
Tools|Export Table Meta Data.
The system prompts you to enter a directory path and file name for the
exported data.
The resulting XML file includes the table structure of the selected items
in the data warehouse, as well as the contents of the replication scripts.
If your company has multiple instances of QAD BI installed, you can use
this feature to synchronize the setup data. Additionally, you can use the
XML file as a backup.
To reload data from exported files, use the Load Meta Data function,
described on page 74.
Rebuild Links
For Progress data sources, QAD BI Data Transformer uses the
DB-NAME and REC-ID fields to maintain links between the data source
and the data warehouse. However, this approach is not always reliable in
some circumstances:
• When the user dumps and loads tables in the source database, the
REC-ID values of the records in these tables are changed.
• Data is archived and no longer exists in the source database.
In both cases, the links between the data source and the data warehouse
are broken and can no longer be used for replication purposes. Continuing
to perform data replication without first rebuilding the links may cause
data corruption in the data warehouse.
QAD BI Data Transformer lets you rebuild links by synchronizing the
REC-ID values between the source and target databases based on
business keys so that you can continue to perform replication without data
loss or corruption. See “Maintain Business Keys” on page 47 for details
on business keys.
Using QAD BI, OpenEdge 10 Edition
Note The rebuild links function does not update custom tables. You need
to write Progress scripts in the updateCustomTables.p file under the
DWHWorkDir\appl directory to customize custom tables. DWHWorkDir
is the data warehouse work directory that you set during installation or in
Application Settings. See “Modifying Application Settings” on page 77
for details.
To rebuild links, click the Rebuild Link icon on the Data Transformer
main screen. Click Start to start on the status screen. The system runs the
rebuilding task, listing status messages to indicate its progress.
Fig. 1.40
Rebuild Links
The buttons at the bottom of the screen control these functions:
• Click Start to begin update.
• Click Stop to end update.
• Click Close to exit the screen.
After rebuilding links is complete, you can review the rebuild.log log
file generated in the DWHWorkDir\log directory for more detailed
processing and error information.
Important Every time you want to dump/load table or archive data in the
source database, make sure you perform these operations in the following
order:
1
Perform replication to refresh the data warehouse tables with updated
values from the source database. See “Replicate Data” on page 39 for
details.
2
Perform table dump/load or data archiving.
3
Rebuild links.
65
66
User Guide — QAD Business Intelligence
If you do not exactly follow this order or if you perform other operations
that affect either the source database or the data warehouse in-between
these steps, data integrity may be compromised and data corruption may
occur in future replications.
Using the SQL Query Analysis Tool
QAD BI provides a built-in SQL query analysis tool that you can use to
execute SQL queries against the data warehouse database, display and
export query results, and view query execution plans.
A query execution plan outlines step by step how a SQL query is run.
This information is very useful when it comes to finding out why a query
is running slowly and seeking to optimize the query.
To launch the SQL query analysis tool, click the SQL Tool icon on the
toolbar.
Fig. 1.41
SQL Query
Analysis Tool
Create SQL query scripts under the SQL tab.
Click Check SQL Syntax icon on the toolbar to check if the syntax of the
SQL statements you created is valid.
Using QAD BI, OpenEdge 10 Edition
Click the Execute SQL icon on the toolbar to execute the SQL query and
display the query results under the Result tab. If the SQL query syntax is
invalid, an error message displays.
By default, the query result table displays 50 records; click the View All
button to show all results.
Click the Export button to export the results to a CSV (comma delimited)
file.
Click the View Execution Plan icon on the toolbar to view the query
execution plan for the SQL query you created. If the SQL query syntax is
invalid, an error message displays.
Click the Run and Export icon on the toolbar to execute the SQL query
and directly export the query results to a CSV file.
Maintaining Parameters
QAD BI provides a parameter maintenance tool for maintaining
maintaining database-level, domain-level, or global parameters in custom
scripts. The parameter values can be retrieved in custom scripts using
specific built-in functions.
Click the Parameter Table icon on the toolbar to open the associated
maintenance function.
Fig. 1.42
Parameter Table
67
68
User Guide — QAD Business Intelligence
Name. Specify the parameter name. You can assign identical names
to parameters at different levels and scopes, but the name must be
unique for parameters with the same combination of level and scope
values.
Level. Specify at which level the parameter is declared.
Global: The parameter is declared globally and is available at all
levels.
Domain: The parameter is declared at the domain level and is only
available within specific domains.
Database: The parameter is declared at the database level and is only
available within specific databases.
Scope. Specify the scope within which the parameter is available.
For global parameters, Global is the only available option and is
automatically selected.
For domain-level parameters, select a specific domain within which
the parameter is available.
For database-level parameters, select a specific database within which
the parameter is available.
Value. Assign a value to the parameter.
Description. Optionally, provide a description of the parameter.
To maintain parameters, search and select parameters in the parameter list
and perform corresponding actions in the lower Properties frame.
Changes will be reflected in the parameter list. When finished, click
Apply or OK to save all changes.
To use defined parameters in custom scripts, include the task-enginedefs.i file and use the following functions to return parameter values of
corresponding data types:
• getParamInteger
• getParamDecimal
• getParamString
• getParamLogical
• getParamDate
Using QAD BI, OpenEdge 10 Edition
Use the following example as reference.
define variable param as integer no-undo. /* Define a
variable */
assign param = getParamInteger("param name"). /* Call the
function using parameter name as the parameter */
if param = ? then /* Check returned value, if ?, the
parameter is not found */
return "This error message will appear in log". /* return
a error message which will be logged, and the status of
this script will be Error */
Working with the Model
Cognos models supporting multidimensional analysis of business process
areas can be purchased from QAD. The models map the contents of the
data warehouse to concepts supported by the PowerPlay product such as
dimensions, levels, categories, and measures. The product of executing a
model against the data warehouse is a Cognos PowerCube.
The location of the models is referenced in the Cognos Transformer tab
on the Application Settings screen. See Figure 1.53 on page 81 for details.
Note Cubes can only be built after data has been replicated to the data
warehouse database.
You can:
• Create the Cube.
• Check the model.
• View the model properties to specify the replication schedule and
select the languages in which Cubes are generated.
Create the Cube
You can create the Cube by using the Create Cube function of Data
Transformer, or by using a batch task. Cubes can only be built after data
has been replicated to the data warehouse database.
69
70
User Guide — QAD Business Intelligence
Check the Model
The Cognos PowerPlay Transformer includes a function that verifies the
correctness of the model file. Select a cube in the Cubes folder on the
main QAD BI screen and choose File|Check Model. The system uses the
Cognos function to verify the model and displays an appropriate message.
Specify Model Properties
To display the Model Properties screen, select a model and choose Tools|
Properties. The screen contains three tabs.
Cube Details
The Cube Details tab contains read-only displays of the Cognos
Transformer model name and path.
Fig. 1.43
Cube Properties,
Cube Details Tab
Schedule
The Schedule tab is the same as the Table and Custom Script Schedule
tabs. Select Active and enter a sequence number to enable cube
generation within the automated replication.
Using QAD BI, OpenEdge 10 Edition
71
Fig. 1.44
Cube Properties,
Schedule Tab
Languages
The Languages tab allows for the selection of the language or languages
in which multilingual cubes should be created.
Note Single-language cubes ignore these settings.
Important To support different languages when displaying Cubes in
Cognos PowerPlay Transformer, you must set special language encoding
and fonts in the Windows operating system. For information on setting up
language support, see Installation Guide: QAD Business Intelligence.
Cubes are created in subfolders of the Cube directory (as specified in the
Application Settings Cognos Transformer tab). Subfolders are named
using the two-character language identifier for the selected languages. If
no language is selected, the cube is built directly within the Cube
directory.
72
User Guide — QAD Business Intelligence
Fig. 1.45
Cube Properties,
Languages Tab
For information on creating or modifying language tokens for translated
Cognos Transformer model files, see “Creating Translatable Cognos
Transformer Models” on page 191.
Edit IQD Files
Cubes are created by Cognos Transformer using Impromptu Query
Definition (.iqd) files. One IQD file with native SQL corresponds to each
query subject or dimension externalized for use in Transformer.
By default, IQD files are located in the qadbiinstalldir\data\db
directory. You can change the IQD files directory in Application Settings.
You can create new IQD files or edit existing IQD files in Data
Transformer using IQD Editor.
To create a new IQD file, right-click the IQD Files folder in the
application tree on the main screen and choose Add IQD File; then enter
an IQD file name and click OK.
To edit an existing IQD file, right-click the IQD file under the IQD Files
folder and choose Edit.
In IQD Editor, click Check Syntax to check the syntax of the sql scripts in
the IQD file. Click the Execute SQL icon on the toolbar to execute the
SQL query and display the query results. Click the View Execution Plan
icon on the toolbar to view the query execution plan for the SQL query
you created. If the SQL query syntax is invalid, an error message
displays.
Using QAD BI, OpenEdge 10 Edition
Click the Run and Export icon on the toolbar to execute the SQL query
and directly export the query results to a CSV (comma delimited) file.
Fig. 1.46
IQD Editor
Using QAD-Provided Model Data
If your QAD BI configuration includes one or more of the seven
predefined models purchased from QAD, load the schema using Data
Transformer’s Load Meta Data function instead of building the data
warehouse tables manually from QAD ERP schema. You can then use the
table and field tools to customize the schema for the predefined models as
needed.
Note In MFG/PRO eB2.1 and later releases of QAD ERP, you must load
metadata and scripts for each domain that you want to analyze.
73
74
User Guide — QAD Business Intelligence
Perform the following tasks to load the model data and make it ready for
use:
1
Load metadata.
2
Load custom scripts.
3
Bulk validate custom scripts.
4
Complete model setup.
Load Metadata
To load the metadata that describes the data warehouse structure used in
the models, right-click a database or a domain name—if you are using a
database that is MFG/PRO eB2.1 or later releases of QAD ERP—on the
main screen and select Import Meta Data. The Choose Import File screen
displays.
Fig. 1.47
Chose Import File
Navigate to the directory where the model source files were placed during
installation. Typically, this is:
qadbiInstallDir\data\meta\version
Where version is the QAD ERP database version; for example:
c:\qadbi\data\meta\eB2.1
Using QAD BI, OpenEdge 10 Edition
Select a file and click Open to load the metadata and create the data
warehouse structure. The Meta Filter Window displays.
Fig. 1.48
Meta Filter
Window
Use the check box to
Indicate that you want
to import the object.
The Meta Filter Window presents a list of objects and the following
information for each object:
Object Name. Displays the name of an object.
Object Type. Displays the type of the database object: SRC-TABLE,
DWH-TABLE, MERGE-TABLE, SCRIPT, or CUBE.
New Object. Indicates whether the object already exits in the database
or domain.
Yes: This is a new object that has not been imported before.
No: The object has already been imported.
Use the check box to the left of the object name to indicate whether to
import the object. The check box is selected by default when the object is
new. If the object is not new, you can select the check box to reimport the
object.
75
76
User Guide — QAD Business Intelligence
Review the list to verify that the selected objects are those you want to
import. Then click OK to activate the import. The created data structure
then displays on the main screen directory tree. The display includes a
green triangle beside a valid object or a yellow exclamation point beside
an invalid object.
Note In MFG/PRO eB2.1 and later releases of QAD ERP, metadata must
be loaded for each active domain in the database.
Important If this is first time you have loaded the standard XML
metafiles, ensure that you load Custom Scripts.xml last. After the
custom scripts are loaded, they are automatically compiled. Since the
scripts refer to several tables in the data warehouse, the table schemas
must have already been loaded for successful compilation to take place. If
these schemas have not been created in the data warehouse, compilation
will fail.
Fig. 1.49
Metadata Loaded
Bulk Generate and Validate Scripts
After loading model data and custom scripts, you can have the system
regenerate and check all the scripts at the same time based on the
completed data warehouse structure.
Select the database on the main screen directory tree, and then choose
Tools|Check Scripts.
The system updates the table icons in the directory tree to show whether
they passed validation. A green triangle indicates a validated script; a
yellow exclamation point indicates a problem. For example, scripts
Using QAD BI, OpenEdge 10 Edition
shown in Figure 1.50 were validated before all the custom scripts were
loaded. A secondary custom script, Script Call Lead Time2, failed
validation.
Fig. 1.50
Validation Icons
Note You can check the script for an individual table by right-clicking
the table on the main screen, then selecting Check Scripts.
Complete Model Setup
After loading model data and checking scripts, complete setup tasks by:
• Updating the table links for all replication and custom tables; see
page 39.
• Scheduling automatic replication for each table, custom script, and
cube as shown in the relevant sections above.
• Optionally, fine-tuning the data warehouse structure and replication
setup. Use the following sections for reference:
• “Manage Domains” on page 26
• “Select Tables” on page 27
• “Set Up Replication” on page 29
Modifying Application Settings
Based on information entered during the installation, most settings
required to connect the components of QAD BI are in place when you
begin using the application.
Note An important exception to this is the currency setting, which
defaults from the QAD ERP base currency unless:
• You are connecting to a domain database and the base currencies in
the domains are different.
77
78
User Guide — QAD Business Intelligence
• You are connecting to multiple databases and the base currencies in
the databases are different.
In both of these cases, the currency setting is blank and you must
manually set the currency for the data warehouse database. See
“Currency” on page 79.
If for any reason you need to update any of those settings, choose
Settings|Application Settings from the main menu. The system displays a
screen with the following tabs:
• Data Warehouse
• ODBC Connection
• Cognos Transformer
• Replication
• Batch Process
• AppServer
• Notification
The following sections describe the functions of each tab.
Data Warehouse
The Data Warehouse tab includes parameters applicable to the data
warehouse database.
Fig. 1.51
Application
Settings, Data
Warehouse Tab
Using QAD BI, OpenEdge 10 Edition
Generated Scripts Directory. Enter or browse to the location where
the automatically generated table-replication scripts are to be written.
Custom Scripts Directory. Enter or browse to the location where the
custom scripts are located.
System Scripts Directory. Enter or browse to the location where the
system task scripts are located.
IQD Files Directory. Enter or browse to the location where the IQD
files are located.
Work Directory. Enter or browse to the location of the ETL tool. This
directory contains the encrypted source code, log files, and temporary
files and should not be changed unless recommended by QAD
Support.
Automatically Resort Fields Alphabetically. Select to have the fields
(columns) of the mapped table automatically sorted on the field
mapping screen.
Automatically Check ETL-Scripts. Select to automatically generate
the mapped table scripts and to compile the generated and custom
scripts. This process also applies after a metadata import.
IQD Source. Specify the data source name set up in Cognos Access
Manager to connect to the data warehouse database. By default, this
is dwh.
Currency. Select a currency from the list of currency codes in which
to express all currency values defined in the standard business
models. The default currency is the QAD ERP base currency.
79
80
User Guide — QAD Business Intelligence
ODBC Connection
The ODBC Connection tab includes parameters used by Cognos
Transformer to connect to the data warehouse database through IQD files.
Fig. 1.52
Application
Settings, ODBC
Connection
Note In general, this field should not be changed.
DSN. Enter the Data Source Name created for the data warehouse
proxy ODBC connection.
User. Enter the user name for the data warehouse proxy. By default,
this is dwh.
Password. Enter the password for the specified user. By default, this
is admin.
Schema. Enter the data warehouse Progress schema name. The
default set during installation is PUB.
Using QAD BI, OpenEdge 10 Edition
81
Cognos Transformer
The Cognos Transformer tab includes path preferences used by the
Cognos PowerPlay Transformer. The ETL tool uses these settings to set
the values in the Cognos Transformer.
Fig. 1.53
Application
Settings, Cognos
Transformer Tab
Models. Enter or browse to the location where the Cognos model files
were installed or copied.
Data-Temp. Enter or browse to the location that the Cognos
Transformer should use to store temporary data files created during
cube generation.
Model-Temp. Enter or browse to the location that the Cognos
Transformer should use to store temporary files created during model
operations.
Cubes. Enter or browse to the location where the Cognos
Transformer should create the cubes.
Log. Enter or browse to the location where the Cognos Transformer
and Data Transformer should write the log files.
The following optional properties are used when building Cognos models
in which Cognos security has been enabled. Cognos security is set up
using the Cognos Access Manager and stored in a local authentication
export (.lae) file or LDAP-compliant namespace.
82
User Guide — QAD Business Intelligence
Login. Specify the log-in for a Cognos user whose authority will be
used to regenerate the models.
Password. Specify the password for a Cognos user whose authority
will be used to regenerate the models.
User Class. Specify a Cognos User Class to which the specified login user belongs and which will be used to regenerate the models.
For additional information regarding the use of the Cognos cube security
and Transformer, see the Cognos Transformer online help and user
documentation.
Replication
Use the settings on the Replication tab to determine the replication
strategy.
Fig. 1.54
Application
Settings,
Replication Tab
Host Mode. Choose how QAD BI is deployed.
Local Host (DWH): Choose this if the data warehouse database is
located on the same server as the QAD BI Data Transformer.
Remote Host (DWH): Choose this if the data warehouse database
and QAD BI Data Transformer are installed on different servers.
Connection Mode. Choose which method QAD BI Data Transformer
uses to exchange data.
Using QAD BI, OpenEdge 10 Edition
Shared Memory Mode: The application exchanges data through
shared memory. Choose this if QAD BI is deployed in local host
mode since it is a faster way of exchanging data. Using a
designated area of shared memory, the data can be made directly
accessible to both client and server processes without having to
use the system services.
Client/Server Mode: The application transfers data through
TCP/IP.
Note If QAD BI is deployed in remote host mode, only client/server
mode can be used and the connection mode options are grayed-out.
User Mode. Choose whether the application runs in single-user or
multiple-user mode.
Single User: Only one user can exclusively connect to the data
warehouse database.
Multiple Users: Multiple users can connect to the data warehouse
database simultaneously.
Note If the connection mode is client/server, only the multiple-user
mode can be used and the user mode options are grayed-out.
Replication Mode. Choose the replication strategy.
Serial Replication: Each task is processed sequentially based on
its defined sequence—that is, its priority.
Parallel Replication: Choose this strategy to allow for more than
one replication task to be processed concurrently by separate
Progress processes. With parallel replication, a pool of processors
is created and each processor is assigned a task to process. As a
processor finishes a task, it is assigned another task to be
processed until all tasks have been performed with respect to
sequence order.
Batch Process
Use settings on the Batch Process tab to customize QAD BI in the
following areas:
• Improve performance.
• Allow concurrent access to the data warehouse while the batch is run.
• Use the Progress-supplied database server administration.
83
84
User Guide — QAD Business Intelligence
• Use custom scripts (batch files) to start and stop the data warehouse.
Fig. 1.55
Application
Settings, Batch
Process Tab
Database. Enter or browse to the location of the data warehouse file.
By default, this is the dwh.db file in the directory where QAD BI is
installed.
Repository. Enter or Browse to the location of the data warehouse
repository. By default, this is the dwh-admin.db file in the directory
where QAD BI is installed.
Database Management. Select the method to use to start and stop the
data warehouse—Progress Explorer or Scripts. Depending on this
setting, you can update the fields in the appropriate frame.
Single User Batch Process. Specify whether the data warehouse
database is started in single-user mode when running the batch
process. If selected, no other connections to the data warehouse are
accepted until the batch process completes. This field is not available
when parallel replication is selected on the AppServer tab—that is,
the Use AppServer check box is selected.
Use non-integrity parameter. Specify whether the data warehouse is
started in non-integrity mode. When this option is selected, Progress
runs without using the database integrity or database recovery
features.
Using QAD BI, OpenEdge 10 Edition
Important Selecting this option can improve system performance.
However, if Progress fails for any reason, you cannot recover the
database. Use this feature with caution and make sure you have an
adequate database backup strategy.
Log Language. Select the language in which the log information is
written.
Log Level. Select the level of log information to be captured.
Error: Displays functional errors
Warn: Displays activities that may cause errors, as well as errors
Info: Displays trace of user activities, as well as errors and
warnings
Debug: Displays debug information for developers, as well as
errors and warnings
Log to DB. Specify whether to store log information in the
administration database as well as write log files.
Note Whether or not you choose to log to the administration
database, log files are always generated.
Start. If Database Management is Scripts, enter or browse to the
appropriate script files that are used to start the data warehouse.
Stop. If Database Management is Scripts, enter or browse to the
appropriate script files that are used to stop the data warehouse.
Database. Enter the data warehouse database name as defined in the
Progress Explorer.
Host. Enter the Progress server defined in the Progress Explorer and
assigned to manage the data warehouse.
Config. Enter the Progress Explorer Configuration to use to start and
stop the data warehouse.
Port. Enter the port or service the data warehouse runs under. This is
defined in the Progress Explorer Configuration.
User. Enter a user authorized to start and stop the data warehouse.
Password. Enter the password of the user authorized to start and stop
the data warehouse.
85
86
User Guide — QAD Business Intelligence
AppServer
The AppServer tab includes the AppServer configuration information
when parallel replication is used. For more details on parallel replication,
see “QAD BI Parallel Replication Setup” on page 178.
Note When serial replication is used, all the fields under the AppServer
tab are disabled.
Fig. 1.56
Application
Settings,
AppServer Tab
AppService. Enter the name of the AppServer broker. This is the
same value that appears in the Progress Explorer tree under the
AppServer folder. Also referred to as the AppServer name.
AppServer Host. Enter the name of the server where the AppServer
has been installed.
NameServer Port. Specify the port to which the NameServer has
been configured to listen. The default is 5162.
Pool Size of Script. Specify the number of AppServer processes that
will be available to execute scripts. Four is a good starting value for
testing. The value entered here must be one less than the value of the
Minimum and Maximum Servers settings on the AppServer
properties screen. See “QAD BI Parallel Replication Setup” on
page 178 for details.
Using QAD BI, OpenEdge 10 Edition
Pool Size of Cube. Specify the number of AppServer processes that
will be available to generate cubes. Four is a good starting value for
testing. The value entered here must be one less than the value of the
Minimum and Maximum Servers settings on the AppServer
properties screen. See “QAD BI Parallel Replication Setup” on
page 178 for details.
Note Do not set this value too high. Entering a value that is too large
can reduce performance on hardware that is insufficient to handle the
processing load.
DWH-ADMIN Host. Specify the name of the server where the
administration database is running.
DWH-ADMIN Service. Specify the port to which the administration
database is configured to listen. The default is 24001.
DWH-ADMIN Network. Specify the protocol that the administration
database is configured to use for communication. Default is TCP.
AppServer Log Directory. Specify the directory to which all log files
will be written.
AppServer Error Log. Specify the name of the AppServer error log.
AppServer Replication Log. Specify the name of the AppServer
replication log.
For additional information on using parallel replication with Data
Transformer, see “QAD BI Parallel Replication Setup” on page 178.
87
88
User Guide — QAD Business Intelligence
Notification
The Notification tab includes information the system uses to send e-mail
messages when an error occurs during batch processing.
Fig. 1.57
Application
Settings,
Notification Tab
Enable Notification. When this is selected, e-mail is sent when errors
occur during batch processing.
SMTP Server. Enter the name of the Simple Mail Transfer Protocol
server to use to send the e-mail
e-mail Address. Enter the e-mail address of the person you want to
receive the e-mail notifications.
Return Address. Enter the e-mail address of the person you want to
be used for the return address on the e-mail.
Performing Administration Tasks
Update User Records
During installation, a single default user is defined with database
administrator rights in the Progress Administration database:
Default user ID: dwh
Default password: admin
Using QAD BI, OpenEdge 10 Edition
89
You can modify this default information, as well as create additional users
or delete existing ones, with the following procedure:
1
Start Progress Data Administration.
2
Select Database|Connect and enter connection information on the
Connect Database screen. If the default installation was performed,
the connection parameters are:
• Physical Name: dwh
• Logical Name: dwh
• Network: TCP
• Multiple Users: checked
• Host Name: localhost
• User ID: dwh
• Password: admin
Fig. 1.58
Updating User Data
3
Select Admin|Security|Edit User List.
4
On the Edit User List screen, click Add, Modify, or Delete to manage
users.
For additional information on managing users in a Progress database, see
the Progress System Administration Guide.
90
User Guide — QAD Business Intelligence
Set Up Windows Task Scheduler
You can use Data Transformer to define the replication schedule for each
individual task. See “Scheduling Automatic Replication” on page 39 for
information on defining task schedules in Data Transformer.
However, you also must set up an operating-system-level scheduling task
to look at the individual task schedules and run the processes accordingly.
Note This procedure is based on Windows XP Professional. It may vary
for other versions of Windows.
1
To run the Windows Task Scheduler Wizard, select Start|Control
Panel|Scheduled Tasks|Add Scheduled Tasks.
2
Click Next to continue.
3
Click Browse and select the Run Tasks shortcut located in the
directory where program files were installed.
4
Choose the task schedule:
• Daily
• Weekly
• Monthly
• One time only
• When my computer starts
• When I log on
Depending on your choice, you may be prompted for further scheduling
information.
Important The schedule you define here describes when Windows
launches its own scheduling task, which in turn looks at Data Transformer
scheduling tasks. You should be sure to define the Windows task so that it
is appropriate to the schedule granularity defined for Data Transformer.
For example, it would not make sense to define a monthly Windows task
if you want to replicate tables every day.
5
Enter the name of a Windows account with sufficient access
privileges to execute Data Transformer on the target machine.
6
Select the date and time for the task to begin.
Using QAD BI, OpenEdge 10 Edition
7
Click Finish to save the task.
Using BI Monitor
BI Monitor User Interface
This section describes user interface features specific to BI Monitor.
To start BI Monitor, launch the program from the Windows Start menu.
By default, choose All Programs|QAD BI|Monitor.
The BI Monitor main screen includes a menu bar, a task set pane, and a
task pane.
The task set pane on the left shows execution information of currently
running task sets or task sets history logs.
The upper part of the task pane on the right displays execution
information of all tasks pertaining to the selected task set in the task set
pane. Tasks are displayed in a paginated view. You can use the navigation
controls at the bottom of these screens to easily page through records or
jump to a page by its number.
The lower part of the task pane displays task details including task type,
sequence, number of deleted and copied records, and error messages.
In both panes, you can use the search box at the top to filter records. Use
vertical scroll bars to scroll through records and horizontal scroll bars to
scroll through details.
Clicking the <| button on the upper-left corner of the task pane hides the
task set pane and the button becomes |>. Clicking the button again
displays the task set pane.
To exit BI Monitor, click the Exit button at the bottom.
Important To use BI Monitor to monitor and manage tasks, you must set
the Log to DB option to Yes under the Batch Process tab of Application
Settings. See “Batch Process” on page 83.
91
92
User Guide — QAD Business Intelligence
Fig. 1.59
QAD BI Monitor
Main Screen
Status Icons
BI Monitor distinguishes tasks and task sets using icons.
There are three task set statuses:
• Running: The task set is being executed.
• Finished: All tasks in the task set have been executed successfully
without any errors.
• Error: One or more errors occurred during execution of tasks in the
task set.
There are six task statuses:
• Running: The task is being executed.
• Pending: The task is waiting to be executed.
• Stopping: The task is being stopped.
• Stopped: The task has stopped.
• Finished: The task has been executed successfully without any errors.
• Error: Error occurred during execution of the task.
Using QAD BI, OpenEdge 10 Edition
The statuses are represented by the following icons.
Table 1.7
Icon
Description
Icon
Description
Running
Pending
Stopping
Stopped
Finished
Error
Monitor and Manage Currently Running Tasks
By default, BI Monitor displays currently running task sets in the task set
pane. Select a task set to display all its tasks in the task pane. Select a task
in the task pane to view its detailed information in the lower section of the
task pane.
Specify search criteria in the search box at the top of the task pane and
click Search to filter tasks by task name, task status, and database.
To stop a currently running task, select it and click the Stop Task button.
This stops the selected task and starts execution of the next task in the
queue.
By default, the running tasks/task sets screen refreshes every 10 seconds.
You can change the refresh rate by choosing Preference from the Settings
menu and specifying a new value in the Preference dialogue box. You can
also manually refresh the screen by clicking the Refresh button at the
bottom. To disable the auto refresh feature, clear the Auto Refresh option
from the Control menu.
You can define how often task events are logged by choosing Settings|
Preference and specifying the Logging Frequency value in the Preference
dialogue box.
Status Icons
93
94
User Guide — QAD Business Intelligence
View Tasks and Task Sets Logs
To view history information of tasks and task sets, select Log in the search
box at the top of the task set pane. Specify a start date and an end date and
click Search to view all task set runs executed within this time range.
If no start date is specified (the check box next to the date is cleared), the
search lists all task set runs executed before the specified end date. If no
end date is specified, the search lists all task set runs executed after the
specified start date. If neither start date nor end date is specified, the
search lists all executed task set runs.
Select a task set to display all its tasks in the task pane. Select a task in the
task pane to view its detailed information in the lower section of the task
pane.
Specify search criteria in the search box at the top of the task pane and
click Search to filter tasks by task name, task status, and database.
Tasks/task sets log screen does not refresh automatically. You can refresh
the screen manually by clicking the Refresh button.
Archive Tasks and Task Sets Logs
Log information stored in the administration database can grow large over
time and bring down system performance. Archiving frees up space and
improves the performance of the administration database by dumping log
data in table contents (.d) files when it is old or not in use anymore. If
required, Table contents can be loaded back to store log information in the
administration database.
To archive log data:
1
Choose Archive from the Control menu.
2
In the Archive dialog box, specify a date range in which log data will
be archived and click OK.
If no start date is specified (the check box next to the date is cleared),
all log data before the specified end date will be archived. If no end
date is specified, all log data after the specified start date will be
archived. If neither start date nor end date is specified, all log data
will be archived.
Using QAD BI, OpenEdge 10 Edition
3
An archiving progress bar displays. When archiving completes, you
are returned to the BI Monitor main screen.
Installing and Configuring QAD-Provided
Dashboards
If you purchased QAD-provided dashboards, you can implement
dashboard reports in QAD 2007.1 or later using the applicable version of
QAD .NET UI.
Before installing QAD dashboards, you must first install required QADprovided business models and generate corresponding cubes:
For dashboard
Install model
Generate cube
PurchaseManager
QAD BI
Purchasing/Vendor
Rating
Purchase Statistics Cube
SalesManager
QAD BI Sales Analysis Sales Analysis Cube
QAD BI Forecasting
WarehouseManager QAD BI Inventory
Monitoring
Sales Forecast Performance Cube
Current Inventory Analysis Cube
Inventory History Analysis Cube
See “Using QAD-Provided Model Data 73” on page 5 and “Working with
the Model” on page 69 for details on how to set up QAD-provided
business models and create cubes.
Perform the following steps to implement QAD-provided dashboards.
• Create Data Source Connections
• Install QAD-Provided Dashboards
• Configure Cognos Server Settings
• Perform Report Synchronization
• Create Menu Entries for the Dashboards
Create Data Source Connections
You must create data source connections to the required QAD BI business
model cubes in Cognos to use them in dashboard reports.
95
96
User Guide — QAD Business Intelligence
To create data source connections to QAD BI business model cubes:
1
Log in to Cognos Connection.
2
On the toolbar, choose Tools|Directory.
3
Click the Data Sources tab.
4
Click the new data source button.
5
In the Name box, type one of the following, and then click Next:
• Purchase Statistics Cube
• Sales Analysis Cube
• Sales Forecast Performance Cube
• Current Inventory Analysis Cube
• Inventory History Analysis Cube
Important The name is case-sensitive and you must type exactly the
same name as listed above.
6
In the connection page, under Type click Cognos PowerCube, and
then click Next. The connection string page for the selected database
appears.
7
In the Read cache size (MB) field, enter the cache size of the cube in
megabytes. If you leave this field blank or enter 0, Cognos
Connection uses the default value in the ppds_cfg.xml file in the
configuration folder.
8
In the Windows location field, enter the location and name of the cube
file for the data source connection.
9
To test whether the parameters are correct, click Test.
10 Click Finish.
11 Repeat steps 4 through 10 to create data source connections for all the
QAD BI business model cubes required for implementing the QADprovided dashboards.
Using QAD BI, OpenEdge 10 Edition
97
Install QAD-Provided Dashboards
1
Launch install.exe from the QAD Dashboard installation CD.
2
An introduction screen displays. Choose Next to continue.
3
The BI Admin Server Configuration screen displays. Enter the correct
information for connecting to the QAD BI administration database.
Fig. 1.60
BI Admin Server
Configuration
Host. Enter the host where the QAD BI administration database is
running.
Port. Enter the TCP/IP port on which the QAD BI administration
server is listening for database connections.
Database. Displays the QAD BI administration database name.
User and Password. Displays the username and password for
connecting to the QAD BI administration database.
Click Next to continue.
4
On the Cognos Server Configuration screen, enter the correct Cognos
Server configuration information.
98
User Guide — QAD Business Intelligence
Fig. 1.61
Cognos Server
Configuration
Gateway URL. Enter the gateway URL to connect to the Cognos
server. This is a required field.
A gateway is an extension of a Web server program that transfers
information from the Web server to another server. Gateways are
often CGI programs, but may follow other standards such as ISAPI
and Apache Modules.
Namespace. Enter the logon namespace to log on to the Cognos
server as a full authentication provider.
Namespace is a configured instance of an authentication provider that
allows access to user and group information for authentication and
access control.
User and Password. Enter the username and password combination
that is authorized to access applications and resources on the Cognos
server. The username is part of the credential created on the Cognos
server for user authentication.
For information on setting up credentials on the Cognos server, see
the Cognos server installation guide.
Click Next to continue.
5
On the second Cognos Server Configuration screen, enter the Cognos
installation directory.
Using QAD BI, OpenEdge 10 Edition
Fig. 1.62
Cognos Server
Configuration
Cognos Installation Directory. Enter the directory where Cognos is
installed.
Cognos Version. Indicates the version of Cognos installed.
Operating System. Indicates the server operating system.
Click Next to continue.
6
On the Cognos Metadata Model Publish screen, select the dashboard
metadata models you want to deploy on the Cognos Server.
Fig. 1.63
Metadata Model
Publish
99
100
User Guide — QAD Business Intelligence
If you want to deploy a dashboard metadata model using different
package and data source names than the default values, click the
Advanced button next to the dashboard. You can then modify package
and data source names in the Alias fields. Click Save to save your
changes.
Fig. 1.64
Metadata Model
Publish
Click Next to continue.
7
On the Report Deployment screen, select the dashboard reports you
want to deploy on the Cognos Server.
Note To successfully implement reports for a dashboard, you should
also deploy its metadata model in the previous step.
Fig. 1.65
Report Deployment
Using QAD BI, OpenEdge 10 Edition
101
Click Next to continue.
8
An installation summary screen displays. If all information is correct,
click Install to proceed with the installation.
Fig. 1.66
Installation
Summary
9
When installation is complete, exit the installation program.
Configure Cognos Server Settings
Use Report Control to configure Cognos server settings in QAD ERP.
1
Log in to the ERP and go to Report Control (36.4.21.24).
2
Enter the correct information that matches the Cognos server settings
configured in Cognos.
Fig. 1.67
Report Control
(36.4.21.24)
Gateway. Enter the gateway URL to connect to the Cognos server.
102
User Guide — QAD Business Intelligence
A gateway is an extension of a Web server program that transfers
information from the Web server to another server. Gateways are
often CGI programs, but may follow other standards such as ISAPI
and Apache Modules.
Dispatcher. Enter the internal dispatcher URI to connect directly to
the dispatcher.
WSA WSDL. Enter the WSDL (Web Services Definition Language)
file URL. This is configured when the WSA (Web Services Adapter)
is installed.
Logon Namespace. Enter the logon namespace to log on to the
Cognos server as a full authentication provider.
Namespace is a configured instance of an authentication provider that
allows access to user and group information for authentication and
access control.
You can configure Cognos 8 components to use the Windows native
security, NT LAN Manager (NTLM), as the authentication source, or
configure a new LDAP namespace for use with Sun ONE Directory
Server.
See the related Cognos 8 documentation for information about how to
configure namespaces in Cognos.
Logon Username. Enter a username that is authorized to access
applications and resources on the Cognos server. The username is
part of the credential created on the Cognos server for user
authentication.
Note This does not have to be a valid system user ID.
Update Password. Indicate whether you want to change the password
associated with Logon Username.
Yes: When you press Go, you will be prompted to enter and confirm
the new password.
No: The user’s password will not be changed.
Namespace Type. Specify the type of the namespace configured as a
third-party trusted signon provider. Two namespace types are
supported by the Cognos server: LDAP (LDAP version 3 directory
servers) and NTLM (Windows Native Security).
Using QAD BI, OpenEdge 10 Edition
103
The authentication namespace configuration is part of the Cognos
Content Manager installation on the Cognos server.
Report Runner Namespace. Enter the namespace configured as a
third-party trusted signon provider to perform user authentication to
run reports.
Report Runner Username. Enter a username that is authorized to run
reports on the Cognos server. The username is part of the credential
created on the Cognos server for user authentication.
3
Press Go. Do not change anything on the second screen and exit the
program.
Perform Report Synchronization
Use Report Synchronization to synchronize the deployed dashboard
reports from the Cognos server to the ERP as report resources.
1
In QAD ERP, go to Report Synchronization (36.4.21.2).
2
Accept the defaults on the first screen and press Go. Choose Yes
when prompted to confirm the information.
Fig. 1.68
Report
Synchronization
(36.4.21.2)
3
The next screen lists all the reports that do not have matching report
resources in the system. If installed, you can find the following QADprovided dashboard home pages:
• PurchaseManagerHomepage
• SalesManagerHomepage
• WarehouseManagerHomepage
Note Dashboard reports accessible from these home pages are not
displayed and will be synchronized along with associated home
pages.
104
User Guide — QAD Business Intelligence
Fig. 1.69
Mismatching
Reports List
4
Enter or select from the mismatching report list the name of the
dashboard home page that you want to take action on.
5
Set the action on the selected dashboard home page to Create. The
Create action creates a new report resource in the system from the
selected report on the Cognos server. The actions you choose will be
displayed for the corresponding report in the mismatching report list.
Note The actions will not be executed until you save the changes.
6
Enter a unique report code identifying a report resource in the system.
The code defaults from the name of the specified dashboard home
page.
Press Enter.
7
Repeat steps 4 through 6 for all the dashboards you want to
synchronize from the Cognos server to QAD ERP.
8
Press End and choose Yes to execute the synchronization.
Using QAD BI, OpenEdge 10 Edition
Create Menu Entries for the Dashboards
Create menu entries for the new dashboard home pages using Menu
System Maintenance.
1
Log in to the ERP and go to Menu System Maintenance (36.4.4).
2
On the Menu System Maintenance screen, assign a menu label and a
report code to the menu number you want to set up for the dashboard
home page.
Fig. 1.70
Menu System
Maintenance
(36.4.4)
Language ID. Specify a language code that uniquely identifies the
language you want to use for the menu label.
Menu. Enter a number associated with the menu from which to access
the dashboard home page.
Selection. Enter a menu selection number associated with the
dashboard home page.
Label. Enter a label name for this menu selection.
Name. Optionally, enter a short, symbolic name associated with the
dashboard.
Exec Procedure. Specify the report code of the dashboard home page
in the following format:
urn:qad-report:cognos:ReportCode
105
106
User Guide — QAD Business Intelligence
The report code was specified when you synchronized the dashboard
home page from the Cognos server to QAD ERP. See “Perform
Report Synchronization” on page 103.
Press Go to save the record.
3
You have set up the menu for accessing a QAD BI dashboard from
the QAD .NET 2.7 user interface in QAD ERP. Repeat the previous
step to create menu entries for all the dashboards you want to
implement.
Chapter 2
Using QAD BI,
Progress 9 Edition
Overview
108
Data Transformer User Interface
111
Setting Up QAD BI Data Transformer
Using QAD-Provided Model Data
Modifying Application Settings
Performing Administration Tasks
160
164
173
118
108
User Guide — QAD Business Intelligence
Overview
The QAD Business Intelligence (QAD BI) product lets users extract and
restructure data from MFG/PRO and other data sources into a Progressbased data warehouse presenting a business-oriented view of the
enterprise. Analysts can use Cognos 8 to perform powerful
multidimensional analysis against the data warehouse.
The QAD BI solution includes:
• One or more existing data sources
• The Data Transformer Extract-Transform-Load (ETL) tool
• Data warehouse
• A Microsoft Access database used as a database proxy between the
data warehouse and PowerPlay
• The PowerPlay application from Cognos
Figure 2.1 illustrates the overall structure of QAD BI.
Fig. 2.1
QAD BI Overview
Cognos
OLAP Cubes
Windows
Scheduler
O
ODBC
is
lys
na
-A
M
O
C
ld
ui
eb
R
-
P
LA
Batch Execute
MFG/PRO
Progress
4GL
QAD BI
QAD BI
Data
Data
Transformer
Transformer
4GL
Data
ODBC
Warehouse
(Progress)
Warehouse Analysis
Proxy
(Access)
Cognos
Cognos
PowerPlay
PowerPlay
Progress
W
e
rit
Scripts
QAD BI
Configuration
(Progress)
W
rite
COM - Table Links
Admin
Log
Im
po
rt
XML
Configuration
The following sections summarize the role each element plays in QAD
BI. See Installation Guide: QAD Business Intelligence for information on
installing and configuring the individual components.
Using QAD BI, Progress 9 Edition
MFG/PRO
MFG/PRO databases are the primary source of the data that is made
available within the data warehouse by the ETL process for analysis in
Cognos PowerPlay.
In a multi-database environment, the data warehouse can be configured to
populate the same table from more than one source database.
Note While you can have multiple data sources, language combinations
are restricted to compatible code pages. See Installation Guide: QAD
Business Intelligence for supported MFG/PRO versions.
See the user guides for your version of MFG/PRO for information on its
features.
QAD BI Data Transformer
Data Transformer is an ETL tool for building and maintaining a data
warehouse specifically designed to support analysis. You can use the Data
Transformer to configure tasks to structure the data warehouse or load and
then modify predefined business models from QAD.
Data Transformer generates a set of Progress scripts to synchronize the
data warehouse with the source databases. Progress developers can
customize the automatically generated scripts or create new scripts to
extend the ETL process.
This guide includes detailed information on using the features of Data
Transformer to configure your QAD BI environment.
Data Warehouse
The data warehouse is a Progress database that is populated with data
from MFG/PRO and/or other data sources during the ETL process. The
data warehouse is an environment separate from the source databases
where data can be specially structured to support analysis.
109
110
User Guide — QAD Business Intelligence
Microsoft Access Database
Access is used as a query layer that makes data in the Progress warehouse
available to Cognos PowerPlay. The Access database itself does not store
any data. Instead, it serves only to maintain relationships for the data
warehouse and to provide an interface for the Cognos PowerPlay
Transformer.
In the QAD BI architecture, Access provides the connection to the data
warehouse using ODBC and is referred to as the data warehouse proxy.
An Update Links command available in QAD BI Data Transformer is
used to update the table links when changes take place in the data
warehouse.
See the Microsoft user documentation for details on using Microsoft
Access.
Cognos PowerPlay
An important part of the QAD BI solution is supplied by Cognos
PowerPlay—an online analytical processing (OLAP) software application
that lets users perform multidimensional analysis, create reports, and
share them to make better decisions.
PowerPlay draws information from the data warehouse using the proxy to
model and build PowerCubes, or simply cubes—the Cognos term for
optimized, multidimensional data sets that enable users to perform
analysis with quick response times.
See the Cognos documentation for information on configuring and using
PowerPlay, as well as on how to configure PowerCubes.
QAD-Provided Models
QAD sells the following seven models to provide out-of-the-box analysis
for standard MFG/PRO installations. The seven models together provide
support for more than 100 key performance indicators (KPIs).
• Inventory monitoring, for insight into current and historic inventory
trends
Using QAD BI, Progress 9 Edition
• Manufacturing performance, including statistics on work orders,
production costs, productivity, and throughput
• Forecasting performance
• Sales analysis, including statistical trends in sales and revenue
margins
• Financial controls, encompassing gauges for profitability,
investments, and the effectiveness of financial management
• Purchasing controls, from patterns in purchase price and cost, to
materials delivery
• Service performance insights, including service profitability and
trends in customer calls and contract selection
For information on the models and KPIs, see Reference Guide: QAD
Business Intelligence Key Performance Indicators. This is provided on
the installation CD for each model you purchased.
A model is realized by the following components:
• Replication tasks to extract, transform, and load selected data from
MFG/PRO into the data warehouse.
• Relationship definitions for the model tables in the data warehouse
defined in the data warehouse proxy (Access).
• Cognos OLAP model defining the multidimensional representation of
the tables in the data warehouse. Building the OLAP model creates an
OLAP cube that can be analyzed using the Cognos reporting tools.
See “Using QAD-Provided Model Data” on page 160 for information on
how to implement models.
Data Transformer User Interface
Important This guide is limited mainly to descriptions of the features of
QAD BI Data Transformer. For information on user interfaces for
associated tools such as Cognos PowerPlay and Microsoft Access, see the
user documentation for those products.
QAD BI Data Transformer features a Windows-based graphical user
interface. Windows conventions are used throughout the product; for
example, drop-down menus, shortcut menus, drag-and-drop, and so on.
111
112
User Guide — QAD Business Intelligence
This section describes user interface features specific to QAD BI Data
Transformer.
Starting
As part of the initialization process, the Data Transformer prompts for
user credentials.
Fig. 2.2
QAD BI Data
Transformer Log-in
Screen
The credentials provided are authenticated against the users configured in
the data warehouse database. When installed, the data warehouse
database is configured with a single user:
User: dwh
Password: admin
You can add new users or change the default user with the Progress Data
Dictionary tool connected to the data warehouse database. See “Update
User Records” on page 173 for details.
The language selected from the drop-down list determines the language in
which text labels and menus display.
Important If you chose to enable the support of multiple code page data
sources during installation, a warning message displays after log-in.
Ignore it and choose OK. It has no impact on your application and
database.
Using QAD BI, Progress 9 Edition
113
Fig. 2.3
Log-In Warning
Navigating
Navigation within the Data Transformer provides up to three methods of
accessing individual functions, depending on the type of action being
performed:
• Menus on the Data Transformer main screen
• Toolbar commands
• Context-sensitive shortcut menus
The primary view of the Data Transformer is the main screen, which
includes a toolbar, a menu bar, and a two-pane navigation tree.
The left pane shows the current structure of the data warehouse. When
completely minimized, the top-level tree is a series of category folders.
When completely maximized, it lists all the tables and custom scripts in
the warehouse. Select a table to display its fields in the right pane.
Fig. 2.4
QAD BI Data
Transformer Main
Screen
114
User Guide — QAD Business Intelligence
Some functions are available using any of these methods. For example,
when a table is selected in the main menu, you can define subsets by
clicking Subset on the Tools menu, clicking the Subset command on the
toolbar, or right-clicking the table name and selecting Subset. Whichever
method you use, the same Map Table screen displays.
Note Some screens include their own toolbars, typically containing two
or three additional commands that apply only to the current function.
Other functions are available using only one method. For example, on the
Indexes screen, you must click a command to add or delete an index, or to
define a primary index.
Toolbar Commands and Menu Functions
Table 2.1 through Table 2.5 list the menu functions and related toolbar
commands.
Table 2.1
Main Screen
Toolbar Commands
Command
Menu Function
Replication Setup
Subset
Check Scripts
Update Links
Execute Now
Preview Data (data warehouse)
Refresh
Field Mapping
Using QAD BI, Progress 9 Edition
Command
115
Menu Function
Properties
Task List
Add Database
Application Settings
Rebuild Links
Table 2.2
Command
Menu Function
Field Selection
Toolbar Commands
Field Properties
Add Field
Delete Field (custom tables only)
Table 2.3
Command
Menu Function
Add Index
Delete Index
Designate as Primary Index
Designate as Business Key Index
Indexes Toolbar
Commands
116
User Guide — QAD Business Intelligence
Command
Menu Function
Delete Business Key Index
Designate as Complete Business Key
Index
Designate as Incomplete Business Key
Index
Table 2.4
Import Metadata
Toolbar Commands
Command
Menu Function
Open and load metadata file
Exit screen without loading metadata
Table 2.5
Tasklist Toolbar
Commands
Command
Menu Function
Select All
Select None
Note Toolbar commands are context sensitive; they are enabled only
when the function they represent is appropriate to the current task or
selection. Unavailable commands display in gray.
Other situations require you to right-click to display and choose available
functions. For example, to assign tables to the data warehouse structure,
you must right-click the appropriate database and choose the Select
Tables command. There is no other access point for this function.
Using QAD BI, Progress 9 Edition
Source System Icons
The Data Transformer distinguishes items in the left pane of the main
screen (the tree) using icons. Table 2.6 lists the icons and their
descriptions.
Table 2.6
Icon
Description
Icon
Description
Server
Table with script error
Schema holder
Subset
Connected domain database
Validated code table
Disconnected domain
database
Non-validated code table
Connected database or
domain
Code table with script error
Disconnected database or
domain
Validated custom script
Logical grouping
Non-validated custom script
Source table prior to
replication setup
Custom script with script error
Validated table
Cube
Non-validated table
Custom table
Merged table
Source System
Icons
117
118
User Guide — QAD Business Intelligence
Setting Up QAD BI Data Transformer
This section describes the steps necessary to connect to an MFG/PRO
database that provides source data to the QAD BI analysis tools, as well
as define the tables and fields that are included in the analysis models.
Additionally, you control how and when data is replicated between this
database and the data warehouse, which serves as the actual source of
data used in analysis.
You can use one of the following methods to set up the Data Transformer:
• Perform a manual setup by defining tables and fields based on the
MFG/PRO database schema.
• If you purchased one or more of the QAD-developed business
models, load table definitions and scripts; then use the Data
Transformer tools to fine-tune your environment as needed.
See “Using QAD-Provided Model Data” on page 160 for information.
Using QAD BI, Progress 9 Edition
Figure 2.5 summarizes the work flow used in the setup tasks. Subsequent
paragraphs describe each task.
Fig. 2.5
Define
Definedatabase
databaseconnections.
connections.
Load
LoadQAD-defined
QAD-definedmodels
models
from
frommeta
metadata.
data.
IfIfrequired,
required,adjust
adjusttable
tableand
andfield
field
properties;
properties;create
createadditional
additional
subsets
subsetsand
andcustom
customdata.
data.
Select
Selecttables
tablesfrom
fromMFG/PRO
MFG/PRO
database.
database.
Set
Setup
upreplication
replicationby
byadding
adding
MFG/PRO
MFG/PROtables
tablesand
andfields
fieldstoto
data
datawarehouse.
warehouse.
Create
Createsubsets.
subsets.
Create
Createcustom
customscripts
scriptsand
and
tables.
tables.
Schedule
Schedulereplication.
replication.
Add
Addororadjust
adjustindexes.
indexes.
Optional
Modify
Modifyapplication
applicationsettings
settings
and
andperform
performadministrative
administrative
tasks.
tasks.
Define Database Connections
Note Many required connection settings are specified during QAD BI
installation. See “Modifying Application Settings” on page 164 if you
need to modify any of this information.
Before you begin mapping fields from the source MFG/PRO database to
the data warehouse, you must define the connection parameters for the
MFG/PRO database. The Data Transformer reads the source schema,
which are used to define the tables and fields that make up the data
warehouse structure.
QAD BI Setup
Work Flow
119
120
User Guide — QAD Business Intelligence
To add a new source database connection, select File|Add Database or
click the Add Database command. To edit an existing source database
connection, right-click the database on the main Data Transformer screen
and select Properties.
If you did not enable support for multiple data sources during installation,
the code page of the source database must match the value specified for
default encoding during installation. If you did enable this support, the
code page of the source database must be either ISO8859-1 or the same
code page that you selected during installation. See Installation Guide:
QAD Business Intelligence for details on installing QAD BI Data
Transformer Files.
If you update existing properties, you must disconnect and reconnect to
the database to use the new settings.
Fig. 2.6
Database Properties
Physical Name. Specify the name of the database to connect.
Logical Name. Specify a logical database name that will be used to
uniquely identify the database and its data within the data warehouse.
This field can only be updated when a connection is first defined.
Using QAD BI, Progress 9 Edition
Active. Indicate whether this is an active connection. Databases
marked as active are automatically connected when the Data
Transformer is started. Tasks associated with databases marked as
inactive are not executed during batch (non-interactive) replication.
QADDB. Indicate if this is an MFG/PRO database (Yes) or not (No).
See “Domain Database Data Sources” on page 121.
Version. Select the MFG/PRO version associated with this database.
Remote. Indicate whether the database server is local or remote.
Host. When Remote is Yes, enter the host where the database server is
running.
Service. When Remote is Yes, specify the service name or TCP-IP
Port on which the remote database server is listening for database
connections.
Single-user. Indicate if this is a single-user or a multi-user
connection.
Other Parameters. Specify any additional Progress connection
parameters to apply to this connection.
Connection String. The system displays the connection string based
on the settings entered on the screen after the connection
configuration has been accepted.
Domain Database Data Sources
The introduction of the domain concept in the MFG/PRO database
provides flexible implementation options for supporting multiple business
operations within a single database and eliminates the need for a single
database-wide base currency or database-wide control settings. The
domain is essentially a logical partition within a single database. Any
number of domains can be set up in one physical database—each domain
with its own base currency, chart of accounts, and operating controls.
You add the domain database just as any other database, indicating the
version as eB2.1. The Data Transformer retrieves a list of all domains
defined in the database; each domain is displayed as a subnode of the
121
122
User Guide — QAD Business Intelligence
domain database. From that point forward, a domain is treated exactly as
any other database in the system and represented with the Database
Connected and Database Disconnected icons.
Important Only the domain database itself can be connected or
disconnected. Individual domains cannot be connected or disconnected
because they are physically realized in a single database. All domains are
connected based on their domain database’s status.
Text is appended to the logical names of the domain database and each
domain in the tree, to indicate the type of source system—domain
database or domain blade, which represents the individual domains within
the database. Additionally, the Database Properties screen for an
individual domain blade allows only the Active field to be modified. All
other fields are read-only and based on the information entered for the
domain database.
Fig. 2.7
Domain Database
in the Tree
Non-Progress Data Sources
You can connect to non-Progress relational databases using the Progress
DataServer technology. See the Progress DataServer for Oracle Guide,
the Progress DataServer for Microsoft SQL Server Guide, or the Progress
DataServer for ODBC Guide to learn about setting up and configuring
DataServers in Progress.
Once the DataServer has been set up, you configure the connection to the
schema holder database in the Data Transformer as described previously,
leaving the QADDB check box cleared. The Data Transformer lists all of
the schema images associated with the schema holder as child
Using QAD BI, Progress 9 Edition
123
connections after the schema holder has been connected. You can rightclick each of the child connections and choose Properties to configure
connection information specific to the targeted schema image.
For example, if the schema image references an Oracle database, you will
need to provide the following information in the Other Parameters field
on the Connection Properties screen to use Oracle SQL*Net networking:
-U [ORACLE-USERNAME]@[ORACLE-SID]
-P [ORACLE-PASSWORD]
Fig. 2.8
Schema Image
Database Properties
When a schema holder is first added, the Data Transformer retrieves all
defined schema images and creates additional connection records for each
one. You can limit the selection of schema images to include using either
the standard Delete function or the Select Schema Images screen.
124
User Guide — QAD Business Intelligence
Fig. 2.9
Select Schema
Images Menu Item
Use the Select Schema Images screen to choose which schema images
you want to work with and remove those you do not need to replicate.
Move schema images from the Available Schema Images list to the
Selected Schema Images list to have them show up in the tree.
Fig. 2.10
Select Schema
Images
Manage Domains
When a domain database is first added, the Data Transformer retrieves all
defined domains and creates additional connection records for each one.
These domains are created with the Active field set to false. You must set
this field to true for any domains you want to replicate before they can be
scheduled for the batch process.
Using QAD BI, Progress 9 Edition
125
Fig. 2.11
Database Properties
for an Individual
Domain
Select domains to include using either the standard Delete function or the
Select Domains screen.
Fig. 2.12
Select Domains
Menu Item
Use the Select Domains screen to choose which domains you want to
work with and remove those you do not need to replicate. Move domains
from the Available Domains list to the Selected Domains list to have them
show up in the tree.
126
User Guide — QAD Business Intelligence
Fig. 2.13
Select Domains
Select Tables
To begin constructing the data warehouse, you first select the tables you
want to add to the data warehouse from those in the connected data
source.
Note If you loaded the table mapping structure from QAD-provided
metadata, you do not have to use this procedure unless you want to
modify the default table selections.
To view the available tables, right-click the database icon in the left pane
of the main Data Transformer screen. Then choose Select Tables.
The system scans the schema definitions of the connected database and
displays the Select Source Tables screen illustrated in Figure 2.14.
Using QAD BI, Progress 9 Edition
Fig. 2.14
Select Source
Tables
The selection screen consists of six frames:
• The two on the left side represent source tables from the source
database. The system separates standard table listings from fields
controlled through generalized codes when connecting to a QADDB
database.
• The four frames on the right side represent destinations in the QAD
BI data warehouse. These are shown in three groups—Master Files,
Active Transactions, and Historic Transactions—as well as a fourth
division for fields using generalized codes.
Move tables from the left to the right side using drag-and-drop. You can
move tables from either frame on the left into any frame on the right.
If this is the first time you have selected tables from the database—unless
you added tables by loading QAD-provided metadata—the frames on the
right will be blank. Otherwise, tables you moved in earlier sessions
display in the frames where they were placed. Once a table has been
moved, it no longer displays in the source frame.
127
128
User Guide — QAD Business Intelligence
Note Drag-and-drop works in both directions. If you decide you do not
want a table to be replicated to the data warehouse, you can move it back
to the left side of the screen. If you save your changes and then decide you
want to remove a table that has not yet been set up for replication, reopen
the Select Tables screen and drag the table to its source location.
Important Removing a table from the right to the left once replication
setup has been completed has no effect on the structure of the data
warehouse. To remove a replicated table from the data warehouse, select
it on the main screen and choose Tools|Delete.
When you finish selecting tables, close the screen. The system prompts
you to save your changes.
The directory tree on the main screen updates to display a folder for each
of the destination frames that have had tables added.
Set Up Replication
After selecting the tables to be included in the data warehouse, you must
define how data should be extracted from the source table into the data
warehouse. Activities include:
• Map the source table to a new data warehouse table and apply filters.
• Select fields to be replicated and create calculated fields.
• Define replication and scheduling modes.
Map Tables to Warehouse Tables
To start the replication setup, select a table from the main screen and
choose Tools|Replication Setup. The Map Table screen displays
(Figure 2.16).
Important You cannot choose this option for a table that has already
been set up. Instead, select a table and choose individual options from the
Tools menu for the function you want to perform. For example, choose
Properties to modify the table mapping structure. If the table type is code
table, you can use the WHERE clause to define a filter (Figure 2.15).
Using QAD BI, Progress 9 Edition
129
Fig. 2.15
Table Properties
Mapping Filter
You can configure replication for all of the records in the table or for a
subset of the records in the table by applying a filter. Filters can also be
used to split a table into multiple table-like entities known as subsets,
each of which can be a replication target. See “Create Subsets” on
page 139 for details.
Fig. 2.16
Map Table
Source Table Name. The system displays the source table name.
130
User Guide — QAD Business Intelligence
Table Type. Read-only field that displays the table type—active,
historic, master, or code. The system categorizes the tables based on
this value.
DWH Table Name. Enter the name of a new data warehouse table that
will be created to hold data from the source table.
Source Table Filter. Enter Progress code to filter records that are
replicated to the data warehouse. Syntax for the filter always has the
same format:
WHERE {&SRC-DB}.tablename.fieldname [operator] <value>
AND/OR {&SRC-DB}. tablename.fieldname [operator] <value>
[Operator] can have the following values: = , >= , <= , <> , matches ,
begins.
When this is blank, all records are replicated. When you save your
changes, the system validates the syntax.
Click OK to save your changes and display the field mapping screen.
Map Fields to Warehouse Fields
Use the Field Selection frame to select the fields from the source table
that will be replicated to the data warehouse table.
Note After initial replication setup, access this function by selecting a
table and choosing Tools|Field Mapping.
Note If you loaded the database structure from QAD-provided metadata,
you do not have to use this procedure unless you want to modify the
default field mapping structure.
The first column indicates whether a field is included in the replication
process. When a field is selected on this screen, values are copied from
the source database to the data warehouse during replication.
Important When you first set up table replication, the DB-NAME (and
REC-ID for Progress data sources) fields are automatically configured.
These system-defined fields are used to maintain links between the data
source and the data warehouse. You cannot deselect them.
Using QAD BI, Progress 9 Edition
131
Fig. 2.17
Field Selection
Specifying Field Properties
To define the properties associated with each field, select it and click the
Properties command.
Note You can also define custom calculated fields by clicking the Add
Field command. The system displays a Field Properties screen with all
data fields blank and input enabled.
Fig. 2.18
Field Properties
DWH Field Name. Enter the name used to represent this field in the
data warehouse. The default is the MFG/PRO schema field name.
Note You also can rename a field directly on the field selection
screen by selecting its name and overtyping it.
132
User Guide — QAD Business Intelligence
Field Type. The system displays the field data type from the
MFG/PRO schema. You cannot change it.
Convert String to Upper Case. If the field type is Character, set this to
Yes to convert the field values to upper-case in the ETL script. This
can be used to rationalize data that is entered in mixed cases in the
data source for use in Cognos PowerPlay (a case-sensitive tool).
Description. Enter a text description of the field.
Expression. The system displays the field name or formula associated
with the field.
Click OK to save the properties of an individual field. When you finish
specifying field properties for the table, click OK to save your
configuration.
The system validates each field record for syntax.
• Valid: A green triangle on the table icon on the main screen indicates
that replication setup is complete for the table.
• Invalid: A yellow exclamation point displays on the table icon and a
message indicates the nature of the error.
Important To modify field properties for tables that have already
completed replication setup, you cannot access the Field Mapping
function through the Replication Setup screen. You must first select the
table on the main screen, and then choose Tools|Field Mapping. Select the
field you want to edit and click the Field Properties command.
Define Replication Method
To specify how the system replicates data between the data source and the
data warehouse, select a table on the main screen and choose Tools|
Properties. Then click the Replication tab.
Important The Properties tool is available only for tables that have
completed the replication.
Using QAD BI, Progress 9 Edition
133
Fig. 2.19
Table Properties,
Replication Tab
Note If you loaded the table warehouse structure from QAD-provided
metadata, you do not have to use this procedure unless you want to
modify the default setup.
Choose one of three replication methods:
• Incremental Load. Only records that have never been replicated to the
data warehouse are selected for replication. This method is typically
used for tables that contain historical records such as tr_hist and
ih_hist, or a combination of historical and active transaction records
such as wod_det or pod_det. Incremental load generally is not as time
consuming as a full refresh.
Important The replication process for incremental load does not
determine whether a record has been modified since the last
replication—only that it has been created. Be aware that using this
method for records that are commonly updated—master records, for
example—can create data synchronization problems between
MFG/PRO and the data warehouse.
• Full Refresh. The system clears all existing fields in the data
warehouse for the data source and completely replaces the contents.
This is typically used to replicate master data—often including tables
that do not contain more than 10,000 records. It is the default for
newly defined tables.
134
User Guide — QAD Business Intelligence
• Custom. Whether a table is replicated depends on some user-defined
condition; for example, replication only takes place when an item is
associated with a product line.
The system displays a default Progress replication script based on the
selected method. If you modify the code, Replication Mode is
automatically set to Custom. When you click OK, the system validates the
syntax. If there are errors, the table icon on the main screen displays a
yellow warning indicator to indicate that a problem exists.
Replicate Data
You can synchronize data between a data warehouse table and the
associated MFG/PRO table using two methods:
• Automatically, by setting up scheduling for each table
• Manually, by selecting the table on the main screen, then clicking
Execute Now on the Tools menu
The following sections describe these methods.
Scheduling Automatic Replication
Automatic replication takes place using either a serial or parallel strategy.
In serial replication, each task is processed sequentially based on its
defined sequence—that is, its priority. With parallel replication, a pool of
processors is created and each processor is assigned a task to process. As
a processor finishes a task, it is assigned another task to be processed until
all tasks have been performed with respect to sequence order.
Note The processor pool size is set to one less than the value of the
Minimum and Maximum Servers settings on the AppServer properties
screen. See “AppServer Pool Size” on page 173 for details.
In order to use parallel replication, the Progress AppServer must be
installed and configured on the same machine as QAD BI Data
Transformer. For information on setting up and using parallel replication
and configuring the AppServer, see “QAD BI Parallel Replication Setup”
on page 178.
Using QAD BI, Progress 9 Edition
135
Use the Scheduling tab to define when replication takes place for each
table in the data warehouse. You can set up different scheduling methods
for individual tables based on the frequency of changes to the source
table.
Important Automatic scheduling uses the Windows Task Scheduler to
start a QAD BI process to review the scheduled replication tasks on a
periodic basis.
See “Set Up Windows Task Scheduler” on page 175 for information.
Fig. 2.20
Table Properties,
Scheduling Tab
Activate. Select this field to have automatic replication take place on
the specified schedule. When Activate is not selected, you must
replicate this table manually using Tools|Execute Now.
When a database is marked as Inactive, you cannot change the
Activate check box. To set the database’s Active/Inactive status, use
the Database Properties screen.
Sequence. Specify the relative order in which the task associated
with this table should be replicated. Tasks are executed from low
sequences to higher sequences. Tasks that share the same sequence
may be executed in any order among themselves. In general:
• Tasks that pull data from sources into the data warehouse should
be scheduled to precede tasks that operate on data within the data
warehouse.
136
User Guide — QAD Business Intelligence
• Tasks that generate Cognos PowerCubes should be scheduled to
run after all other tasks.
For a more detailed discussion of setting the sequence for a
replication task, see “Setting the Replication Task Sequence” on
page 189.
Frequency. Specify how often the replication task for this table
should be run. Options are:
• Daily (the default). The table is replicated each day when the
Windows scheduler starts up.
• Weekly. The system displays a list of weekdays; select the days
you want this table to be replicated. Use Ctrl+Click to select more
than one list entry.
• Monthly. The system displays available dates, as well as First of
the Month and Last of the Month options.
Note The Windows Task Scheduler should be configured to run the
QAD BI process at least as frequently as the most frequent replication
task. For example, if the Windows Task Scheduler is set to run every
week, even if a table replication task is scheduled to run every day, it
will only be run every week.
Running Manual Replication
In addition to setting up scheduled replication processes, you can refresh
a data warehouse table with updated values from the source database at
any time.
Select the table on the main screen and choose Tools|Execute Now. Click
Start on the Record Processing Status screen. The system runs the
replication task, listing status messages to indicate its progress.
Note The moving status bar at the top of the screen will not necessarily
fill completely to the right when the replication task completes. Since
each new status message is added to the top of the list, you can determine
that replication is finished when the Total Update Time message displays.
Using QAD BI, Progress 9 Edition
137
Fig. 2.21
Record Processing
Status
The buttons at the bottom of the screen control this function:
• Click Start to begin replication.
• Click Stop to end replication.
Note Replication may not stop immediately when you click the
button depending on the nature of the script being executed.
• Click Close to exit the screen.
Rename Table
When you perform Replication Setup, tables are created in the data
warehouse. If necessary, you can change a table name by using the
Rename Table function on the Data Transformer|Tools menu. This
function opens the Rename Table screen.
Fig. 2.22
Rename Table
If the old table name cannot be found in the data warehouse, an error
message is displayed. An error message also displays if a user enters:
• A blank table name
• Reserved words
138
User Guide — QAD Business Intelligence
• A table name that is already in use
When you click OK and Automatically Check ETL-Scripts and
Automatically Refresh Linked Tables is selected in Data Transformer|
Settings|Applications Settings, the validation and linking of scripts and
tables is automatically performed. See “Modifying Application Settings”
on page 164 for details.
When the validation is successful and the linked table refreshed, the new
table name is displayed on the main directory tree and a green triangle
placed on the table icon. If there is an error, a yellow exclamation point
appears on the table icon.
After successfully renaming a table, the field mapping screen is
displayed.
Fig. 2.23
Field Mapping
From the field mapping screen, select the fields in the source table that
you want to replicate to the data warehouse table. Then click OK.
The system validates each field record for syntax and, when successful,
places a green triangle on the table icon on the main screen to indicate that
replication setup is completed for that table. If validation fails, a message
is displayed to indicate the nature of the error, and the table icon is set to a
yellow exclamation point.
Using QAD BI, Progress 9 Edition
139
Create Subsets
Within the data source, data from different functional areas is sometimes
stored in the same table. For example, the MFG/PRO transaction history
table (tr_hist) stores data related to sales orders—but it also contains
many other types of business documents as well. You can define subsets
to isolate the data of interest in a data warehouse table.
In QAD BI Data Transformer, defining a subset is similar to setting up a
table for replication. The main difference is that the subset definition
includes a filter specification to select the area of interest in the source
table.
Instead of Tools|Replication Setup, choose Tools|Subset.
Fig. 2.24
Subset Definition
Table Type defaults to Subset; you cannot change it. Specify the data
warehouse table name. Then enter Progress code to filter the records that
should be replicated in the data warehouse.
Syntax for the filter always has the same format:
WHERE {&SRC-DB}.tablename.fieldname [operator] <value>
AND/OR {&SRC-DB}. tablename.fieldname [operator] <value>
[Operator] can have the following values: = , >= , <= , <> , matches ,
begins.
140
User Guide — QAD Business Intelligence
After defining the subset, you can continue to define fields and replication
settings just as in the standard replication setup.
Add Indexes
When you select tables for the data warehouse, the system disregards any
indexes defined in the data source. Instead, you can custom-design
indexes for each table after adding it to the warehouse. This lets you test
the performance of your data models first, then add indexes that are
appropriate to your specific needs.
Note You can view a list of indexes defined in the data source by
selecting the table on the main screen and choosing Tools|Source indexes.
To add an index to a table, select the table on the main screen and choose
Tools|Indexes. The Indexes screen displays any existing indexes.
Note By default, the system creates a primary index for each table called
DB-NAME. It includes the system-maintained DB-NAME field (and
REC-ID for Progress data sources). You cannot modify or delete this
index, unless you create a new index and set it as the primary index.
Fig. 2.25
Indexes
Use the commands at the top left to add or delete an index, or designate it
as primary.
Using QAD BI, Progress 9 Edition
When you click the Add Index command, the screen illustrated in
Figure 2.26 displays.
Fig. 2.26
Add Index
Enter a name for the new index. The left pane displays all the fields in the
data warehouse table or subset that are available for indexing. Drag-anddrop fields to the right pane to include them in the index.
Important After adding or deleting an index, you should validate the
synchronization script using these steps:
1
Select the updated table on the main screen.
2
Choose Tools|Generate ETL-script.
3
Choose Check Script.
If the new index validates properly, a green triangle displays on the table
icon. Otherwise, a yellow warning icon displays.
141
142
User Guide — QAD Business Intelligence
Add Business Key Indexes
For Progress data sources, QAD BI Data Transformer uses the
DB-NAME and REC-ID fields to maintain links between the data source
and the data warehouse. However, this approach is not always reliable in
some circumstances:
• When the user dumps and loads tables in the source database, the
REC-ID values of the records in these tables are changed.
• Data is archived and no longer exists in the source database.
In both cases, the links between the data source and the data warehouse
are broken and can no longer be used for replication purposes. Continuing
to perform data replication without first rebuilding the links may cause
data corruption in the data warehouse.
This is where business key index comes into play. You can designate
indexes that can represent unique identifiers of records as business key
indexes to construct more reliable links between the data source and the
data warehouse. You can then use the business key indexes to synchronize
the REC-ID values between the source and target databases to re-establish
the links based on the REC-ID field for replication purposes.
Note REC-ID cannot be designated as business key index due to the
reason stated previously.
You can only define one business key index for a table. If you are certain
the business key index you define can uniquely identify each record,
designate it as a complete business key index; otherwise, designate it as
an incomplete business key index to have the system validate uniqueness
and maximize accuracy when rebuilding data links.
Note When processing incomplete business key indexes, the system
maximizes accuracy by performing additional operations during data link
update, which may require longer execution time.
To designate an index as a business key index in a table, select the table
on the main screen and choose Tools|Indexes. The Indexes screen
displays any existing indexes.
Using QAD BI, Progress 9 Edition
Fig. 2.27
Business Key
Indexes
Use the commands at the top left to designate an index as a complete
business key index or incomplete business key index.
• To designate an index as a complete business key index, select the
index and click the Set to BK icon.
• Use the Complete BK and Incomplete BK icons to switch the
business key index between complete and incomplete.
• To remove the business key index, select the index and click the
Cancel BK icon.
Note Custom tables do not support business key indexes. Business key
index command icons are always grayed-out in the Indexes window of a
custom table.
Preview Data
You can view data both after it has been replicated to the data warehouse
and in its original form, in the data source.
First, select a table on the main screen. Then:
• To view the data records in the data warehouse, choose Tools|Preview
Target Data.
• To view the source database records, choose Tools|Preview Source
Data.
143
144
User Guide — QAD Business Intelligence
Figure 2.28 shows the contents of the address master (ad_mstr) table in
MFG/PRO, as well as the corresponding Address table in the data
warehouse. Note that the MFG/PRO table shows all fields in the schema,
identified by the schema field names; the data warehouse displays only
the mapped fields.
To sort the records based on values in a specific column, click the column
heading.
Fig. 2.28
Table Preview
Delete Target Data
You can delete data records after they have been replicated to the data
warehouse. You can delete all data records from a table while preserving
its table mapping information.
Using QAD BI, Progress 9 Edition
145
Choose Delete Target Data from the Data Transformer|Tools menu to
open the Record Deletion Status screen.
Fig. 2.29
Delete Data
Records from Data
Warehouse
To start the deletion process, click Start. If it is necessary to stop the
deletion before completion, click Stop.
Validate Tables
The Validate Table function on the Data Transformer|Tools menu lets you
validate table and field mappings between source tables and data
warehouse tables.
Validation takes place in two phases. The system first checks for valid
tables; then it checks each field mapping between source table and data
warehouse table.
When checking for valid tables, the system determines whether a table
has changed, is unchanged, or is missing. This information displays in the
Source Table Status and DWH Table Status columns of the Table
Mapping frame shown in Figure 2.30.
When checking field mappings, the system determines the field mapping
status and displays this information in the Field Mapping frame. If any
field mapping status is Mismatching or Invalid, the status Corrupted
displays in the Status column of the Table Mapping frame. You should fix
the field mapping problems before attempting to recreate a table.
Using this status information, you can detect and recover any corrupted
mapping that may have occurred after activities such as database
replication.
146
User Guide — QAD Business Intelligence
Fig. 2.30
DWH Table
Mapping Validation
Table Mapping Display and Functions
The following fields display in the Table Mapping frame:
Status. Displays the status of the table, based on the status of
associated fields:
OK: No invalid or mismatched field mappings exist.
Corrupted: At least one invalid or mismatched field mapping exists.
Description. This field displays detailed table error information, such
as a table is missing.
Source DB Logical Name. The alias for the source database.
Source DB. The physical path to the source database.
Source Table. The name of the table from the source database.
Source Table Status and DWH Table Status. These status fields
indicate if mappings between the source and data warehouse are new,
unchanged, or missing:
Unchanged: Field mappings are unchanged.
Changed: Field mappings have changed. Either source table fields or
data warehouse fields have changed.
Using QAD BI, Progress 9 Edition
Missing: Either the source table or the data warehouse table is
missing.
Use the two buttons in the Table Mapping frame to delete tables or
recreate them.
Deleting Table Mapping
Clicking the Delete Table Mapping button lets you delete both table and
field mapping information. The data warehouse table is also deleted.
Recreating Data Warehouse Table
You can use the Recreate DWH Table button to resolve any mismatching
between source and data warehouse tables. You can also use it to delete
data from the data warehouse table.
When you click the Recreate DWH Table button, the system:
1
Deletes all mapped data from the data warehouse table and deletes the
data warehouse table
2
Creates a data warehouse table based on the original table mapping
stored in data warehouse-admin
Before recreating a data warehouse table, ensure that you have deleted
any field mappings with the status of Invalid shown in the Field Mapping
frame.
Field Mapping Display and Functions
The following fields display in the Field Mapping frame:
Status. Status information is displayed as follows:
OK: Both source and data warehouse fields exist and are consistent.
Invalid: The source table field cannot be found and the field mapping
must be deleted.
Mismatch: The source table field or the data warehouse field has
changed and are inconsistent. This field mapping can be rebuilt by
overriding the target field with the source field.
147
148
User Guide — QAD Business Intelligence
Description. For mismatched or invalid fields, a brief description of
the error.
Source Field. The name of the field in the source table.
DWH Field. The name of the field in the data warehouse table.
DWH Expression. The expression used to calculate the value that
populates the data warehouse field.
Function. Currently not used.
When you click Delete Field Mapping after selecting the relevant check
boxes, the selected field mapping information stored in data warehouseadmin is deleted but the field data in the data warehouse tables is retained.
When you click Close after performing Delete Field Mapping, the system
performs the Recreate DWH Table function.
Create Custom Tables
Not all tables in the data warehouse have to be based on table definitions
from the connected data sources. You can create custom tables that exist
only in the data warehouse.
Custom tables are populated with data using custom scripts. They can
contain virtually any data the designer wants to put in them.
To create a new table, right-click the Custom Tables folder on the main
screen and select Create Table. The Map Table screen displays.
Using QAD BI, Progress 9 Edition
Fig. 2.31
Custom Table
Setup
While the overall process is similar to mapping an MFG/PRO table to the
data warehouse, you can only access one field—DWH Table Name. Table
Type is automatically set to Custom Table, and you cannot define code to
filter records because a custom table is not directly based on any source
table.
Click OK to display the field mapping screen. Again, navigation is similar
to standard table setup. Use the Field Properties and Add Field commands
in the upper left corner of the screen to update an existing field or add a
new one.
You can define a field to be any data type supported by Progress.
However, once you have initially specified a data type, you cannot change
it. Instead, delete the field and add a new one with the correct data type.
Once you have created the custom table and defined its fields, you can
define indexes for the table using the Indexes right-click option while the
custom table is selected in the tree.
Create Custom ETL Scripts
Because of the way some types of data are stored in data sources, data is
not always directly usable as management information. In such cases,
Data Transformer lets you reference custom ETL scripts that you have
149
150
User Guide — QAD Business Intelligence
written to convert MFG/PRO data into warehouse data more appropriate
for use in analysis. Custom scripts are associated with custom tables,
which were described in the previous section.
Important You must be familiar with writing Progress queries to create
custom scripts. See the Progress documentation for information.
Note Custom ETL scripts are used to restructure data in the data
warehouse. A related type of script—a custom replication script—is used
when the Replication Method of a table replication task is set to Custom.
It moves data into the data warehouse using custom extraction logic.
Script Guidelines
For a custom script to be usable by QAD BI, it should follow several
guidelines:
• Field references must include the full namespace reference to the
field, from the database level down; for example,
databasename.tablename.fieldname.
• The database name must be the logical database name for the data
warehouse, followed by the letter q; for example, dwhq. The
following shows an example of a correct field reference:
dwhq.Balance_Sheet_totals_.Cost_Center_
• For scripts that reference the data warehouse, include the following
alias as the first line to be used in the script implementation:
&SCOPED-DEFINE TRG-DB DWHQ
• Similarly, for scripts that reference the source database, include the
following alias:
&SCOPED-DEFINE SRC-DB SRCDB
• Check the syntax of the saved script using the Progress tools or use
the Check Scripts function after adding it.
Using QAD BI, Progress 9 Edition
151
Figure 2.32 shows an example of a completed script.
Fig. 2.32
Sample Custom
ETL Script
Adding Scripts to Data Transformer
To add a custom script, right-click the Custom Scripts folder on the main
screen and select Add ETL-Script.
Fig. 2.33
Add Custom Script
152
User Guide — QAD Business Intelligence
Click Browse to navigate to the directory containing the Progress script.
The system displays the contents of the script. You can update the default
script name as needed. However, you cannot update the content of the
script itself on the preview screen.
On the Schedule tab, specify when this script is run. This is the same as
scheduling replication for standard tables.
For a more detailed discussion of setting the sequence for a replication
task, see “Setting the Replication Task Sequence” on page 189.
Merge Data from Multiple Databases
You can use the merge feature in the Data Transformer to consolidate data
from multiple data sources that share the same underlying table
definitions. After defining replication for one database, use the Merge
command to configure additional databases to reuse the replication
configuration of the configured database.
To merge in data from a data source, right-click the data source and select
Merge Tables. The system displays the data warehouse structure
associated with all other data sources.
Fig. 2.34
Merge Tables
To use the same replication configuration as another data source, select
the check box associated with the replication tasks you want to reuse.
When you choose Settings|Task List, the system displays a separate ETL
script for each database.
Using QAD BI, Progress 9 Edition
Use the Task List
The Task List provides a consolidated view of all scheduled tasks
(whether activated or not) on a single screen. It is an alternative to
selecting each element in the application tree and scheduling it using the
Properties function. Use it to select and deselect elements scheduled for
automated replication.
To view the task list, click the Task List command on the toolbar.
You can select or deselect tasks individually. To select or deselect the
entire list at once, use the Select All and Select None commands.
Fig. 2.35
Task List
Database Status
A source system (database) can be either active or inactive, as defined on
the Database Properties screen. When a source system is marked as
inactive, none of its tasks will execute under the batch replication process.
153
154
User Guide — QAD Business Intelligence
You can determine if a task is from an inactive database by viewing the
Active/Inactive column in the Task List or by observing the icon for the
task. Inactive tasks display a grayed-out icon. See page 121 for details.
When a database is marked as Inactive you cannot change the Activate
check box. To set the database’s Active/Inactive status, use the Database
Properties screen.
Fig. 2.36
Database Status in
the Task List
Update Links
In QAD BI, Microsoft Access serves as the query layer between Cognos
PowerPlay and the data warehouse. Use the Data Transformer Update
Links command to synchronize table references in Access with the tables
and fields available in the data warehouse.
Important You should update links anytime you add or update a table in
the warehouse.
You can run the command either for an individual table or for the entire
data warehouse by choosing the appropriate icon from the main screen
directory tree and clicking the Update Links command:
• For an individual table, select its icon.
• For the entire warehouse, select the database icon.
After a metadata import, scripts can be validated and links updated
automatically based on settings in defined in Settings|Application
Settings. See “Automatically Refresh Linked Tables” on page 167 for
details.
Using QAD BI, Progress 9 Edition
Export Tables
You can export table information in XML format on any level of the main
screen directory tree by selecting the icon on the appropriate level and
choosing an export command from the Tools menu. For example, to
export the entire directory structure, select the database icon and choose
Tools|Export Tables. For an individual table, select the table and choose
Tools|Export Table Meta Data.
The system prompts you to enter a directory path and file name for the
exported data.
The resulting XML file includes the table structure of the selected items
in the data warehouse, as well as the contents of the replication scripts.
If your company has multiple instances of QAD BI installed, you can use
this feature to synchronize the setup data. Additionally, you can use the
XML file as a backup.
To reload data from exported files, use the Load Meta Data function,
described on page 161.
Rebuild Links
For Progress data sources, QAD BI Data Transformer uses the
DB-NAME and REC-ID fields to maintain links between the data source
and the data warehouse. However, this approach is not always reliable in
some circumstances:
• When the user dumps and loads tables in the source database, the
REC-ID values of the records in these tables are changed.
• Data is archived and no longer exists in the source database.
In both cases, the links between the data source and the data warehouse
are broken and can no longer be used for replication purposes. Continuing
to perform data replication without first rebuilding the links may cause
data corruption in the data warehouse.
QAD BI Data Transformer lets you rebuild links by synchronizing the
REC-ID values between the source and target databases based on the
REC-ID field so that you can continue to perform replication without data
loss or corruption. See “Add Business Key Indexes” on page 142 for
details on business key index.
155
156
User Guide — QAD Business Intelligence
Note The rebuild links function does not update custom tables. You need
to write Progress scripts in the updateCustomTables.p file under the
DWHWorkDir\appl directory to customize custom tables. DWHWorkDir
is the data warehouse work directory that you set during installation or in
Application Settings. See “Modifying Application Settings” on page 164
for details.
To rebuild links, click the Rebuild Link icon on the Data Transformer
main screen. Click Start on the status screen to start. The system runs the
rebuilding task, listing status messages to indicate its progress.
Fig. 2.37
Rebuild Links
The buttons at the bottom of the screen control these functions:
• Click Start to begin update.
• Click Stop to end update.
• Click Close to exit the screen.
After rebuilding links is complete, you can review the rebuild.log log
file generated in the DWHWorkDir\log directory for more detailed
processing and error information.
Important Every time you want to dump/load table or archive data in the
source database, make sure you perform these operations in the following
order:
1
Perform replication to refresh the data warehouse tables with updated
values from the source database. See “Replicate Data” on page 134
for details.
2
Perform table dump/load or data archiving.
3
Rebuild links.
Using QAD BI, Progress 9 Edition
If you do not exactly follow this order or if you perform other operations
that affect either the source database or the data warehouse in-between
these steps, data integrity may be compromised and data corruption may
occur in future replications.
Working with the Model
Cognos models supporting multidimensional analysis of business process
areas can be purchased from QAD. The models map the contents of the
data warehouse to concepts supported by the PowerPlay product such as
dimensions, levels, categories, and measures. The product of executing a
model against the data warehouse is a Cognos PowerCube.
The location of the models is referenced in the Cognos Transformer tab
on the Application Settings screen. See Figure 2.48 on page 168 for
details.
Note Cubes can only be built after data has been replicated to the data
warehouse database.
You can:
• Create the cube.
• Check the model.
• Check the model relations.
• View the model properties to specify the replication schedule and
select the languages in which cubes are generated.
Create the Cube
You can create the cube by using the Create Cube function of the Data
Transformer, or by using a batch task. Cubes can only be built after data
has been replicated to the data warehouse database.
Check the Model
The Cognos PowerPlay Transformer includes a function that verifies the
correctness of the model file. Select a cube in the Cubes folder on the
main QAD BI screen and choose File|Check Model. The system uses the
Cognos function to verify the model and displays an appropriate message.
157
158
User Guide — QAD Business Intelligence
Check the Model Relations
The Check Model Relations function provides detail information about
the data structure of a cube. You can see the relationship between data
warehouse and source tables and fields.
Fig. 2.38
Check Model
Relations
Using QAD BI, Progress 9 Edition
159
Specify Model Properties
To display the Model Properties screen, select a model and choose Tools|
Properties. The screen contains three tabs.
Cube Details
The Cube Details tab contains read-only displays of the Cognos
Transformer model name and path.
Fig. 2.39
Cube Properties,
Cube Details Tab
Schedule
The Schedule tab is the same as the Table and Custom Script Schedule
tabs. Select Active and enter a sequence number to enable cube
generation within the automated replication.
Fig. 2.40
Cube Properties,
Schedule Tab
160
User Guide — QAD Business Intelligence
Languages
The Languages tab allows for the selection of the language or languages
in which multilingual cubes should be created.
Note Single-language cubes ignore these settings.
Cubes are created in subfolders of the Cube directory (as specified in the
Application Settings Cognos Transformer tab). Subfolders are named
using the two-character language identifier for the selected languages. If
no language is selected, the cube is built directly within the Cube
directory.
Fig. 2.41
Cube Properties,
Languages Tab
For information on creating or modifying language tokens for translated
Cognos Transformer model files, see “Creating Translatable Cognos
Transformer Models” on page 191.
Using QAD-Provided Model Data
If your QAD BI configuration includes one or more of the seven
predefined models purchased from QAD, load the schema using the Data
Transformer’s Load Meta Data function instead of building the data
warehouse tables manually from MFG/PRO schema. You can then use the
table and field tools to customize the schema for the predefined models as
needed.
Note In MFG/PRO eB2.1, you must load metadata and scripts for each
domain that you want to analyze.
Using QAD BI, Progress 9 Edition
161
Perform the following tasks to load the model data and make it ready for
use:
1
Load metadata.
2
Load custom scripts.
3
Bulk validate custom scripts.
4
Complete model setup.
Load Metadata
To load the metadata that describes the data warehouse structure used in
the models, right-click a database or a domain name—if you are using an
MFG/PRO eB2.1 database—on the main screen and select Import Meta
Data. The Choose Import File screen displays.
Fig. 2.42
Chose Import File
Navigate to the directory where the model source files were placed during
installation. Typically, this is:
qadbiInstallDir\data\meta\version
Where version is the MFG/PRO database version; for example:
c:\qadbi\data\meta\eB2.1
162
User Guide — QAD Business Intelligence
Select a file and click Open to load the metadata and create the data
warehouse structure. The Meta Filter Window displays.
Fig. 2.43
Meta Filter
Window
Use the check box to
Indicate that you want
to import the object.
The Meta Filter Window presents a list of objects and the following
information for each object:
Object Name. Displays the name of an object.
Object Type. Displays the type of the database object: SRC-TABLE,
DWH-TABLE, MERGE-TABLE, SCRIPT, or CUBE.
New Object. Indicates whether the object already exits in the database
or domain.
Yes: This is a new object that has not been imported before.
No: The object has already been imported.
Use the check box to the left of the object name to indicate whether to
import the object. The check box is selected by default when the object is
new. If the object is not new, you can select the check box to reimport the
object.
Using QAD BI, Progress 9 Edition
163
Review the list to verify that the selected objects are those you want to
import. Then click OK to activate the import. The created data structure
then displays on the main screen directory tree. The display includes a
green triangle beside a valid object or a yellow exclamation point beside
an invalid object.
Note In MFG/PRO eB2.1, metadata must be loaded for each active
domain in the database.
Important If this is first time you have loaded the standard XML
metafiles, ensure that you load Custom Scripts.xml last. After the
custom scripts are loaded, they are automatically compiled. Since the
scripts refer to several tables in the data warehouse, the table schemas
must have already been loaded for successful compilation to take place. If
these schemas have not been created in the data warehouse, compilation
will fail.
Fig. 2.44
Metadata Loaded
Bulk Generate and Validate Scripts
After loading model data and custom scripts, you can have the system
regenerate and check all the scripts at the same time based on the
completed data warehouse structure.
Select the database on the main screen directory tree, and then choose
Tools|Check Scripts.
The system updates the table icons in the directory tree to show whether
they passed validation. A green triangle indicates a validated script; a
yellow exclamation point indicates a problem. For example, scripts
164
User Guide — QAD Business Intelligence
shown in Figure 2.45 were validated before all the custom scripts were
loaded. A secondary custom script, Script Call Lead Time2, failed
validation.
Fig. 2.45
Validation Icons
Note You can check the script for an individual table by right-clicking
the table on the main screen, then selecting Check Script.
Complete Model Setup
After loading model data and checking scripts, complete setup tasks by:
• Updating the table links for all replication and custom tables; see
page 39.
• Scheduling automatic replication for each table, custom script, and
cube as shown in the relevant sections above.
• Optionally, fine-tuning the data warehouse structure and replication
setup. Use the following sections for reference:
• “Manage Domains” on page 124
• “Select Tables” on page 126
• “Set Up Replication” on page 128
Modifying Application Settings
Based on information entered during the installation, most settings
required to connect the components of QAD BI are in place when you
begin using the application.
Note An important exception to this is the currency setting, which
defaults from the MFG/PRO base currency unless:
• You are connecting to a domain database and the base currencies in
the domains are different.
Using QAD BI, Progress 9 Edition
165
• You are connecting to multiple databases and the base currencies in
the databases are different.
In both of these cases, the currency setting is blank and you must
manually set the currency for the data warehouse database. See
“Currency” on page 166.
If for any reason you need to update any of those settings, choose
Settings|Application Settings from the main menu. The system displays a
screen with the following tabs:
• Data Warehouse
• Table Linking
• Cognos Transformer
• Batch Process
• Notification
• AppServer
The following sections describe the functions of each tab.
Data Warehouse
The Data Warehouse tab includes parameters applicable to the data
warehouse database.
Fig. 2.46
Application
Settings, Data
Warehouse Tab
166
User Guide — QAD Business Intelligence
Generated Scripts Directory. Enter or browse to the location where
the automatically generated table-replication scripts are to be written.
Custom Scripts Directory. Enter or browse to the location where the
custom scripts are located.
Automatically Resort Fields Alphabetically. Select to have the fields
(columns) of the mapped table automatically sorted on the field
mapping screen.
Automatically Check ETL-Scripts. Select to automatically generate
the mapped table scripts and to compile the generated and custom
scripts. This process also applies after a metadata import.
Work Directory. Enter or browse to the location of the ETL tool. This
directory contains the encrypted source code, log files, and temporary
files and should not be changed unless recommended by QAD
Support.
Currency. Select a currency from the list of currency codes in which
to express all currency values defined in the standard business
models. The default currency is the MFG/PRO base currency.
Table Linking
The Table Linking tab includes parameters used to connect to the Access
data warehouse proxy.
Fig. 2.47
Application
Settings, Table
Linking Tab
Using QAD BI, Progress 9 Edition
Database. Enter or browse to the location of the data warehouse
proxy Access .mdb file.
Automatically Refresh Linked Tables. Select this option to
automatically update data warehouse proxy link data when mapping
tables or after importing metadata.
DAO version. Enter the Database Access Objects database engine
version.
Note In general, this field should not be changed.
DSN. Enter the Data Source Name created for the data warehouse
proxy ODBC connection. This is initially set during installation. See
Installation Guide: QAD Business Intelligence for details on updating
the ODB account.
User. Enter the user name for the data warehouse proxy.
Note By default, no user name is required.
Password. Enter the password for the specified user.
Note By default, no password is required.
Schema. Enter the data warehouse Progress schema name. The
default set during installation is dwh.
167
168
User Guide — QAD Business Intelligence
Cognos Transformer
The Cognos Transformer tab includes path preferences used by the
Cognos PowerPlay Transformer. The ETL tool uses these settings to set
the values in the Cognos Transformer.
Fig. 2.48
Application
Settings, Cognos
Transformer Tab
Models. Enter or browse to the location where the Cognos model files
were installed or copied.
Data-Temp. Enter or browse to the location that the Cognos
Transformer should use to store temporary data files created during
cube generation.
Model-Temp. Enter or browse to the location that the Cognos
Transformer should use to store temporary files created during model
operations.
Cubes. Enter or browse to the location where the Cognos
Transformer should create the cubes.
Log. Enter or browse to the location where the Cognos Transformer
and the Data Transformer should write the log files.
The following optional properties are used when building Cognos models
in which Cognos security has been enabled. Cognos security is set up
using the Cognos Access Manager and stored in a local authentication
export (.lae) file or LDAP-compliant namespace.
Using QAD BI, Progress 9 Edition
169
Login. Specify the log-in for a Cognos user whose authority will be
used to regenerate the models.
Password. Specify the password for a Cognos user whose authority
will be used to regenerate the models.
User Class. Specify a Cognos User Class to which the specified log-
in user belongs and which will be used to regenerate the models.
For additional information regarding the use of the Cognos cube security
and Transformer, see the Cognos Transformer online help and user
documentation.
Batch Process
Use settings on the Batch Process tab to customize QAD BI in the
following areas:
• Improve performance.
• Allow concurrent access to the data warehouse while the batch is run.
• Use the Progress-supplied database server administration.
• Use custom scripts (batch files) to start and stop the data warehouse.
Fig. 2.49
Application
Settings, Batch
Process Tab
Database. Enter or browse to the location of the data warehouse file.
By default, this is the dwh.db file in the directory where QAD BI is
installed.
170
User Guide — QAD Business Intelligence
Repository. Enter or Browse to the location of the data warehouse
repository. By default, this is the dwh-admin.db file in the directory
where QAD BI is installed.
Database Management. Select the method to use to start and stop the
data warehouse—Progress Explorer or Scripts. Depending on this
setting, you can update the fields in the appropriate frame.
Single User Batch Process. Specify whether the data warehouse
database is started in single-user mode when running the batch
process. If selected, no other connections to the data warehouse are
accepted until the batch process completes. This field is not available
when parallel replication is selected on the AppServer tab—that is,
the Use AppServer check box is selected.
Use non-integrity parameter. Specify whether the data warehouse is
started in non-integrity mode. When this option is selected, Progress
runs without using the database integrity or database recovery
features.
Important Selecting this option can improve system performance.
However, if Progress fails for any reason, you cannot recover the
database. Use this feature with caution and make sure you have an
adequate database backup strategy.
Log Language. Select the language in which the log information is
written.
Log Level. Select the level of log information to be captured.
Error: Displays functional errors
Warn: Displays activities that may cause errors, as well as errors
Info: Displays trace of user activities, as well as errors and
warnings
Debug: Displays debug information for developers, as well as
errors and warnings
Start. If Database Management is Scripts, enter or browse to the
appropriate script files that are used to start the data warehouse.
Stop. If Database Management is Scripts, enter or browse to the
appropriate script files that are used to stop the data warehouse.
Using QAD BI, Progress 9 Edition
171
Database. Enter the data warehouse database name as defined in the
Progress Explorer.
Host. Enter the Progress server defined in the Progress Explorer and
assigned to manage the data warehouse.
Config. Enter the Progress Explorer Configuration to use to start and
stop the data warehouse.
Port. Enter the port or service the data warehouse runs under. This is
defined in the Progress Explorer Configuration.
User. Enter a user authorized to start and stop the data warehouse.
Password. Enter the password of the user authorized to start and stop
the data warehouse.
Notification
The Notification tab includes information the system uses to send e-mail
messages when an error occurs during batch processing.
Fig. 2.50
Application
Settings,
Notification Tab
Enable Notification. When this is selected, e-mail is sent when errors
occur during batch processing.
SMTP Server. Enter the name of the Simple Mail Transfer Protocol
server to use to send the e-mail
172
User Guide — QAD Business Intelligence
e-mail Address. Enter the e-mail address of the person you want to
receive the e-mail notifications.
Return Address. Enter the e-mail address of the person you want to
be used for the return address on the e-mail.
AppServer
The AppServer tab includes information the system uses to determine the
replication strategy (that is, serial or parallel via the Use AppServer check
box) and, when parallel replication is used, the AppServer configuration
information. For more details on parallel replication, see “QAD BI
Parallel Replication Setup” on page 178.
Fig. 2.51
Application
Settings,
AppServer Tab
Use AppServer. When this is selected, parallel replication is used for
the batch replication. When not selected, serial replication is used.
AppService. Enter the name of the AppServer broker. This is the
same value that appears in the Progress Explorer tree under the
AppServer folder. Also referred to as the AppServer name.
AppServer Host. Enter the name of the server where the AppServer
has been installed.
NameServer Port. Specify the port to which the NameServer has
been configured to listen. The default is 5162.
Using QAD BI, Progress 9 Edition
AppServer Pool Size. Specify the number of AppServer processes
that will be available to process replication tasks. Four is a good
starting value for testing. The value entered here must be one less
than the value of the Minimum and Maximum Servers settings on the
AppServer properties screen. See “QAD BI Parallel Replication
Setup” on page 178 for details.
Note Do not set this value too high. Entering a value that is too large
can reduce performance on hardware that is insufficient to handle the
processing load.
DWH-ADMIN Host. Specify the name of the server where the
administration database is running.
DWH-ADMIN Service. Specify the port to which the administration
database is configured to listen. The default is 24001.
DWH-ADMIN Network. Specify the protocol that the administration
database is configured to use for communication. Default is TCP.
AppServer Log Directory. Specify the directory to which all log files
will be written.
AppServer Error Log. Specify the name of the AppServer error log.
AppServer Replication Log. Specify the name of the AppServer
replication log.
For additional information on using parallel replication with the Data
Transformer, see “QAD BI Parallel Replication Setup” on page 178.
Performing Administration Tasks
Update User Records
During installation, a single default user is defined with database
administrator rights in the Progress Administration database:
Default user ID: dwh
Default password: admin
173
174
User Guide — QAD Business Intelligence
You can modify this default information, as well as create additional users
or delete existing ones, with the following procedure:
1
Start Progress Data Administration.
2
Select Database|Connect and enter connection information on the
Connect Database screen. If the default installation was performed,
the connection parameters are:
• Physical Name: dwh
• Logical Name: dwh
• Network: TCP
• Multiple Users: checked
• Host Name: localhost
• User ID: dwh
• Password: admin
Fig. 2.52
Updating User Data
3
Select Admin|Security|Edit User List.
4
On the Edit User List screen, click Add, Modify, or Delete to manage
users.
For additional information on managing users in a Progress database, see
the Progress System Administration Guide.
Using QAD BI, Progress 9 Edition
Set Up Windows Task Scheduler
You can use Data Transformer to define the replication schedule for each
individual task. See “Scheduling Automatic Replication” on page 134 for
information on defining task schedules in Data Transformer.
However, you also must set up an operating-system-level scheduling task
to look at the individual task schedules and run the processes accordingly.
Note This procedure is based on Windows XP Professional. It may vary
for other versions of Windows.
1
To run the Windows Task Scheduler Wizard, select Start|Control
Panel|Scheduled Tasks|Add Scheduled Tasks.
2
Click Next to continue.
3
Click Browse and select the Run Tasks shortcut located in the
directory where program files were installed.
4
Choose the task schedule:
• Daily
• Weekly
• Monthly
• One time only
• When my computer starts
• When I log on
Depending on your choice, you may be prompted for further scheduling
information.
Important The schedule you define here describes when Windows
launches its own scheduling task, which in turn looks at the Data
Transformer scheduling tasks. You should be sure to define the Windows
task so that it is appropriate to the schedule granularity defined for Data
Transformer. For example, it would not make sense to define a monthly
Windows task if you want to replicate tables every day.
5
Enter the name of a Windows account with sufficient access
privileges to execute the Data Transformer on the target machine.
6
Select the date and time for the task to begin.
7
Click Finish to save the task.
175
176
User Guide — QAD Business Intelligence
Chapter 3
Reference
QAD BI Parallel Replication Setup
Multicurrency Configuration
178
184
Setting the Replication Task Sequence
189
Creating Translatable Cognos Transformer Models
Manually Loading Custom Scripts
194
191
178
User Guide — QAD Business Intelligence
QAD BI Parallel Replication Setup
This section provides the information required for configuring QAD BI
for parallel replication. It also provides QAD BI specific guidelines and
information for configuring the Progress AppServer, which is required to
replicate tasks in parallel.
See the Progress document Building Distributed Applications Using the
Progress AppServer for documentation describing the general setup and
configuration of the AppServer.
Overview
In order to improve replication performance during batch processing,
parallel or multi-threaded processing of the replication tasks is supported
using the Progress AppServer. Parallel replication allows for more than
one replication task to be processed concurrently by separate Progress
processes. In order to use the parallel replication strategy, both Data
Transformer and AppServer must be configured.
This section assumes the AppServer has been installed and configured
using the default settings on the same server as Data Transformer.
Configure the AppServer
The AppServer can be configured using the Progress Explorer application
(recommended) or by directly modifying the ubroker.properties file
located in ProgressInstallDir\properties.
This section describes only the process of configuring the AppServer
using the Progress Explorer application.
1
Open the Progress Explorer application.
2
Connect to the localhost Progress Server.
3
Expand the AppServer folder in the tree in the left pane.
4
Right-click the asbroker1 item in the expanded AppServer folder
and select Properties.
Reference
179
Fig. 3.1
Selecting the
Properties for the
AppServer
5
Expand the Broker item in the tree and select the General item.
6
Set Operating Mode to State-reset.
Fig. 3.2
Configuring the
Broker’s General
Parameters
180
User Guide — QAD Business Intelligence
7
Select Logging Setting under the Broker.
8
Modify the Broker log filename setting to the following:
ETLInstallDir\log\asbroker1.broker.log
where ETLInstallDir is the value supplied for the program files
during the installation.
Fig. 3.3
Configuring the
Broker’s Logging
Parameters
9
Expand the Server item in the tree and select the General item.
10 Modify the Server startup parameters setting to the following:
-pf ETLInstallDir\appserver.pf
Where ETLInstallDir is the value supplied for the program files
during the installation.
Reference
181
Fig. 3.4
Configuring the
Server’s General
Server Startup
Parameter
11 Modify the PROPATH setting to include the following at the
beginning:
ETLInstallDir;DataInstallDir;
Where ETLInstallDir is the value supplied for the program files
and DataInstallDir is the value supplied for the data files during
the installation.
Fig. 3.5
Configuring the
Server’s General
PROPATH
Parameter
12 Select Logging Setting under the Server.
182
User Guide — QAD Business Intelligence
13 Modify the Server log filename setting to the following:
ETLInstallDir\log\asbroker1.server.log
Where ETLInstallDir is the value supplied for the program files
during the installation.
Fig. 3.6
Configuring the
Server’s Logging
Parameters
14 Select Pool Range under the Server.
15 Modify the initial number of servers to start, maximum servers, and
minimum servers settings to the integer value equal to your
AppServer Pool Size setting + 1. For example, this document
indicates that the value 4 should be used. So, use 5 for the Initial
number of servers to start setting. See “Pool Size of Script” on
page 86 and for details.
Reference
183
Fig. 3.7
Configuring the
Server’s Pool
Range Parameters
Important If changes were made to the AppServer’s configuration, the
server must be shut down and restarted for the modifications to take
effect.
Configure Data Transformer
1
Start the Application Settings dialog for Data Transformer.
2
Switch to the AppServer tab.
3
Select the Use AppServer check box to enable processing of tasks in
parallel. When this check box is not selected, the default serial
processing will be used.
4
Enter information for your setup for every field on the tab. The
following graphic depicts the AppServer default settings. See
“AppServer” on page 86 for details.
184
User Guide — QAD Business Intelligence
Fig. 3.8
Configuring
AppServer
Parameters
See detailed field descriptions for the AppServer tab in “AppServer” on
page 86.
Multicurrency Configuration
This section provides the information required to enable QAD BI to
extract data from MFG/PRO sources that have differing base or system
currencies and to convert the currencies to a single user-defined data
warehouse currency for the standard business models.
Overview
Multicurrency support in QAD BI allows amounts valued in different
currencies to be revalued in a common currency within the standard
business models. This provides a foundation for analytic operations that
compare and aggregate amounts that were originally valued in different
currencies.
Important The Sequence dependencies for multicurrency scripts must
be observed to get the correct results. See “Setting the Replication Task
Sequence” on page 189 for information.
Reference
185
Configure the Data Warehouse Currency
A single currency can be defined as the data warehouse currency in Data
Transformer. When a data warehouse currency is defined, all source
system currencies are revalued using the Exchange Rate table (see next
section) in this currency. If no data warehouse currency is defined, the
data warehouse is considered a single-currency implementation and no
conversions occur.
To set the Date Warehouse currency, follow these steps:
1
Choose Settings|Application Settings from the menu.
2
Select the data warehouse tab and select the desired currency from the
Currency drop-down list.
3
Click OK to save the selected currency as the data warehouse
currency.
Fig. 3.9
Setting the Data
Warehouse
Currency
Configure Multicurrency Custom Scripts
For source systems with differing base currencies defined, Data
Transformer supports conversion of currency values into a single
currency for analysis—that is, the data warehouse currency. To value
multiple currencies in a single currency, additional custom scripts must be
added to the source metadata and configured for replication.
186
User Guide — QAD Business Intelligence
In addition to setting the data warehouse currency in the Application
Settings, you must perform the following steps to enable multicurrency
support in QAD BI.
Note These steps assume the table tasks have all been configured with a
Sequence value less than 10 (by default they will have the value 00) and
that the Custom Scripts Sequence values are greater than 15.
1
Start Data Transformer and navigate to the Custom Scripts folder in
the tree.
2
Right-click the Custom Scripts folder and select Add Script.
3
Click Browse on the Add Script screen and navigate to the
QADBIDataDir\scripts\custom directory; select the
Script_Currency_Fields_Incremental_.p custom script,
and click Open.
4
Select the Schedule tab and set the fields as follows:
• Activate: selected
• Sequence: 15
• Frequency: any item in the list
Fig. 3.10
Setting the
Schedule Fields for
Script_Currency_
Fields_
Incremental_.p
5
Again choose to add a custom script (see steps 2 and 3 above).
Reference
6
Click Browse on the Add Script screen and navigate to the
QADBIDataDir\scripts\custom directory; select the
Script_Base_Currency_.p custom script, and click Open.
7
Select the Schedule tab and set the fields as follows:
187
• Activate: selected
• Sequence: 10
• Frequency: any item in the list
Fig. 3.11
Setting the
Schedule Fields for
Script_Base_
Currency_.p
8
Repeat steps 5 through 7 for Script_Exchange_Rate_.p.
Modifying Currency
After the first batch replication has run in a multicurrency-enabled
configuration, the base currency may change in either the source system
or the data warehouse. To accommodate this change, a custom script must
be executed.
188
User Guide — QAD Business Intelligence
Note This procedure assumes that multicurrency replication has been set
up as described in this section.
1
Start Data Transformer and navigate to and expand the Custom
Scripts folder in the tree.
2
Right-click the Script_Currency_Fields_Incremental_.p
custom script and select Properties.
3
Select the Schedule tab and clear the Activate check box.
4
Click OK to save the changes.
5
Right-click the Custom Scripts folder and select Add Script.
6
Click Browse on the Add Script screen and navigate to the
QADBIDataDir\scripts\custom directory; select the
Script_Currency_Fields_Full_.p custom script, and click
Open.
7
Select the Schedule tab and set the fields as follows:
• Activate: selected
• Sequence: 15
• Frequency: any item in the list
8
Exit Data Transformer and execute the batch replication.
9
Start Data Transformer and navigate to and expand the Custom
Scripts folder in the tree.
10 Right-click the Script_Currency_Fields_Incremental_.p
custom script and select Properties.
11 Select the Schedule tab and select the Activate check box.
12 Click OK to save the changes.
13 Right-click the Script_Currency_Fields_Full_.p custom
script and select Properties.
14 Select the Schedule tab and clear the Activate check box.
15 Click OK to save the changes.
Reference
189
QAD BI has now been configured to use the new source base currency or
data warehouse currency. Batch replication can continue in the normal
manner.
Setting the Replication Task Sequence
This section provides detailed information for configuring replication task
sequences in Data Transformer.
Overview
In order to configure replication tasks to run automatically in batch mode,
the Schedule tab for Tables, Custom Scripts, and Cubes must be properly
set up. This section discusses the setting of the Sequence field on these
screens so that the dependencies for each task type—Tables, Custom
Scripts, and Cubes—are met.
Fig. 3.12
Setting the
Sequence for a
Replication Task
Dependencies exist between the Table, Custom Script, and Cube tasks. In
general, all Table tasks must run before the Custom Script tasks and all
Custom Script tasks must run before the Cube tasks.
Single-Currency Sequence Dependencies
Table 3.1 lists the dependencies between the task types and the
recommended values that should be used in a standard single-currency
installation.
Note All dependencies require that prior dependencies have also been
met.
190
User Guide — QAD Business Intelligence
Table 3.1
Single-Currency
Dependencies
Script or Task Type
Dependencies
Recommended
Sequence Setting
Table
None
00
Script_Currency_Fields_
Incremental_.p
Table
15
Custom Script
Script_Currency_Fields_
Incremental_.p
20
Cube
Custom Script
90
Multicurrency Sequence Dependencies
Some special considerations must be observed if Data Transformer is
being used in multicurrency mode. Table 3.2 lists the dependencies
between the task types and the recommended values that should be used
in a standard multicurrency installation.
Note All dependencies require that prior dependencies have also been
met.
Table 3.2
Multicurrency
Sequence
Dependencies
Script or Task Type
Dependencies
Recommended
Sequence Setting
Table
None
00
Script_Base_Currency_.p
Table
10
Script_Currency_Fields_
Incremental_.p
Script_Base_Currency_.p and
Script_Exchange_Rate_.p
15
Custom Script
Script_Currency_Fields_
Incremental_.p
20
Cube
Custom Script
90
Script_Exchange_Rate_.p
Reference
191
Creating Translatable Cognos Transformer
Models
This section provides information for creating translatable Cognos
Transformer models.
Overview
The QAD BI Data Transformer supports creating Cognos Transformer
models using tokens to define text for dimensions, levels, categories, and
measures. These tokens are translated during replication using userdefined replacement text specified using Data Transformer Label
function.
Cognos Transformer Model
The model is created using tokens of the form ${token} for any text that
requires translation; for example, dimension names, level names, and so
on. Keep in mind that when a language is not defined in the Languages
tab of Cube Properties, the value of token is used for the text; the
${ and } is stripped from the ${token}.
Fig. 3.13
Defining Cognos
Transformer Model
Text Using a Token
192
User Guide — QAD Business Intelligence
The token is replaced by the value defined, using Data Transformer Label
function described in the next section, for the language being processed.
Data Transformer User-Defined Labels
In addition to defining your Cognos Transformer model using tokens,
Data Transformer’s configuration database must be updated with the
token and its language-dependent translations. This is accomplished using
the following steps:
1
In Data Transformer, choose Settings|Labels from the menu. This
displays the Labels screen.
2
On the Labels screen, click the New button on the toolbar.
3
Enter the information to define your translatable token on the Add
Label screen as follows:
Fig. 3.14
Labels
• Field: Enter the token used in the Cognos Transformer model.
Example If the token entered in the Cognos Transformer model is
${Customer}, enter Customer in this field.
• Languages: Select the language you are defining for the token
from the drop-down list.
• Label: Enter the text that should be used to replace the token.
Reference
193
Fig. 3.15
Add Label
4
Repeat Steps 2 and 3 for all languages you want to define. When
finished, the Labels screen should contain multiple records for the
token—one for each language defined.
Fig. 3.16
Multiple Languages
Defined for
Customers Token
194
User Guide — QAD Business Intelligence
Manually Loading Custom Scripts
Overview
You can manually load custom scripts. This section provides information
on the interdependencies between custom scripts as well as instructions
for loading them.
Alternately, the predefined business models offered for sale by QAD
include prebuilt custom scripts and tables to transform data in the data
warehouse into the data required by the Cognos cubes. To load custom
scripts in this fashion, see the sections under “Using QAD-Provided
Model Data” on page 73.
Load Custom Scripts
To manually load custom scripts, right-click the Custom Scripts folder on
the main screen directory tree and select Add Script.
Fig. 3.17
Add a Customer
Script
The Add Script screen displays. Click Browse to navigate to the directory
where the custom script files were placed during installation. Typically,
this is:
qadbiInstallDir\data\scripts\custom
For example:
c:\qadbi\data\scripts\custom
Reference
195
Fig. 3.18
Selecting Custom
Scripts
Select the first script on the list and click Open. The system populates the
Script Details frame with the path, the default script name—which you
can update as needed—and a preview of the script contents.
Important Not all scripts in the custom folder are to be loaded into Data
Transformer. Table 3.3 lists the custom scripts distributed for the current
version. Only primary scripts should be loaded. Loaded secondary scripts
will fail validation.
Table 3.3
Primary Scripts
Secondary Scripts
Script_Balance_Sheet_Totals_.p
None
Script_Call_Billing_Detail_.p
None
Script_Call_Lead_Time_.p
Script_Call_Lead_Time2_.p
Script_Engineer_Hours_Available_.p
Script_Engineer_Hours_Available2_.p
Script_Forecast_.p
None
Script_Forecast_Simulation_.p
None
Script_Format_Positions_.p
Script_Format_Positions2_.p
Script_Invoice_Discounts_.p
None
Script_Engineer_Hours_Available3_.p
Custom Primary
and Secondary
Scripts
196
User Guide — QAD Business Intelligence
Primary Scripts
Secondary Scripts
Script_Invoice_Trailers_.p
None
Script_Purchase_Statistics_.p
None
Script_Repeat_Calls_.p
Script_Repeat_Calls2_.p
Script_Sales_Order_Discounts_.p
None
Script_Sales_Order_Trailers_.p
None
Script_Sales_Statistics_.p
None
Script_Stock_History_Week_.p
Script_Stock_History_.p
Script_Stock_History_Month_.p
Script_Stock_History_.p
Script_Currency_Fields_Incremental_.p
Script_Currency_Fields_.p
Additional scripts should be loaded if multiple MFG/PRO base currencies will be used.
To support multiple MFG/PRO base currencies:
Script_Base_Currency_.p
None
Script_Exchange_Rate_.p
None
The additional scripts shown in Table 3.4 are required for multiple
MFG/PRO base currencies.
Table 3.4
Multiple-Currency
Scripts
Primary Scripts
Secondary Scripts
Script_Base_Currency_.p
None
Script_Exchange_Rate_.p
None
Important The custom script Script_Multi_Currency.p is a utility
script—that is, not a primary or secondary script—and should not be
scheduled by users.
Reference
Fig. 3.19
Add Script
Click the Schedule tab to specify when this script will run to replicate
data. For information on scheduling, see “Scheduling Automatic
Replication” on page 39.
Note To ensure that custom scripts are run after any standard (that is,
generated) scripts, set Sequence to a value that is greater than the highest
standard script’s sequence. For additional information regarding the use
of multicurrencies, see “Multicurrency Configuration” on page 184.
Repeat this task for each primary script in the directory.
197
198
User Guide — QAD Business Intelligence
Index
A
application settings 77, 164, 186
B
batch process 83, 169, 178, 187, 189
business key indexes 47, 142
business models 9, 17, 69, 110, 118, 157
C
code pages 120
code table filter 29, 128
Cognos 8 6, 108
Cognos PowerPlay Transformer 81, 110, 168
Cognos Transformer models 191
currency 185
custom
compiled scripts 76, 163
fields 32, 131
indexes 45, 47, 140, 142
scripts 55, 76, 149, 163, 194
tables 35, 55, 134, 149
D
Dashboard 10
Install 95
data
merge 58, 152
replication 49, 143
subsets 44, 139
target 50, 144
Data Transformer 7, 109
configuring 183
menu 13, 114
navigation 12, 113
setting up 17, 118
source system icons 16, 117
toolbar 13, 114
translatable Cognos models 191
user interface 11, 111
data warehouse 6, 7, 78, 108, 109, 165
currency 185
fields 31, 130
tables 27, 29, 53, 126, 128, 147
databases
connections 18, 119
merge data 58, 152
replication 29, 128
status 63, 153
domains 23, 26, 121, 124
E
error messages 88, 171
F
fields
custom 32, 131
mapping 31, 43, 51, 130, 138, 145
properties 32, 131
filter, code table 29, 128
I
icons, Data Transformer source system 16, 117
Impromptu Query Definition 8
indexes 45, 47, 140, 142
IQD Editor 72
K
key performance indicators 9, 110
L
links
rebuilding 64, 155
updating 154
log-in, user 11, 112
200
User Guide — QAD Business Intelligence
M
mapping
fields 31, 43, 51, 130, 138, 145
tables 29, 54, 128, 148
menu, Data Transformer 13, 114
merge data 58, 152
metadata 28, 74, 127, 161
MFG/PRO database 7, 109
connecting to 17, 118
domain 23, 121
Microsoft Access 111, 166
database 110
server 64, 154
multicurrency configuration 184
N
navigation, Data Transformer 12, 113
notification 88, 171
O
Oracle database 24, 123
overview 6, 108
P
parallel replication 178
Progress
DataServer 24, 122
R
rebuild links 64, 155
recreating tables 53, 147
reference information 178–197
replication
automatic 39, 134
data 39, 49, 134, 143
fields 31, 43, 130, 138
manual 42, 136
method 33, 132
multicurrency 187
parallel 178
setup 29, 128
table validation 51, 145
tables 29, 42, 128, 136
task sequence 189
S
script validation 76, 163
setting up BI 17, 118
source system
icons, Data Transformer 16, 117
system tasks 59
T
tables
custom 35, 134
export 64, 155
linking 80, 166
mapping 29, 54, 128, 148
re-creation 53, 147
removal 29, 128
rename 42, 137
selection 27, 126
status 54, 148
subsets 13, 114
validation 51, 145
toolbar, Data Transformer 13, 114
U
user
log-in 11, 112
records 88, 173
using QAD BI 6–91, 108–175
V
validation
scripts 76, 163
tables 51, 145
W
Windows Task Scheduler 90, 175