1
This document describes launching of graphic and
console applications using OTC Terminal software.
Terminal GUI
Terminal Console
V. 2.4
User
Podręcznik
manual
użytkownika
© OTC S.A., 2008
Table of contents
I. General characteristic of the product .................................... 5
II. Terminal GUI - main features .............................................. 7
Handling of GUI applications (Terminal GUI only) ............................. 7
Handling of console applications .................................................... 7
Seamless windows integration....................................................... 7
Mapping of terminal station printers ............................................... 8
Two authorization variants............................................................ 8
Optimization of network transmission ............................................. 8
Encryption of network transmission ............................................... 8
Graphic editor of application parameters ......................................... 9
Virtualized application work environment ........................................ 9
Possible extension of the application and client by using attached
interfaces (API)......................................................................... 10
System requirements................................................................. 10
III. Installation ..................................................................... 12
Terminal server installation......................................................... 12
Terminal client installation .......................................................... 13
Installation validity test .............................................................. 14
IV. Terminal GUI client – the gte.exe program .......................... 16
Using the gte.exe client in graphic mode ...................................... 16
Using the gte.exe client from the command line............................. 22
V.
Terminal GUI –server configuration .................................... 30
Starting and configuring the TMTool program ................................ 30
Main information window ............................................................ 34
Configuration of Terminal server.................................................. 36
User accounts ........................................................................... 39
Server monitor ......................................................................... 43
VI. Testing of terminal operation on a slow network link ............ 46
Terminal GUI/Console – User Manual 3
I.
General characteristic of the product
Terminal GUI (Graphical User Interface) is a software package that allows terminal
(remote) execution of Windows applications on Windows servers. Upon user’s
request Terminal GUI launches a GUI application on an application server and
redirects individual elements of the graphical interface such as windows, menus or
icons onto the terminal system, thus allowing remote execution.
Terminal GUI can be used to launch both the applications, which take advantage of
the users graphical interface, and those executed in Windows console mode. The
applications do not require modifications or attaching of additional libraries as was the
case for previous versions of the Terminal (Terminal xBase).
The software consists of two parts – Terminal server and Terminal client. The
Terminal GUI server is installed on the computer which is to be the application server,
and is responsible for authorization handling and launching of the application. The
Terminal client (gte.exe) is a program which is installed and executed on terminal
computers. The two systems communicate via the TCP/IP network. The low
throughput requirements make it possible to work not only in a local network but also
in wide area (WAN) network using dedicated connections or VPN Internet channels.
If advanced encryption options are used, communication over open Internet links is
possible.
Terminal GUI/Console – User Manual 5
Terminal Console is identical to Terminal GUI but allows execution of applications in
Windows console mode only. The present documentation of Terminal GUI refers to
Terminal Console as well. Any existing differences between the two programs are
clearly pointed out.
6 Terminal GUI/Console – User Manual II. Terminal GUI - main features
Handling of GUI applications (Terminal GUI only)
Terminal GUI allows launching of applications which use a windows graphical user
interface (GUI). This is regardless of the library used by the application to handle the
user interface. It can be implemented by direct Win32 API calls or through one of the
higher level libraries such as MFC, WinForms, Delphi VCL, COM objects, etc.
Handling of console applications
Terminal GUI and Terminal Console handle 32-bit Windows console applications.
Console applications are handled in text mode, which reduces the server load and the
amount of data transmitted over the network. Since the standard handling of Windows
console is rather slow, a large part of it was reprogrammed. Significant improvement
of console performance on the server side and a reduction of the processor load was
achieved. As a consequence, simultaneous launching of large numbers of console
applications on the server is now possible.
Seamless windows integration
Terminal GUI does not grant access to the whole server desktop. Instead, only
windows created by the launched application appear on the terminal. We believe that
this solution offers the following advantages:
• It limits the possible interference of the user with the application server
environment. For multi-user business applications it is not recommended for the
user to be allowed to modify and configure the server environment which can
happen in case of full desktop access. The adopted solution limits user’s access to
what is granted by the application.
• It is more comfortable, since the access to the application windows is direct, and
not via an additional window which shows the image of the desktop.
Terminal GUI/Console – User Manual 7
• It generates less network activity, since only modifications of the application
windows are transmitted without any information concerning the desktop.
Mapping of terminal station printers
To facilitate work in a centralized environment, Terminal GUI allows the use of
terminal station printers by the application executed on the application server. The
printers are made available to the application automatically, without the need to install
them on the server. Two methods of remote printing are implemented – using the
Windows metafiles or bitmaps.
Two authorization variants
The application executed on the application server can be executed directly on the
account used by the Terminal server (authorization by Terminal) or on another
Windows user account (authorization by Windows). If the application is executed
within a Windows user account, it works with the environment and permissions of the
Windows user. The use of Windows user account for application execution allows a
better control of the application on the operating system level.
Optimization of network transmission
A multilevel data compression has been introduced to optimize the amount and the
characteristic of the network traffic. The use of local handling of the mouse cursor on
the terminal station improves the comfort of working with a remote application.
Additionally, it is possible to use an optimization of the mouse cursor handling which
blocks constant sending of the cursor position during mouse movement. The software
implements special options which allow to test Terminal GUI performance in different
network conditions.
Encryption of network transmission
To ensure secure transfer of information the terminal allows encryption of network
transmission. Three symmetrical encryption algorithms controlled from the terminal
server configurator (TMTool) are available:
8 Terminal GUI/Console – User Manual • AES with a 128 or 256 bit key,
• 3DES with a 192 bit key,
• OTC Prop – an OTC algorithm of low security but high efficiency (practically
does not put any load on the server).
An asymmetric RSA algorithm with a public key is used to negotiate the connection
conditions. The ensuing transmission is encrypted using the chosen symmetrical
algorithm. The algorithms listed above are available for GUI clients and all 32-bit
text-application clients running on Windows, PocketPC and Linux systems. For CAClipper applications and clients only the „OTC Prop” algorithm is available. If the
administrator chooses AES or 3DES encryption, he can still allow CA-Clipper
applications to use the „OTC Prop” algorithm at the same time. If such explicit
permission is not given, the CA-Clipper application can not be launched in terminal
mode. The permission has to be granted from the TMTool configurator level.
Graphic editor of application parameters
The gte.exe program, which serves as a client for launching GUI and console
applications, allows specifying the complete set of parameters from the command line.
Alternatively, it allows editing of those parameters using a simple graphic application.
This is a significant assistance, especially for inexperienced users.
Virtualized application work environment
An application executed in the terminal mode can log in as a Terminal user or as a
Windows user. In case of a Windows user login the application works with the
environment and permissions of the selected Windows user.
Regardless of whether the application executed in the terminal mode logs into the
Windows system or not, it is executed in a special, virtualized environment. Such an
environment is created at the start of the application and is being used by this
application and all processes that it starts, either directly or by the „out-of-process”
COM objects. If another application is started from the same terminal station, a new
virtualized environment is created for it and its child processes.
The features of the virtualized environment:
Terminal GUI/Console – User Manual 9
• It has its own main window (desktop), with resolution corresponding to the
terminal resolution.
• It has its own name space for classes and windows.
• It has its own name space for the following system objects: mutexes, semaphores,
shared memory blocks, tasks, timers, events.
• It has its own printers mapped according to the application launch options.
Possible extension of the application and client by
using attached interfaces (API)
No changes to the application code are necessary in order to launch it using the
Terminal GUI program. However, if the standard functionality of the Terminal is not
sufficient, it is possible to extend the client application by using interfaces of the
Terminal. Extension possibilities include:
• Attaching to gte.exe the dedicated RPC (remote procedure call) procedures which
can be called from the application using the RPC mechanism.
• Calling from the application or from the RPC code of built-in library functions
allowing for instance for the transfer of files between the server and the terminal.
• A dedicated interface for xHarbour application users, which allows attaching of
RPC procedures written in xHarbour, and libraries containing xHarbour functions
compatible with earlier versions of the Terminal.
More details concerning the use of the application and client interfaces and the RPC
procedures can be found in the programmers manual.
System requirements
Following operating systems are supported at this time:
Application server system:
•
•
•
•
Windows 2003
Windows XP
Windows Vista
Windows 2008
10 Terminal GUI/Console – User Manual Terminal system:
•
•
•
•
•
•
•
•
Windows 2008
Windows 2003
Windows XP
Windows Vista
Windows 2000
Windows 98
Windows Me (has not been tested)
Linux (at this time for console applications only)
Terminal GUI/Console – User Manual 11
III. Installation
Terminal server installation
Terminal GUI server is to be installed on the computer which will be used as the
application server. The application server must run on one of the following systems:
•
•
•
•
1.
2.
3.
4.
5.
6.
Windows 2003
Windows XP
Windows Vista
Windows 2008
The Terminal server must be installed by a user that belongs to the Administrators
group.
If Terminal GUI is already installed on the server, it must be uninstalled first. To
uninstall, choose the proper Menu option and restart the computer afterwards.
Next, start the trmsv.exe installer and follow the instructions. The default
installation directory of the Terminal server is c:\trmsv.
Restart the system to complete the installation.
Set the graphic parameters of the server. The server must work in the True color
graphic mode (32 bits per pixel). The display resolution must not be inferior to
that of the cooperating terminal stations.
Switch on Themes service.
To do that open the Control Panel / Administrative Tools / Services, choose the
Themes service, change the Startup Type to Automatic, select “Start” and “OK”.
After enabling of the Themes service change the active Theme in the following
manner:
9 On Windows XP/2003:
go to Control Panel / Display, go to tag Themes, select Theme "Windows
XP" and confirm "OK".
9 On Windows Vista:
go to Control panel Æ Personalization Æ Color and windows style. Select
the "Windows Vista base" and confirm pressing Apply.
12 Terminal GUI/Console – User Manual 9 On Windows 2008:
Same as on Windows Vista. Sometimes it is necessary to install additional
system components by using the Server Manager Æ Features: choose
Desktop Experience.
7.
8.
On Vista/Windows 2008 the users account control (UAC) must be switched off in
the following way: Control panel Æ User accounts Æ Turn on / off the users
account control function: uncheck use „Users account control”.
If the application will be launched from Windows accounts (Windows
authorization) make sure that:
9 The accounts have been added to the Terminal GUI users group created by
the terminal installer.
9 On Windows XP/2003 those accounts must be part of the Administrators
group, otherwise some elements of the graphic interface might not be
displayed and the application will not work properly.
9 Those accounts are not restricted accounts.
ATTENTION!
If, despite following this installation list, problems persist, additional information can
be found in the guiinstall.txt file.
Terminal client installation
Terminal client is installed on the computers which will be used as terminal stations.
The Terminal client can work on the following systems:
•
•
•
•
•
•
•
•
Windows 2008
Windows 2003
Windows XP
Windows Vista
Windows 2000
Windows 98
Windows Me (has not been tested)
Linux (at this time for console applications only)
Terminal GUI/Console – User Manual 13
1.
2.
3.
If Terminal client is already installed on the terminal station, it must either be
uninstalled using the proper Menu option, or a different installation directory
must be selected during installation.
Next, start the trmclpl.exe installer and follow the instructions. The trmclpl.exe
installer includes Terminal client software for all versions of Terminal. To install
Terminal GUI client only, uncheck all options except for Terminal GUI Client
and Configurator of the Terminal server. The default client installation directory
is c:\trmcl.
At this time the terminal station must work in the True color graphic mode (32
bits per pixel). For proper functioning of the software, the display resolution of
the client must not be larger than the display resolution of the server.
Installation validity test
For a quick installation validity test do the following:
On the server: 1.
2.
3.
Start the Terminal server from the menu
Start Æ OTC Terminal Server Æ Terminal Server.
Press Start in the Terminal server window.
Create the Terminal user:
9 Launch the configurator (TMT) using the Preferences button in the Terminal
server window.
9 In the configurator window choose Preferences/Users.
9 Press User accounts.
9 Fill the fields Name (e.g. test), Password (e.g. testpwd) and Confirm (e.g.
testpwd)
9 Add the Terminal user by selecting Add.
9 Confirm saving of the file and exit the configurator.
On the terminal: 1.
Start the gte.exe Terminal client from the menu
Start Æ OTC Terminal Client Æ Terminal Client.
14 Terminal GUI/Console – User Manual 2.
Fill data necessary to start a terminal session.
9 In tab Login:
User Name (test),
Password (testpwd)
9 In tab Application:
Application path (c:\windows\system32\notepad.exe),
Working directory (c:\windows\system32)
9 In tab Server & Transmission:
Address (IP address of the Terminal server, numerical or symbolic)
3.
Start the application by selecting the Run application button. If everything is in
order the notepad application should start on the server, its window should appear
on the terminal.
Terminal GUI/Console – User Manual 15
IV. Terminal GUI client – the gte.exe program
The gte.exe program is the client of the Terminal GUI/Console software. The gte.exe
can be used to remotely launch Windows programs that will be executed on the
application server. The gte.exe can be executed in graphic or command line mode.
Using the gte.exe client in graphic mode
Launching of the gte.exe client without any application start parameters or with the
−SHOWGUI parameter displays the graphic editor of session start parameters. All
known values of parameters are initially placed in the proper text fields and can be
modified by the user.
Parameters of the Terminal GUI client are divided into five tabs:
Login, Application, Server & transmission, Printers and Options.
Additionally, the address of the server on which the application will be started is
displayed in the upper part of the window. The lower part of the window contains two
buttons:
Run application – starts the application on the server. If any of the required parameters are missing the
application will not be started and the cursor will be moved to the first of the fields
that must be properly filled. If the application starts correctly, all parameters (apart
from the password) will be saved, overwriting any previous values. The password can
be saved on users request by selecting the option „Save password”.
Cancel – cancels launching of the application; the gte.exe client terminates, any changes of
the parameters are discarded.
Described below are the contents of tabs of the gte.exe client.
16 Terminal GUI/Console – User Manual „Login” tab Contains parameters which are used for user identification:
• User name – a text field containing the user name recognized by the authorization
mechanism of the Terminal OTC server or, if the option „Windows logon” is
checked, by the Windows authorization mechanism. This is the equivalent of the
–USER command line option of gte.exe (p. 22).
• Password – a text field used for password of the user defined by the user name
given above. The password is not displayed when typed in. This parameter is the
equivalent of the –PASSWD command line option of the terminal client (p. 23).
• Windows logon – a checkbox used for specification if the user name and password
given above are to be used for OTC Terminal authorization or for Windows
authorization mechanism. For Windows authorization the domain in which the
user account is created must be given. This is the equivalent of the –WINLOGON
command line option of gte.exe (p. 22).
• Domain – a text field to define the domain name. If the „Windows logon” button is
unchecked the „Domain” field is not active. This is the equivalent of the –
DOMAIN command line option of the terminal client (p. 23).
• Save password – a checkbox which states if the password given above is to be
saved along with other parameters. If this checkbox remains unchecked the user
will be asked to type in his password every time gte.exe is started.
Terminal GUI/Console – User Manual 17
„Application” tab This tab contains the parameters which identify the application that is to be started.
• Application path – a text field to input the full application name including the full
and explicit path name. Do not input any application arguments into this field. A
separate field is used to pass arguments. In gte.exe command line mode the path
name is given after the terminal options and the working directory of the
application (p. 28).
• Application arguments – a text field containing the parameters (arguments) of the
starting application. In the command line mode the arguments are given at the end
of the command (see description on page 28).
• Working directory – a text field to input the working directory of the starting
application. The directory should be given as a full, explicit path name. In the
command line mode the working directory is given immediately after the terminal
options (see description on page 29).
„Server & transmission” tab This tab contains information which identifies the application server and the network
transmission parameters.
• Address – a text field used to input the IP address or the name of the application
server. The name must be resolved by the DNS/WINS. The address introduced in
this field is displayed in the upper part of gte.exe client window as well, regardless
18 Terminal GUI/Console – User Manual of the active tab. This parameter is the equivalent of the –ADDR command line
option of gte.exe (p. 24).
• Port – a text field which defines the TCP port number where OTC Terminal server
awaits the client connections.. The port number must be given as a decimal
number, the default value is 6601 (hexadecimal: 19C9). The equivalent of this
parameter in command line mode is the –PORT option (p. 24).
• Compression – a slider used for selecting the data compression level that is to be
used for transmission between the client and the server. Level 0 switches the
compression off altogether. The default setting is 6. Selection of a higher value
will produce a slightly better compression but will result in a large increase of the
server load.
• Small packets – a checkbox, which allows to limit the size of the data packets sent
from the application to the terminal client. If the option is checked the size of a
single packet is limited to 512 bytes. This option is very useful when working on a
garbled network link as it reduces the number of retransmitted packets, thus
reducing the load.
„Printers” tab The parameters placed in the „Printers” tab allow configuration of the printouts
created by the terminal client.
Terminal GUI/Console – User Manual 19
• Map printers – a checkbox which determines if the printers defined on the client
station should be mapped on the application server. If this option remains
unchecked, all remaining printing parameters become inactive. Keeping this option
unchecked is equivalent to the –NOPRN parameter in gte.exe command line mode.
More information can be found in the description of the –NOPRN option on page
27.
• Server printers visible – a checkbox which determines if the application should see
the printers defined on the application server. The server printers are not seen by
default. If this option is selected the application will see the printers of both the
terminal and the server. The parameter is the equivalent of the –SVPRN option of
the command line mode (see description on page 27).
• Set terminal default printer on the Server – a checkbox which determines if the
default printer defined on the terminal should also become the default printer of
the application on the server. If this option remains unchecked, the default
application printer will not be defined, or it will be the default server printer (if the
application can see the printers of the application server). Keeping this option
unchecked is equivalent to the –NODEFPRN parameter in gte.exe command line
mode. The description of the –NODEFPRN option can be found on page 28.
• EMF printing/Bitmap printing – switches between the two printing methods:
9 printing using the EMF (enhanced metafile) files – the default method
9 printing using bitmaps – to be selected if EMF printing fails
20 Terminal GUI/Console – User Manual If bitmap printing is selected an additional field becomes active, with a list which
determines the number of colors of the transmitted bitmap. Detailed information
can be found in the description of the –BINPRN option on page 27.
„Options” tab This tab is used to define additional parameters of the terminal and allows creation on
the clients station desktop of an icon/shortcut which can be used to automatically
launch the remote application with a predefined set of parameters.
• Cursor movement optimization – a checkbox which allows switching on of the
mouse cursor optimization in order to limit the network traffic. Detailed
information about this function can be found in the description of the -CROPT
command line option of gte.exe on page 24.
• Mark remoted windows on terminal – a checkbox which determines if the remote
windows on the terminal are to be marked by an additional symbol in the upper
left corner. This option allows for better distinction of windows created by remote
applications using Terminal from local windows of the client station. The
equivalent of this parameter is the –RMARK command line option of gte.exe
described on page 26.
• Create desktop icon – this button can be used to create on the terminal desktop an
icon/shortcut for easy starting of a remote application. The shortcut is created
based on the parameters given in all tabs of the gte.exe window. The name of the
shortcut is defined by the user in the Icon name text field. The shortcut will not be
Terminal GUI/Console – User Manual 21
created if any necessary parameters are missing and the cursor will be moved to
the missing text field in the respective tab. To start the application using the
shortcut, double click on the icon and input the password if necessary.
• Icon name – a text field to input the name of the shortcut which will be created
using the Create desktop icon button.
Using the gte.exe client from the command line
The gte.exe client can be called from the command line with the application start
parameters in the following way:
gte [options] workingDirectory programName [parameters]
where [options] - none or several call options as described below:
‐HELP Displays a brief summary of available options of gte.exe.
‐WINLOGON By default, the Terminal server launches applications within the user account on
which it is running. The parameters -USER and -PASSWD determine the Terminal
user name and password of a user, which must be defined earlier in the Terminal
using the TMTool.exe program. The option -WINLOGON requests the application
to be launched within the given Windows user account. In such a case, the
parameters -USER and -PASSWD refer to a Windows user name and password.
The user account must be defined in the Windows server system and must be a
member of the Terminal GUI users group defined by the server installer. On
WindowsXP and Windows2003 systems, the user must be a member of the
Administrators group.
‐USER=user_name The option is used to specify the name of the Terminal server or Windows user,
whose account will be used to launch the application.
22 Terminal GUI/Console – User Manual Example:
-USER=mike
‐PASSWD=user_password The option is used to specify the password of the Terminal server or Windows
user, whose account will be used to launch the application.
Example:
-PASSWD=mysecretpwd
‐DOMAIN=user_domain For Windows authentication (-WINLOGON) this option allows to specify the
Windows domain of the user defined by the -USER and –PASSWD parameters. If
the application is to be launched by a local user (not belonging to a domain), the
option –DOMAIN should not be used, or the name of the computer which is
running the Terminal server program should be substituted for the domain name.
‐ADDR=name_or_ip The option allows to give the symbolic (domain) address or the IP address of the
application server on which the application will be launched.
Example:
-ADDR=appserver.mynet.com
-ADDR=10.1.23.55
‐PORT=server_port The option allows to change the server port which is used by the Terminal server
for connection. The port number is given in decimal. The default port number is
6601.
Terminal GUI/Console – User Manual 23
Example:
-PORT=6000
‐CPRn The option allows to define the compression level of the compression used for the
network transmission of data. The parameter n can assume values from 0 to 9,
where 0 switches the compression off altogether and 9 is the highest available
compression level. If the –CPRn is not used, the default compression level is set to
6.
‐CROPTn The option switches on (-CROPT1) or switches off (-CROPT0) the optimization
of the mouse cursor movement on the terminal. When the optimization is active,
the cursor position is sent to the application 150 ms after the cursor movement
stops. Thanks to this, the elements of the interface over which the cursor is moved
are not getting activated, which reduces the network traffic. If the optimization is
switched off, new positions of the cursor are being sent constantly as the cursor
moves. Switching the optimization off increases the network traffic, yet it gives an
appearance of a faster reaction of the user interface. It should be used only if the
network connection is good, e.g. when working on a LAN network.
‐PKTn For some network devices it is necessary to limit the maximum size of the package
transmitted over the network between the terminal and the application. This can be
done using the –PKTn option. The parameter n can take values from 1 to 3,
depending on the maximum packet size that is to be set (1=1024 bytes, 2=512
bytes, 3=256 bytes).
‐NETSTAT An auxiliary option to check the amount of data transmitted between the
application and gte.exe. The gte.exe program creates an additional, small window
which is used to display communication statistics.
Rcv blocks - number of packets sent from the application to gte.exe
Rcv Network - number of kilobytes sent over the network from the application
to gte.exe
24 Terminal GUI/Console – User Manual Rcv uncpr number of kilobytes received by gte.exe after decompression
Snd blocks - number of packets sent from gte.exe to the application
Snd Network - number of kilobytes sent over the network from gte.exe to the
application
Snd uncpr number of kilobytes received by the application after
decompression
A separate copy of gte.exe and thus a separate window with the communication
statistics is created for each process. The communication statistics window can be
closed at any time without affecting the functioning of the application.
‐LINK=kbps An auxiliary option – allows to artificially limit the link throughput to the given
number of kilobytes per second. The given value is assumed to be the link
throughput for uplink and downlink traffic independently. This option is very
useful for testing of the application behavior in limited link throughput conditions.
For a reliable emulation, the real throughput of the link between gte.exe and the
application must be several times larger than the tested value.
Example:
-LINK=128
The value limits the network throughput to 128 kbps.
‐DELAY=ms An auxiliary option – introduces artificially an additional network transmission
delay. The delay appears at each sending and receiving of a network packet. The
option is very useful to test the application behavior in conditions of large
connection delays. The delay value is given in milliseconds. It is recommended to
use the average delay value between the client computer and the application server
as given by the PING program.
Terminal GUI/Console – User Manual 25
Example:
-DELAY=30
‐UPLINK=kbps An auxiliary option – allows to artificially limit the throughput of the link in the
direction from gte.exe to the application to the to the given number of kilobytes per
second. The option is very useful for testing of the application behavior in limited
link throughput conditions. For a reliable emulation, the real throughput of the link
between gte.exe and the application must be several times larger than the tested
value.
‐DOWNLINK=kbps An auxiliary option – allows to artificially limit the throughput of the link in the
direction from the application to gte.exe to the given number of kilobytes per
second. The option is very useful for testing of the application behavior in limited
link throughput conditions. For a reliable emulation, the real throughput of the link
between gte.exe and the application must be several times larger than the tested
value.
‐RMARK An auxiliary option – if given, the remote windows on the terminal are being
marked by a sign in the upper left corner. In the test version, the sign is a short
skew line pointing towards the lower right corner. This option allows to easily
distinguish between the windows of remote applications launched using the
Terminal and local windows on the terminal system.
‐SHOWGUI The gte.exe program can be started without any parameters or with a set of
parameters not sufficient to correctly establish a link with the server and launch an
application. In such a case a window allowing to input the missing parameters will
appear. If in the command line the user name (-USER), password (-PASSWD), the
address of the server (-ADDR), the working directory (workingDirectory) and the
name of the application (programName) have been given, gte.exe will attempt to
establish the connection with server and start the application without switching
over to the parameters editor mode. The parameter -SHOWGUI forces the program
26 Terminal GUI/Console – User Manual to enter the parameters editor mode before establishing the connection, even
though all required parameters are given.
‐NOPRN If the –NOPRN parameter is used, gte.exe does not perform printer mapping. In
such a case the –SVPRN, -NODEFPRN and -BINPRN parameters are ignored, the
application does not see any printers of the terminal system, while it can see
printers installed on the application server. If the –NOPRN parameter is not
specified at the start of the program, the application on the server can see the
terminal system printers under their names with an attached @ERATERM postfix.
The details of mapping and handling of the printers are determined by the
following parameters: –SVPRN, -NODEFPRN and -BINPRN. Mapping of the
printers involves reading of parameters of all the printers installed on the terminal
system. It is done at the first call of the application to any function related to the
printer handling and can take from a few seconds up to a few minutes. Thus, if the
application is not going to use the printer it should be started with the –NOPRN
parameter.
‐SVPRN The parameter determines if the application should see the printers defined on the
application server. By default, the server printers are not seen. If the –SVPRN
parameter is given the application can see printers defined on both the terminal and
the server.
‐NODEFPRN If a default printer is defined on the terminal, at the start of the application it
becomes the default printer of the application. If such an assignment is not
desirable, it can be blocked by the -NODEFPRN parameter. In such a case the
default application printer will not be defined, or it will be the default server
printer, if the application can see the printers of the application server.
‐BINPRN The default method for transmitting of printouts from the application to the
terminal printer is by using metafiles (enhanced metafile). The printout is created
Terminal GUI/Console – User Manual 27
on disk as a metafile and sent to the printer after it is fully completed. This method
is not always successful. In some cases the printouts do not appear on the printer,
or appear in a wrong form, or appear only after exiting from the application. If this
happens it is advised to use bitmap printing. Bitmap printing can be switched on
using the –BINPRN option. If this option is switched on, the images of subsequent
pages of the printout are saved as bitmaps and sent to the printer one page at a
time. Bitmap printing requires more memory since it is necessary to store high
resolution bitmaps in memory. The resolution of bitmaps corresponds to the
printer page resolution which is often very high. A 256 color bitmap is created by
default. In order to save memory we advise to use 2 or 16 color bitmaps whenever
possible. To switch the color resolution of the bitmap the parameters –BINPRN1
(two colors) or –BINPRN2 (16 colors) can be used. The parameter -BINPRN3
(256 colors) is equivalent to -BINPRN.
workingDirectory – the working directory of the application. If the path contains any
spaces it should be specified in quotation marks, e.g.
”C:\Program Files\myprog”.
The working directory should be given as seen on the application server.
programName – the full path of the launched application (program). If the path
contains any spaces it should be specified in quotation marks, e.g.
”C:\Program Files\myprog\prog.exe”.
The working directory should be given as seen on the application server.
[parameters] – optional parameters that will be passed to the programName program.
If the parameters contain any spaces they should be specified in quotation marks, e.g.
”par 1”
”par 2”
par3
Examples of gte.exe calls:
• Starting an application with parameters, without printer mapping
28 Terminal GUI/Console – User Manual gte -addr=10.1.18.41 -user=test -passwd=testpwd -noprn
"c:\program files\app" "c:\program files\app\main.exe"
"par 1" "par 2" par3
• Starting an application with metafile printing (default)
gte -addr=10.1.18.41 -user=test -passwd=testpwd
"c:\program files\app" "c:\program files\app\main.exe"
• Starting an application with two color bitmap printing
gte -addr=10.1.18.41 -user=test -passwd=testpwd
binprn1 "c:\program files\app" "c:\program
files\app\main.exe"
-
• Starting an application within a Windows user account
gte -addr=10.1.18.41 -user=winuser -passwd=winpwd
-domain=office –winlogon "c:\program files\app"
"c:\program files\app\main.exe"
Terminal GUI/Console – User Manual 29
V. Terminal GUI –server configuration
The program TMTool.exe (Terminal Management Tool) allows to configure the
parameters of Terminal GUI server. Principal functions of the program are listed
below:
• Displaying information about the server (license ownership, number of users,
running time).
• Reading/modifying/saving of the server options.
• Creating/modifying/removing the server user accounts.
• Monitoring of terminal application (RAM usage, CPU time, network protocols,
addresses, etc.).
The program communicates with the Terminal server via the network (using the
UDP/IP protocol) and thus can be executed on any Windows system computer with
access to the IP network. The TMTool can manage several Terminal servers
simultaneously (up to 64).
Starting and configuring the TMTool program
The TMTool program can be started directly from the Terminal server by selecting a
button, or as a separate application launched from the Start Menu or from the
command line of the operating system. The TMTool started by the Terminal server
can manage the operation of this server only. The program can manage several
Terminal servers if it is started as an independent application.
Starting the program from the Terminal server The Terminal server does not have built-in configurator and monitor functionalities.
For all modification of server parameters, changes in user accounts and viewing of
session parameters an external TMTool module must be used. For easy access it can
be started directly from the main Terminal window by selecting the Preferences &
Monitor button. Starting of the module will automatically connect the process with the
server that is to be managed and will block any connections to other servers. In the
30 Terminal GUI/Console – User Manual main TMTool window a limited menu will appear, which can be used to change the
language of the user interface and the program messages.
In another window, information about the managed server will appear. The contents of
the information window are described in section „Main information window” on page
35.
Starting of the program from the „Start Menu” or from the command line After the installation of the Terminal server using the supplied installation program, a
shortcut to the module TMTool – Terminal Management Tool will appear in the Start
Menu. Using this shortcut or calling:
> tmtool.exe
from the command line, starts the TMTool program in the „multi-server” mode,
allowing to manage up to 64 Terminal servers.
Terminal GUI/Console – User Manual 31
In the main program window, beside the Tools menu, a File menu appears. It can be
used to add, remove or modify the access parameters of managed servers. Apart from
that, a list of the servers is displayed in the window along with a Connect button. The
configuration of the TMTool program is done by choosing the language of the graphic
interface and messages and by defining the list of servers, which can be managed.
Those functions are accessible from the main menu of the program.
Main menu The program main menu consists of three submenus: Files, Tools and Help. If the
TMTool module was started from the Terminal GUI server, the only action allowed
by the menu is to change the language version of the program. All three submenus are
active in the „multi-server” mode of the program – when it is started from the Start
Menu or from the command line:
• File – contains a set of functions to manage the list of servers and the command to
exit the program.
• Tools – contains the function to change the language of the graphic interface and
the program messages. Available now are two languages: Polish and English.
• Help – contains the function to open the program information window. Most
information about the functions of the program are available as tips displayed
automatically after the mouse cursor is placed over the selected item.
File Menu The functions of the File menu allow adding, removing and changing the position of
entries on the list of managed servers. Each entry is identified by a name (nickname)
and corresponds to a set of parameters which give access to the server (the protocol,
address and port). Following functions are available:
• New connection
• Remove connection
• Modify connection
Additional functions:
• Save list of connections – saves the list of managed servers with corresponding
connection parameters in the Windows Registry or in the configuration file.
32 Terminal GUI/Console – User Manual • Exit – terminates the TMTool application.
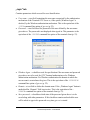
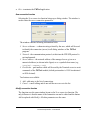
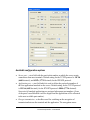
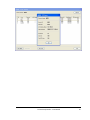
New connection function Selecting the New connection function brings up a dialog window. The window is
used to enter the server connection parameters.
The window contains following information fields:
9 Server nickname – a character string selected by the user, which will be used
to identify the connection (server) in all dialog windows of the TMTool
program.
9 Network – the communication protocol; at this time the IPX/SPX protocol is
not implemented.
9 Server address – the network address of the managed server, given as a
numerical address (as shown in the figure) or as a symbolic host name (e.g.
terminal.company.com).
9 Port/Socket – port number which will be used by the Terminal server to await
commands of the TMTool module (default port number is 19C6 hexadecimal
or 6598 decimal).
Two buttons are available:
9 Add – add entry to the list of connections.
9 Cancel – cancel editing and do not add the new server to the list.
Modify connection function The function uses the same window layout as the New connection function. The
only difference is that the name of the connection can not be edited and the button
Add is replaced with Modify. All other parameters are the same.
Terminal GUI/Console – User Manual 33
Remove connection function After confirmation, this function removes an entry from the list of connections.
Save list of connections function After confirmation, this function saves the list of connections and the selected
language of the graphic interface in the configuration file or in the Windows
Registry (depending on the version). Manual editing of the registry or the
configuration file is not recommended.
Exit function Terminates the TMTool application, asking if the changes made to the list of
connections are to be saved.
Connecting to Terminal server To connect to a Terminal server choose the name of the connection corresponding to
this server from the list and press the Connect button. The server may ask for the
access password (if activated before). If all connection parameters are correct, the
network link is operational and no other TMTool is connected to the server, the main
information window corresponding to the inspected server will appear. Otherwise, an
error message will be displayed. After the connection is established, the Connect
button becomes inactive if the same server is selected from the list.
Main information window
The main information window contains essential information about the connected
Terminal server:
9
9
9
9
Name of the connection (as defined on the list of connections).
Date and time of the server launch.
Name and address of the license owner.
Maximum allowed number of sessions or connected computers (depending
on the license type).
9 License type (full – FULL USE, evaluation – EVALUATION, developers –
DEVELOPMENT).
34 Terminal GUI/Console – User Manual 9 License number.
9 TCP port and/or SPX socket which are used by the server to await calls from
the terminals (if the server has not been activated using the Start button or
one of the protocols has not been implemented ‘xxxx’ sign will appear).
9 Number of existing sessions.
9 Number of connected devices (workstations) – always smaller or equal to the
number of sessions.
Several buttons which are used to start individual functions of the TMTool application
are located in the lower part of the main information window.
• Maintenance mode – checking of this field switches the server to the maintenance
mode. In this mode the server does not accept any logins. The already connected
sessions work normally. After the maintenance mode is selected the green sign
next to the selection field will change to red. Logins will no longer be blocked and
the sign will change color to green after the maintenance mode is switched off.
• Server start/restart – clicking this button will restart the Terminal server. All
active sessions will be disconnected. The green sign next to the button will
temporarily change color to yellow and return to green after restart. A restart with
the maintenance mode selected will disconnect all sessions and prevent any new
connections.
• Options/User accounts – opens a dialog window of the Terminal server
configurator which allows changing the parameters of the server and starting
dialog window to manage the Terminal server user accounts. The parameters and
Terminal GUI/Console – User Manual 35
the layout and contents of the Options dialog window are described in the
„Configuration of Terminal server” section on page 37. The handling, layout and
contents of the User accounts window are described in the „User accounts ”
section on page 39.
• Server monitor – opens a dialog window which allows to monitor the status of all
active sessions, in particular the address of the client station, the user name, and
the memory and CPU usage. It can also be used to terminate (“kill”) a session. For
a detailed description of the monitor see the „Server” section on page 43.
• Refresh – reads current information from the server and refreshes the contents of
the information window.
• Disconnect – disconnects the session with the managed server. In the multi-server
work mode this activates the Connect button in the main window of TMTool.
Disconnect terminates the TMTool module altogether if the program was started
from the Terminal server using the button, thus in the single server mode.
Configuration of Terminal server
Current values of all parameters are read from the server at the start of this dialog
window.
Two buttons are located in the upper part of the window:
• Defaults – sets all parameters to default values (use this function with caution as
the default values overwrite all previously made and unsaved changes).
• Refresh – reads current values of the parameters from the Terminal server (this
function overwrites all previously made and unsaved changes as well).
36 Terminal GUI/Console – User Manual Available configuration options • Server port – a text field with the port/socket number on which the server awaits
connections from user terminals. Default setting for the TCP/IP protocol is 19C9h
(6601 decimal), and 4547h (17735 decimal) for the IPX/SPX protocol.
• Application port – a text field which is used to define the port/socket number of
the first application launched on the server. Default setting for the TCP/IP protocol
is 19CAh (6602 decimal), for the IPX/SPX protocol: 4548h (17736 decimal).
Successively launched applications are assigned subsequent port numbers (if one
of the ports is used/blocked it will be skipped and the application will be allocated
to the next available port number).
• Encrypt transmission – a checkbox used for switching on the encryption of
transmission between the terminal and the application. The encryption causes
Terminal GUI/Console – User Manual 37
•
•
•
•
•
•
slightly larger load on the server. By default, the encryption is switched off. After
selecting, a list of available encryption algorithms becomes active (the encryption
algorithms and methods are described in section „Encryption of network
transmission” on page 8)
‘OTC Prop’ for Clipper applications – a checkbox which determines if the CAClipper text applications which do not have symmetric encryption capabilities can
use the simple and fast OTC Prop algorithm. If this field is not active it will not be
possible to start a CA-Clipper application if AES or 3DES encryption method is
selected.
Application disconnects after – a text field giving the time in seconds after which
no network activity from the terminal will cause a session disconnection (default
value is 60 seconds). The application is terminated by server, unless it is executing
a terminal transaction. In such a case the parameter Transaction terminates after...
is considered.
Transaction terminates after – a text field giving the time in seconds after which
an application which is executing a terminal transaction will be terminated (even
before the conclusion of the transaction) in case of a session disconnect. The
default value of the parameter is 180 seconds.
Shutdown the server – a selection field which allows to switch on an automatic
shutdown of the Terminal server at a given time on selected days. After activating
this option the remaining fields (the hour, minute, and day of the week) will
become active. Enter the time of the server shutdown and mark the days on which
the option is to be active. By default this option is not active.
Suspend event logging – a checkbox which disables writing of events to the
terminal logs (not recommended). By default this option is not active (writing to
event logs enabled).
Event log details level – a selection list assuming values from 0 to 2 which
determines how many details will be written to the event log. The value 0 means
that only the most important messages will be written, the value 2 is for all
messages to be written. The default value of the parameter is 1.
•
• One CPU for application – for CA-Clipper applications only – every application is
bound to one CPU which executes its code
38 Terminal GUI/Console – User Manual • Iconify applications – if this checkbox is selected, the console windows of text
applications will start as icons (minimized) on the task bar. By default this option
is active.
• Allowed applications list – if this checkbox is selected, the server verifies at each
login if the launched application is on the list of allowed applications. The
connection is rejected if the called application is not on the list. The list of allowed
applications is stored in the file allowed.aps which is a text file. Each line of the
file corresponds to an application and contains the full path with the file name of
the program written exactly as in the parameter of the of the te.exe program. By
default this option is not active.
• Change ‘kill application’ password – a text field to define or modify a password
which enables terminating (‘killing’) of a running application from the te.exe text
terminal level. The application must be identified by the PID process identifier. To
change the password, type in the current password into the first field and the new
password into the remaining two fields. The new password must be confirmed by
retyping it correctly.
• TMTool access password – a checkbox which determines if the server will require
a password from the TMTool application. The password must be entered in the
text field below the checked selection field. The password must be at least 8
characters long and must contain at least one digit, one letter and one nonalphanumeric character. By default this option is not active.
• ‘Strong’ user passwords – if this selection field is activated the system does not
accept simple and easy passwords. All user passwords must be at least 8 characters
long and must contain at least one digit, one letter and one character from the
following set: ! @ # $ % ^ & * ( ) _ + = [ ] { } | , . < > ? : ; ” ’. Passwords defined
before this option was activated remain valid. By default this option is not active.
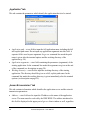
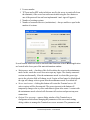
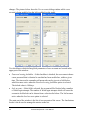
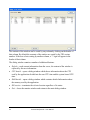
User accounts
The dialog window User accounts is used to add, modify and remove user accounts in
the Terminal server. The current list of the Terminal server users is read in when the
window is started. The button Refresh is located in the upper part of the window and
can be used at any time to reload the list of the accounts from the server. This function
should be used carefully as it might cause overwriting of recently made, unsaved
Terminal GUI/Console – User Manual 39
changes. The pictures below show the User accounts dialog window while a user
account is being modified (on the left) or added (on the right).
Two checkboxes which define global parameters of user accounts are located in the
upper part of the window:
• Password reusing forbidden – if this checkbox is checked, the user can not choose
a new password that is identical to one that has been used before, within a given
time. The time used to remember old passwords can be given in a field below,
which becomes active when the Password reusing forbidden option is selected.
The default value is 180 days.
• Lock account – if this field is selected, the account will be blocked after a number
of failed login attempts. The number of failed login attempts which will cause the
account to be blocked can be chosen from a selection list below. The list becomes
active when the Lock account option is selected.
The main part of the window is the list of user accounts of the server. The four buttons
beside it can be used to manage the entries on the list:
40 Terminal GUI/Console – User Manual •
•
•
•
Add – adds a new user to the list.
Change – confirms the change of parameters for the selected account.
Drop – removes the selected account from the list.
Unlock – unlocks account locked after a number of failed logins. The button
becomes active when the locked account is selected on the list.
Two more buttons are located below:
• Export – exports the list of accounts including the account parameters to a text file.
The function opens a dialog window which allows to choose the directory and the
file name used to save the data.
• Import – imports the list of accounts from a text file. The format of the list is
described in the last part of this section. The function opens a dialog window
which allows to select the data file. After a file is chosen, the user is asked if all
existing accounts should be removed. The program will report any format errors in
the imported text file.
Each user account is characterized by a following set of properties and parameters:
• Name – a text field which can contain any ASCII characters. The length of the
name is limited to 30 characters.
• Password – a text field to enter the user password. The length of the password is
limited to 30 characters. If the Strong user passwords function is not active the
password can be any sequence of ASCII characters from 1 to 30 characters long. If
the Strong user passwords function is active the password must be at least 8
characters long and must contain at least one digit, one letter and one character
from the following set: ! @ # $ % ^ & * ( ) _ + = [ ] { } | , . < > ? : ; ” ’. The
password must be confirmed by retyping it correctly.
• Login limits – a selection of login restrictions imposed on a given user. The log in
access for a given account can be restricted to one or several sessions, or limited to
only one workstation. The maximum number of active sessions that can be held by
the user can be chosen from a selection list.
• Password change required – a checkbox that allows to select the validity time of a
users password. After a selected time, defined in days in the adjacent text field, the
user must change his password. By default this restriction is not active. After it is
activated the default validity time of a password is 90 days.
Terminal GUI/Console – User Manual 41
Following buttons are located in the lower part of the dialog window:
• Save – sends the modified list of user accounts to the Terminal server. After
completing the operations on the list of accounts the list must be sent and saved in
a configuration file of the managed server.
• Cancel – closes the window without confirming of any changes that have been
made.
• OK – closes the dialog window and checks for modifications. If any changes have
been made, asks if the changes should be sent to the server.
Adding a new user Selecting of any entry from the user list is interpreted by the system as preparation for
a modification or removal of an account. Thus, the field Name is substituted by the
New user button. Selecting this function switches the dialog to the adding of a new
user mode. Information about the new account (user name, password and password
confirmation, restrictions and password validity) must be entered and confirmed by
selecting the Add button.
Modification of the account parameters Select the account to be modified from the list and enter the parameters that are to be
changed. When done press the Change button.
Removing a user account Select from the list the account to be deleted and press the Drop button. The account
will be removed after confirmation.
The format of the import text file Each line contains description of an account. Subsequent parameters must be
separated by a space or a tabulator:
• User name – the length of the user name is limited to 30 characters. The user name
must be composed of alphanumeric characters. If the name contains a space it
must be given in square brackets: [user name],
42 Terminal GUI/Console – User Manual • Password type – letter ‘P’ for a password written as clear text, letter ‘E’ for an
encrypted password.
• Password – a character string given in curly brackets. According to the Password
type option, the password can be given as clear text or encrypted.
• Login restrictions – one of the numbers ‘0’, ‘1’ or ‘2’. ‘0’ – no restrictions, ‘1’ –
from one computer only, ‘2’ – limited number of sessions.
• Limited number of sessions – if the limited number of sessions restriction is
selected, the maximum number of sessions which can be held by the user
(accepted values are 1–99).
• Enforce password change – letter ‘Y’ – yes, ‘N’ – no.
• Password validity in days – a number, accepted values are 1–999.
The default file extension is *.txp, files with other extensions can also be read.
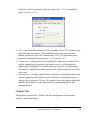
Server monitor
The server monitor presents the information about terminal sessions running on the
application server at the moment. It also provides a tool to remove selected session,
which for some reason can not be closed from the user terminal.
Following information is displayed in the monitor window:
9
9
9
9
9
9
9
9
9
Session number
User name / account name
Communication protocol
NAT address of the workstation (if used)
Address of the user workstation
Date and time of the session login
ID of the application process on the Windows server (PID)
Memory usage
CPU time used by the application
Terminal GUI/Console – User Manual 43
The contents of the window can be sorted by any column by clicking on the header of
that column. By default the contents of the window are sorted by the TID session
number. If the user selects sorting by another column, a ‘*’ sign will appear in the
header of that column.
The dialog window contains a number of additional buttons:
• Refresh – reads current information from the server, the content of the window is
replaced by the new information.
• CPU details – opens a dialog window which shows information about the CPU
used by the application divided into the user CPU time and the system kernel CPU
time.
• RAM details – opens a dialog window which contains detailed information about
the memory used by the application.
• Kill session – terminates the selected session regardless of its status.
• Exit – closes the monitor window and returns to the main dialog window.
44 Terminal GUI/Console – User Manual Terminal GUI/Console – User Manual 45
VI. Testing of terminal operation on a slow
network link
The most reliable method of testing the terminal work of applications on slow network
links is a test in real conditions on a network link on which the application will be
used. Since such tests are not always possible the gte.exe program offers a number of
options which can be used to perform such tests on a LAN network. The gte.exe
allows to emulate slow network link working conditions according to the supplied
parameters of the network link. If the application is to be used on a symmetric link
(one on which the throughput is the same in both directions), it is best to use the
option:
–LINK=kbps,
which defines the throughput of the emulated network link in kilobytes per second.
For instance, for a single base ISDN channel of 64 kbps the correct option is:
-LINK=64
If the application is to be used on an asymmetric network link (such as ADSL), it is
necessary to define separately the network link throughput from gte.exe to the server
(-UPLINK) and from the server to gte.exe (-DOWNLINK). For instance, for ADSL
512 connection with an uplink throughput 128 kbps, proper options are:
-UPLINK=128 –DOWNLINK=512
Apart from the throughput, the network links are characterized by the delay induced
by telecommunication devices. The best method to measure the network link delay is
by using the PING command, for instance for Windows:
ping –n 100 10.1.1.1
After sending of 100 packets the command will display among others the average
delay time of packets in milliseconds. If this time is greater than 0, it is advised to
specify it using the –DELAY option. This will make the network link emulation more
adequate. If the delay time is given, ½ of this value modified by a random component
is lost each time network packet is sent or received by gte.exe. Emulation tests should
46 Terminal GUI/Console – User Manual be carried out on a fast network, e.g. a LAN network. On such network the additional
delays induced by the actual transmission are negligible.
Another option useful for testing of the application work in slow network conditions is
–NETSTAT. If called with this option, the gte.exe will open a small window
containing the statistics of network traffic. The most important value „Rcv Network”
shows the number of bytes send from the application to gte.exe over the network link.
The value „Snd Network” is the number of bytes sent in the opposite direction. It is
less crucial since the network traffic to the application is usually much smaller. The
value „Avg bandwdth” is the average used bandwidth of the network link from the
application to gte.exe. This value is calculated by dividing the total network traffic in
this direction by the running time of the application.
Terminal GUI/Console – User Manual 47