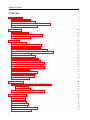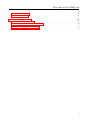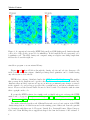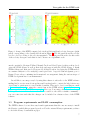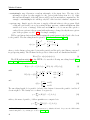
1
User Guide for DTFE -The Delaunay Tessellation Field Estimator Code version 0.9.1 Marius Cautun∗ Kapteyn Astronomical Institute, University of Groningen, Netherlands May 10, 2011 ∗ DTFE code related e-mail: [email protected], other e-mail: [email protected] Marius Cautun Contents 1 Introduction 1.1 The DTFE method . . . . . . . . . . . . . . . 1.2 The DTFE public software . . . . . . . . . . . 1.3 Program requirements and RAM consumption 1.4 Understanding the user guide . . . . . . . . . . . . . . . . . . . . . . . . . . . . . . . . . . . . . . . . . . . . . . . . . . . . . . . . . . . . . . . . . . . . . . . . . . . . . . . . . . . . . 4 4 5 7 8 2 Installation 10 2.1 External libraries . . . . . . . . . . . . . . . . . . . . . . . . . . . . . . . . . . . 10 2.2 First compilation and running tests . . . . . . . . . . . . . . . . . . . . . . . . . 11 2.3 Custom compilation . . . . . . . . . . . . . . . . . . . . . . . . . . . . . . . . . 12 3 Examples 3.1 Basic example . . . . . . . . . . . . . . . . . . . . . 3.2 Periodic data and box boundaries . . . . . . . . . . 3.3 Grid interpolation in a subregion . . . . . . . . . . 3.4 Padding size outside the region of interest . . . . . 3.5 Splitting the computation due to RAM limitations . 3.6 Density interpolation . . . . . . . . . . . . . . . . . 3.7 Velocity field interpolation . . . . . . . . . . . . . . 3.8 Additional fields interpolation . . . . . . . . . . . . 3.9 Redshift cone grid computations . . . . . . . . . . . 3.10 Additional grid interpolation methods . . . . . . . . 3.11 User defined grid sampling points . . . . . . . . . . 3.12 Suppressing run time output messages . . . . . . . 3.13 Configuration files . . . . . . . . . . . . . . . . . . . 3.14 Testing padding completness . . . . . . . . . . . . . 3.15 Select random data subset . . . . . . . . . . . . . . 3.16 The parallel computation . . . . . . . . . . . . . . . 3.17 Data visualization . . . . . . . . . . . . . . . . . . . 4 Input-Output 4.1 How to modify the input and output files 4.1.1 Input files . . . . . . . . . . . . . 4.1.2 Output files . . . . . . . . . . . . 4.2 Understanding the run time messages . . 5 Program options 5.1 Main options . . . . . . . . 5.2 Field options . . . . . . . . 5.3 Region options . . . . . . . 5.4 Partition options . . . . . . 5.5 Padding options . . . . . . . 5.6 Density computation options 5.7 Redshift cone options . . . . 2 . . . . . . . . . . . . . . . . . . . . . . . . . . . . . . . . . . . . . . . . . . . . . . . . . types . . . . . . . . . . . . . . . . . . . . . . . . . . . . . . . . . . . . . . . . . . . . . . . . . . . . . . . . . . . . . . . . . . . . . . . . . . . . . . . . . . . . . . . . . . . . . . . . . . . . . . . . . . . . . . . . . . . . . . . . . . . . . . . . . . . . . . . . . . . . . . . . . . . . . . . . . . . . . . . . . . . . . . . . . . . . . . . . . . . . . . . . . . . . . . . . . . . . . . . . . . . . . . . . . . . . . . . . . . . . . . . . . . . . . . . . . . . . . . . . . . . . . . . . . . . . . . . . . . . . . . . . . . . . . . . . . . . . . . . . . . . . . . . . . . . . . . . . . . . . . . . . . . . . . . . . . . . . . . . . . . . . . . . . . . . . . . . . . . . . . . . . . . . . . . . . . . . . . . . . . . . . . . . . . . . . . . . . . . . . . . . . . . . . . . . . . . . . . . . . . . . . . . . . . . . . . . . . . . . . . . . . . . . . . . . . . . . . . . . . . . . . . . . . . . . . . . . . . . . . . . . . . . . . . . . . . . . . . . . . . . . . . . . . . . . . . . . . . . . 15 15 15 16 17 17 18 19 20 20 21 21 22 22 23 23 23 24 . . . . 26 26 26 30 33 . . . . . . . 35 35 36 37 38 39 40 42 User guide for the DTFE code 5.8 5.9 Additional options . . . . . . . . . . . . . . . . . . . . . . . . . . . . . . . . . . 43 Configuration file . . . . . . . . . . . . . . . . . . . . . . . . . . . . . . . . . . . 45 6 Additional Information 6.1 Using DTFE as a library . . . . . . . 6.2 Accessing the Delaunay triangulation 6.3 Custom scalar field components . . . 6.4 More on DTFE internal classes . . . . . . . . . . . . . . . . . . . . . . . . . . . . . . . . . . . . . . . . . . . . . . . . . . . . . . . . . . . . . . . . . . . . . . . . . . . . . . . . . . . . . . . . . . . . . . . . . . . 47 47 49 55 55 3 Marius Cautun 1 Introduction This section gives an overview about what is the DTFE method, about the DTFE program and the structure of this user guide. It is recommend that you read this short introduction before continuing with the installation and run of the DTFE program since the information presented here is helpful in better understanding of what the DTFE code does and how it does that. 1.1 The DTFE method The Delaunay Tessellation Field Estimator (from now on DTFE) (see Schaap & van de Weygaert 2000; van de Weygaert & Schaap 2009; Cautun et al. 2011) represents the natural method of reconstructing from a discrete set of samples/measurements a volume-covering and continuous density and intensity fields using the maximum of information contained in the point distribution. This interpolation method works for any scalar or vector fields that are defined at the positions of a discrete point set. Moreover, if the point distribution traces the underlying density field, DTFE offers a local method in determining the density at each point and accordingly also in the whole volume. The DTFE method was first developed by Willem Schaap and Rien van de Weijgaert (Schaap & van de Weygaert 2000) to be used on various astrophysical applications, but can also be used in other fields where one needs to interpolate quantities given at a discrete point set. The DTFE method is especially suitable for astrophysical data due to the following reasons: 1. Preserves the multi-scale character of the point distribution. This is the case in numerical simulations of large scale structure (from now on LSS) where the density varies over more than 6 orders of magnitude and for a lesser extent for galaxy redshift surveys. 2. Preserves the local geometry of the point distribution. This is important in recovering sharp and anisotropic features like the different components of the LSS (i.e. clusters, filaments, walls and voids). 3. DTFE does not depend on user defined parameters or choices. 4. The interpolated fields are volume weighted (versus mass weighted quantities in most other interpolation schemes). This can have a significant effect especially when comparing with analytical predictions which are volume weighted (see Bernardeau & van de Weygaert 1996). The first two points can be easily seen in Figure 1, where starting from the point distribution (upper left insert), one constructs the Delaunay tessellation (upper right insert) and than zooms on a high density region (lower right and left inserts). The DTFE software is based on the work described in: Schaap & van de Weygaert (2000): Letter describing the original idea of using Delaunay tessellation for field reconstruction. van de Weygaert & Schaap (2009): Lecture notes on the DTFE method and its application in studying LSS. 4 User guide for the DTFE code Cautun et al. (2011): The complete and updated procedure on which this public code is based. Figure 1: An illustration of the 2D Delaunay tessellation of a set of particles from a cosmological numerical simulation. Courtesy: Schaap (2007). 1.2 The DTFE public software The code accompanying this document is a C++ implementation of the DTFE method of interpolating from a discrete point set (in 2 or 3 dimensions) to a grid. The current program implementation comes with three possible output grids: regular rectangular/cuboid grids (useful for numerical simulations), light cone (spherical coordinates) grids (useful when analyzing galaxy redshift surveys or when simulating such data) and user defined grid points (can describe any complex grid geometries). Moreover the program comes with a large number of features designed to manipulate and split the data such that it can be useful in dealing with a wide variety of problems (these features are described in Sec. 3). The DTFE code can be used as a 5 Marius Cautun Figure 2: A comparison between the DTFE (left panel) and SPH (right panel) densities through a 80 × 80 × 2 Mpc/h slice in an N-body simulation. Both density fields are represented on a logarithmic scale. The SPH density was computed using an adaptive smoothing length that involves the closest 40 neighbors. standalone program or as an external library. Figures 2 and 3 show 2D slices through the density, velocity and velocity divergence 3D fields obtained using this software. Similar grid interpolated quantities can be obtained using any other scalar or vector fields. DTFE is free software, distributed under the GNU General Public License. This implies that you may freely distribute and copy the software. You may also modify it as you wish, and distribute these modified versions as long as you indicate prominently any changes you made in the original code, and as long as you leave the copyright notices, and the no-warranty notice intact. Please read the General Public License for more details. Note that the authors retain their copyright on the code. If you use the DTFE software for scientific work, we kindly ask you to reference the DTFE method and code papers: Schaap & van de Weygaert (2000), van de Weygaert & Schaap (2009) and Cautun et al. (2011) - see the previous section for a short description of each paper. The author acknowledges the work of Erwin Platen who wrote a basic version of the DTFE density interpolation code which was used as the starting point of this work. I am also grateful for discussions with Rien van de Weygaert, Patrick Bos, Pratyush Pranav, Miguel AragonCalvo and Johan Hidding whose suggestions shaped the form and features of the software. I 6 User guide for the DTFE code Figure 3: A map of the DTFE computed velocity flow (left panel) and velocity divergence (right panel) corresponding to the density field shown in Figure 2. The left panel shows the velocity vectors colored according to the velocity magnitude. The right panel show the absolute value of the velocity divergence such that it can be shown on a logarithmic scale. am also grateful to Monique Teilland, Manuel Caroli and Gert Vegter for their work in developing the CGAL library as well as their help and support with the CGAL library. I thank Willem Schaap and Rien van de Weygaert for all their work in developing the DTFE method as a mature analysis tool for studying cosmological data. A special acknowledgment goes to Bernard Jones, whose continuing involvement and encouragement during the various stages of DTFE development have been instrumental. I would like to encourage everybody using this software to subscribe to the DTFE software mailing list (to receive news about updates and bug fixes) and to contact the help desk in case of problems or questions not covered in this document. This can be done by sending an e-mail to [email protected] or using the contact form at the DTFE website http://www.intra. astro.rug.nl/~voronoi/DTFE/contact.php. Moreover, I encourage whoever makes changes and improvements to the code, to make them accessible to the whole scientific community you can contact me such that the changes can be included in a future release of the DTFE software. 1.3 Program requirements and RAM consumption The DTFE software does not have any formal requirements than the ones necessary to install the libraries on which this program depends on. For the external library requirements you have to check the library documentation pages. 7 Marius Cautun Running the DTFE software can be demanding for the computer resources since during the computation that code needs to store the Delaunay triangulation of the point set (this means storing all neighboring point pairs and the Delaunay cells that they give rise to). In 3D for 106 (one million) particles using single precision data the code needs: 1. 500MB to store the Delaunay triangulation (this does not depend if the data is single or double precision). 2. 4MB for each particles’ property (storing the position, velocity, weight and density for each particles needs (3 + 3 + 1 + 1) × 4MB= 32MB). 3. 4MB for each one component quantity interpolated on a 106 grid. For example interpolating the density, velocity and velocity gradient on a 106 grid needs (1+3+9)×4MB= 52MB. The memory requirements for a typical task of interpolating 106 measurements to a 106 grid are ∼580MB for single and ∼660MB for double precision data. Most of these resources (8090%) are needed to store the triangulation itself and they do not depend on the data precision, number of properties associated to each particle or size of the output grid. To summarize, running the DTFE with Np input particles to interpolate the fields on Ng grid cells requires: 500 Np Np Ng + 4 g np 6 + 4 g ng 6 6 10 10 10 (1) MB where: • g = 1 or 2 and characterizes if the data is single or double precision. • np is the number of properties associated to each particle (minimum 5: 3 positions, 1 weight and 1 density). • ng is the number of all field components interpolated to grid (1 for density, 3 for velocity, 9 for velocity gradient, etc ...). For a large number of particles the memory requirements can become overwhelming, this is why the code comes with the option of splitting the full data set in several partitions to accommodate the RAM available. The partition data are analyzed one after another in such a way that the output is the same as if the data was all analyzed at once (more information about this can be found in Sec. 3.5 and Sec. 5.4). 1.4 Understanding the user guide Before going to compile the code and run a few example, I suggest that you keep reading until the end of this section to get an overview of the documentation manual and especially to understand what is the easiest and fastest way to get everything working. The documentation is structured in several parts: Installation - gives information about the libraries needed by the code. It also describes the steps necessary to easily compile the code in a standalone program or as a library. 8 User guide for the DTFE code Examples - gives examples of the typical features of the program. It supplies examples for each task and also discusses some of the examples in more detail. Input-Output - describes what changes are necessary to read from/write to different file formats than the default ones. It also gives a short description of the output messages of the DTFE program during run time. Program Options - gives a detailed description of the program options that can be used to interactively control the tasks from the command line or from a configuration file. Additional Information - additional information useful for using the code as a library or changing and implementing additional features in the code. When compiling and testing the program for the first time, I recommend that you start in Sec. 2. First you need to download and install the 3 libraries needed by the code: GSL, Boost C++ and CGAL (usually the first two libraries are already installed on most systems). The next step, before being able to compile the code, one needs to make a few changes in the makefile - this changes are described in Sec. 2. This should lead to a successful compilation after which one can run a few test examples to check that everything works fine. Now one can modify the code and the compilation options depending on one’s needs. The first step in doing so is to modify the functions for reading the input data and writing the results in the file format that you use. A short guide to the steps and source files needed for doing so is given in Sec. 4. The last step is to choose the suitable compilation options, depending on your goals. Sec. 2 gives an overview of the available Makefile options. After a successful compilation, one should consult Sec. 3 to see what is the program syntax for the different tasks the user is interested in. Along that, you can also consult Sec. 5 which gives more detailed information about all the available program options. The last part of the user guide, Sec. 6, is meant for the user/developer that wants to make changes or improvements to the program. 9 Marius Cautun 2 Installation This section gives information about the external libraries needed by the DTFE code, the steps necessary to compile and run the test examples and how to configure the DTFE compilation for your needs. For most users, these steps should go pretty fast and without problems. In case that you do get errors, the DTFE help desk can offer help regarding the compilation and running of the DTFE code, but not for problems related to installing the external libraries. For that we recommend that you contact the specific library help pages or googling for the solution in the hope that other users had the same problem (this works in most cases). 2.1 External libraries The DTFE code depends on 3 external libraries: GSL, Boost C++ and CGAL - usually the first two libraries are already installed on most systems. The following will give a very short description on where one can download the libraries and how they can be installed on your system. All the instruction presented below are for the Linux operating system, but similarly straightforward instruction can be found in the library packages for Mac or Windows. Before compiling the program one needs to have installed the following libraries (please follow the order given below since CGAL depends on Boost C++ for a successful build): • GNU Scientific Library (GSL) which can be downloaded at http://www.gnu.org/ software/gsl/ (usually this library is already installed on Linux systems). To build the library one needs to do the following easy steps (for additional information and options check the file INSTALL that comes with the library distribution): 1. Go to the directory where you untared the GSL library. 2. Type the configure command ./configure . This will build the library in the default system library path, so you need root privileges for this. If you don’t have a root account, use ./configure --prefix=FOLDER PATH where FOLDER PATH is the path to the directory of choice where to install the library. 3. Type make and after that make install. Now you have successfully built the GSL library. • Boost C++ Libraries which can be found at http://www.boost.org/users/download/ (usually this library is already installed on Linux systems) The code was succesfully build using Boost version 1.44, but should work with higher versions too. To build the library on a Linux system, on must follow the steps (more detailed information can be found in the INSTALL file or in the online documentation): 1. Go to the directory where you untared the library. 2. Type the configure command ./bootstrap.sh . This will build the library in the default system library path, so you need root privileges for this. If you don’t have a root account, use ./bootstrap.sh --prefix=FOLDER PATH where FOLDER PATH is the path to the directory of choice where to install the library. 10 User guide for the DTFE code 3. Type ./bjam install. Now you have successfully built the Boost C++ Libraries. • Computational Geometry Algorithms Library (CGAL) which can be found at http://www.cgal.org/. The code was succesfully build using CGAL version 3.6 and it should work succesfully with higher versions too. To build the library on a Linux system you need CMake (http://www.cmake.org/). For a succesful build one must do the following (more detailed information can be found in the INSTALL file): 1. Go to the directory where you untared the library. 2. To configure CGAL type cmake . This will build the library in the default system library path, so you need root privileges for this. If you don’t have a root account, use cmake -DCMAKE INSTALL PREFIX=FOLDER PATH where FOLDER PATH is the path to the directory of choice where to install the library. 3. Type make and after that make install. Now you have successfully built the CGAL library. In case that you did not install the libraries in the default system path, one must add the location of the libraries and include files to the system environments. Below are two examples of how one can do so for two common shells (LIB DIR denotes the directory where the library build is located): ? For the tcsh shells one needs to add the following lines in the ∼/.cshrc file: setenv CPPFLAGS -I/LIB DIR/include:$CPPFLAGS setenv LD LIBRARY PATH /LIB DIR/lib:$LD LIBRARY PATH setenv LDFLAGS -L/LIB DIR/lib:$LDFLAGS ? For the bash shells one needs to add the following lines in the ∼/.profile file: CPPFLAGS=-I/LIB DIR/include:$CPPFLAGS LD LIBRARY PATH=/LIB DIR/lib:$LD LIBRARY PATH LDFLAGS=-L/LIB DIR/lib:$LDFLAGS NOTE: In case one or more of the above system variables (i.e. CPPFLAGS, LD LIBRARY PATH or LDFLAGS) are not defined, than one should drop the variable name on the right side of the definition (e.g. if CPPFLAGS is not defined, than one should use setenv CPPFLAGS -I/LIB DIR/include for the tcsh shell and export CPPFLAGS; CPPFLAGS=-I/LIB DIR/include for the bash shell). 2.2 First compilation and running tests This section describes the minimal steps necessary to compile the DTFE code and be able to run the test examples. If you installed any of the external libraries in a user specified directory and not the system default path, than you need to specify the library directories in the Makefile file that comes 11 Marius Cautun with the DTFE code. Upon opening Makefile you will see in the first lines the variables: GSL PATH, BOOST PATH and CGAL PATH. These variables should store the directories where you build the corresponding libraries (i.e. the directories that you supplied to the --prefix option for GSL and Boost libraries and to the -DCMAKE INSTALL PREFIX option for CGAL). You can also choose the C++ compiler used to build the DTFE executable using the variable CC. Now you should be able to compile the DTFE code by typing make in the DTFE directory. This will create the executable DTFE that you can use to run a few tests. The following examples are meant to test that the code compiled properly and also to show you the syntax and options of the DTFE code. You can check Sec. 4.2 for detailed information about the run time output messages of program and hence understand what each of the below examples does. Run the following examples to check that everything is working properly (you will need at least 512MB of RAM): 1. ./DTFE demo/z0 64.gadget demo/test 1 --grid 128 --field density --periodic - this will compute the density on a 1283 grid using the particle data given in file demo/z0 64.gadget1 and will save the output in the binary file demo/test 1.den2 . 2. ./DTFE demo/z0 64.gadget demo/test 2 --grid 128 --field density velocity --periodic - similarly to the first example, it will compute both the density and velocity on a 1283 grid and will output the results in the files demo/test 2.den and demo/test 2.vel. 3. DTFE --config demo/config.cfg - reads the program options from the configuration file demo/config.cfg. Program options can be supplied via the command line or via a configuration file - if the same options was supplied twice, the command line option supersedes the option given in the configuration file. If you open the configuration file, you will see an example of the use of the option --partition 2 1 1 which tells the program to split the computation in 2 × 1 × 1 partitions in case the system does not have enough memory to support the full computation and option --region 0 0.5 0 0.5 0 1 which selects only the lower left corner of the box as the region of interest. 2.3 Custom compilation If you are building just the DTFE library than you can skip to the next paragraph. Before building the DTFE binary, it is recommended that you customize the functions that input/output the data from/to files. Detailed descriptions of these changes can be found in Sec. 4. The Makefile file contains the following variables: 1 The file contains about 643 dark matter particles in a 100×100×100 Mpc3 volume from a periodic boundary condition numerical simulation. 2 Please note that the program will automatically assign an extension to your output file name. This is the case since it can compute several grid quantities at a time, each quantity being outputted to a separate file hence it must generate different names for each output file. This behavior can be modified in the function that outputs the results to a file. 12 User guide for the DTFE code • The paths to the three libraries needed by the program, if not installed in the default system path. You should have already set the values of these variables in the previous section. GSL PATH directory where is the build of the Gnu Scientific Library BOOST PATH directory where is the build of the Boost C++ Libraries CGAL PATH directory where is the build of CGAL CC the C++ compiler used to compile the source code (tested with g++ 4.4) • The directories where to store the compiled DTFE binary file or the DTFE library: OBJ DIR directory where to put the object files during compilation (can leave default value) BIN DIR directory where to put the DTFE binary (default value will create it in the current directory) LIB DIR directory where to put the DTFE library (used only with make library) INC DIR directory where to put the DTFE include files needed when using the DTFE library (used only with make library) • Program wide compiler directives that affect the behavior of the DTFE program. These are saved in the variable OPTIONS and will be supplied to the compiler during the build process. The options are: sets the number of spatial dimensions. Set -DNO DIM=2 for two dimensional problems and -DNO DIM=3 for three dimensional problems. This variable must always be assigned a value. -DDOUBLE use double precision for floating point numbers. If this line is commented, than the code uses single precision. -DVELOCITY uncomment this if the program will store velocity information for the points/particles and if it will compute velocity related quantities on a grid. If you don’t use velocity information, than comment this line. -DSCALAR uncomment this if you want to interpolate to grid other fields on top of density and velocity. The DTFE program will save these additional fields under the internal variable scalar. -DNO SCALARS=1 sets the number of scalar components. Each additional scalar fields adds one component while each vector field adds 3 components in 3D (2 in 2D). E.g. if you need to interpolate to grid the temperature, pressure and electric field you need to set -DNO SCALARS=5 (1+1+3). -DTEST PADDING see Sec. 5.5 for information of what is padding. By enabling this option, the program will test for the efficiency of the padding (this is disabled by default) and will let you know if the padding wasn’t complete. -DOPEN MP uncomment this to use OpenMP to parallelize the computations on processors with shared memory. To do so you must have a compiler that supports OpenMP. -DNO DIM=3 13 Marius Cautun -DMPC UNIT=1000. factor to convert from the units in which the input data is saved to Mpc units. The value represents 1Mpc in input data units. The DTFE code doesn’t use physical constants so the units of the input data do not matter. -DTRIANGULATION should be enabled when you need to have access to the Delaunay triangulation of the point set. • Program options that affect the help messages during runtime. These options do not affect how the program works, but only what is shown when using -h / --help to display the available program options1 . The DTFE code has many runtime options so you may not care about all of them when running only certain specialized tasks. -DFIELD OPTIONS show the options used to select the quantities that will be computed (see Sec. 5.2). -DREGION OPTIONS show the options used to select a region in the full data set (see Sec. 5.3). -DPARTITION OPTIONS show the options used to split the data in case of RAM limitations (see Sec. 5.4). -DPADDING OPTIONS show the options used to control the padding of the data cube such that the triangulation covers fully the regions of interest (see Sec. 5.5). -DDENSITY OPTIONS show the options available for the density computation (see Sec. 5.6). -DREDSHIFT CONE OPTIONS show the options available for redshift cone grid computation (see Sec. 5.7). show the additional options (see Sec. 5.8). -DADDITIONAL OPTIONS To create the DTFE binary type make. This will create the executable DTFE in the directory BIN DIR. If you add the path pointed by BIN DIR to the system path, than you can run the DTFE program from any directory by typing DTFE. To create the DTFE library type make library. This will create the shared library libDTFE.so in the directory LIB DIR. To be able to link the library to your programs you need to take into account two things: 1. When linking your code add the additional option -L/DTFE LIB PATH -lDTFE (where DTFE LIB PATH is the directory where you put the libDTFE.so library). 2. Since the libDTFE.so is a shared library, you need to add DTFE LIB PATH to the system variable LDFLAGS (see end of Sec. 2.1 for an example of how to do so). 1 You will be able to use all the program options described in Sec. 5, just that some of them will not be shown by the -h command. 14 User guide for the DTFE code 3 Examples This section gives a few examples of the tasks that can be performed by the DTFE code. Each example is accompanied by information and tips partaining to the task under discussion. This section should be used as the starting point to search for the options that you need to execute a certain task or combination of tasks. Once you found the necessary options, you can use Sec. 5 (which describes all the available options) for more detailed information about the program options. You can run all the examples presented below from the directory where you untared the DTFE code archive. The examples make the following assumptions: 1. The DTFE binary is located in the directory where you untared the DTFE code archive. If this is not the case, use the relative/full path of the DTFE binary or use the alias command to create a shortcut named DTFE. 2. The function for reading the input data is a Gadget file reader. If you changed this, than you will have to replace the input file demo/z0 64.gadget with your own data file. 3.1 Basic example ./DTFE demo/z0_64.gadget demo/output --grid 128 This is the simplest way to call the DTFE program. It needs two take at least two input arguments: the name of the input data file and the root name of the output files - you will receive an error if these are missing. On top of that the program also needs the coordinates of the box enclosing the data (here the box coordinates are read from the input Gadget file) and the grid size along each dimension (here 1282 or 1283 if the code is 2D or 3D)1 . For additional information about the basic options of the program see Sec. 5.1. NOTE: If you use a custom input data reader that does not assign values to the box enclosing the data, than you can specify the coordinates of the box using the option --box xmin xmax ymin ymax zmin zmax . 3.2 Periodic data and box boundaries ./DTFE demo/z0_64.gadget demo/output --grid 128 --periodic Use the option -p/--periodic to specify that the data are from an N-body simulation with periodic boundary conditions. The coordinates of the box encompassing the data must be the coordinates of the periodic boundaries. For the periodic case the code will add at the boundaries an additional buffer region with particles translated periodically. The size of the padded region can be set using the option --padding 10 - see Sec. 3.4. 1 The grid dimensions can be specified via --grid N for a N 3 grid or --grid Nx Ny Nz for grids that have different sizes along each axis. 15 Marius Cautun If the data are not periodic and would like to compute the DTFE fields for the full data than there is an incompleteness problem on the box boundaries. Since there are no points outside the box, the Delaunay triangulation will not cover the sides of the simulation box. When interpolating the density there are two ways to resolve this problem: 1. If the density at the boundaries is supposed to go to 0 or be very small (e.g. simulation of an isolated galaxy) than you don’t need to add any additional data outside the initial data box. The region not covered by the tessellation will have a density of 0. 2. If the density outside the box is expected to be similar to the one inside the box (e.g. galaxy redshift surveys), than one can add randomly distributed particles in the outside region. This procedure has to be done by you before loading the data in the DTFE code (the DTFE does NOT generate random particles outside the box boundaries). When interpolating other fields, if the field behavior outside the boundaries is not known, there is no method within DTFE to intrepolate the field values at the grid points that are not covered by the tessellation of the data. NOTE: See Sec. 3.14 to find out how you can know which grid points do not have a correct estimate for the interpolated field due to an imcomplete tessellation. 3.3 Grid interpolation in a subregion ./DTFE demo/z0_64.gadget demo/output --grid 128 --region 0 .5 0 .5 0 .5 ./DTFE demo/z0_64.gadget demo/output --grid 128 --regionMpc 0 50 0 50 0 50 The above examples show the syntax to choose a smaller region from the full data set where to interpolate the fields to a grid. Can be usefull when you want a higher grid resolution in an interesting region like a massive cluster in the simulation. When using this option, the code starts by selecting the particles in the region of interest and also the particles in the buffer region (see Sec. 3.4) and it uses those particles to compute the Delaunay tessellation and interpolate the fields to grid. The value given by the --grid option gives the grid size in the region specified by the --region/--regionMpc option. There are two ways in which to specify the region of interest: 1. --region fx,l fx,r fy,l fy,r fz,l fz,r which tells the program to select the region x = [x0 + fx,l Lx to x0 + fx,r Lx ] and similarly along the y and z directions (where x0 and Lx are the left coordinate of the box and the full data box size along the x direction). 2. --region xmin xmax ymin ymax zmin zmax which tells the program to select the region x = [xmin to xmax ], y = [ymin to ymax ] and z = [zmin to zmax ]. You can find more information in Sec. 5.3. 16 User guide for the DTFE code 3.4 Padding size outside the region of interest ./DTFE demo/z0_64.gadget demo/output --grid 128 --padding 5 ./DTFE demo/z0_64.gadget demo/output --grid 128 --padding .1 .3 .1 .3 .5 .5 ./DTFE demo/z0_64.gadget demo/output --grid 128 --paddingMpc 1 3 1 3 5 5 The above three example show the way in which one can specify the size of the buffer zone around the region of interest. When computing the Delaunay tessellation the code doesn’t use only the particles in the region of interest (the full box or the region specified via the --region option), but also particles outside this region to be able to get a complete tessellation inside the region of interest. In the following we will call the region of interest plus the buffer zone as the padded box (since it is the box of interest padded on the sides with the buffer zone). For numerical simulation the natural way to specify the buffer size is by giving the average number of particles that need to be copied on each side of the box1 . This can be done via the --padding n option where n is the average number of particles to be coppied on each side of the region of interest - in practice the code copies all the particles that are within nדaverage particle separation” from the box boundaries. For data sets in which the point distribution is highly inhomogeneous (e.g. one side of the box has a much higher point density than the other one), we recommend that you use: 1. --padding fx,l fx,r fy,l fy,r fz,l fz,r which specifies that the buffer size on the x-direction left side of the box is fx,l Lx and on the x-direction right side of the box is fx,r Lx (with Lx the box size along the x-direction) and similarly for the y and z directions. 2. --paddingMpc ∆xl ∆xr ∆yl ∆yr ∆zl ∆zr which specifies that the buffer size on the x-direction left side of the box is ∆xl and on the x-direction right side of the box is ∆xr and similarly for the y and z directions. You can find more information in Sec. 5.5. NOTE 1: A reasonable buffer size is 5-10 particles copied on each side of the box of interest, which is a good balance between the computational workload and the tessellation coverage of the region of interest. There may still be some problems in the very empty regions of the simulations, but in general this will have a density close to 0 anyway, so this will not affect the density estimations. For the rest of the fields, the buffer size requirement is even smaller, so 510 particles should be more than enough for most of the typical point distributions in astronomy. NOTE 2: You can test the completness of the padding - see Sec. 3.14. 3.5 Splitting the computation due to RAM limitations ./DTFE demo/z0_64.gadget demo/output --grid 128 --partition 2 1 1 1 The Delaunay tessellation works by finding the closest neighbors for each particle, so if the number of particles doubles, the average size between neighbors halves. This is why we recommend to specify the padding size as a number of particles to be copied on each side of the box. 17 Marius Cautun The above options will make the DTFE code to split the data into two chunks along the x direction1 . It will compute the Delaunay tessellation of each part of the data one at a time and will interpolate the fields to the grid points corresponding to that region. The final results are the same as if the data was not split (with the exception of the density interpolation methods which use Monte Carlo sampling). For more information about the partition and how best to decide the number of partitions check Sec. 5.4. You can also use the --partition option to distribute the computation on several processors that do not have shared memory. You can do so using the option --partNo i which tells DTFE to split the data in the partitions given by option --partition, but only to compute the fields corresponding to partition number given by --partNo. In this case the user will have to assemble the data from the output files of each different partition computation. For example: ./DTFE demo/z0_64.gadget demo/output_0 --grid 128 --partition 2 1 1 --partNo 0 ./DTFE demo/z0_64.gadget demo/output_1 --grid 128 --partition 2 1 1 --partNo 1 will output the density in two files: demo/output 0.den and demo/output 1.den, with the first one giving the density values for the grid indices [nx =(0 to 63), nx =(0 to 127), nx =(0 to 127)] and the second for the grid indices [nx =(64 to 127), nx =(0 to 127), nx =(0 to 127)]. The grid indices of the data in each file are shown during run time. Note that the output files above have different names, otherwise the files will be overwritten. In this case the grid dimensions given by option grid are the grid sizes for the full region, not for each partition. NOTE: The option --partition does not work when interpolating on a light cone grid or at user defined sampling coordinates. In those cases the --partition option is ignored. 3.6 Density interpolation ./DTFE demo/z0_64.gadget demo/output --grid 128 ./DTFE demo/z0_64.gadget demo/output --grid 128 --field density --method 2 --samples 20 The above examples both interpolate the DTFE density of the particle distribution to a grid. In the absence of any options to the --field option, the code interpolates the density to the grid. The second example also shows some additional options for the density interpolation, like the method used for interpolation and the number of sample points in each grid cell used to estimate the density value at that grid point. The DTFE density computation consists of two steps: 1. Estimation of the density at each particle position - the density is taken as inversely proportional to the volume of the Delaunay tetrahedra (area of Delaunay triangles in 2D) that have that particle as a vertex. 1 The data is split spatially and not according to the particle number. If the data is highly clustered, than splitting the data in 2 may result in a partition with 10% of the data and the other with 90% of the data. Take this into account when deciding the optimal number of partitions. It is better to distribute the partitions equally along all directions (this means less particles coppied in the buffer regions). E.g. for 4 partitions it is better to use --partition 2 2 1 than --partition 4 1 1. 18 User guide for the DTFE code 2. Using the density values at the particles’ position, the density is interpolated to grid. Since the particle distribution is a Poisson sample of the underlying density distribution, it is plagued with shot noise. To reduce the noise one takes the density inside each grid mass inside grid cell cell as total . volume of the grid cell The available methods for DTFE density interpolation have to do with the method that is used to estimate the mass inside each grid cell1 . Two methods are available: 1. Computes the mass inside the grid cells by generating Monte Carlo sampling points inside the Delaunay cells (triangles in 2D and tetrahedra in 3D). Each sample point has −1 a mass that is distributed to the grid cell in which it resides. The method has ≈ Nsamples convergence. It gives very good density estimates for the high density regions, but it has a poorer behavior in the low density regions. This method is selected using --method 1 (DEFAULT value). 2. Computes the mass inside the grid cells by generating Monte Carlo sampling points −.5 inside the grid cell itself. This method has a slower convergence (about Nsamples ) and even though it gives good density estimates for the low density regions, it has a very poor behavior in the high density regions (there the mass can be overestimated up to a factor of 2). This method is selected using --method 2. We recommend that you use the first method when the number of particles is similar or larger than the number of grid points (e.g. in numerical simulations), while the second method is best suitable for when the number of particles is much smaller than the number of grid cells (e.g. when analyzing galaxy survey data). By choosing a higher number of samples in each grid cell (option --samples Nsamples ) one achieves a better estimate of the mass inside the grid cell. For additional information check Sec. 5.6. NOTE: Interpolating the density to a light cone grid or at user defined sampling points can be done only using the second method (i.e. --method 2). 3.7 Velocity field interpolation ./DTFE demo/z0_64.gadget demo/output --grid 128 --field velocity ./DTFE demo/z0_64.gadget demo/output --grid 128 --field velocity gradient divergence shear vorticity The above syntax are two examples on how one can use the DTFE code to interpolate to grid velocity and/or velocity gradient quantities. The code can compute for each grid point: 1. The velocity vector - --field velocity. 2. The gradient of the velocity vector - --field gradient. 3. The velocity divergence - --field divergence. 1 Theoretically the DTFE method assigns a well defined mass to each grid cell. But this is difficult to implement in practice, this is why one use Monte Carlo methods to estimate the mass in each grid cell. 19 Marius Cautun 4. The velocity shear - --field shear. 5. The velocity vorticity - --field vorticity. For additional information about what are the above quantities and their components check Sec. 5.2. 3.8 Additional fields interpolation ./DTFE demo/z0_64.gadget demo/output --grid 128 --field scalar scalar_gradient The above example shows how one can interpolate to grid using the DTFE method additional fields on top of the density and velocity. In the absence of a better name, these additional fields are bundled in the scalar variable of the DTFE code. The DTFE interpolation works the same for a scalar quantity or for a vector field (each component is interpolated to grid independently). This is why or all the additional fields (scalars and vectors) are bundled together in a variable called scalar. Each of the components of this variable are interpolated independently to grid. The DTFE code can compute: 1. The scalar components at grid positions - --field scalar. 2. The gradients of the scalar components at grid positions - --field scalar gradient. For additional information about the scalar field computations see Sec. 5.2. 3.9 Redshift cone grid computations ./DTFE demo/z0_64.gadget demo/output --grid 128 32 32 --redshiftCone 50 100 0 45 0 90 --origin 0 0 0 In the above example the option --redshiftCone rmin rmax θmin θmax ϕmin ϕmax tells the code to interpolate to a grid in spherical coordinates where the grid cells have the same min min min , δθ = θmaxN−θ and δϕ = ϕmaxN−ϕ (with Nr , Nθ and Nϕ given by the size δr = rmaxN−r r ϕ θ option --grid Nr Nθ Nϕ ). The option --origin x y z gives the x, y and z coordinates of the origin of the spherical coordinate system. This option is useful when dealing with galaxy redshift data where one would like that all sky coordinates have the same grid cell size. See Sec. 5.7 for additional information about these options. NOTE: For density computations it is recommend that you the option --method 2. The first density method is also implemented for redshift cone grid interpolation but: it is not tested and makes a few assumption that may not always hold. 20 User guide for the DTFE code 3.10 Additional grid interpolation methods ./DTFE demo/z0_64.gadget demo/output --grid 128 32 32 --TSC ./DTFE demo/z0_64.gadget demo/output --grid 128 32 32 --SPH 40 On top of the DTFE grid interpolation method, the code also comes with the Triangular Shape Cloud (TSC) and Smooth Particle Hydrodynamics (SPH) interpolation methods. These methods are given only for comparison purposes and are not tested rigorously or optimized for speed and memory requirements (the DTFE part of the code was optimized in that respect). The TSC method interpolates to grid only the density and velocity, while the SPH method interpolates to grid all the fields, but NOT their gradients. For details about the kernels of the two methods see Sec. 5.8. 3.11 User defined grid sampling points ./DTFE demo/z0_64.gadget demo/output -g 64 --options userGridFile The above code syntax shows an example of how the user can load user defined sampling points (sampling points that are not on a uniform regular grid or on a light cone grid) from a file and how to run such a program. At the moment the DTFE code does not come with an example of how to load the user defined sampling points, but this can be done very easily. Before describing that part, it has to be mentioned that there is no special option that tells the program to use a given input file as user defined sampling points. In the above example, for this, we used the --options option which saves all the values assigned to it to a vector of strings (called additionalOptions) in the program class User options. The user can use this option to pass to the program additional values without having to modify the class User options. Loading the user defined sampling points in the DTFE program is as simple as the following steps (before you continue, make sure that you are familiar with the methods used to load the input data into the program - see Sec 4.1): \* open the input file with the sampling coordinates here it is a text file with 1ts line = number of sampling points*/ std::string filename = userOptions.additionalOptions[0]; std::fstream file; openInputTextFile( file, filename ); size_t noSamples; file >> noSamples; // reads the number of user sampling points \\ reserve memory for the sampling coordinates Real *sampling = readData.sampling(noSamples); //sampling points positions Real *delta = readData.delta(noSamples); //sampling points sizes \* read the sampling point positions and sizes into the ’sampling’ and ’delta’ arrays */ ... 21 Marius Cautun The above code insert is composed of: 1. Opening the file which gives the user sampling points. Here we assumed that this is a text file and the first line in file gives the number of sampling points. The name of the input user sampling file is given by the first entry of string vector User options::additionalOptions which stores the value given to the program via the option --options. 2. Reserve memory for the arrays storing the user sampling points data. This should be done via the class Read data - readData is such an object (see Sec. 4.1 for more information on this). The sampling array will store the positions of the sampling points, while the delta array will store the grid cell size associated to each sampling point along each axis (the delta values are needed only for the density interpolation). 3. Read from the input file the sampling point positions and grid cell size (if any). 4. (Not shown above) The function Read data::transferData will copy the sampling points positions and sizes from the sampling and delta arrays into the internal objects used by the DTFE code. When running the DTFE code with user defined sampling points, the resulting fields interpolated to grid are saved in a vector in the same order as when the sampling points where inserted into the sampling array. NOTE 1: The density interpolation to user defined sampling points can be done only via the second method for density interpolation (see Sec. 3.6). NOTE 2: At the moment the interpolation to user defined sampling points cannot be done in parallel. The computation will be executed in serial. 3.12 Suppressing run time output messages ./DTFE demo/z0_64.gadget demo/output -g 64 --verbose 0 The above syntax suppresses all run time messages with the exception of errors. There are 3 verbose levels, from 0 to 3, each one giving more information about the run of the code. For details see Sec. 5.8. NOTE: If you send the run time output directly to a file, than you may consider running the program with --verbose 2 - this will hide the task progress messages that sometimes clog the output message files. 3.13 Configuration files ./DTFE --config demo/config.cfg The above example shows how to supply all or part of the program options in a configuration file. The demo/config.cfg file is an example of a valid configuration file for the DTFE program. 22 User guide for the DTFE code If the same option is supplied on the command line and in the configuration file, than the command line value has precedence over the value specified in the configuration file. Detailed information about the syntax of the configuration file can be found in Sec. 5.9. 3.14 Testing padding completness To test the completeness of the Delaunay tessellation in the region of interest you must use the makefile compilation option TEST PADDING. This will add dummy test particles outside the box of interest and check if any of the new tessellation cells intersect the region of interest1 . If the DTFE code finds flagged grid points, it issues a message at the end of the computation and outputs the positions of that grid points into a text file. The name of the output file is taken as: “root name of output files” + “variable name” + “.badGridPoints extension”2 (e.g. for density computation using “root name of output files”=output the name of the text file will be output density.badGridPoints). The output file will contain on each row the index of the flagged grid point as well as its position in the grid (nx , ny , nz ) along the x, y and z axes. NOTE 1: If the code flagged one or more grid points, than you can try and solve the problem by increasing the padding size around the region of interest (see Sec. 3.4). NOTE 2: You can disable the Delaunay tessellation completeness test via the program option --noTest (this program option is available only when the code was compiled with the TEST PADDING option). 3.15 Select random data subset ./DTFE demo/z0_64.gadget demo/output -g 64 --randomSample 0.1 The above syntax makes the code select a random subset of particles from the given input data (in this case 10% of the data set). Only this subset will be used for all further computations. The particles in the subset are selected randomly using a generator seed that can be set via the option --seed seed value. 3.16 The parallel computation The parallel part of the DTFE code uses the OpenMP directives to split the computations on multiple threads (this feature is available when the code is compiled with the OPEN MP option). This means that the computation can be run in parallel on shared-memory architectures. Splitting the computation on multiple threads is done internally similarly to using the --partition option, with the advantage that all the cores work at the same time. Only the Delaunay tessellation and the grid interpolation are parallel (since this takes most of the CPU time), so the 1 In practice the procedure is slightly different. Each time the value of a field is computed at a grid point, the code checks to see if the Delaunay cell used has only valid data points. If the Delaunay cell has one or more dummy test points as vertices, than the values of the field at that grid point cannot be trusted and the grid point is flagged as bad. 2 If the computation is run on more than one processor the extension gain a number - the id of the process writing the file. 23 Marius Cautun file input and output as well as other small tasks are done in serial. The number of parallel processors that the code will use can be set using the environment variable OMP NUM THREADS - the code will use at most that number of threads. The code will try to factorize the number of processors in factors of 2 and 3 and will use the largest number n = 2i 3j such that n ≤OMP NUM THREADS. This is done such that the parallel grid used for splitting the data has similar grid dimensions along each axis. For example if OMP NUM THREADS=7 than the code will use 6 processors that will be distributed on the parallel grid (2, 1, 3, ) - the full data box will be split in 2 along the x direction and in 3 along the z direction. By balancing the parallel splitting grid one avoids the downside of a large number of particles being copied in the buffer zones, as is the case when splitting the data along a single direction - this problem gets worse as the number of processors increases. Using OMP NUM THREADS=1 will make the DTFE code run in serial. If the code detects OMP NUM THREADS>1 than it will output messages with the number of parallel threads that it will use and the parallel grid it uses to split the data. While in parallel mode, all the run time messages will be outputted only by the thread with id = 0. At the end of the parallel section, there is a statistics section which shows the balance of particles on each processor and the computational time of each thread. Splitting the data into different region for the parallel computation is done spatially (i.e. the box is split in equal volume regions) and not according to the number of particles. This does not pose a CPU work balance problem for cosmological simulations of box size ≥ 100 Mpc, but it can be a significant thread imbalance for smaller simulations or for multiple-resolution simulations1 . NOTE 1: When splitting the data in parallel, the size of the buffer region for each processor is also controlled via the --padding option - see Sec. 3.4. So remember to have a reasonable value for the --padding option when running the program on several cores. NOTE 2: At the moment the parallel feature does not work for interpolation to a light cone grid or at user defined sampling coordinates. These tasks can only be performed in serial. 3.17 Data visualization The binary data output that comes by default with the DTFE code can easily be used to import the data into some visualization program. Here we will concentrate on two such scientific data visualization tools: 1. VisIt which can be obtained from https://wci.llnl.gov/codes/visit/home.html. The binary data output can be loaded into VisIt using the bov reader. For doing so one needs an additional text file that describes the data in the binary file - this text file must 1 A future version may come with a data splitting mechanism that is done according to the number of particles, but than one also faces balancing problems since the density computation can be even more time consuming than the Delaunay tessellation. Hence a more complex work-balancing method should be implemented. 24 User guide for the DTFE code have extension .bov. An example of such a file comes with this program and can be found at demo/visit visualization.bov. Before loading the data, you still need to make a few small change to that file (for additional information check the VisIt documentation): • Set the name of the input data file under field DATA FILE. • Set the grid dimensions under field DATA SIZE. NOTE that this values should be Nz , Ny and Nx (VisIt assumes the file contains a FORTRAN array, so you need to interchange the x and z values for the grid dimensions). • Set the data type under field DATA FORMAT (useful values are FLOAT or DOUBLE). • Set the variable name under field VARIABLE. • Set the endian type of your machine under field DATA ENDIAN. • Can also set the origin of you simulation box under field BRICK ORIGIN. Remember to switch the x and z axis, such that you should insert z0 , y0 and x0 . • Can also set the box length under field BRICK SIZE. Must set the box length in the order Lz , Ly and Lx . 2. ParaView which can be obtained from http://www.paraview.org/paraview/resources/ software.html. The binary data can be loaded using the raw reader in ParaView. To do so add the additional .raw extension to you data. Than you will be able to load it easily from ParaView - but you still need to set inside the program: data type, machine endian type, spatial dimensions, grid dimensions and grid spacing. 25 Marius Cautun 4 Input-Output 4.1 How to modify the input and output files types This section describes the steps necessary to change the format type of the input files read by the DTFE code as well as of the output files where DTFE writes the results. 4.1.1 Input files The reading of the input data is done in function readInputData in file src/input output.cc1 . The default readInputData function that comes with the code reads in the dark matter particles from a gadget snapshot. This function may be a little cumbersome to understand, especially for users that don’t have experience in working with gadget files, this is why just below there is another (commented out) version of readInputData that reads from a text file. For clarity,the description will focus on the function that reads in from a text file. The readInputData function reads: void readInputData(std::vector<Particle_data> *particleData, std::vector<Sample_point> *samplingCoordinates, User_options *userOptions) { /* Variables need for any type of data input */ std::string filename = userOptions->inputFilename; Read_data<Real> readData; // will store the data read from the input file /* How to read the data from a text file */ Real *box = &(userOptions->boxCoordinates[0]); readTextFile( filename, box, &readData, userOptions->verboseLevel ); //! Do not modify below this /* ’MPC_UNIT’ is the conversion factor from the units in the input data file to Mpc units - to the next computation only if MPC_UNIT!=1 */ if ( Real(MPC_UNIT)!=Real(1.) ) { for (size_t i=0; i<userOptions->boxCoordinates.size(); ++i) userOptions->boxCoordinates[2*i] /= Real(MPC_UNIT); Real *positions = readData.position(); for (size_t i=0; i<noParticles*NO_DIM; ++i) positions[i] /= Real(MPC_UNIT); } /* now store the data in the ’Particle_data list’. It also copies the user given sampling coordinates, if any - none in this case. */ readData.transferData( particleData, samplingCoordinates ); } The comment lines split the readInputData function within 4 distinct parts. Most users will only have to change the second part, but for completeness all parts are explained below: 1 Do not confuse this with the file src/input output.h which defines classes that make it very easy for the user to read in the data. 26 User guide for the DTFE code Part 1: Defines two variables: the name of the input file and the object readData that will store the input data. The particle data is defined as the type Real which can be a single/double precision floating point number depending if the compilation option DOUBLE is used or not1 . A detailed description of readData will come later on when describing the function readTextFile. Part 2: Call the functions that reads the data from the input data file into the readData object. In this example also the data box coordinates are read from the input data file (you can also specify the box coordinates from the command line). The argument userOptions->verboseLevel controls the verbosity level of the program and can be dropped for simplicity. NOTE: The userOptions->boxCoordinates object has 2Ndim (with Ndim the number of dimensions) entries and stores the xmin , xmax ymin , ymax zmin , zmax coordinates of the box that encloses the data. Part 3: This is part of the function that deals with the rescaling of the data in case the makefile variable MPC UNIT6=1. Part 4: Copies the data from the readData object into particleData (which stores the particles positions and properties) and the user given sampling points (if any) into samplingCoordinates2 . So the hard job of reading the data in this example is done inside the function readTextFile. For your specific case you will have to write a similar function as readTextFile. This can be done very easily by taking the reader of your data and changing it such that it reads the data into the readData object. For clarity let us analyze the function readTextFile: void readTextFile(std::string filename, Real *boxEncompassingData, Read_data<Real> *readData, int const verboseLevel) { MESSAGE::Message message( verboseLevel ); message << ‘‘Reading the input data from file ’’’ << filename << ‘‘’ ... ’’ << MESSAGE::Flush; // open the text file for reading std::fstream inputFile; openInputTextFile( inputFile, filename ); /* read the first line that gives the number of particles and the second line that gives the coordinates of the box encompassing the data */ size_t noParticles; inputFile >> noParticles; for (int i=0; i<2*NO_DIM; ++i) inputFile >> boxEncompassingData[i]; 1 You can read double precision data via Read data<double> readData and later on the code will transform it to single precision inside the function Read data::transferData() if the option DOUBLE is not used. Also the vice versa holds. 2 It is indeed an overhead of CPU memory and CPU time to first read the data into the readData variable and than to copy it again to the particleData variable. But this is done for clarity and simplicity, and it represents only a small fraction of the CPU memory and CPU time needed for the overall computation. You can as well read directly the data into particleData variable - for details see Sec. 6. 27 Marius Cautun // assign memory to store the particle data being read from file /* the following assumes that the text file has a line for each particle with: posX, posY, posZ, velX, velY, velZ, weight, scalar(’N_scalar’ components) */ Real *positions = readData->position(noParticles); //particle positions Real *velocities = readData->velocity(noParticles); //particle velocities Real *weights = readData->weight(noParticles); //particle weights Real *scalars = readData->scalar(noParticles); //scalar components // now read the particle data for (int i=0; i<noParticles; ++i) { for (int j=0; j<NO_DIM; ++j) // read inputFile >> positions[NO_DIM*i+j]; for (int j=0; j<noVelComp; ++j) // read inputFile >> velocities[noVelComp*i+j]; inputFile >> weights[i]; // read for (int j=0; j<noScalarComp; ++j) // read inputFile >> scalars[noScalarComp*i+j]; } positions velocities weight scalars // close the input file inputFile.close(); message << ‘‘Done.\n’’; } The readTextFile functions follows the structure: Part 1: We start by defining the message(verboseLevel) object that is used to output messages during runtime (it is a fancy version of std::cout with the property that the output messages can be visible or hidden depending on the value of verboseLevel) you can leave this out. After that we open the input text file. For opening files in src/input output.h there are implemented 2 functions: 1. Use openInputTextFile(std::string fileName,std::fstream file) to open a text file for reading. Reading a value x from the file is done via file >> x. 2. Use openInputBinaryFile(std::string fileName,std::fstream file) to open a binary file for reading. Reading a value x from the file is done via which reads file.read(reinterpret cast<char *>(&x),numberOfBytes) numberOfBytes bytes from the file. Part 2: Before allocating memory for the particle data, we must read the number of particles. In this example, the first line of the text file gives the number of particles while the second line gives the coordinates of the box encompassing the data. After that, each line contains the particle properties: 3 positions, 3 velocities, the weight and a given number of scalar components. The second part of function readTextFile reads the number of particles and the coordinates of the box encompassing the data. Part 3: Memory allocation for the quantities that will be read from the input file. This is done via the readData variable that returns a pointer to the start of each dynamically 28 User guide for the DTFE code allocated array. Details on the Read data<Type> class are presented at the end of this enumeration. Part 4: Read the data. Part 5: Close the input file. Now you have successfully read the input data. The readData1 object that does all the data management for you: allocates memory for all the quantities that you want to read, returns pointers to those arrays and at the end writes the input data to the particleData and samplingCoordinates objects - the objects that the DTFE code will use. The Read data class has defined the following functions to allocate memory for the data: function name position(int Npart ) return type101 T* description reserve memory for the positions of Npart particles. Returns a pointer to a 1D array of dimension Ndim × Npart (with Ndim = 2 or 3 for the 2D or 3D case). velocity(int Npart ) T* reserve memory for the velocities of Npart particles. Returns a pointer to a 1D array of dimension Ndim × Npart . weight(int Npart ) T* reserve memory for the weights102 of Npart particles. Returns a pointer to a 1D array of dimension Npart . scalar(int Npart ) T* reserve memory for the scalar variable of Npart particles. Returns a pointer to a 1D array of dimension Nscalar ×Npart (with Nscalar the number of components of the scalar variable). sampling(int Nsamples ) T* reserve memory for the positions of Nsamples sampling points. To be used when reading the grid sampling points from an external file. delta(int Nsamples ) T* reserve memory for the cell size of Nsamples sampling points. This is necessary when interpolating the density to external grid sampling points. The last two functions (with user defined sampling points) are useful when dealing with complex grid geometries that are not implemented in the DTFE code. To save any quantity that has more than one component per particle (like position or velocity), write them in the following order: r1,x , r1,y , r1,z , r2,x , r2,y , r2,z ... (where ri,w denotes the w-coordinate of particle i). You only need to assign memory for the data that you will read from the input file. For example if your input file has no weights, than you should comment out the line 1 readData is a Read data<Type> class defined in src/input output.h. In the following T will denote the return type of Read data<T>, with T most commonly float or double. 102 Typically the particle weight is the mass of the particle in numerical simulation or a complex weight function for galaxy survey that takes into account the galaxy luminosity, survey completeness function, magnitude limit, etc. 101 29 Marius Cautun Real *weights = readData->weight(noParticles). This will give to all the particles the same weight, with a value of 1. Once memory was assigned in the readData variable for a given particle property (e.g. velocity), via the functions given above (e.g. readData.velocity(Npart )), the pointer to the array containing that particle property can be accessed via the same function as the memory allocation minus the argument giving the number of particles (e.g. readData.velocity() returns a pointer to the array storing the velocity information). An example using this can be seen in Part 3 of function readInputData. 4.1.2 Output files The data output is done inside the function writeOutputData. In the current implementation, each different grid interpolated quantity is written to a different file (you can change this behavior according to your needs). The following is a short extract of the writeOutputData function: void writeOutputData(Quantities &quantities, User_options const &userOptions ) { if ( userOptions.field.density ) // outputs the density { std::string filename = userOptions.outputFilename + ‘‘.den’’; writeBinaryFile(quantities.density,filename,‘‘density’’,userOptions.verboseLevel); } if ( userOptions.field.velocity ) // outputs the velocity { std::string filename = userOptions.outputFilename + ‘‘.vel’’; writeBinaryFile(quantities.velocity,filename,‘‘velocity’’,userOptions.verboseLevel); } // write the rest of the data -> skipped here for clarity ... } The writeOutputData function uses writeBinaryFile to write all the grid interpolated fields to binary files (each one to a different file). The file name is formed by a root name (userOptions.outputFilename) plus an extension (which you can change), file extension that is different for each quantity. We use this syntax since during a run of the DTFE code one can compute several grid quantities, and each one must be written to a different file. The quantities1 variable stores the different grid interpolation results: density: A std::vector of Real values storing the density interpolated to grid. velocity: A std::vector of Pvector<Real,noVelComp>2 values storing the velocity interpolated to grid (noVelComp = 2 and 3 for the 2D and 3D cases respectively). 1 The Quantities class is defined in the src/quantities.h file. The class Pvector<T,N> stores N T-type values in a continuous array in memory. The values can be accessed via the [int i] operator with i from 0 to N-1. 2 30 User guide for the DTFE code velocity gradient: A std::vector of Pvector<Real,noGradComp> values storing the velocity gradient interpolated to grid (noGradComp = 4 and 9 for the 2D and 3D cases respectively). velocity divergence: A std::vector of Real values storing the velocity divergence interpolated to grid. velocity shear: A std::vector of Pvector<Real,noShearComp> values storing the velocity shear interpolated to grid (noShearComp = 2 and 5 for the 2D and 3D cases respectively - number of independent shear values). velocity vorticity: A std::vector of Pvector<Real,noVortComp> values storing the velocity vorticity interpolated to grid (noVortComp = 1 and 3 for the 2D and 3D cases respectively - number of independent vorticity values). scalar: A std::vector of Pvector<Real,noScalarComp> values storing the scalar field components interpolated to grid (noScalarComp = NO SCALARS makefile option - set it at compile time in the Makefile). scalar gradient: A std::vector of Pvector<Real,noScalarGradComp> values storing the scalar field gradient interpolated to grid (noScalarGradComp = Ndim NO SCALARS with Ndim = 2 and 3 for the 2D and 3D cases respectively). Each of the grid interpolated quantities are written in a std::vector following the syntax: size_t *grid = &(userOptions.gridSize[0]); for (size_t i=0; i<grid[0]; ++i) for (size_t k=0; k<grid[2]; ++k) { size_t index = i*grid[1] + j; quantities.density[index] = density value at grid cell (i,j) } for the 2-dimensional case, while for the 3-dimensional case the syntax is: size_t *grid = &(userOptions.gridSize[0]); for (size_t i=0; i<grid[0]; ++i) for (size_t j=0; j<grid[1]; ++j) for (size_t k=0; k<grid[2]; ++k) { size_t index = i*grid[1]*grid[2] + j*grid[2] + k; quantities.density[index] = density value at grid cell (i,j,k) } Writing the results to a binary file can be done via (the same syntax is used in function writeBinaryFile): size_t dataSize = dataToWrite.size()*sizeof(dataToWrite[0]); //number of data bytes written outputFile.write( reinterpret_cast<char const *>(&(dataToWrite[0])), dataSize ); which writes all the data stored in dataToWrite into the outputFile file. Writing the data into a text file can be done via: 31 Marius Cautun for (size_t i=0; i<dataToWrite.size(); ++i) { \\ if the data is a real value per grid cell (e.g. density) outputFile << dataToWrite[i] << ‘‘\n’’; \\ if the data has multiple values per grid cell (e.g. velocity) for (size_t w=0; w<noVelComp; ++w) outputFile << dataToWrite[i][w] << ‘‘ ’’; outputFile << ‘‘\n’’; } where the syntax depends if grid variable to be written has one or multiple values per grid cell (noVelComp should be replaced by the number of components for each grid cell). In the above examples only the values at the grid cells are written to a file. In case also the grid cells coordinates need to be written to the output file, than you should use the following syntax (this is an example for 3D): size_t *grid = &(userOptions.gridSize[0]); for (size_t i=0; i<grid[0]; ++i) for (size_t j=0; j<grid[1]; ++j) for (size_t k=0; k<grid[2]; ++k) { size_t index = i*grid[1]*grid[2] + j*grid[2] + k; outputFile << i << ‘‘ ’’ << j << ‘‘ ’’ << k << ‘‘ ’’; \\ if the data is a real value per grid cell (e.g. density) outputFile << dataToWrite[index] << ‘‘\n’’; \\ if the data has multiple values per grid cell (e.g. velocity) for (size_t w=0; w<noVelComp; ++w) outputFile << dataToWrite[index][w] << ‘‘ ’’; outputFile << ‘‘\n’’; } Do not take this example as an encouragment to output the data to a text file because it has several drawbacks like larger file sizes and loss of precision for floating point numbers. As in the case of reading the input data, the DTFE code comes with two functions for opening output files to write in: 1. Use openOutputTextFile(std::string fileName,std::fstream file) to open a text file for writing. Writing a value x to the file is done via file << x. 2. Use openOutputBinaryFile(std::string fileName,std::fstream file) to open a binary file for writing. Writing a value x to the file is done via file.write(reinterpret cast<char *>(&x),numberOfBytes) where numberOfBytes is the byte size of x. 32 User guide for the DTFE code Figure 4: Breakdown of most of the messages shown during the run time of the DTFE code. 4.2 Understanding the run time messages The DTFE code is very verbose and shows messages for all the important stages of the computation. The typical run time messages that DTFE gives are shown in Fig. 4, where also a short explanation of the different messages is given. The output shown in Fig. 4 was obtained using DTFE snapshot 009 test -g 128 --region 0 1 0 1 0 0.5 -f density velocity (you can find the same picture also in the demo directory). The main sections of the output messages are: 1. Information about the options supplied to the program. mass 2. Average density in the data box (ρ0 = totaltotal ). This will be used to normalized box volume the density values (i.e. the output density values are in fact ρρ0 ). 3. Each time the code selects particles in a certain region it shows a message giving the 33 Marius Cautun coordinates of the padded box (= region of interest + padding length) where is searches for the particles (e.g. 2nd red message and 2nd blue message in Fig. 4). 4. If the code detects more than one available processor and the compilation option -DOPEN MP is active, than it will distribute the computation over the available processors. Each time it does so it shows a message similar to 2nd green message in Fig. 4. The following messages will be shown only for thread 0. 5. Shows the progress in computing the Delaunay triangulation for the given point set. The progress is shown via the percentage of the computation already done (between 0 to 100) - most of the CPU demanding computations have a progress display. 6. Next step is computing the density at the point set position (not on the grid) - this is 3rd green message in Fig. 4. 7. Status of field interpolation on the grid - 3rd blue message in Fig. 4. 8. After finishing the work across all threads, statistics of the time required by each thread is shown. 9. The last messages are of writing the data in the output file/files. The messages shown in Fig. 4 can be hidden by selecting an appropriate value for the --verbose option of the program (see Sec. 5.8). The --verbose 2 will hide the progress messages during the computation (the percentage message) while --verbose 1 will hide all messages with the exception of errors and warnings. 34 User guide for the DTFE code 5 Program options The program output can be easily controlled via several program options1 . These program options can be supplied via the command line2 or in a configuration file that is specified at runtime as an argument3 - in both cases the options have (almost) the same form and syntax. Always the first options supplied to the program is the name of the input data file, while the second option is the output file name for the results. Theses two options always need to be specified to the program so they are not preceded by any keyword - but they always must be the first two arguments. The rest of the program options are optional, and hence must be used in conjunction with keywords. The DTFE program recognizes a large number of options, options that are described below. The different options are grouped around the tasks they perform. Many of the DTFE options require a value/s, this will be represented below with the use of the keyword arg. Some of the options require values that need to be inserted in units of length. If this is the case, the option description will specify that the values supplied must be in Mpc. This means that in the case that the input data positions are in Mpc or you use the MPC UNIT compiler constant to transform the data to Mpc units, the values supplied for those options are really in Mpc. Otherwise, if the input data is in different units, you have to supply those values in the units of your data. The code does not use internal physical constants and hence it makes no difference between positions in Mpc, kpc or other length unit. 5.1 Main options These are some of the most important options of the program and in general they always have to be specified (via the command line or they can be read from the input data file): -h, --help: Produces short help messages during run time. -g, --grid arg: Specifies the grid dimensions of the field/s to be computed. The code works for any non-negative grid dimensions. This option must be always specified with the exception when the sampling points are given by the user. Example in 3D: -g 128 (for a 1283 grid) or -g 128 256 128 (for a 128 × 256 × 128 grid). --box arg: Specifies the coordinates of the box that encompasses the data in Mpc. For Nbody simulations with periodic boundary conditions, the box size specified here must be the periodic box used in the simulation (to get correct padding of the periodic boundaries). For non-periodic data, the box coordinates can be the region of interest where the fields need to be interpolated to a grid. This option expects 6 arguments in 3D (4 in 2D) in the order: xmin , xmax , ymin , ymax , zmin and zmax (for example --box 0. 100. 0 50. 0. 50.). NOTE: When some of the box coordinates are negative, the program option parser will 1 Some of the program options may be inactive when using certain compiler directives. If this is the case, a short note will be given during the program option description. 2 For example: DTFE input data file output file --grid 128 --field density 3 For example: DTFE -c configuration file 35 Marius Cautun interpret the negative coordinate as an unknown option (this will be the case for --box 0. 100. -100. -50. 10. 100.). To overcome this inconvenience insert the box coordinates via the expression --box 0. 100. --box -100. --box -50. 10. 100.), i.e. precede any negative values with the keyword --box. -p, --periodic: The particle position data is in a periodic box. Additional data is padded outside the box, by translating the data, such that there is a complete Delaunay Triangulation of the point set inside the periodic box. 5.2 Field options This set of options is used in selecting what fields should the DTFE code compute: --field arg: Specifies what quantity to compute using the code. This option can take one or more of the following values: d, density: interpolate the density to grid. v, velocity: interpolate the velocity to grid. gradient: interpolate the velocity gradient to grid. divergence: interpolate the velocity divergence to grid. shear: interpolate the velocity shear to grid. vorticity: interpolate the velocity vorticity to grid. scalar: interpolate a scalar field1 to grid. scalar gradient: interpolate the scalar field gradient to grid. NOTE: The precompiler option NO VELOCITY disables the computations for any velocity related quantity and hence one will not be able to use the the velocity, divergence, shear and vorticity options. The precompiler option NO SCALAR disables the scalar field computations and hence one will not be able to use the scalar option. Depending on the program option values, the DTFE code computes the following grid quantities: 1. The density - one value per grid point. 2. The velocity vector - Ndim components per grid point (Ndim is the number of spatial dimensions; 2 or 3). 1 Here the scalar field variable is used to denote any combination of additional fields except density and velocity that needs to be interpolated to the grid. The DTFE interpolation works the same for a scalar quantity like temperature or for a vector field. In the case of the vector field each component is interpolated to grid independently. Hence one can bundle many additional quantities (scalar values of vector components) in the DTFE code variable scalar and interpolate them to grid. 36 User guide for the DTFE code 2 3. The gradient of the velocity vector - Ndim components per grid point and in 3D is given by: ∂x vx ∂y vx ∂z vx ∇~v = ∂x vy ∂y vy ∂z vy ∂x vz ∂y vz ∂z vz 4. The velocity divergence - this is the trace of the velocity gradient, so one value per grid point. 5. The velocity shear - 2 independent components per grid point in 2D and 5 in 3D. The shear is given by: 1 1 σij = (∂i vj + ∂j vi ) − δij Trace (∇~v ) 2 3 The code outputs only (σ11 , σ12 ) for 2D and (σ11 , σ12 , σ13 , σ22 , σ23 ) for 3D. 6. The velocity vorticity - 1 independent component per grid cell in 2D and 3 in 3D. The vorticity is given by: 1 ωij = (∂i vj − ∂j vi ) 2 The code outputs only (ω12 ) for 2D and (ω12 , ω13 , ω23 ) for 3D. 7. The scalar fields components - Nscalar components per grid cell (with Nscalar =NO SCALARS value used in the makefile). 8. The gradient of the scalar fields components - Nscalar × Ndim components per grid cell. The first Ndim entries are the gradient for the first component of the scalar field, the second Ndim entries are the gradient for the second component of the scalar field and so on. Any field that has more than one component at a grid point is written in a one dimensional vector for each grid point. For example the velocity gradient is saved as (∂x vx , ∂y vx , ∂z vx , ∂x vy , ...) - the rest of the multiple component quantities are saved in the same manner. 5.3 Region options Use the following options to specify if to interpolate the fields to grid only in a given subregion of the full available data: --region arg: Interpolate the fields to a grid only in a given region of the full data. This arguments specifies the extension of the region of interest by giving the left and right boundaries along each direction. These boundaries are given as a fraction of the full box length along that direction. For example in 2D --region 0.2 0.6 0.4 0.7 specifies that the grid interpolated fields are to be computed only in the region 0.2 - 0.6 Lx along x-direction and 0.4 - 0.7 Ly along y-direction (with Lx,y the full box length along the x,y-directions). NOTE: In this case the option --grid gives the interpolation grid dimensions for the specified region of the full box, not for the full box. 37 Marius Cautun --regionMpc arg: Exactly like the --region option with the only difference that the boundaries of the region of interest are given in Mpc and not as a fraction of the full box length. 5.4 Partition options The following options can be used when dealing with limited computer memory or when speeding the computation by using several processors that do not have a shared memory: --partition arg: Split the full data in several smaller boxes that cover the full box and compute the fields in each box one at a time. This option is useful when one does not have enough memory to compute the Delaunay Triangulation for the full data set. The arguments give the number of cells the data is to be split along each direction, for example: --partition 2 2 1 to split the 3D data in 2 × 2 × 1 smaller boxes. NOTE: In this case the option --grid gives the interpolation grid dimensions for the full particle box and not for the sub-boxes. --partNo arg: Choose to compute the DTFE fields only in one of the sub-boxes in which the full data was split using the option --partition. This option is useful to reduce the computational time by sending each sub-box to a different computer - this must be done by the user using a script. The options can take values form 0 to number of partitions 1, for example --partNo 2 will compute the results for sub-box 2. NOTE: The user will have to glue together afterwards the results for each of the sub-boxes to get the fields for the full box. As in the case of --partition, the option --grid gives the field grid dimensions for the full particle box and not for the sub-box in question. This option should be used when dealing with a large amount of data and only limited computer resources (CPU RAM). The user needs to decide the optimal number of partitions taking into account that: 1. The more partitions there are, the longer the computation takes due to additional overheads incurred (i.e because the program needs to copy also a buffer zone around the region of interest). 2. The memory necessary for each partition computation should fit inside the CPU RAM an should not overspill in the swap memory (that would make the code much slower). For best results, the program should take at most 80 − 90% of the total RAM. 3. When splitting the data there are additional memory overheads on top of that given by Eq. (1). The new memory consumption is given by: Np Ng Np,i Np,i Ng,i 4 g np 6 + 4 g ng 6 + 500 6 + 4 g np + 4 g ng (2) 10 10 10 106 106 where the first part is the memory overhead since the full input and output data must be stored, while the second part comes from the data contribution for the partition i: Delaunay triangulation memory, partition particles’ data memory and partition subgrid’s memory. The symbols Np and Ng denote the total number of particles and interpolation 38 User guide for the DTFE code grid points, while Np,i and Ng,i denote the number of particles and grid points located in the i-th partition region. For the meaning of g, np and ng see Eq. (1). For homogeneous particle distributions, Np,i = so Eq. (2) can be rewritten as: partition memory overhead + Np number of partitions and Ng,i = Ng number of partitions memory consumption without partition option number of partitions (3) which is a good approximation even for inhomogeneous particle distributions. It is recommend that you use the above expression when estimating the memory requirement for a given number of partitions. For example if you need to interpolate the density on a 5123 grid starting with 5123 = 134 × 106 particles. According to Eq. (1), this would require about 70GB of RAM in single precision, which is a problem if one has available at most a CPU with 32GB of RAM. So you need to use the partition program option. According to Eq. (2), the memory overhead for computing the particle density in single precision (g = 1, np = 5 and ng = 1) is 3.2GB. According to second part of Eq. (3), the memory requirement for a given partition is 23.5GB for 3 partitions and 17.5GB for 4 partitions. In total, the DTFE program would take 27GB for 3 partitions and 21GB for 4 partitions. Taking into account that our estimation is only approximative and because of some inhomogeneities there may be more particles in a partition than on average, it is a safe choice to split the computation in 4 or more partitions - this should easily accommodate the computation on the 32 GB of RAM CPU. 5.5 Padding options The following options have to do with the size of the buffer zone around the regions of interest such that the Delaunay triangulation fully covers the volume we are interested in. The buffer (or padding) size is the thickness of the additional volume that has to be added along each side of the box where we interpolate the fields to a grid. Higher padding values will make sure that the region of interest is fully covered by the Delaunay tessellation, but it also has the disadvantage of being computationally more demanding, so a balance has to be reached, depending on the characteristics of the point distribution. --padding arg: Specify how much padding to be added such that there is a complete Delaunay triangulation when using any of the options: --periodic, --partition, --region or when computations are done in parallel on several processors. There are two ways to give the padding size: 1. By giving one value which represents the average number of particles that will be copied along each face of the region of interest. The actual computation uses all the particle that are within ’padding number’ times ’particle grid spacing’ distance from the region of interest. For example --padding 5 will add an average of 5 particles on both the left and right sides for each dimension. This way of specifying the padding is useful for N-body simulations where all coordinates are the same. [The DEFAULT is 5 particles padding on average - this is enough for LSS simulations up to the present time.] 39 Marius Cautun 2. By giving the size of the padding for each face of the box of interest. This size is given with respect to the box length along each coordinate (e.g -padding 0.1 0.2 0.5 0.5 0.1 0.1 means that the box will be padded with 0.1Lx on the left of the x-coordinate and by 0.2Lx on the right of the x-coordinate, similar for the y and z dimensions). This option is useful when there are large anisotropies in the data distribution - like in a galaxy redshift survey. NOTE: For special cases you also have the following options: --padding 0 to don’t use any padding outside the region of interest and --padding ‘‘large number’’1 to use all the available particles for the computation. --paddingMpc arg: Similar to option --padding choice 2 with the difference that the padding size is given in Mpc and not box lengths. Must be followed by 6 values in 3D (4 in 2D). --noTest: Do not test for the efficiency of the padding when computing the Delaunay tessellation. This option is valid only when using the compiler directive TEST PADDING (when using this directive the code will automatically test for the completeness of the padding) - this option can be used to switch off this behavior. NOTE: When computing the DTFE density, there is the need for a higher padding size than when interpolating the other fields. 5.6 Density computation options There are several additional options related to density interpolation to the grid. The main difference between density interpolation and the rest of the fields comes from the fact that the density is inferred from the point distribution (if the point distribution is a Poisson sample of the underlying density). Due to Poissonian noise in the particle distribution, the density has to be averaged over the full cell of the interpolating grid. Normally the DTFE method assigns an unambiguous density to each grid cell, but this is very difficult and slow to compute practically. So in this code the density interpolation is implemented by randomly sampling the density at a given number of sample points and than taking the density as the average of those values. For additional information on the convergence of the different density interpolation methods consult Cautun et al. (2011). -m, --method arg: Choose the interpolation method for finding the density. There are three choices: method=1: Computes the density using a Monte Carlo integration method with pseudorandom numbers inside the Delaunay cells (triangles in 2D and tetrahedra in 3D). This method has the advantage of achieving a fast convergence in the high density regions (ρ/ρbackground ≥ 1) but has a much slower convergence in the low density regions. This method is recommended for use when the number of particles and the number of grid cells have the same order of magnitude. 1 If you use --padding ‘‘large number’’ for a periodic simulation than the code will compute the triangulation for 27 times the initial nuber of particles - be carefull since this may have large RAM requirements. Also it does not make sense to use a large padding size when the code is run on several processors with shared memory since there is no gain in speed if all the processors do the same work. 40 User guide for the DTFE code method=2: Computes the density using Monte Carlo integration inside the grid cells. This method has a rapid convergence in the low density regions (ρ/ρbackground ≤ 1) but has a very poor behavior in the high density regions (for ρ/ρbackground ≤ 100 the typical error is of the order 25 − 50% - for 20 − 100 samples per grid cell). Also this method is slower than the first method and has a √ 1 convergence compared Nsamples 1 with the Nsamples convergence of the first method. This method is recommended when the data completness is very poor and the number of particles is much smaller than the grid cells for the interpolation field. method=3: Similar to method 2 with the exception that the density is sampled at equidistant points inside the grid cells. This method can be used for testing since it should always return the same answer (if the number of sampling points stays the same). This method works only for interpolation to regular rectangular grids. Method 1 for density interpolation is not available when interpolating the field at user given sampling points. Method 2 is available for all types of density interpolation. CPU timewise, for the same number of sample points, method 1 is 5-10 times faster than method 2. -s, --samples arg: Use this option to change the number of sampling points per cell of the interpolating grid. In the absence of this option, the following are the default values: 1st method: an average of 100 sample points per grid cell (this can differ from cell to cell since the sample points are not generated inside the grid cells). 2nd method: 20 random sample points per grid cell. 3rd method: 27 equidistant sample points per grid cell. --density0 arg: Use this option to specify what is the value of the background density. The ρ output of the density interpolation is the ratio ρbackground where ρ is the density at a given grid point and ρbackground is the average background matter density in the box (i.e. in the box ρbackground = totalmass ). You can use this option to specify a different value for volume of the box ρbackground - so now all the density values will be with respect to the value of ρbackground that you inserted. --seed arg: Use this option to specify a seed for the random number generator when using method 2 for density interpolation. In general the density interpolation is much slower than the interpolation for the other fields. Depending on the number of samples used, the CPU time for computing the Delaunay triangulation is similar to that necessary to interpolate the density using method 1 with 100 samples or method 2 with 20 samples. The CPU time increases linearly with the number of samples for both density interpolation methods. NOTE 1: This message is important only if you are puzzled why you get slightly different values when computing the density of the same data set between different runs. This is NOT and error. Density interpolation method 1 in principle does not use random numbers so every 41 Marius Cautun run should give the same result, but this is not the case in practice. The results of the method are depended on the order of the input data and on how many parallel processors are used (since this changes the order of the data on each processor). The variation between different runs is consistent with the convergence error expected for a given number of samples (since it is due to distributing the samples differently inside the Delaunay cells). This program behavior can be fixed such that all runs give the same result, but it does not make sense to do so since there is anyway an uncertainty in the density estimation due to using a finite number of samples. NOTE 2: This message is important if you try to reproduce an earlier density result obtained using interpolation method 2. If you are trying to reproduce a previous density result obtained using method 2, you not only have to give the same random seed, but you also have to use the same number of parallel processors and/or data partitions. 5.7 Redshift cone options These represent the options that can be used to interpolate the fields to a spherical grid (a redshift cone grid) that mimics galaxy redshift surveys. When dealing with a redshift survey (or when generating a redshift-like survey from numerical simulations) it makes sense to use different grid cell sizes, with small cells close to the observer that increase in size as one goes to higher redshifts. When using this options, each grid cell has the same size in angular coordinates (i.e. θ and ψ). Also each grid cell has the same size in the r coordinate - this may not be ideal, but may be extended in a future version of the code. --redshiftCone arg: Specify to interpolate the fields on a redshift cone grid (i.e. on spherical coordinates). Must give 6 arguments in 3D (4 in 2D) which give rmin , rmax , θmin , θmax , ϕmin and ϕmax (where r is the distance in Mpc and θ and ϕ the two angles expressed in degrees). For example --redshiftCone 1 10 0 90 0 360 gives you a half a sphere shell. --origin arg: Specify the origin of the spherical coordinate system used in option --lightCone. It gives the x, y and z values (in Mpc) of the origin of the spherical coordinate system. When using the redshift cone options, the --grid Nx Ny Nz option specifies the number of grid cells along the r, θ and ψ direction respectively. Each grid cell will have the dimensions rmax −rmin min min × θmaxN−θ × ϕmaxN−ϕ which the code will internally transform to units of length. Nx y z When using the redshift cone options, the coordinates of the input data must still be in Mpc (or length units in general) - the code cannot use angular coordinates since than the gradient inside the Delaunay cell has a different form that is not implemented at the moment (also the density estimation at each particle position will be different). Moreover, when translating from spherical coordinates to Cartesian ones and back, the code uses the following relations: x − xorigin = r sin θ cos ϕ y − yorigin = r sin θ sin ϕ z − zorigin = r cos θ 42 (4) (5) (6) User guide for the DTFE code hence the x, y and z coordinates of the input data must be given such that they respect the above relationship (e.g. when computing the spatial positions of a galaxy survey, x, y and z must be computed from the above relations with r = r(redshift) and θ and ϕ the sky coordinates). 5.8 Additional options This section gathers a variety of options that can be used for multiple purposes. On top of the DTFE grid interpolation method, the code comes also with the TSC and SPH grid interpolation methods that can be used to compare with the DTFE results. The TSC and SPH implementations are simplistic in the sense that they are not optimized for speed and they did not undergo complex tests to check the correctness of the implementation (this is different from the DTFE case). Use them at your own risk1 . -c, --config arg: Supply the name of the configuration file that contains part/all the program options (see Sec. 5.9 for information about the syntax of the configuration file). --TSC: Interpolate the fields to grid using the Triangular Shape Cloud (TSC) method. In the current implementation the width of the TSC cloud is twice the grid spacing of the interpolating grid. NOTE: The TSC method interpolates to grid only the density, the velocity and the scalar field. It does not compute derivatives for any of the fields. At the moment this method works only rectangular regular grids (does not work for redshift cone coordinates or for user given sampling points). --SPH arg: Interpolate the fields to grid using the Smoothed Particle Hydrodynamics (SPH) method. It takes as argument the number of closest neighbors. NOTE: This method interpolates to grid only the density, the velocity and the scalar field. It does not compute derivatives for any of the fields. --extensive: Specify that all the fields under scalar fields are extensive quantities. If this option is missing than the code treats the variables as intensive fields. This option is important only when using the TSC or SPH interpolation methods applied to the scalar variable. -v, --verbose arg: Choose the verbosity level of the program (a value from 0 to 3): 0 Shown only error messages during run time of the DTFE code. 1 Shown only error and warning messages during run time of the DTFE code. 2 Do not show computation progress messages (for CPU intensive computations the progress is shown in percentage of the task already done). 3 Show all messages. 1 I am pretty confident that both the TSC and SPH methods do not have errors. 43 Marius Cautun --randomSample arg: Generates a random subsample of the input data. The size of the subsample is given by value supplied to the option (with values from 0 to 1). Only this random subsample of the full data set will be used in any further computations. For example --randomSample 0.1 will keep only 10% of the data set for further computations. --options arg: Simple way for the user to supply additional values to the program. Each additional option will be stored as a string in User options::additionalOptions (this variable is a vector of strings). If the user modifies the code, it can use this option to easily add new options to the program (without having to change directly the user options part of the program - see Sec. 3.11 for a simple example). TSC is a grid interpolation scheme which assigns the particle mass to the 27 gird cells closest to the particle. The smoothing kernel is given by Hockney & Eastwood (1981): 3 1 2 4 − xi if |xi | ≤ 2 , 2 w(xi ) = 12 32 − xi (7) if 21 < |xi | ≤ 23 , 0 else where xi is the distance along axis i between the particle and the grid point (distance expressed in grid spacing units). The 3D kernel is the product of three such one-dimensional kernels: WT SC (~x) = w(x1 )w(x2 )w(x3 ). (8) The SPH implementation1 in the DTFE code uses the following smoothing kernel (Monaghan 1992; Hernquist & Katz 1989): Wij (r = |~ xi − x~j |, hi , hj ) = with: 1 [W (r, hi ) + W (r, hj )] , 2 3 r 2 1 − 2 h + 3 W (r, h) = c(h) 14 2 − hr 0 and: ( c(h) = 10 1 7π h2 1 1 π h3 3 4 r 3 h if 0 ≤ if 1 < else r h r h in 2D, in 3D. ≤ 1, ≤ 2, (9) (10) (11) The smoothing length hi for particle i is half of the distance between the particle i and its N closest neighbor. The density at coordinate x~i is given by: X ρi = mj Wij (|~ xi − x~j |, hi , hj ) (12) j with mj the mass of particle j. Other quantities are computed via: X qj qi = mj Wij (|~ xi − x~j |, hi , hj ) ρj j 1 (13) The SPH computation uses a kdtree implementation by Matthew Kennel. If you use the SPH results obtained using this code you must give credit to Kennel (2004). 44 User guide for the DTFE code for extensive quantities, while for intensive quantities we have: qi = 5.9 1 X mj qj Wij (|~ xi − x~j |, hi , hj ). ρi j (14) Configuration file The DTFE program options can also be supplied via a configuration file. In the most general case, options can be given using both the command line and the configuration file. If the same option is present twice, in both the command line and configuration file, than only the command line values associated to that option will be considered1 . An example of a configuration file can be found in the demo directory that comes with the code. There are a few differences between the syntax of the options in the configuration file and that of the options at the command line: • Each line of the configuration file should contain one options in the form option name = option value (with option name = for options that do not take values). • To specify the input data file in the configuration file use the keywords To specify the output file name use inputFile = your input data file. outputFile = your output file name. • You cannot use shortcuts for option names as is the case for the command line (e.g. g = 256 is not a valid option to specify grid = 256). • You can insert comments anywhere in the file, as long as they start with the symbol #. For example the following are two valid comments: # This represents a comment line grid = 256 # this is a comment on the same line as the option • For options that should take more than one value, you have to insert each value one a new line and using the option name. For example something that at command line is --grid 256 128 64, must be specified in the configuration file via (this is a limitation of the Boost Program Options Library): grid = 256 grid = 128 grid = 64 Depending on how many option you need to use for the DTFE program, it may make sense to use a combination of options supplied via both the command line and via a configuration 1 The only difference is when asking for the same task via slightly different options. For example, both the options --region and --regionMpc have the same effect on the program, yet they are separate options. In this case, if the --region is given in the command line and --regionMpc is given in the configuration file, both options will be read. But since it does not make sense to specify both options at the same time, there will be a run time error message. At the moment there is no easy way to solve this problem since the Boost Program Options library does keep track of which of the two options came first. 45 Marius Cautun file. Another advantage of configuration files is that you have a written record of what options you used. For an example using the configuration file see Sec. 3.13. 46 User guide for the DTFE code 6 Additional Information 6.1 Using DTFE as a library The DTFE software was designed to be used as both a standalone program and also as a library. The makefile already comes with the commands necessary to build a dynamic library. When building the DTFE library, the following steps must be taken: 1. Set the Makefile options that you need for your task. Pay attention that you also must set the Makefile variables LIB DIR and INC DIR which give the directories where to put the library and the include DTFE header files. It is advised that you put the DTFE include files in a separate directory such that there is no possibility that this files will be overwritten on top of similar named header files. 2. Build the library using: make library. This will build the DTFE library under the name libDTFE.so in directory LIB DIR. The same command will also copy the necessary header files to the INC DIR directory. To be able to use the library in your C++ program, include the header file DTFE.h. This contains include statements to the rest of the DTFE headers that you may need when dealing with the DTFE library. To compile your program you should use -I include files path while when linking with the library you should use -L library path lDTFE. Now you should be able to run your program that uses the DTFE library1 . Using the DTFE library in you own C++ code is as simple as: #include<DTFE.h> ... // your own code here //read the program options User_options userOptions; userOptions.readOptions( argc, argv, false ); // define variables to store the particle data and the output results std::vector<Particle_data> particles; // vector for particle data std::vector<Sample_point> samplingCoordinates;// sampling coordinates for non-regular grid Quantities quantities; // class to keep the results of the interpolation /* read the input particle data into the DTFE data structure */ /* here: pos - vector to particle positions, vel-particle velocities, etc ... */ particles.reserve(noParticles); // reserve memory for ’noParticles’ particles for (size_t i=0; i<noParticles; ++i) { Particle_data temp; for (int j=0; j<NO_DIM; ++j) // read particle i-th position temp.position(j) = pos[NO_DIM*i+j]; for (int j=0; j<NO_DIM; ++j) // read particle i-th velocity temp.velocity(j) = vel[NO_DIM*i+j]; temp.weight = w[i]; // read particle i-th weight 1 Since libDTFE.so is a shared library, you need to add library path to the system variable LDFLAGS. 47 Marius Cautun for (int j=0; j<NO_SCALARS; ++j) // read particle i-th scalars temp.scalar(j) = scalar[NO_DIM*i+j]; particles.push_back(temp); } // if you use user given sampling coordinates samplingCoordinates.reserve(noSamples); for (size_t i=0; i<noSamples; ++i) { Sample_point temp; for (int j=0; j<NO_DIM; ++j) // read i-th sample point position temp.position(j) = sample[NO_DIM*i+j]; for (int j=0; j<NO_DIM; ++j) // read i-th sample point cell size temp.delta(j) = delta[NO_DIM*i+j]; samplingCoordinates.push_back(temp); } // compute the DTFE interpolation DTFE( &particles, samplingCoordinates, userOptions, &quantities ); // the above function deletes the data contained in the ’particles’ vector ... // do additional computations with the results To better understand the above code, let us go over each step described above: 1. Include the header file for the DTFE library. After this you can insert your own code that deals with reading the data, doing computations on it, etc ... 2. Now begins the code part that has to do only with the DTFE computation. Start by defining the User options class that stores the variables values that control the behavior of the code. The easiest way to set the options you like is using the User options::readOptions member function which has the syntax: void readOptions(int const length, char** ptrChar, bool getFileNames = true, bool showOptions = true); Where length is the length of the C-string array ptrChar. The program expects the first element of the ptrChar array to be the name of the program (or any other string)1 - if the first element of the array is an option it will be ignored by the library and hence the DTFE computation may give unexpected results. The boolean variable getFileNames should be true if the input and output file names are in the ptrChar array, otherwise should be set to false. The last variable, showOptions, controls if the program should output or not the options it read from the ptrChar array. One can also set the options directly accessing the members of the User options class, but that it is a more complex task - especially when dealing with more than the basic 1 The function readOptions is designed to take as inputs the variables of the C/C++ int main(int argc, char** argv) function. 48 User guide for the DTFE code options -, this is why it is recommended that the DTFE program options are set using the User options::readOptions function. The complexity of setting the DTFE options values directly on the User options class members arises since some option combinations cannot be used at the same time and also since one option may influence multiple members of the User options class. The following is an example of defining the argc and argv options for the above code extract in the case when all the options are read from a configuration file: int argc = 3; char* argv[] = {‘‘program_name’’, ‘‘--config’’, ‘‘config_file_name’’}; 3. The next step, after reading in the program options, is to define the variables that will store the input data and the output results. The input particle data for each particle is stored by the class Particle data1 , and all the particles are stored in a std::vector of Particle data elements. One needs to define a sampling coordinates array which is a std::vector of Sample point2 elements. This array must be defined even if the interpolation is done on a regular grid or on a light cone grid; in which case this vector should be left empty. The last step is defining the variable that will store the results of the interpolation which is the Quantities3 class. This class contains std::vector member elements for all the quantities available for computation (see Sec. 4.1.2 for more details about the members of the Quantities class). 4. The fourth step involves reading the point set data into the DTFE particle data vector. The example given above reads a number of noParticles particles. Each particle has 4 properties: NO DIM4 coordinates, NO DIM velocity components, weight and NO SCALARS additional field components. 5. This step shows how to use user-defined sampling coordinates; skip this step if you are using regular or light cone grid. The noSamples sampling point coordinates (stored in array sample) and sampling cell size (stored in array delta) are assigned to the samplingCoordinates variable. See Sec. 3.11 for additional details. 6. The last step involves calling the DTFE function which performs the interpolation for you. Please pay attention that this function will delete the data in the particles vector. Now you can use the results of the interpolation; results that are stored in the quantities variable. 6.2 Accessing the Delaunay triangulation The DTFE code can be used to return the full Delaunay tessellation of the point set. One can use the triangulation to do additional computations that are not implemented by default in 1 See the file src/particle data.h for the definition of the Particle data class. See the file src/particle data.h for the definition of the Sample point class. 3 See the file src/quantities.h for the definition of the Quantities class. 4 NO DIM is the number of spatial dimensions - 2 or 3. 2 49 Marius Cautun the current version of the software. Before describing how to do so, it is important to know of some of the limitations of the DTFE code when returning the Delaunay triangulation: 1. The code will run only serially12 . 2. When using the --region option the code returns the Delaunay tessellation only for the particles in the region of interest plus the buffer zone. 3. The option --partition does not work. But the option --partition accompanied by the option --partNo will work3 - so you can still manage the computation one partition at a time if the CPU resources do not allow to analyze the full data set. 4. When using dummy test point to test the tessellation padding (Makefile option TEST PADDING), the dummy test points will also be part of the Delaunay triangulation returned by the DTFE code. But there is an easy way to distinguish between the dummy test points and the actual data points. For the DTFE function to return the Delaunay tessellation one must compile the code using the Makefile option TRIANGULATION. This has the effect of exposing a different version of the DTFE function that on top of the normal arguments takes an additional argument which will be used to return the Delaunay triangulation. The following code extract shows the syntax needed to return the Delaunay triangulation: #define TRIANGULATION #define NO_DIM 3 // or 2 //#define DOUBLE // if you data is in double precision //#define NO_SCALARS 1 #include<DTFE.h> /*same code as in the absence of the triangulation - see previous section */ ... /* with exception that you need to add the following line after defining the ’User_option’ variable and before calling ’userOption.readOptions(...);’ */ userOption.field.triangulation = true; ... // define the triangulation structure /* DT is the CGAL structure for storing Delaunay triangulations - see the ’CGAL_include_2D.h’ or ’CGAL_include_3D.h’ header files for the definition of DT */ DT delaunayTriangulation; // call the DTFE interpolation function DTFE( &particles, samplingCoordinates, userOptions, &quantities, delaunayTriangulation ); ... // do computations using the triangulation 1 This is the case since there is no implementation inside the current DTFE version that takes the Delaunay triangulation computed on several processors and “binds” it together in just on structure. The rumors tell that it is more time consuming to “binds” the separate triangulations than to compute the full triangulation on a single processor - but I personally never checked this. 2 To run the code in parallel you would have to use the --partition + --partNo options and start each computation separately. See Sec. 3.5 for more information on doing so 3 The combination of the two options will return the Delaunay triangulation only for the data points in the partitioned region + buffer zone. 50 User guide for the DTFE code NOTE: The DTFE function will return the Delaunay triangulation of the point set and will also interpolate the fields to grid (fields selected via the --field option). In the absence of the --field option the code will still interpolate the density to grid. If you don’t want that, than you can suppress this behavior by inserting the code userOption.field.density = false; after the call userOption.readOptions(...);. One can implement the above code directly in the main function (src/main.cpp) that comes with the DTFE distribution. In that case the code compiling and build should work without additional changes in the Makefile. When compiling the above code extract using the DTFE library, one needs to supply the path for the CGAL include files (using -I CGAL headers path ) and the CGAL libraries (using -L CGAL library path -lCGAL -lboost thread) - if these are not build at the default system path. The Delaunay triangulation is made of: Vertices: these are the graph nodes and correspond to the initial point set used to build the triangulation. Edges: these are lines that connect all the neighboring vertices. Faces: these are triangles and are formed by 3 edges. For the 2D case there are no higher dimensional components of the triangulation. Cells: these are the tetrahedra of triangulation and are bounded by 4 faces. They are defined only for 3 or higher dimensional triangulations. The DTFE code uses only the vertices and faces for 2D/cells for 3D of the triangulation. For practical purposes for the 2D code we rename the faces and the faces iterators as cell and cell iterators (the renaming is done in file src/CGAL include 2D.h). So pay attention that for the 2D case the cell represent triangles and not tetrahedra. The Delaunay triangulation returned by DTFE has some additional properties compared with the standard GCAL Delaunay triangulation. The tessellation vertices have a one to one correspondence to the point set used to create the triangulation, so each vertex keeps track of the point properties to which it corresponds. This can be accessed via the info() vertex member function which links directly to the vertexData class1 . The following gives an example of how to access the different data at each Delaunay triangulation vertex (in the following vh is a Delaunay vertex handle - similar to a vertex pointer2 ): Point vh->point(): Returns a CGAL::Point structure with the coordinates of the vertex. The coordinates of the point can be accessed via the [] operator with values from 0 to N − 1, with N the number of dimensions. 1 The vertexData class is defined in src/vertexData.h file and inherits from the Data structure class. The Data structure class contains the same information as Particle data class with the exception of the point position, i.e. the function Data structure::position() is not defined. Both the Data structure class and Particle data class are defined in src/particle data.h 2 You can define a Delaunay vertex handle via Vertex handle vh;. See the files src/CGAL include 2D.h and src/CGAL include 2D.h for all the CGAL::Delaunay triangulation type definitions. 51 Marius Cautun Real1 vh->point()[i]: Returns the i-th coordinates of the vertex (with i= 0 to N − 1). Real vh->info().density(): Returns the DTFE density value corresponding to the vertex position1 . Pvector<Real,N> vh->info().velocity(): Returns the velocity vector corresponding to the vertex. Pvector<Real,N> vh->info().velocity(i): Returns the i-th component of the velocity vector corresponding to the vertex (with i=0 to N − 1). Pvector<Real,Ns > vh->info().scalar(): Returns the scalar field components for the vertex (with Ns the number of field components.). Pvector<Real,Ns > vh->info().scalar(i): Returns the i-th component of the scalar field for the vertex Pvector<Real,Ns > vh->info().myscalar(): Returns a user defined scalar field for the given component. For more information check Sec. 6.3. Real vh->info().weight(): Returns the weight associated to the vertex. bool vh->info().isDummy(): Returns true if the vertex corresponds to a dummy point used to test the completeness of the Delaunay triangulation. Dummy test points are enabled when using the Makefile option TEST PADDING. bool vh->info().hasDummyNeighbor(): Returns true if at least of the vertex neighbors is a dummy test point. If the vertex has at least one dummy point neighbor than the density estimate at th vertex position is inaccurate. Another important part of the Delaunay triangulation is given by the cell (face in 2D). Starting with a cell handle ch, one can access the cell vertices using ch->vertex(i) which returns a vertex handle to the i-th vertex of the given cell (with i=0 to N in N -dimensions). The Delaunay triangulation is stored in CGAL by keeping track of all the vertices and cells (facets in 2D) of the triangulation. This means the CGAL Delaunay triangulation class has implemented only vertex and cell iterators; the triangulation edges and faces can be reached by starting from a given vertex or cell and using special defined CGAL functions (see the CGAL documentation for more information on this). The following will show an example of computations using the Delaunay triangulation. It shows how one can compute the DTFE density at the particle positions2 (at the moment this is not yet implemented due to parallelization issues, but may be done so in a future release, 1 Real represents the data type: single or double precision floating point numbers. The vertex density value is unfiltered so is plagued by Poisson sampling noise. 2 A much simple way to get the density at the particle position is described in Sec. 6.3. 1 52 User guide for the DTFE code after a redesign of the parallel section). The following are extract from the example code that can be found at demo/examples/main particle density.cpp1 : // Compute the density at the given sample point using the Delaunay cell as input. Real computeDensity(Cell_handle &cell, Real* samplePoint) { /* get the vertex position difference matrix (= position(vertices!=base) - position(base); where ‘‘base’’ = vertex 0 of the Delaunay cell) */ Point base = cell->vertex(0)->point(); // now base stores the position of the 0-th vertex Real A[NO_DIM][NO_DIM]; vertexPositionMatrix( cell, A ); // compute the inverse of A Real AInverse[NO_DIM][NO_DIM]; matrixInverse( A, AInverse ); // compute the density gradient Real dens[NO_DIM]; //matrix to store the density differences for (int i=0; i<NO_DIM; ++i) dens[i] = cell->vertex(i+1)->info().density() - cell->vertex(0)->info().density(); Real densGrad[NO_DIM]; matrixMultiplication( AInverse, dens, densGrad ); //computes the density gradient // get the density at the sample point Real result = cell->vertex(0)->info().density(); for (int i=0; i<NO_DIM; ++i) result += (samplePoint[i]-base[i]) * densGrad[i]; return result; } // Extract from the main function: // find the density at the positions stored in vector ‘‘positions’’ vector<Real> particleDensity; // variable to store the density values at each particle position particleDensity.reserve( positions.size() ); for (size_t i=0; i<positions.size(); ++i) { // variables used by CGAL to locate the Delaunay cell where the sample point lies Locate_type lt; int li, lj; // locate the Delaunay cell where the sample point lies Point samplePoint = Point( positions[i][0], positions[i][1], positions[i][2] ); Cell_handle cell = delaunayTriangulation.locate( samplePoint , lt, li, lj ); //compute the density at the sample point particleDensity.push_back( computeDensity( cell, &(positions[i][0]) ) ); } 1 The example comes with a Makefile so, once you are in the /demo/examples directory, you can compile the code using make DTFE particle density which will create the executable DTFE particle density. You can run an example using this program via ./DTFE particle density ../z0 64.gadget test -g 64 -p. This will output the particle density to a text file called test.particleDensity. 53 Marius Cautun The above code shows how one can use the Delaunay triangulation to compute different quantities, in this case the density at the particle positions. The code contains two main parts: how to compute the density once one has the Delaunay cell (triangle in 2D and tetrahedron in 3D) in which the sample point sits while the second part shows how to find the Delaunay cell which encloses the sample point. The first part of above code extract gives a simple example of how one can use a sample point and the Delaunay cell in which it lies to interpolate the field values (in this case density) at the sample point. Interpolating at a sample point inside the Delaunay cell consists of taking the following steps: 1. Find the matrix that gives the relative positions of the vertices with respect to a given vertex called the base vertex. The relative positions matrix A in 3D is given by: ∆x1 ∆y1 ∆z1 A = ∆x2 ∆y2 ∆z2 ∆x3 ∆y3 ∆z3 where the vertices were denoted from 0 to N and xi , yi and zi give the position along each axis of vertex i. In the above expression vertex 0 is taken as the base and ∆xi = xi − x0 (similarly for ∆yi and ∆zi ). 2. Compute the inverse of A since this is what gives the field gradients inside the cell. 3. Compute the difference between the fields of interest at the vertices with respect to the base vertex (in the above example the field of interest is the density). The field difference matrix ∆f in 3D is given by: ∆f1,α ∆f1,β ... ∆f1,ω ∆f = ∆f2,α ∆f2,β ... ∆f2,ω ∆f3,α ∆f3,β ... ∆f3,ω with f a n-dimensional field and ∆fi,δ = fi,δ − f0,δ (where fi,δ is the δ-th component of field f at vertex i). 4. Compute the field gradient ∇f inside the Delaunay cell using: ∇f = A−1 ∆f. 5. Get the field values at the sample point using: f (~xsample ) = f (~xbase ) + ∇f (~xsample − ~xbase ) with ~xsample and ~xbase the position of the sample point and of the base vertex respectively. The second part of the code extract shows an example of how one can locate the Delaunay cell (face in 2D) where a sample point lies. This can be done using the DT::locate(...) function which returns a cell handle to the tetrahedron (triangle in 2D) where the sample point lies. 54 User guide for the DTFE code 6.3 Custom scalar field components The DTFE code comes with the possibility of using combinations of variables or field components when interpolating the scalar field components to grid. This method is useful when the quantity to be interpolated depends on the density at the particle position1 . This can be done by changing the function vertexData::myscalar() in file src/vertexData.h since the DTFE method uses the vertexData::myscalar() function (and not vertexData::scalar()) to interpolate the scalar field components to grid. For example an easy way to get the density at the particle positions is to use this method. For this we must: 1. Change the vertexData::myscalar() function in file src/vertexData.h to: inline Pvector<Real,noScalarComp> myScalar() { Pvector<Real,noScalarComp> temp = scalar(); temp[0] = density(); return temp; } This means that the first component of the interpolated scalar field Quantities::scalar stores the density2 . 2. Use the DTFE method using user defined sampling points - where the sampling points = particle positions. See Sec. 3.11 (note that there is no need for sampling point sizes for this example). 3. Compile the code with the Makefile options: SCALAR and N0 SCALARS=1. The scalar field component will store the density, but this will only be assigned after computing the Delaunay triangulation. 4. Run the executable with at least the program option --field scalar. This will output the density at the particle position. 6.4 More on DTFE internal classes This section gives a very short description of the classes used to store the particle data inside the DTFE code. The data are saved as Real types which can be float or double. Scalar quantities are stored as a Real value while vector/matrix quantities are stored as a Pvector<Real,n>3 object where n represents the number of components of the vector/matrix. 1 For example one needs to interpolate ρT - with ρ density and T temperature- on the grid. The density ρ at each particle position is unknown to the user since is computed using the Delaunay triangulation. 2 The interpolated density obtained this way is highly noisy since is not averaged over the entire sampling cell as in the case of the results returned by the Quantities::density variable. 3 The Pvector<type,int> class is defined in src/Pvector.h. The elements of this class are accessed using the [] operator and the class has overloaded operators for basic mathematical operations. 55 Marius Cautun The input data is saved in a vector of Particle data1 objects. Each Particle data object keeps track of the properties for a given particle. Depending on the compilation options, each particle has the following properties(N denotes the number of spatial dimensions while Ns denotes the number of components of the scalar field.): Pvector<Real,N> position(): Returns a reference to the particle’s coordinate. Real position(i): Returns a reference to the particle’s i-th coordinate (with i from 0 to N − 1). Real weight(): Returns a reference to the particle’s weight. Pvector<Real,N> velocity(): Returns a reference to the particle’s velocity. Real velocity(i): Returns a reference to the particle’s i-th velocity component (with i from 0 to N − 1). Pvector<Real,Ns > scalar(): Returns a reference to the particle’s scalar field components. Real scalar(i): Returns a reference to the particle’s i-th scalar field component (with i from 0 to Ns − 1). Real density(): Do not use this function since it does not return a valid value. The user defined sampling points are stored in the Sample point class2 . The Sample point class has defined the following member functions: Pvector<Real,N> position(): Returns a reference to the sampling point’s coordinate. Real position(i): Returns a reference to the sampling point’s i-th coordinate (with i from 0 to N − 1). Pvector<Real,N> delta(): Returns a reference to the cell size associated to the sampling point. Real delta(i): Returns a reference to the cell size along the i-th direction associated to the sampling point (with i from 0 to N − 1). 1 2 56 The Particle data class is defined in src/particle data.h. The Sample point class is defined in src/particle data.h. User guide for the DTFE code References ????, Cgal, Computational Geometry Algorithms Library, 2D and 3D Triangulation Packages, http://www.cgal.org Bernardeau, F. & van de Weygaert, R. 1996, M.N.R.A.S., 279, 693 Cautun, M., Schaap, W., & van de Weygaert, R. 2011, M.N.R.A.S., in prep. Hernquist, L. & Katz, N. 1989, The Astrophysical Journal Supplement, 70, 419 Hockney, R. W. & Eastwood, J. W. 1981, Computer Simulation Using Particles, ed. Hockney, R. W. & Eastwood, J. W. Kennel, M. B. 2004, ArXiv Physics e-prints Monaghan, J. J. 1992, Annual Review of Astronomy and Astrophysics, 30, 543 Schaap, W. E. 2007, The Delaunay Tessellation Field Estimator, PhD thesis, University of Groningen Schaap, W. E. & van de Weygaert, R. 2000, Astronomy and Astrophysics, 363, L29 van de Weygaert, R. & Schaap, W. 2009, Lecture Notes in Physics, Berlin Springer Verlag, Vol. 665, The Cosmic Web: Geometric Analysis, ed. V. J. Mart´ınez, E. Saar, E. Mart´ınezGonz´alez, & M.-J. Pons-Border´ıa, 291–413 57