1
BCMS Version 3.5 User Guide
Revision 3, September 2005 - © 2004, 2005 Web Chemistry, all rights reserved.
Welcome to the BCMS User Guide. In this guide you will find a brief description on using BCMS, and
more detailed information on the functions accessible to end users.
System Requirements
Editor's Computer:
•
•
•
•
MS Windows 95 or better (recommended: Windows 2000/XP)
Internet Explorer 6 or better
800x600 screen resolution. (1024x768 recommended)
Internet connection, preferably broadband
Web Server1
•
•
•
•
PHP version 4.3.2 or better, with built-in GD libraries
MySQL version 3.x
Apache web server
Linux platform
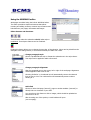
Logging in
You can log in at:
http://www.yourdomain.ext/bcms.
Enter your password, and click the 'log in' button to
continue.
You can, optionally, select the period your login
remains valid.
1
Server sofware is typically provided by your hosting company. Most linux-based hosting companies offer the
required serverside software.
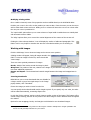
Web Content
After logging in, you will see a list of the
pages within your website.
Pages placed under 'Web Pages' are
generally available to your visitors.
Pages under 'Protected Web Pages' can
only be accessed by users after logging in on
your website2.
Pages under 'Trash Can' are not available
to visitors. They can, however, be restored
by moving them to 'Web Pages' or 'Protected
Web Pages'.
Next to each listed web page, some details
are listed, as well as 4 buttons:
Creates a new web pages, located below the current one in tree view
Deletes the web page (moves the page directly under trash)
Move the web page below another page (also used to move pages to/from 'protected')
Edit the web page using the built-in WYSIWYG editor.
Other left-menu items under Web Content3:
Images
Displays a list of images currently in your CMS. You can delete existing or upload new images here.
Documents
Displays a list of documents currently in your CMS. You can delete existing or upload new documents
here.
2
3
These pages are only available on websites that feature a log-in system.
Documents and images can also be managed while using the WYSIWYG editor.
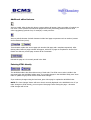
Using the WYSIWYG editor
Web pages are edited using the built-in WYSIWYG editor.
The editor provides a simple environment that allows
inserting and editing contents, common layout features and
links between your pages, documents and images.
Editor features and functions:
These buttons make the selected text bold, italics-style or
underlined. These layout features can be combined.
Clicking this button allows you to change the text color of the selection. Colors can be picked from the
examples in the dialog window, or be entered manually as HTML color codes.
Change paragraph style.
Choose a predefined text style to format the selected text in the style chosen.
Text styles can be applied to table cells as well.
Change paragraph alignment.
Align the paragraph text to the center, left or right of the web page. Alignments
can be applied to table cells as well.
Choosing 'bullet list' or 'numbered list' will automatically convert the selected
lines of text to a list. The numbered list will automatically create numbers
starting at 1.
Add a link
Choose to link a CMS page ('internal'), page on another website ('external') or
directly link to a document in your CMS.
You can also use this feature to link to images, which should be uploaded as
documents to do so.
After choosing one of the options, a small window will open.
(see next page).
Working with Links
Linking to other CMS pages
Select the text you wish to link, and choose 'internal' in the
'add link' menu.
A dialog window will appear, listing all the pages in the
CMS. Choose the page you wish to link to, and click 'insert
link'.
Linking to pages on other websites
Select the text you wish to link, and choose 'external' in the
'add link' menu.
A dialog window will appear, in which you can enter the
address (URL) of the external page. Usually, external pages
are opened in a new window, but you can choose to open the link in your website window as well.
Linking to a document
Select the text you wish to link, and choose 'document' in
the 'add link' menu.
A dialog window will appear, listing all documents stored in
the CMS. You can link to a document that is currently on
your computer by uploading it first. To do so, click 'upload a document'. You can now select the file
on your computer, press upload, and link it.
Working with tables
Tables are an important layout feature in website design. BCMS offers basic table adding and editing
features that allow you to create tables easily.
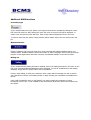
Creating a new table
From the table menu, choose 'insert new'. A dialog window
will appear where you can enter some of the table's
properties.
Rows / Columns: The number of rows and columns your new table should have.
Border: The width of the table cell borders in pixels
Spacing: The distance between adjacent cells in pixels
Margin: The margin between a cell's border and its contents
Cell width: Equal or automatic. Automatic mode scales the column width according to its contents
Alignment: The vertical position of the content of each cell4
4
The horizontal alignment of cell contents can be controlled using the 'align' menu after the table is created.
Modifying existing tables
Once a table is inserted, some of its properties can be modified directly in the WYSIWYG editor.
Position your cursor in the cell or at the position you want to alter. From the menu you can choose to
add or delete both column and rows. Adding a row or column will insert the new row or column after
the one your cursor is positioned in.
The 'equal width' option allows you to create columns of equal width in tables that were initially built
with automatic column widths.
The 'Align' options allow you to control the vertical alignment of the content of the current cell.
Clicking the 'show element borders' icon will display the outline of tables and paragraphs. This
feature can be very helpful to visualize the structure of borderless tables you are working on.
Working with images
Click the 'add image' icon to insert an image at the current cursor position.
A dialog window will appear, listing all images stored in the
CMS. To insert an image from the list, select it and click
'insert image'.
There are some optional parameters of images:
Border: Width of the border around the image in pixels
Wrap Text: The position of the text, relative to the image. If you choose to wrap text, you can also
use these additional parameters:
Hspace and Vspace: The horizontal and vertical margin between the image and wrapped text in
pixels.
Inserting thumbnails
BCMS allows you to create thumbnails that are clickable for
a larger version in just a few simple steps. In the 'image'
popup window, click 'Thumbnail'.
Choose the image you wish to insert from the list.
You can specify the thumbnails width and/or height in pixels. If you specify only one value, the other
will be scaled automatically, conserving aspect ratio.
Un-tick the 'Click to enlarge' option to simply insert a smaller version of the image. This feature offers
smooth image resizing5, and can be very useful if the same image is used in different sizes throughout
the website.
Options for text wrappings, border, and margins work identical to non-thumbnail images.
5
Using the resize feature is only preferred if the image is needed in multiple sizes. Images uploaded in the
correct size will generally load faster for your visitors.
Additional editor features
Insert a symbol. After clicking this button a popup widow will appear, listing a number of symbols you
can insert. These symbols are inserted as proper html codes, preventing problems that can arise
when copy/pasting symbols from, for example, a word processor.
Insert a prebuilt element. Prebuilt elements include html page components such as anchors, buttons
and horizontal lines (rulers).
These buttons replace the current page with another CMS page and a template respectively. After
clicking either button a popup window will appear, with a list of pages or templates to choose from.
Please note that any current page content will be overwritten.
Reloads the page as it is currently stored in the CMS.
Entering HTML directly
The WYSIWYG editor also allows direct entry of html code. The HTML source code is visible in the
gray area below the WYSIWYG editing area. If you make changes in the WYSIWYG field, press 'show
code' to update the gray HTML area to reflect these changes.
If you make any changes using the html area, press 'show page' to update the WYSIWYG view.
NOTE: The 'save changes' button will store what is currently displayed in the WYSIWYG view. If you
make changes in HTML directly, you must press 'show page' before saving the page – otherwise
HTML changes will be lost.
Additional BCMS functions
Protected pages
If your website features a log-in system, user login accounts can be managed by clicking the 'users'
link in the left menu bar. After clicking the 'users' link, a list of current users will be displayed. To
create a new user account, click 'add user'. Enter a login-name and password for the new user.
To remove users from the system, simply click the 'delete' button next to the user name in the user
list.
Website Statistics
Click the 'statistics' link in the left menu bar to view numerical and graphical statistics about your
website visitors. Available statistics include the number of visitors and page views per day and month,
top lists of referring domains and visitor countries, and detailed statistics on the last 30 visitors.
Mailing list
If your website has the mailing list feature installed, click on the mailing list button in the menu on the
left. A list of all subscribed mail addresses will be displayed. To remove an address from the mailing
database, simply click the 'delete' button next to the address.
Click on 'send mailing' to send your newsletter. Enter a topic and the message you wish to send to
your subscribers. Click the 'send mailing' button to begin sending your newsletter to all addresses in
the list.
Leave 'Add 'unsubscribe' link to e-mail' ticked if you want to enable the recipients to remove
themselves from the list – a link is added to each email which will directly remove the recipient from
the system.
Working with backups
The backup system in BCMS allows in- and export of both database contents and files. The database
backup contains all text entered through the online editor, usernames and passwords for protected
users, statistics and collected mailing addresses. The binary backup contains images and documents
uploaded through the CMS.
By clicking on the 'download backup' buttons, a backup file is created which can be stored on your
local computer. To restore a backup, click the 'restore a backup' button and upload a backup file.
Restoring a backup will delete the current CMS content, and all changes since downloading the
backup file will be lost. If a partial restoration is required, please contact Web Chemistry.
It is advised to make regular backups of the database. These backups can be used to recover from
both system damage and user errors. Binary files are usually backed up by hosting companies, and
can grow very large if your website contains many images and documents.
Tips & Tricks
WYSIWIG Editor
Line breaks & Paragraphs: Pressing 'enter' will result in a new paragraph, pressing shift-enter will
result in a line break. Use shift-enter to avoid the whitespace between texts.
Dragging/Pasting Images: Do not drag images from applications on your PC to the editor window.
Although these may show up properly on your system, they are not uploaded and therefor not
available to website visitors. To include an image from your computer, select 'upload image' in the
image dialog and proceed from there on.
Resizing images: Try not to resize images in the wysiwig editor by dragging their control box
anchors. This will work, but will result in 'grainy' images. Use the thumbnail feature to resize images
in web pages.
Importing / pasting text from a word processor: Layout features can not be pasted in web
pages directly. When pasting content from a word processor, only the plain text and paragraph
spacing is preserved.