1
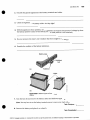
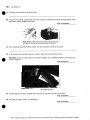
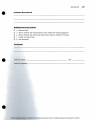
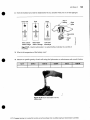
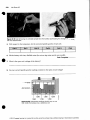
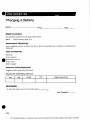
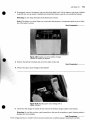
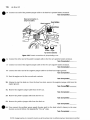
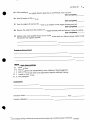
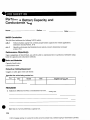
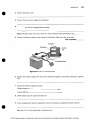
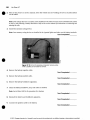
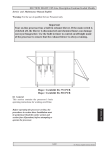
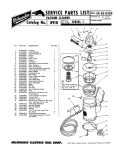
•
JOB SHEET 42
Inspecting and Cleaning the Battery Cables
and Connections
Name: -------------------------- Station: --------------------- Date: ________
NATEF Correlation
This Job Sheet addresses the following NATEF task(s):
Inspect, clean, fill, and/or replace battery, battery cables, connectors, clamps, and
holddowns. (P-1)
6.B.4
Performance Objective(s)
Upon completion of this Job Sheet, you will be able to understand how to inspect, clean, remove, and
install a battery, the cables, and holddown apparatus.
Tools and Materials
•
Voltmeter
Battery terminal cleaner/brush
Service manual
Technician's tool set
Vehicle
Baking soda or battery cleaning solution
Battery terminal remover
Wire brush
Protective Clothing/Equipment
Goggles or safety glasses with side shields
Describe the vehicle being worked on:
Year
Make
Model
VIN
Engine type and size
PROCEDURE .
1. Describe the general appearance of the battery.
•
164
© 2012, Cengage Learning, Inc. Licensed for one-time use by the purchaser only; no additional copying or retransmission is permitted.
Job Sheet 42
•
165
2. Describe the general appearance of the battery terminals and cables.
3. Check the tightness of the battery cables. Are they tight?
4. With the ignition in the on position, use the voltmeter to measure the amount of voltage drop from
the battery positive terminal to the battery positive cable (while it is still attached).
5. Do your answers from steps 3 and 4 indicate that there might be a problem?
6. Describe the condition of the battery holddown .
•
(a)
Holddown
J-bolts
Figure 26.21 Different types of battery holddowns.
7. Turn the key off and remove the battery cables and holddown apparatus.
•
Note: You may have to use the battery terminal remover to remove some stuck cables.
Task Completed _ _ __
8. Remove the battery and place it on a bench.
Task Completed _ _ __
© 2012, Cengage Learning, Inc. Licensed for one-time use by the purchaser only; no additional copying or retransmission is permitted .
166
•
Job Sheet 42
9. Describe the condition of the battery tray.
10. Using the wire brush, a baking soda and water solution, or a battery terminal cleaning solution, clean
the battery cables, holddown, and tray.
Task Completed _ _ __
Figure 27.4 A battery terminal cleaner that cleans both
the inside of the clamp and the outside of the post.
11. After cleaning, inspect the battery cables. Do they still have corrosion on them?
12. If the battery has removable caps on it, remove them and check the fluid level.
•
Warning: Do not use a flame light to look inside the battery. Use a flashlight. Batteries emit hydrogen gas,
which is explosive!
Task Completed _ _ __
Figure 26.8 This battery has removable cell caps.
13. Fill the battery with clean, distilled water (do not use tap water and do not overfill).
Task Completed _ _ __
14. Reinstall the battery, cables, and holddown.
Task Completed _ _ __
•
© 2012, Cengage Learning, Inc. Licensed for one-time use by the purchaser only; no additional copying or retransmission is permitted .
Job Sheet 42
•
167
Problems Encountered
INSTRUCTOR EVALUATION
D
D
D
D
D
4
3
2
1
0
Mastered Task
Able to Perform Task Independently; Some Additional Training Suggested
Able to Perform Task with Close Supervision; Requires Additional Training
Unable to Perform Task
Not Attempted
Comments
•
Instructor Name: - - - - - - - - - - - - - - - - - - - - - - - - Date: _ _ _ _ _ __
Instructor Signature: - - - - - - - - - - - - - - - - - - - - - - - - - - - - - - - - -
•
© 2012, Cengage Learning, Inc. Licensed for one-time use by the purchaser only; no additional copying or retransmission is permitted.
•
JOB SHEET 43
Perform a State-of-Charge Battery Test
Date: ________
Name: --------------------------- Station: ---------------------
NATEF Correlation
This Job Sheet addresses the following NATEF task(s):
Perform battery state-of-charge test; determine necessary action. (P-1 )
6.B.l
Performance Objective(s)
Upon completion of this Job Sheet, you will be able to understand how to perform a battery state-ofcharge test.
Tools and Materials
•
Voltmeter
Service manual
Hydrometer or refractometer
Technidan's tool set
Battery with removable caps
Infrared temperature gun
Protective Clothing/Equipment
Goggles or safety glasses with side shields
Describe the vehicle being worked on:
Year
Make
Model
VIN
Engine type and size
PROCEDURE
1. Remove the battery caps and check the fluid level.
Warning: Do not use a flame light to look inside the battery. Use a flashlight. Batteries emit hydrogen gas,
which is explosive!
Task Completed _ _ __
•
168
© 2012, Cengage Learning, Inc. Licensed for one-time use by the purchaser only; no additional copying or retransmission is permitted.
Job Sheet 43
•
1 &9
2. Does the battery have a built-in hydrometer? If yes, describe what you see in the sight glass.
Green dot
65% or above
state of charge
Dark
Top of
Clear
Below65%
state of charge
battery
Sight
glass
Low level
electrolyte
Figure 27.27 A built-in hydrometer in a sealed battery indicates the condition of
the battery.
3. What is the temperature of the battery case?
•
4. Measure the specific gravity of each cell using the hydrometer or refractometer and record it below.
Celll
Cell2
Cell3
Cell4
CeliS
Cell6
Figure 27.24 Draw electrolyte into the
hydrometer.
•
© 2012, Cengage Learning, Inc. Licensed for one-time use by the purchaser only; no additional copying or retransmission is permitted.
170
Job Sheet 43
•
(b)
Figure 27.30 (a) Removing an electrolyte sample from the battery. (b) Reading the strength of the sample
with the refractometer.
5. With respect to the temperature, list the corrected specific gravity of each cell.
Celll
Cell2
c•u3
Cell4
CeliS
Cell6
6. Fill the battery with clean, distilled water (do not use tap water and do not overfill).
Task Completed _ _ __
What is the open drcuit voltage of the battery?
8. Do your corrected spedfic gravity readings correlate to the open circuit voltage?
Acid content
1.260
1 .260
•
1.260
1.195
1.250
1.250
Figure 27.26 Hydrometer readings should vary no more
than 0.050. This battery has a defective cell .
© 2012, Cengage Learning, Inc. Licensed for one-time use by the purchaser only; no additional copying or retransmission is permitted .
Job Sheet 43
•
171
9. Based on your testing, does the battery require replacement or recharging?
Problems Encountered
INSTRUCTOR EVALUATION
D 4 Mastered Task
D 3 Able to Perform Task Independently; Some Additional Training Suggested
D 2 Able to Perform Task with Close Supervision; Requires Additional Training
D 1 Unable to Perform Task
D 0 Not Attempted
•
Comments
InstructorName: ------------------------------------------------
Date: ______________
Instructor Signature: -----------------------------------------------------------------
•
© 2012, Cengage Learning, Inc. Licensed for one-time use by the purchaser only; no additional copying or retransmission is permitted .
•
JOB SHEET 44
Charging a Battery
Name: --------------------------- Station:--------------------- Date: ________
NATEF Correlation
This Job Sheet addresses the following NATEF task(s):
Perform battery charge. (P-1)
6.B.5
Performance Objective(s)
Upon completion of this Job Sheet, you will be able to understand how to perform a battery state-ofcharge test.
Tools and Materials
•
Voltmeter
Service manual
Technician's tool set
Fender cover
Battery charger
Protective Clothing/Equipment
Goggles or safety glasses with side shields
Describe the vehicle being worked on:
Year
Make
Model
VIN
Engine type and size
PROCEDURE
1. Place the fender covers on the fender closest to the battery.
Task Completed _____
•
172
© 2012, Cengage Learning, Inc. Licensed for one-time use by the purchaser only; no additional copying or retransmission is permitted .
Job Sheet 44
•
173
2. If equipped, remove the battery caps and check the fluid level. Fill the battery with clean, distilled
water (do not use tap water) if needed and reinstall the battery caps (do not overfill the battery).
Warning: Do not charge the battery if the fluid inside is frozen!
Note: If the battery is a sealed design, use a noncontact thermometer or a temperature probe to get an indica-
tion if the battery is frozen.
Task Completed _ _ __
•
Figure 3.28 Careless use of the battery charger
caused this battery to explode .
3. Remove the battery terminals and move the cables to the side.
Task Completed _ _ __
4. What is the open circuit voltage of the battery?
•
Figure 27.32 Reading open circuit voltage with a
digital voltmeter.
5. Check that the charger is turned off and connect the battery charger cables to the battery.
Warning: Be sure that you have a good connection so that you do not produce a spark. Batteries produce a
hydrogen gas when charging.
Task Completed _ _ __
© 2012, Cengage Learning, Inc. Licensed for one-time use by the purchaser only; no additional copying or retransmission is permitted.
Job Sheet 44
174
Turn the charger on to the setting for a slow charge. What is the amperage on this setting and how
long would you leave it on?
7. Turn the charger on to the setting for a fast charge. What is the amperage on this setting and how
long would you leave it on?
8. Explain the situations in which you would use a slow charge or a fast charge.
Problems Encountered
INSTRUCTOR EVALUATION
•
0
0
0
0
0
4
3
2
1
0
Mastered Task
Able to Perform Task Independently; Some Additional Training Suggested
Able to Perform Task with Close Supervision; Requires Additional Training
Unable to Perform Task
Not Attempted
Comments
Instructor Name: - - - - - - - - - - - - - - - - - - - - - - - - Date: _ _ _ _ _ __
Instructor Signature: - - - - - - - - - - - - - - - - - - - - - - - - - - - - - - - - -
•
© 2012, Cengage Learning, Inc. Licensed for one-time use by the purchaser only; no additional copying or retransmission is permitted.
•
JOB SHEET 45
Jump-Starting a Battery
Name: ______________
Station: _ _ _ _ _ _ _ _ _ __
Date: _ _ __
NATEF Correlation
This Job Sheet addresses the following NATEF task(s):
6.B.6
Start a vehicle using jumper cables or an auxiliary power supply. (P-2)
Performance Objective(s)
Upon completion of this Job Sheet, you will be able to understand how to properly jump-start a vehicle
using a live battery in a vehicle and an auxiliary power supply (booster pack).
Tools and Materials
•
Battery jumper cables
Vehicle with a live battery
Vehicle with a dead battery
Auxiliary power supply (booster pack)
Protective Clothing/Equipment
Goggles or safety glasses with side shields
Describe the vehicle being worked on:
Year
Make
Model
VIN
Engine type and size
PROCEDURE
1. What are the gauge size and length of the battery jumper cables you are using?
2. Position the vehicle with the live battery so that the jumper cables will not be stretched.
Task Completed _ _ __
3. Open the hood of both vehicles.
Task Completed _ _ __
•
4. Make sure that the ignition is in the off position on both vehicles.
Task Completed _ _ __
175
© 2012, Cengage Learning, Inc. Licensed for one-time use by the purchaser only; no additional copying or retransmission is permitted .
176
Job Sheet 45
Connect one end of the positive jumper cable to the dead car's positive battery terminal.
Task Completed _ _ __
Make last connection, 4,
away from battery
Black (negative)
Good battery
NEGa·ePOS
Smaller Larger
Top-terminal batteries
Figure 3.29 Correct connections for jump-starting a car.
Connect the other end of the positive jumper cable to the live car's positive battery terminal.
Task Completed _ _ __
7. Connect one end of the negative jumper cable to the live car's negative battery terminal.
Task Completed _ _ __
8. Connect the other end of the negative jumper cable to the dead car's engine ground.
Task Completed _ _ __
9. Start the engine on the live car and wait a minute.
Task Completed _ _ __
10. Attempt to start the dead car. Once the dead car starts, remove the negative jumper cable from the
engine ground.
Task Completed _ _ __
11. Remove the negative jumper cable from the live car.
Task Completed _ _ __
12. Remove the positive jumper cable from the live car.
Task Completed _ _ __
13. Remove the positive jumper cable from the dead car.
Task Completed _ _ __
•
14. Now connect the auxiliary power supply (booster pack) to the dead vehicle's battery in the same
manner as you did before, but skipping the "live car" steps.
Task Completed _ _ __
© 2012, Cengage Learning, Inc. licensed for one-time use by the purchaser only; no additional copying or retransmission is permitted .
Job Sheet 45
•
177
15. If the auxiliary power supply (booster pack) has an on/off switch, tum it on now.
Task Completed _ _ __
16. Start the engine of the dead car.
Task Completed _ _ __
17. Tum the engine off and turn the switch on the auxiliary power supply (booster pack) off.
Task Completed _ _ __
18. Remove the cables from the auxiliary power supply (booster pack) and remove it from the vehicle.
Task Completed _ _ __
19. Explain what could possibly happen if you connected the dead car's battery jumper cables to both
the positive and negative terminals.
Problems Encountered
•
INSTRUCTOR EVALUATION
D
D
D
D
D
4
3
2
1
0
Mastered Task
Able to Perform Task Independently; Some Additional Training Suggested
Able to Perform Task with Close Supervision; Requires Additional Training
Unable to Perform Task
Not Attempted
Comments
Instructor Name: - - - - - - - - - - - - - - - - - - - - - - - Date: _ _ _ _ _ __
InstructorSignature: - - - - - - - - - - - - - - - - - - - - - - - - - - - - - - - - -
•
© 2012, Cengage Learning, Inc. Licensed for one-time use by the purchaser only; no additional copying or retransmission is permitted.
•
JOB SHEET 46
Perform a Battery Capacity and
Conductance Test
Name: --------------------------- Station:--------------------- Date: ________
NATEF Correlation
This Job Sheet addresses the following NATEF task(s):
6.B.2
Perform battery capacity test; confirm proper battery capacity for vehicle application;
determine necessary action. (P-1)
6.A.2
Identify and interpret electrical/electronic system concern; determine necessary
action. (P-1)
Performance Objective(s)
Upon completion of this Job Sheet, you will be able to understand how to perform a battery test using
both the capacity and conductance methods .
•
Tools and Materials
Capacity (load) tester
Conductance tester
Protective Clothing/Equipment
Goggles or safety glasses with side shields
Describe the vehicle being worked on:
Year
Make
Model
VIN
Engine type and size
PROCEDURE
1. Explain the difference between a conductance test and a capacity test .
•
Note: Steps 2-8 are for perfonning a capacity test.
178
© 2012, Cengage Learning, Inc. Licensed for one-time use by the purchaser only; no additional copying or retransmission is permitted.
Job Sheet 46
•
179
2. What is the battery CCA?
3. What is the open circuit voltage of the battery?
4. Does the battery require charging before testing?
Note: If the battery open circuit is less than 12.4 volts, recharge it before performing the capacity test.
5. Connect the battery capacity tester clamps to the battery. Make sure they are on tight.
Task Completed _ _ __
Ammeter
Voltmeter
•
Carbon
pile
Inductive pickup
"'
@
"'
~
~
=
~
l'l
g
Figure 27.41 Parts of a volt-amp tester.
6. Based on the battery rating, how much load should be applied to the battery during the capacity
test?
7. Conduct the battery capacity load test.
Voltage dropped t o - - - - - - - - - - - - - - - volts
Load was held f o r - - - - - - - - - - - - - - - - seconds
8. Did the battery pass the capacity (load) test?
•
9. Is there enough power (current capacity) to meet the minimum requirements for this vehicle?
Note: Steps 10-13 are for performing a conductance test.
© 2012, Cengage Learning, Inc. Licensed for one-time use by the purchaser only; no additional copying or retransmission is permitted.
180
•
Job Sheet 46
10. Connect the battery conductance tester to the battery terminals.
Task Completed _ _ __
11. Follow the tester's instructions by entering the CCA into the tester screen.
Task Completed _ _ __
12. Conduct the battery conductance test.
Task Completed _ _ __
13. What were the results of the test?
14. If this Job Sheet is for a live customer, do you think that this testing series provides sufficient infor-
mation to determine the customer's problem? Why or why not?
Problems Encountered
•--------------------INSTRUCTOR EVALUATION
D
D
D
D
D
4
3
2
1
0
Mastered Task
Able to Perform Task Independently; Some Additional Training Suggested
Able to Perform Task with Close Supervision; Requires Additional Training
Unable to Perform Task
Not Attempted
Comments
Instructor Name: - - - - - - - - - - - - - - - - - - - - - - - - Date: _______
Instructor Signature: - - - - - - - - - - - - - - - - - - - - - - - - - - - - - - - - -
•
© 2012, Cengage Learning, Inc. Licensed for one-time use by the purchaser only; no additional copying or retransmission is permitted.
•
JOB SHEET 47
Battery Removal and Installation
Name: ---------------------------- Station:---------------------- Date: _____
NATEF Correlation
This Job Sheet addresses the following NATEF task(s):
6.B.3
6.B.8
Maintain or restore electronic memory functions. (P-1)
Identify electronic modules, security systems, radios, and other accessories that require
reinitialization or code entry following battery disconnect. (P-1)
6.B.4
Inspect, clean, fill, and/or replace battery, battery cables, connectors, clamps, and
holddowns. (P-1)
Performance Objective(s)
•
Upon completion of this Job Sheet, you will be able to understand how to remove and reinstall a battery
and how to use a memory saving device .
Tools and Materials
Service manual
Technician's tool set
Vehicle
Memory saving device
Protective Clothing/Equipment
Goggles or safety glasses with side shields
Describe the vehicle being worked on:
Year
Make
Model
VIN
Engine type and size
PROCEDURE
1. Record the radio station presets .
•
181
© 2012, Cengage Learning, Inc. Licensed for one-time use by the purchaser only; no additional copying or retransmission is permitted.
182
Job Sheet 47
Refer to the owner's or service manual. Does the vehicle you are working on have a security system
on the radio?
Note: If the vehicle does have a security system installed on the radio you may need to reinitialize the system
or enter a code following a battery disconnect. Refer to the service manual for instructions on retrieving and
entering the code.
3. Install the memory saving device.
Note: Some memory saving devices are installed in the cigarette lighter and others use the battery terminals.
Task Completed _ _ __
•
Figure 27.10 A tool for keeping computer memory alive
while a battery is removed for service.
4. Remove the battery negative cable.
Task Completed _ _ __
5. Remove the battery positive cable.
Task Completed _ _ __
6. Remove the battery holddown apparatus.
Task Completed _ _ __
7. Clean the battery holddown, tray, and cables as needed.
Note: See fob Sheet #42 for the procedures for cleaning.
Task Completed _ _ __
8. Reinstall the battery and holddown apparatus.
Task Completed _ _ __
•
9. Connect the positive cable to the battery.
Task Completed _ _ __
© 2012, Cengage Learning, Inc. Licensed for one-time use by the purchaser only; no additional copying or retransmission is permitted.
Job Sheet 47
•
183
10. Connect the negative cable to the battery.
Task Completed _ _ __
11. Remove the memory saving device. Did the memory saving device work?
12. If the memory saving device did not work, you will need to set the radio station presets, clock(s), and
seat memory positions.
Task Completed _ _ __
Problems Encountered
INSTRUCTOR EVALUATION
•
D
D
D
D
D
4
3
2
1
0
Mastered Task
Able to Perform Task Independently; Some Additional Training Suggested
Able to Perform Task with Close Supervision; Requires Additional Training
Unable to Perform Task
Not Attempted
Comments
InstructorName: ------------------------------------------------
Date: ______________
Instructor Signature: ------------------------------------------------------------------
•
© 2012, Cengage Learning, Inc. Licensed for one-time use by the purchaser only; no additional copying or retransmission is permitted.
•
JOB SHEET 48
Identifying Hybrid Electric Vehicle High-Voltage
Circuits, Safety, and Precautions
Name: --------------------------- Station: --------------------- Date: ________
NATEF Correlation
This Job Sheet addresses the following NATEF task(s):
6.8.7
Identify high-voltage circuits of electric or hybrid electric vehicle and related safety
precautions. (P-3)
6.8.9
Identify hybrid vehicle auxiliary (12v) battery service, repair, and test procedures. (P-3)
8.F.7
Identify hybrid vehicle internal combustion engine service precautions. (P-3)
Performance Objective(s)
•
Upon completion of this Job Sheet, you will be able to describe how to safely handle and identify a hybrid
electric vehicle and related components.
Tools and Materials
Service manual
High-voltage gloves
Protective Clothing/Equipment
Goggles or safety glasses with side shields
Describe the vehicle being worked on:
Year
Make
Model
VIN
Engine type and size
PROCEDURE
1. Describe the location of"the high-voltage service plug (also known as the disconnect plug).
•
2. Gain access to the service switch .
184
© 2012, Cengage Learning, Inc. Licensed for one-time use by the purchaser only; no additional copying or retransmission is permitted.
Job Sheet 48
•
185
3. Compare those readings to what the manufacturer specifies. Is there a difference?
4. Do the pressure readings indicate that the warning light should be on?
5. Gain access to the service manual. Describe how this specific type of TPMS works.
Task Completed _ _ __
Problems Encountered
•
INSTRUCTOR EVALUATION
4
3
D 2
D 1
D 0
D
D
Mastered Task
Able to Perform Task Independently; Some Additional Training Suggested
Able to Perform Task with Close Supervision; Requires Additional Training
Unable to Perform Task
Not Attempted
Comments
Instructor Name: - - - - - - - - - - - - - - - - - - - - - - - - Date: _ _ _ _ _ __
Instructor Signature: - - - - - - - - - - - - - - - - - - - - - - - - - - - - - - - - -
•
© 2012, Cengage Learning, Inc. Licensed for one-time use by the purchaser only; no additional copying or retransmission is permitted.