Transcript
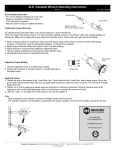
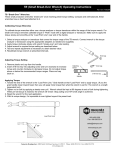
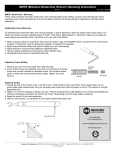
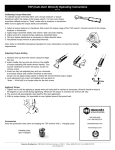
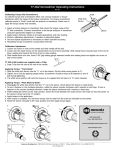
WSTT (Weld Stud Test Tool) Operating Instructions
Rev 1.0
Testing Weld Studs
1. The Weld Stud Test Tool is designed for use during the production
of sheet metal products to test the strength and integrity of welds
used to attach threaded studs to the sheet metal.
2. Attach the appropriate “End Fitting” for the weld stud.
3. Apply a straight pull of the WSTT wrench (no side load). When the
wrench breaks-over and the weld stud is still attached then it passed.
If the weld stud breaks off - then it failed.
Calibrating and Adjusting Torque Setting
1. Take the “Setting Adapter” (3/8 Square Drive) and weld a weld stud to it.
Make sure to use the same size weld stud that the tool will be used on.
2. Select a torque analyzer or transducer that covers the torque range of
the WSTT wrench. Insert setting adapter to the torque analyzer or transducer.
3. Connect WSTT to setting adapter. Apply a straight pull slowly until wrench
breaks-over and note reading (no side load).
4. Adjust wrench to required torque setting. Remove end cap.
5. Use a hex key and unlock the setting.
6. Insert the adjusting key. Turn clockwise to increase torque
and counter clockwise to decrease torque. Do not adjust
torque above or below the recommended torque ranges.
7. Use a hex key and lock the setting.
8. Connect WSTT to setting adapter. Apply a straight pull
slowly until wrench breaks-over and note reading
Setting Adapter
(no side load).
Item # 020572
9. Once the desired torque is set, tighten end cap back on.
2
6
1
4
3
7
Corporate Headquarters: 1080 North 11th Street, San Jose, CA 95112
www.etorque.com
5
8
Phone: (408) 292-2214 Fax: (408) 292-2733
9