1
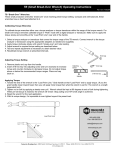
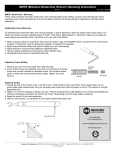
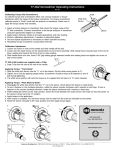
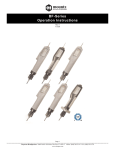
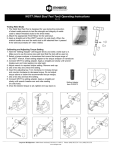
SLO Insulated Wrench Operating Instructions
Rev 1.0
SLO Insulated Wrenches
- For use on electrical systems up to 50 volts.
- Reduces possibility of shorting or shock.
- PVC heat shrink insulation.
- May be used for torque on battery terminals.
Calibrating Torque Wrenches
Ref. Item # 500204
Insulated Boot
Torque Scale
Double insulation:
Red inside & Yellow outside
To calibrate torque wrenches either use a torque analyzer or torque transducer
within the range of the torque wrench. For click wrenches calibrate torque in “First Peak” mode with a digital analyzer or
transducer. Make sure to apply the torque slowly and smoothly at the “Load Point Line” near end of the handle.
1. Select a torque analyzer or transducer that covers the torque range of the wrench. Connect wrench to the torque
analyzer or transducer using the appropriate adapters as needed (not supplied).
2. Apply torque clockwise slowly until wrench ‘clicks’ and note reading.
3. Adjust wrench to required torque setting as described below.
4. Test and repeat adjustment as necessary to obtain desired value.
5. Recalibrate torque wrench at prescribed intervals.
Adjustement
Knob
Adjusting Torque Setting
1. Use the adjustment knob to change torque setting.
2. Swing lever clockwise to increase torque or counterclockwise to
decrease torque.
Torque Scale
Applying Torque
1. Toward the end of the wrench is the “Load Point Line.” Grab handle at that “Load Point” end to apply torque. (If you the
grab handle closer toward head, then you will apply more torque than what the wrench is set for. The wrench is a length
dependent tool).
2. Tighten nut or bolt by applying a steady even pull using built in ratchet as necessary. Wrench should be kept at 90
degrees to axis of bolt during tightening. When pre-set torque is reached, the wrench will ‘click.’
3. After the “click”, do not apply any more torque or you will over tighten it.
Note:
- Best protection for the operator is using an insulated socket with the wrench.
- For operator protection, red insulation is underneath the yellow insulation. Once the red is visible, remove for service.
800-456-1828
Fax: 408-292-2214
[email protected]
www.etorque.com
ISO 9001
Corporate Headquarters: 1080 North 11th Street, San Jose, CA 95112
www.etorque.com
Phone: (408) 292-2214 Fax: (408) 292-2733
TSN Insulated Wrench Operating Instructions
Rev 1.0
TSN Insulated Wrenches
For any application which requires the tightening of fasteners under
“electrically live” situations. The TSN wrench head and handle are
securely insulated for protecting the operator. The TSN wrench is
then preset to the customers requirements and the handle end is
effectively sealed using a heat shrink end cap, hot melt adhered to
the handle tube, The normal hand grip is then assembled over the
heat shrink end cap providing additional protection.
Insulated Boot
1000 Volt Insulation
IEC 900 - ESI 26-3
Calibrating Torque Wrenches
To calibrate torque wrenches either use a torque analyzer or torque transducer within the range of the torque
wrench. For cam-over torque wrenches calibrate torque in “Peak” mode with an analyzer or transducer. Make sure
you apply the torque slowly and smoothly.
Adjusting
Key
1. Select a torque analyzer or transducer that covers the torque range of the TSN
wrench. Connect wrench to the torque analyzer or transducer.
2. Apply torque clockwise slowly until wrench ‘slips’ and note reading.
3. Adjust wrench to required torque setting.
4. Test and repeat adjustment as necessary to obtain desired value.
5. Recalibrate torque wrench at prescribed intervals.
Adjusting Torque Setting
1. Remove rubber handle grip. Then remove the sealed heat shrink cap.
2. Remove end cap from wrench and insert special adjusting key.
3. The special Adjusting Key is an articulated design. When in use the two
halves are set at 90º, this allows downward force to be exerted on the
Sliding Lock while rotating the Adjusting Screw.
4. Turn clockwise to increase torque and counter clockwise to decrease
torque. Do not adjust torque above or below the recommended
torque ranges. Tighten end cap back on.
5. Then seal the end cap with heat shrink end cap (hot melt adhered to the
handle tube). Then assemble rubber hand grip over the heat shrink end cap.
Adjusting
Key
Applying Torque
1. Tighten nut or bolt by applying a steady even pull using built in ratchet as necessary. Wrench should be kept at
90 degrees to axis of bolt during tightening. When pre-set torque is reached, the wrench will ‘slip.’
2. The wrench will automatically reset itself for the next application.
3. With its unique design, it’s impossible to over tighten beyond the preset load.
800-456-1828
Fax: 408-292-2214
[email protected]
www.etorque.com
ISO 9001
Corporate Headquarters: 1080 North 11th Street, San Jose, CA 95112
www.etorque.com
Phone: (408) 292-2214 Fax: (408) 292-2733