1
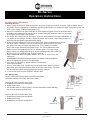
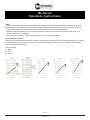
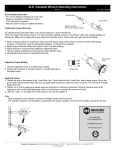
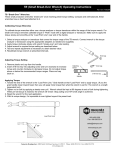
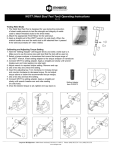
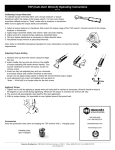
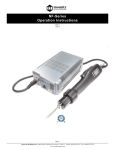
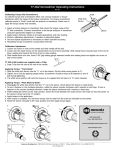
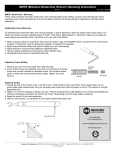
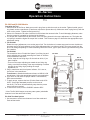
BL-Series
Operation Instructions
Rev 2
11.3.08
BL-2000 and BL-3000 Models
Operating the Tool
1. Attach cord to the BL Driver. Make sure notch in plug lines up with the notch on the socket. Tighten knurled ground
ring. Attach cord to a transformer (Transformer required to operate the tool). Make sure notch in plug lines up with the
notch on the socket. Tighten knurled ground ring.
2. Select a bit. Retract the bit collar. Insert the bit and release the retracted collar. To avoid damaging fasteners, make
sure the proper bit is suitable for the head of the fastener.
3. The torque limit is determined by the tension of the coil spring housed in the torque adjustment nut. The tighter the
coil spring is wound the higher the torque limit is raised. See Charts on page 3 to determine the appropriate torque
adjustment setting.
4. For BL-3000
Rotate the torque adjustment nut to set the torque limit. Turn clockwise to increase torque and counter clockwise to
decrease torque.The scale adjacent to the Torque Adjustment Nut is a reference guide. The torque output from the
driver can change depending on various fastening factors like friction, type of joint, and the type material being used
like a washer.
For BL-2000
The screwdriver has a “Double Nut System” (nut fixing ring and
BL-2000
BL-3000
torque adjusting nut) to avoid loosening from shock or vibration
to the screwdriver. See Dia A.
Dia. B
- At first, keep the nut fixing ring to fit the scale at which, if you
for BL-3000
Cord
want to adjust.
- Then turn the torque adjusting nut toward the nut fixing ring.
- Lastly, to avoid the loosening of the torque adjusting nut fasten
Joint Ring
strongly the nut fixing ring by holding the torque
adjustment nut.
5. Plug in transformer and check power indicator. If it is not on,
Switch Lever
check fuse in the transformer.
Transformers - Standard transformers feature a HIGH & LOW
speed button. Select the appropriate speed for your application.
6. Turn driver on and check for proper rotation. FOR-clockwise,
REV-counterclockwise.
7. To apply torque, squeeze the lever (Push-to-Start mode of BLAdjusting Bolt
3000* - place light downward pressure on the nose of
(torque adjusting
the driver). The driver will automatically stop when the preset
scale
torque has been reached.
Dia. A
8. To remove the screw, turn the FOR/REV switch to REV.
Torque Adjusting Nut
* Note: The BL-3000 features a two-way start system (switchable
between Lever Start and Push-to-Start)
BL-3000 Two-Start System
1. Use tweezers to switch lever between Lever Start mode and
Push-to-Start mode.
Joint Shaft Collar
Bit
Torque Cover
Page 1
Corporate Headquarters: 1080 North 11th Street, San Jose, CA 95112
www.etorque.com
Phone: (408) 292-2214 Fax: (408) 292-2733
for BL-2000
BL-Series
Operation Instructions
BL-5000 and BL-7000 Models
Operating the Tool
1. Attach cord to the BL Driver. Make sure notch in plug lines up with the notch on the socket. Tighten knurled ground
ring. Attach cord to a transformer (Transformer required to operate the tool). Make sure notch in plug lines up with the
notch on the socket. Tighten knurled ground ring.
2. Select a bit. Retract the bit collar. Slide the bit collar forward and insert the bit into bit-socket of the
screwdriver and release the bit sleeve (Dia A). To avoid damaging fasteners, make sure the proper
bit is suitable for the head of the fastener.
3. The torque limit is determined by the tension of the coil spring housed in the torque adjustment nut.
The tighter the coil spring is wound the higher the torque limit is raised. See Charts on page 3 to
Dia. A
determine the appropriate torque adjustment setting.
4 Rotate the torque adjustment nut to set the torque limit. Torque is adjusted on the side of
the driver (Dia B). Using the 5mm hex key that was provided with driver, insert into
Dia. B
the rubber hole to access Torque Adjustment Nut. Turn clockwise to increase
torque and counter clockwise to decrease torque. The Torque Adjustment Scale
adjacent to the Torque Adjustment Nut is a reference guide. The torque output
from the driver can change depending on various fastening factors like friction, type
of joint, and the type material being used like a washer.
5. Plug in transformer and check power indicator. If it is not on, check fuse in the
transformer.
Torque
Transformers - Standard transformers feature a HIGH & LOW speed button.
Adjustment
Select the appropriate speed for your application.
Scale
6. Turn driver on and check for proper rotation. FOR-clockwise,
REV-counterclockwise.
7. When in Lever Start mode, squeeze the lever to apply torque. When in Push-toStart mode, place light downward pressure on the nose of the driver). The driver
Hex Key
will automatically stop when the preset torque has been reached.
8. To remove the screw, turn the FOR/REV switch to REV.
Two-Start System
The BL-5000 and BL-7000 features a two-way start system
(switchable between Lever Start and Push-to-Start).
Switching BL-5000 to push-to-start mode.
1. Rotate the hex head screw and detach.
2. Detach switch lever.
3. Set the start switch to “PUSH” position. Use the screwdriver without attaching
the hex head screw and switch lever.
Switching BL-7000 to push-to-start mode.
1. Rotate the hex head screw and detach.
2. Detach switch lever.
3. Reattach the switch lever upside down
Hex Head
Screw
Switch Lever
Hex Head Screw
Switch Lever
Switch Lever
upside down
Page 2
Corporate Headquarters: 1080 North 11th Street, San Jose, CA 95112
www.etorque.com
Phone: (408) 292-2214 Fax: (408) 292-2733
BL-Series
Operation Instructions
CARE
1. The BL-Series screwdrivers are a precision torque control instrument and should be handled with care at all times.
2. Only use the transformers listed in the Mountz catalog for appropriate BL driver model (If you have any questions
regarding the appropriate transformer set-up, contact Mountz Customer Service Department).
3. Operate under safe conditions. Do not place in operation where such objects as hair, strings, clothing, etc. can
become tangled in the rotating bit.
4. Keep away from moisture. Never use in high humid, moist or damp environment.
Torque Reference Charts
The torque is externally adjusted within the range of the driver by a simple twist of the torque adjustment nut. The charts
are used to determine the torque of a specific tool and torque spring combination at a given setting. Figures below for
each chart indicate scale setting.
Color of Springs:
K = Black
S = Silver
Y = Yellow
Page 3
Corporate Headquarters: 1080 North 11th Street, San Jose, CA 95112
www.etorque.com
Phone: (408) 292-2214 Fax: (408) 292-2733
BL-Series
Operation Instructions
Testing Power Tools:
1. Application Method: Use a torque analyzer in “Peak Mode” with a rotary transducer between the power tool and the actual
application. This is the best way to test since you are using the actual joint as the test station. You will see the actual
torque applied to the fastener. Caution: Variances in tool performance may occur do to the addition of the rotary transducer.
2. Simulated Method: Always use a quality joint rate simulator (run down adapter) with a torque analyzer when testing power
tools in a simulated application. Use Joint rate and Breakaway methods to obtain most accurate torque readings in a
simulated rundown.
Service
Mountz Inc. features an experienced calibration and repair staff. Our trained technicians can calibrate and repair most any tool.
Mountz provides rapid service with quality that you can trust as we offer three state-of-the-art calibration lab and repair facilities that
can calibrate up to 20,000 lbf.ft.
With over 40 years of experience, Mountz’s in-depth knowledge of torque is reflected in our tool’s craftsmanship and our ability to provide solutions to both common and uncommon torque applications. We perform calibrations in accordance with ANSI/NCSL-Z540. Mountz is dedicated
solely to the manufacturing, marketing and servicing of high quality torque
Mountz Service Locations
tools.
Eastern Service Center
Tool Service & Repair Capability
Torque Wrenches: Click, Dial, Beam, Cam-Over & Break-Over
19051 Underwood Rd.
Foley, AL 36535
Phone: (251) 943-4125
Fax: (251) 943-4979
Torque Screwdrivers: Dial, Micrometer, Preset & Adjustable
Torque Analyzers/Sensors: All brands
Western Service Center
Electric Screwdrivers: All brands
Air Tools: All brands
Impact Wrenches, Drills, Pulse Tools, Grinders, Percussive Tools,
Air Screwdrivers, Nutrunners, DC Controlled Nutrunners
Torque Multipliers: All brands
1080 N.11th Street
San Jose, CA 95112
Phone: (408) 292-2214
Fax: (408) 292-2733
Mexico Service Center
Mountz Mexico SA de CV Chihuahua
Av. Cristobal Colon #15343
Col. Paseos de Chihuahua
Chihuahua, Chih. Mexico CP 31125
Phone: (614) 481-0023
Fax: (614) 481-0053
www.etorque.com
Download a “Service Form” and include a copy
when you send the tools in to be serviced.
Page 14
Corporate Headquarters: 1080 North 11th Street, San Jose, CA 95112
www.etorque.com
Phone: (408) 292-2214 Fax: (408) 292-2733