1
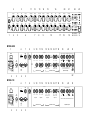
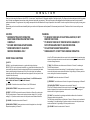
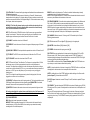
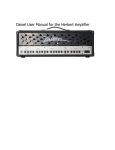
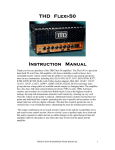
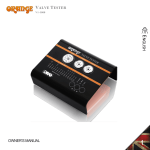
OPERATING INSTRUCTIONS 2008 Koch Guitar Electronics GB We, Koch Guitar Electronics, Neonweg 27, 3812RG Amersfoort, The Netherlands, declare under our sole responsibility that the product: Guitar Amplifier To which this declaration relates is in conformity with the following harmonized standards: * EN 50081-1 [1991] Electromagnetic compatibility. Generic emission standard. Part 1 : residential, commercial and light industry; * EN 50082-1 [1991] Electromagnetic compatibility. General immunity standard. Part 1 : residential, domestic and light industrial environment; * EN 60065-1 [1993] Household electronic apparatus Part 7 : Heating under normal operating conditions * EN 60335-1 [1988] Safety of household and similar electrical appliances. Part 1 : general requirements following the provisions of Council Directive 98/336/EEC on the approximation of the laws of the Member States relating to electromagnetic compatibility and the provisions of Council Directive 73/23/EEC on the approximation of the laws of the Member States relating to low voltage and electrical safety. Amersfoort, 1 December 2007 Dolf Koch 2 3 Volume Bass Mid Treble 11 12 13 14 15 High Gain Volume Ultra Gain Volume Presence 16 Bass Mid Treble 20 21 Master-1 Master-2 22 23 H Bass Mid CHs OTS S-1 S-2 M L Hi-Cut Speaker Damping Master Reverb STORE Bright Inputs Voicing 1 10 0 Normal Drive +5 -5 +5 -5 Volume +5 -5 Bass Mid 4 0 10 10 0 Treble 5 Gain 10 0 Volume 10 0 +5 -5 Presence +5 -5 Bass +5 -5 Mid Treble +5 -5 OTS Drive 10 0 OTS Volume 10 0 Spring Reverb Power Standby FX Loops Bright Clean 2 0 1 10 0 4 10 -5 +5 5 MODEL 6060 1 -5 +5 -5 3 +5 0 10 6 6 7 7 8 9 0 10 -5 +5 8 10 -5 +5 -5 9 11 12 +5 -5 +5 0 10 13 14 15 16 17 18 1 2 3 4 5 6 Off On VAC: 100 115 230 Level (Mono) Mute-to-Tune FX Mute HT Fuse 0 18 19 To Tuner To FX From FX To FX From FX To FX From FX 24 25 26 27 29 30 31 32 19 20 21 Level To FX 1x 4 2x 8 From FX 1x 8 2x16 16 R AT1.25A In Ceramic (or) Fuse - 100/120V: 6.3A (T) Level Thru Loop S1 FS6 220/240V: 3.15A 2 MIDI MODEL 120 1 Power 4 5 6 7 Loop P2 Mute switch on To-FX Stereo mode: 2x 60 Watts Output Power Mono mode: 60 Watts Output Power (L) Parallel FX Loops Speaker Outputs On Stereo Off Mono R Power Amp 22 8 9 10 11 12 13 14 15 16 17 18 19 -10 dBV Signal Level FS2 MIDI Level Loop P1 Mute switch on From-FX Serial FX Loops Channels Master 1/2 3 Loop S2 20 21 120 Watts Output Power 1 2 3 4 5 6 Off On on Channel Select 50/60 Hz, 250 Watts VAC: 100 115 230 Mute-to-Tune FX Mute HT Fuse Level To Tuner To FX From FX Loop S1 AT1.25A In Ceramic (or) Fuse - 100/120V: 6.3A (T) 4 Loop S2 Serial FX Loops Channels Master 1/2 3 From FX To FX From FX Level To FX From FX Mute switch on From-FX Mute switch on To-FX Loop P1 Loop P2 1x 4 2x 8 1x 8 2x16 5 Parallel FX Loops 16 ALWAYS CONNECT SPEAKERS BEFORE USE !!! Thru FS6 220/240V: 3.15A 2 MIDI To FX P-2 10 L on Channel Select 50/60 Hz, 250 Watts 10 ALWAYS CONNECT SPEAKERS BEFORE USE !!! FS2 MIDI 0 17 -10 dBV Signal Level Power 10 P-1 Speaker Outputs 28 33 E N G L I S H Thank you for choosing the Supernova from KOCH. You now own a "state-of-the-art" all-tube guitar amplifier of the highest quality. The Supernova has been designed and built by people who - from their own experience as musicians - take guitar sound and quality very seriously. That is why this product was designed and built with the utmost care in order to meet all professional standards. Our goal was not only to design an amp which sounds fantastic and is easy to operate, but also to build it in such a way that it will serve you loyally for many years to come. Please take your time to read this manual carefully before you switch on the Supernova and also please fill in the warranty card and mail it. Thanks and lots of success with your new Supernova! CAUTION: * BEFORE PUTTING INTO OPERATION READ THESE OPERATING INSTRUCTIONS CAREFULLY. * NO USER SERVICEABLE PARTS INSIDE. * REFER SERVICING TO QUALIFIED SERVICE PERSONNEL ONLY. WARNING: * TO REDUCE THE RISKS OF ELECTRICAL SHOCK, DO NOT REMOVE THE COVER. * TO REDUCE THE RISK OF FIRE OR SHOCK HAZARD, DO NOT EXPOSE AMPLIFIER TO RAIN OR MOISTURE. * THIS APPARATUS MUST BE EARTHED. * TUBES ARE HOT. DO NOT TOUCH DURING OPERATION. FRONT PANEL FUNCTIONS [1] INPUTS NORMAL - Input for standard instruments, e.g. guitars with single-coil pickups. BRIGHT CLEAN - Input for high-output instruments, e.g. guitars with humbucker pickups. This input has 6dB gain reduction to prevent overload and a filter which compensates guitar cable losses by boosting the high frequencies as of 3Khz. (Due to their higher coil impedance, humbucker pick-ups suffer more from cable losses than single-coils, which may result in lack of sparkle in the clean sound) NOTE: The BRIGHT CLEAN input only changes Channel 1, the CLEAN channel, but does not affect the Channel 2-5, the distortion channels. [2] VOLUME: Controls the volume level of Channel 1, the CLEAN channel. [3] BASS, MID & TREBLE: Classic passive tone controls of Channel 1. [4] DRIVE: This DRIVE knob controls the amount of distortion in Channel 2, a medium gain Pre-EQ Overdrive channel. Cleaner sound is achieved at lower settings (3 to 5), at higher settings (5 to 10) medium overdrive occurs which will produce more sustain and distortion. [5] VOLUME: Controls the volume level of Channel 2. [6] BASS, MID & TREBLE: Classic passive tone controls that regulate low, mid and high frequencies respectively, of Channel 2. In this Pre-EQ Overdrive channel the tone control circuit is located before the overdrive stage, therefore it pre-shapes the overdrive tone which results in a bluesy type of distortion with lots of sweet mid-range harmonics. [7] GAIN: This GAIN knob controls the amount of distortion in Channel 3, a medium gain Post-EQ Overdrive channel. Cleaner sound is achieved at lower settings 3-4, at middle settings 4-6 medium overdrive occurs which will produce more sustain and distortion. At high settings 6-10 heavy overdrive occurs, adding a lots of sustain and compression. [8] VOLUME: Controls the volume level of Channel 3. [9] PRESENCE: Controls the amount of boost in the upper mid frequency range of Channel 3. [10] BASS, MID & TREBLE: Classic passive tone controls of Channel 3. In this Post-EQ Overdrive channel the tone control circuit is located after the overdrive stage, therefore it shapes the final overdrive tone which results in a more raw and rock type of distortion with lots of grind and dynamics. [11] GAIN: This channel has four gain stages and therefore delivers lots of sustain and compression without losing dynamics. This GAIN knob controls the amount of distortion in Channel 4. Cleaner sound is achieved at lower settings 3-4, at middle settings 4-6 medium overdrive occurs which will produce more sustain and distortion. At high settings 6-10 heavy overdrive occurs. [12] VOLUME: Controls the volume level of Channel 4. [13] ULTRA-GAIN: This channel has five gain stages and therefore delivers endless amounts of sustain and compression. This ULTRA-GAIN knob controls the amount of distortion in Channel 5. Distorted sound is already achieved at low settings 2-3, at higher settings 3-5 heavy overdrive occurs which will produce a more powerful distortion. At the highest settings 5-10 ultra overdrive occurs, adding tons of power, sustain and compression. WARNING: This Ultra-Gain channel requires a guitar with low microphonic pick-ups and sufficient screening. Otherwise squealing and/or excessive hum and noise may occur if the Ultra-Gain knob is turned above "4". NOTE: The GAIN and the ULTRA-GAIN controls of the Supernova are very powerful and practical 'sound-creators'. These dual controls control the amount of amplification in two amplifier stages simultaneously and combine Drive and Gain-Boost in one knob. BRIGHT: Boosts the high frequencies. The effect is subtle but therefore always instantly useable without having to re-adjust the tone controls. HI-CUT: Cuts the highest frequencies. The effect is most noticeable with distortion sounds. It removes any schratchiness and smoothens out the sound. [23] SPEAKER DAMPING: This switch selects speaker damping between High, Medium and Low. In the H (HIGH) position the power amp damps the speaker’s own cone-movement which results in a more controlled sound (compare with shock breakers of a car). In the M (MEDIUM) position the power amp’s damping of the speaker is less, which results in a more open sound. In the L (LOW) position the damping is minimal which enhances the sound in the low and the high frequencies. Which option is best depends on personal taste. [24] CHANNELS: Selects channels 1-5 as long as the FS-6 footswitch (set to Channel Switching) is not connected. [14] VOLUME: Controls the volume level of Channel 5. [25] OTS: Activates the OTS circuit [see 17, 18] by placing it in the signal path. [15] PRESENCE: Controls the amount of boost in the upper mid frequency range of Channel 4 and 5 [26] MASTER: Selects Master-1 [20] or Master-2 [21]. [16] BASS, MID & TREBLE: Classic post-distortion passive tone controls of Channel 4 and 5. [17] OTS DRIVE: This DRIVE knob controls the amount of distortion of the OTS circuit. [18] OTS VOLUME: Controls the volume level of the OTS circuit. [27] REVERB: Activates the built-in spring reverb unit [19]. [28] STORE: Stores any combinations of choices made with the switches 22-32 in a MIDI program number (1-128). When the lever is pushed down the STORE LED flashes for 2 seconds indicating that storage will be activated. After two seconds the STORE LED will light continuously indicating that storage has taken place. NOTE: OTS stands for Output Tube Saturation. The Supernova is equipped with a 0.5 Watt all-tube power amp, not for driving any speakers but pure for creating new harmonic structures. This unique feature enables you to add real tube-power-amp distortion to all your sounds, clean as well as distorted! If CH1 is on, you can create nice and musical saturation of clean tones; in CH2-5 you can really fatten up all your crunchy or even your high-gain distortion tones. If the OTS is activated the small tube-power-amp is placed in the signal path, like it was plugged in as an effects unit in an effects loop. When the FS6 is connected and set to "Channel Switching Mode" the STORE button now only stores your current choices as default start-up setting. [19] REVERB: The Supernova has a built-in spring reverb unit. This knob controls the amount of the Spring Reverb signal mixed with the original dry signal.[20] MASTER-1: If activated, this master volume control can be preset at a lower rhythm level. [29-32] FX Loops: Activate the two serial FX loops S1 and S2, and the two parallel FX loops P1 and P2. [21] MASTER-2: If activated, this master volume control can be preset at a higher solo level. All functions described in the section below can be linked to each of the Supernova's 5 channels. They are MIDI accessible and recordable with the Store button. [22] VOICING SWITCHES BASS: Boosts the lowest frequencies in all channels. MID SHIFT: Shifts the operating frequency of the Treble controls in all channels from the standard frequency of 2 KHz down to 800Hz, thus creating a very natural and musically sounding boost in the middle frequencies. NOTE: if a stored combination of choices is changed, the STORE LED will burn on half power indicating that the choices made do not correspond with the stored data. NOTE: By holding the lever of the STORE switch down while switching on the Power switch [see back panel 1], all stored data can be RESET. [33] STANDBY: This switch allows the SUPERNOVA to be placed in Standby (green LED off) or Active (green LED on) mode. In Standby mode the tubes remain hot, but the amplifier is not operational. The green LED monitors the internal HT power supply for the tubes. If the amp is switched from the Active to the Standby mode, the green LED slowly dims indicating that the HT power supply shuts down slowly. The SUPERNOVA remains (partly) operational until the LED is completely off. BACK PANEL FUNCTIONS [1] POWER: This switch turns AC power on (red LED on) and off (red LED off). When the switch is off the amplifier is completely shut down. NOTE: When switching the amplifier on, leave the Standby switch [33] in the “Off” position for 5-10 seconds thus allowing the tubes to heat up before switching to the Active mode. [2] A.C. POWER POWER CORD INPUT: The SUPERNOVA is equipped with a worldwide power supply. It is possible to change one of three voltages, 100, 115 or 230 inside the SUPERNOVA. Either of these voltages will work worldwide with minor power differences. The SUPERNOVA will work on either 50 or 60 hertz. After changing the voltage, make sure fuses are replaced with printed ratings on rear of amp. FUSE: Both fuse and spare fuse are located within the cap of the fuse holder. Fuse sled can be removed with a screwdriver. If the fuse should fail, it must be replaced with the same type and value in order to avoid damage to the amp and to prevent voiding the warranty. WARNING: Only a qualified technician should attempt an input voltage change. Personal injury or equipment damage may occur if done incorrectly. WARNING: A voltage change or fuse replacement should only be attempted when the power cord has been disconnected from its power source. [3] HT FUSE: This fuse protects the power supply in case of tube failure. If it blows, check for a bad power tube. If tube-failure is not the cause, the SUPERNOVA should be taken to a qualified service center for repair. If the fuse should fail, it must be replaced with the same type and value to avoid damage to the amp and to prevent voiding the warranty. [4] MIDI IN / FS-6 CONNECTOR: Provides an input for a MIDI Footcontroller or for the KOCH FS6-SN Footswitch. Pin 6 & 7 of the DIN connector provide +12VDC (fused) phantom power for feeding the FS6SN footswitch. If a different MIDI Foot controller is used and if it is designed to accept an external +12VDC supply on pin 6 and/or 7, a special 7-pin MIDI cable must be used. NOTE: The first five switches now do NOT necessarily correspond with the five channels anymore. In this mode it is advised to think more in creating six different Sounds than selecting channels. [5] MIDI THRU CONNECTOR: Provides an output for running the MIDI data through to another MIDI controlled apparatus e.g. an effects unit. If the FS-6 Footswitch is connected and set to the CHANNEL SWITCHING MODE this output is NOT active. [6] MIDI CHANNEL SELECTOR: Selects each of 12 MIDI channels. See MIDI IMPLIMENTATION CHART for further details. If all switches are in the OFF position, the SUPERNOVA receives all channels simultaneously (OMNI MODE). [7] FS-2 JACK: Provides an input for the optional KOCH FS2-SN Footswitch. FS2-SN FOOTSWITCH The FS-SN footswitch has two switches: - The left-hand switch is for silencing the amp except the MUTE-TO-TUNE output jack [8]. Thus providing the possibility for switching guitars or tuning your guitar silently. -The right-hand switch is for muting all effect signals at the same time thus providing the possibility to switch between DRY and WET. [8] MUTE-TO-TUNE JACK: Provides an output for connecting a Guitar Tuner. SERIAL EFFECTS LOOPS S1 AND S2: [9, 11] TO FX (=SEND): These jacks provide a buffered output from the preamp of the SUPERNOVA and can be used to connect an external effects unit. These jacks must be connected with the input(s) of the effects unit(s) (see also CONNECTION DIAGRAM pages). [10, 12] FROM FX (=RETURN): These jacks provide an input for external effects units and must be connected to the output of these units. When used they disconnect the preamp of the SUPERNOVA from the power amp. PARALLEL EFFECTS LOOPS P1 AND P2: FS6-SN FOOTSWITCH The optional FS6-SN Footswitch is equipped with six switches and is able to operate in two different modes, which can be selected with the little slide switch on the bottom side. If these parallel loops are used, direct signal must be taken off the effects unit's signal (for example with the effects unit's dry/wet mix control). CH - CHANNEL SWITCHING MODE The Six switches now have the following functions: - Five CHANNEL switches for selecting one of the five channels. - One SOLO/RHYTHM switch for activating the Master-1 [front panel 20] or the Master-2 [front panel 21] volume control. [13, 16] TO FX (=SEND): These jacks provide a buffered output from the preamp of the SUPERNOVA and can be used to connect external effects units. These jacks must be connected with the input(s) of the effects unit(s) (see also CONNECTION DIAGRAM pages). MIDI - SOUND SWITCHING MODE The FS-6 now operates as a simple MIDI Foot controller. The six switches now correspond with the first six (out of 128) MIDI programs. [14, 17] FROM FX (=RETURN): These jacks provide an input for external effects units and must be connected to the output of these units. The REVERB/FX MIX control allows volume adjustment of the external effects signal. [15, 18] LEVEL: Controls the volume level of the effects signal inputted in the parallel effects loops P1 and P2. All four FX loops (S1, S2, P1, P2) can be switched ON/OFF with the switches [29-32] at the front panel. The serial loops S1 and S2 are relay bypassed when switched OFF. The parallel loop P1 is relay muted on the FROM FX (return) jack when switched OFF. The parallel loop P2 is relay muted on the TO FX (send) jack when switched OFF, thus enabling delay effect signals to fully fade out. NOTE: The effect loops operate on a -10dBV signal level which guarantees compatibility with both instrument-level effects like floor-pedals and guitar-processors, as well as line-level effects like professional 19 inch rack mount devices. NOTE: If connecting an effects unit to the SUPERNOVA causes hum, a ground-loop may cause it. [19, 20, 21] SPEAKER OUTPUT JACKS: Provided for connection of speaker(s) or speaker cabinet(s) with an impedance of 1x4/2x8 ohms, OR 1x8/2x16 ohms, OR 1x16 ohms. (see also CONNECTION DIAGRAM page) REPLACING TUBES SAFETY FIRST: DISCONNECT THE POWER CORD FROM ITS POWER SOURCE AND LET HOT TUBES COOL. CHECK THE ‘TUBE LOCATION DIAGRAM’ ON THE CHASSIS FOR THE CORRECT TYPE NUMBERS AND LOCATIONS. REPLACE TUBES ONLY WITH ORIGINAL KOCH HIGH QUALITY TUBES. [IF OTHER TUBES ARE USED THE WARRANTEE OBLIGATION EXPIRES] NOTE: Always have the amp rebiased after replacing the power tubes. Biasing instructions can be found inside the amp. Rebiasing the amp is not necessary only if KOCH power tubes are used with the same type and bias-class number. If you have any doubts, please take no risks and let a qualified technician do the job. WARNING: Never play the SUPERNOVA without a speaker connected. This may cause serious damage to either the power tubes and/or the output transformer. Always use speaker cable. Preamp and Power tubes wear out and have to be changed from time to time to maintain the SUPERNOVA's best performance. Tubes behave like strings, they lose highs, lows and dynamics and after a period of time they have to be replaced. Exactly when is hard to say but this is an indication: if you play almost every day change tubes each year, if you play once or twice a week change tubes every 2-3 years. Tubes rarely fail. If they are bad, these might be the symptoms: [22] STEREO/MONO SWITCH (Model 6060 only): Provided for switching the R(ight) Channel ON (STEREO) or OFF (MONO). In the OFF position the R(ight) Channel speaker outputs do not have to be connected to a speaker cabinet or a Loadbox. PREAMP TUBES (ECC83, 12AX7, 7025): - Microphonic whistling or squealing on one or both channels. - No or low amp volume on one or more channels. - Excessive noise on one or more channels. POWER TUBE OPTIONS Each type of power tube has its own distinctive sound character, therefore changing to a different type (or mix of types) of power tubes will also change the SUPERNOVA’s overall sound. Due to special bias control circuitry, the SUPERNOVA is able to accept almost any type of power tube, for example: EL34, 6CA7, 6L6, 6550, KT66, KT77, KT88, KT90 and KT100. The SUPERNOVA is provided with two separate bias control trimmers (located inside on the PC board) 6060 STEREO VERSIONS One trimmer is for the two left power tubes and one for the two right power tubes, therefore either one quartet (=4 matched tubes) or two duets (= 2 matched tubes) of power tubes can be used. Also different types of tubes can be used for each side, for example the two left tubes may be EL34’s while the two right tubes are 6L6’s or 6550’s. 120 MONO VERSIONS One trimmer is for all four power tubes, a quartet (=4 matched tubes) of power tubes must be used. Also different types of tubes can be used, for example 6L6, KT66, KT88 or 6550’s. POWER TUBES (EL34, 6550): - Loud crackling that is not affected by front panel controls. - Intermittent or regular blowing fuses. - Weird amp ‘distorting’. - Hum. Changing a tube is a simple and quick fix for most problems in your amp. In case of failure, just one bad power tube can be replaced without re-biasing only if a KOCH tube with the same type and bias-class number is used. If power tubes with a different or unknown bias-class number are used for replacement, the two inner and/or the two outer tubes have to be replaced and the amp has to be rebiased. Always use a set of four (one quartet), or two sets of two (two duets) matched replacement power tube sets to maintain the amp's best performance. Again, if you have any doubts, please take no risks and consult your dealer and/or a qualified technician. CHECK FOR UPDATES OF THIS MANUAL AT WWW.KOCH-AMPS.COM MIDI DIP Switch Coding See back panel [6]) S1 S2 S3 S4 S5 S6 OMNI 0 0 0 0 0 0 CH1 ON 0 0 0 0 0 CH2 0 ON 0 0 0 0 CH3 ON ON 0 0 0 0 CH4 O O ON 0 0 0 CH5 ON 0 ON 0 0 0 CH6 0 ON ON 0 0 0 CH7 ON ON ON 0 0 0 CH8 0 0 0 ON 0 0 CH9 ON 0 0 ON 0 0 CH10 0 ON 0 ON 0 0 CH11 ON ON 0 ON 0 0 CH12 0 0 ON ON 0 0 CH13 ON 0 ON ON 0 0 CH14 0 ON ON ON 0 0 CH15 ON ON ON ON 0 0 CH16 0 0 0 0 ON 0 0 = OFF MIDI Implementation Chart Function Basic Channel Program Change 7 20 21 22 23 24 25 26 27 28 29 30 31 Number OMNI 1-16 0-127 Recognized O O O O O O O O O O O O O O O O 80 O 81 O 82 O 83 O 84 O 85 O 86 O 87 O Other messages X Control Change Remark Depending on dipswitches Preset 1-128 Mute OTS Master Reverb FX Loop S-1 FX Loop S-2 FX Loop P-1 FX Loop P-2 Low Mid shift Bright Hi-Cut All FX Loops Active if value smaller than 64; else off Active if value larger than 63; else off Active if value larger than 63; else off Active if value larger than 63; else off Active if value larger than 63; else off Active if value larger than 63; else off Active if value larger than 63; else off Active if value larger than 63; else off Active if value larger than 63; else off Active if value larger than 63; else off Active if value larger than 63; else off Active if value larger than 63;else off Switches off if value smaller than 64 else switches to previous value Channel 1 Switches to Ch1 if value larger than 64 else switches to previous value Channel 2 Switches to Ch2 if value larger than 64 else switches to previous value Channel 3 Switches to Ch3 if value larger than 64 else switches to previous value Channel 4 Switches to Ch4 if value larger than 64 else switches to previous value Channel 5 Switches to Ch5 if value larger than 64 else switches to previous value Speaker damping low Switches to low if value larger than 64 else switches to previous value Speaker damping mid Switches to mid if value larger than 64 else switches to previous value Speaker damping high Switches to high if value larger than 64 else switches to previous value Not recognized O = Yes, X = No This table provides the necessary information to set up a PC or keyboard for remote controlling all programmable functions individually (see front panel [22-32]). TS212V/H TS412SL/ST Mono 16 16 TS412SL/ST Stereo TS112 Mute-to-Tune L FX Mute R OR OR USE EITHER 4 OR 8 OR 16 OHMS SPEAKER OUTPUTS DO NOT USE SIMULTANEOUSLY Power -10 dBV Signal Level FS2 MIDI 1 2 3 4 5 6 Off On L on Channel Select 115 230 Level (Mono) 50/60 Hz, 250 Watts VAC: 100 ALWAYS CONNECT SPEAKERS BEFORE USE !!! Mute-to-Tune FX Mute HT Fuse To Tuner To FX From FX To FX From FX To FX Level From FX To FX 1x 4 2x 8 From FX 1x 8 2x16 16 R Fuse - 100/120V: 6.3A (T) 220/240V: 3.15A AT1.25A In Ceramic (or) MIDI Level Thru Loop S1 FS6 L(mono) R Inputs In MIDI Footcontroller or FS6 Footswitch set on MIDI mode MIDI Thru cannot be used if FS6 is set to Channel Switch mode MIDI Thru Dry L(mono) R Outputs Loop P2 Mute switch on From-FX Mute switch on To-FX Parallel FX Loops Effects Unit In MIDI Thru Dry Stereo mode: 2x 60 Watts Output Power Mono mode: 60 Watts Output Power (L) Speaker Outputs L(mono) R Inputs Wet FX Mix Level Loop P1 Serial FX Loops Channels Master 1/2 MIDI Out Loop S2 L(mono) R Outputs Wet FX Mix Effects Unit On Stereo Off Mono R Power Amp TS412SL+ST Mono 16 TS212V/H TS412SL/ST Mono Mute-to-Tune 16 FX Mute 16 USE EITHER 4 OR 8 OR 16 OHMS SPEAKER OUTPUTS DO NOT USE SIMULTANEOUSLY Power -10 dBV Signal Level FS2 MIDI 1 2 3 4 5 6 Off On L on Channel Select 115 230 Level (Mono) 50/60 Hz, 250 Watts VAC: 100 ALWAYS CONNECT SPEAKERS BEFORE USE !!! Mute-to-Tune FX Mute HT Fuse To Tuner To FX From FX To FX From FX To FX Level From FX To FX 1x 4 2x 8 From FX 1x 8 2x16 16 R Fuse - 100/120V: 6.3A (T) 220/240V: 3.15A AT1.25A In Ceramic (or) MIDI Level Thru Loop S1 FS6 L(mono) R Inputs In MIDI Footcontroller or FS6 Footswitch set on MIDI mode MIDI Thru cannot be used if FS6 is set to Channel Switch mode MIDI Thru Dry L(mono) R Outputs Loop P2 Mute switch on From-FX Mute switch on To-FX Parallel FX Loops Effects Unit In MIDI Thru Dry Stereo mode: 2x 60 Watts Output Power Mono mode: 60 Watts Output Power (L) Speaker Outputs L(mono) R Inputs Wet FX Mix Level Loop P1 Serial FX Loops Channels Master 1/2 MIDI Out Loop S2 L(mono) R Outputs Wet FX Mix Effects Unit On Stereo Off Mono R Power Amp TS412SL+ST Mono 16 TS212V/H TS412SL/ST Mono Mute-to-Tune 16 FX Mute 16 USE EITHER 4 OR 8 OR 16 OHMS SPEAKER OUTPUTS DO NOT USE SIMULTANEOUSLY Power -10 dBV Signal Level FS2 MIDI 120 Watts Output Power on Off On 1 2 3 4 5 6 Channel Select 50/60 Hz, 250 Watts VAC: 100 115 230 Mute-to-Tune FX Mute HT Fuse Level To Tuner To FX From FX To FX Loop S1 From FX Loop S2 To FX (T) 220/240V: 3.15A In Ceramic (or) MIDI From FX 1x 4 2x 8 Mute switch on To-FX Thru ALWAYS CONNECT SPEAKERS BEFORE USE !!! FS6 Speaker Outputs L(mono) R Inputs In MIDI Footcontroller or FS6 Footswitch set on MIDI mode MIDI Thru cannot be used if FS6 is set to Channel Switch mode 16 Parallel FX Loops Channels Master 1/2 MIDI Out 1x 8 2x16 Loop P2 Mute switch on From-FX AT1.25A To FX Loop P1 Serial FX Loops Fuse - 100/120V: 6.3A Level From FX MIDI Thru Dry L(mono) R Outputs L(mono) R Inputs Wet FX Mix Effects Unit In MIDI Thru Dry L(mono) R Outputs Wet FX Mix Effects Unit