1
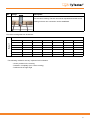
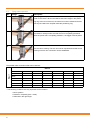
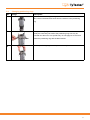
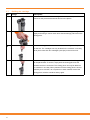
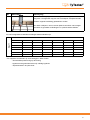
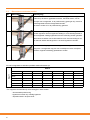
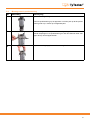
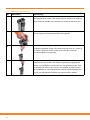
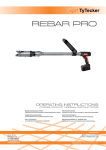
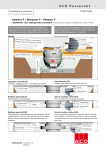
Operating instructions Rebar Pro
(Translation of original instructions)
Gebruiksaanwijzing Rebar Pro
(Oorspronkelijke gebruiksaanwijzing)
TTM 21032014
Verpa Senco
Pascallaan 88
8218 NJ Lelystad
The Netherlands
www.tytecker.com
Questions? Comments?
e-mail: [email protected]
© 2014 by Verpa Senco B.V.
1.
Table of contents
2. General safety guidelines for using power tools
3
3. Safety instructions
5
3.1 Tool
6
3.2 Batteries and battery charger
8
3.3 Personal protection
9
4. Specificatications and technical data of the tool
10
4.1
Specifications of the tool
10
4.2
Specifications of the clips
10
4.3
Technical data
10
4.4
Noise and vibrations
11
5. Operation
12
5.1
Charging the battery
12
5.2
Turning on and off
13
5.3
Adjusting the handle
13
5.4
Tying re-bars crossed
14
5.5
Tying re-bars parralel
16
5.6
Changing positioning rings
17
5.7 Refilling the cartridge
18
6. Maintenance and cleaning
19
6.1 19
Power tool
7. Repairs
20
7.1 Troubleshooting
20
7.2 Environmental protection
21
7.3Warrenty
21
8. Tips for use
22
9. Replacement part list for RebarPro
45
Declaration of Conformity
2
46
2.
General safety guidelines for using power tools
WARNING! Read all instructions. Failure to follow all instructions listed below may result in electric shock,
fire and/or serious injury. The term “power tool” in all of the warnings listed below refers to your mains
operated (corded) power tool or battery operated (cordless) power tool.
1. Work area
a) Keep the work area tidy and well lit. An untidy and dark work area is an accident hazard.
b) Do not operate power tools in explosive atmospheres, such as in the presence of flam
mable liquids, gases or dust. Power tools create sparks which may ignite the dust or fumes.
c) Keep children and bystanders away while operating a power tool. Distractions can cause you to lose control of the power tool.
2. Electrical safety
a) Power tool plugs must match the outlet. Never modify the plug in any way. Do not use
any adapter plugs with earthed (grounded) power tools. Unmodified plugs and matching outlets will reduce risk of electric shock.
b) Do not expose power tools to rain or wet conditions. Water entering a power tool will
increase the risk of electric shocks.
c) Do not abuse the cord. Never use the cord for carrying, pulling, or unplugging the power tool. Keep cord away from heat, oil, sharp edges or mobbing parts. Damaged or entangles cords increase the risk of electric shocks.
3. Personal safety
a) Stay alert, watch what you are doing and operate the power tool in a responsive way.
Do not use a power tool while you are tired or under the influence of drugs, alcohol or
medication. A moment of inattention while operating power tools may result in serious
personal injury.
b) Use safety equipment. Always wear eye protection. Safety equipment such as dust masks,
non-skid safety shoes, hard hat, or hearing protection used for appropriate conditions will
reduce personal injuries.
c) Do not overreach. Keep proper footing and balance at all times. This enables better
control of the power tool in unexpected situations.
d) Dress properly. Do not wear loose clothing or jewellery. Keep your hair, clothing and
gloves away from moving parts. Loose clothes, jewellery or long hair can be caught in
moving parts.
e) If devices are provided for the connection of dust extraction and collection facilities,
ensure these are connected and properly used. Use of these devices can reduce dust
related hazards.
3
4. Power tool use and care
a) Do not force the power tool. Use the correct power tool for you application. The correct
power tool will do the job better and safer at the rate for which it was designed in combination
with the pressing of the head.
b) Do not use the power tool if the switch does not turn it on and off. Any power tool that
cannot be controlled with the switch is dangerous and must be repaired.
c) Store idle power tools out of the reach of children and do not allow persons unfamiliar
with the power tool or these instructions to operate the power tool. Power tools are
dangerous in the hands of untrained users.
d) Maintain power tools. Check for misalignment or binding of moving parts, breakage
of parts and any other condition that may affect the power tools operation. If damaged,
have the power tool repaired before use. Many accidents are caused by poorly maintained
power tools.
e) Use the power tool, accessories etc., in accordance with these instructions and in the
manner intended for the particular type of power tool, taking into account the working
conditions and the work to be performed. Use of the power tool for operations different from
the intended use could result in a hazardous situation.
5. Battery tool use and care
a) Ensure the switch is in the “off” position before inserting battery pack. Inserting the
battery pack into power tools that have the switch on invites accidents.
b) Recharge only with the charger specified by the manufacturer. A charge that is suitable
for one type of battery pack may create a risk of fire when used with another battery pack.
c) Use power tools only with specifically designated battery packs. Use of any other battery
packs may create a risk of injury and fire.
d) When battery pack is not in use, keep it away from other metal objects like paper clips,
coins, keys, nails, screws or other small metal objects that can make a connection from
one terminal to another. Shorting the battery terminals together may cause burns or a fire.
6. Service
a) Have your power tool serviced by a qualified repair person using only identical
replacement parts. This will ensure that the safety of the power tool is maintained.
Keep these instructions in a safe place!
4
3.
Safety instructions
For your safety:
Avoid serious personal injuries and damage to your property
This power tool can only be used in a safe and secure manner if you read the complete user manual and abide
by its directions. Be sure to strictly follow the general safety instructions in this manual. Store this user manual
for later reference. Be sure to send along the user manual when you give away or sell the power tool.
This power tool is intended for:
Professional use in industry and trade, for tying concrete reinforcement bars. Using this equipment for other applications or in ways not specified in the manual may lead to serious accidents. Be sure to strictly observe the items
written in this manual. Persons not concerned with the work, particularly children, should be kept away from the
work site and should not be allowed to touch this equipment. Do not leave the RebarPro tool unattended, so that
outsiders or children may come in contact with it.
5
3.1Tool
No
a.
b.
Image
Description
-
Hold the power tool firmly.
The power tool is solely intended for the purpose of tying concrete
reinforcement bars.
c.
-
Keep your work area tidy. If necessary, remove other tools and/or
materials before proceeding with use of power tool.
d.
-
Take extra special care when working in the proximity of electrical
cables, gas and/or water pipes. Always check your work area!
e.
Never point the power tool at persons and/or animals.
f.
Keep hands, fingers and body parts away from the head of the
machine when the power tool is in operation.
g.
Keep hands and fingers away from the gripping jaws and/or levers
at all times.
h.
i.
Keep body parts and clothing away from all rotating parts.
-
When the tool is not in operation keep your fingers of the trigger.
Never press the trigger when:
• The head of the power tool is not pointed towards the ground.
• You have removed the tool head.
• You are refilling the tool with cartridges.
• You are performing other tasks than re-bar tying with the tool.
j.
k.
-
Do not use the power tool as a clubbing tool.
Never use the tool under any abnormal condition. If the tool is not in
good working order or if any abnormal condition is noticed, switch
the tool off immediately and have it examined by an expert.
l.
m.
n.
6
-
Never modify the tool.
Maintain the tool in good operating condition
Only use TyTecker certified batteries in the power tool.
No
o.
Image
Description
-
After battery installation, if the tool operates without the trigger
being pulled or if the operator notices unusual heat, smell or sound,
immediately discontinue operation and contact your TyTecker service centre.
p.
Do not use the power tool in the rain, where water is splashing, in a
wet place or in a damp place.
q.
-
Do not use the tool and its accessories when they have been
subjected to heavy blows or impacts, or have been damaged in any
other way.
r.
Always store the power tool in its original carrying case. Also store
the tool in this case, when the power tool remains unused for longer
periods of time. Store the case in a dry space.
s.
Don’t allow children near the power tool. Never allow children to
use the power tool.
t.
Do not use the tool in an environment with flammable gasses,
liquids or clouds of dust. Small sparks may be generated in the tool
head.
u.
TyTecker can only guarantee good operation of the power tool if it
is used in conjunction with the original and intended TyTecker parts,
TyTecker cartridges and accessories.
7
3.2
No
a.
Batteries and battery charger
Image
Description
-
Always ensure that the mains voltage and the voltage data on the battery
charger match.
b.
-
Before using the battery charger always check if it is damaged. A damaged battery charger or battery may not be used. Use the following parts
only if they are undamaged: battery charger, cable, plug and battery pack.
Do not use the battery charger and batteries if they have been subjected
to strong blows or impacts or if they have been damaged in any other way.
c.
Short circuits release energy surges and may cause a fire. Keep the battery’s contacts clean and dry. Separate the battery from metal objects (like
d.
nails and screws) at all times.
Danger explosion! Do not toss batteries in open fire. Do not expose them
to high temperatures and never open them. Due to the heat generated
during charging, the battery charger should not be operated on a combustible surface or in an inflammable environment. Cover the contacts of the
battery during storage when it is not in the battery charger. A short-circuit
caused by metallic bridging-over may cause fire or explosion!
e.
Do not cover the ventilating slits of the battery charger. This might overheat and short-circuit the battery.
f.
Never disassemble the battery or battery charger yourself. Danger of an
electric shock or fire could be caused by improper re-assembly.
g.
Pull the battery charger’s plug out of the socket when it is not in use or
when cleaning it. If the battery is not going to be used for a longer period,
pull the battery off the battery charger and pull out the mains plug.
h.
-
Only use extension cable that is approved and technically in perfect condition.
i.
During operation provide sufficient ventilation. Malfunction during charging
can be caused by storing and operating in places where the temperature
exceeds +40°C; this should be avoided at all costs. Battery charging in
closed cupboards, near heat sources (radiators, bright sunshine), etc.
causes heat to accumulate and will possible destroy the devices.
j.
-
Do not rivet or screw any name-plates or signs onto the device. The protective insulation can thereby be rendered ineffective or may cause short
circuits. Adhesive labels are recommended.
8
No
k.
Image
Description
A damaged mains cable may only be replaced by the TyTecker customer
service.
l.
Using accessories that have not been recommended or sold by TyTecker
can cause fire, an electric shock or personal injury. Only charge original
TyTecker batteries.
3.3
No
a.
Personal protection
Image
Description
Always wear safety shoes
b.
Always wear safety glasses
c.
Always wear work gloves
d.
Always wear appropriate clothing.
e.
When the situation calls for it, wear a safety helmet.
f.
When the situation calls for it, use ear protection.
9
4.
Specifications and technical data of the tool
4.1
Specifications of the tool
Article number
TT2020
Weigth
6,2 kg (including battery)
Length
1100 mm
Width
300 mm
Heigth
300 mm
Battery
18V Li-Ion
Battery charger
Input: 230V ~ 50Hz, 110W
Operating time
1 hour
Charging time
40 - 60 minutes
Ties / battery
1.100
Ties / hour
800 - 1000
Accessoires
- Battery type KET01-0001
- Battery charger type KET01-0011
- Carrying case
4.2
Specifications of the clips
Product name
TyTecker clips / cartridges
Clips / cartridge
50
Ties / cartridge
50
Wire type
DIN 17223 BL.1/1964/2076
Surface
Phosphated
Diameter wire
1,4mm
Length wire
320mm
Diameter clip
30mm
4.3
Technical data
Voltage
18V
No-load speed
1220/min
Tightening torque flexible
21Nm
Tightening torque fixed
27Nm
NB: only use the original RebarPro battery charger for the KET01-0011
NB: only use patented RebarPro clips / cartridges in the Rebar Pro
10
4.4
Noise and vibrations
Sound pressure level
85 dB(A)
Sound power level
98 dB(A)
Vibration value
6,5m/s2
The A-weighted sound pressure level of the power tool is typically 85dB (A) During operation of the power
tool the noise level may exceed 98dB (A) Always wear ear protection. This value is tool-related characteristic value and does not represent noise developed at the point of use. Workplace design can also serve to
reduce noise levels, for example placing workpiece on sound-damping supports.
The weighted acceleration is typically 6,5m/s2. This value is a tool-related characteristic value and does
not represent the influence to the hand-arm-system when using the tool. An influence to the hand-arm
system when using the tool will, for example, depend on the gripping force, the contact pressure force, the
working direction, the adjustment of main supply, the workpiece and the workpiece support.
The declared vibration information total value has been measured according to EN 60745 and may be used
for comparing one tool with another. The declared vibration total value may be used in a preliminary test of
exposure.
Warning
The declared vibration level is representative of the main areas of use of the power tool. However, when
the power tool is used for other applications, with different tools or is not sufficiently maintained, the level of
vibration may vary. This may allow the vibration load over the entire period of use to increase.
For an accurate assessment of the vibration load one must also take into account the times when the device is turned off or while running but not in use. This allows a reduction in the vibration load over the entire
period. Use other security measures to protect the user against vibrations, such as: Maintenance of the
electrical appliance and tools, keeping warm hands, organization of work.
11
5.Operation
5.1
No
1.
Charging the battery
Image
Description
Before using the battery for the first time, charge it using an original
RebarPro battery charger. Improper handling can cause an electric shock
or overheating.
2.
Plug the battery charger into the socket and charge the battery
3.
Plug the battery charger into the mains (230V ~ 50Hz)
and charge the battery. When the green LED on the
battery charger is constantly lit, the battery is fully
charged. After the battery has been charged, replace the battery on the
power tool and unplug the battery charger. A new battery does not reach
its full charge until several charging/discharging procedures. Only charge
the battery if it is cool to the touch.
4.
Remove the battery by pressing the unlock button and sliding it off the
battery charger.
12
5.2
No
1.
Turning on and off
Image
Description
The power tool is ready for use after the battery is placed on the handle.
2.
The functioning of the power tool can be verified by pressing the trigger
when the battery is placed. No clips will come out of the tool as long as
the tool head is not fully pressed. If the drill is not heard or the shaft holder
is not rotating then the battery needs replacing or the drill is out of order.
5.3
No
1.
2.
Adjusting the handle
Image
Description
Release the handle by turning the knob on the side of the handle.
a. The handle can now slide up and down the tool base and can be
adjusted on the right or left hand side (depending on your preferred
hand.
b. When the handle is placed in a comfortable position it can be tightened
again by turning the knob on the side of the handle in the opposite
direction.
13
5.4
No
1.
Tying rebars crossed
Image
Description
The power tool is held with both hands. The preferred hand is usually
used to handle the power drill. Approach the rebar crossing so that the
rebars slide into the V-shaped grooves (red triangle above) in the positioning ring. Make sure the tool is aimed at the lower lying re-bar . The power
tool must be positioned under an angle, as will be explicated below.
Next, the power tool must be completely pressed in under an angle. Pressing in the tool brings the clips into launch position.
The diameter(s) of the rebars determines the angle (between tool and
re-bars) under which the power tool is supposed to be held, while tying
re-bars:
6mm: 60º
10mm: 70º
16mm: 80º
When the power tool is placed under the correct angle the trigger must be
pulled. In order to make one rebar connection the trigger needs to be
pulled. To make multiple connections keep the
trigger pressed in.
2.
Place the tool on the top rebar and turn clockwise until the guide hits the
bar. Make sure the two rebars are pressed against each other. 3.
Press the tool down completely
Alwasys make sure the tool is completely pressed in
14
No
4.
Image
Description
When the connection has been established the tool can be withdrawn
from the rebar crossing. The tool can now be repositioned towards a new
crossing so that a new connection can be established.
The rebar crossings that can be tied are:
Rebar 1
Rebar 2
Size
6mm
8mm
10mm
12mm
14mm
16mm
6mm
+
+
+
+
+
+
8mm
+
+
+
+
+
+
10mm
+
+
+
+
+
+
12mm
+
+
+
+
+
+*
14mm
+
+
+
+
+*
+*
16mm
+
+
+
+*
+*
-
* The following conditions are very important for this situation:
- Centric position on the crossing
- Pressed in completely (tool + rebar crossing)
- Positioned in the right angle
15
5.5 No
1.
Tying rebars parallel
Image
Description
When tying parallel positioned rebars, the tool must be positioned perpendicular to the rebars. When both rebars have been caught in the positioning ring at the front of the tool, the entire tool must be twisted clockwise.
This way the rebars are clamped inside the positioning ring.
2.
When the re-bars have been fixated in the positioning ring, the tool must
be pressed in. Always make sure that the tool is completely pressed in.
When the power tool is completely pressed in, the trigger must be pulled.
3.
When the connection has been established the tool can be withdrawn
from the rebar crossing. The tool can now be repositioned towards a new
crossing so that a new connection can be established.
The parallel rebar connections that can be tied are:
Rebar 1
Rebar 2
Size
6mm
8mm
10mm
12mm
14mm
16mm
6mm
+
+
+
+
+
+
8mm
+
+
+
+
+
+
10mm
+
+
+
+
+
+
12mm
+
+
+
+
+
+*
14mm
+
+
+
+
+*
+*
16mm
+
+
+
+*
+*
-
* The following conditions are very important for this situation:
- Centric position
- Pressed in completely (tool + rebar)
- Positioned in the right angle
16
5.6 No
1.
Changing positioning rings
Image
Description
Open the draw latches by pushing the levers outward.
Next, remove the draw latch hooks from the notches in the positioning
ring.
2.
A new positioning ring can be mounted onto the tool in
exactly the same way. Be careful, the positioning rings can only be
mounted onto the tool in one specific way. Do not apply too much force!
Fasten the positioning ring with the draw latches.
3.
The new positioning ring is now in place and ready for use.
17
5.7 No
1.
Refilling the cartridge
Image
Description
In order to fill the tool with new cartridges, the tool must be opened. In
order to do this press the black knob shown in the picture.
2.
Now, the closing piece can be withdrawn from the tool. By pressing it
slightly and turning it counter clock wise. After that simply pull back on the
closing piece.
3.
When the closing piece has been removed, new cartridges can be placed
into the tool. The cartridges can only be fitted in the container in one way.
Never place more than two cartridges (100 clips) in the tool at once.
4.
When the cartridges have been placed in the container, the closing piece
can be placed back. To do this, simply stick the closing piece into the
container and turn it clockwise. The closing piece can only be fitted into
the container in one way. When placement of the closing piece is accompanied by a lot of friction, do not press it too hard. Instead, remove the
closing piece, twist the container and try again.
18
6. Maintenance and cleaning
6.1 Power tool
Risk of injury: by switching on unintentionally. Before any maintenance work, pull out the battery, or pull the
plug out of the mains.
No
1.
Image
Description
Before cleaning the tool, always remove the battery. Keep both the
contacts on the battery and the contacts on the tool clean. For this, use
dry cloth.
2.
- Remove the head of the tool and clean it using compressed air. Clogged
dirt can be removed using a damp piece of cloth.
- Clean the outside of the tool using a damp piece of cloth
- Remove the closing piece and clean it, using a damp cloth.
- Clean the container by means of compressed air.
- Remaining dirt can be removed by using either compressed air or a
damp piece of cloth.
3.
If necessary, lubricate the parts of the gripping jaw wand the separation
mechanism. Preferably, teflon spray is used for this purpose.
PTFE
4.
After use, always store the tool in the accompanying blow-mold case.
19
7. Repairs
7.1 Troubleshooting
Risk of injury: service, testing and repairs of the power tool, battery charge rand batteries may only be carried
out by electrical engineers in conformity with the regulations valid in the respective country.
We advise you to contact your local Tytecker dealer. Hand over these operating instructions to the repair workshop.
Use only original and Tytecker authorized replacement parts.
No
1.
Problem
Indicator
Nothing
happens
2.
Cause
Solution
Action
No sound
Capacity of the
No movement battery
Empty or
defect battery
Charge the battery
or replace with a
new battery.
Connect
battery
No clips exit
the tool
Tool is
functioning
normal
Contents of the
container
No clips
Fill the tool with
inside the tool clips
Apply clips
3.
No clips exit
the tool
Tool is
functioning
normal
Remove the
positioning ring
(see 5.6 changing
the positioning
rings). Check for
loose clips, clips
stuck in the tool
head
Loose clips,
clips stuck in
the tool head
Remove clips
Apply clips
4.
No clips exit
Tool is
the power tool functioning
normal
Remove positioning
ring, Check motion
of chisel
Chisel is
stuck
Clear the path of the Apply clips
chisel
5.
The clips
miss the
rebars/
There is no
good rebar
connection
The position of the
Wrong
tool in relation to the positioning of
re-bars.
the tool
Check:
- Angle, orientation
of the rebars.
- Position of the
rebars in the slots
of the positioning
ring.
- Distance between
the rebars
20
Tool is
functioning
normal
Check
Correct positioning
of the tool
Apply clips
No
6.
Problem
Indicator
Check
Cause
Solution
Action
The clips
miss the
rebars/
There is no
good rebar
connection
Tool is
functioning
normal
Position of the
positioning ring
Positioning
ring is not
mounted
correctly
Mount and secure
the positioning ring
correctly
Apply clips
7.
The tool is
stuck to the
rebars after a
clip has been
installed.
Tool is no
longer stuck
on the rebars
Check motion of
chisel.
Check for the presence of loose clip in
the positioning ring.
The trigger
was pulled
for a too short
period of time
Keep the trigger
pressed in longer
when making the
next connection.
Slightly pull
back the tool
and twist
the entire
tool counterclockwise. Do
not attempt to
free the tool
by pulling it.
7.2 Environmental protection
Regaining of raw materials instead of increasing waste. Power tool, accessories and packaging
should be sorted for environmental-friendly recycling. According to guideline 91/157/EEG, defect
batteries must be recycled. Do not throw away old batteries in the household waste. TyTecker takes
back batteries for recycling. Deliver old batteries to your TyTecker supplier or to the TyTecker customer service. Further information is available from your TyTecker supplier.
7.3Warranty
TyTecker power tools are guaranteed in accordance with statutory and national regulations (evidence of purchase
by invoice or delivery note). In addition to the applicable regulations we offer a guarantee in accordance with the
TyTecker. For more details contact a TyTecker representative in your country or TyTecker customer support. The
guarantee does not warrant damage through inappropriate use, unintended use, overloading or damage obtained
through normal wear.
21
8. Tips for use
Learning to work with the power tool does not take more than fifteen minutes. Efficient use of the tool and dealing
with problems demand some skills and training. Learning to work efficiently with the tool is easiest when instructed
by an experienced user.
Use the provided battery packs alternately. By allowing the batteries to regain their normal operating temperature
after use, their lifespan will increase.
Use the V-shaped notch (red triangle), visible on the top of the positioning ring, to aim the tool at the re-bar
crossing. The bottom re-bar must lie in the middle of this notch.
Never leave cartridge boxes outside. Instead, store them someplace dry. Moist through for example rain can cause
the clips to corrode.
Do not use rusty clips.
22
23
1.Inhoudsopgave
2. Algemene veiligheidsinstructies voor het hanteren van elektrisch gereedschap
25
3. Veiligheidsinstructies
27
3.1 Apparaat
28
3.2 Accu’s en acculader
30
3.3 Persoonlijke bescherming
31
4. Specificaties en technische gegevens
32
4.1
Specificaties van het apparaat
32
4.2
Specificaties van de clips
32
4.3
Technische gegevens
32
4.4
Geluid en trillingen
33
5. Algemeen gebruik
34
5.1
Laad de accu op
34
5.2
In- en uitschakelen
35
5.3
Het handvat instellen
35
5.4
Betonstaven verbinden kruislings
36
5.5
Betonstaven verbinden parallel
38
5.6
Montage van de positioneerring
39
5.7 Bijvullen van patronen
40
6. Onderhoud en reiniging
41
6.1 41
Apparaat
7. Tot slot
42
7.1 Oplossen van problemen
42
7.2 Milieubescherming
43
7.3
Garantie
43
8. Tips voor gebruik
44
9. Vervangende onderdelenlijst voor RebarPro
45
Conformiteitsverklaring
24
46
2.
Algemene veiligheidsinstructies voor het hanteren van elektrisch gereedschap
LET OP! Bij het gebruik van elektrische gereedschappen moeten ter voorkoming van ene elektrische
schok, verwondings- en brandgevaar de volgende belangrijke veiligheidsmaatregelen altijd in acht worden
genomen. Lees deze instructies aandachtig voordat u de machine gebruikt. Bewaar deze veiligheidsinstructies goed.
1. Werkomgeving
a) Houd uw werkomgeving geordend en goed verlicht. Een wanordelijke of donkere werkomgeving
kan tot ongevallen leiden.
b) Bedien het elektrische gereedschap niet in explosieve atmosferen, bijvoorbeeld in een ruimte
waar vlambare vloeistoffen, gas of stof aanwezig is. Het elektrische gereedschap kan een vonk
veroorzaken die er voor kan zorgen dat stof of gas ontbrandt.
c) Houd het elektrisch gereedschap buiten bereik van kinderen en onbevoegden. Afleidingen
kunnen ervoor zorgen dat uw de controle over het elektrisch gereedschap verliest.
2. Elektrische veiligheid
a) De stekker van het elektrisch gereedschap moet overeenkomen met het stopcontact. Maak nooit
aanpassingen aan de stekker. Gebruik geen verloopstukjes die geaard zijn met het elektrisch
gereedschap. Een originele stekker en een overeenkomend stopcontact verminderen de kans op een
elektrische schok.
b) Stel het elektrische apparaat nooit bloot aan regen of vochtige omstandigheden. Water dat het
elektrisch gereedschap binnendringt verhoogt de kans op een elektrische schok.
c) Maak geen misbruik van het netsnoer. Gebruik het netsnoer nooit om te tillen, trekken of voor
het loskoppelen van het elektrische gereedschap. Houd het netsnoer buiten bereik van hitte,
olie, scherpe hoeken of bewegende onderdelen. Een beschadigd netsnoer verhoogt de kans op een
elektrische schok.
3. Persoonlijke veiligheid
a) Blijf alert, en ga op verantwoorde wijze om met het elektrisch gereedschap. Gebruik het
elektrisch apparaat niet wanneer u moe bent of onder invloed van drugs, alcohol of medicatie.
Een moment van onoplettendheid kan een serieuze persoonlijke verwonding veroorzaken.
b) Gebruik een veiligheidsuitrusting en draag altijd een veiligheidsbril. Veiligheidsuitrusting zoals een
stofmasker, antislip schoenen, veiligheidshelm en oorbescherming verminderen de kans op persoonlijk
letsel indien juist gebruikt.
c) Overstrek u niet en behoud uw balans ten alle tijden. Hierdoor heeft u meer controle over het
elektrisch gereedschap.
25
d) Draag de juiste kleding. Draag geen losse kleren of sieraden. Houd u haar, kleren en hand-
schoenen buiten het bereik van bewegende onderdelen. Losse kleren, sieraden of lang haar kan
vast komen te zitten in bewegende onderdelen.
e) Als er apparaten bij zijn geleverd voor het verwijderen van stof controleer dan of deze juist zijn
aangesloten. Gebruik van deze apparaten kan stof gerelateerde gevaren verminderen.
4. Gebruik en onderhoud
a) Forceer het elektrisch gereedschap niet. Gebruik het gereedschap alleen voor de juiste
applicatie. Elektrisch gereedschap dat ongecontroleerd werkt is gevaarlijk en moet gerepareerd
worden.
b) Gebruik het elektrisch apparaat niet als de aan en uit knop in combinatie met het indrukmecha-
nisme in de kop niet goed functioneert. Elektrisch gereedschap dat ongecontroleerd werkt is
gevaarlijk en moet gerepareerd worden.
c) Sla het elektrisch apparaat op buiten bereik van kinderen en zorg dat het elektrisch apparaat
buiten bereik blijft van personen die niet bekend zijn met het apparaat. Het elektrisch apparaat kan
gevaarlijk zijn in de handen van ongetrainde personen.
d) Onderhoud uw elektrisch apparaat goed. Controleer de machine incompleetheid, beschadigen of
andere condities die het gebruik van het elektrisch gereedschap kunnen belemmeren. Wanneer een
beschadiging geconstateerd is laat de machine dan eerst repareren voor het gebruik. Ongelukken
treden sneller op bij slecht onderhouden gereedschappen.
e) Gebruik het elektrische gereedschap, accessoires, voor de toepassing waar deze voor bestemd
zijn. Besteed daarbij aandacht aan de originele toepassingen van het elektrische gereedschap en wat u
wilt uitvoeren. Gebruik van het elektrisch gereedschap voor andere toepassingen kan gevaarlijk zijn.
5. Batterij gebruik en onderhoud
a) Controleer of de schakelaar zich in de “uit” positie bevindt voordat u de accu aansluit. De accu
aansluiten wanneer de machine aan staat is vragen om ongelukken.
b) Laad de accu alleen op met een originele lader gespecificeerd door de fabrikant. Een lader met
een andere specificatie kan het risico op brand vergroten.
c) Gebruik het elektrisch gereedschap alleen met de gespecificeerde accu. Gebruik van een andere
accu kan leiden tot brand of persoonlijk letsel.
d) Wanneer de accu niet in gebruik is houd hem dan weg van metalen objecten zoals paper clips,
munten, sleutels, spijkers, schroeven en andere kleine metalen objecten. Wanneer er kortsluiting
optreed in de accu kan u brandwonden oplopen of brand veroorzaken.
6. Service
a) Laat uw elektrisch gereedschap nakijken en repareren door een gekwalificeerde reparateur van
de fabrikant. Hierdoor wordt uw elektrisch gereedschap goed onderhoud en gerepareerd.
Bewaar deze veiligheidsinstructies zorgvuldig!
26
3.Veiligheidsinstructies
Voor uw veiligheid:
Voorkom ernstig persoonlijk letsel en schade aan uw eigendom
Met het apparaat kan uitsluitend veilig worden gewerkt, wanneer u deze gebruiksaanwijzing volledig leest en u
zich strikt aan de gegeven aanwijzingen houdt. Houd u bovendien aan de algemene veiligheidsvoorschriften.
Bewaar deze gebruiksaanwijzing voor later gebruik. Geef de gebruiksaanwijzing en de veiligheidsvoorschriften
mee wanneer u het apparaat afgeeft of verkoopt.
Dit apparaat is bestemd:
Voor professioneel gebruik in de industrie en door de vakman, voor het maken van verbindingen tussen betonstaven. Het gebruik van dit apparaat in andere toepassingen of op manieren die niet in deze handleiding staan
omschreven kan tot ernstig letsel leiden. Houd daarom nauwgezet de in deze gebruiksaanwijzing omschreven
instructies in acht. Personen die niet bij het werk betrokken zijn, met name kinderen, dienen uit de buurt van het
apparaat gehouden te worden en mogen het apparaat onder geen beding aanraken. Laat het apparaat niet onbeheerd achter in een omgeving waar buitenstaanders en kinderen mogelijkerwijs met het apparaat in contact kunnen
komen. De acculader is bestemd voor het opladen en heropladen van Rebar Pro accu’s met een accuspanning van
18V.
27
3.1Apparaat
Nr.
a.
b.
c.
Afbeelding
Beschrijving
-
Houd het apparaat altijd goed vast.
Gebruik het apparaat alleen voor het verbinden van betonstaven.
Draag zorg voor een geordende werkplek. Verwijder zo nodig ander
gereedschap en materiaal.
d.
-
Wees voorzichtig in de buurt van elektrische leidingen en buizen
voor gas en water. Controleer altijd de plaats waar gewerkt wordt.
e.
Richt het apparaat nooit op personen of dieren. Richt het apparaat
altijd met de kop naar de grond. Los afgeschoten clips kunnen tot
ernstig oogletsel leiden.
f.
Houd uw handen, vingers, voeten en tenen uit de buurt van de kop
van het apparaat.
g.
Steek handen, vingers en andere lichaamsdelen nooit tussen de
onderdelen van de klembek.
h.
i.
Houd lichaamsdelen uit de buurt van alle draaiende delen.
-
Houd de trekker vrij als het apparaat niet in gebruik is. Druk de
knop van het apparaat nooit in als:
• De kop van het apparaat niet naar de grond gericht is.
• De kop van het apparaat verwijderd is.
• Andere handelingen aan het apparaat verricht worden die niet
gemoeid zijn met het verbinden van betonstaven.
j.
k.
l.
m.
n.
28
-
Gebruik het apparaat niet als slaggereedschap.
Gebruik het apparaat nooit onder abnormale omstandigheden.
Pas het apparaat onder geen enkel beding aan.
Onderhoud het apparaat altijd goed.
Gebruik alleen Rebar Pro accu’s in het apparaat.
Nr.
o.
Afbeelding
Beschrijving
-
Mocht het apparaat na het vastzetten van een nieuwe accu uit
zichzelf beginnen met werken, gebruik het apparaat dan niet. Ontkoppel de accu en neem direct contact op met de TyTecker klantenservice.
p.
Gebruik het apparaat niet in de regen of andere vochtige omgevingen.
q.
-
Gebruik het apparaat en toebehoren niet wanneer zij onderhevig
zijn geweest aan sterke slagen of stoten of op een andere manier
zijn beschadigd.
r.
Berg het apparaat na gebruik op in de bijgeleverde koffer. Als het
apparaat langdurig niet gebruikt wordt , sla het dan in de koffer op
een droge plaats op.
s.
Houd kinderen uit de buurt. Laat kinderen het apparaat nooit gebruiken.
t.
Gebruik het apparaat nooit en te nimmer in de nabijheid van licht
ontvlambare stoffen. Er kunnen in de kop van het apparaat kleine
vonken ontstaan.
u.
TyTecker kan een juiste werking van het apparaat uitsluitend
waarborgen indien originele onderdelen, patronen en toebehoren
worden gebruikt.
29
3.2
Nr.
a.
Accu’s en acculader
Afbeelding
Beschrijving
-
Zorg ervoor dat de netspanning en de spanningsgegevens op de acculader overeenkomen.
b.
-
Controleer de acculader en accu’s voor gebruik op beschadigingen.
Gebruik de volgende onderdelen alleen indien deze onbeschadigd zijn:
acculader, kabel, stekker en accu. Gebruik de acculader en accu’s niet
wanneer zij onderhevig zijn geweest aan sterke slagen of stoten of op een
andere manier zijn beschadigd.
c.
Brandgevaar door kortsluiting: houd de accucontacten schoon en droog.
Bewaar de accu gescheiden van metaaldelen (zoals schroeven en spij-
d.
kers).
Explosiegevaar! Werp accu’s niet in open vuur, stel ze niet bloot aan een
hoge temperatuur en open ze in geen geval. Vanwege de bij het opladen
optredende verwarming mag de acculader niet worden gebruikt op een
brandbare ondergrond of in een brandbare omgeving. Bedek de contacten van de accu wanneer u de accu buiten het oplaadapparaat bewaart.
Bij kortsluiting door overbrugging met metaal bestaat brand en explosiegevaar.
e.
Dek de ventilatieopeningen van de acculader nooit af. Hierdoor kan de
acculader oververhit raken en kortsluiten.
f.
Demonteer de acculader of de accu’s nooit zelf. Een ondeskundige demontage houdt het gevaar voor een elektrische schok of brand in.
g.
Trek de stekker uit het stopcontact wanneer de acculader niet wordt gebruikt of bij reinigingswerkzaamheden. Wanneer u de accu langdurig niet
gebruikt dient u deze van het oplaadapparaat los te trekken en de stekker
uit het stopcontact te trekken.
h.
-
Gebruik alleen verlengsnoeren die goedgekeurd en technisch geheel in
orde zijn.
i.
Zorg tijdens gebruik voor voldoende ventilatie. Opslag en gebruik op
plaatsen waar de temperatuur +40°C overschrijdt, kunnen tot storingen bij
het opladen leiden en moeten beslist worden voorkomen. Het opladen in
een gesloten kast, in de buurt van een warmtebron zoals verwarming of
fel zonlicht leiden tot ophoping van warmte en eventueel tot onherstelbare
beschadiging van de acculader.
j.
-
Niet of schroef geen plaatjes of symbolen op de accu’s en/of acculader.
De veiligheidsisolatie kan hierdoor ineffectief worden. Tevens is er kans op
kortsluiting. Gebruik stickers.
30
Nr.
k.
Afbeelding
Beschrijving
Een beschadigd netsnoer mag alleen worden vervangen door de TyTecker
importeur.
l.
Het gebruik van toebehoren dat niet door TyTecker wordt geadviseerd of
verkocht, kan leiden tot persoonlijk letsel en materiele schade.
3.3
Nr
a.
Persoonlijke bescherming
Afbeelding
Beschrijving
Draag altijd veiligheidsschoeisel
b.
Draag altijd een veiligheidsbril
c.
Draag altijd werkhandschoenen
d.
Draag altijd geschikte werkkleding
e.
Draag indien nodig een veiligheidshelm
f.
Gebruik indien nodig gehoorbescherming
31
4.
Specificaties en technische gegevens
4.1
Specificaties van het apparaat
Product code
TT2020
Gewicht
6,2 kilogram (inclusief accu)
Lengte
1100 mm
Breedte
300 mm
Hoogte
300 mm
Accu
18V Li-Ion
Acculader
Input: 230V ~ 50Hz, 110W
Gebruiksduur
Bindingen / uur
1 uur
40 tot 60 minuten
1100
800 - 1000
Toebehoren
- Accu type KET01-0001
Oplaadtijd accu
Bindingen / accu
- Acculader type KET01-0011
- Opbergkoffer
4.2
Specificaties van de clips
Product naam
TyTecker clips
Clips / patroon
50
Bindingen / patroon
50
Draadtype
DIN 17223 BL.1/1964/2076
Oppervlakte
Gefosfateerd
Diameter draad
1,4mm
Lengte draad
320mm
Diameter clip
30mm
4.3
Technical data
Spanning
18V
Onbelast toerental
1220/min
Maximaal aandraaimoment flexibel
21Nm
Maximaal aandraaimoment star
27Nm
NB: gebruik alleen de bijgeleverde oplader, Rebar Pro acculader KET01-0011
NB: gebruik alleen gepatenteerde Rebar Pro patronen / clips in de Rebar Pro
32
4.5
Geluid en trillingen
Sound pressure level
85 dB(A)
Sound power level
98 dB(A)
Vibration value
6,5m/s2
Het A-gewaardeerde geluidsniveau van de machine bedraagt typisch: geluidsdrukniveau 85dB (A); geluidsvermogen niveau 98 dB (A). Draag gehoorbescherming. Deze waarde is een gereedschap gerelateerde
karakteristieke waarden en niet die geluid ontwikkeld op de plaats van gebruik. Werkplekinrichting kan ook
dienen om het geluidsniveau te verminderen, bijvoorbeeld het plaatsen van werkstuk op geluiddempende
steunen.
De aangegeven trillingsinformatie waarde werd gemeten volgens EN 60745 en mag worden gebruikt voor
het vergelijken van een gereedschap met een ander. De aangegeven totale trillingswaarde kan worden
gebruikt in een voorafgaande proef van blootstelling.
Waarschuwing
Het aangegeven trillingsniveau is representatief voor de belangrijkste gebruiksgebieden van de machine.
Als de machine echter wordt gebruikt voor andere toepassingen, met afwijkende gereedschappen of als het
onvoldoende wordt onderhouden, kan het trillingsniveau afwijken. Hierdoor kan de trilling belasting over de
gehele gebruiksperiode duidelijk worden verhoogd.
Voor een nauwkeurige inschatting van de trilling belasting moet ook rekening worden gehouden met de
tijden waarin de machine is uitgeschakeld of weliswaar draait maar niet wordt gebruikt. Hierdoor kan de
trilling belasting over de gehele gebruiksperiode duidelijk verminderen. Leg de overige veiligheidsmaatregelen ter bescherming van de gebruiker tegen trillingen ook vast, zoals: Onderhoud van de machine en de
gereedschappen, het warmhouden van handen, organisatie van de werkzaamheden.
33
5.
Algemeen gebruik
5.1
Laad de accu op
Nr.
1.
Afbeelding
Beschrijving
Laad voorafgaand aan het eerste gebruik de accu op met een originele
Rebar Pro acculader. Verkeerd gebruik kan leiden tot een elektrische
schok of oververhitting. Ontgrendel de accu door het indrukken van de
ontgrendelingsknop en trek de accu naar voren uit de greep. Forceer niet!
2.
Schuif de accu op de daartoe bestemde contacten op de acculader.
3.
Sluit de acculader aan op het lichtnet (230V, 50Hz) en laad de accu op.
De groene LED knippert tijdens het opladen. Wanneer de groene LED op
de acculader continu brandt dan is de accu volledig geladen. Een nieuwe
accu bereikt pas na een aantal keren opladen en ontladen zijn volledige
capaciteit. Laad de accu alleen op als deze koel aanvoelt.
4.
Ontkoppel de geladen accu door de ontgrendelingsknop in te drukken en
de accu naar voren te schuiven.
34
5.2
Nr.
1.
In- en uitschakelen
Afbeelding
Beschrijving
Het apparaat is gebruiksklaar zodra de accu op het handvat van de boormachine op het apparaat wordt bevestigd.
2.
Als de accu bevestigd is kan de werking van de aandrijving worden
gecontroleerd door het indrukken van de trekker. Zolang de kop van het
apparaat niet ingedrukt is zal het apparaat geen clips schieten. Als u na
bevestiging van de accu en het indrukken van de trekker het sluitstuk niet
ziet draaien of u hoort de motor niet draaien, dan kan het zijn dat u de
accu moet verwisselen.
5.3
Nr.
1.
Het handvat instellen
Afbeelding
Beschrijving
Ontsluit de klemschroef door de knop aan de zijkant van het handvat los
te draaien.
2.
a. De greep kan nu in de gewenste stand langs de verlengbuis worden
geschoven of gedraaid worden aan de hand van u voorkeurshand
(links of rechts).
b. Als een comfortabele positie voor de greep is gevonden kan de greep
worden vastgezet door de knop vast te draaien. Het apparaat is nu
gereed voor gebruik.
35
5.4
Nr.
1.
Betonstaven verbinden kruislings
Afbeelding
Beschrijving
Het apparaat wordt met twee handen beetgepakt. Hierbij wordt de voorkeurshand meestal gebruikt voor het hanteren van de betonvlechtmachine. Nader het te binden kruispunt zodanig dat de staven in de V-bekken
van de positioneerring vallen. Zorg dat u het apparaat altijd op de onder
gelegen staaf positioneert. Zorg er ook voor dat de V-gleuf met de rode
driehoek naar boven van de positioneerring op de zichtbaar is om het apparaat op het betonstaal te richten.
Duw de machine goed naar voren om zeker te weten dat de machine
goed gepositioneerd staat op het kruispunt.
De diameter van de te binden staven bepaalt de hoek (tussen apparaat
en de bindstaven) waaronder het apparaat gehouden dient worden tijdens
het binden:
6mm: 60º
10mm: 70º
16mm: 80º
Als het apparaat onder de juiste hoek staat en goed gepositioneerd staat
op het kruispunt kan de trekker over gehaald worden. Om een binding te
maken dient de trekker ingedrukt te worden. Om meerdere verbindingen
achter elkaar te maken dient de trekker ingedrukt te blijven.
2.
Plaats het apparaat op de bovenste staaf en draai het apparaat met de
klok mee totdat de positioneerring de staaf raakt.
3.
Druk het apparaat volledig naar beneden.
Zorg er altijd voor dat het apparaat volledig naar beneden wordt gedrukt.
36
Nr.
4.
Afbeelding
Beschrijving
Zodra de verbinding is gemaakt kan de gebruiker het apparaat laten
terugveren. Het apparaat mag dan van het kruispunt verwijderd worden
zodat de volgende verbinding gemaakt kan worden.
Door deze richtlijnen in acht te nemen tijdens het werken met het apparaat zullen de gemaakte verbindingen hun optimale sterkte hebben.
De met het apparaat te verbinden kruislingse staafcombinaties zijn:
Staaf 1
Staaf 2
Maat
6mm
8mm
10mm
12mm
14mm
16mm
6mm
+
+
+
+
+
+
8mm
+
+
+
+
+
+
10mm
+
+
+
+
+
+
12mm
+
+
+
+
+
+*
14mm
+
+
+
+
+*
+*
16mm
+
+
+
+*
+*
-
* De volgende voorwaarden zijn zeer belangrijk in deze situatie:
- Gecentreerde positionering op de kruising
- Apparaat en de gekruisde staven zijn volledig ingedrukt
- Gepositioneerd in de juiste hoek
37
5.5 Nr.
1.
Betonstaven verbinden parallel
Afbeelding
Beschrijving
Voor het verbinden van staven die naast elkaar liggen dient het apparaat
loodrecht op de staven geplaatst te worden. Als beide staven, aan de
voorzijde van het apparaat, in de positioneerring gevangen zijn, moet het
gehele apparaat rechtsom aangedraaid worden.
De staven worden zo in de positioneerring geklemd.
2.
Als de staven zijn vastgeklemd in de positioneerring, kan het apparaat
worden ingedrukt. Druk het apparaat volledig in, tot de aanslag bereikt is.
Als het apparaat volledig ingedrukt is kan de verbinding worden gemaakt.
Haal hiertoe de trekker van de boormachine over. Om een binding te maken dient de trekker iets langer dan 1 seconde ingedrukt te worden.
3.
Zodra de verbinding is gemaakt kan de gebruiker het apparaat laten
terugveren. Het apparaat mag dan van het bindpunt worden verwijderd
zodat de volgende verbinding gemaakt kan worden.
De met het apparaat te verbinden parallelle staafcombinaties zijn:
Staaf 1
Staaf 2
Maat
6mm
8mm
10mm
12mm
14mm
16mm
6mm
+
+
+
+
+
+
8mm
+
+
+
+
+
+
10mm
+
+
+
+
+
+
12mm
+
+
+
+
+
+*
14mm
+
+
+
+
+*
+*
16mm
+
+
+
+*
+*
-
* De volgende voorwaarden zijn zeer belangrijk in deze situatie:
- Gecentreerde positionering
- Apparaat en staven zijn volledig ingedrukt
- Gepositioneerd in de juiste hoek
38
5.6 Nr.
1.
Montage van de positioneerring
Afbeelding
Beschrijving
Open de overslagsluitingen door de hefbomen naar buiten toe te duwen.
Schuif de positioneerring op het apparaat. Let hierbij wel op dat de positioneerring maar op 1 manier op het apparaat past.
2.
Plaats vervolgens de haakjes van de overslagsluitingen in de daartoe bestemde uitsparingen in de positioneerring en druk de hefbomen weer vast
tegen de kop van het apparaat aan.
3.
De positioneerring is geplaatst en klaar voor gebruik.
39
5.7 Nr.
1.
Bijvullen van patronen
Afbeelding
Beschrijving
Om het apparaat van nieuwe patronen te voorzien dient eerst het apparaat opengeklapt te worden. Druk hiertoe eerst de zwarte knop onder het
zwarte rubberen gedeelte van het sluitstuk in en klap de machine open.
2.
Druk het sluitstuk in en draai deze tegen de klok in.
Trek vervolgens het sluitstuk helemaal uit het apparaat.
3.
Als het sluitstuk uit het apparaat gehaald is kunnen er nieuwe patronen in
het apparaat geplaatst worden. De patronen kunnen maar op 1 manier in
de container gestoken worden. Plaats nooit meer dan 2 patronen
(100 clips) tegelijk in het apparaat.
4.
Als de patronen in de container geplaatst zijn kan het sluitstuk teruggeplaatst worden. Hiertoe dient het sluitstuk simpelweg teruggeplaatst te
worden in het apparaat en met de klok mee vast gedraaid worden. Ook
het sluitstuk kan maar op een manier in de container gestoken worden.
Na het plaatsen van het sluitstuk kan de machine weer dichtgeklapt worden. Bij veel weerstand het sluitstuk niet geforceerd door drukken.
40
6. Onderhoud en reiniging
6.1 Apparaat
Verwondingsgevaar: door per ongeluk inschakelen van apparaat of acculader. Trek de accu voor verzorgingswerkzaamheden los van het apparaat of trek de stekker uit het stopcontact.
Nr.
1.
Afbeelding
Beschrijving
Neem voor de reiniging van het apparaat altijd eerst de accu los. Houd
zowel de contacten van de accu als die van het apparaat en de acculader
schoon.
2.
- Neem de kop los van het apparaat en spuit hem schoon met perslucht.
Verwijder aangekoekt vuil met een vochtige doek.
- Neem de buitenkant van de machine af met een vochtige doek.
- Haal het sluitstuk uit het apparaat en neem ook dit onderdeel af met een
vochtige doek.
- Spuit de container schoon met perslucht.
- Overig vuil kan met perslucht of met een vochtige doek verwijdert
worden.
3.
Smeer zo nodig de onderdelen van de klembek en die van het scheidingsmechnisme. Bij voorkeur wordt er teflon spray gebruikt.
PTFE
4.
Berg het apparaat en de accessoires, na gebruik, altijd op in de
bijgeleverde koffer.
41
7. Tot slot
7.1 Oplossen van problemen
Verwondingsgevaar: het apparaat mag alleen worden onderhouden, gecontroleerd en gerepareerd door een
elektromonteur volgens de geldende voorschriften.
Als u vragen heeft adviseren wij u om contact op te nemen met uw Tytecker dealer. Het adres vindt u aan het einde
van deze gebruiksaanwijzing. Geef deze gebruiksaanwijzing samen met het apparaat aan uw Tytecker leverancier
mee. Gebruik alleen de originele TyTecker vervangingsonderdelen.
Nr.
1.
Probleem
Indicatie
Oorzaak
Oplossing
Actie
Er gebeurt
niets
Geen geluid
Capaciteit van de
Geen beweging accu
Lege of
defecte accu.
Accu opladen of
accu vervangen
Accu
bevestigen
2.
Er komen
geen clips uit
het apparaat
Apparaat
functioneert
normaal
Inhoud van de
container
Geen
patronen in
apparaat
Apparaat met
patronen bijvullen
Clips
3.
Er komen
geen clips uit
het apparaat
Apparaat
functioneert
normaal
Verwijder positioLosse clips in Verwijder clips
neerring (zie 5.6
kop; vastgeloverwisselen positio- pen clips
neerringen). Controleer op losse clips,
vastgelopen clips
Clips
aanbrengen
4.
Er komen
geen clips uit
het apparaat
Apparaat
functioneert
normaal
Verwijder positioneer- Beitel zit vast
ring, Controleer vrije
baan van de beitel
Clips
aanbrengen
5.
De clips
missen de
betonstaven/
er ontstaat
geen goede
verbinding
Apparaat
functioneert
normaal
De stand van het
Verkeerd po- Juist positioneren
apparaat ten opsitioneren van van het apparaat
zichte van de staven het apparaat
Let op:
- hoek, oriëntatie
van de staven en
afstand tussen de
staven
- positie van de
staven in de
gleuven van de
positioneerring
42
Controleer
Baan van de beitel
vrijmaken
aanbrengen
Clips
aanbrengen
Nr.
6.
Probleem
Indicatie
Controleer
Oorzaak
Oplossing
Actie
De clips
missen de
betonstaven/
er ontstaat
geen goede
verbinding
Apparaat
functioneert
normaal
De positie van de
positioneerring
Positioneerring is niet
goed gemonteerd
Goed monteren van
de positioneerring
Clips
aanbrengen
7.
Machine zit
vast aan het
betonstaal
Apparaat
Controleer vrije
komt los van baan van de beitel
het betonstaal
7.2 De trekker
Druk het apparaat
van het appa- langer in bij de volraat is te kort gende binding.
ingedrukt.
Trek het
apparaat licht
terug en draai
het tegen
de klok in.
Probeer het
apparaat niet
los te trekken
Milieubescherming
Terugwinnen van grondstoffen in plaats van het weggooien van afval. Apparaat, toebehoren en
verpakking moeten op een voor het milieu verantwoordelijke manier worden afgevoerd. Open de
accu’s niet. Defecte accu’s moeten volgens richtlijn 91/157/EEG worden gerecycled. Werp verbruikte accu’s niet bij het huisafval. TyTecker biedt een afvoer van accu’s die verantwoord is voor
het milieu: defecte accu’s worden volledig gerecycled. Lever de accu’s in bij de importeur of bij de
TyTecker klantenservice. Neem voor meer informatie contact op met de TyTecker klantenservice.
7.3Garantie
Voor TyTecker apparaten bieden wij garantie volgens de geldende voorschriften (factuur of pakbon geldt als aankoopbewijs). Naast de wettelijke garantie bieden wij garantie volgens de TyTecker garantieverklaring. Raadpleeg
voor meer details de TyTecker vertegenwoordiger in uw land of de TyTecker klantenservice. Voor schade door
onjuist gebruik, overbelasting, ongelukken of normale slijtage geldt de garantie niet.
43
8. Tips voor gebruik
Leren werken met het apparaat duurt niet langer dan een kwartier. Efficiënt gebruik van het apparaat en het
omgaan met storingen vereist enige handigheid en training. Efficiënt leren werken met het apparaat gaat het
eenvoudigst met instructie van een ervaren persoon.
Gebruik de bijgeleverde accu’s om de beurt. Door de accu’s de tijd te gunnen om binnen het juiste temperatuur
bereik te komen, zullen ze langer meegaan.
De motor laten draaien zolang de verbinding nog niet gemaakt is. Door vroegtijdig de motor stop te zetten vergroot
je de kans op slechte verbindingen en/of achterblijvende clips in de tool.
Gebruik de v-vormige uitsparing op de bovenkant (rode driehoek) van de positioneerring zichtbaar is om het
apparaat op het betonstaal te richten. De onderste staaf moet ongeveer in het midden van deze gleuf zitten.
Laat doosjes met patronen niet buiten staan maar berg ze op in een droge ruimte. Vocht door bijvoorbeeld regen
veroorzaken roest op de clips.
Gebruik geen roestige clips.
44
9. Replacement part list for Rebar Pro
Replacement
part
list for RebarPro
Vervangende
onderdelenlijst
voor Rebar Pro
Item No. Part No.
Description
Qty
Item No. Part No.
Description
Qty
1
B0800-0441
Click lever set
2
14
A0100-3761
Spring 69*158L
1
2
B4800-0011
Sliding sleeve assembly
1
15
B4600-0001
Container assembly
1
3
B4800-0031
Chisel assembly**
1
16
B4600-0021
Clip shaft assembly
1
4
B4800-0001
Positioning ring assembly
1
17
A4600-0011
Clip Shaft axis
1
5
B4800-0021*
Positioning ring assy for floor heating
1
18
B4300-0001
Upper folding part assembly
1
6
B0700-8561
Head wearing set
1
19
B4300-0021
Lower folding part assembly
1
7
A0000-0571
Screw M4*12
1
20
A0105-0401
Container locate reed**
1
8
A4802-0001
Ramp
1
21
B4500-0001
Driver shaft & Adapter assembly
1
9
A4900-0001
Cover, dust preventing
1
22
B4300-0011
Base tube assy
1
10
A0000-1831
FHC screw M3*12
2
23
VET01-00
18V cordless drill driver assembly
1
11
A4500-0001
Passive transmission plate
1
24
B2300-0061
Handle
1
12
A4601-0001
Lower contour ring
1
25
KET01-0001
Battery pack
1
13
A0206-0061
Deep groove ball bearings
2
26
KET01-0011
Battery charger
1
* This part is an accessory
** Repair kit
45
DECLARATION OF CONFORMITY
Verpa Senco B.V.
Pascallaan 88, 8218 NJ
Lelystad, The Netherlands
in accordance with the following directive(s): Machine Directive 2006/42/EC. Declare under our sole responsibility that
We
of
Equipment: Concrete rebar tier
Model type:
TT2020 (Rebar Pro)
EC Directives: 2006/42/EC
2004/108/EC
Fred van Gerven
Technical manager
Verpa Senco B.V.
Pascallaan 88, 8218 NJ,
Lelystad, The Netherlands
Original Issue: March 18, 2014
Signed by:
Position:
Place of DOC:
Authorized Representative: (authorized to compile the technical file)
Name: Fred van Gerven
Address: Verpa Senco B.V.
Pascallaan 88,
8218 NJ Lelystad, The Netherlands
Fred van Gerven,
Technical Manager
CONFORMITEITSVERKLARING
Verpa Senco B.V.
Pascallaan 88, 8218 NJ
Lelystad, The Netherlands
in overeenstemming met de volgende richtlijn(en): Machinerichtlijn 2006/42/EC. Verklaren onder onze eigen verantwoordelijkheid
dat:
Wij
uit
Apparatuur: Beton vlecht apparaat
Model type:
TT2020 (Rebar Pro)
EC Directives:
2006/42/EC
2004/108/EC
Ondertekend door: Fred van Gerven
Functie:
Technische manager
Locatie van doc.: Verpa Senco B.V.
Pascallaan 88, 8218 NJ,Lelystad,
The Netherlands
Originale uitgave: maart 18, 2014
Geautoriseerde vertegenwoordiger: (gemachtigd om het technisch dossier samen te stellen)
Naam: Fred van Gerven
Adres: Verpa Senco B.V.
Pascallaan 88,
8218 NJ Lelystad, The Netherlands
46
Fred van Gerven,
Technical Manager