1
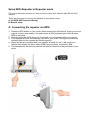
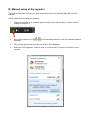
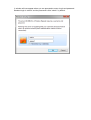
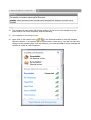
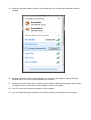
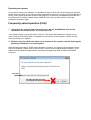
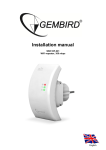
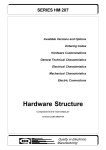
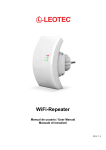
Installation manual
WNP-RP-002
WiFi-repeater, 300 mbps
English
Setup WiFi-Repeater in Repeater mode
This manual describes the steps you have to follow to setup your Gembird WNP-RP-002 WiFirepeater.
There are two ways to connect the repeater to your home router:
A: Via WPS (Wifi Protected Setup)
B: Manual setup
A: Connecting the repeater via WPS
1. Press the WPS button on your router (Most routers have this feature, check your router
manual for more information). On most routers a WPS indicator light will blink when
WPS is activated.
2. Now also press the WPS button for 5 seconds on your repeater within one minute.
3. Your repeater will now automatically connect to your router. During this process the
indicator lights on the repeater will blink frequently.
4. When the setup is complete and your repeater is ready for use, it will send out a
network with exactly the same name (SSID) as your router, followed by .Ext.
5. The password for this wireless network will also be identical to the password of your
router.
B: Manual setup of the repeater
This manual describes the steps you have to follow to setup your Gembird WNP-RP-002 WiFirepeater.
Follow below steps to setup your repeater:
1.
Plug in the repeater in an available power outlet socket. Wait for about 1 minute until the
repeater is booted up.
2.
Click on the network icon (
networks.
3.
The repeater network will be in this list, SSID is WiFi-Repeater.
4.
Select the “WiFi-Repeater” network (click on it) and choose “Connect” and wait for some
seconds.
of
) in the Windows taskbar to view the available wireless
5.
You will be asked for a password. The password is: 12348765
6.
Windows will now establish a connection with the WiFi-Repeater. It might ask you to
specify the network type. In most cases you can select “Home Network”.
7.
You are now connected to the network of the repeater and you are ready to open the setup
page via your web browser (Internet Explorer, Firefox, Safari, etc)
8.
Open your web browser (Internet Explorer, Firefox, Safari, etc) and type http://192.168.10.1
in the address bar (not in the Google search bar).
A window will now appear where you are prompted to enter a login and password.
Standard login is “admin” and the password is also “admin” by default.
9.
You are now in the main menu of the Gembird WNP-RP-002 WiFi-Repeater
1
3
(optional)
2
10. On the top of the page, choose “Repeater” (1)
11. Click on the “Site Survey” button (2)
12. You will now see a list of all available wireless networks that are found by the repeater. Your
own personal WiFi-network should also be in this list.
Select your network in the column “Select” by checking the checkbox next to it.
Name current network/router
Your router password
13. The name (SSID) of your current network/router will now be visible in the “Network name”
field. Below you are asked to enter the password of your network. NOTE, this is case
sensitive!
You do not have to change anything from the pre-entered settings. In above example you
only have to check if all settings are correct and enter the pre-shared key (the password).
14. Technically, the device is now ready for use. However, you do have the optional possibility to
change the name (SSID) and password of the repeater network (3). This will influence the
network name that will be visible on your Phone, tablet or PC. By unchecking the “Auto setup”
checkbox, you can choose any name and password you prefer. E.g. it is possible to give your
repeater exactly the same name and password as your existing router, so all you equipment
can switch between the repeater and router seamlessly.
15. If you have setup everything according to your preferences, press “Save/Apply” .
16. The repeater will now reboot with all new settings. Do not remove the repeater from the
power socket until it has completely finished rebooting.
17. Your repeater is now ready for use.
18. Again click on the network icon (
of
) in the Windows taskbar to view the available
wireless networks. Your repeater will be visible under its new name. If you did not make any
changes to the repeater name it will be visible as yourroutername.Ext. In below example the
repeater is visible as “WiFi-Repeater1”.
19. Select the repeater network (click on it) and make sure the “Connect automatically” option is
enabled.
20. Windows will ask to enter a password when you connect to the repeater network. Use the
password from your router (or the password you created).
21. Windows will now connect to the network of your repeater. Windows might again ask to select
the network type. In most cases “Home Network” is the correct option.
22. Your PC now has an internet connection via the repeater.
23. You can safely unplug the repeater from its power socket; it will always keep its settings.
Resetting the repeater
If you need to reboot your repeater, it is possible to unplug it from the wall socket and plug it back
in after some seconds. Or you can press the reset button in the side. In case you wish to perform a
factory reset, please press and hold the reset button for 30 seconds. Afterwards the repeater will
be sending out its original network name “WNP-RP-002” and you will be able to follow the
installation procedure again.
Frequently asked question (FAQ)
1. I plugged in the repeater and conencted to its network, but Windows tells me the
connection has limited access or no internet acces.
Your repeater needs to be setup before First use. This allows the repeater to connect to your
router. Only after the initial setup it is possible to use internet via the repeater. Please use this
manual to setup your repeater.
2. Windows asks for a PIN code when I try to connect to the repeater network. Entering the
password (12348765) is not working here.
Indee Windows can ask for a PIN code sometimes. However, for setting up this repeater using a
PIN is not possible. Please click on the blue link “connect to this network without setting it up” to
enable normal password authentication. (Windows message may differ in different Windows
versions)
Click here
Do NOT click OK, but click
on the blue link above.
X
3. When I press “Site Survey” nothing is happening or the list of found networks is not
complete or stays empty.
Wifi networks only send out their name (beacon) every 100 milliseconds. In theory this is possible
that your network was just ‘missed’. In this case it’s usually enough to press the “Site Survey”
button again, or to refresh the webpage (F5) and press the “Site Survey” button again.
4. This manual is made for Windows users; can I also install the repeater with my iPad?
Yes, that is possible. Follow the below steps to setup the repeater with your iPad (or any other
tablet)
a. Plug the repeater into a wall socket on a location within the network range of the router.
b. Get your iPad/tablet and go to ‘settings’
c. Have your iPad/tablet searching for wireless networks in range. It should find a network
named: WNP-RP-002.
d. Connect your iPad/tablet to this network. The password is 12348765.
e. When your iPad/tablet is connected to the repeater network, you can close the settings
screen of your iPad/Tablet.
f. Now open Safari/browser on your iPad/tablet and type 192.168.10.1 in the address field
(not in the Google search field)
g. A login screen will now appear. Login is ‘admin’ and password is also ‘admin’.
h. The setup page of the repeater will now be opened.
i. Now follow the on-screen instructions and/or follow the remaining steps in this manual.