Transcript
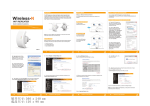
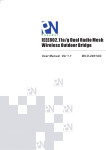
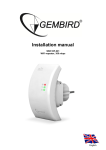
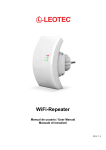
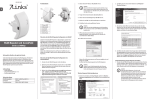
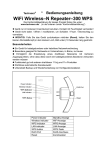
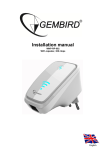
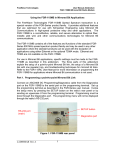
Introduction:
WLAN
REPEATER
The WiFi Repeater is a combined wired/wireless network connection device
designed specifically for small business, office, and home office networking
requirements. It allows a wireless network to be expanded using multiple access
points without the need for a wired backbone to link them. It also works well with
other 11b/g and 11n protocol wireless products.
Getting Started
Setting up a Wireless Infrastructure Network
For a typical wireless setup at home (as shown below), please do the
following:
You will need WiFi
AP/Router Internet access
Wireless AP Mode
NOTE: If you need to reset the Wi-Fi Repeater, you need press and hold the
reset button inside the tiny hole for 10 seconds.
Package Contents
Before you starting to use this router, please check if there's anything missing in
the package, and contact your dealer of purchase to claim for missing items:
You can configure the Wi-Fi Repeater by connecting it with your
computer/laptop with enclosed RJ45 cable or wirelessly. We recommend you to
do it with wire.
A. Configure the Wi-Fi Repeater with RJ45 Cable
Wireless Repeater Mode
Quick Installation Guide (Q.IG)
How to configure the Wi-Fi Repeater
You will need broadband
Router Internet access
A1. Plug the Wi-Fi Repeater to a
wall socket. Connect your computer
/ laptop with the Wi-Fi Repeater with
enclosed RJ45 Cable.
A2. Click the “Start” button (it
should be located at the lower-left
corner of your screen), then click
“Control Panel”. Click “View Network
Status and Tasks”, and then click
“Manage Network Connections”.
Right-click “Local Area Network”,
then select “Properties”. When the
“Local Area Connection Properties”
window appears, select “Internet
Protocol Version 4 (TCP/IPv4)” and
then click “Properties”.
Connect the WiFi-Repeater
to your Router/Switch with
RJ-45 Cable
A3. Setting IP address manually:
Type IP address is 192.168.10.x (x
is from 2 to 254), and Subnet mask
is 255.255.255.0. Type the Router’s
LAN IP address (the default IP is
192.168.10.1) into the Default
gateway field.
·1 x Wireless-N Repeater
·1 x RJ-45 Networking Cable
·1 x Quick installation Guide
MT4212
01
A4. Open web browser and type
http://192.168.10.1 in the browser's
address box. This number is the
default IP address for this device.
Wireless-N Wifi Repeater
A7. Click on ‘Repeater – OneKey Setting’ button
02
Wireless-N Wifi Repeater
A9. Click on ‘Refresh List’ button.
Select the Wireless SSID and click ‘Next’ to continue.
A5. The login screen below will
appear. Enter the “User Name” and
“Password” and click “OK” to login.
The default User name is “admin”
and the Password is “admin”.
03
Wireless-N Wifi Repeater
A11. Click ‘OK’ to confirm. The
Repeater will restart.
A12. Wait a few seconds and you will see the status site like below. It means
your Wi-Fi Repeater is ready for use.
The Wi-Fi Repeater1 WLAN key is same with your router.
A6. After logging in and click
“Setup Wizard”, you will see
the web page below:
Select “Wireless Repeater Mode
(Station)” and click on ‘Next’ to continue.
A10.When you see the site below, please do not change any setting but only
insert the password of your network.
A8. Wait a few seconds and you will see the site below and please click on
‘Wireless Network Selection’ button.
If you do not see the site like above, you need to re-configure it again.
Click on ‘Apply and Reboot’ button.
04
Wireless-N Wifi Repeater
05
Wireless-N Wifi Repeater
06
Wireless-N Wifi Repeater
NOTE: If you need to reset the Wi-Fi Repeater, you need press the reset button
inside the tiny hole for 10 seconds.
07
Wireless-N Wifi Repeater