1
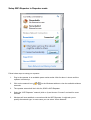
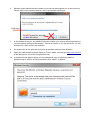
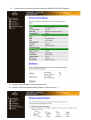
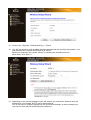
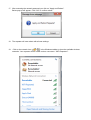
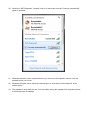
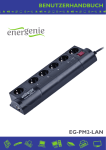
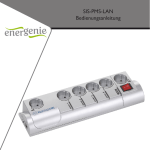
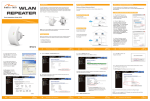
Installation manual
WNP-RP-001
WiFi-repeater, 300 mbps
English
Setup WiFi-Repeater in Repeater mode
Follow below steps to setup your repeater:
1.
Plug in the repeater in an available power outlet socket. Wait for about 1 minute until the
repeater is booted up.
2.
Click on the network icon (
networks.
3.
The repeater network will be in this list, SSID is WiFi-Repeater.
4.
Select the “WiFi-Repeater” network (click on it) and choose “Connect” and wait for some
seconds.
5.
Windows will now establish a connection with the WiFi-Repeater. It might ask you to
specify the network type. In most cases you can select “Home Network”.
of
) in the Windows taskbar to view the available wireless
6.
Windows might indicate that the network is not secured and suggest you to setup security.
For the setup of the repeater however, this is not relevant at this point.
Click here
Do NOT press OK, but click
on blue link above
X
7.
In the window where you are asked to setup the network, you are also offered the option to
“continue without setting up the network”. Choose this option. If you just press OK, you will
be asked for a PIN, which is not available.
8.
So, please click on the blue link and ignore all possible warnings from Windows..
9.
Open your web browser (Internet Explorer, Firefox, Safari, etc) and type http://192.168.10.1
in the address bar (not in the Google search bar).
10. A window will now appear where you are prompted to enter a login and password.
Standard login is “admin” and the password is also “admin” by default.
11. You are now in the main menuof the Gembird WNP-RP-001 WiFi-Repeater
12. Choose “Setup Wizard” from the left menu bar
13. Choose “Wireless Repeater Mode (Station)” and click “Next >>”
14. Click on the “Repeater –OneKey Setting >> ” button
15. You will now see a list of all available wireless networks that are found by the repeater. Your
own personal WiFi-network should also be in this list.
Select your network in the column “Select” by checking the checkbox next to it.
When done, click “Next >>”
16. Depending on the security settings of your wifi network you now will be asked to enter the
password of your network. NOTE, this is case sensitive!
You do not have to change anything from the pre-entered settings. In above example you
only have to enter the pre-shared key (the password).
17. After entereing the network password you click on “Apply and Reboot”.
Below pop-up will appear. Click “OK” to confirm reboot.
18. The repeater will now reboot with all new settings.
19.
Click on the network icon (
of
) in the Windows taskbar to view the available wireless
networks. Your repeater will be visible under a new name: “WiFi-Repeater1”.
20. Select the “WiFi-Repeater1” network (click on it) and make sure the “Connect automatically”
option is enabled.
21. Windows will ask to enter a password when you connect to the repeater network. Use the
password from your router.
22. Windows will again ask to select the network type. In most cases “Home Network” is the
correct option.
23. The repeater is now ready for use. You can safely unplug the repeater from its power socket;
it will always keep its settings.