Transcript
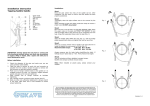
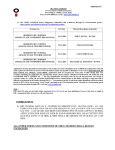
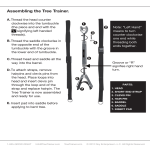
Installation Instruction
Gekave Internal Repair Clamp
Before installation:
1.
2.
3.
4.
5.
6.
Check the internal diameter of the pipe and make sure you
are using correctly sized clamps.
Clean the pipe to remove as much dirt and corrosion as
possible from the surface. Scrape the pipe to remove dirt
and corrosion so that the surface is smooth.
Make sure no foreign material sticks to the gasket as it is
placed in the pipe, nor becomes lodged between gasket and
pipe as the nuts are tightened.
Keep threads free of foreign material to facilitate tightening.
Use a torque wrench to achieve proper torque. Also make
sure you use the right wrench size (step 6).
Bolts are often not sufficiently tightened if a torque wrench
is not used. Take extra care in this situation to ensure
proper tightening.
Step 6
Then use a torque wrench with a handle of at least 300 mm in
length to tighten all nuts evenly and crosswise in 20 Nm
increments to a maximum of 140 Nm. This exerts pressure on
the bolts so that the sections will expand against the inside of
the pipe.
Note: The gap between the turnbuckle blocks should be equal
on all turnbuckle studs.
Recommended torque
M16: 140 Nm
Wrench size:
24
Always pressure test for leak. If leakage occurs repeat step 4, 5
& 6. Then pressure test again.
Step 6
Wait 20 minutes and then retighten to proper torque.
Installation:
Step 1
Mark the pipe where the ends of the clamp will be. After
installation use this mark to confirm that the clamp has been
properly positioned.
Note: When installed on plastic pipes, please contact your
supplier.
Step 2
Thoroughly clean the pipe surface area to be covered by the
clamp.
Apply lubricant to pipe and rubber inside the clamp to ensure a
proper seal. DO NOT use grease!
Step 3
Place the gasket carefully with the grooves against the inside of
the pipe. The leakage should be in the middle of the grooves.
1.
2.
3.
4.
5.
Bolt *
Turnbuckle stud
Tension pin *
Turnbuckle block
Gasket
6.
7.
8.
9.
Armour
Scale
Nut
SS Washer
* 1+3 are connected
Step 4
Place one scale with 2 armours on the bottom of the gasket and
install the tension pins/bolts. Place the next scale with 1 armour
on one of the tension pins/bolts.
Place the last scale without armours on the other tension
pin/bolt and install the last tension pin/bolt.
Step 5
Install all the turnbuckle blocks, SS washers and nuts on the
bolts.
IMPORTANT: Always check that you have a correct and
fully functional product before you start any excavations
or repairs. When in doubt, take a spare unit with you to
avoid delaying the work.
All our quotations, all orders placed with us and all contracts concluded with us are
subject to the METAALUNIECONDITIONS, filed with the registrar of the District Court
of Rotterdam, as stipulated in the latest text lodged with the said Court. The conditions
of delivery and payment have been sent to you earlier and are in your possession, but
if they are not, they will be sent to you again upon request. All agreements are subject
to the law of the Netherlands.
All disputes arising from offers and agreements, however such disputes may be called,
shall be submitted to the competent Dutch Court.
Version 1.0