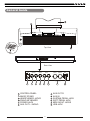
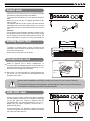
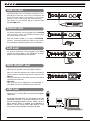
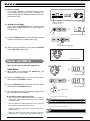
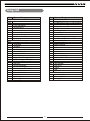
1
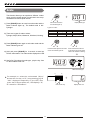
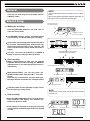
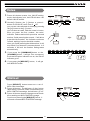
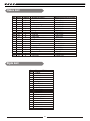
Stage Piano
User's Manual
Using the Instruction Manual
Congratulations on your purchase of this stage piano!
The piano is an user friendly piano with fabulous sound quality and advance feature such as scale practise and MIDI
controller. No matter you are adult or children, you will enjoy playing the piano as it provides amazing styles for
accompaniment, expressive tones, and real time record. Other features such as lesson function, variety of songs will
help you better master the playing skil.
This piano also provide with SD card function, you can choose your favorate MIDI song to play;You can backup your
recording setting to SD card.
You are recommended to study this manual carefully before using the unit.
Precautions
Please read the following carefully before use:
Do not expose the piano to high temperature, direct sunlight and excessive dusty places.
Do not place the piano too close to other electrical appliances such as television and radio. It may cause interference.
Do not place the piano to excessive humid area. Avoid putting container with liquid on top of the piano in order to
prevent damage of the internal parts of the piano by flowing liquid.
Always unplug AC cord by gripping the plug firmly, but not pulling on the cable.
Do not apply excessive force to the switches and buttons.
When the piano is not in use or in the time of thunderstorm, please disconnect the power supply.
Avoid adjusting the volume level to the maximum or to the levels that you feel uncomfortable, we recommend you to
limit the volume level to two-thirds of the max for preventing the damage of audiory sense.
Unplug the power cable before cleaning the piano. Do not connect or disconnect the power cable with a wet hand.
Check and clean the power plug periodically.
To avoid damages, turn off the power switches before you disconnect the related devices from the piano.
Clean the piano and remove the dust with a dry soft cloth or a slightly damp cloth.
Never use cleaners such as thinner or alcohol. To prevent any damage on the surface of the LED display, please
use lens cleaning tissue to clean the display.
If the piano cable is damaged, please do not use the piano. Otherwise it may cause fire or electrical hazard.
In case of malfunction due to improper handling the piano, please switch off and on again after 30 seconds.
Do not attempt to disassemble or repair the piano. If the piano does not work properly, please contact the
approved repairer.
The piano should not be exposed to dripping or splashing.
2
Conent
Main Feature
4
General Guide
5
Control Panel
6
The Connectors
- Power Jack
- Headphones Jack
- AUX OUTJack
- Sustain/Soft Jack
- MIDI IN/OUT Jack
7-8
7
7
7
8
8
Operation
- Power on & Master Volume
- Song
- Voices and Effects
- Metronome
- Style Control
- Record
- Lesson
- SD Function
9-19
9
9
10
15
15-16
17-18
18
18-19
MIDI
- MIDI Controler
- Command
- Channel
- Value
- MIDI OUT
- What is MIDI
20-24
20
21
22
23
23
24
Specifications
25
Voice List
26
Style List
26
Song List
27
MIDI Implementation Chart
28-29
3
Main Feature
Keyboard:
88 touch response keyboard with 3 touch levels.
Operation:
Use the [+] & the [-] button or direct select button to select desired function & parameters.
Voice:
20 voices in all, 10 direct select buttons to select.
Style:
20 piano styles in all, use the [+] & the [-] button to select.
Song:
60 songs in all, each one has self-learning mode.
Song learning:
Use the [TRACK1 / SONG MELODY OFF] button to enter.
Record:
1 user song, include 2 record track.
SD card:
Play midi files, save recorded data.
MIDI ctrl:
Send out midi control message
Style :
START/STOP, ACC VOL, FILL A/FILL B.
Others function buttons:
DUAL, SPLIT, REVERB/CHORUS, METRO, TRANSPOSE +/-, TOUCH, etc.
Buttons with indicator:
FILL A/FILL B, RECORD, PLAY/STOP, ACC VOL, SPLIT, DUAL, REVERB/CHORUS, TOUCH, METRO,
(SD)STORE, (SD)PLAY/STOP, TRACK 1,TRACK 2, SCALE.
Pedal:
Sustain pedal, soft pedal
.
Interface:
MIDI in/out, USB, Phone, Aux in/out
4
General Guide
Top View
4
3
12V
AUX IN
AUX OUT
L/MONO
R
PEDAL
SUSTAIN
MIDI IN
MIDI OUT
USB
SOFT
Rear View
12V
5
1
2
3
4
5
6
AUX IN
AUX OUT
L/MONO
R
6
7
8
PEDAL
SUSTAIN
SOFT
9
10
CONTROL PANEL
MUSIC STAND
HEADPHONES JACKS
PIANO KEYBOARD
POWER JACK
AUX OUT L / MONO
MIDI IN
11
7
8
9
10
11
12
5
MIDI OUT
USB
12
AUX OUT R
AUX IN
SUSTAIN PEDAL JACK
SOFT PEDAL JACK
MIDI IN/OUT JACKS
USB JACK
Control Panel
2
1
2
3
4
5
6
7
8
9
10
11
12
13
11
13
12
3
4 5 6 7 8 9 10
1
21
14 15 16
17
22
23
POWER SWITCH
BRILLANCE
MASTER VOLUME
START/STOP
ACC.VOL
FILL A/FILL B
RECORD
PLAY/STOP
TRACK 1/SONG MELODY OFF
TRACK 2
TRANSPOSE +/TEMPO +/MIDI CONTROL
- MIDI OUT
- COMMAND
- VALUE
- CHANNEL
24
14
15
16
17
18
19
20
21
22
23
24
25
26
27
6
25
18
19
26
20
27
STYLE
VOICE
+ & VOICE DIRECT SELECT BUTTONS
LED DISPLAY( VOICE, STYLE, -SONG)
SONG
SCALE
DUAL
SPLIT
REVERB/CHORUS
TOUCH
METRONOME
SD CONTROL
- PLAY
- STORE
SD SLOT
Power Jack
This piano can be powered from a standard household
wall outlet by using the specified AC adaptor.
The power jack is located on the rear panel of the piano
body.
Make sure that only the AC adaptor specified for this
piano is used.
The adaptor shall be 12V DC output, and center positive
type.Make sure to turn off the piano before you connect
the adaptor into the AC wall outlet and the cord into the
unit.
Cautions£¡
Use of another type of adaptor creates a danger of fire
and electrical shock.For safety sake, make sure to unplug
the AC adaptor from the wall outlet whenever leaving the
piano unattended for a long time or during a thunderstorm.
12V
AUX IN
AUX OUT
L/MONO
PEDAL
SUSTAIN
R
MIDI IN
MIDI OUT
USB
SOFT
Setting Music Rest
The piano is supplied with a music rest that can be
attached to the instrument by inserting it into slot at the
rear of the control panel.
Please set up the music rest as shown.
Headphones Jack
Headphones
Jack 1
1 When an optional set of stereo headphones is
connected with the headphones jack 2, the sound from
speakers will switch off automatically resulting in only
the sound from headphone to be heard.
Headphones
Jack 2
2 When jack 1 is connected with the stereo headphones,
the sound can be heard from both headphones and
speakers of the piano.
Never use the headphone with high volume, as it may hurt your sense of hearing.
To prevent the damage of the speakers, ensure that the volume is set to the minimum
level before connecting the power and other devices.
AUX OUT Jack
12V
When you want to listen to the voice with an amplifier,
connect amplifiers to the AUX OUT L/MONO and R jacks
on the rear panel. The volume is adjusted with the
VOLUME button. (For monaural playback, use the L/
MONO jack. For stereo playback, connect both L/
MONO and R jacks.)
L/MONO
To avoid damaging the speakers, please ensure that
volume has set to the minimum level before connecting
the power and other devices.
7
AUX IN
AUX OUT
R
PEDAL
SUSTAIN
SOFT
MIDI IN
MIDI OUT
USB
AUX IN Jack
12V
The audio output from a CD player connected to the
AUX IN jack on the rear panel can be mixed with the
sound of the piano brain. This function is convenient
when you want to play along with a favourite song.
The volume of the external signal is adjusted with
the VOLUME button.
AUX IN
AUX OUT
L/MONO
PEDAL
SUSTAIN
R
MIDI IN
MIDI OUT
USB
MIDI IN
MIDI OUT
USB
SOFT
Sustain Jack
12V
An optional footswitch can be plugged into the SUSTAIN
jack for sustain control. The footswitch function is like
the sustain pedal on a piano.
AUX IN
AUX OUT
L/MONO
PEDAL
SUSTAIN
R
SOFT
Step the sustain pedal on to open the SUSTAIN
function , it will apply SUSTAIN effect to the piano,
then release the sustain pedal to turn off the effect.
Soft Jack
12V
An optional footswitch can be plugged into the SOFT
jack for soft control. Step on the soft pedal , all notes
played on the keyboard have a soft effect.
AUX IN
AUX OUT
L/MONO
PEDAL
SUSTAIN
R
MIDI IN
MIDI OUT
USB
SOFT
MIDI IN/OUT Jack
MIDI stand for Musical Instrument Digital Interface.
MIDI is a world wide standard that makes it possible for
various electronic musical instruments and other devices.
MIDI IN:
Data transmitted from other MIDI instrument via MIDI is
received by this terminal.
MIDI OUT:
Data produced by the Digital Piano is transmitted to
other MIDI instruments via MIDI from this terminal.
12V
L/MONO
USB Jack
Connect PC or other USB host devices that support
USB Audio.
For devices with USB cable, you can simply connect the
MIDI/USB convertor to your USB connector on your
devices and plug the MIDI in and out cables into the
piano, after the driver is installed and initialization is
finished, you can choose USB Audio Device in the
device menu of the software to transfer midi data.
8
AUX IN
AUX OUT
R
PEDAL
SUSTAIN
SOFT
MIDI IN
MIDI OUT
USB
Power on & Master Volume
1 First, make sure the correct connections.
VOICE
2 Press the [POWER] switch. The LED display lightens
up.
STYLE
SONG
Press the power switch on
3 Push the [VOLUME] sliding bar rightwards, the whole
volume becomes increase, push it leftwards, the
whole volume becomes decrease.
VOLUME
MIN
The level decreases
MAX
The level increases
4 Press the [+] and the [-] button synchronously, and then
power on the piano. it can reset all the setting to the
default value and erase the record data.
+
Press the power switch on
Press together
NOTE:
If the LED display has not lightened up after you power on the piano, please check the power supply.
If the piano is silent, the volume may be adjusted to its minimum level.
Although Mains switch is in OFF position, the piano is not disconnected from the power supply completely!
Song
There are 60 songs in total. (See Appendix 3 ).
1
STYLE
VOICE
PLAY a song:
Press the [SONG] button to enter the song mode, the
SONG flag on LED is lightened. It will play all songs
circlely.
VOICE
STYLE
SONG
SONG
Enter the song mode
and play all songs circlely.
Press the [START/STOP] button to stop playing the
song, but it will not quit the song mode. The 2nd time
you start playing the song by pressing the [START
/STOP] button, it will play current song repeatedly.
Press first to stop playing the song,
press again to play current song repeatedly.
9
Song flag
is lightened
2 SELECT a song:
Use the [+] or [-] button to select the song you want.
If you select the new song, LED will display it's
number at first and then display introductory beat and
the measure count.
VOICE
STYLE
SONG
Select a song
The beat LED indicators
are lightened in turn.
3 INTRODUCTORY BEAT:
After pressing [START/STOP] , the measure count
begins from negative value to 1, and then begins to
play the song.
VOICE
STYLE
SONG
Display the measure count
4 Press the [TRACK1] button to enter self-learning mode,
and turn on/off the main melody of the song.
The LED indicator is lightened.
5 While the song stop playing, you can press the [VOICE]
and the [STYLE] button to exit.
STYLE
VOICE
Exit the song mode
SONG
Voices and Effects
There are 20 voices in total (See Appendix 1).
STYLE
VOICE
Voice Select
1
When power on, LED lightens the VOICE flag and
displays the 001 voice number.
VOICE
STYLE
SONG
Display VOICE R1
SONG
2 Press the [VOICE] button to enter the voice mode,
LED displays the VOICE R1 number.
3 Press the [DUAL] button to enter the dual voice mode,
LED displays the VOICE R2 number.
VOICE
SONG
Display VOICE R2
Select a voice
4
STYLE
you can select other voice by pressing the [+] and the
[-] or voice Direct Select buttons.
Use Direct Select buttons to select
Press the first time to select GRD.PIANO
There are 10 voices Direct Select buttons to select 20
voices. Each Direct Select button can be used to choose
2 different voices.
Press the first time to select upper layer voice , press the
second time to select the lower layer voice.
Press the second time to select BRT.PIANO
When you select the upper layer voice, the upper layer
indicator turns on.
When you select the lower layer voice, the lower layer
indicator turns on and the upper layer indicator turns off.
10
Dual
The piano has dual voice. You can create the new sound through this function for richer and punchier
sounds. It seems that you can get two different sounds at the same time when you press a key in the right
area in the keyboard.
1 Press the [DUAL] button to turn on the DUAL mode,
the VOICE flag on the LED and the indicator are both
lightened. The dual voice number is also displayed on
the LED.
VOICE
STYLE
SONG
Voice flag is lightened
Turn on the DUAL voice
2 Then, you can get two different sounds at the same
time when you press one key on the keyboard.
Two voices will sound
at the same time.
Eg. Piano
STR. TRIO
3 Use the [+] / [-] button and voice Direct Select buttons
to select your desired voice. The default voice number
is 007.
4
Press the [DUAL] button again to turn off the DUAL
mode, the indicator goes off.
VOICE
STYLE
SONG
NOTE:
Select a dual voice
While the keyboard is splited,only the right hand
area can respond the dual voice, the left hand
area can't.
The indicator goes off.
Transpose
1 You can change the pitch of the entire keyboard by
semitone steps with TRANSPOSE function.
- TRANSPOSE +
-
TEMPO
+
2 Press the [TRANSPOSE +] or [TRANSPOSE -] button
for the first time, LED displays current transpose value
temporarily.
VOICE
STYLE
SONG
Display current transpose value
- TRANSPOSE +
3 Press [TRANSPOSE +] to increase the value and Press
[TRANSPOSE -] to decrease the value, the maximal
range to be adjusted is from -12 to +12 semitones, the
default value is 000.
-
TEMPO
- TRANSPOSE +
+
Decrease the value
increase the value
- TRANSPOSE +
4 In TRANSPOSE setting , press the [TRANSPOSE +]
and [TRANSPOSE -] button simultaneously to set the
value to default.
-
TEMPO
+
VOICE
STYLE
SONG
Display default transpose value
NOTE:
If you don't press any button for 2 seconds in transpose
setting mode, it will quit this mode automatically.
11
Touch
This function allows you to turn on the dynamic
level when playing the keyboard.
1
2
When power is on , the TOUCH indicator lightened.
Press the [TOUCH] button continuously to select the
touch response type, the TOUCH indicator is flash and
displays touch response type 00X temporarily on LED.
VOICE
The indicator flashes
There are 4 touch response types. Press [TOUCH]
button repeatedly to select, the default is 002.
VOICE
STYLE
STYLE
SONG
Display touch value
SONG
Select touch response type
3
If the type is set as OFF, it means no touch response
to keyboard, the TOUCH indicator goes off.
VOICE
STYLE
SONG
NOTE:
If you don't press anybutton for 2 seconds in touch
response type select mode,it will quit this mode
automatically.
Reverb/Chorus
Reverb/chorus effect will enhances the piano with
fuller and expressive sound.
2 Press the [REVERB/CHORUS] button to switch the
DSP response setting.
3 Press [REVERB/CHORUS] repeatedly to switch
to reverb or chorus setting mode.
12
STYLE
SONG
VOICE
STYLE
SONG
Display touch
value on the LED
1 When power is on , the Reverb/chorus indicator is on.
4 There are 32 level to be selected by pressing [+]
and [-] button. The default chorus level is 00, the
default reverb level is 08.
VOICE
VOICE
STYLE
SONG
VOICE
STYLE
SONG
Split Point
You can split the piano to melody and chord
area by this function.
VOICE
The indicator is flashing.
1
Press the [SPLIT] button, LED displays the current
split parameter XXX .
2
Use the [+] / [-] button or Keyboard to change it, after
exit the setting mode the new value becomes to the
new split point, the split default value is 34.
VOICE
STYLE
STYLE
Display split parameter
SONG
Change split point
Default split
point F#3
3
SONG
The new split point belongs to the left area of the
keyboard.
Chord
area
Melody
area
Brilliance
When the piano is power on:
Push BRILLANCE splider bar to right it sounds
brighter ;
Push BRILLANCE splider bar to left, it sounds more
gloomy;
You can change the piano brilliance as your wish.
13
For a mellower sound
For a brighter sound
Scale
This function allows you to experience different scales
when you play certain genres of music that is not composed based on twelve equal interval.
VOICE
Enter scale mode and
the indicator lights up.
1 Press [SCALE] button to enter into scale mode and the
button indicator lights up; The default scale is 001
Pythagor.
STYLE
SONG
Display scale type.
Types of scale :
Number
1
2
3
2 There are 6 types of scale to select:
Pythagor, Major, Minor, Meantone, Werckmei, kirnberg.
Name
Pythagor
Major
Minor
Number
4
5
6
Name
MeanTone
Werckmei
Kirnberg
3 Press [SCALE] button again to exit scale mode and the
button indicator goes off.
Press the button again to exit scale
mode. The indicator goes off.
4 Hold and press [SCALE] for 2 seconds to enter into
SCALE select status. The scale number displayed on LED.
Press and hold the button for
2 seconds to enter scale select
status. The indicator is flashing.
5 Use [+] or [-] to select the scale type, play the key from
C7~B7 to select scale root.
VOICE
STYLE
SONG
Select the scale type
C7
For example, to select the scale named "Minor"
and set the root key to "G", keep pressing [+] till
"003 " displayed temporarily on the LED, then
press the G7 key to set the root, LED displays "G",
"G" stands for "Scale Root".
B7
VOICE
Press the G7 key
14
STYLE
SONG
Display scale root.
Metronome
1 Press the [METRO] button to turn on the metronome
and the metronome sound will be played.
2 Press the button again to turn off the metronome.
The LED indicator is lightened.
3 When the style stops to play, the beat type follows 4/4
after turning on the metronome.
When the style begins to play, the beat type follows the
current style.
Metronome can be turned on
together with the style.
4 Metronome can be turned on together with the style.
If the style plays at first, then to turn on the metronome,
the metronome will respond next measure.
If the metronome plays at first, then to start to play the
style, the metronome responds at once to the first beat
of the style.
VOICE
STYLE
SONG
The beat LED indicators
are lightened in turn.
Style Control
STYLE
VOICE
There are 20 styles in total. (See APPENDIX 2).
STYLE SELECT
VOICE
Style flag
SONG
1 Press the [STYLE] button to enter style mode, the style
number and style flag on the LED are both lightened.
STYLE
SONG
Style number
2 You can use the [+] / [-] button to select the style you
want.
VOICE
STYLE
SONG
Select the style
Start/Stop The Style
START
/STOP
1 When the style is not playing, you can press the
[START/STOP] button to enter "SYNC START"
mode, the beat point are flashing at the same time,
now the style will be start with A.B.C. on if you press
the key in the chord area on Piano.
ACC
VOL
Chord area
Enter " SYNC START " mode
2 Press the [START/STOP] button again to stop style
play and turn off the A.B.C. function at the same time.
VOICE
STYLE
SONG
The beat LED indicators are flashing at the same time.
15
Style is not playing:
FILL IN A/B
START
/STOP
1 In NORMAL mode, press the [FILL A/FILL B] button
to insert 1 measure fill and the FILL A/FILL B indicator
is flashing, after one measure is over, NORMAL style
will be returned.
START
/STOP
ACC
VOL
Preset style mode is NORMAL
mode, the indicator is off.
ACC
VOL
Press and enter VARIATION
mode, the indicator is on.
Style is playing:
2 In VARIATION mode, press the [FILL A/FILL B] button
to insert 1 measure fill and the [FILL A/FILL B]
indicator is flashing, after one measure is over,
VARIATION style will be returned.
START
/STOP
ACC
VOL
START
/STOP
The indicator is flashing, after a
measure is over, the indicator is
off, enter NORMAL mode.
The indicator is flashing, after a
measure is over, the indicator is
on, enter VARIATION mode.
3 When power is on, the preset style mode is NORMAL
mode.
START
/STOP
ACC
VOL
START
/STOP
ACC
VOL
ACC
VOL
START
/STOP
ACC
VOL
Accomp Volume
1
Press the [ACC VOL] button, LED displays the current
volume temporarily.
VOICE
The indicator is on.
2 You can use the [+] / [-] button to adjust the volume
from 0 ~ 31. (Default Accomp Value is 24) The ACC
VOL indicator is flashing at the same time.
STYLE
SONG
Display current volume.
Adjust the
volume
VOICE
STYLE
SONG
3 When power is on, the ACC VOL indicator is on.
START
/STOP
4 In ACC VOL mode, press the [+] and [-] buttons
synchronously can mute the accompaniment, the ACC
VOL indicator goes off at the same time; If you press
the [+] and [-] buttons again synchronously can open
the accompaniment, the ACC VOL indicator is lightened
at the same time.
VOICE
STYLE
The indicator
is flashing.
Press them
together.
SONG
START
/STOP
Tempo
- TRANSPOSE +
ACC
VOL
-
TEMPO
ACC
VOL
The indicator
goes off.
+
1 Use the [TEMPO+] or [TEMPO-] button to adjust the
tempo from 30 to 280.
VOICE
STYLE
SONG
Adjust the tempo from 30~280. Display current tempo
2 Press the [TEMPO+] and [TEMPO-] synchronously to
set to the default tempo.
- TRANSPOSE +
3 When the style is not playing, it will take out the default
tempo of the style if you select the style.
When the style is playing, it will keep the current tempo
once you change the style.
-
TEMPO
+
VOICE
Press them
together.
16
STYLE
SONG
Display default tempo.
Record
NOTE:
The recorded data will not be lost when you turn off the
power.
There are one user song can be recorded, include
2 Melody Tracks.
Hold on the [+] and [-] button together and power on
the piano,it will erase all the recorded data.
Record Song
1
Enter the record mode,
the indicator is flashing.
Waiting for recording:
Press the [RECORD] button for the first time to
enter the record mode.
Select the record track,
the indicator will flash.
The RECORD indicator flashes, four beats flashes
synchronously to indicate waiting for recording.
At the same time an empty track will be selected to
be recorded automatically and relative track flag
flashes (the selection order is Track 1,Track 2, the
Track 1 will be selected while neither the tracks is
empty )
VOICE
SONG
Four beats flashes synchronously
to indicate waiting for recording.
You also can press the [TRACK 1] or [TRACK 2]
button to select the track you want to record.
2
STYLE
Start recording:
When 4 beats flashes on LED, you can play the
keyboard directly to start recording, the RECORD
indicator turns on, the track flag that you select is
still flashing.
Play the keyboard to start recording.
When 4 beats flashes , you can also press the
[START/STOP] button, open the A.B.C. and start
record.
Press the key in the left area and sync start style,
then style data are recorded to the correspond track.
The indicator turns on.
START
/STOP
The indicator will still flash.
ACC
VOL
Chord area
Open A.B.C. and start record
If the two tracks all have style data, it plays follow
with the track you newly record.
3
NOTE:
when entering record mode, the old data of the selected
track will lost.
Stop recording:
Press the [RECORD] button for the second time to
stop recording. LED display and indicator get
back to the previous mode.
If the capacity is full while recording, the recording
will be stopped automatically with the FUL display
on LED.
VOICE
The indicator is off.
VOICE
17
The indicator turns on.
STYLE
SONG
STYLE
SONG
Get back to previous mode.
Playback Song
1 Press the [PLAY/STOP] button for the first time
to playback the record data, you can choose any
one track or all two tracks to play, the indicator is on.
Enter the record playback
mode, the indicator is on.
Then, select the track,
the indicator is on.
2 Press it for the second time or press the [START/STOP]
to stop playback.
START
/STOP
Stop playback record.
ACC
VOL
Stop playback record.
3 You can press the [TRACK 1] and [TRACK 2] button to
turn on or off the relative track in process of playback.
Turn on or off the track.
NOTE:
If there is no record data when you press [PLAY/STOP]
LCD will display "NUL" temporarily.
VOICE
STYLE
SONG
Lesson
STYLE
1
VOICE
In song mode, press the [TRACK1] button to enter the
lesson mode.
Enter the lesson mode,
the indicator turns on.
SONG
Enter the song mode.
2 When you press the [TRACK1] button, the [TRACK1]
indicator turns on, it will mute the melody of the song,
then you can play the Piano to practise the song you
want.
Play the keyboard to practise the song,
and the melody of the song will be muted.
3 You press again the [TRACK1] button, the [TRACK1]
indicator goes off.
Exit the lesson mode,
the indicator turns off.
SD Function
There is a standard SD external interface which supports
the cards of 16M ~ 2G capacity. It is compatible with
the file system format of the FAT 16/32.
Press one of the 2 SD buttons [PLAY], [STORE] to
enter the relative function mode.
SD SLOT
If there is no card, "ERR" will display 2 seconds.
VOICE
18
STYLE
SONG
1 SD card function
PLAY can play midi file at the root directory in SD,
support format 0 and format 1.
Play midi file at the root directory in SD.
Save the recorded data to SD root
directory as midi file.
STORE can save the recorded data to SD root directory
as midi file which can be played on MIDI player.
2 SD button
In the SD mode, it won't respond to the other button
except [VOICE], [STYLE], [SONG].
It can play MIDI file and save recorded data at the root
directory.
Play all files and indicator is on.
Play
When power is on, press the [PLAY] button to play all
files at the root directory in SD card and the PLAY
indicator is on.
In the SD mode, you can select the midi file with [+]
or [-] button. The default file number is 001.
VOICE
VOICE
When playing the midi file, you can press the [PLAY] or
the [START/STOP] button to stop playing.
STYLE
STYLE
SONG
SONG
Stop playing.
Select the midi file to play.
START
/STOP
Press the [START/STOP] button again to start to play it
repeatedly.
ACC
VOL
Start or stop playing the midi file.
No midi file in the SD
Press the [PLAY] button when there is no midi file in the
SD card, LED display "noF", then the display will get back
to previous mode in 2 seconds.
VOICE
STYLE
SONG
VOICE
STYLE
SONG
Store
When power is on, press the [STORE] button to enter
store mode and the STORE indicator is on.
It can save the recorded data to SD root directory as
midi file, midi file name is generated by system automatically to avoid same name.
If the SD card capacity is full, it will stop saving
automatically and display "FUL". Then exit the store
mode and return to the previous mode.
After saving, the indicator of the [STORE ] button goes
off, LED will display "End" temporarily which means
saving be over and succeed.
19
Enter store mode and indicator is on. The midi file name is generated
by system automatically.
VOICE
After saving, indicator goes off.
STYLE
SONG
Midi Controler
Summarize
Under MIDI controller mode, other buttons all
have no effect except four MIDI controller, [+]/[-]
numeric button, the VOICE/STYLE/SONG button.
When power on the piano, press one of the
[COMMAND],
[VALUE], [CHANNEL] and
[MIDIOUT] MIDI controller to enter into MIDI
controller mode. When in other mode, press the
[MIDIOUT] button to send out a set of default midi
control command.
Press the [VOICE ] / [STYLE ] / [SONG] button,
can exit the MIDI controller mode, return to voice,
style or song mode.
Command
into midi controller mode
Exit the MIDI
controller mode
+
Press this button, the command indicator is on,
you can choose the related command by pressing
the [+] / [-] or numeric button.
MIDI OUT
Press this button, the MIDIOUT indicator turns on
and it send out a set of midi control command, the
indicator flashes in the process of sending out,
when it finish sen ding out, the indicator go off.
finish sending out
Value
Press this button, the value indicator is on, you
can set the value by pressing the [+], [-] or numeric
button.
Channel
Press this button, the channel indicator is on,
you can select any channel that you want from
1-16 by pressing the [+], [-] or numeric button.
20
Command
1.
2.
When the button is pressed, the indicator of
the button turns on to show that it enter into MIDI
CTRL mode.
The LED display 001 (default command), you
can select MIDI CTRL information by the numeric
button , the [ + ] button or the [ - ] button and
XXX, will displayed on LED. You can set 131
MIDI command (0 130), the default number is 1.
VOICE
STYLE
SONG
VOICE
STYLE
SONG
VOICE
STYLE
SONG
VOICE
STYLE
SONG
VOICE
STYLE
SONG
127
number
0
3.
127
command
128
standard MIDI control(BN)
128
program change(CN)
129
channel pressure(DN)
130
pitch bend(EN)
129
130
T he command you select is shown on the LED .
(Once you set 128,”Cn”will be displayed, you
set 129, “Dn” will be displayed, you set 130,
“En” be displayed), you can select number
allowed circlularly by pressing the [ + ] button
or the [ - ] button;While setting number with the
numeric button,after you press the first number,
the command indicator flashes and wait for press
the second number, finish pressing the second,
if still allow press the third number, the indicator
continues to flash, waiting for press the third
number, when you finish pressing the third
number, it will stop flash. If you does not press
any button in 2 seconds , it will exit the number
setting status automatically.
VOICE
STYLE
SONG
VOICE
STYLE
SONG
If the number you set is from 0 127 , that represent as the DATA1 of Bn order, and the value of
DATA2 can be set by pressing [VALUE] button.
If the number you set is 128,that means Cn command be selected, the value of DATA can be set by
pressing the [VALUE] button .
If the number you set is 129, that means Dn command be selected,the value of DATA can be set by
pressing the [VALUE] button .
If the number you set is 130, that means En command be selected, the value of DATA can be set by
pressing the [VALUE] button .
When the value you set is 0H, that means to bend the note down to the lowest,
When the value you set is 40H, that means to bend the note to the normal value;
When the value you set is 7FH, that means to bend the note up to the highest.
21
4. In
5.
6.
COMMAND mode, press the [VALUE]/
[CHANNEL] button to enter into VALUE and
CHANNEL setting mode, corresponding button
indicator turn on, the COMMAND indicator go off.
If you press the [MIDIOUT] button, it will enter
into midiout mode and send out midi control
message.
Press the [COMMAND] button continuously to
select the next command type (as follows ).
once
VOICE
STYLE
SONG
VOICE
STYLE
SONG
VOICE
STYLE
SONG
VOICE
STYLE
SONG
twice
NO.
1
2
3
4
Adjustdigit value
0-127
128
129
130
Display(default) Commandtype name
001
Bn
Cn
Cn
Dn
Dn
En
En
thrice
Press the COMMAND
button continuously
quartic
Channel
1.
The button is used to choose the MIDI CTRL
channel, from:1~16.
2.
Pressing this button to get into CHANNEL
setting mode, the LED display the current default
channel value XX, the CHANNEL button indicator
light up.
3.
Use the [ + ] button, the [ - ] button or numeric
button to choose CHANNEL.
You can choose channel allowed circlularly by
pressing the [ + ] or the [ - ] button .
You can also set channel with the numeric button,
after press the first number, channel indicator
flashes and wait for press the second number,
when you finish pressing the second number, it
will stop flash. If you does not press any button
in 2 seconds , it will exit the number setting
status automatically.
4.
5.
If you press the [COMMAND] button or [VALUE]
button, it will get into correspond mode, and the
indicator of the corresponding button indicator
turn on, the CHANNEL indicator go off.
If you press the [MIDIOUT] button, it will get
into midiout mode.
22
VOICE
STYLE
SONG
VOICE
STYLE
SONG
VOICE
STYLE
SONG
Value
1. Press
this button to enter into VALUE setting
mode, the indicator is on, the LED will show the
default VALUE as 064.
VOICE
2. Use the [ + ] button,
the [ - ] button or numeric
button to set VALUE value from 0 127.
you can set value allowed circlularly by pressing
the [ + ] button or the [ - ] button .
you can also set value with the numeric button,
after you press the first number, the value
indicator flashes and wait for press the second
number, finish pressing the second, if still allow
press the third number, the indicator continues
to flash, waiting for press the third number,
when you finish pressing the third number, it will
stop flash.If you does not press any button in 2
seconds , it will exit the number setting status
automatically.
3.
If you press the [COMMAND] button or the
[CHANNEL] button , it will get into correspond
mode and its button indicator turn on, the VALUE
indicator go off.
4.
If you press the [MIDIOUT] button, it will get
into MIDIOUT mode.
Midiout
1.
2.
Press [MIDIOUT] button to sent out a set of
MIDI control message.
Press this button, the indicator of that button
flash within 2 seconds, when finish sending out
MIDI CONTROL message, the indicator go off.
Press this button doesn't change current mode
after sending out MIDI CONTRO Lessage.
Continuous pressing the [MIDIOUT] button, it
will send out same MIDI CONTROL message.
23
STYLE
SONG
VOICE
STYLE
SONG
VOICE
STYLE
SONG
What is MIDI
12V
1 Musical Instrument Digital Interface. The standard
interface between PC and Electronic instrument.
AUX IN
AUX OUT
L/MONO
R
PEDAL
SUSTAIN
MIDI IN
MIDI OUT
USB
SOFT
2 It is equipped with standard MIDI interface, including 1
MIDI IN and 1 MIDI OUT.
3 Connection
It can connect with PC or other MIDI equipment.
MIDI IN/OUT
Terminals
MIDI Connection
1 Connection rule
In midi connection, the equipment which controls another equipment is called Host Equipment.
Another equipment is called Affiliated Equipment.
The host equipment's MIDI OUT connect with affiliated equipment's MIDI IN.
Do not connect MIDI OUT with MIDI IN on the same equipment.
2 MIDI IN
You can use a MIDI cable to connect the MIDI IN terminal of system to another MIDI OUT terminal of compatible MIDI
electronic instrument. Use MIDI IN, system can receive midi data such as note, program and touch etc. in order to be
handled by another MIDI instrument.
MIDI OUT
You can use a MIDI cable to connect the MIDI OUT terminal of system to another MIDI IN terminal of compatible MIDI
electronic instrument. Midi data of system can be sent by MIDI OUT, when a note is generated, the relative message will
be transmitted. System can control other midi instrument by sending program change messages
3 Sample Connection Method
Connect the MIDI interface with your PC.
Connect the MIDI interface with other digital music instruments.
Major Application
1 The piano can control other equipments or electronic instruments.
2 Some equipments can be used to control the piano.
3 PC recorded data (MIDI) can be played on the piano.
24
Specifications
Keyboard
Voice
Style
Song
Display
Switch and Buttons
Transpose
Pedals
Connectors
Dimension
Weight
88 keys, 3 kinds of touch level.
20 voices.
20 piano styles.
60 songs.
LED display.
POWER SWITCH, VOLUME SWITCH, DUAL, REVERB/CHORUS,
TOUCH, RECORD, TRACK 1, TRACK 2, PLAY/STOP, SPLIT, METRO,
TRANSPOSE +/-, TEMPO +/-, SD CONTROL, SONG, VOICE, STYLE,
BRILLIANCE,MIDIOUT,COMMAND,VALUE, CHANNEL,SCALE,
START/STOP, ACC VOL, FILL A/FILL B
+12 semi tones
Soft, Sustain
AC POWER, HEADPHONES, AUX IN/OUT, MIDI IN/OUT, PEDALS,USB
1360(L)x370(W)x143(H)mm
19.5kg
25
Voice List
No
PRG
001
002
003
004
005
006
007
008
009
010
011
012
013
014
015
016
017
018
019
020
0
4
6
16
21
25
48
56
66
73
1
5
11
19
22
40
49
61
68
75
BANK
0
8
0
0
0
8
8
8
8
0
0
8
8
0
0
8
0
0
0
0
Name of Voice
Acoustic Grand Piano
Epiano1
Harpsichord
Hammond Organ
Accordion
Steel Guitar
String
Trumpet
Folk Sax
Jazz Flute
Bright Acoustic Piano
Epiano2
Vibes
Church Organ
Harmonica
STRTRIO
Slow String
Brass Section
Oboe
Pan Flute
Style List
No
Name of Style
001
002
003
004
005
006
007
008
009
010
011
012
013
014
015
016
017
018
019
020
Pianist
8 Beat
16 Beat
Ballad
Pop Piano
Boogie
Slow Rock
Swing
Jazz
Jazz Waltz
Swing Fox
Shuffle
Twist
Country Ballad
Bossa Nova
Latin
March
6/8 March
Waltz
Slow Waltz
26
Name of Voice on Panel
GRDPIANO
EPIANO1
HARPSICD
DRAWBAR
ACORDION
STGUITAR
STRING
TRUMPET
FOLK SAX
JZ.FLUTE
BRTPIANO
EPIANO2
VIBES
CHRORGAN
HAMONICA
STRTRIO
SLOWSTR
BRASS
OBOE
PANFLUTE
Song List
No
001
002
003
004
005
006
007
008
009
010
Name of Song
Piano
For Alice
Habanera
Four Little Swans
Moseta Dance
Germanic Dance
Turkish March
March
Away In A Manger
Chopsticks
2-Part Invention #13 In A Minor.B.W. Iii
Folk & Country
011
012
013
014
015
016
017
018
019
020
Country
Jambalaya
Susanna
Bridge
Battle Hymne Of The Republic
The Old Gray Mare
American Patrol
In The Rain
Sippin`Cider Through A Straw
Are You Lonesome Tonight
Golden & Pop
021
022
023
024
025
026
027
028
029
030
Only You
End Of The World
House Of Rising Sun
The Blue-Bells Of Scotland
Over The Rainbow
Beautiful Dreamer
Edelweiss
O Sole Mio
Silent Night
Ave Maria
No
Name of Song
031
032
033
034
035
036
037
038
039
040
041
042
Five Hundred Miles
Happy New Year
It`S Beginning To Look A Lot Like Christmas
043
044
045
046
047
048
049
050
051
052
053
054
055
056
057
Jeanie With The Light Brown Hair
My Bonnie
Song Of The Pearlfisher
The Stage Coach
Entertainer
Annie Laurie
Killing Me Softly With His Song
Last Rose Of Summer
The Old King Cole
Jazz & fusion
Maple Leaf Rag
June Samba
Funk
I Can......
Sea Shore
Guitar&Saxphone
The Hip Hop's Night
Blue Lunch
Cobweb
Wine
Jazz Old Man
Dark Eyes
Carlos
Sad
The Jazz
058
059
060
South Mud Bay
Give You A Rose
Flowing Rill
Chinese
27
MIDI Implementation Chart
Transmitted
Function
Basic
1ch
Default
Channel
Recognized
1-16ch
1-16ch
Changed
1-16ch
3
Default
Mode
Remarks
Messages
Altered
Note
Number :
True voice
Velocity :
Note on
Note off
***********
09-120
0-127
***********
0-127
9nH,V=1 -127
9nH,V=1-127
(9nH,V=0;
9nH,V=0
After
key
s
Touch
Ch
s
8nH,V=0- 127)
Pitch Bend
Control
0
Bank Select
Change
1
Modulation
5
Portamento Time
6
Data Entry
7
Volume
10
Pan
11
Expression
64
SustainPedal
65
66
Portamento on/off
SostenutoPedal
67
Soft Pedal
80
Reverb Program
81
Chorus Program
91
Reverb Level
93
Chorus Level
120
A ll Sound Off
121
Reset A ll
123
Controllers
All Notes Off
Program
Change :
true #
***********
0-127
System Exclusive
System
Common
Song Position
Song Select
: Tune
System
: Clock
Real Time
:Commands
*1
Aux
*1
:LOCAL ON/OFF
28
MIDI Implementation Chart
Aux
Messages
:LOCAL ON/OFF
:ALL NOTES OFF
:Active sense
:Reset
*1
When the accompaniment is started, an FAH message is
transmitted. When accompaniment is stoped, an FCH
message is transmitted. When an FAH message is
received, accompaniment is started. When an FCH
message is received, accompaniment is stoped.
Mode 1: OMNI ON , POLY
Mode 3: OMNI OFF , POLY
Mode 2 : OMNI ON , MONO
Mode 4 : OMNI OFF , MONO
: YES
: NO
Version: G01
29