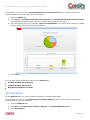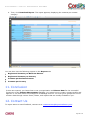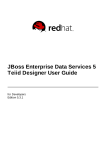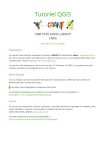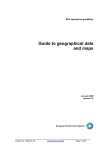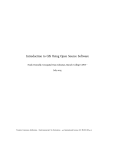
1
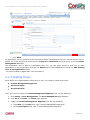
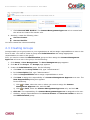
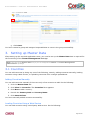
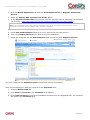
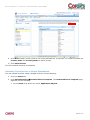
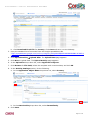
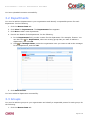
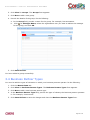
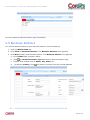
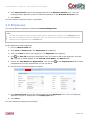
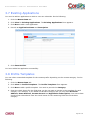
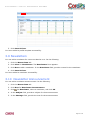
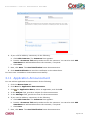
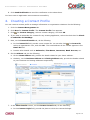
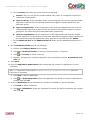
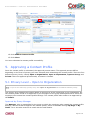
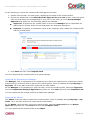
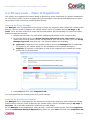
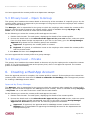
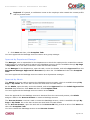
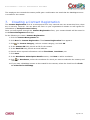
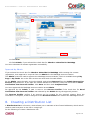
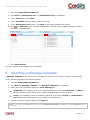
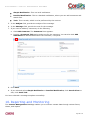
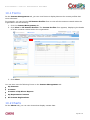
User Manual: Contact Management MashApp USER MANUAL: CONTACT MANAGEMENT MASHAPP Copyright © 2009 Cordys R&D B.V. All rights reserved. The information in this document is confidential, constitutes the intellectual and proprietary property of Cordys R&D B.V., and is protected by intellectual property laws and international intellectual property treaties. Cordys and the Cordys logo are the registered trademarks of Cordys R&D B.V. All other trademarks mentioned herein maybe/are the trademarks or registered trademarks of their respective owners and should be noted as such. No part of this document may be reproduced or transmitted in any form or by any means, electronic or mechanical, for any purpose, without the express written permission of Cordys R&D B.V. The information contained in this document is subject to change without notice. Cordys R&D B.V. does not warrant that the information contained in this document is error free. Page 2 of 32 USER MANUAL: CONTACT MANAGEMENT MASHAPP Contents 1.Introduction ......................................................................4 2.Setting up Organization Data ............................................5 2.1 Creating Application Users ............................................... 5 2.2 Creating Roles ............................................................... 6 2.3 Creating Groups............................................................. 7 3.Setting up Master Data ......................................................8 3.1 Countries ...................................................................... 8 3.2 Departments ............................................................... 12 3.3 Groups ....................................................................... 12 3.4 Business Partner Types ................................................. 13 3.5 Business Partners......................................................... 14 3.6 Employees .................................................................. 15 3.7 Existing Applications ..................................................... 16 3.8 Profile Templates ......................................................... 16 3.9 Newsletters ................................................................. 17 3.10 Newsletter Announcement ........................................... 17 3.11 Application Announcement .......................................... 18 4.Creating a Contact Profile ...............................................19 5.Approving a Contact Profile .............................................21 5.1 Privacy Level – Open to Organization .............................. 21 5.2 Privacy level – Open to Department ................................ 23 5.3 Privacy level – Open to Group ........................................ 24 5.4 Privacy level – Private................................................... 24 6.Creating a MashApp Account ...........................................24 7.Creating a Contact Registration.......................................26 8.Creating a Distribution List .............................................27 9.Selecting a Message Template ........................................28 10.Reporting and Monitoring ..............................................29 10.1 Forms....................................................................... 30 10.2 Charts ...................................................................... 30 10.3 Reports .................................................................... 31 11.Conclusion .....................................................................32 12.Contact Us .....................................................................32 Page 3 of 32 USER MANUAL: CONTACT MANAGEMENT MASHAPP 1. Introduction This user manual is designed to guide you through using the Contact Management MashApp solution to record personal contact information of employees and other relations such as customers, suppliers etc. of your organization. This MashApp was built using Composer, a MashApp tool from Cordys Process Factory (CPF). Usually, when you have a manual contact management system, the bottlenecks are many. For example, the long tedious procedures are time-consuming and taxing, which makes it difficult to manage. Moreover, it is difficult to maintain and locate the contacts. To avoid such bottlenecks, we are providing the Contact Management MashApp, which will help you: Maintain paperless records Track contact information easily Make communication to contacts easier and effective To use the Contact MashApp, you need to first set up organization data such as application users, roles, and groups and then set up MashApp Master Data such as countries, departments, groups, business partner types, business partners, employees, existing applications, profile templates, newsletters, etc. After setting up the required data, you can use the MashApp to manage contacts. You can create new contact profiles, approve them according to various levels of privacy, and also subscribe for MashApp accounts. You can manage contact registrations. You can also monitor data through forms, charts, and reports. Page 4 of 32 USER MANUAL: CONTACT MANAGEMENT MASHAPP 2. Setting up Organization Data Now, you need to set up organization data such as roles, groups, application users, and application privileges. Note: You can set up organization data only if you have either Admin or Contact Management Administrator privilege. 2.1 Creating Application Users Now, you need to create application users to enable users in your organization to access the Contact Management MashApp. You also need to assign users the appropriate privilege to restrict their access within the MashApp. Do the following to set up application users. 1. Click Setup User Management. The User Management page appears. 2. Click Go to for Application Users. The Application Users page appears, displaying a list of existing application users, if any. 3. Create an application user. Do the following. a. Click Add and select Add New User to the Application. b. In the User Id field, type the unique id of the user in the form of a valid email address. For example, “[email protected]”. This email address is populated in the Login Id and Email fields respectively. The credentials required to access the Contact Management MashApp will be sent to the user via email. Note: You cannot modify the Login Id. c. Provide the required details of the application user such as Name and Contact Details. d. Assign a privilege to the user to access the Contact Management MashApp. Click Privilege Name. The Application Privileges dialog box appears. for e. Select one of the following privileges to assign to the user according to their role in the organization: Admin: This privilege enables users to create application users as well as maintain the Master Data that needs to be set up for the functioning of the MashApp. For example, Departments, Employees, Business Partners, etc. Contact Management Administrator: This privilege enables users to perform all the functions of an Admin. In addition to this, the user can also customize the application through the Modify Application tab. Manager: This privilege enables users to create contact profiles and view contact details of those under him or her. The user can also view charts and reports to monitor the data. Contact Management User: This privilege enables the users to create contact profiles for themselves and others. Registered User: This privilege enables the external users to create contact profiles. Click OK. The privilege is assigned. The description of the privilege appears in the Description field. Page 5 of 32 USER MANUAL: CONTACT MANAGEMENT MASHAPP f. Click Save. An application user is created and the required privilege is assigned to the user. As soon as the user is added, he or she receives an email with the Login Id and Password required to log in to the Contact Management MashApp. This application user is also an organization user. So, you can grant access to this user to other applications in the organization through the Setup tab for those applications using the Add Existing User to the Application option. You have created an application user successfully. 2.2 Creating Roles Roles define the responsibilities assigned to a user. You need to create three roles: Contact Management Approver Account Creator Account Verifier First, you need to create the Contact Management Approver role. Do the following. 1. Click Setup User Management. The User Management page appears. 2. Click Go to for Roles. The Roles page appears. 3. Create the Contact Management Approver role. Do the following. a. Click New. In the Role field, type “Contact Management Approver”. b. In the Description field, type “Contact Management Approver”. Page 6 of 32 USER MANUAL: CONTACT MANAGEMENT MASHAPP c. Click Save and Add Another. The Contact Management Approver role is created and the values are cleared for another role. 4. Similarly, create the following roles: Account Creator Account Verifier You have created the roles successfully. 2.3 Creating Groups Groups enable you to group users in your organization as well as assign responsibilities to users in the form of roles. You need to create a group called Administration and assign appropriate responsibilities to users in this group. First, you need to create the Administration group and then assign the Contact Management Approver role to a user in the group. Do the following. 1. Click Setup User Management. The User Management page appears. 2. Click Go to for Groups. The Groups page appears. 3. Create the Administration group. Do the following. a. Click New. In the Group Name field, type “Administration”. b. In the Description field, type “Administration”. c. Click the Responsibilities tab to assign responsibilities to users. d. Click New to assign the responsibility of a Contact Management Approver to a user. The New Responsibility dialog box appears. Do the following. i) Click for User, select the user to whom you want to assign the Contact Management Approver role, and click OK. ii) Click for Role, select the Contact Management Approver role, and click OK. e. Click OK. The responsibility of a Contact Management Approver is assigned to the user. f. Similarly, assign responsibilities of an Account Creator and Account Verifier to users in the Administration group. Page 7 of 32 USER MANUAL: CONTACT MANAGEMENT MASHAPP g. Click Save. You have created a group and assigned responsibilities to users in the group successfully. 3. Setting up Master Data After setting up the required application users, you need to set up the Master Data that is required for the functioning of the Contact Management MashApp. Note: You can set up Master Data only if you are assigned the Admin or Contact Management Administrator privilege. 3.1 Countries You can add countries by doing any one of the following, namely, adding countries manually, loading countries using a Web service, or uploading countries from a Google spreadsheet. Adding Countries Manually You can add countries manually if there are only a few countries to add. Do the following. 1. Click the Master Data tab. 2. Click View for Countries. The Countries form appears. 3. Click New to add a country. 4. Provide the Country Code and Country Name. 5. Click Save & Close. You have manually added countries successfully. Loading Countries Using a Web Service You can load countries using a third party Web service. Do the following. Page 8 of 32 USER MANUAL: CONTACT MANAGEMENT MASHAPP 1. Click the Modify Application tab and click Build Web Services Register an External Service. 2. Select the Display Web services from a URL option. 3. In the Service Provider URL field, provide a service provider URL for retrieving the countries. For example, “http://ws.srlink.com/GeoServices/CountryInfoService.asmx?WSDL”. Note: The availability of the Web Service depends on the third party Web service provider. If you encounter any issues with the sample URL, try after sometime. 4. Provide a Service Provider Name, if required. This is optional. 5. Leave User Authentication blank as it is not required for this Web service. 6. Then, click Display Services. The Web services are displayed. 7. Select the check box for the GetCountryList Web service and click Register Services. You have registered the GetCountryList external Web service successfully. Now, do the following to load the countries in the Countries form. 1. Click the Master Data tab. 2. Click View for Countries. The Countries form appears. 3. Click Load Countries to load all the standard countries from the displayed URL. The countries are listed in the Countries grid. Page 9 of 32 USER MANUAL: CONTACT MANAGEMENT MASHAPP 4. Click New to add a country that is not in the standard list, if required. You need to provide the Country Code and Country Name to add a country. 5. Click Save & Close. You have loaded countries successfully. Uploading Countries from a Google Spreadsheet You can upload countries using a Google account. Do the following. 1. Click the Setup tab. 2. Click Upload Activity Download Excel Template. The Download Excel Template page appears. Do the following. a. In the Show drop-down list, select Application Objects. Page 10 of 32 USER MANUAL: CONTACT MANAGEMENT MASHAPP b. Click Download Excel File for Country. Click Save and save it to the desktop. 3. Copy the standard list of countries from the Google spreadsheet URL “http://spreadsheets.google.com/ccc?key=0AgU2e_O0PgCtdGZIQkR5UGlRbXRJMDNiV1k3MFV4 dVE&hl=en” to the downloaded template and click Save. 4. Click Upload Activity Upload Data. The Upload Data page appears. 5. Click New to upload data. The Upload Activity page appears. 6. In the Upload for drop-down list, select Application Objects. 7. Click Browse for File Path, select the template with countries data, and click OK. 8. In the Activity Settings section, do the following. a. In the Application Object Name drop-down list, select Country. b. In the Start Activity drop-down list, select Immediately. 9. Click Save. Page 11 of 32 USER MANUAL: CONTACT MANAGEMENT MASHAPP You have uploaded countries successfully. 3.2 Departments You need to add the departments in your organization and identify a responsible person for each department. Do the following. 1. Click the Master Data tab. 2. Click View for Departments. The Departments form appears. 3. Click New to add a new department. 4. Provide the details of the department. Do the following. a. In the Department field, provide a name for the department. For example, Finance. You can also click for Department, select an existing group that you want to add as a department, and click OK. b. Click for Manager Name, select the organization user you want to add as the manager for the department, and click OK. 5. Click Save & Close. You have added a department successfully. 3.3 Groups You need to add the groups in your organization and identify a responsible person for each group. Do the following. 1. Click the Master Data tab. Page 12 of 32 USER MANUAL: CONTACT MANAGEMENT MASHAPP 2. Click View for Groups. The Groups form appears. 3. Click New to add a new group. 4. Provide the details of the group. Do the following. a. In the Group field, provide a name for the group. For example, Documentation. b. Click for Manager Name, select the organization user you want to add as the manager for the group, and click OK. 5. Click Save & Close. You have added a group successfully. 3.4 Business Partner Types You need to add the types of industries in which your business partners operate. Do the following. 1. Click the Master Data tab. 2. Click View for Business Partner Types. The Business Partner Types form appears. 3. Click New to add a new business partner type. 4. In the Business Partner Type field, provide the type of industry the business partner operates in. For example, Construction. 5. Click Save & Close to save the changes and close the Business Partner Types form. Page 13 of 32 USER MANUAL: CONTACT MANAGEMENT MASHAPP You have added a business partner type successfully. 3.5 Business Partners You need to add the names of your business partners. Do the following. 1. Click the Master Data tab. 2. Click View for Business Partners. The Business Partners form appears. 3. Click New to add a new business partner. The Business Partner form appears. a. In the Name field, provide a name. b. Click for Business Partner Type and select a business partner type. c. Provide other details such as Email, City, State, etc. d. To select a Country, click and select a country from the list that appears. Page 14 of 32 USER MANUAL: CONTACT MANAGEMENT MASHAPP 4. Click Save & Close to save the changes and close the Business Partner form. The new business partner appears in the list of business partners in the Business Partners form. 5. Click Close. You have added a business partner successfully. 3.6 Employees You need to add the employees needed for Contact Management. Note: Any user who needs to create a contact profile must be added as an employee in the Employees form. Also, every employee must be an application user. You need to ensure that you already added the new employee as an application user in Section 2.1. Do the following to add employees. 1. Click the Master Data tab. 2. Click View for Employees. The Employees form appears. 3. Then, click New to add a new employee. The Employee form appears. 4. Click for User ID, select the organization user you want to add as an employee, and click OK. The user’s details appear in the User ID, First Name, and Email fields. 5. Provide the Last Name and Department. You can click a department from the departments you set up earlier. for the Department field to select 6. Provide other employee details as needed. 7. Click Save & Close to save the changes and close the Employee form. The new employee appears in the list of employees in the Employees form. 8. Click Close. You have added an employee successfully. Page 15 of 32 USER MANUAL: CONTACT MANAGEMENT MASHAPP 3.7 Existing Applications You need to add an application to which a user can subscribe. Do the following. 1. Click the Master Data tab. 2. Click View for Existing Applications. The Existing Applications form appears. 3. Click New to add a new application. 4. Provide an Application Name and Description. 5. Click Save & Close. You have added an application successfully. 3.8 Profile Templates You can select a standard template for the contact profile depending on the contact category. Do the following. 1. Click the Master Data tab. 2. Click View for Profile Templates. The Profile Templates form appears. 3. Click New to add a profile template. You need to provide the Category. 4. Clear the check boxes for the fields that you do not want to include in the template for each category. For example, if you added the Student category and you only want Personal Address, Home Address, Contact Control and Application Subscription, then leave these check boxes selected and clear the check boxes for the remaining fields for the Student category. Page 16 of 32 USER MANUAL: CONTACT MANAGEMENT MASHAPP 5. Click Save & Close. You have added a profile template successfully. 3.9 Newsletters You can add a newsletter for users to subscribe to it. Do the following. 1. Click the Master Data tab. 2. Click View for Newsletters. The Newsletters form appears. 3. Click New to add a newsletter. In the Newsletter field, provide a name for the newsletter. 4. Click Save & Close. You have added a newsletter successfully. 3.10 Newsletter Announcement You can add a newsletter announcement. Do the following. 1. Click the Master Data tab. 2. Click New for Newsletter Announcement. 3. Click for Newsletter, select a newsletter, and click OK. 4. In the Subject field, provide a subject for the announcement. 5. In the Message field, provide the text for the announcement. Page 17 of 32 USER MANUAL: CONTACT MANAGEMENT MASHAPP 6. If you need to add any comments, do the following. a. Click Add Comment. The Comment form appears. b. Provide a Comment Title and provide text for the comment. You can also click Add Attachment to add attachments to the comment, if required. c. Click Save. 7. Now, click Save. The Send Notification button becomes active. 8. Click Send Notification to send the notification to the subscribers. You have sent a newsletter announcement successfully. 3.11 Application Announcement You can add an application announcement. Do the following. 1. Click the Master Data tab. 2. Click New for Application Announcement. 3. Click for Application Name, select an application, and click OK. 4. In the Subject field, provide a subject for the announcement. 5. In the Message field, provide the text for the announcement. 6. If you need to add any comments, do the following. a. Click Add Comment. The Comment form appears. b. Provide a Comment Title and provide text for the comment. You can also click Add Attachment to add attachments to the comment, if required. c. Click Save. 7. Now, click Save. The Send Notification button becomes active. Page 18 of 32 USER MANUAL: CONTACT MANAGEMENT MASHAPP 8. Click Send Notification to send the notification to the subscribers. You have sent an application announcement successfully. 4. Creating a Contact Profile You can create a contact profile to manage information on organization relations. Do the following. 1. Click the Contact Management tab. 2. Click New for Contact Profile. The Contact Profile form appears. 3. Click for Contact Category, select a contact category, and click OK. 4. If you want to subscribe the contact for any existing application, select the check box for Check to subscribe for MashApp. 5. Now, on the Personal Details tab, do the following. a. In the Contact ID field, provide a new contact ID. You can also click for Contact ID, select an organization user, and click OK. The email address of the contact appears in the Email ID field. b. Provide other details such as Salutation, First Name, Last name, Bank Account, etc. 6. On the Address tab, do the following. a. On the Home Address tab, provide the details related to your home address. b. Similarly, on the Business Address and Visiting Address tabs, provide the details related to your business and visiting addresses respectively. 7. In the Other Details section, on the Contact Controls tab, do the following. a. In the Contact Origin field, provide the place to which the contact belongs. Page 19 of 32 USER MANUAL: CONTACT MANAGEMENT MASHAPP b. In the Privacy drop-down list, select one of the following. Private: Only you can see the contact details. Also, there is no approval required to create the contact profile. Open to Group: All the members of the concerned group can view the contact details. Approval is required from the person authorized to approve contact profiles for the particular group. Open to Department: All the employees in the concerned department can view the contact details. Approval is required from the persons authorized to approve contact profiles for the concerned group and department respectively. Open to Organization: All the employees in the organization can view the contact details. Approval is required from the persons authorized to approve contact profiles for the concerned group and department. Also, approval is required from the Admin. c. In the Additional Info 1 and Additional Info 2 fields, provide additional information, if any. 8. On the Business Details tab, do the following. a. Provide the Company Name of the contact. b. Click for Business Partner to select a business partner, if required. c. Click for Country to select a country. d. Similarly, provide other required information such as contact numbers, Department, Job Title etc. 9. Click Save. 10. Click the Application Subscription tab to subscribe the contact for applications. Do the following. Note: The Application Subscription tab appears only if you selected the check box for Check to subscribe for MashApp. a. Click New to add an application. b. Click for Application Name, select the application for which you want to subscribe the contact, and click OK. 11. Click the Newsletter tab to subscribe the contact for newsletters. Do the following. a. Click New to add a newsletter. b. Click for Newsletter, select the newsletter for which you want to subscribe the contact, and click OK. Page 20 of 32 USER MANUAL: CONTACT MANAGEMENT MASHAPP 12. Click Submit Contact Profile. 13. Click Close. You have submitted a contact profile successfully. 5. Approving a Contact Profile Once the contact profile is submitted, the approval process starts. The approval process differs depending on the level of privacy you have selected while submitting the contact profile. There are four different privacy levels, namely Open to Organization, Open to Department, Open to Group, and Private. Once the approval process ends, a contact is created. 5.1 Privacy Level – Open to Organization Note: If you do not select any privacy level, then Open to Organization is the default selected privacy level. This privacy level enables the contact details to be seen by all the employees in the organization. So, the contact profile needs to be approved by the managers of the group and department to which the employee who created the contact profile belongs. The contact profile also needs to be approved by the Admin. Approval by Group Manager The Manager, who is responsible for the group to which the employee who created the contact profile belongs, receives a task to approve the contact profile, which is available through My Page My Tasks. He or she also receives an email with the task details. Page 21 of 32 USER MANUAL: CONTACT MANAGEMENT MASHAPP Do the following to review the contact profile and approve the task. 1. Double-click the task. The task opens, displaying the details of the contact profile. 2. Review the details and in the Select here the approval for your role section, select an option from the drop-down list corresponding to your role. In this case, go to the Group Manager Approval drop-down list. The following options are available: Approved: If approved, the contact profile is sent to the Manager who is responsible for approving the contact profile for the department the employee belongs to. Rejected: If rejected, a notification is sent to the employee who created the contact profile and the process ends. 3. Click Save and then click Complete Task. You have approved the contact profile as a group manager. Approval by Department Manager The Manager, who is responsible for the department to which the employee who created the contact profile belongs, receives a task to approve the contact profile, which is available through My Page My Tasks. He or she also receives an email with the task details. As the Manager for the department, open the task, review the contact profile, and select Approved from the Department Manager Approval drop-down list. Click Save and then click Complete Task. You have approved the contact profile as a department manager. Approval by Admin The Admin receives a task to approve the contact profile, which is available through My Page My Tasks. He or she also receives an email with the task details. As the Admin, open the task, review the contact profile, and select Approved from the Admin Approval drop-down list. Click Save and then click Complete Task. You have approved the contact profile as an Admin. Page 22 of 32 USER MANUAL: CONTACT MANAGEMENT MASHAPP 5.2 Privacy level – Open to Department This privacy level enables the contact details to be seen by all the employees in a specific department. So, the contact profile needs to be approved by the managers of the group and department to which the employee who created the contact profile belongs. Approval by Group Manager The Manager, who is responsible for the group to which the employee who created the contact profile belongs, receives a task to approve the contact profile, which is available through My Page My Tasks. He or she also receives an email with the task details. Do the following to review the contact profile and approve the task. 1. Double-click the task. The task opens, displaying the details of the contact profile. 2. Review the details and in the Select here the approval for your role section, select an option from the drop-down list that corresponds to your role. In this case, go to the Group Manager Approval drop-down list. The following options are available: Approved: If approved, the contact profile is sent to the Manager who is responsible for approving the contact profile for the department the employee belongs to. Rejected: If rejected, a notification is sent to the employee who created the contact profile and the process ends. 3. Click Save and then, click Complete Task. You have approved the contact profile as a group manager. Approval by Department Manager The Manager who is responsible for the department to which the employee who created the contact profile belongs receives a task to approve the contact profile, which is available through My Page My Tasks. He or she also receives an email with the task details. As the Manager for the department, open the task, review the contact profile, and select Approved from the Department Manager Approval drop-down list. Click Save and then click Complete Task. Page 23 of 32 USER MANUAL: CONTACT MANAGEMENT MASHAPP You have approved the contact profile as a department manager. 5.3 Privacy level – Open to Group This privacy level enables the contact details to be seen by all the members of a specific group. So, the contact profile needs to be approved by the manager of the group to which the employee who created the contact profile belongs. The Manager, who is responsible for the group to which the employee who created the contact profile belongs, receives a task to approve the contact profile, which is available through My Page My Tasks. He or she also receives an email with the task details. Do the following to review the contact profile and approve the task. 1. Double-click the task. The task opens, displaying the details of the contact profile. 2. Review the details and in the Select here the approval for your role section, select an option from the drop-down list that corresponds to your role. In this case, go to the Group Manager Approval drop-down list The following options are available: Approved: If approved, the contact profile is created. Rejected: If rejected, a notification is sent to the employee who created the contact profile and the process ends. 3. Click Save and then click Complete Task. You have approved the contact profile as a group manager. 5.4 Privacy level – Private This privacy level enables the contact details to be seen only by the employee who created the contact profile. If you have selected Private as the privacy level, there is no approval required. The contact profile is created automatically. 6. Creating a MashApp Account Once the approval process is complete, the contact profile is created. If the employee who created the contact profile selects the check box for Check to subscribe for MashApp, then the approval process for creating a MashApp account starts. Approval by Group Manager The Manager, who is responsible for the group to which the employee who created the contact profile belongs, receives a task to approve the MashApp account creation, which is available through My Page My Tasks. He or she also receives an email with the task details. Do the following to review the contact profile and approve the task. 1. Double-click the task. The task opens, displaying the details of the contact profile. 2. Review the details and in the Select here the approval for your role section, select an option from the drop-down list that corresponds your role. In this case, go to the Group Manager Approval for Account drop-down list The following options are available: Approved: If approved, the approval task for MashApp account creation is sent to the Manager who is responsible for approving the MashApp account for the department the employee belongs to. Page 24 of 32 USER MANUAL: CONTACT MANAGEMENT MASHAPP Rejected: If rejected, a notification is sent to the employee who created the contact profile and the process ends. 3. Click Save and then, click Complete Task. You have approved the MashApp account creation as a group manager. Approval by Department Manager The Manager, who is responsible for the department to which the employee who created the contact profile belongs, receives a task to approve the MashApp account, which is available through My Page My Tasks. He or she also receives an email with the task details. As the Manager for the department, open the task, review the details, and select Approved from the Department Manager Approval for Account drop-down list. Click Save and then click Complete Task. You have approved the MashApp account creation as a department manager. Approval by Admin The Admin receives a task to approve the MashApp account creation, which is available through My Page My Tasks. He or she also receives an email with the task details. As the Admin, open the task, review the details, and select Approved from the Admin Approval for Account drop-down list. Click Save and then click Complete Task. You have approved the MashApp account creation as an Admin. Once the approval for the MashApp account is obtained from the concerned persons, the Admin assigns a task to the Account Creator to create a MashApp account The Account Creator receives a task to create the MashApp account, which is available through My Page My Tasks. He or she also receives an email with the task details. As the Account Creator, open the task and in the Account ID field, provide a value. Click Save and then click Complete Task. You have created the MashApp account as an Account Creator. Page 25 of 32 USER MANUAL: CONTACT MANAGEMENT MASHAPP The employee who created the contact profile gets a confirmation via email that the MashApp account is created for the contact. 7. Creating a Contact Registration The Contact Registration form is an anonymous form. Any external user can access this form; there are no security concerns. You can place this form on your organization’s website to self-register for information on Cordys Process Factory. Once you self-register through the Contact Registration form, your contact details will be stored in our Contact Management MashApp. Do the following to create a Contact Registration. 1. Click the Contact Management tab. 2. Click New for Contact Registration. The Contact Registration form appears. 3. Click for Contact Category, select a contact category, and click OK. 4. In the Contact ID field, provide an ID for the contact. 5. In the Email Id field, provide an email address. 6. Provide other required information such as First Name, Last Name, etc. 7. Click Save. 8. In the Newsletter Subscription Details section, click New to add a newsletter. 9. Click for Newsletter, select the newsletter for which you want to subscribe the contact, and click OK. 10. If you want a MashApp account to be created for the contact, select the check box for Check to subscribe for MashApp. Page 26 of 32 USER MANUAL: CONTACT MANAGEMENT MASHAPP 11. Click Save. 12. Click Submit, if you selected the check box for Check to subscribe for MashApp. You have submitted a contact registration successfully. Approval by Admin If you selected the check box for Check to Subscribe for MashApp while creating the contact registration, then approval is required from the Admin for the MashApp account creation. The Admin receives a task to approve the MashApp account creation, which is available through My Page My Tasks. He or she also receives an email with the task details. As the Admin, open the task, review the details, and select Approved from the Admin Approval for Account drop-down list. If you want the contact details to be verified, select the check box for Need Verification from Account Verifier. Click Save and then click Complete Task. You have approved the MashApp account creation as an Admin. On approval by the Admin, a task is sent to the Account Verifier if the check box for Need Verification from Account Verifier was selected by the Admin during the approval process. The Account Verifier verifies if an account can be created for the external contact. Once the verification is complete, a task is assigned to the Account Creator who creates the MashApp account. 8. Creating a Distribution List A Distribution List is a function, which allows you to maintain a list of email addresses, which can be used to email everyone on the list in a single go. Do the following to create a distribution list. Page 27 of 32 USER MANUAL: CONTACT MANAGEMENT MASHAPP 1. Click the Contact Management tab. 2. Click View for Distribution List. The Distribution List form appears. 3. In the Lists section, click New. 4. In the List Name field, provide a name for the list. 5. In the Distribution List section, click New to add email addresses to the list. 6. Click for Email ID, select an email address for a contact, and click OK. Repeat this step to add more email addresses. 7. Click Save & Close. You have created a distribution list successfully. 9. Selecting a Message Template A Message Template is used to send a notification or task to an individual or a group of individuals Do the following to select a message template. 1. Click the Contact Management tab. 2. Click New for Message Template. The Message Template form appears. 3. Select one of the following options for Send Message to. Individual: The message is sent to a single recipient. If you select Individual, the Email Id field becomes active and you can select the email address of the recipient. Group: The message is sent to multiple recipients. If you select Group, the Distribution List field becomes active and you can select a distribution list. 4. Select one of the following options for Send as. Note: If you select the Send as option as either Detailed Notification or Task, then only Comments section will appear. Page 28 of 32 USER MANUAL: CONTACT MANAGEMENT MASHAPP Simple Notification: This is a brief notification. Detailed Notification: This is a detailed notification, where you can add comments and attach files. Task: This is a task, which is to be performed by the receiver. 5. In the Subject field, provide the subject of the message. 6. In the Message field, provide the text for the message. 7. If you need to add any comments, do the following. a. Click Add Comment. The Comment form appears. b. Provide a Comment Title and provide text for the comment. You can also click Add Attachment to add attachments to the comment, if required. 8. Click Save. 9. If you selected either Simple Notification or Detailed Notification, click Save & Close or else, click Send Task. You have selected a message template successfully. 10. Reporting and Monitoring The Contact Management MashApp enables you to monitor contact data through various forms, charts, and reports. Page 29 of 32 USER MANUAL: CONTACT MANAGEMENT MASHAPP 10.1 Forms On the Contact Management tab, you can view forms to display data on the contact profiles that were submitted. For example, you can view the All Contact Profiles form to view all the contacts created within the organization. Do the following. 1. Click the Contact Management tab. 2. Click View for All Contact Profiles. The Contact Profiles form appears, displaying the details of all the contacts created within the organization. 3. Click Close. You can also view the following forms on the Contact Management tab: My Contacts Contacts Contacts of My Direct Reports My Department Contacts All Contact Registrations 10.2 Charts On the Charts tab, you can view charts that display contact data. Page 30 of 32 USER MANUAL: CONTACT MANAGEMENT MASHAPP For example, you can view the Contact Profiles per Privacy Level chart to view the number of contact profiles per privacy level. Do the following. 1. Click the Charts tab. 2. Click View for Contact Profiles per Privacy Level. The Contact Profiles per Privacy Level chart appears, displaying the number of contact profiles per privacy level. 3. Click any privacy level. For example, Open to Organization. The status and number of contact profiles under this privacy level are displayed. 4. Click Close. You can also view the following charts on the Charts tab: Contact Profiles per Category Contact Profiles per Period Registered Contacts per Year 10.3 Reports On the Reports tab, you can run various reports on contact profile data. For example, you can run the Contacts per Contact Category report to view all the contacts per contact category. Do the following. 1. Click the Reports tab. 2. Click Run for Contacts per Contact Category. The Report Wizard appears. 3. Click Run Report. Page 31 of 32 USER MANUAL: CONTACT MANAGEMENT MASHAPP 4. Then, click Download Report. The report appears, displaying the contacts per contact category. You can also view the following reports on the Reports tab: Registered Contacts per Business Partner Registered Contacts per Country Contacts per Business Partner Contacts per Country 11. Conclusion In this user manual, you learnt how to set up organization and Master Data for the successful functioning of the Contact Management MashApp. You learnt how to create a contact profile and approve it. You also learnt how to approve a MashApp account. You even got a glimpse on how to monitor data through various forms, charts, and reports that are readily available to you. 12. Contact Us To report issues or send feedback, contact us at: [email protected] Page 32 of 32